At re:Inforce 2025, AWS unveiled an enhanced AWS Security Hub that transforms how organizations prioritize their most critical security issues and respond at scale to protect their cloud environments. In this blog post, we discuss how you can use Security Hub to prioritize these issues with exposure findings. The enhanced Security Hub now uses advanced analytics to automatically correlate, enrich, and prioritize security signals across your cloud environment. Security Hub seamlessly integrates with Amazon GuardDuty, Amazon Inspector, Amazon Macie, and AWS Security Hub Cloud Security Posture Management (CSPM), formerly known as AWS Security Hub. Through these integrations, it provides comprehensive threat detection and vulnerability assessment. This intelligent integration helps organizations quickly identify critical security issues, from potential credential compromises to unintended resource exposures, enabling security teams to focus on what matters most.
What is Security Hub?
Security Hub delivers three key security capabilities to help you strengthen your cloud security posture through a unified cloud security solution:
Provides visibility across your organization through centralized management and continuous monitoring.
Enriches security signals from services such as Amazon Inspector and AWS Security Hub CSPM to surface active risks specific to your environment, so you can prioritize with confidence and streamline response.
Delivers integrated risk analysis by correlating findings from Amazon Inspector, AWS Security Hub CSPM, Amazon Macie, and other AWS services to help identify potential attack paths, surface exploitable vulnerabilities and misconfigurations, and provide actionable remediation guidance.
A top concern for customers is: How do I know where to prioritize response first? Managing large volumes of findings across multiple accounts and regions becomes more challenging when security findings are viewed in isolation, making it difficult to determine true priority and impact. Security Hub solves this by providing context-driven analysis. It surfaces the most critical risks by correlating related vulnerabilities, threats, and misconfigurations to reveal exploitable paths. This can help you make informed decisions about which issues to address first.
With exposure findings, you can prioritize critical security issues and respond at scale. Exposures are based on an analysis of findings and traits from Security Hub CSPM, Amazon Inspector (which scans for vulnerabilities), and Amazon Macie (which discovers and protects sensitive data). They are defined as potential security issues, and they are generated by different exposure traits.
Without automated correlation and enriched signals, security teams can struggle to effectively prioritize issues. For example, a vulnerability that Amazon Inspector detects might become critically important when combined with misconfigurations that Security Hub CSPM identifies. However, manually analyzing relationships across thousands of signals is time-consuming and prone to missing critical security context. Teams often build custom solutions to achieve this, but this approach requires significant analyst time and maintenance, which can cause critical security relationships to be overlooked.
Security Hub reduces this complexity by providing native integration across these AWS services in a unified cloud security center, without the operational overhead of log collection and aggregation. For security teams, this means they can help identify and respond to their most critical exposures before the exposures can lead to business impact, rather than spending valuable time manually piecing together individual security signals. Automated correlation and enriched context can help you make faster, more informed decisions about where to focus your efforts. This ultimately helps protect your cloud environment more effectively.
Exposure findings identify security risks in your environment by providing a comprehensive view of your security posture. These findings enable you to understand and address potential risks. Through this consolidated approach, you can efficiently prioritize your remediation efforts by focusing on the most critical exposure findings first,.
Exposure findings are formatted in the Open Cybersecurity Schema Framework (OCSF) schema, an open-source standard that enables security tools to share data seamlessly. The adoption of OCSF by Security Hub has several advantages. As an open, standardized schema that is part of the Linux Foundation, OCSF enables interoperability across multiple security tools and services, both within and outside of the AWS environment. It provides enhanced data normalization with consistent field naming and categorization, making it more straightforward to integrate with third-party security tools.
Partners who already support or intend to support the OCSF schema to receive findings from Security Hub include companies such as Arctic Wolf; CrowdStrike; DataBee, a Comcast company; Datadog; DTEX Systems; Dynatrace; Fortinet; IBM; Netskope; Orca Security; Rapid7; Securonix; SentinelOne; Splunk, a Cisco Company; Sumo Logic; Tines; Trellix; and Wiz. Additionally, service partners such as Accenture, Caylent, Deloitte, IBM, and Optiv can help you adopt Security Hub and the OCSF schema.
Prioritizing security risks
When you navigate to Security Hub, you will see the summary dashboard, which includes an exposure summary widget, as shown in Figure 1. This widget shows your exposures by severity and frequency. Security Hub assigns each exposure finding a default severity of Critical, High, Medium, or Low. Exposure findings with a severity of Informational are not published.
Security Hub calculates exposure finding severity by analyzing and correlating multiple security traits across AWS services. Instead of evaluating these factors in isolation, Security Hub uses a contextual approach, assigning a severity rating based on how these factors are correlated. For example, a resource with an identified vulnerability might receive a higher severity rating if it’s exploitable from the internet or has access to sensitive data.
Security Hub uses several factors to determine the default severity of an exposure finding:
Ease of discovery – The availability of automated tools, such as port scans or internet searches to discover the resource at risk.
Ease of exploit – The ease with which a threat actor can exploit the risk. For example, if there are open network paths or misconfigured metadata, a threat actor can more quickly exploit the risk.
Likelihood of exploit– Security Hub uses both external signals, such as the Exploit Prediction Scoring System (EPSS)—a data-driven scoring system that estimates the probability of a vulnerability being exploited—and internal threat intelligence to determine the probability that the risk is exploited. This comprehensive approach applies to exposure findings for Amazon Elastic Compute Cloud (EC2) instances and AWS Lambda functions.
Awareness – The extent to which the risk is not merely theoretical but has publicly available or automated exploits. This factor applies to exposure findings for EC2 instances and Lambda functions.
Impact – The potential harm if the exploit is carried out. For example, an exposure could lead to loss of confidentiality from data exposure, loss of integrity from data corruption, loss of availability, or loss of accountability.
The list of risks in this widget is limited to the eight highest risks with the greatest number of critical findings. If two or more risks have an equal number of critical findings, the list automatically groups those findings behind more recent critical findings.
Figure 1 : Exposure summary widget
From the widget, you can pivot to the exposure dashboard to see to a pre-filtered view of your exposures for continued analysis of potential security issues. You can filter by severity by selecting the number associated with each severity, view a specific exposure by selecting from the list, or select View all exposure findings to see a dashboard of new exposures that are currently open, as shown in Figure 2.
Figure 2: Exposure dashboard
The exposure console shows findings by their title and ranked by decreasing severity. It’s organized by the filter criteria and grouped by finding title. On the left-hand side, Quick filters provide a fast way to filter through exposures based on severity, the top 10 attributes based on the most common values across your findings, top 10 accounts, and top 10 resource types, as shown in Figure 2. In addition to using filters, you can use the Group by dropdown to group exposure findings by a specific attribute, such as AWS account ID, resource type, or product name.
To review the exposure, expand the findings, as shown in Figure 3 for the correlation of resources, status, attributes, and traits such as software vulnerabilities, misconfigurations, and reachability. These are also referred to as trait types. For a particular exposure finding, a trait can be associated with one or more signals, and a signal can contain one or more indicators.
Figure 3: Exposure findings
As shown in Figure 3, the Potential Credential Stealing: Internet reachable EC2 instance with administrative instance profile has network-exploitable software vulnerabilities with a high likelihood of exploitation finding indicates that there are misconfigurations, vulnerabilities, and reachability (indication of an open network path to a resource) associated with the instance. To find out more about the signal, select anywhere in the line associated with the risk, and you will see an overview panel, as shown in Figure 4.
Figure 4: Exposure finding overview
This example highlights a critical-severity finding for an internet-reachable EC2 instance with software vulnerabilities in the us-east-1 Region. This visualization is powerful because the Potential attack path diagram helps you see what matters by mapping out how potential threat actors could exploit these vulnerabilities to access your resources. The finding also includes critical metadata such as the resource identifier, creation time, reachability, vulnerability, and misconfigurations.
Using the finding, you can quickly understand complex security relationships, assess risk context, and determine remediation priorities, so you can better protect your workloads in the cloud and make more informed security decisions. To prioritize your security response efforts, you can also set finding severity levels and update status, and export findings in OCSF format.
To understand why an exposure is present, you can select the Traits tab, as shown in Figure 5. This will list traits such as Misconfiguration or Vulnerability. If you select By signal, in the Traits tab, you have a full list of the signals associated with the exposure finding. These signals are the underlying findings that were created from different services, such as Security Hub CSPM and Amazon Inspector, that were correlated together to determine the risk associated with the exposure finding.
Figure 5: Exposure finding traits
If you select the Resources tab, you will see the resources associated with the exposure finding, as shown in Figure 6.
Figure 6: Exposure finding resources
For this example, we have an EC2 instance, but you might have a combination of resources such as an EC2 instance, Amazon Simple Storage Service (Amazon S3) bucket, and AWS Identity and Access Management (IAM) role. This list of resources will help you determine what needs to be remediated in your environment to mitigate the risk attributed to this finding.
Finally, with the Create ticket option, Security Hub helps streamline the incident management process through its native integrations with popular ticketing systems such as Jira and ServiceNow. This integration minimizes the need for manual ticket creation and reduces the time between finding and fixing security issues. Organizations can use a Security Hub Automation Rule to automatically create and track tickets for security findings directly from the Security Hub console, helping to make sure that no critical security exposure goes unaddressed. Integration with these widely-used ticketing systems helps maintain a consistent workflow, enables better tracking of remediation efforts, and improves collaboration between security and operations teams. This can help you make your security operations more efficient by providing a streamlined path from detection to resolution.
Conclusion
The enhanced exposure findings capabilities in Security Hub represent a significant advancement in how organizations can secure their cloud environments. By automatically correlating and analyzing security signals across multiple AWS services, Security Hub helps you prioritize your most critical security issues confidently and respond at scale. The intuitive visualization of potential attack paths, combined with intelligent severity rankings and comprehensive trait analysis, enables security teams to make data-driven decisions about risk prioritization.
Security Hub exposure findings help organizations move from reactive to proactive security postures by:
Automatically discovering and evaluating publicly accessible resources
Providing clear visibility into security capabilities and configurations
Correlating multiple security signals to identify critical risks
Delivering actionable remediation guidance
Offering intuitive filtering and grouping options for efficient analysis
As cloud environments continue to grow in complexity, exposure findings provide the automation, intelligence, and context needed to stay ahead of potential security issues. This enables security teams to focus their valuable time on addressing the most critical risks first, ultimately helping organizations maintain a stronger security posture across their cloud environment.
Whether you’re managing a small deployment or a large enterprise environment, exposure findings in Security Hub provide the insights needed to effectively protect your AWS workloads and maintain a robust security position in an ever-evolving landscape.
AWS Security Hub is a cloud security posture management (CSPM) service that performs security best practice checks across your Amazon Web Services (AWS) accounts and AWS Regions, aggregates alerts, and enables automated remediation. Security Hub is designed to simplify and streamline the management of security-related data from various AWS services and third-party tools. It provides a holistic view of your organization’s security state that you can use to prioritize and respond to security alerts efficiently.
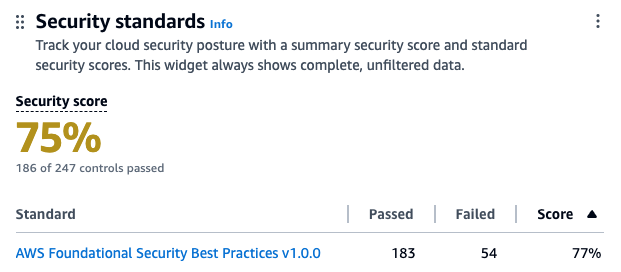
Security Hub assigns a security score to your environment, which is calculated based on passed and failed controls. A control is a safeguard or countermeasure prescribed for an information system or an organization that’s designed to protect the confidentiality, integrity, and availability of the system and to meet a set of defined security requirements. You can use the security score as a mechanism to baseline the accounts. The score is displayed as a percentage rounded up or down to the nearest whole number.
In this blog post, we review the top four mechanisms that you can use to improve your security score, review the five controls in Security Hub that most often fail, and provide recommendations on how to remediate them. This can help you reduce the number of failed controls, thus improving your security score for the accounts.
What is the security score?
Security scores represent the proportion of passed controls to enabled controls. The score is displayed as a percentage rounded to the nearest whole number. It’s a measure of how well your AWS accounts are aligned with security best practices and compliance standards. The security score is dynamic and changes based on the evolving state of your AWS environment. As you address and remediate findings associated with controls, your security score can improve. Similarly, changes in your environment or the introduction of new Security Hub findings will affect the score.
Each check is a point-in-time evaluation of a rule against a single resource that results in a compliance status of PASSED, FAILED, WARNING, or NOT_AVAILBLE. A control is considered passed when the compliance status of all underlying checks for resources are PASSED or if the FAILED checks have a workflow status of SUPPRESSED. You can view the security score through the Security Hub console summary page—as shown in figure 1—to quickly gain insights into your security posture. The dashboard provides visual representations and details of specific findings contributing to the score. For more information about how scores are calculated, see determining security scores.
Figure. 1 Security Hub dashboard
How to improve the security score?
You can improve your security score in four ways:
Remediating failed controls: After the resources responsible for failed checks in a control are configured with compliant settings and the check is repeated, Security Hub marks the compliance status of the checks as PASSED and the workflow status as RESOLVED. This increases the number of passed controls, thus improving the score.
Suppressing findings associated with failed controls: When calculating the control status, Security Hub ignores findings in the ARCHIVED state as well as findings with a workflow status of SUPPRESSED, which will affect security scores. So if you suppress all failed findings for a control, the control status becomes passed.
If you determine that a Security Hub finding for a resource is an accepted risk, you can manually set the workflow status of the finding to SUPPRESSED from the Security Hub console or using the BatchUpdateFindings API. Suppression doesn’t stop new findings from being generated, but you can set up an automation rule to suppress all future new and updated findings that meet the filtering criteria.
Disabling controls that aren’t relevant: Security Hub provides flexibility by allowing administrators to customize and configure security controls. This includes the ability to disable specific controls or adjust settings to help align with organizational security policies. When a control is disabled, security checks are no longer performed and no additional findings are generated. Existing findings are set to ARCHIVED and the control is excluded from the security score calculations.
Use central configuration in Security Hub to tailor the security controls to help align with your organization’s specific requirements. You can fine-tune your security controls, focus on relevant issues, and improve the accuracy and relevance of your security score. Introducing new central configuration capabilities in AWS Security Hub provides an overview and the benefits of central configuration.
Suppression should be used when you want to tune control findings from specific resources whereas controls should be disabled only when the control is no longer relevant for your AWS environment.
Customize parameter values to fine tune controls: Some Security Hub controls use parameters that affect how the control is evaluated. Typically, these controls are evaluated against the default parameter values that Security Hub defines. However, for a subset of these controls, you can customize the parameter values. When you customize a parameter value for a control, Security Hub starts evaluating the control against the value that you specify. If the resource underlying the control satisfies the custom value, Security Hub generates a PASSED finding.
We will use these mechanisms to address the most commonly failed controls in the following sections.
Identifying the most commonly failed controls in Security Hub
You can use the AWS Management Console to identify the most commonly failed controls across your accounts in AWS Organizations:
Sign in to the delegated administrator account and open the Security Hub console.
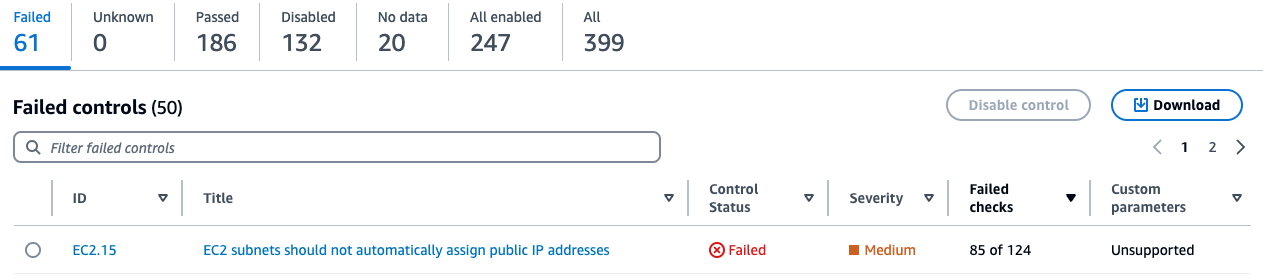
On the navigation pain, choose Controls.
Here, you will see the status of your controls sorted by the severity of the failed controls. You will also see the associated number of failed checks with the failed controls in the Failed checks column on this page. A check is performed for each resource. If a column says 85 out of 124 for a control, it means 85 resources out of 124 failed the check for that control. You can sort this column in descending order to identify failed controls that have the most resources as shown in Figure 2.
Figure 2: Security Hub control status page
Addressing the most commonly failed controls
In this section we address remediation strategies for the most used Security Hub controls that have Critical and High severity and have a high failure rate amongst AWS customers. We review five such controls and provide recommended best practices, default settings for the resource type at deployment, guardrails, and compensating controls where applicable.
AutoScaling.3: Auto Scaling group launch configuration
An Auto Scaling group in AWS is a service that automatically adjusts the number of Amazon Elastic Compute Cloud (Amazon EC2) instances in a fleet based on user-defined policies, making sure that the desired number of instances are available to handle varying levels of application demand. A launch configuration is a blueprint that defines the configuration of the EC2 instances to be launched by the Auto Scaling group. The AutoScaling.3 control checks whether Instance Metadata Service Version 2 (IMDSv2) is enabled on the instances launched by EC2 Auto Scaling groups using launch configurations. The control fails if the Instance Metadata Service (IMDS) version isn’t included in the launch configuration, or if both Instance Metadata Service Version 1 (IMDSv1) and IMDSv2 are included. AutoScaling.3 aligns with best practice SEC06-BP02 Reduce attack surface of the well architected framework.
The IMDS is a service on Amazon EC2 that provides metadata about EC2 instances, such as instance ID, public IP address, AWS Identity and Access Management (IAM) role information, and user data such as scripts during launch. IMDS also provides credentials for the IAM role attached to the EC2 instance, which can be used by threat actors for privilege escalation. The existing instance metadata service (IMDSv1) is fully secure, and AWS will continue to support it. If your organization strategy involves using IMDSv1, then consider disabling AutoScaling.3 and EC2.8 Security Hub controls. EC2.8 is a similar control, but checks the IMDS configuration for each EC2 instance instead of the launch configuration.
IMDSv2 adds protection for four types of vulnerabilities that could be used to access the IMDS, including misconfigured or open website application firewalls, misconfigured or open reverse proxies, unpatched service-side request forgery (SSRF) vulnerabilities, and misconfigured or open layer 3 firewalls and network address translation. It does so by requiring the use of a session token using a PUT request when requesting instance metadata and using a Time to Live (TTL) default of 1 so the token cannot travel outside the EC2 instance. For more information on protections added by IMDSv2, see Add defense in depth against open firewalls, reverse proxies, and SSRF vulnerabilities with enhancements to the EC2 Instance Metadata Service.
The Autoscaling.3 control creates a failed check finding for every Amazon EC2 launch configuration that is out of compliance. An Auto Scaling group is associated with one launch configuration at a time. You cannot modify a launch configuration after you create it. To change the launch configuration for an Auto Scaling group, use an existing launch configuration as the basis for a new launch configuration with IMDSv2 enabled and then delete the old launch configuration. After you delete the launch configuration that’s out of compliance, Security Hub will automatically update the finding state to ARCHIVED. It’s recommended to use Amazon EC2 launch templates, which is a successor to launch configurations because you cannot create launch configurations with new EC2 instances released after December 31, 2022. See Migrate your Auto Scaling groups to launch templates for more information.
Amazon has taken a series of steps to make IMDSv2 the default. For example, Amazon Linux 2023 uses IMDSv2 by default for launches. You can also set the default instance metadata version at the account level to IMDSv2 for each Region. When an instance is launched, the instance metadata version is automatically set to the account level value. If you’re using the account-level setting to require the use of IMDSv2 outside of launch configuration, then consider using the central Security Hub configuration to disable AutoScaling.3 for these accounts. See the Sample Security Hub central configuration policy section for an example policy.
EC2.18: Security group configuration
AWS security groups act as virtual stateful firewalls for your EC2 instances to control inbound and outbound traffic and should follow the principle of least privileged access. In the Well-Architected Framework security pillar recommendation SEC05-BP01 Create network layers, it’s best practice to not use overly permissive or unrestricted (0.0.0.0/0) security groups because it exposes resources to misuse and abuse. By default, the EC2.18 control checks whether a security group permits unrestricted incoming TCP traffic on ports except for the allowlisted ports 80 and 443. It also checks if unrestricted UDP traffic is allowed on a port. For example, the check will fail if your security group has an inbound rule with unrestricted traffic to port 22. This control allows custom control parameters that can be used to edit the list of authorized ports for which unrestricted traffic is allowed. If you don’t expect any security groups in your organization to have unrestricted access on any port, then you can edit the control parameters and remove all ports from being allowlisted. You can use a central configuration policy as shown in Sample Security Hub central configuration policy to update the parameter across multiple accounts and Regions. Alternately, you can also add authorized ports to the list of ports you want to allowlist for the check to pass.
EC2.18 checks the rules in the security groups in accounts, whether the security groups are in use or not. You can use AWS Firewall Manager to identify and delete unused security groups in your organization using usage audit security group policies. Deleting unused security groups that have failed the checks will change the finding state of associated findings to ARCHIVED and exclude them from security score calculation. Deleting unused resources also aligns with SUS02-BP03 of the sustainability pillar of the Well-Architected Framework. You can create a Firewall Manager usage audit security group policy through the firewall manager using the following steps:
To configure Firewall Manager:
Sign in to the Firewall Manager administrator account and open the Firewall Manager console.
In the navigation pane, select Security policies.
Choose Create policy.
On Choose policy type and Region:
For Region, select the AWS Region the policy is meant for.
For Policy type, select Security group.
For Security group policy type, select Auditing and cleanup of unused and redundant security groups.
Choose Next.
On Describe policy:
Enter a Policy name and description.
For Policy rules, select Security groups within this policy scope must be used by at least one resource.
You can optionally specify how many minutes a security group can exist unused before it’s considered noncompliant, up to 525,600 minutes (365 days). You can use this setting to allow yourself time to associate new security groups with resources.
For Policy action, we recommend starting by selecting Identify resources that don’t comply with the policy rules, but don’t auto remediate. This allows you to assess the effects of your new policy before you apply it. When you’re satisfied that the changes are what you want, edit the policy and change the policy action by selecting Auto remediate any noncompliant resources.
Choose Next.
On Define policy scope:
For AWS accounts this policy applies to, select one of the three options as appropriate.
For Resource type, select Security Group.
For Resources, you can narrow the scope of the policy using tagging, by either including or excluding resources with the tags that you specify. You can use inclusion or exclusion, but not both.
Choose Next.
Review the policy settings to be sure they’re what you want, and then choose Create policy.
Firewall manager is a Regional service so these policies must be created in each Region you have services in.
You can also set up guardrails for security groups using Firewall Manager policies to remediate new or updated security groups that allow unrestricted access. You can create a Firewall Manager content audit security group policy through the Firewall Manager console:
To create a Firewall Manager security group policy:
Sign in to the Firewall Manager administrator account.
Open the Firewall Manager console.
In the navigation pane, select Security policies.
Choose Create policy.
On Choose policy type and Region:
For Region, select a Region.
For Policy type, select Security group.
For Security group policy type, select Auditing and enforcement of security group rules.
Choose Next.
On Describe policy:
Enter a Policy name and description.
For Policy rule options, select configure managed audit policy rules.
Configure the following options under Policy rules.
For the Security group rules to audit, select Inbound rules from the drop down.
Select Audit overly permissive security group rules.
Select Rule allows all traffic.
For Policy action, we recommend starting by selecting Identify resources that don’t comply with the policy rules, but don’t auto remediate. This allows you to assess the effects of your new policy before you apply it. When you’re satisfied that the changes are what you want, edit the policy and change the policy action by selecting Auto remediate any noncompliant resources.
Choose Next.
On Define policy scope:
For AWS accounts this policy applies to, select one of the three options as appropriate.
For Resource type, select Security Group.
For Resources, you can narrow the scope of the policy using tagging, by either including or excluding resources with the tags that you specify. You can use inclusion or exclusion, but not both.
Choose Next.
Review the policy settings to be sure they’re what you want, and then choose Create policy.
For use cases such as a bastion host where you might have unrestricted inbound access to port 22 (SSH), EC2.18 will fail. A bastion host is a server whose purpose is to provide access to a private network from an external network, such as the internet. In this scenario, you might want to suppress findings associated with the bastion host security groups instead of disabling the control. You can create a Security Hub automation rule in the Security Hub delegated administrator account based on a tag or resource ID to set the workflow status of future findings to SUPPRESSED. Note that an automation rule applies only in the Region in which it’s created. To apply a rule in multiple Regions, the delegated administrator must create the rule in each Region.
To create an automation rule:
Sign in to the delegated administrator account and open the Security Hub console.
In the navigation pane, select Automations, and then choose Create rule.
Enter a Rule Name and Rule Description.
For Rule Type, select Create custom rule.
In the Rule section, provide a unique rule name and a description for your rule.
For Criteria, use the Key, Operator, and Value drop down menus to select your rule criteria. Use the following fields in the criteria section:
Add key ProductName with operator Equals and enter the value Security Hub.
Add key WorkFlowStatus with operator Equals and enter the value NEW.
Add key ComplianceSecurityControlId with operator Equals and enter the value EC2.18.
Add key ResourceId with operator Equals and enter the Amazon Resource Name (ARN) of the bastion host security group as the value.
For Automated action:
Choose the drop down under Workflow Status and select SUPPRESSED.
Under Note, enter text such as EC2.18 exception.
For Rule status, select Enabled.
Choose Create rule.
This automation rule will set the workflow status of all future updated and new findings to SUPPRESSED.
IAM.6: Hardware MFA configuration for the root user
When you first create an AWS account, you begin with a single identity that has complete access to the AWS services and resources in the account. This identity is called the AWS account root user and is accessed by signing in with the email address and password that you used to create the account.
The root user has administrator level access to your AWS accounts, which requires that you apply several layers of security controls to protect this account. In this section, we walk you through:
What to do when the root account isn’t required on your Organizations member accounts and what to do when the root user is required.
We recommend using a layered approach and applying multiple best practices to secure your root account across these scenarios.
AWS root user best practices include recommendations from SEC02-BP01, which recommends multi-factor authentication (MFA) for the root user be enabled. IAM.6 checks whether your AWS account is enabled to use a hardware MFA device to sign in with root user credentials. The control fails if MFA isn’t enabled or if any virtual MFA devices are permitted for signing in with root user credentials. A finding is generated for every account that doesn’t meet compliance. To remediate, see General steps for enabling MFA devices, which describes how to set up and use MFA with a root account. Remember that the root account should be used only when absolutely necessary and is only required for a subset of tasks. As a best practice, for other tasks we recommend signing in to your AWS accounts using federation, which provides temporary access keys by assuming an IAM role instead of using long-lived static credentials.
The Organizations management account deploys universal security guardrails, and you can configure additional services that will affect the member accounts in the organization. So, you should restrict who can sign in and administer the root user in your management account and is why you should apply hardware MFA as an added layer of security.
Many customers manage hundreds of AWS accounts across their organization and managing hardware MFA devices for each root account can be a challenge. While it’s a best practice to use MFA, an alternative approach might be necessary. This includes mapping out and identifying the most critical AWS accounts. This analysis should be done carefully—consider if this is a production environment, what type of data is present, and the overall criticality of the workloads running in that account.
This subset of your most critical AWS accounts should be configured with MFA. For other accounts, consider that in most cases the root account isn’t required and you can disable the use of the root account across the Organizations member accounts using Organizations service control policies (SCP). The following is an example:
If you’re using AWS Control Tower, use the disallow actions as a root user guardrail. If you’re using an SCP for organizations or the AWS Control Tower guardrail to restrict root use in member accounts, consider disabling the IAM.6 control in those member accounts. However, do not disable IAM.6 in the management account. See the Sample Security Hub central configuration policy section for an example policy.
If root account use is required within a member account, confirmed as a valid root-user-task, then perform the following steps:
Another consideration and best practice is to make sure that all AWS accounts have updated contact information, including the email attached to the root user. This is important for several reasons. For example, you must have access to the email associated with the root user to reset the root user’s password. See how to update the email address associated with the root user. AWS uses account contact information to notify and communicate with the AWS account administrators on several important topics including security, operations, and billing related information. Consider using an email distribution list to make sure these email addresses are mapped to a common internal mailbox restricted to your cloud or security team. See how to update your AWS primary and secondary account contact details.
EC2.2: Default security groups configuration
Each Amazon Virtual Private Cloud (Amazon VPC) comes with a default security group. We recommend that you create security groups for EC2 instances or groups of instances instead of using the default security group. If you don’t specify a security group when you launch an instance, the service associates the instance with the default security group for the VPC. In addition, the default security group cannot be deleted because it’s the default security group assigned to an EC2 instance if another security group is not created or assigned.
The default security group allows outbound and inbound traffic from network interfaces (and their associated instances) that are assigned to the same security group. EC2.2 checks whether the default security group of a VPC allows inbound or outbound traffic, and the control fails if the security group allows inbound or outbound traffic. This control doesn’t check if the default security group is in use. A finding is generated for each default VPC security group that’s out of compliance. The default security group doesn’t adhere to least privilege and therefore the following steps are recommended. If no EC2 instance is attached to the default security group, delete the inbound and outbound rules of the default security group. However, if you’re not certain that the default security group is in use, use the following AWS Command Line Interface (AWS CLI) command across each account and Region. If the command returns a list of EC2 instance IDs, then the default security group is in use by these instances. If it returns an empty list, then the default security group isn’t used in that account. Use the ‐‐region option to change Regions.
For these instances, replace the default security group with a new security group using similar rules and work with the owners of those EC2 instances to determine a least privilege security group and ruleset that could be applied. After the instances are moved to the replacement security group, you can remove the inbound and outbound rules of the default security group. You can use an AWS Config rule in each account and Region to remove the inbound and outbound rules of the default security group.
Under the Resource ID Parameter dropdown, select GroupId.
Under Parameter, enter the ARN of the automation service role you copied in step 1.
Choose Save.
It’s important to verify that changes and configurations are clearly communicated to all users of an environment. We recommend that you take the opportunity to update your company’s central cloud security requirements and governance guidance and notify users in advance of the pending change.
ECS.5: ECS container access configuration
An Amazon Elastic Container Service (Amazon ECS) task definition is a blueprint for running Docker containers within an ECS cluster. It defines various parameters required for launching containers, such as Docker image, CPU and memory requirements, networking configuration, container dependencies, environment variables, and data volumes. An ECS task definition is to containers is what a launch configuration is to EC2 instances. ECS.5 is a control related to ECS and ensures that the ECS task definition has read-only access to mounted root filesystem enabled. This control is important and great for defense in depth because it helps prevent containers from making changes to the container’s root file system, prevents privilege escalation if a container is compromised, and can improve security and stability. This control fails if the readonlyRootFilesystem parameter doesn’t exist or is set to false in the ECS task definition JSON.
If you’re using the console to create the task definition, then you must select the read-only box against the root file system parameter in the console as show in Figure 3. If you are using JSON for task definition, then the parameter readonlyRootFilesystem must be set to true and supplied with the container definition or updated in order for this check to pass. This control creates a failed check finding for every ECS task definition that is out of compliance.
Figure 3: Using the ECS console to set readonlyRootFilesystem to true
Follow the steps in the remediation section of the control user guide to fix the resources identified by the control. Consider using infrastructure as code (IaC) tools such as AWS CloudFormation to define your task definitions as code, with the read-only root filesystem set to true to help prevent accidental misconfigurations. If you use continuous integration and delivery (CI/CD) to create your container task definitions, then consider adding a check that looks for the existence of the readonlyRootFilesystem parameter in the task definition and that its set to true.
If this is expected behavior for certain task definitions, you can use Security Hub automation rules to suppress the findings by matching on the ComplianceSecurityControlID and ResourceId filters in the criteria section.
To create the automation rule:
Sign in to the delegated administrator account and open the Security Hub console.
In the navigation pane, select Automations.
Choose Create rule. For Rule Type, select Create custom rule.
Enter a Rule Name and Rule Description.
In the Rule section, enter a unique rule name and a description for your rule.
For Criteria, use the Key, Operator, and Value drop down menus to specify your rule criteria. Use the following fields in the criteria section:
Add key ProductName with operator Equals and enter the value Security Hub.
Add key WorkFlowStatus with operator Equals and enter the value NEW.
Add key ComplianceSecurityControlId with operator Equals and enter the value ECS.5.
Add key ResourceId with operator Equals and enter the ARN of the ECS task definition as the value.
For Automated action,
Choose the dropdown under Workflow Status and select SUPPRESSED.
Under note, enter a description such as ECS.5 exception.
For Rule status, select Enabled
Choose Create rule.
Sample Security Hub central configuration policy
In this section, we cover a sample policy for the controls reviewed in this post using central configuration. To use central configuration, you must integrate Security Hub with Organizations and designate a home Region. The home Region is also your Security Hub aggregation Region, which receives findings, insights, and other data from linked Regions. If you use the Security Hub console, these prerequisites are included in the opt-in workflow for central configuration. Remember that an account or OU can only be associated with one configuration policy at a given time as to not have conflicting configurations. The policy should also provide complete specifications of settings applied to that account. Review the policy considerations document to understand how central configuration policies work. Follow the steps in the Start using central configuration to get started.
If you want to disable controls and update parameters as described in this post, then you must create two policies in the Security Hub delegated administrator account home Region. One policy applies to the management account and another policy applies to the member accounts.
First, create a policy to disable IAM.6, Autoscaling.3, and update the ports for the EC2.18 control to identify security groups with unrestricted access on the ports. Apply this policy to all member accounts. Use the Exclude organization units or accounts section to enter the account ID of the AWS management account.
To create a policy to disable IAM.6, Autoscaling.3 and update the ports:
Open the Security Hub console in the Security Hub delegated administrator account home Region.
In the navigation pane, select Configuration and then the Policies tab. Then, choose Create policy. If you already have an existing policy that applies to all member accounts, then select the policy and choose Edit.
For Controls, select Disable specific controls.
For Controls to disable, select IAM.6 and AutoScaling.3.
Select Customize controls parameters.
From the Select a Control dropdown, select EC2.18.
Edit the cell under List of authorized TCP ports, and add ports that are allow listed for unrestricted access. If no ports should be allow listed for unrestricted access then delete the text in the cell.
For Accounts, select All accounts.
Choose Exclude organizational units or accounts and enter the account ID of the management account.
For Policy details, enter a policy name and description.
Choose Next.
On the Review and apply page, review your configuration policy details. Choose Create policy and apply.
Create another policy in the Security Hub delegated administrator account home Region to disable Autoscaling.3 and update the ports for the EC2.18 control to fail the check for security groups with unrestricted access on any port. Apply this policy to the management account. Use the Specific accounts option for the Accounts section and then the Enter organization unit or accounts tab to enter the account ID of the management account.
To disable Autoscaling.3 and update the ports:
Open the AWS Security Hub console in the Security Hub delegated administrator account home Region.
In the navigation pane, select Configuration and the Policies tab.
Choose Create policy. If you already have an existing policy that applies to the management account only, then select the policy and choose Edit.
For Controls, choose Disable specific controls.
For Controls to disable, select AutoScaling.3.
Select Customize controls parameters.
From the Select a Control dropdown, select EC2.18.
Edit the cell under List of authorized TCP ports and add ports that are allow listed for unrestricted access. If no ports should be allow listed for unrestricted access then delete the text in the cell.
For Accounts, select Specific accounts.
Select the Enter Organization units or accounts tab and enter the Account ID of the management account.
For Policy details, enter a policy name and description.
Choose Next.
On the Review and apply page, review your configuration policy details. Choose Create policy and apply.
Conclusion
In this post, we reviewed the importance of the Security Hub security score and the four methods that you can use to improve your score. The methods include remediation of non-complaint resources, managing controls using Security Hub central configuration, suppressing findings using Security Hub automation rules, and using custom parameters to customize controls. You saw ways to address the five most commonly failed controls across Security Hub customers, including remediation strategies and guardrails for each of these controls.
If you have feedback about this post, submit comments in the Comments section below. If you have questions about this post, contact AWS Support.
Using Kubernetes policy-as-code (PaC) solutions, administrators and security professionals can enforce organization policies to Kubernetes resources. There are several publicly available PAC solutions that are available for Kubernetes, such as Gatekeeper, Polaris, and Kyverno.
PaC solutions usually implement two features:
Use Kubernetes admission controllers to validate or modify objects before they’re created to help enforce configuration best practices for your clusters.
Provide a way for you to scan your resources created before policies were deployed or against new policies being evaluated.
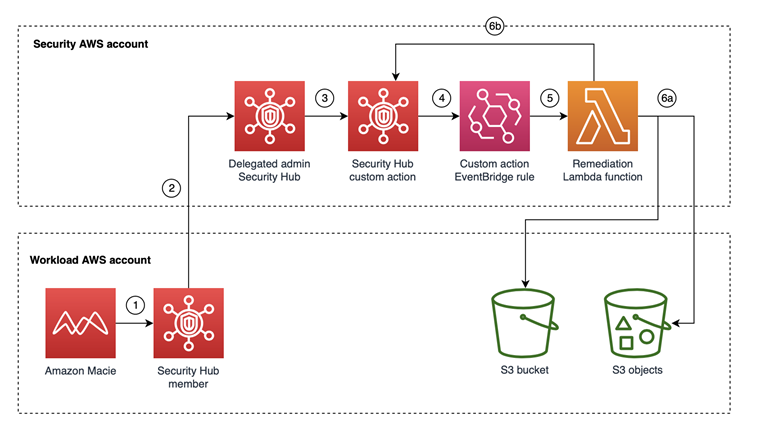
This post presents a solution to send policy violations from PaC solutions using Kubernetes policy report format (for example, using Kyverno) or from Gatekeeper’s constraints status directly to AWS Security Hub. With this solution, you can visualize Kubernetes security misconfigurations across your Amazon Elastic Kubernetes Service (Amazon EKS) clusters and your organizations in AWS Organizations. This can also help you implement standard security use cases—such as unified security reporting, escalation through a ticketing system, or automated remediation—on top of Security Hub to help improve your overall Kubernetes security posture and reduce manual efforts.
Solution overview
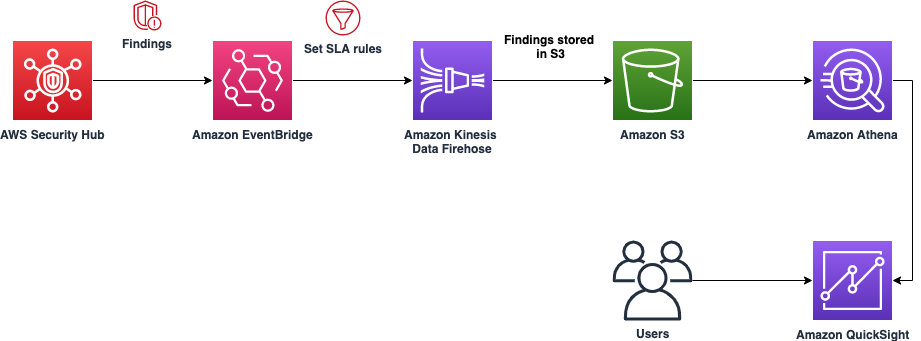
The solution uses the approach described in A Container-Free Way to Configure Kubernetes Using AWS Lambda to deploy an AWS Lambda function that periodically synchronizes the security status of a Kubernetes cluster from a Kubernetes or Gatekeeper policy report with Security Hub. Figure 1 shows the architecture diagram for the solution.
Figure 1: Diagram of solution
This solution works using the following resources and configurations:
A scheduled event which invokes a Lambda function on a 10-minute interval.
For each running cluster, the Lambda function retrieves the selected Kubernetes policy reports (or the Gatekeeper constraint status, depending on the policy selected) and sends active violations, if present, to Security Hub. With Gatekeeper, if more violations exist than those reported in the constraint, an additional INFORMATIONAL finding is generated in Security Hub to let security teams know of the missing findings.
Optional: EKS cluster administrators can raise the limit of reported policy violations by using the –constraint-violations-limit flag in their Gatekeeper audit operation.
For each running cluster, the Lambda function archives archive previously raised and resolved findings in Security Hub.
In the walkthrough, I show you how to deploy a Kubernetes policy-as-code solution and forward the findings to Security Hub. We’ll configure Kyverno and a Kubernetes demo environment with findings in an existing EKS cluster to Security Hub.
The code provided includes an example constraint and noncompliant resource to test against.
Prerequisites
An EKS cluster is required to set up this solution within your AWS environments. The cluster should be configured with either aws-auth ConfigMap or access entries. Optional: You can use eksctl to create a cluster.
The following resources need to be installed on your computer:
Open the parameters.json file and configure the following values:
Policy – Name of the product that you want to enable, in this case policyreport, which is supported by tools such as Kyverno.
ClusterNames – List of EKS clusters. When AccessEntryEnabled is enabled, this solution deploys an access entry for the integration to access your EKS clusters.
SubnetIds – (Optional) A comma-separated list of your subnets. If you’ve configured the API endpoints of your EKS clusters as private only, then you need to configure this parameter. If your EKS clusters have public endpoints enabled, you can remove this parameter.
SecurityGroupId – (Optional) A security group ID that allows connectivity to the EKS clusters. This parameter is only required if you’re running private API endpoints; otherwise, you can remove it. This security group should be allowed ingress from the security group of the EKS control plane.
AccessEntryEnabled – (Optional) If you’re using EKS access entries, the solution automatically deploys the access entries with read-only-group permissions deployed in the next step. This parameter is True by default.
Save the changes and close the parameters file.
Set up your AWS_REGION (for example, export AWS_REGION=eu-west-1) and make sure that your credentials are configured for the delegated administrator account.
Enter the following command to deploy:
./deploy.sh
You should see the following output:
Waiting for changeset to be created..
Waiting for stack create/update to complete
Successfully created/updated stack - aws-securityhub-k8s-policy-integration
Step 3: Set up EKS cluster access
You need to create the Kubernetes Group read-only-group to allow read-only permissions to the IAM role of the Lambda function. If you aren’t using access entries, you will also need to modify the aws-auth ConfigMap of the Kubernetes clusters.
To configure access to EKS clusters
For each cluster that’s running in your account, run the kube-setup.sh script to create the Kubernetes read-only cluster role and cluster role binding.
(Optional) Configure aws-auth ConfigMap using eksctl if you aren’t using access entries.
Step 4: Verify AWS service integration
The next step is to verify that the Lambda integration to Security Hub is running.
To verify the integration is running
Open the Lambda console, and navigate to the aws-securityhub-k8s-policy-integration-<region> function.
Start a test to import your cluster’s noncompliant findings to Security Hub.
The final step is to clean up the resources that you created for this walkthrough.
To destroy the stack
Use the command line terminal in your laptop to run the following command:
./cleanup.sh
Conclusion
In this post, you learned how to integrate Kubernetes policy report findings with Security Hub and tested this setup by using the Kyverno policy engine. If you want to test the integration of this solution with Gatekeeper, you can find alternative commands for step 1 of this post in the GitHub repository’s README file.
Using this integration, you can gain visibility into your Kubernetes security posture across EKS clusters and join it with a centralized view, together with other security findings such as those from AWS Config, Amazon Inspector, and more across your organization. You can also try this solution with other tools, such as kube-bench or Gatekeeper. You can extend this setup to notify security teams of critical misconfigurations or implement automated remediation actions by using AWS Security Hub.
Continually reviewing your organization’s incident response capabilities can be challenging without a mechanism to create security findings with actual Amazon Web Services (AWS) resources within your AWS estate. As prescribed within the AWS Security Incident Response whitepaper, it’s important to periodically review your incident response capabilities to make sure your security team is continually maturing internal processes and assessing capabilities within AWS. Generating sample security findings is useful to understand the finding format so you can enrich the finding with additional metadata or create and prioritize detections within your security information event management (SIEM) solution. However, if you want to conduct an end-to-end incident response simulation, including the creation of real detections, sample findings might not create actionable detections that will start your incident response process because of alerting suppressions you might have configured, or imaginary metadata (such as synthetic Amazon Elastic Compute Cloud (Amazon EC2) instance IDs), which might confuse your remediation tooling.
In this post, we walk through how to deploy a solution that provisions resources to generate simulated security findings for actual provisioned resources within your AWS account. Generating simulated security findings in your AWS account gives your security team an opportunity to validate their cyber capabilities, investigation workflow and playbooks, escalation paths across teams, and exercise any response automation currently in place.
Important: It’s strongly recommended that the solution be deployed in an isolated AWS account with no additional workloads or sensitive data. No resources deployed within the solution should be used for any purpose outside of generating the security findings for incident response simulations. Although the security findings are non-destructive to existing resources, they should still be done in isolation. For any AWS solution deployed within your AWS environment, your security team should review the resources and configurations within the code.
Conducting incident response simulations
Before deploying the solution, it’s important that you know what your goal is and what type of simulation to conduct. If you’re primarily curious about the format that active Amazon GuardDuty findings will create, you should generate sample findings with GuardDuty. At the time of this writing, Amazon Inspector doesn’t currently generate sample findings.
If you want to validate your incident response playbooks, make sure you have playbooks for the security findings the solution generates. If those playbooks don’t exist, it might be a good idea to start with a high-level tabletop exercise to identify which playbooks you need to create.
Because you’re running this sample in an AWS account with no workloads, it’s recommended to run the sample solution as a purple team exercise. Purple team exercises should be periodically run to support training for new analysts, validate existing playbooks, and identify areas of improvement to reduce the mean time to respond or identify areas where processes can be optimized with automation.
Now that you have a good understanding of the different simulation types, you can create security findings in an isolated AWS account.
Prerequisites
[Recommended] A separate AWS account containing no customer data or running workloads
[Optional] AWS Security Hub can be enabled to show a consolidated view of security findings generated by GuardDuty and Inspector
Solution architecture
The architecture of the solution can be found in Figure 1.
Figure 1: Sample solution architecture diagram
A user specifies the type of security findings to generate by passing an AWS CloudFormation parameter.
An Amazon Simple Notification Service (Amazon SNS) topic is created to subscribe to findings for notifications. Subscribed users are notified of the finding through the deployed SNS topic.
Upon user selection of the CloudFormation parameter, EC2 instances are provisioned to run commands to generate security findings.
Note: If the parameter inspector is provided during deployment, then only one EC2 instance is deployed. If the parameter guardduty is provided during deployment, then two EC2 instances are deployed.
The Lambda function, ecr_cleanup_function, cleans up the vulnerable images in the deployed Amazon ECR repository based on applied tags and sends a notification to the Amazon SNS topic.
Note: The ecr_cleanup_function Lambda function is also invoked as a custom resource to clean up vulnerable images during deployment. If there are issues with cleanup, the EventBridge rule continually attempts to clean up vulnerable images.
For GuardDuty, the following actions are taken and resources are deployed:
An AWS Systems Manager parameter stores the IAM access key for guardduty-demo-user.
An AWS Secrets Manager secret stores the inactive IAM secret access key for guardduty-demo-user.
An Amazon DynamoDB table is created, and the table name is stored in a Systems Manager parameter to be referenced within the EC2 user data.
An Amazon Simple Storage Service (Amazon S3) bucket is created, and the bucket name is stored in a Systems Manager parameter to be referenced within the EC2 user data.
A Lambda function adds a threat list to GuardDuty that includes the IP addresses of the EC2 instances deployed as part of the sample.
EC2 user data generates GuardDuty findings for the following:
Updates EKS cluster configuration to make a dashboard public.
DynamoDB
Adds an item to the DynamoDB table for Joshua Tree.
EC2
Creates an AWS CloudTrail trail named guardduty-demo-trail-<GUID> and subsequently deletes the same CloudTrail trail. The <GUID> is randomly generated by using the $RANDOM function
Runs portscan on 172.31.37.171 (an RFC 1918 private IP address) and private IP of the EKS Deployment EC2 instance provisioned as part of the sample. Port scans are primarily used by bad actors to search for potential vulnerabilities. The target of the port scans are internal IP addresses and do not leave the sample VPC deployed.
Curls DNS domains that are labeled for bitcoin, command and control, and other domains associated with known threats.
Amazon S3
Disables Block Public Access and server access logging for the S3 bucket provisioned as part of the solution.
IAM
Deletes the existing account password policy and creates a new password policy with a minimum length of six characters.
guardduty_remediation_eks_rule – When a GuardDuty finding for EKS is created, a Lambda function attempts to delete the EKS resources. Subscribed users are notified of the finding through the deployed SNS topic.
guardduty_remediation_credexfil_rule – When a GuardDuty finding for InstanceCredentialExfiltration is created, a Lambda function is used to revoke the IAM role’s temporary security credentials and AWS permissions. Subscribed users are notified of the finding through the deployed SNS topic.
guardduty_respond_IAMUser_rule – When a GuardDuty finding for IAM is created, subscribed users are notified through the deployed SNS topic. There is no remediation activity triggered by this rule.
Guardduty_notify_S3_rule – When a GuardDuty finding for Amazon S3 is created, subscribed users are notified through the deployed Amazon SNS topic. This rule doesn’t invoke any remediation activity.
The following Lambda functions are created:
guardduty_iam_remediation_function – This function revokes active sessions and sends a notification to the SNS topic.
eks_cleanup_function – This function deletes the EKS resources in the EKS CloudFormation template.
Note: Upon attempts to delete the overall sample CloudFormation stack, this runs to delete the EKS CloudFormation template.
An S3 bucket stores EC2 user data scripts run from the EC2 instances
Option 1: Deploy the solution with AWS CloudFormation using the console
Use the console to sign in to your chosen AWS account and then choose the Launch Stack button to open the AWS CloudFormation console pre-loaded with the template for this solution. It takes approximately 10 minutes for the CloudFormation stack to complete.
Option 2: Deploy the solution by using the AWS CDK
To build the app when navigating to the project’s root folder, use the following commands:
npm install -g aws-cdk-lib
npm install
Run the following command in your terminal while authenticated in your separate deployment AWS account to bootstrap your environment. Be sure to replace <INSERT_AWS_ACCOUNT> with your account number and replace <INSERT_REGION> with the AWS Region that you want the solution deployed to.
After the solution successfully deploys, security findings should start appearing in your AWS account’s GuardDuty console within a couple of minutes.
Amazon GuardDuty findings
In order to create a diverse set of GuardDuty findings, the solution uses Amazon EC2 user data to run scripts. Those scripts can be found in the sample repository. You can also review and change scripts as needed to fit your use case or to remove specific actions if you don’t want specific resources to be altered or security findings to be generated.
A comprehensive list of active GuardDuty finding types and details for each finding can be found in the Amazon GuardDuty user guide. In this solution, activities which cause the following GuardDuty findings to be generated, are performed:
To generate the EKS security findings, the EKS Deployment EC2 instance is running eksctl commands that deploy CloudFormation templates. If the EKS cluster doesn’t deploy, it might be because of capacity restraints in a specific Availability Zone. If this occurs, manually delete the failed EKS CloudFormation templates.
If you want to create the EKS cluster and security findings manually, you can do the following:
Connect to the EKS Deployment EC2 instance using an IAM role that has access to start a session through Systems Manager. After connecting to the ssm-user, issue the following commands in the Session Manager session:
The findings for Amazon Inspector are generated by using the open source Vulhub collection. The open source collection has pre-built vulnerable Docker environments that pull images into Amazon ECR.
The Amazon Inspector findings that are created vary depending on what exists within the open source library at deployment time. The following are examples of findings you will see in the console:
If you deployed the security finding generator solution by using the Launch Stack button in the console or the CloudFormation template security_finding_generator_cfn, do the following to clean up:
In the CloudFormation console for the account and Region where you deployed the solution, choose the SecurityFindingGeneratorStack stack.
Choose the option to Delete the stack.
If you deployed the solution by using the AWS CDK, run the command cdk destroy.
Important: The solution uses eksctl to provision EKS resources, which deploys additional CloudFormation templates. There are custom resources within the solution that will attempt to delete the provisioned CloudFormation templates for EKS. If there are any issues, you should verify and manually delete the following CloudFormation templates:
In this blog post, I showed you how to deploy a solution to provision resources in an AWS account to generate security findings. This solution provides a technical framework to conduct periodic simulations within your AWS environment. By having real, rather than simulated, security findings, you can enable your security teams to interact with actual resources and validate existing incident response processes. Having a repeatable mechanism to create security findings also provides your security team the opportunity to develop and test automated incident response capabilities in your AWS environment.
If you have feedback about this post, submit comments in the Comments section below. If you have questions about this post, start a new thread on the Incident Response re:Post or contact AWS Support.
Vulnerability findings in a cloud environment can come from a variety of tools and scans depending on the underlying technology you’re using. Without processes in place to handle these findings, they can begin to mount, often leading to thousands to tens of thousands of findings in a short amount of time. We’re excited to announce the Building a scalable vulnerability management program on AWS guide, which includes how you can build a structured vulnerability management program, operationalize tooling, and scale your processes to handle a large number of findings from diverse sources.
Building a scalable vulnerability management program on AWS focuses on the fundamentals of building a cloud vulnerability management program, including traditional software and network vulnerabilities and cloud configuration risks. The guide covers how to build a successful and scalable vulnerability management program on AWS through preparation, enabling and configuring tools, triaging findings, and reporting.
Targeted outcomes
This guide can help you and your organization with the following:
Develop policies to streamline vulnerability management and maintain accountability.
Establish mechanisms to extend the responsibility of security to your application teams.
Configure relevant AWS services according to best practices for scalable vulnerability management.
Identify patterns for routing security findings to support a shared responsibility model.
Establish mechanisms to report on and iterate on your vulnerability management program.
Improve security finding visibility and help improve overall security posture.
Using the new guide
We encourage you to read the entire guide before taking action or building a list of changes to implement. After you read the guide, assess your current state compared to the action items and check off the items that you’ve already completed in the Next steps table. This will help you assess the current state of your AWS vulnerability management program. Then, plan short-term and long-term roadmaps based on your gaps, desired state, resources, and business needs. Building a cloud vulnerability management program often involves iteration, so you should prioritize key items and regularly revisit your backlog to keep up with technology changes and your business requirements.
We greatly value feedback and contributions from our community. To share your thoughts and insights about the guide, your experience using it, and what you want to see in future versions, select Provide feedback at the bottom of any page in the guide and complete the form.
If you have feedback about this post, submit comments in the Comments section below. If you have questions about this post, contact AWS Support.
Want more AWS Security news? Follow us on Twitter.
In this blog post, we focus on two recently released features of AWS Security Hub: the consolidated controls view and consolidated control findings. You can use these features to manage controls across standards and to consolidate findings, which can help you significantly reduce finding noise and administrative overhead.
Security Hub is a cloud security posture management service that you can use to apply security best practice controls, such as “EC2 instances should not have a public IP address.” With Security Hub, you can check that your environment is properly configured and that your existing configurations don’t pose a security risk. Security Hub has more than 200 controls that cover more than 30 AWS services, such as Amazon Elastic Compute Cloud (Amazon EC2), Amazon Simple Storage Service (Amazon S3), and AWS Lambda. In addition, Security Hub has integrations with more than 85 partner products. Security Hub can centralize findings across your AWS accounts and AWS Regions into a single delegated administrator account in your aggregation Region of choice, creating a single pane of glass to view findings. This can help you to triage, investigate, and respond to findings in a simpler way and improve your security posture.
The Security Hub controls are grouped into the following security standards:
With the new features — consolidated controls view and consolidated control findings—you can now do the following:
Enable or disable controls across standards in a single action. Previously, if you wanted to maintain the same enablement status of controls between standards, you had to take the same action across multiple standards (up to six times!).
If you choose to turn on consolidated control findings, you will receive only a single finding for a security check, even if the security check is enabled across several standards. This reduces the number of findings and helps you focus on the most important misconfigured resources in your AWS environment. It allows you to apply actions and updates (such as suppressing the finding or changing its severity) one time rather than having to do so multiple times across non-consolidated findings.
Overview of new features
Now we’ll discuss some of the details of how you can use the two new features to streamline the management of controls.
The new consolidated controls view
On the new Controls page, now available in the Security Hub console as shown in Figure 1, you can view and configure security controls across standards from one central location.
Figure 1: Security Hub Controls page
Before this release, controls had to be managed within the context of individual security standards. Even if the same control was part of multiple standards, the control had different IDs in each of them. With this recent release, Security Hub now assigns controls a unique security control ID across standards, so that it’s simpler for you to reference the controls and view their findings. Following the current naming convention of the AWS FSBP standard, the consolidated control IDs start with the relevant service in scope for the control. In fact, whenever possible, the new consolidated control ID is the same as the previous FSBP control ID.
For example, before this release, control IAM.6 in FSBP was also referenced as 1.14 in CIS 1.2, and 1.6 in CIS 1.4, PCI.IAM.4, and CT.IAM.6. After the release, the control is now referenced as IAM.6 in the Security Hub standards. This change does not affect the pre-existing API calls for Security Hub, such as UpdateStandardsControl, where you can still provide the previous StandardControlARN in order to make the call.
By using the new Controls view, you can understand the status of controls across your system, view control findings, and prioritize next steps without context switching. The following information is available on the Controls page of the Security Hub console:
An overall security score, which is based on the proportion of passed controls to the total number of enabled controls.
A breakdown of security checks across controls, with the percentage of failed security checks highlighted. Because many controls can contain multiple security checks and multiple findings, this value might be different from the security score, which considers controls as a single object. You can use this metric, as well as your security score, to monitor your progress as you work to remediate findings.
A list of controls that are categorized into different tabs based on enablement and compliance status. If you are an administrator of an organization within Security Hub, the enablement and compliance status will reflect the aggregate status of the entire organization. In your finding aggregation Region, the status will also be aggregated across linked Regions.
From the controls page, you can select a control to view its details (including its title and the standards it belongs to), and view and act on the findings generated by the control.
Security Hub also offers new API operations that match the capabilities of the controls page. Unlike the pre-existing API operations, these new API operations use the consolidated control IDs (also known as security control IDs) to provide a way to know and manage the relationship between controls and standards. You can use these API operations to manage each Security Hub control across standards, to make sure that the status of controls in the standards is aligned. The new API operations include the following:
BatchGetSecurityControls — Given a list of security control IDs, returns the full definition of those controls.
BatchGetStandardsControlAssociations — Given a list of security control IDs and standards, returns whether each control is turned on in the relevant standard or not.
We also provide an example script that makes use of these API calls and applies them across accounts and Regions so that your configuration is consistent. You can use our script to enable or disable Security Hub controls across your various accounts or Regions.
Consolidating control findings between standards
Before we released the consolidated control findings feature, Security Hub generated separate findings per standard for each related control. Now, you can turn on consolidated control findings, and after doing so, Security Hub will produce a single finding per security check, even when the underlying control is shared across multiple standards. Having a single finding per check across standards will help you investigate, update, and remediate failed findings more quickly, while also reducing finding noise.
As an example, we can look at control CloudTrail.2, which is shared between standards supported by Security Hub. Before you turn on this capability, you might potentially receive up to six findings for each security check generated by this control—with one finding for each security standard. After you turn on consolidated control findings, these older findings will be archived and Security Hub will generate one finding per security check in this control, regardless of how many security standards you have enabled. For an example of how the standard-specific findings compare to the new consolidated finding, see Sample control findings. The following is an example of a consolidated finding for the CloudTrial.2 control; we’ve highlighted the part that shows this finding is shared across standards.
{
"SchemaVersion": "2018-10-08",
"Id": "arn:aws:securityhub:us-east-2:123456789012:security-control/CloudTrail.2/finding/a1b2c3d4-5678-90ab-cdef-EXAMPLE11111",
"ProductArn": "arn:aws:securityhub:us-east-2::product/aws/securityhub",
"ProductName": "Security Hub",
"CompanyName": "AWS",
"Region": "us-east-2",
"GeneratorId": "security-control/CloudTrail.2",
"AwsAccountId": "123456789012",
"Types": [
"Software and Configuration Checks/Industry and Regulatory Standards"
],
"FirstObservedAt": "2022-10-06T02:18:23.076Z",
"LastObservedAt": "2022-10-28T16:10:06.956Z",
"CreatedAt": "2022-10-06T02:18:23.076Z",
"UpdatedAt": "2022-10-28T16:10:00.093Z",
"Severity": {
"Label": "MEDIUM",
"Normalized": "40",
"Original": "MEDIUM"
},
"Title": "CloudTrail should have encryption at-rest enabled",
"Description": "This AWS control checks whether AWS CloudTrail is configured to use the server-side encryption (SSE) AWS Key Management Service (AWS KMS) customer master key (CMK) encryption. The check will pass if the KmsKeyId is defined.",
"Remediation": {
"Recommendation": {
"Text": "For directions on how to correct this issue, consult the AWS Security Hub controls documentation.",
"Url": "https://docs.aws.amazon.com/console/securityhub/CloudTrail.2/remediation"
}
},
"ProductFields": {
"RelatedAWSResources:0/name": "securityhub-cloud-trail-encryption-enabled-fe95bf3f",
"RelatedAWSResources:0/type": "AWS::Config::ConfigRule",
"aws/securityhub/ProductName": "Security Hub",
"aws/securityhub/CompanyName": "AWS",
"Resources:0/Id": "arn:aws:cloudtrail:us-east-2:123456789012:trail/AWSMacieTrail-DO-NOT-EDIT",
"aws/securityhub/FindingId": "arn:aws:securityhub:us-east-2::product/aws/securityhub/arn:aws:securityhub:us-east-2:123456789012:security-control/CloudTrail.2/finding/a1b2c3d4-5678-90ab-cdef-EXAMPLE11111"
}
"Resources": [
{
"Type": "AwsCloudTrailTrail",
"Id": "arn:aws:cloudtrail:us-east-2:123456789012:trail/AWSMacieTrail-DO-NOT-EDIT",
"Partition": "aws",
"Region": "us-east-2"
}
],
"Compliance": {
"Status": "FAILED",
"RelatedRequirements": [
"PCI DSS v3.2.1/3.4",
"CIS AWS Foundations Benchmark v1.2.0/2.7",
"CIS AWS Foundations Benchmark v1.4.0/3.7"
],
"SecurityControlId": "CloudTrail.2","AssociatedStandards": [ { "StandardsId": "standards/aws-foundational-security-best-practices/v/1.0.0"}, { "StandardsId": "standards/pci-dss/v/3.2.1"}, { "StandardsId": "ruleset/cis-aws-foundations-benchmark/v/1.2.0"}, { "StandardsId": "standards/cis-aws-foundations-benchmark/v/1.4.0"}, { "StandardsId": "standards/service-managed-aws-control-tower/v/1.0.0"}, ]},
"WorkflowState": "NEW",
"Workflow": {
"Status": "NEW"
},
"RecordState": "ACTIVE",
"FindingProviderFields": {
"Severity": {
"Label": "MEDIUM",
"Normalized": "40",
"Original": "MEDIUM"
},
"Types": [
"Software and Configuration Checks/Industry and Regulatory Standards"
]
}
}
In the left navigation pane, choose Settings, and then choose the General tab.
Under Controls, turn on Consolidated control findings, and then choose Save.
Figure 2: Turn on consolidated control findings
If you are using the Security Hub integration with AWS Organizations or have invited member accounts through a manual invitation process, consolidated control findings can only be turned on by the administrator account. When this action is taken in the administrator account, the action will also be reflected in each member account in the current Region. It can take up to 18 hours for Security Hub to archive existing standard-specific findings and generate the new, standard-agnostic, findings.
You can also enable consolidated control findings by using the API (calling the UpdateSecurityHubConfiguration API with the ControlFindingGenerator parameter equal to SECURITY_CONTROL), or by using the AWS CLI (running the update-security-hub-configuration command with control-finding-generator equal to SECURITY_CONTROL), as in the following example.
aws securityhub ‐‐region <Region of choice> update-security-hub-configuration ‐‐control-finding-generator SECURITY_CONTROL
Much like the console behavior, if you have an organizational setup in Security Hub, this API action can only be taken by the administrator, and it will be reflected in each member account in the same Region.
What to expect when you enable consolidated control findings
To allow for these new capabilities to be launched, changes to the AWS Security Finding Format (ASFF) are required. This format is used by Security Hub for findings it generates from its controls or ingests from external providers. When you turn on finding consolidation, Security Hub will archive old standard-specific findings and generate standard-agnostic findings instead. This action will only affect control findings that Security Hub generates, and it will not affect findings ingested from partner products. However, in Security Hub findings, turning on consolidated control findings might cause some updates that you previously made to findings to be archived. Despite this one-time change, after the migration is complete (it can take up to 18 hours), you will be able to update finding fields in a single action and the updates will apply across standards, without the need to make multiple updates.
One field affected by the new capabilities is the Workflow field, which provides information about the status of the investigation into a finding. Manipulating this field can also update the overall compliance status of the control that the finding is related to. For example, if you have a control with one failed finding (and the rest have passed), and the failed finding comes from a resource for which you’d like to make an exception, you can decide to suppress that failed finding by updating the Workflow field. If you suppress failed findings in a control, its compliance status can change to pass.
Before turning on consolidated control findings, if you want to maintain an aligned compliance status in controls that belong to multiple standards, you have to update the Workflow status of findings in each standard. After turning on finding consolidation, you will only have to update the Workflow status once, and the suppression will be applied across standards, helping you to reduce the number of steps needed to suppress the same findings across standards.
As mentioned earlier, when you turn on this new capability, some updates made to the previous, standard-specific findings will be archived and will not be included in the new consolidated control findings generated by Security Hub. In the case of the Workflow status, the new consolidated findings will be created with a value of NEW (for failed findings) or RESOLVED (for new findings) in the Workflow field. However, after you have onboarded to the new finding format, you can update the value of the Workflow field, as well as other fields, and this value will be maintained without requiring you to make continuous updates. For the full list of fields that can be affected by the migration to the consolidated finding format, see Consolidated control findings – ASFF changes. Before you turn on finding consolidation, we suggest that you check if your custom automations refer to those affected fields. If they do, you can update your automations and test them by using the Sample control findings in the documentation.
Conclusion
This blog post covers new Security Hub features that make it simpler for you to manage controls across standards. With the new consolidated control findings feature, you can focus on the most relevant findings and reduce noise, which is why we recommend that you review the new feature and its associated changes and turn it on at your earliest convenience.
If you have feedback about this blog post, submit comments in the Comments section below. If you have questions about this blog post, start a new thread on the Security Hub forum or contact AWS Support.
Want more AWS Security news? Follow us on Twitter.
Your organization can use AWS Security Hub to gain a comprehensive view of your security and compliance posture across your Amazon Web Services (AWS) environment. Security Hub receives security findings from AWS security services and supported third-party products and centralizes them, providing a single view for identifying and analyzing security issues. Security Hub correlates findings and breaks them down into five severity categories: INFORMATIONAL, LOW, MEDIUM, HIGH, and CRITICAL. In this blog post, we provide step-by-step instructions for tracking Security Hub findings in each severity category against service-level agreements (SLAs) through visual dashboards.
SLAs are defined collaboratively by the Business, IT, and Security and Compliance teams within an organization. You can track Security Hub findings against your specific SLAs, and any findings that are in breach of an SLA can be escalated. You can also apply automation to alert the owners of the resources and remediate common security findings to improve your overall security posture.
Prerequisites
Security Hub uses service-linked AWS Config rules to perform security checks behind the scenes. To support these controls, you must enable AWS Config on all accounts, including the administrator and member accounts, in each AWS Region where Security Hub is enabled.
In this solution, you will learn two different ways to track your findings in Security Hub against the pre-defined SLA for each severity category.
Option 1: Use custom insights
Security Hub offers managed insights, which include a collection of related findings that identify a security issue that requires attention and intervention. You can view and take action on the insight findings. In addition to the managed insights, you can create custom insights to track issues and findings related to your resources in your environment.
Create a custom insight for SLA tracking
In this example, you set an SLA of 30 days for HIGH severity findings. This example will provide you with a view of the HIGH severity findings that were generated within the last 30 days and haven’t been resolved.
To create a custom insight to view HIGH severity findings from the last 30 days
On the Insights page, choose Create insight, as shown in Figure 1.
Figure 1: Create insight in the Security Hub console
On the Create insight page, in the search box, leave the following default filters: Workflow status is NEW, Workflow status is NOTIFIED, and Record state is ACTIVE, as show in Figure 2.
To select the required grouping attribute for the insight, choose the search box to display the filter options. In the search box, choose the following filters and settings:
Choose the Group by filter, and select WorkflowStatus.
Figure 2: Create insights using filters
Choose the Severity label filter and enter HIGH.
Choose the Created at filter and enter 30 to indicate the number of days you want to set as your SLA.
Choose Create insight again.
For Insightname, enter a meaningful name (for this example, we entered UnresolvedHighSevFindings), and then choose Create insight again.
You can repeat the same steps for other finding severities – CRITICAL, MEDIUM, LOW, and INFORMATIONAL; you can change the number of days you specify for the Created at filter to meet your SLA requirements; or specify different workflow status settings. Note that the workflow status can have the following values:
NEW – The initial state of a finding before you review it.
NOTIFIED – Indicates that the resource owner has been notified about the security issue.
SUPPRESSED – Indicates that you have reviewed the finding and no action is required.
RESOLVED – Indicates that the finding has been reviewed and remediated.
Your custom insight will show the findings that meet the criteria you defined. For more information about creating custom insights, see Module 2: Custom Insights in the Security Hub Workshop.
Option 2: Build visualizations for Security Hub findings data by using Amazon QuickSight
We hear from our customers that your organizations are looking for a solution where you can quickly visualize the status of your Security Hub findings, to see which findings you need to take action on (NEW and NOTIFIED) and which you do not (SUPPRESSED and RESOLVED). You can achieve this by building a data analytics pipeline that uses Amazon EventBridge, Amazon Kinesis Data Firehose, Amazon Simple Storage Service (Amazon S3), Amazon Athena, and Amazon QuickSight. The data analytics pipeline enables you to detect, analyze, contain, and mitigate issues quickly.
This solution integrates Security Hub with EventBridge to set SLA rules to a specified period of your choice for each severity level. For example, you can set the SLA to 5 days for CRITICAL severity findings, 10 days for HIGH severity findings, 14 days for MEDIUM severity findings, 30 days for LOW severity findings, and 60 days for INFORMATIONAL severity findings.
Architecture overview
Figure 3 shows the architectural overview of the QuickSight solution workflow.
Figure 3: Architecture diagram for option 2, the QuickSight solution
In the QuickSight solution, Security Hub publishes the findings to EventBridge, and then an EventBridge rule (based on the SLA) is configured to deliver the findings to Kinesis Data Firehose. For example, if the SLA is 14 days for all MEDIUM severity findings, then those findings will be filtered by the rule and sent to Kinesis Data Firehose. Security Hub findings follow the AWS Security Finding Format (ASFF).
The following is a sample EventBridge rule that filters the Security Hub findings for MEDIUM severity and workflow status NEW, before publishing the findings to Kinesis Data Firehose, and then finally to Amazon S3 for storage. A workflow status of NEW and NOTIFIED should be included to catch all findings that require action.
After the findings are exported and stored in Amazon S3, you can use Athena to run queries on the data and you can use Amazon QuickSight to display the findings that violate your organization’s SLA. With Athena, you can create views of the original table as a logical table. You can also create a view for CRITICAL, HIGH, MEDIUM, LOW, and INFORMATIONAL severity findings.
The QuickSight dashboard shown in Figure 4 is an example that shows all the MEDIUM severity findings that should be resolved within a 14 day SLA.
Figure 4: QuickSight table showing medium severity findings over a 14-day SLA
Using QuickSight, you can create different types of data visualizations to represent the exported Security Hub findings, which enables the decision makers in your organization to explore and interpret information in an interactive visual environment. For example, Figure 5 shows findings categorized by service.
Figure 5: QuickSight visual showing MEDIUM severity findings for each service
As another example, Figure 6 shows findings categorized by severity.
Figure 6: QuickSight visual showing findings by severity
Over time, your organization might discover that there are certain findings that should be tracked at a lower or higher severity level than what is auto-generated from Security Hub. You can implement EventBridge rules with AWS Lambda functions to automatically update the severity of the findings as soon as they are generated.
Figure 7: Create an EventBridge rule in the console
Define the event pattern, including the finding generator ID or any other identifying fields for which you want to redefine the severity. Review the fields in the format, and choose your desired filters. The following is a sample of the event pattern.
Specify the target as a Lambda function that will host the code to update the finding severity.
Figure 8: Select a target Lambda function
In the Lambda function, use the BatchUpdateFindings API action to update the severity label as desired.
The following example Lambda code will update finding severity to INFORMATIONAL. This function requires Amazon CloudWatch write permissions, and requires permissions to invoke the Security Hub API action BarchUpdateFindings.
import logging
import json, boto3
import botocore.exceptions as boto3exceptions

logger = logging.getLogger()
logger.setLevel(os.environ.get('LOGLEVEL', 'INFO').upper())

def lambda_handler(event, context):

    finding_id = ""
    product_arn = ""

    logger.info(event)

    for finding in event['detail']['findings']:

        #determine and log this Finding's ID
        finding_id = finding["Id"]
        product_arn = finding["ProductArn"]
        logger.info("Finding ID: " + finding_id)


        #determine and log this Finding's resource type
        resource_type = finding["Resources"][0]["Type"]
        logger.info("Resource Type is: " + resource_type)

        try:
            sec_hub_client = boto3.client('securityhub')
            response = sec_hub_client.batch_update_findings(
                FindingIdentifiers=[
                {
                    'Id': finding_id,
                    'ProductArn': product_arn
                }
                ],
                    Severity={"Label": "INFORMATIONAL"}

                )

        except boto3exceptions.ClientError as error:
            logger.exception(f"Client error invoking batch update findings {error}")
        except boto3exceptions.ParamValidationError as error:
            logger.exception(f"The parameters you provided are incorrect: {error}")

    return {"statusCode": 200}
The finding is generated with a new severity level, as updated in the Lambda function. For example, Figure 9 shows a finding that is generated as MEDIUM by default, but the configured EventBridge rule and Lambda function update the severity level to INFORMATIONAL.
Figure 9: Security Hub findings generated with updated severity level
Conclusion
This blog post walked you through two different solutions for setting up and tracking the SLAs for the findings generated by Security Hub. Reporting Security Hub findings for a given SLA in a dashboard view can help you prioritize findings and track whether findings are being remediated on time. This post also provided example code that you can use to modify the Security Hub severity for a specific finding. To further extend the solution and enable custom actions to remediate the findings, see the following:
In this blog post, you’ll learn how to extend the solution so you can use AWS Chatbot to remediate the findings in your Slack channel. You’ll receive the findings from Security Hub and then run AWS CLI commands from your Slack channel to remediate the reported security findings.
AWS Chatbot works by acting as a subscriber to an Amazon Simple Notification Service (Amazon SNS) topic that can receive notifications from either Amazon CloudWatch or Amazon EventBridge, and have them delivered to the configured Slack channels or Amazon Chime chat rooms. You can apply standard AWS Identity and Access Management (IAM) permissions to the Slack channel or Amazon Chime chatroom, and you can also associate some channel guardrails to provide granular control on what commands can be run from the channel. For example, you may want to allow running commands that would allow getting more details on findings reported from Security Hub, and remediating and archiving those findings, but use channel guardrails to prevent anyone from disabling Security Hub. Another example is that you might want to allow the channel members to query AWS CloudTrail logs in order to get more details on findings, but you use channel guardrails to prevent them from disabling AWS CloudTrail or changing the destination Amazon Simple Storage Services (Amazon S3) bucket.
Overview of ChatOps and ChatSecOps concepts
ChatOps, also known as Chat Operations, refers to using chatbots, tools, and clients to communicate, notify, assign, and launch operational tasks and issues. You can use your existing Slack channels and Amazon Chime chatrooms to receive alerts and notifications about operational issues or tasks, and you can also respond to those incidents or tasks in real time from the same chat room. SecOps is a philosophy of encouraging collaboration between the ITOps and Security teams of an organization. ChatSecOps, also known as Chat Security Operations, uses the ChatOps technology to enable customers to put SecOps in practice.
ChatSecOps facilitates this collaboration by allowing security-related notifications to be delivered to common chat rooms used by SecOps teams, providing visibility on the issues and actions that are taken to investigate and remediate the reported issues. SecOps teams can share threat analysis reports, compliance finding reports, and information on security vulnerabilities in these channels and work closely with DevOps teams to perform further analysis, investigation, and remediation of the issues and findings. This helps to ensure visibility and collaboration across the SecOps and DevOps teams and promotes the philosophy of DevSecOps.
Prerequisites
To get started, you’ll need the following prerequisites:
You need to grant permissions to the users in Slack channels, which you can do in one of the following ways:
Associate a channel IAM role with AWS Chatbot. This method provides similar permissions to all the members of the Slack channel. A channel IAM role is more useful if all your channel members require the same set of permissions. The channel IAM role can also be used to restrict the permissions provided by the user IAM role.
Define user roles. User roles require channel members to choose their own roles. This allows different users in your channel to have different sets of permissions. User roles are also useful when you don’t want new channel members to perform actions as soon as they join the channel.
For detailed instructions about setting up AWS Chatbot and defining permissions, see Getting started with AWS Chatbot. For more information about setting boundaries on the permissions that can be allowed by the channel and user IAM roles, see Channel guardrails.
Integrate the Slack channel with AWS Chatbot
After you set up the Slack channel with required permissions, you integrate the ChatOps for AWS app with your channel by using the following steps.
To integrate the Slack channel with AWS Chatbot
Log in to Slack by using either the Slack app or web browser.
In the Slack sidebar, from the Channels section, choose the channel name.
In the right pane, choose the channel name to open the channel configuration window.
Choose the Integrations tab, then choose Add an App.
In the search bar, enter AWS Chatbot. In the search results list, choose the Add button for AWS Chatbot.
On the Integrations tab, under Apps, you should see ChatOps for AWS, as shown in Figure 1.
Figure 1: Integrate the ChatOps for AWS app with your Slack channel
Now you’re ready to start running the commands. Note that you need to add @aws before writing any commands. For more information , see Running AWS CLI commands from Slack channels.
Use case: Amazon S3 Block Public Access enabled at the account level
The Amazon S3 Block Public Access feature provides settings for access points, buckets, and accounts to help you manage public access to Amazon S3 resources. With S3 Block Public Access, account administrators and bucket owners can set up centralized controls to limit public access to your S3 resources. These controls are enforced regardless of how the resources are created.
Amazon GuardDuty tracks and reports S3 Block Public Access feature configurations at the account level, as well as the bucket level. These findings are automatically sent to Security Hub.
To remediate finding for Amazon S3 Block Public Access from the Slack channel
You receive a Security Hub notification that Amazon S3 Block Public Access was disabled for an account in your designated Slack channel.
Figure 2: Notification received from Security Hub in Slack channel
This notification indicates that S3 Block Public Access was disabled for a specific account.
Note: Your Slack channel members require permissions to investigate and remediate the findings received in the Slack channel. As described earlier, you can grant permissions using a channel IAM role or a user IAM role. You should follow the principal of least privilege access when granting access and use IAM Access Analyzer to review the permissions that are granted through the channel or user IAM role.
Before you take any action, you need to find the current S3 Block Public Access configuration for the account. To do this, run the following AWS CLI command from the Slack channel, replacing <your_account_id> with the AWS account ID you are investigating.
Figure 3: AWS CLI command output in Slack channel indicating that S3 Block Public Access is disabled
You see that the output in Figure 3 shows that all the parameters of PublicAccessBlockConfiguration are set to false, which indicates that the Block Public Access feature is disabled at the account level.
To remediate this issue, run the following AWS CLI command in your Slack channel, replacing <your_account_id> with the AWS account ID you are investigating.
In the response from AWS Chatbot, look for Result was null to verify that the command was run without any errors.
Figure 4: AWS CLI command run from Slack channel to enable S3 Block Public Access
To check the current status of the configuration, and to validate whether the issue has been resolved, again run the following AWS CLI command from the Slack channel, replacing <your_account_id> with the AWS account ID you are investigating:
In the response, you see that all the parameters of PublicAccessBlockConfiguration are set to false, which indicates that the Block Public Access feature is enabled at the account level.
Figure 5: AWS CLI command output in Slack channel indicating S3 Block Public Access is enabled
Another example use case is that you get a security finding notifying you about unencrypted Amazon Elastic Block Store (Amazon EBS) volumes. You can remediate the finding by running AWS CLI commands to encrypt the volume. In addition to interacting with AWS services by running standard AWS CLI commands in the Slack channel, you can further extend this capability to run operating system (OS)-level commands by using AWS Systems Manager runbooks, using the same mechanism described in this post. For more information, see AWS Systems Manager Runbooks in the AWS Chatbot Administrator Guide.
Conclusion
In this blog post, you learned how to run AWS CLI commands from Slack channels to remediate your security findings. This allows you to receive alerts and notifications from Security Hub and other security services such as Amazon GuardDuty, then investigate and remediate the issues from a single platform. You can integrate AWS Chatbot with your security operation team’s Slack channel or Amazon Chime chatroom, and manage your security operations in a more collaborative, transparent, and automated manner.
If you have any questions about this post, let us know in the Comments section below. For more information about AWS Chatbot, see the AWS Chatbot Administrator Guide.
Want more AWS Security news? Follow us on Twitter.
The amount of data available to be collected, stored and processed within an organization’s AWS environment can grow rapidly and exponentially. This increases the operational complexity and the need to identify and protect sensitive data. If your security teams need to review and remediate security risks manually, it would either take a large team or the actions might not be timely. There is also a chance that with manual operation, a step could be missed or the incorrect action could be taken. As a result, your security teams will need an automated and scalable way to support these operations efficiently.
Amazon Macie is a fully managed data security and data privacy service that uses machine learning and pattern matching to discover and protect your sensitive data in AWS. Macie generates findings for sensitive data in an S3 object or a potential issue with the security or privacy of an S3 bucket. AWS Security Hub allows you to gain a centralized view into the security posture across your AWS environment by aggregating security findings from various AWS services and partner products, including Amazon Macie. Security Hub also includes the custom actions feature, which you can use to create actions for response and remediation to selected findings within the Security Hub console in an efficient and consistent manner.
It is important for your security teams to create effective and standardized mechanisms for taking action against Macie findings to ensure that data remains secure. By using Security Hub custom actions, you can have predefined actions for the security team to take against Macie findings without having to manually find and remediate the resources.
This blog post provides you with an example solution for responding to Macie sensitive data findings and policy findings in Security Hub by using custom actions. I will walk through the components of the solution, as well as opportunities where resources can be customized for your specific use case.
Prerequisites
You must have AWS Security Hub and Amazon Macie enabled in the AWS account where you are deploying this solution.
Solution overview
In this solution, you’ll use a combination of Security Hub custom actions, Amazon EventBridge, and AWS Lambda to take action on Macie findings in Security Hub. You will be working with the findings within the same AWS account where you deployed the solution.
Macie generates two categories of findings relating to different resources, which will require different remediation actions.
Sensitive data finding is a detailed report of sensitive data in an S3 object.
A full list of Macie finding types can be found in the Macie User guide.
For the two Macie finding categories, there is an associated Security Hub custom action:
Custom action for sensitive data finding (S3 object) – When the security team selects this custom action, the action invokes a Lambda function that will take the following steps on the S3 object in the Macie finding:
Tag the object with the Security Hub finding ID
Encrypt the S3 object with a different customer-managed KMS key
Update the Security Hub finding workflow status to RESOLVED
Custom action for policy finding (S3 bucket). When you select this this custom action, it invokes a Lambda function that will take the following steps on the S3 bucket in the Macie finding:
Tag the object with the Security Hub finding ID
Update the S3 bucket configuration to:
Enable default encryption
Enable public access block
Update the Security Hub finding workflow status to RESOLVED
The solution is configured to take action within the AWS account where the finding and corresponding resource is generated. In order to enable cross-account remediation, you will need to deploy an additional IAM role for the automation to assume and provision a KMS key to use for encryption.
Note: The custom actions in this solution are meant to be examples of actions to take against Macie policy and sensitive data findings. These actions will be different depending on your use-case and environment. You will also need to review and update the associated Lambda function execution role IAM policies accordingly.
Solution architecture
Figure 1: Resources deployed in the Security AWS account taking action on resources identified in the Workload AWS account
Figure 1 shows the architecture for the solution. The workflow is as follows:
A Macie job runs and creates findings, which are sent to Security Hub in the same AWS account as the Macie finding.
The delegated administrator Security Hub account combines findings across all member Security Hub accounts, including Macie findings.
The security team reviews the Macie findings in the Security Hub delegated administrator account and determines to take remediation actions for a finding by selecting the finding and then selecting the appropriate Security Hub custom action.
The Security Hub custom action sends the finding to the EventBridge rule, which is linked to the Lambda function.
The EventBridge rule invokes the Lambda function to take action against the resources from the Macie finding.
The Lambda function will:
Take action for the S3 resource
Mark the Macie finding as resolved in the delegated administrator Security Hub account
The solution is currently intended to work in a single Region. In order to enable this solution across Regions, you will need to change the Remediation Lambda function code for any regional resources used for remediation actions (i.e. AWS Key Management Service).
To deploy the solution by using the AWS Management Console
In your security tooling account, launch the AWS CloudFormation template by choosing the following Launch Stack button. It will take approximately 10 minutes for the CloudFormation stack to complete.
Note: The stack will launch in the N. Virginia (us-east-1) Region. To deploy this solution into other AWS Regions, download the solution’s CloudFormation template, modify it, and deploy it to the selected Region.
(OPTIONAL) If you want to enable cross-account remediation, launch the following AWS CloudFormation template in the AWS account where you want to be able to take remediation actions. You can also use AWS CloudFormation StackSets if deploying to multiple AWS accounts.
To deploy the solution by using AWS CDK
You can find the latest code in our GitHub repository, where you can also contribute to the sample code. The following commands show how to deploy the solution by using the AWS CDK. First, the CDK initializes your environment and uploads the AWS Lambda assets to Amazon S3. Then, you can deploy the solution to your account. Make sure to replace <AWS_ACCOUNT> with the account number, and replace <REGION> with the AWS Region that you want the solution deployed to.
Run the following commands in your terminal while authenticated in the security tooling AWS account:
Now that you’ve successfully deployed the solution, you can see things in action. You have two options for testing the workflow on your own:
Use a sample event, generated by a Macie finding in Security Hub, and invoke the Lambda function that is tied to the Security Hub custom action.
Note: If using sample events, you can replace the values for the resources with real resources. Otherwise, you will not be able to see the Lambda function successfully take action because the resource in your sample event may not exist.
I have existing findings for Macie generated in my AWS account, and in the procedures in this section, I’ll walk through taking action against these.
Note: If you set up Macie and Security Hub in a delegated administrator and member model that ingests findings from other AWS accounts, the IAM remediation roles for the S3 bucket and S3 objects must be deployed in the member accounts.
Review deployed resources in the AWS console
Before taking action on your sample findings, review the deployed resources that you’ll use.
To review deployed resources
In the AWS account console where the automation was deployed, go to Security Hub, choose Settings, and then choose Custom actions. You should see two custom actions:
Navigate to the EventBridge console and then choose Rules. You should see four rules:
Disabled – These are disabled by default during deployment
Autoremediate_Macie_Policy_Finding
Autoremediate_Macie_Sensitive_Data_Finding
Figure 3: Disabled EventBridge rules for autoremediation of Macie findings in Security Hub
Enabled – These are enabled by default during deployment:
Custom_Action_Macie_Policy_Finding
Custom_Action_Macie_Sensitive_Data_Finding
Figure 4: Enabled EventBridge rules tied to the Security Hub custom actions
In the enabled EventBridge rules, you should see the corresponding Security Hub custom action Amazon Resource Names (ARNs) in the rule event pattern.
Figure 5: Enabled EventBridge rule event pattern for the Security Hub custom action
Take action on an Amazon Macie object or policy finding
Each Security Hub custom action invokes a corresponding Lambda function that is configured as a target in the EventBridge rule. The Lambda function parses the information in the Macie finding from Security Hub to take action.
Each Security Hub custom action is specific to either an S3 object or an S3 bucket. If you attempt a custom action meant for an S3 object against a Macie policy finding, this will successfully initiate the custom action, but the Lambda function that is invoked will be unsuccessful.
If the Macie finding is specific to an S3 object, the title will display “The S3 object …,” whereas if the Macie finding is for a policy finding, the title will display information for an S3 bucket.
To take action on findings
In the AWS account console where the automation was deployed, navigate to AWS Security Hub, and then choose Findings.
Filter the findings by setting Product Name to Macie.
Figure 6: Filter for Macie findings in Security Hub
Select the checkbox for either a Macie policy finding or a sensitive data finding; this will select a custom action. After you select the action, there is no confirmation step, and the action will invoke the Lambda function.
Figure 7: Validate Custom Action has sent the finding to Amazon CloudWatch Events (EventBridge rule)
Review and validate the Security Hub custom action on target resources
In order to validate or troubleshoot the solution, you need to review whether the Lambda function was able to take action against the resources in the Security Hub finding for Macie.
To validate or troubleshoot the custom action
For validation of sensitive data finding remediation, review S3 object configuration:
Navigate to the Amazon S3 console.
Choose the S3 object in the Macie finding.
Choose the Properties tab and review the following fields:
Tags should be set to SH_Finding_ID.
AWS KMS key ARN should be set to the KMS key with the alias `macie_key`
Click on the KMS key ARN and validate the key’s alias is the key deployed in the solution
For validation of policy finding remediation, review the S3 bucket configuration:
Navigate to the Amazon S3 console.
Choose the S3 bucket in the Macie finding.
Choose the Properties tab and review the following fields:
Tags should be set to SH_Finding_ID.
Default Encryption should be set to Enabled.
Choose the Permissions tab and review the following fields:
Block public access should be set to On.
For troubleshooting, you can review the CloudWatch logs for the Lambda function:
Navigate to the CloudWatch console.
Choose /aws/lambda/Remediate_Macie_S3_Bucket.
Choose the most recent log stream and review the logs to see what actions were taken on the resources.
Next steps and customization
The solution in this post has a custom action for an S3 object and an S3 bucket, and is meant to serve as a template. You could modify the Lambda functions associated with the custom actions to take different or additional actions that are specific to your environment and data classification.
Additionally, I walked through specific Security Hub custom actions for Macie policy (bucket) or sensitive data (objects) findings. If you have defined actions to take for both, you could consolidate the custom actions and invoke a Lambda function that parses information from the Security Hub Macie finding to determine if it is a policy or sensitive data finding.
The two disabled EventBridge rules deployed as part of the solution are examples that can be leveraged for auto-remediation. After you use Security Hub’s custom actions to remediate findings, your security team could start to see a trend where you always want to take specific actions and enable the EventBridge rules to take action without requiring your security team to select a custom action in Security Hub in the AWS console.
Autoremediate_Macie_Policy_Finding
Autoremediate_Macie_Sensitive_Data_Finding
Conclusion
In this post, you deployed a solution to allow your security team to take automated actions against a Macie sensitive data and policy finding from Security Hub by using custom actions in the AWS console. We walked through what the solution does and how the solution can be customized to your use case.
If you have feedback about this post, submit comments in the Comments section below. If you have any questions about this post, start a thread on the AWS Security Hub forum or Amazon Macie forum.
Want more AWS Security news? Follow us on Twitter.
The collective thoughts of the interwebz
Manage Consent
To provide the best experiences, we use technologies like cookies to store and/or access device information. Consenting to these technologies will allow us to process data such as browsing behavior or unique IDs on this site. Not consenting or withdrawing consent, may adversely affect certain features and functions.
Functional
Always active
The technical storage or access is strictly necessary for the legitimate purpose of enabling the use of a specific service explicitly requested by the subscriber or user, or for the sole purpose of carrying out the transmission of a communication over an electronic communications network.
Preferences
The technical storage or access is necessary for the legitimate purpose of storing preferences that are not requested by the subscriber or user.
Statistics
The technical storage or access that is used exclusively for statistical purposes.The technical storage or access that is used exclusively for anonymous statistical purposes. Without a subpoena, voluntary compliance on the part of your Internet Service Provider, or additional records from a third party, information stored or retrieved for this purpose alone cannot usually be used to identify you.
Marketing
The technical storage or access is required to create user profiles to send advertising, or to track the user on a website or across several websites for similar marketing purposes.