Tag Archives: Macie

Use Amazon Macie for automatic, continual, and cost-effective discovery of sensitive data in S3

Post Syndicated from Jonathan Nguyen original https://aws.amazon.com/blogs/security/use-amazon-macie-for-automatic-continual-and-cost-effective-discovery-of-sensitive-data-in-s3/

Customers have an increasing need to collect, store, and process data within their AWS environments for application modernization, reporting, and predictive analytics. AWS Well-Architected security pillar, general data privacy and compliance regulations require that you appropriately identify and secure sensitive information. Knowing where your data is allows you to implement the appropriate security controls which help support meeting a range of objectives including compliance & data privacy.

With Amazon Macie, you can detect sensitive information stored in your organization’s Amazon Simple Storage Service (Amazon S3) storage. Macie provides sensitive data findings and additional metadata to help you protect your data in Amazon S3.

If you have many accounts with a lot of S3 buckets and data, you might find it complex, expensive, and time consuming to discover sensitive data in each bucket and account, and to evaluate the large number of findings. As your applications continue to scale you want to have confidence that you continue to understand where the data is in your environment.

To help discover sensitive data across your entire S3 storage, you can now use a new feature in Macie—automated sensitive data discovery—to automatically build sensitive data profiles on S3 buckets and uncover the presence of sensitive data. The new feature continually and cost-efficiently samples data across your S3 storage. This reduces the data scanning needed to locate sensitive data so that you can focus your time, effort, and resources on additional investigation and remediation if sensitive data is found. This broad visibility can help you develop scalable, repeatable processes for ongoing and proactive protection of data.

In this blog post, we show you how to set up Macie automated sensitive data discovery in your AWS environment and walk you through the insights that it generates. We also share some common patterns on how you can use the findings to improve your data security posture.

Prerequisites

To get started, you’ll need the following prerequisites:

  1. Activate Amazon Macie in your accounts for the AWS Regions of your choosing. Macie is a regional service, so it scans S3 buckets only in the Regions where it’s turned on.
  2. Set up a delegated Macie administrator account, also referred to as the Macie admin account, for these Regions. A Macie admin account has visibility into the S3 buckets of member accounts. It also allows you to restrict access to automated sensitive data discovery results to the appropriate teams, without providing access into the management account.

    To set up the delegated Macie administrator to centrally manage multiple Macie accounts, do one of the following:

    For steps on how to implement these options, see Considerations and recommendations for invitation-based organizations in Amazon Macie.

  3. Make sure that a Macie service-linked IAM role has appropriate permissions to read and decrypt S3 objects. For S3 objects that are server-side encrypted with AWS Key Management Service (AWS KMS), update the associated KMS key policies to grant the required permission for the Macie service-linked role to decrypt existing and future S3 objects.
  4. Configure a S3 bucket for sensitive data results in the Macie admin account to access the results and allow for long-term storage and retention.

Activate automated sensitive data discovery in the delegated Macie administrator account

In this section, we walk you through how to activate automated sensitive data discovery in Macie.

For new Macie admin accounts, automated sensitive data discovery is turned on by default. For existing Macie accounts, you need to activate automated sensitive data discovery in the existing Macie admin accounts.

To activate automated sensitive data discovery in the existing Macie admin accounts

  1. Navigate to the Amazon Macie console.
  2. Under Settings, choose Automated discovery.
  3. For Status, choose Enable, and then edit the following sections according to your needs:
    • S3 buckets – By default, Macie selects and inspects samples of objects across all S3 buckets in your organization. For example, you might want to exclude an S3 bucket that stores AWS CloudTrail logs.
    • Managed data identifiers – You can select managed data identifiers to include or exclude during automated sensitivity data discovery. By default, Macie inspects and samples objects by using a set of managed data identifiers that AWS recommends. This includes most of the managed data identifiers that AWS supports, but excludes some that can potentially cause a high volume of alerts in buckets where you might not expect them. If you know specific data types that could exist within your environment, you can add those managed data identifiers specifically. If you want Macie to exclude detections that aren’t sensitive in your deployment, you can exclude them. For more details, see the Macie administrator user guide.
    • Custom data identifiers – You can select custom data identifiers to include or exclude during automated sensitive data discovery.
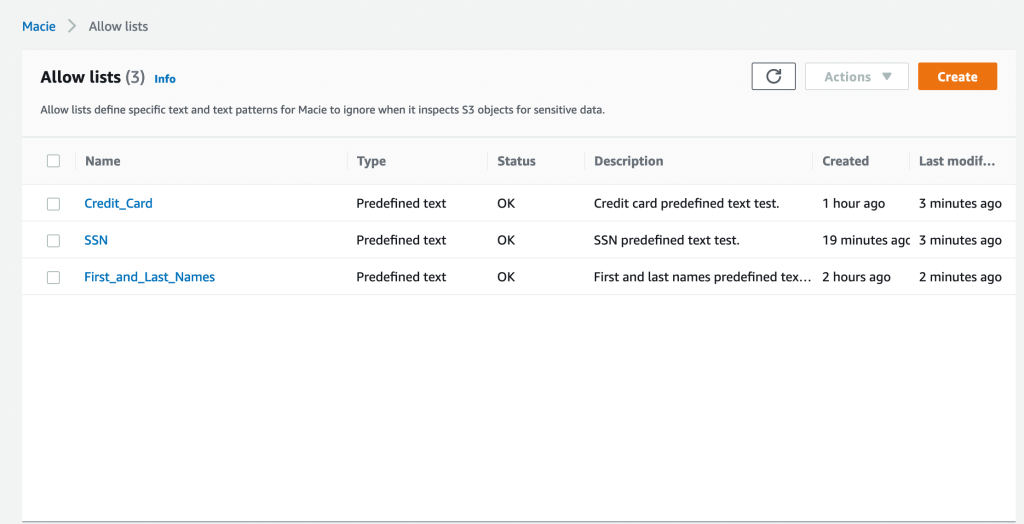
    • Allow lists – You can select allow lists to define specific text or a text pattern that you want Macie to exclude from automated sensitive data discovery.
Figure 1: Settings page for Macie automated sensitive data discovery

Figure 1: Settings page for Macie automated sensitive data discovery

Note: When you make changes to the inclusion or exclusion of managed or custom data identifiers for S3 buckets managed by the Macie admin account, those changes apply only to new S3 objects that are discovered. The changes do not apply to detections for existing S3 objects that were previously scanned with automated sensitive data discovery.

How Macie samples data and assigns scores

Macie automated sensitive data discovery analyzes objects in the S3 buckets in your accounts where Macie is turned on. It organizes objects with similar S3 metadata, such as bucket names, object-key prefixes, file-type extensions, and storage class, into groups that are likely to have similar content. It then selects small, but representative, samples from each identified group of objects and scans them to detect the presence of sensitive data. Macie has a feedback loop that uses the results of previously scanned samples to prioritize the next set of samples to inspect.

This systematic exploration of your S3 storage can help identify the presence of unknown sensitive data for a fraction of the cost of targeted sensitive data discovery jobs. A single sample might not be conclusive, so Macie continues sampling to build a security-relevant, interactive map of your S3 buckets. It automatically detects new buckets in your accounts, and keeps track of the previously scanned objects that get deleted from existing buckets to make sure that your map stays up to date.

Review data sensitivity scoring

When you first activate automated sensitive data discovery, Macie assigns each of your S3 buckets a sensitivity score of 50. Then, Macie begins to continually select and scan a sample of objects in your S3 buckets across each member account. Based on the results, Macie adjusts the sensitivity score for each bucket, assigning new scores that range from 1–99. Macie increases the score if sensitive data is found, and decreases the score if sensitive data isn’t found.

Macie calculates this score based on the amount of data inspected, number of sensitive data types discovered, number of occurrences of each sensitive data type, and the nature of the sensitive data. The score can help you identify potential security risks, but it does not indicate the criticality that a given bucket, and its contents, might have for your organization.

Figure 2 shows an example Summary page for the delegated Macie administrator. This page summarizes the results of automated sensitive data discovery for the delegated administrator account and each member account.

Figure 2: Macie summary page showing S3 bucket metadata

Figure 2: Macie summary page showing S3 bucket metadata

From the Summary page, you can choose statistics, such as Publicly accessible or Sensitive, to investigate. When you choose a statistic, you will be redirected to the S3 buckets page that displays a filtered view based on the selected data.

On the S3 buckets page shown in Figure 3, Macie displays a heat map of consolidated information, grouped by account, on whether a bucket is sensitive, not sensitive, or not analyzed yet. Each square in the heat map represents an S3 bucket. In the figure, account 111122223333 has 79 buckets, including 4 buckets with sensitive data findings, 34 buckets that were scanned with no sensitive data found, and 41 buckets that are pending scanning.

Figure 3: Heat map of automated sensitive data discovery in Macie

Figure 3: Heat map of automated sensitive data discovery in Macie

For more information about an S3 bucket, select one of the squares in the heat map. This will show you the sensitivity score and other details, such as types of sensitive data, names of sensitive objects, and profiling statistics.

The following table summarizes Macie sensitivity score categories and how to interpret the heat map.

Data sensitivity score Data sensitivity status Data sensitivity heat map
-1 Unable to analyze Macie was unable to analyze a S3 object(s) due to a permission issue.
1-49 Not sensitive A darker shade of blue, and a lower sensitivity score, indicates that a greater proportion of objects in the bucket were scanned and fewer occurrences of sensitive data were found.

  • A score closer to 1 indicates that Macie scanned most of the objects in the bucket and did not find occurrences of objects with sensitive data.
  • A score closer to 49 indicates that Macie scanned a smaller proportion of objects in the bucket and did not find occurrences of objects with sensitive data.
50 Not analyzed White shading indicates that Macie hasn’t analyzed objects yet.
51-99 Sensitive A darker shade of red, and a higher sensitivity score, indicates that a greater proportion of objects in the bucket were scanned and more occurrences of sensitive data were found.

  • A score closer to 99 indicates that Macie scanned a greater proportion of objects in the bucket, and found several occurrences of objects with sensitive data.
  • A score closer to 51 indicates that Macie scanned a smaller proportion of objects and found some occurrences of objects with sensitive data.
100 Maximum score A solid shade of red. Macie doesn’t assign this score, but you can manually assign it.

Common use cases for Macie automated sensitive data discovery

In this section, we discuss how you can use automated sensitive data discovery in Macie to implement the following common patterns:

  1. Activate continuous monitoring for broad visibility into the presence of sensitive data in your S3 buckets, including existing buckets where sensitive data was not found before.
  2. Manually identify and prioritize a subset of S3 buckets so that you can conduct a full scan based on the sensitivity score.
  3. Build automation that scans S3 buckets by using the sensitivity score and takes actions, such as sending notifications or performing remediation, so that buckets with sensitive data have proper guardrails.

Continuous monitoring of S3 buckets for sensitive data

The dynamic nature of applications and the speed of innovation increases the type and amount of data generated, stored, and processed over time. While development teams work on developing new features for your applications, security teams help the application teams understand where they should take action to protect data.

Discovering sensitive data is an ongoing activity that requires a continuous search for sensitive data in S3 buckets in each account that the Macie admin accounts manage. Macie continually searches for sensitive data and updates the information found on the Summary and S3 buckets pages in the Macie admin accounts.

To help you gain visibility across your S3 storage at an affordable cost, automated sensitive data discovery establishes a baseline profile of the sensitivity of each bucket, while analyzing only a fraction of S3 data for each account in a given month. After you activate this feature in the Macie admin accounts, Macie starts constructing an S3 bucket baseline within 48 hours.

Macie continues to refine bucket profiles and prioritizes those that it has the least information on. For example, Macie might prioritize buckets that were recently created in the monitored accounts or existing buckets from a member account that recently joined your organization. This provides continual visibility that achieves greater fidelity over time while scanning data at a predictable monthly rate.

Automated discovery uses the results of the automated data inspection to create a profile for each bucket. It also tracks previously scanned objects to make sure that each bucket profile is up to date. This means that if a previously scanned object is removed, Macie updates the profile of the bucket to make sure that you have the most current information.

You can also include or exclude specific managed and custom data identifiers from specific S3 buckets or from each S3 bucket that the Macie admin accounts manages. For example, to make sure that the sensitivity score is as accurate as possible, you can exclude specific data identifiers on select S3 buckets where you expect those identifiers.

Let’s walk through an example of how to exclude specific data identifiers on an S3 bucket. Imagine that your company has an S3 bucket where data scientists store a test dataset of fictitious names and addresses. The appropriate teams have verified that the test dataset isn’t sensitive and can be used to create test data models. You want to exclude name and address detections for this bucket while keeping these detections for the rest of your S3 storage.

To exclude the name and address identifiers, navigate to the specific S3 bucket, choose the identifiers to exclude (in this case, NAME and ADDRESS), and choose Exclude from score, as shown in Figure 4. Macie automatically excludes these identifiers from the sensitivity score for that S3 bucket only, for existing and new objects.

Figure 4: Macie S3 bucket list view with sensitivity scores and detections

Figure 4: Macie S3 bucket list view with sensitivity scores and detections

Note: When you change the included or excluded managed or custom data identifiers for an S3 bucket, Macie automatically updates existing detections and sensitivity scores. Macie also applies these changes to new S3 objects that it scans with automated sensitive data discovery.

You can prioritize S3 buckets that need additional review by manually assigning them a maximum sensitivity score. When you select Assign maximum score on an S3 bucket, Macie sets the score to 100, regardless of the sensitive data detections that it found through automated sensitive data discovery. Automated sensitive data discovery continues to scan the bucket and create sensitive data detections unless you select Exclude from automated discovery.

You might want to assign maximum scores for S3 buckets that are publicly accessible, shared across multiple internal or external customers, or part of an environment where sensitive data shouldn’t be present. By assigning a maximum score to an S3 bucket, you can help ensure that your security and privacy teams regularly review high-priority buckets. You can decide whether to assign maximum scores based on your organization’s use cases and security policies.

Identify a subset of S3 buckets to conduct a full scan based on the sensitivity score

You can use sensitivity scores to prioritize specific S3 buckets for full Macie scanning jobs. By running full scanning jobs on specific buckets, you can focus your efforts on buckets where sensitive data could have the greatest impact on your organization. Because full scanning occurs on only a subset of your buckets, this strategy can help lower your overall costs for Macie.

To create a Macie job that scans S3 buckets based on the sensitivity score

  1. Navigate to the Amazon Macie console.
  2. In the left navigation pane, choose S3 buckets.
  3. For Sensitivity, add a filter as follows:
    • For To, enter a minimum sensitivity score.
    • For From, enter a maximum sensitivity score.

    If you leave the To field blank, Macie returns a list of buckets with a score greater than or equal to the value in the From field.

    Note: Sensitivity scores can vary based on the objects analyzed and whether you have the settings configured for Assign maximum score, Automatically discover sensitive data, or both.

  4. After you add the filter, you will see the S3 bucket results for the Sensitivity values that you entered, grouped by account. To view the buckets in list view, choose the list view icon (list view icon). To view the buckets in group view, choose the group view icon (group view icon).

    Note: You can’t create Macie scan jobs from group view. To run Macie scan jobs, switch to list view.

  5. Make sure that you are in list view, select the specific S3 buckets that you want to scan based on the Sensitivity score, and then choose Create Jobs.
    Figure 5: List view of sensitivity scores for S3 buckets

    Figure 5: List view of sensitivity scores for S3 buckets

  6. Review the S3 buckets that you selected. To exclude specific buckets, choose Remove for each bucket. After you review your selection, choose Next.
  7. Select a scheduled job or one-time job. If you select Scheduled job, select the update frequency and whether or not to include existing objects. Configure the sampling depth to be 100%. Optionally, you can configure additional object criteria.
  8. Select managed data identifiers, custom data identifiers, allow lists, and general settings according to your needs.
  9. Confirm the Macie job details and choose Submit to start scanning the S3 buckets based on the sensitivity score. When this job is complete, you will receive findings on sensitive data discovered from the job.

When you are considering whether to run a scheduled job or a one-time job, remember that S3 bucket sensitivity scores can change based on new objects, managed or custom identifiers, and allow lists used by Macie automated sensitive data discovery. If you run a scheduled job on buckets that meet certain sensitivity score criteria, the configurations for the job are immutable in order to support data privacy and protection audits or investigations. If a new bucket meets the sensitivity score criteria, you need to create a new scheduled job to include that bucket.

Use automation to scan S3 buckets by sensitivity score and take actions based on findings

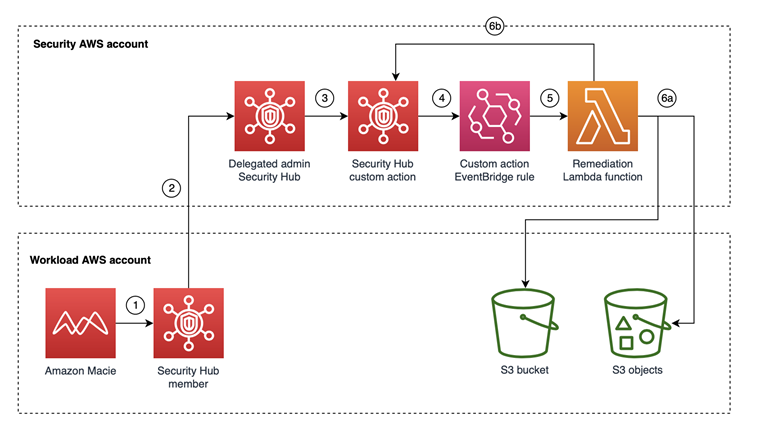
You can use the GetResourceProfile API to query specific S3 buckets and return sensitivity profiling information. With the information returned from the API, you can develop custom automation to take specific actions on buckets based on their sensitivity scores. For example, you can use Amazon EventBridge and AWS Lambda functions to create Macie jobs based on the sensitivity scores of the S3 buckets managed by Macie, as shown in the following architecture.

Figure 6: Example architecture for automated jobs based on sensitivity scores

Figure 6: Example architecture for automated jobs based on sensitivity scores

This architecture has the following steps:

  1. An EventBridge rule runs periodically to invoke a Lambda function that invokes the GetResourceProfile API for S3 buckets managed by the Macie admin accounts.
  2. The Lambda function takes the following actions:
    1. Creates a list of S3 buckets with maximum sensitivity scores, or with automated sensitivity profiling scores that exceed a threshold value, and then stores the results in an Amazon DynamoDB table.
    2. Creates a Macie job by using items in the DynamoDB table to conduct a one-time scan with 100% sampling depth of those S3 buckets. Upon job submission, you can add a last-scanned date to the table for tracking purposes, to help avoid the creation of multiple one-time jobs on the same bucket.
  3. The delegated Macie administrator job starts scan jobs for S3 buckets in member accounts.

After you conduct your Macie scans either manually or with automation, you can implement semi- or fully automated response and remediation actions based on the sensitive data findings. The following are examples of automated response and remediation actions that you can take:

Conclusion

In this blog post, we showed you how to turn on Macie automated sensitive data discovery in your AWS environment and how to use the findings to continually manage your data security posture. This new feature can help you prioritize your remediation efforts and identify buckets on which to run full scans for sensitive data discovery. We also shared a design pattern to build automation by using Macie APIs for automated remediation of Macie findings.

If you have feedback about this post, submit comments in the Comments section below. If you have questions about this post, start a new thread on Amazon Macie re:Post.

Want more AWS Security news? Follow us on Twitter.

Jonathan Nguyen

Jonathan Nguyen

Jonathan is a shared delivery team senior security consultant at AWS. His background is in AWS security, with a focus on threat detection and incident response. He helps enterprise customers develop a comprehensive AWS security strategy, deploy security solutions at scale, and train customers on AWS security best practices.

Ajay Rawat

Ajay Rawat

Ajay is a Security Consultant in a shared delivery team at AWS. He is a technology enthusiast who enjoys working with customers to solve their technical challenges and to improve their security posture in the cloud.

Anuj Gupta

Anuj Gupta

Anuj is a Principal Solutions Architect working with digital native business customers on their cloud native journey. He is passionate about using technology to solve challenging problems and has worked with customers to build highly distributed and low latency applications. He also contributes to open-source solutions. Outside of work, he loves traveling with his family and meeting new people.

Best practices for setting up Amazon Macie with AWS Organizations

Post Syndicated from Jonathan Nguyen original https://aws.amazon.com/blogs/security/best-practices-for-setting-up-amazon-macie-with-aws-organizations/

In this post, we’ll walk through the best practices to implement before you enable Amazon Macie across all of your AWS accounts within AWS Organizations.

Amazon Macie is a data classification and data protection service that uses machine learning and pattern matching to help secure your critical data in AWS. To do this, Macie first automatically provides an inventory of Amazon Simple Storage Service (Amazon S3) buckets in AWS accounts managed by Macie and identifies S3 buckets with security risks, including unencrypted buckets, publicly accessible buckets, and buckets shared with AWS accounts external to AWS Organizations. Second, Macie applies machine learning and pattern matching techniques to the buckets you select to discover, identify, and create alerts for sensitive data, such as personally identifiable information (PII). With the visibility provided by Macie, you can centrally manage your sensitive data findings across your data estate and automate and take actions on Macie findings.

By enabling Amazon Macie within AWS Organizations, you immediately start receiving the benefits of viewing your Macie policy findings and sensitive data findings from jobs that ran for member AWS accounts. When you enable Macie for member accounts, a service-linked role is created within each member AWS account. Macie uses a service-linked role (AWSServiceRoleForAmazonMacie) to monitor resources on your behalf. The service-linked role has a trust relationship with the Macie service (macie.amazonaws.com). For more information about using Macie in your AWS Organizations architecture, see the AWS Security Reference Architecture (AWS SRA).

The best practices we’ll walk through include how to create least-privilege AWS Identity and Access Management (IAM) policies for Macie-delegated administrators and for security engineers who will use Macie on a day-to-day basis. We’ll also show you how to create classification buckets, provide you with the correct resource permissions to allow the Macie service-linked role in each AWS account, and cover how to troubleshoot common issues.

IAM roles to provision for Amazon Macie

The least-privilege principle is important when managing access to sensitive data within your AWS accounts. In this section, we’ll show you how to create least-privilege IAM roles for the following personas for Macie:

  1. Data administrator
  2. Data security engineers
  3. DevOps/DevSecOps engineer
  4. Macie sensitive data findings reviewer

The personas can vary based on your organization, and this list is primarily meant to serve as an example. You will need to align the appropriate permissions to each role in order to enable Macie with the principle of least privilege. You can create your own customer managed policies after you know the specific permissions required for each persona.

Important: In general, AWS strongly recommends you limit the use of wildcards where possible. However, in some of the persona policies that follow, wildcards are necessary to accomplish the task. To implement the principle of least privilege where wildcards must be used, you should put limits on the resources that the persona can access. You can do this by adding condition keys for Macie; or if you deployed Macie by using AWS Organizations, you can add a condition for aws:ResourceOrgId.

Persona 1: Data administrator

This persona is a data administrator who is responsible for setting up and configuring Macie within AWS Organizations. To enforce separation of duties, this persona is not able to view or access Macie findings. You can perform the following steps to verify that the entity has the required permissions to enable the Macie-delegated administrator, and onboard the member AWS accounts within AWS Organizations. You can find the full procedure for each step by following the links to the Macie User Guide.

  1. Verify your permissions
  2. Designate the delegated Macie administrator account
  3. Automatically enable and add new organization accounts
  4. Enable and add existing organization accounts

It’s important to note that Macie is a Regional service. This means that the designation of a Macie administrator account is a Regional designation. A Macie administrator account in a specific AWS Region can manage Macie for member accounts only in that Region. To centrally manage Macie accounts in multiple Regions, the management account must log in to each Region where the organization uses Macie, and then designate the Macie administrator account in each of those Regions. You can use a single Macie administrator account to centrally manage up to 5,000 AWS accounts.

In the following policy, replace <account-id> with the Macie-delegated administrator account ID.

{
    "Version": "2012-10-17",
    "Statement": [
        {
            "Sid": "OrganizationsReadAccess",
            "Effect": "Allow",
            "Action": [
                "organizations:ListDelegatedAdministrators",
                "organizations:ListAccounts",
                "organizations:DescribeOrganization",
                "organizations:ListAWSServiceAccessForOrganization"
            ],
            "Resource": "*"
        },
        {
            "Sid": "AWSServiceAccess",
            "Effect": "Allow",
            "Action": "organizations:EnableAWSServiceAccess",
            "Resource": "*",
            "Condition": {
                "StringLikeIfExists": {
                    "organizations:ServicePrincipal": "macie.amazonaws.com"
                }
            }
        },
        {
            "Sid": "RegisterDelegatedAdministrator",
            "Effect": "Allow",
            "Action": "organizations:RegisterDelegatedAdministrator",
            "Resource": "arn:*:organizations::*:<account-id>",
            "Condition": {
                "StringLikeIfExists": {
                    "organizations:ServicePrincipal": "macie.amazonaws.com"
                }
            }
        }
    ]
}

Persona 2: Data security engineer

This persona is a data security engineer who has day-to-day responsibility for reviewing Macie findings or Macie sensitive data discovery job configurations. Depending on your use case, you may need to separate this persona into two distinct personas where one is responsible to view Macie findings and the other to set Macie job configurations. To allow an IAM principal read-only permissions to view the Macie dashboard, configurations, and features, you can use the following policy. To enforce least privilege and restrict the resources to the Macie-delegated administrator, replace <region> with the AWS Region in which the delegated administrator is designated, and replace <account-id> with the Macie delegated administrator account ID.

{
    "Version": "2012-10-17",
    "Statement": [
        {
            "Sid": "MacieJobConfiguration",
            "Effect": "Allow",
            "Action": [
                "macie2:GetFindingsFilter",
                "macie2:DescribeClassificationJob",
                "macie2:GetCustomDataIdentifier",
                "macie2:BatchGetCustomDataIdentifiers",
                "macie2:ListTagsForResource",
                "macie2:GetMember",
                "macie2:GetAllowList"
            ],
            "Resource": [
                "arn:aws:macie2:<region>:<account-id>:custom-data-identifier/*",
                "arn:aws:macie2:<region>:<account-id>:findings-filter/*",
                "arn:aws:macie2:<region>:<account-id>:member/*",
                "arn:aws:macie2:<region>:<account-id>:classification-job/*",
                "arn:aws:macie2:<region>:<account-id>:allow-list/*"
            ]
        },
        {
            "Sid": "MacieFindings",
            "Effect": "Allow",
            "Action": [
                "macie2:ListFindings",
                "macie2:ListClassificationJobs",
                "macie2:ListFindingsFilters",
                "macie2:GetFindings",
                "macie2:GetUsageTotals",
                "macie2:GetSensitiveDataOccurrencesAvailability",
                "macie2:GetFindingsPublicationConfiguration",
                "macie2:GetSensitiveDataOccurrences",
                "macie2:GetClassificationExportConfiguration",
                "macie2:GetUsageStatistics",
                "macie2:GetRevealConfiguration",
                "macie2:GetFindingStatistics",
                "macie2:GetBucketStatistics",
                "macie2:GetMacieSession",
                "macie2:ListMembers",
                "macie2:ListAllowLists",
                "macie2:DescribeBuckets",
                "macie2:ListCustomDataIdentifiers",
                "macie2:ListManagedDataIdentifiers",
                "macie2:SearchResources",
                "macie2:ListInvitations"
            ],
            "Resource": "*"
        }
    ]
}

Persona 3: DevOps/DevSecOps engineer

This persona is a DevOps or DevSecOps engineer who is responsible for building and maintaining applications that run on AWS resources. These application builders typically receive top-level security guidance from central security, and they are directly responsible for the security of the applications that they design, build, and operate in AWS. DevSecOps engineers might need limited additional IAM permissions to configure Macie discovery jobs, depending on how Macie will be used within AWS Organizations. To allow an IAM principal the ability to pause or stop Macie jobs, you can add the following policy. Be sure to replace <region> with the AWS Region in which the delegated administrator is designated, and replace <account-id> with the Macie delegated administrator AWS account number.

{
    "Version": "2012-10-17",
    "Statement": [
        {
            "Sid": "MacieUpdateJobs",
            "Effect": "Allow",
            "Action": [
                "macie2:UpdateClassificationJob",
                "macie2:DescribeClassificationJob"
            ],
            "Resource": "arn:aws:macie2:<region>:<account-id>:classification-job/*"
        },
        {
            "Sid": "MacieListJobs",
            "Effect": "Allow",
            "Action": [
                "macie2:GetClassificationExportConfiguration",
                "macie2:GetMacieSession",
                "macie2:ListClassificationJobs"
            ],
            "Resource": "*"
        }
    ]
}

Persona 4: Macie sensitive data findings reviewer

This persona is a reviewer (usually a security engineer) who is responsible for investigating the sensitive data associated with Macie findings. There are a number of ways this persona can be set up, based on your specific use case and the needs of your organization. In this section, we will describe two of the options for setting up this persona.

Option 1: Enable and use Macie to retrieve and reveal sensitive data samples from the delegated Macie account where findings are consolidated

In this option, Macie doesn’t use the Macie service-linked role for your account to perform these tasks. Instead, you use your IAM identity to locate, retrieve, encrypt, and reveal the samples for sensitive findings. You can retrieve and reveal sensitive data samples for a finding if you’re allowed to access the requisite resources and data, and you’re allowed to perform the requisite actions. All the requisite actions are logged in AWS CloudTrail. In the following policy, be sure to replace <account-id>, <region>, and <key-id> with your own values.

{
    "Version": "2012-10-17",
    "Statement": [
        {
            "Sid": "MacieReveal",
            "Effect": "Allow",
"Action": [
"macie2: UpdateRevealConfiguration",
"macie2:GetRevealConfiguration
],
            "Resource": " arn:aws:macie2:*:<account-id>:*"
        },
        {
            "Sid": "KMSPermissions",
            "Effect": "Allow",
            "Action": [
                "kms:Decrypt",
                "kms:DescribeKey",
                "kms:GenerateDataKey"
],
"Resource": "arn:aws:kms:<region>:<account-id>:key/<key-id>"
        }

    ]
}

Option 2: Create IAM roles to review findings and objects in the same AWS account where objects are located

For a command line utility to help you investigate the sensitive data, you can use the Macie Finding Data Reveal project. The Macie Finding Data Reveal project needs permissions to invoke macie:GetFindings on the account and s3:GetObject on the specific object reported in the finding.

In the following policy, be sure to replace <DOC-EXAMPLE-BUCKET> with the values for the S3 bucket where the finding is reported; and replace <account-id>, <region>, and <key-id> with your own values. You will also need to configure the KMS key and S3 bucket resource policies to allow permissions to your IAM role.

{
    "Version": "2012-10-17",
    "Statement": [
        {
            "Sid": "InvokeMacieFindings",
            "Effect": "Allow",
            "Action": "macie2:GetFindings",
            "Resource": "*"
        },
        {
            "Sid": "ReportedS3Object",
            "Effect": "Allow",
            "Action": "s3:GetObject",
            "Resource": " arn:aws:s3:::<DOC-EXAMPLE-BUCKET>/*"
        },
     {
               "Sid": "KMSPermissions",
               "Effect": "Allow",
               "Action": [
                   "kms:Decrypt",
                   "kms:DescribeKey",
                   "kms:GenerateDataKey"
   ],
   "Resource": "arn:aws:kms:<region>:<account-id>:key/<key-id>"
        }
    ]
}

If you use an IAM role in the same AWS account, you can specify permissions to access the object and encryption key by using resource policies, and you can leave off the ReportedS3Object and KMSPermissions statement ID (Sid).

Apply SCPs to restrict unauthorized changes to Macie

After you create the personas, you need to verify that the Macie configurations to manage Macie members within AWS Organizations are only updated by authorized IAM principals. The following is an example service control policy (SCP) that you can use to prevent users from disabling Macie, or from modifying Macie configurations within the organization. Make sure to replace <account-id> and <data-admin-role-name> with your own values for the authorized IAM principal.

Note: When you use SCPs within a multi-account structure, it is important to keep in mind quotas that affect AWS Organizations.

{
    "Version": "2012-10-17",
    "Statement": [
        {
            "Sid": "RestrictAmazonMacie",
            "Effect": "Deny",
            "Action": [
                "macie2:DeleteMember",
                "macie2:DisableMacie",
                "macie2:DisableOrganizationAdminAccount",
                "macie2:DisassociateFromAdministratorAccount",
                "macie2:DisassociateMember",
                "macie2:UpdateMacieSession",
                "macie2:UpdateMemberSession"
            ],
            "Resource": [
                "*"
            ],
            "Condition": {
                "StringNotLike": {
                    "aws:PrincipalArn": [
                        "arn:aws:iam::<account-id>:role/<data-admin-role-name>"
                    ]
                }
            }
        }
    ]
}

Allow the Macie service-linked IAM role to scan S3 objects

When Macie analyzes files, it needs permissions to analyze encrypted files. This is important so that you don’t have blind spots in your data protection initiatives.

Before you run a Macie job against S3 objects, make sure that existing KMS keys that are used to encrypt the S3 buckets also grant the Macie service-linked IAM role in the AWS account the necessary permissions to decrypt the S3 objects. For more information, see Service-linked roles for Amazon Macie. To confirm that Macie can scan encrypted objects, the associated KMS key resource policies must allow the Macie service-linked role to use the KMS key to decrypt objects.

Furthermore, depending on the object’s type of encryption, Macie might not be able to fully scan the object. The following table summarizes types of object encryption and the ability Macie has to scan the object. For more information, see Macie supported encryption types.

S3 object encryption type Macie scan ability
Client-side encryption Macie cannot decrypt and analyze the object. Macie can only store and report metadata for the object.
Server-side encryption with Amazon S3 managed keys (SSE-S3) Macie can decrypt and analyze the object.
Server-side encryption with AWS managed AWS KMS encryption (AWS-KMS) Macie can decrypt and analyze the object.
Server-side encryption with customer managed AWS KMS encryption (SSE-KMS) Macie can decrypt and analyze the object if Macie is authorized to use the KMS key. Otherwise, Macie can only store and report metadata for the object.
Server-side encryption with customer provided key (SSE-C) Macie cannot decrypt and analyze the object. Macie can only store and report metadata for the object.

Investigating failed Macie scans of S3 objects

In the event Macie is unable to scan an S3 object, you can view the logs in an S3 bucket configured in the Macie delegated administrator account for sensitive data discovery results, or in centralized AWS CloudTrail logs. The following are common reasons why Macie might not be able to scan S3 objects, and the associated steps for remediating each issue.

KMS implicit deny

The Macie service-linked role (AWSServiceRoleForAmazonMacie) is not authorized to decrypt S3 objects in Macie member accounts, because no resource-based policy allows the kms:Decrypt action. Check for the following error message in AWS CloudTrail if the AWS KMS resource-based policy implicitly denies the Macie service-linked role. Your error message will show <account-id> and <region> as your own values.

sourceIPAddress: "macie.amazonaws.com" and eventSource : "kms.amazonaws.com" and eventName : "Decrypt" and errorCode : "AccessDenied" Filter the results by error message: “User: arn:aws:sts::<account-id>:assumed-role/AWSServiceRoleForAmazonMacie/classifier-content-fetcher is not authorized to perform: kms:Decrypt on resource: arn:aws:kms:<region>:key/key-id because no resource-based policy allows the kms:Decrypt action…”

In order to remediate a KMS implicit deny error for a customer-managed key, add the following to the customer managed key policy. Be sure to replace <account_name> with your own value.

{
            "Sid": "Allow Macie Decrypt S3",
            "Effect": "Allow",
            "Principal": {
                "AWS": "*"
            },
            "Action": [
                "kms:Decrypt",
                "kms:DescribeKey"
            ],
            "Resource": "*",
            "Condition": {
                "StringEquals": {
                    "aws:PrincipalArn": "arn:aws:iam::<account_name>:role/aws-service-role/macie.amazonaws.com/AWSServiceRoleForAmazonMacie"              
            }
          }
  }

KMS explicit deny

The Macie service-linked role (AWSServiceRoleForAmazonMacie) is not authorized to decrypt S3 objects in Macie member accounts, because resource-based policies explicitly deny the kms:Decrypt action for the Macie service-linked role. Check for the following error message in AWS CloudTrail if the AWS KMS resource-based policy explicitly denies the Macie service-linked role. Your error message will show <account_name> and <region> as your own values.

sourceIPAddress : "macie.amazonaws.com" and eventSource : "kms.amazonaws.com" and eventName : "Decrypt" and errorCode : "AccessDenied" Filter the results by error message:
“User:arn:aws:sts::<account_name>:assumed-role/AWSServiceRoleForAmazonMacie/classifier-content-fetcher is not authorized to perform: kms:Decrypt on resource: arn:aws:kms:<region>:key/key-id with an explicit deny in resource-based policy…”

In order to remediate a KMS explicit deny error, update the policy statement to allow the Macie service-linked role access to decrypt and describe key actions. Be sure to replace <account_name> with your own value.

{
            "Sid": "Deny Macie Decrypt S3",
            "Effect": "Deny",
            "Principal": {
                "AWS": "*"
            },
            "Action": [
                "kms:Decrypt",
                "kms:DescribeKey"
            ],
            "Resource": "*",
            "Condition": {
                "StringEquals": {
                    "aws:PrincipalArn": "arn:aws:iam::<account_name>:role/aws-service-role/macie.amazonaws.com/AWSServiceRoleForAmazonMacie"              
              }
            }
 }

S3 explicit deny

The Macie service-linked role (AWSServiceRoleForAmazonMacie) is explicitly denied in the S3 bucket policy. Check for the following error messages in AWS CloudTrail for S3 explicit deny.

userIdentity.sessionContext.sessionIssuer.userName: "AWSServiceRoleForAmazonMacie" and eventSource: "s3.amazonaws.com" and eventName: " GetBucketEncryption" and errorcode: “ServerSideEncryptionConfigurationNotFoundError” and errormessage: “The server side encryption configuration was not found” OR userIdentity.sessionContext.sessionIssuer.userName: "AWSServiceRoleForAmazonMacie" and eventSource: "s3.amazonaws.com" and eventName: "GetBucketReplication" and errorcode: " ReplicationConfigurationNotFoundError" and errormessage: “The replication configuration was not found” OR userIdentity.sessionContext.sessionIssuer.userName: "AWSServiceRoleForAmazonMacie" and eventSource: "s3.amazonaws.com" and eventName: " GetBucketTagging" and errorcode: " NoSuchTagSet" and errormessage: “The TagSet does not exist” OR userIdentity.sessionContext.sessionIssuer.userName: "AWSServiceRoleForAmazonMacie" and eventSource: "s3.amazonaws.com" and eventName: "GetBucketAcl" and responseElements: "null" OR userIdentity.sessionContext.sessionIssuer.userName: "AWSServiceRoleForAmazonMacie" and eventSource: "s3.amazonaws.com" and eventName: " GetBucketPublicAccessBlock" and responseElements: "null" OR userIdentity.sessionContext.sessionIssuer.userName: "AWSServiceRoleForAmazonMacie" and eventSource: "s3.amazonaws.com" and eventName: "GetBucketLocation" and responseElements: "null" OR userIdentity.sessionContext.sessionIssuer.userName: "AWSServiceRoleForAmazonMacie" and eventSource: "s3.amazonaws.com" and eventName: "GetBucketVersioning" and responseElements: "null" OR userIdentity.sessionContext.sessionIssuer.userName: "AWSServiceRoleForAmazonMacie" and eventSource: "s3.amazonaws.com" and eventName: " GetBucketPolicy" and errorcode: "NoSuchBucketPolicy" and errormessage: “The bucket policy does not exist” OR userIdentity.sessionContext.sessionIssuer.userName: "AWSServiceRoleForAmazonMacie" and eventSource: "s3.amazonaws.com" and eventName: " GetBucketEncryption" and responseElements: "null" OR userIdentity.sessionContext.sessionIssuer.userName: "AWSServiceRoleForAmazonMacie" and eventSource: "s3.amazonaws.com" and eventName: " GetBucketPolicy" and responseElements: "null"

Note: Nearly all S3 explicit deny and S3 object ownership error messages have the same event names. See the Ensure S3 and KMS resource policy compliance section in this post to view the S3 object ownership setting.

Macie cannot decrypt and analyze S3 objects if there is an explicit deny in the S3 bucket policy. The following is an example of an S3 bucket policy that explicitly denies the Macie service-linked role. Be sure to replace <DOC-EXAMPLE-BUCKET> and <account_id> with your own values.

{
    "Version": "2012-10-17",
    "Statement": [
        {
            "Sid": "S3ExplicitDeny",
            "Effect": "Deny",
            "Principal": {
                "AWS": "*"
            },
            "Action": [
                "s3:GetObject",
                "s3:GetObjectTagging"
            ],
            "Resource": [
                "arn:aws:s3:::<DOC-EXAMPLE-BUCKET>/*",
                "arn:aws:s3:::<DOC-EXAMPLE-BUCKET>"
            ],
            "Condition": {
                "StringEquals": {
                    "aws:PrincipalArn": "arn:aws:iam::<account_id>:role/aws-service-role/macie.amazonaws.com/AWSServiceRoleForAmazonMacie"
                }
            }
        }
    ]
}

Macie can decrypt and analyze S3 objects if there is no explicit deny in the S3 bucket. The following is an example of the permission for the S3 bucket policy to explicitly allow the Macie service-linked role to have access to your S3 bucket. Be sure to replace <DOC-EXAMPLE-BUCKET> and <account-id> with your own values.

{
    "Version": "2012-10-17",
    "Statement": [
        {
            "Sid": "Allow Macie S3 Read",
            "Effect": "Allow",
            "Principal": {
                "AWS": "*"
            },
            "Action": [
                "s3:ListBucket",
                "s3:GetReplicationConfiguration",
                "s3:GetObject*",
                "s3:GetLifecycleConfiguration",
                "s3:GetEncryptionConfiguration",
                "s3:GetBucket*"
            ],
            "Resource": [
                "arn:aws:s3:::<DOC-EXAMPLE-BUCKET>/*",
                "arn:aws:s3:::<DOC-EXAMPLE-BUCKET>"
            ],
            "Condition": {
                "StringEquals": {
                    "aws:PrincipalArn": "arn:aws:iam::<account-id>:role/aws-service-role/macie.amazonaws.com/AWSServiceRoleForAmazonMacie“
                }
            }
        }
    ]
  }

S3 Object Ownership

Macie is unable to scan S3 objects that are owned by another AWS account, due to access control list (ACL) settings and permissions. Event names are identical for both S3 explicit deny errors and S3 Object Ownership errors. S3 explicit deny has the following additional two event names.

userIdentity.sessionContext.sessionIssuer.userName: "AWSServiceRoleForAmazonMacie" and eventSource: "s3.amazonaws.com" and eventName: " GetBucketEncryption" and errorcode: “ServerSideEncryptionConfigurationNotFoundError” and errormessage: “The server side encryption configuration was not found” OR userIdentity.sessionContext.sessionIssuer.userName: "AWSServiceRoleForAmazonMacie" and eventSource: "s3.amazonaws.com" and eventName: " GetBucketPolicy" and errorcode: "NoSuchBucketPolicy" and errormessage: “The bucket policy does not exist”

The S3 Object Ownership feature has the following three settings that you can use to control ownership of objects that are uploaded to your bucket, and to disable or enable ACLs. We recommend that you disable ACLs on your S3 buckets.

  • Bucket owner enforced (recommended) – ACLs are disabled, and the bucket owner automatically owns and has full control over every object in the bucket. ACLs no longer affect permissions to data in the S3 bucket. The bucket uses policies to define access control.
  • Bucket owner preferred – The bucket owner owns and has full control over new objects that other accounts write to the bucket with the bucket-owner-full-control canned ACL.
  • Object writer (default) – The AWS account that uploads an object owns the object, has full control over it, and can grant other users access to it through ACLs.

In order to remediate an S3 object ownership issue, there are two options available:

Option 1: Change object ownership settings to bucket owner enforced (recommended). When you disable ACLs, it changes the ownership of existing objects to the bucket owner account. You should consider the following scenarios prior to changing the S3 Object Ownership setting.

S3 objects in the source bucket (account A) are encrypted with a customer-managed key, and you copy the object in the destination bucket (account B) that has the object writer object ownership setting and its own customer managed key. If you copy S3 objects from the source bucket (account A) to the destination bucket (account B), and you do not specify a customer-managed key to use during the copy command, and the object ownership setting in the destination bucket (account B) is bucket owner enforced (ACLs disabled), then this will result in an object ownership change to bucket owner. These actions will also set the object’s server-side encryption to use the encryption settings in the destination bucket (account B).

However, if you specify a customer-managed key during the S3 copy command, then the object’s server-side encryption remains with the source bucket account (account A) customer managed key.

Option 2: Use S3 batch operations to copy objects and set ACLs. Changing the object ownership

setting to bucket owner preferred only applies to new objects and not the existing objects. You can use one one-time batch operation to set ACLs on existing objects.

Ensure S3 and KMS resource policy compliance

Another best practice to follow when you enable Macie with AWS Organizations is to use Macie to verify your organization’s policy compliance for S3 objects and KMS resources. In the Macie-delegated admin account, the summary page provides an overview of S3 data and security and access control in your organization in AWS Organizations. Users can view information about S3 security posture, such as whether S3 buckets are public or not, server-side encryption of S3 buckets, and whether S3 buckets are shared inside or outside of your organization. Data privacy and compliance groups can get organization-wide visibility across their accounts and buckets.

Your organization is responsible for introducing guardrails based on your organization’s security policies. To automate compliance checks for S3 objects and KMS resources, make sure to update your continuous integration and continuous deployment (CI/CD) pipeline. This will allow you to set up continuous compliance checks for the Macie service-linked role by using tools like CloudFormation Guard or Open Policy Agent.

In order to check S3 object ownership settings, you can use AWS Command Line Interface (AWS CLI) commands to view bucket ownership settings. Currently, Macie and AWS Config do not report on S3 object ownership as part of the resource configuration. You can run the following AWS CLI command in AWS accounts within AWS Organizations, making sure to replace <DOC-EXAMPLE-BUCKET> with your own value, to view bucket ownership settings. This can be scripted to list all AWS accounts within AWS Organizations, list all S3 buckets within the AWS account, then get the bucket ownership configuration.

aws s3api get-bucket-ownership-controls --bucket <DOC-EXAMPLE-BUCKET>

After checking these ownership settings, you can run the following AWS CLI commands to view the S3 objects ownership settings, making sure to replace <DOC-EXAMPLE-BUCKET> with your own value.

aws s3api list-objects-v2 —bucket <DOC-EXAMPLE-BUCKET> —fetch-owner—query ”Contents[?Owner.ID!='CURRENT-ID'].{Key:Key,Owner:Owner.DisplayName}" —output

Additional Macie best practices

You should also consider the following recommendations before you enable Macie, so that you can manage Macie findings and member accounts efficiently at scale:

  • Enable Macie using AWS Organizations to manage multiple accounts and to govern your environment as you grow and scale your AWS resources.
  • Enable Macie in all Regions where you have workloads with S3 buckets.
  • Enable Security Hub and Amazon Macie integration to send Macie findings to Security Hub (enabled by default).
  • Enable Security Hub Region aggregation to consolidate Macie findings in a single Region.
  • Ingest logs from AWS CloudWatch Logs to enable custom alerting for Macie sensitive data discovery job results.
  • In Macie settings, turn on the Auto-enable setting. That way, Macie will automatically be enabled for new accounts when the accounts are added to your organization in AWS Organizations.
  • Store sensitive data discovery results in an S3 bucket, with default encryption enabled, after you have configured your Macie delegated administrator account.

Conclusion

In this blog post, we walked you through the best practices to implement before you enable Amazon Macie across your AWS accounts within AWS Organizations. In order to efficiently use Macie within AWS Organizations, it is important to understand why failures can occur, how to investigate the logs, and how to remediate the issues for both existing and future resources.

Now that you have a better understanding of how to prepare for using Macie, try running a Macie sensitive data discovery job. The next aspect to start thinking about is how to review and respond to Macie findings. You can deploy another solution to automatically send notifications with Slack when Macie findings are generated.

If you have feedback about this post, submit comments in the Comments section below. If you have any questions about this post, start a thread on the Amazon Macie forum.

Want more AWS Security news? Follow us on Twitter.

Jonathan Nguyen

Jonathan Nguyen

Jonathan is a Shared Delivery Team Senior Security Consultant at AWS. His background is in AWS Security with a focus on threat detection and incident response. Today, he helps enterprise customers develop a comprehensive security strategy and deploy security solutions at scale, and he trains customers on AWS Security best practices.

Ajay Rawat

Ajay Rawat

Ajay is a Security Consultant in a shared delivery team at AWS. He is a technology enthusiast who enjoys working with customers to solve their technical challenges and to improve their security posture in the cloud.

Learn more about the new allow list feature in Macie

Post Syndicated from Jonathan Nguyen original https://aws.amazon.com/blogs/security/learn-more-about-the-new-allow-list-feature-in-macie/

Amazon Macie is a fully managed data security and data privacy service that uses machine learning and pattern matching to discover and help you protect your sensitive data in Amazon Web Services (AWS). The data that is available within your AWS account can grow rapidly, which increases your need to verify that all sensitive data is identified and protected. Macie provides you with the ability to use both managed data identifiers and custom data identifiers, but enabling these identifiers for every job could result in a large number of security findings that might not take into account how data is used within your AWS account. So that you can tailor the detection and creation of findings within Macie, Macie now has an allow list feature available for use with your scanning jobs.

In this blog post, we show you how to set up an allow list in Macie and run a Macie scan that uses the allow list to ignore the specified values when creating sensitive data findings. The allow list feature can help your sensitive data management team by reducing false positives due to data text or formats in your environment that do not require action. This makes it easier for your team to focus on Macie findings that need to be reviewed and remediated. By increasing the overall confidence in findings presented by Macie, you can improve the performance of automated workflows and solutions.

Prerequisites

To get started, you’ll need the following prerequisites:

  1. An active AWS account
  2. Amazon Macie enabled within your AWS account
  3. (Optional) Member AWS accounts are enabled using AWS Organizations and a delegated Macie administrator account

Create an allow list in Macie

You can configure allow lists with either regular expressions (regex) or predefined text. Use a predefined text allow list if you have a list of specific values you want to exclude, like a list of example fake names or addresses that are used in test data sets. Alternatively, if you don’t have the exact values but know the pattern to exclude, you can use a regex allow list. Some use cases for a regex allow list could be to exclude tracking IDs or public reference numbers that could resemble a Macie managed data identifier or custom data identifier.

It is important to note that allow lists, and S3 objects if using predefined text, must be created in the same AWS account where the Macie job is created.

  1. If Macie jobs are created from the Macie delegated administrator AWS account to scan member AWS accounts, then the allow lists must be centrally configured in the Macie delegated administrator account.
  2. If Macie jobs are created from the member AWS account to scan buckets within the same AWS account, then the allow lists must be configured in the same AWS account where the Macie job is created.

To create an allow list by using the Amazon Macie Console

  1. In the Amazon Macie Console, navigate to Macie.
  2. Under Settings, choose Allow lists.
  3. Choose Create.
  4. Choose a list type.
    1. If you’re creating a regex allow list, choose Regular expression. For List settings, enter the following settings for the allow list.
      1. For Name, enter the name of the list.
      2. For Description, enter a description (optional).
      3. For Regular expression, enter the regular expression. Macie will not create findings for any matches on the allow list regex.
      4. Evaluate with sample data if needed to test your regex. Macie provides an Evaluate option so you can test your regex against sample data sets to make sure it’s working as expected.
    2. If you’re creating a predefined text allow list, choose Predefined text. For this option, you will need to create a plaintext file and upload the file to an Amazon Simple Storage Service (Amazon S3) bucket. Once you upload the file, you can then reference the Amazon S3 object in the allow list.
      1. Enter the name of the list.
      2. Enter a description for the list (optional).
      3. Enter the S3 bucket name.
      4. Enter the S3 object name of the plaintext file.

    Note: The Macie service-linked role must have the ability to read the S3 object for the predefined text. When you run Macie jobs that use allow lists with predefined text, the Macie service-linked role will read the S3 object. If there is any error reading the S3 object, the Macie job will continue to run without using the predefined text allow list. You will need to periodically check your allow lists to make sure they are in an OK status. You can check the status of each allow list in the Amazon Macie console or via the AWS CLI using the get-allow-list API.

    More information and explanation for status of allow list can be found in the Amazon Macie User Guide.

  5. Choose Create to create the allow list.

    Note: An allow list must be stored in an S3 bucket in the same AWS account and AWS Region as your Macie account. Macie cannot access an allow list if it is stored in a different Region or account.

You can also create and manage allow lists by using the Amazon Macie console, AWS Command Line Interface (AWS CLI) or AWS CloudFormation.

To create or manage an allow list by using the AWS CloudFormation

Below is an example enabling Amazon Macie for an account. The session resource configures Macie to publish updated policy findings for the account.

AWSTemplateFormatVersion: 2010-09-09
Description:<insert-template-description>
Resources:
  EnableMacieSession:
Type: AWS::Macie::Session
Properties:
    	    FindingPublishingFrequency: <insert-finding-publishing-frequency>
    Status: ENABLED

Below is an example of creating an allow list that uses a regular expression to specify a text pattern to ignore. Like other Macie resources, the DependsOn attribute is a required dependency for creating a Macie allow list.

AWSTemplateFormatVersion: 2010-09-09
Description:<insert-template-description>
Resources:
  RegularExpressionAllowList:
Type: AWS::Macie::AllowList
DependsOn: Session
Properties:
  Criteria:
    Regex: “<insert-regex-expression>”
  Description: <insert-allow-list-description>
  Name: <insert-allow-list-name>
  Tags:
    - Key: <insert-tag-key-name>
      Value: <insert-tag-key-value>

Below is an example creating an allow list that specifies a list of predefined text to ignore.

AWSTemplateFormatVersion: 2010-09-09
Description:<insert-template-description>
Resources:
PredefinedAllowList:
Type: AWS::Macie::AllowList
DependsOn: Session
Properties:
  Criteria:
    S3WordsList:
      BucketName: <DOC-EXAMPLE-BUCKET>
      ObjectKey: <OBJECT-EXAMPLE-KEY>
  Description: <insert-allow-list-description>
  Name: <insert-allow-list-name>
  Tags:
  - Key: <insert-tag-key-name>
    Value: <insert-tag-key-value>

To create or manage an allow list by using the AWS CLI

  1. In the AWS CLI, run the following commands to create an allow list with a regular expression.
    aws macie2 create-allow-list \
    --criteria '{"regex":"<insert-regex-expression>"}' \
    --name "<insert-allow-list-name>" \
    --description "<insert-allow-list-description>"
  2. In the AWS CLI, run the following commands to create an allow list with predefined text.
    aws macie2 create-allow-list \
    --criteria '{"s3WordsList":{"bucketName":"<DOC-EXAMPLE-BUCKET>","objectKey":"<OBJECT-EXAMPLE-KEY>"}}' \
    --name "<insert-allow-list-name>" \
    --description "<insert-allow-list-description>"
  3. In the AWS CLI, run the following commands to update an existing allow list.
    aws macie2 update-allow-list --id <GUID-for-Macie-allow-list> example --description <insert-new-description>
  4. In the AWS CLI, run the following commands to delete an existing allow list.
    aws macie2 delete-allow-list --id <GUID-for-Macie-allow-list> example --ignoreJobChecks false
  5. In the AWS CLI, run the following commands to get existing allow lists.
    aws macie2 get-allow-list –id <GUID-for-Macie-allow-list>

For a detailed list of available AWS CLI commands, refer to the AWS CLI documentation for Amazon Macie.

Use the allow list in a Macie scan

After you create allow lists, you can create and run sensitive data discovery jobs in Macie. This will enable you to review, analyze, and compare findings about the affected resources in Amazon S3 buckets with or without allow lists.

Option 1: Create a Macie job with the allow list by using the console

  1. Go to the Amazon Macie Console and navigate to Macie.
  2. In the navigation pane, choose Jobs, and then choose Create job.
  3. On the Choose Amazon S3 buckets page, choose Select specific buckets.

    Note: Macie displays a list of all the buckets managed by your AWS account, including members if configured, in the current Region.

    • Under Select Amazon S3 buckets, optionally choose Refresh to retrieve the latest bucket metadata from Amazon S3.
  4. In the table, select each bucket you want the job to analyze, and then choose Next.
  5. Review and optionally adjust the list of S3 buckets that you selected for the job, and then choose Next.
  6. Refine the scope of the job, if needed. Use these settings to specify how often you want the job to run and the depth and scope of the job’s analysis, and then choose Next.
  7. Select any managed data identifiers you want to use, and then choose Next.
  8. Select any custom data identifiers that you want to use, and then choose Next.
  9. Select the allow lists that you created to ignore either predefined text or regular expression patterns for any objects in the job, and then choose Next.

    Figure 1: Selecting allow lists for a Macie job

    Figure 1: Selecting allow lists for a Macie job

  10. In General settings, enter a name for the job. You can also enter a description and assign tags to the job. Choose Next.
  11. Review and create the job, and then choose Submit.

Option 2: Create a Macie job with the allow list by using the AWS CLI

  1. In the AWS CLI, run the following command.
    aws macie2 create-classification-job \
    --generate-cli-skeleton > <insert-macie-job-input-json>
  2. Input the GUID for the Macie allow list as part of the Macie job input in the JSON file.
  3. Run the following command.
    aws macie2 create-classification-job \
    --cli-input-json file://<insert-macie-job-input-json>

Review Macie findings before and after allow lists

It is important to note that for any existing jobs you configured in your AWS account or organization prior to the Macie allow list feature being released, you will need to recreate those Macie jobs and reference the allow lists you want the job to use. This is only required if you want to have existing jobs use allow lists.

Before you run a Macie job that uses predefined text allow lists, verify that existing Amazon Key Management Service (AWS KMS) keys that are used to encrypt buckets and S3 bucket policy grant the Macie service-linked role the necessary permissions to decrypt the S3 objects.

Figure 2 shows an example of predefined text allow lists for sensitive data discovery jobs, that include credit card numbers, Social Security Numbers (SSNs), and first and last names. The values in the S3 object allow lists will not create Macie findings when the sensitive data discovery job inspects S3 objects.

Figure 2: Example list of existing allow lists

Figure 2: Example list of existing allow lists

Figure 3 shows a sensitive data discovery job that does not include the predefined text allow lists.

Figure 3: Macie job example without allow list configured

Figure 3: Macie job example without allow list configured

Since there are no allow lists configured, Macie creates findings for credit card numbers, United States SSNs, and names, as shown in Figure 4.

Figure 4: Macie job scan without allow list results

Figure 4: Macie job scan without allow list results

Figure 5 shows a sensitive data discovery job that does include the use of a predefined text allow lists.

Figure 5: Macie job example with allow list configured

Figure 5: Macie job example with allow list configured

Because we have configured an allow list for this job, Macie creates no findings for credit card numbers, United States SSNs, and names. Figure 6 shows the lack of findings.

Figure 6: Macie job results with allow list configured

Figure 6: Macie job results with allow list configured

Conclusion

In this post, we walked through how to create, manage, and use Macie allow lists with your Macie jobs. Reducing Macie false-positive findings can help your security team to efficiently identify and protect sensitive data within your AWS environment.

Now that we’ve showed you how to create an allow list in Macie, you can use this feature to tailor Macie in your AWS environment, based on your use cases and workloads. After you’ve reduced the false positives in your environment, you can start looking at how to add in automation to respond to Macie findings with allow lists configured.

Try implementing the solution in this blog post for auto-remediation behavior based on finding type and finding severity. Alternatively, since Macie is automatically integrated with AWS Security Hub, you could implement this automated solution to respond to Macie findings by using by Security Hub custom actions.

If you have feedback about this post, submit comments in the Comments section below. If you have questions about this post, contact AWS Support.

Want more AWS Security news? Follow us on Twitter.

Jonathan Nguyen

Jonathan Nguyen

Jonathan is a Shared Delivery Team Senior Security Consultant at AWS. His background is in AWS Security with a focus on threat detection and incident response. Today, he helps enterprise customers develop a comprehensive security strategy and deploy security solutions at scale, and he trains customers on AWS Security best practices.

Ajay Rawat

Ajay Rawat

Ajay is a Security Consultant in a shared delivery team at AWS. He is a technology enthusiast who enjoys working with customers to solve their technical challenges and to improve their security posture in the cloud.

Use Security Hub custom actions to remediate S3 resources based on Macie discovery results

Post Syndicated from Jonathan Nguyen original https://aws.amazon.com/blogs/security/use-security-hub-custom-actions-to-remediate-s3-resources-based-on-macie-discovery-results/

The amount of data available to be collected, stored and processed within an organization’s AWS environment can grow rapidly and exponentially. This increases the operational complexity and the need to identify and protect sensitive data. If your security teams need to review and remediate security risks manually, it would either take a large team or the actions might not be timely. There is also a chance that with manual operation, a step could be missed or the incorrect action could be taken. As a result, your security teams will need an automated and scalable way to support these operations efficiently.

Amazon Macie is a fully managed data security and data privacy service that uses machine learning and pattern matching to discover and protect your sensitive data in AWS. Macie generates findings for sensitive data in an S3 object or a potential issue with the security or privacy of an S3 bucket. AWS Security Hub allows you to gain a centralized view into the security posture across your AWS environment by aggregating security findings from various AWS services and partner products, including Amazon Macie. Security Hub also includes the custom actions feature, which you can use to create actions for response and remediation to selected findings within the Security Hub console in an efficient and consistent manner.

It is important for your security teams to create effective and standardized mechanisms for taking action against Macie findings to ensure that data remains secure. By using Security Hub custom actions, you can have predefined actions for the security team to take against Macie findings without having to manually find and remediate the resources.

This blog post provides you with an example solution for responding to Macie sensitive data findings and policy findings in Security Hub by using custom actions. I will walk through the components of the solution, as well as opportunities where resources can be customized for your specific use case.

Prerequisites

You must have AWS Security Hub and Amazon Macie enabled in the AWS account where you are deploying this solution.

Solution overview

In this solution, you’ll use a combination of Security Hub custom actions, Amazon EventBridge, and AWS Lambda to take action on Macie findings in Security Hub. You will be working with the findings within the same AWS account where you deployed the solution.

Macie generates two categories of findings relating to different resources, which will require different remediation actions.

  1. Policy finding is a detailed report of a potential policy violation or issue with the security or privacy of an Amazon Simple Storage Service (Amazon S3) bucket.
  2. Sensitive data finding is a detailed report of sensitive data in an S3 object.

A full list of Macie finding types can be found in the Macie User guide.

For the two Macie finding categories, there is an associated Security Hub custom action:

  1. Custom action for sensitive data finding (S3 object) – When the security team selects this custom action, the action invokes a Lambda function that will take the following steps on the S3 object in the Macie finding:
    1. Tag the object with the Security Hub finding ID
    2. Encrypt the S3 object with a different customer-managed KMS key
    3. Update the Security Hub finding workflow status to RESOLVED
  2. Custom action for policy finding (S3 bucket). When you select this this custom action, it invokes a Lambda function that will take the following steps on the S3 bucket in the Macie finding:
    1. Tag the object with the Security Hub finding ID
    2. Update the S3 bucket configuration to:
      • Enable default encryption
      • Enable public access block
    3. Update the Security Hub finding workflow status to RESOLVED

The solution is configured to take action within the AWS account where the finding and corresponding resource is generated. In order to enable cross-account remediation, you will need to deploy an additional IAM role for the automation to assume and provision a KMS key to use for encryption.

Note: The custom actions in this solution are meant to be examples of actions to take against Macie policy and sensitive data findings. These actions will be different depending on your use-case and environment. You will also need to review and update the associated Lambda function execution role IAM policies accordingly.

Solution architecture

Figure 1: Resources deployed in the Security AWS account taking action on resources identified in the Workload AWS account

Figure 1: Resources deployed in the Security AWS account taking action on resources identified in the Workload AWS account

Figure 1 shows the architecture for the solution. The workflow is as follows:

  1. A Macie job runs and creates findings, which are sent to Security Hub in the same AWS account as the Macie finding.
  2. The delegated administrator Security Hub account combines findings across all member Security Hub accounts, including Macie findings.
  3. The security team reviews the Macie findings in the Security Hub delegated administrator account and determines to take remediation actions for a finding by selecting the finding and then selecting the appropriate Security Hub custom action.
  4. The Security Hub custom action sends the finding to the EventBridge rule, which is linked to the Lambda function.
  5. The EventBridge rule invokes the Lambda function to take action against the resources from the Macie finding.
  6. The Lambda function will:
    1. Take action for the S3 resource
    2. Mark the Macie finding as resolved in the delegated administrator Security Hub account

The solution is currently intended to work in a single Region. In order to enable this solution across Regions, you will need to change the Remediation Lambda function code for any regional resources used for remediation actions (i.e. AWS Key Management Service).

Deploy the solution

You can deploy the solution through either the AWS Management Console or the AWS Cloud Development Kit (AWS CDK).

To deploy the solution by using the AWS Management Console

  • In your security tooling account, launch the AWS CloudFormation template by choosing the following Launch Stack button. It will take approximately 10 minutes for the CloudFormation stack to complete.
    Select this image to open a link that starts building the CloudFormation stack

    Note: The stack will launch in the N. Virginia (us-east-1) Region. To deploy this solution into other AWS Regions, download the solution’s CloudFormation template, modify it, and deploy it to the selected Region.

  • (OPTIONAL) If you want to enable cross-account remediation, launch the following AWS CloudFormation template in the AWS account where you want to be able to take remediation actions. You can also use AWS CloudFormation StackSets if deploying to multiple AWS accounts.
    Select this image to open a link that starts building the CloudFormation stack

To deploy the solution by using AWS CDK

You can find the latest code in our GitHub repository, where you can also contribute to the sample code. The following commands show how to deploy the solution by using the AWS CDK. First, the CDK initializes your environment and uploads the AWS Lambda assets to Amazon S3. Then, you can deploy the solution to your account. Make sure to replace <AWS_ACCOUNT> with the account number, and replace <REGION> with the AWS Region that you want the solution deployed to.

  1. Run the following commands in your terminal while authenticated in the security tooling AWS account:

    cdk bootstrap aws://<Security_Tooling_AWS_ACCOUNT>/<REGION>

    cdk deploy MacieRemediationStack

  2. (OPTIONAL) If you want to enable cross-account remediation, Run the following commands in your terminal while authenticated to member AWS account:

    cdk bootstrap aws://<Member_AWS_ACCOUNT>/<REGION>

    cdk deploy MacieRemediationIAMStack –parameters solutionaccount=<Security_Tooling_AWS_ACCOUNT>

Solution walkthrough and validation

Now that you’ve successfully deployed the solution, you can see things in action. You have two options for testing the workflow on your own:

  1. Use a sample event, generated by a Macie finding in Security Hub, and invoke the Lambda function that is tied to the Security Hub custom action.

    Note: If using sample events, you can replace the values for the resources with real resources. Otherwise, you will not be able to see the Lambda function successfully take action because the resource in your sample event may not exist.

  2. Generate demo Macie findings in Security Hub by using this sample data for Amazon Macie.

I have existing findings for Macie generated in my AWS account, and in the procedures in this section, I’ll walk through taking action against these.

Note: If you set up Macie and Security Hub in a delegated administrator and member model that ingests findings from other AWS accounts, the IAM remediation roles for the S3 bucket and S3 objects must be deployed in the member accounts.

Review deployed resources in the AWS console

Before taking action on your sample findings, review the deployed resources that you’ll use.

To review deployed resources

  1. In the AWS account console where the automation was deployed, go to Security Hub, choose Settings, and then choose Custom actions. You should see two custom actions:
    • Macie Policy Finding
      • arn:aws:securityhub:<region>:<account-id>:action/custom/MacieS3BucketPolicy
    • Macie Data Finding
      • arn:aws:securityhub:<region>:<account-id>:action/custom/MacieSensitiveData
        Figure 2: Custom actions in Security Hub

        Figure 2: Custom actions in Security Hub

  2. Navigate to the EventBridge console and then choose Rules. You should see four rules:
    • Disabled – These are disabled by default during deployment
      • Autoremediate_Macie_Policy_Finding
      • Autoremediate_Macie_Sensitive_Data_Finding
        Figure 3: Disabled EventBridge rules for autoremediation of Macie findings in Security Hub

        Figure 3: Disabled EventBridge rules for autoremediation of Macie findings in Security Hub

    • Enabled – These are enabled by default during deployment:
      • Custom_Action_Macie_Policy_Finding
      • Custom_Action_Macie_Sensitive_Data_Finding
        Figure 4: Enabled EventBridge rules tied to the Security Hub custom actions

        Figure 4: Enabled EventBridge rules tied to the Security Hub custom actions

    In the enabled EventBridge rules, you should see the corresponding Security Hub custom action Amazon Resource Names (ARNs) in the rule event pattern.

    Figure 5: Enabled EventBridge rule event pattern for the Security Hub custom action

    Figure 5: Enabled EventBridge rule event pattern for the Security Hub custom action

Take action on an Amazon Macie object or policy finding

Each Security Hub custom action invokes a corresponding Lambda function that is configured as a target in the EventBridge rule. The Lambda function parses the information in the Macie finding from Security Hub to take action.

Each Security Hub custom action is specific to either an S3 object or an S3 bucket. If you attempt a custom action meant for an S3 object against a Macie policy finding, this will successfully initiate the custom action, but the Lambda function that is invoked will be unsuccessful.

If the Macie finding is specific to an S3 object, the title will display “The S3 object …,” whereas if the Macie finding is for a policy finding, the title will display information for an S3 bucket.

To take action on findings

  1. In the AWS account console where the automation was deployed, navigate to AWS Security Hub, and then choose Findings.
  2. Filter the findings by setting Product Name to Macie.
    Figure 6: Filter for Macie findings in Security Hub

    Figure 6: Filter for Macie findings in Security Hub

  3. Select the checkbox for either a Macie policy finding or a sensitive data finding; this will select a custom action. After you select the action, there is no confirmation step, and the action will invoke the Lambda function.
    Figure 7: Validate Custom Action has sent the finding to Amazon CloudWatch Events (EventBridge rule)

    Figure 7: Validate Custom Action has sent the finding to Amazon CloudWatch Events (EventBridge rule)

Review and validate the Security Hub custom action on target resources

In order to validate or troubleshoot the solution, you need to review whether the Lambda function was able to take action against the resources in the Security Hub finding for Macie.

To validate or troubleshoot the custom action

  1. For validation of sensitive data finding remediation, review S3 object configuration:
    1. Navigate to the Amazon S3 console.
    2. Choose the S3 object in the Macie finding.
    3. Choose the Properties tab and review the following fields:
      • Tags should be set to SH_Finding_ID.
      • AWS KMS key ARN should be set to the KMS key with the alias `macie_key`
        1. Click on the KMS key ARN and validate the key’s alias is the key deployed in the solution
  2. For validation of policy finding remediation, review the S3 bucket configuration:
    1. Navigate to the Amazon S3 console.
    2. Choose the S3 bucket in the Macie finding.
    3. Choose the Properties tab and review the following fields:
      • Tags should be set to SH_Finding_ID.
      • Default Encryption should be set to Enabled.
    4. Choose the Permissions tab and review the following fields:
      • Block public access should be set to On.
  3. For troubleshooting, you can review the CloudWatch logs for the Lambda function:
    1. Navigate to the CloudWatch console.
    2. Choose /aws/lambda/Remediate_Macie_S3_Bucket.
    3. Choose the most recent log stream and review the logs to see what actions were taken on the resources.

Next steps and customization

The solution in this post has a custom action for an S3 object and an S3 bucket, and is meant to serve as a template. You could modify the Lambda functions associated with the custom actions to take different or additional actions that are specific to your environment and data classification.

Additionally, I walked through specific Security Hub custom actions for Macie policy (bucket) or sensitive data (objects) findings. If you have defined actions to take for both, you could consolidate the custom actions and invoke a Lambda function that parses information from the Security Hub Macie finding to determine if it is a policy or sensitive data finding.

The two disabled EventBridge rules deployed as part of the solution are examples that can be leveraged for auto-remediation. After you use Security Hub’s custom actions to remediate findings, your security team could start to see a trend where you always want to take specific actions and enable the EventBridge rules to take action without requiring your security team to select a custom action in Security Hub in the AWS console.

  • Autoremediate_Macie_Policy_Finding
  • Autoremediate_Macie_Sensitive_Data_Finding

Conclusion

In this post, you deployed a solution to allow your security team to take automated actions against a Macie sensitive data and policy finding from Security Hub by using custom actions in the AWS console. We walked through what the solution does and how the solution can be customized to your use case.

If you have feedback about this post, submit comments in the Comments section below. If you have any questions about this post, start a thread on the AWS Security Hub forum or Amazon Macie forum.

Want more AWS Security news? Follow us on Twitter.

Jonathan Nguyen

Jonathan Nguyen

Jonathan is a Shared Delivery Team Senior Security Consultant at AWS. His background is in AWS Security with a focus on threat detection and incident response. Today, he helps enterprise customers develop a comprehensive security strategy and deploy security solutions at scale, and he trains customers on AWS Security best practices.