Amazon S3 Tables now offer managed migration of Apache Hive tables to Apache Iceberg

Post Syndicated from Channy Yun (윤석찬) original https://aws.amazon.com/blogs/aws/amazon-s3-tables-now-offer-managed-migration-of-apache-hive-tables-to-apache-iceberg/

Today, we’re announcing a simple, cost-effective path for data lake modernization. Amazon S3 Tables now support managed migration of your Apache Hive tables to Apache Iceberg. Migration works with Parquet tables in Amazon S3 that are registered in the AWS Glue Data Catalog and allows you to upgrade your data lake with no pipelines to build or compute to provision, while production workloads keep running.

Apache Iceberg has become the open standard for large analytics datasets. It lets you manage petabyte-scale tables with features like schema evolution, hidden partitioning, and time travel queries, while keeping your data open and queryable with any Iceberg-compatible engine. Amazon S3 Tables offer fully managed storage purpose-built to keep Iceberg tables performant and cost-effective as they grow, with features like automatic maintenance, optimization, replication, and S3 Intelligent-Tiering built-in.

What is new
Previously, migrating Apache Hive tables to Apache Iceberg could take weeks of engineering work to build and manage the required infrastructure. Converting data types and building rollback capabilities added operational complexity. Now, this is available as a managed, API-driven operation.

S3 Tables handle the entire migration workflow, including data validation, compatibility checks, type conversions, file recompression, and compaction. Before copying any data, S3 Tables identify every source object in scope and generate a compatibility report. You can sync as many times as you need without stopping writes to your source table, except for a few minutes during cutover. Once you are ready, you can complete the migration, minimizing time that tables are offline.

Compared to self-managed approaches, S3 Tables managed migrations are cost-effective because you pay only for the data copied, with no charge for the Hive-to-Iceberg conversion, and source objects in S3 Intelligent-Tiering stay in their current access tier.

A first look at the migration
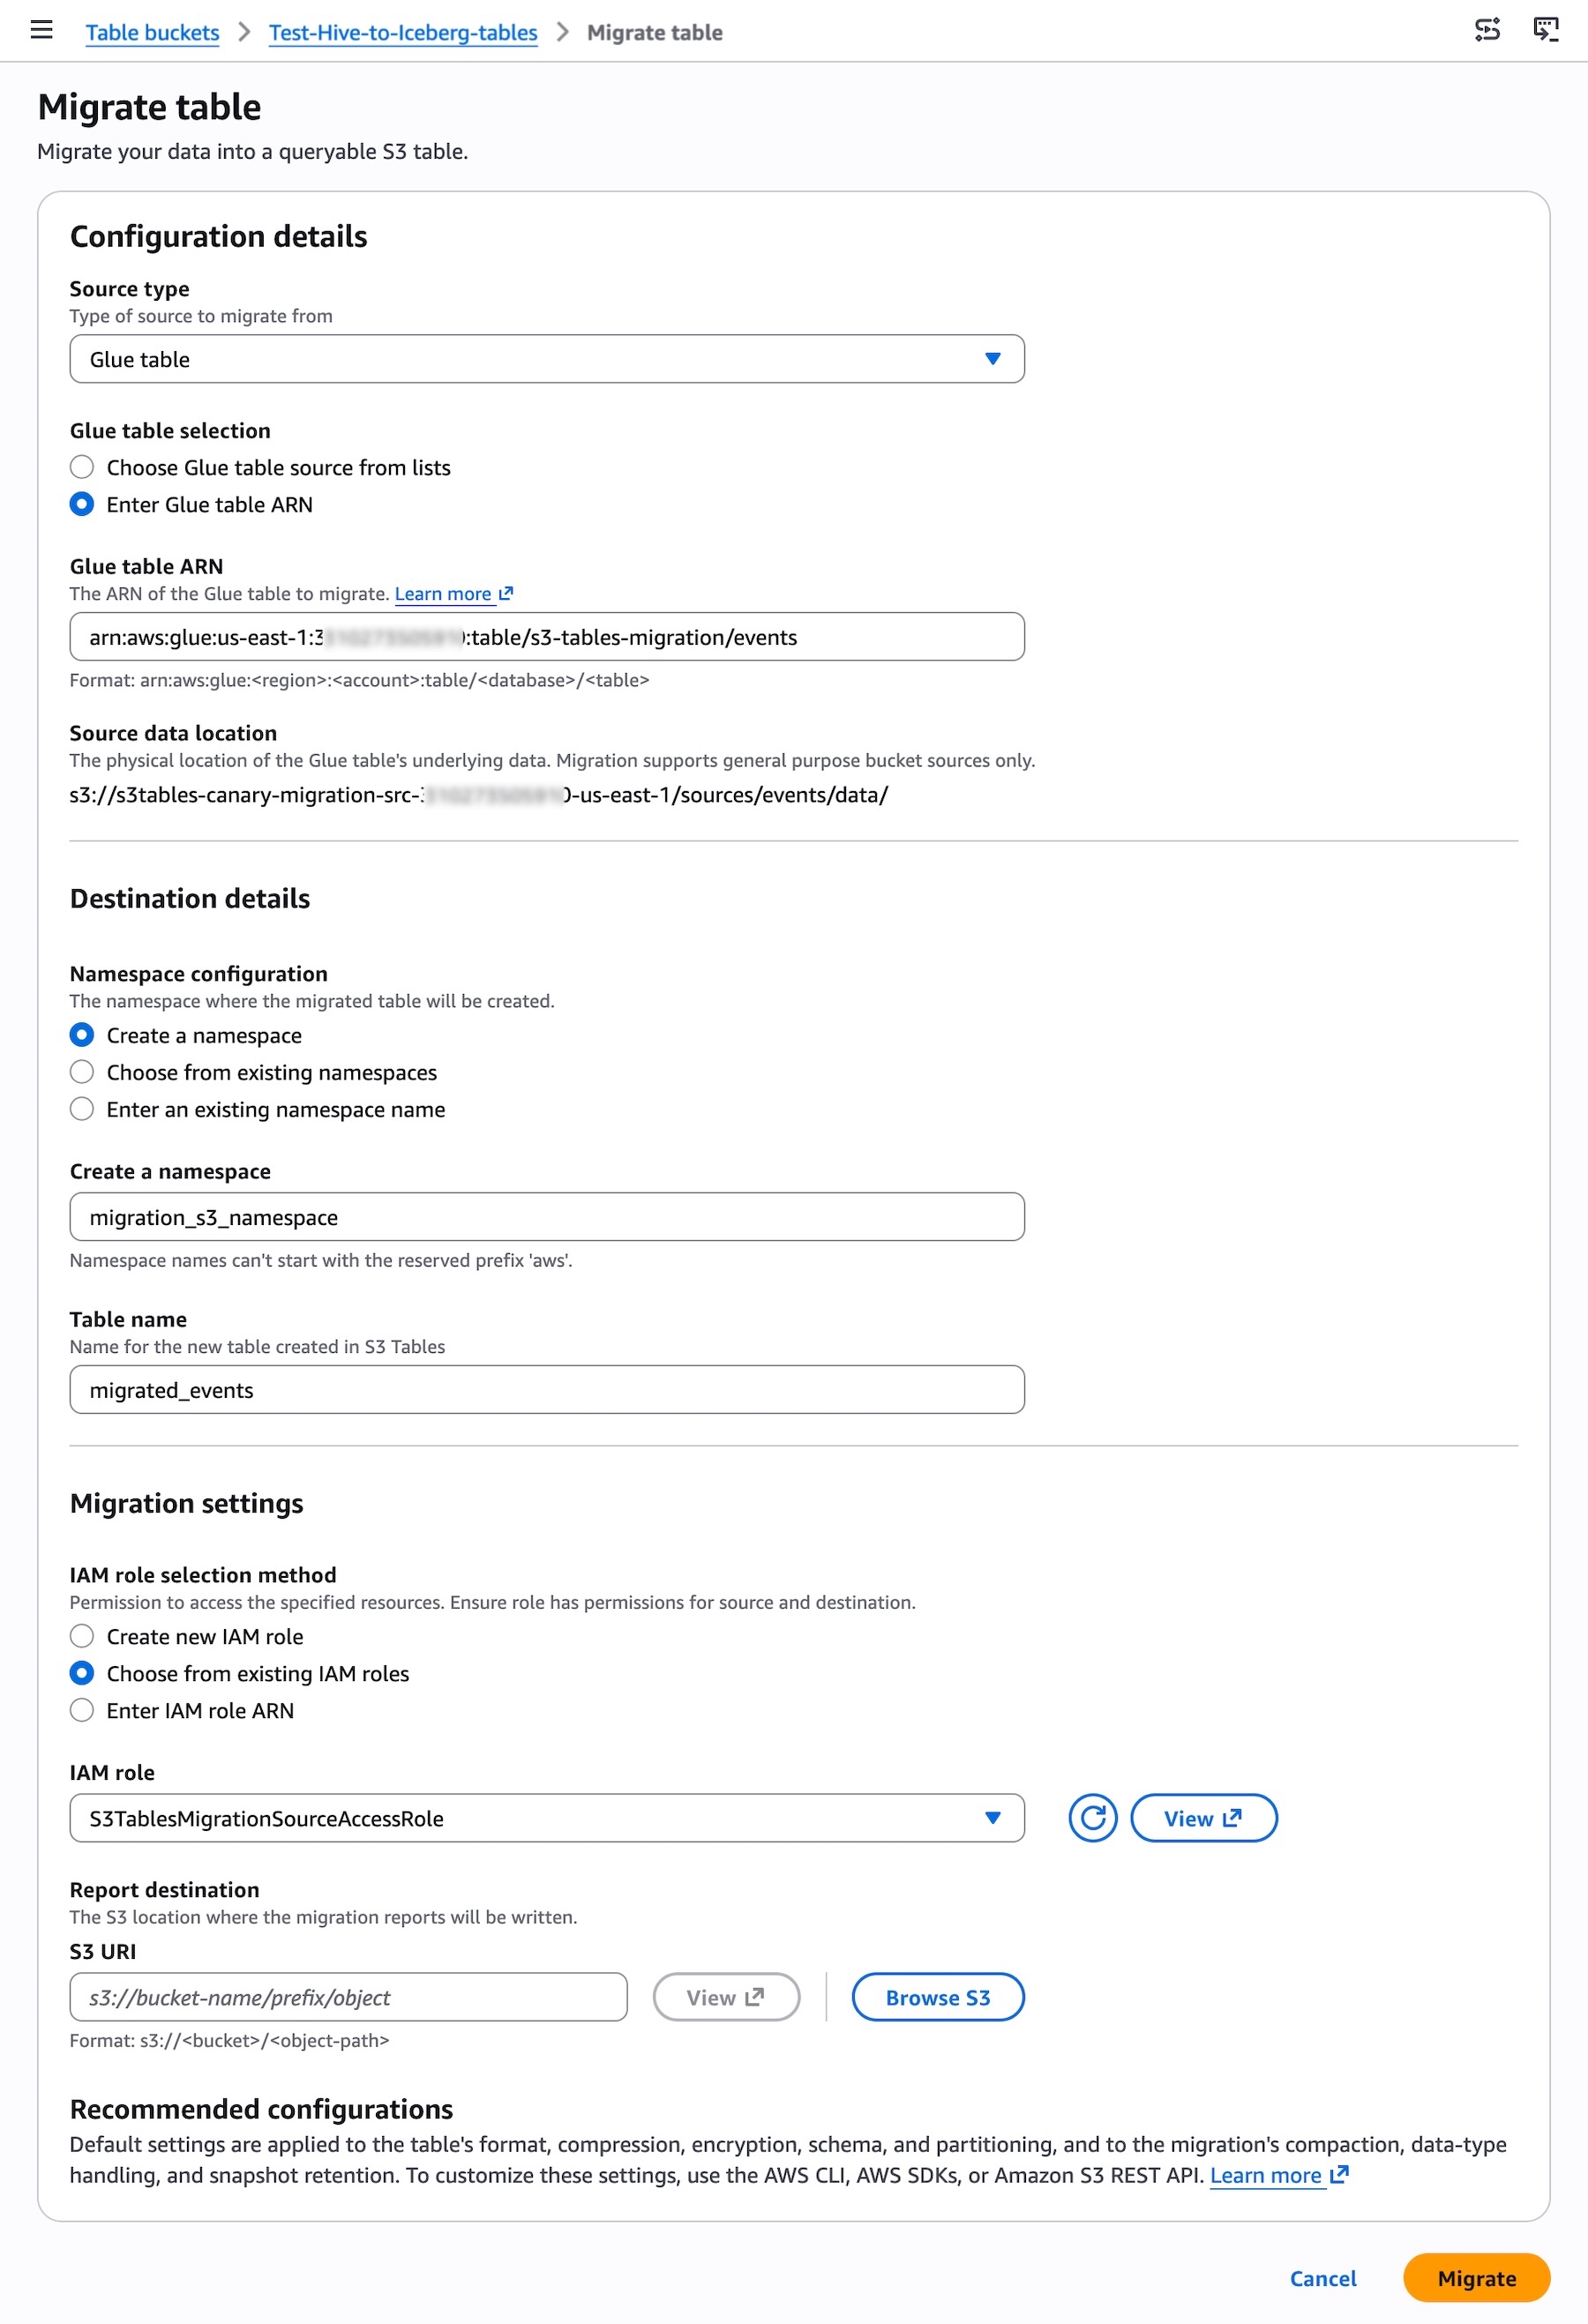
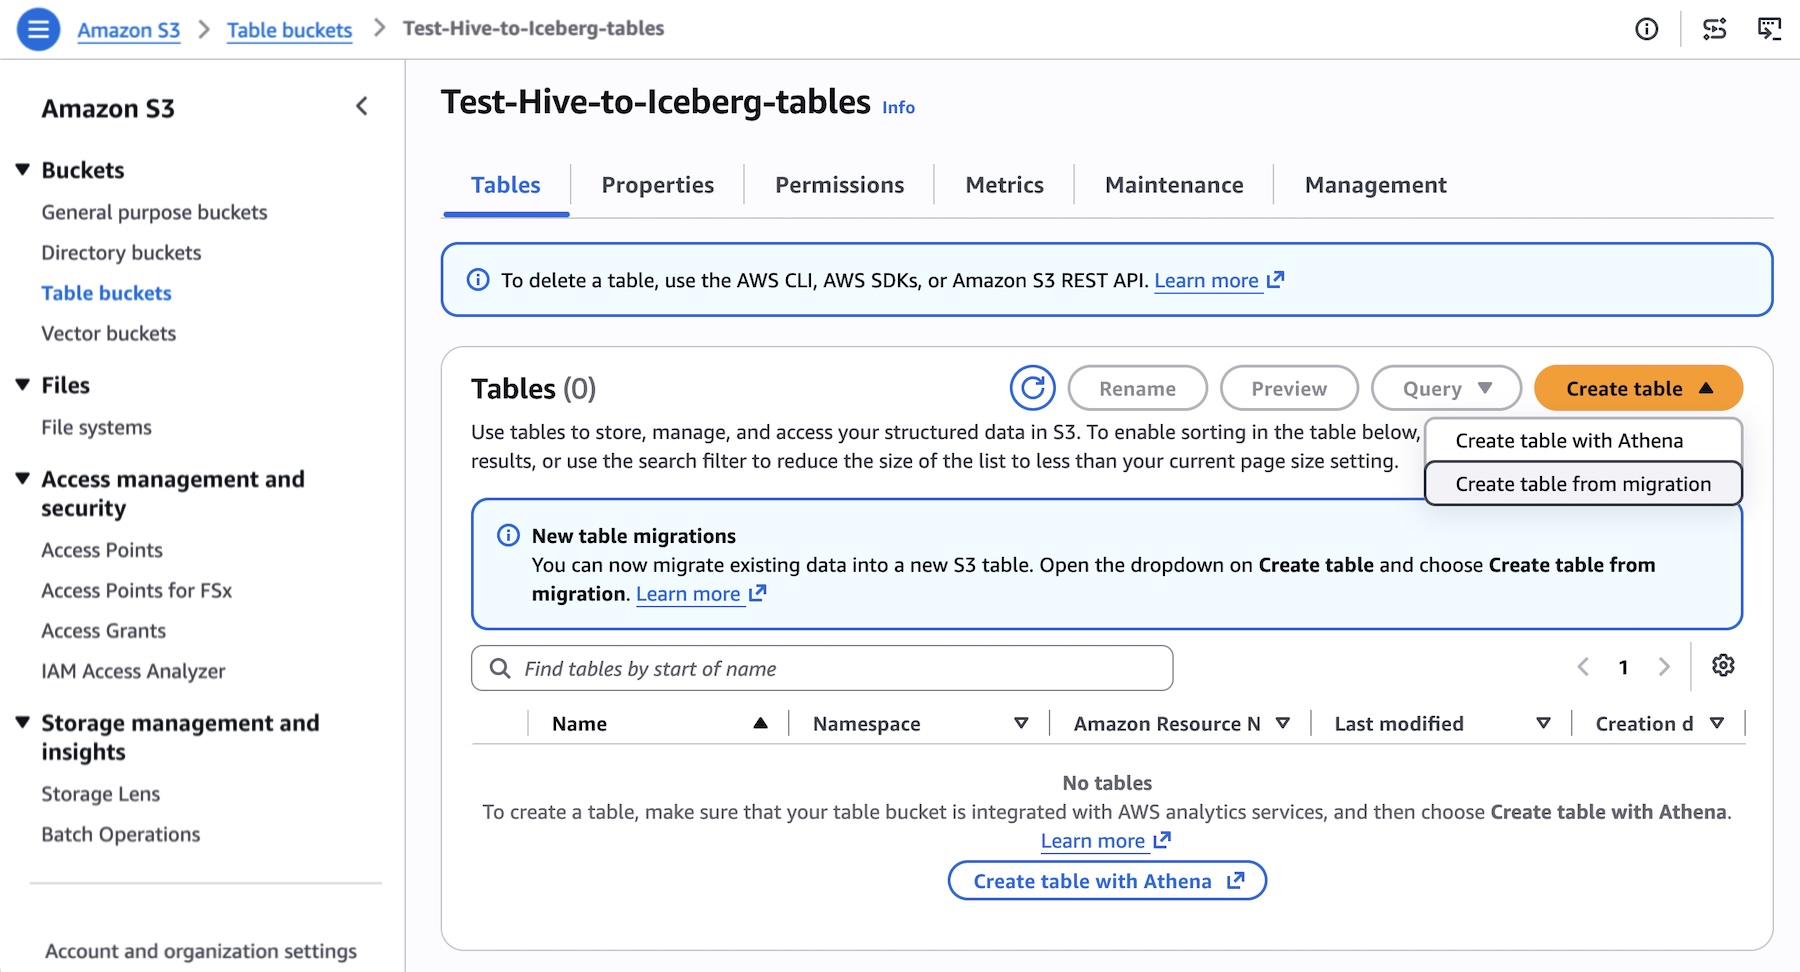
To migrate an AWS Glue Hive table, choose your destination table bucket in the S3 console, then choose Create table from migration.

Create a namespace and table name for your destination Iceberg table. The destination table is created using recommended default settings tuned for query performance and storage efficiency.

When you start the migration, S3 Tables validate the source table, generate a compatibility report, and begin copying data. The destination table is read-only during the migration. Once you complete migration, the destination table is promoted to read-write.

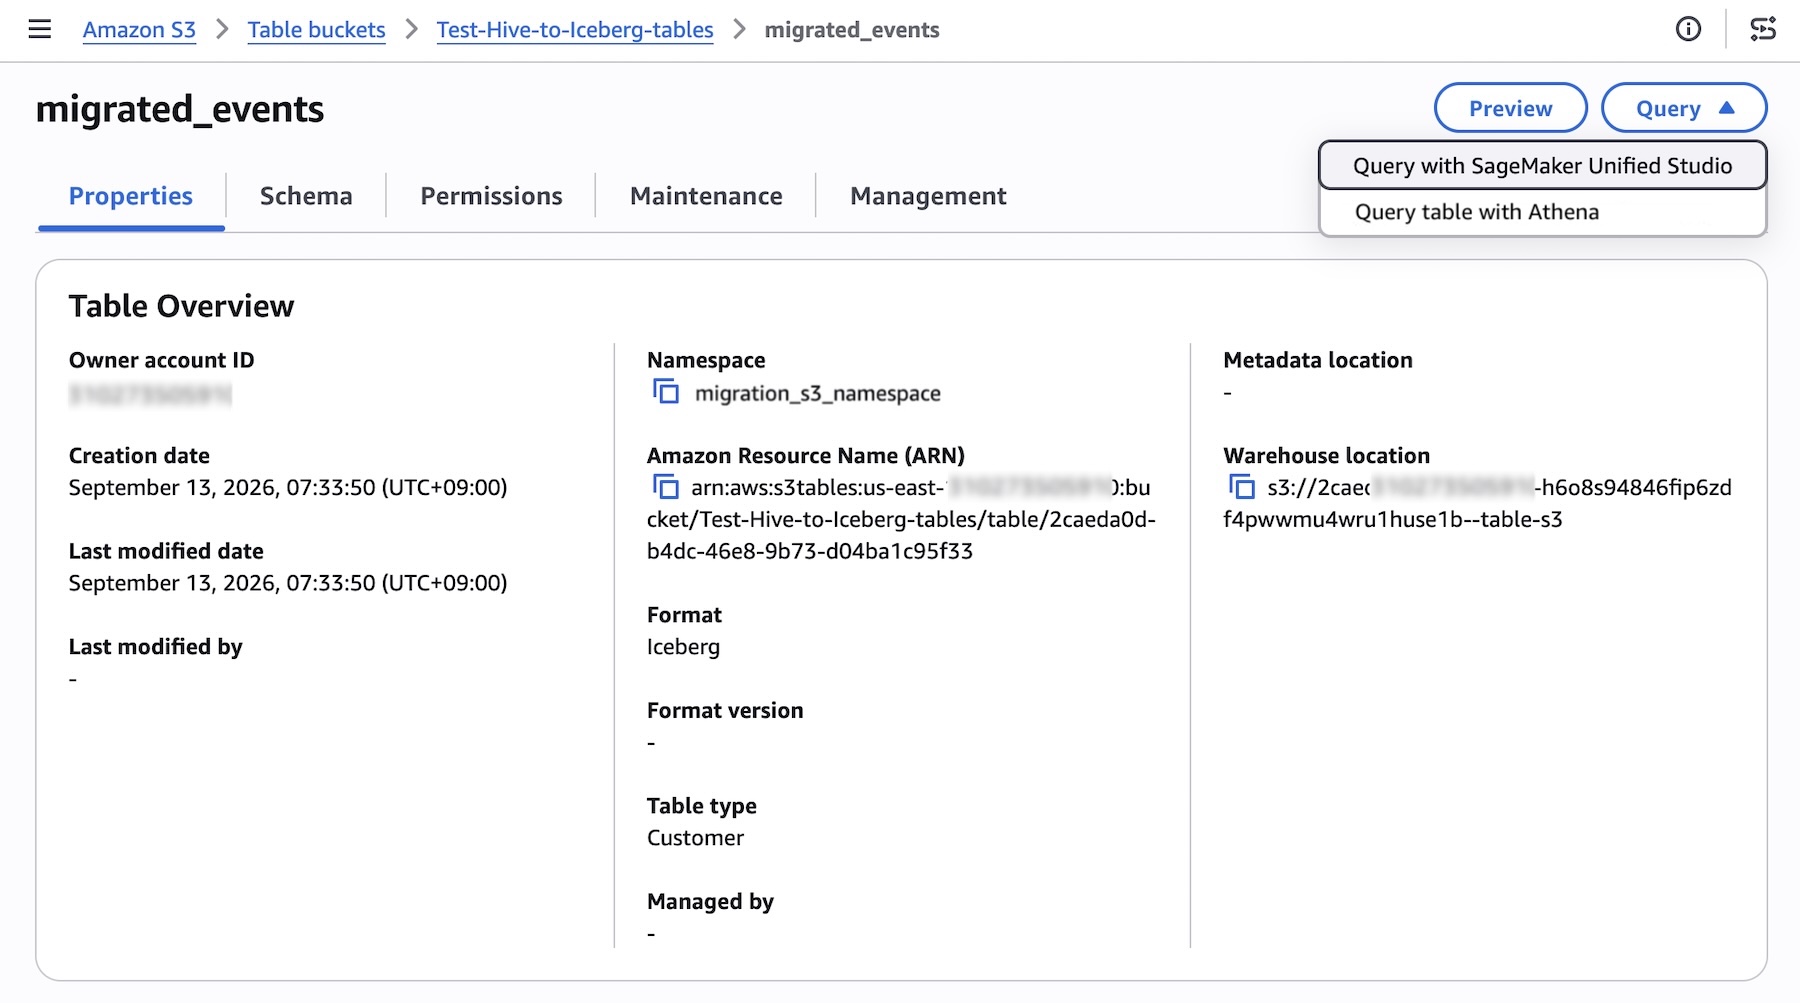
You can begin working with your data right away using a direct integration with Amazon Athena and Amazon SageMaker Unified Studio in the AWS console, or use any tool compatible with the Apache Iceberg REST API to directly query the tables. To learn more, visit the S3 Tables migration documentation.

You can also use AWS Command Line Interface (AWS CLI), AWS SDKs, or the Agent Toolkit for AWS. For example, set up migration jobs and call the start-table-migration command.

cat > /tmp/start-migration.json <<'EOF'
{
  "roleArn": "arn:aws:iam::123456789012:role/S3TablesMigrationRole",
  "destinationTable": {
    "tableBucketARN": "arn:aws:s3tables:us-east-1:123456789012:bucket/my-destination-bucket",
    "namespace": "mynamespace",
    "name": "my_destination_table",
    "encryptionConfiguration": {
      "sseAlgorithm": "aws:kms",
      "kmsKeyArn": "arn:aws:kms:us-east-1:123456789012:key/1234abcd-12ab-34cd-56ef-1234567890ab"
    },
    "storageClassConfiguration": { "storageClass": "INTELLIGENT_TIERING" },
    "tags": { "team": "s3tables", "purpose": "migration" },
    "properties": {
      "writeFormat": "parquet",
      "icebergFormatVersion": 2,
      "compressionCodec": "zstd",
      "dictionaryEncoding": true
    },
    "schema": {
      "type": "struct",
      "schema-id": 0,
      "identifier-field-ids": [1],
      "fields": [
        { "id": 1, "name": "id",      "type": "long",   "required": true, "doc": "primary key" },
        { "id": 2, "name": "payload", "type": "string", "required": false }
      ]
    },
    "partitionSpec": {
      "spec-id": 0,
      "fields": [ { "source-id": 1, "transform": "identity", "name": "id", "field-id": 1000 } ]
    }
  },
  "source": {
    "sourceType": "glueTable",
    "glueTable": {
      "catalogId": "123456789012",
      "databaseName": "my_glue_database",
      "tableName": "my_source_table",
      "lastModifiedTime": "2026-09-01T00:00:00.000Z"
    }
  },
  "dataMigration": {
    "maintenanceSettings": {
      "icebergCompaction": {
        "targetFileSizeMB": 512,
        "strategy": "sort",
        "icebergSortOrder": {
          "order-id": 1,
          "fields": [ { "source-id": 1, "transform": "identity", "direction": "asc", "null-order": "nulls-first" } ]
        }
      },
      "icebergSnapshotManagement": { "minSnapshotsToKeep": 1, "maxSnapshotAgeHours": 168 }
    },
    "dataTypeTransforms": {
      "conflictPolicy": "FAIL",
      "typeConversion": { "int96": { "type": "timestamp", "sourceTimezone": "UTC" } }
    }
  },
  "reviewMigrationPlan": false,
  "completeWorkflowOnSuccess": false,
  "output": {
    "compatibilityReportConfiguration": {
      "bucket": "arn:aws:s3:::my-report-bucket",
      "prefix": "reports/compat/",
      "scope": "AllSourceObjects"
    },
    "migrationReportConfiguration": {
      "bucket": "arn:aws:s3:::my-report-bucket",
      "prefix": "reports/migration/",
      "scope": "FailedSourceObjects"
    }
  }
}
EOF

aws s3tables start-table-migration \
  --cli-input-json file:///tmp/start-migration.json

To catch up the destination table with changes in the source, call sync-table-migration as many times as you need before you complete the migration. Each sync copies only what changed.

If you’re using coding agents like Kiro, the migrating-hive-tables-to-s3-tables skill in the Agent Toolkit for AWS provides step-by-step migration guidance with safety guardrails for agents. The skill can:

  • Analyze existing IAM policies and recommend equivalent destination policies
  • Validate the migration plan before getting started
  • Execute the Start → Sync → Complete API calls
  • Monitor job progress and guide validation and cutover

To learn more, visit the GitHub README page for the skill.

Now available
Amazon S3 Tables managed migration is available today in US East (N. Virginia, Ohio), US West (Oregon), Asia Pacific (Mumbai, Singapore, Sydney, Tokyo), and Europe (Frankfurt, Ireland, Stockholm) Regions. At launch, the capability supports AWS Glue-registered Hive tables stored in Parquet format within the same AWS account and AWS Region. If you want to call APIs, search documentation, find regional availability, or troubleshoot about this new feature, try using the AWS MCP Server and plugins with your preferred AI tool.

Try it in the Amazon S3 console today and send feedback to AWS re:Post for Amazon S3 or through your usual AWS Support contacts.

— Channy

Implementing PostgreSQL logical replication between Amazon RDS for PostgreSQL instances on separate AWS Outposts

Post Syndicated from Belma Canik original https://aws.amazon.com/blogs/compute/implementing-postgresql-logical-replication-between-amazon-rds-for-postgresql-instances-on-separate-aws-outposts/

Organizations in regulated industries such as healthcare, financial services, and government often face strict data residency mandates that require all data, including database backups, to remain within their on-premises environment. You can keep backups on-premises with Amazon Relational Database Service (Amazon RDS) local backups on AWS Outposts by setting the backup target to AWS Outposts (--backup-target outposts). Your AWS Outposts must have Amazon Simple Storage Service (Amazon S3) on Outposts capacity to store those backups locally. While Amazon RDS local backups on Outposts can keep backup data on-premises, organizations that need high availability across two separate Outposts racks, without any data traversing the AWS Region, lack a built-in, native replication mechanism between Outpost-hosted RDS instances.

In this post, we demonstrate how you can configure PostgreSQL logical replication between two Amazon RDS instances running on separate AWS Outposts racks, so that all data remains within your on-premises environment. By using Customer-owned IP addresses (CoIP) and Local Gateways (LGW), you can establish secure, low-latency replication between Outposts without exposing any data to the Region.

Architecture overview

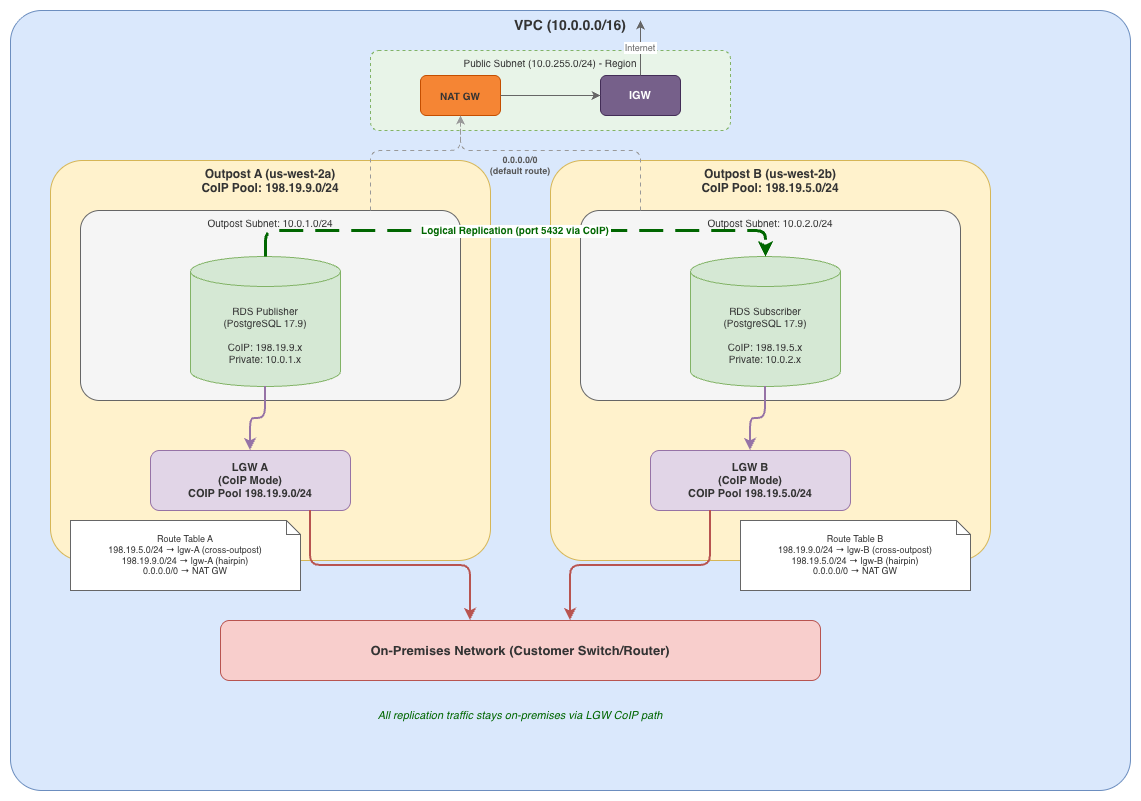
Our solution uses two AWS Outpost racks, each with its own Local Gateway (LGW) configured in Customer-owned IP (CoIP) mode. In this architecture, all database traffic flows through your on-premises network infrastructure:

Two AWS Outposts racks replicating Amazon RDS data through Local Gateways over the on-premises network, bypassing the AWS Region

Figure 1: Replication architecture across two AWS Outposts racks using Customer-owned IP addresses and Local Gateways

Prerequisites

Before beginning the configuration, make sure you have:

  • Two AWS Outpost racks with Local Gateways (LGW) configured in CoIP mode.
  • CoIP pools configured and shared with your AWS account.
  • LGW route table associations with your virtual private cloud (VPC) in place.
  • On-premises network connectivity between the two Outpost Local Gateways.
  • VPC with subnets spanning both Outposts.
  • Security groups configured to allow PostgreSQL traffic (port 5432).

Step 1: Create Outpost subnets with CoIP configuration

Each Outpost needs a subnet with CoIP auto-assign enabled.

While Amazon Elastic Compute Cloud (Amazon EC2) instances can inherit CoIP assignment from subnet settings, RDS instances require explicit CoIP enablement (covered in Step 3).

Subnet on Outpost A

aws ec2 create-subnet \
--vpc-id vpc-xxx \
--cidr-block 10.0.1.0/24 \
--availability-zone us-west-2a \
--outpost-arn arn:aws:outposts:us-west-2:OWNER_ACCOUNT:outpost/op-xxx

# Enable CoIP auto-assign (applies to EC2, not RDS)
aws ec2 modify-subnet-attribute \
--subnet-id subnet-xxx \
--map-customer-owned-ip-on-launch \
--customer-owned-ipv4-pool ipv4pool-coip-xxx

Subnet on Outpost B

aws ec2 create-subnet \
--vpc-id vpc-xxx \
--cidr-block 10.0.2.0/24 \
--availability-zone us-west-2b \
--outpost-arn arn:aws:outposts:us-west-2:OWNER_ACCOUNT:outpost/op-yyy

aws ec2 modify-subnet-attribute \
--subnet-id subnet-outpost-b \
--map-customer-owned-ip-on-launch \
--customer-owned-ipv4-pool ipv4pool-coip-yyy

Important: The MapCustomerOwnedIpOnLaunch setting works for EC2 instances but doesn’t automatically apply to RDS instances. RDS requires explicit CoIP enablement during instance creation.

Create DB subnet group

Create a DB subnet group spanning both Outposts:

aws rds create-db-subnet-group \
--db-subnet-group-name rds-outposts-subnet-group \
--db-subnet-group-description "Subnet group spanning Outpost A and B" \
--subnet-ids subnet-outpost-a subnet-outpost-b

Step 2: Configure route tables for cross-Outpost communication

This configuration step is often overlooked. Each subnet’s route table requires two Local Gateway routes:

  1. Cross-outpost route: To reach the other Outpost’s CoIP range.
  2. Same-outpost hairpin route: To reach its own CoIP range, which is required because RDS DNS resolves to CoIP. This affects any resource on the subnet that needs to reach the RDS instance by endpoint, including Amazon EC2 application servers on the same Outpost.

Why the hairpin route is important

When you enable CoIP on RDS, the DNS endpoint resolves to the CoIP address instead of the private IP. EC2 instances (and other RDS instances) on the same subnet need a route through the LGW to reach CoIP addresses, even for same-Outpost traffic. Without the hairpin route, traffic to the local CoIP range matches the default route (NAT gateway or internet gateway) and is lost.

Route configuration for Outpost A

# Cross-outpost: reach Outpost B's CoIP via Outpost A's LGW
aws ec2 create-route \
--route-table-id rtb-outpost-a \
--destination-cidr-block 198.19.5.0/24 \
--local-gateway-id lgw-A

# Same-outpost hairpin: reach Outpost A's own CoIP via its LGW
aws ec2 create-route \
--route-table-id rtb-outpost-a \
--destination-cidr-block 198.19.9.0/24 \
--local-gateway-id lgw-A

Route configuration for Outpost B

# Cross-outpost: reach Outpost A's CoIP via Outpost B's LGW
aws ec2 create-route \
--route-table-id rtb-outpost-b \
--destination-cidr-block 198.19.9.0/24 \
--local-gateway-id lgw-B

# Same-outpost hairpin: reach Outpost B's own CoIP via its LGW
aws ec2 create-route \
--route-table-id rtb-outpost-b \
--destination-cidr-block 198.19.5.0/24 \
--local-gateway-id lgw-B

Final route table summary

Outpost A Route Table:

Destination Target Purpose
10.0.0.0/16 local VPC internal traffic
198.19.5.0/24 (Outpost B CoIP) lgw-A Cross-outpost
198.19.9.0/24 (Outpost A CoIP) lgw-A Same-outpost hairpin
0.0.0.0/0 NAT GW Internet access

Outpost B Route Table:

Destination Target Purpose
10.0.0.0/16 local VPC internal traffic
198.19.9.0/24 (Outpost A CoIP) lgw-B Cross-outpost
198.19.5.0/24 (Outpost B CoIP) lgw-B Same-outpost hairpin
0.0.0.0/0 NAT GW Internet access

Step 3: Create RDS instances with CoIP enabled

In this step, you create the Amazon RDS for PostgreSQL instances on each Outpost using the aws rds create-db-instance CLI command. CoIP provides local or external connectivity to resources in your Outpost subnets through your on-premises network. It provides lower latency for connections to the DB instance from outside of its VPC on your local network. When you create an Amazon RDS instance on an Outpost, you can enable CoIP to make sure the instance is reachable over your on-premises network through the Local Gateway rather than the Region.

The --enable-customer-owned-ip flag must be explicitly set. RDS doesn’t inherit the subnet’s MapCustomerOwnedIpOnLaunch setting.

Keep in mind that this property isn’t supported in AWS CloudFormation. Use the AWS Command Line Interface (AWS CLI), Terraform (customer_owned_ip_enabled = true), or the console (select Customer-owned IP address (CoIP) under Access type).

Create the publisher instance (Outpost A)

aws rds create-db-instance \
--db-instance-identifier rds-publisher \
--db-instance-class db.r5.xlarge \
--engine postgres \
--engine-version 17.9 \
--master-username postgres \
--master-user-password <SecurePassword> \
--allocated-storage 200 \
--storage-type gp2 \
--storage-encrypted \
--db-subnet-group-name rds-outposts-subnet-group \
--availability-zone us-west-2a \
--no-multi-az \
--no-publicly-accessible \
--enable-customer-owned-ip \
--db-parameter-group-name <parameter-group-with-logical-replication> \
--vpc-security-group-ids sg-xxx \
--region us-west-2

Create the subscriber instance (Outpost B)

aws rds create-db-instance \
--db-instance-identifier rds-subscriber \
--db-instance-class db.r5.xlarge \
--engine postgres \
--engine-version 17.9 \
--master-username postgres \
--master-user-password <SecurePassword> \
--allocated-storage 200 \
--storage-type gp2 \
--storage-encrypted \
--db-subnet-group-name rds-outposts-subnet-group \
--availability-zone us-west-2b \
--no-multi-az \
--no-publicly-accessible \
--enable-customer-owned-ip \
--vpc-security-group-ids sg-xxx \
--region us-west-2

Verify CoIP assignment

After the instances become available, verify that CoIP addresses have been assigned:

aws ec2 describe-addresses --region us-west-2 \
--query "Addresses[?CustomerOwnedIp!=null].[CustomerOwnedIp,PrivateIpAddress,NetworkInterfaceId]" \
--output table

You should see output similar to:

-------------------------------------------------
|                DescribeAddresses              |
+------------------+-------------+--------------+
| 198.19.9.10      | 10.0.1.15   | eni-xxx      |
| 198.19.5.20      | 10.0.2.25   | eni-yyy      |
+------------------+-------------+--------------+

Step 4: Configure security groups

Security groups must allow PostgreSQL traffic (port 5432) from both CoIP ranges and private subnet ranges:

# Allow traffic from Outpost A CoIP range
aws ec2 authorize-security-group-ingress \
--group-id sg-xxx \
--protocol tcp \
--port 5432 \
--cidr 198.19.9.0/24

# Allow traffic from Outpost B CoIP range
aws ec2 authorize-security-group-ingress \
--group-id sg-xxx \
--protocol tcp \
--port 5432 \
--cidr 198.19.5.0/24

# Allow traffic from Outpost A private subnet
aws ec2 authorize-security-group-ingress \
--group-id sg-xxx \
--protocol tcp \
--port 5432 \
--cidr 10.0.1.0/24

# Allow traffic from Outpost B private subnet
aws ec2 authorize-security-group-ingress \
--group-id sg-xxx \
--protocol tcp \
--port 5432 \
--cidr 10.0.2.0/24

Make sure egress rules allow all outbound traffic (default) or at minimum port 5432 to the CoIP ranges.

Step 5: Configure PostgreSQL logical replication

Enable logical replication on the publisher

The publisher requires the rds.logical_replication parameter set to 1, which requires a database reboot:

aws rds modify-db-parameter-group \
--db-parameter-group-name publisher-params \
--parameters "ParameterName=rds.logical_replication,ParameterValue=1,ApplyMethod=pending-reboot"

aws rds reboot-db-instance --db-instance-identifier rds-publisher

This automatically sets wal_level = logical, so PostgreSQL can capture the necessary change data for replication.

Create replication user and publication on the publisher

Connect to the publisher instance and execute:

-- Create a replication user
CREATE USER repluser WITH REPLICATION LOGIN PASSWORD 'YourStrongPassword';

-- Grant SELECT on tables to replicate (required for initial COPY)
GRANT SELECT ON ALL TABLES IN SCHEMA public TO repluser;

-- Create table to replicate (example: healthcare appointments)
CREATE TABLE patient_appointments (
    appointment_id SERIAL PRIMARY KEY,
    patient_id INTEGER NOT NULL,
    patient_name VARCHAR(100), -- PHI: can be excluded from replication
    ssn VARCHAR(11), -- PHI: can be excluded from replication
    date_of_birth DATE, -- PHI: can be excluded from replication
    diagnosis_code VARCHAR(10), -- PHI: can be excluded from replication
    appointment_date DATE NOT NULL,
    doctor_id INTEGER NOT NULL,
    department VARCHAR(50),
    billing_amount DECIMAL(10,2),
    procedure_code VARCHAR(10),
    visit_type VARCHAR(20)
);

-- Create a publication for the table
CREATE PUBLICATION my_publication FOR TABLE patient_appointments;

-- Or for all tables in the schema:
-- CREATE PUBLICATION my_publication FOR ALL TABLES;

Keep in mind that the replication user must have SELECT permission on all published tables. Without it, the initial table synchronization (COPY phase) hangs indefinitely in state ‘d’ (data copy).

Create matching schema and subscription on the subscriber

Connect to the subscriber instance and execute:

-- Create the target table with IDENTICAL schema
-- The table structure must match the publisher exactly
CREATE TABLE patient_appointments (
    appointment_id SERIAL PRIMARY KEY,
    patient_id INTEGER NOT NULL,
    patient_name VARCHAR(100),
    ssn VARCHAR(11),
    date_of_birth DATE,
    diagnosis_code VARCHAR(10),
    appointment_date DATE NOT NULL,
    doctor_id INTEGER NOT NULL,
    department VARCHAR(50),
    billing_amount DECIMAL(10,2),
    procedure_code VARCHAR(10),
    visit_type VARCHAR(20)
);

-- Create the subscription
CREATE SUBSCRIPTION my_subscription
CONNECTION 'host=rds-publisher.xxx.us-west-2.rds.amazonaws.com port=5432 dbname=postgres user=repluser password=YourStrongPassword '
PUBLICATION my_publication;

PostgreSQL 15+ on RDS defaults to rds.force_ssl = 1, which means the database rejects any non-SSL connection. When CoIP is enabled, RDS on Outposts automatically uses the CoIP address for all connections from both inside and outside of the VPC. Traffic routes through the Local Gateway even for same-outpost communication. PostgreSQL’s pg_hba.conf treats these CoIP-routed connections as non-local, and with rds.force_ssl = 1, the server requires SSL. If the CREATE SUBSCRIPTION connection string omits sslmode=require, the subscriber’s connection attempt is rejected with a no pg_hba.conf entry for host error. To avoid this, always include sslmode=require in the subscription connection string:

CREATE SUBSCRIPTION my_subscription CONNECTION 'host=rds-publisher.xxx.us-west-2.rds.amazonaws.com port=5432 dbname=postgres user=repluser password=YourStrongPassword sslmode=require'
PUBLICATION my_publication;

The subscription will automatically:

  1. Create a replication slot on the publisher.
  2. Perform an initial table sync (COPY of existing data).
  3. Begin streaming ongoing changes in real-time.

Step 6: Monitor and verify replication

To monitor replication and verify that logical replication is functioning correctly between the publisher and subscriber instance, PostgreSQL provides several system catalog views and statistics views to monitor replication health. On the publisher instance, we query pg_stat_replication to confirm active write-ahead log (WAL) sender connections and track replication progress through sent and written log sequence number (LSN) positions. We also query pg_replication_slots to verify that the logical replication slot is active and its WAL retention status is healthy. On the subscriber instance, we query pg_subscription to confirm the subscription is enabled and connected to the correct upstream database. We query pg_subscription_rel to verify the synchronization state of each replicated table.

Check replication status on the publisher

-- View active replication connections
SELECT pid, usename, client_addr, state, sent_lsn, write_lsn
FROM pg_stat_replication;

-- View replication slots
SELECT slot_name, active, restart_lsn, confirmed_flush_lsn, wal_status
FROM pg_replication_slots;

Check subscription status on the subscriber

-- View subscription details
SELECT subname, subenabled, subconninfo FROM pg_subscription;

-- View subscription state
SELECT srsubstate FROM pg_subscription_rel;
-- States: 'i' = init, 'd' = data copy, 'r' = ready, 's' = synced, 'f' = finished table copy

Expected output after successful initial sync:

srsubstate
-----------
r

Test data replication

-- On publisher:
INSERT INTO patient_appointments (patient_id, appointment_date, doctor_id, department, billing_amount, visit_type)
VALUES (1001, '2026-07-15', 42, 'Cardiology', 250.00, 'Follow-up');

-- On subscriber (should appear within seconds):
SELECT count(*) FROM patient_appointments;
SELECT * FROM patient_appointments WHERE patient_id = 1001;

Troubleshooting common issues

Issue 1: RDS endpoint not reachable through CoIP

Symptom: TCP connection to CoIP address times out.

Diagnosis:

# From an EC2 instance on the same subnet
telnet rds-publisher.xxx.us-west-2.rds.amazonaws.com 5432

Check:

  • Route table has both cross-outpost and same-outpost hairpin routes.
  • Security groups allow port 5432 from CoIP ranges.
  • CoIP is enabled on the RDS instance (CustomerOwnedIpEnabled: true).

Issue 2: CoIP not assigned to RDS instance

Symptom: CustomerOwnedIpEnabled: false when describing the RDS instance.

Cause: RDS doesn’t inherit the subnet’s MapCustomerOwnedIpOnLaunch setting. Must be explicitly enabled.

Fix:

aws rds modify-db-instance \
--db-instance-identifier rds-xxx \
--enable-customer-owned-ip \
--apply-immediately

Issue 3: Initial sync stuck in state ‘d’

Symptom: pg_subscription_rel shows srsubstate = 'd' indefinitely.

Causes:

  • Replication user lacks SELECT permission on published tables.
  • Table schema mismatch between publisher and subscriber.
  • Network connectivity issue during COPY phase.

Fix:

-- On publisher: grant SELECT permission
GRANT SELECT ON ALL TABLES IN SCHEMA public TO repluser;

-- On subscriber: drop and recreate subscription
ALTER SUBSCRIPTION my_subscription DISABLE;
ALTER SUBSCRIPTION my_subscription SET (slot_name = NONE);
DROP SUBSCRIPTION my_subscription;

-- Recreate subscription
CREATE SUBSCRIPTION my_subscription CONNECTION '...' PUBLICATION my_publication;

Issue 4: “no pg_hba.conf entry for host” error

Symptom: Connection refused with pg_hba error when connecting from CoIP address.

Cause: rds.force_ssl = 1 (default in PostgreSQL 15+) requires SSL for connections from non-VPC addresses.

Fix: Make sure sslmode=require is included in the connection string:

CONNECTION 'host=... port=5432 dbname=... user=... password=... sslmode=require'

Issue 5: Subscription pointing to wrong publication

Symptom: Subscription connected but no data replicating.

Fix: Drop and recreate subscription with correct publication name:

ALTER SUBSCRIPTION my_subscription DISABLE;
ALTER SUBSCRIPTION my_subscription SET (slot_name = NONE);
DROP SUBSCRIPTION my_subscription;

-- Clean up orphaned slots on publisher if needed
-- SELECT pg_drop_replication_slot('my_subscription');

CREATE SUBSCRIPTION my_subscription
CONNECTION '...'
PUBLICATION correct_publication_name;

Data residency considerations

This architecture provides complete data residency by the following means:

  • No regional backups: Automated backups to Amazon S3 in the Region are disabled. All data remains on the Outposts.
  • On-premises replication: All replication traffic flows through Local Gateways and your on-premises network, never traversing the Region backbone.
  • Local recovery: If an Outpost fails, you can promote the subscriber to become the new primary, maintaining business continuity without regional dependencies.
  • Selective replication: With logical replication, you can exclude sensitive columns, such as protected health information (PHI) and personally identifiable information (PII), from replication by creating publications for specific columns or tables.

For customers who can accept local backups, RDS on Outposts supports local backup to S3 on Outposts for MySQL and PostgreSQL (not supported for Multi-AZ deployments or read replicas). This requires S3 on Outposts capacity.

Best practices and key takeaways

Throughout this implementation, we encountered several configuration details that are important for a successful deployment. The following best practices and key takeaways will help you avoid common pitfalls when setting up PostgreSQL logical replication between RDS instances on separate Outposts.

  • CoIP must be explicitly enabled on RDS: It isn’t inherited from subnet settings. Always include --enable-customer-owned-ip when creating RDS instances.
  • Both cross-outpost and hairpin routes are required: Without hairpin routes, same-subnet access to CoIP addresses fails because DNS resolves to CoIP instead of the private IP.
  • Replication user needs SELECT permission: Required for the initial COPY phase. Without it, the subscription hangs in state ‘d’.
  • Table schemas must be identical: The subscriber table must exactly match the publisher table structure, including column names, types, and constraints.
  • SSL is enforced by default: PostgreSQL 15+ defaults to rds.force_ssl = 1. Use sslmode=require for external connections.
  • Use Terraform or the CLI for deployment: AWS CloudFormation doesn’t support the EnableCustomerOwnedIp property. Use Terraform (customer_owned_ip_enabled = true) or the AWS CLI.
  • Monitor replication lag: Use the pg_stat_replication and pg_replication_slots views to monitor replication health and lag.
  • Plan for failover: Document procedures for promoting the subscriber to primary if Outpost A fails, including application connection string updates.

Comparison with Multi-AZ deployments

Multi-AZ deployments remain the recommended approach for high availability on Amazon RDS on AWS Outposts. They provide automatic failover with synchronous replication between a primary DB instance on one Outpost and a standby on a different Outpost. However, Multi-AZ requires two Outposts anchored to different Availability Zones, and local backups aren’t supported for Multi-AZ deployments. As AWS documentation notes, customers whose workloads must abide by data residency regulations should consult with regulators to determine whether Multi-AZ meets their requirements, because only Single-AZ instances support storing all automated backups and logs directly on the Outposts rack. This post presents an alternative approach that uses PostgreSQL logical replication between Outposts for organizations that need an additional layer of data resilience while keeping all data on-premises. It applies specifically where data residency requirements prevent the use of Regional backups and where the Multi-AZ infrastructure prerequisites (two Outposts across two Availability Zones) are not available. The two options have different characteristics:

Feature Logical Replication Multi-AZ on Outposts
Data Residency Complete (no regional backups) Automated backups to Region S3
Failover Manual promotion Automatic (1-2 minutes)
Replication Granularity Table-level or column-level Entire database instance
Cross-Region DR Supported Requires additional setup
Network Path CoIP through Local Gateway VPC internal (Multi-AZ)
Use Case Strict data residency, selective replication High availability with regional integration

For organizations that can accept automated backups to the Region, Multi-AZ deployments offer simpler management and automatic failover. For those with absolute data residency requirements, logical replication with CoIP provides complete control over data locality.

Clean up

When you’re done testing, remove the replication resources to avoid unnecessary costs and WAL accumulation.

On the target, drop the subscription first:

DROP SUBSCRIPTION my_subscription;

On the source, drop the publication:

DROP PUBLICATION my_publication;

Drop the test tables on both source and target:

DROP TABLE IF EXISTS patient_appointments;

If you created dedicated Amazon RDS instances for this walkthrough, delete them through the AWS Management Console or CLI to stop incurring charges. If you modified an existing parameter group, consider reverting rds.logical_replication to 0 if you no longer need logical replication, and reboot the instance.

Conclusion

In this post, we showed you how to configure PostgreSQL logical replication between Amazon RDS for PostgreSQL instances on separate AWS Outposts. This approach gives organizations with strict data residency requirements a way to keep all data on-premises. By using Customer-owned IP addresses and Local Gateways, you can establish secure, low-latency replication that keeps all data within your on-premises environment.

This architecture is particularly valuable for:

  • Healthcare providers managing PHI under the Health Insurance Portability and Accountability Act (HIPAA).
  • Financial institutions with data sovereignty requirements.
  • Government agencies with classified or sensitive data.
  • Organizations in regulated industries where data must remain on-premises.

The configuration requires careful attention to networking details, particularly the hairpin routes and explicit CoIP enablement. After it’s established, it provides a foundation for disaster recovery and high availability without compromising data residency.

For more information about Amazon RDS on AWS Outposts, visit the RDS on Outposts documentation and the AWS Outposts High Availability Design whitepaper.


About the authors
Belma Canik

Belma Canik

Belma is a Senior Database Specialist Technical Account Manager (STAM) at Amazon Web Services. She helps customers run optimized workloads on AWS and make the best out of their cloud journey. She also helps customers have robust Data Operations that also provide AI-ready data platforms through Data Operations Review at AWS.

Qualcomm Dragonwing Nabs a Big SpaceX Starlink Mobile Nationwide US 5G Network Win

Post Syndicated from Vic A original https://www.servethehome.com/qualcomm-dragonwing-nabs-a-big-spacex-starlink-mobile-nationwide-us-5g-network-win/

Qualcomm Dragonwing just landed a new US customer as part of the SpaceX Starlink mobile nationwide build-out

The post Qualcomm Dragonwing Nabs a Big SpaceX Starlink Mobile Nationwide US 5G Network Win appeared first on ServeTheHome.

Plan and measure EC2 flexibility with Amazon EC2 Capacity Manager

Post Syndicated from Yagya Vir Singh original https://aws.amazon.com/blogs/compute/plan-and-measure-ec2-flexibility-with-amazon-ec2-capacity-manager/

Global enterprises that run thousands of workloads across hundreds of accounts often configure them to use multiple instance types and Availability Zones. This flexibility gives Amazon Elastic Compute Cloud (Amazon EC2) more options to fulfill each request. At that scale, you need to decide which instance types and Availability Zones to include, and have visibility into how well those choices are working.

To gain these insights, Amazon EC2 Capacity Manager offers real-time supportability checks and capacity fulfillment metrics. Supportability checks help you find capacity when you plan a workload by scoring how well each instance type and Availability Zone can support a request. They do this without launching or reserving instances. Capacity fulfillment metrics show whether you configured your launch requests to use multiple instance types and Availability Zones, their fulfillment rate, and where that capacity came from. They measure your actual launches, not the accuracy of a check. Together, they cover both sides of a scale up: deciding where to run, and measuring what was delivered.

Both capabilities are included with AWS Unified Operations, the AWS Support plan for global enterprises that run workloads at large scale. You can query data from all commercial AWS Regions using the Region in which you enabled EC2 Capacity Manager.

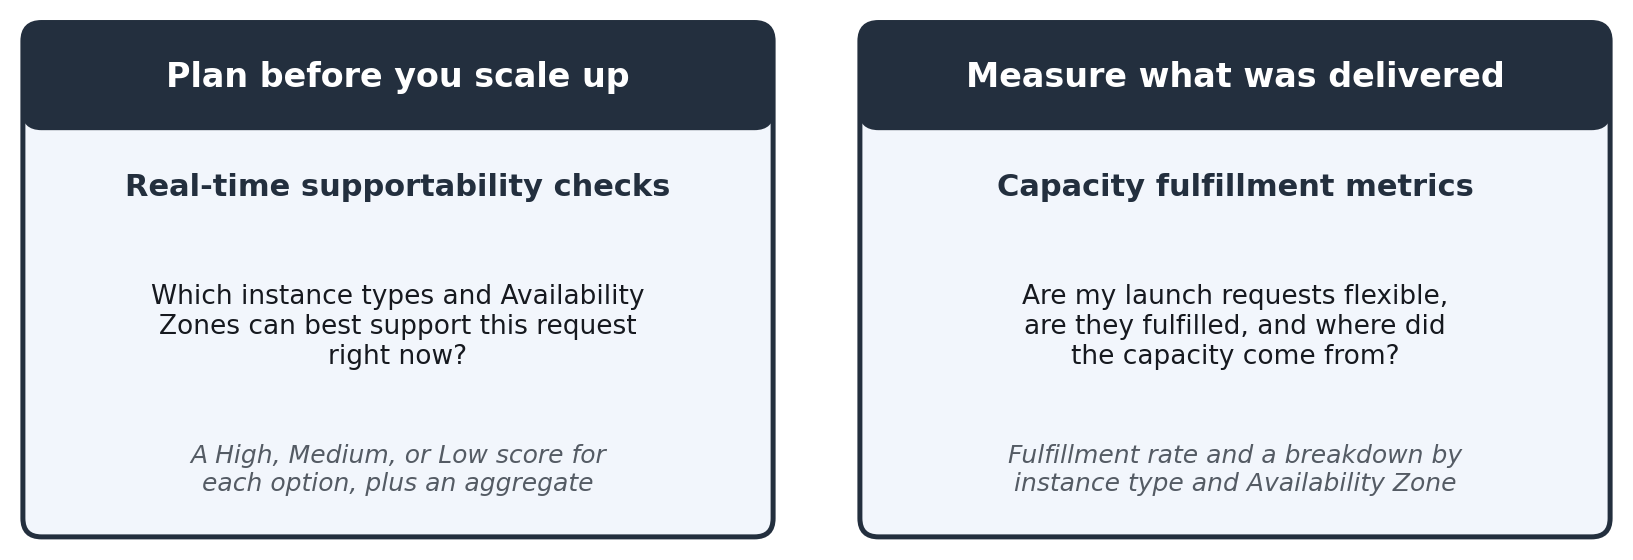
Two panels. Plan before you scale up: real-time supportability checks return a High, Medium, or Low score for each option plus an aggregate. Measure what was delivered: capacity fulfillment metrics show a fulfillment rate and a breakdown by instance type and Availability Zone.

Figure 1: Supportability checks score options before you scale up. Fulfillment metrics measure how your actual launches were fulfilled.

This post follows the platform team at AnyCompany, a global enterprise that supports several large scale ups each year. Before each one, the team wants to know which instance types and Availability Zones will best support a workload. In this post, a combination means one instance type in one Availability Zone, such as r5.16xlarge in use1-az5. Capacity Manager measures capacity in vCPUs, and each step shows the AWS Management Console path and the AWS Command Line Interface (AWS CLI) command.

Before you begin

  • Turn on Capacity Manager at the organization level (from the management account or a delegated administrator) or for a single account. Both capabilities work at either level. See Enabling EC2 Capacity Manager.
  • Confirm your support plan. Your account must be covered by AWS Unified Operations.
  • (Optional) To see metrics by workload, activate a workload tag as a monitored tag key. Some tags, including aws:eks:cluster-name and aws:autoscaling:groupName, are always available and need no activation. This post uses aws:eks:cluster-name. For more information, see Managing monitored tag keys.

Step 1: See whether your workloads are getting the capacity they need

Capacity fulfillment metrics start at the request level. A request that can use several combinations is fulfilled if any one of them delivers, so a high request fulfillment rate means flexibility is working. Capacity Manager tracks four request-level metrics.

Metric Console label What it tells you
CapacityTotalRequestedVcpu Requested (vCPUs) Capacity requested. Retries within five minutes for the same configuration count once.
CapacityTotalFulfilledVcpu Fulfilled (vCPUs) Capacity delivered.
CapacityRequestFulfillmentRate Request fulfillment rate Fulfilled divided by requested, vCPU-weighted.
AvgInstAzCountPerRequestedVcpu Instance Type x AZ count (avg) Combinations each request is configured to use. A value above 1 means the request is flexible.

These metrics break down by account, Region, and tag. To review them on the console, complete the following steps.

  1. Open the Fulfillment tab.
  2. Choose a date range and a metric set (On-Demand or Spot).
  3. Filter by a dimension, such as Region, account, or tag, to see one row for each value.
  4. Sort by Requested (vCPUs) to see your largest workloads first, or by request fulfillment rate to find the ones with the most room to improve.
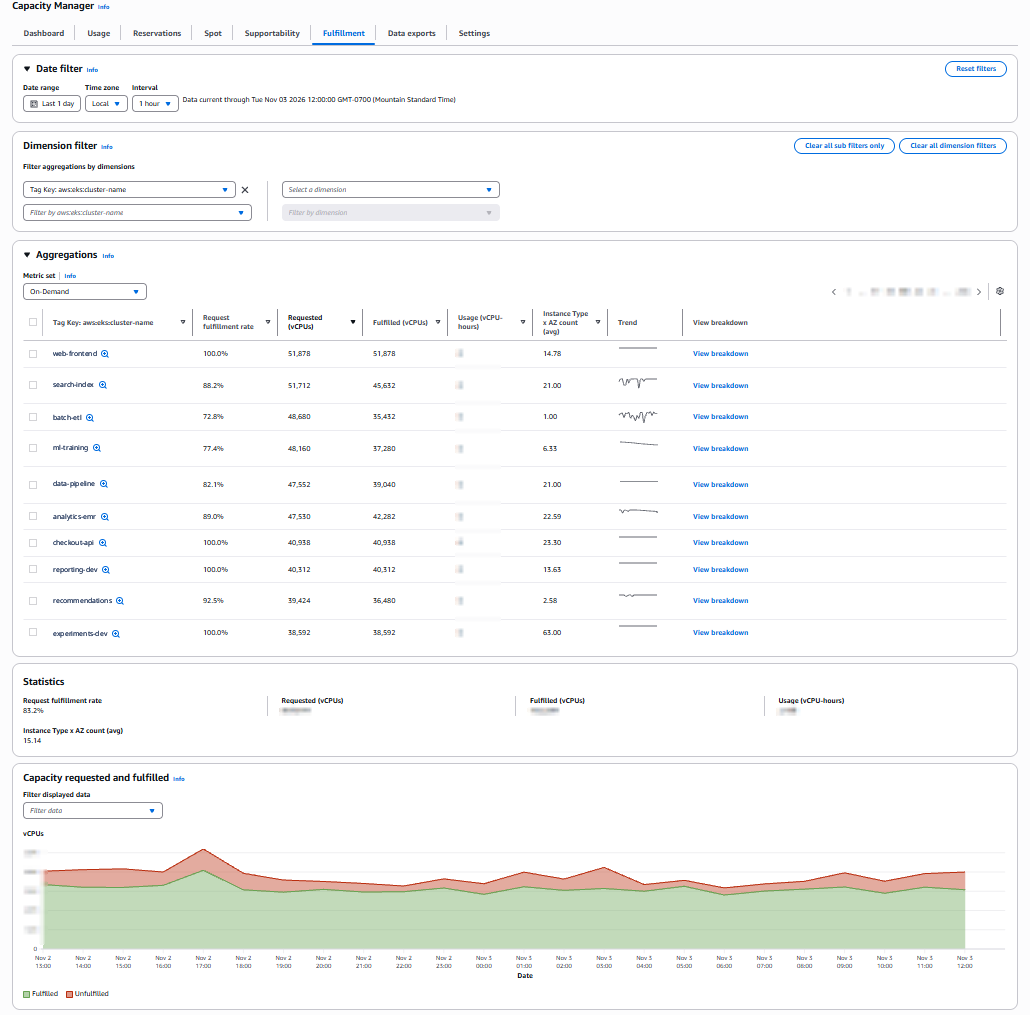
Capacity Manager Fulfillment tab listing workloads by the aws:eks:cluster-name tag, each row showing its request fulfillment rate and Instance Type x AZ count

Figure 2: The Fulfillment tab for an example account, filtered by the aws:eks:cluster-name tag. Each row shows one workload’s request fulfillment rate and Instance Type x AZ count.

At AnyCompany, the search-index workload requested 51,712 vCPUs and received 45,632, an 88.2 percent request fulfillment rate. Its requests could use an average of 21 combinations. Compare batch-etl, which can use only one combination and fulfills 72.8 percent. Step 2 shows where the search-index capacity came from and where it fell short.

To get the same data with the AWS CLI, call get-capacity-manager-metric-data. Spot metrics use a Spot prefix, such as SpotCapacityRequestFulfillmentRate.

aws ec2 get-capacity-manager-metric-data \
--metric-names capacity-request-fulfillment-rate avg-inst-az-count-per-requested-vcpu \
--start-time 2026-11-02T19:00:00Z --end-time 2026-11-03T19:00:00Z \
--period 86400 \
--filter-by 'DimensionCondition={Dimension=tag:aws:eks:cluster-name,Comparison=equals,Values=[search-index]}'

Step 2: See where your flexibility is paying off

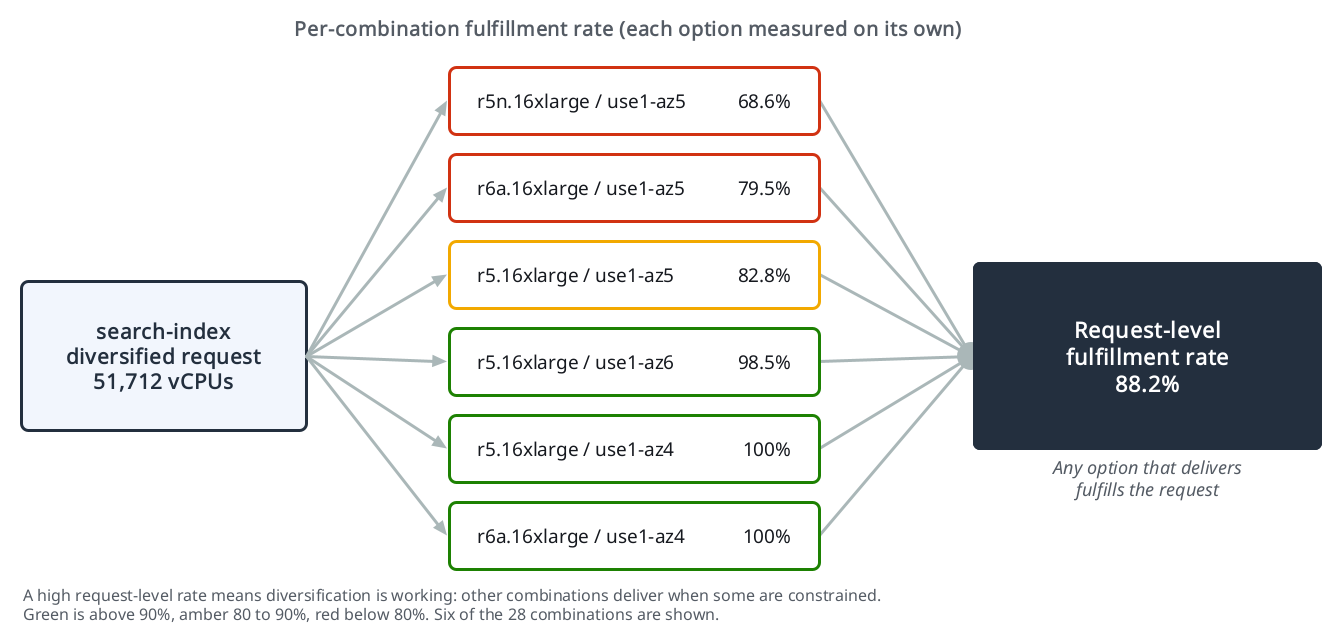
The breakdown measures each combination on its own, so per-combination rates are usually lower than the request rate, which includes the benefit of diversification.

Breakdown for the search-index workload showing lower per-combination fulfillment rates against the 88.2 percent request rate

Figure 3: The search-index request is 88.2 percent fulfilled, while each combination is measured on its own.

In Figure 3, the three search-index combinations in use1-az5 deliver 68.6–82.8 percent of what is asked. Outside use1-az5, r5.16xlarge delivers 98.5–100 percent in use1-az4 and use1-az6, and r6a.16xlarge delivers 100 percent in use1-az4. Because the request can use any of these combinations, the other zones cover part of what use1-az5 can’t. So those zones are worth keeping, and use1-az5 is where to add options or reserve capacity.

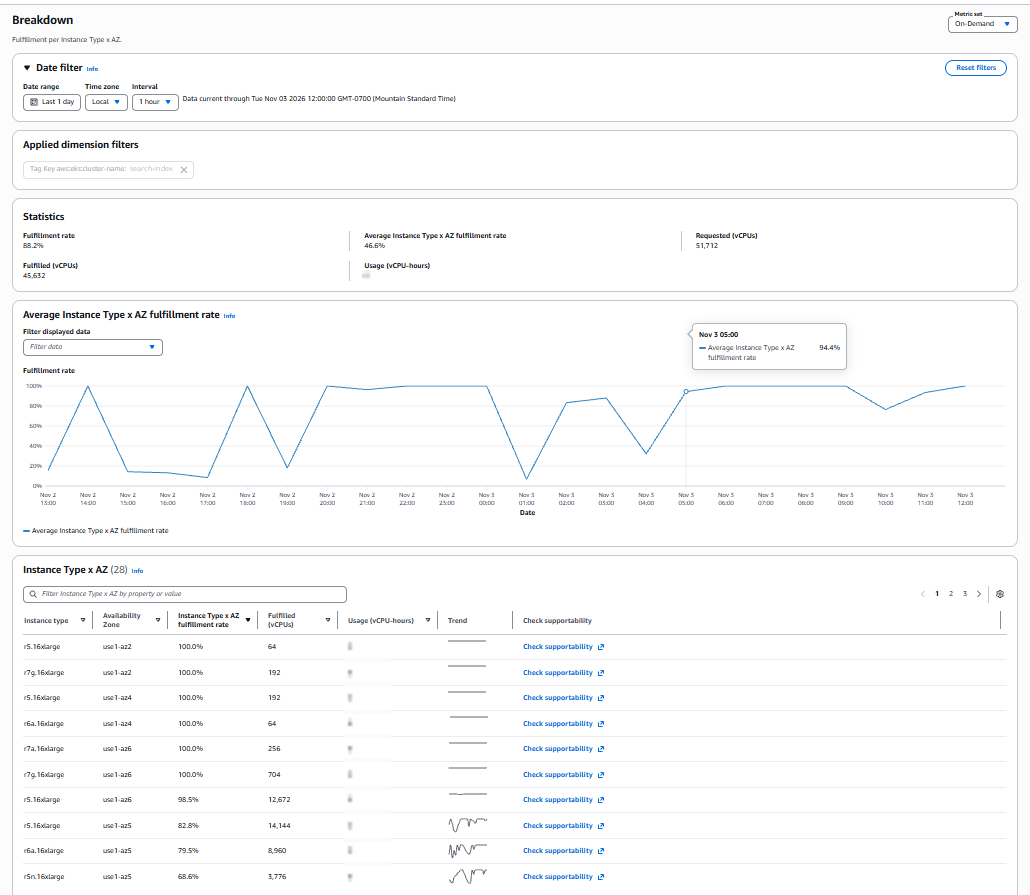
On the console, choose View breakdown on any row of the Fulfillment tab. The breakdown lists each combination, and you can sort by fulfillment rate, fulfilled vCPUs, or usage. It adds instance type, instance family, and Availability Zone to the dimensions from Step 1.

Fulfillment breakdown for search-index with per-combination rates and a Check supportability link on each row

Figure 4: The breakdown for the search-index workload, with a Check supportability link on each row.

In Figure 4, search-index fulfills 88.2 percent of requested capacity, while its 28 combinations average 46.6 percent on their own. The difference is what flexibility adds: when some combinations come up short, others deliver. The three use1-az5 combinations delivered 26,880 vCPUs, more than half of the 45,632 total, so that zone has the most room to improve. The Check supportability link on each row opens a check for that combination.

Through the API, query InstAzFulfillmentRate. The request must include the availability-zone-id dimension and either instance-type or instance-family.

aws ec2 get-capacity-manager-metric-data \
--metric-names inst-az-fulfillment-rate \
--start-time 2026-11-02T19:00:00Z --end-time 2026-11-03T19:00:00Z \
--period 86400 \
--group-by availability-zone-id instance-type \
--filter-by 'DimensionCondition={Dimension=tag:aws:eks:cluster-name,Comparison=equals,Values=[search-index]}'

Step 3: Find where capacity is strongest before you scale up

Before a large scale up or migration, the platform team runs a supportability check. They provide the market type (On-Demand or Spot), the capacity amount, the Availability Zones, and the instance types to consider. The check returns a High, Medium, or Low score for each combination, plus an aggregate score for the set. The following example checks a scale up for search-index: 100 instances across its three Availability Zones, with its three current instance types and two candidates, r6i.16xlarge and r7i.16xlarge.

aws ec2 get-capacity-manager-supportability-scores \
--market-type "on-demand" \
--capacity-amount 100 \
--capacity-unit "instances" \
--capacity-availability-zone-ids '["use1-az4", "use1-az5", "use1-az6"]' \
--instance-types '["r5.16xlarge", "r6a.16xlarge", "r7a.16xlarge", "r6i.16xlarge", "r7i.16xlarge"]'
{
  "AggregateScore": "high",
  "CapacityManagerSupportabilityScores": [
    {"InstanceType": "r5.16xlarge", "AvailabilityZoneId": "use1-az4", "Score": "high"},
    {"InstanceType": "r6a.16xlarge", "AvailabilityZoneId": "use1-az4", "Score": "medium"},
    {"InstanceType": "r7i.16xlarge", "AvailabilityZoneId": "use1-az6", "Score": "medium"},
    {"InstanceType": "r7a.16xlarge", "AvailabilityZoneId": "use1-az4", "Score": "low"},
    ...
  ]
}

Instead of a list, you can also pass --instance-requirements-with-metadata, with the vCPU and memory ranges inside an InstanceRequirements object. Capacity Manager scores each matching instance type. For Spot, set the market type to spot.

--instance-requirements-with-metadata '{
  "InstanceRequirements": {
    "VCpuCount": {"Min": 64, "Max": 64},
    "MemoryMiB": {"Min": 524288}
  }
}'

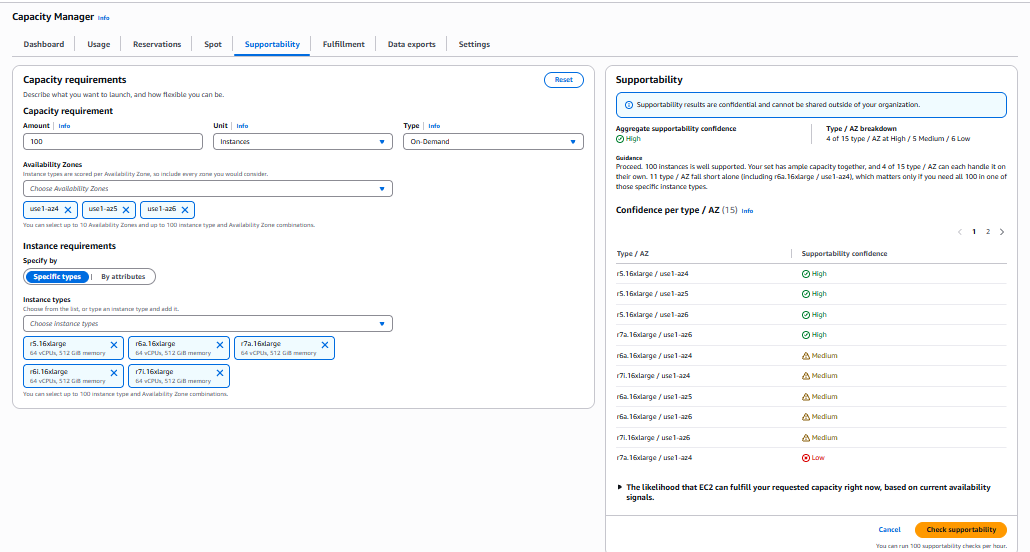
The Supportability tab on the console runs the same check. Enter the amount, type, Availability Zones, and instance types or attributes, then choose Check supportability. One check can include up to 10 Availability Zones, from more than one Region, and up to 100 combinations. Figure 5 shows the search-index check on the console. The aggregate score is High, so together the set can support 100 instances. r5.16xlarge scores High in all three zones, and r7a.16xlarge scores High in use1-az6. r6a.16xlarge scores Medium in all three zones, and the new candidate r7i.16xlarge scores Medium in use1-az4 and use1-az6. The other six combinations, including every r6i.16xlarge combination, score Low.

Screenshot of the Capacity Manager Supportability tab. The left panel sets 100 On-Demand instances, Availability Zones use1-az4, use1-az5, and use1-az6, and instance types r5.16xlarge, r6a.16xlarge, r7a.16xlarge, r6i.16xlarge, and r7i.16xlarge. The right panel shows High aggregate supportability confidence, 4 of 15 combinations at High, 5 at Medium, and 6 at Low, with a confidence for each combination.

Figure 5: A check for 100 instances of five instance types across the three search-index Availability Zones, with High aggregate confidence.

High means a combination holds more than enough to serve your request. Medium means it can cover the request with little to spare, and Low means it holds less than you asked for. For details, see What the scores mean and What to do based on your score in the Amazon Elastic Compute Cloud User Guide.

Scores are guidance, not commitments. If you need assurance capacity will be there when you launch, use Capacity Reservations or future-dated Capacity Reservations.

Run the check when you plan a workload, not on every launch. You call it in the Region where Capacity Manager is turned on, so per-launch calls would add a cross-Region dependency and use up the hourly quota.

Step 4: Add the flexibility to your fleet

After a check shows which combinations can support a workload, add them to your Auto Scaling group, Amazon EC2 Fleet, or Karpenter configuration. You configure flexibility once, and every later launch benefits from it.

Flow: supportability check and fulfillment metrics, then identify the instance types and zones that support the workload, then add that flexibility to Auto Scaling group, EC2 Fleet, or Karpenter, then launch as usual.

Figure 6: Use the capabilities to plan flexibility, then configure it in your fleet.

Add flexibility

For an Auto Scaling group, a mixed instances policy lists instance types in priority order. This example keeps r5.16xlarge, r6a.16xlarge, and r7a.16xlarge, which each delivered 98.5–100 percent outside use1-az5 in Figure 4. It adds r7i.16xlarge, which the check in Figure 5 scored Medium in two zones, and leaves out r6i.16xlarge, which scored Low.

aws autoscaling update-auto-scaling-group \
--auto-scaling-group-name search-index-asg \
--mixed-instances-policy file://mixed-instances.json
# mixed-instances.json
{
  "LaunchTemplate": {
    "LaunchTemplateSpecification": {"LaunchTemplateName": "search-index-lt", "Version": "$Latest"},
    "Overrides": [{"InstanceType": "r5.16xlarge"}, {"InstanceType": "r6a.16xlarge"},
      {"InstanceType": "r7a.16xlarge"}, {"InstanceType": "r7i.16xlarge"}]
  },
  "InstancesDistribution": {"OnDemandAllocationStrategy": "prioritized"}
}

For workloads defined by vCPU and memory, attribute-based instance type selection draws on every type that fits. Afterward, watch AvgInstAzCountPerRequestedVcpu (the Instance Type x AZ count (avg) column) to confirm the change.

Reserve where you need certainty

In use1-az5, r5.16xlarge delivered 82.8 percent in Figure 4, even though the check in Figure 5 scores it High right now. If the team needs that type in that zone, it can reserve its steady-state baseline with an On-Demand Capacity Reservation and let the rest stay flexible.

aws ec2 create-capacity-reservation \
--instance-type r5.16xlarge --instance-platform Linux/UNIX \
--availability-zone-id use1-az5 --instance-count 10 \
--instance-match-criteria open --end-date-type unlimited

AWS bills you for Capacity Reservations whether or not you use them, so size them to your baseline. If you create one to try this example, cancel it when you no longer need it. Use the reservation ID from the create-capacity-reservation output.

aws ec2 cancel-capacity-reservation \
--capacity-reservation-id cr-1234567890abcdef0

Canceling an active reservation that has no commitment duration, like this one, has no charge. Any instances running in it keep running at On-Demand rates.

Conclusion

Real-time supportability checks and capacity fulfillment metrics in Amazon EC2 Capacity Manager make flexibility visible. You can find the best instance types and Availability Zones before you scale up, see where flexibility is paying off, and know where to add more.

To make this routine, review fulfillment rates each week and open the breakdown for any workload below target. Add a supportability check to change management, so capacity is validated before a change that adds or scales a workload goes live.

To get started, open the Fulfillment tab on the AWS console under Capacity Manager. To learn more, go to EC2 Capacity Manager on AWS Console.


About the authors

Yagya Vir Singh

Yagya Vir Singh

Yagya is a Senior Technical Account Manager at AWS based in Nashville, Tennessee. He helps enterprise customers plan and operate their workloads on AWS, with a focus on monitoring and observability, cloud governance, cloud financial management, and generative AI.

Brian Phillippi

Brian Phillippi

Brian is a Principal Product Manager – Technical for Amazon EC2, based in Arizona. He works on EC2 capacity products, including EC2 Capacity Manager, and helps large customers plan and secure the capacity they need. Before joining EC2 product management, he spent several years in AWS infrastructure and demand planning, forecasting and planning the capacity behind AWS Regions.

[$] Plasma X11 session removal surprises some Fedora users

Post Syndicated from jzb original https://lwn.net/Articles/1105130/

The KDE Project announced, in 2025, that Plasma 6.7 would
be the last version of the desktop environment that would support X11
sessions. Those who keep up with KDE’s announcements no doubt expected it when
Plasma 6.8
dropped X11 support as promised. What seems to have come as a surprise, at
least to a number of Fedora KDE Plasma
Desktop
users, is that the Fedora 44 release—which shipped in
April with Plasma 6.6—received
an update to Plasma 6.8 that swept away the X11 session without much warning.
Despite the surprise, it is gone for good: the Fedora Engineering Steering
Committee
(FESCo) has voted
against
a request to revert the update for Fedora 44 and the just-released
Fedora 45.

[$] Portable Python scripts with dependencies

Post Syndicated from jake original https://lwn.net/Articles/1104646/

A basic Python script is portable: it can be copied between machines with little concern about compatibility.
A script that depends on third-party packages requires quite a bit more
care and consideration, however.
In 2023, PEP
723
(“Inline script metadata”) introduced a standard for declaring a Python script’s
dependencies inside the script itself.
Several third-party tools can now automatically install and manage those dependencies, but there is still little official support for this standard within Python itself.

Security updates for Wednesday

Post Syndicated from jzb original https://lwn.net/Articles/1105378/

Security updates have been issued by AlmaLinux (cockpit, dpdk, fence-agents, firefox, freerdp, gimp, opentelemetry-collector, python-dns, qemu-kvm, and raptor2), Debian (apt and squid), Fedora (ags, apptainer, chromium, fractal, mingw-harfbuzz, mingw-qt5-qtwebkit, mingw-qt6-qt5compat, python-mistune, python3-docs, python3.14, python3.9, rubygem-gist, rust-app-store-connect, rust-qemu-rdp, rust-redlib, and selenium-manager), Mageia (java-latest-openjdk, java-17-openjdk, java-21-openjdk, timezone), Oracle (.NET 10.0, .NET 8.0, .NET 9.0, bind, bind9.16, cockpit, firefox, freerdp, gcc, ghostscript, glibc, grafana, java-17-openjdk, java-21-openjdk, kernel, kernel-uek, libXi, pipewire, pki-deps:10.6, podman, python-jwt, python-pillow, python-pyasn1, qt5-qtbase, thunderbird, tomcat, util-linux, and wireshark), Red Hat (dnsmasq, fence-agents, freerdp, pki-core:10.6, and thunderbird), SUSE (amazon-ssm-agent, aom-tools, apache2, brotli, cadvisor, chromium, cups, curl, distribution-registry, eog, gh, go-containerregistry, google-guest-agent, gvfs, haproxy, hauler, helm3, kernel, libBasicUsageEnvironment2, libcdio, libinstpatch-1_0-2, libosmocore, libreoffice, libX11, nodejs22, nvidia-open-driver-G06-signed, openssh, parted, perl-DBI, perl-mime-tools, python-pypdf, rootlesskit, rqlite, rsyslog, sssd, tomcat10, warewulf4, and xen), and Ubuntu (apt-cacher, bind9, bitlbee, cakephp, deluge, dmitry, e17, feh, gnome-shell, golang-github-gin-contrib-cors, gvfs, haproxy, jabberd2, libmspack, libnet-easytcp-perl, libphp-swiftmailer, libsoup2.4, libsoup3, libuser, pcre2, rear, ruby-rack, ruby-sprockets, rxvt-unicode, shapelib, sogo, vips, and yaws).

See the agents, set the terms: new visibility and control for personal agents

Post Syndicated from Marina Elmore original https://blog.cloudflare.com/personal-agents-visibility-control/

Personal agents are the intermediary between humans and the Internet, turning a person’s instructions into requests and actions on websites. A customer might ask a personal agent to compare products across your site, find support articles, or complete a purchase. To a site owner, all three interactions show up as automated traffic — and without a clear view of which agents are visiting and what they are doing, it can be difficult to know whether that traffic is helping your business or creating risk. Blocking agents altogether can feel like the safest choice, but it can mean losing customers. Better visibility into agent activity allows you to decide what access makes sense for your site.

Today, we’re launching new analytics to help you understand how personal agents access your site on behalf of humans, along with more granular access policies to put those decisions into practice. Together, they let you welcome agents on your own terms, and in ways that support your business.

See how agents access your site

Knowing which agent is behind a request turns unexplained automated traffic into traffic you can act on with confidence. Cloudflare maintains the largest verified bot directory in the world, and we are now bringing that intelligence into your traffic details. In Security Analytics, the Bot Analysis chart now shows Personal Assistants as a new category, next to Verified Bot, Likely Human, Likely Automated, and Automated. Security teams can select it to see only personal agent traffic over time.

In Top statistics, a new Personal Assistants widget lists which agents are visiting your site and how many requests each one sends. Filter on one agent and every other widget updates to show only its traffic details: the paths it requests, the status codes it receives, and the networks it comes from. At a glance, you can see whether an agent is logging in, reading your product pages, reaching your checkout, or hitting errors on pages it cannot use.

For sites that protect user accounts with Account Abuse Protection (currently in early access), site owners and fraud teams are able to see which user each agent represents. The population overview page shows which personal agents are active across your users and how many accounts use them, so you can determine whether agent traffic is a meaningful part of your business. Every login and sign-up event now shows whether a personal agent made the request, and which one. Fraud teams can filter accounts by AI assistant events or number of AI assistants.

Additionally, each user's account overview shows the agents acting for that account. A fraud analyst investigating an unusual login can tell whether it came from an agent the customer has relied on for weeks, or from an agent that appeared for the first time today and needs a closer look. If it looks like an attacker is using an agent on an account, fraud analysts can mitigate that account directly, with a WAF rule on its Hashed User ID, without blocking the agent for everyone else who relies on it.

Together, these views give you a clearer basis for deciding which personal agents to welcome, limit, or block.

Set access policies that reflect your preferences

We introduced AI bot policies this summer so site owners could make separate access control choices for AI bots used for Search, Training, and Agent behaviors. Now we’re expanding the existing Agents policy to include granular control options for supported personal agents. To reflect this broader scope, we’re renaming the setting AI Crawler and Agent access policies.

In Security Settings, you can set an overall Agents policy, then choose a different policy for each supported personal agent: Allow (do not block), Block on pages with ads, or Block. For example, you can set the overall Agents policy to Block on pages with ads, then choose Allow (do not block) for a supported personal agent you want to welcome. Your existing Search and Training policies stay as they are.

You can also make these choices when you add a new zone to Cloudflare. During onboarding, we ask whether you monetize pages with ads and then tailor the recommended policies to your answer. You can always revisit your access controls later in Security Settings.

The right policy depends on your site. One publisher may allow a supported personal agent throughout its site so readers can find its articles, while another may block that same agent on pages where ads support the content. Both publishers are choosing the access control that works for their business.

Agent identity is only part of the story

The analytics and policies we’re launching today give site owners visibility into personal agent activity and control over their access. Our next goal is to help site owners preserve the context of their relationships with users when personal agents act as intermediaries. A site may recognize the agent making a request but lack information it would otherwise have about the user: whether they are an existing customer, what they authorized the agent to do, whether they have a subscription, or which protections should apply.

Reaching that goal will require privacy-aware ways to (1) carry user context through an agent, (2) help sites assess reputation, and (3) establish clear accountability when something goes wrong. We’ll be sharing more as we work with agent operators and others across the ecosystem, so site owners can choose whether to grant agents greater access while continuing to build relationships with their users.

Make the choice for your site

That person asking a personal agent to compare products, find support, or complete a purchase is still a customer trying to reach your business. Review how personal agents are accessing your site, then visit Security Settings → AI Crawler and Agent access policies to set the terms that work for your site.

Celebrating the UK’s National Engineering Day 2026

Post Syndicated from Philippa Hanman original https://www.raspberrypi.org/blog/celebrating-the-uks-national-engineering-day-2026/

We’re celebrating National Engineering Day in the UK with our friends at the Royal Academy of Engineering. National Engineering Day aims to make the UK’s engineers and engineering more visible, and celebrate how they improve everyday lives and shape the world around us.

The engineers of 2076

Now hiring: The engineers of 2076

This year, the Royal Academy of Engineering is marking its 50th anniversary by looking 50 years into the future. Through job ads for roles that don’t exist yet, they invite us to imagine the engineering careers that will build life on the Moon, Mars, and beyond.

Scientific investigations in space

Some of those future engineers could be taking their first steps today. They might be getting their first experience with space science in the European Astro Pi Challenge, for example. This ESA Education project is run in collaboration with the Raspberry Pi Foundation and offers young people the amazing opportunity to conduct scientific investigations in space by writing computer programs that run on Raspberry Pi computers aboard the International Space Station (ISS). 

We spoke to Geraint Ballinger, a Software Development and Deployment Engineer who works on the Astro Pi Challenge, to find out what engineering roles he thought could be important in the future. We also discussed how the engineers of 2076 need opportunities to experiment, solve problems, and build confidence today.

Hi Geraint. Can you tell us a bit about your role as a Software Development and Deployment Engineer at the Raspberry Pi Foundation?

I like to describe it as a blend between traditional software engineering and teaching. The overall aim of my work is to help young people run code on the Astro Pi computers aboard the International Space Station, which means designing systems that hide unnecessary complexity so students can learn and solve problems effectively, while ensuring the software deployed to orbit remains secure and compliant.

Part of the role is to create applications and code libraries that young people can use to simplify the routine things so they can focus their energy on the interesting aspects of running code in space: taking pictures of the Earth and investigating various scientific concepts. I also oversee the pipeline that receives their work — reviewing submissions, moderating Mission Zero images, and building internal tools to streamline the review process.

On the flight software side, I am jointly responsible for delivering the Astro Pi operating system on the ISS. This involves preparing and delivering system updates, coordinating security reviews, and developing internal astronaut-facing applications such as the application used by the astronauts to focus the Astro Pi cameras.

What do you most enjoy about your role?

I enjoy the sheer variety of engineering challenges to which I am exposed. In any given week, I might be writing a Python library, developing a Typescript web application, or diagnosing a low-level hardware failure on the ISS — like debugging corrupted SD cards.  In particular, I have really enjoyed the challenge of maintaining a system on real physical hardware in space. Operating a Raspberry Pi in orbit makes it impossible to ignore the physical machine: you have to actively design around constraints such as solar radiation, tight power and bandwidth budgets, and hardware degradation over the mission lifecycle.  It’s been really interesting to learn about the procedures and processes involved in delivering software and hardware into orbit.

How does your work help young people’s Astro Pi programs run on the ISS?

I developed the Astro Pi Replay tool, an online browser emulator that simplifies testing and code submission for Mission Space Lab. This allows anyone with a standard school laptop to test their code as if it were running on the ISS, without the need for physical hardware.

Alongside the software tooling, I am also involved in writing the educational materials that guide young people and mentors through the core concepts required for Mission Space Lab.  These resources hopefully enable participants to get up to speed quickly, and to produce working code within a few hours.

What skills do you see young people practising through Astro Pi that future space engineers will need?

Problem-solving, patience, critical thinking, and creativity are vital skills for future space engineers that young people put into practice through the Astro Pi Challenge.

In Mission Space Lab, the more advanced of the Astro Pi missions, young people learn to break down complex tasks into manageable pieces and to coordinate independent pieces of work as a team.

Becauses technical failures and software bugs are inevitable realities of operating in space, Mission Space Lab gives participants practical opportunities to hone their debugging skills, to build resilience and a constructive approach to problem-solving, and foster an active curiosity about underlying system processes.

National Engineering Day is imagining the engineers of 2076. What space engineering job would you invent, and what would someone need to know or be able to do to succeed in it?

I’d invent the role of Interplanetary Communications Manager. If we’ve reached Mars by 2076, then keeping a reliable link back to Earth will be critical infrastructure, and someone will need to look after it.

The job would sit across software and hardware. Software will be a big part of it, but you’d always be working with physical systems, particularly radio transmission. I don’t think we’ll find a fundamentally new way to communicate across space, so I’d expect the role to build on radio and optical technology we already use today. So the key knowledge would be the physics of communication, such as how radio waves and light travel over huge distances, along with how networks are designed to stay reliable.

I also expect AI to touch almost every area of engineering, but I doubt something this critical (and expensive!) would be left entirely without human oversight. There will always be a need for people who truly understand how the system works and can judge whether it can be trusted. That understanding is what I’d want a candidate to bring to the role.

Thanks, Geraint! And we hope any future Interplanetary Communications Managers try out the Astro Pi Challenge, which is open for submissions now!

Get involved with National Engineering Day

Now it’s your turn. What engineering role would you create for 2076? Find out more about how to take part on the Royal Academy of Engineering website.  

And if your young people and future engineers would like to enter the European Astro Pi Challenge 26/27, visit: https://astro-pi.org/ to select a mission.

The post Celebrating the UK’s National Engineering Day 2026 appeared first on Raspberry Pi Foundation.

The collective thoughts of the interwebz