Post Syndicated from Abrom Douglas original https://aws.amazon.com/blogs/security/securing-ai-agents-with-amazon-bedrock-agentcore-identity/
By using Amazon Bedrock AgentCore, developers can build agentic workloads using a comprehensive set of enterprise-grade services that help quickly and securely deploy and operate AI agents at scale using any framework and model, hosted on Amazon Bedrock or elsewhere. AgentCore services are modular and composable, allowing them to be used together or independently. To get a high level overview of Amazon Bedrock AgentCore and all of the modular services, be sure to read the Introducing Amazon Bedrock AgentCore blog post.
In this post, I take a deeper look at AgentCore Identity, powered by Amazon Cognito, to introduce the identity and credential management features designed specifically for AI agents and automated workloads. AgentCore Identity provides secure, scalable agent identity and access management capabilities that are compatible with existing identity providers, avoiding the need for user migration or rebuilding authentication flows. Additionally, AgentCore Identity provides a token vault to help secure user access tokens and a native integration with AWS Secrets Manager to secure API keys and OAuth client credentials for external resources and tools, helps orchestrate standard OAuth flows, and centralizes AI agent identities to a secure central directory.
More specifically, here are some key features provided by AgentCore Identity:
- Centralized agent identity management – A unified directory feature that serves as the single source of truth for managing agent identities across your organization, providing each agent a unique identity and associated metadata. This provides each agent identity a distinct identifier using Amazon Resource Names (ARNs) and providing a central view of your agents whether they’re hosted in AWS, self-hosted, or using a hybrid deployment.
- Token vault – Securely store OAuth 2.0 Access and Refresh tokens, API keys, and OAuth 2.0 client secrets. Credentials are encrypted using AWS Key Management Service (AWS KMS) keys with support for customer-managed keys. The system implements strict access controls for credential retrieval, limiting access to individual agents only. For user-specific credentials such as OAuth 2.0 tokens, agents are restricted to accessing them solely on behalf of the associated user, maintaining least privilege and proper delegation mechanisms. When an expired access token is retrieved from the token vault and fails authorization with the resource server, the AI agent can use a secured refresh token to obtain and store a new access token. This allows a high security bar to be met, while improving the user experience by requiring less authentication requests to obtain new access tokens.
- OAuth 2.0 flow support – Provides native support for OAuth 2.0 client credentials grant, also known as two-legged OAuth (2LO), and authorization code grant, also known as three-legged OAuth (3LO). This includes built-in credential providers for popular services and support for custom integrations. The service handles OAuth 2.0 implementations while offering simple APIs for agents to access AWS resources and third-party services.
- Agent identity and access controls – Supports delegated authentication flow allowing agents to access resources using provided credentials while maintaining audit trails and access controls. Authorization decisions are based on the provided credentials during the delegation process.
- AgentCore SDK integration – Offers integration through declarative annotations that automatically handle credential retrieval and injection, reducing boilerplate code, and providing a seamless developer experience. The Bedrock AgentCore SDK provides automatic error handling for common scenarios such as token expiration and user consent requirements.
- Identity-aware authorization – Passes user context to agent code that allows the full access token to be forwarded to the agent code. AgentCore Identity first validates the token, then passes it to the agent where it can be decoded to obtain user context. In the case of passing an access token that does not have the full user context, the agent code can use it to call an OpenID Connect (OIDC) user info endpoint and retrieve user information. This can make sure agents get only the right access through dynamic decisions based on the user’s identity context, delivering enhanced security controls.
For full details on the features of AgentCore Identity, see the AgentCore developer guide.
Getting started with AgentCore Identity
There are several ways to get started with Amazon Bedrock AgentCore overall and more specifically with AgentCore Identity. You can follow the steps in Introducing Amazon Bedrock AgentCore: Securely deploy and operate AI agents at any scale for several AgentCore services, or you can navigate to the developer guide and follow along in the Getting started section for AgentCore Identity. Also, be sure to look into the Bedrock AgentCore Starter Toolkit GitHub repository and AgentCore Identity samples repository. Following the previous guides and samples will help you to get up and running quickly while using the Python Bedrock AgentCore SDK.
To start diving deeper into AgentCore Identity and how it can be used as a modular service, I’ll walk through an example use case involving a web application that uses AI agents. Using one of the features of the example application, the user can interact with an AI agent to help schedule meetings in their Google calendar. The AI agent will eventually be able to act on behalf of the authenticated human user. Let’s take a deeper look into this use case and better understand the end-to-end flow.
End-to-end flow example
The following sequence diagram (Figure 1) provides the details of an example end-to-end interaction between a human user signing in to a web application and interacting with an AI agent to perform actions on behalf of the human user. This shows how AgentCore Identity provides AI agent builders the identity primitives to create and secure AI agent identities, orchestrate a 3LO flow (following an authorization code grant flow), and securing temporary access tokens in the token vault for third-party OAuth resources, such as Google.
To help understand the end-to-end flow, I’ve broken this down into three different sub-flows. The first sub-flow is user authentication—in the example, the human user needs to first sign in to the web application. Amazon Cognito is used here, but you can use the identity provider of your choice. The second sub-flow is AI agent interaction—this is how the human user is interacting with the AI agent by way of the web application. This sub-flow also handles the orchestration between the human user and the AI agent, including consent, acquiring access tokens on behalf of the user, and securing them in the token vault. The third and last sub-flow is AI agent acting on behalf of user—as the name implies, these are the actions the AI agent is taking on behalf of the human user. This could include performing actions entirely within the application itself or by accessing external resource servers, such as Google Calendar in Figure 1.
Two prerequisites for the flow require setting up an OAuth 2.0 credential provider (Google is used for this flow) using the CreateOauth2CredentialProvider API, and creating your AI agent identity using the CreateWorkloadIdentity API.
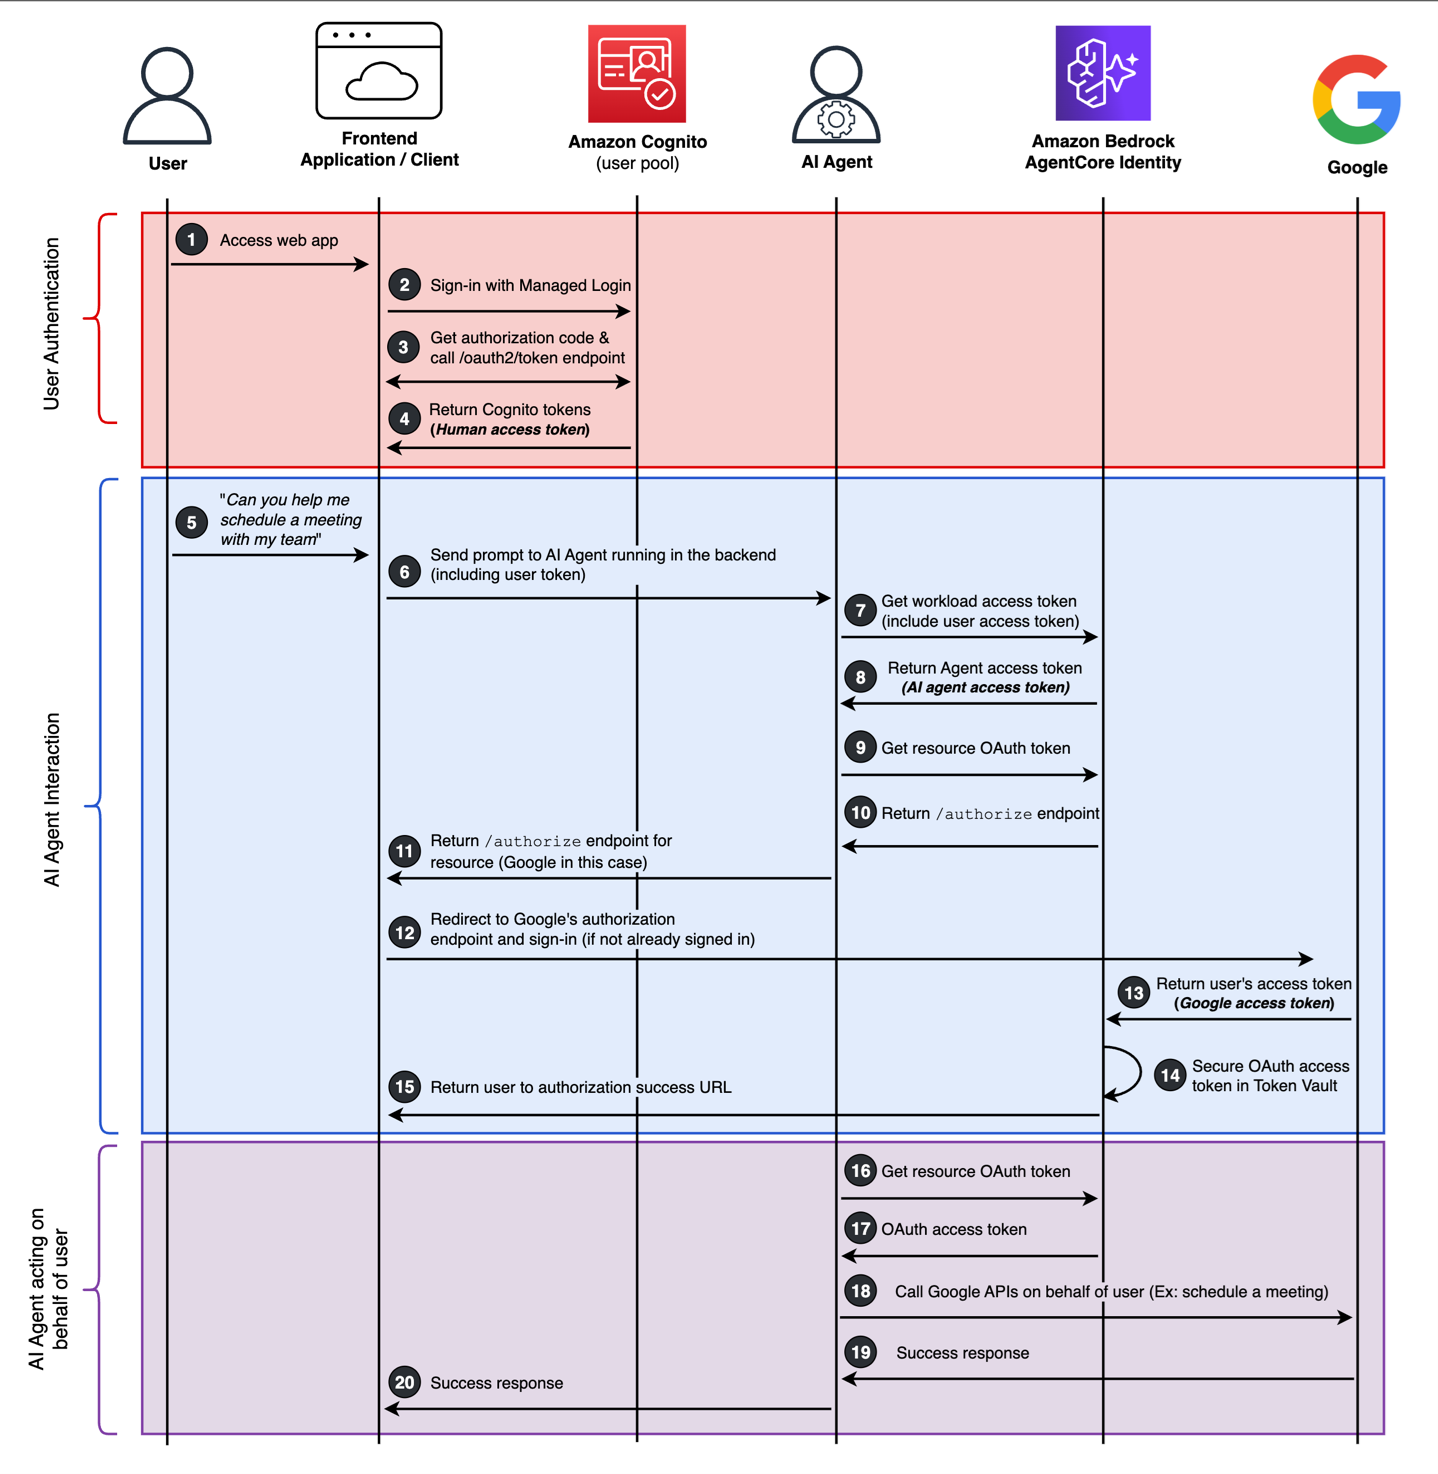
Figure 1: End-to-end flow showing an example of a human user securely interacting with an AI agent.
User authentication
- The user navigates to the web application.
- There are no existing sessions or tokens. The client will redirect the user to the Amazon Cognito managed login and the user signs in with their username and password, or uses a passwordless OTP or passkey.
- Amazon Cognito happens to be used in this flow with a local Cognito user account. This can also support federated login flows with third-party identity providers, including social, SAML, or OIDC providers.
- After successful authentication an authorization code is returned to the application, and this is used to call the /oauth2/token endpoint to get Cognito tokens.
- Amazon Cognito ID, access, and refresh tokens are returned to the client. I’ll refer to this access token as the human access token going forward.
AI agent interaction
- With the user signed in, they begin interacting with the AI agent through the web application and ask the AI agent to help with scheduling a meeting in their Google calendar.
- The prompt is sent to the backend where the AI agent is running along with the human access token.
- This could be using AgentCore Runtime and could use Amazon Bedrock to access various large language models (LLMs). The architecture could also be expanded to use Amazon Bedrock Knowledge Bases for a retrieval-augmented generation (RAG) solution.
- The AI agent will first obtain its own access token from AgentCore Identity. It will also provide the human access token as a request parameter. This is using the AgentCore Identity GetWorkloadAccessTokenForJWT API.
- When using the GetWorkloadAccessTokenForJWT API, AgentCore Identity will verify the human access token signature and verify the token is not expired.
- AgentCore Identity returns an access token for the AI agent, going forward I’ll call this the AI agent access token. Because the human access token was provided during the initial request to get the AI agent access token, the specific returned AI agent access token is bound to the human user’s identity.
- AgentCore Identity will derive the human user’s identity by combing the ISS and SUB claims within the human access token. You can learn more about obtaining credentials in the AgentCore Identity developer guide.
- The AI agent, using its own access token, will begin the process of obtaining a third, new access token from a third-party OAuth resource, which is Google in this flow. The AI agent will call the AgentCore Identity GetResourceOauth2Token API. Because this is the initial login flow and a human user is involved, an OAuth 2.0 authorization code grant flow will begin for the OAuth resource (that is, Google). This can be referred to as a 3LO flow.
- The goal of this process is to obtain a temporary access token to be used with Google calendar that will be secured in the token vault. It’s important to note that as long as this access token for Google remains active after the human user has given consent, it can continue to securely be retrieved and used by the AI agent from the token vault.
- The Google authorization URL will be generated by AgentCore identity service based on the pre-configured Google OAuth client.
- The Google authorization URL is sent to the client from the AI agent.
- The client will immediately redirect to Google’s authorization endpoint and begin the auth flow for the human user to sign in to Google.
- After a successful authentication with Google, an authorization code is returned to AgentCore Identity, and an access token is obtained following the OAuth 2.0 authorization code grant flow.
- The access token from Google for the user is secured in the token vault. I’ll call this third access token going forward the Google access token.
- Tokens are secured in the token vault under the agent identity ID and the user ID, this way the token is bound between the agent identity, the human identity, and the Google access token.
- As the authorization code grant completes its process to obtain a Google access token in the backend, the user will be redirected back to the frontend of the application. This is configured as the callback URL.
AI agent acting on behalf of the user
- The AI agent will call the GetResourceOauth2Token API again (same as step 9) and include the AI agent access token as the workloadIdentityToken request parameter.
- However, this time the Google access token is returned from the token vault. This provides an enhanced user experience by reducing consent fatigue and minimizing the number of authorization prompts.
- With the original context and intent of having the AI agent help schedule a meeting in Google calendar, the AI agent will call the Google Calendar APIs with the Google access token.
- The Google access token used by the AI agent will have the https://www.googleapis.com/auth/calendar.events scope, authorizing certain calendar actions.
- After actions are complete between the AI agent and Google calendar, success responses (or failures) will be returned to the AI agent.
- This could be an opportunity for the AI agent to perform other automated actions, such as updating a user record in the web application’s backend.
- After all actions of the AI agent are complete, a success response is returned to the frontend application.
The previous flow describes the entire end-to-end process starting from a human user needing to sign in to the web application and ending with an AI agent performing an automated action on behalf of the user. Three different access tokens were involved in this process, and the following is a summary of these access tokens.
- Human access token – This is issued by an Amazon Cognito user pool (or another identity provider). This access token is used to access the web application and is used to obtain the AI agent access token using the GetWorkloadAccessTokenForJWT API.
- AI agent access token –This is issued by AgentCore Identity. This access token is used by the AI agent to securely access the token vault.
- Google access token – This is issued by Google representing the human user. This access token is what’s secured in the token vault and can be securely retrieved by the AI agent access token.
Conclusion
Organizations are rapidly seeking opportunities to use AI agents to automate workflows and enhance user experiences, but this adoption can introduce security and compliance challenges that can’t be ignored. Organizations must make sure that AI agents can securely access resources on behalf of users while protecting sensitive credentials and maintaining compliance at scale. AgentCore Identity addresses these fundamental challenges by providing enterprise-grade security that protects user credentials and maintains strict access controls. This helps make sure that AI agents can only access what they need when they need it. The service integrates with existing identity systems, avoiding the need for complex migrations or rebuilding authentication flows. Its centralized management of AI agent identities reduces operational overhead and strengthens security posture. For organizations scaling their AI initiatives, these capabilities translate into faster time-to-market and reduced risk of unauthorized access. By implementing AgentCore Identity, organizations can confidently deploy AI agents with built-in OAuth support and secure token management, while lowering development and maintenance costs through streamlined security controls that scale with their business needs.
To learn more about building with AgentCore Identity in your organization, review some example use cases and visit the Getting started with AgentCore Identity section of the developer guide to explore prerequisites, SDK usage, best practices, and start building your first authenticated agent.
Use the comments section to leave feedback and engage about this post. If you have questions about this post, start a new thread on Amazon Bedrock AgentCore re:Post or contact AWS Support.


