All posts by Anni Wang

AI Search: the search primitive for your agents

Post Syndicated from Anni Wang original https://blog.cloudflare.com/ai-search-agent-primitive/

Every agent needs search: Coding agents search millions of files across repos. Support agents search customer tickets and internal docs. Even an agent’s memory, its ability to recall past interactions, is fundamentally a search problem. The use cases are different, but the underlying problem is the same: get the right information to the model at the right time.

If you’re building search yourself, you need a vector index, an indexing pipeline that parses and chunks your documents, and something to keep the index up to date when your data changes. If you also need keyword search, that’s a separate index and fusion logic on top. And if each of your agents needs its own searchable context, you’re setting all of that up per agent. 

AI Search (formerly AutoRAG) is the plug-and-play search primitive you need. You can dynamically create instances, give it your data, and search — from a Worker, the Agents SDK, or Wrangler CLI. Here’s what we’re shipping:

  • Hybrid search. Enable both semantic and keyword matching in the same query. Vector search and BM25 run in parallel and results are fused. (The search on our blog is now powered by AI Search. Try the magnifying glass icon to the top right.)

  • Built-in storage and index. New instances come with their own storage and vector index. Upload files directly to an instance via API and they’re indexed. No R2 buckets to set up, no external data sources to connect first. The new ai_search_namespaces binding lets you create and delete instances at runtime from your Worker, so you can spin up one per agent, per customer, or per language without redeployment.

You can now also attach metadata to documents and use it to boost rankings at query time, and query across multiple instances in a single call. 

Now, let’s look at what this means in practice.

In action: Customer Support Agent

Let’s walk through a support agent that searches for two kinds of knowledge: shared product docs, and per-customer history like past resolutions. The product docs are too large to fit in a context window, and each customer’s history grows with every resolved issue, so the agent needs retrieval to find what’s relevant.

Here’s what that looks like with AI Search and the Agents SDK. Start by scaffolding a project:

npm create cloudflare@latest -- --template cloudflare/agents-starter

First, bind an AI Search namespace to your Worker:

// wrangler.jsonc 
{
  "ai_search_namespaces": [
    { "binding": "SUPPORT_KB", "namespace": "support" }
  ],
  "ai": { "binding": "AI" },
  "durable_objects": {
    "bindings": [
      { "name": "SupportAgent", "class_name": "SupportAgent" }
    ]
  }
}

Let’s say your shared product documentation lives in an R2 bucket called product-doc. You can create a one-off AI Search instance (named product-knowledge) backed by the bucket on the Cloudflare Dashboard within the support namespace:


That’s your shared knowledge base, the docs every agent can reference.

When a customer comes back with a new issue, knowing what’s already been tried saves everyone time. You can track this by creating an AI Search instance per customer. After each resolved issue, the agent saves a summary of what went wrong and how it was fixed. Over time, this builds up a searchable log of past resolutions. You can create instances dynamically using the namespace binding:

// create a per-customer instance when they first show up 
await env.SUPPORT_KB.create({
  id: `customer-${customerId}`,
  index_method:{ keyword: true, vector: true }
});

Each instance gets its own built-in storage and vector index — powered by R2 and Vectorize. The instance starts empty and accumulates context over time. Next time the customer comes back, all of it is searchable.

Here’s what the namespace looks like after a few customers:

namespace: "support"
├── product-knowledge     (R2 as source, shared across all agents)
├── customer-abc123       (managed storage, per-customer)
├── customer-def456       (managed storage, per-customer)
└── customer-ghi789       (managed storage, per-customer)

Now the agent itself. It extends AIChatAgent from the Agents SDK and defines two tools. We’re using Kimi K2.5 as the LLM via Workers AI. The model decides when to call the tools based on the conversation:

import { AIChatAgent, type OnChatMessageOptions } from "@cloudflare/ai-chat";
import { createWorkersAI } from "workers-ai-provider";
import { streamText, convertToModelMessages, tool, stepCountIs } from "ai";
import { routeAgentRequest } from "agents";
import { z } from "zod";

export class SupportAgent extends AIChatAgent<Env> {
  async onChatMessage(_onFinish: unknown, options?: OnChatMessageOptions) {
    // the client passes customerId in the request body
    // via the Agent SDK's sendMessage({ body: { customerId } })
    const customerId = options?.body?.customerId;

    // create a per-customer instance when they first show up.
    // each instance gets its own storage and vector index.
    if (customerId) {
      try {
        await this.env.SUPPORT_KB.create({
          id: `customer-${customerId}`,
          index_method: { keyword: true, vector: true }
        });
      } catch {
        // instance already exists
      }
    }

    const workersai = createWorkersAI({ binding: this.env.AI });

    const result = streamText({
      model: workersai("@cf/moonshotai/kimi-k2.5"),
      system: `You are a support agent. Use search_knowledge_base
        to find relevant docs before answering. Search results
        include both product docs and this customer's past
        resolutions — use them to avoid repeating failed fixes
        and to recognize recurring issues. When the issue is
        resolved, call save_resolution before responding.`,
      // this.messages is the full conversation history, automatically
      // persisted by AIChatAgent across reconnects
      messages: await convertToModelMessages(this.messages),
      tools: {
        // tool 1: search across shared product docs AND this
        // customer's past resolutions in a single call
        search_knowledge_base: tool({
          description: "Search product docs and customer history",
          inputSchema: z.object({
            query: z.string().describe("The search query"),
          }),
          execute: async ({ query }) => {
            // always search product docs;
            // include customer history if available
            const instances = ["product-knowledge"];
            if (customerId) {
              instances.push(`customer-${customerId}`);
            }
            return await this.env.SUPPORT_KB.search({
              query: query,
              ai_search_options: {
                // surface recent docs over older ones
                boost_by: [
                  { field: "timestamp", direction: "desc" }
                ],
                // search across both instances at once
                instance_ids: instances
              }
            });
          }
        }),

        // tool 2: after resolving an issue, the agent saves a
        // summary so future agents have full context
        save_resolution: tool({
          description:
            "Save a resolution summary after solving a customer's issue",
          inputSchema: z.object({
            filename: z.string().describe(
              "Short descriptive filename, e.g. 'billing-fix.md'"
            ),
            content: z.string().describe(
              "What the problem was, what caused it, and how it was resolved"
            ),
          }),
          execute: async ({ filename, content }) => {
            if (!customerId) return { error: "No customer ID" };
            const instance = this.env.SUPPORT_KB.get(
              `customer-${customerId}`
            );
            // uploadAndPoll waits until indexing is complete,
            // so the resolution is searchable before the next query
            const item = await instance.items.uploadAndPoll(
              filename, content
            );
            return { saved: true, filename, status: item.status };
          }
        }),
      },
      // cap agentic tool-use loops at 10 steps
      stopWhen: stepCountIs(10),
      abortSignal: options?.abortSignal,
    });

    return result.toUIMessageStreamResponse();
  }
}

// route requests to the SupportAgent durable object
export default {
  async fetch(request: Request, env: Env) {
    return (
      (await routeAgentRequest(request, env)) ||
      new Response("Not found", { status: 404 })
    );
  }
} satisfies ExportedHandler<Env>;

With this, the model decides when to search and when to save. When it searches, it queries product-knowledge and this customer’s past resolutions together. When the issue is resolved, it saves a summary that’s immediately searchable in future conversations. 

How AI Search finds what you’re looking for

Under the hood, AI Search runs a multi-step retrieval pipeline, in which every step is configurable.

Hybrid Search: search that understands intent and matches terms

Until now, AI Search only offered vector search. Vector search is great at understanding intent, but it can lose specifics. In a query “ERR_CONNECTION_REFUSED timeout,” the embedding captures the broad concept of connection failures. But the user isn’t looking for general networking docs. They’re looking for the specific document that mentions “ERR_CONNECTION_REFUSED”. Vector search might return results about troubleshooting without ever surfacing the page that contains that exact error string. 

Keyword search fills that gap. AI Search now supports BM25, one of the most widely used retrieval scoring functions. BM25 scores documents by how often your query terms appear, how rare those terms are across the entire corpus, and how long the document is. It rewards matches on specific terms, penalizes common filler words, and normalizes for document length. When you search “ERR_CONNECTION_REFUSED timeout”, BM25 finds documents that actually contain “ERR_CONNECTION_REFUSED” as a term. However, BM25 may miss a page about “troubleshooting network connections” even though it may be describing the same problem. That’s where vector search shines, and why you need both.

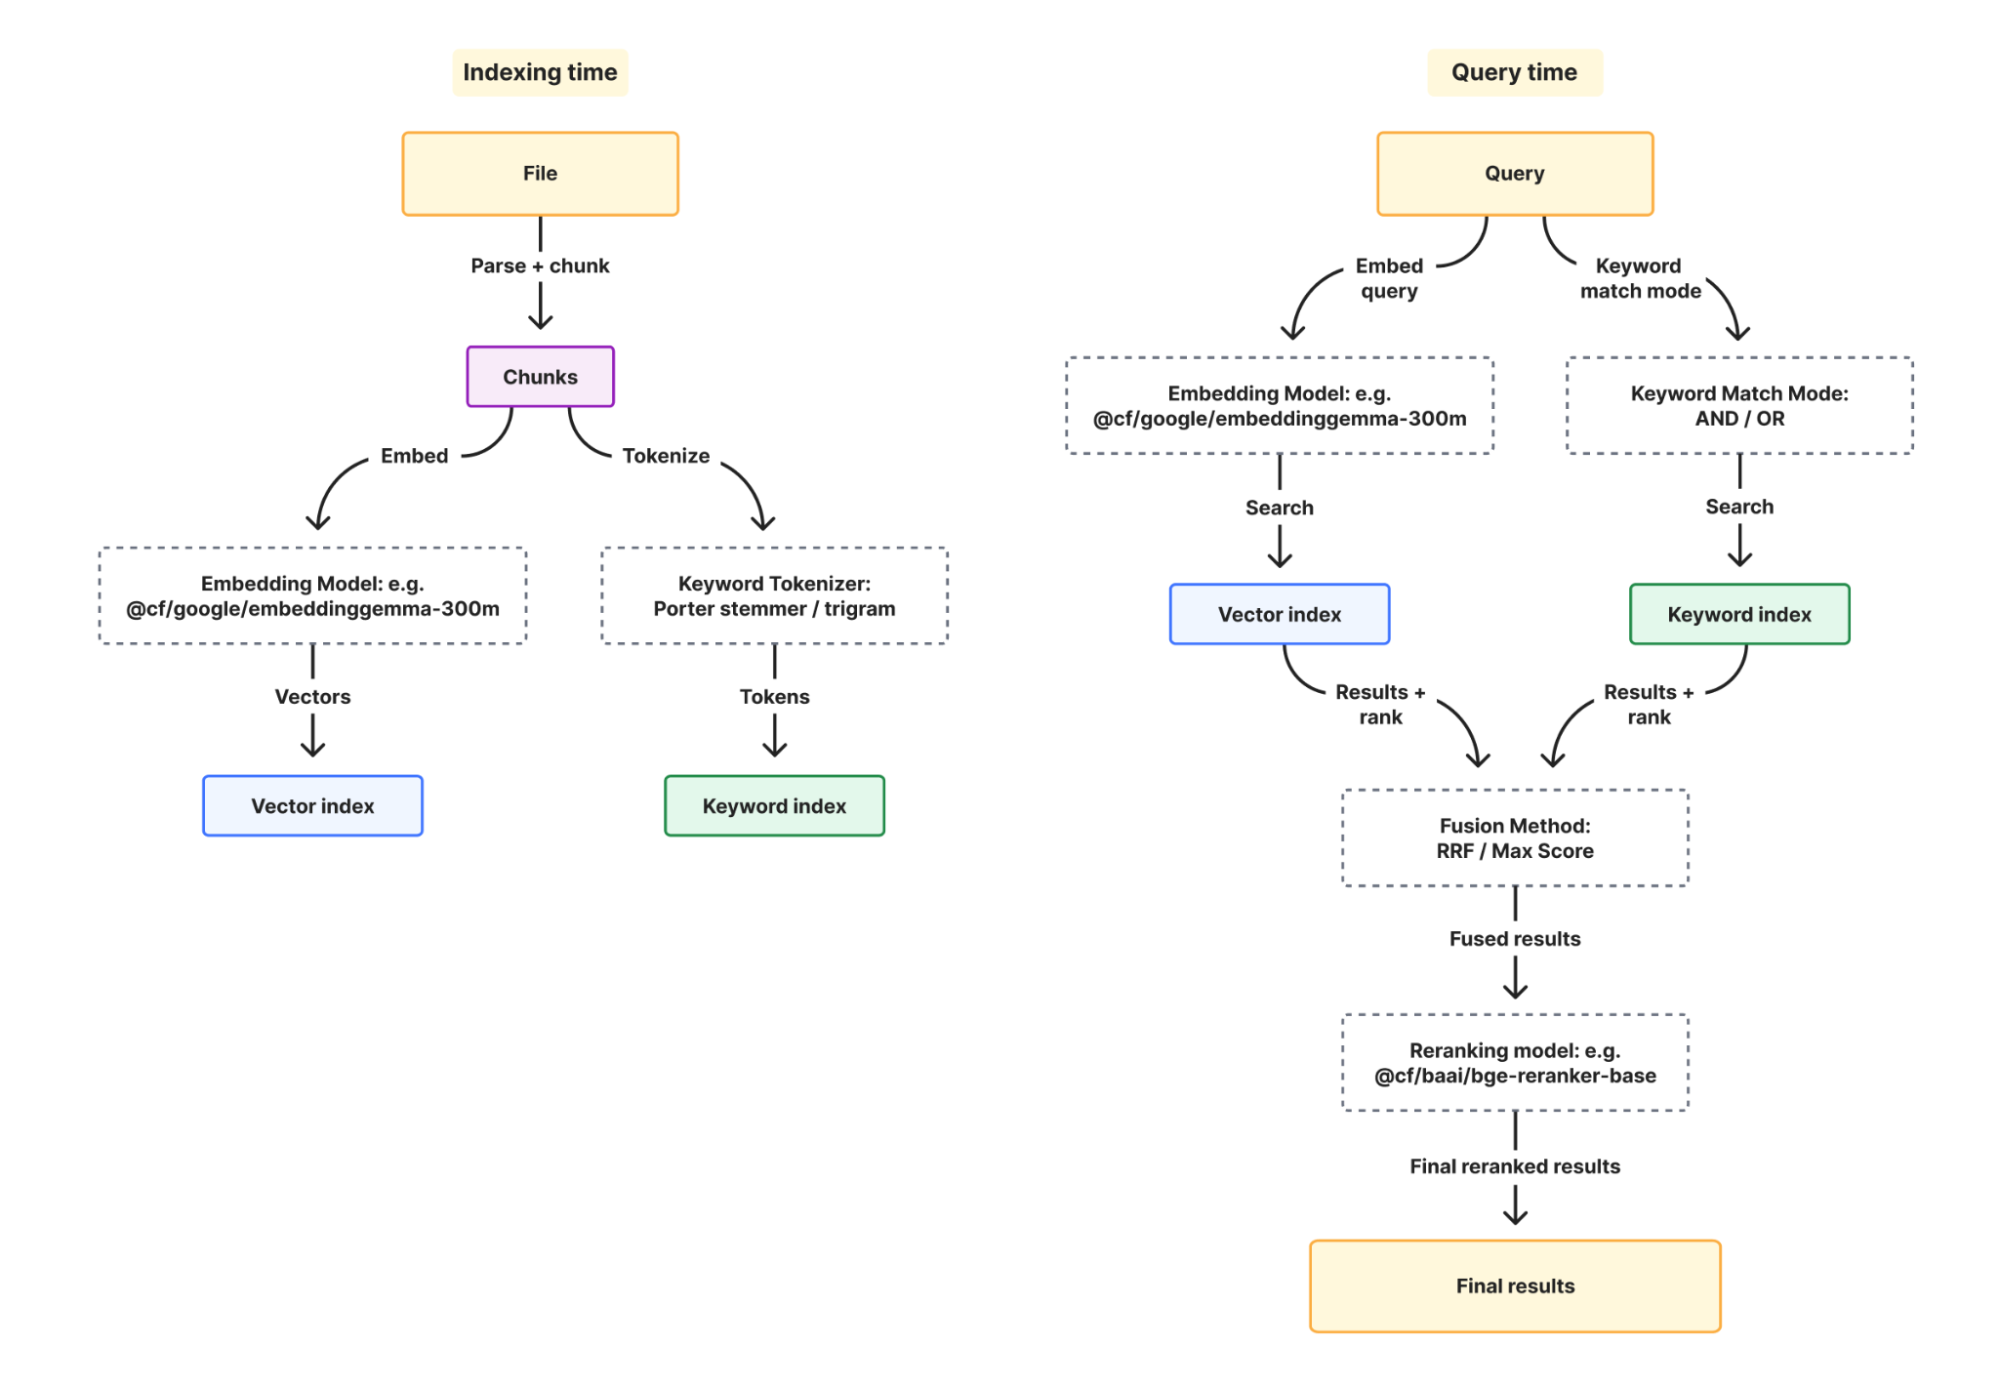
When you enable hybrid search, it runs vector and BM25 in parallel, fuses the results, and optionally reranks them:

Let’s take a look at the new configurations for BM25, and how they come together.

  1. Tokenizer controls how your documents are broken into matchable terms at index time. Porter stemmer (option: porter) stems words so “running” matches “run.” Trigram (option: trigram) matches character substrings so “conf” matches “configuration.” You can use porter for natural language content like docs, and trigram for code where partial matches matter.

  2. Keyword match mode controls which documents are candidates for BM25 scoring at query time. AND requires all query terms to appear in a document, OR includes anything with at least one match.

  3. Fusion controls how vector and keyword results are combined into the final list of results during query time. Reciprocal rank fusion (option: rrf) merges by rank position rather than score, which avoids comparing two incompatible scoring scales, whereas max fusion (option: max) takes the higher score.

  4. (Optional) Reranking adds a cross-encoder pass that re-scores results by evaluating the query and document together as a pair. It can help catch cases where a result has the right terms but isn’t answering the question. 

Every option has a sane default when omitted. You have the flexibility to configure what matters whenever you create a new instance:

const instance = await env.AI_SEARCH.create({
  id: "my-instance",
  index_method: { keyword: true, vector: true },
  indexing_options: {
    keyword_tokenizer: "porter"
  },
  retrieval_options: {
    keyword_match_mode: "or"
  },
  fusion_method: "rrf",
  reranking: true,
  reranking_model: "@cf/baai/bge-reranker-base"
});

Boost relevance: surface what matters

Retrieval gets you relevant results, but relevance alone isn’t always enough. For example, in a news search, an article from last week and an article from three years ago might both be semantically relevant to “election results,” but most users probably want the recent one. Boosting lets you layer business logic on top of retrieval by nudging rankings based on document metadata.

You can boost on timestamp (built in on every item) or any custom metadata field you define.

// boost high priority docs
const results = await instance.search({
  query: "deployment guide",
  ai_search_options: {
    boost_by: [
      { field: "timestamp", direction: "desc" }
    ]
  }
});

Cross-instance search: query across boundaries

In the support agent example, product documentation and customer resolution history live in separate instances by design. But when the agent is answering a question, it needs context from both places at once. Without cross-instance search, you’d make two separate calls and merge the results yourself.

The namespace binding exposes a search() method that handles this for you. Pass an array of instance names and get one ranked list back:

const results = await env.SUPPORT_KB.search({
  query: "billing error",
  ai_search_options: {
    instance_ids: ["product-knowledge", "customer-abc123"]
  }
});

Results are merged and ranked across instances. The agent doesn’t need to know or care that shared docs and customer resolution history live in separate places. 

How AI Search instances work

So far we’ve covered how AI Search finds the right results. Now let’s look at how you can create and manage your search instances.

If you used AI Search before this release, you know the setup: create an R2 bucket, link it to an AI Search instance, AI search generates a service API token for you, and you manage the Vectorize index that gets provisioned on your account. Uploading an object requires you to write to R2 and then wait for a sync job to run to have the object indexed.

New instances created now work differently. When you call create(), the instance comes with its own storage and vector index built-in. You can upload a file, the file is sent to index immediately, and you can poll for indexing status all with one uploadAndpoll() API. Once completed, you can search the instance immediately, and there are no external dependencies to wire together.

const instance = env.AI_SEARCH.get("my-instance");

// upload and wait for indexing to complete
const item = await instance.items.uploadAndPoll("faq.md", content, {
  metadata: { category: "onboarding" }
});
console.log(item.status); // "completed"

// immediately search after indexing is completed
const results = await instance.search({
  // alternative way to pass in users' query other than using parameter query 
  messages: [{ role: "user", content: "onboarding guide" }],
});

Each instance can also connect to one external data source (an R2 bucket or a website) and run on a sync schedule. It can exist alongside the provided built-in storage. In the support agent example, product-knowledge is backed by an R2 bucket for shared documentation, while each customer’s instance uses built-in storage for context uploaded on the fly.

Namespaces: create search instances at runtime

The ai_search_namespaces is a new binding you can leverage to dynamically create search instances at runtime. It replaces the previous env.AI.autorag() API, which accessed AI Search through the AI binding. The old bindings will continue to work using Workers compatibility dates.

// wrangler.jsonc 
{
  "ai_search_namespaces": [
    { "binding": "AI_SEARCH", "namespace": "example" },
  ]
}

The namespace binding gives you APIs like create(), delete(), list(), and search() at the namespace level. If you’re creating instances dynamically (e.g. per agent, per customer, per tenant), this is the binding to use.

// create an instance 
const instance = await env.AI_SEARCH.create({
  id: "my-instance"
});

// delete an instance and all its indexed data
await env.AI_SEARCH.delete("old-instance");

Pricing for new instances

New instances created as of today will get built-in storage and a vector index automatically. 

These instances are free to use while AI Search is in open beta with the limits listed below. When using the website as a data source, website crawling using Browser Run (formerly Browser Rendering) is also now a built-in service, meaning that you won’t be billed for it separately. After beta, the goal is to provide unified pricing for AI Search as a single service, rather than billing separately for each underlying component. Workers AI and AI Gateway usage will continue to be billed separately.

We’ll give at least 30 days notice and communicate pricing details before any billing begins.

Limit

Workers Free

Workers Paid

AI Search instances per account

100

5,000

Files per instance

100,000

1M or 500K for hybrid search

Max file size

4MB

4MB

Queries per month

20,000

Unlimited

Maximum pages crawled per day

500

Unlimited

What about existing instances? 

If you created instances before this release, they continue to work exactly as they do today. Your R2 buckets, Vectorize indexes, and Browser Run usage remain on your account and are billed as before. We’ll share migration details for existing instances soon.

Get started today

Search is one of the most fundamental things an agent can do. With AI Search, you don’t have to build the infrastructure to make it happen. Create an instance, give it your data, and let your agents search it.

Get started today by running this command to create your first instance:

npx wrangler ai-search create my-search

Check out the docs and come tell us what you’re building on the Cloudflare Developer Discord.


Introducing AutoRAG: fully managed Retrieval-Augmented Generation on Cloudflare

Post Syndicated from Anni Wang original https://blog.cloudflare.com/introducing-autorag-on-cloudflare/

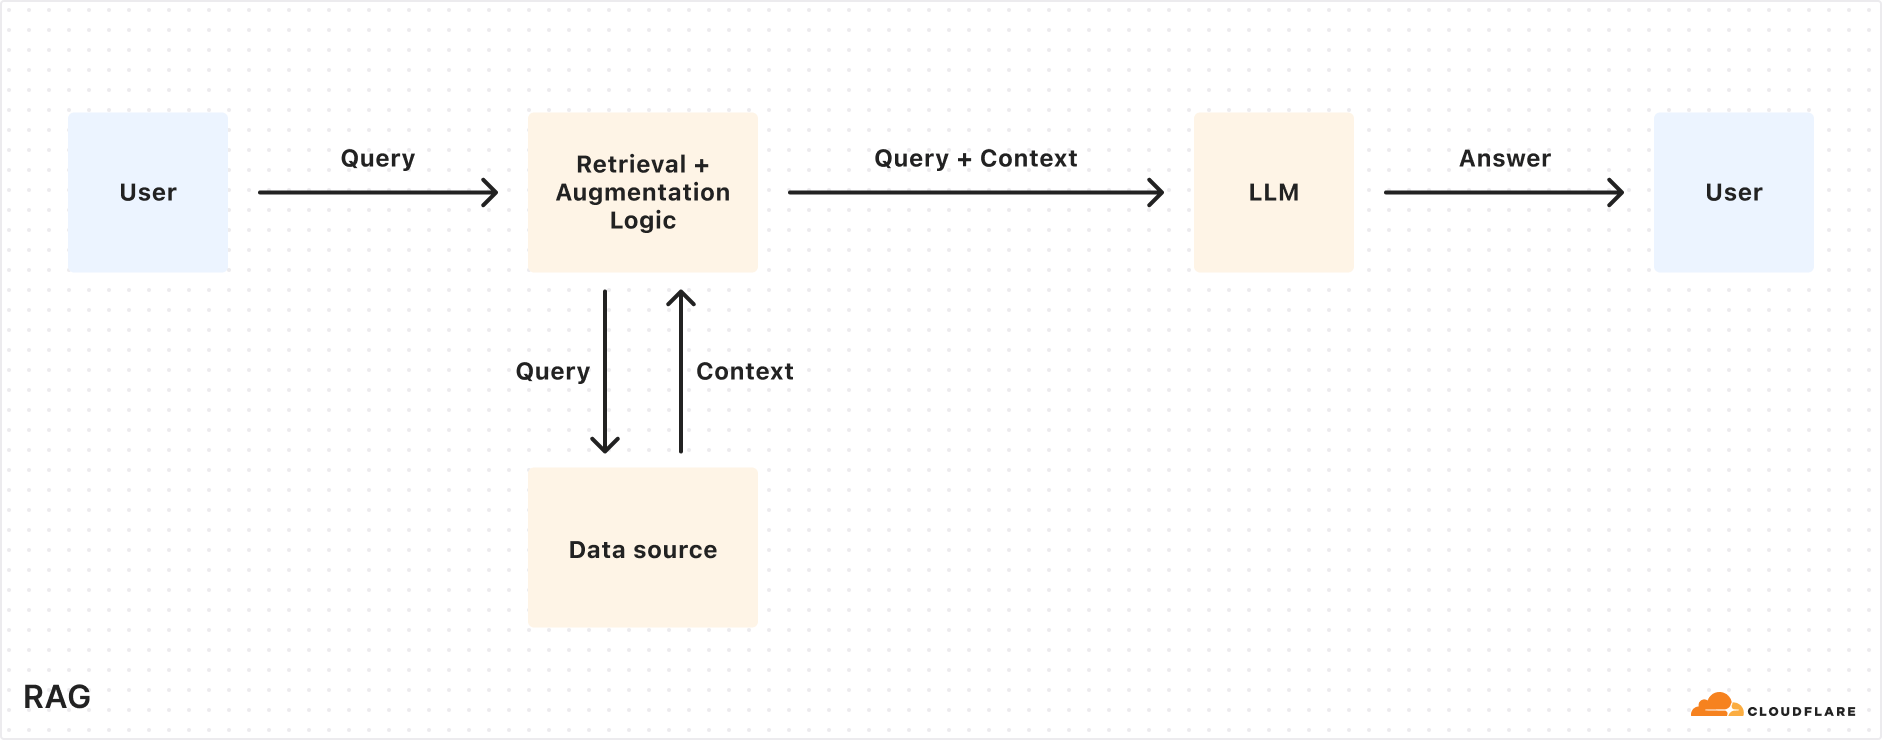
Today we’re excited to announce AutoRAG in open beta, a fully managed Retrieval-Augmented Generation (RAG) pipeline powered by Cloudflare, designed to simplify how developers integrate context-aware AI into their applications. RAG is a method that improves the accuracy of AI responses by retrieving information from your own data, and providing it to the large language model (LLM) to generate more grounded responses.

Building a RAG pipeline is a patchwork of moving parts. You have to stitch together multiple tools and services — your data storage, a vector database, an embedding model, LLMs, and custom indexing, retrieval, and generation logic — all just to get started. Maintaining it is even harder. As your data changes, you have to manually reindex and regenerate embeddings to keep the system relevant and performant. What should be a simple “ask a question, get a smart answer” experience becomes a brittle pipeline of glue code, fragile integrations, and constant upkeep.

AutoRAG removes that complexity. With just a few clicks, it delivers a fully-managed RAG pipeline end-to-end: from ingesting your data and automatically chunking and embedding it, to storing vectors in Cloudflare’s Vectorize database, performing semantic retrieval, and generating high-quality responses using Workers AI. AutoRAG continuously monitors your data sources and indexes in the background so your AI stays fresh without manual effort. It abstracts away the mess, letting you focus on building smarter, faster applications on Cloudflare’s developer platform. Get started today in the Cloudflare Dashboard!

Why use RAG in the first place?

LLMs like Llama 3.3 from Meta are powerful, but they only know what they’ve been trained on. They often struggle to produce accurate answers when asked about new, proprietary, or domain-specific information. System prompts providing relevant information can help, but they bloat input size and are limited by context windows. Fine-tuning a model is expensive and requires ongoing retraining to keep up to date.

RAG solves this by retrieving relevant information from your data source at query time, combining it with the user’s input query, and feeding both into the LLM to generate responses grounded with your data. This makes RAG a great fit for AI-driven support bots, internal knowledge assistants, semantic search across documentation, and other use cases where the source of truth is always evolving.


What’s under the hood of AutoRAG?

AutoRAG sets up a RAG pipeline for you, using the building blocks of Cloudflare’s developer platform. Instead of you having to write code to create a RAG system using Workers AI, Vectorize, and AI Gateway, you just create an AutoRAG instance and point it at a data source, like an R2 storage bucket.

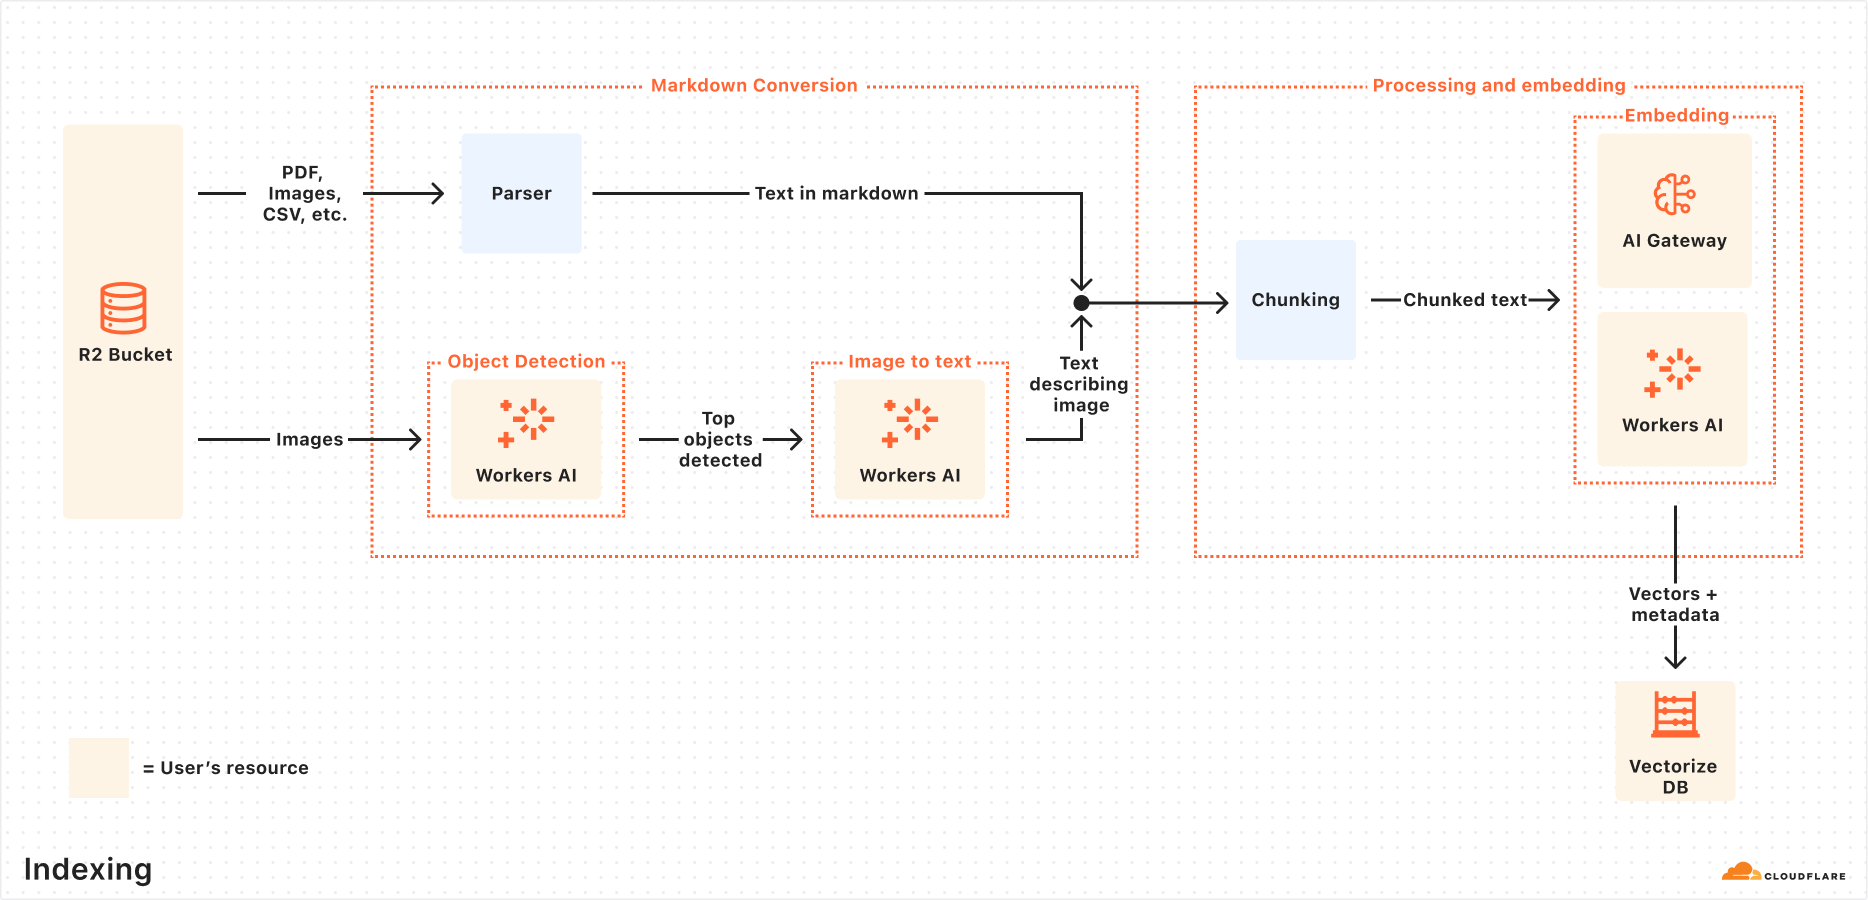
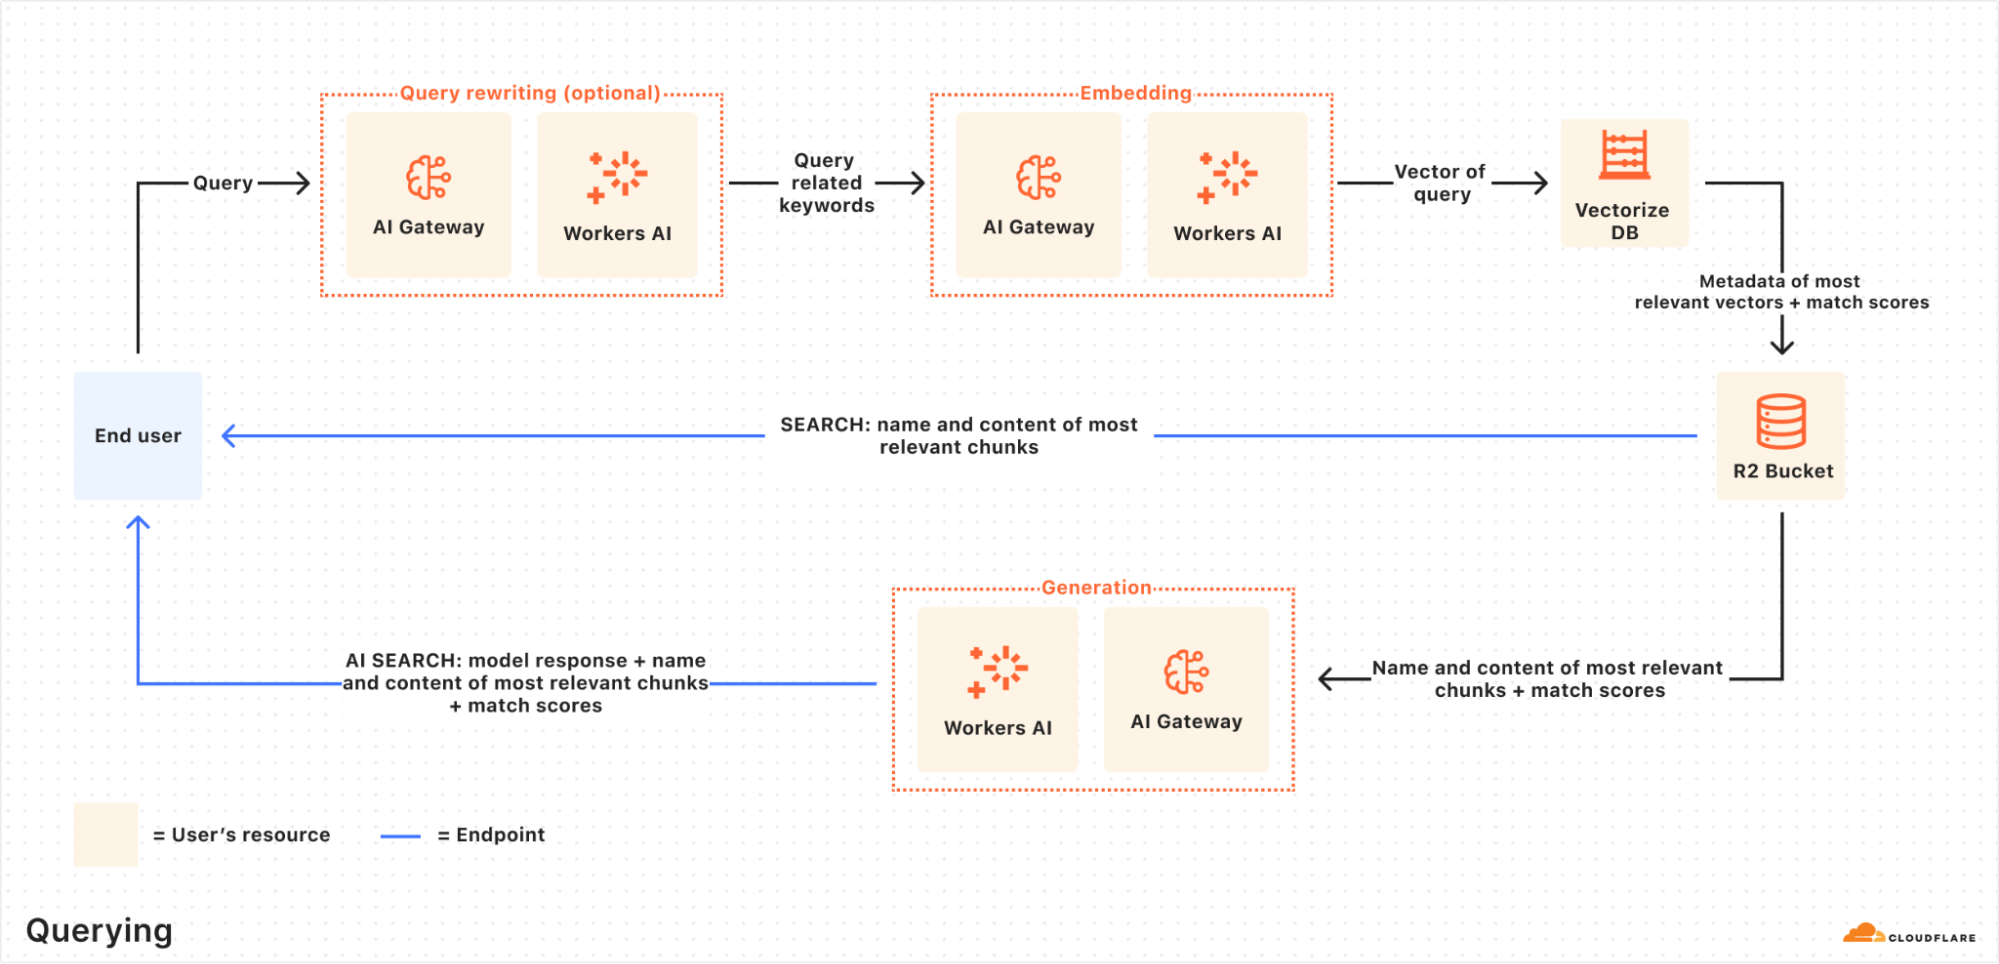
Behind the scenes, AutoRAG is powered by two processes: indexing and querying.

  • Indexing is an asynchronous process that runs in the background. It kicks off as soon as you create an AutoRAG, and automatically continues in cycles — reprocessing new or updated files after each previous job completes. During indexing, your content is transformed into vectors optimized for semantic search.

  • Querying is a synchronous process triggered when a user sends a search request. AutoRAG takes the query, retrieves the most relevant content from your vector database, and uses it to generate a context-aware response using an LLM.

Let’s take a closer look at how they work.

Indexing process

When you connect a data source, AutoRAG automatically ingests, transforms, and stores it as vectors, optimizing it for semantic search when querying:

  1. File ingestion from data source: AutoRAG reads directly from your data source. Today, it supports integration with Cloudflare R2, where you can store documents like PDFs, images, text, HTML, CSV, and more for processing.
    Check out the RAG to riches in 5 minutes tutorial below to learn how you can use Browser Rendering to parse webpages to use within your AutoRAG.

  2. Markdown conversion: AutoRAG uses Workers AI’s Markdown Conversion to convert all files into structured Markdown. This ensures consistency across diverse file types. For images, Workers AI is used to perform object detection followed by vision-to-language transformation to convert images into Markdown text.

  3. Chunking: The extracted text is chunked into smaller pieces to improve retrieval granularity.

  4. Embedding: Each chunk is embedded using Workers AI’s embedding model to transform the content into vectors.

  5. Vector storage: The resulting vectors, along with metadata like source location and file name, are stored in a Cloudflare’s Vectorize database created on your account.


Querying process

When an end user makes a request, AutoRAG orchestrates the following:

  1. Receive query from AutoRAG API: The query workflow begins when you send a request to either the AutoRAG’s AI Search or Search endpoint.

  2. Query rewriting (optional): AutoRAG provides the option to rewrite the input query using one of Workers AI’s LLMs to improve retrieval quality by transforming the original query into a more effective search query.

  3. Embedding the query: The rewritten (or original) query is transformed into a vector via the same embedding model used to embed your data so that it can be compared against your vectorized data to find the most relevant matches.

  4. Vector search in Vectorize: The query vector is searched against stored vectors in the associated Vectorize database for your AutoRAG.

  5. Metadata + content retrieval: Vectorize returns the most relevant chunks and their metadata. And the original content is retrieved from the R2 bucket. These are passed to a text-generation model.

  6. Response generation: A text-generation model from Workers AI is used to generate a response using the retrieved content and the original user’s query.

The end result is an AI-powered answer grounded in your private data — accurate, and up to date.


RAG to riches in under 5 minutes

Most of the time, getting started with AutoRAG is as simple as pointing it to an existing R2 bucket — just drop in your content, and you’re ready to go. But what if your content isn’t already in a bucket? What if it’s still on a webpage or needs to first be rendered dynamically by a frontend UI? You’re in luck, because with the Browser Rendering API, you can crawl your own websites to gather information that powers your RAG. The Browser Rendering REST API is now generally available, offering endpoints for common browser actions including extracting HTML content, capturing screenshots, and generating PDFs. Additionally, a crawl endpoint is coming soon, making it even easier to ingest websites.

In this walkthrough, we’ll show you how to take your website and feed it into AutoRAG for Q&A. We’ll use a Cloudflare Worker to render web pages in a headless browser, upload the content to R2, and hook that into AutoRAG for semantic search and generation.

Step 1. Create a Worker to fetch webpages and upload into R2

We’ll create a Cloudflare Worker that uses Puppeteer to visit your URL, render it, and store the full HTML in your R2 bucket. If you already have an R2 bucket with content you’d like to build a RAG for then you can skip this step.

  1. Create a new Worker project named browser-r2-worker by running:

npm create cloudflare@latest -- browser-r2-worker

For setup, select the following options:

  • What would you like to start with? Choose Hello World Starter.

  • Which template would you like to use? Choose Worker only.

  • Which language do you want to use? Choose TypeScript.

2. Install @cloudflare/puppeteer, which allows you to control the Browser Rendering instance:

npm i @cloudflare/puppeteer

3. Create a new R2 bucket named html-bucket by running: 

npx wrangler r2 bucket create html-bucket

4. Add the following configurations to your Wrangler configuration file, so your Worker can use browser rendering and your new R2 bucket:

{
	"compatibility_flags": ["nodejs_compat"],
	"browser": {
		"binding": "MY_BROWSER"
	},
	"r2_buckets": [
		{
			"binding": "HTML_BUCKET",
			"bucket_name": "html-bucket",
		}
	],
}

5. Replace the contents of src/index.ts with the following skeleton script:

import puppeteer from "@cloudflare/puppeteer";

// Define our environment bindings
interface Env {
	MY_BROWSER: any;
	HTML_BUCKET: R2Bucket;
}

// Define request body structure
interface RequestBody {
	url: string;
}

export default {
	async fetch(request: Request, env: Env): Promise<Response> {
		// Only accept POST requests
		if (request.method !== 'POST') {
return new Response('Please send a POST request with a target URL', { status: 405 });
		}

		// Get URL from request body
		const body = await request.json() as RequestBody;
		// Note: Only use this parser for websites you own
		const targetUrl = new URL(body.url); 

		// Launch browser and create new page
		const browser = await puppeteer.launch(env.MY_BROWSER);
		const page = await browser.newPage();

		// Navigate to the page and fetch its html
		await page.goto(targetUrl.href);
		const htmlPage = await page.content();

		// Create filename and store in R2
		const key = targetUrl.hostname + '_' + Date.now() + '.html';
		await env.HTML_BUCKET.put(key, htmlPage);

		// Close browser
		await browser.close();

		// Return success response
		return new Response(JSON.stringify({
			success: true,
			message: 'Page rendered and stored successfully',
			key: key
		}), {
			headers: { 'Content-Type': 'application/json' }
		});
	}
} satisfies ExportedHandler<Env>;

6. Once the code is ready, you can deploy it to your Cloudflare account by running:

npx wrangler deploy

7. To test your Worker, you can use the following cURL request to fetch the HTML file of a page. In this example we are fetching this blog page to upload into the html-bucket bucket:

curl -X POST https://browser-r2-worker.<YOUR_SUBDOMAIN>.workers.dev \
-H "Content-Type: application/json" \
-d '{"url": "https://blog.cloudflare.com/introducing-autorag-on-cloudflare"}'

Step 2. Create your AutoRAG and monitor the indexing

Now that you have created your R2 bucket and filled it with your content that you’d like to query from, you are ready to create an AutoRAG instance:

  1. In your Cloudflare dashboard, navigate to AI > AutoRAG

  2. Select Create AutoRAG and complete the setup process:

    1. Select the R2 bucket which contains your knowledge base, in this case, select the html-bucket.

    2. Select an embedding model used to convert your data to vector representation. It is recommended to use the Default.

    3. Select an LLM to use to generate your responses. It is recommended to use the Default.

    4. Select or create an AI Gateway to monitor and control your model usage.

    5. Name your AutoRAG as my-rag.

    6. Select or create a Service API token to grant AutoRAG access to create and access resources in your account.

  3. Select Create to spin up your AutoRAG.

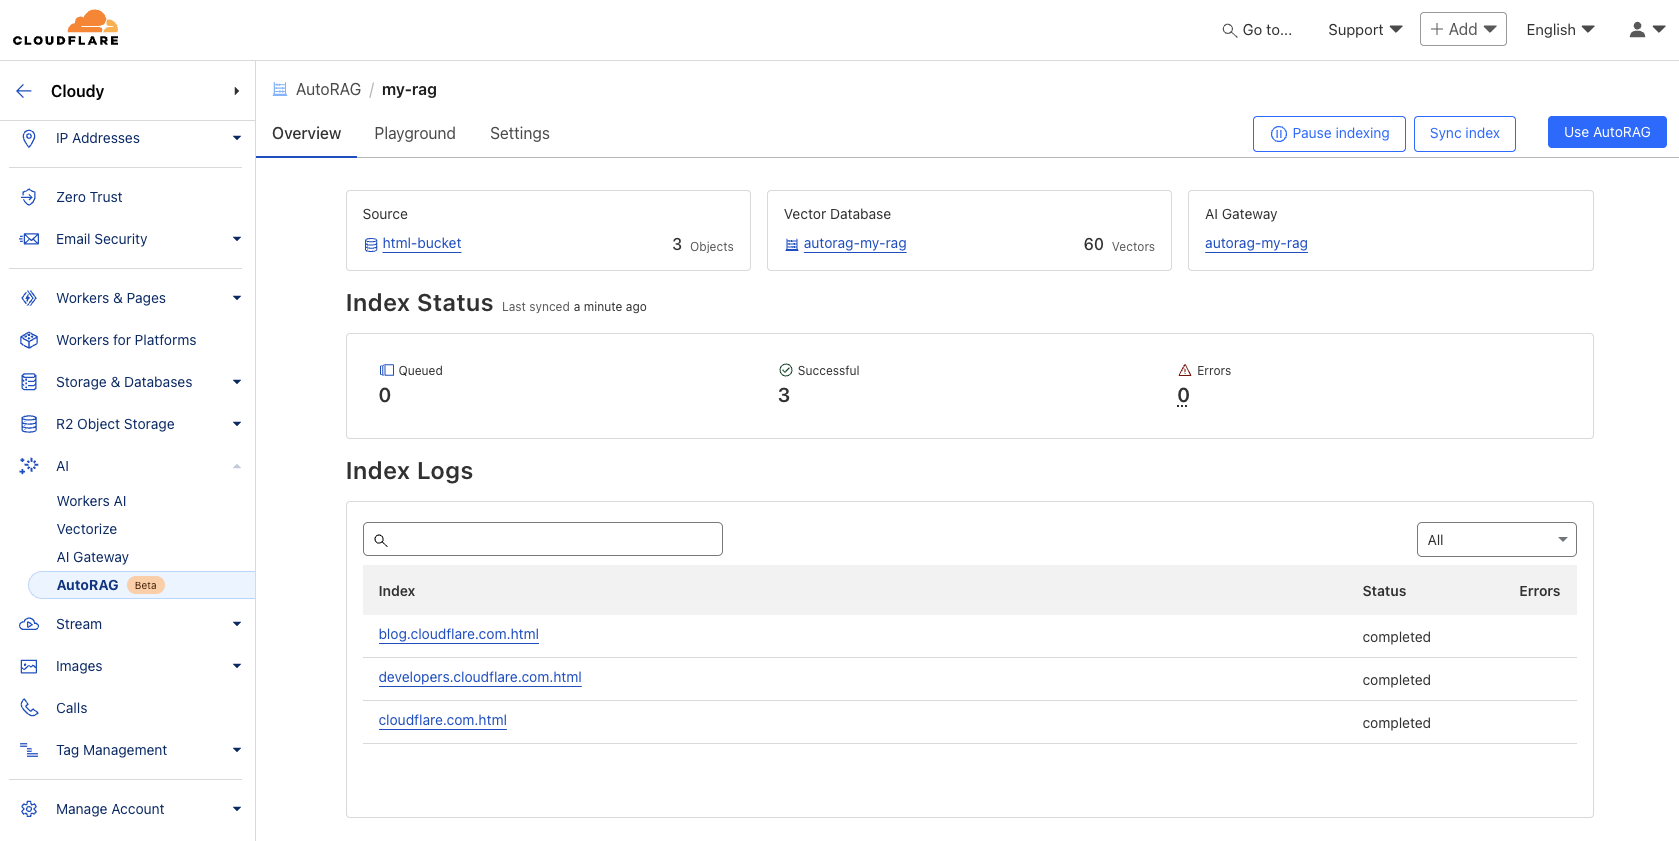
Once you’ve created your AutoRAG, it will automatically create a Vectorize database in your account and begin indexing the data. You can view the progress of your indexing job in the Overview page of your AutoRAG. The indexing time may vary depending on the number and type of files you have in your data source.


Step 3. Test and add to your application

Once AutoRAG finishes indexing your content, you’re ready to start asking it questions. You can open up your AutoRAG instance, navigate to the Playground tab, and ask a question based on your uploaded content, like “What is AutoRAG?”.

Once you’re happy with the results in the Playground, you can integrate AutoRAG directly into the application that you are building. If you are using a Worker to build your application, then you can use the AI binding to directly call your AutoRAG: 

{
  "ai": {
    "binding": "AI"
  }
}

Then, query your AutoRAG instance from your Worker code by calling the aiSearch() method. Alternatively you can use the Search() method to get a list of retrieved results without an AI generated response.

const answer = await env.AI.autorag('my-rag').aiSearch({
   query: 'What is AutoRAG?'
});

For more information on how to add AutoRAG into your application, go to your AutoRAG then navigate to Use AutoRAG for more instructions.

Start building today

During the open beta, AutoRAG is free to enable. Compute operations for indexing, retrieval and augmentation incur no additional cost during this phase.

AutoRAG is built entirely on top of Cloudflare’s Developer Platform, using the same tools you’d reach for if you were building a RAG pipeline yourself. When you create an AutoRAG instance, it provisions and runs on top of Cloudflare services within your own account, giving you full visibility into performance, cost, and behavior with fewer black boxes.

These services include:

  • R2: stores your source data.

  • Vectorize: stores vector embeddings and powers semantic retrieval.

  • Workers AI: converts images to markdown, generates embeddings, rewrites queries, and generates responses.

  • AI Gateway: tracks and controls your model’s usage.

To help manage resources during the beta, each account is limited to 10 AutoRAG instances, with up to 100,000 files per AutoRAG

What’s on the roadmap?

We’re just getting started with AutoRAG and we have more planned throughout 2025 to make it more powerful and flexible. Here are a few things we’re actively working on:

  • More data source integrations: We’re expanding beyond R2, with support for new input types like direct website URL parsing (powered by browser rendering) and structured data sources like Cloudflare D1.

  • Smarter, higher-quality responses: We’re exploring built-in reranking, recursive chunking, and other processing techniques to improve the quality and relevance of generated answers.

These features will roll out incrementally, and we’d love your feedback as we shape what’s next. AutoRAG is built to evolve with your use cases so stay tuned.

Try it out today!

Get started with AutoRAG today by visiting the Cloudflare Dashboard, navigate to AI > AutoRAG, and select Create AutoRAG. Whether you’re building an AI-powered search experience, an internal knowledge assistant, or just experimenting with LLMs, AutoRAG gives you a fast and flexible way to get started with RAG on Cloudflare’s global network. For more details, refer to the Developer Docs. Also, try out the Browser Rendering API that is now generally available for your browser action needs.

We’re excited to see what you build and we’re here to help. Have questions or feedback? Join the conversation on the Cloudflare Developers Discord.

Race ahead with Cloudflare Pages build caching

Post Syndicated from Anni Wang original http://blog.cloudflare.com/race-ahead-with-build-caching/

Race ahead with Cloudflare Pages build caching

Race ahead with Cloudflare Pages build caching

Today, we are thrilled to release a beta of Cloudflare Pages support for build caching! With build caching, we are offering a supercharged Pages experience by helping you cache parts of your project to save time on subsequent builds.

For developers, time is not just money – it’s innovation and progress. When every second counts in crunch time before a new launch, the “need for speed” becomes critical. With Cloudflare Pages’ built-in continuous integration and continuous deployment (CI/CD), developers count on us to drive fast. We’ve already taken great strides in making sure we’re enabling quick development iterations for our users by making solid improvements on the stability and efficiency of our build infrastructure. But we always knew there was more to our build story.

Quick pit stops

Build times can feel like a developer's equivalent of a time-out, a forced pause in the creative process—the inevitable pit stop in a high-speed formula race.

Long build times not only breaks the flow of individual developers, but it can also create a ripple effect across the team. It can slow down iterations and push back deployments. In the fast-paced world of CI/CD, these delays can drastically impact productivity and the delivery of products.

We want to empower developers to win the race, miles ahead of competition.

Mechanics of build caching

At its core, build caching is a mechanism that stores artifacts of a build, allowing subsequent builds to reuse these artifacts rather than recomputing them from scratch. By leveraging the cached results, build times can be significantly reduced, leading to a more efficient build process.

Previously, when you initiated a build, the Pages CI system would generate every step of the build process, even if most parts of the codebase remain unchanged between builds. This is the equivalent to changing out every single part of the car during a pit stop, irrespective of if anything needs replacing.

Build caching refines this process. Now, the Pages build system will detect if cached artifacts can be leveraged, restore the artifacts, then focus on only computing the modified sections of the code. In essence, build caching acts like an experienced pit crew, smartly skipping unnecessary steps and focusing only on what's essential to get you back in the race faster.

What are we caching?

It boils down to two components: dependencies and build output.

The Pages build system supports dependency caching for select package managers and build output caching for select frameworks. Check out our documentation for more information on what’s currently supported and what’s coming up.

Let’s take a closer look at what exactly we are caching.

Dependencies: upon initiating a build, the Pages CI system checks for cached artifacts from previous builds. If it identifies a cache hit for dependencies, it restores from cache to speed up dependency installation.

Build output: if a cache hit for build output is identified, Pages will only build the changed assets. This approach enables the long awaited incremental builds for supported JavaScript frameworks.

Race ahead with Cloudflare Pages build caching

Ready, set … go!

Build caching is now in beta, and ready for you to test drive!

In this release, the feature will support the node-based package managers npm, yarn, pnpm, as well as Bun. We’ve also ensured compatibility with the most popular frameworks that provide native incremental building support: Gatsby.js, Next.js and Astro – and more to come!

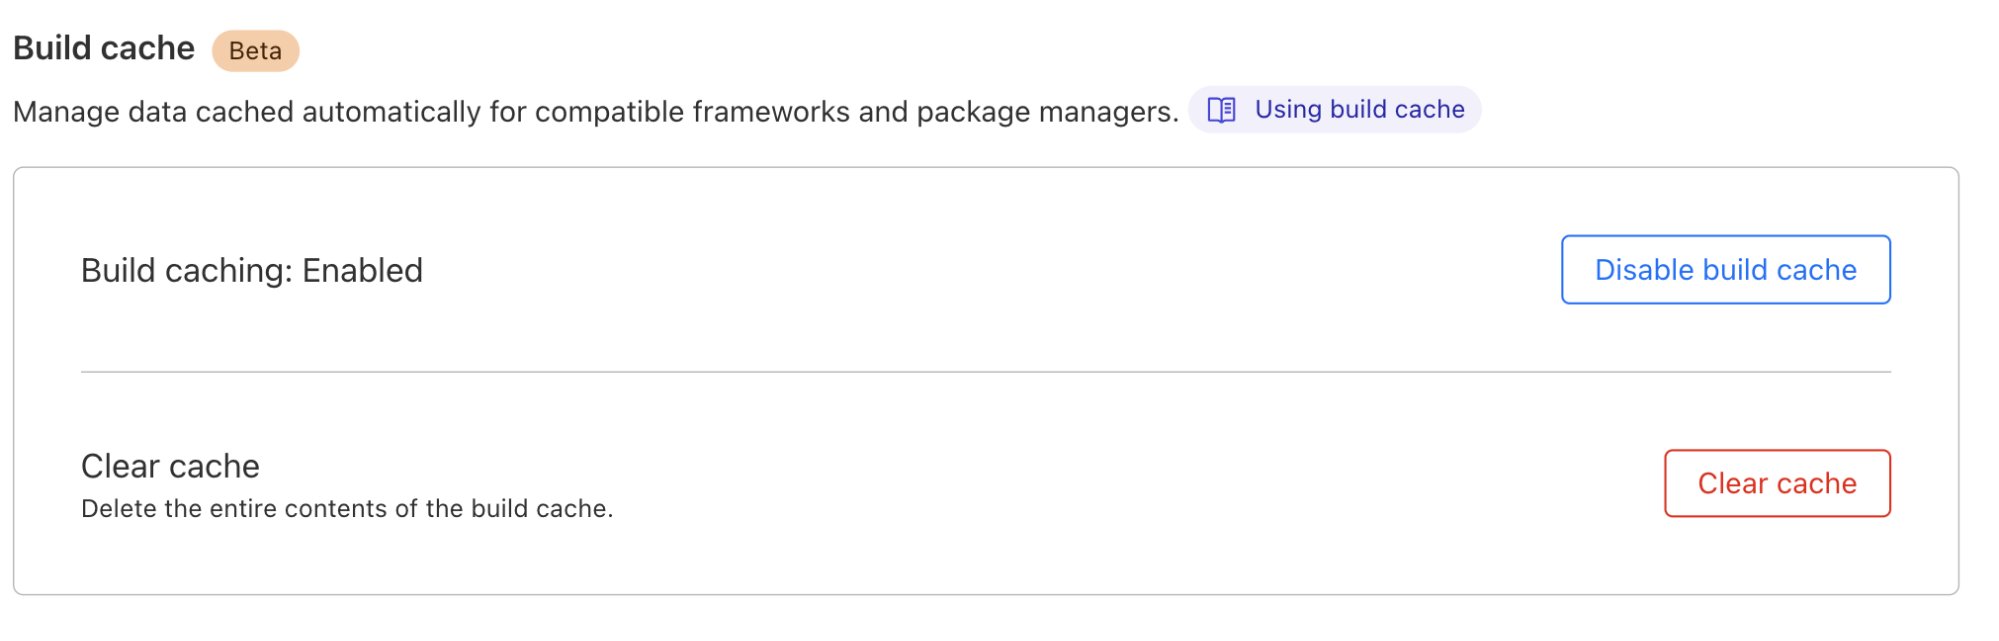
For you as a Pages user, interacting with build caching will be seamless. If you are working with an existing project, simply navigate to your project’s settings to toggle on Build Cache.

When you push a code change and initiate a build using Pages CI, build caching will kick-start and do its magic in the background.

Race ahead with Cloudflare Pages build caching

“Cache” us on Discord

Have questions? Join us on our Discord Server [link]. We will be hosting an “Ask Us Anything” session on October 2nd where you can chat live with members of our team! Your feedback on this beta is invaluable to us, so after testing out build caching, don't hesitate to share your experiences! Happy building!

Race ahead with Cloudflare Pages build caching