At Cloudflare, we believe that helping build a better Internet means encouraging a healthy ecosystem of options for how people can connect safely and quickly to the resources they need. Sometimes that means we tackle immense, Internet-scale problems with established partners. And sometimes that means we support and partner with fantastic open teams taking big bets on the next generation of tools.
To that end, today we are excited to announce our support of two independent, open source projects: Ladybird, an ambitious project to build a completely independent browser from the ground up, and Omarchy, an opinionated Arch Linux setup for developers.
Two open source projects strengthening the open Internet
Cloudflare has a long history of supporting open-source software – both through our own projects shared with the community and external projects that we support. We see our sponsorship of Ladybird and Omarchy as a natural extension of these efforts in a moment where energy for a diverse ecosystem is needed more than ever.
Ladybird, a new and independent browser
Most of us spend a significant amount of time using a web browser – in fact, you’re probably using one to read this blog! The beauty of browsers is that they help users experience the open Internet, giving you access to everything from the largest news publications in the world to a tiny website hosted on a Raspberry Pi.
Unlike dedicated apps, browsers reduce the barriers to building an audience for new services and communities on the Internet. If you are launching something new, you can offer it through a browser in a world where most people have absolutely zero desire to install an app just to try something out. Browsers help encourage competition and new ideas on the open web.
While the openness of how browsers work has led to an explosive growth of services on the Internet, browsers themselves have consolidated to a tiny handful of viable options. There’s a high probability you’re reading this on a Chromium-based browser, like Google’s Chrome, along with about 65% of users on the Internet. However, that consolidation has also scared off new entrants in the space. If all browsers ship on the same operating systems, powered by the same underlying technology, we lose out on potential privacy, security and performance innovations that could benefit developers and everyday Internet users.
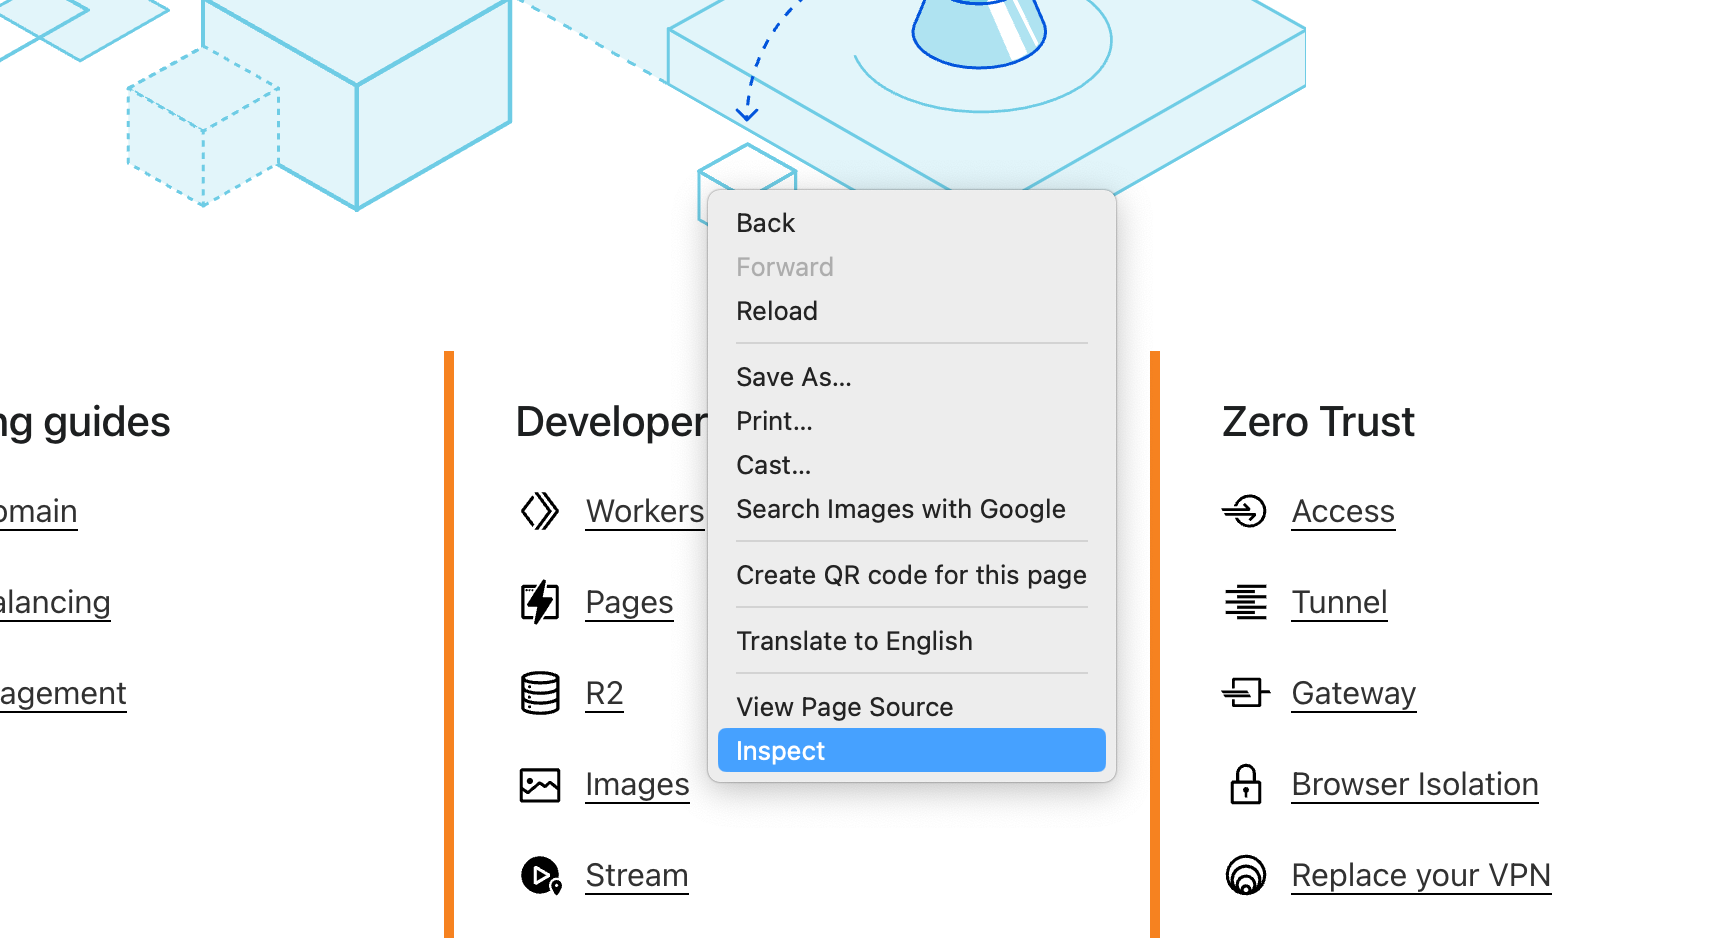
A screenshot of Cloudflare Workers developer docs in Ladybird
This is where Ladybird comes in: it’s not Chromium based – everything is built from scratch. The Ladybird project has two main components: LibWeb, a brand-new rendering engine, and LibJS, a brand-new JavaScript engine with its own parser, interpreter, and bytecode execution engine.
Building an engine that can correctly and securely render the modern web is a monumental task that requires deep technical expertise and navigating decades of specifications governed by standards bodies like the W3C and WHATWG. And because Ladybird implements these standards directly, it also stress-tests them in practice. Along the way, the project has found, reported, and sometimes fixed countless issues in the specifications themselves, contributions that strengthen the entire web platform for developers, browser vendors, and anyone who may attempt to build a browser in the future.
Whether to build something from scratch or not is a perennial source of debate between software engineers, but absent the pressures of revenue or special interests, we’re excited about the ways Ladybird will prioritize privacy, performance, and security, potentially in novel ways that will influence the entire ecosystem.
A screenshot of the Omarchy development environment
Omarchy, an independent development environment
Developers deserve choice, too. Beyond the browser, a developer’s operating system and environment is where they spend a ton of time – and where a few big players have become the dominant choice. Omarchy challenges this by providing a complete, opinionated Arch Linux distribution that transforms a bare installation into a modern development workstation that developers are excited about.
Perfecting one’s development environment can be a career-long art, but learning how to do so shouldn’t be a barrier to beginning to code. The beauty of Omarchy is that it makes Linux approachable to more developers by doing most of the setup for them, making it look good, and then making it configurable. Omarchy provides most of the tools developers need – like Neovim, Docker, and Git – out of the box, and tons of other features.
At its core, Omarchy embraces Linux for all of its complexity and configurability, and makes a version of it that is accessible and fun to use for developers that don’t have a deep background in operating systems. Projects like this ensure that a powerful, independent Linux desktop remains a compelling choice for people building the next generation of applications and Internet infrastructure.
Our support comes with no strings attached
We want to be very clear here: we are supporting these projects because we believe the Internet can be better if these projects, and more like them, succeed. No requirement to use our technology stack or any arrangement like that. We are happy to partner with great teams like Ladybird and Omarchy simply because we believe that our missions have real overlap.
Notes from the teams
Ladybird is still in its early days, with an alpha release planned for 2026, but we encourage anyone who is interested to consider contributing to the open source codebase as they prepare for launch.
“Cloudflare knows what it means to build critical web infrastructure on the server side. With Ladybird, we’re tackling the near-monoculture on the client side, because we believe it needs multiple implementations to stay healthy, and we’re extremely thankful for their support in that mission.”
– Andreas Kling, Founder, Ladybird
Omarchy 3.0 was released just last week with faster installation and increased Macbook compatibility, so if you’ve been Linux-curious for a while now, we encourage you to try it out!
“Cloudflare’s support of Omarchy has ensured we have the fastest ISO and package delivery from wherever you are in the world. Without a need to manually configure mirrors or deal with torrents. The combo of a super CDN, great R2 storage, and the best DDoS shield in the business has been a huge help for the project.”
– David Heinemeier Hansson, Creator of Omarchy and Ruby on Rails
A better Internet is one where people have more choice in how they browse and develop new software. We’re incredibly excited about the potential of Ladybird, Omarchy, and other audacious projects that support a free and open Internet.
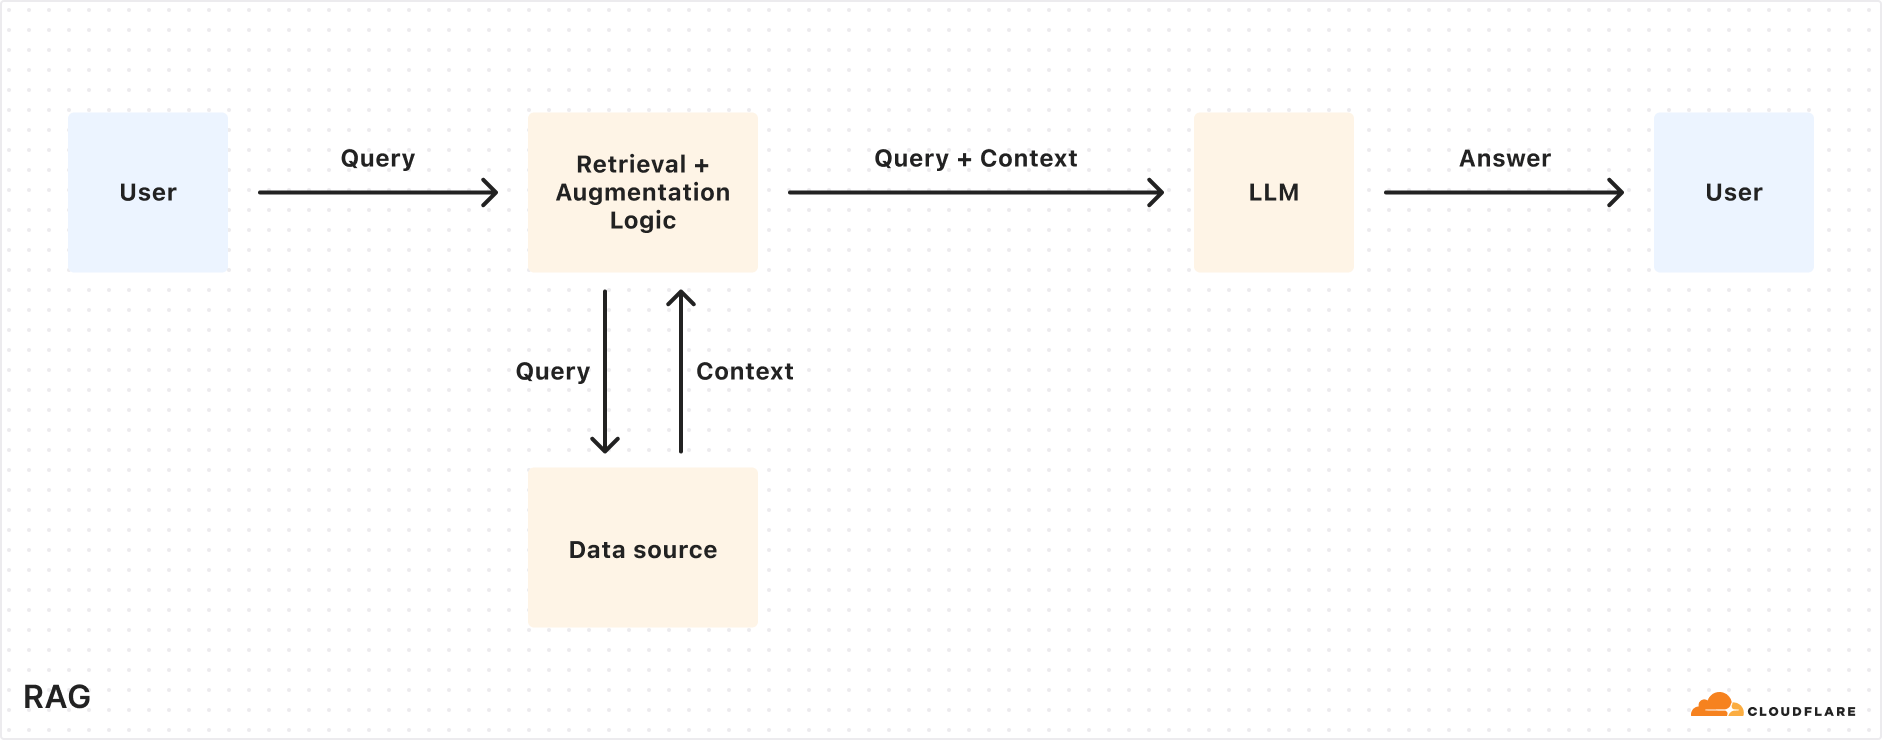
Today we’re excited to announce AutoRAG in open beta, a fully managed Retrieval-Augmented Generation (RAG) pipeline powered by Cloudflare, designed to simplify how developers integrate context-aware AI into their applications. RAG is a method that improves the accuracy of AI responses by retrieving information from your own data, and providing it to the large language model (LLM) to generate more grounded responses.
Building a RAG pipeline is a patchwork of moving parts. You have to stitch together multiple tools and services — your data storage, a vector database, an embedding model, LLMs, and custom indexing, retrieval, and generation logic — all just to get started. Maintaining it is even harder. As your data changes, you have to manually reindex and regenerate embeddings to keep the system relevant and performant. What should be a simple “ask a question, get a smart answer” experience becomes a brittle pipeline of glue code, fragile integrations, and constant upkeep.
AutoRAG removes that complexity. With just a few clicks, it delivers a fully-managed RAG pipeline end-to-end: from ingesting your data and automatically chunking and embedding it, to storing vectors in Cloudflare’s Vectorize database, performing semantic retrieval, and generating high-quality responses using Workers AI. AutoRAG continuously monitors your data sources and indexes in the background so your AI stays fresh without manual effort. It abstracts away the mess, letting you focus on building smarter, faster applications on Cloudflare’s developer platform. Get started today in the Cloudflare Dashboard!
Why use RAG in the first place?
LLMs like Llama 3.3 from Meta are powerful, but they only know what they’ve been trained on. They often struggle to produce accurate answers when asked about new, proprietary, or domain-specific information. System prompts providing relevant information can help, but they bloat input size and are limited by context windows. Fine-tuning a model is expensive and requires ongoing retraining to keep up to date.
RAG solves this by retrieving relevant information from your data source at query time, combining it with the user’s input query, and feeding both into the LLM to generate responses grounded with your data. This makes RAG a great fit for AI-driven support bots, internal knowledge assistants, semantic search across documentation, and other use cases where the source of truth is always evolving.
What’s under the hood of AutoRAG?
AutoRAG sets up a RAG pipeline for you, using the building blocks of Cloudflare’s developer platform. Instead of you having to write code to create a RAG system using Workers AI, Vectorize, and AI Gateway, you just create an AutoRAG instance and point it at a data source, like an R2 storage bucket.
Behind the scenes, AutoRAG is powered by two processes: indexing and querying.
Indexing is an asynchronous process that runs in the background. It kicks off as soon as you create an AutoRAG, and automatically continues in cycles — reprocessing new or updated files after each previous job completes. During indexing, your content is transformed into vectors optimized for semantic search.
Querying is a synchronous process triggered when a user sends a search request. AutoRAG takes the query, retrieves the most relevant content from your vector database, and uses it to generate a context-aware response using an LLM.
Let’s take a closer look at how they work.
Indexing process
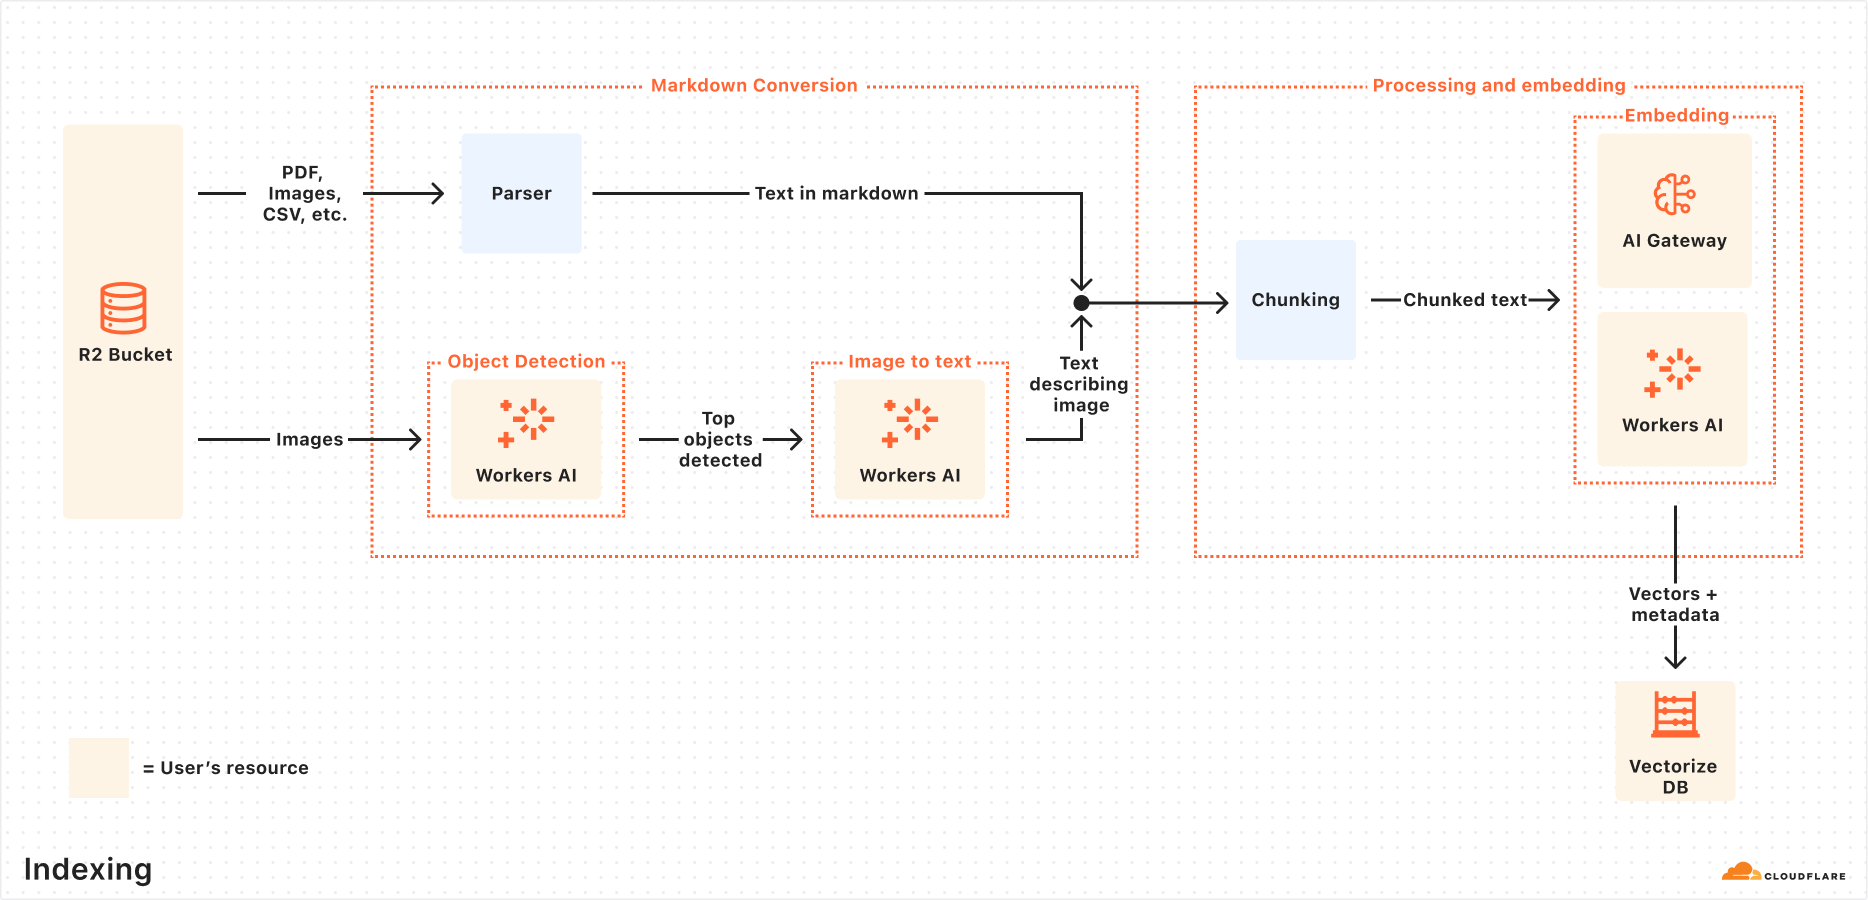
When you connect a data source, AutoRAG automatically ingests, transforms, and stores it as vectors, optimizing it for semantic search when querying:
File ingestion from data source: AutoRAG reads directly from your data source. Today, it supports integration with Cloudflare R2, where you can store documents like PDFs, images, text, HTML, CSV, and more for processing. Check out the RAG to riches in 5 minutes tutorial below to learn how you can use Browser Rendering to parse webpages to use within your AutoRAG.
Markdown conversion: AutoRAG uses Workers AI’s Markdown Conversion to convert all files into structured Markdown. This ensures consistency across diverse file types. For images, Workers AI is used to perform object detection followed by vision-to-language transformation to convert images into Markdown text.
Chunking: The extracted text is chunked into smaller pieces to improve retrieval granularity.
Embedding: Each chunk is embedded using Workers AI’s embedding model to transform the content into vectors.
Vector storage: The resulting vectors, along with metadata like source location and file name, are stored in a Cloudflare’s Vectorize database created on your account.
Querying process
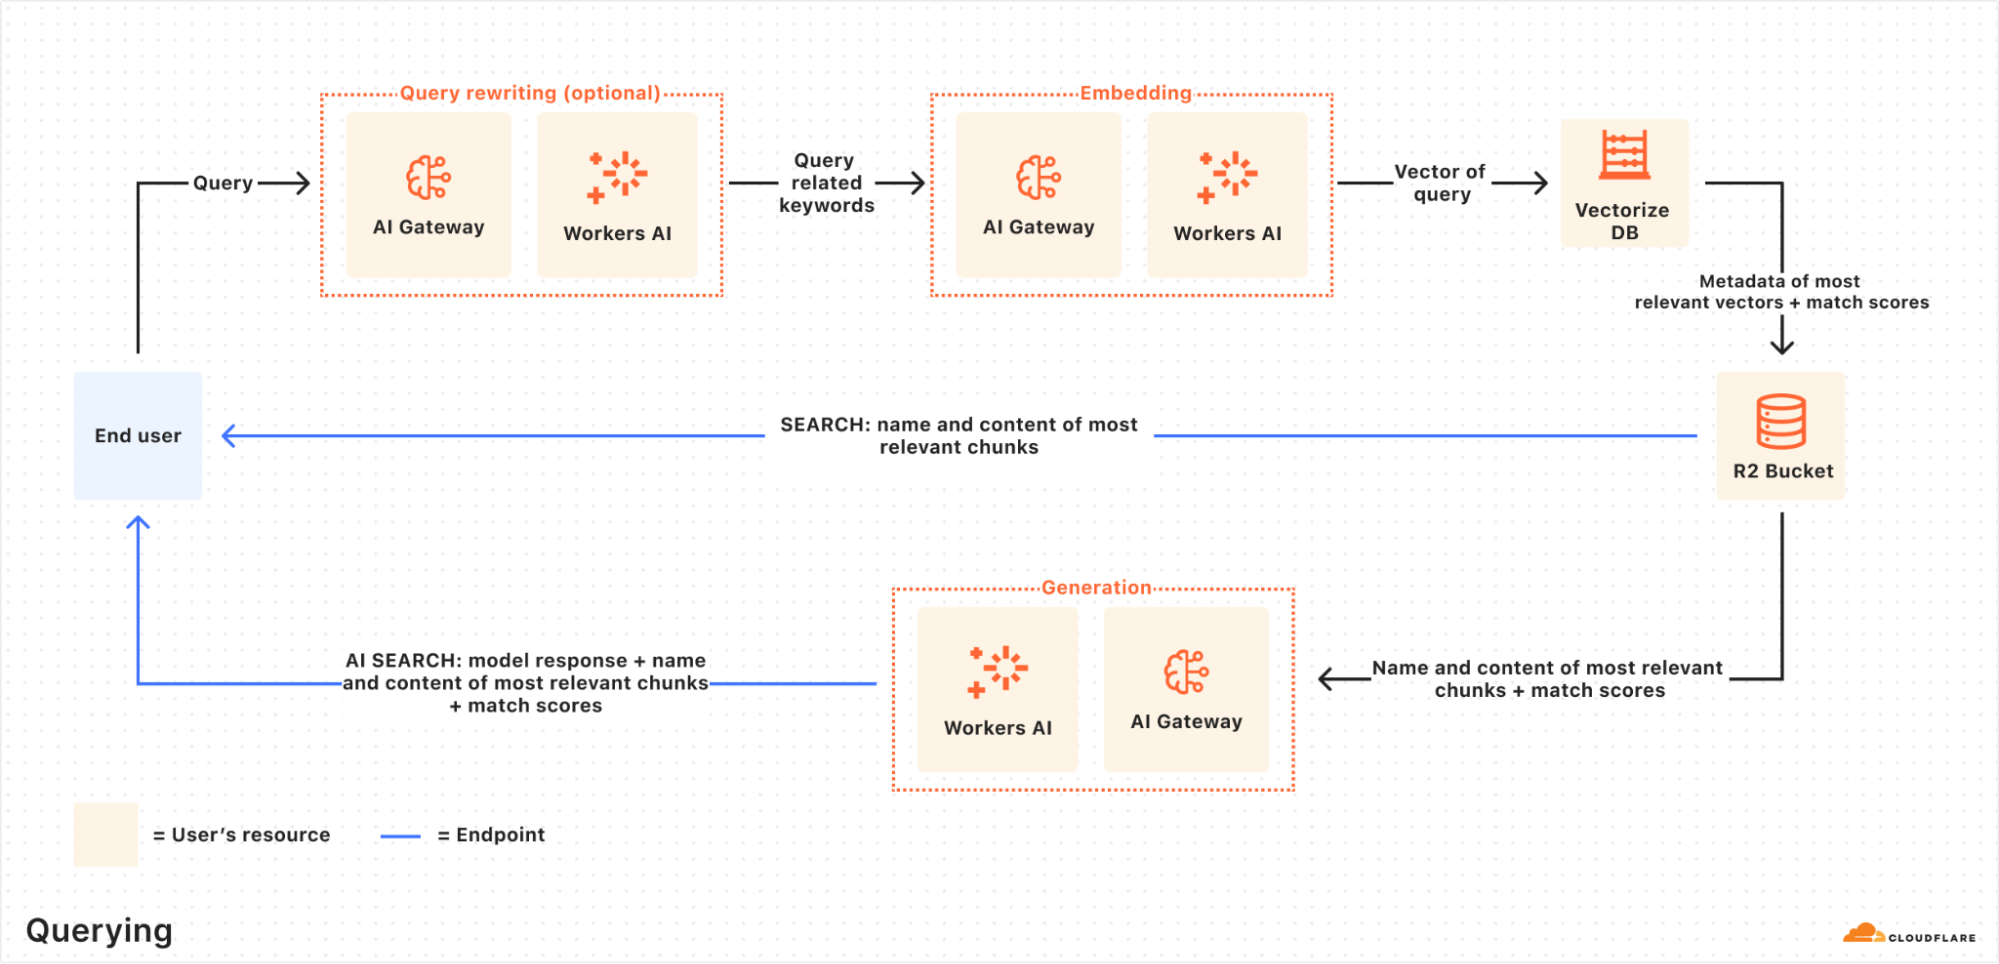
When an end user makes a request, AutoRAG orchestrates the following:
Receive query from AutoRAG API: The query workflow begins when you send a request to either the AutoRAG’s AI Search or Search endpoint.
Query rewriting (optional): AutoRAG provides the option to rewrite the input query using one of Workers AI’s LLMs to improve retrieval quality by transforming the original query into a more effective search query.
Embedding the query: The rewritten (or original) query is transformed into a vector via the same embedding model used to embed your data so that it can be compared against your vectorized data to find the most relevant matches.
Vector search in Vectorize: The query vector is searched against stored vectors in the associated Vectorize database for your AutoRAG.
Metadata + content retrieval: Vectorize returns the most relevant chunks and their metadata. And the original content is retrieved from the R2 bucket. These are passed to a text-generation model.
Response generation: A text-generation model from Workers AI is used to generate a response using the retrieved content and the original user’s query.
The end result is an AI-powered answer grounded in your private data — accurate, and up to date.
RAG to riches in under 5 minutes
Most of the time, getting started with AutoRAG is as simple as pointing it to an existing R2 bucket — just drop in your content, and you’re ready to go. But what if your content isn’t already in a bucket? What if it’s still on a webpage or needs to first be rendered dynamically by a frontend UI? You’re in luck, because with the Browser Rendering API, you can crawl your own websites to gather information that powers your RAG. The Browser Rendering REST API is now generally available, offering endpoints for common browser actions including extracting HTML content, capturing screenshots, and generating PDFs. Additionally, a crawl endpoint is coming soon, making it even easier to ingest websites.
In this walkthrough, we’ll show you how to take your website and feed it into AutoRAG for Q&A. We’ll use a Cloudflare Worker to render web pages in a headless browser, upload the content to R2, and hook that into AutoRAG for semantic search and generation.
Step 1. Create a Worker to fetch webpages and upload into R2
We’ll create a Cloudflare Worker that uses Puppeteer to visit your URL, render it, and store the full HTML in your R2 bucket. If you already have an R2 bucket with content you’d like to build a RAG for then you can skip this step.
Create a new Worker project named browser-r2-worker by running:
npm create cloudflare@latest -- browser-r2-worker
For setup, select the following options:
What would you like to start with? Choose Hello World Starter.
Which template would you like to use? Choose Worker only.
Which language do you want to use? Choose TypeScript.
2. Install @cloudflare/puppeteer, which allows you to control the Browser Rendering instance:
npm i @cloudflare/puppeteer
3. Create a new R2 bucket named html-bucket by running:
npx wrangler r2 bucket create html-bucket
4. Add the following configurations to your Wrangler configuration file, so your Worker can use browser rendering and your new R2 bucket:
5. Replace the contents of src/index.ts with the following skeleton script:
import puppeteer from "@cloudflare/puppeteer";

// Define our environment bindings
interface Env {
	MY_BROWSER: any;
	HTML_BUCKET: R2Bucket;
}

// Define request body structure
interface RequestBody {
	url: string;
}

export default {
	async fetch(request: Request, env: Env): Promise<Response> {
		// Only accept POST requests
		if (request.method !== 'POST') {
return new Response('Please send a POST request with a target URL', { status: 405 });
		}

		// Get URL from request body
		const body = await request.json() as RequestBody;
		// Note: Only use this parser for websites you own
		const targetUrl = new URL(body.url);

		// Launch browser and create new page
		const browser = await puppeteer.launch(env.MY_BROWSER);
		const page = await browser.newPage();

		// Navigate to the page and fetch its html
		await page.goto(targetUrl.href);
		const htmlPage = await page.content();

		// Create filename and store in R2
		const key = targetUrl.hostname + '_' + Date.now() + '.html';
		await env.HTML_BUCKET.put(key, htmlPage);

		// Close browser
		await browser.close();

		// Return success response
		return new Response(JSON.stringify({
			success: true,
			message: 'Page rendered and stored successfully',
			key: key
		}), {
			headers: { 'Content-Type': 'application/json' }
		});
	}
} satisfies ExportedHandler<Env>;
6. Once the code is ready, you can deploy it to your Cloudflare account by running:
npx wrangler deploy
7. To test your Worker, you can use the following cURL request to fetch the HTML file of a page. In this example we are fetching this blog page to upload into the html-bucket bucket:
Select Create AutoRAG and complete the setup process:
Select the R2 bucket which contains your knowledge base, in this case, select the html-bucket.
Select an embedding model used to convert your data to vector representation. It is recommended to use the Default.
Select an LLM to use to generate your responses. It is recommended to use the Default.
Select or create an AI Gateway to monitor and control your model usage.
Name your AutoRAG as my-rag.
Select or create a Service API token to grant AutoRAG access to create and access resources in your account.
Select Create to spin up your AutoRAG.
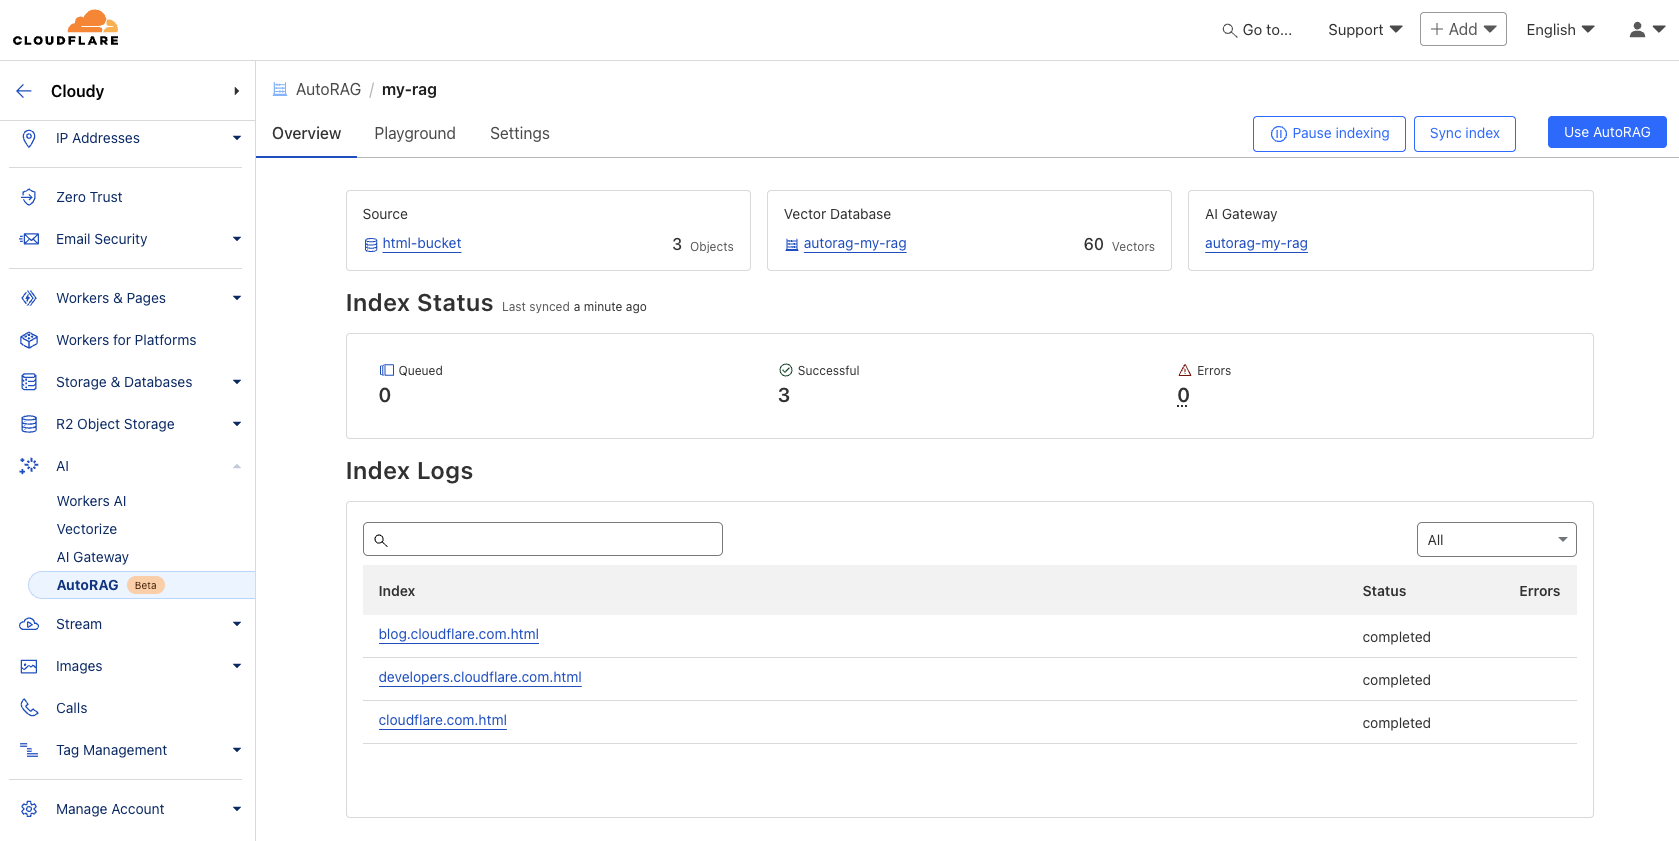
Once you’ve created your AutoRAG, it will automatically create a Vectorize database in your account and begin indexing the data. You can view the progress of your indexing job in the Overview page of your AutoRAG. The indexing time may vary depending on the number and type of files you have in your data source.
Step 3. Test and add to your application
Once AutoRAG finishes indexing your content, you’re ready to start asking it questions. You can open up your AutoRAG instance, navigate to the Playground tab, and ask a question based on your uploaded content, like “What is AutoRAG?”.
Once you’re happy with the results in the Playground, you can integrate AutoRAG directly into the application that you are building. If you are using a Worker to build your application, then you can use the AI binding to directly call your AutoRAG:
{
  "ai": {
    "binding": "AI"
  }
}
Then, query your AutoRAG instance from your Worker code by calling the aiSearch() method. Alternatively you can use the Search() method to get a list of retrieved results without an AI generated response.
const answer = await env.AI.autorag('my-rag').aiSearch({
   query: 'What is AutoRAG?'
});
For more information on how to add AutoRAG into your application, go to your AutoRAG then navigate to Use AutoRAG for more instructions.
Start building today
During the open beta, AutoRAG is free to enable. Compute operations for indexing, retrieval and augmentation incur no additional cost during this phase.
AutoRAG is built entirely on top of Cloudflare’s Developer Platform, using the same tools you’d reach for if you were building a RAG pipeline yourself. When you create an AutoRAG instance, it provisions and runs on top of Cloudflare services within your own account, giving you full visibility into performance, cost, and behavior with fewer black boxes.
Vectorize: stores vector embeddings and powers semantic retrieval.
Workers AI: converts images to markdown, generates embeddings, rewrites queries, and generates responses.
AI Gateway: tracks and controls your model’s usage.
To help manage resources during the beta, each account is limited to 10 AutoRAG instances, with up to 100,000 filesper AutoRAG.
What’s on the roadmap?
We’re just getting started with AutoRAG and we have more planned throughout 2025 to make it more powerful and flexible. Here are a few things we’re actively working on:
More data source integrations: We’re expanding beyond R2, with support for new input types like direct website URL parsing (powered by browser rendering) and structured data sources like Cloudflare D1.
Smarter, higher-quality responses: We’re exploring built-in reranking, recursive chunking, and other processing techniques to improve the quality and relevance of generated answers.
These features will roll out incrementally, and we’d love your feedback as we shape what’s next. AutoRAG is built to evolve with your use cases so stay tuned.
Try it out today!
Get started with AutoRAG today by visiting the Cloudflare Dashboard, navigate to AI > AutoRAG, and select Create AutoRAG. Whether you’re building an AI-powered search experience, an internal knowledge assistant, or just experimenting with LLMs, AutoRAG gives you a fast and flexible way to get started with RAG on Cloudflare’s global network. For more details, refer to the Developer Docs. Also, try out the Browser Rendering API that is now generally available for your browser action needs.
We’re excited to see what you build and we’re here to help. Have questions or feedback? Join the conversation on the Cloudflare Developers Discord.
The Workers Browser Rendering API allows developers to programmatically control and interact with a headless browser instance and create automation flows for their applications and products.
Since the private beta announcement, based on the feedback we've been receiving and our own roadmap, the team has been working on the developer experience and improving the platform architecture for the best possible performance and reliability. Today we enter the open beta and will start onboarding the customers on the wait list.
Developer experience
Starting today, Wrangler, our command-line tool for configuring, building, and deploying applications with Cloudflare developer products, has support for the Browser Rendering API bindings.
Bindings allow your Workers to interact with resources on the Cloudflare developer platform. In this case, they will provide your Worker script with an authenticated endpoint to interact with a dedicated Chromium browser instance.
This is all you need in your wrangler.toml once this service is enabled for your account:
browser = { binding = "MYBROWSER", type = "browser" }
Now you can deploy any Worker script that requires Browser Rendering capabilities. You can spawn Chromium instances and interact with them programmatically in any way you typically do manually behind your browser.
Under the hood, the Browser Rendering API gives you access to a WebSocket endpoint that speaks the DevTools Protocol. DevTools is what allows us to instrument a Chromium instance running in our global network, and it's the same protocol that Chrome uses on your computer when you inspect a page.
With enough dedication, you can, in fact, implement your own DevTools client and talk the protocol directly. But that'd be crazy; almost no one does that.
So…
Puppeteer
Puppeteer is one of the most popular libraries that abstract the lower-level DevTools protocol from developers and provides a high-level API that you can use to easily instrument Chrome/Chromium and automate browsing sessions. It's widely used for things like creating screenshots, crawling pages, and testing web applications.
Puppeteer typically connects to a local Chrome or Chromium browser using the DevTools port.
We forked a version of Puppeteer and patched it to connect to the Workers Browser Rendering API instead. The changes are minimal; after connecting the developers can then use the full Puppeteer API as they would on a standard setup.
In the long term, we will update Puppeteer to keep matching the version of our Chromium instances infrastructure running in our network.
Developer documentation
Following the tradition with other Developer products, we created a dedicated section for the Browser Rendering APIs in our Developer's Documentation site.
You can access this page to learn more about how the service works, Wrangler support, APIs, and limits, and find examples of starter templates for common applications.
An example application: taking screenshots
Taking screenshots from web pages is one of the typical cases for browser automation.
Let's create a Worker that uses the Browser Rendering API to do just that. This is a perfect example of how to set up everything and get an application running in minutes, it will give you a good overview of the steps involved and the basics of the Puppeteer API, and then you can move from here to other more sophisticated use-cases.
Step one, start a project, install Wrangler and Cloudflare’s fork of Puppeteer:
Step two, let’s create the simplest possible wrangler.toml configuration file with the Browser Rendering API binding:
name = "browser-worker"
main = "src/index.ts"
compatibility_date = "2023-03-14"
node_compat = true
workers_dev = true

browser = { binding = "MYBROWSER", type = "browser" }
Step three, create src/index.ts with your Worker code:
import puppeteer from "@cloudflare/puppeteer";

export default {
    async fetch(request: Request, env: Env): Promise<Response> {
        const { searchParams } = new URL(request.url);
        let url = searchParams.get("url");
        let img: Buffer;
        if (url) {
            const browser = await puppeteer.launch(env.MYBROWSER);
            const page = await browser.newPage();
            await page.goto(url);
            img = (await page.screenshot()) as Buffer;
            await browser.close();
            return new Response(img, {
                headers: {
                    "content-type": "image/jpeg",
                },
            });
        } else {
            return new Response(
                "Please add the ?url=https://example.com/ parameter"
            );
        }
    },
};
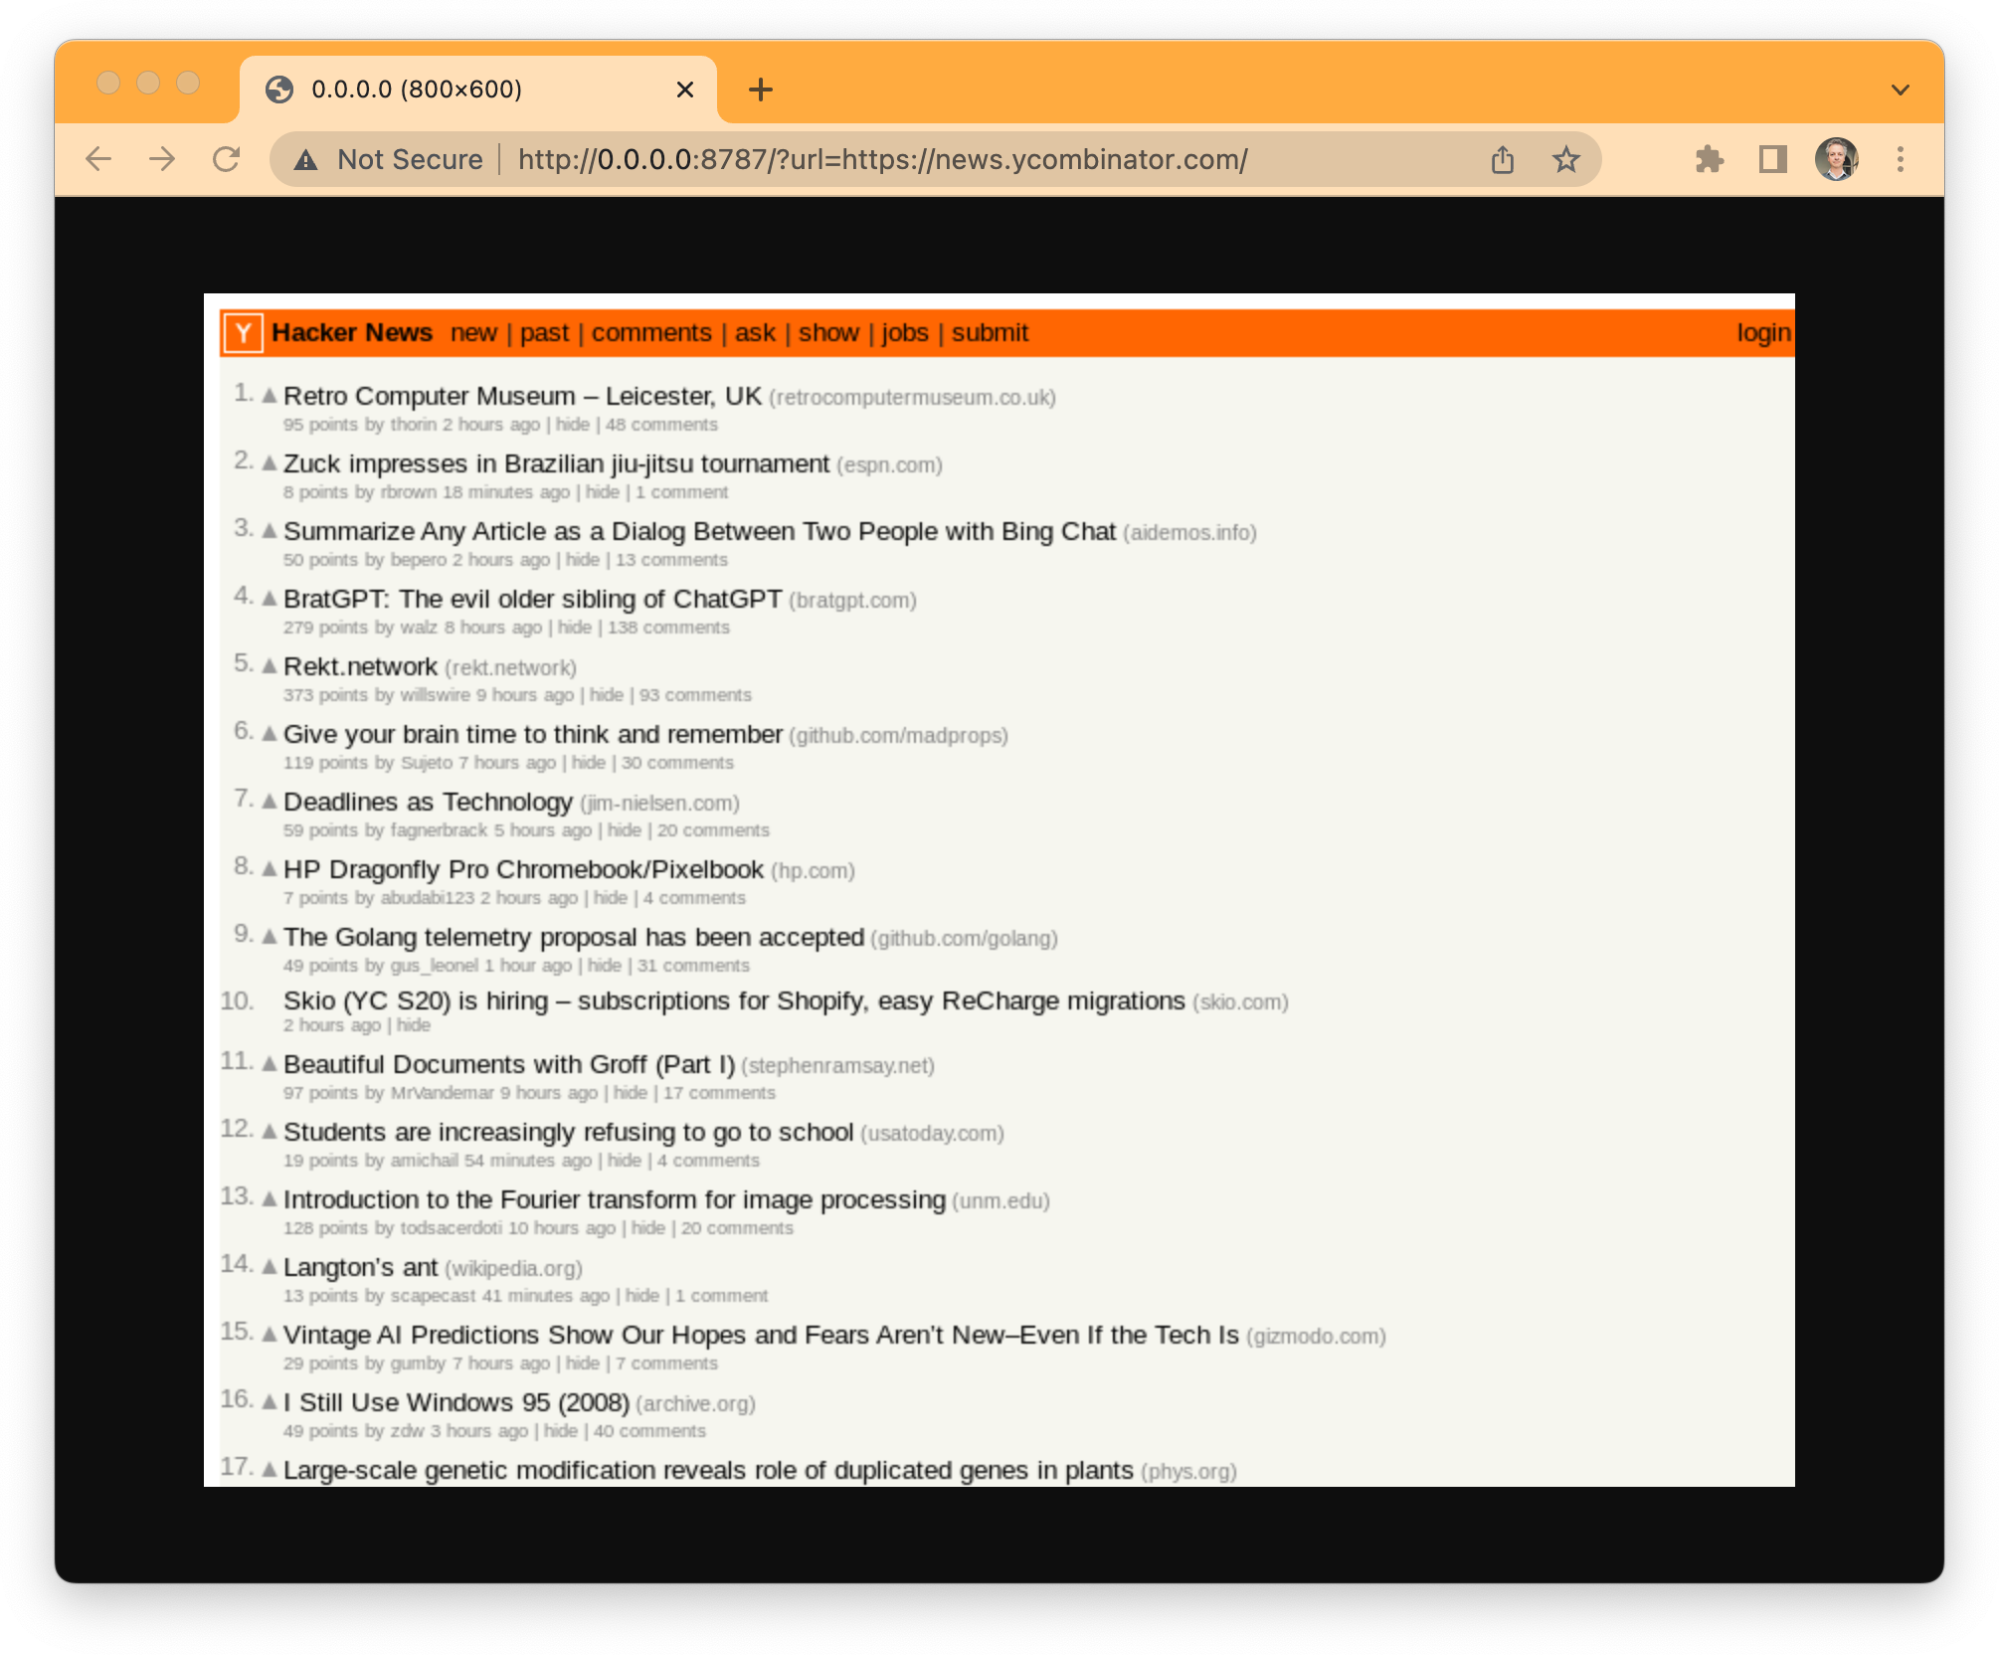
That's it, no more steps. This Worker instantiates a browser using Puppeteer, opens a new page, navigates to whatever you put in the "url" parameter, takes a screenshot of the page, closes the browser, and responds with the JPEG image of the screenshot. It can't get any easier to get started with the Browser Rendering API.
Run npx wrangler dev –remote to test it and npx wrangler publish when you’re done.
You can explore the entire Puppeteer API and implement other functionality and logic from here. And, because it's Workers, you can add other developer products to your code. You might need a relational database, or a KV store to cache your screenshots, or an R2 bucket to archive your crawled pages and assets, or maybe use a Durable Object to keep your browser instance alive and share it with multiple requests, or queues to handle your jobs asynchronous, we have all of this and more.
You can also find this and other examples of how to use Browser Rendering in the Developer Documentation.
How do we use Browser Rendering
Dogfooding our products is one of the best ways to test and improve them, and in some cases, our internal needs dictate or influence our roadmap. Workers Browser Rendering is a good example of that; it was born out of our necessities before we realized it could be a product. We've been using it extensively for things like taking screenshots of pages for social sharing or dashboards, testing web software in CI, or gathering page load performance metrics of our applications.
But there's one product we've been using to stress test and push the limits of the Browser Rendering API and drive the engineering sprints that brought us to open the beta to our customers today: The Cloudflare Radar URL Scanner.
The URL Scanner scans any URL and compiles a full report containing technical, performance, privacy, and security details about that page. It's processing thousands of scans per day currently. It was built on top of Workers and uses a combination of the Browser Rendering APIs with Puppeteer to create enriched HAR archives and page screenshots, Durable Objects to reuse browser instances, Queues to handle customers' load and execute jobs asynchronously, and R2 to store the final reports.
This tool will soon have its own "how we built it" blog. Still, we wanted to let you know about it now because it is a good example of how you can build sophisticated applications using Browser Rendering APIs at scale starting today.
Future plans
The team will keep improving the Browser Rendering API, but a few things are worth mentioning today.
First, we are looking into upstreaming the changes in our Puppeteer fork to the main project so that using the official library with the Cloudflare Workers Browser Rendering API becomes as easy as a configuration option.
Second, one of the reasons why we decided to expose the DevTools protocol bare naked in the Worker binding is so that it can support other browser instrumentalization libraries in the future. Playwright is a good example of another popular library that developers want to use.
And last, we are also keeping an eye on and testing WebDriver BiDi, a "new standard browser automation protocol that bridges the gap between the WebDriver Classic and CDP (DevTools) protocols." Click here to know more about the status of WebDriver BiDi.
Final words
The Workers Browser Rendering API enters open beta today. We will gradually be enabling the customers in the wait list in batches and sending them emails. We look forward to seeing what you will be building with it and want to hear from you.
To provide the best experiences, we use technologies like cookies to store and/or access device information. Consenting to these technologies will allow us to process data such as browsing behavior or unique IDs on this site. Not consenting or withdrawing consent, may adversely affect certain features and functions.
Functional
Always active
The technical storage or access is strictly necessary for the legitimate purpose of enabling the use of a specific service explicitly requested by the subscriber or user, or for the sole purpose of carrying out the transmission of a communication over an electronic communications network.
Preferences
The technical storage or access is necessary for the legitimate purpose of storing preferences that are not requested by the subscriber or user.
Statistics
The technical storage or access that is used exclusively for statistical purposes.The technical storage or access that is used exclusively for anonymous statistical purposes. Without a subpoena, voluntary compliance on the part of your Internet Service Provider, or additional records from a third party, information stored or retrieved for this purpose alone cannot usually be used to identify you.
Marketing
The technical storage or access is required to create user profiles to send advertising, or to track the user on a website or across several websites for similar marketing purposes.