Post Syndicated from Bhanu Pittampally original https://aws.amazon.com/blogs/big-data/use-amazon-redshift-ra3-with-managed-storage-in-your-modern-data-architecture/
Amazon Redshift is a fully managed, petabyte-scale data warehouse service in the cloud. You can start with just a few hundred gigabytes of data and scale to a petabyte or more. This enables you to use your data to acquire new insights for your business and customers.
Over the years, Amazon Redshift has evolved a lot to meet our customer demands. Its journey started as a standalone data warehousing appliance that provided a low-cost, high-performance, cloud-based data warehouse. Support for Amazon Redshift Spectrum compute nodes was later added to extend your data warehouse to data lakes, and the concurrency scaling feature was added to support burst activity and scale your data warehouse to support thousands of queries concurrently. In its latest offering, Amazon Redshift runs on third-generation architecture where storage and compute layers are decoupled and scaled independent of each other. This latest generation powers the several modern data architecture patterns our customers are actively embracing to build flexible and scalable analytics platforms.
When spinning up a new instance of Amazon Redshift, you get to choose either Amazon Redshift Serverless, for when you need a data warehouse that can scale seamlessly and automatically as your demand evolves unpredictably, or you can choose an Amazon Redshift provisioned cluster for steady-state workloads and greater control over your Amazon Redshift cluster’s configuration.
An Amazon Redshift provisioned cluster is a collection of computing resources called nodes, which are organized into a group called a cluster. Each cluster runs the Amazon Redshift engine and contains one or more databases. Creating an Amazon Redshift cluster is the first step in your process of building an Amazon Redshift data warehouse. While launching a provisioned cluster, one option that you specify is the node type. The node type determines the CPU, RAM, storage capacity, and storage drive type for each node.
In this post, we cover the current generation node RA3 architecture, different RA3 node types, important capabilities that are available only on RA3 node types, and how you can upgrade your current Amazon Redshift node types to RA3.
Amazon Redshift RA3 nodes
RA3 nodes with managed storage enable you to optimize your data warehouse by scaling and paying for compute and managed storage independently. RA3 node types are the latest node type for Amazon Redshift. With RA3, you choose the number of nodes based on your performance requirements and only pay for the managed storage that you use. RA3 architecture gives you the ability to size your cluster based on the amount of data you process daily or the amount of data that you want to store in your warehouse; there is no need to account for both storage and processing needs together.
Other node types that we previously offered include the following:
- Dense compute – DC2 nodes enable you to have compute-intensive data warehouses with local SSD storage included. You choose the number of nodes you need based on data size and performance requirements.
- Dense storage (deprecated) – DS2 nodes enable you to create large data warehouses using hard disk drives (HDDs). If you’re using the DS2 node type, we strongly recommend that you upgrade to RA3 to get twice as much storage and improved performance for the same on-demand cost.
When you use the RA3 node size and choose your number of nodes, you can provision the compute independent of storage. RA3 nodes are built on the AWS Nitro System and feature high bandwidth networking and large high-performance SSDs as local caches. RA3 nodes use your workload patterns and advanced data management techniques to deliver the performance of local SSD while scaling storage automatically to Amazon Simple Storage Service (Amazon S3).
RA3 node types come in three different sizes to accommodate your analytical workloads. You can quickly start experimenting with the RA3 node type by creating a single-node ra3.xlplus cluster and explore various features that are available. If you’re running a medium-sized data warehouse, you can size your cluster with ra3.4xlarge nodes. For large data warehouses, you can start with ra3.16xlarge. The following table gives more information about RA3 node types and their specifications as of this writing.
| Node Type | vCPU |
RAM (GiB) |
Default Slices Per Node | Managed Storage Quota Per Node | Node Range with Create Cluster | Total Managed Storage Capacity |
| ra3.xlplus | 4 | 32 | 2 | 32 TB | 1-16 | 1024 TB |
| ra3.4xlarge | 12 | 96 | 4 | 128 TB | 2-32 | 8192 TB |
| ra3.16xlarge | 48 | 384 | 16 | 128 TB | 2-128 | 16384 TB |
Amazon Redshift with managed storage
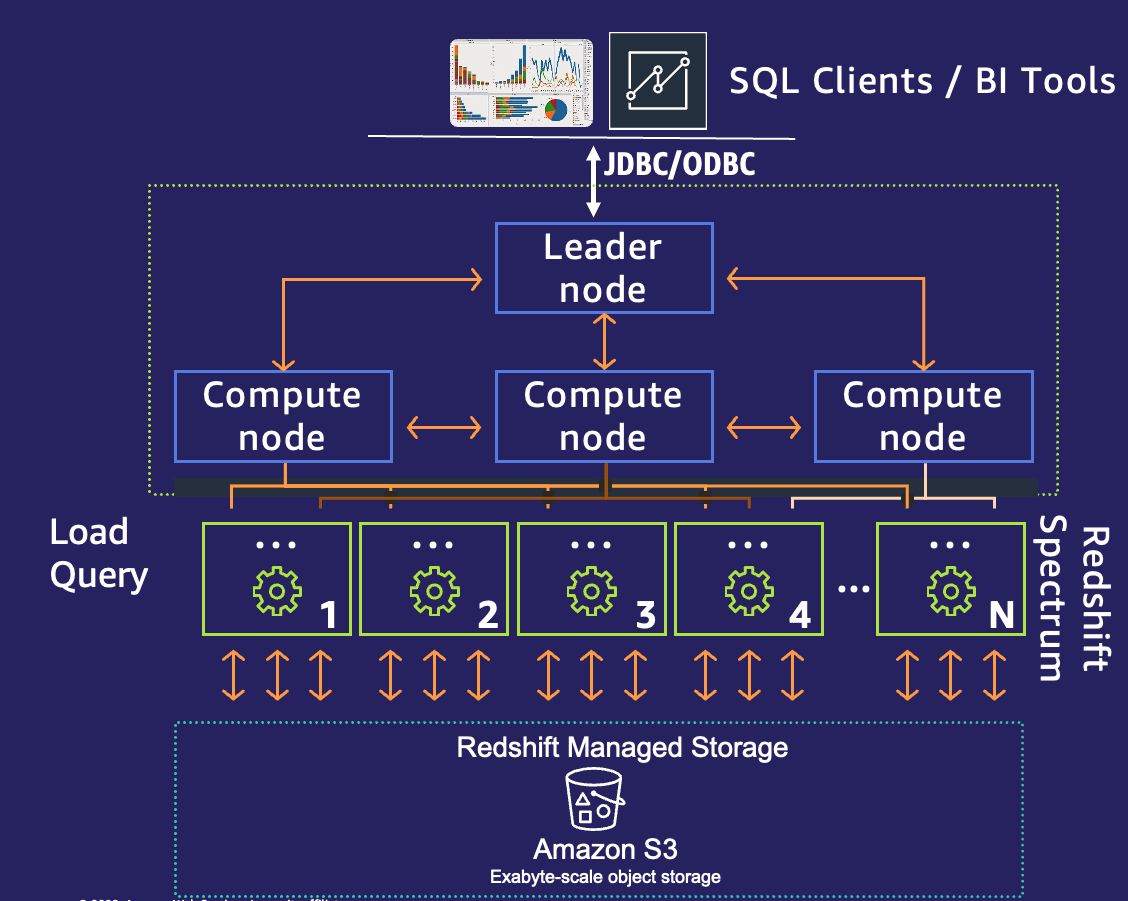
Amazon Redshift with a managed storage architecture (RMS) still boasts the same resiliency and industry-leading hardware. With managed storage, Amazon Redshift uses intelligent data prefetching and data evictions based on the temperature of your data. This method helps you decide where to store your most-queried data. Most frequently used blocks (hot data) are cached locally on SSD, and infrequently used blocks (cold data) are stored on an RMS layer backed by Amazon S3. The following diagram depicts the leader node, compute node, and Amazon Redshift managed storage.
In the following sections, we discuss the capabilities that Amazon Redshift RA3 with managed storage can provide.
Independently scale compute and storage
As the scale of an organization grows, data continues to grow—reaching petabytes. The amount of data you ingest into your Amazon Redshift data warehouse also grows. You may be looking for ways to cost-effectively analyze all your data and at the same time have control over choosing the right compute or storage resource at the right time. For customers who are looking to be cost conscientious and cost-effective, the RA3 platform provides the option to scale and pay for your compute and storage resources separately.
With RA3 instances with managed storage, you can choose the number of nodes based on your performance requirements, and only pay for the managed storage that you use. This gives you the flexibility to size your RA3 cluster based on the amount of data you process daily without increasing your storage costs. It allows you to pay per hour for the compute and separately scale your data warehouse storage capacity without adding any additional compute resources and paying only for what you use.
Another benefit of RMS is that Amazon Redshift manages which data should be stored locally for fastest access, and data that is slightly colder is still kept within fast-access reach.
Advanced hardware
RA3 instances use high-bandwidth networking built on the AWS Nitro System to further reduce the time taken for data to be offloaded to and retrieved from Amazon S3. Managed storage uses high-performance SSDs for your hot data and Amazon S3 for your cold data, providing ease of use, cost-effective storage, and fast query performance.
Additional security options
Amazon Redshift managed VPC endpoints enable you to set up a private connection to securely access your Amazon Redshift cluster within your virtual private cloud (VPC) from client applications in another VPC within the same AWS account, another AWS account, or a subnet without using public IPs and without requiring the traffic to traverse across the internet.
The following scenarios describe common reasons to allow access to a cluster using an Amazon Redshift managed VPC endpoint:
- AWS account A wants to allow a VPC in AWS account B to have access to a cluster
- AWS account A wants to allow a VPC that is also in AWS account A to have access to a cluster
- AWS account A wants to allow a different subnet in the cluster’s VPC within AWS account A to have access to a cluster
For information about access options to another VPC, refer to Enable private access to Amazon Redshift from your client applications in another VPC.
Further optimize your workload
In this section, we discuss two ways to further optimize your workload.
AQUA
AQUA (Advanced Query Accelerator) is a new distributed and hardware-accelerated cache that enables Amazon Redshift to run up to 10 times faster than other enterprise cloud data warehouses by automatically boosting certain types of queries. AQUA is available with the ra3.16xlarge, ra3.4xlarge, or ra3.xlplus nodes at no additional charge and with no code changes.
AQUA is an analytics query accelerator for Amazon Redshift that uses custom-designed hardware to speed up queries that scan large datasets. AQUA automatically optimizes query performance on subsets of the data that require extensive scans, filters, and aggregation. With this approach, you can use AQUA to run queries that scan, filter, and aggregate large datasets.
For more information about using AQUA, refer to How to evaluate the benefits of AQUA for your Amazon Redshift workloads.
Concurrency scaling for write operations
With RA3 nodes, you can take advantage of concurrency scaling for write operations, such as extract, transform, and load (ETL) statements. Concurrency scaling for write operations is especially useful when you want to maintain consistent response times when your cluster receives a large number of requests. It improves throughput for write operations contending for resources on the main cluster.
Concurrency scaling supports COPY, INSERT, DELETE, and UPDATE statements. In some cases, you might follow DDL statements, such as CREATE, with write statements in the same commit block. In these cases, the write statements are not sent to the concurrency scaling cluster.
When you accrue credit for concurrency scaling, this credit accrual applies to both read and write operations.
Increased agility to scale compute resources
Elastic resize allows you to scale your Amazon Redshift cluster up and down in minutes to get the performance you need, when you need it. However, there are limits on the nodes that you can add to a cluster. With some RA3 node types, you can increase the number of nodes up to four times the existing count. All RA3 node types support a decrease in the number of nodes to a quarter of the existing count. The following table lists growth and reduction limits for each RA3 node type.
| Node Type | Growth Limit | Reduction Limit |
| ra3.xlplus | 2 times (from 4 to 8 nodes, for example) | To a quarter of the number |
| ra3.4xlarge | 4 times (from 4 to 16 nodes, for example) | To a quarter of the number (from 16 to 4 nodes, for example) |
| ra3.16xlarge | 4 times (from 4 to 16 nodes, for example) | To a quarter of the number (from 16 to 4 nodes, for example) |
RA3 node types also have a shorter duration of snapshot restoration time because of the separation of storage and compute.
Improved resiliency
Amazon Redshift employs extensive fault detection and auto remediation techniques in order to maximize the availability of a cluster. With the RA3 architecture, you can enable cluster relocation, which provides additional resiliency by having the ability to relocate a cluster across Availability Zones without losing any data (RPO is zero) or having to change your client applications. The cluster’s endpoint remains the same after the relocation occurs so applications can continue operating without modifications. As the existing cluster fails, a new cluster is created on demand in another Availability Zone so cost of a standby replica cluster is avoided.
Accelerate data democratization
In this section, we share two techniques to accelerate data democratization.
Data sharing
Data sharing provides instant, granular, and high-performance access without copying data and data movement. You can query live data constantly across all consumers on different RA3 clusters in the same AWS account, in a different AWS account, or in a different AWS Region. Data is shared securely and provides governed collaboration. You can provide access in different granularity, including schema, database, tables, views, and user-defined functions.
This opens up various new use cases where you may have one ETL cluster that is producing data and have multiple consumers such as ad-hoc querying, dashboarding, and data science clusters to view the same data. This also enables bi-directional collaboration where groups such as marketing and finance can share data with one another. Queries accessing shared data use the compute resources of the consumer Amazon Redshift cluster and don’t impact the performance of the producer cluster.
For more information about data sharing, refer to Sharing Amazon Redshift data securely across Amazon Redshift clusters for workload isolation.
AWS Data Exchange for Amazon Redshift
AWS Data Exchange for Amazon Redshift enables you to find and subscribe to third-party data in AWS Data Exchange that you can query in an Amazon Redshift data warehouse in minutes. You can also license your data in Amazon Redshift through AWS Data Exchange. Access is automatically granted when a customer subscribes to your data and is automatically revoked when their subscription ends. Invoices are automatically generated, and payments are automatically collected and disbursed through AWS. This feature empowers you to quickly query, analyze, and build applications with third-party data.
For details on how to publish a data product and subscribe to a data product using AWS Data Exchange for Amazon Redshift, refer to New – AWS Data Exchange for Amazon Redshift.
Cross-database queries for Amazon Redshift
Amazon Redshift supports the ability to query across databases in a Redshift cluster. With cross-database queries, you can seamlessly query data from any database in the cluster, regardless of which database you are connected to. Cross-database queries can eliminate data copies and simplify your data organization to support multiple business groups on the same cluster.
One of many use cases where Cross-database query helps you is when data is organized across multiple databases in a Redshift cluster to support multi-tenant configurations. For example, different business groups and teams that own and manage data sets in their specific database in the same data warehouse need to collaborate with other groups. You might want to perform common ETL staging and processing while your raw data is spread across multiple databases. Organizing data in multiple Redshift databases is also a common scenario when migrating from traditional data warehouse systems. With cross-database queries, you can now access data from any of the databases on the Redshift cluster without having to connect to that specific database. You can also join data sets from multiple databases in a single query
You can read more about cross-database queries here.
Upgrade to RA3
You can upgrade to RA3 instances within minutes no matter the size of your current Amazon Redshift clusters. Simply take a snapshot of your cluster and restore it to a new RA3 cluster. For more information, refer to Upgrading to RA3 node types.
You can also simplify your migration efforts with Amazon Redshift Simple Replay. For more information, refer to Simplify Amazon Redshift RA3 migration evaluation with Simple Replay utility.
Summary
In this post, we talked about the RA3 node types, the benefits of Amazon Redshift managed storage, and the additional capabilities that you get by using Amazon Redshift RA3 with managed storage. Migrating to RA3 node types isn’t a complicated effort, you can get started today.
About the Authors
 Bhanu Pittampally is an Analytics Specialist Solutions Architect based out of Dallas. He specializes in building analytic solutions. His background is in data warehouses—architecture, development, and administration. He has been in the data and analytics field for over 13 years.
 Jason Pedreza is an Analytics Specialist Solutions Architect at AWS with data warehousing experience handling petabytes of data. Prior to AWS, he built data warehouse solutions at Amazon.com. He specializes in Amazon Redshift and helps customers build scalable analytic solutions.


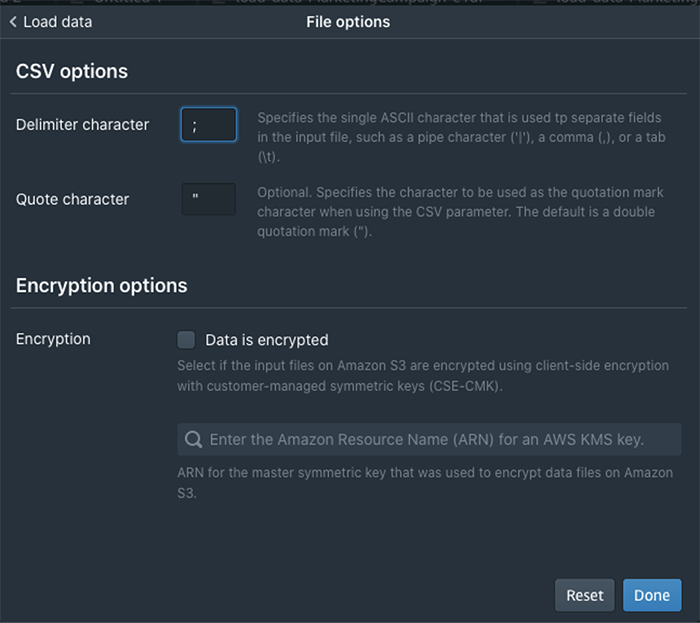


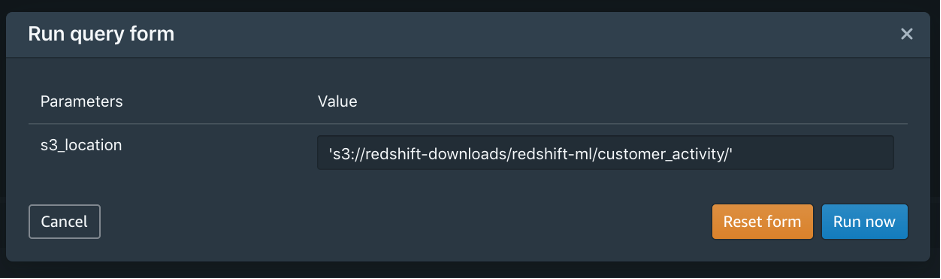
 You would probably like to reuse the load query in the future to load data in from another S3 location. In that case, you can use the parameterized query by replacing the S3 URL of the as shown in the following screenshot:

 Debu Panda is a Principal Product Manager at AWS, is an industry leader in analytics, application platform, and database technologies, and has more than 25 years of experience in the IT world.
 Cansu Aksu is a Front End Engineer at AWS, has a several years of experience in developing user interfaces. She is detail oriented, eager to learn and passionate about delivering products and features that solve customer needs and problems
 Chengyang Wang is a Frontend Engineer in Redshift Console Team. He worked on a number of new features delivered by redshift in the past 2 years. He thrives to deliver high quality products and aim to improve customer experience from UI