Post Syndicated from Rodrigo Ferroni original https://aws.amazon.com/blogs/security/configure-aws-sso-abac-for-ec2-instances-and-systems-manager-session-manager/
In this blog post, I show you how to configure AWS Single Sign-On to define attribute-based access control (ABAC) permissions to manage Amazon Elastic Compute Cloud (Amazon EC2) instances and AWS Systems Manager Session Manager for federated users. This combination allows you to control access to specific Amazon EC2 instances based on users’ attributes. I show you how defined AWS SSO identity source attributes like login and department can be used, and how custom attributes like SSMSessionRunAs can be used to pass these attributes into Amazon Web Services (AWS) from an external identity provider (IdP) using SAML 2.0 assertion.
AWS SSO added support for ABAC to enable you to create fine-grained permissions for your workforce in AWS using user attributes. Using user attributes as tags in AWS helps you simplify the process of creating fine-grained permissions in AWS and enables you to ensure that your workforce has access only to the AWS resources with matching tags.
The new feature works with any supported AWS SSO identity source. This post walks you through the steps to enable attributes for access control, create permission sets and manage assignments when using a supported external IdP as your identity source.
Solution overview
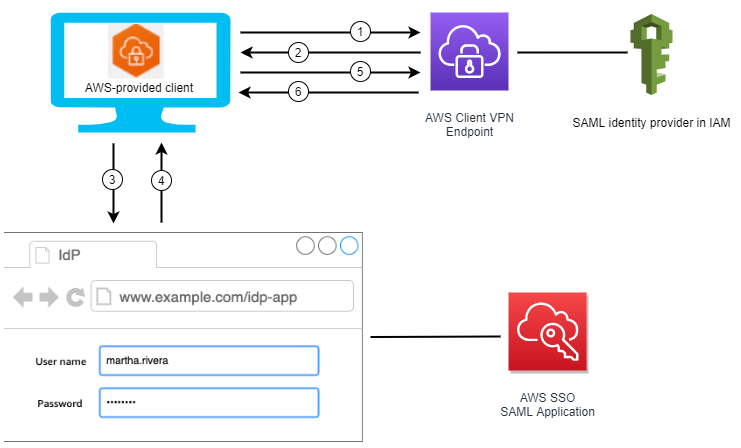
The following architecture diagram—Figure 1—presents an overview of the solution.
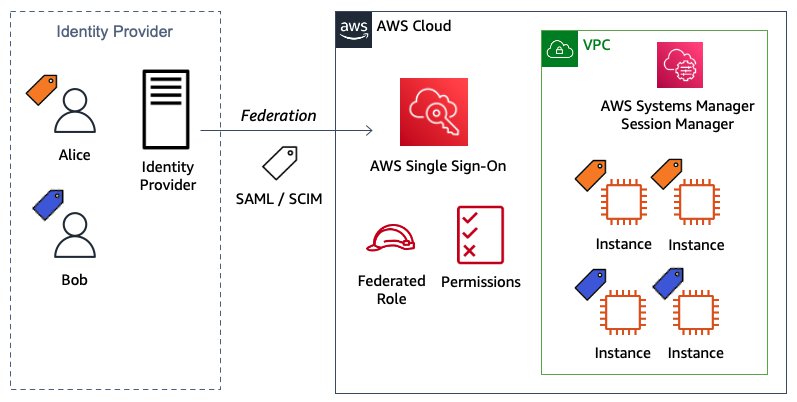
Figure 1: Solution architecture diagram
In the example in Figure 1, Alice and Bob are users who each have the attributes
login, department, and SSMSessionRunAs. These attributes are created and updated in the external directory—Okta in this example—under those users’ profiles. The first two attributes are automatically synchronized by using System for Cross-domain Identity Management (SCIM) protocol between AWS SSO and Okta and configured within AWS SSO settings. The third custom attribute is passed directly from Okta into the AWS accounts as a new SAML assertion.
Both users are using the same AWS SSO custom permission set that allows them to launch a new Amazon EC2 instance with proper tags enforcement. Based on those tags, they can start, stop, and restart the EC2 instance if they are in the same department, and to terminate it if they are the owner. Also, they can connect using Session Manager if they’re in the same department. Users can sign in to those instances using the Linux OS user defined in the attribute SSMSessionRunAs.
Prerequisites
To perform the steps to use AWS SSO attributes for ABAC, you must already have deployed AWS SSO for your AWS Organizations and have connected with an external identity source using SAML and SCIM protocols. For more information, see Checklist: Configuring ABAC in AWS using AWS SSO.
You need two test users for implementing and testing the solution. You can use two existing users, or create new users named Alice and Bob to match the solution and testing described in the following sections.
Implement the solution
The basic steps to implement the solution are:
- Confirm in AWS SSO settings that you have defined an external IdP, authentication via SAML 2.0, and provisioning via SCIM protocol.
- Enable attributes for access control and define the two supported attributes: login and department.
- Create a new user attribute in the Okta Directory.
- Edit and confirm the users’ attributes defined in the Okta Directory profile.
- Configure the SAML attribute statement in the Okta AWS SSO application.
- Create a new permission set using an ABAC policy.
- Create an AWS account assignment to the users using the permission set created in the previous step.
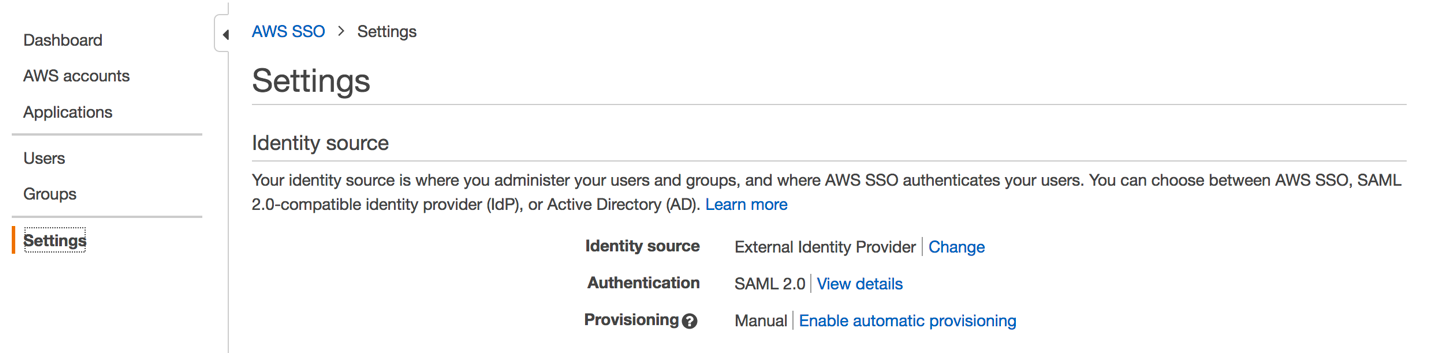
Confirm AWS SSO configuration
In this first step, you confirm that AWS SSO has been properly configured. Go to AWS SSO console SSO settings to check that the configuration of your identity source, authentication, and provisioning is as follows:
Identity source: External Identity Provider
Authentication: SAML 2.0
Provisioning: SCIM
- Confirm authentication is working as expected, by going to your user portal URL in a new browser instance (to ensure your user authentication doesn’t overwrite your existing authentication). The user portal offers a single place to access all the assigned AWS accounts, roles, and applications. For example, it should look like https://exampledomain.awsapps.com/start. Once you access it, the process automatically redirects the request to your external provider for authentication, and then returns the user to the AWS SSO user portal.
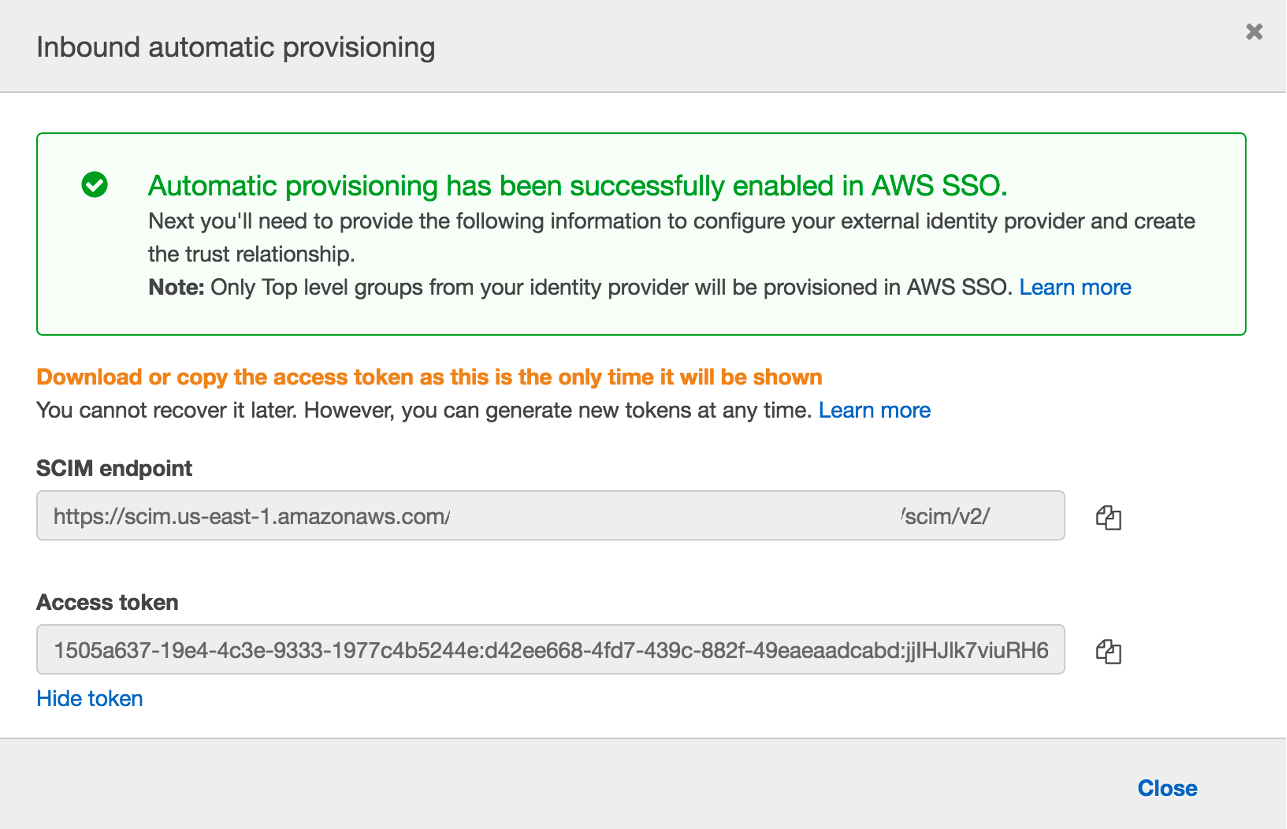
- To confirm provisioning, go to the AWS SSO console and choose Users from the right panel. You should see your Okta users assigned to the AWS SSO application being synchronized by SCIM protocol. Select any user to see the Created by SCIM and Updated by SCIM information for that user.
Enable AWS SSO attributes for access control
In this step, you enable ABAC and then configure AWS SSO attributes. This solution uses the Attributes for access control page in the AWS Management Console to enter the key and value pairs.
To enable attributes for access control
- Open the AWS SSO console.
- Choose Settings.
- On the Settings page, under Identity source, next to Attributes for access control, select Enable. As shown in Figure 2.
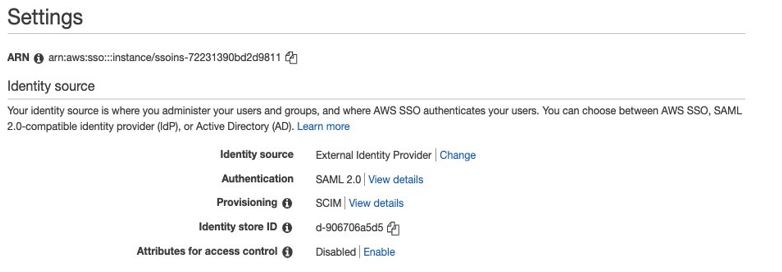
Figure 2: Attributes for access control settings (enable ABAC)
Once ABAC is enabled, you can select the attributes to be synchronized. For this use case, select login and department.
To select your attributes using the AWS SSO console
- Open the AWS SSO console.
- Choose Settings.
- On the Settings page, under Identity source, next to Attributes for access control, choose View details.
- On the Attributes for access control page, notice the Key and Value columns. This is where you will be mapping the attribute from your identity source to an attribute that AWS SSO passes as a session tag. Set the first key and value pair by entering login as the key and ${path:userName} as the value. Set the second key and value pair to department and ${path:enterprise.department}. The settings are shown in Figure 3 below.

Figure 3: Map attributes using the Attributes for access control page
- Choose Save changes.

Create a new attribute in Okta Directory
In this third step, you create the new custom attribute SSMSessionRunAs.
To create a new user attribute
- Open the Okta console.
- Under Directory, choose Profile Editor.
- Choose Edit Profile for Okta User (default).
- Under Attributes, choose Add Attribute as follows:
Data type: Select String
Display Name: Enter SSMSessionRunAs
Variable Name: Enter SSMSessionRunAs
Attribute Length: Select Less than and enter 10 (max). - Choose Save.
Edit and confirm users’ attributes defined in Okta Directory profile
Now that you have the new attribute SSMSessionRunAs created, go to the users’ profiles to enter the Department and SSMSessionRunAs values for both users.
To edit and confirm users’ attributes
- Open the Okta console.
- Under Directory, choose People.
- Select user Bob.
- Under Profile tab choose Edit as follows:
For the key Department, enter blue as the value.
For the key SSMSessionRunAs, enter bob as the value.
- Choose Save.
- Repeat steps 1 through 5 for Alice. For the key Department, enter amber as the value and for SSMSessionRunAs, enter alice as the value.
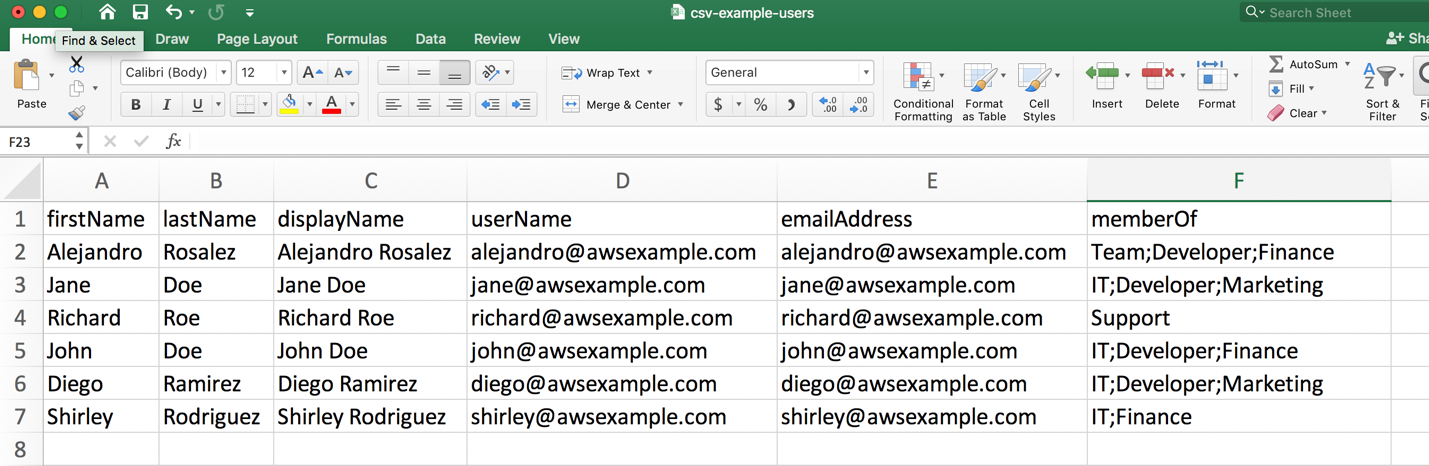
- Confirm that the attributes of both users are defined in the external directory as follows:Username (login): [email protected]
First name (firstName): Bob
Last name (lastName): Rodriguez
Display name (displayName): Bob
Department (department): blue
SSMSessionRunAs (SSMSessionRunAs): bobUsername (login): [email protected]
First name (firstName): Alice
Last name (lastName): Rosalez
Display name (displayName): Alice
Department (department): amber
SSMSessionRunAs (SSMSessionRunAs): alice
Configure SAML attribute statement in Okta AWS SSO application
The attribute SSMSessionRunAs isn’t available as an attribute within AWS SSO. However, you can include it by defining SAML attribute statements, which are inserted into the SAML assertions.
To create a new SAML attribute
- Open the Okta Application console.
- Choose AWS Single Sign-on application.
- On the Sign On tab, choose Edit Settings.
- Under SAML 2.0 Attributes Statements enter the following:
- For Name, enter https://aws.amazon.com/SAML/Attributes/AccessControl:SSMSessionRunAs
- For Name format, select URI Reference
- For Value, enter user.SSMSessionRunAs
- Choose Save.
Create a new permission set using an ABAC policy
In this step, you create a permissions policy that determines who can access your AWS resources based on the configured attribute value. When you enable ABAC and specify attributes, AWS SSO passes the attribute value of the authenticated user into AWS Identity and Access Management (IAM) for use in policy evaluation.
To create a permission set
- Open the AWS SSO console.
- Choose AWS accounts.
- Select the Permission sets tab.
- Choose Create permission set.
- On the Create new permission set page, choose Create a custom permission set.
- Choose Next: Details.
- Under Create a custom permission set, enter a name that will identify this permission set in AWS SSO. This name will also appear as an IAM role in the user portal for any users who have access to it. For this solution, name it myCustomPermissionSetEC2SSM.
- Choose Create a custom permissions policy and paste in the following ABAC policy document:
- Choose Next: Tags.
- Review the selections you made, and then choose Create.
The policy described above uses SAML session tags for the ABAC to define permissions based on attributes. These attributes are the tags passed in the AssumeRoleWithSAML operation when the SAML-based federation occurs.
A combination of global (aws:TagKeys, aws:PrincipalTag, aws:RequestTag) and service (ec2:ResourceTag, ec2:CreateAction, ssm:resourceTag) condition keys is used to assign the permissions.
To learn more about AWS global and service conditions keys, see AWS global condition context keys and The condition keys table for AWS services.
Assign users to an AWS account
In this step, you use the permission set created in the previous step to assign access to the users for a specified AWS account.
To assign access to users
- Open the AWS SSO console.
- Choose AWS accounts.
- Under the AWS organization tab, in the list of AWS accounts, select one or more accounts to which you want to assign access.
- Choose Assign users.
- On the Select users or groups page, select both test users from the list of users as shown in Figure 4.
Note: You can use the search box to look for specific users.

Figure 4: Select users to assign to AWS accounts
- Choose Next: Permission sets.
- On the Select permission sets page, select the permission sets that you created in step 5 to apply to the users from the table as shown in Figure 5.

Figure 5: Select permissions sets
- Choose Finish to start the configuration of your AWS account. When configuration is complete, a message is displayed stating that you have successfully configured your AWS account as shown in Figure 6.

Figure 6: Confirmation that configuration is complete


Test the solution
Now that you have everything in place, let’s test the solution. To test the solution, you’ll log in to AWS SSO, access the AWS account and check the event logs, and test the Amazon EC2 operations.
Log in to AWS SSO as Bob through your external IdP
Enter the user portal URL in a browser window and log in to AWS SSO as Bob. AWS SSO redirects to the external provider for the log in process. After successful authentication, the external provider redirects to the AWS SSO portal, which shows you a list of the AWS accounts that you have access to. In this case, Bob has access to one AWS account as shown in Figure 7.
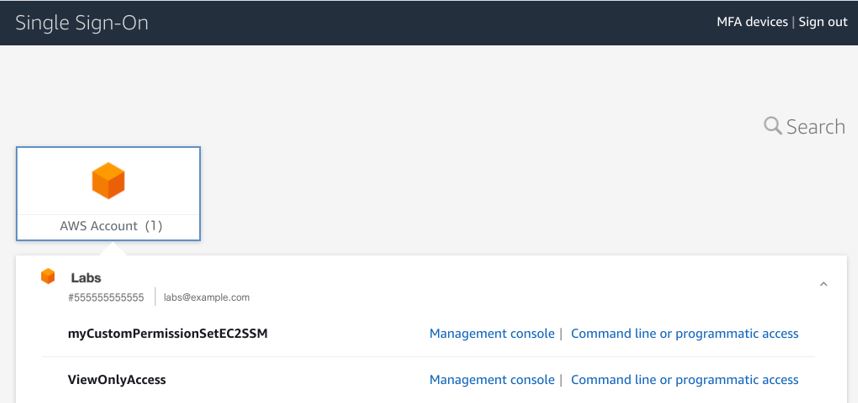
Figure 7: AWS SSO showing AWS accounts that the user has access to
Access the AWS account using the permission set and confirm the event logs
Select the Management console link for the AWS account that has the myCustomPermissionSetEC2SSM permission set that you created earlier. This action federates into the AWS account and is logged in to AWS CloudTrail with the API AssumeRoleWithSAML. To confirm that the SAML session tags are being passed in the session, look at the API event log in the CloudTrail Event history console. In the following example, you can check the principalTags keys and their values under requestParameters.
Test EC2 operations
- Open the Amazon EC2 console:
For this example, when opening the Amazon EC2 console there are already three running EC2 instances to test the ABAC policy that have been created with proper tags explained in the following step. From the top menu, you can also confirm the federated login AWSReservedSSO_myCustomPermissionSetEC2SSM_9e80ec498218bbea/[email protected] that represents the AWS SSO managed role and the user as shown in Figure 8.
Figure 8: EC2 instances and user information
- Launch a new EC2 instance:
Start testing the ABAC policy by launching a new EC2 instance. This action is authorized only when you fill in the three required tags: Name, Owner, and Department.- From the Amazon EC2 console, choose Launch Instances.
- Set the AMI, for this example select an Ubuntu-based OS.
- Set the Instance Type, a t2.micro will work.
- Configure the EC2 instance. Choose an IAM role to allow Systems Manager to manage the new EC2 instance. In this case, you have to create the IAM role EC2UbuntuSSMRole with the AWS managed policy AmazonEC2RoleforSSM attached in advanced with proper IAM permissions since the user Bob is not allow to do so. Then, you must use the user data to create the OS Ubuntu user—Bob—that you need to log in to the EC2 instance by using Session Manager. You can copy and paste the following to create the user “Bob”:#!/bin/bash
sudo useradd -m bob - Add storage using the default settings.
- Add tags. From the ABAC policy previously created, you can confirm that tag key Name can be anything as the condition StringLike is indicated with a wildcard (*). The tag keys Owner and Department have to match the principal session tags passed through federation. In this case, enter [email protected] as the key Owner, and enter blue as the Department, as shown in Figure 9.

Figure 9: EC2 tags describing key value pairs
- Configure security groups. When configuring security groups, you can choose an existing security group that doesn’t allow any inbound traffic to the SSH port. Since when using Session Manager you connect to the EC2 instance through an API that is going to be an outbound connection. This way you can safely leave the security group inbound rules close.
- Review and launch. It will ask you about selecting or creating a key pair. You don’t need one, because you’re using Session Manager. Proceed without selecting or creating a new SSH key pair. When launching the EC2 instance with the correct tag keys and values, you get the success message shown in Figure 10.

Figure 10: EC2 success message launching an instance with the correct tags
If there are any missing tag keys or the values aren’t correct, the action will be denied as shown in Figure 11. For more information, you can decode the authorization error message using the API DecodeAuthorizationMessage.

Figure 11: EC2 failed message launching an instance with incorrect tags
- Stop, reboot, and terminate EC2 instances.
The next tests are to be stop, reboot, and terminate the EC2 instances. In the ABAC policy you defined that only users who have the same department value as the resource can perform the first two actions. You can terminate and EC2 instance only if you are an owner. To stop, reboot, and terminate instances, open the EC2 Console, choose Instances, and select the instance you want to affect. Choose Instance state and choose the action you want to test: Stop instance, Reboot instance or Terminate instance.Trying to stop the EC2 instance amber-instance where Department is amber is shown in Figure 12.

Figure 12: EC2 console showing how to stop an instance
The action should fail as shown in Figure 13.

Figure 13: EC2 instance failure message stopping an instance with wrong tags
Only when the department value of the EC2 instance is blue is it possible to stop or reboot the instance as shown in Figure 14.

Figure 14: EC2 success message stopping an instance with correct tags
Only when the owner who launched the EC2 instance matches with the federated login is it possible to terminate the instance. Trying to terminate an EC2 instance that was launched by anyone other than the owner will lead to a failed action as shown in Figure 15.

Figure 15: EC2 failed message terminating an instance with incorrect tags
- Try to modify tags. Because ABAC policies rely on tags, you cannot modify tags after the resources have been created. This is set in the ABAC policy statement AllowCreateTagsOnRunInstance in Create a new permission set using an ABAC policy. If you try to modify any tag keys or values on existing resources, the changes will be denied. For example, if you try to modify the owner of a tag on an existing EC2 instance, you get the “Failed to update tags” error message as shown in Figure 16.

Figure 16: Failed message when attempting to modify tags
- Connect to the EC2 instance using Session Manager.
- Test logging in to the EC2 instance by choosing the new instance and choosing Connect as shown in Figure 17.

Figure 17: EC2 console selecting an instance to connect
- Then choose the Session Manager tab and choose Connect as shown in Figure 18.

Figure 18: EC2 console selecting Session Manager to connect
This will open a new tab in the browser redirecting to a Systems Manager session where you can confirm that the Ubuntu OS user is Bob as shown in Figure 19.

Figure 19: Systems Manager session started confirming Ubunto OS user
Note: By default, sessions are launched using the credentials of a system-generated account named ssm-user that is created on a managed instance. However, you can instead launch sessions using any OS user by enabling the run as feature in SSM. To learn more about this, see Enable run as support for Linux and macOS instances in the Systems Manager Session Manager user guide.
- Performing the same action in an EC2 instance with a different Department tag will lead to a denied action as shown in Figure 20. This is because the ABAC policy allows the StartSession action only when the Department key matches the Department value in the EC2 instance.

Figure 20: Systems Manager StartSession failed message
- Test logging in to the EC2 instance by choosing the new instance and choosing Connect as shown in Figure 17.


Conclusion
In this blog post, you learned how to use AWS SSO with the two methods of passing attributes to AWS account using session tags for ABAC. You also learned how to build policies with tags as conditions to simplify and reuse custom permission sets. You have seen working examples with services like EC2, and Systems Manager Session Manager. To learn more about ABAC policies, SAML session tags, and how to pass session tags in federation, see IAM tutorial: Use SAML session tags for ABAC and Passing session tags using AssumeRoleWithSAML.
If you have feedback about this post, submit comments in the Comments section below.
Want more AWS Security news? Follow us on Twitter.