All posts by Felix John

Amazon Managed Service for Apache Flink application lifecycle management with Terraform 

Post Syndicated from Felix John original https://aws.amazon.com/blogs/big-data/amazon-managed-service-for-apache-flink-application-lifecycle-management-with-terraform/

In this post, you’ll learn how to use Terraform to automate and streamline your Apache Flink application lifecycle management on Amazon Managed Service for Apache Flink. We’ll walk you through the complete lifecycle including deployment, updates, scaling, and troubleshooting common issues.

Managing Apache Flink applications through their entire lifecycle from initial deployment to scaling or updating can be complex and error-prone when done manually. Teams often struggle with inconsistent deployments across environments, difficulty tracking configuration changes over time, and complex rollback procedures when issues arise.

Infrastructure as Code (IaC) addresses these challenges by treating infrastructure configuration as code that can be versioned, tested, and automated. While there are different IaC tools available including AWS CloudFormation or AWS Cloud Development Kit (AWS CDK), we focus on HashiCorp Terraform to automate the complete lifecycle management of Apache Flink applications on Amazon Managed Service for Apache Flink.

Managed Service for Apache Flink allows you to run Apache Flink jobs at scale without worrying about managing clusters and provisioning resources. You can focus on developing your Apache Flink using your Integrated Development Environment (IDE) of choice, building and packaging the application using standard build and CI/CD tools. Once your application is packaged and uploaded to Amazon S3, you can deploy and run it with a serverless experience.

While you can control your Managed Service for Apache Flink applications directly using the AWS Console, CLI, or SDKs, Terraform provides key advantages such as version control of your application configuration, consistency across environments, and seamless CI/CD integration. This post builds upon our two-part blog series “Deep dive into the Amazon Managed Service for Apache Flink application lifecycle – Part 1” and “Part 2” that discusses the general lifecycle concepts of Apache Flink applications.

We use the sample code published on the GitHub repository to demonstrate the lifecycle management. Note that this is not a production-ready solution.

Setting up your Terraform environment

Before you can manage your Apache Flink applications with Terraform, you need to set up your execution environment. In this section, we’ll cover how to configure Terraform state management and credential handling. The Terraform AWS provider supports Managed Service for Apache Flink through the aws_kinesis_analyticsv2_application resource (using the legacy name “Kinesis Analytics V2“).

Terraform state management

Terraform uses a state file to track the resources it manages. In Terraform, storing the state file in Amazon S3 is a best practice for teams working collaboratively because it provides a centralised, durable, and secure location for tracking infrastructure changes. However, since multiple engineers or CI/CD pipelines may run Terraform simultaneously, state locking is essential to prevent race conditions where concurrent executions could corrupt the state. S3 as backend is commonly used for state storage and locking, ensuring that only one Terraform process can modify the state at a time, thus maintaining infrastructure consistency and avoiding deployment conflicts.

Passing credentials

To run Terraform inside a Docker container while ensuring that it has access to the necessary AWS credentials and infrastructure code, we follow a structured approach. This process involves exporting AWS credentials, mounting required directories, and executing Terraform commands inside a Docker container. Let’s break this down step by step. Before running Terraform, we need to make sure that our Docker container has access to the required AWS credentials. Since we are using temporary credentials, we generate them using the AWS CLI with the following command:

aws configure export-credentials --profile $AWS_PROFILE --format env-no-export > .env.docker

This command does the following:

  • It exports AWS credentials from a specific AWS profile ($AWS_PROFILE).
  • The credentials are saved in .env.docker in a format suitable for Docker.
  • The --format env-no-export option displays credentials as non-exported shell variables

This file (.env.docker) will later be used to pass credentials into the Docker container

Running Terraform in Docker

Running Terraform inside a Docker container provides a consistent, portable, and isolated environment for managing infrastructure without requiring Terraform to be installed directly on the local machine. This approach ensures that Terraform runs in a controlled environment, reducing dependency conflicts and improving security. To execute Terraform within a Docker container, we use a docker run command that mounts the necessary directories and passes AWS credentials, allowing Terraform to apply infrastructure changes seamlessly.

The Terraform configuration files are stored in a local terraform folder, which is virtually attached to the container using the -v flag. This allows the containerised Terraform instance to access and modify infrastructure code as if it were running locally.

To run Terraform in Docker, the following command is executed:

docker run --env-file .env.docker --rm -it \
-v ./flink:/home/flink-project/flink \
-v ./terraform:/home/flink-project/terraform \
-v ./build.sh:/home/flink-project/build.sh \
msf-terraform bash build.sh apply

Breaking down this command step by step:

  • --env-file .env.docker provides the AWS credentials required for Terraform to authenticate.
  • --rm -it runs the container interactively and is removed after execution to prevent clutter.
  • -v ./terraform:/home/flink-project/terraform mounts the Terraform directory into the container, making the configuration files accessible.
  • -v ./build.sh:/home/flink-project/build.sh mounts the build.sh script, which contains the logic to build JAR file for flink and execute Terraform commands.
  • msf-terraform is the Docker image used, which has Terraform pre-installed.
  • bash build.sh apply runs the build.sh script inside the container, passing apply as an argument to trigger the Terraform apply process.

Inside the container, build.sh typically includes commands such as terraform init to initialise the Terraform working directory and terraform apply to apply infrastructure changes. Since the Terraform execution happens entirely within the container, there is no need to install Terraform locally, and the process remains consistent across different systems. This method is particularly beneficial for teams working in collaborative environments, as it standardises Terraform execution and allows for reproducibility across development, staging, and production environments.

Managing application lifecycle with Terraform

In this section, we walk through each phase of the Apache Flink application lifecycle and understand how you can implement these operations using Terraform. While these operations are usually fully automated as part of a CI/CD pipeline, you will execute the individual steps manually from the command line for demonstration purposes. There are many ways to run Terraform depending on your organization’s tooling and infrastructure setup, but for this demonstration, we run Terraform in a container alongside the application build to simplify dependency management. In real-world scenarios, you would typically have separate CI/CD stages for building your application and deploying with Terraform, with distinct configurations for each environment. Since every organization has different CI/CD tooling and approaches, we keep these implementation details out of scope and focus on the core Terraform operations.

For a comprehensive deep dive into Apache Flink application lifecycle operations, refer to our previous two-part blog series.

Create and start a new application

To get started you want to create your Apache Flink application running on Managed Service for Apache Flink. You should execute the following Docker command:

docker run --env-file .env.docker --rm -it \
-v ./flink:/home/flink-project/flink \
-v ./terraform:/home/flink-project/terraform \
-v ./build.sh:/home/flink-project/build.sh \
msf-terraform bash build.sh apply

This command will complete the following operations by executing the bash script build.sh:

  1. Building the Java ARchive (JAR) file from your Apache Flink application
  2. Uploading the JAR file to S3
  3. Setting the config variables for your Apache Flink application in terraform/config.tfvars.json
  4. Create and deploy the Apache Flink application to Managed Service for Apache Flink using terraform apply

Terraform fully covers this operation. You can check the running Apache Flink application using AWS CLI or inside the Managed Apache Flink Console after Terraform completes with Apply Complete! Terraform is expecting the Apache Flink artifact, i.e. the JAR file to be packaged and copied to S3. This operation is usually part of the CI/CD pipeline and executed before invoking the terraform apply. Here, the operation is specified in the build.sh script.

Deploy code change to an application

You have successfully created and started the Flink application. However, you realize that you have to make a change to the Flink application code. Let’s make a code change to the application code in flink/ and see how to build and deploy it. After making the necessary changes, you simply have to run the following Docker command again that builds the JAR file, uploads it to S3 and deploys the Apache Flink application using Terraform:

docker run --env-file .env.docker --rm -it \
-v ./flink:/home/flink-project/flink \
-v ./terraform:/home/flink-project/terraform \
-v ./build.sh:/home/flink-project/build.sh \
msf-terraform bash build.sh apply

This phase of the lifecycle is fully supported by Terraform as long as both applications are state compatible, meaning that the operators of the upgraded Apache Flink application are able to restore the state from the snapshot that is taken from the old application version, before Managed Service for Apache Flink stops and deploys the change. For example, removing a stateful operator without enabling the allowNonRestoredState flag or changing an operator’s UID could prevent the new application from restoring from the snapshot. For more information on state compatibility, refer to Upgrading Applications and Flink Versions. For an example of state incompatibility, and strategies for handling state incompatibility, refer to Introducing the new Amazon Kinesis source connector for Apache Flink.

When deploying a code change goes wrong – A problem prevents the application code from being deployed

You also need to be careful with deploying code changes that contain bugs preventing the Apache Flink job from starting. For more information, refer to failure mode (a) – a problem prevents the application code from being deployed under When starting or updating the application goes wrong. For instance, this can be simulated by setting the mainClass in flink/pom.xml mistakenly to com.amazonaws.services.msf.WrongJob. Similar to before you build the JAR, upload it and run the terraform apply by running the Docker command from above. However, Terraform now fails to correctly apply the changes and throws an error message as the Apache Flink application fails to correctly update. Finally, the application status moves to READY.

Error message from terminal

To remedy the issue, you have to change the value of mainClass back to the original one and deploy the changes to Managed Service for Apache Flink. The Apache Flink application remains in READY status and doesn’t start automatically, as this was its state before applying the fix. Note that Terraform does not try to start the application when you deploy a change. You will have to manually start the Flink application using the AWS CLI or through the Managed Apache Flink Console.

As detailed in Part 2 of the companion blog, there is a second failure scenario where the application starts successfully, but the job becomes stuck in a continuous fail-and-restart loop. A code change can also cause this failure mode. We will cover the second error scenario when we cover deploying configuration changes.

Manual rollback application code to previous application code

As part of the lifecycle management of your Apache Flink application, you may need to explicitly rollback to a previous running application version. This is particularly useful when a newly deployed application version with application code changes exhibits unexpected behaviour and you want to explicitly rollback the application. Currently, Terraform does not support explicit rollbacks of your Apache Flink application running in Managed Service for Apache Flink. You will have to resort to therollbackApplication API through the AWS CLI or the Managed Service for Apache Flink Console to revert the application to the previous running version.

When you perform the explicit rollback, Terraform will initially not be aware of the changes. More specifically, the S3 path to the JAR file in the Managed Service for Apache Flink service (see left part of the image below) is different to the S3 path denoted in the terraform.tfstate file stored in Amazon S3 (see the right part of the image below). Fortunately, Terraform will always perform refreshing actions that include reading the current settings from all managed remote objects and updating the Terraform state to match as part of creating a plan in both terraform plan and terraform apply commands.
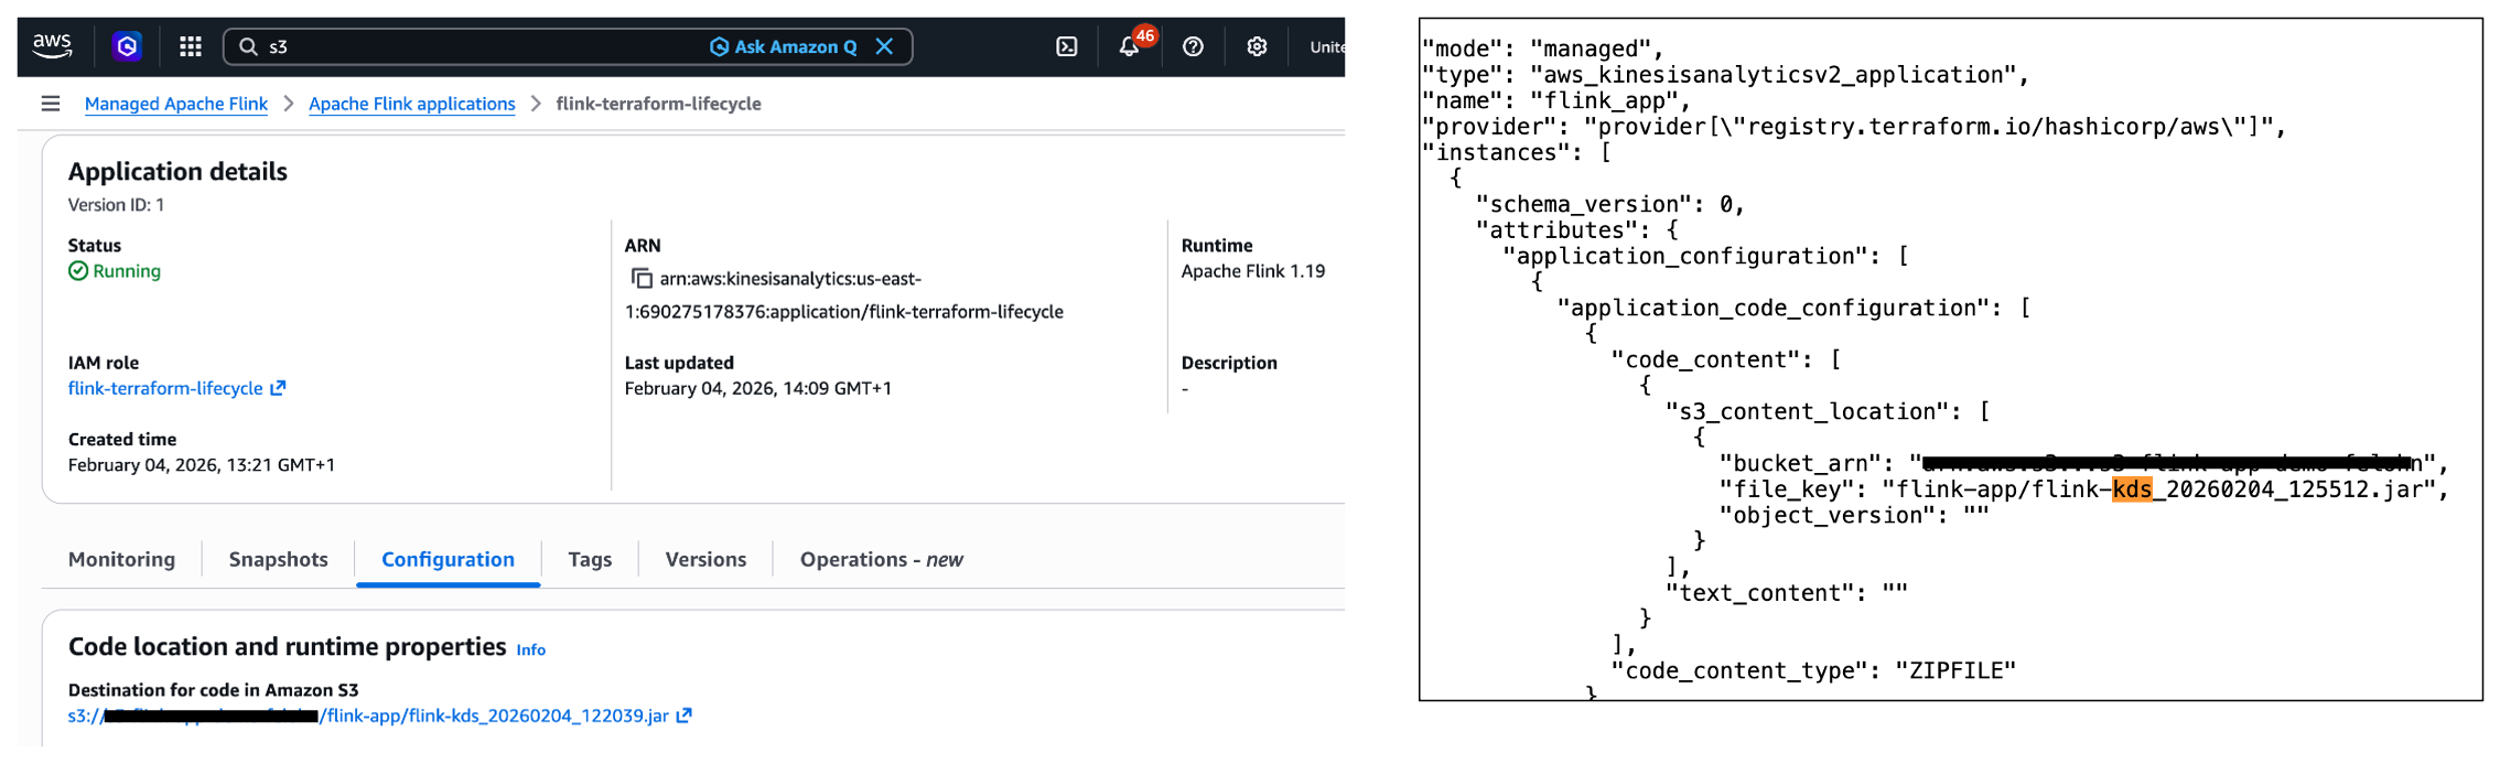
Terraform State vs. MSF State

In summary, while you can not perform a manual rollback using Terraform, Terraform will automatically refresh the state when deploying a change using terraform apply.

Deploy config change to application

You have already made changes to the application code of your Apache Flink application. What about making changes to the config of the application, e.g., changing runtime parameters? Imagine you want to change the application logging level of your running Apache Flink application. To change the logging level from ERROR to INFO, you have to change the value for flink_app_monitoring_metrics_level in the terraform/config.tfvars.json to INFO. To deploy the config changes, you need to run the docker run command again as done in the previous sections. This scenario works as expected and is fully covered by Terraform.

What happens when the Apache Flink application deploys successfully but fails and restarts during execution? For more information, please refer to failure mode (b) – the application is started, the job is stuck in a fail-and-restart loop under When starting or updating the application goes wrong. Note that this failure mode can happen when making code changes as well.

When deploying config change goes wrong – The application is started, the job is stuck in a fail-and-restart loop

In the following example, we apply a wrong configuration change preventing the Kinesis connector from initialising correctly, ultimately putting the job in a fail-and-restart loop. To simulate this failure scenario, you’ll need to modify the Kinesis stream configuration by changing the stream name to a non-existent one. This change is made in the terraform/config.tfvars.json file, specifically altering the stream.name value under flink_app_environment_variables. When you deploy with this invalid configuration, the initial deployment will appear successful, showing an Apply Complete! message. The Flink application status will also show as RUNNING. However, the actual behaviour reveals problems. If you check the Flink Dashboard, you’ll see the application is continuously failing and restarting. Also, you will see a warning message about the application requiring attention in the AWS Console.
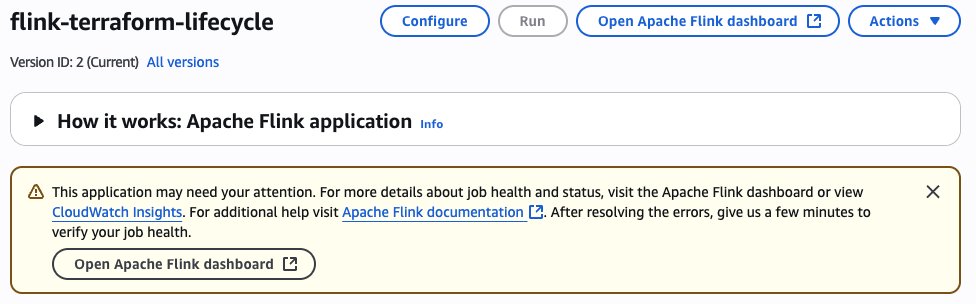
Problem message within the MSF Console

As detailed in the section Monitoring Apache Flink application operations in the companion blog (part 2), you can monitor the FullRestarts metric to detect the fail-and-restart loop.

Reverting the changes made to the environment variable and deploying the changes will result in Terraform showing the following error message: Failed to take snapshot for the application flink-terraform-lifecycle at this moment. The application is currently experiencing downtime.

Error message 2 from terminal

You have to force-stop without a snapshot and restart the application with a snapshot to get your Flink application back to a properly functioning state. You should constantly monitor the application state of your Apache Flink application to detect any issues.

Other common operations

Manually scaling the application

Another common operation in the lifecycle of your Apache Flink application is scaling the application up or down by adjusting the parallelism. This operation changes the number of Kinesis Processing Units (KPUs) allocated to your application. Let’s look at two different scaling scenarios and how they are handled by Terraform.

In the first scenario, you want to change the parallelism of your running Apache Flink application within the default parallelism quota. To do this, you need to modify the value for flink_app_parallelism in the terraform/config.tfvars.json file. After updating the parallelism value, you deploy the changes by running the Docker command as done in the previous sections:

docker run --env-file .env.docker --rm -it \
-v ./flink:/home/flink-project/flink \
-v ./terraform:/home/flink-project/terraform \
-v ./build.sh:/home/flink-project/build.sh \
msf-terraform bash build.sh apply

This scenario works as expected and is fully covered by Terraform. The application will be updated with the new parallelism setting, and Managed Service for Apache Flink will adjust the allocated KPUs accordingly. Note that there is a default quota of 64 KPUs for a single Managed Service for Apache Flink application, which must be raised proactively via a quota increase request if you need to scale your Managed Service for Apache Flink application beyond 64 KPUs. For more information, refer to Managed Service for Apache Flink quota.

Less common change deployments which require special handling In this section we analyze some less common change deployment scenarios which require some special handling.

Deploy code change that removes an operator

Removing an operator from your Apache Flink application requires special consideration, particularly regarding state management. When you remove an operator, the state from that operator still exists in the latest snapshot, but there’s no longer a corresponding operator to restore it. Let’s take a closer look at this scenario and understand how you can handle it properly. First, you need to make sure that the parameter AllowNonRestoredState is set to True. This parameter specifies whether the runtime is allowed to skip a state that cannot be mapped to the new program, when restoring from a snapshot. Allowing non-restored state is required to successfully update an Apache Flink application when you dropped an operator. To enable the AllowNonRestoredState, you need to set the configuration value for flink_app_allow_non_restored_state to true in terraform/config.tfvars.json. Then, you can go ahead and remove an operator: For example, you can directly have the sourceStream write to the sink connector in flink/src/main/java/com/amazonaws/services/msf/StreamingJob.java. Change code line 146 from windowedStream.sinkTo(sink).uid("kinesis-sink")to sourceStream.sinkTo(sink).uid("kinesis-sink"). Make sure that you have commented out the entire windowedStream code block (lines 103 to 140).

This change will remove the windowed computation and directly connect the source stream to the sink, effectively removing the stateful operation. After removing the operator from your Flink application code, you deploy the changes using the Docker command as previously done. However, the deployment fails with the following error message: Could not execute application. As a result, the Apache Flink application moves to the READY state. To recover from this situation, you need to restart the Apache Flink application using the latest snapshot for the application to successfully start and move to RUNNING status. Importantly, you need to make sure that AllowNonRestoredState is enabled. Otherwise, the application will fail to start as it cannot restore the state for the removed operator.

Deploy change that breaks state compatibility with system rollback enabled

During the lifecycle management of your Apache Flink application, you might encounter scenarios where code changes break state compatibility. This typically happens when you modify stateful operators in ways that prevent them from restoring their state from previous snapshots.

A common example of breaking state compatibility is changing the UID of a stateful operator (such as an aggregation or windowing operator) in your application code. To safeguard against such breaking changes, you can enable the automatic system rollback feature in Managed Service for Apache Flink as described in the subsection Rollback under Lifecycle of an application in Managed Service for Apache Flink previously. This feature is disabled by default and can be enabled using the AWS Management Console or invoking the UpdateApplication API operation. There is no way in Terraform to enable system rollback.

Next, let’s demonstrate this by breaking the state compatibility of your Apache Flink application by changing the UID of a stateful operator, e.g., the string windowed-avg-price in line 140 of flink/src/main/java/com/amazonaws/services/msf/StreamingJob.java to windowed-avg-price-v2 and deploy the changes as before. You will encounter the following error:

Error: waiting for Kinesis Analytics v2 Application (flink-terraform-lifecycle) operation (*) success: unexpected state ‘FAILED’, wanted target ‘SUCCESSFUL’. last error: org.apache.flink.runtime.rest.handler.RestHandlerException: Could not execute application.

At this point, Managed Service for Apache Flink automatically rolls back the application to the previous snapshot with the previous JAR file, maintaining your application’s availability as you have enabled system-rollback capability. Terraform will initially be not aware of the performed rollback. Fortunately, as we have already witnessed in subsection Manual rollback application code to previous application code, Terraform will automatically refresh the state when we change UID to the previous value and deploy the changes.

In-place upgrade of Apache Flink runtime version

Managed Service for Apache Flink supports in-place upgrade to new Flink runtime versions. See the documentation for more details. Updating the application dependencies and any required code changes is a responsibility of the user. Once you have updated the code artifact, the service is able to upgrade the runtime of your running application in-place, without data loss. Let’s examine how Terraform handles Flink version upgrades.

To upgrade your Apache Flink application from version 1.19.1 to 1.20, you need to:

  1. Update the Flink dependencies in your flink/pom.xml to version 1.20.0 (flink.version to 1.20.1 and flink.connector.version to 5.0.0-1.20 in <properties>)
  2. Update the flink_app_runtime_environment to FLINK-1_20 in terraform/config.tfvars.json
  3. Build and deploy the changes using the familiar docker run command

Terraform successfully performs an in-place upgrade of your Flink application. You will receive the following message: Apply complete! Resources: 0 added, 1 changed, 0 destroyed.

Operations currently not supported by Terraform

Let’s take a closer look at operations that are currently not supported by Terraform.

Starting or stopping the application without any configuration change

Terraform provides the start_application parameter, indicating whether to start or stop the application. You can set this parameter using flink_app_start in config.tfvars.json to stop your running Apache Flink application. However, this will only work if the current configuration value is set to true. In other words, Terraform only responds to the change in the parameter value, not the absolute value itself. After Terraform applies this change, your Apache Flink application will stop and its application status will move to READY. Similarly, restarting the application requires changing the flink_app_start value back to true, but this will only take effect if the current configuration value is false. Terraform will then restart your application, moving it back to the RUNNING state.

In summary, you cannot start or stop your Apache Flink application without making any configuration change in Terraform. You have to use AWS CLI, AWS SDK or AWS Console to start or stop your application.

Restarting application from an older snapshot or no snapshot without any configuration change

Similar to the previous section, Terraform requires an actual configuration change of application_restore_type to trigger a restart with different snapshot settings. Simply reapplying the same configuration values won’t initiate a restart from a different snapshot or no snapshot. You have to use AWS CLI, AWS SDK or AWS Console to restart your application from an older snapshot.

Performing rollback triggered manually or by system-rollback feature

Terraform does not support performing a manual rollback nor automatic system rollback. In addition, Terraform will also not be aware when such a rollback is taking place. The state information will be outdated, e.g. S3 path information. However, Terraform automatically performs refreshing actions to read settings from all managed remote objects and updates the Terraform state to match. Consequently, you can have Terraform refresh the Terraform state by successfully running a terraform apply command.

Conclusion

In this post, we demonstrated how to use Terraform to automate the lifecycle management of your Apache Flink applications on Managed Service for Apache Flink. We walked through fundamental operations including creating, updating, and scaling applications, explored how Terraform handles various failure scenarios and examined advanced scenarios such as removing operators and performing in-place runtime upgrades. We also identified operations that are currently not supported by Terraform.

For more information, see Run a Managed Service for Apache Flink application and our two-part blog on Deep dive into the Amazon Managed Service for Apache Flink application lifecycle.

Felix John

Felix John

Felix is a Global Solutions Architect and data & AI expert at AWS, based out of Germany. He focuses on supporting AWS’ strategic global automotive & manufacturing customers on their cloud journey.

Mazrim Mehrtens

Mazrim Mehrtens

Mazrim is a Sr. Specialist Solutions Architect for messaging and streaming workloads. Mazrim works with customers to build and support systems that process and analyze terabytes of streaming data in real time, run enterprise Machine Learning pipelines, and create systems to share data across teams seamlessly with varying data toolsets and software stacks.

Build a streaming data mesh using Amazon Kinesis Data Streams

Post Syndicated from Felix John original https://aws.amazon.com/blogs/big-data/build-a-streaming-data-mesh-using-amazon-kinesis-data-streams/

Organizations face an ever-increasing need to process and analyze data in real time. Traditional batch processing methods no longer suffice in a world where instant insights and immediate responses to market changes are crucial for maintaining competitive advantage. Streaming data has emerged as the cornerstone of modern data architectures, helping businesses capture, process, and act upon data as it’s generated.

As customers move from batch to real-time processing for streaming data, organizations are facing another challenge: scaling data management across the enterprise, because the centralized data platform can become the bottleneck. Data mesh for streaming data has emerged as a solution to address this challenge, building on the following principles:

  • Distributed domain-driven architecture – Moving away from centralized data teams to domain-specific ownership
  • Data as a product – Treating data as a first-class product with clear ownership and quality standards
  • Self-serve data infrastructure – Enabling domains to manage their data independently
  • Federated data governance – Following global standards and policies while allowing domain autonomy

A streaming mesh applies these principles to real-time data movement and processing. This mesh is a modern architectural approach that enables real-time data movement across decentralized domains. It provides a flexible, scalable framework for continuous data flow while maintaining the data mesh principles of domain ownership and self-service capabilities. A streaming mesh represents a modern approach to data integration and distribution, breaking down traditional silos and helping organizations create more dynamic, responsive data ecosystems.

AWS provides two primary solutions for streaming ingestion and storage: Amazon Managed Streaming for Apache Kafka (Amazon MSK) or Amazon Kinesis Data Streams. These services are key to building a streaming mesh on AWS. In this post, we explore how to build a streaming mesh using Kinesis Data Streams.

Kinesis Data Streams is a serverless streaming data service that makes it straightforward to capture, process, and store data streams at scale. The service can continuously capture gigabytes of data per second from hundreds of thousands of sources, making it ideal for building streaming mesh architectures. Key features include automatic scaling, on-demand provisioning, built-in security controls, and the ability to retain data for up to 365 days for replay purposes.

Benefits of a streaming mesh

A streaming mesh can deliver the following benefits:

  • Scalability – Organizations can scale from processing thousands to millions of events per second using managed scaling capabilities such as Kinesis Data Streams on-demand, while maintaining transparent operations for both producers and consumers.
  • Speed and architectural simplification – Streaming mesh enables real-time data flows, alleviating the need for complex orchestration and extract, transform, and load (ETL) processes. Data is streamed directly from source to consumers as it’s produced, simplifying the overall architecture. This approach replaces intricate point-to-point integrations and scheduled batch jobs with a streamlined, real-time data backbone. For example, instead of running nightly batch jobs to synchronize inventory data of physical goods across regions, a streaming mesh allows for instant inventory updates across all systems as sales occur, significantly reducing architectural complexity and latency.
  • Data synchronization – A streaming mesh captures source system changes one time and enables multiple downstream systems to independently process the same data stream. For instance, a single order processing stream can simultaneously update inventory systems, shipping services, and analytics platforms while maintaining replay capability, minimizing redundant integrations and providing data consistency.

The following personas have distinct responsibilities in the context of a streaming mesh:

  • Producers – Producers are responsible for generating and emitting data products into the streaming mesh. They have full ownership over the data products they generate and must make sure these data products adhere to predefined data quality and format standards. Additionally, producers are tasked with managing the schema evolution of the streaming data, while also meeting service level agreements for data delivery.
  • Consumers – Consumers are responsible for consuming and processing data products from the streaming mesh. They rely on the data products provided by producers to support their applications or analytics needs.
  • Governance – Governance is responsible for maintaining both the operational health and security of the streaming mesh platform. This includes managing scalability to handle changing workloads, enforcing data retention policies, and optimizing resource usage for efficiency. They also oversee security and compliance, enforcing proper access control, data encryption, and adherence to regulatory standards.

The streaming mesh establishes a common platform that enables seamless collaboration between producers, consumers, and governance teams. By clearly defining responsibilities and providing self-service capabilities, it removes traditional integration barriers while maintaining security and compliance. This approach helps organizations break down data silos and achieve more efficient, flexible data utilization across the enterprise.A streaming mesh architecture consists of two key constructs: stream storage and the stream processor. Stream storage serves all three key personas—governance, producers, and consumers—by providing a reliable, scalable, on-demand platform for data retention and distribution.

The stream processor is essential for consumers reading and transforming the data. Kinesis Data Streams integrates seamlessly with various processing options. AWS Lambda can read from a Kinesis data stream through event source mapping, which is a Lambda resource that reads items from the stream and invokes a Lambda function with batches of records. Other processing options include the Kinesis Client Library (KCL) for building custom consumer applications, Amazon Managed Service for Apache Flink for complex stream processing at scale, Amazon Data Firehose, and more. To learn more, refer to Read data from Amazon Kinesis Data Streams.

This combination of storage and flexible processing capabilities supports the diverse needs of multiple personas while maintaining operational simplicity.

Common access patterns for building a streaming mesh

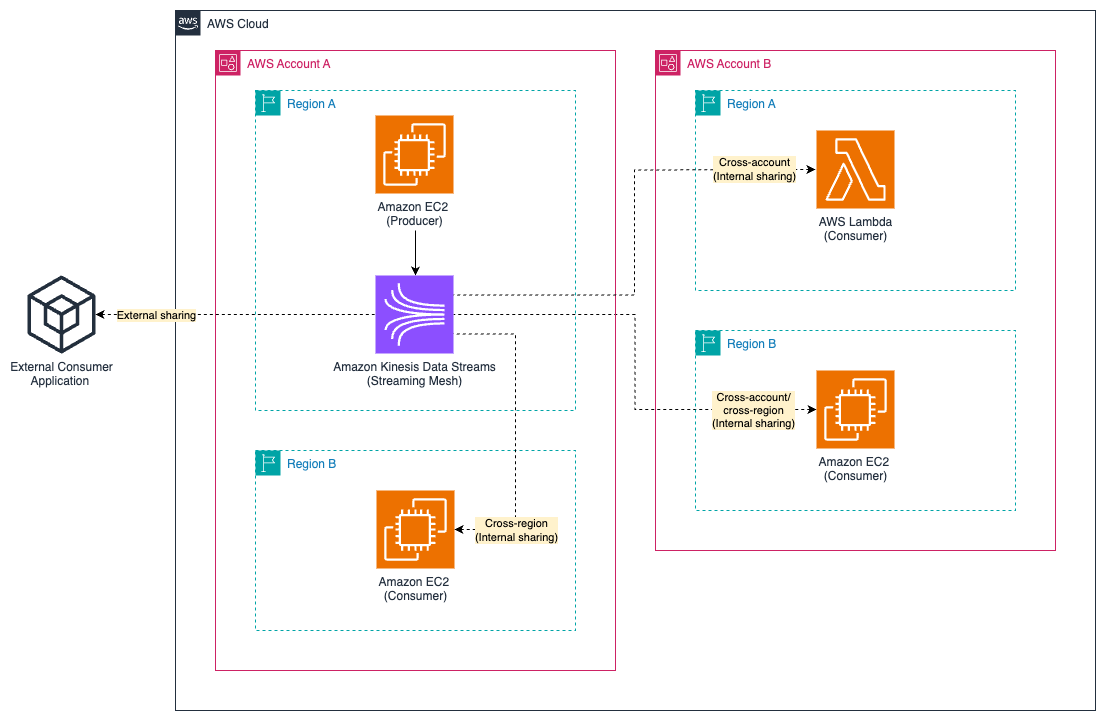
When building a streaming mesh, you should consider data ingestion, governance, access control, storage, schema control, and processing. When implementing the components that make up the streaming mesh, you must properly address the needs of the personas defined in the previous section: producer, consumer, and governance. A key consideration in streaming mesh architectures is the fact that producers and consumers can also exist outside of AWS entirely. In this post, we examine the key scenarios illustrated in the following diagram. Although the diagram has been simplified for clarity, it highlights the most important scenarios in a streaming mesh architecture:

  • External sharing – This involves producers or consumers outside of AWS
  • Internal sharing – This involves producers and consumers within AWS, potentially across different AWS accounts or AWS Regions

Overview of internal and external sharing

Building a streaming mesh on a self-managed streaming solution that facilitates internal and external sharing can be challenging because producers and consumers require the appropriate service discovery, network connectivity, security, and access control to be able to interact with the mesh. This can involve implementing complex networking solutions such as VPN connections with authentication and authorization mechanisms to support secure connectivity. In addition, you must consider the access pattern of the consumers when building the streaming mesh.The following are common access patterns:

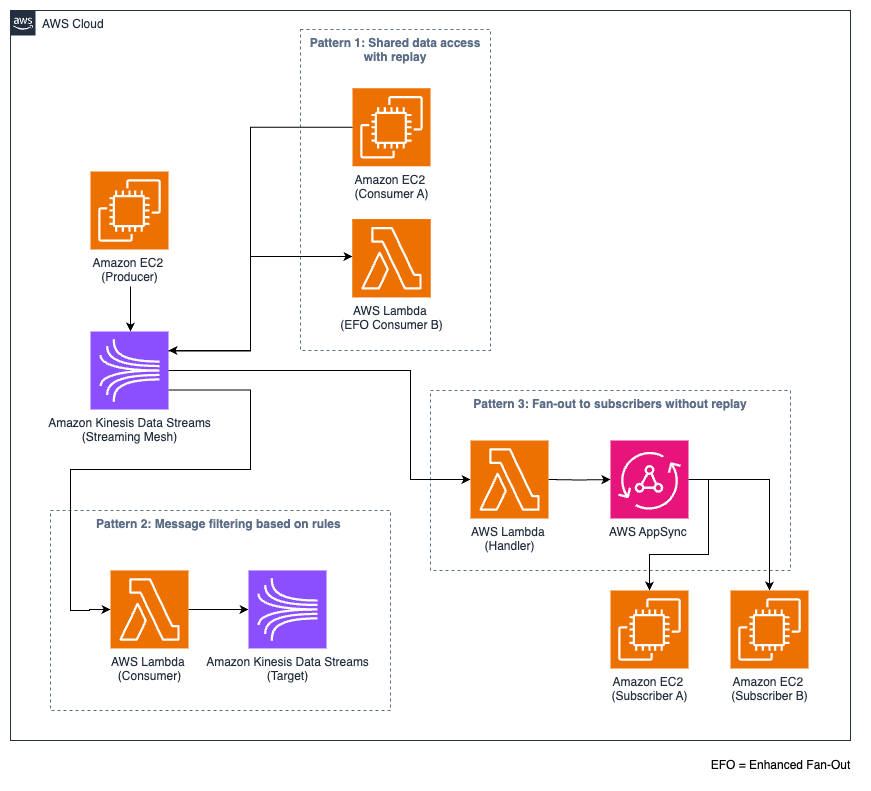
  • Shared data access with replay – This pattern allows multiple (standard or enhanced fan-out) consumers to access the same data stream as well as the ability to replay data as needed. For example, a centralized log stream might serve various teams: security operations for threat detection, IT operations for system troubleshooting, or development teams for debugging. Each team can access and replay the same log data for their specific needs.
  • Messaging filtering based on rules – In this pattern, you must filter the data stream, and consumers are only reading a subset of the data stream. The filtering is based on predefined rules at the column or row level.
  • Fan-out to subscribers without replay – This pattern is designed for real-time distribution of messages to multiple subscribers with each subscriber or consumer. The messages are delivered under at-most-once semantics and can be dropped or deleted after consumption. The subscribers can’t replay the events. The data is consumed by services such as AWS AppSync or other GraphQL-based APIs using WebSockets.

The following diagram illustrates these access patterns.

Streaming mesh patterns

Build a streaming mesh using Kinesis Data Streams

When building a streaming mesh that involves internal and external sharing, you can use Kinesis Data Streams. This service offers a built-in API layer that deliver secure and highly available HTTP/S endpoints accessible through the Kinesis API. Producers and consumers can securely write and read from the Kinesis Data Streams endpoints using the AWS SDK, the Amazon Kinesis Producer Library (KPL), or Kinesis Client Library (KCL), alleviating the need for custom REST proxies or additional API infrastructure.

Security is inherently integrated through AWS Identity and Access Management (IAM), supporting fine-grained access control that can be centrally managed. You can also use attribute-based access control (ABAC) with stream tags assigned to Kinesis Data Streams resources for managing access control to the streaming mesh, because ABAC is particularly helpful in complex and scaling environments. Because ABAC is attribute-based, it enables dynamic authorization for data producers and consumers in real time, automatically adapting access permissions as organizational and data requirements evolve. In addition, Kinesis Data Streams provides built-in rate limiting, request throttling, and burst handling capabilities.

In the following sections, we revisit the previously mentioned common access patterns for consumers in the context of a streaming mesh and discuss how to build the patterns using Kinesis Data Streams.

Shared data access with replay

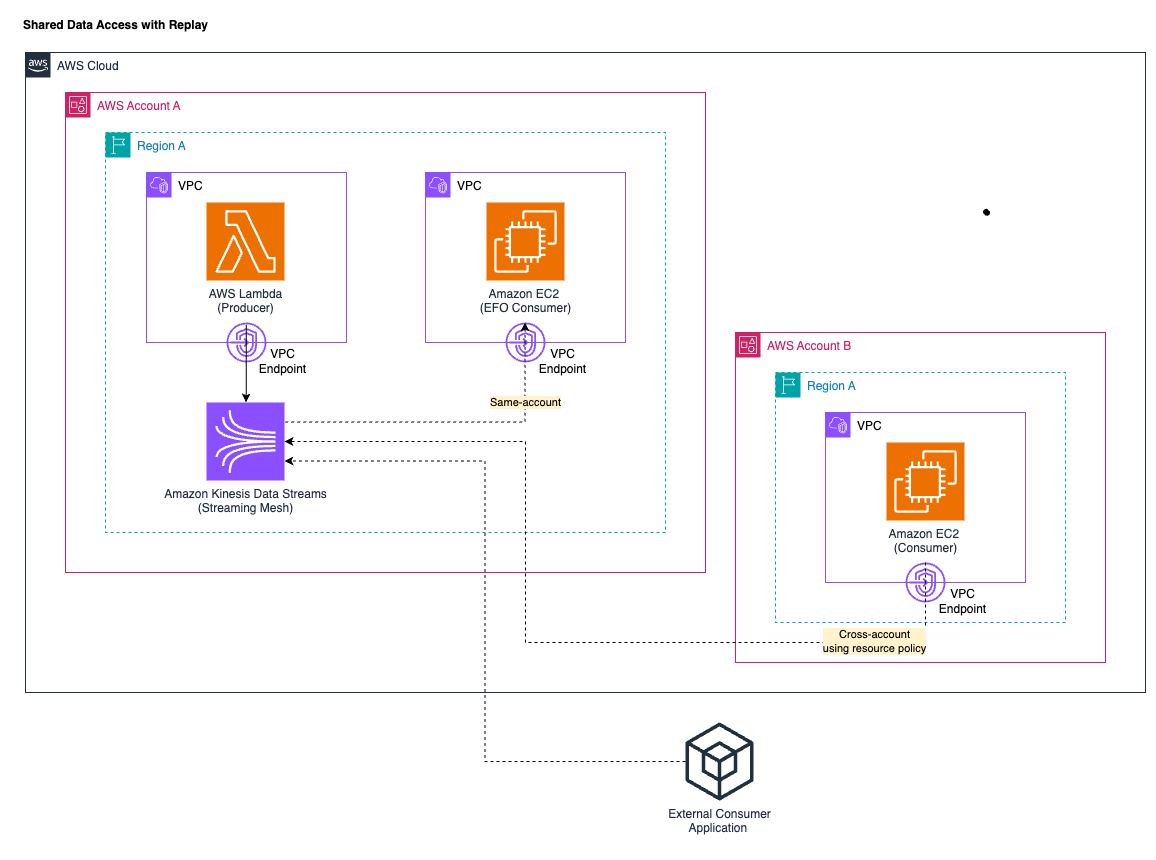
Kinesis Data Stream has built-in support for the shared data access with replay pattern. The following diagram illustrates this access pattern, focusing on same-account, cross-account, and external consumers.

Shared access with replay

Governance

When you create your data mesh with Kinesis Data Streams, you should create a data stream with the appropriate number of provisioned shards or on-demand mode based on your throughput needs. On-demand mode should be considered for more dynamic workloads. Note that message ordering can only be guaranteed at the shard level.

Configure the data retention period of up to 365 days. The default retention period is 24 hours and can be modified using the Kinesis Data Streams API. This way, the data is retained for the specified retention period and can be replayed by the consumers. Note that there is an additional fee for long-term data retention fee beyond the default 24 hours.

To enhance network security, you can use interface VPC endpoints. They make sure the traffic between your producers and consumers residing in your virtual private cloud (VPC) and your Kinesis data streams remain private and don’t traverse the internet. To provide cross-account access to your Kinesis data stream, you can use resource policies or cross-account IAM roles. Resource-based policies are directly attached to the resource that you want to share access to, such as the Kinesis data stream, and a cross-account IAM role in one AWS account delegates specific permissions, such as read access to the Kinesis data stream, to another AWS account. At the time of writing, Kinesis Data Streams doesn’t support cross-Region access.

Kinesis Data Streams enforces quotas at the shard and stream level to prevent resource exhaustion and maintain consistent performance. Combined with shard-level Amazon CloudWatch metrics, these quotas help identify hot shards and prevent noisy neighbor scenarios that could impact overall stream performance.

Producer

You can build producer applications using the AWS SDK or the KPL. Using the KPL can facilitate the writing because it provides built-in functions such as aggregation, retry mechanisms, pre-shard rate limiting, and increased throughput. The KPL can incur an additional processing delay. You should consider integrating Kinesis Data Streams with the AWS Glue Schema Registry to centrally control discover, control, and evolve schemas and make sure produced data is continuously validated by a registered schema.

You must make sure your producers can securely connect to the Kinesis API whether from inside or outside the AWS Cloud. Your producer can potentially live in the same AWS account, across accounts, or outside of AWS entirely. Typically, you want your producers to be as close as possible to the Region where your Kinesis data stream is running to minimize latency. You can enable cross-account access by attaching a resource-based policy to your Kinesis data stream that grants producers in other AWS accounts permission to write data. At the time of writing, the KPL doesn’t support specifying a stream Amazon Resource Name (ARN) when writing to a data stream. You must use the AWS SDK to write to a cross-account data stream (for more details, see Share your data stream with another account). There are also limitations for cross-Region support if you want to produce data to Kinesis Data Streams from Data Firehose in a different Region using the direct integration.

To securely access the Kinesis data stream, producers need valid credentials. Credentials should not be stored directly in the client application. Instead, you should use IAM roles to provide temporary credentials using the AssumeRole API through AWS Security Token Service (AWS STS). For producers outside of AWS, you can also consider AWS IAM Roles Anywhere to obtain temporary credentials in IAM. Importantly, only the minimum permissions that are required to write the stream should be granted. With ABAC support for Kinesis Data Streams, specific API actions can be allowed or denied when the tag on the data stream matches the tag defined in the IAM role principle.

Consumer

You can build consumers using the KCL or AWS SDK. The KCL can simplify reading from Kinesis data streams because it automatically handles complex tasks such as checkpointing and load balancing across multiple consumers. This shared access pattern can be implemented using standard as well as enhanced fan-out consumers. In the standard consumption mode, the read throughput is shared by all consumers reading from the same shard. The maximum throughput for each shard is 2 MBps. Records are delivered to the consumers in a pull model over HTTP using the GetRecords API. Alternatively, with enhanced fan-out, consumers can use the SubscribeToShard API with data pushed over HTTP/2 for lower-latency delivery. For more details, see Develop enhanced fan-out consumers with dedicated throughput.

Both consumption methods allow consumers to specify the shard and sequence number from which to start reading, enabling data replay from different points within the retention period. Kinesis Data Streams recommends to be aware of the shard limit that is shared and use fan-out when possible. KCL 2.0 or later uses enhanced fan-out by default, and you must specifically set the retrieval mode to POLLING to use the standard consumption model. Regarding connectivity and access control, you should closely follow what is already suggested for the producer side.

Messaging filtering based on rules

Although Kinesis Data Streams doesn’t provide built-in filtering capabilities, you can implement this pattern by combining it with Lambda or Managed Service for Apache Flink. For this post, we focus on using Lambda to filter messages.

Governance and producer

Governance and producer personas should follow the best practices already defined for the shared data access with replay pattern, as described in the previous section.

Consumer

You should create a Lambda function that consumes (shared throughput or dedicated throughput) from the stream and create a Lambda event source mapping with your filter criteria. At the time of writing, Lambda supports event source mappings for Amazon DynamoDB, Kinesis Data Streams, Amazon MQ, Managed Streaming for Apache Kafka or self-managed Kafka, and Amazon Simple Queue Service (Amazon SQS). Both the ingested data records and your filter criteria for the data field must be in a valid JSON format for Lambda to properly filter the incoming messages from Kinesis sources.

When using enhanced fan-out, you configure a Kinesis dedicated-throughput consumer to act as the trigger for your Lambda function. Lambda then filters the (aggregated) records and passes only those records that meet your filter criteria.

Fan-out to subscribers without replay

When distributing streaming data to multiple subscribers without the ability to replay, Kinesis Data Streams supports an intermediary pattern that’s particularly effective for web and mobile clients needing real-time updates. This pattern introduces an intermediary service to bridge between Kinesis Data Streams and the subscribers, processing records from the data stream (using a standard or enhanced fan-out consumer model) and delivering the data records to the subscribers in real time. Subscribers don’t directly interact with the Kinesis API.

A common approach uses GraphQL gateways such as AWS AppSync, WebSockets API services like the Amazon API Gateway WebSockets API, or other suitable services that make the data available to the subscribers. The data is distributed to the subscribers through networking connections such as WebSockets.

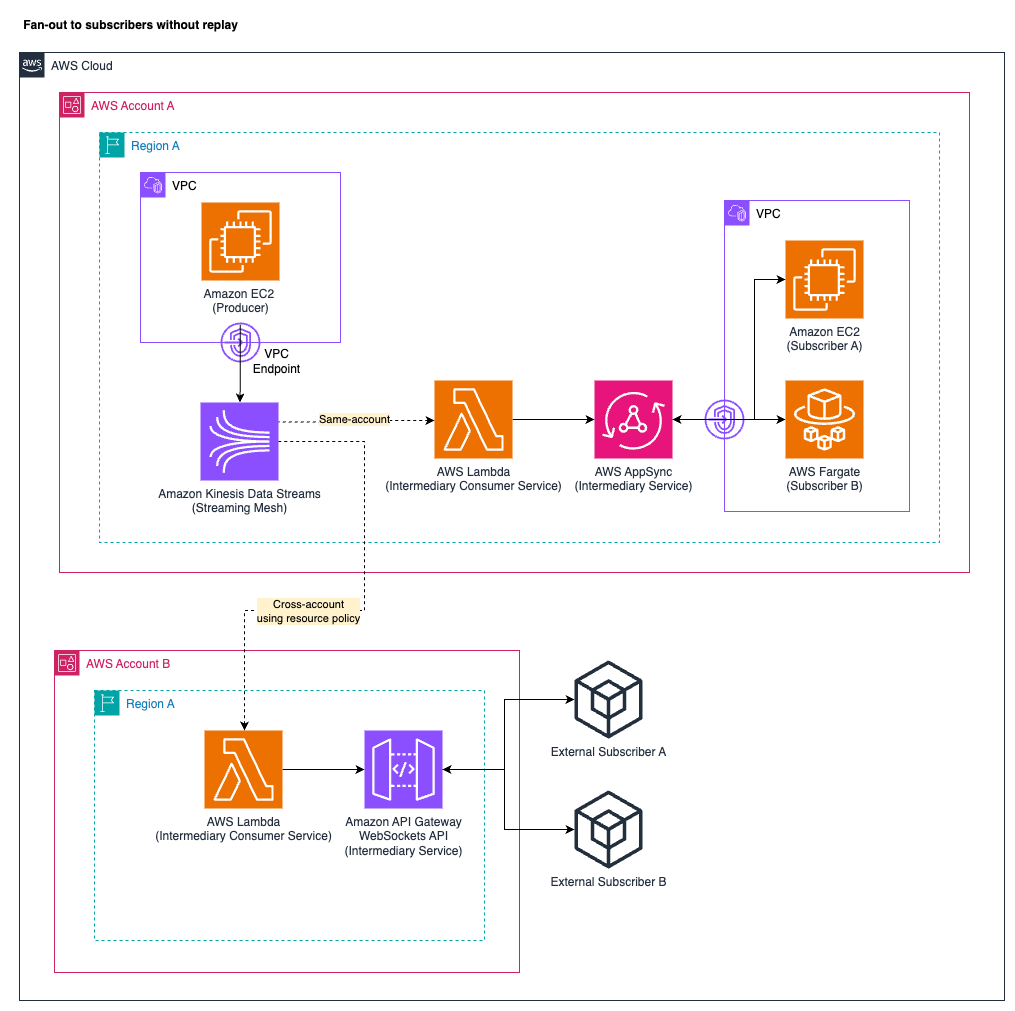
The following diagram illustrates the access pattern of fan-out to subscribers without replay. The diagram displays the managed AWS services AppSync and API Gateway as intermediary consumer options for illustration purposes.

Fan-out without replay

Governance and producer

Governance and producer personas should follow the best practices already defined for the shared data access with replay pattern.

Consumer

This consumption model operates differently from traditional Kinesis consumption patterns. Subscribers connect through networking connections such as WebSockets to the intermediary service and receive the data records in real time without the ability to set offsets, replay historical data, or control data positioning. The delivery follows at-most-once semantics, where messages might be lost if subscribers disconnect, because consumption is ephemeral without persistence for individual subscribers. The intermediary consumer service must be designed for high performance, low latency, and resilient message distribution. Potential intermediary service implementations range from managed services such as AppSync or API Gateway to custom-built solutions like WebSocket servers or GraphQL subscription services. In addition, this pattern requires an intermediary consumer service such as Lambda that reads the data from the Kinesis data stream and immediately writes it to the intermediary service.

Conclusion

This post highlighted the benefits of a streaming mesh. We demonstrated why Kinesis Data Streams is particularly suited to facilitate a secure and scalable streaming mesh architecture for internal as well as external sharing. The reasons include the service’s built-in API layer, comprehensive security through IAM, flexible networking connection options, and versatile consumption models. The streaming mesh patterns demonstrated—shared data access with replay, message filtering, and fan-out to subscribers—showcase how Kinesis Data Streams effectively supports producers, consumers, and governance teams across internal and external boundaries.

For more information on how to get started with Kinesis Data Streams, refer to Getting started with Amazon Kinesis Data Streams. For other posts on Kinesis Data Streams, browse through the AWS Big Data Blog.


About the authors

Felix John

Felix John

Felix is a Global Solutions Architect and data streaming expert at AWS, based in Germany. He focuses on supporting global automotive & manufacturing customers on their cloud journey. Outside of his professional life, Felix enjoys playing Floorball and hiking in the mountains.

Ali Alemi

Ali Alemi

Ali is a Principal Streaming Solutions Architect at AWS. Ali advises AWS customers with architectural best practices and helps them design real-time analytics data systems which are reliable, secure, efficient, and cost-effective. Prior to joining AWS, Ali supported several public sector customers and AWS consulting partners in their application modernization journey and migration to the Cloud.

Build a real-time streaming generative AI application using Amazon Bedrock, Amazon Managed Service for Apache Flink, and Amazon Kinesis Data Streams

Post Syndicated from Felix John original https://aws.amazon.com/blogs/big-data/build-a-real-time-streaming-generative-ai-application-using-amazon-bedrock-amazon-managed-service-for-apache-flink-and-amazon-kinesis-data-streams/

Generative artificial intelligence (AI) has gained a lot of traction in 2024, especially around large language models (LLMs) that enable intelligent chatbot solutions. Amazon Bedrock is a fully managed service that offers a choice of high-performing foundation models (FMs) from leading AI companies such as AI21 Labs, Anthropic, Cohere, Meta, Mistral AI, Stability AI, and Amazon through a single API, along with a broad set of capabilities to help you build generative AI applications with security, privacy, and responsible AI. Use cases around generative AI are vast and go well beyond chatbot applications; for instance, generative AI can be used for analysis of input data such as sentiment analysis of reviews.

Most businesses generate data continuously in real-time. Internet of Things (IoT) sensor data, application log data from your applications, or clickstream data generated by users of your website are only some examples of continuously generated data. In many situations, the ability to process this data quickly (in real-time or near real-time) helps businesses increase the value of insights they get from their data.

One option to process data in real-time is using stream processing frameworks such as Apache Flink. Flink is a framework and distributed processing engine for processing data streams. AWS provides a fully managed service for Apache Flink through Amazon Managed Service for Apache Flink, which enables you to build and deploy sophisticated streaming applications without setting up infrastructure and managing resources.

Data streaming enables generative AI to take advantage of real-time data and provide businesses with rapid insights. This post looks at how to integrate generative AI capabilities when implementing a streaming architecture on AWS using managed services such as Managed Service for Apache Flink and Amazon Kinesis Data Streams for processing streaming data and Amazon Bedrock to utilize generative AI capabilities. We focus on the use case of deriving review sentiment in real-time from customer reviews in online shops. We include a reference architecture and a step-by-step guide on infrastructure setup and sample code for implementing the solution with the AWS Cloud Development Kit (AWS CDK). You can find the code to try it out yourself on the GitHub repo.

Solution overview

The following diagram illustrates the solution architecture. The architecture diagram depicts the real-time streaming pipeline in the upper half and the details on how you gain access to the Amazon OpenSearch Service dashboard in the lower half.

Architecture Overview

The real-time streaming pipeline consists of a producer that is simulated by running a Python script locally that is sending reviews to a Kinesis Data Stream. The reviews are from the Large Movie Review Dataset and contain positive or negative sentiment. The next step is the ingestion to the Managed Service for Apache Flink application. From within Flink, we are asynchronously calling Amazon Bedrock (using Anthropic Claude 3 Haiku) to process the review data. The results are then ingested into an OpenSearch Service cluster for visualization with OpenSearch Dashboards. We directly call the PutRecords API of Kinesis Data Streams within the Python script for the sake of simplicity and to cost-effectively run this example. You should consider using an Amazon API Gateway REST API as a proxy in front of Kinesis Data Streams when using a similar architecture in production, as described in Streaming Data Solution for Amazon Kinesis.

To gain access to the OpenSearch dashboard, we need to use a bastion host that is deployed in the same private subnet within your virtual private cloud (VPC) as your OpenSearch Service cluster. To connect with the bastion host, we use Session Manager, a capability of Amazon Systems Manager, which allows us to connect to our bastion host securely without having to open inbound ports. To access it, we use Session Manager to port forward the OpenSearch dashboard to our localhost.

The walkthrough consists of the following high-level steps:

  1. Create the Flink application by building the JAR file.
  2. Deploy the AWS CDK stack.
  3. Set up and connect to OpenSearch Dashboards.
  4. Set up the streaming producer.

Prerequisites

For this walkthrough, you should have the following prerequisites:

Implementation details

This section focuses on the Flink application code of this solution. You can find the code on GitHub. The StreamingJob.java file inside the flink-async-bedrock directory file serves as entry point to the application. The application uses the FlinkKinesisConsumer, which is a connector for reading streaming data from a Kinesis Data Stream. It applies a map transformation to convert each input string into an instance of Review class object, resulting in DataStream<Review> to ease processing.

The Flink application uses the helper class AsyncDataStream defined in the StreamingJob.java file to incorporate an asynchronous, external operation into Flink. More specifically, the following code creates an asynchronous data stream by applying the AsyncBedrockRequest function to each element in the inputReviewStream. The application uses unorderedWait to increase throughput and reduce idle time because event ordering is not required. The timeout is set to 25,000 milliseconds to give the Amazon Bedrock API enough time to process long reviews. The maximum concurrency or capacity is limited to 1,000 requests at a time. See the following code:

DataStream<ProcessedReview> processedReviewStream = AsyncDataStream.unorderedWait(inputReviewStream, new AsyncBedrockRequest(applicationProperties), 25000, TimeUnit.MILLISECONDS, 1000).uid("processedReviewStream");

The Flink application initiates asynchronous calls to the Amazon Bedrock API, invoking the Anthropic Claude 3 Haiku foundation model for each incoming event. We use Anthropic Claude 3 Haiku on Amazon Bedrock because it is Anthropic’s fastest and most compact model for near-instant responsiveness. The following code snippet is part of the AsyncBedrockRequest.java file and illustrates how we set up the required configuration to call the Anthropic’s Claude Messages API to invoke the model:

@Override
public void asyncInvoke(Review review, final ResultFuture<ProcessedReview> resultFuture) throws Exception {

    // [..]

    JSONObject user_message = new JSONObject()
        .put("role", "user")
        .put("content", "<review>" + reviewText + "</review>");

    JSONObject assistant_message = new JSONObject()
        .put("role", "assistant")
        .put("content", "{");

    JSONArray messages = new JSONArray()
            .put(user_message)
            .put(assistant_message);

    String payload = new JSONObject()
            .put("system", systemPrompt)
            .put("anthropic_version", "bedrock-2023-05-31")
            .put("temperature", 0.0)
            .put("max_tokens", 4096)
            .put("messages", messages)
            .toString();

    InvokeModelRequest request = InvokeModelRequest.builder()
            .body(SdkBytes.fromUtf8String(payload))
            .modelId("anthropic.claude-3-haiku-20240307-v1:0")
            .build();

    CompletableFuture<InvokeModelResponse> completableFuture = client.invokeModel(request)
            .whenComplete((response, exception) -> {
                if (exception != null) {
                    LOG.error("Model invocation failed: " + exception);
                }
            })
            .orTimeout(250000, TimeUnit.MILLISECONDS);

Prompt engineering

The application uses advanced prompt engineering techniques to guide the generative AI model’s responses and provide consistent responses. The following prompt is designed to extract a summary as well as a sentiment from a single review:

String systemPrompt = 
     "Summarize the review within the <review> tags 
     into a single and concise sentence alongside the sentiment 
     that is either positive or negative. Return a valid JSON object with 
     following keys: summary, sentiment. 
     <example> {\\\"summary\\\": \\\"The reviewer strongly dislikes the movie, 
     finding it unrealistic, preachy, and extremely boring to watch.\\\", 
     \\\"sentiment\\\": \\\"negative\\\"} 
     </example>";

The prompt instructs the Anthropic Claude model to return the extracted sentiment and summary in JSON format. To maintain consistent and well-structured output by the generative AI model, the prompt uses various prompt engineering techniques to improve the output. For example, the prompt uses XML tags to provide a clearer structure for Anthropic Claude. Moreover, the prompt contains an example to enhance Anthropic Claude’s performance and guide it to produce the desired output. In addition, the prompt pre-fills Anthropic Claude’s response by pre-filling the Assistant message. This technique helps provide a consistent output format. See the following code:

JSONObject assistant_message = new JSONObject()
    .put("role", "assistant")
    .put("content", "{");

Build the Flink application

The first step is to download the repository and build the JAR file of the Flink application. Complete the following steps:

  1. Clone the repository to your desired workspace:
    git clone https://github.com/aws-samples/aws-streaming-generative-ai-application.git

  2. Move to the correct directory inside the downloaded repository and build the Flink application:
    cd flink-async-bedrock && mvn clean package

Building Jar File

Maven will compile the Java source code and package it in a distributable JAR format in the directory flink-async-bedrock/target/ named flink-async-bedrock-0.1.jar. After you deploy your AWS CDK stack, the JAR file will be uploaded to Amazon Simple Storage Service (Amazon S3) to create your Managed Service for Apache Flink application.

Deploy the AWS CDK stack

After you build the Flink application, you can deploy your AWS CDK stack and create the required resources:

  1. Move to the correct directory cdk and deploy the stack:
    cd cdk && npm install & cdk deploy

This will create the required resources in your AWS account, including the Managed Service for Apache Flink application, Kinesis Data Stream, OpenSearch Service cluster, and bastion host to quickly connect to OpenSearch Dashboards, deployed in a private subnet within your VPC.

  1. Take note of the output values. The output will look similar to the following:
 ✅  StreamingGenerativeAIStack

✨  Deployment time: 1414.26s

Outputs:
StreamingGenerativeAIStack.BastionHostBastionHostIdC743CBD6 = i-0970816fa778f9821
StreamingGenerativeAIStack.accessOpenSearchClusterOutput = aws ssm start-session --target i-0970816fa778f9821 --document-name AWS-StartPortForwardingSessionToRemoteHost --parameters '{"portNumber":["443"],"localPortNumber":["8157"], "host":["vpc-generative-ai-opensearch-qfssmne2lwpzpzheoue7rkylmi.us-east-1.es.amazonaws.com"]}'
StreamingGenerativeAIStack.bastionHostIdOutput = i-0970816fa778f9821
StreamingGenerativeAIStack.domainEndpoint = vpc-generative-ai-opensearch-qfssmne2lwpzpzheoue7rkylmi.us-east-1.es.amazonaws.com
StreamingGenerativeAIStack.regionOutput = us-east-1
Stack ARN:
arn:aws:cloudformation:us-east-1:<AWS Account ID>:stack/StreamingGenerativeAIStack/3dec75f0-cc9e-11ee-9b16-12348a4fbf87

✨  Total time: 1418.61s

Set up and connect to OpenSearch Dashboards

Next, you can set up and connect to OpenSearch Dashboards. This is where the Flink application will write the extracted sentiment as well as the summary from the processed review stream. Complete the following steps:

  1. Run the following command to establish connection to OpenSearch from your local workspace in a separate terminal window. The command can be found as output named accessOpenSearchClusterOutput.
    • For Mac/Linux, use the following command:
aws ssm start-session --target <BastionHostId> --document-name AWS-StartPortForwardingSessionToRemoteHost --parameters '{"portNumber":["443"],"localPortNumber":["8157"], "host":["<OpenSearchDomainHost>"]}'
    • For Windows, use the following command:
aws ssm start-session ^
    —target <BastionHostId> ^
    —document-name AWS-StartPortForwardingSessionToRemoteHost ^    
    —parameters host="<OpenSearchDomainHost>",portNumber="443",localPortNumber="8157"

It should look similar to the following output:

Session Manager CLI

  1. Create the required index in OpenSearch by issuing the following command:
    • For Mac/Linux, use the following command:
curl --location -k --request PUT https://localhost:8157/processed_reviews \
--header 'Content-Type: application/json' \
--data-raw '{
  "mappings": {
    "properties": {
        "reviewId": {"type": "integer"},
        "userId": {"type": "keyword"},
        "summary": {"type": "keyword"},
        "sentiment": {"type": "keyword"},
        "dateTime": {"type": "date"}}}}}'
    • For Windows, use the following command:
$url = https://localhost:8157/processed_reviews
$headers = @{
    "Content-Type" = "application/json"
}
$body = @{
    "mappings" = @{
        "properties" = @{
            "reviewId" = @{ "type" = "integer" }
            "userId" = @{ "type" = "keyword" }
            "summary" = @{ "type" = "keyword" }
            "sentiment" = @{ "type" = "keyword" }
            "dateTime" = @{ "type" = "date" }
        }
    }
} | ConvertTo-Json -Depth 3
Invoke-RestMethod -Method Put -Uri $url -Headers $headers -Body $body -SkipCertificateCheck
  1. After the session is established, you can open your browser and navigate to https://localhost:8157/_dashboards. Your browser might consider the URL not secure. You can ignore this warning.
  2. Choose Dashboards Management under Management in the navigation pane.
  3. Choose Saved objects in the sidebar.
  4. Import export.ndjson, which can be found in the resources folder within the downloaded repository.

OpenSearch Dashboards Upload

  1. After you import the saved objects, you can navigate to Dashboards under My Dashboard in the navigation pane.

At the moment, the dashboard appears blank because you haven’t uploaded any review data to OpenSearch yet.

Set up the streaming producer

Finally, you can set up the producer that will be streaming review data to the Kinesis Data Stream and ultimately to the OpenSearch Dashboards. The Large Movie Review Dataset was originally published in 2011 in the paper “Learning Word Vectors for Sentiment Analysis” by Andrew L. Maas, Raymond E. Daly, Peter T. Pham, Dan Huang, Andrew Y. Ng, and Christopher Potts. Complete the following steps:

  1. Download the Large Movie Review Dataset here.
  2. After the download is complete, extract the .tar.gz file to retrieve the folder named aclImdb 3 or similar that contains the review data. Rename the review data folder to aclImdb.
  3. Move the extracted dataset to data/ inside the repository that you previously downloaded.

Your repository should look like the following screenshot.

Folder Overview

  1. Modify the DATA_DIR path in producer/producer.py if the review data is named differently.
  2. Move to the producer directory using the following command:
    cd producer

  3. Install the required dependencies and start generating the data:
    pip install -r requirements.txt && python produce.py

The OpenSearch dashboard should be populated after you start generating streaming data and writing it to the Kinesis Data Stream. Refresh the dashboard to view the latest data. The dashboard shows the total number of processed reviews, the sentiment distribution of the processed reviews in a pie chart, and the summary and sentiment for the latest reviews that have been processed.

When you have a closer look at the Flink application, you will notice that the application marks the sentiment field with the value error whenever there is an error with the asynchronous call made by Flink to the Amazon Bedrock API. The Flink application simply filters the correctly processed reviews and writes them to the OpenSearch dashboard.

For robust error handling, you should write any incorrectly processed reviews to a separate output stream and not discard them completely. This separation allows you to handle failed reviews differently than successful ones for simpler reprocessing, analysis, and troubleshooting.

Clean up

When you’re done with the resources you created, complete the following steps:

  1. Delete the Python producer using Ctrl/Command + C.
  2. Destroy your AWS CDK stack by returning to the root folder and running the following command in your terminal:
    cd cdk && cdk destroy

  3. When asked to confirm the deletion of the stack, enter yes.

Conclusion

In this post, you learned how to incorporate generative AI capabilities in your streaming architecture using Amazon Bedrock and Managed Service for Apache Flink using asynchronous requests. We also gave guidance on prompt engineering to derive the sentiment from text data using generative AI. You can build this architecture by deploying the sample code from the GitHub repository.

For more information on how to get started with Managed Service for Apache Flink, refer to Getting started with Amazon Managed Service for Apache Flink (DataStream API). For details on how to set up Amazon Bedrock, refer to Set up Amazon Bedrock. For other posts on Managed Service for Apache Flink, browse through the AWS Big Data Blog.


About the Authors

Felix John is a Solutions Architect and data streaming expert at AWS, based in Germany. He focuses on supporting small and medium businesses on their cloud journey. Outside of his professional life, Felix enjoys playing Floorball and hiking in the mountains.

Michelle Mei-Li Pfister is a Solutions Architect at AWS. She is supporting customers in retail and consumer packaged goods (CPG) industry on their cloud journey. She is passionate about topics around data and machine learning.