All posts by Greg Eppel

Automating the Experimentation Lifecycle with Kiro, AWS DevOps Agent, and LaunchDarkly

Post Syndicated from Greg Eppel original https://aws.amazon.com/blogs/devops/automating-the-experimentation-lifecycle-with-kiro-aws-devops-agent-and-launchdarkly/

Introduction

Continuous improvement depends on experimentation. Teams know that the fastest path to better outcomes is to test changes against real user behavior, measure results, and iterate. In practice, sustaining that cycle is slow and costly because the overhead compounds with each attempt.

Three barriers slow teams down:

1. Planning cost — Turning a proposed change into a testable experiment requires defining a feature flag strategy, coordinating implementation, and wiring everything together before any user sees new behavior.

2. Measurement disconnected from action — Once live, teams must configure metrics, define success criteria, monitor, and interpret results. When metrics regress, remediation traditionally depends on a human merging a fix or rolling back a deployment.

3. Stalled iteration — Without a record of which change caused which outcome, the next hypothesis is a guess, so iteration often does not happen and the goal stalls.

This post introduces a reference solution that closes the gap between defining a goal and reaching it. A team states an improvement goal (for example, increase add-to-cart rate by 10%), and agents plan the experiment, implement the change, deploy it behind a feature flag, measure its impact, and iterate on the result, all within defined safety boundaries. The solution connects Kiro for code generation, AWS DevOps Agent for orchestration and release readiness review, and LaunchDarkly for feature flag governance, experiments, and Guarded Releases for safe, metric-driven rollouts with automatic rollback. The architecture described here is a reference implementation you can build today. A more turnkey experience is planned for the future.

Pre-requisites

Step 1. Enable AWS DevOps Agent and Create an Agent Space. AWS DevOps Agent is available in the AWS regions listed here. Follow these steps to create your AWS DevOps Agent and create an Agent Space.

Step 2. Create your LaunchDarkly account. Create your LaunchDarkly account using the AWS Marketplace or through LaunchDarkly website.

Step 3. Enable the LaunchDarkly MCP Server in the Agent Space. AWS DevOps Agent connects to LaunchDarkly’s hosted MCP server as a client, giving it the ability to query flag state, read targeting rules, and list flags by project or environment.

Step 4 — Register the LaunchDarkly MCP server (account-level). MCP servers are registered at the AWS account level and shared among all Agent Spaces in that account.

  • Sign in to the AWS DevOps Agent console.
  • Navigate to the Capability Providers page (side navigation).
  • Find MCP Server under the Available providers section and choose Register.
  • Enter the MCP server details (see table below).
  • Choose Next.
    • Name: LaunchDarkly
    • Endpoint URL: https://mcp.launchdarkly.com/mcp/launchdarkly
    • Description: LaunchDarkly feature flag management MCP server
    • Enable Dynamic Client Registration: Select this checkbox to allow DevOps Agent to automatically register with LaunchDarkly’s authorization server

Step 4a — Configure the authorization flow

LaunchDarkly’s hosted MCP server uses OAuth for authentication:

  • Select OAuth 3LO (Three-Legged OAuth).
  • Choose Next.
  • Complete the OAuth authorization — you will be redirected to LaunchDarkly’s consent page to authorize the connection.
  • Choose Next.
  • Tip: Refer to the LaunchDarkly MCP server documentation for specific OAuth scope and credential details.

Step 4b — Review and submit

  • Review the MCP server configuration details.
  • Choose Submit.
  • AWS DevOps Agent validates the connection to LaunchDarkly’s MCP server.
  • On successful validation, the MCP server is registered at the account level.

Step 5 — Add the MCP server to your Agent Space

After the account-level registration, connect it to your specific Agent Space:

  • In the AWS DevOps Agent console, select your Agent Space (created in Section 1).
  • Go to the Capabilities tab.
  • In the MCP Servers section, choose Add.
  • Select the LaunchDarkly MCP server you just registered.
  • Configure tool access:
    • Allow all tools — makes all LaunchDarkly MCP tools available to the agent
    • Select specific tools — allowlist only the tools you need (recommended for production)
  • Choose Add.

Step 5 — Validate the connection. Run a test query to confirm the integration is working. In the DevOps Agent console, start a new investigation or chat session and ask: “List the feature flags in the <your-project-key> project in the production environment.” If the agent returns flag data from LaunchDarkly, the connection is active.

Solution overview

The automated experimentation lifecycle operates as a closed loop. A team states an improvement goal, and the system moves through a continuous cycle: decide what to try next, implement the change behind a feature flag, validate and deploy it, run an experiment to measure impact, roll it out safely, and feed the outcome back into the next iteration. The loop continues until the goal is met or the team decides to stop.
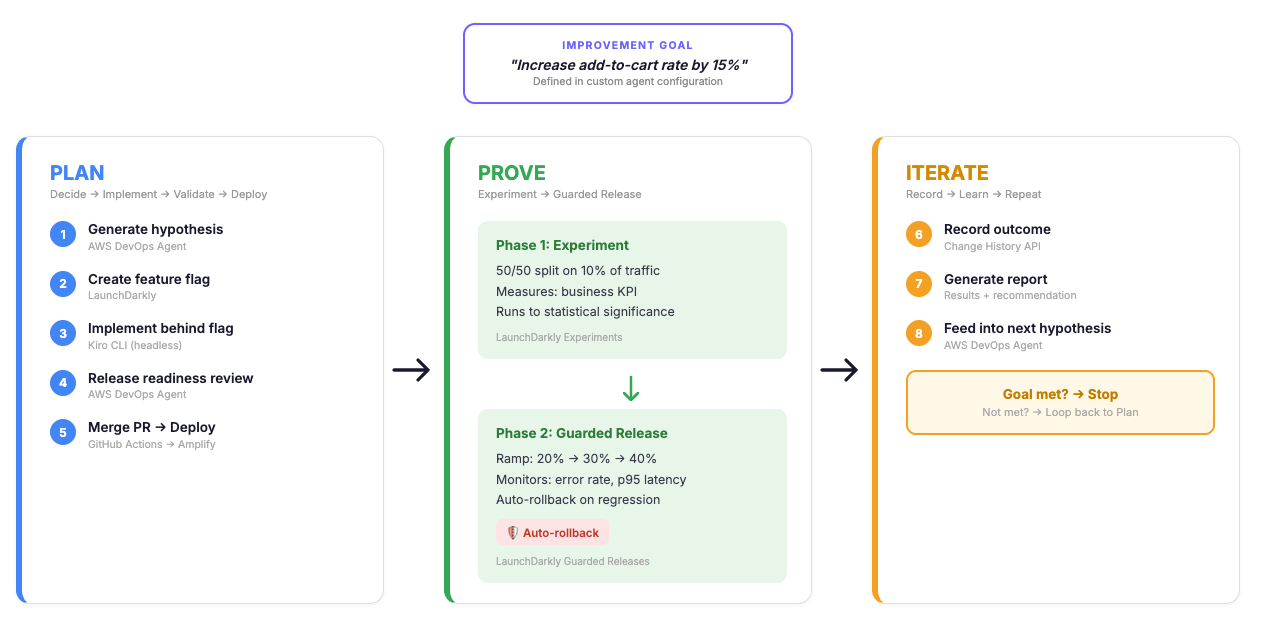
Flowchart showing the Plan-Prove-Iterate continuous improvement loop for AWS DevOps Agent. The Plan phase covers steps 1 through 5: generate hypothesis, create feature flag, implement behind flag, release readiness review, and merge PR to deploy. The Prove phase has two sub-phases: Experiment (50/50 split on 10% traffic measuring business KPIs) and Guarded Release (ramp from 20% to 40% with auto-rollback on regression). The Iterate phase covers steps 6 through 8: record outcome, generate report, and feed into next hypothesis, ending with a goal-met decision gate. An improvement goal banner reads "Increase add-to-cart rate by 15%."

End-to-end Plan-Prove-Iterate workflow showing how AWS DevOps Agent orchestrates hypothesis generation, feature-flagged implementation, experimentation, guarded rollout, and outcome recording in a continuous improvement loop.

Each component has a distinct responsibility. AWS DevOps Agent orchestrates the cycle: it runs on a schedule as a Custom Agent which is a user-defined agent with its own instructions, skills, and connected tools that executes autonomously without pausing for input unless something fails. AWS DevOps Agent supports Custom Agents as a way to encode a specific workflow, including its decision logic, safety constraints, and cadence, into an agent that runs end-to-end on its own. In this solution, the Custom Agent reviews goals, generates hypotheses informed by prior outcomes, coordinates implementation and validation, and drives iteration across multiple experiment cycles.”. Kiro CLI runs in headless mode inside the Experiment MCP Server container on Amazon Bedrock AgentCore, implementing code changes behind LaunchDarkly feature flags and opening pull requests without a human operating an IDE.

LaunchDarkly hosts feature flags, experiments, and Guarded Releases, monitors metrics in real time, and reverts flag state when a threshold is breached. It also exposes a hosted MCP server with tools the agent calls directly. The Experiment MCP Server (custom, built for this solution) exposes the remaining operations over MCP: code implementation through Kiro, PR merge, and deployment triggering.

The agent acts as an MCP client connected to these two servers. LaunchDarkly’s hosted MCP server provides flag management, experiment lifecycle, Guarded Release, and observability tools. The Experiment MCP Server provides code implementation, PR merging, and deployment tools. This design separates decision-making from execution: the agent decides what to do, the MCP servers handle how.

Plan / Prove / Iterate

The lifecycle operates in three phases.

Plan — The agent decides the next action for a goal, generates a hypothesis informed by prior outcomes when iterating, and creates a feature flag in LaunchDarkly. It then invokes Kiro CLI to implement the change behind the flag and open a pull request. AWS DevOps Agent validates the change through release readiness review. After a green review, the PR is merged and a GitHub Actions workflow deploys the application through AWS Amplify.

Prove — Two sequential phases run after deployment. First, a 50/50 experiment splits 10% of traffic on a business KPI (for example, add-to-cart rate) until statistical significance selects a winning variation. Then a Guarded Release ramps the winning variation from 20% to 30% to 40% and eventually to 100% while LaunchDarkly monitors operational guardrails (error rate, page-load-time-p95). If a guardrail threshold is breached, LaunchDarkly reverts the flag state automatically, requiring no redeployment. The experiment measures value (does the change improve the goal metric?); the Guarded Release measures safety (does the change hold up at scale?).

Iterate — After a rollout concludes, the agent queries LaunchDarkly’s Change History API to associate specific flag modifications with outcomes. The recorded outcome informs the next hypothesis, and the cycle repeats until the goal is met or the agent recommends waiting.

Extending the agent with a custom MCP server

AWS DevOps Agent reads code, reviews changes, and decides what to do next. It does not take action on its own. To move from decision to execution, you connect it to MCP servers that expose operations as tools.

LaunchDarkly’s hosted MCP server covers flags, experiments, and Guarded Releases. We needed operations it doesn’t cover — writing code, merging PRs, and deploying — so we built the Experiment MCP Server. It runs on Amazon Bedrock AgentCore and exposes five tools: create_task and get_task_status (invoke Kiro CLI to implement changes and open a PR), merge_pr, trigger_deployment, and get_deployment_status.

These are mutation operations. When the agent calls create_task, Kiro writes real code. When it calls merge_pr, that code lands in main. You are responsible for this server — what it exposes, which repos it can touch, which branches it can merge to. We scoped ours to one repository, one branch, and one Amplify application. Those constraints live in the MCP server’s code, not the agent’s prompt, because API-level scoping cannot be misinterpreted.

The Experiment MCP Server [CG1] is a Python application built on FastMCP, packaged as a container and deployed to Amazon Bedrock AgentCore over stateless HTTP so the platform can restart or replace the container without breaking in-flight requests. At startup, the container pulls credentials from AWS Secrets Manager, clones the target repository, and makes Kiro CLI available as a local binary. This single-container design keeps everything colocated: when the agent calls create_task, the server spawns Kiro CLI as a headless subprocess with direct filesystem access to the cloned repo rather than making a network call to a separate code-generation service. Kiro CLI receives a structured prompt containing the task description, the LaunchDarkly flag key, and the variation details, then writes the change, commits to a new branch, and pushes. The server opens a pull request through the GitHub API and returns the task ID immediately without waiting for Kiro to finish. The caller polls get_task_status, which long-polls against an S3-backed state store so task progress survives container restarts. Deployment tracking follows a similar pattern: trigger_deployment dispatches a GitHub Actions workflow and returns the real GitHub run ID, and get_deployment_status reads live status directly from GitHub, so there is nothing to lose if the container cycles between calls. The overall design principle is that the MCP server coordinates work and delegates persistence to external systems (S3 for task state, GitHub for deployment state, Secrets Manager for credentials) rather than holding anything in memory that a restart would erase.

How the agent works

The agent runs on a schedule. Each run, it evaluates the current state of each goal and picks one of three actions: create a new experiment (no active rollout exists), iterate on a prior result (a rollout completed and the goal is not yet met), or wait (an experiment or rollout is still in progress).

The entry point for the system is an outcome, not a task list. The team picks a business metric from the available set — add-to-cart rate, checkout conversion, bounce rate, or page-load-time-p95 — and sets a target improvement, for example “increase add-to-cart rate by 10%.” Error rate is reserved as a safety guardrail during the Guarded Release phase and cannot be chosen as the primary success metric, because the system needs an independent operational signal to decide whether a winning variation is safe to scale. Beyond the metric and the target, all other inputs are optional. The agent infers the current baseline, the areas of the application in scope for changes, and any constraints from the codebase and production data. If those assumptions are off, the team corrects them before any code is written. The team states where they want to end up, and the agent works backward from there.

Ecommerce demo store product listing page showing a grid of six products: Wireless Headphones at $149.99, Bluetooth Speaker at $79.99, USB-C Hub at $49.99, Mechanical Keyboard at $129.99, Leather Wallet at $59.99, and Canvas Backpack at $89.99. Each product card displays a product photo with name and price below. The page header shows "Demo Store" with Products and cart navigation links.

Demo Store product listing page used as the test surface for the add-to-cart experimentation cycles. Product cards currently show the control layout (no inline Add to Cart button).

For new goals, the agent explores the target repository and proposes a code change likely to move the metric. For iterations, it reads prior outcomes and adjusts its approach based on what worked and what did not. Before any code change, the agent creates a feature flag in LaunchDarkly (boolean, OFF by default, named with a convention like exp-add-to-cart-*) so every change ships behind a flag from the start.

Implementation runs through Kiro CLI in headless mode. The agent calls create_task, Kiro clones the repository, writes the change behind the feature flag, and opens a pull request.
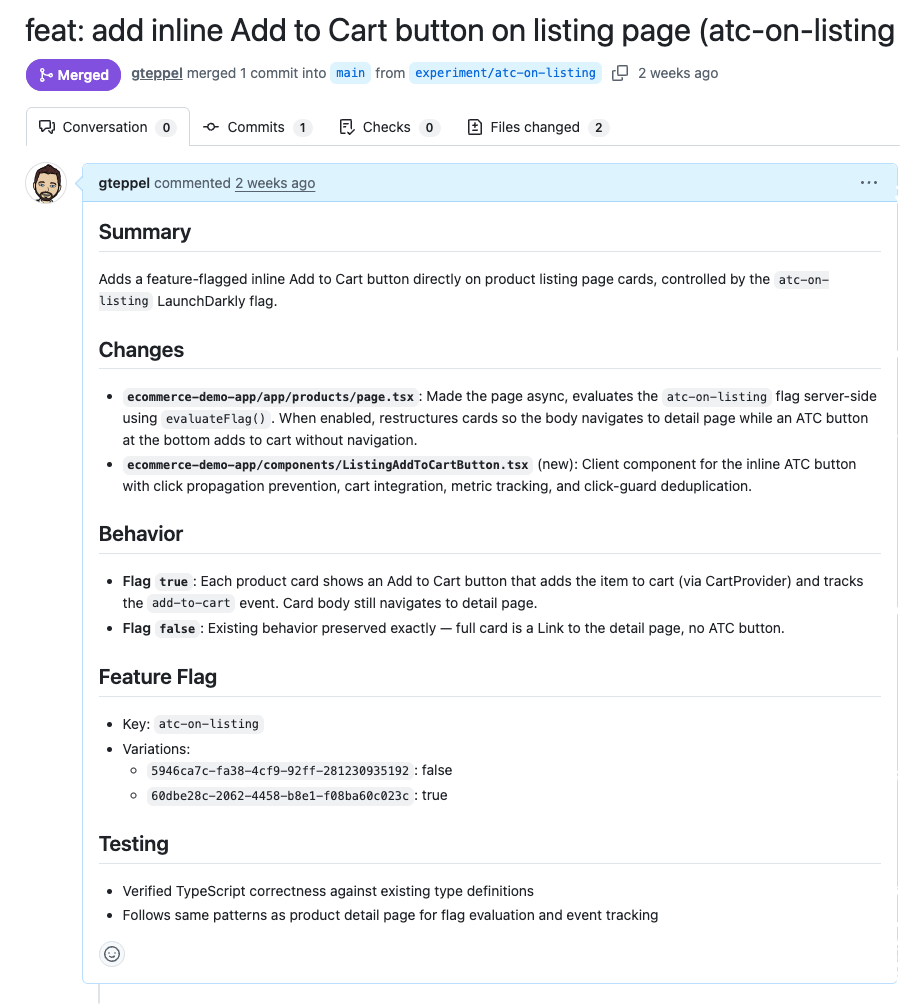
GitHub merged pull request titled "feat: add inline Add to Cart button on listing page (atc-on-listing)" by gteppel. The PR merged 1 commit into main from experiment/atc-on-listing with 2 files changed. The description lists changes to page.tsx and a new ListingAddToCartButton.tsx component, explains flag-true and flag-false behavior, documents the atc-on-listing feature flag key with two variations, and notes TypeScript verification.

Merged GitHub PR implementing the feature-flagged inline Add to Cart button on the product listing page, controlled by the atc-on-listing LaunchDarkly flag.

AWS DevOps Agent then runs a release readiness review on the PR. If the review fails, the agent retries up to three times before stopping to ask for help. After a green review, the PR is merged and a GitHub Actions workflow deploys through AWS Amplify.
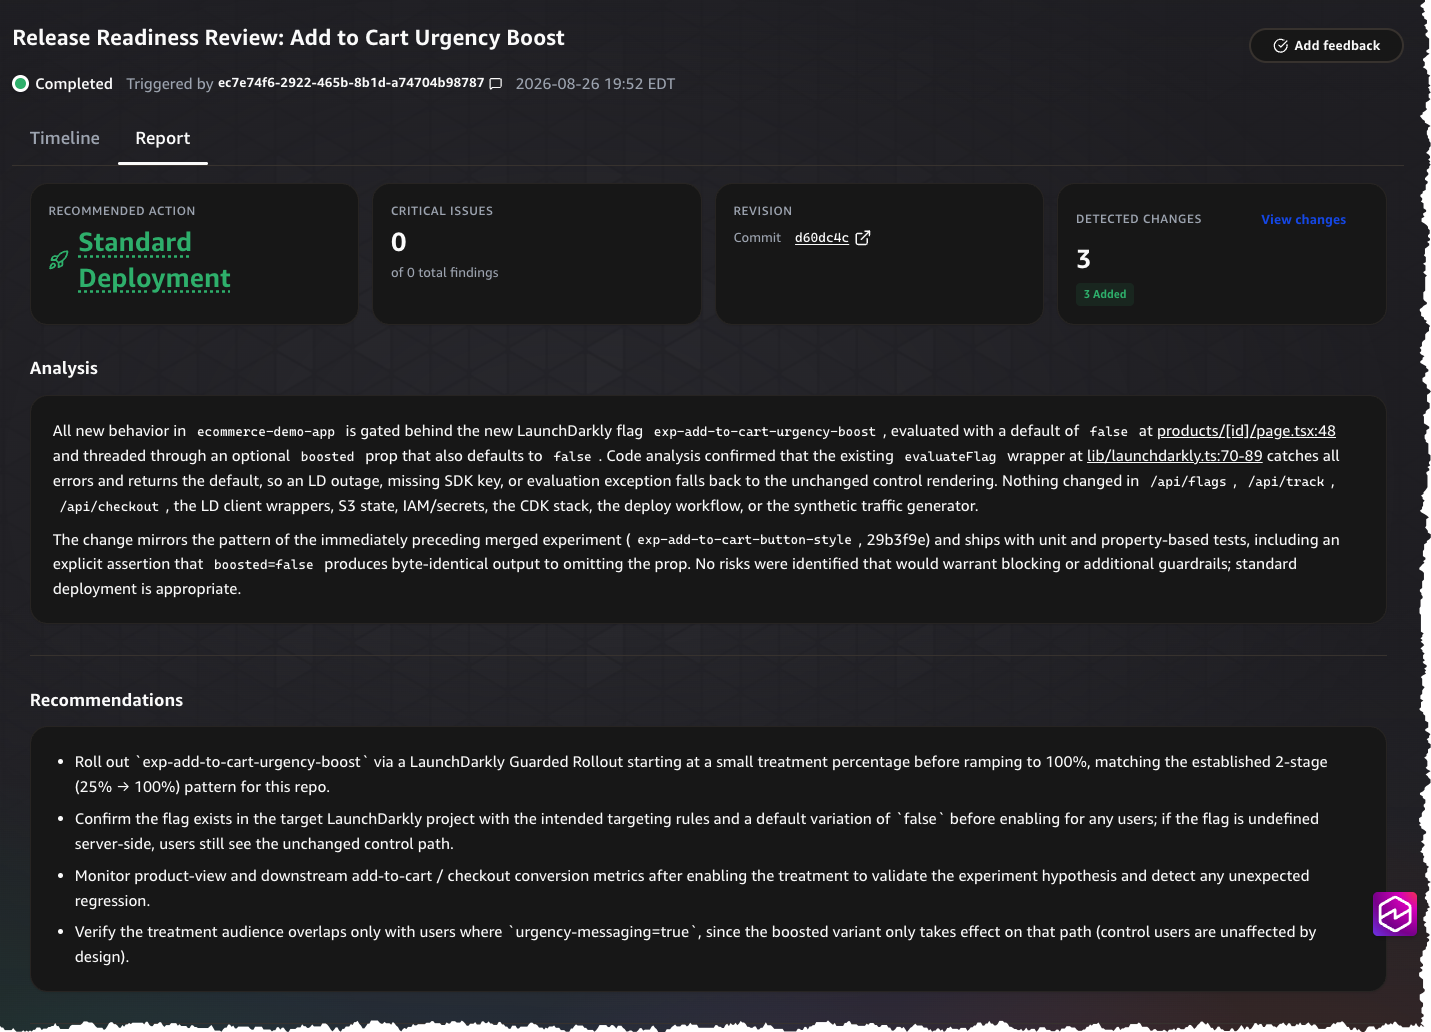
AWS DevOps Agent Release Readiness Review report for "Add to Cart Urgency Boost," completed on August 26, 2026. The report shows a recommended action of Standard Deployment, zero critical issues, commit d60dc4c, and 3 detected changes (all additions). The analysis section confirms all new behavior is gated behind the LaunchDarkly flag exp-add-to-cart-urgency-boost with a safe default of false. Recommendations include guarded rollout starting at a small treatment percentage, confirming the flag exists in LaunchDarkly, monitoring add-to-cart and checkout conversion metrics, and verifying treatment audience overlap.

AWS DevOps Agent Release Readiness Review for the Add to Cart Urgency Boost experiment. The automated review found zero critical issues and recommended standard deployment with a guarded rollout.

Proving the change

Once deployed, the flag is toggled on and the experiment begins. The agent creates a 50/50 experiment across 10% of traffic, splitting on the goal’s business KPI. In production, experiment data comes from real users interacting with your application, with metrics emitted through OpenTelemetry to LaunchDarkly. For this reference implementation, we built a synthetic traffic generator that simulates user sessions across both treatment and control variations, producing the conversion events and operational metrics that drive experiment decisions. It runs alongside the demo application and generates enough volume to reach statistical significance within minutes rather than days. The synthetic traffic generator is a demo convenience, not a production requirement. Any application that emits the right events to LaunchDarkly will work with this architecture.

The agent checks for results on each Custom Agent execution until statistical significance is reached. In an interactive chat session, you prompt the agent to check when you are ready. If the treatment wins, the agent proceeds to the Guarded Release. If it loses, the agent archives the flag and records the outcome for the next iteration.
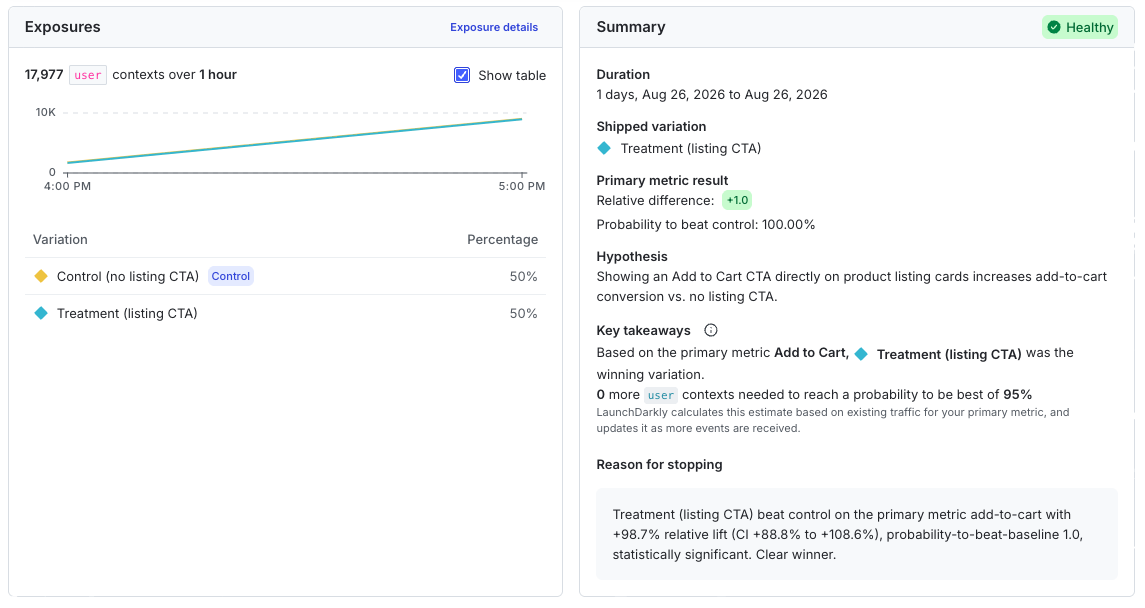
LaunchDarkly experiment results dashboard showing Exposures and Summary panels. Exposures panel shows 17,977 user contexts over 1 hour with a 50/50 split between Control (no listing CTA) and Treatment (listing CTA). Summary panel shows a Healthy status, 1-day duration on August 26 2026, Treatment shipped as the winning variation with a relative difference of plus 1.0 and 100% probability to beat control. The experiment was stopped because Treatment beat control with plus 98.7% relative lift, statistically significant.

LaunchDarkly experiment summary for the inline Add to Cart listing CTA test. Treatment won decisively with 98.7% relative lift in add-to-cart conversion and 100% probability to beat control.

The Guarded Release ramps the winning variation from 20% to 30% to 40% while LaunchDarkly [1] applies sequential testing to the operational guardrail metric, halting the rollout as soon as the data shows a statistically significant regression against the original variation.. If a guardrail threshold is breached at any stage, LaunchDarkly reverts flag state at runtime without a redeployment. Guarded Releases and automatic rollback serve as the runtime safety net: if something goes wrong after deployment, the system reverts flag state without waiting for a human to intervene.

To validate the safety net in the reference implementation, we triggered a simulated error-rate spike during the ramp. LaunchDarkly detected the regression within the monitoring window, halted the rollout, and reverted the flag to its pre-rollout state automatically. No human intervened, no redeployment ran, and the application returned to the control behavior within seconds. The screenshot below shows the Guarded Release dashboard after the rollback.
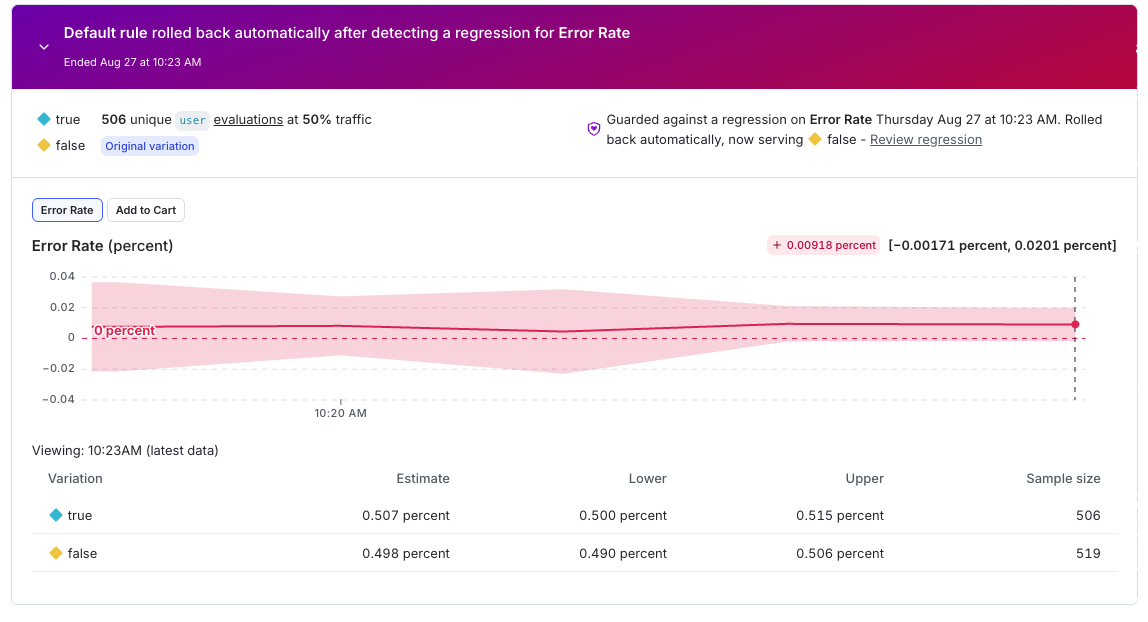
LaunchDarkly Guarded Release dashboard showing an automatic rollback triggered by an error rate regression. A red banner states the default rule rolled back automatically after detecting a regression for Error Rate, ended August 27 at 10:23 AM. The error rate chart shows the treatment (true) variation at 0.507% versus control (false) at 0.498% with a sample size of approximately 500 per variation. The system rolled back to serving the false variation.

LaunchDarkly Guarded Release auto-rollback event. The system detected an error rate regression during the ramp phase and automatically rolled traffic back to the control variation.

After recording the rollback and feeding the outcome into the next iteration, the agent adjusted its approach and proposed a revised implementation that avoided the latency regression. The second attempt followed the same pipeline: hypothesis, feature flag, implementation, review, deployment, experiment, and Guarded Release. This time, monitoring completed with no regressions detected. LaunchDarkly rolled the winning variation forward to full traffic, with add-to-cart conversion lifting from 20.1% to 37.9% across the treatment population, confirming the experiment result held at scale.
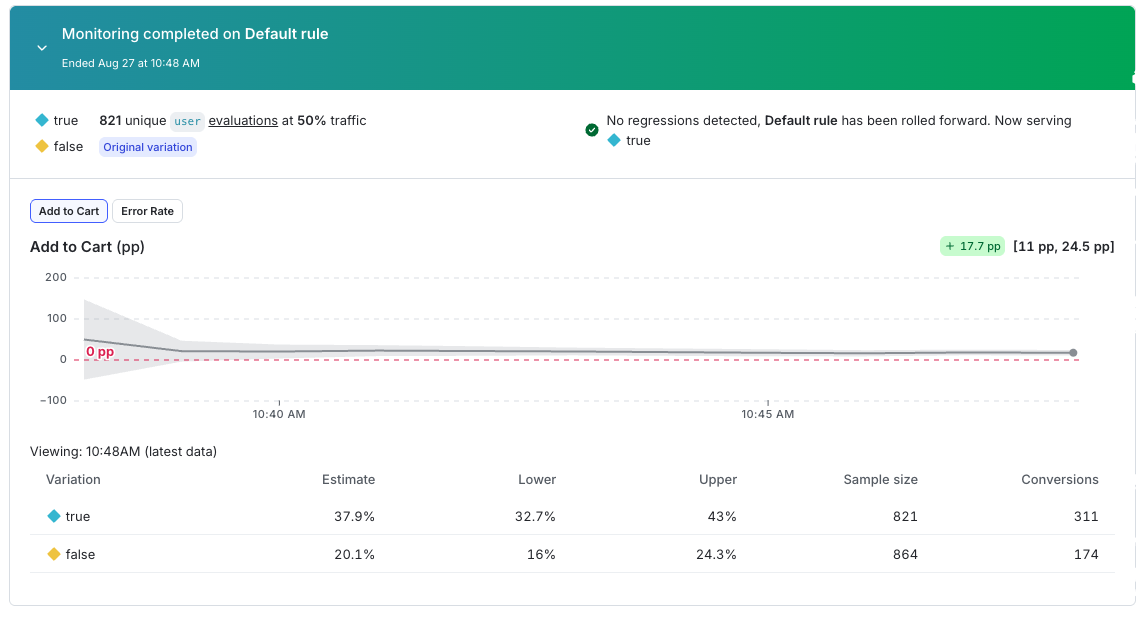
LaunchDarkly Guarded Release dashboard showing successful monitoring completion. A green banner states monitoring completed on the default rule, ended August 27 at 10:48 AM. The Add to Cart metric chart shows the treatment (true) variation at 37.9% conversion versus control (false) at 20.1%, a lift of plus 17.7 percentage points. No regressions were detected, and the default rule rolled forward to serve the true variation. Sample sizes are 821 (true) and 864 (false).

LaunchDarkly Guarded Release monitoring completion. The Add to Cart metric showed a 17.7 percentage point lift with no regressions, so the system graduated the treatment to 100% of traffic.

After each cycle, the agent generates a report documenting the hypothesis, experiment results, rollout outcome, and a recommendation for the next iteration. This report feeds into the next decision, so no context is lost between cycles.
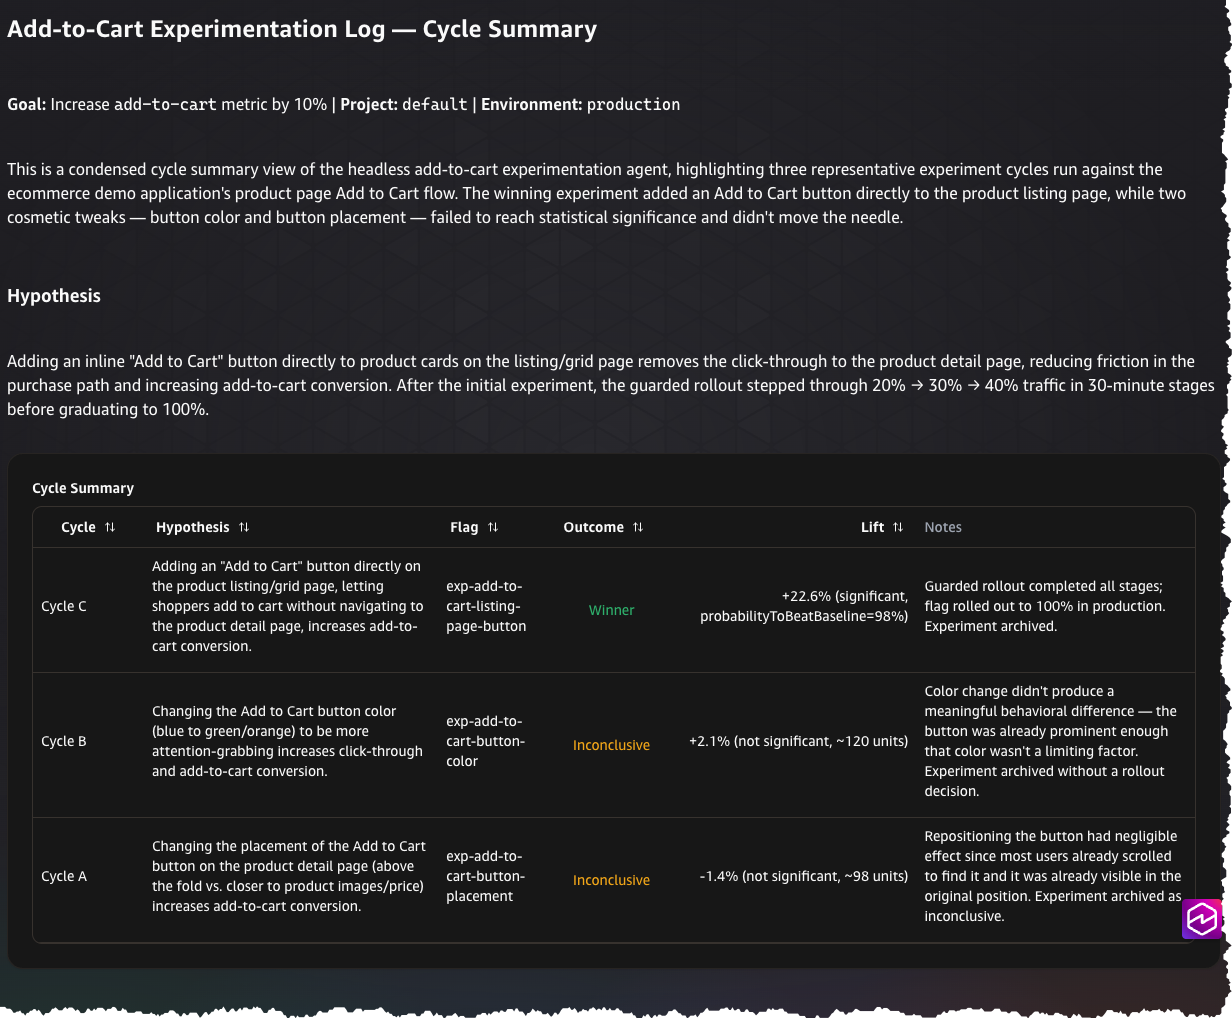
Add-to-Cart Experimentation Log showing a cycle summary table with three experiment cycles. Goal is to increase the add-to-cart metric by 10% in the default project and production environment. Cycle C tested adding an Add to Cart button directly to the listing page, resulted in a Winner outcome with plus 22.6% lift (significant, probability to beat baseline 98%), and was rolled out to 100%. Cycle B tested changing the button color from blue to green/orange, resulted in Inconclusive with plus 2.1% lift (not significant, approximately 120 units). Cycle A tested changing button placement on the detail page, resulted in Inconclusive with minus 1.4% lift (not significant, approximately 98 units).

Experimentation cycle summary showing three hypothesis-test iterations. Only Cycle C (inline Add to Cart on listing page) reached statistical significance and was promoted to production. The two cosmetic experiments (button color and placement) were inconclusive.

Safety boundaries

The system operates within defined constraints. The agent validates every change through release readiness review before merge. It creates a feature flag before writing any code, so every change can be toggled off without a redeployment. Guarded Releases enforce operational guardrails at runtime with automatic rollback. The agent retries failed validations up to three times, then stops and asks for help rather than proceeding. All credentials are stored in AWS Secrets Manager and referenced by name only, never exposed in agent logs or tool calls.

Getting started

To implement this workflow, you need AWS DevOps Agent enabled in your AWS account, a LaunchDarkly account (start with a free 30-day AWS trial), and a target application and repository. The reference uses a Next.js app deployed through AWS Amplify. Experiments are available on every LaunchDarkly plan, including the free Developer plan. Guarded Releases, which automate progressive rollouts with automatic rollback, require a LaunchDarkly Enterprise plan with the Guardian add-on. Without Guarded Releases, the workflow still runs experiments and reports results. You manage the rollout manually instead. If your plan does not include Guarded Releases, update the agent skill definition below to remove the Guarded Release actions.

Setup requires three steps. First, add the LaunchDarkly remote MCP server to your AWS DevOps Agent space. Second, deploy the Experiment MCP Server container to an AgentCore runtime, storing API keys and tokens in AWS Secrets Manager. Third, create your custom agent with the orchestration skill. Use the experimentation skill in AWS DevOps Agent to guide you through defining goals, connecting the MCP servers, and writing the orchestration instructions. The full orchestration skill is included below.

---
name: "experiment-orchestration"
description: "Orchestrates automated experimentation lifecycle using LaunchDarkly Guarded Rollouts, an AI coding agent for implementation, and GitHub Actions for deployment."
---
 
# Automated Experimentation
 
Use this skill when you have a goal you want to move through experimentation (e.g., "increase checkout conversion by 15%", "decrease page load time by 20%").
 
**Core principle: experiment first, then guarded rollout.** Always prove a change on a small, fixed slice of traffic via an A/B experiment before ramping it up through a guarded rollout. Never start a guarded rollout blind — it exists only to scale a change the experiment has already shown to work.
 
**Execution mode:** once the goal is confirmed (Step 1), run Steps 2–8 end-to-end. Async operations (code implementation, release review, deployment, experiment monitoring, rollout monitoring) should be checked periodically, not tight-polled — see the waiting note in each step. Only stop and ask the user something if a step fails unrecoverably (repeated failed release reviews, deployment failure, or an inconclusive/losing experiment result).
 
**The final report (Step 8) is mandatory, not optional.** The moment an experiment or rollout reaches a terminal outcome — winner, loser, inconclusive, or rollback — produce the full report in the same turn you announce the outcome. Don't let a casual "it worked! ????" substitute for the structured report.
 
## Step 1: Goal Clarification
 
Before doing anything, get answers to:
 
1. **What metric measures success?** *(Required)* e.g. conversion rate, page load time, bounce rate. Reserve your error-rate metric as a safety guardrail — never use it as the primary success metric.
2. **What's the target improvement?** *(Required)* e.g. 15% increase, 200ms decrease.
3. **What's the current baseline?** *(Optional — infer from production metrics if not given)*
4. **What parts of the app are in scope?** *(Optional — infer from the codebase if not given)*
5. **Any constraints?** *(Optional)* e.g. no changes to the payment flow.
 
Questions 1–2 are required before proceeding; infer 3–5 where possible and confirm your assumptions with the user before implementing.
 
## Step 2: Hypothesis Generation
 
Explore the target repository/codebase to find a plausible change:
 
1. Search and read the relevant code paths.
2. Think through what UI/UX or logic change could plausibly move the chosen metric.
3. Check whether this hypothesis (or something close to it) has already been tried and failed — look at flag history or archived flags with similar naming. Avoid repeating a known failure.
4. Present the hypothesis to the user before proceeding, along with your reasoning and any inferred assumptions from Step 1.
 
**Before finalizing a flag key, check for collisions:** look up any candidate flag key first.
- Already fully shipped (100% one variation, no split) → already decided, pick a different hypothesis.
- Actively running an experiment → mid-flight, don't compete with it, pick a different hypothesis.
- Doesn't exist → safe to create.
 
## Step 3: Implementation
 
1. Create a boolean feature flag, OFF by default in all environments. Name it with a clear pattern like `exp-<metric>-<short-description>` (e.g. `exp-checkout-conversion-cta-color`), lowercase with hyphens, ~50 chars max.
2. Hand off implementation to your coding agent/tool of choice, with clear instructions to gate the change behind the exact flag key from step 1.
3. This step is asynchronous — check status periodically rather than looping tightly on it.
4. Once implementation completes, move to Step 4 with the resulting branch/PR. If it fails, report the error and stop.
 
## Step 4: Release Readiness
 
Run your standard release/risk review on the PR before merging.
 
- If it passes: merge the PR.
- If it fails: feed the review's specific feedback back into implementation and retry. Cap retries at a small fixed number (e.g. 3 attempts total) — if it still hasn't passed, stop and report the last failure to the user rather than retrying indefinitely.
 
*(If your environment genuinely has no review capability available — e.g., a fully unattended automation context — you can skip straight to merge, but treat that as a deliberate, narrow exception you call out explicitly, not a default. Skipping review removes your only gate against shipping broken code.)*
 
## Step 5: Deployment
 
Deployment typically won't fire automatically on merge if your workflow is manually-triggered (`workflow_dispatch`-only) — you'll need to trigger it explicitly.
 
1. Trigger the deploy workflow on the merge target branch. Treat "already an in-progress deployment for this ref" as expected de-duplication, not an error — don't re-trigger.
2. Poll for status, but let your polling tool's own internal long-poll do the waiting rather than looping tightly yourself.
3. Watch for a "stale" status specifically: if a deployment reports "running" for far longer than normal, cross-check the actual CI run history by commit SHA/timing before assuming it's still in progress — a background poll process may have died without updating the record.
4. **Trigger a deployment at most once per attempt.** If you're unsure whether a previous trigger succeeded, check status first — never re-trigger just because you're unsure.
5. On timeout: stop, check the CI run directly, report the situation, ask how to proceed.
6. On explicit failure: stop and report — do not proceed to the experiment.
7. On success: proceed immediately to Step 6.
 
## Step 6: Experiment Phase (fixed 10%)
 
Prove the change on a small, fixed slice of traffic. Do **not** start a guarded rollout here — that's Step 7, and only after this proves out.
 
1. Turn the flag ON.
2. Configure a fixed 50/50 split across 10% of traffic (a flat allocation, not a staged ramp) on your chosen randomization unit (typically "user"). The remaining 90% of traffic is excluded from the experiment entirely. 
3. Create an experiment with:
   - Exactly one primary metric: the success metric from Step 1.
   - Guardrail metric(s): always include your error-rate metric; add a performance metric (e.g. p95 page load time) too if this is a performance-focused change.
   - Treatments: control (off) at 50%, treatment (on) at 50%, allocated to 10% of total traffic.
4. Start the experiment/data collection.
5. Move to Step 7 to monitor toward a decision.
 
## Step 7: Monitoring & Outcome
 
Check status periodically — don't tight-loop. In an interactive session, check once and report progress, then pick back up later. In an unattended/scheduled context, check once per invocation and persist your progress somewhere durable between runs.
 
**Phase 1 — Prove the experiment at 10% (gate before any rollout):**
 
Watch for statistical significance on the primary metric:
 
- **Significant + positive lift** → experiment proven. Stop the experiment iteration and move to Phase 2.
- **Significant + negative lift** → declare a loser, archive the flag, skip Phase 2, go straight to the Step 8 report.
- **No significance after a reasonable ceiling (e.g. 30 minutes)** → report "inconclusive, need more traffic" and stop; don't proceed to Phase 2.
 
Never declare a winner off a single data point or before your stats engine confirms significance.
 
**Phase 2 — Guarded rollout ramp (only after Phase 1 proves the change):**
 
Start a guarded rollout with:
- The winning ("on") variation as the test, the original as control.
- Same randomization unit as the experiment.
- **Exactly 3 monitored stages, capped well below 100%** — e.g. 20% → 30% → 40%, ~60 minutes monitoring each. Don't add a stage at or above 100%; Guarded-rollout implementations reject stages above 50% audience allocation, and the rollout auto-promotes to 100% itself once the final monitored stage completes cleanly — no explicit 100% stage needed.
- The same primary + guardrail metrics as the experiment, each configured to notify and auto-rollback on regression.
 
Track stage progression. If the rollout rolls back or stops at any point, treat it as a regression: declare failed, clean up the flag (deprecate/archive it), and go to the Step 8 report.
 
Once the final stage completes cleanly and auto-promotes to 100%, declare a winner and go to the Step 8 report.
 
**Retrying after a rollback:** a rollback isn't always caused by your monitored metrics genuinely regressing — it can also be triggered by an unrelated application error surfacing mid-ramp. Before blindly restarting after the user says they've fixed something:
1. Confirm the flag's current state (should be back to 100% control, nothing stuck mid-rollout).
2. Check the change history timing between "advanced to next stage" and "reverted." A rollback within seconds of advancing is inconsistent with a full metric-window regression and points to an external cause instead.
3. If the flag is cleanly reverted and the external cause is confirmed fixed, it's safe to restart the guarded rollout from scratch with the same parameters.
4. Don't silently retry without this check, and don't refuse to retry just because a prior attempt rolled back — a genuinely fixed external cause is a legitimate reason to retry. A metric-driven loser is not — don't retry that.
 
**On any terminal outcome, immediately produce the Step 8 report in the same turn** — a one-line "it worked!" note is fine as a lead-in, but the structured report must follow, not wait for a follow-up request.
 
## Step 8: Report
 
Runs automatically the instant Step 7 reaches a terminal outcome (winner + auto-promoted to 100%; loser; inconclusive; or rollback/failure). Use this exact structure:
 
```
## Experiment Report: [Goal Description]
 
**Date:** [YYYY-MM-DD]
**Goal:** [metric] [direction] by [target]%
**Status:** [achieved / in progress / stalled]
 
### Hypothesis
[What we tried and why]
 
### Implementation
- Flag: [flag_key]
- Files modified: [list]
- Branch: [branch name]
 
### Release Readiness
- [reviewed, passed after N attempt(s) / skipped, per your environment's process]
 
### Experiment Phase (10% fixed split)
- Status: [proven / loser / inconclusive]
- Duration: [time]
- Metric change: [before] → [after] ([+/-]%)
- Statistical significance: [value, confidence interval]
 
### Guarded Rollout Phase (if reached)
- Status: [completed / rolled_back / not started]
- Duration: [time]
- Stages reached: [N of 3 monitored stages]
- If rolled back and retried: [root cause, outcome of retry]
 
### Safety Metrics
- error-rate: [baseline] → [final] ([no regression / regression detected])
- [other guardrails]: [baseline] → [final] ([status])
 
### Next Steps
[What to do next based on the outcome]
```
 
## Safety Rules (the non-negotiables)
 
- Always present the hypothesis before implementing.
- Always run a release/risk review before merging, unless your environment has a deliberate, explicitly-called-out exception.
- **Always prove a change via a fixed small-percentage experiment before starting any guarded rollout** — never ramp blind.
- Always include an error-rate (or equivalent "don't break prod") metric as a guardrail, separate from your success metric.
- Add a performance guardrail (e.g. p95 latency) for performance-focused changes.
- Every rollout metric should be configured to both notify AND auto-rollback on regression — don't rely on notification alone.
- **Cap guarded rollout stages well below 100%** (most platforms reject stages ≥50% audience allocation) and let the platform auto-promote to 100% after the final stage — don't try to add an explicit 100% stage.
- Distinguish a metric-driven rollback (don't retry) from an external-cause rollback (safe to retry once fixed) before restarting a rolled-back rollout.
- The final report is automatic and mandatory on every terminal outcome — never defer it to a follow-up ask.

Conclusion

This post described how AWS DevOps Agent, Kiro CLI, and LaunchDarkly connect into a closed-loop system that turns an improvement goal into a series of measured, safe experiments. The agent runs autonomously on a schedule: it generates hypotheses informed by prior outcomes, creates feature flags before any code change, invokes Kiro CLI in headless mode to implement changes behind those flags, validates through release readiness review, deploys through GitHub Actions and AWS Amplify, and hands off to LaunchDarkly for experiment measurement and guarded rollout. If a guardrail is breached at any point during the rollout, LaunchDarkly reverts flag state at runtime without a redeployment. After each cycle, the agent records what happened and feeds it into the next decision.

This directly addresses the three barriers that slow experimentation:

● Planning cost is reduced because the agent handles hypothesis generation, flag creation, implementation coordination, and validation. The team defines the goal; the system handles the wiring.

● Measurement disconnected from action is addressed because LaunchDarkly monitors metrics in real time and reverts flag state automatically when a guardrail is breached, requiring no redeployment and no waiting for a human to notice.

● Stalled iteration is solved because every outcome is recorded and fed into the next hypothesis automatically. The system does not forget what it learned, and it does not stall between iterations.

The architecture is available to implement today as a reference. The orchestration skill included in this post encodes the full 8-step workflow: goal clarification, hypothesis generation, implementation, release readiness, deployment, experiment, monitoring, guarded rollout, and reporting. Teams define their improvement goal, connect the LaunchDarkly MCP server and the Experiment MCP Server to a DevOps Agent custom agent, and let the system iterate toward the target within the safety boundaries they configure. A more turnkey experience is planned for the future.
Authors

Greg Eppel

Greg Eppel is a Principal Specialist for DevOps Agent and has spent the last several years focused on Cloud Operations and helping AWS customers on their cloud journey.

Jonathan Nolen

Jonathan Nolen is the CPO at LaunchDarkly, the leading platform for Runtime Control for AI software development.

He first joined LaunchDarkly in 2018 and has led the Product, Engineering and Design teams. Currently he is leading the team to build critical infrastructure that helps thousands of customers deliver at agentic speed and still ship software safely. Jonathan was at Atlassian from 2005 until 2018. He helped grow the company from 25 employees to over 2,500 and contributed to multiple Atlassian products. Jonathan and his team also built the Atlassian Marketplace, which in 2024 had done over $3 billion of business for the Atlassian community.

Feature Flag Orchestration with AWS DevOps Agent and LaunchDarkly

Post Syndicated from Greg Eppel original https://aws.amazon.com/blogs/devops/feature-flag-orchestration-with-aws-devops-agent-and-launchdarkly/

Introduction

Organizations that use feature flags alongside incident response tooling often connect the two manually. When an outage occurs, engineers must identify which flags are relevant, decide whether to disable them, and coordinate the change across teams. This manual process adds latency at the moment it matters most.

You can use AWS DevOps Agent and its MCP server feature to connect to LaunchDarkly’s hosted MCP server, enabling feature flag recommendations during both proactive deployment review and reactive incident response workflows. Once connected, DevOps Agent can query flag state, read targeting rules, and surface recommendations directly within the workflows where engineers make decisions.

This post walks through two primary use cases:

  1. Pre-deployment review where the release management capabilities in AWS DevOps Agent evaluate changes and a DevOps Agent Skill recommends feature flag coverage before code ships.
  2. Incident response where DevOps Agent queries LaunchDarkly flag state via MCP and recommends containment actions during active incidents.

We also cover the connection architecture, a reusable DevOps Agent Skill for pre-deployment flag validation, and links to get started.

Defense: Release Management and Proactive Flag Recommendations

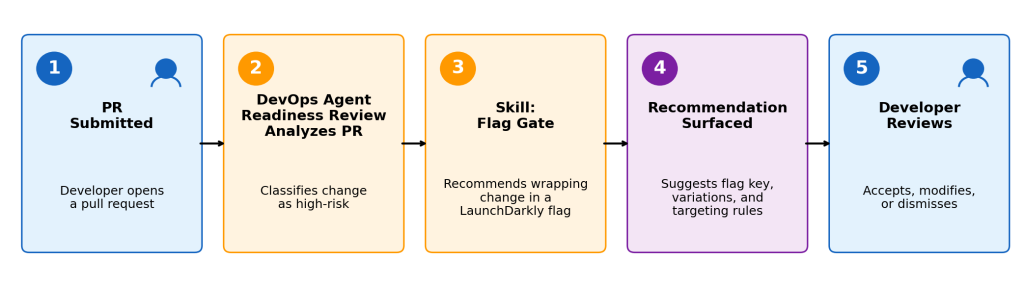
Five-step sequence diagram of the pre-deployment review workflow: PR Submitted, DevOps Agent Readiness Review Analyzes PR, Flag Gate Skill recommends a LaunchDarkly flag, Recommendation Surfaced, Developer Reviews.

Figure 1: DevOps Agent’s readiness review identifies high-risk PRs and recommends LaunchDarkly feature flag coverage before code ships.

The release management capabilities (now in public preview) in AWS DevOps Agent evaluate code changes before they ship to production.

It performs functional testing in an AWS-managed verification environment, assesses risks to cross-codebase dependencies, evaluates adherence to your organization’s standards and best practices, and mathematically verifies that access control configurations in CloudFormation do not deviate from Well-Architected best practices.

AWS DevOps Agent is designed to be extended and customized to fit your tools, standards, and practices. Using the product’s primitives, you can add Skills that enhance its capabilities. For example, when a high-risk change is identified, a custom Skill can evaluate whether the change has adequate feature flag coverage, operating on deployment metadata and code analysis to identify gaps and surface a recommendation to the developer, such as recommending feature flags with LaunchDarkly when needed.

What the Skill Evaluates

The release readiness flag Skill classifies code changes into risk tiers (Critical, High, Moderate) based on what’s being modified — payments, authentication, database schemas, third-party integrations, new API endpoints, performance-sensitive paths, and more — and recommends feature flags proportional to the risk level.

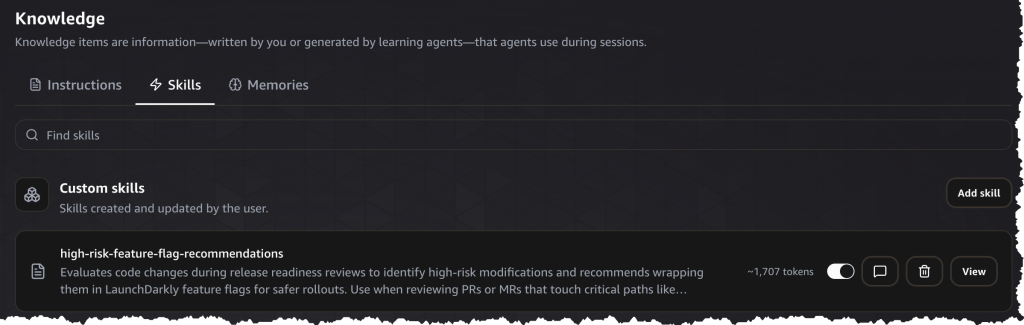
Screenshot of the AWS DevOps Agent Knowledge panel on the Skills tab, showing a custom skill named "high-risk-feature-flag-recommendations" with a description that reads "Evaluates code changes during release readiness reviews to identify high-risk modifications and recommends wrapping them in LaunchDarkly feature flags for safer rollouts."

Figure 2: The high-risk-feature-flag-recommendations Skill configured in AWS DevOps Agent’s Knowledge panel.

What the Recommendation Includes

When the Skill identifies a gap, it surfaces a recommendation containing:

  • Risk context: Why the change is flagged as high-risk (e.g., “This deployment modifies payment authorization logic across 3 downstream services with no existing rollback mechanism.”)
  • Suggested flag configuration: A proposed LaunchDarkly flag key, variations, and default targeting rules aligned with the deployment plan.
  • Rollout strategy: A recommended phased rollout (e.g., internal users first, then 5% of traffic, then full rollout) that matches the risk profile.
  • Kill-switch behavior: What happens when the flag is turned off — the fallback code path, cleanup considerations, and data consistency implications.

Example Scenario

Consider a team deploying an update to a tax calculation service. The change modifies the tax rate computation logic, affecting all order totals across multiple regions. AWS DevOps Agent evaluates the deployment and classifies it as high-risk. The pre-deployment flag gate Skill then identifies:

  • The change touches critical-path tax calculation code.
  • No feature flag wraps the new computation behavior.
  • The blast radius covers all active checkout sessions.

The Skill surfaces a recommendation: “This deployment modifies tax calculation logic with no existing feature flag coverage. Recommend wrapping the new tax computation in a LaunchDarkly flag (tax-calculation-v2) with a phased rollout targeting internal test accounts first, followed by 5% of production traffic.” 

The developer can then action the recommendation, creating the flag in LaunchDarkly, adjusting the suggested configuration to fit their rollout plan, or noting the justification for proceeding without one as part of the deployment record.

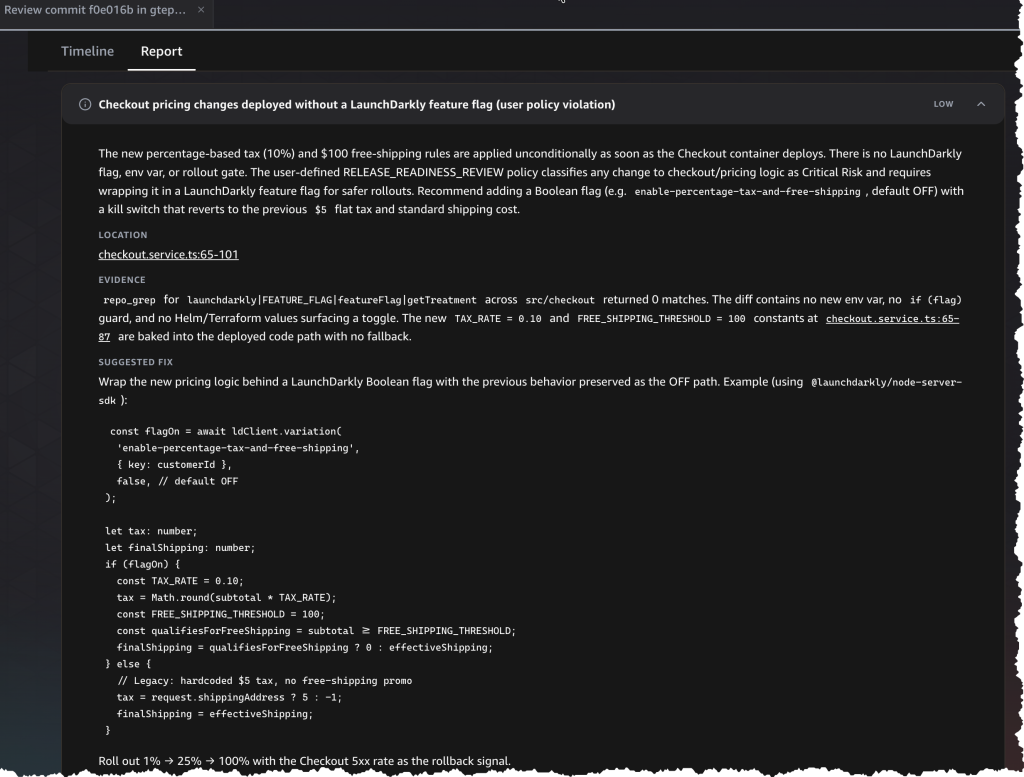
Screenshot of the AWS DevOps Agent Report tab showing a policy violation titled "Checkout pricing changes deployed without a LaunchDarkly feature flag." The report includes risk context, evidence from a repo grep showing no existing flag, a suggested fix with sample Node.js code using the LaunchDarkly SDK, and a recommended phased rollout strategy.

Figure 3: AWS DevOps Agent release management report identifying checkout pricing changes deployed without LaunchDarkly feature flag coverage, including a suggested fix with sample code.

Closing the Loop with Kiro IDE

DevOps Agent’s release management capabilities identify when a deployment needs feature flag coverage. Paired with Kiro IDE, this recommendation becomes actionable without leaving the development workflow.

Kiro connects to LaunchDarkly’s MCP server directly, providing flag integration capabilities during development. When a developer builds a new feature in Kiro, the IDE can query LaunchDarkly via MCP to check whether a flag already exists for that feature and generate code with the flag evaluation built in from the start.

Together, this creates one continuous flow: DevOps Agent identifies the risk and recommends flag coverage → the developer, working in Kiro, generates the flag and wraps the code in a single action → the deployment ships with coverage already in place. No context-switching between tools, no manual flag creation in a separate console.

Developers can also use Kiro’s flag integration independently during feature development, even before a deployment triggers a release management review. The two operate as layered coverage: if Kiro catches it during development, DevOps Agent validates the targeting rules match the rollout plan at deployment time. If the developer bypasses Kiro or uses a different toolchain, DevOps Agent still identifies the gap.

Offense: Flag Recommendations During Incident Response

During an active incident, speed of containment directly affects customer impact. DevOps Agent participates in incident response workflows by querying LaunchDarkly to understand current flag state, then recommending containment actions based on what it finds.

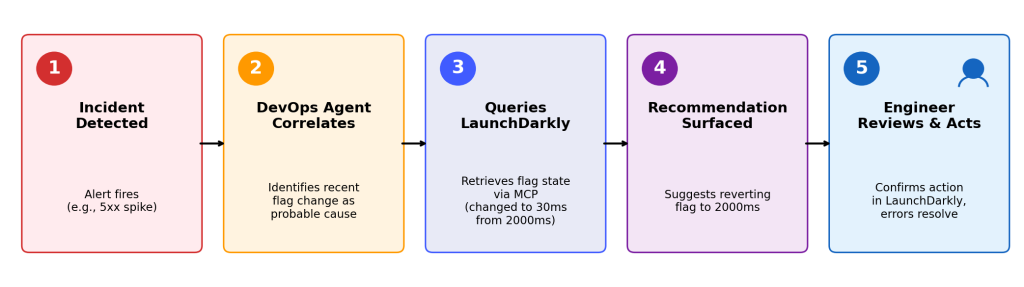
Sequence diagram: Incident Detected, DevOps Agent correlates with flag change, queries LaunchDarkly via MCP (value changed to 30ms from 2000ms), recommends reverting to 2000ms, engineer confirms action.

Figure 4: DevOps Agent identifies a flag change (30ms from 2000ms) as the probable cause, queries LaunchDarkly for state, and recommends reverting the value.

When you detect an incident, DevOps Agent correlates the affected service with recent deployments. It queries LaunchDarkly to identify feature flags associated with those deployments and their current state (enabled, targeting rules, rollout percentage). If a relevant flag is enabled, the agent recommends disabling it as a containment option before suggesting a full rollback.

Flag-based containment provides an alternative containment option that can help reduce the time to resolution. Disabling a flag may return behavior to the previous state, which can be faster than a full deployment rollback in some scenarios

Example Scenario

An alert fires indicating sustained 5XX errors on the bot-service. The on-call engineer engages DevOps Agent, which:

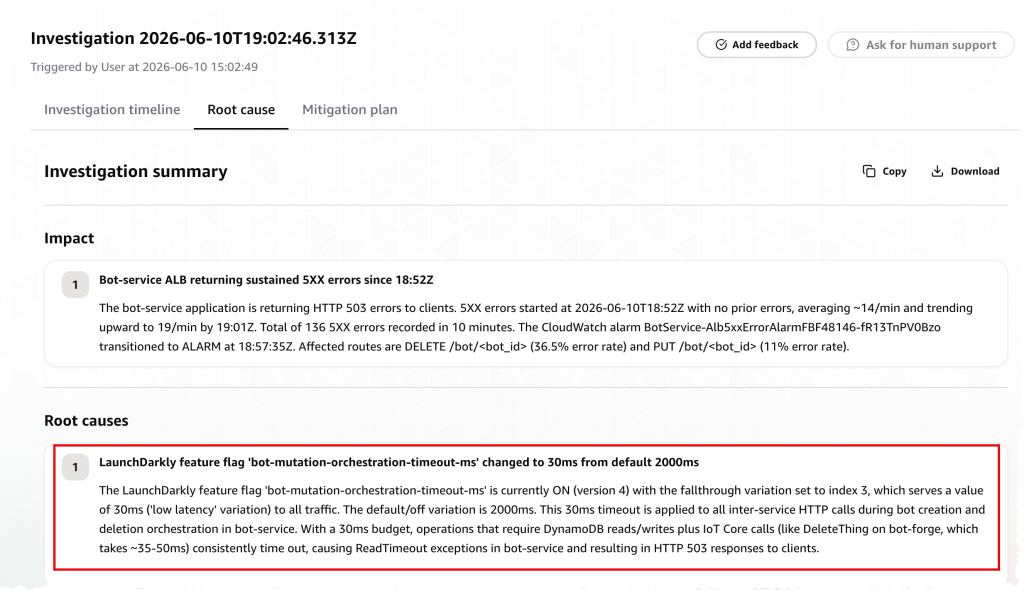
  1. Correlates the HTTP 503 errors with a LaunchDarkly feature flag change: bot-mutation-orchestration-timeout-ms was changed from the default 2000ms to 30ms (the “low latency” variation), applied to all traffic.
  2. Identifies that the 30ms timeout budget is insufficient for inter-service HTTP calls during bot creation and deletion orchestration, which require DynamoDB reads/writes plus IoT Core calls, causing ReadTimeout exceptions.
  3. Recommends reverting the bot-mutation-orchestration-timeout-ms flag to its default variation (2000ms) as the containment action, noting this will restore sufficient timeout budget without requiring a code deployment.

The engineer reviews the recommendation, updates the flag variation in LaunchDarkly, and the error rate returns to baseline within minutes.

Screenshot of the AWS DevOps Agent Root cause tab showing an investigation summary. The Impact section reports bot-service ALB returning sustained 5XX errors since 18:52Z with 136 errors in 10 minutes. The Root causes section, highlighted with a red border, identifies that the LaunchDarkly feature flag "bot-mutation-orchestration-timeout-ms" was changed to 30ms from the default 2000ms, causing ReadTimeout exceptions.

Figure 5: AWS DevOps Agent investigation summary identifying a LaunchDarkly feature flag timeout change as the root cause of sustained 5XX errors

Step-by-Step Mitigation Plans

When DevOps Agent identifies a root cause, it generates a structured mitigation plan with concrete, executable steps. Rather than a generic recommendation, the agent provides:

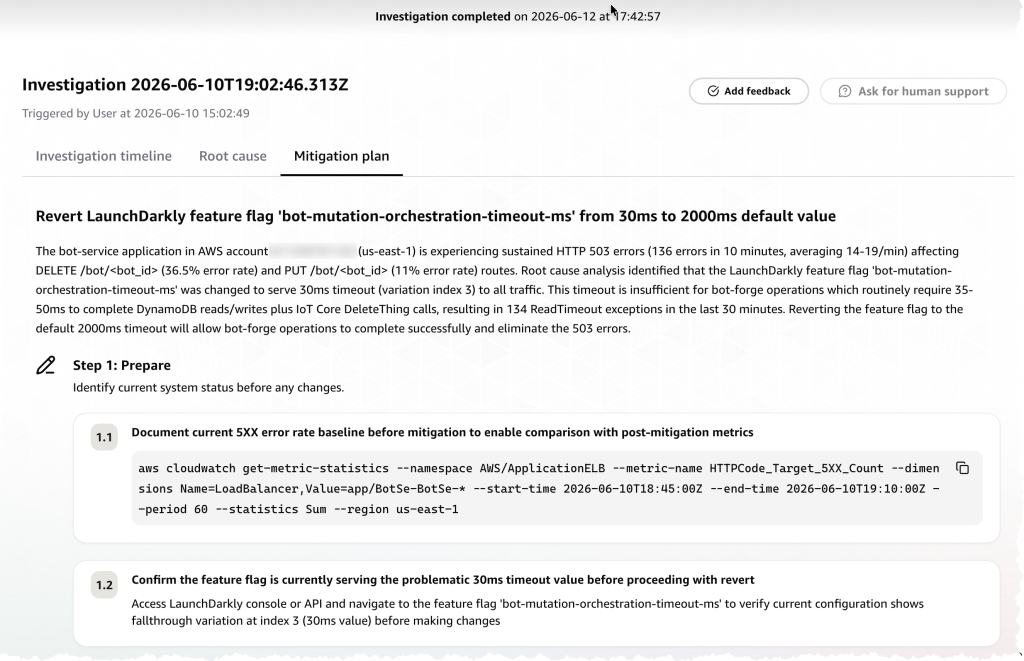
  1. Prepare — Document the current error baseline (with ready-to-run CLI commands, e.g., CloudWatch get-metric-statistics) and confirm the problematic configuration is still active before making changes.
  2. Execute — Revert the specific change (in this case, reverting the LaunchDarkly feature flag bot-mutation-orchestration-timeout-ms from 30ms back to the 2000ms default) with clear instructions on which variation to target.
  3. Verify — Validate that error rates return to baseline after the change, confirming the mitigation was effective.

Each step includes sub-steps with specific commands, API paths, and success criteria — giving the on-call engineer a clear, auditable runbook rather than a vague recommendation.

Screenshot of the AWS DevOps Agent Mitigation plan tab showing a plan titled "Revert LaunchDarkly feature flag 'bot-mutation-orchestration-timeout-ms' from 30ms to 2000ms default value." The plan includes Step 1: Prepare, with sub-steps to document the current 5XX error baseline using an AWS CLI command and confirm the flag is still serving the problematic 30ms value.

Figure 6: Structured mitigation plan generated by AWS DevOps Agent with executable steps to revert the feature flag and verify resolution.

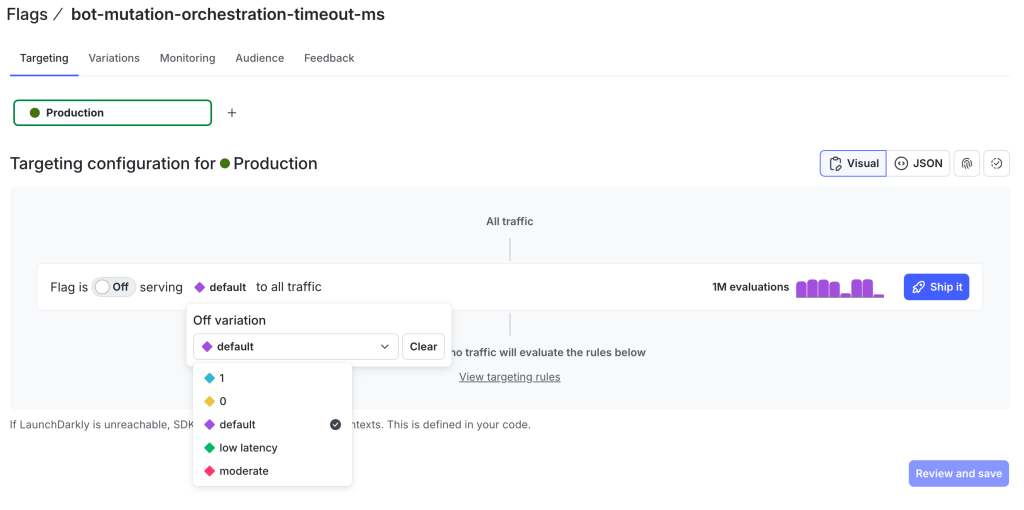
Below, the LaunchDarkly targeting configuration shows the bot-mutation-orchestration-timeout-ms flag with its available variations. During the incident, the engineer reverted from the “low latency” variation back to “default” to restore the 2000ms timeout budget.

Screenshot of the LaunchDarkly console showing the targeting configuration for the "bot-mutation-orchestration-timeout-ms" flag in the Production environment. The flag is set to Off, serving the "default" variation to all traffic. A dropdown menu displays the available variations: 1, 0, default (selected), low latency, and moderate.

Figure 7: LaunchDarkly targeting configuration for the bot-mutation-orchestration-timeout-ms flag showing available variations including the default and low latency values.

Connecting to LaunchDarkly via MCP

As described in the introduction, DevOps Agent uses its MCP server feature to connect to LaunchDarkly’s hosted MCP server. This section covers the architecture and setup steps.

LaunchDarkly’s MCP server exposes flag management operations as agent-callable tools through the Model Context Protocol (MCP) standard. DevOps Agent connects as a client, giving it the ability to query flag state, read targeting rules, and list flags by project or environment without custom integration code.

Architecture

The connection follows this flow:

  1. DevOps Agent identifies a need for flag-related context (e.g., during incident response).
  2. DevOps Agent calls LaunchDarkly’s hosted MCP server using standardized MCP tool definitions.
  3. LaunchDarkly MCP Server translates the request into LaunchDarkly API calls and returns structured responses (flag state, targeting rules, rollout percentages).
  4. DevOps Agent uses the response to formulate recommendations presented to the engineer.

Registration and Configuration

To set up the connection:

  1. Register LaunchDarkly’s hosted MCP server endpoint with DevOps Agent.
  2. Configure authentication credentials (LaunchDarkly API key with appropriate scopes).
  3. Validate connectivity by running a test flag query.

For the full setup walkthrough, including detailed configuration steps and permissions requirements, refer to LaunchDarkly’s companion blog post (link placeholder).

The same LaunchDarkly MCP server connection is available in Kiro IDE for flag-aware code generation during development; see the Defense section above for how Kiro completes the pre-deployment workflow.

Example Skill: High-Risk Feature Flag Recommendations

AWS DevOps Agent Skills are modular instruction sets that extend the agent’s capabilities with specialized domain knowledge and investigation methodologies tailored to your infrastructure and operational workflows. AWS DevOps Agent supports a subset of the Agent Skills specification. The format is flexible, but this example is structured into the following sections:

  • Risk Classification Criteria — defines what constitutes Critical, High, and Moderate risk changes
  • Feature Flag Recommendation Format — specifies the output structure: flag name, flag type, targeting strategy, and kill switch guidance
  • Example Recommendations — provides reference examples so the agent produces consistent, actionable output
  • Integration Notes — describes how recommendations surface during release readiness reviews
  • What NOT to Flag — explicitly scopes out low-risk changes to reduce noise

Below is the full Skill used in this example:


# High-Risk Code Feature Flag Recommendations

When performing a release readiness review, use this skill to identify high-risk code changes and recommend LaunchDarkly feature flags for safer, controlled rollouts.

## Risk Classification Criteria

Evaluate code changes against these risk categories:

### Critical Risk (Always recommend feature flag)
- **Payment/billing logic** — any changes to checkout, payment processing, subscription handling, or pricing calculations
- **Authentication/authorization** — login flows, session management, permission checks, OAuth/SSO integrations
- **Database schema changes** — migrations, new columns, index changes, especially on high-traffic tables
- **Data deletion or mutation** — bulk updates, cascading deletes, data transformations
- **Third-party API integrations** — new external service dependencies or changes to existing integrations
- **Core business logic** — order processing, inventory management, user registration flows

### High Risk (Strongly recommend feature flag)
- **New API endpoints** — especially public-facing or partner APIs
- **Performance-sensitive paths** — changes to hot paths, caching logic, query optimizations
- **Feature rewrites** — replacing existing functionality with new implementations
- **Concurrency changes** — threading, async processing, queue handling modifications
- **Configuration changes** — environment variables, feature toggles, service endpoints

### Moderate Risk (Consider feature flag)
- **UI changes to critical flows** — checkout pages, login screens, dashboard views
- **Logging/monitoring changes** — new metrics, log format changes, tracing modifications
- **Error handling changes** — exception handling, retry logic, fallback behaviors

## Feature Flag Recommendation Format

When recommending a feature flag, provide:

### 1. Flag Name
Use a descriptive, lowercase, hyphenated name:
- `enable-new-payment-processor`
- `use-v2-auth-flow`
- `rollout-order-service-refactor`

### 2. Flag Type
Recommend the appropriate LaunchDarkly flag type:
- **Boolean** — simple on/off for feature enablement
- **Multivariate** — when you need multiple variations (A/B testing, gradual migrations)
- **Number/String** — for configuration values that might need adjustment

### 3. Targeting Strategy
Recommend an appropriate rollout strategy:
- **Percentage rollout** — start at 1-5%, monitor, then increase (default for most changes)
- **User segment targeting** — internal users first, then beta users, then general availability
- **Environment targeting** — enable in staging/canary before production

### 4. Kill Switch Guidance
Explain what happens when the flag is turned off:
- What code path executes when disabled
- Any cleanup or rollback considerations
- Data consistency implications

## Example Recommendations

### Example 1: Payment Processing Change

**Code Change:** Refactored payment gateway integration to support new processor

**Recommendation:**
```CRITICAL RISK: Payment processing changes detected

Recommend wrapping in LaunchDarkly feature flag:
- Flag name: `enable-stripe-v2-integration`
- Flag type: Boolean
- Default: OFF (use existing payment flow)

Rollout strategy:
1. Enable for internal test accounts first
2. Expand to 1% of production traffic
3. Monitor payment success rates and error logs
4. Gradually increase to 100% over 1-2 weeks

Kill switch behavior: Reverts to existing payment processor immediately. 
In-flight transactions will complete with their original processor.
```

### Example 2: New API Endpoint

**Code Change:** Added new `/api/v2/orders` endpoint with different response format

**Recommendation:**
```HIGH RISK: New API endpoint with breaking response format

Recommend wrapping in LaunchDarkly feature flag:
- Flag name: `enable-orders-api-v2`
- Flag type: Boolean
- Default: OFF (return v1 format)

Rollout strategy:
1. Enable for specific API clients by client_id targeting
2. Coordinate with consuming teams before enabling
3. Run both versions in parallel during migration period

Kill switch behavior: Returns v1 response format. Ensure v1 
serialization logic remains in codebase until flag is permanent.
```

### Example 3: Database Migration

**Code Change:** Adding new index to high-traffic `orders` table

**Recommendation:**
```CRITICAL RISK: Database schema change on high-traffic table

Recommend wrapping dependent code in LaunchDarkly feature flag:
- Flag name: `use-orders-status-index`
- Flag type: Boolean  
- Default: OFF (use existing query patterns)

Rollout strategy:
1. Deploy migration to create index (can be done independently)
2. Deploy code that uses new index behind flag
3. Enable flag in staging, verify query performance
4. Enable in production during low-traffic window
5. Monitor query latency and database load

Kill switch behavior: Queries fall back to non-indexed path.
May see temporary performance degradation but no data loss.
```

## Integration Notes

When the release readiness review identifies high-risk changes:

1. **Surface the risk level** clearly in the review summary
2. **Provide the flag recommendation** with copy-paste ready configuration
3. **Explain the rollout strategy** appropriate for the risk level
4. **Document the kill switch behavior** so operators know what to expect

## What NOT to Flag

Not every change needs a feature flag. Avoid recommending flags for:
- Pure refactoring with no behavior change
- Test file additions or modifications
- Documentation updates
- Dependency version bumps (unless major version with breaking changes)
- Code formatting or linting fixes

Activating the Skill

DevOps Agent loads Skill metadata at the start of each workflow and loads the full Skill content when it determines relevance. To ensure the feature flag Skill is consistently applied during release readiness reviews, add a directive to your DevOps Agent Instructions (Agent.md), which is loaded in full at the start of every session:

“When performing release readiness reviews, always load and apply the high-risk-feature-flag-recommendations skill to evaluate code changes for risk and recommend LaunchDarkly feature flags where appropriate.”

This guarantees the agent loads and applies the Skill for every release readiness review rather than relying on relevance detection to surface it.

Getting Started

To begin using feature flag orchestration with AWS DevOps Agent and LaunchDarkly:

  1. Enable AWS DevOps Agent in your AWS account to start building Skills and connecting MCP servers
  2. Set up the LaunchDarkly MCP server: Follow the LaunchDarkly MCP server documentation for installation and configuration instructions.
  3. Read the companion post: LaunchDarkly’s blog post explores why feature flags are essential infrastructure for SRE agents and how the LaunchDarkly MCP Server connects to AWS DevOps Agent for pre-deployment review and incident response workflows.

Conclusion

Feature flag orchestration with AWS DevOps Agent and LaunchDarkly reduces the manual coordination required during both deployment review and incident response. A DevOps Agent Skill surfaces flag recommendations before high-risk changes ship, and during incidents, the agent queries LaunchDarkly to recommend flag-based containment, providing faster resolution with less disruption than full rollbacks.

For developers using Kiro IDE, the same LaunchDarkly MCP server enables flag-aware code generation during development, shifting flag coverage left to the point of authorship. Together, these workflows provide layered coverage: individual developers build with flags, DevOps Agent’s release management capabilities validate coverage at deployment time, and DevOps Agent uses flag state during incident response.

Authors

Greg Eppel

Greg Eppel is a Principal Specialist for DevOps Agent and has spent the last several years focused on Cloud Operations and helping AWS customers on their cloud journey.

Carl Caum

Carl Caum is a Senior Product Manager for DevOps Agent focused on accelerating safe software delivery through agentic solutions.

Best Practices for Deploying AWS DevOps Agent in Production

Post Syndicated from Greg Eppel original https://aws.amazon.com/blogs/devops/best-practices-for-deploying-aws-devops-agent-in-production/

Root cause analysis during incidents is one of the most time-consuming and stressful parts of operating cloud applications. Engineers must quickly correlate telemetry data across multiple services, review deployment history, and understand complex application dependencies—all while under pressure to restore service. AWS DevOps Agent changes this paradigm by bringing autonomous investigation capabilities to your operations team, reducing mean time to resolution (MTTR) from hours to minutes.

However, the effectiveness of AWS DevOps Agent depends heavily on how you configure your Agent Spaces which control resource access boundaries. An Agent Space that’s too narrow misses critical context during investigations. One that’s too broad introduces performance overhead and complexity. This post provides best practices for setting up Agent Spaces that balance investigation capability with operational efficiency, drawing from our experience onboarding early customers and using DevOps agent across our own teams.

By the end of this post, you’ll understand how to structure Agent Spaces for optimal investigation accuracy, determine the right scope of resource access, and use Infrastructure as Code (IaC) to streamline deployment. Let’s start by understanding the foundational concept that makes all of this possible: the Agent Space itself.

What is an Agent Space and Why Does It Matter?

An Agent Space is a logical container that defines what AWS DevOps Agent can access and investigate. Think of it as the agent’s operational boundary—it determines which cloud accounts the agent can query, which third-party integrations are available, and who can interact with investigations.

Agent Spaces are critical because AWS DevOps Agent needs sufficient context to perform accurate root cause analysis.

When an incident occurs, the agent:

  1. Learns your resources and their relationships across accounts
  2. Correlates telemetry data from logs, metrics, and traces
  3. Reviews recent changes including deployments and configuration updates
  4. Generates and tests hypotheses by querying additional data sources
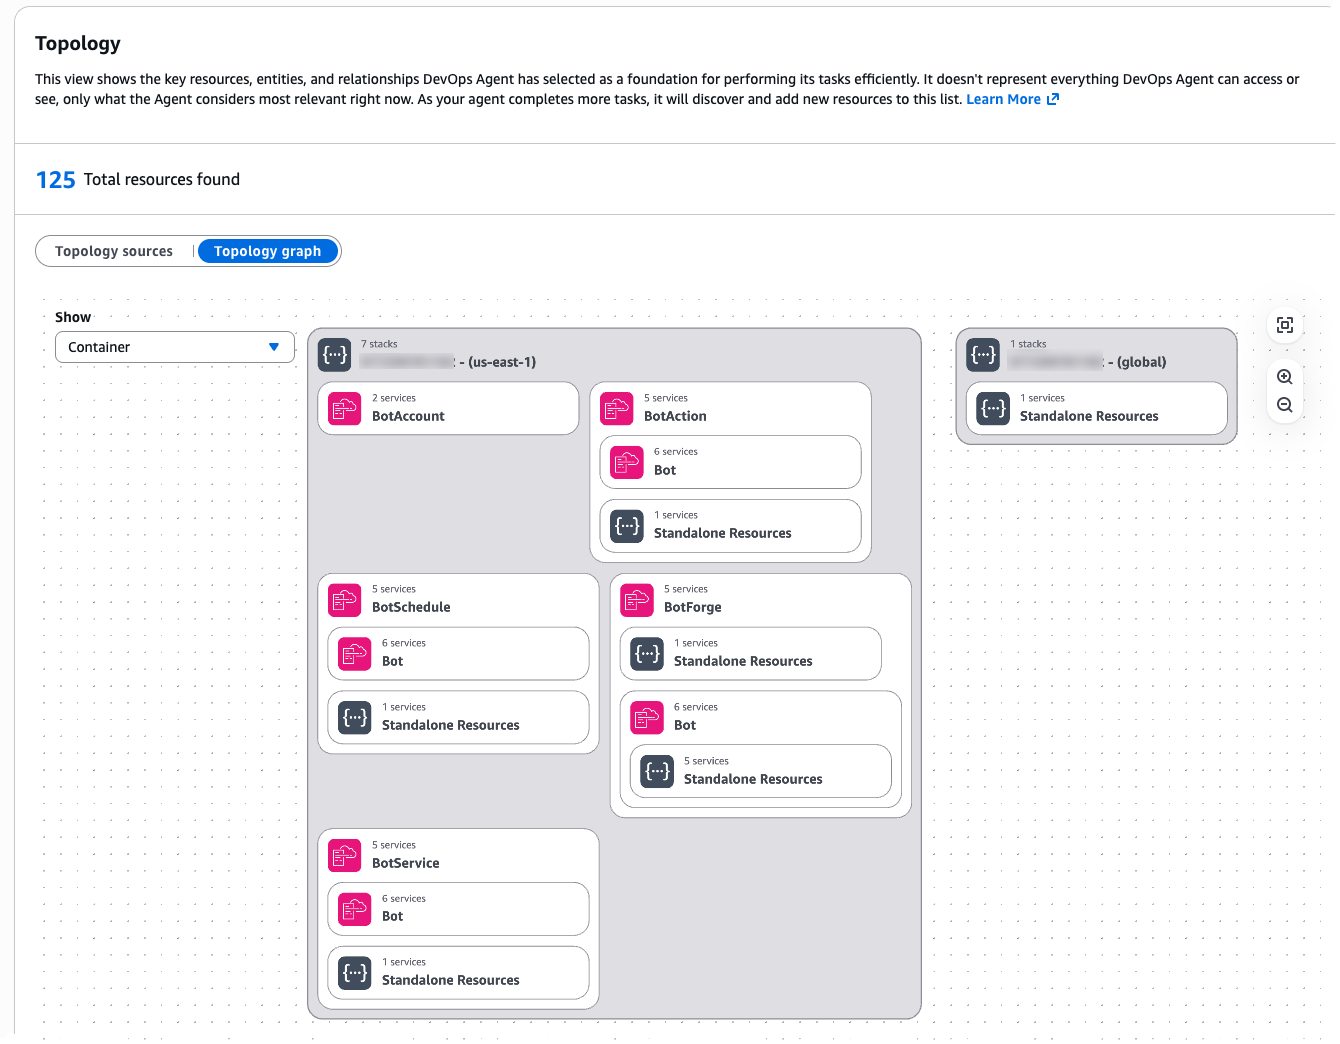
This view shows the key resources, entities, and relationships DevOps Agent has selected as a foundation for performing it's task efficently.

Figure 1: Agent Space Topology

If the Agent Space doesn’t include access to a critical account or integration, the agent might miss the root cause entirely. Conversely, an overly broad Agent Space introduces performance challenges as the agent considers more resource permutations during investigations.

Understanding these trade-offs between scope and performance is essential. The question becomes: how do you determine the right boundaries for your specific organization and operational model?”

Part 1: Design your Agent Space architecture

We recommend thinking about Agent Space boundaries the same way you think about on-call responsibilities: grant access to accounts relevant to the application, but separate production from non-production environments.

This approach provides several benefits:

  • Familiar mental model – Operations teams already understand on-call boundaries
  • Appropriate investigation scope – Mirrors how human engineers would investigate incidents
  • Two-way door decision – You can expand or narrow Agent Space scope as needs evolve
  • Performance balance – Provides sufficient context without overwhelming the agent

Determine Your Agent Space Boundaries

Start by mapping your application architecture to Agent Space boundaries and consider the following questions:

  • What defines a logical application?
    • Does your team own multiple independent applications? If so, create separate Agent Spaces.
    • Is it a monolith spanning multiple accounts? Then one Agent Space with cross-account access makes sense.
  • How do you organize on-call rotations?
    • Separate teams for production versus non-production suggests separate Agent Spaces.
    • One team handling all environments might work with one Agent Space per application.
  • What are your investigation patterns?
    • Do production incidents require querying dependent services in other accounts? Include those accounts.
    • Are environments completely isolated? Keep Agent Spaces separate.

Example decision tree:

Application: E-commerce Platform
├── Production environment
│ ├── Account 111111111111 (Frontend)
│ ├── Account 222222222222 (API Gateway + Lambda)
│ └── Account 333333333333 (RDS + DynamoDB)
├── Staging environment
│ └── Account 444444444444 (All resources)
└── Development environment
└── Account 555555555555 (All resources)

Recommended Agent Spaces:
→ "EcommerceProd" (accounts 111111111111, 222222222222, 333333333333)
→ "EcommerceNonProd" (accounts 444444444444, 555555555555)

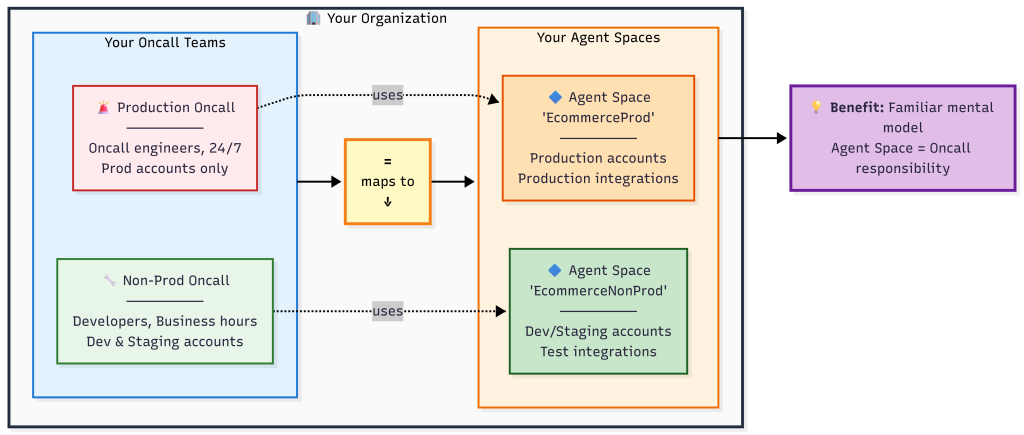
Create one Agent Space per oncall team. The Production Oncall team manages the "EcommerceProd" Agent Space covering production accounts. The Non-Prod Oncall team manages the "EcommerceNonProd" Agent Space covering development and staging accounts. This 1:1 mapping provides operations teams with a familiar mental model where Agent Space boundaries match their existing oncall responsibilities.

Figure 2: Agent Space boundaries mirror on-call team responsibilities

Common Agent Space Patterns and Decision Points

Beyond the basic single-application pattern, organizations encounter more complex scenarios that require careful consideration. Here are critical patterns to address that we’ve seen customers successfully adopt:

Pattern 1: Investigations Spanning Multiple Teams. Large organizations with multiple teams (example: 3 teams managing 100+ production accounts) encounter situations where an issue originates in Team A’s infrastructure but the root cause lies in Team B’s services. The question becomes: how do you enable collaboration across Agent Spaces?

Recommended approach: Create application-specific Agent Spaces that include read-only access to shared resource accounts e.g. dependencies. Establish clear on-call escalation procedures and add them as runbooks when investigations identify cross-team root causes for efficient communication (e.g. via chat in Slack). Configure the shared service team’s resources with tags identifying which applications use them (example: app-id: ecommerce-frontend). Following a consistent tagging strategy provides investigation context for shared resources while maintaining clear resource ownership.

Pattern 2: Shared Services and Network Operations Center (NOC) Teams. Some organizations have centralized teams that provide and support shared infrastructure services (databases, networking, monitoring, security) used by multiple applications across the organization. These NOC or central operations teams need visibility into their services without requiring access to every application’s Agent Space.

Recommended approach: Create a dedicated Agent Space for the shared service team and configure an Agent Space scoped to the shared service team’s infrastructure and operational responsibilities:

  • Include AWS accounts containing shared databases, network infrastructure, centralized logging, and monitoring systems
  • Add relevant CloudFormation stacks for shared platform services
  • Configure IAM roles that provide read-only access to the specific resources the team supports
  • Include runbooks and operational procedures specific to the shared services

This follows the same principle as application-specific Agent Spaces: one Agent Space per on-call team, even when that Agent Space’s scope spans multiple applications. While shared services teams manage specific infrastructure domains, SRE teams often face an even larger challenge: operational responsibility for hundreds or thousands of applications at enterprise scale.

Pattern 3: Central Operations Teams Managing Many Applications. Central operations teams responsible for operational tooling across hundreds or thousands of applications can efficiently manage Agent Spaces at scale using Infrastructure as Code.

Recommended approach: Use the AWS CDK or Terraform samples available as starting points. These samples enable teams to:

  • Define a standardized Agent Space template with your organization’s required IAM roles, integrations, resource boundaries and governance tags
  • Deploy Agent Spaces programmatically as part of application onboarding workflows
  • Enforce compliance through AWS Config rules or service control policies
  • Track all Agent Spaces through consolidated billing and tagging (application-id, team, cost-center, environment)

Central operations teams manage the templates and governance policies, while application teams operate within those guardrails. This approach scales to thousands of applications with consistent configuration and automated deployment. AWS DevOps agent allows limiting agent access in an AWS account and controlling access for users to the operator console for teams to manage Agent Space access at scale.

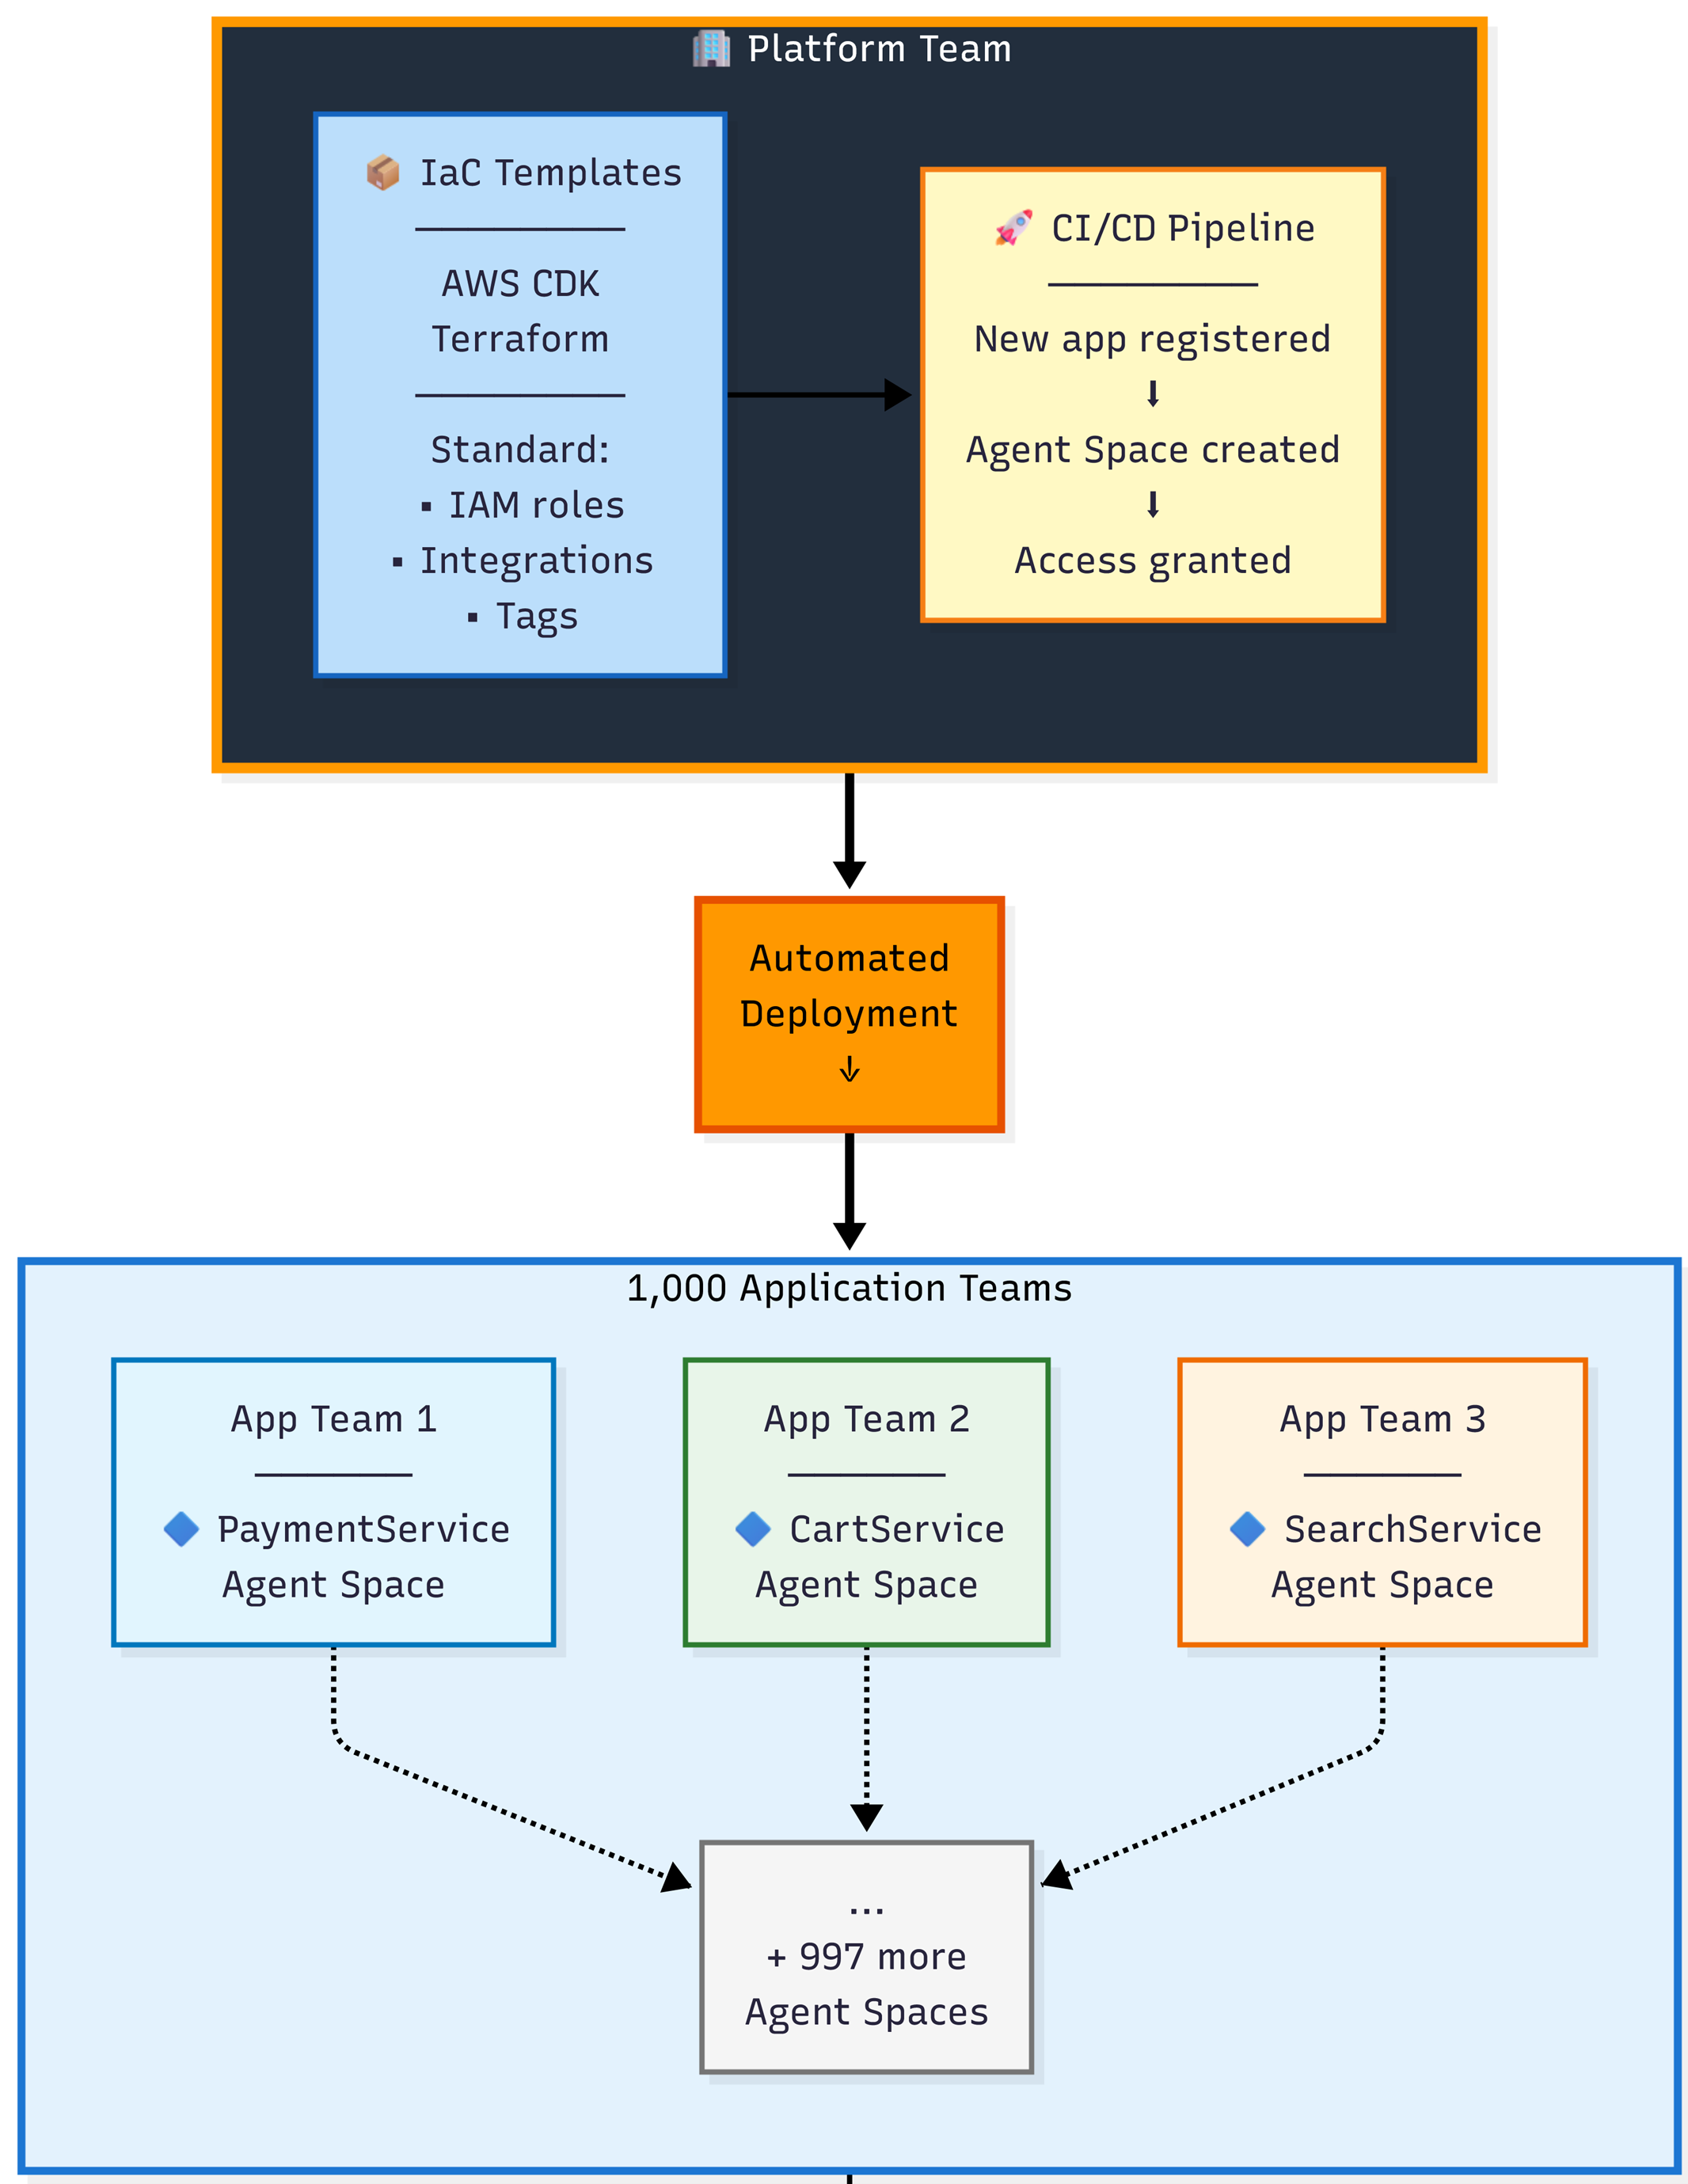
A small platform team (a few engineers) manages 1,000+ Agent Spaces by maintaining standardized IaC templates (AWS CDK and Terraform). When new applications are registered, a CI/CD pipeline automatically deploys an Agent Space for that application team. This distributed pattern (one Agent Space per app team) scales to many applications without manual intervention, while maintaining investigation accuracy by avoiding a centralized "monitoring account" that would bias toward its primary application.

Figure 3: Enterprise scale pattern using Infrastructure as Code

Now that you understand how to design Agent Space boundaries aligned with your team structure and scale requirements, let’s walk through the practical implementation steps to bring these architectural patterns to life.

Part 2: Implement your Agent Space architecture

This section walks you through the practical steps of creating your first Agent Space—from verifying prerequisites and configuring IAM roles across accounts to integrating observability tools, setting up access controls, and testing your configuration to ensure investigations have the context they need.

Step 1: Agent Space Prerequisites

Before setting up your first Agent Space, ensure you have:

  • AWS accounts – At least one AWS account where your application resources run
  • IAM permissions – Sufficient access to create IAM roles and policies across accounts. AWS DevOps Agent requires two distinct sets of IAM permissions:
    • Agent Space role permissions – The IAM role that AWS DevOps Agent assumes to query your AWS resources, access CloudWatch Logs, and discover topology. This role requires the AIOpsAssistantPolicy managed policy plus additional permissions for AWS Support and expanded capabilities. See the CLI onboarding guide for the complete role configuration.
    • Operator app role permissions – The IAM role that controls what human operators can do in the AWS DevOps Agent web application, such as starting investigations, viewing results, and creating AWS Support cases. This role is separate from the agent’s investigation permissions.
  • Service Control Policies (SCPs) – Verify that your organization’s SCPs allow AWS DevOps Agent API actions. Common issue: Teams complete Agent Space setup but investigations fail because SCPs block aidevops:* actions or bedrock:InvokeModel actions. Review your AWS Organization’s SCPs and add exceptions for DevOps Agent if needed. Note that DevOps Agent and Amazon Bedrock inference are not impacted by policies that restrict customer content to specific AWS regions—Bedrock may use US regions other than US East (N. Virginia) for stateless inference.
  • Observability tools – At minimum, Amazon CloudWatch (automatically available via IAM roles) and Amazon CloudTrail. For comprehensive investigations, integrate Application Performance Monitoring tools like Datadog, Dynatrace, New Relic, Grafana, or Splunk. See Connecting telemetry sources for supported integrations.
  • Understanding third-party integration configuration – Some third-party tools require a two-step configuration process:
    • Account-level registration – Tools that use OAuth (like GitHub, Dynatrace) must first be registered at the AWS account level through the DevOps Agent console. This establishes OAuth credentials that are shared across all Agent Spaces in your account.
    • Agent Space-level association – After registration, each Agent Space individually specifies which resources from that tool to use. For example, after registering GitHub once, Agent Space “EcommerceProd” can associate only production repositories while Agent Space “EcommerceNonProd” associates development repositories.Other tools like Datadog, New Relic, and Splunk can be directly associated with an Agent Space using API keys or tokens without separate account-level registration. CloudWatch requires no additional configuration beyond IAM roles.
  • Source control – GitHub or GitLab repository access for code context and deployment correlation (optional but highly recommended)
  • IaC tooling – AWS CDK (TypeScript/Python), Terraform, AWS CLI, or AWS Management Console for Agent Space deployment

With prerequisites verified, you’re ready to create your Agent Space and establish the IAM trust relationships that enable investigations.

Step 2: Create an Agent Space

AWS DevOps Agent requires IAM roles in each AWS account within the Agent Space boundary. The agent assumes these roles to query CloudWatch Logs, describe resources, and build application topology.

The AWS DevOps Agent is designed to retrieve operational data from multiple AWS Regions across all AWS accounts that you grant access to within the configured Agent Space, enabling comprehensive visibility into distributed infrastructure and applications regardless of their geographic deployment, while supporting multiple accounts through a configuration process that involves creating IAM roles with appropriate trust policies and permissions in secondary accounts

Option A: Use the AWS Console wizard
Navigate to the AWS DevOps Agent console and choose Create Agent Space and follow the guided setup to create IAM roles in each target account.

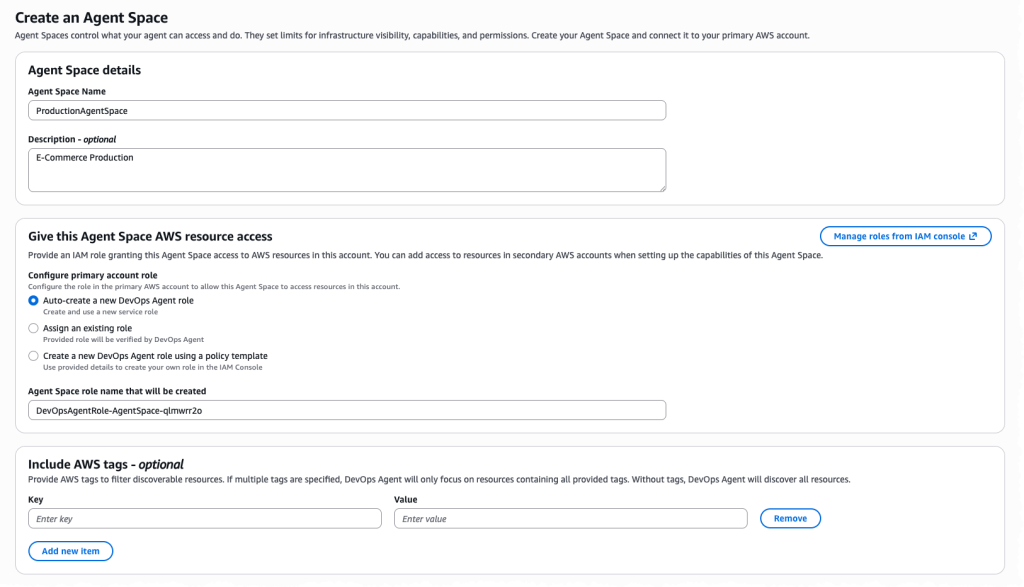
The Create an Agent Space setup wizard in the AWS Management Console showing Agent Space Details.

Figure 4: Creating an Agent Space in the Console

The setup wizard helps in configuring cross-account trust relationships.

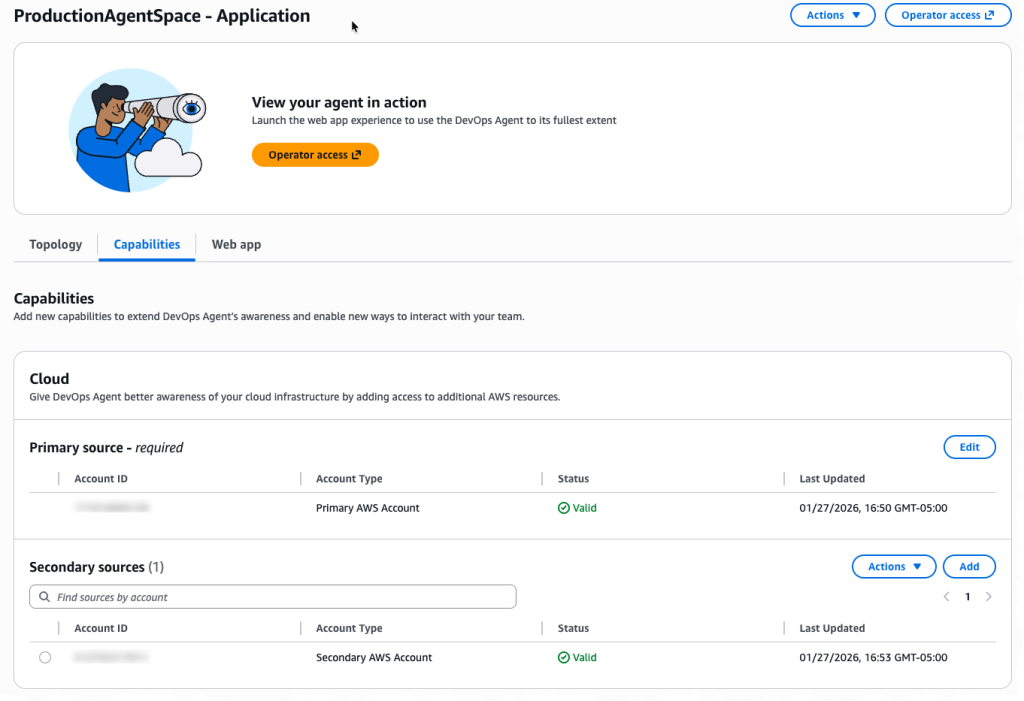
Shows the Agent Space Management Console and in particular the capability to configure your Agent Space to access multiple accounts.

Figure 5: Multiple account configuration for your Agent Space

Option B: Use Infrastructure as Code (Recommended)
We provide sample CDK and Terraform templates that automate Agent Space creation and IAM role deployment across multiple accounts.

AWS CDK example (TypeScript):

//If you have many accounts, use a loop:

const accounts = [
  { id: '111111111111', name: 'Prod', role: prodRole, stage: 'prod' },
  { id: '222222222222', name: 'Dev', role: devRole, stage: 'dev' },
  { id: '333333333333', name: 'Test', role: testRole, stage: 'test' },
];

accounts.forEach(account => {
  const association = new devopsagent.CfnAssociation(this, `${account.name}Association`, {
    agentSpaceId: agentSpace.ref,
    serviceId: 'aws',
    configuration: {
      aws: {
        assumableRoleArn: account.role.roleArn,
        accountId: account.id,
        accountType: 'monitor'
      }
    }
  });

  association.addDependency(agentSpace);
  cdk.Tags.of(association).add('stage', account.stage);
});

For detailed instructions on setting up IAM roles and permissions across accounts, see the CLI Onboarding Guide.

Once your Agent Space exists and has access to AWS accounts, the next critical step is connecting the observability and development tools that provide investigation context beyond AWS native services.

Step 3: Configure Integrations

AWS DevOps Agent investigates incidents by correlating data from multiple sources. The more context available, the more accurate the root cause analysis.

Recommended integrations by priority:

  1. Amazon CloudWatch – Provides logs, metrics, and traces from AWS services. The agent queries CloudWatch Logs Insights automatically during investigations. No additional configuration is needed if IAM roles are properly configured.
  2. Application Performance Monitoring tools – Datadog, Dynatrace, New Relic, and Splunk provide distributed tracing, custom metrics, and application-level context. Configure via Agent Space integrations in the AWS Console.
  3. Code repositories – GitHub or GitLab integration enables the agent to review recent deployments and code changes. Requires OAuth or personal access token.
  4. CI/CD pipelines – GitHub Actions or GitLab workflows help the agent correlate incidents with deployment timing. Configured alongside code repository integration.
  5. Communication Channels – Slack and ServiceNow integration enables DevOps Agent to post real-time investigation updates to team channels and automatically update incident tickets with findings, root cause analysis, and recommended mitigation steps throughout the investigation lifecycle.

Advanced Integrations

Beyond built-in integrations, AWS DevOps Agent supports webhook triggered investigations and custom MCP (Model Context Protocol) servers so you can bring-your-own observability tools.

Webhook configuration for investigation triggers
Webhooks allow external systems (Grafana, Prometheus, PagerDuty, custom monitoring tools) to automatically trigger DevOps Agent investigations when incidents occur. Each Agent Space receives a unique webhook URL that accepts JSON payloads describing the incident.

Common configuration pitfalls:

  • Webhook authentication: Webhooks use HMAC signatures for security. Store the webhook secret in AWS Secrets Manager and rotate it according to your security policies.
  • Payload format: Ensure your monitoring tool sends incident context including timestamps, affected resources, and symptom descriptions. Richer context enables more accurate investigations.

For detailed webhook setup, see Invoking DevOps Agent through Webhook.

Bring-your-own MCP servers
If you use observability tools beyond the built-in integrations (Grafana, Prometheus, custom telemetry systems), you can connect them via MCP servers. MCP servers expose your tool’s data through a standardized protocol that DevOps Agent queries during investigations.

Key requirements for MCP servers:

  • Publicly accessible HTTPS endpoint: MCP servers must be reachable from the public internet. VPC-hosted servers are not currently supported.
  • Read-only tools only: For security, only expose MCP tools that perform read operations. Write operations introduce prompt injection risks.
  • Tool allowlisting: Register MCP servers at the account level, then selectively enable specific tools per Agent Space. Don’t grant access to all tools—choose only those relevant to investigations.

Common MCP setup errors:

  • Authentication misconfiguration: MCP servers support OAuth 2.0 or API key authentication. Verify your OAuth client credentials are correct and that token exchange URLs are accessible from AWS infrastructure.
  • Tool name length: MCP tool names have a maximum length of 64 characters. Longer names will fail registration.
  • Endpoint URL format: Use the full HTTPS URL including path. Example: https://mcp.example.com/v1/mcp not just mcp.example.com.

For comprehensive MCP server setup including authentication configuration, see Connecting MCP Servers.

Testing your integrations
After configuring webhooks or MCP servers, trigger a test investigation to verify connectivity:

  • For webhooks: Send a test payload from your monitoring tool and verify the investigation starts in the DevOps Agent web app
  • For MCP servers: Start an investigation manually and check the agent journal to confirm it successfully called your MCP tools
  • Review any errors in AWS CloudTrail logs which capture all DevOps Agent API calls including integration attempts

With your data sources connected, you now need to ensure the right people have appropriate access to investigations while maintaining security boundaries.

Step 4: Configure Access Controls

Agent Spaces support fine-grained access controls to ensure only authorized team members can interact with investigations.

Access control considerations:

  • Who should view investigations? Typically on-call engineers, SREs, and DevOps engineers. Consider including security teams for security-related incidents.
  • Who should create AWS Support cases? Typically on-call leads and senior engineers. Restrict this permission to prevent excessive case creation.
  • Who should modify Agent Space configuration? Typically central operations or infrastructure teams. Separate this from day-to-day investigation access.

IAM-based access control:

AWS DevOps Agent uses IAM policies to control access to Agent Spaces. Attach policies to IAM users, groups, or roles:

{
  "Version": "2012-10-17",
  "Statement": [
    {
      "Effect": "Allow",
      "Action": [
        "devopsagent:GetAgentSpace",
        "devopsagent:StartInvestigation",
        "devopsagent:GetInvestigation",
        "devopsagent:ListInvestigations"
      ],
      "Resource": "arn:aws:devopsagent:us-east-1:123456789012:agentspace/EcommerceProd"
    }
  ]
}

AWS DevOps Agent operates within your AWS environment with privileged access to operational data across multiple accounts. While general security foundations apply, Agent Space configuration introduces specific considerations. For comprehensive security guidance, see the AWS DevOps Agent Security documentation.

Access controls are in place—now it’s time to validate that your Agent Space configuration provides the investigation coverage you need.

Step 5: Test and Iterate

Agent Space configuration is a two-way door decision. Start with a focused scope and expand based on investigation results.

Testing your Agent Space: 

Trigger a test investigation using the AWS DevOps Agent web app.

  • Start an investigation and provide symptoms such as “High latency on /api/checkout endpoint”.
  • Observe which resources the agent queries.
  • Review investigation completeness. Did the agent identify the root cause?
  • Were any accounts or services missing from the investigation?
  • Did the agent have sufficient telemetry data?

Adjust Agent Space boundaries based on results.

  • Add accounts if investigations lack context.
  • Add integrations if telemetry gaps exist.
  • Narrow scope if performance degrades.

Conclusion

AWS DevOps Agent transforms incident response from a manual, time-consuming process into an autonomous, data-driven investigation. However, the agent’s effectiveness depends on proper Agent Space configuration. By following the on-call based approach—granting access to accounts relevant to your application while separating production from non-production environments—you provide sufficient context for accurate root cause analysis without introducing unnecessary complexity.

Key takeaways:

  • Think on-call boundaries – Agent Space scope should mirror how your team investigates incidents
  • Use Infrastructure as Code – CDK and Terraform templates ensure consistent, repeatable deployments
  • Integrate observability tools – More data sources equals more accurate investigations
  • Iterate based on results – Expand or narrow Agent Space scope as investigation patterns emerge

Next steps:

We’re committed to making AWS DevOps Agent easier to adopt and more accurate in solving customer problems. Your
Agent Space setup is the foundation for achieving fast, reliable incident resolution. Have questions or feedback? Leave a comment below.

Authors

Tipu Qureshi

Tipu Qureshi is a Senior Principal Technologist in AWS Agentic AI, focusing on operational excellence and incident response automation. He works with AWS customers to design resilient, observable cloud applications and autonomous operational systems.

Bill Fine

Bill Fine is a Product Management Leader for Agentic AI at AWS, where he leads product strategy and customer engagement for AWS DevOps Agent.

Greg Eppel

Greg Eppel is a Principal Specialist for DevOps Agent and has spent the last several years focused on Cloud Operations and helping AWS customers on their cloud journey.

A sneak peek at the governance, risk, and compliance sessions for AWS re:Inforce 2022

Post Syndicated from Greg Eppel original https://aws.amazon.com/blogs/security/a-sneak-peek-at-the-governance-risk-and-compliance-sessions-for-aws-reinforce-2022/

Register now with discount code SALUZwmdkJJ to get $150 off your full conference pass to AWS re:Inforce. For a limited time only and while supplies last.

Today we want to tell you about some of the exciting governance, risk, and compliance sessions planned for AWS re:Inforce 2022. AWS re:Inforce is a conference where you can learn more about security, compliance, identity, and privacy. When you attend the event, you have access to hundreds of technical and business sessions, an AWS Partner expo hall, a keynote speech from AWS Security leaders, and more. AWS re:Inforce 2022 will take place in person in Boston, MA on July 26 and 27. AWS re:Inforce 2022 features content in the following five areas:

  • Data protection and privacy
  • Governance, risk, and compliance
  • Identity and access management
  • Network and infrastructure security
  • Threat detection and incident response

This post will highlight of some of the governance, risk, and compliance offerings that you can sign up for, including breakout sessions, chalk talks, builders’ sessions, and workshops. For the full catalog of all tracks, see the AWS re:Inforce session preview.

Breakout sessions

These are lecture-style presentations that cover topics at all levels and are delivered by AWS experts, builders, customers, and partners. Breakout sessions typically include 10–15 minutes of Q&A at the end.

GRC201: Learn best practices for auditing AWS with Cloud Audit Academy
Do you want to know how to audit in the cloud? Today, control framework language is catered toward on-premises environments, and security IT auditing techniques have not been reshaped for the cloud. The AWS Cloud–specific Cloud Audit Academy provides auditors with the education and tools to audit for security on AWS using a risk-based approach. In this session, experience a condensed sample domain from a four-day Cloud Audit Academy workshop.

GRC203: Panel discussion: Continuous compliance and auditing on AWS
In this session, an AWS leader speaks with senior executives from enterprise customer and AWS Partner organizations as they share their paths to success with compliance and auditing on AWS. Join this session to hear how they have used AWS Cloud Operations to help make compliance and auditing more efficient and improve business outcomes. Also hear how AWS Partners are supporting customer organizations as they automate compliance and move to the cloud.

GRC205: Crawl, walk, run: Accelerating security maturity
Where are you on your cloud security journey? Where do you want to end up? What are your next steps? In this step-by-step roadmap, we provide a comprehensive overview of the AWS security journey based on lessons learned with other organizations. Learn where you are, how to take the next step and how to improve your cloud security program. In this session, we will leverage cloud-native tools like AWS Control Tower, AWS Config, and AWS Security Hub to demonstrate how knowing your current state of security can drive more effective and efficient story telling of your posture.

GRC302: Using AWS security services to build our cloud operations foundation
Organizations new to the cloud need to quickly understand what foundational security capabilities should be considered as a baseline. In this session, learn how AWS security services can help you improve your cloud security posture. Learn how to incorporate security into your AWS architecture based on the AWS Cloud Operations model, which will help you implement governance, manage risk, and achieve compliance while proactively discovering opportunities for improvement.

GRC331: Automating security and compliance with OSCAL
Documentation exports can be very time consuming. In this session, learn how the National Institute of Science and Technology is developing the Open Security Controls Assessment Language (OSCAL) to provide common translation between XML, JSON, and YAML formats. OSCAL also provides a common means to identify and version shared resources, and standardize the expression of assessment artifacts. Learn how AWS is working to implement OSCAL for our security documentation exports so that you can save time when creating and maintaining ATO packages.

Builders’ sessions

These are small-group sessions led by an AWS expert who guides you as you build the service or product on your own laptop. Use your laptop to experiment and build along with the AWS expert.

GRC351: Implementing compliance as code on AWS
To manage compliance at the speed and scale the cloud requires, organizations need to implement automation and have an effective mechanism to manage it. In this builders’ session, learn how to implement compliance as code (CaC). CaC shares many of the same benefits as infrastructure as code: speed, automation, peer review, and auditability. Learn about defining controls with AWS Config rules, customizing those controls, using remediation actions, packaging and deploying with AWS Config conformance packs, and validating using a CI/CD pipeline.

GRC352: Deploying repeatable, secure, and compliant Amazon EKS clusters
In this builders’ session, learn how to deploy, manage, and scale containerized applications that run Kubernetes on AWS with AWS Service Catalog. Walk through how to deploy the Kubernetes control plane into a virtual private cloud (VPC), connect worker nodes to the cluster, and configure a bastion host for cluster administrative operations. Using AWS CloudFormation registry resource types, learn how to declare Kubernetes manifests or Helm charts to deploy and manage your Kubernetes applications. With AWS Service Catalog, you can empower your teams to deploy securely configured Amazon Elastic Kubernetes Service (Amazon EKS) clusters in multiple accounts and Regions.

GRC354: Building remediation workflows to simplify compliance
Automation and simplification are key to managing compliance at scale. Remediation is one of the key elements of simplifying and managing risk. In this builders’ session, walk through how to build a remediation workflow using AWS Config and AWS Systems Manager Automation. Then, explore how the workflow can be deployed at scale and monitored with AWS Security Hub to oversee your entire organization.

GRC355: Build a Security Posture Leaderboard using AWS Security Hub
This builders’ session introduces you to the possibilities of creating a robust and comprehensive leaderboard using AWS Security Hub findings to improve security and compliance visibility in your organization. Learn how to design and support various use cases, such as combining security and compliance data into a single, centralized dashboard that allows you to make more informed decisions; correlating Security Hub findings with operational data for deeper insights; building a security and compliance scorecard across various dimensions to share across different stakeholders; and supporting a decentralized organization structure with centralized or shared security function.

Chalk talks

These are highly interactive sessions with a small audience. Experts lead you through problems and solutions on a digital whiteboard as the discussion unfolds.

GRC233: Critical infrastructure: Supply chain and compliance impacts
In this chalk talk, learn how you can benefit from cloud-based solutions that build in security from the beginning. Review technical details around cybersecurity best practices for OT systems in adherence with government partnership with public and private industries. Dive deep into use cases and best practices for using AWS security services to help improve cybersecurity specifically for water utilities. Hear about opportunities to receive AWS cybersecurity training designed to teach you the skills necessary to support cloud adoption.

GRC304: Scaling the possible: Digitizing the audit experience
Do you want to increase the speed and scale of your audits? As companies expand to new industries and environments, so too does the scale of regulatory compliance. AWS undergoes over 500 audits in a year. In this session, hear from AWS experts as they digitize and automate the regulator/auditor experience. Walk through pre-audit educational training, self-service of control evidence and walkthrough information, live chatting with an audit control owner, and virtual data center tours. This session discusses how innovation and digitization allows companies to build trust with regulators and auditors while reducing the level of effort for internal audit teams and compliance executives.

GRC334: Shared responsibility deep dive at the service level
Auditors and regulators often need assistance understanding which configuration settings and security responsibilities are in the company’s control. Depending on the service, the AWS shared responsibility model can vary, which can affect the process for meeting compliance goals. Join AWS subject-matter experts in this chalk talk for an in-depth discussion on the next wave of compliance activation for AWS customers. Explore the configurable security decisions that users have for each service and how you can map to AWS best practices and security controls.

GRC431: Building purpose-driven and data-rich GRC solutions
Are you getting everything you need out of your data? Or do you not have enough information to make data-driven security decisions? Many organizations trying to modernize and innovate using data often struggle with finding the right data security solutions to build data-driven applications. In this chalk talk, explore how you can use Amazon Virtual Private Cloud (Amazon VPC), AWS Identity and Access Management (IAM), AWS Key Management Service (AWS KMS), AWS Systems Manager, AWS Single Sign-On (AWS SSO), and AWS Config to drive valuable insights to make more informed decisions. Hear about best practices and lessons learned to help you on your journey to garner purpose-filled information.

Workshops

These are interactive learning sessions where you work in small teams to solve problems using AWS Cloud security services. Come prepared with your laptop and a willingness to learn!

GRC272: Executive Security Simulation
The Executive Security Simulation takes senior security management and IT/business executive teams through an experiential exercise that illuminates key decision points for a successful and secure cloud journey. During this team-based, game-like competitive simulation, participants leverage an industry case study to make strategic security, risk, and compliance time-based decisions and investments. Participants experience the impact of these investments and decisions on the critical aspects of their secure cloud adoption. Join this workshop to understand the major success factors to lead security, risk, and compliance in the cloud, and learn applicable decision and investment approaches to specific secure cloud adoption journeys.

GRC371: Automate your compliance and evidence collection with AWS
Automation and simplification are key to managing compliance at scale. Remediation is one of the key elements of simplifying and managing risk. In this workshop, we will walk through building a remediation workflow using AWS Config and AWS Systems Manager and show how it can be deployed at scale and then monitored with Security Hub across the entire organization. In this workshop, you will learn how you can set up a continuous collection process that not only establishes controls to help meet the requirements of compliance but also automates the process of collecting evidence to avoid the time-consuming manual effort to prepare for audits.

GRC372: How to implement governance on AWS with ServiceNow
Many AWS customers use IT service management (ITSM) solutions such as ServiceNow to implement governance and compliance and manage security incidents. In this workshop, learn how to use AWS services such as AWS Service Catalog, AWS Config, AWS Systems Manager, and AWS Security Hub on the ServiceNow service portal. Learn how AWS services align to service management standards by integrating AWS capabilities through ITSM process integration with ServiceNow. Design and implement a curated provisioning strategy, along with incident management and resource transparency/compliance, by using the AWS Service Management Connector for ServiceNow.

GRC471: Building guardrails to meet your custom control requirements
In this session, you will experience the process of identifying, designing, and implementing security configurations, as well as detective and preventive guardrails, to meet custom control requirements. You will use a pre-built environment, read a customer scenario to identify specific control needs, and then learn how to design and implement the custom controls.

If any of these sessions look interesting to you, consider joining us in Boston by registering for re:Inforce 2022. We look forward to seeing you there!

Greg Eppel

Greg is the Tech Leader for Cloud Operations and is responsible for the global direction of an internal community of hundreds of AWS experts who are focused on the operational capabilities of AWS. Prior to joining AWS in 2016, he was the CTO of a company that provided SaaS solutions to the sports, media, and entertainment industry. He is a Canadian originally from Vancouver, and he currently resides in the DC metro area with his family.

Author

Alexis Robinson

Alexis is the Head of the US Government Security and Compliance Program for AWS. For over 10 years, she has served federal government clients by advising them on security best practices and conducting cyber and financial assessments. She currently supports the security of the AWS internal environment, including cloud services applicable to AWS US East/West and AWS GovCloud (US) Regions.