All posts by John Jackson

Introducing Amazon MWAA Serverless

Post Syndicated from John Jackson original https://aws.amazon.com/blogs/big-data/introducing-amazon-mwaa-serverless/

Today, AWS announced Amazon Managed Workflows for Apache Airflow (MWAA) Serverless. This is a new deployment option for MWAA that eliminates the operational overhead of managing Apache Airflow environments while optimizing costs through serverless scaling. This new offering addresses key challenges that data engineers and DevOps teams face when orchestrating workflows: operational scalability, cost optimization, and access management.

With MWAA Serverless you can focus on your workflow logic rather than monitoring for provisioned capacity. You can now submit your Airflow workflows for execution on a schedule or on demand, paying only for the actual compute time used during each task’s execution. The service automatically handles all infrastructure scaling so that your workflows run efficiently regardless of load.

Beyond simplified operations, MWAA Serverless introduces an updated security model for granular control through AWS Identity and Access Management (IAM). Each workflow can now have its own IAM permissions, running on a VPC of your choosing so you can implement precise security controls without creating separate Airflow environments. This approach significantly reduces security management overhead while strengthening your security posture.

In this post, we demonstrate how to use MWAA Serverless to build and deploy scalable workflow automation solutions. We walk through practical examples of creating and deploying workflows, setting up observability through Amazon CloudWatch, and converting existing Apache Airflow DAGs (Directed Acyclic Graphs) to the serverless format. We also explore best practices for managing serverless workflows and show you how to implement monitoring and logging.

How does MWAA Serverless work?

MWAA Serverless processes your workflow definitions and executes them efficiently in service-managed Airflow environments, automatically scaling resources based on workflow demands. MWAA Serverless uses the Amazon Elastic Container Service (Amazon ECS) executor to run each individual task on its own ECS Fargate container, on either your VPC or a service-managed VPC. Those containers then communicate back to their assigned Airflow cluster using the Airflow 3 Task API.


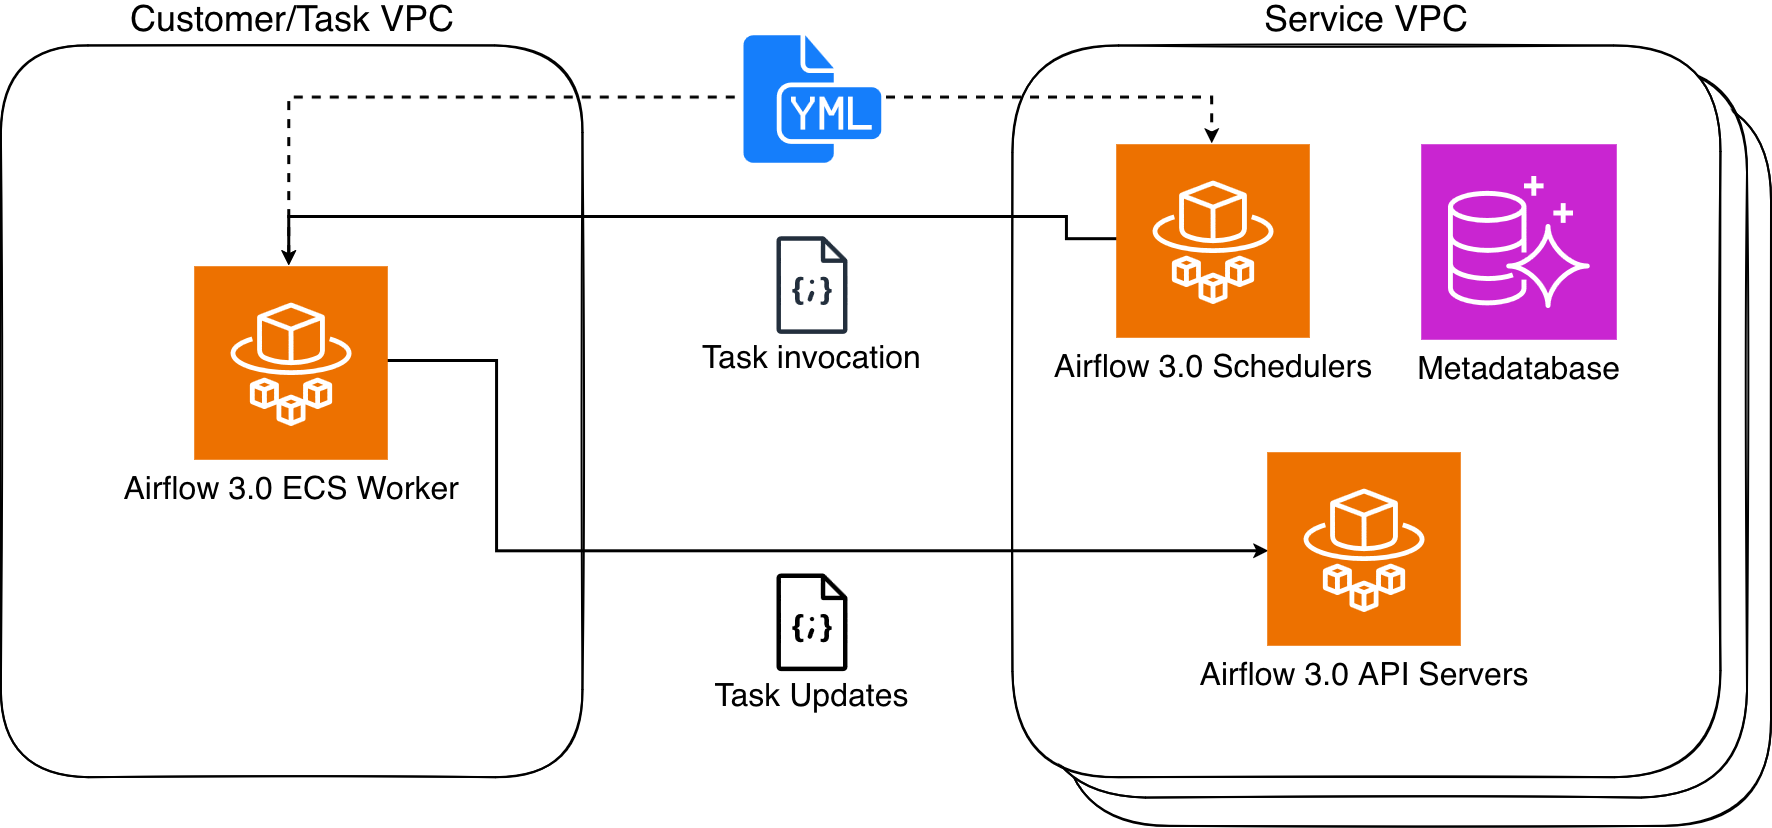
Figure 1: Amazon MWAA Architecture

MWAA Serverless uses declarative YAML configuration files based on the popular open source DAG Factory format to enhance security through task isolation. You have two options for creating these workflow definitions:

This declarative approach provides two key benefits. First, since MWAA Serverless reads workflow definitions from YAML it can determine task scheduling without running any workflow code. Second, this allows MWAA Serverless to grant execution permissions only when tasks run, rather than requiring broad permissions at the workflow level. The result is a more secure environment where task permissions are precisely scoped and time limited.

Service considerations for MWAA Serverless

MWAA Serverless has the following limitations that you should consider when deciding between serverless and provisioned MWAA deployments:

  • Operator support
    • MWAA Serverless only supports operators from the Amazon Provider Package.
    • To execute custom code or scripts, you’ll need to use AWS services, such as:
  • User interface
    • MWAA Serverless operates without using the Airflow web interface.
    • For workflow monitoring and management, we provide integration with Amazon CloudWatch and AWS CloudTrail.

Working with MWAA Serverless

Complete the following prerequisites and steps to use MWAA Serverless.

Prerequisites

Before you begin, verify you have the following requirements in place:

  • Access and permissions
    • An AWS account
    • AWS Command Line Interface (AWS CLI) version 2.31.38 or later installed and configured
    • The appropriate permissions to create and modify IAM roles and policies, including the following required IAM permissions:
      • airflow-serverless:CreateWorkflow
      • airflow-serverless:DeleteWorkflow
      • airflow-serverless:GetTaskInstance
      • airflow-serverless:GetWorkflowRun
      • airflow-serverless:ListTaskInstances
      • airflow-serverless:ListWorkflowRuns
      • airflow-serverless:ListWorkflows
      • airflow-serverless:StartWorkflowRun
      • airflow-serverless:UpdateWorkflow
      • iam:CreateRole
      • iam:DeleteRole
      • iam:DeleteRolePolicy
      • iam:GetRole
      • iam:PutRolePolicy
      • iam:UpdateAssumeRolePolicy
      • logs:CreateLogGroup
      • logs:CreateLogStream
      • logs:PutLogEvents
      • airflow:GetEnvironment
      • airflow:ListEnvironments
      • s3:DeleteObject
      • s3:GetObject
      • s3:ListBucket
      • s3:PutObject
      • s3:Sync
    • Access to an Amazon Virtual Private Cloud (VPC) with internet connectivity
  • Required AWS services – In addition to MWAA Serverless you will need access to the following AWS services:
    • Amazon MWAA to access your existing Airflow environment(s)
    • Amazon CloudWatch to view logs
    • Amazon S3 for DAG and YAML file management
    • AWS IAM to control permissions
  • Development environment
  • Additional requirements
    • Basic familiarity with Apache Airflow concepts
    • Understanding of YAML syntax
    • Knowledge of AWS CLI commands

Note: Throughout this post, we use example values that you’ll need to replace with your own:

  • Replace amzn-s3-demo-bucket with your S3 bucket name
  • Replace 111122223333 with your AWS account number
  • Replace us-east-2 with your AWS Region. MWAA Serverless is available in multiple AWS Regions. Check the List of AWS Services Available by Region for current availability.

Creating your first serverless workflow

Let’s start by defining a simple workflow that gets a list of S3 objects and writes that list to a file in the same bucket. Create a new file called simple_s3_test.yaml with the following content:

simples3test:
  dag_id: simples3test
  schedule: 0 0 * * *
  tasks:
    list_objects:
      operator: airflow.providers.amazon.aws.operators.s3.S3ListOperator
      bucket: 'amzn-s3-demo-bucket'
      prefix: ''
      retries: 0
    create_object_list:
      operator: airflow.providers.amazon.aws.operators.s3.S3CreateObjectOperator
      data: '{{ ti.xcom_pull(task_ids="list_objects", key="return_value") }}'
      s3_bucket: 'amzn-s3-demo-bucket'
      s3_key: 'filelist.txt'
      dependencies: [list_objects]

For this workflow to run, you must create an Execution role that has permissions to list and write to the above bucket. The role also needs to be assumable from MWAA Serverless. The following CLI commands create this role and its associated policy:

aws iam create-role \
--role-name mwaa-serverless-access-role \
--assume-role-policy-document '{
    "Version": "2012-10-17",
    "Statement": [
      {
        "Effect": "Allow",
        "Principal": {
          "Service": [
            "airflow-serverless.amazonaws.com"
          ]
        },
        "Action": "sts:AssumeRole"
      },
      {
        "Sid": "AllowAirflowServerlessAssumeRole",
        "Effect": "Allow",
        "Principal": {
          "Service": "airflow-serverless.amazonaws.com"
        },
        "Action": "sts:AssumeRole",
        "Condition": {
          "StringEquals": {
            "aws:SourceAccount": "${aws:PrincipalAccount}"
          },
          "ArnLike": {
            "aws:SourceArn": "arn:aws:*:*:${aws:PrincipalAccount}:workflow/*"
          }
        }
      }
    ]
  }'

aws iam put-role-policy \
  --role-name mwaa-serverless-access-role \
  --policy-name mwaa-serverless-policy   \
  --policy-document '{
	"Version": "2012-10-17",
	"Statement": [
		{
			"Sid": "CloudWatchLogsAccess",
			"Effect": "Allow",
			"Action": [
				"logs:CreateLogGroup",
				"logs:CreateLogStream",
				"logs:PutLogEvents"
			],
			"Resource": "*"
		},
		{
			"Sid": "S3DataAccess",
			"Effect": "Allow",
			"Action": [
				"s3:ListBucket",
				"s3:GetObject",
				"s3:PutObject"
			],
			"Resource": [
				"arn:aws:s3:::amzn-s3-demo-bucket",
				"arn:aws:s3:::amzn-s3-demo-bucket/*"
			]
		}
	]
}'

You then copy your YAML DAG to the same S3 bucket, and create your workflow based upon the Arn response from the above function.

aws s3 cp "simple_s3_test.yaml" \
s3://amzn-s3-demo-bucket/yaml/simple_s3_test.yaml

aws mwaa-serverless create-workflow \
--name simple_s3_test \
--definition-s3-location '{ "Bucket": "amzn-s3-demo-bucket", "ObjectKey": "yaml/simple_s3_test.yaml" }' \
--role-arn arn:aws:iam::111122223333:role/mwaa-serverless-access-role \
--region us-east-2

The output of the last command returns a WorkflowARN value, which you then use to run the workflow:

aws mwaa-serverless start-workflow-run \
--workflow-arn arn:aws:airflow-serverless:us-east-2:111122223333:workflow/simple_s3_test-abc1234def \
--region us-east-2

The output returns a RunId value, which you then use to check the status of the workflow run that you just executed.

aws mwaa-serverless get-workflow-run \
--workflow-arn arn:aws:airflow-serverless:us-east-2:111122223333:workflow/simple_s3_test-abc1234def \
--run-id ABC123456789def \
--region us-east-2

If you need to make a change to your YAML, you can copy back to S3 and run the update-workflow command.

aws s3 cp "simple_s3_test.yaml" \
s3://amzn-s3-demo-bucket/yaml/simple_s3_test.yaml

aws mwaa-serverless update-workflow \
--workflow-arn arn:aws:airflow-serverless:us-east-2:111122223333:workflow/simple_s3_test-abc1234def \
--definition-s3-location '{ "Bucket": "amzn-s3-demo-bucket", "ObjectKey": "yaml/simple_s3_test.yaml" }' \
--role-arn arn:aws:iam::111122223333:role/mwaa-serverless-access-role \
--region us-east-2

Converting Python DAGs to YAML format

AWS has published a conversion tool that uses the open-source Airflow DAG processor to serialize Python DAGs into YAML DAG factory format. To install, you run the following:

pip3 install python-to-yaml-dag-converter-mwaa-serverless
dag-converter convert source_dag.py --output output_yaml_folder

For example, create the following DAG and name it create_s3_objects.py:

from datetime import datetime
from airflow import DAG
from airflow.models.param import Param
from airflow.providers.amazon.aws.operators.s3 import S3CreateObjectOperator

default_args = {
    'start_date': datetime(2024, 1, 1),
    'retries': 0,
}

dag = DAG(
    'create_s3_objects',
    default_args=default_args,
    description='Create multiple S3 objects in a loop',
    schedule=None
)

# Set number of files to create
LOOP_COUNT = 3
s3_bucket = 'md-workflows-mwaa-bucket'
s3_prefix = 'test-files'

# Create multiple S3 objects using loop
last_task=None
for i in range(1, LOOP_COUNT + 1):  
    create_object = S3CreateObjectOperator(
        task_id=f'create_object_{i}',
        s3_bucket=s3_bucket,
        s3_key=f'{s3_prefix}/{i}.txt',
        data='{{ ds_nodash }}-{{ ts_nodash | lower }}',
        replace=True,
        dag=dag
    )
    if last_task:
        last_task >> create_object
    last_task = create_object

Once you have installed python-to-yaml-dag-converter-mwaa-serverless, you run:

dag-converter convert "/path_to/create_s3_objects.py" --output "/path_to/yaml/"

Where the output will end with:

YAML validation successful, no errors found

YAML written to /path_to/yaml/create_s3_objects.yaml

And resulting YAML will look like:

create_s3_objects:
  dag_id: create_s3_objects
  params: {}
  default_args:
    start_date: '2024-01-01'
    retries: 0
  schedule: None
  tasks:
    create_object_1:
      operator: airflow.providers.amazon.aws.operators.s3.S3CreateObjectOperator
      aws_conn_id: aws_default
      data: '{{ ds_nodash }}-{{ ts_nodash | lower }}'
      encrypt: false
      outlets: []
      params: {}
      priority_weight: 1
      replace: true
      retries: 0
      retry_delay: 300.0
      retry_exponential_backoff: false
      s3_bucket: md-workflows-mwaa-bucket
      s3_key: test-files/1.txt
      task_id: create_object_1
      trigger_rule: all_success
      wait_for_downstream: false
      dependencies: []
    create_object_2:
      operator: airflow.providers.amazon.aws.operators.s3.S3CreateObjectOperator
      aws_conn_id: aws_default
      data: '{{ ds_nodash }}-{{ ts_nodash | lower }}'
      encrypt: false
      outlets: []
      params: {}
      priority_weight: 1
      replace: true
      retries: 0
      retry_delay: 300.0
      retry_exponential_backoff: false
      s3_bucket: md-workflows-mwaa-bucket
      s3_key: test-files/2.txt
      task_id: create_object_2
      trigger_rule: all_success
      wait_for_downstream: false
      dependencies: [create_object_1]
    create_object_3:
      operator: airflow.providers.amazon.aws.operators.s3.S3CreateObjectOperator
      aws_conn_id: aws_default
      data: '{{ ds_nodash }}-{{ ts_nodash | lower }}'
      encrypt: false
      outlets: []
      params: {}
      priority_weight: 1
      replace: true
      retries: 0
      retry_delay: 300.0
      retry_exponential_backoff: false
      s3_bucket: md-workflows-mwaa-bucket
      s3_key: test-files/3.txt
      task_id: create_object_3
      trigger_rule: all_success
      wait_for_downstream: false
      dependencies: [create_object_2]
  catchup: false
  description: Create multiple S3 objects in a loop
  max_active_runs: 16
  max_active_tasks: 16
  max_consecutive_failed_dag_runs: 0

Note that, because the YAML conversion is done after the DAG parsing, the loop that creates the tasks is run first and the resulting static list of tasks is written to the YAML document with their dependencies.

Migrating an MWAA environment’s DAGs to MWAA Serverless

You can take advantage of a provisioned MWAA environment to develop and test your workflows and then move them to serverless to run efficiently at scale. Further, if your MWAA environment is using compatible MWAA Serverless operators, then you can convert all of the environment’s DAGs at once. The first step is to allow MWAA Serverless to assume the MWAA Execution role via a trust relationship. This is a one-time operation for each MWAA Execution role, and can be performed manually in the IAM console or using an AWS CLI command as follows:

MWAA_ENVIRONMENT_NAME="MyAirflowEnvironment"
MWAA_REGION=us-east-2

MWAA_EXECUTION_ROLE_ARN=$(aws mwaa get-environment --region $MWAA_REGION --name $MWAA_ENVIRONMENT_NAME --query 'Environment.ExecutionRoleArn' --output text )
MWAA_EXECUTION_ROLE_NAME=$(echo $MWAA_EXECUTION_ROLE_ARN | xargs basename) 
MWAA_EXECUTION_ROLE_POLICY=$(aws iam get-role --role-name $MWAA_EXECUTION_ROLE_NAME --query 'Role.AssumeRolePolicyDocument' --output json | jq '.Statement[0].Principal.Service += ["airflow-serverless.amazonaws.com"] | .Statement[0].Principal.Service |= unique | .Statement += [{"Sid": "AllowAirflowServerlessAssumeRole", "Effect": "Allow", "Principal": {"Service": "airflow-serverless.amazonaws.com"}, "Action": "sts:AssumeRole", "Condition": {"StringEquals": {"aws:SourceAccount": "${aws:PrincipalAccount}"}, "ArnLike": {"aws:SourceArn": "arn:aws:*:*:${aws:PrincipalAccount}:workflow/*"}}}]')

aws iam update-assume-role-policy --role-name $MWAA_EXECUTION_ROLE_NAME --policy-document "$MWAA_EXECUTION_ROLE_POLICY"

Now we can loop through each successfully converted DAG and create serverless workflows for each.

S3_BUCKET=$(aws mwaa get-environment --name $MWAA_ENVIRONMENT_NAME --query 'Environment.SourceBucketArn' --output text --region us-east-2 | cut -d':' -f6)

for file in /tmp/yaml/*.yaml; do MWAA_WORKFLOW_NAME=$(basename "$file" .yaml); \
      aws s3 cp "$file" s3://$S3_BUCKET/yaml/$MWAA_WORKFLOW_NAME.yaml --region us-east-2; \
      aws mwaa-serverless create-workflow --name $MWAA_WORKFLOW_NAME \
      --definition-s3-location "{\"Bucket\": \"$S3_BUCKET\", \"ObjectKey\": \"yaml/$MWAA_WORKFLOW_NAME.yaml\"}" --role-arn $MWAA_EXECUTION_ROLE_ARN  \
      --region us-east-2  
      done

To see a list of your created workflows, run:

aws mwaa-serverless list-workflows --region us-east-2

Monitoring and observability

MWAA Serverless workflow execution status is returned via the GetWorkflowRun function. The results from that will return details for that particular run. If there are errors in the workflow definition, they are returned under RunDetail in the ErrorMessage field as in the following example:

{
  "WorkflowVersion": "7bcd36ce4d42f5cf23bfee67a0f816c6",
  "RunId": "d58cxqdClpTVjeN",
  "RunType": "SCHEDULE",
  "RunDetail": {
    "ModifiedAt": "2025-11-03T08:02:47.625851+00:00",
    "ErrorMessage": "expected token ',', got 'create_test_table'",
    "TaskInstances": [],
    "RunState": "FAILED"
  }
}

Workflows that are properly defined, but whose tasks fail, will return "ErrorMessage": "Workflow execution failed":

{
  "WorkflowVersion": "0ad517eb5e33deca45a2514c0569079d",
  "RunId": "ABC123456789def",
  "RunType": "SCHEDULE",
  "RunDetail": {
    "StartedOn": "2025-11-03T13:12:09.904466+00:00",
    "CompletedOn": "2025-11-03T13:13:57.620605+00:00",
    "ModifiedAt": "2025-11-03T13:16:08.888182+00:00",
    "Duration": 107,
    "ErrorMessage": "Workflow execution failed",
    "TaskInstances": [
      "ex_5496697b-900d-4008-8d6f-5e43767d6e36_create_bucket_1"
    ],
    "RunState": "FAILED"
  },
}

MWAA Serverless task logs are stored in the CloudWatch log group /aws/mwaa-serverless/<workflow id>/ (where /<workflow id> is the same string as the unique workflow id in the ARN of the workflow). For specific task log streams, you will need to list the tasks for the workflow run and then get each task’s information. You can combine these operations into a single CLI command.

aws mwaa-serverless list-task-instances \
  --workflow-arn arn:aws:airflow-serverless:us-east-2:111122223333:workflow/simple_s3_test-abc1234def \
  --run-id ABC123456789def \
  --region us-east-2 \
  --query 'TaskInstances[].TaskInstanceId' \
  --output text | xargs -n 1 -I {} aws mwaa-serverless get-task-instance \
  --workflow-arn arn:aws:airflow-serverless:us-east-2:111122223333:workflow/simple_s3_test-abc1234def \
  --run-id ABC123456789def \
  --task-instance-id {} \
  --region us-east-2 \
  --query '{Status: Status, StartedAt: StartedAt, LogStream: LogStream}'

Which would result in the following:

{
    "Status": "SUCCESS",
    "StartedAt": "2025-10-28T21:21:31.753447+00:00",
    "LogStream": "//aws/mwaa-serverless/simple_s3_test_3-abc1234def//workflow_id=simple_s3_test-abc1234def/run_id=ABC123456789def/task_id=list_objects/attempt=1.log"
}
{
    "Status": "FAILED",
    "StartedAt": "2025-10-28T21:23:13.446256+00:00",
    "LogStream": "//aws/mwaa-serverless/simple_s3_test_3-abc1234def//workflow_id=simple_s3_test-abc1234def/run_id=ABC123456789def/task_id=create_object_list/attempt=1.log"
}

At which point, you would use the CloudWatch LogStream output to debug your workflow.

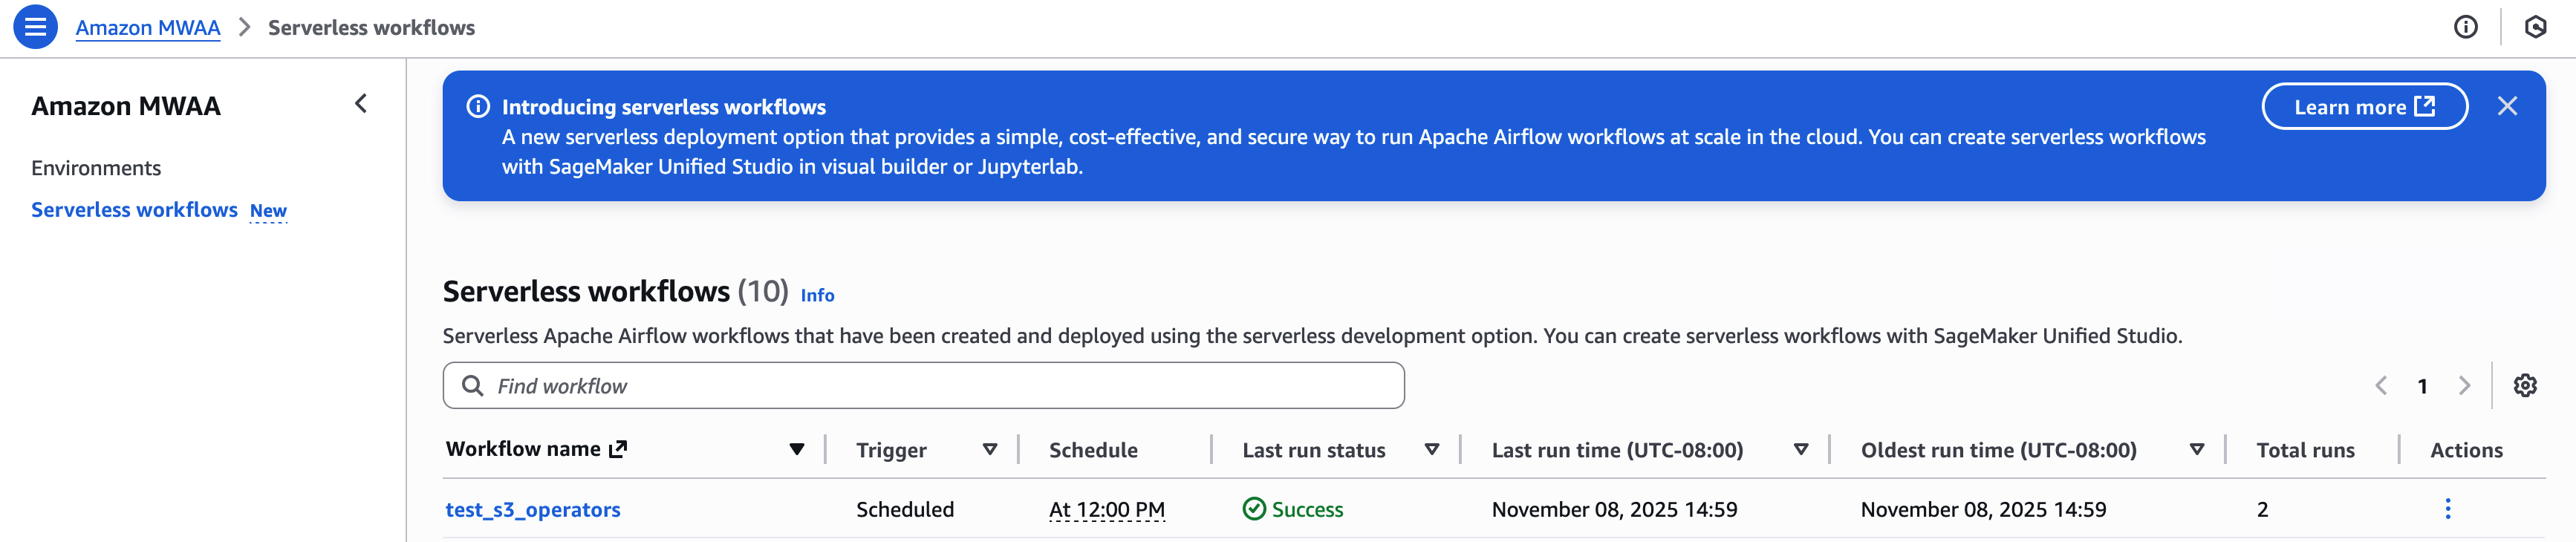
You may view and manage your workflows in the Amazon MWAA Serverless console:

For an example that creates detailed metrics and monitoring dashboard using AWS Lambda, Amazon CloudWatch, Amazon DynamoDB, and Amazon EventBridge, review the example in this GitHub repository.

Clean up resources

To avoid incurring ongoing charges, follow these steps to clean up all resources created during this tutorial:

  1. Delete MWAA Serverless workflows – Run this AWS CLI command to delete all workflows:
    aws mwaa-serverless list-workflows --query 'Workflows[*].WorkflowArn' --output text | while read -r workflow; do aws mwaa-serverless delete-workflow --workflow-arn $workflow done

  2. Remove the IAM roles and policies created for this tutorial:
    aws iam delete-role-policy --role-name mwaa-serverless-access-role --policy-name mwaa-serverless-policy

  3. Remove the YAML workflow definitions from your S3 bucket:
    aws s3 rm s3://amzn-s3-demo-bucket/yaml/ --recursive

After completing these steps, verify in the AWS Management Console that all resources have been properly removed. Remember that CloudWatch Logs are retained by default and may need to be deleted separately if you want to remove all traces of your workflow executions.

If you encounter any errors during cleanup, verify you have the necessary permissions and that resources exist before attempting to delete them. Some resources may have dependencies that require them to be deleted in a specific order.

Conclusion

In this post, we explored Amazon MWAA Serverless, a new deployment option that simplifies Apache Airflow workflow management. We demonstrated how to create workflows using YAML definitions, convert existing Python DAGs to the serverless format, and monitor your workflows.

MWAA Serverless offers several key advantages:

  • No provisioning overhead
  • Pay-per-use pricing model
  • Automatic scaling based on workflow demands
  • Enhanced security through granular IAM permissions
  • Simplified workflow definitions using YAML

To learn more MWAA Serverless, review the documentation.


About the authors

John Jackson

John Jackson

John has over 25 years of software experience as a developer, systems architect, and product manager in both startups and large corporations and is the AWS Principal Product Manager responsible for Amazon MWAA.

Introducing shared VPC support on Amazon MWAA

Post Syndicated from John Jackson original https://aws.amazon.com/blogs/big-data/introducing-shared-vpc-support-on-amazon-mwaa/

In this post, we demonstrate automating deployment of Amazon Managed Workflows for Apache Airflow (Amazon MWAA) using customer-managed endpoints in a VPC, providing compatibility with shared, or otherwise restricted, VPCs.

Data scientists and engineers have made Apache Airflow a leading open source tool to create data pipelines due to its active open source community, familiar Python development as Directed Acyclic Graph (DAG) workflows, and extensive library of pre-built integrations. Amazon MWAA is a managed service for Airflow that makes it easy to run Airflow on AWS without the operational burden of having to manage the underlying infrastructure. For each Airflow environment, Amazon MWAA creates a single-tenant service VPC, which hosts the metadatabase that stores states and the web server that provides the user interface. Amazon MWAA further manages Airflow scheduler and worker instances in a customer-owned and managed VPC, in order to schedule and run tasks that interact with customer resources. Those Airflow containers in the customer VPC access resources in the service VPC via a VPC endpoint.

Many organizations choose to centrally manage their VPC using AWS Organizations, allowing a VPC in an owner account to be shared with resources in a different participant account. However, because creating a new route outside of a VPC is considered a privileged operation, participant accounts can’t create endpoints in owner VPCs. Furthermore, many customers don’t want to extend the security privileges required to create VPC endpoints to all users provisioning Amazon MWAA environments. In addition to VPC endpoints, customers also wish to restrict data egress via Amazon Simple Queue Service (Amazon SQS) queues, and Amazon SQS access is a requirement in the Amazon MWAA architecture.

Shared VPC support for Amazon MWAA adds the ability for you to manage your own endpoints within your VPCs, adding compatibility to shared and otherwise restricted VPCs. Specifying customer-managed endpoints also provides the ability to meet strict security policies by explicitly restricting VPC resource access to just those needed by your Amazon MWAA environments. This post demonstrates how customer-managed endpoints work with Amazon MWAA and provides examples of how to automate the provisioning of those endpoints.

Solution overview

Shared VPC support for Amazon MWAA allows multiple AWS accounts to create their Airflow environments into shared, centrally managed VPCs. The account that owns the VPC (owner) shares the two private subnets required by Amazon MWAA with other accounts (participants) that belong to the same organization from AWS Organizations. After the subnets are shared, the participants can view, create, modify, and delete Amazon MWAA environments in the subnets shared with them.

When users specify the need for a shared, or otherwise policy-restricted, VPC during environment creation, Amazon MWAA will first create the service VPC resources, then enter a pending state for up to 72 hours, with an Amazon EventBridge notification of the change in state. This allows owners to create the required endpoints on behalf of participants based on endpoint service information from the Amazon MWAA console or API, or programmatically via an AWS Lambda function and EventBridge rule, as in the example in this post.

After those endpoints are created on the owner account, the endpoint service in the single-tenant Amazon MWAA VPC will detect the endpoint connection event and resume environment creation. Should there be an issue, you can cancel environment creation by deleting the environment during this pending state.

This feature also allows you to remove the create, modify, and delete VPCE privileges from the AWS Identity and Access Management (IAM) principal creating Amazon MWAA environments, even when not using a shared VPC, because that permission will instead be imposed on the IAM principal creating the endpoint (the Lambda function in our example). Furthermore, the Amazon MWAA environment will provide the SQS queue Amazon Resource Name (ARN) used by the Airflow Celery Executor to queue tasks (the Celery Executor Queue), allowing you to explicitly enter those resources into your network policy rather than having to provide a more open and generalized permission.

In this example, we create the VPC and Amazon MWAA environment in the same account. For shared VPCs across accounts, the EventBridge rule and Lambda function would exist in the owner account, and the Amazon MWAA environment would be created in the participant account. See Sending and receiving Amazon EventBridge events between AWS accounts for more information.

Prerequisites

You should have the following prerequisites:

  • An AWS account
  • An AWS user in that account, with permissions to create VPCs, VPC endpoints, and Amazon MWAA environments
  • An Amazon Simple Storage Service (Amazon S3) bucket in that account, with a folder called dags

Create the VPC

We begin by creating a restrictive VPC using an AWS CloudFormation template, in order to simulate creating the necessary VPC endpoint and modifying the SQS endpoint policy. If you want to use an existing VPC, you can proceed to the next section.

  1. On the AWS CloudFormation console, choose Create stack and choose With new resources (standard).
  2. Under Specify template, choose Upload a template file.
  3. Now we edit our CloudFormation template to restrict access to Amazon SQS. In cfn-vpc-private-bjs.yml, edit the SqsVpcEndoint section to appear as follows:
   SqsVpcEndoint:
     Type: AWS::EC2::VPCEndpoint
     Properties:
       ServiceName: !Sub "com.amazonaws.${AWS::Region}.sqs"
       VpcEndpointType: Interface
       VpcId: !Ref VPC
       PrivateDnsEnabled: true
       SubnetIds:
        - !Ref PrivateSubnet1
        - !Ref PrivateSubnet2
       SecurityGroupIds:
        - !Ref SecurityGroup
       PolicyDocument:
        Statement:
         - Effect: Allow
           Principal: '*'
           Action: '*'
           Resource: []

This additional policy document entry prevents Amazon SQS egress to any resource not explicitly listed.

Now we can create our CloudFormation stack.

  1. On the AWS CloudFormation console, choose Create stack.
  2. Select Upload a template file.
  3. Choose Choose file.
  4. Browse to the file you modified.
  5. Choose Next.
  6. For Stack name, enter MWAA-Environment-VPC.
  7. Choose Next until you reach the review page.
  8. Choose Submit.

Create the Lambda function

We have two options for self-managing our endpoints: manual and automated. In this example, we create a Lambda function that responds to the Amazon MWAA EventBridge notification. You could also use the EventBridge notification to send an Amazon Simple Notification Service (Amazon SNS) message, such as an email, to someone with permission to create the VPC endpoint manually.

First, we create a Lambda function to respond to the EventBridge event that Amazon MWAA will emit.

  1. On the Lambda console, choose Create function.
  2. For Name, enter mwaa-create-lambda.
  3. For Runtime, choose Python 3.11.
  4. Choose Create function.
  5. For Code, in the Code source section, for lambda_function, enter the following code:
    import boto3
    import json
    import logging
    
    logger = logging.getLogger()
    logger.setLevel(logging.INFO)
    
    def lambda_handler(event, context):
        if event['detail']['status']=="PENDING":
            detail=event['detail']
            name=detail['name']
            celeryExecutorQueue=detail['celeryExecutorQueue']
            subnetIds=detail['networkConfiguration']['subnetIds']
            securityGroupIds=detail['networkConfiguration']['securityGroupIds']
            databaseVpcEndpointService=detail['databaseVpcEndpointService']
    
            # MWAA does not need to store the VPC ID, but we can get it from the subnets
            client = boto3.client('ec2')
            response = client.describe_subnets(SubnetIds=subnetIds)
            logger.info(response['Subnets'][0]['VpcId'])  
            vpcId=response['Subnets'][0]['VpcId']
            logger.info("vpcId: " + vpcId)       
            
            webserverVpcEndpointService=None
            if detail['webserverAccessMode']=="PRIVATE_ONLY":
                webserverVpcEndpointService=event['detail']['webserverVpcEndpointService']
            
            response = client.describe_vpc_endpoints(
                VpcEndpointIds=[],
                Filters=[
                    {"Name": "vpc-id", "Values": [vpcId]},
                    {"Name": "service-name", "Values": ["*.sqs"]},
                    ],
                MaxResults=1000
            )
            sqsVpcEndpoint=None
            for r in response['VpcEndpoints']:
                if subnetIds[0] in r['SubnetIds'] or subnetIds[0] in r['SubnetIds']:
                    # We are filtering describe by service name, so this must be SQS
                    sqsVpcEndpoint=r
                    break
            
            if sqsVpcEndpoint:
                logger.info("Found SQS endpoint: " + sqsVpcEndpoint['VpcEndpointId'])
    
                logger.info(sqsVpcEndpoint)
                pd = json.loads(sqsVpcEndpoint['PolicyDocument'])
                for s in pd['Statement']:
                    if s['Effect']=='Allow':
                        resource = s['Resource']
                        logger.info(resource)
                        if '*' in resource:
                            logger.info("'*' already allowed")
                        elif celeryExecutorQueue in resource: 
                            logger.info("'"+celeryExecutorQueue+"' already allowed")                
                        else:
                            s['Resource'].append(celeryExecutorQueue)
                            logger.info("Updating SQS policy to " + str(pd))
            
                            client.modify_vpc_endpoint(
                                VpcEndpointId=sqsVpcEndpoint['VpcEndpointId'],
                                PolicyDocument=json.dumps(pd)
                                )
                        break
            
            # create MWAA database endpoint
            logger.info("creating endpoint to " + databaseVpcEndpointService)
            endpointName=name+"-database"
            response = client.create_vpc_endpoint(
                VpcEndpointType='Interface',
                VpcId=vpcId,
                ServiceName=databaseVpcEndpointService,
                SubnetIds=subnetIds,
                SecurityGroupIds=securityGroupIds,
                TagSpecifications=[
                    {
                        "ResourceType": "vpc-endpoint",
                        "Tags": [
                            {
                                "Key": "Name",
                                "Value": endpointName
                            },
                        ]
                    },
                ],           
            )
            logger.info("created VPCE: " + response['VpcEndpoint']['VpcEndpointId'])
                
            # create MWAA web server endpoint (if private)
            if webserverVpcEndpointService:
                endpointName=name+"-webserver"
                logger.info("creating endpoint to " + webserverVpcEndpointService)
                response = client.create_vpc_endpoint(
                    VpcEndpointType='Interface',
                    VpcId=vpcId,
                    ServiceName=webserverVpcEndpointService,
                    SubnetIds=subnetIds,
                    SecurityGroupIds=securityGroupIds,
                    TagSpecifications=[
                        {
                            "ResourceType": "vpc-endpoint",
                            "Tags": [
                                {
                                    "Key": "Name",
                                    "Value": endpointName
                                },
                            ]
                        },
                    ],                  
                )
                logger.info("created VPCE: " + response['VpcEndpoint']['VpcEndpointId'])
    
        return {
            'statusCode': 200,
            'body': json.dumps(event['detail']['status'])
        }

  6. Choose Deploy.
  7. On the Configuration tab of the Lambda function, in the General configuration section, choose Edit.
  8. For Timeout, increate to 5 minutes, 0 seconds.
  9. Choose Save.
  10. In the Permissions section, under Execution role, choose the role name to edit the permissions of this function.
  11. For Permission policies, choose the link under Policy name.
  12. Choose Edit and add a comma and the following statement:
    {
    		"Sid": "Statement1",
    		"Effect": "Allow",
    		"Action": 
    		[
    			"ec2:DescribeVpcEndpoints",
    			"ec2:CreateVpcEndpoint",
    			"ec2:ModifyVpcEndpoint",
                "ec2:DescribeSubnets",
    			"ec2:CreateTags"
    		],
    		"Resource": 
    		[
    			"*"
    		]
    }

The complete policy should look similar to the following:

{
	"Version": "2012-10-17",
	"Statement": [
		{
			"Effect": "Allow",
			"Action": "logs:CreateLogGroup",
			"Resource": "arn:aws:logs:us-east-1:112233445566:*"
		},
		{
			"Effect": "Allow",
			"Action": [
				"logs:CreateLogStream",
				"logs:PutLogEvents"
			],
			"Resource": [
				"arn:aws:logs:us-east-1:112233445566:log-group:/aws/lambda/mwaa-create-lambda:*"
			]
		},
		{
			"Sid": "Statement1",
			"Effect": "Allow",
			"Action": [
				"ec2:DescribeVpcEndpoints",
				"ec2:CreateVpcEndpoint",
				"ec2:ModifyVpcEndpoint",
               	"ec2:DescribeSubnets",
				"ec2:CreateTags"
			],
			"Resource": [
				"*"
			]
		}
	]
}
  1. Choose Next until you reach the review page.
  2. Choose Save changes.

Create an EventBridge rule

Next, we configure EventBridge to send the Amazon MWAA notifications to our Lambda function.

  1. On the EventBridge console, choose Create rule.
  2. For Name, enter mwaa-create.
  3. Select Rule with an event pattern.
  4. Choose Next.
  5. For Creation method, choose User pattern form.
  6. Choose Edit pattern.
  7. For Event pattern, enter the following:
    {
      "source": ["aws.airflow"],
      "detail-type": ["MWAA Environment Status Change"]
    }

  8. Choose Next.
  9. For Select a target, choose Lambda function.

You may also specify an SNS notification in order to receive a message when the environment state changes.

  1. For Function, choose mwaa-create-lambda.
  2. Choose Next until you reach the final section, then choose Create rule.

Create an Amazon MWAA environment

Finally, we create an Amazon MWAA environment with customer-managed endpoints.

  1. On the Amazon MWAA console, choose Create environment.
  2. For Name, enter a unique name for your environment.
  3. For Airflow version, choose the latest Airflow version.
  4. For S3 bucket, choose Browse S3 and choose your S3 bucket, or enter the Amazon S3 URI.
  5. For DAGs folder, choose Browse S3 and choose the dags/ folder in your S3 bucket, or enter the Amazon S3 URI.
  6. Choose Next.
  7. For Virtual Private Cloud, choose the VPC you created earlier.
  8. For Web server access, choose Public network (Internet accessible).
  9. For Security groups, deselect Create new security group.
  10. Choose the shared VPC security group created by the CloudFormation template.

Because the security groups of the AWS PrivateLink endpoints from the earlier step are self-referencing, you must choose the same security group for your Amazon MWAA environment.

  1. For Endpoint management, choose Customer managed endpoints.
  2. Keep the remaining settings as default and choose Next.
  3. Choose Create environment.

When your environment is available, you can access it via the Open Airflow UI link on the Amazon MWAA console.

Clean up

Cleaning up resources that are not actively being used reduces costs and is a best practice. If you don’t delete your resources, you can incur additional charges. To clean up your resources, complete the following steps:

  1. Delete your Amazon MWAA environment, EventBridge rule, and Lambda function.
  2. Delete the VPC endpoints created by the Lambda function.
  3. Delete any security groups created, if applicable.
  4. After the above resources have completed deletion, delete the CloudFormation stack to ensure that you have removed all of the remaining resources.

Summary

This post described how to automate environment creation with shared VPC support in Amazon MWAA. This gives you the ability to manage your own endpoints within your VPC, adding compatibility to shared, or otherwise restricted, VPCs. Specifying customer-managed endpoints also provides the ability to meet strict security policies by explicitly restricting VPC resource access to just those needed by their Amazon MWAA environments. To learn more about Amazon MWAA, refer to the Amazon MWAA User Guide. For more posts about Amazon MWAA, visit the Amazon MWAA resources page.


About the author

John Jackson has over 25 years of software experience as a developer, systems architect, and product manager in both startups and large corporations and is the AWS Principal Product Manager responsible for Amazon MWAA.