All posts by Michaela DeForest

Kubernetes monitoring with Zabbix – Part 3: Extracting Prometheus metrics with Zabbix preprocessing

Post Syndicated from Michaela DeForest original https://blog.zabbix.com/kubernetes-monitoring-with-zabbix-part-3-extracting-prometheus-metrics-with-zabbix-preprocessing/25639/

In the previous Kubernetes monitoring blog post, we explored the functionality provided by the Kubernetes integration in Zabbix and discussed use cases for monitoring and alerting to events in a cluster, such as changes in replicas or CPU pressure.

In the final part of this series on monitoring Kubernetes with Zabbix, we will show how the Kubernetes integration uses Prometheus to parse data from kube-state-metrics and how users can leverage this functionality to monitor the many cloud-native applications that expose Prometheus metrics by default.

Want to see Kubernetes monitoring in action? Watch Part 3 of our Kubernetes monitoring video guide.

Prometheus Data Model

Prometheus is an open-source toolkit for monitoring and alerting created by SoundCloud. Prometheus was the second hosted project to join the Cloud-native Computing Foundation in 2016, after Kubernetes. As such, users of Kubernetes have adopted Prometheus extensively.

Lines in the model begin with or without a pound sign. Lines beginning with a pound sign specify metadata that includes help text and type information. Additional lines follow where the first key is the metric name with optional labels specified, followed by the value, and optionally concluding with a timestamp. If a timestamp is absent, the assumption is that the timestamp is equal to the time of collection.

http_requests_total{job=”nginx”,instance=”10.0.0.1:443”} 15 1677507349983

Using Prometheus with Kubernetes Monitoring

Let’s start with an example from the kube-state-metrics endpoint, installed in the first part of this series. Below is the output for the /metrics endpoint used by the Kubernetes integration, showing the metric kube_job_created. Each metric has help text followed by a line starting with that metric name, labels describing each job, and creation time as the sample value.

# HELP kube_job_created Unix creation timestamp
# TYPE kube_job_created gauge
kube_job_created{namespace="jdoe",job_name="supportreport-supportreport-27956880"} 1.6774128e+09
kube_job_created{namespace="default",job_name="core-backup-data-default-0-27957840"} 1.6774704e+09
kube_job_created{namespace="default",job_name="core-backup-data-default-1-27956280"} 1.6773768e+09
kube_job_created{namespace="jdoe",job_name="activetrials-activetrials-27958380"} 1.6775028e+09
kube_job_created{namespace="default",job_name="core-cache-tags-27900015"} 1.6740009e+09
kube_job_created{namespace="default",job_name="core-cleanup-pipes-27954860"} 1.6772916e+09
kube_job_created{namespace="jdoe",job_name="salesreport-salesreport-27954060"} 1.6772436e+09
kube_job_created{namespace="default",job_name="core-correlation-cron-1671562914"} 1.671562914e+09
kube_job_created{namespace="jtroy",job_name="jtroy-clickhouse-default-0-maintenance-27613440"} 1.6568064e+09
kube_job_created{namespace="default",job_name="core-backup-data-default-0-27956880"} 1.6774128e+09
kube_job_created{namespace="default",job_name="core-cleanup-sessions-27896445"} 1.6737867e+09
kube_job_created{namespace="default",job_name="report-image-findings-report-27937095"} 1.6762257e+09
kube_job_created{namespace="jdoe",job_name="salesreport-salesreport-27933900"} 1.676034e+09
kube_job_created{namespace="default",job_name="core-cache-tags-27899775"} 1.6739865e+09
kube_job_created{namespace="ssmith",job_name="test-auto-merger"} 1.653574763e+09
kube_job_created{namespace="default",job_name="report-image-findings-report-1650569984"} 1.650569984e+09
kube_job_created{namespace="ssmith",job_name="auto-merger-and-mailer-auto-merger-and-mailer-27952200"} 1.677132e+09
kube_job_created{namespace="default",job_name="core-create-pipes-pxc-user"} 1.673279381e+09
kube_job_created{namespace="jdoe",job_name="activetrials-activetrials-1640610000"} 1.640610005e+09
kube_job_created{namespace="jdoe",job_name="salesreport-salesreport-27943980"} 1.6766388e+09
kube_job_created{namespace="default",job_name="core-cache-accounting-map-27958085"} 1.6774851e+09

Zabbix collects data from this endpoint in the “Get state metrics.” The item uses a script item type to get data from the /metrics endpoint. Dependent items that use a Prometheus pattern as a preprocessing step to obtain data relevant to the dependent item are created.

Prometheus and Out-Of-The-Box Templates

Zabbix also offers many templates for applications that expose Prometheus metrics, including etcd. Etcd is a distributed key-value store that uses a simple HTTP interface. Many cloud applications use etcd, including Kubernetes. Following is a description of how to set up an etcd “host” using the built-in etcd template.

A new host is created called “Etcd Application” with an agent interface specified that provides the location of the application API. The interface port does not matter because a macro sets the port. The “Etcd by HTTP” template is attached to the host.

The “Get node metrics” item is the master item that collects Prometheus metrics. Testing this item shows that it returns Prometheus formatted metrics. The master item creates many dependent items that parse the Prometheus metrics. In the dependent item, “Maximum open file descriptors,” the maximum number of open file descriptors is obtained by adding the “Prometheus pattern” preprocessing step. This metric is available with the metric name process_max_fds.

Custom Prometheus Templates


While it is convenient when Zabbix has a template for the application you want to monitor, creating a new template for an application that exposes a /metrics endpoint but does not have an associated template is easy.

One such application is Argo CD. Argo CD is a GitOps continuous delivery tool for Kubernetes. An “application” represents each deployment in Kubernetes. Argo CD uses Git to keep applications in sync.

Argo CD exposes a Prometheus metrics endpoint that we can be used to monitor the application. The Argo CD documentation site includes information about available metrics.

In Argo CD, the metrics service is available at the argocd-metrics service. Following is a demonstration of creating an Argo CD template that collects Prometheus metrics. Install Argo CD in a cluster with a Zabbix proxy installed before starting. To do this, follow the Argo CD “Getting Started” guide.

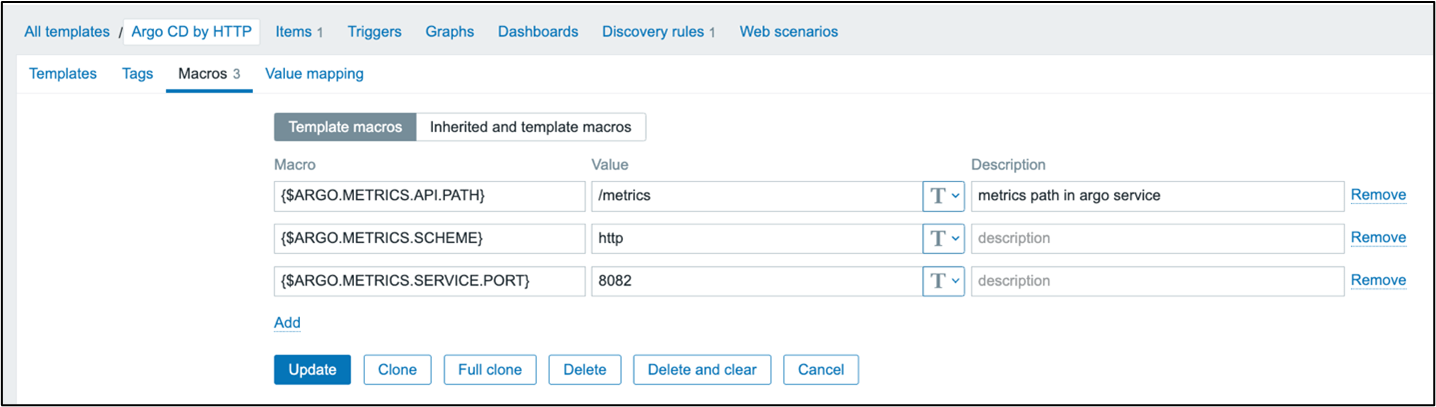
Create a new template called, “Argo CD by HTTP” in the “Templates/Applications” group. Add three macros to the template. Set {$ARGO.METRICS.SERVICE.PORT} to the default of 8082. Set {$ARGO.METRICS.API.PATH} to “/metrics.” Set the last macro, {$ARGO.METRICS.SCHEME} to the default of “http.”

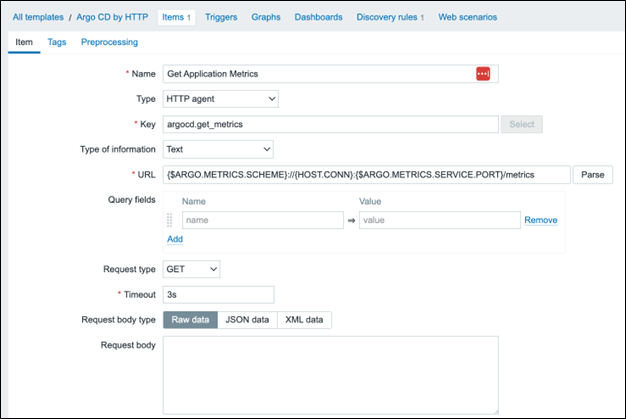
Open the template and click “Items -> Create item.” Name this item “Get Application Metrics” and give it the “HTTP agent” type. Set the key to argocd.get_metrics with a “Text” information type. Set the URL to {$ARGO.METRICS.SCHEME}://{HOST.CONN}:{$ARGO.METRICS.SERVICE.PORT}/metrics. Set the History storage period to “Do not keep history.”

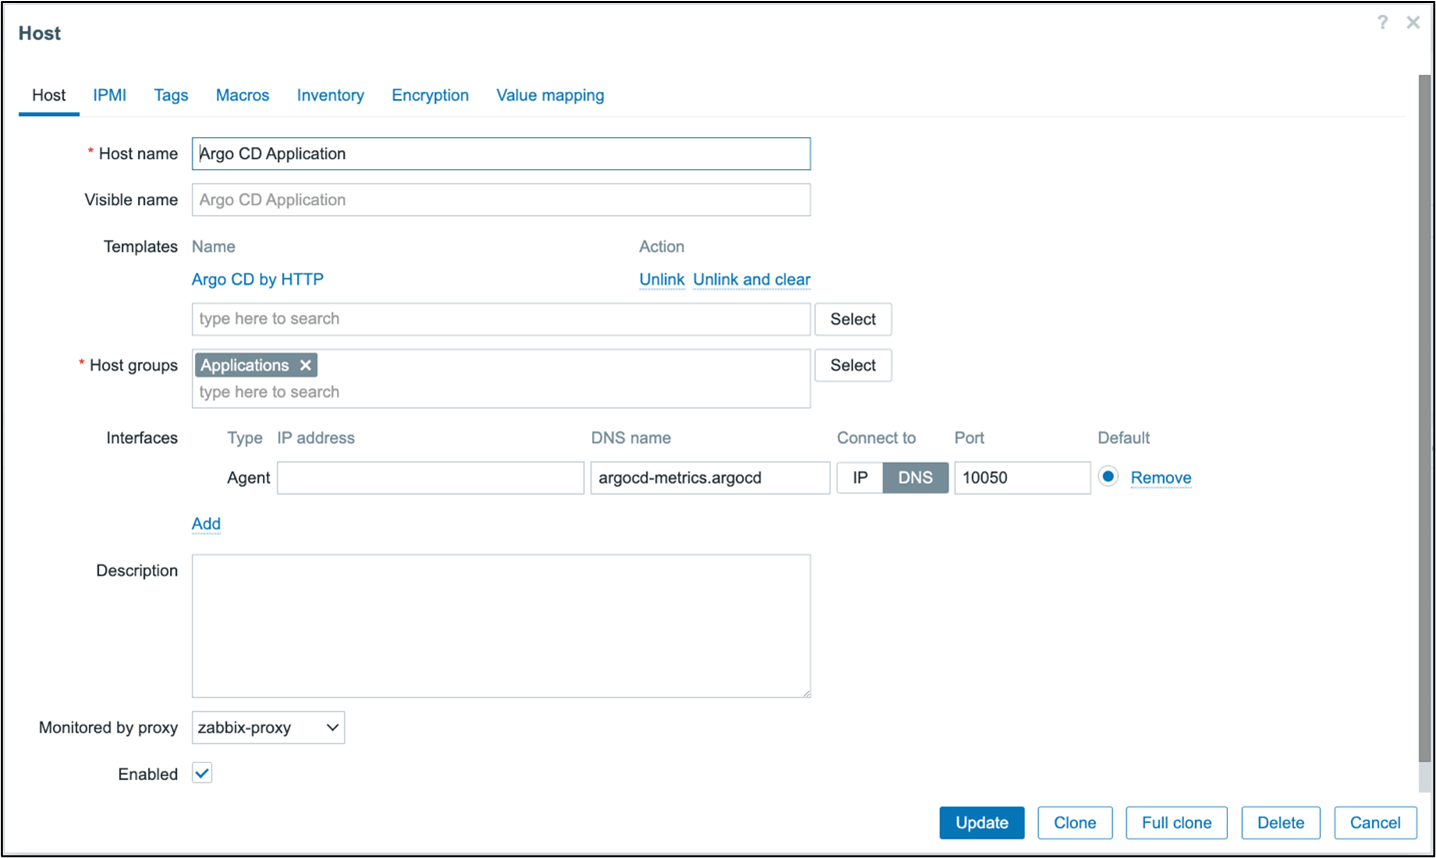
Create a new host to represent Argo. Go to “Hosts -> Create host”. Name the host “Argo CD Application” and assign the newly created template. Define an interface and set the DNS name to the name of the metrics service, including the namespace, if the Argo CD deployment is not in the same namespace as the Zabbix proxy deployment. Connect to DNS and leave the port as the default because the template does not use this value. Like in the etcd template, a macro sets the port. Set the proxy to the proxy located in the cluster. In most cases, the macros do not need to be updated.

Click “Test -> Get value and test” to test the item. Prometheus metrics are returned, including a metric called argocd_app_info. This metric collects the status of the applications in Argo. We can collect all deployed applications with a discovery rule.

Navigate to the Argo CD template and click “Discovery rules -> Create discovery rule.” Call the rule “Discover Applications.” The type should be “Dependent item” because it depends on the metrics collection item. Set the master item to the “Get Application Metrics” item. The key will be argocd.applications.discovery. Go to the preprocessing tab and add a new step called, “Prometheus to JSON.” The preprocessing step will convert the application data to JSON, which will look like the one below.

[{"name":"argocd_app_info","value":"1","line_raw":"argocd_app_info{dest_namespace=\"monitoring\",dest_server=\"https://kubernetes.default.svc\",health_status=\"Healthy\",name=\"guestbook\",namespace=\"argocd\",operation=\"\",project=\"default\",repo=\"https://github.com/argoproj/argocd-example-apps\",sync_status=\"Synced\"} 1","labels":{"dest_namespace":"monitoring","dest_server":"https://kubernetes.default.svc","health_status":"Healthy","name":"guestbook","namespace":"argocd","operation":"","project":"default","repo":"https://github.com/argoproj/argocd-example-apps","sync_status":"Synced"},"type":"gauge","help":"Information about application."}]

Set the parameters to “argocd_app_info” to gather all metrics with that name. Under “LLD Macros”, set three macros. {#NAME} is set to the .labels.name key, {#NAMESPACE} is set to the .labels.dest_namespace key, and {#SERVER} is set to .labels.dest_server.

Let us create some item prototypes. Click “Create item prototype” and name it “{#NAME}: Health Status.” Set it as a dependent item with a key of argocd.applications[{#NAME}].health. The type of information will be “Character.” Set the master item to “Get Application Metrics.”

In preprocessing, add a Prometheus pattern step with parameters argocd_app_info{name=”{#NAME}”}. Use “label” and set the label to health_status. Add a second step to “Discard unchanged with heartbeat” with the heartbeat set to 2h.

Clone the prototype to create another item called “{#NAME}: Sync status.” Change the key to argocd.applications.sync[{#NAME}]. Under “Preprocessing” change the label to sync_status.

Now, when viewing “Latest Data” the sync and health status are available for each discovered application.

Conclusion

We have shown how Zabbix templates, such as the Kubernetes template, and the etcd template utilize Prometheus patterns to extract metric data. We have also created templates for new applications that expose Prometheus data. Because of the adoption of Prometheus in Kubernetes and cloud-native applications, Zabbix benefits by parsing this data so that Zabbix can monitor Kubernetes and cloud-native applications.

I hope you enjoyed this series on monitoring Kubernetes and cloud-native applications with Zabbix. Good luck on your monitoring journey as you learn to monitor with Zabbix in a containerized world.

About the Author

Michaela DeForest is a Platform Engineer for The ATS Group. She is a Zabbix Certified Specialist on Zabbix 6.0 with additional areas of expertise, including Terraform, Amazon Web Services (AWS), Ansible, and Kubernetes, to name a few. As ATS’s resident authority in DevOps, Michaela is critical in delivering cutting-edge solutions that help businesses improve efficiency, reduce errors, and achieve a faster ROI.

About ATS Group:

The ATS Group provides a fully inclusive set of technology services and tools designed to innovate and transform IT. Their systems integration, business resiliency, cloud enablement, infrastructure intelligence, and managed services help businesses of all sizes “get IT done.” With over 20 years in business, ATS has become the trusted advisor to nearly 500 customers across multiple industries. They have built their reputation around honesty, integrity, and technical expertise unrivaled by the competition.

Kubernetes monitoring with Zabbix – Part 2: Understanding the discovered resources

Post Syndicated from Michaela DeForest original https://blog.zabbix.com/kubernetes-monitoring-with-zabbix-part-2-understanding-the-discovered-resources/25476/

In the previous blog post, we installed the Zabbix Agent Helm Chart and set up official Kubernetes templates to monitor a cluster in Zabbix. In this edition, part 2, we will explore the functionality provided by the Kubernetes integration in Zabbix and discuss use cases for monitoring and alerting on events in a cluster. (This post assumes that the Kubernetes integration has been set up in at least one cluster using the helm chart and provided templates.)

Want to see Kubernetes monitoring in action? Watch Part 2 of our Kubernetes monitoring video guide.

Node and Component Discovery

Following integration setup, the templates will discover control plane components, each node, and the kubelet associated with it using the Kubernetes API via a “Script” item type.

Note:

In the last blog post, I showed a managed EKS cluster. Control plane components cannot be discovered in an EKS cluster because AWS does not make them directly available through the API. For the sake of demonstrating the full capabilities of the integration, this post will use screenshots depicting a cluster that was created using the kubeadm utility.

In the latest version of Zabbix (6.2 at the time of writing), control plane components are discovered via node labels added only for clusters created with kubeadm. Depending on your setup, you may be able to add the same node labels to your own control plane nodes or modify the template to use your specific labels.

This example cluster has 4 worker nodes and 1 master node. The control plane runs entirely on the master node.

Zabbix’s “Low-Level Discovery” is the backbone of the Kubernetes integration. Zabbix discovers each node and creates two hosts to represent them in the cluster. The first host attaches the “Linux by Zabbix Agent” template to it, and the second attaches a custom Kubelet template called “Kubernetes Kubelet by HTTP. Zabbix also creates items for most standard objects like pods, deployments, replicasets, job, cronjob, etc.

Node and Kubernetes Performance Metrics

In this example, there are four discovered worker nodes with the “Linux by Zabbix Agent” template attached to them. The template will provide metrics about the machines running in the cluster.

Each worker host’s “System performance” dashboard shows system load, CPU usage, and memory usage metrics.

Zabbix will also collect Kubernetes-specific metrics related to the nodes. “Latest Data” for the Kubernetes Nodes host shows metrics such as the Allocatable CPU available to pods and the node’s memory capacity.

Alerts are generated for events such as the allocation of too much CPU. This could indicate that capacity should be increased, assuming that the memory and CPU limits set on the pod label are accurate.

The Kubernetes integration also monitors object states. As a best practice, any tool used to monitor Kubernetes should be monitoring and alerting critical status changes within the cluster. The image above shows the triggers related to the health of a pod. There are also triggers when certain conditions are detected by the nodes, like memory or CPU pressure.

Zabbix discovers objects like pods, deployments, and Replicasets, and triggers on object states.  For example, pods that are not up or deployments that do not have the correct number of replicas up.

In this example, a cluster is running a Kubernetes dashboard deployment with 3 replicas. By running the following command, we can see that all 3 replicas are up. Under “Latest Data,” Zabbix shows those 3 replicas available out of the 3 desired.

kubectl get deployment kubernetes-dashboard


To mimic a pod crashing, the pod is edited to use an invalid image tag.

kubectl edit pod <pod name>

The image tag is changed to  “invalid.tag, “ which is unavailable for the image. This causes the pod to fail because it can no longer pull the image. Output now shows that one pod is no longer ready.

Looking at the data in Zabbix, the number of available replicas is only 3, while the number of unavailable replicas is now 1.

On the problems page, there are two new problems. Both alerted that there is a mismatch between the number of replicas for the dashboard and the number of desired replicas.

Changing the tag back to a valid one should cause those problems to be resolved.

The Kubernetes templates offer many metrics and triggers, including most provided by Prometheus and Alert Manager. With some Zabbix experience and the ability to navigate kube-state-metrics and Kubernetes APIs, creating new items is possible.

What’s Next?

Above is an example of the output from the kube-state-metrics API. Unlike most APIs that return data in JSON format, the kube-state-metrics API uses the Prometheus data model to supply metrics.

As you get comfortable with Kubernetes monitoring in Zabbix, you may want to parse your own metrics from kube-state-metrics and create new items.

In the next video, we will learn how to monitor applications with Prometheus in Zabbix.

About the Author

Michaela DeForest is a Platform Engineer for The ATS Group.  She is a Zabbix Certified Specialist on Zabbix 6.0 with additional areas of expertise, including Terraform, Amazon Web Services (AWS), Ansible, and Kubernetes, to name a few.  As ATS’s resident authority in DevOps, Michaela is critical in delivering cutting-edge solutions that help businesses improve efficiency, reduce errors, and achieve a faster ROI.

About ATS Group: The ATS Group provides a fully inclusive set of technology services and tools designed to innovate and transform IT.  Their systems integration, business resiliency, cloud enablement, infrastructure intelligence, and managed services help businesses of all sizes “get IT done.” With over 20 years in business, ATS has become the trusted advisor to nearly 500 customers across multiple industries.  They have built their reputation around honesty, integrity, and technical expertise unrivaled by the competition.

Monitoring Kubernetes with Zabbix

Post Syndicated from Michaela DeForest original https://blog.zabbix.com/monitoring-kubernetes-with-zabbix/25055/

There are many options available for monitoring Kubernetes and cloud-native applications. In this multi-part blog series, we’ll explore how to use Zabbix to monitor a Kubernetes cluster and understand the metrics generated within Zabbix. We’ll also learn how to exploit Prometheus endpoints exposed by applications to monitor application-specific metrics.

Want to see Kubernetes monitoring in action? Watch the step-by-step Zabbix Kubernetes monitoring configuration and deployment guide.

Why Choose Zabbix to Monitor Kubernetes?

Before choosing Zabbix as a Kubernetes monitoring tool, we asked ourselves, “why would we choose to use Zabbix rather than Prometheus, Grafana, and alertmanager?” After all, they have become the standard monitoring tools in the cloud ecosystem. We decided that our minimum criteria for Zabbix would be that it was just as effective as Prometheus for monitoring both Kubernetes and cloud-native applications.

Through our discovery process, we concluded that Zabbix meets (and exceeds) this minimum requirement. Zabbix provides similar metrics and triggers as Prometheus, alert manager, and Grafana for Kubernetes, as they both use the same backend tools to do this. However, Zabbix can do this in one product while still maintaining flexibility and allowing you to monitor pretty much anything you can write code to collect. Regarding application monitoring, Zabbix can transform Prometheus metrics fed to it by Prometheus exporters and endpoints. In addition, because Zabbix can make calls to any HTTP endpoint, it can monitor applications that do not have a dedicated Prometheus endpoint, unlike Prometheus.

The Zabbix Helm Chart

Zabbix monitors Kubernetes by collecting metrics exposed via the Kubernetes API and kube-state-metrics. The components necessary to monitor a cluster are installed within the cluster using this helm chart provided by Zabbix. The helm chart includes the Zabbix agent installed as a daemon set and is used to monitor local resources and applications on each node. A Zabbix proxy is also installed to collect monitoring data and transfer it to the external Zabbix server.

Only the Zabbix proxy needs access to the Zabbix server, while the agents can send data to the proxy installed in the same namespace as each agent. A cluster role allows Zabbix to access resources in the cluster via the Kubernetes API. While the cluster role could be modified to restrict privileges given to Zabbix, this will result in some items becoming unsupported. We recommend keeping this the same if you want to get the most out of Kubernetes monitoring with Zabbix.

The Zabbix helm chart installs the kube-state-metrics project as a dependency. You may already be familiar with this project under the Kubernetes organization, which generates Prometheus format metrics based on the current state of the Kubernetes resources. In addition, if you have experience using Prometheus to monitor a cluster, you may already have this installed. If that is the case, you can point to this deployment rather than installing another one.

In this tutorial, we will install kube-state-metrics via the Zabbix helm chart.

For more information on skipping this step, refer to the values file in the Zabbix Kubernetes helm chart.

Installing the Zabbix Helm Chart

Now that we’ve explained how the Zabbix helm chart works, let’s go ahead and install it. In this example, we will assume that you have a running Zabbix 6.0 (or higher) instance that is reachable from the cluster you wish to monitor. I am running a 6.0 instance in a different cluster than the one we want to monitor. The server is reachable via the DNS name mdeforest.zabbix.atsgroup.io with a non-standard port of 31103.

We will start by installing the latest Zabbix helm chart. I recommend visiting zabbix.com/integrations/kubernetes to get any sources that may be referred to in this tutorial. There you will find a link to the Zabbix helm chart and templates. For the most part, we will follow the steps outlined in the readme.


Using a terminal window, I am going to make sure the active cluster is set to the cluster that I want to monitor:

kubectl config use-context <cluster context name>

I’m then going to add the Zabbix chart repo to my local helm repository:

helm repo add zabbix-chart-6.0 https://cdn.zabbix.com/zabbix/integrations/kubernetes-helm/6.0/

If you’re running Zabbix 6.2 or newer, change the references to 6.0 in this command to 6.2.

Depending on your circumstances, you will need to set a few values for the installation. In most cases, you only need to set a few environment variables for the Zabbix agent and the proxy. The complete list of values and environment variables is available in the helm chart repo, alongside the agent and proxy images on Docker Hub.

In this case, I’m setting the passive server environment variable for the agent to allow any IP to connect. For the proxy, I am setting the server host accessible from the proxy alongside the non-standard port. I’ve also set here some variables related to cache size. These variables may depend on your cluster size, so you may need to play around with them to find the correct values.

Now that I have the values file ready, I’m ready to install the chart. So, we’ll use the following command. Of course, the chart path might vary depending on what version of the chart you’re using.

helm install -f </path/to/values/file> [-n <namespace>] zabbix zabbix-chart-6.0/zabbix-helm-chart

You can also optionally add a namespace. You must wait until everything is running, so I’ll check just that with the following:

watch kubectl get pods

Now that everything is installed, we’re ready to set up hosts in Zabbix that will be associated with the cluster. The last step before we have all the information we need is to obtain the token created via the service account installed with the helm chart. We’ll get this by running the next command, which is the name of the service account that was created:

kubectl get secret -o jsonpath={.data.token} zabbix service-account | base64 -d

This will get the secret created for the service account and grab just the token from that, which is passed to the base64 utility to decode it. Be sure to copy that value somewhere because you’ll need it for later.

You’ll also need the Kubernetes API endpoint. In most cases, you’ll use the proxy installed rather than the server directly or a proxy outside the cluster. If this is the case, you can use the service DNS for the API. We should be able to reach it by pointing to https://kubernetes.default.svc.cluster.local:443/api.

If this is not the case, you can use the output from the command:

kubectl cluster-info

Now, let’s head over to the Zabbix UI. All the templates we need are shipped in Zabbix 6. If for some reason, you can’t find them, they are available for download and import by visiting the integrations page that I pointed out earlier on the Zabbix site.

Adding the Proxy

We will add our proxy by heading to Administration -> Proxies:

  1. Click Create Proxy. Because this is an active proxy by default, we only need to specify the proxy name. If you didn’t make any changes to the helm chart, this should default to zabbix-proxy. If you’d like to name this differently, you can change the environment variable zbx_hostname for the proxy in the helm chart. We’re going to leave it as the default for now. You’re going to enter this name and then click “Add.” After a few minutes, you’ll start to see that it says that the proxy has been seen.
  2. Create a Host Group to put hosts related to Kubernetes. For this example, let’s create one, which we’ll call Kubernetes.
  3. Head to the host page under configuration and click Create Host. The first host will collect metrics related to monitoring Kubernetes nodes, and we’ll discover nodes and create new hosts using Zabbix low-level discovery.
  4. Give this host the name Kubernetes Nodes. We’ll also assign this host to the Kubernetes host group we created and attach the template Kubernetes nodes by HTTP.
  5. Change the line “Monitored by proxy” to the proxy created earlier, called zabbix-proxy.
  6. Click the Macros tab and select “Inherited and host macros.” You should be able to see all the macros that may be set to influence what is monitored in your cluster. In this case, we need to change the first two macros. The first, {KUBE.API.ENDPOINT.URL}, should be set to the Kubernetes API endpoint. In our case, we can set it to what I mentioned earlier: default.svc.cluster.local:443/api. Next, the token should be set to the previously retrieved value from the command line.
  7. lick Add. After a few minutes, you should start seeing data on the latest data page and new hosts on the host page representing each node.

Creating an Additional Host

Now let’s create another host that will represent the metrics available via the Kubernetes API and the kube-state-metrics endpoint.

  1. Click Create Host again, name this host Kubernetes Cluster State, and add it to the Kubernetes group again.
  2. Let’s also attach the Kubernetes Cluster State template by HTTP. Again, we’re going to choose the proxy that we created earlier.
  3. In the Macro section, change the kube.api.url to the same thing we used before, but this time leave off the /api at the end. Simply: default.svc.cluster.local:443. Be sure to set the token as we did before.
  4. Assuming nothing else was changed in the installation of the helm chart, we can now add that host.

After a few minutes, you should receive metrics related to the cluster state, including hosts representing the kubelet on each node.

What’s Next?

Now you’re all set to start monitoring your Kubernetes cluster in Zabbix! Give it a try, and let us know your thoughts in the comments.

In the next blog post, we’ll look at what you can do with your newly monitored cluster and how to get the most out of it.

If you’d like help with any of this, ATS has advanced monitoring, orchestration, and automation skills to make this process a snap. Set up a 15-minute with our team to go through any questions you have.

About the Author

Michaela DeForest is a Platform Engineer for The ATS Group.  She is a Zabbix Certified Specialist on Zabbix 6.0 with additional areas of expertise, including Terraform, Amazon Web Services (AWS), Ansible, and Kubernetes, to name a few.  As ATS’s resident authority in DevOps, Michaela is critical in delivering cutting-edge solutions that help businesses improve efficiency, reduce errors, and achieve a faster ROI.

About ATS Group: The ATS Group provides a fully inclusive set of technology services and tools designed to innovate and transform IT.  Their systems integration, business resiliency, cloud enablement, infrastructure intelligence, and managed services help businesses of all sizes “get IT done.” With over 20 years in business, ATS has become the trusted advisor to nearly 500 customers across multiple industries.  They have built their reputation around honesty, integrity, and technical expertise unrivaled by the competition.