Post Syndicated from Patrick Duffy original https://aws.amazon.com/blogs/big-data/avb-accelerates-search-in-linq-with-amazon-opensearch-service/
This post is co-written with Mike Russo from AVB Marketing.
AVB Marketing delivers custom digital solutions for their members across a wide range of products. LINQ, AVB’s proprietary product information management system, empowers their appliance, consumer electronics, and furniture retailer members to streamline the management of their product catalog.
A key challenge for AVB’s members is the ability to retrieve, sort, and search through product data, which is crucial for sales activities within their stores. Floor sales use AVB’s Hub, a custom in-store customer relationship management (CRM) product, which relies on LINQ. Initially, searches from Hub queried LINQ’s Microsoft SQL Server database hosted on Amazon Elastic Compute Cloud (Amazon EC2), with search times averaging 3 seconds, leading to reduced adoption and negative feedback.
In this post, we share how AVB reduced their average search time from 3 seconds to 300 milliseconds in LINQ by adopting Amazon OpenSearch Service while processing 14.5 million record updates daily.
Overview of solution
To meet the demands of their users, the LINQ team set a goal to reduce search time response to under 2 seconds while supporting retrieval of over 60 million product data records. Additionally, the team aimed to reduce operational costs, reduce administrative overhead, and scale the solution to meet demand, especially during peak retail periods. Over a 6-month period, the team evaluated multiple architecture options, eventually moving forward with a solution using OpenSearch Service, Amazon EventBridge, AWS Lambda, Amazon Simple Queue Service (Amazon SQS), and AWS Step Functions.
During implementation, the LINQ team worked with OpenSearch Service specialists to optimize the OpenSearch Service cluster configuration to maximize performance and optimize cost of the solution. Following the best practices section of the OpenSearch Service Developer Guide, AVB selected an optimal cluster configuration with three dedicated cluster manager nodes and six data nodes, across three Availability Zones, while keeping shard size between 10–30 GiB.
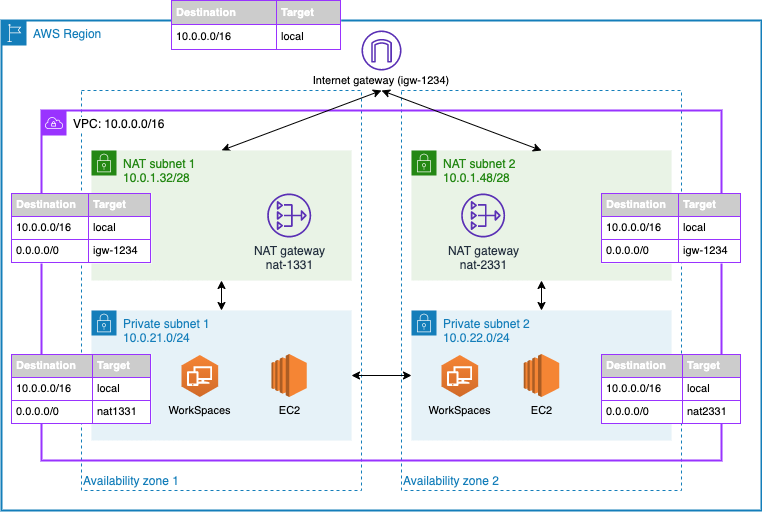
Updates to the primary LINQ database come from various sources, including partner APIs for manufacturer metadata updates, LINQ’s frontend, and LINQ PowerTools. A Lambda function reads the updates from change data capture (CDC) tables on a schedule, which sends the updated records to a Step Functions workflow. This workflow prepares and indexes the record into OpenSearch Service in JSON format, allowing for individual customizations of the record on a per-customer basis. The LINQ team exposes access to the OpenSearch Service index through a search API hosted on Amazon EC2. The following figure outlines the solution.

AVB developed the LINQ Product Data Search solution with the expertise of a diverse team including software engineers and database administrators. Despite their limited experience with AWS, they set a timeline to complete the project in 6 months. AVB had several goals for this new workload, including search APIs to support in-store sales floor associates’ ability to quickly find products based on customer requirements, scalability to support future growth, and real-time analytics to support AVB’s needs around understanding their data.
AVB split this project into three key phases:
- Research and development
- Proof of concept
- Implementation and iteration
Research and development
AVB’s LINQ team received a task to identify the most efficient solution to expedite product searches across AVB’s suite of software products. The team completed a comprehensive evaluation of various technologies and techniques to meet their requirements, including a close examination of various NoSQL databases and caching mechanisms. Following this exploration, AVB selected OpenSearch Service, an open source, distributed search and analytics suite, for use in a proof of concept. AVB chose OpenSearch Service for its powerful search capabilities, including full-text search and complex query support, as well as its ability to integrate seamlessly with other AWS services.
Proof of concept
In the proof of concept phase, the AVB team focused on validating the effectiveness of their chosen technology stack, with a particular emphasis on data loading and synchronization processes. This was essential to achieve real-time data consistency with their primary system of record to provide correct and up-to-date information to floor sales agents. A significant part of this phase involved the innovative process of data flattening, a technique crucial for managing complex product data.
For example, let’s explore a use case of a refrigerator listed in the SQL Server database. This product is linked to several related tables: one for basic details like model number and manufacturer, another for pricing, and another for features such as energy efficiency and capacity. The original database stores elements separately but connected through relational keys. The following figure provides an example data schema of the SQL Server database.

To enhance search capabilities in OpenSearch Service, the team merged all these disparate data elements into a single, comprehensive JSON document. This document includes both standard manufacturer details and member-specific customizations, like special pricing or additional features. This results in an optimized record for each product for quick and efficient search in OpenSearch Service. The following figure shows the data schema in OpenSearch Service.

Transforming relational data into a consolidated, searchable format allowed the LINQ team to ingest the data into OpenSearch Service. In the proof of concept, AVB shifted to updating data by using reference IDs, which are directly linked to the primary IDs of the product records or their relational entities in the SQL database. This approach allows updates to be executed independently and asynchronously. Crucially, it supports non-first in, first out (FIFO) processing models, which are vital in high-scale environments susceptible to data discrepancies like drops or replays. By using reference IDs, the system fetches the most current data for each entity at the time a change occurs, ensuring that the latest data is always used when processed. This method maintains data integrity by preventing outdated data from superseding newer information, thereby keeping the database accurate and current. A noteworthy technique used in the proof of concept was index aliases, allowing for zero downtime re-indexes for adding new fields or fixing bugs. AVB built robust performance monitoring and alerts using Amazon CloudWatch and Splunk, which enabled swift identification of issues.
The proof of concept improved search relevance by flattening relational data, which improved indexing and queryability. This restructuring reduced search response latency to 300 milliseconds, which was well under the 2-second goal set for this proof of concept. With this successful proof of concept demonstrating the effectiveness of the architectural approach, AVB moved on to the next phase of implementation and iteration.
Implementation and iteration
With AVB exceeding their initial goal of reducing search latency to under 2 seconds, the team then adopted an iterative approach to implement the complete solution, with a series of deployments designed to make data available in OpenSearch Service from different business verticals. Each business vertical has records consisting of different attributes, and this incremental approach allowed AVB to bring in and inspect data to make sure the documents in OpenSearch Service are what the team expected. Each deployment focused on specific data categories and included refinements to the indexing process from lessons learned in prior deployments. AVB also places a strong emphasis on cost optimization and security of the solution, and deployed OpenSearch Service into a private VPC to allow strict access control. Access to the new search capabilities is controlled through their Hub product using a middleware service provided by LINQ’s API. AVB uses robust API keys and tokens to provide API security to the new search product. This systematic progression meant that the completed LINQ Product Data Search catalog met AVB’s speed and accuracy requirements.
Conclusion
In this post, you learned how AVB reduced their average search time from 3 seconds to 300 milliseconds in LINQ by adopting OpenSearch Service while processing 14.5 million record updates daily, resulting in a 500% increase in adoption by AVB’s internal teams. Tim Hatfield, AVB Marketing’s VP of Engineering, reflected on the project and stated, “By partnering with AWS, we’ve not only supercharged Hub’s search speeds but also forged a cost-efficient foundation for LINQ’s future, where swift searches translate into reduced operating costs and maintain the competitive edge in retail technology.”
To get started with OpenSearch Service, see Getting started with Amazon OpenSearch Service.
About the Authors
 Mike Russo is a Director of Software Engineering at AVB Marketing. He leads the software delivery for AVB’s e-commerce and product catalog solutions. Outside work, Mike enjoys spending time with his family and playing basketball.
 Patrick Duffy is a Senior Solutions Architect in the at AWS. He is passionate about raising awareness and increasing security of AWS workloads. Outside work, he loves to travel and try new cuisines, and you may match up against him in a game on Magic Arena.