AWS Identity and Access Management (IAM) Access Analyzer is a feature that you can use to identify resources in your AWS organization and accounts that are shared with external entities and to identify unused access. In this post, we explore how the unused access analyzer in IAM Access Analyzer works, dive into the cost implications, and share practical approaches to manage and optimize how you use it with a primary focus on cost optimization.
Note: While security best practices for managing AWS Identity and Access Management (IAM) resources are critical, this post emphasizes cost-saving strategies rather than detailed security guidance. We don’t cover step-by-step implementation details for the recommendations here; instead, we provide links to resources that you can use as guides for the process.
Understanding the unused access analyzer in IAM Access Analyzer
IAM Access Analyzer has two capabilities to generate findings:
External access analysis (no additional charge): Identifies resources shared with external entities. It requires one analyzer per AWS Region where you have resources.
Unused access analysis (paid): Detects unused roles, access keys, and permissions. It requires only one analyzer per AWS account and analyzes IAM roles and users across Regions from a single analyzer.
Both external access analysis and unused access analysis support AWS Organizations and you can create a single analyzer per organization (in the case of external access analysis, per organization per Region).
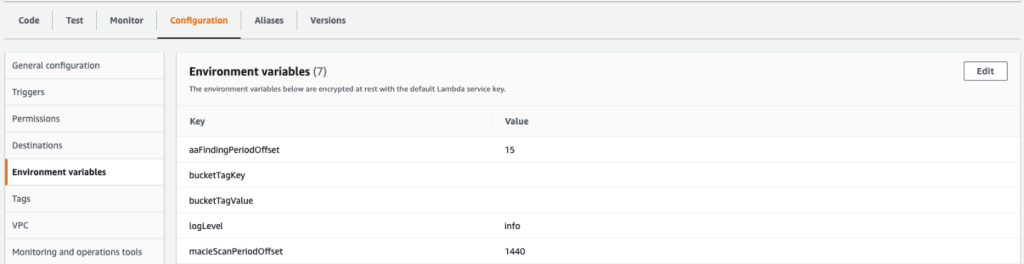
IAM Access Analyzer unused access analysis costs $0.20 per IAM role or user analyzed each month. The charges for existing roles and users happen at the beginning of the month. As new roles and users are added throughout the month, they are analyzed and charged at a rate of $0.20 per role or user. To help avoid duplicate charges, create only one unused access analyzer per account if using an account-level analyzer, or one unused access analyzer for the entire organization if using an organizational-level analyzer. You should avoid deleting and recreating an analyzer. If you recreate an analyzer, you will be charged again for the analysis.
Reviewing and optimizing your usage
Before taking any actions to reduce costs, it’s crucial to understand your current usage. You can use the AWS Cost and Usage Report (AWS CUR) to identify how many unused access analyzers you have in your environment. To learn more, see Querying Cost and Usage Reports using Amazon Athena.
Use the following Athena query on your CUR data to identify the unused access analyzers within your organization. Replace <CUR_TABLE> with the name of your CUR table.
SELECT
line_item_usage_type,
product_region,
line_item_resource_id,
bill_payer_account_id,
line_item_usage_account_id,
SUM(line_item_unblended_cost)
FROM <CUR_TABLE>
WHERE line_item_product_code = 'AWSIAMAccessAnalyzer'
AND line_item_line_item_type = 'Usage'
GROUP BY
line_item_usage_type,
product_region,
line_item_resource_id,
bill_payer_account_id,
line_item_usage_account_id
This query will give you a comprehensive view of your IAM Access Analyzer usage across your organization, including the cost per analyzer.
Now, let’s walk through four things that you can do today to optimize your IAM Access Analyzer unused access analysis costs.
Consolidate unused analyzers
Review your AWS CUR analysis results to identify opportunities for consolidation. If you’re using an organizational unused access analyzer, you should use a single analyzer. If you’re using an unused access analyzer per account, make sure a single account doesn’t have more than one analyzer.
Use tags to exclude some roles or users
Consider using tags to exclude certain roles or users from analysis. This approach can help scope your analysis and reduce costs by avoiding roles and users that you don’t want to analyze. To do this, you’ll need to implement a tagging strategy for your IAM roles and users, identifying principals that might not require regular access analysis. Then, when creating or modifying an analyzer, use exclusion to skip analysis of tagged IAM roles and users. Regularly review your exclusion strategy to validate that it aligns with your organization’s security policies and compliance requirements.
Periodically review and remove unnecessary IAM roles and users. Because IAM Access Analyzer unused access analysis charges are based on the number of roles and users analyzed, removing unused roles and users will help reduce unused access findings cost. This is also a security best practice for IAM.
Monitor and adjust
Set up AWS Budgets or AWS Cost Anomaly Detection to track your IAM Access Analyzer unused access analysis costs. Create alerts for when costs exceed expected thresholds. By using the proactive approach, you can quickly identify and address unexpected cost increases.
Conclusion
IAM Access Analyzer is a valuable tool for improving your organization’s security posture by detecting unused IAM roles, unused access keys for IAM users, unused passwords for IAM users, and unused services and actions for active IAM roles and users. You can then act based on those findings and support your effort to achieve least privilege access. By understanding the billing model and implementing these cost optimization strategies, you can maximize benefits while keeping costs under control. Remember, cost optimization is an ongoing process. Regularly review your usage and adjust your strategy as your needs evolve.
Amazon Web Services (AWS) provides service reference information in JSON format to help you automate policy management workflows. With the service reference information, you can access available actions across AWS services from machine-readable files. The service reference information helps to address a key customer need: keeping up with the ever-growing list of services and actions in AWS. As new services launch and existing services expand their capabilities, you can now conveniently identify and incorporate available actions, resources, and condition keys for each AWS service into your policy authoring and validation workflows. As your business expands and your AWS footprint grows, you might decide to automate your policy management workflows. With the service authorization reference, you can build custom tools to make it easier to evaluate and use new actions, resources, and condition keys that AWS services introduce.
Getting started with service reference information
The service reference information is static information about the actions, resources, and condition keys available for each service in AWS. To obtain the list of AWS services for which reference information is available, go to the following URL: https://servicereference.us-east-1.amazonaws.com/v1/service-list.json
This URL endpoint provides a JSON file that contains an up-to-date catalog of AWS services with available reference information. By querying this endpoint, you can retrieve the most current list of services supported by the AWS Service Reference Information feature.
To retrieve the list of actions, resources, and condition keys for a specific AWS service, go to the following URL: https://servicereference.us-east-1.amazonaws.com/v1/<service-name>/<service-name>.json
Replace <service-name> with the name of the desired AWS service (for example, “s3” for Amazon Simple Storage service (Amazon S3) or “ec2” for Amazon Elastic Compute Cloud (Amazon EC2)). This URL endpoint provides a JSON file that contains the comprehensive list of actions, resources, and condition keys that are available for that particular service.
The following example shows the format of the output from the service-list.json file, which contains the service names and URLs for each service’s reference information:
You can navigate to the service information page by using the url field to view the list of permissions for the service. You can also download the JSON file to use in your policy authoring workflows. For example, you can download the permissions for Amazon S3 by following this URL: https://servicereference.us-east-1.amazonaws.com/v1/s3/s3.json
The following example shows a partial output of the permissions for Amazon S3. The AWS Identity and Access Management (IAM) actions are available in JSON format, and each action is its own JSON object. The Name field for those objects provides the name of the IAM action, the ActionConditionKeys field provides the available condition keys for this action, and the Resources field provides the available resources for this action.
What can you build with the service reference information?
Let’s explore how you can make use of the service reference information through practical examples. To help you get started, here are two custom tools that use the service reference information. You can find these tools in our GitHub repository, ready for you to use and adapt to your specific needs. You can download the source code for these tools by visiting the following links:
The SCP pre-processor provides a convenient way to write SCPs. You run the SCP pre-processor as a command-line tool. The tool takes a single, monolithic JSON file and runs a series of transformations and optimizations, then outputs a collection of valid service control policies that fit within policy size quotas. The tool uses AWS service reference information data in order to optimize lists of IAM actions.
Notification tool for new or removed IAM actions
You might find yourself needing to update various policies throughout your AWS environment when new IAM actions or services are released. You can use this tool to notify you when new services or new actions are added or removed. It works by downloading the service reference information and comparing it to the previous version of the file when the tool last ran. You can use these notifications to perform actions like automatically updating IAM policies when new actions are added or manually reviewing the notifications for new, sensitive actions.
The AWS service reference information makes it easier for you to create automation for policy authoring and validation. By providing the AWS service actions reference in JSON format, this feature enables you to create custom tools for policy authoring and management.
We’re excited to know what kind of policy authoring tools you can think up.
If you have feedback about this post, submit comments in the Comments section below. If you have questions about this post, contact AWS Support.
In this blog post, we show how you can integrate IAM Access Analyzer custom policy check capability into VS Code, so you can identify overly permissive IAM policies and fine-tune access controls early in the development process. This proactive approach to security and compliance helps to ensure that your IAM policies are validated before they are deployed, reducing the risk of introducing misconfigurations or granting unintended access. It also saves developer time by providing fast feedback to developers when they write a policy that does not meet organizational standards.
What is the problem?
Although security teams oversee an organization’s overall security posture, developers create applications that require specific permissions. To enable developers to work efficiently while maintaining high security standards, organizations often seek ways to safely delegate the authoring of AWS Identity and Access Management (IAM) policies to developers. Many AWS customers manually review developer-authored IAM policies before deploying them to production environments to help prevent granting excessive or unintended permissions. However, depending on the volume and complexity of policies, these manual reviews can be time-consuming, leading to development delays and potential bottlenecks in the deployment of applications and services. Organizations need to balance secure access management with the agility required for rapid application development and deployment.
How to use IAM Access Analyzer custom policy checks in VS Code
Custom policy checks are a feature in IAM Access Analyzer that are designed to help security teams proactively identify and analyze critical permissions within their IAM policies. In this section, we provide step-by-step instructions for using custom policy checks directly in VS Code.
Prerequisites
To complete the examples in our walkthrough, you first need to do the following:
Install Python version 3.6 or later.
Assuming you are already using the VS Code Integrated Development Environment (IDE), search for and install the AWS Toolkit extension.
So that you can open IAM Access Analyzer policy checks in the VS Code editor, open the VS Code Command Palette by pressing Ctrl+Shift+P, search for IAM Policy Checks, and then choose AWS: Open IAM Policy Checks as shown in Figure 1.
Figure 1: Search for the AWS: Open IAM Policy Checks option
By using the IAM policy checks option in VS Code, you can perform four types of checks:
We’ll walk through examples of each of these checks in the sections that follow.
Example 1: ValidatePolicy
In this example, we use the ValidatePolicy option provided by the IAM policy check plugin to validate IAM policies against IAM policy grammar and AWS best practices. When you run this check, you can view policy validation check findings that include security warnings, errors, general warnings, and suggestions for your policy. These actionable recommendations help you author policies that are aligned with AWS best practices.
To run the ValidatePolicy check
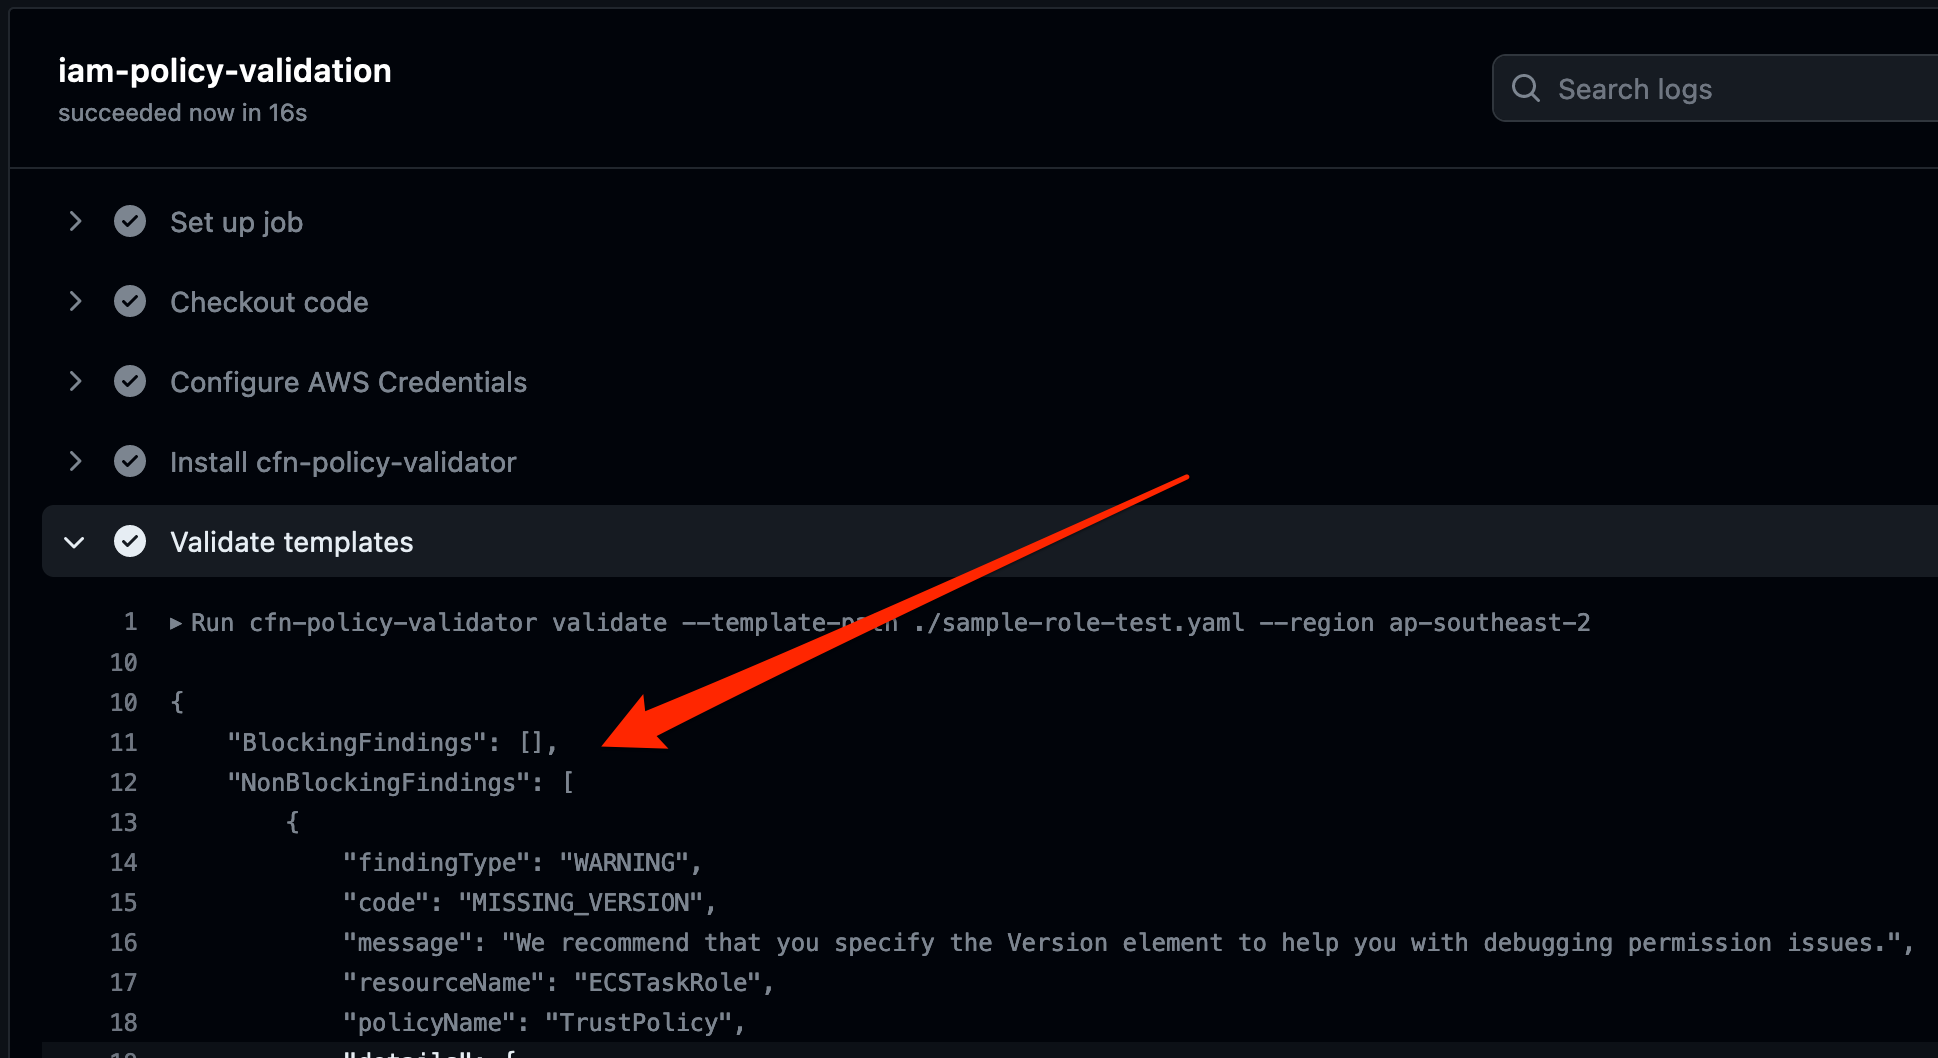
Let’s use the following IAM policy for illustration purposes. You can see that resource * (a wildcard) is being used in the first statement, which indicates that the iam:PassRole action is allowed for all resources.
In the VS Code editor, navigate to the IAM Policy Checks pane. Choose the document type JSON Policy Language and policy type Identity. Then choose Run Policy Validation.
Figure 2: IAM Access Analyzer ValidatePolicy check results
You can see that Access Analyzer has detected an issue, which is shown in the PROBLEMS pane.
Figure 3: Problems pane with finding details for the ValidatePolicy check
The security warning shown in Figure 3 states that the iam:PassRole action with a wildcard (*) in the resource can be overly permissive because it allows the ability to pass any IAM role in that account.
Now, let’s modify the IAM policy by replacing the wildcard (*) with a specific role Amazon Resource Name (ARN).
Verify the policy again by running the ValidatePolicy check to make sure that it doesn’t generate findings after you updated the IAM policy.
Figure 4: Results of the ValidatePolicy check after IAM policy correction
Example 2: CheckNoPublicAccess
With the CheckNoPublicAccess option, you can verify whether your resource policy grants public access for supported resource types.
To run the CheckNoPublicAccess check
To test whether a policy does not allow public access, create a new bucket using a CloudFormation template and attach a resource policy that grants access to any principal to see the objects in this bucket.
WARNING: This sample bucket policy should not be used in production. Using a wildcard in the principal element of a bucket policy would allow any IAM principal to view the contents of the bucket.
Select the document type CloudFormation template and then choose Run Custom Policy Check to see whether this resource policy passes the CheckNoPublicAccess check.
Figure 5: IAM Access Analyzer CheckNoPublicAccess check results
The policy check returns a failed result because this bucket does allow public access.
Figure 6: Problems pane finding details for CheckNoPublicAccess check
Next, fix this policy to allow access from a role within the same account by restricting the policy to a specific role ARN.
Re-run the CheckNoPublicAccess check. The resource policy no longer grants public access and the status of the policy check is PASS.
Example 3: CheckAccessNotGranted
The CheckAccessNotGranted option allows you to check whether a policy allows access to a list of IAM actions and resource ARNs. You can use this check to give developers fast feedback that certain permissions or access to certain resources are not allowed.
To run the CheckAccessNotGranted check
Identify sensitive actions and resources.
In the VS Code editor, under Custom Policy Checks, choose the check type CheckAccessNotGranted. Using a comma-separated list, create a list of actions and resource ARNs that you don’t want to allow in your IAM policy. You can also create a JSON file with your actions and resources by using the syntax shown in Figure 7. For this example, set the s3:PutBucketPolicy and dynamodb:DeleteTable IAM actions to “not allowed” in the IAM policy.
Figure 7: Configure the CheckAccessNotGranted check
Create a sample CloudFormation template that contains an IAM policy attached to an IAM role, as follows. This policy grants access to some of the actions that you deemed sensitive in Figure 7.
In the VS Code editor, choose Run Custom Policy Check to identify whether one of the sensitive actions or resources is allowed in the IAM policy. The policy check returns FAIL because the policy has the actions s3:PutBucketPolicy and dynamodb:DeleteTable, which you marked as actions that you don’t want developers to grant access to. Remove the restricted actions from the policy and run the check again to see a PASS result for the policy check.
Example 4: CheckNoNewAccess
The CheckNoNewAccess option is a custom policy check that verifies whether your policy grants new access compared to a reference policy.
You use a reference policy to check whether a candidate policy allows more access than the reference policy does. In other words, the check passes if the candidate policy is a subset of the reference policy. A reference policy typically starts by allowing all access. You then add a statement or statements that deny the access that you want the reference policy to check for. For more details and examples of reference policies, see the iam-access-analyzer-custom-policy-check-samples repository on GitHub.
The ability to use a reference policy provides you with the flexibility to look for almost anything in an IAM policy. This is useful when you have custom requirements for your organization that may not be met with some of the other custom policy checks.
To run the CheckNoNewAccess check
Create a reference policy: In your project, create a new JSON policy document that will serve as your reference policy.
The following reference policy checks that an IAM role trust policy only grants access to an allowlisted set of AWS services. This enables you to allow builders to create roles, but constrain the use of those roles to the set of AWS services specified.
In this reference policy, only the specified AWS service principals ec2.amazonaws.com, lambda.amazonaws.com, and ecs-tasks.amazonaws.com are allowed to assume the role.
Enter the reference policy in the VS Code editor. In the IAM Policy Checks pane, select the check type CheckNoNewAccess. Then set the reference policy type to Resource, because this is a trust policy that defines which principals can assume the role. In addition, provide the path of the reference policy that you created in Step 1. You can also directly enter the reference policy as a JSON policy document, as shown in Figure 8.
Figure 8: Enter the reference policy for the CheckNoNewAccess check
Create a CloudFormation template, as follows. This template creates an IAM role that allows the AWS service principals lambda.amazonaws.com and glue.amazonaws.com to assume the sample-application-role IAM role.
In the VS Code editor, choose Run Custom Policy Check to check your CloudFormation template against the reference policy you configured in Step 1. The check will return FAIL and you will see a security warning in the editor in the PROBLEMS pane.
Figure 9: Problems pane finding details for the CheckNoNewAccess check
The issue is that glue.amazonaws.com was not listed as a service principal that was allowed to assume a role in your reference policy. You can remove glue.amazonaws.com from the CloudFormation template and re-run the check to receive a PASS result.
Conclusion
In this post, we explored how you can use the integration of VS Code with IAM Access Analyzer in your development workflow to make sure that your IAM policies align with best practices and adhere to your organization’s security requirements. The four critical checks provided by IAM Access Analyzer can be summarized as follows:
The ValidatePolicy check provides actionable recommendations that help you author policies that are aligned with AWS best practices.
The CheckNoPublicAccess check helps protect resources from being exposed publicly and mitigates the risk of unauthorized public access.
The CheckAccesNotGranted check looks for specific IAM actions and resource ARNs to help enforce access restrictions and help prevent unauthorized access to critical data or services.
The CheckNoNewAccess check validates that the permissions granted in your IAM policies remain within the intended scope, as defined by your organization’s requirements.
AWS Identity and Access Management Access Analyzer simplifies inspecting unused access to guide you towards least privilege. You can use unused access findings to identify over-permissive access granted to AWS Identity and Access Management (IAM) roles and users in your accounts or organization. From a delegated administrator account for IAM Access Analyzer, you can use the dashboard to review unused access findings across your organization and prioritize the accounts to inspect based on the volume and type of findings. The findings highlight unused roles, unused access keys for IAM users, and unused passwords for IAM users. For active IAM users and roles, the findings provide visibility into unused services and actions. Recently, IAM Access Analyzer launched new configuration capabilities that you can use to customize the analysis. You can select accounts, roles, and users to exclude, and focus on the areas that matter the most to you. You can use identifiers such as account ID or scale configuration using tags. By scoping the IAM Access Analyzer to monitor a subset of accounts and roles, you can reduce noise from unwanted findings. You can update the configuration when needed to change the scope of analysis. With this new offering, IAM Access Analyzer provides enhanced controls to help you tailor the analysis more closely to your organization’s security needs.
In this post, we walk you through an example scenario. Imagine that you’re a cloud administrator in a company that uses Amazon Web Services (AWS). You use AWS Organizations to organize your workload into several organizational units (OUs) and accounts. You have dedicated accounts for testing and experimenting with new AWS features called sandbox accounts across your organization. The sandbox accounts can be created by anyone in your company and are centrally recorded. You’re using tags on IAM resources and have followed AWS best practices and strategies when tagging your AWS resources. Tags are applied to the IAM roles created by your teams.
To make sure that your teams are following the principle of least privilege and are working with only the required permissions to access the AWS accounts, you use IAM Access Analyzer. You created an unused access analyzer at the organization level so it will monitor the AWS accounts in your organization. You noticed that you have multiple unused access findings. After analysis, your security team suggests the exclusion of some AWS accounts, IAM roles, and users so they can focus on the relevant findings. They want the sandbox accounts and the IAM roles they use for security purposes (such as auditing, incident response) to be excluded from the unused access analysis.
You can select accounts and roles to exclude when you create a new analyzer or update the analyzer later. In this post, we show you how to configure IAM Access Analyzer unused access finding to exclude specific accounts across your organization and specific principals (IAM roles and IAM users) once you have set up an analyzer. There is no additional pricing for using the prescriptive recommendations after you have enabled unused access findings.
Prerequisites
The following are the prerequisites to configure IAM Access Analyzer for unused access analysis:
An unused access analyzer created at the organization level
Administrative level access to the IAM Access Analyzer delegated administrator account
A list of account IDs that you want to exclude
IAM roles with tags
In the following sections, you will learn how to customize your IAM Access Analyzer to better suit your organization’s needs. This includes the following:
Explore how to exclude specific AWS accounts from the analyzer’s unused access findings.
See how to exclude tagged IAM roles from the analysis, allowing you to focus on the most relevant security insights and you see how to review exclusions on your analyzer to modify them as needed.
By the end, you will have a tailored unused access analyzer that provides more meaningful and actionable results for your organization.
Exclude specific accounts across your organization
In this section, you will see how to update your existing unused access analyzer at the organization level through the AWS Management Console and AWS Command Line Interface (AWS CLI) to exclude specific AWS account IDs from its analysis.
If you don’t have an unused access analyzer in the organization, see this post for instructions on how to create one.
Use the console to update your unused access analyzer:
Connect to your IAM Access Analyzer delegated administrator account (by default, your organization management account).
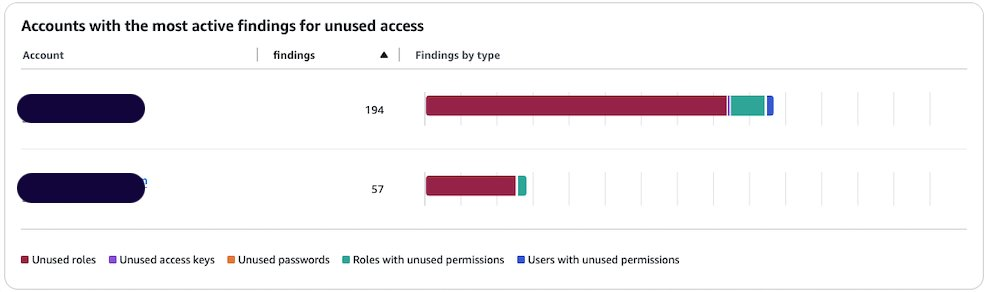
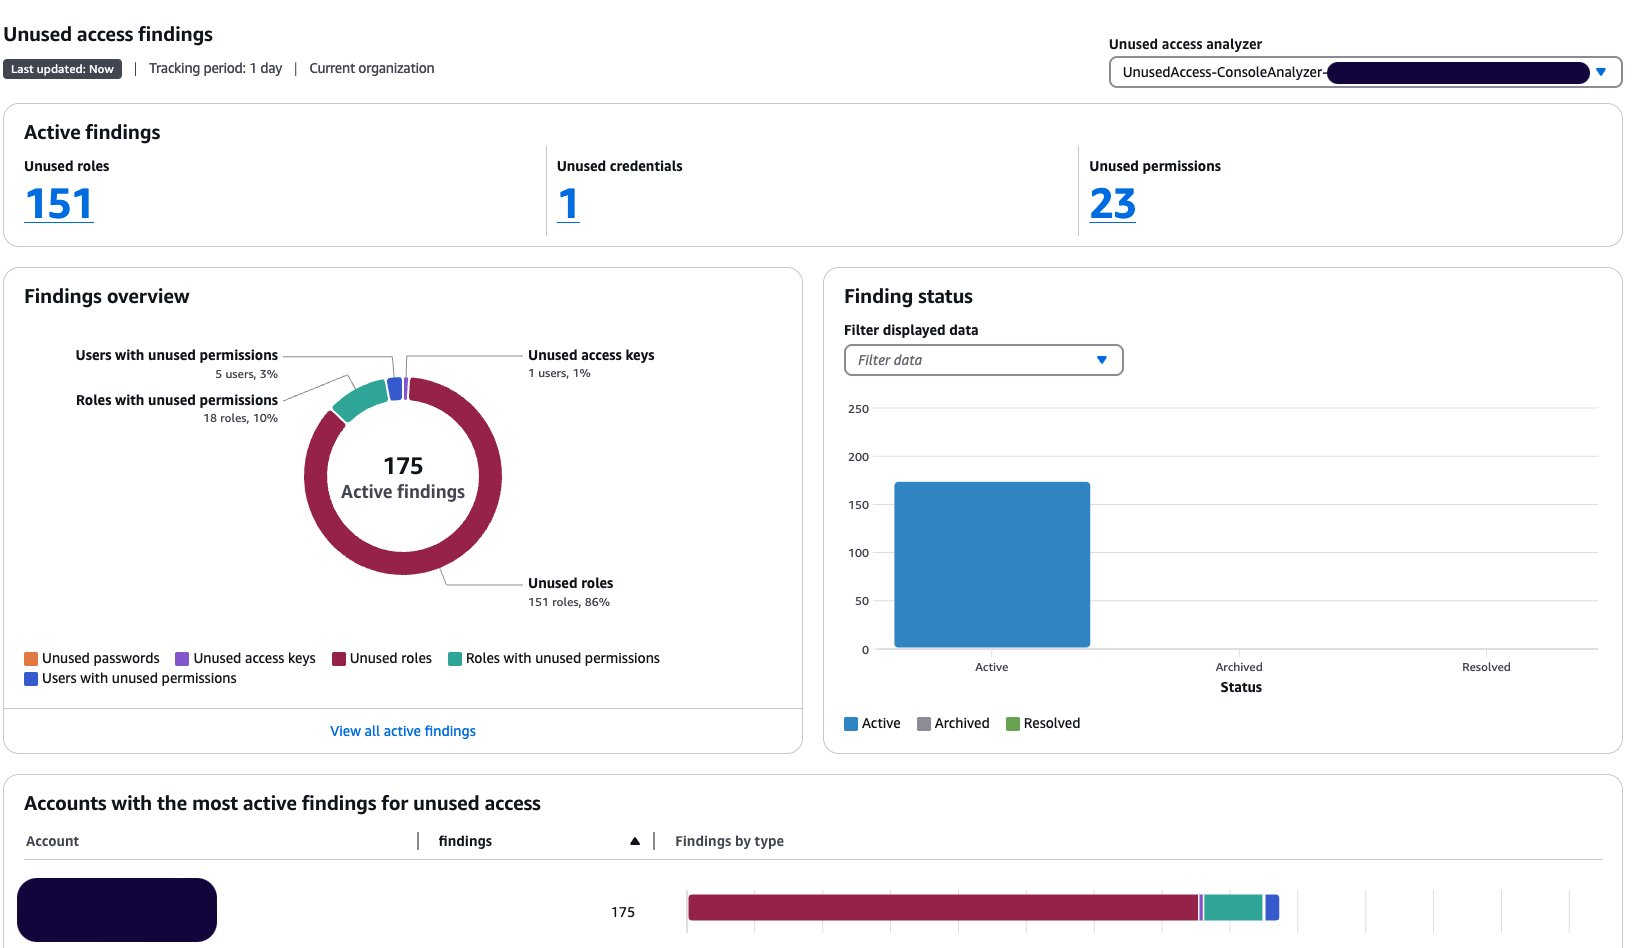
Open the IAM Access Analyzer console in your management account. You will see the dashboard with your active finding by selecting the analyzer of your choice on the top right. In this example, the analyzer has 251 active findings.
Figure 1: Unused access findings dashboard without exclusions
You can see the split of active findings per account. The example account has 57 active findings that you want to exclude from it.
Figure 2: Unused access findings per account
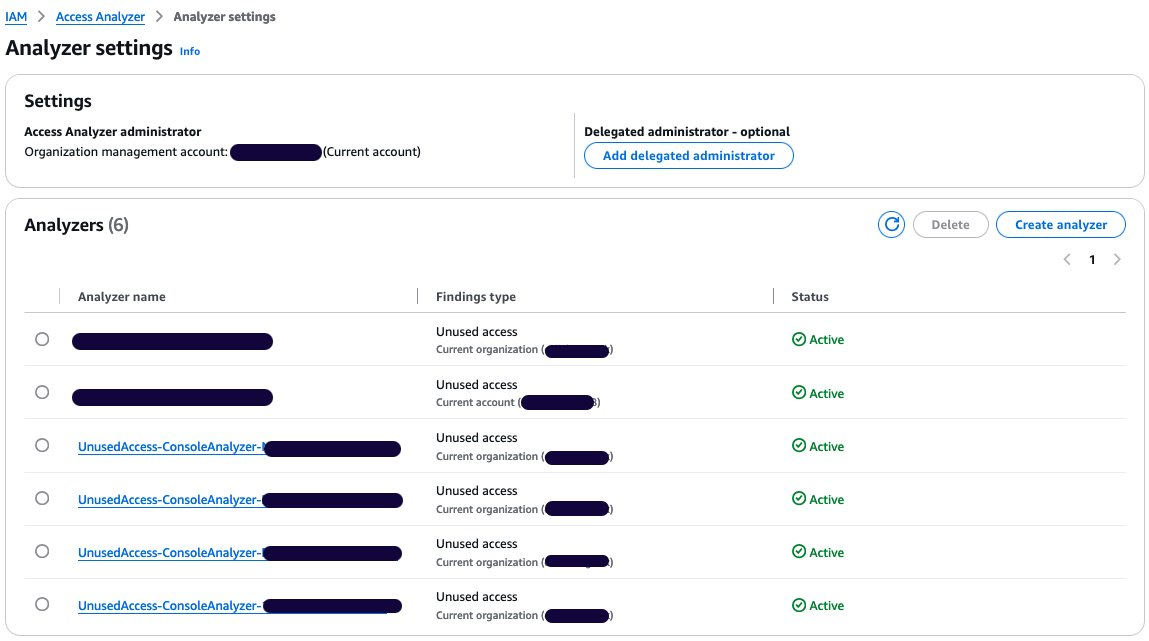
Select Analyzer settings under Access Analyzer in that navigation pane.
The analyzer settings page presents the analyzers in your AWS Region and their status.
Select your unused access analyzer in the list based on its name.
Figure 3: Active access analyzers
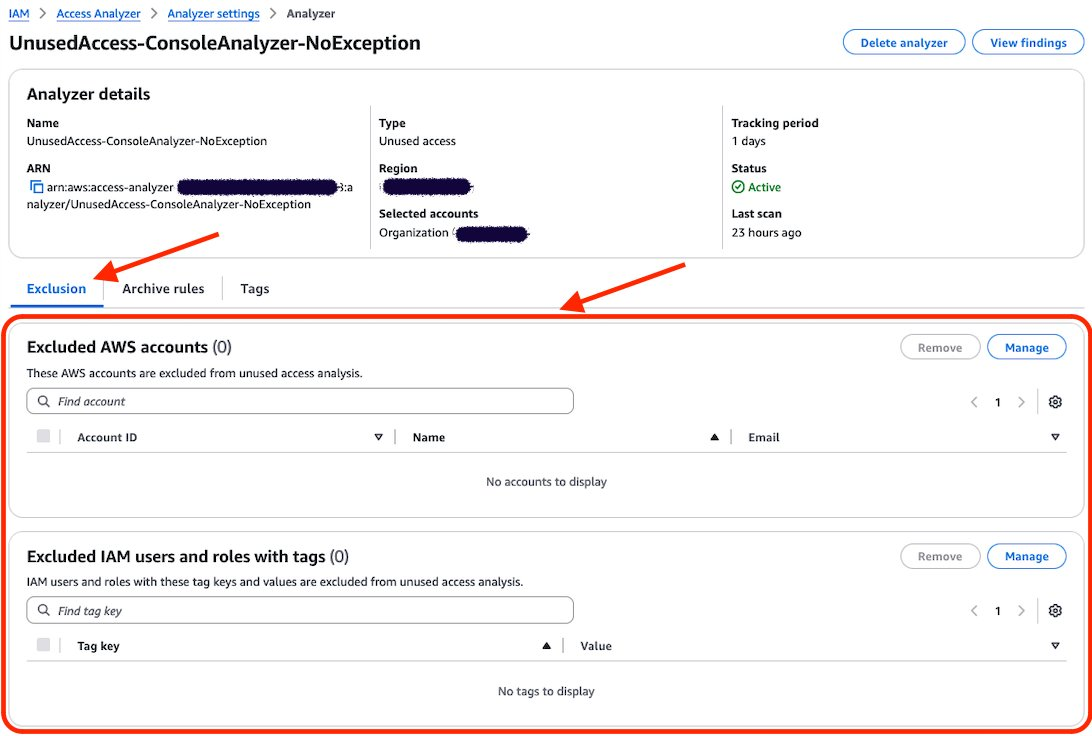
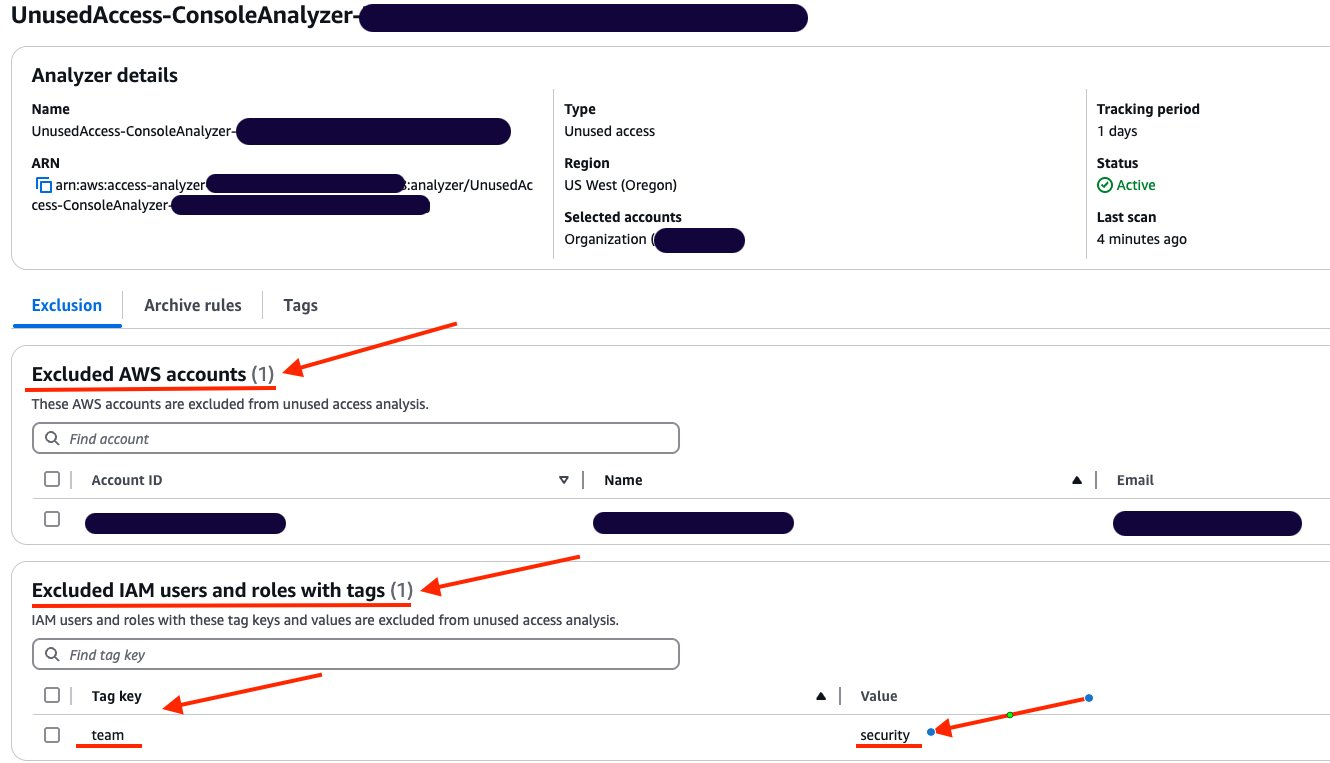
On the Analyzer page, you can see the analyzer settings and a new tab called Exclusion. Because you have no excluded AWS accounts, the count of Excluded AWS accounts is 0 and there are no accounts displayed.
Figure 4: Unused access analyzer exclusion tab
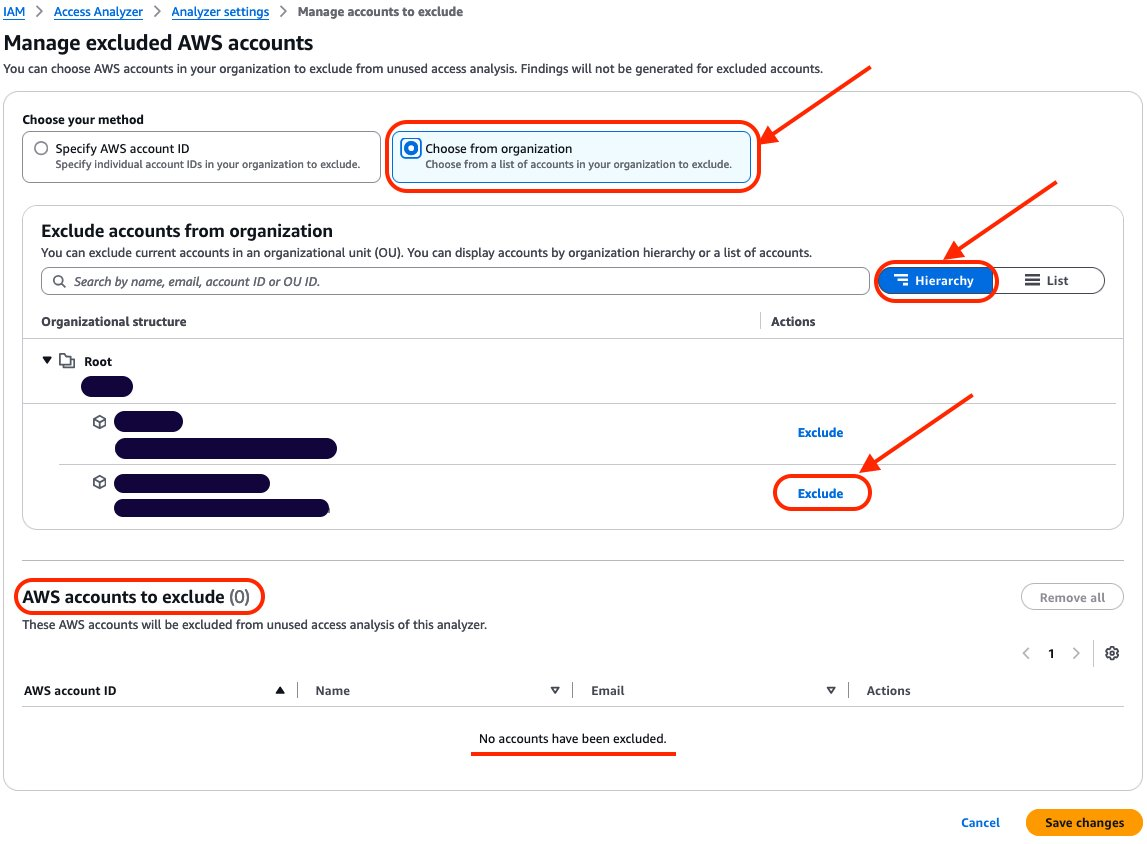
Choose Manage in the Excluded AWS accounts section.
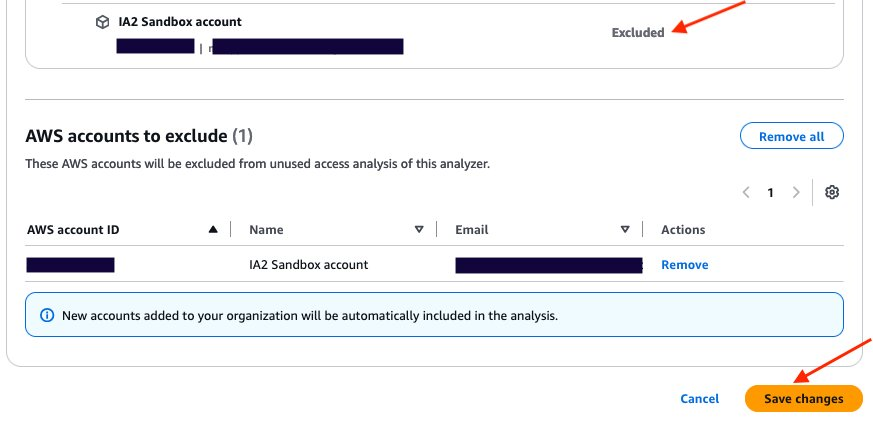
Select Choose from organization and Hierarchy and choose Exclude next to the sandbox account that you want to exclude.
Figure 5: Exclude sandbox account
After you select Exclude for the sandbox account, the account will be deselected and will appear in AWS accounts to exclude. The count of accounts to exclude has changed from 0 to 1. After you have finished, choose Save changes.
Figure 6: Verify that the account is excluded and save changes
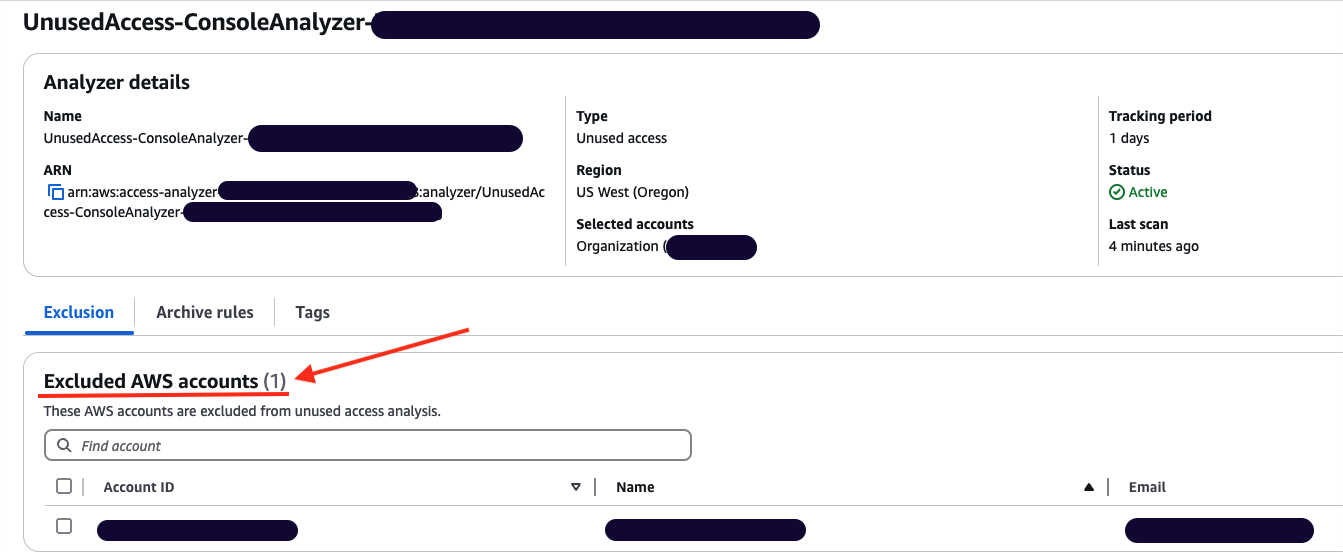
The page will be automatically updated with your changes. You can then review the Excluded AWS accounts and verify that your excluded account is correctly configured.
Figure 7: Analyzer configuration updated with excluded account
You can go back to the console dashboard and see the results. In this example, the exclusion of the sandbox account has caused the total number of active findings to go down from 251 to 194.
Figure 8: Dashboard showing a reduction in active findings
Use AWS CLI to update your unused access analyzer:
You can update your existing analyzer using the AWS CLI command aws accessanalyzer update-analyzer. Use the following command, replacing <YOUR-ANALYZER-NAME> with the name of your analyzer.
You have successfully excluded a sandbox account from the unused access analysis. Now you will exclude the IAM roles used by the security team to audit your accounts based on tags.
Excluding specific principals in your organization using tags
In this section, you will see how to update an existing unused access analyzer by excluding tagged IAM roles in your organization using the console and then AWS CLI.
Use the console to update your unused access analyzer:
Open the IAM Access Analyzer console.
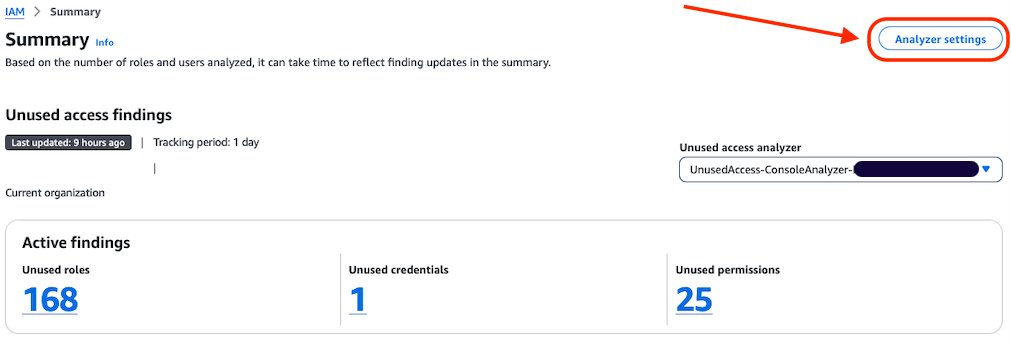
Review the summary dashboard containing your unused findings. Choose Analyzer settings at the top of the screen.
Figure 9: IAM Access Analyzer summary dashboard
You will see a list of analyzers created in your account in that Region. Select the analyzer that you want to update.
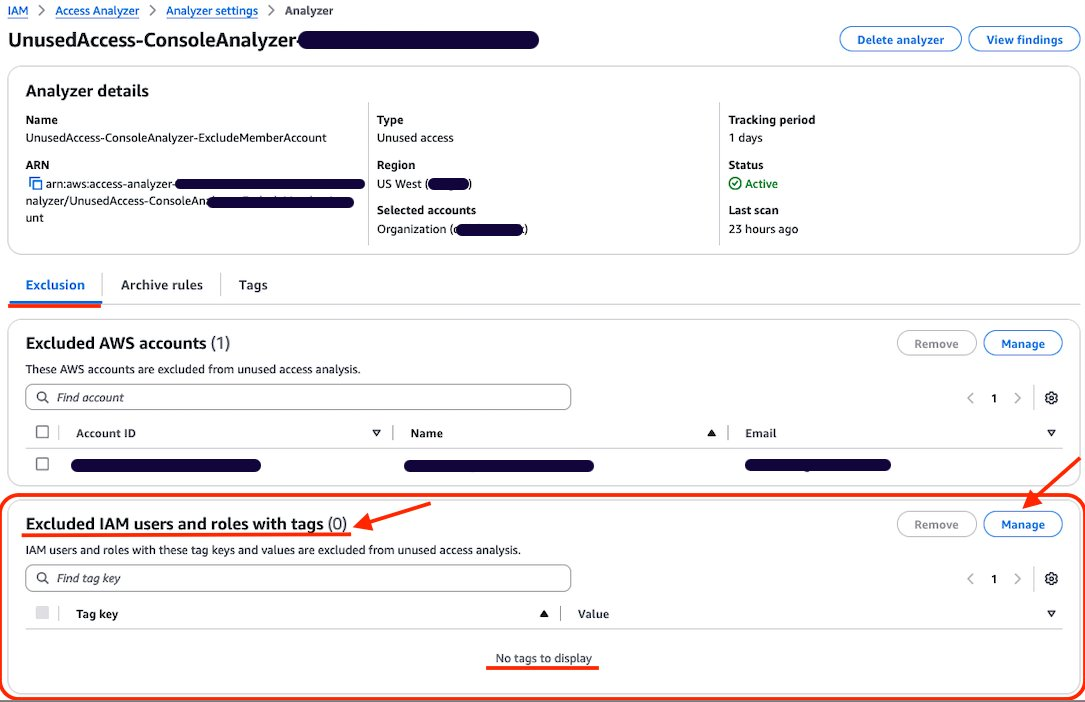
Review the analyzer page. On the Exclusion tab, you will see Exclude IAM users and roles with tags with a count of 0.
Figure 10: Configure exclusion of IAM roles using tag
Choose Manage in the Excluded IAM users and roles with tags section.
Add the tags attached to the roles that you want to exclude from the analysis and choose Save changes.
Figure 11: Add tag to exclude
You can now see that Excluded IAM users and roles with tags now has a count of 1, and you can see the tags in the list.
Figure 12: List of exclusion tags
Use AWS CLI to update your unused access analyzer:
You can also update your existing analyzer using the AWS CLI command aws accessanalyzer update-analyzer. Using the following command, replace <YOUR-ANALYZER-NAME> with the name of your analyzer.
You can review, remove, or update the exclusions configured on your analyzer by using the console or AWS CLI. For example, as a security administrator managing multiple accounts, you might initially exclude IAM roles that have the tag security from analysis. However, you might need to review these exclusions if your policies change, requiring analysis of certain security roles or removing the exclusion entirely. By adjusting your exclusions, you can make sure that your analyzer’s results remain relevant to your organization’s needs and account structure.
Review the exclusion on unused access analyzer using the console:
In this section, review the tags that have been excluded from an analyzer.
Open the IAM console.
Select Access Analyzer, under Access reports, you will see a summary dashboard of findings from an analyzer.
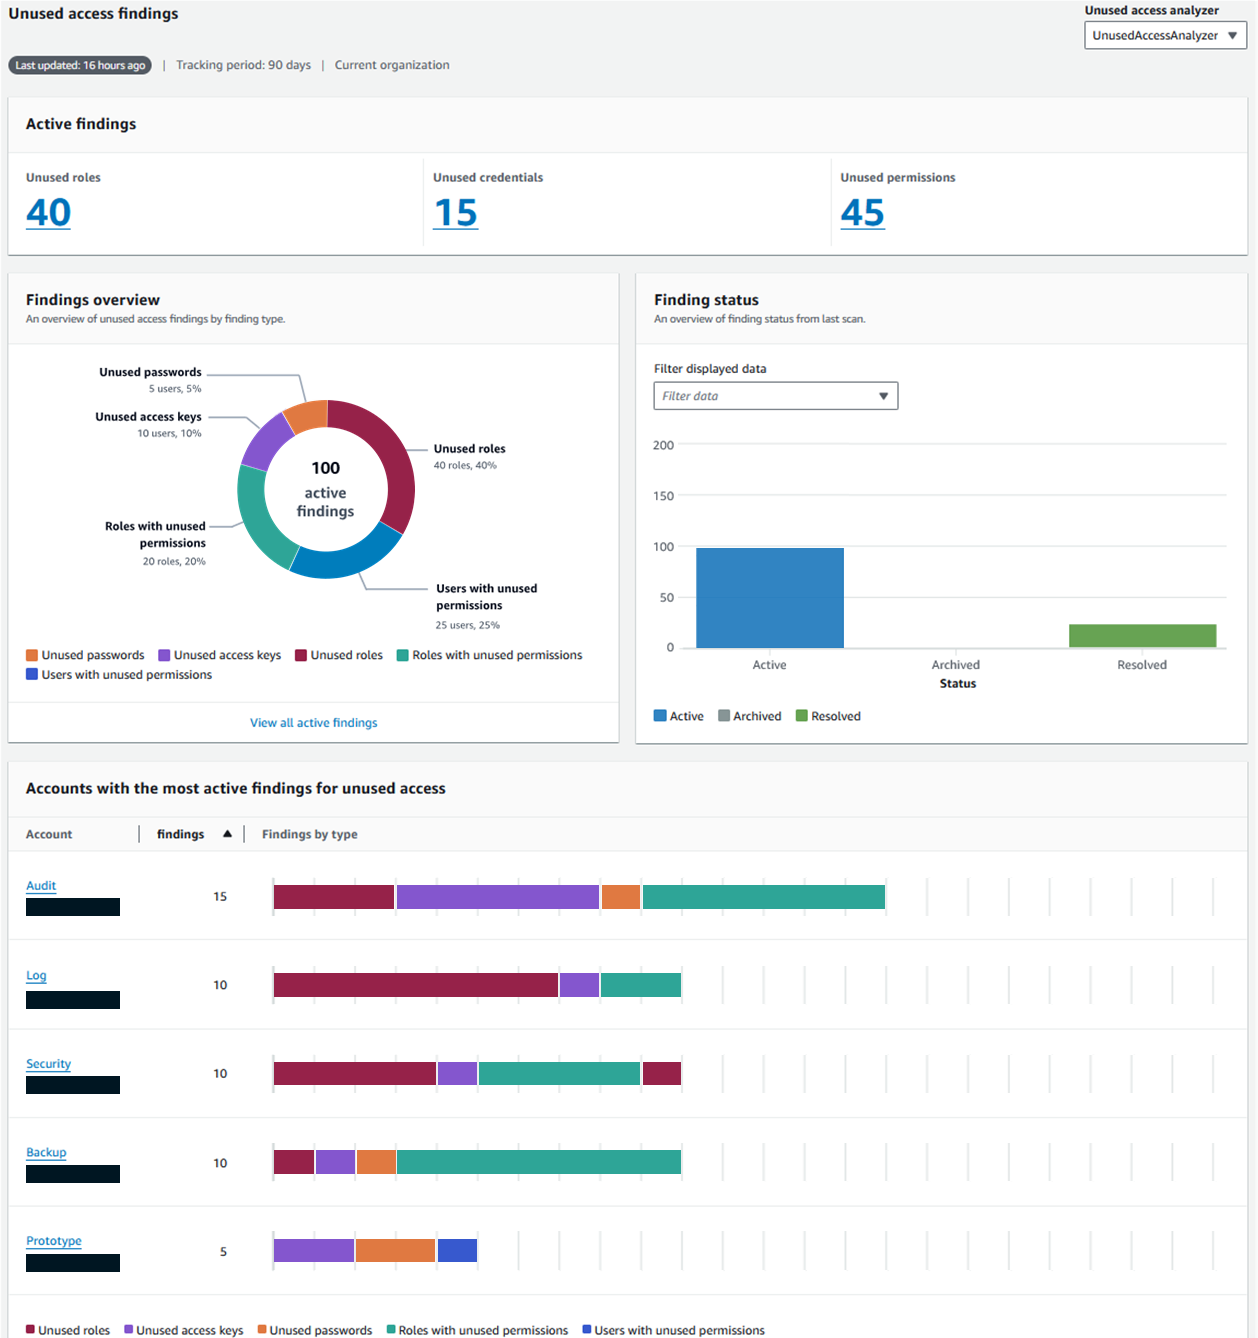
The Active findings section shows the number of active findings for unused roles, the number of active findings for unused credentials and the number of active findings for unused permissions.
The Findings overview section includes a breakdown of the active findings.
The Findings status section shows the status of findings (whether active, archived or resolved).
Figure 13: Unused access analyzer dashboard
Select the Analyzer settings at the top of the screen.
Select the analyzer that you want to review to see the exclusion tags.
After applying the tags, the updated dashboard is shown after the next scan.
Figure 15: Dashboard showing reduction of findings after exclusions
Review the exclusion on an unused access analyzer using AWS CLI:
Using the name of your analyzer, you can run the command get-analyzer to see the configured exclusion. Using the following command, replace <YOUR-ANALYZER-NAME> with the name of your analyzer:
In this post, you learned how to tailor your unused access analyzer to your needs by excluding specific accounts and IAM roles. To exclude the accounts in your organization from being monitored by IAM Access Analyzer, you can use a list of account IDs or select them from a hierarchical view of your organization structure. You can exclude IAM roles and IAM users based on tags. By customizing the exclusion on the unused access analyzer, you saw that the number of active findings went down, helping you focus on the findings that matter most. With this new offering, IAM Access Analyzer provides enhanced controls to help you tailor the analysis more closely to your organization’s security needs.
As a security team lead, your goal is to manage security for your organization at scale and ensure that your team follows AWS Identity and Access Management (IAM)security best practices, such as the principle of least privilege. As your developers build on AWS, you need visibility across your organization to make sure that teams are working with only the required privileges. Now, AWS Identity and Access Management Analyzer offers prescriptive recommendations with actionable guidance that you can share with your developers to quickly refine unused access.
In this post, we show you how to use IAM Access Analyzer recommendations to refine unused access. To do this, we start by focusing on the recommendations to refine unused permissions and show you how to generate the recommendations and the actions you can take. For example, we show you how to filter unused permissions findings, generate recommendations, and remediate issues. Now, with IAM Access Analyzer, you can include step-by-step recommendations to help developers refine unused permissions quickly.
Unused access recommendations
IAM Access Analyzer continuously analyzes your accounts to identify unused access and consolidates findings in a centralized dashboard. The dashboard helps review findings and prioritize accounts based on the volume of findings. The findings highlight unused IAM roles and unused access keys and passwords for IAM users. For active IAM roles and users, the findings provide visibility into unused services and actions. You can learn more about unused access analysis through the IAM Access Analyzer documentation.
For unused IAM roles, access keys, and passwords, IAM Access Analyzer provides quick links in the console to help you delete them. You can use the quick links to act on the recommendations or use export to share the details with the AWS account owner. For overly permissive IAM roles and users, IAM Access Analyzer provides policy recommendations with actionable steps that guide you to refine unused permissions. The recommended policies retain resource and condition context from existing policies, helping you update your policies iteratively.
Throughout this post, we use an IAM role in an AWS account and configure the permissions by doing the following:
We use an inline policy to demonstrate that IAM Access Analyzer unused access recommendations are applicable for that use case. The recommendations are also applicable when using AWS managed policies and customer managed policies.
In your AWS account, after you have configured an unused access analyzer, you can select an IAM role that you have used recently and see if there are unused access permissions findings and recommendations.
In this post we explore three options for generating recommendations for IAM Access Analyzer unused permissions findings: the console, AWS CLI, and AWS API.
Generate recommendations for unused permissions using the console
After you have created an unused access analyzer as described in the prerequisites, wait a few minutes to see the analysis results. Then use the AWS Management Console to view the proposed recommendations for the unused permissions.
To list unused permissions findings
Go to the IAM console and under Access Analyzer, choose Unused access from the navigation pane.
Search for active findings with the type Unused permissions in the search box.
Select Active from the Status drop-down list.
In the search box, select Findings type under Properties.
Select Equals as Operators.
Select Findings Type = Unused permissions.
This list shows the active findings for IAM resources with unused permissions.
Figure 1: Filter on unused permissions in the IAM console
Select a finding to learn more about the unused permissions granted to a given role or user.
To obtain recommendations for unused permissions
On the findings detail page, you will see a list of the unused permissions under Unused permissions.
Following that, there is a new section called Recommendations. The Recommendations section presents two steps to remediate the finding:
Review the existing permissions on the resource.
Create new policies with the suggested refined permissions and detach the existing policies.
Figure 2: Recommendations section
The generation of recommendations is on-demand and is done in the background when you’re using the console. The message Analysis in progress indicates that recommendations are being generated. The recommendations exclude the unused actions from the recommended policies.
When an IAM principal, such as an IAM role or user, has multiple permissions policies attached, an analysis of unused permissions is made for each of permissions policies:
If no permissions have been used, the recommended action is to detach the existing permissions policy.
If some permissions have been used, only the used permissions are kept in the recommended policy, helping you apply the principle of least privilege.
The recommendations are presented for each existing policy in the column Recommended policy. In this example, the existing policies are:
AmazonBedrockReadOnly
AmazonS3ReadOnlyAccess
InlinePolicyListLambda
And the recommended policies are:
None
AmazonS3ReadOnlyAccess-recommended
InlinePolicyListLambda-recommended
Figure 3: Recommended policies
There is no recommended policy for AmazonBedrockReadOnly because the recommended action is to detach it. When hovering over None, the following message is displayed: There are no recommended policies to create for the existing permissions policy.
AmazonS3ReadOnlyAccess and InlinePolicyListLambda and their associated recommended policy can be previewed by choosing Preview policy.
To preview a recommended policy
IAM Access Analyzer has proposed two recommended policies based on the unused actions.
To preview each recommended policy, choose Preview policy for that policy to see a comparison between the existing and recommended permissions.
Choose Preview policy for AmazonS3ReadOnlyAccess-recommended.
The existing policy has been analyzed and the broad permissions—s3:Get* and s3:List*—have been scoped down to detailed permissions in the recommended policy.
The permissions s3:Describe*, s3-object-lambda:Get*, and s3-object-lambda:List* can be removed because they weren’t used.
Figure 4: Preview of the recommended policy for AmazonS3ReadOnlyAccess
Choose Preview policy for InlinePolicyListLambda-recommended to see a comparison between the existing inline policy InlinePolicyListLambda and its recommended version.
The existing permissions, lambda:ListFunctions and lambda:ListLayers, are kept in the recommended policy, as well as the existing condition.
The permissions in lambda:ListAliases and lambda:ListFunctionUrlConfigs can be removed because they weren’t used.
Figure 5: Preview the recommended policy for the existing inline policy InlinePolicyListLambda
To download the recommended policies file
Choose Download JSON to download the suggested recommendations locally.
Figure 6: Download the recommended policies
A .zip file that contains the recommended policies in JSON format will be downloaded.
Figure 7: Downloaded recommended policies as JSON files
The content of the AmazonS3ReadOnlyAccess-recommended-1-2024-07-22T20/08/44.793Z.json file the same as the recommended policy shown in Figure 4.
Generate recommendations for unused permissions using AWS CLI
Use the following code to refine the results by filtering on the type UnusedPermission and selecting only the active findings. Copy the Amazon Resource Name (ARN) of your unused access analyzer and use it to replace the ARN in the following code:
This command provides the following results. For more information about the meaning and structure of the recommendations, see Anatomy of a recommendation later in this post.
Note: The recommendations consider AWS managed policies, customer managed policies, and inline policies. The IAM conditions in the initial policy are maintained in the recommendations if the actions they’re related to are used.
The remediations suggested are to do the following:
Detach AmazonBedrockReadOnly policy because it is unused: DETACH_POLICY
Create a new recommended policy with scoped down permissions from the managed policy AmazonS3ReadOnlyAccess: CREATE_POLICY
Detach AmazonS3ReadOnlyAccess: DETACH_POLICY
Embed a new recommended policy with scoped down permissions from the inline policy: CREATE_POLICY
To generate recommendations for unused permissions using the IAM Access Analyzer API
The findings are generated on-demand. For that purpose, IAM Access Analyzer API GenerateFindingRecommendation can be called with two parameters: the ARN of the analyzer and the finding ID.
After the recommendations are generated, they can be obtained by calling the API GetFindingRecommendation with the same parameters: the ARN of the analyzer and the finding ID.
Use AWS SDK for Python (boto3) for the API call as follows:
The recommendations are generated as actionable guidance that you can follow. They propose new IAM policies that exclude the unused actions, helping you rightsize your permissions.
Anatomy of a recommendation
The recommendations are usually presented in the following way:
Date and time: startedAt, completedAt. Respectively when the API call was made and when the analysis was completed and the results were provided.
Resource ARN: The ARN of the resource being analyzed.
Recommended steps: The recommended steps, such as creating a new policy based on the actions used and detaching the existing policy.
Status: The status of retrieving the finding recommendation. The status values include SUCCEEDED, FAILED, and IN_PROGRESS.
For more information about the structure of recommendations, see the output section of get-finding-recommendation.
Recommended policy review
You must review the recommended policy. The recommended actions depend on the original policy. The original policy will be one of the following:
An AWS managed policy: You need to create a new IAM policy using recommendedPolicy. Attach this newly created policy to your IAM role. Then detach the former policy.
A customer managed policy or an inline policy: Review the policy, verify its scope, consider how often it’s attached to other principals (customer managed policy only), and when you are confident to proceed, use the recommended policy to create a new policy and detach the former policy.
Use cases to consider when reviewing recommendations
During your review process, keep in mind that the unused actions are determined based on the time defined in your tracking period. The following are some use cases you might have where a necessary role or action might be identified as unused (this is not an exhaustive list of use cases). It’s important to review the recommendations based on your business needs. You can also archive some findings related to the use cases such as the ones that follow:
Backup activities: If your tracking period is 28 days and you have a specific role for your backup activities running at the end of each month, you might discover that after 29 days some of the permissions for that backup role are identified as unused.
IAM permissions associated to an infrastructure as code deployment pipeline: You should also consider the permissions associated to specific IAM roles such an IAM for infrastructure as code (IaC) deployment pipeline. Your pipeline can be used to deploy Amazon Simple Storage Service (Amazon S3) buckets based on your internal guidelines. After deployment is complete, the pipeline permissions can become unused after your tracking period, but removing those unused permissions can prevent you from updating your S3 buckets configuration or from deleting it.
IAM roles associated with disaster recovery activities: While it’s recommended to have a disaster recovery plan, the IAM roles used to perform those activities might be flagged by IAM Access Analyzer for having unused permissions or being unused roles.
To apply the suggested recommendations
Of the three original policies attached to IAMRole_IA2_Blog_EC2Role, AmazonBedrockReadOnly can be detached and AmazonS3ReadOnlyAccess and InlinePolicyListLambda can be refined.
DetachAmazonBedrockReadOnly
No permissions are used in this policy, and the recommended action is to detach it from your IAM role. To detach it, you can use the IAM console, the AWS CLI, or the AWS API.
Create a new policy called AmazonS3ReadOnlyAccess-recommended and detach AmazonS3ReadOnlyAccess.
The unused access analyzer has identified unused permissions in the managed policy AmazonS3ReadOnlyAccess and proposed a new policy AmazonS3ReadOnlyAccess-recommended that contains only the used actions. This is a step towards least privilege because the unused actions can be removed by using the recommended policy.
Create a new IAM policy named AmazonS3ReadOnlyAccess-recommended that contains only the following recommended policy or one based on the downloaded JSON file.
Embed a new inline policy InlinePolicyListLambda-recommended and delete InlinePolicyListLambda. This inline policy lists AWS Lambda aliases, functions, layers, and function URLs only when coming from a specific source IP address.
After updating the policies based on the Recommended policy proposed, the finding Status will change from Active to Resolved.
Figure 9: The finding is resolved
Pricing
There is no additional pricing for using the prescriptive recommendations after you have enabled unused access findings.
Conclusion
As a developer writing policies, you can use the actionable guidance provided in recommendations to continually rightsize your policies to include only the roles and actions you need. You can export the recommendations through the console or set up automated workflows to notify your developers about new IAM Access Analyzer findings.
This new IAM Access Analyzer unused access recommendations feature streamlines the process towards least privilege by selecting the permissions that are used and retaining the resource and condition context from existing policies. It saves an impressive amount of time by the actions used by your principals and guiding you to refine them.
By using the IAM Access Analyzer findings and access recommendations, you can quickly see how to refine the permissions granted. We have shown in this blog post how to generate prescriptive recommendations with actionable guidance for unused permissions using AWS CLI, API calls, and the console.
AWS Identity and Access Management (IAM) Access Analyzer offers tools that help you set, verify, and refine permissions. You can use IAM Access Analyzer external access findings to continuously monitor your AWS Organizations organization and Amazon Web Services (AWS) accounts for public and cross-account access to your resources, and verify that only intended external access is granted. Now, you can use IAM Access Analyzer unused access findings to identify unused access granted to IAM roles and users in your organization.
If you lead a security team, your goal is to manage security for your organization at scale and make sure that your team follows best practices, such as the principle of least privilege. When your developers build on AWS, they create IAM roles for applications and team members to interact with AWS services and resources. They might start with broad permissions while they explore AWS services for their use cases. To identify unused access, you can review the IAM last accessed information for a given IAM role or user and refine permissions gradually. If your company has a multi-account strategy, your roles and policies are created in multiple accounts. You then need visibility across your organization to make sure that teams are working with just the required access.
Now, IAM Access Analyzer simplifies inspection of unused access by reporting unused access findings across your IAM roles and users. IAM Access Analyzer continuously analyzes the accounts in your organization to identify unused access and creates a centralized dashboard with findings. From a delegated administrator account for IAM Access Analyzer, you can use the dashboard to review unused access findings across your organization and prioritize the accounts to inspect based on the volume and type of findings. The findings highlight unused roles, unused access keys for IAM users, and unused passwords for IAM users. For active IAM users and roles, the findings provide visibility into unused services and actions. With the IAM Access Analyzer integration with Amazon EventBridge and AWS Security Hub, you can automate and scale rightsizing of permissions by using event-driven workflows.
In this post, we’ll show you how to set up and use IAM Access Analyzer to identify and review unused access in your organization.
Generate unused access findings
To generate unused access findings, you need to create an analyzer. An analyzer is an IAM Access Analyzer resource that continuously monitors your accounts or organization for a given finding type. You can create an analyzer for the following findings:
An analyzer for unused access findings is a new analyzer that continuously monitors roles and users, looking for permissions that are granted but not actually used. This analyzer is different from an analyzer for external access findings; you need to create a new analyzer for unused access findings even if you already have an analyzer for external access findings.
You can centrally view unused access findings across your accounts by creating an analyzer at the organization level. If you operate a standalone account, you can get unused access findings by creating an analyzer at the account level. This post focuses on the organization-level analyzer setup and management by a central team.
Pricing
IAM Access Analyzer charges for unused access findings based on the number of IAM roles and users analyzed per analyzer per month. You can still use IAM Access Analyzer external access findings at no additional cost. For more details on pricing, see IAM Access Analyzer pricing.
Create an analyzer for unused access findings
To enable unused access findings for your organization, you need to create your analyzer by using the IAM Access Analyzer console or APIs in your management account or a delegated administrator account. A delegated administrator is a member account of the organization that you can delegate with administrator access for IAM Access Analyzer. A best practice is to use your management account only for tasks that require the management account and use a delegated administrator for other tasks. For steps on how to add a delegated administrator for IAM Access Analyzer, see Delegated administrator for IAM Access Analyzer.
To create an analyzer for unused access findings (console)
From the delegated administrator account, open the IAM Access Analyzer console, and in the left navigation pane, select Analyzer settings.
Choose Create analyzer.
On the Create analyzer page, do the following, as shown in Figure 1:
For Findings type, select Unused access analysis.
Provide a Name for the analyzer.
Select a Tracking period. The tracking period is the threshold beyond which IAM Access Analyzer considers access to be unused. For example, if you select a tracking period of 90 days, IAM Access Analyzer highlights the roles that haven’t been used in the last 90 days.
Set your Selected accounts. For this example, we select Current organization to review unused access across the organization.
Select Create.
Figure 1: Create analyzer page
Now that you’ve created the analyzer, IAM Access Analyzer starts reporting findings for unused access across the IAM users and roles in your organization. IAM Access Analyzer will periodically scan your IAM roles and users to update unused access findings. Additionally, if one of your roles, users or policies is updated or deleted, IAM Access Analyzer automatically updates existing findings or creates new ones. IAM Access Analyzer uses a service-linked role to review last accessed information for all roles, user access keys, and user passwords in your organization. For active IAM roles and users, IAM Access Analyzer uses IAM service and action last accessed information to identify unused permissions.
Note: Although IAM Access Analyzer is a regional service (that is, you enable it for a specific AWS Region), unused access findings are linked to IAM resources that are global (that is, not tied to a Region). To avoid duplicate findings and costs, enable your analyzer for unused access in the single Region where you want to review and operate findings.
IAM Access Analyzer findings dashboard
Your analyzer aggregates findings from across your organization and presents them on a dashboard. The dashboard aggregates, in the selected Region, findings for both external access and unused access—although this post focuses on unused access findings only. You can use the dashboard for unused access findings to centrally review the breakdown of findings by account or finding types to identify areas to prioritize for your inspection (for example, sensitive accounts, type of findings, type of environment, or confidence in refinement).
Review the findings overview to identify the total findings for your organization and the breakdown by finding type. Figure 2 shows an example of an organization with 100 active findings. The finding type Unused access keys is present in each of the accounts, with the most findings for unused access. To move toward least privilege and to avoid long-term credentials, the security team should clean up the unused access keys.
Figure 2: Unused access finding dashboard
Unused access findings dashboard – Accounts with most findings
Review the dashboard to identify the accounts with the highest number of findings and the distribution per finding type. In Figure 2, the Audit account has the highest number of findings and might need attention. The account has five unused access keys and six roles with unused permissions. The security team should prioritize this account based on volume of findings and review the findings associated with the account.
Review unused access findings
In this section, we’ll show you how to review findings. We’ll share two examples of unused access findings, including unused access key findings and unused permissions findings.
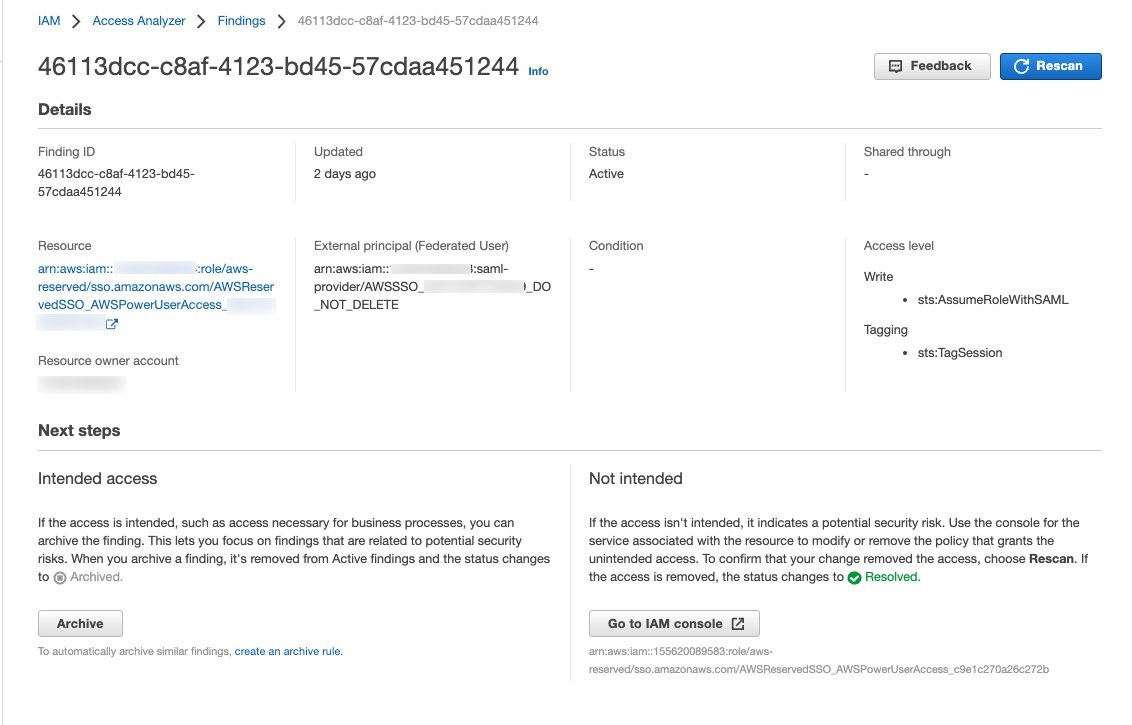
Finding example: unused access keys
As shown previously in Figure 2, the IAM Access Analyzer dashboard showed that accounts with the most findings were primarily associated with unused access keys. Let’s review a finding linked to unused access keys.
Select your analyzer to view the unused access findings.
In the search dropdown list, select the property Findings type, the Equals operator, and the value Unused access key to get only Findings type = Unused access key, as shown in Figure 3.
Figure 3: List of unused access findings
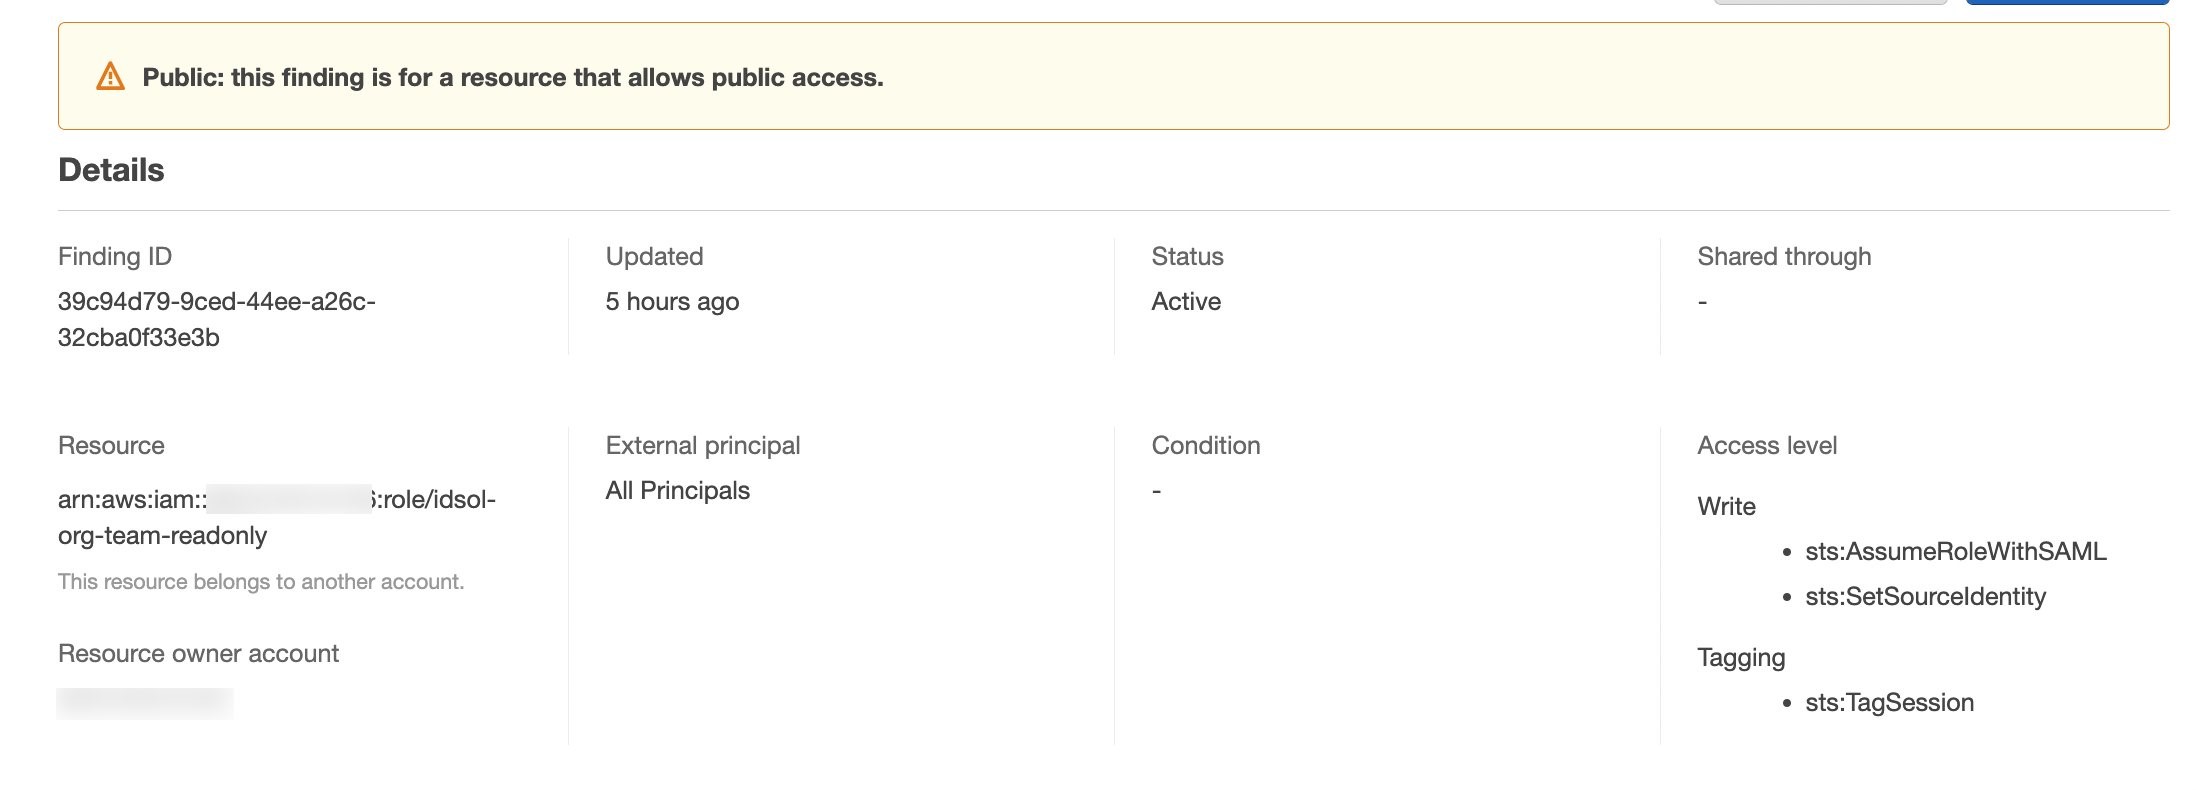
Select one of the findings to get a view of the available access keys for an IAM user, their status, creation date, and last used date. Figure 4 shows an example in which one of the access keys has never been used, and the other was used 137 days ago.
Figure 4: Finding example – Unused IAM user access keys
From here, you can investigate further with the development teams to identify whether the access keys are still needed. If they aren’t needed, you should delete the access keys.
Finding example: unused permissions
Another goal that your security team might have is to make sure that the IAM roles and users across your organization are following the principle of least privilege. Let’s walk through an example with findings associated with unused permissions.
To review findings for unused permissions
On the list of unused access findings, apply the filter on Findings type = Unused permissions.
The security team now has a view of the unused actions for this role and can investigate with the development teams to check if those permissions are still required.
The development team can then refine the permissions granted to the role to remove the unused permissions.
Unused access findings notify you about unused permissions for all service-level permissions and for 200 services at the action-level. For the list of supported actions, see IAM action last accessed information services and actions.
Take actions on findings
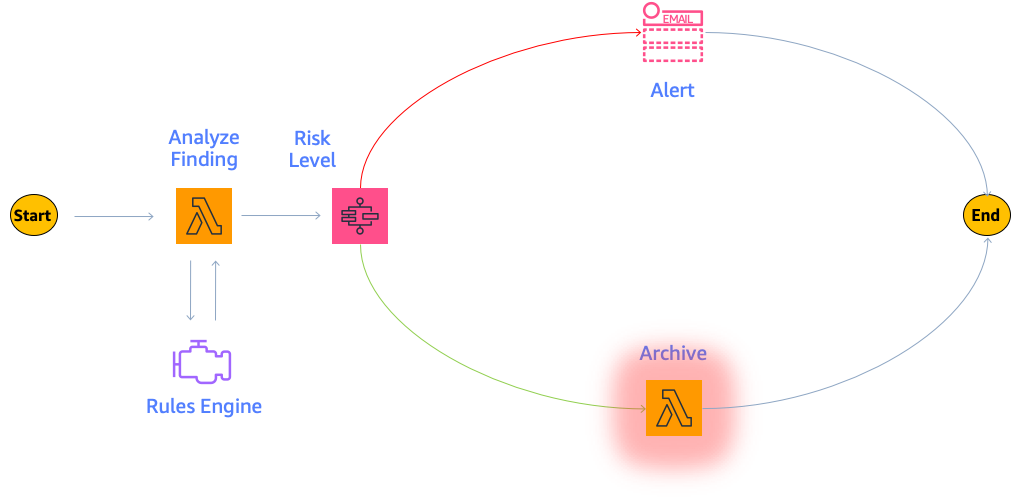
IAM Access Analyzer categorizes findings as active, resolved, and archived. In this section, we’ll show you how you can act on your findings.
Resolve findings
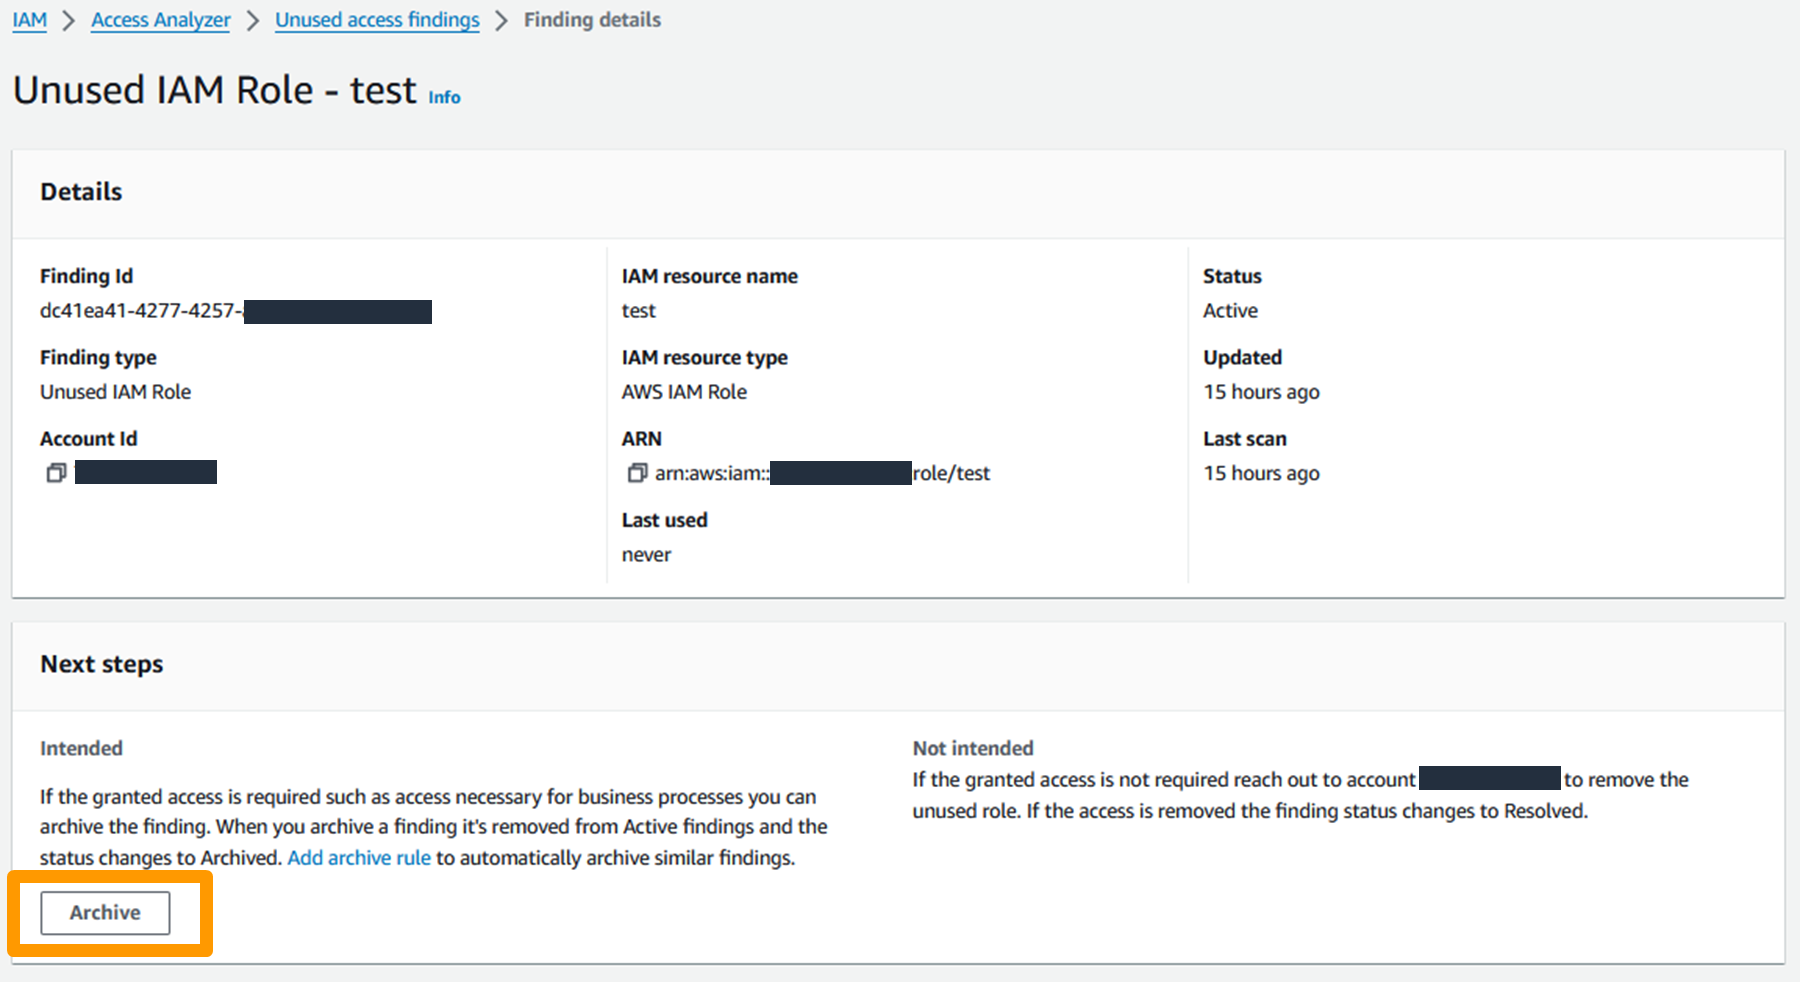
You can resolve unused access findings by deleting unused IAM roles, IAM users, IAM user credentials, or permissions. After you’ve completed this, IAM Access Analyzer automatically resolves the findings on your behalf.
You can suppress a finding by archiving it, which moves the finding from the Active tab to the Archived tab in the IAM Access Analyzer console. To archive a finding, open the IAM Access Analyzer console, select a Finding ID, and in the Next steps section, select Archive, as shown in Figure 6.
Figure 6: Archive finding in the AWS management console
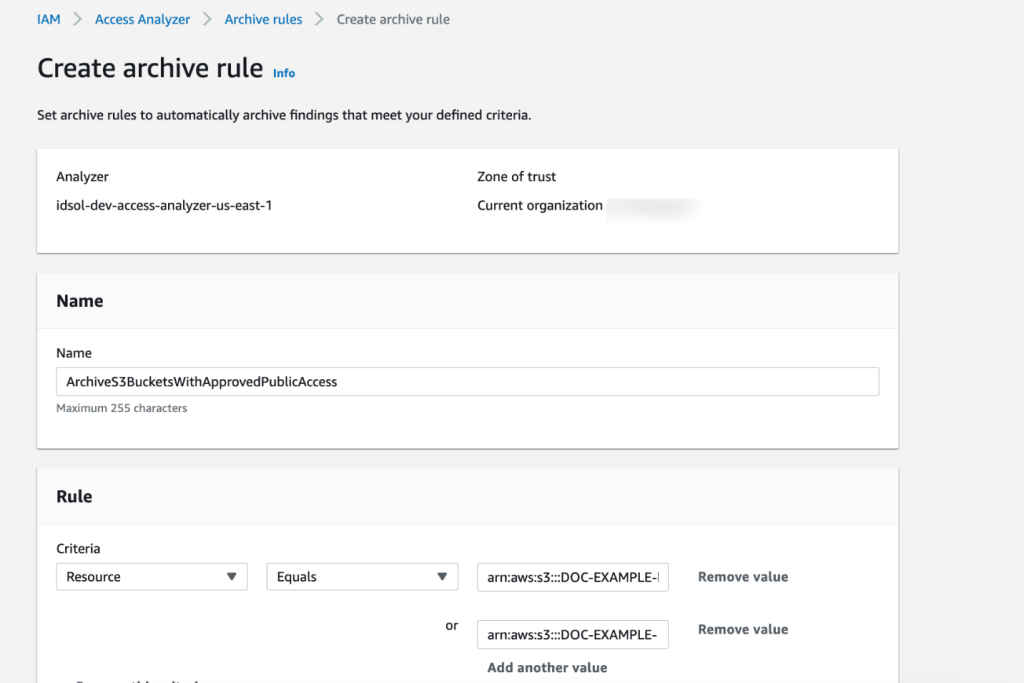
You can automate this process by creating archive rules that archive findings based on their attributes. An archive rule is linked to an analyzer, which means that you can have archive rules exclusively for unused access findings.
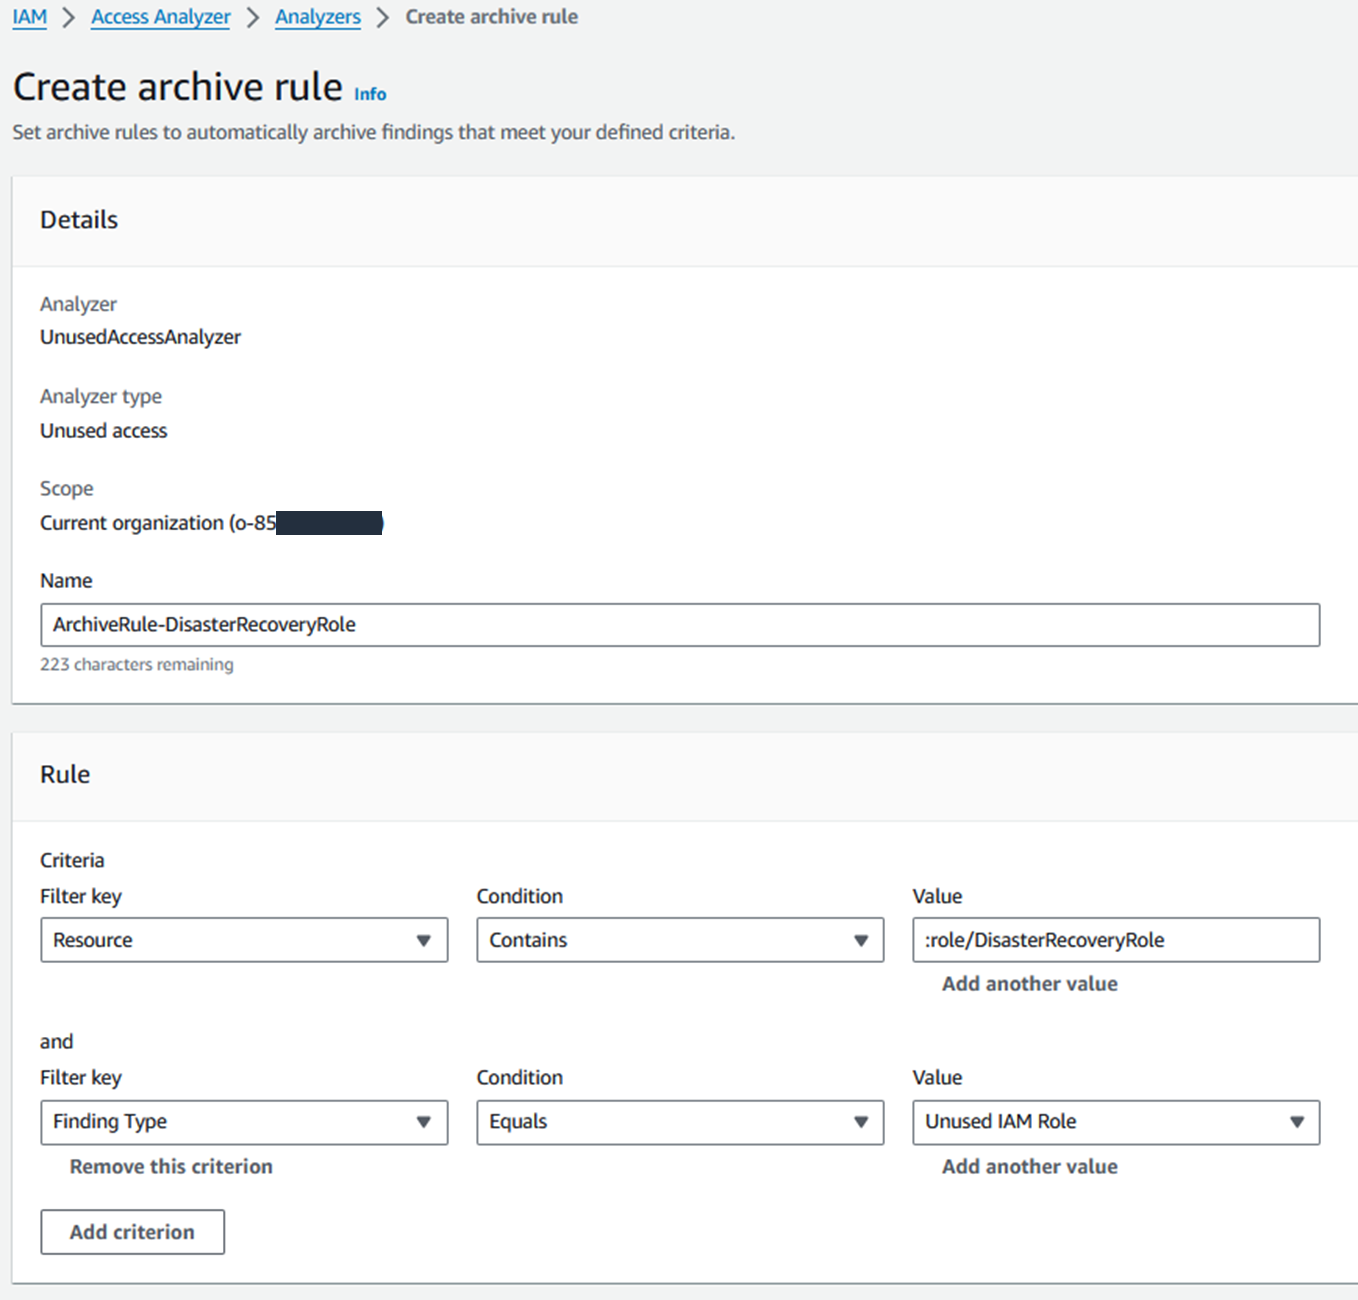
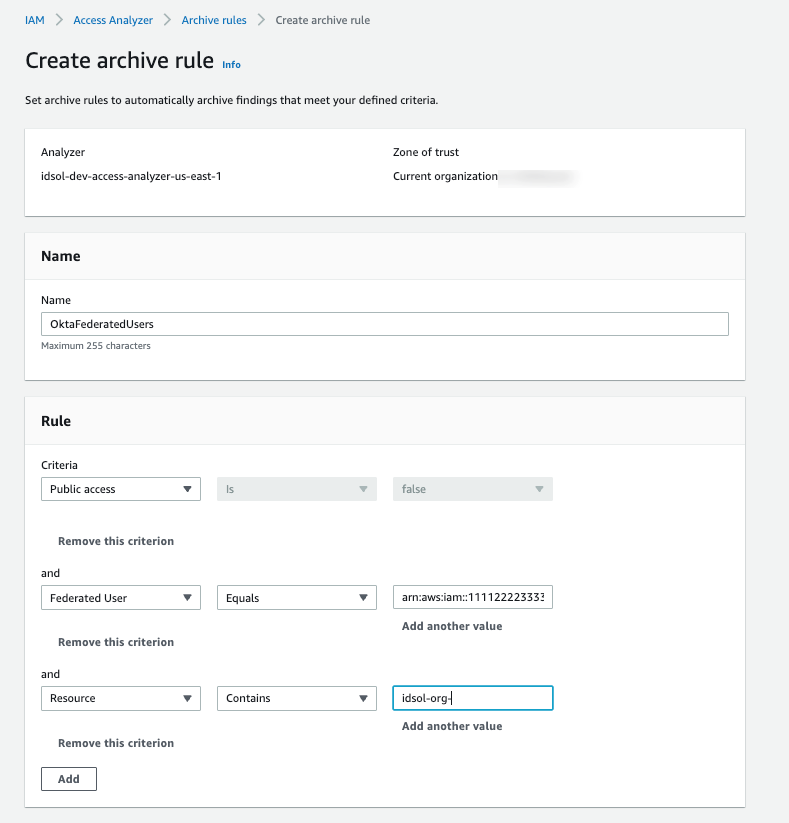
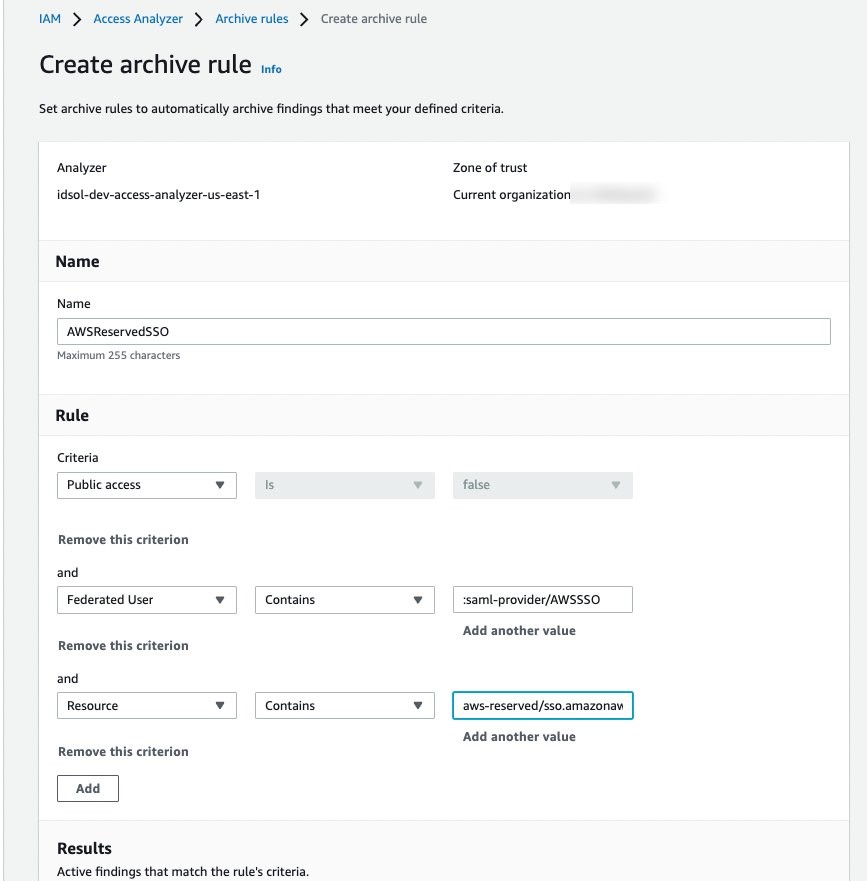
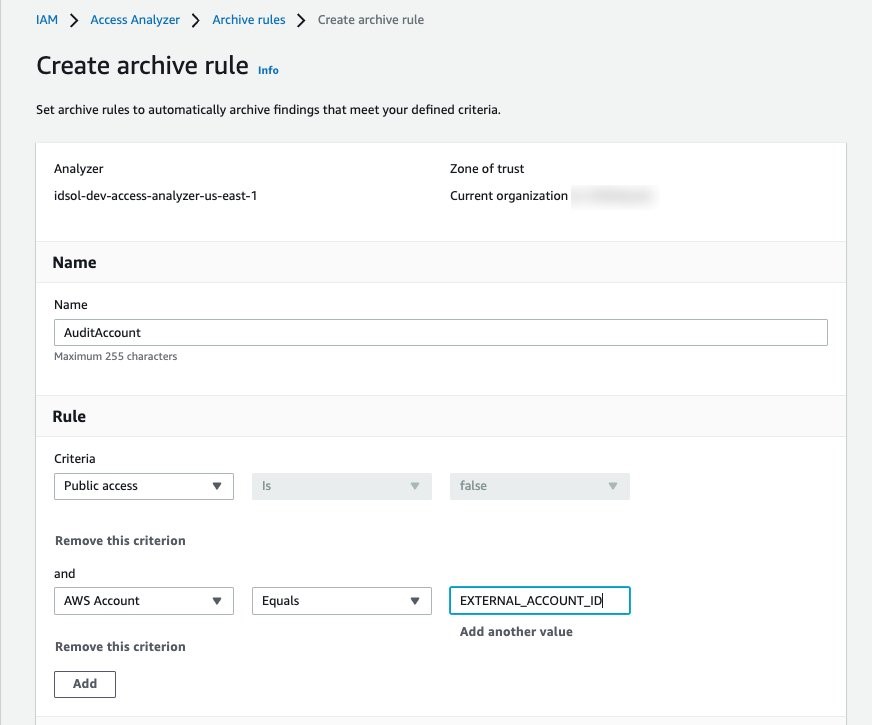
To illustrate this point, imagine that you have a subset of IAM roles that you don’t expect to use in your tracking period. For example, you might have an IAM role that is used exclusively for break glass access during your disaster recovery processes—you shouldn’t need to use this role frequently, so you can expect some unused access findings. For this example, let’s call the role DisasterRecoveryRole. You can create an archive rule to automatically archive unused access findings associated with roles named DisasterRecoveryRole, as shown in Figure 7.
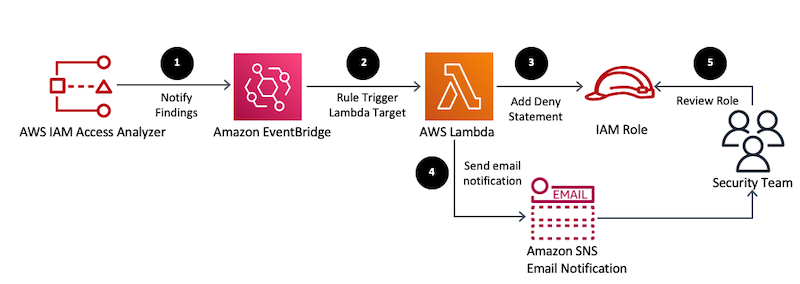
Using an EventBridge rule, you can match the incoming events associated with IAM Access Analyzer unused access findings and send them to targets for processing. For example, you can notify the account owners so that they can investigate and remediate unused IAM roles, user credentials, or permissions.
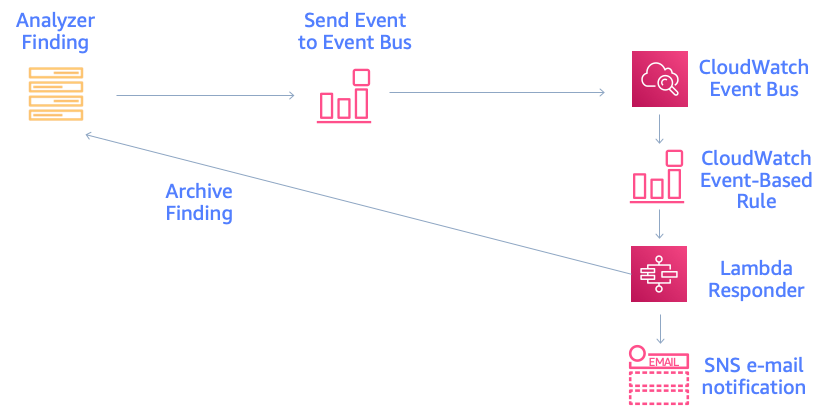
With IAM Access Analyzer, you can centrally identify, review, and refine unused access across your organization. As summarized in Figure 8, you can use the dashboard to review findings and prioritize which accounts to review based on the volume of findings. The findings highlight unused roles, unused access keys for IAM users, and unused passwords for IAM users. For active IAM roles and users, the findings provide visibility into unused services and actions. By reviewing and refining unused access, you can improve your security posture and get closer to the principle of least privilege at scale.
Figure 8: Process to address unused access findings
The new IAM Access Analyzer unused access findings and dashboard are available in AWS Regions, excluding the AWS GovCloud (US) Regions and AWS China Regions. To learn more about how to use IAM Access Analyzer to detect unused accesses, see the IAM Access Analyzer documentation.
If you have feedback about this post, submit comments in the Comments section below. If you have questions about this post, contact AWS Support.
Want more AWS Security news? Follow us on Twitter.
AWS Identity and Access Management (IAM)Access Analyzer was launched in late 2019. Access Analyzer guides customers toward least-privilege permissions across Amazon Web Services (AWS) by using analysis techniques, such as automated reasoning, to make it simpler for customers to set, verify, and refine IAM permissions. Today, we are excited to announce the general availability of IAM Access Analyzer custom policy checks, a new IAM Access Analyzer feature that helps customers accurately and proactively check IAM policies for critical permissions and increases in policy permissiveness.
In this post, we’ll show how you can integrate custom policy checks into builder workflows to automate the identification of overly permissive IAM policies and IAM policies that contain permissions that you decide are sensitive or critical.
What is the problem?
Although security teams are responsible for the overall security posture of the organization, developers are the ones creating the applications that require permissions. To enable developers to move fast while maintaining high levels of security, organizations look for ways to safely delegate the ability of developers to author IAM policies. Many AWS customers implement manual IAM policy reviews before deploying developer-authored policies to production environments. Customers follow this practice to try to prevent excessive or unwanted permissions finding their way into production. Depending on the volume and complexity of the policies that need to be reviewed; these reviews can be intensive and take time. The result is a slowdown in development and potential delay in deployment of applications and services. Some customers write custom tooling to remove the manual burden of policy reviews, but this can be costly to build and maintain.
How do custom policy checks solve that problem?
Custom policy checks are a new IAM Access Analyzer capability that helps security teams accurately and proactively identify critical permissions in their policies. Custom policy checks can also tell you if a new version of a policy is more permissive than the previous version. Custom policy checks use automated reasoning, a form of static analysis, to provide a higher level of security assurance in the cloud. For more information, see Formal Reasoning About the Security of Amazon Web Services.
Custom policy checks can be embedded in a continuous integration and continuous delivery (CI/CD) pipeline so that checks can be run against policies without having to deploy the policies. In addition, developers can run custom policy checks from their local development environments and get fast feedback about whether or not the policies they are authoring are in line with your organization’s security standards.
How to analyze IAM policies with custom policy checks
In this section, we provide step-by-step instructions for using custom policy checks to analyze IAM policies.
Prerequisites
To complete the examples in our walkthrough, you will need the following:
An AWS account, and an identity that has permissions to use the AWS services, and create the resources, used in the following examples. For more information, see the full sample code used in this blog post on GitHub.
An installed and configured AWS CLI. For more information, see Configure the AWS CLI.
Example 1: Use custom policy checks to compare two IAM policies and check that one does not grant more access than the other
In this example, you will create two IAM identity policy documents, NewPolicyDocument and ExistingPolicyDocument. You will use the new CheckNoNewAccess API to compare these two policies and check that NewPolicyDocument does not grant more access than ExistingPolicyDocument.
Step 1: Create two IAM identity policy documents
Use the following command to create ExistingPolicyDocument.
Notice that ExistingPolicyDocument grants access to the ec2:StartInstances and ec2:StopInstances actions if the condition key aws:ResourceTag/Owner resolves to true. In other words, the value of the tag matches the policy variable aws:username. NewPolicyDocument grants access to the same actions, but does not include a condition key.
Step 2: Check the policies by using the AWS CLI
Use the following command to call the CheckNoNewAccess API to check whether NewPolicyDocument grants more access than ExistingPolicyDocument.
After a moment, you will see a response from Access Analyzer. The response will look similar to the following.
{
    "result": "FAIL",
    "message": "The modified permissions grant new access compared to your existing policy.",
    "reasons": [
        {
            "description": "New access in the statement with index: 1.",
            "statementIndex": 1
        }
    ]
}
In this example, the validation returned a result of FAIL. This is because NewPolicyDocument is missing the condition key, potentially granting any principal with this identity policy attached more access than intended or needed.
Example 2: Use custom policy checks to check that an IAM policy does not contain sensitive permissions
In this example, you will create an IAM identity-based policy that contains a set of permissions. You will use the CheckAccessNotGranted API to check that the new policy does not give permissions to disable AWS CloudTrail or delete any associated trails.
Step 1: Create a new IAM identity policy document
Use the following command to create IamPolicyDocument.
Use the following command to call the CheckAccessNotGranted API to check if the new policy grants permission to the set of sensitive actions. In this example, you are asking Access Analyzer to check that IamPolicyDocument does not contain the actions cloudtrail:StopLogging or cloudtrail:DeleteTrail (passed as a list to the access parameter).
Because the policy that you created contains both cloudtrail:StopLogging and cloudtrail:DeleteTrail actions, Access Analyzer returns a FAIL.
{
    "result": "FAIL",
    "message": "The policy document grants access to perform one or more of the listed actions.",
    "reasons": [
        {
            "description": "One or more of the listed actions in the statement with index: 0.",
            "statementIndex": 0
        }
    ]
}
Example 3: Integrate custom policy checks into the developer workflow
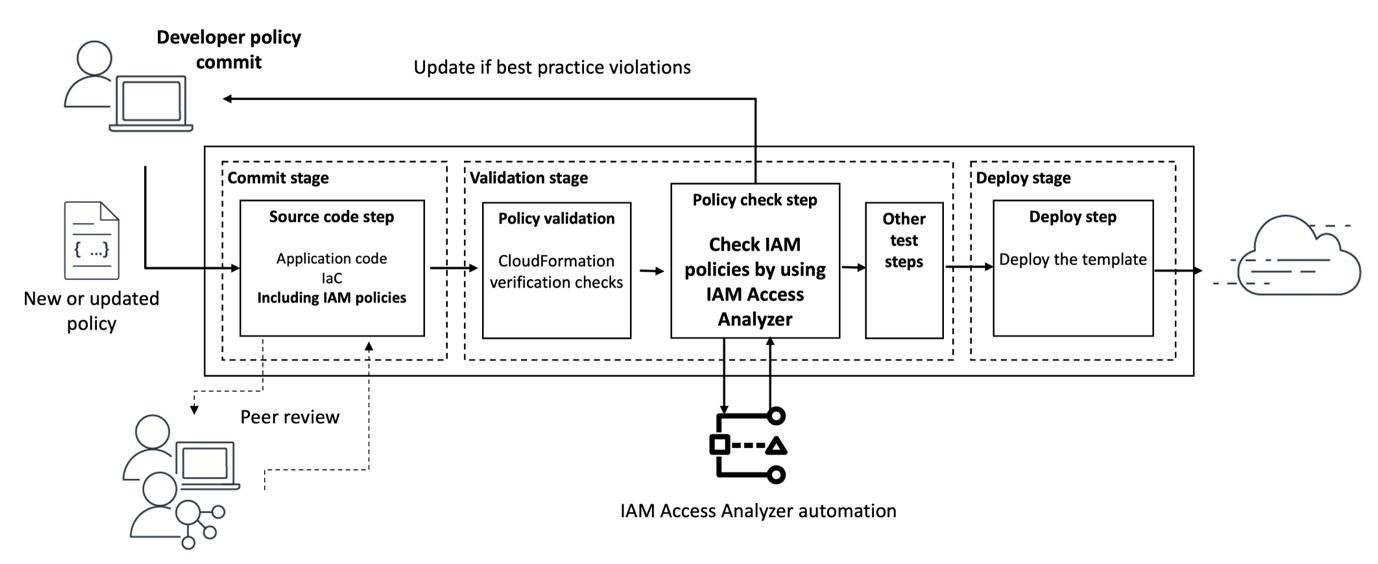
Building on the previous two examples, in this example, you will automate the analysis of the IAM policies defined in an AWS CloudFormation template. Figure 1 shows the workflow that will be used. The workflow will initiate each time a pull request is created against the main branch of an AWS CodeCommit repository called my-iam-policy (the commit stage in Figure 1). The first check uses the CheckNoNewAccess API to determine if the updated policy is more permissive than a reference IAM policy. The second check uses the CheckAccessNotGranted API to automatically check for critical permissions within the policy (the validation stage in Figure 1). In both cases, if the updated policy is more permissive, or contains critical permissions, a comment with the results of the validation is posted to the pull request. This information can then be used to decide whether the pull request is merged into the main branch for deployment (the deploy stage is shown in Figure 1).
Figure 1: Diagram of the pipeline that will check policies
Step 1: Deploy the infrastructure and set up the pipeline
Use the following command to download and unzip the Cloud Development Kit (CDK) project associated with this blog post.
git clone https://github.com/aws-samples/access-analyzer-automated-policy-analysis-blog.git
cd ./access-analyzer-automated-policy-analysis-blog
Create a virtual Python environment to contain the project dependencies by using the following command.
python3 -m venv .venv
Activate the virtual environment with the following command.
source .venv/bin/activate
Install the project requirements by using the following command.
pip install -r requirements.txt
Use the following command to update the CDK CLI to the latest major version.
npm install -g aws-cdk@2 --force
Before you can deploy the CDK project, use the following command to bootstrap your AWS environment. Bootstrapping is the process of creating resources needed for deploying CDK projects. These resources include an Amazon Simple Storage Service (Amazon S3) bucket for storing files and IAM roles that grant permissions needed to perform deployments.
cdk bootstrap
Finally, use the following command to deploy the pipeline infrastructure.
cdk deploy --require-approval never
The deployment will take a few minutes to complete. Feel free to grab a coffee and check back shortly.
When the deployment completes, there will be two stack outputs listed: one with a name that contains CodeCommitRepo and another with a name that contains ConfigBucket. Make a note of the values of these outputs, because you will need them later.
The deployed pipeline is displayed in the AWS CodePipeline console and should look similar to the pipeline shown in Figure 2.
Figure 2: AWS CodePipeline and CodeBuild Management Console view
In addition to initiating when a pull request is created, the newly deployed pipeline can also be initiated when changes to the main branch of the AWS CodeCommit repository are detected. The pipeline has three stages, CheckoutSources, IAMPolicyAnalysis, and deploy. The CheckoutSource stage checks out the contents of the my-iam-policy repository when the pipeline is triggered due to a change in the main branch.
The IAMPolicyAnalysis stage, which runs after the CheckoutSource stage or when a pull request has been created against the main branch, has two actions. The first action, Check no new access, verifies that changes to the IAM policies in the CloudFormation template do not grant more access than a pre-defined reference policy. The second action, Check access not granted, verifies that those same updates do not grant access to API actions that are deemed sensitive or critical. Finally, the Deploy stage will deploy the resources defined in the CloudFormation template, if the actions in the IAMPolicyAnalysis stage are successful.
To analyze the IAM policies, the Check no new access and Check access not granted actions depend on a reference policy and a predefined list of API actions, respectively.
Use the following command to create the reference policy.
This reference policy sets out the maximum permissions for policies that you plan to validate with custom policy checks. The iam:PassRole permission is a permission that allows an IAM principal to pass an IAM role to an AWS service, like Amazon Elastic Compute Cloud (Amazon EC2) or AWS Lambda. The reference policy says that the only way that a policy is more permissive is if it allows iam:PassRole on this group of sensitive resources: arn:aws:iam::*:role/my-sensitive-roles/*”.
Why might a reference policy be useful? A reference policy helps ensure that a particular combination of actions, resources, and conditions is not allowed in your environment. Reference policies typically allow actions and resources in one statement, then deny the problematic permissions in a second statement. This means that a policy that is more permissive than the reference policy allows access to a permission that the reference policy has denied.
In this example, a developer who is authorized to create IAM roles could, intentionally or unintentionally, create an IAM role for an AWS service (like EC2 for AWS Lambda) that has permission to pass a privileged role to another service or principal, leading to an escalation of privilege.
Use the following command to create a list of sensitive actions. This list will be parsed during the build pipeline and passed to the CheckAccessNotGranted API. If the policy grants access to one or more of the sensitive actions in this list, a result of FAIL will be returned. To keep this example simple, add a single API action, as follows.
So that the CodeBuild projects can access the dependencies, use the following command to copy the cnna-reference-policy.file and sensitive-actions.file to an S3 bucket. Refer to the stack outputs you noted earlier and replace <ConfigBucket> with the name of the S3 bucket created in your environment.
Step 2: Create a new CloudFormation template that defines an IAM policy
With the pipeline deployed, the next step is to clone the repository that was created and populate it with a CloudFormation template that defines an IAM policy.
Install git-remote-codecommit by using the following command.
pip install git-remote-codecommit
For more information on installing and configuring git-remote-codecommit, see the AWS CodeCommit User Guide.
With git-remote-codecommit installed, use the following command to clone the my-iam-policy repository from AWS CodeCommit.
git clone codecommit://my-iam-policy && cd ./my-iam-policy
If you’ve configured a named profile for use with the AWS CLI, use the following command, replacing <profile> with the name of your named profile.
git clone codecommit://<profile>@my-iam-policy && cd ./my-iam-policy
Use the following command to create the CloudFormation template in the local clone of the repository.
The actions in the IAMPolicyValidation stage are run by a CodeBuild project. CodeBuild environments run arbitrary commands that are passed to the project using a buildspec file. Each project has already been configured to use an inline buildspec file.
You can inspect the buildspec file for each project by opening the project’s Build details page as shown in Figure 3.
Figure 3: AWS CodeBuild console and build details
Step 3: Run analysis on the IAM policy
The next step involves checking in the first version of the CloudFormation template to the repository and checking two things. First, that the policy does not grant more access than the reference policy. Second, that the policy does not contain any of the sensitive actions defined in the sensitive-actions.file.
To begin tracking the CloudFormation template created earlier, use the following command.
git add ec2-instance-role.yaml
Commit the changes you have made to the repository.
git commit -m 'committing a new CFN template with IAM policy'
Finally, push these changes to the remote repository.
git push
Pushing these changes will initiate the pipeline. After a few minutes the pipeline should complete successfully. To view the status of the pipeline, do the following:
Navigate to https://<region>.console.aws.amazon.com/codesuite/codepipeline/pipelines (replacing <region> with your AWS Region).
Choose the pipeline called accessanalyzer-pipeline.
Scroll down to the IAMPolicyValidation stage of the pipeline.
For both the check no new access and check access not granted actions, choose View Logs to inspect the log output.
If you inspect the build logs for both the check no new access and check access not granted actions within the pipeline, you should see that there were no blocking or non-blocking findings, similar to what is shown in Figure 4. This indicates that the policy was validated successfully. In other words, the policy was not more permissive than the reference policy, and it did not include any of the critical permissions.
Figure 4: CodeBuild log entry confirming that the IAM policy was successfully validated
Step 4: Create a pull request to merge a new update to the CloudFormation template
In this step, you will make a change to the IAM policy in the CloudFormation template. The change deliberately makes the policy grant more access than the reference policy. The change also includes a critical permission.
Use the following command to create a new branch called add-new-permissions in the local clone of the repository.
git checkout -b add-new-permissions
Next, edit the IAM policy in ec2-instance-role.yaml to include an additional API action, dynamodb:Delete* and update the resource property of the inline policy to use an IAM role in the /my-sensitive-roles/*” path. You can copy the following example, if you’re unsure of how to do this.
Commit the policy change and push the updated policy document to the repo by using the following commands.
git add ec2-instance-role.yaml
git commit -m "adding new permission and allowing my ec2 instance to assume a pass sensitive IAM role"
The add-new-permissions branch is currently a local branch. Use the following command to push the branch to the remote repository. This action will not initiate the pipeline, because the pipeline only runs when changes are made to the repository’s main branch.
git push -u origin add-new-permissions
With the new branch and changes pushed to the repository, follow these steps to create a pull request:
Navigate to https://console.aws.amazon.com/codesuite/codecommit/repositories (don’t forget to the switch to the correct Region).
Choose the repository called my-iam-policy.
Choose the branch add-new-permissions from the drop-down list at the top of the repository screen.
Figure 5: my-iam-policy repository with new branch available
Choose Create pull request.
Enter a title and description for the pull request.
(Optional) Scroll down to see the differences between the current version and new version of the CloudFormation template highlighted.
Choose Create pull request.
The creation of the pull request will Initiate the pipeline to fetch the CloudFormation template from the repository and run the check no new access and check access not granted analysis actions.
After a few minutes, choose the Activity tab for the pull request. You should see a comment from the pipeline that contains the results of the failed validation.
Figure 6: Results from the failed validation posted as a comment to the pull request
Why did the validations fail?
The updated IAM role and inline policy failed validation for two reasons. First, the reference policy said that no one should have more permissions than the reference policy does. The reference policy in this example included a deny statement for the iam:PassRole permission with a resource of /my-sensitive-role/*. The new created inline policy included an allow statement for the iam:PassRole permission with a resource of arn:aws:iam::*:role/my-sensitive-roles/my-custom-admin-role. In other words, the new policy had more permissions than the reference policy.
Second, the list of critical permissions included the dynamodb:DeleteTable permission. The inline policy included a statement that would allow the EC2 instance to perform the dynamodb:DeleteTable action.
Cleanup
Use the following command to delete the infrastructure that was provisioned as part of the examples in this blog post.
cdk destroy
Conclusion
In this post, I introduced you to two new IAM Access Analyzer APIs: CheckNoNewAccess and CheckAccessNotGranted. The main example in the post demonstrated one way in which you can use these APIs to automate security testing throughout the development lifecycle. The example did this by integrating both APIs into the developer workflow and validating the developer-authored IAM policy when the developer created a pull request to merge changes into the repository’s main branch. The automation helped the developer to get feedback about the problems with the IAM policy quickly, allowing the developer to take action in a timely way. This is often referred to as shifting security left — identifying misconfigurations early and automatically supporting an iterative, fail-fast model of continuous development and testing. Ultimately, this enables teams to make security an inherent part of a system’s design and architecture and can speed up product development workflow.
You can find the full sample code used in this blog post on GitHub.
With GitHub Actions, you can automate, customize, and run software development workflows directly within a repository. Workflows are defined using YAML and are stored alongside your code. I’ll discuss the specifics of how you can set up and use GitHub actions within a repository in the sections that follow.
The cfn-policy-validator tool is a command-line tool that takes an AWS CloudFormation template, finds and parses the IAM policies that are attached to IAM roles, users, groups, and resources, and then runs the policies through IAM Access Analyzerpolicy checks. Implementing IAM policy validation checks at the time of code check-in helps shift security to the left (closer to the developer) and shortens the time between when developers commit code and when they get feedback on their work.
Let’s walk through an example that checks the policies that are attached to an IAM role in a CloudFormation template. In this example, the cfn-policy-validator tool will find that the trust policy attached to the IAM role allows the role to be assumed by external principals. This configuration could lead to unintended access to your resources and data, which is a security risk.
Prerequisites
To complete this example, you will need the following:
A GitHub account
An AWS account, and an identity within that account that has permissions to create the IAM roles and resources used in this example
Step 1: Create a repository that will host the CloudFormation template to be validated
To begin with, you need to create a GitHub repository to host the CloudFormation template that is going to be validated by the cfn-policy-validator tool.
In the upper-right corner of the page, in the drop-down menu, choose New repository. For Repository name, enter a short, memorable name for your repository.
(Optional) Add a description of your repository.
Choose either the option Public (the repository is accessible to everyone on the internet) or Private (the repository is accessible only to people access is explicitly shared with).
Choose Initialize this repository with: Add a README file.
Choose Create repository. Make a note of the repository’s name.
Step 2: Clone the repository locally
Now that the repository has been created, clone it locally and add a CloudFormation template.
To clone the repository locally and add a CloudFormation template:
Open the command-line tool of your choice.
Use the following command to clone the new repository locally. Make sure to replace <GitHubOrg> and <RepositoryName> with your own values.
Change in to the directory that contains the locally-cloned repository.
cd <RepositoryName>
Now that the repository is locally cloned, populate the locally-cloned repository with the following sample CloudFormation template. This template creates a single IAM role that allows a principal to assume the role to perform the S3:GetObject action.
Use the following command to create the sample CloudFormation template file.
WARNING: This sample role and policy should not be used in production. Using a wildcard in the principal element of a role’s trust policy would allow any IAM principal in any account to assume the role.
Notice that AssumeRolePolicyDocument refers to a trust policy that includes a wildcard value in the principal element. This means that the role could potentially be assumed by an external identity, and that’s a risk you want to know about.
Step 3: Vend temporary AWS credentials for GitHub Actions workflows
In order for the cfn-policy-validator tool that’s running in the GitHub Actions workflow to use the IAM Access Analyzer API, the GitHub Actions workflow needs a set of temporary AWS credentials. The AWS Credentials for GitHub Actions action helps address this requirement. This action implements the AWS SDK credential resolution chain and exports environment variables for other actions to use in a workflow. Environment variable exports are detected by the cfn-policy-validator tool.
AWS Credentials for GitHub Actions supports four methods for fetching credentials from AWS, but the recommended approach is to use GitHub’s OpenID Connect (OIDC) provider in conjunction with a configured IAM identity provider endpoint.
To configure an IAM identity provider endpoint for use in conjunction with GitHub’s OIDC provider:
In the left-hand menu, choose Identity providers, and then choose Add provider.
For Provider type, choose OpenID Connect.
For Provider URL, enter https://token.actions.githubusercontent.com
Choose Get thumbprint.
For Audiences, enter sts.amazonaws.com
Choose Add provider to complete the setup.
At this point, make a note of the OIDC provider name. You’ll need this information in the next step.
After it’s configured, the IAM identity provider endpoint should look similar to the following:
Figure 1: IAM Identity provider details
Step 4: Create an IAM role with permissions to call the IAM Access Analyzer API
In this step, you will create an IAM role that can be assumed by the GitHub Actions workflow and that provides the necessary permissions to run the cfn-policy-validator tool.
To create the IAM role:
In the IAM console, in the left-hand menu, choose Roles, and then choose Create role.
For Trust entity type, choose Web identity.
In the Provider list, choose the new GitHub OIDC provider that you created in the earlier step. For Audience, select sts.amazonaws.com from the list.
After you’ve attached the new policy, choose Next.
Note: For a full explanation of each of these actions and a CloudFormation template example that you can use to create this role, see the IAM Policy Validator for AWS CloudFormation GitHub project.
The default policy you just created allows GitHub Actions from organizations or repositories outside of your control to assume the role. To align with the IAM best practice of granting least privilege, let’s scope it down further to only allow a specific GitHub organization and the repository that you created earlier to assume it.
Replace the policy to look like the following, but don’t forget to replace {AWSAccountID}, {GitHubOrg} and {RepositoryName} with your own values.
At this point, you’ve created and configured the following resources:
A GitHub repository that has been locally cloned and filled with a sample CloudFormation template.
An IAM identity provider endpoint for use in conjunction with GitHub’s OIDC provider.
A role that can be assumed by GitHub actions, and a set of associated permissions that allow the role to make requests to IAM Access Analyzer to validate policies.
Step 5: Create a definition for the GitHub Actions workflow
The workflow runs steps on hosted runners. For this example, we are going to use Ubuntu as the operating system for the hosted runners. The workflow runs the following steps on the runner:
The workflow checks out the CloudFormation template by using the community actions/checkout action.
The workflow then uses the aws-actions/configure-aws-credentials GitHub action to request a set of credentials through the IAM identity provider endpoint and the IAM role that you created earlier.
The workflow runs a validation against the CloudFormation template by using the cfn-policy-validator tool.
The workflow is defined in a YAML document. In order for GitHub Actions to pick up the workflow, you need to place the definition file in a specific location within the repository: .github/workflows/main.yml. Note the “.” prefix in the directory name, indicating that this is a hidden directory.
To create the workflow:
Use the following command to create the folder structure within the locally cloned repository:
mkdir -p .github/workflows
Create the sample workflow definition file in the .github/workflows directory. Make sure to replace <AWSAccountID> and <AWSRegion> with your own information.
Push the local changes to the remote GitHub repository.
git push
After the changes are pushed to the remote repository, go back to https://github.com and open the repository that you created earlier. In the top-right corner of the repository window, there is a small orange indicator, as shown in Figure 2. This shows that your GitHub Actions workflow is running.
Figure 2: GitHub repository window with the orange workflow indicator
Because the sample CloudFormation template used a wildcard value “*” in the principal element of the policy as described in the section Step 2: Clone the repository locally, the orange indicator turns to a red x (shown in Figure 3), which signals that something failed in the workflow.
Figure 3: GitHub repository window with the red cross workflow indicator
Choose the red x to see more information about the workflow’s status, as shown in Figure 4.
Figure 4: Pop-up displayed after choosing the workflow indicator
Choose Details to review the workflow logs.
In this example, the Validate templates step in the workflow has failed. A closer inspection shows that there is a blocking finding with the CloudFormation template. As shown in Figure 5, the finding is labelled as EXTERNAL_PRINCIPAL and has a description of Trust policy allows access from external principals.
Figure 5: Details logs from the workflow showing the blocking finding
To remediate this blocking finding, you need to update the principal element of the trust policy to include a principal from your AWS account (considered a zone of trust). The resources and principals within your account comprises of the zone of trust for the cfn-policy-validator tool. In the initial version of sample-role.yaml, the IAM roles trust policy used a wildcard in the Principal element. This allowed principals outside of your control to assume the associated role, which caused the cfn-policy-validator tool to generate a blocking finding.
In this case, the intent is that principals within the current AWS account (zone of trust) should be able to assume this role. To achieve this result, replace the wildcard value with the account principal by following the remaining steps.
Open sample-role.yaml by using your preferred text editor, such as nano.
nano sample-role.yaml
Replace the wildcard value in the principal element with the account principal arn:aws:iam::<AccountID>:root. Make sure to replace <AWSAccountID> with your own AWS account ID.
Add the updated file, commit the changes, and push the updates to the remote GitHub repository.
git add sample-role.yaml
git commit -m ‘replacing wildcard principal with account principal’
git push
After the changes have been pushed to the remote repository, go back to https://github.com and open the repository. The orange indicator in the top right of the window should change to a green tick (check mark), as shown in Figure 6.
Figure 6: GitHub repository window with the green tick workflow indicator
This indicates that no blocking findings were identified, as shown in Figure 7.
Figure 7: Detailed logs from the workflow showing no more blocking findings
Conclusion
In this post, I showed you how to automate IAM policy validation by using GitHub Actions and the IAM Policy Validator for CloudFormation. Although the example was a simple one, it demonstrates the benefits of automating security testing at the start of the development lifecycle. This is often referred to as shifting security left. Identifying misconfigurations early and automatically supports an iterative, fail-fast model of continuous development and testing. Ultimately, this enables teams to make security an inherent part of a system’s design and architecture and can speed up product development workflows.
In addition to the example I covered today, IAM Policy Validator for CloudFormation can validate IAM policies by using a range of IAM Access Analyzer policy checks. For more information about these policy checks, see Access Analyzer reference policy checks.
If you have feedback about this post, submit comments in the Comments section below. If you have questions about this post, contact AWS Support.
Want more AWS Security news? Follow us on Twitter.
For the permissions already in place, one of IAM Access Analyzer’s capabilities is that it helps you identify resources in your AWS Organizations organization and AWS accounts that are shared with an external entity.
For each external entity that has access to a resource in your account, IAM Access Analyzer generates a finding. Findings display information about the resource and the policy statement that generated the finding, with details such as the list of actions in the policy granting access, level of access, and conditions that allow the access. You can review the findings to determine if the access is intended or unintended.
As your use of AWS services grows and the number of accounts in your organization increases, the number of findings that you have might also increase. To help reduce noise and allow you to focus on unintended access findings, you can filter findings and create archive rules for intended access.
This blog post provides step-by-step guidance on how to get started with IAM Access Analyzer findings by using different filtering techniques that can help you filter approved use cases that result in access findings. For example, you might see a finding generated for an S3 bucket that hosts images for your website and thus allows public access, as approved by your organization, apply a filter so that you can concentrate on unintended access. IAM Access Analyzer offers a wide range of filters; for a complete list, see the IAM documentation.
In this post, we also share example archive rules for approved use cases that result in access findings. Archive rules automatically archive new findings that meet the criteria you define when you create the rule. You can also apply archive rules retroactively to archive existing findings that meet the archive rule criteria. Finally, we have included an example implementation of archive rules using an AWS CloudFormation template.
IAM Access Analyzer findings overview
To get started, create an analyzer for your entire organization or your account. The organization or account that you choose is known as the zone of trust for the analyzer. The zone of trust determines the type of access that IAM Access Analyzer considers to be trusted. IAM Access Analyzer continuously monitors to identify resource policies, access control lists, and other access controls that grant public or cross-account access from outside the zone of trust, and generates findings. For this blog post, we’ll demonstrate an organization as the zone of trust, showcasing findings from a large-scale, multi-account AWS deployment.
Prerequisites
This blog post assumes that you have the following in place:
IAM Access Analyzer is enabled in your organization or account in the AWS Regions where you operate. For more details on how to enable IAM Access Analyzer, see Enabling IAM Access Analyzer.
Access to the AWS Organizations management account or to a member account in the organization with delegated administrator access for creating and updating IAM Access Analyzer resources.
How to filter the findings
To start filtering your findings and create archive rules, you should complete the following steps:
Review public access findings
Filter by removing permissions errors
Filter for known identity providers
Filter cross-account access from trusted external accounts
We’ll walk you through each step.
1. Review public access findings
Some AWS resources allow public access on the resource by means of a resource-based policy—for example, an Amazon Simple Storage Service (Amazon S3) bucket policy that has the “Principal:*” permission added to its bucket policy. For resources such as Amazon Elastic Block Store (Amazon EBS) snapshots, you can share these by using a flag on the resource permission. IAM Access Analyzer looks for such sharing and reports it in the findings.
From the global report, you can generate a list of resources that allow public access by using the Public access: true query in the IAM console.
If the access is intended, you can archive the findings by creating an archive rule using the AWS Management Console, AWS CLI, or API. When you archive a security finding, IAM Access Analyzer removes it from the Active findings list and changes its status to Archived. For instructions on how to automatically archive expected findings, see How to automatically archive expected IAM Access Analyzer findings.
Example: Known S3 bucket that hosts public website images
If you have resources for which public access is expected, such as an S3 bucket that hosts images for your website, you can add an archive rule with Resource criteria equal to the bucket name, as shown in Figure 1.
Figure 1: Create IAM Access Analyzer archive rule using the console
Is the public access unintended?
If the finding results from policies that were misconfigured to allow unintended public access, you can constrain the access by using AWS global condition context keys or a specific IAM principal ARN. The findings show the account and resource that contain the policy.
For example, if the finding shows a misconfigured S3 bucket, the following policy shows how you can modify the S3 bucket policy to only allow IAM principals from your organization to access the bucket by using the PrincipalOrgID condition key. Replace <DOC-EXAMPLE-BUCKET> with the name of your S3 bucket, and <ORGANIZATION_ID> with your organization ID.
Before you further investigate the IAM Access Analyzer findings, you should make sure that IAM Access Analyzer has enough permissions to access the resources in your accounts to be able to provide the analysis.
IAM Access Analyzer uses an AWS service-linked role to call other AWS services on your behalf. When IAM Access Analyzer analyzes a resource, it reads resource metadata, such as a resource-based policy, access control lists, and other access controls that grant public or cross-account access. If the policies don’t allow an IAM Access Analyzer role to read the resource metadata, it generates an Access Denied error finding, as shown in Figure 2.
Figure 2: IAM Access Analyzer access denied error example
To view these error findings from the IAM Access Analyzer console, filter the findings by using the Error: Access Denied property.
Resolution
To resolve the access issue, make sure that the IAM Access Analyzer service-linked role is not denied access. Review the resource-based policy attached to the resource that IAM Access Analyzer isn’t able to access. For a list of services that support resource-based policies, see the IAM documentation.
For example, if the analyzer can’t access an AWS Key Management Service (AWS KMS) key because of an explicit deny, add an exception for the IAM Access Analyzer service-linked role to the policy statement, similar to the following. Make sure that you change the <ACCOUNT_ID> to your account id.
With SAML 2.0 or Open ID Connect (OIDC)—which are open federation standards that many identity providers (IdPs) use—users can log in to the console or call the AWS API operations without you having to create an IAM user for everyone in your organization.
To set up federation, you must perform a one-time configuration so that your organization’s IdP and your account trust each other. To configure this trust, you must register AWS as a service provider (SP) with the IdP of your organization and set up metadata and key exchange.
The role or roles that you create in IAM define what the federated users from your organization are allowed to use on AWS. When you create the trust policy for the role, you specify the SAML or OIDC provider as the Principal. To only allow users that match certain attributes to access the role, you can scope the trust policy with a Condition.
Example 1: Federation with Okta
Let’s walk through an example that uses Okta as the IdP. Although access to a trusted IdP is intended, IAM Access Analyzer creates a finding for an IAM role that has trust policy granting access to a SAML provider because the trust policy allows access outside of the known zone of trust for the analyzer. You will see findings created for the IAM role granting access to Okta using the IAM trust policy, as shown in Figure 3.
Figure 3: IAM Access Analyzer identity provider finding example
Resolution
Setting access through SAML providers is a privileged operation, so we recommend that you analyze each finding to decide if an exception is acceptable. If you approve of the SAML-provided access setup, you can implement an archive rule to archive such findings with conditions for federation used in combination with your SAML provider. The filter for the Federated User rule depends on the name that you gave to the SAML IdP in your federation setup. For example, if your SAML IdP name is Okta, the rule should have a filter for arn:aws:iam::<ACCOUNT_ID>:saml-provider/Okta, where <ACCOUNT_ID> is your account number, as shown in Figure 4.
Figure 4: Archive rule example for using an IdP-related finding
Note: To include additional values for a multi-account setup, use the Add another value filter.
Example 2: IAM Identity Center
With AWS IAM Identity Center (successor to AWS Single Sign-On), you can manage sign-in security for your workforce. IAM Identity Center provides a central place to define your permission sets, assign them to your users and groups, and give your users a portal where they can access their assigned accounts.
With IAM Identity Center, you manage access to accounts by creating and assigning permission sets. These are IAM role templates that define (among other things) which policies to include in a role. When you create a permission set in IAM Identity Center and associate it to an account, IAM Identity Center creates a role in that account with a trust policy that allows a federated IdP as a principal — in this case, IAM Identity Center.
IAM Access Analyzer generates a finding for this setup because the allowed access is outside of the known zone of trust for the analyzer, as shown in Figure 5.
Figure 5: IAM Access Analyzer finding example for IAM Identity Center
To filter this finding, you need to implement an archive rule.
Resolution
You can implement an archive rule with conditions for federation used in combination with IAM Identity Center as the SAML provider. The roles created by IAM Identity Center in member accounts use a reserved path on AWS: arn:aws:iam::<ACCOUNT_ID>:role/aws-reserved/sso.amazonaws.com/. Hence, you can create an archive rule with a filter that contains :saml-provider/AWSSSO in the Federated User name and aws-reserved/sso.amazonaws.com/ in the Resource, as shown in Figure 6.
Figure 6: Archive rule example for IAM Identity Center generated findings
4. Filter cross-account access findings from trusted external accounts
We recommend that you identify and document accounts and principals that should be allowed access outside of the zone of trust for IAM Access Analyzer.
When a resource-based policy attached to a resource allows cross-account access from outside the zone of trust, IAM Access Analyzer generates cross-account access findings.
Is the cross-account access intended?
When you review cross-account access findings, you need to determine whether the access is intended or not. For example, you might have access provided to your auditor’s account or a partner account for visibility and monitoring of your AWS applications.
For trusted external accounts, you can create an archive rule that includes the AWS account in the criteria for the rule. Figure 7 shows an example of how to create the archive rule for a trusted external account (EXTERNAL_ACCOUNT_ID). In your own rule, replace EXTERNAL_ACCOUNT_ID with the trusted account id.
Figure 7: Archive rule example for trusted account findings
Is the cross-account access unintended?
After you have archived the intended access findings, you can start analyzing the findings initiated from unintended access. When you confirm that the findings show unintended access, you should take steps to remove the access by altering or deleting the policy or access control that granted access. You can expand the solution outlined in the blog post Automate resolution for IAM Access Analyzer cross-account access findings on IAM roles by adding an explicit deny statement.
You can also use AWS CloudTrail to track API calls that could have changed access configuration on your AWS resources.
Deploy IAM Access Analyzer and archive rules with a CloudFormation template
In this section, we demonstrate a sample CloudFormation template that creates an IAM access analyzer and archive rules for findings that are created for identified intended access to resources.
Important: When you create an archive rule using the AWS console, the existing findings and new findings that match criteria mentioned in the rules will be archived. However, archive rules created through CloudFormation or the AWS CLI will only archive the new findings that meet the criteria defined. You need to perform the access-analyzer:ApplyArchiveRule API after you create the archive rule to archive existing findings as well.
The sample CloudFormation template takes the following values as inputs and creates archive rules for findings that are created for identified intended access to resources shared outside of your zone of trust for the specified analyzer:
Analyzer name
Zone of trust
Known public S3 buckets, if you have any (for example, a bucket that hosts public website images).
Note: We use S3 buckets as an example. You can edit the rule to include resource types that are supported by IAM Access Analyzer, if public access is intended.
Trusted accounts — AWS accounts that don’t belong to your organization, but you trust them to have access to resources in your organization
SAML provider — The SAML provider approved to have access to your resources
Note: If you don’t use federation, you can remove the rule SAMLFederatedUsers.
AWSTemplateFormatVersion: 2010-09-09
Description: >+
  Sample CloudFormation template creates archive rules for findings
  created for resources shared outside of your zone of trust for specified
  analyzer.

Metadata:
  AWS::CloudFormation::Interface:
    ParameterGroups:
      - Label:
          default: Define Configuration
        Parameters:
          - AccessAnalyzerName
          - ZoneOfTrust
          - KnownPublicS3Buckets
          - TrustedAccounts
          - SAMLProvider
Parameters:
  AccessAnalyzerName:
    Description: Provide name of the analyzer you would like to create archive rules for.
    Type: String
  ZoneOfTrust:
    Description: Select the zone of trust of AccessAnalyzer
    AllowedValues:
      - ACCOUNT
      - ORGANIZATION
    Type: String
  KnownPublicS3Buckets:
    Description: List of comma-separated known S3 bucket arns, that should allow
      public access Example -
      arn:aws:s3:::DOC-EXAMPLE-BUCKET,arn:aws:s3:::DOC-EXAMPLE-BUCKET2
    Type: CommaDelimitedList
  TrustedAccounts:
    Description: List of comma-separated account IDs, that do not belong to your
      organization but you trust them to have access to resources in your
      organization. [Example - Your auditor’s AWS account]
    Type: List<Number>
  TrustedFederationPrincipals:
    Description: List of comma-separated trusted federated principals that are able
      to assume roles in your accounts. [Example -
      arn:aws:iam::012345678901:saml-provider/Okta,
      arn:aws:iam::1111222233334444:saml-provider/Okta]
    Type: CommaDelimitedList
Resources:
  AccessAnalyzer:
    Type: AWS::AccessAnalyzer::Analyzer
    Properties:
      AnalyzerName: ${AccessAnalyzerName}-${AWS::Region}
      Type: ZoneOfTrust
      ArchiveRules:
        - RuleName: ArchivePublicS3BucketsAccess
          Filter:
            - Property: resource
              Eq: KnownPublicS3Buckets
        - RuleName: AccountAccessNecessaryForBusinessProcesses
          Filter:
            - Property: principal.AWS
              Eq: TrustedAccounts
            - Property: isPublic
              Eq:
                - "false"
        - RuleName: SAMLFederatedUsers
          Filter:
            - Property: principal.Federated
              Eq: TrustedFederationPrincipals
To download this sample template, download the file IAMAccessAnalyzer.yaml from Amazon S3.
Conclusion
In this blog post, you learned how to start with IAM Access Analyzer findings, filter them based on the level of access given outside of your zone of trust, and create archive rules for intended access findings. By using different filtering techniques to remediate intended access findings, you can concentrate on unintended access.
In this blog post, we show you how to create an Amazon QuickSight dashboard to visualize the policy validation findings from AWS Identity and Access Management (IAM) Access Analyzer. You can use this dashboard to better understand your policies and how to achieve least privilege by periodically validating your IAM roles against IAM best practices. This blog post walks you through the deployment for a multi-account environment using AWS Organizations.
Policy validation is a feature of IAM Access Analyzer that guides you to author and validate secure and functional policies with more than 100 policy checks. You can use these checks when creating new policies or to validate existing policies. To learn how to use IAM Access Analyzer policy validation APIs when creating new policies, see Validate IAM policies in CloudFormation templates using IAM Access Analyzer. In this post, we focus on how to validate existing IAM policies.
Approach to visualize IAM Access Analyzer findings
As shown in Figure 1, there are four high-level steps to build the visualization.
Figure 1: Steps to visualize IAM Access Analyzer findings
Collect IAM policies
To validate your IAM policies with IAM Access Analyzer in your organization, start by periodically sending the content of your IAM policies (inline and customer-managed) to a central account, such as your Security Tooling account.
Validate IAM policies
After you collect the IAM policies in a central account, run an IAM Access Analyzer ValidatePolicy API call on each policy. The API calls return a list of findings. The findings can help you identify issues, provide actionable recommendations to resolve the issues, and enable you to author functional policies that can meet security best practices. The findings are stored in an Amazon Simple Storage Service (Amazon S3) bucket. To learn about different findings, see Access Analyzer policy check reference.
Visualize findings
IAM Access Analyzer policy validation findings are stored centrally in an S3 bucket. The S3 bucket is owned by the central (hub) account of your choosing. You can use Amazon Athena to query the findings from the S3 bucket, and then create a QuickSight analysis to visualize the findings.
Publish dashboards
Finally, you can publish a shareable QuickSight dashboard. Figure 2 shows an example of the dashboard.
Figure 2: Dashboard overview
Design overview
This implementation is a serverless job initiated by Amazon EventBridge rules. It collects IAM policies into a hub account (such as your Security Tooling account), validates the policies, stores the validation results in an S3 bucket, and uses Athena to query the findings and QuickSight to visualize them. Figure 3 gives a design overview of our implementation.
Figure 3: Design overview of the implementation
As shown in Figure 3, the implementation includes the following steps:
A time-based rule is set to run daily. The rule triggers an AWS Lambda function that lists the IAM policies of the AWS account it is running in.
When new messages are received, the Amazon SQS queue initiates the second Lambda function. For each message, the Lambda function extracts the policy document and validates it by using the IAM Access Analyzer ValidatePolicy API call.
The Lambda function stores validation results in an S3 bucket.
An AWS Glue table contains the schema for the IAM Access Analyzer findings. Athena natively uses the AWS Glue Data Catalog.
Athena queries the findings stored in the S3 bucket.
QuickSight uses Athena as a data source to visualize IAM Access Analyzer findings.
Benefits of the implementation
By implementing this solution, you can achieve the following benefits:
Store your IAM Access Analyzer policy validation results in a scalable and cost-effective manner with Amazon S3.
Add scalability and fault tolerance to your validation workflow with Amazon SQS.
Partition your evaluation results in Athena and restrict the amount of data scanned by each query, helping to improve performance and reduce cost.
Gain insights from IAM Access Analyzer policy validation findings with QuickSight dashboards. You can use the dashboard to identify IAM policies that don’t comply with AWS best practices and then take action to correct them.
Prerequisites
Before you implement the solution, make sure you’ve completed the following steps:
If you plan to deploy the implementation in a multi-account environment using Organizations, enable all features and enable trusted access with Organizations to operate a service-managed stack set.
Note: This implementation works in accounts that don’t have AWS Lake Formation enabled. If Lake Formation is enabled in your account, you might need to grant Lake Formation permissions in addition to the implementation IAM permissions. For details, see Lake Formation access control overview.
Walkthrough
In this section, we will show you how to deploy an AWS CloudFormation template to your central account (such as your Security Tooling account), which is the hub for IAM Access Analyzer findings. The central account collects, validates, and visualizes your findings.
To deploy the implementation to your multi-account environment
Deploy the CloudFormation stack to your central account.
In your central account, run the following commands in a terminal. These commands clone the GitHub repository and deploy the CloudFormation stack to your central account.
# A) Clone the repository
git clone https://github.com/aws-samples/visualize-iam-access-analyzer-policy-validation-findings.git # B) Switch to the repository's directory
cd visualize-iam-access-analyzer-policy-validation-findings # C) Deploy the CloudFormation stack to your central security account (hub). For<AWSRegion>enter your AWS Region without quotes.
make deploy-hub aws-region=<AWSRegion>
If you want to send IAM policies from other member accounts to your central account, you will need to make note of the CloudFormation stack outputs for SQSQueueUrl and KMSKeyArn when the deployment is complete.
make describe-hub-outputs aws-region=<AWSRegion>
Switch to your organization’s management account and deploy the stack sets to the member accounts. For <SQSQueueUrl> and <KMSKeyArn>, use the values from the previous step.
# Create a CloudFormation stack set to deploy the resources to the member accounts.

make deploy-members SQSQueueUrl=<SQSQueueUrl> KMSKeyArn=<KMSKeyArn< aws-region=<AWSRegion>
To deploy the QuickSight dashboard to your central account
Make sure that QuickSight is using the IAM role aws-quicksight-service-role.
In QuickSight, in the navigation bar at the top right, choose your account (indicated by a person icon) and then choose Manage QuickSight.
On the Manage QuickSight page, in the menu at the left, choose Security & Permissions.
On the Security & Permissions page, under QuickSight access to AWS services, choose Manage.
For IAM role, choose Use an existing role, and then do one of the following:
If you see a list of existing IAM roles, choose the role
# <aws-region> your Quicksight main Region, for example eu-west-1
# <account-id> The ID of your account, for example 123456789012
# <namespace-name> Quicksight namespace, for example default.
# You can list the namespaces by using aws quicksight list-namespaces --aws-account-id<account-id>
aws quicksight list-users --region <aws-region> --aws-account-id <account-id> --namespace <namespace-name>
Make a note of the user’s ARN that you want to grant permissions to list, describe, or update the QuickSight dashboard. This information is found in the arn element. For example, arn:aws:quicksight:us-east-1:111122223333:user/default/User1
To launch the deployment stack for the QuickSight dashboard, run the following command. Replace <quicksight-user-arn> with the user’s ARN from the previous step.
make deploy-dashboard-hub aws-region=<AWSRegion> quicksight-user-arn=<quicksight-user-arn>
Publish and share the QuickSight dashboard with the policy validation findings
You can publish your QuickSight dashboard and then share it with other QuickSight users for reporting purposes. The dashboard preserves the configuration of the analysis at the time that it’s published and reflects the current data in the datasets used by the analysis.
To publish the QuickSight dashboard
In the QuickSight console, choose Analyses and then choose access-analyzer-validation-findings.
In your analysis, in the application bar at the upper right, choose Share, and then choose Publish dashboard.
On the Publish dashboard page, choose Publish new dashboard as and enter IAM Access Analyzer Policy Validation.
Choose Publish dashboard. The dashboard is now published.
On the QuickSight start page, choose Dashboards.
Select the IAM Access Analyzer Policy Validation dashboard. IAM Access Analyzer policy validation findings will appear within the next 24 hours.
Note: If you don’t want to wait until the Lambda function is initiated automatically, you can invoke the function that lists customer-managed policies and inline policies by using the aws lambda invoke AWS CLI command on the hub account and wait one to two minutes to see the policy validation findings:
In the QuickSight console, choose Dashboards and then choose IAM Access Analyzer Policy Validation.
In your dashboard, in the application bar at the upper right, choose Share, and then choose Share dashboard.
On the Share dashboard page that opens, do the following:
For Invite users and groups to dashboard on the left pane, enter a user email or group name in the search box. Users or groups that match your query appear in a list below the search box. Only active users and groups appear in the list.
For the user or group that you want to grant access to the dashboard, choose Add. Then choose the level of permissions that you want them to have.
After you grant users access to a dashboard, you can copy a link to it and send it to them.
Your teams can use this dashboard to better understand their IAM policies and how to move toward least-privilege permissions, as outlined in the section Validate your IAM roles of the blog post Top 10 security items to improve in your AWS account.
Clean up
To avoid incurring additional charges in your accounts, remove the resources that you created in this walkthrough.
Before deleting the CloudFormation stacks and stack sets in your accounts, make sure that the S3 buckets that you created are empty. To delete everything (including old versioned objects) in a versioned bucket, we recommend emptying the bucket through the console. Before deleting the CloudFormation stack from the central account, delete the Athena workgroup.
To delete remaining resources from your AWS accounts
Delete the CloudFormation stack from your central account by running the following command. Make sure to replace <AWSRegion> with your own Region.
make delete-stackset-instances aws-region=<AWSRegion>

# Wait for the operation to finish. You can check its progress on the CloudFormation console.

make delete-stackset aws-region=<AWSRegion>
Delete the QuickSight dashboard by running the following command using the central account credentials. Make sure to replace <AWSRegion> with your own Region.
In this post, you learned how to validate your existing IAM policies by using the IAM Access Analyzer ValidatePolicy API and visualizing the results with AWS analytics tools. By using the implementation, you can better understand your IAM policies and work to reach least privilege in a scalable, fault-tolerant, and cost-effective way. This will help you identify opportunities to tighten your permissions and to grant the right fine-grained permissions to help enhance your overall security posture.
If you have feedback about this post, submit comments in the Comments section below. If you have questions about this post, start a new thread on the AWS Security, Identity, & Compliance re:Post.
Want more AWS Security news? Follow us on Twitter.
Network and security teams often need to evaluate the internet accessibility of all their resources on AWS and block any non-essential internet access. Validating who has access to what can be complicated—there are several different controls that can prevent or authorize access to resources in your Amazon Virtual Private Cloud (Amazon VPC). The recently launched Amazon VPC Network Access Analyzer helps you understand potential network paths to and from your resources without having to build automation or manually review security groups, network access control lists (network ACLs), route tables, and Elastic Load Balancing (ELB) configurations. You can use this information to add security layers, such as moving instances to a private subnet behind a NAT gateway or moving APIs behind AWS PrivateLink, rather than use public internet connectivity. In this blog post, we show you how to use Network Access Analyzer to identify publicly accessible resources.
Network Access Analyzer uses automated reasoning to produce findings of potential network paths that don’t meet your network security policy. Network Access Analyzer reasons about all of your Amazon VPC configurations together rather than in isolation. For example, it produces findings for paths from an EC2 instance to an internet gateway only when the following conditions are met: the security group allows outbound traffic, the network ACL allows outbound traffic, and the instance’s route table has a route to an internet gateway (possibly through a NAT gateway, network firewall, transit gateway, or peering connection). Network Access Analyzer produces actionable findings with more context such as the entire network path from the source to the destination, as compared to the isolated rule-based checks of individual controls, such as security groups or route tables.
Sample environment
Let’s walk through a real-world example of using Network Access Analyzer to detect publicly accessible resources in your environment. Figure 1 shows an environment for this evaluation, which includes the following resources:
An EC2 instance in a public subnet allowing inbound public connections on port 80/443 (HTTP/HTTPS).
An EC2 instance in a private subnet allowing connections from an Application Load Balancer on port 80/443.
An Application Load Balancer in a public subnet with a Target Group connected to the private web server, allowing public connections on port 80/443.
An Amazon Aurora database in a public subnet allowing public connections on port 3306 (MySQL).
An Aurora database in a private subnet.
An EC2 instance in a public subnet allowing public connections on port 9200 (OpenSearch/Elasticsearch).
An Amazon EMR cluster allowing public connections on port 8080.
A Windows EC2 instance in a public subnet allowing public connections on port 3389 (Remote Desktop Protocol).
Figure 1: Example environment of web servers hosted on EC2 instances, remote desktop servers hosted on EC2, Relational Database Service (RDS) databases, Amazon EMR cluster, and OpenSearch cluster on EC2
Let us assume that your organization’s security policy requires that your databases and analytics clusters not be directly accessible from the internet, whereas certain workload such as instances for web services can have internet access only through an Application Load Balancer over ports 80 and 443. Network Access Analyzer allows you to evaluate network access to resources in your VPCs, including database resources such as Amazon RDS and Amazon Aurora clusters, and analytics resources such as Amazon OpenSearch Service clusters and Amazon EMR clusters. This allows you to govern network access to your resources on AWS, by identifying network access that does not meet your security policies, and creating exclusions for paths that do have the appropriate network controls in place.
Configure Network Access Analyzer
In this section, you will learn how to create network scopes, analyze the environment, and review the findings produced. You can create network access scopes by using the AWS Command Line Interface (AWS CLI) or AWS Management Console. When creating network access scopes using the AWS CLI, you can supply the scope by using a JSON document. This blog post provides several network access scopes as JSON documents that you can deploy to your AWS accounts.
In the navigation pane, under Network Analysis, choose Network Access Analyzer.
Under Network Access Scopes, select the checkboxes next to the scopes that you want to analyze, and then choose Analyze, as shown in Figure 2.
Figure 2: Custom network scopes created for Network Access Analyzer
If Network Access Analyzer detects findings, the console indicates the status Findings detected for each scope, as shown in Figure 3.
Figure 3: Network Access Analyzer scope status
To review findings for a scope (console)
On the Network Access Scopes page, under Network Access Scope ID, select the link for the scope that has the findings that you want to review. This opens the latest analysis, with the option to review past analyses, as shown in Figure 4.
Figure 4: Finding summary identifying Amazon Aurora instance with public access to port 3306
To review the path for a specific finding, under Findings, select the radio button to the left of the finding, as shown in Figure 4. Figure 5 shows an example of a path for a finding.
Figure 5: Finding details showing access to the Amazon Aurora instance from the internet gateway to the elastic network interface, allowed by a network ACL and security group.
Choose any resource in the path for detailed information, as shown in Figure 6.
Figure 6: Resource detail within a finding outlining a specific security group allowing access on port 3306
How to remediate findings
After deploying network scopes and reviewing findings for publicly accessible resources, you should next limit access to those resources and remove public access. Use cases vary, but the scopes outlined in this post identify resources that you should share publicly in a more secure manner or remove public access entirely. The following techniques will help you align to the Protecting Networks portion of the AWS Well-Architected Framework Security Pillar.
When creating web servers in EC2, you should not place web servers directly in a public subnet with security groups allowing HTTP and HTTPS ports from all internet addresses. Instead, you should place your EC2 instances in private subnets and use Application Load Balancers in a public subnet. From there, you can attach a security group that allows HTTP/HTTPS access from public internet addresses to your Application Load Balancer, and attach a security group that allows HTTP/HTTPS from your Load Balancer security group to your web server EC2 instances. You can also associate AWS WAF web ACLs to the load balancer to protect your web applications or APIs against common web exploits and bots that may affect availability, compromise security, or consume excessive resources.
Similarly, if you have OpenSearch/Elasticsearch running on EC2 or Amazon OpenSearch Service, or are using Amazon EMR, you can share these resources using PrivateLink. Use the Amazon EMR block public access configuration to verify that your EMR clusters are not shared publicly.
To connect to Remote Desktop on EC2 instances, you should use AWS Systems Manager to connect using Fleet Manager. Connecting with Fleet Manager only requires your Windows EC2 instances to be a managed node. When connecting using Fleet Manager, the security group requires no inbound ports, and the instance can be in a private subnet. For more information, see the Systems Manager prerequisites.
Conclusion
This blog post demonstrates how you can identify and remediate publicly accessible resources. Amazon VPC Network Access Analyzer helps you identify available network paths by using automated reasoning technology and user-defined access scopes. By using these scopes, you can define non-permitted network paths, identify resources that have those paths, and then take action to increase your security posture. To learn more about building continuous verification of network compliance at scale, see the blog post Continuous verification of network compliance using Amazon VPC Network Access Analyzer and AWS Security Hub. Take action today by deploying the Network Access Analyzer scopes in this post to evaluate your environment and add layers of security to best fit your needs.
If you have feedback about this post, submit comments in the Comments section below. If you have questions about this post, contact AWS Support.
Want more AWS Security news? Follow us on Twitter.
In Part 1 of this two-part series, we shared an overview of some of the most important 2021 Amazon Web Services (AWS) Security service and feature launches. In this follow-up, we’ll dive deep into additional launches that are important for security professionals to be aware of and understand across all AWS services. There have already been plenty in the first half of 2022, so we’ll highlight those soon, as well.
AWS Identity
You can use AWS Identity Services to build Zero Trust architectures, help secure your environments with a robust data perimeter, and work toward the security best practice of granting least privilege. In 2021, AWS expanded the identity source options, AWS Region availability, and support for AWS services. There is also added visibility and power in the permission management system. New features offer new integrations, additional policy checks, and secure resource sharing across AWS accounts.
AWS Single Sign-On
For identity management, AWS Single Sign-On (AWS SSO) is where you create, or connect, your workforce identities in AWS once and manage access centrally across your AWS accounts in AWS Organizations. In 2021, AWS SSO announced new integrations for JumpCloud and CyberArk users. This adds to the list of providers that you can use to connect your users and groups, which also includes Microsoft Active Directory Domain Services, Okta Universal Directory, Azure AD, OneLogin, and Ping Identity.
For access management, there have been a range of feature launches with AWS Identity and Access Management (IAM) that have added up to more power and visibility in the permissions management system. Here are some key examples.
IAM made it simpler to relate a user’s IAM role activity to their corporate identity. By setting the new source identity attribute, which persists through role assumption chains and gets logged in AWS CloudTrail, you can find out who is responsible for actions that IAM roles performed.
IAM added support for policy conditions, to help manage permissions for AWS services that access your resources. This important feature launch of service principal conditions helps you to distinguish between API calls being made on your behalf by a service principal, and those being made by a principal inside your account. You can choose to allow or deny the calls depending on your needs. As a security professional, you might find this especially useful in conjunction with the aws:CalledVia condition key, which allows you to scope permissions down to specify that this account principal can only call this API if they are calling it using a particular AWS service that’s acting on their behalf. For example, your account principal can’t generally access a particular Amazon Simple Storage Service (Amazon S3) bucket, but if they are accessing it by using Amazon Athena, they can do so. These conditions can also be used in service control policies (SCPs) to give account principals broader scope across an account, organizational unit, or organization; they need not be added to individual principal policies or resource policies.
Another very handy new IAM feature launch is additional information about the reason for an access denied error message. With this additional information, you can now see which of the relevant access control policies (for example, IAM, resource, SCP, or VPC endpoint) was the cause of the denial. As of now, this new IAM feature is supported by more than 50% of all AWS services in the AWS SDK and AWS Command Line Interface, and a fast-growing number in the AWS Management Console. We will continue to add support for this capability across services, as well as add more features that are designed to make the journey to least privilege simpler.
IAM Access Analyzer also launched the ability to generate fine-grained policies based on analyzing past AWS CloudTrail activity. This feature provides a great new capability for DevOps teams or central security teams to scope down policies to just the permissions needed, making it simpler to implement least privilege permissions. IAM Access Analyzer launched further enhancements to expand policy checks, and the ability to generate a sample least-privilege policy from past activity was expanded beyond the account level to include an analysis of principal behavior within the entire organization by analyzing log activity stored in AWS CloudTrail.
AWS Resource Access Manager
AWS Resource Access Manager (AWS RAM) helps you securely share your resources across unrelated AWS accounts within your organization or organizational units (OUs) in AWS Organizations. Now you can also share your resources with IAM roles and IAM users for supported resource types. This update enables more granular access using managed permissions that you can use to define access to shared resources. In addition to the default managed permission defined for each shareable resource type, you now have more flexibility to choose which permissions to grant to whom for resource types that support additional managed permissions. Additionally, AWS RAM added support for global resource types, enabling you to provision a global resource once, and share that resource across your accounts. A global resource is one that can be used in multiple AWS Regions; the first example of a global resource is found in AWS Cloud WAN, currently in preview as of this publication. AWS RAM helps you more securely share an AWS Cloud WAN core network, which is a managed network containing AWS and on-premises networks. With AWS RAM global resource sharing, you can use the Cloud WAN core network to centrally operate a unified global network across Regions and accounts.
AWS Directory Service
AWS Directory Service for Microsoft Active Directory, also known as AWS Managed Microsoft Active Directory (AD), was updated to automatically provide domain controller and directory utilization metrics in Amazon CloudWatch for new and existing directories. Analyzing these utilization metrics helps you quantify your average and peak load times to identify the need for additional domain controllers. With this, you can define the number of domain controllers to meet your performance, resilience, and cost requirements.
Amazon Cognito
Amazon Cognitoidentity pools (federated identities) was updated to enable you to use attributes from social and corporate identity providers to make access control decisions and simplify permissions management in AWS resources. In Amazon Cognito, you can choose predefined attribute-tag mappings, or you can create custom mappings using the attributes from social and corporate providers’ access and ID tokens, or SAML assertions. You can then reference the tags in an IAM permissions policy to implement attribute-based access control (ABAC) and manage access to your AWS resources. Amazon Cognito also launched a new console experience for user pools and now supports targeted sign out through refresh token revocation.
Governance, control, and logging services
There were a number of important releases in 2021 in the areas of governance, control, and logging services.
This approach provides a powerful new middle ground between the older security models of prevention (which provide developers only an access denied message, and often can’t distinguish between an acceptable and an unacceptable use of the same API) and a detect and react model (when undesired states have already gone live). The Cfn-Guard 2.0 model gives builders the freedom to build with IaC, while allowing central teams to have the ability to reject infrastructure configurations or changes that don’t conform to central policies—and to do so with completely custom error messages that invite dialog between the builder team and the central team, in case the rule is unnuanced and needs to be refined, or if a specific exception needs to be created.
For example, a builder team might be allowed to provision and attach an internet gateway to a VPC, but the team can do this only if the routes to the internet gateway are limited to a certain pre-defined set of CIDR ranges, such as the public addresses of the organization’s branch offices. It’s not possible to write an IAM policy that takes into account the CIDR values of a VPC route table update, but you can write a Cfn-Guard 2.0 rule that allows the creation and use of an internet gateway, but only with a defined and limited set of IP addresses.
AWS Systems Manager Incident Manager
An important launch that security professionals should know about is AWS Systems Manager Incident Manager. Incident Manager provides a number of powerful capabilities for managing incidents of any kind, including operational and availability issues but also security issues. With Incident Manager, you can automatically take action when a critical issue is detected by an Amazon CloudWatch alarm or Amazon EventBridge event. Incident Manager runs pre-configured response plans to engage responders by using SMS and phone calls, can enable chat commands and notifications using AWS Chatbot, and runs automation workflows with AWS Systems Manager Automation runbooks. The Incident Manager console integrates with AWS Systems Manager OpsCenter to help you track incidents and post-incident action items from a central place that also synchronizes with third-party management tools such as Jira Service Desk and ServiceNow. Incident Manager enables cross-account sharing of incidents using AWS RAM, and provides cross-Region replication of incidents to achieve higher availability.
Amazon Simple Storage Service (Amazon S3) is one of the most important services at AWS, and its steady addition of security-related enhancements is always big news. Here are the 2021 highlights.
Access Points aliases
Amazon S3 introduced a new feature, Amazon S3 Access Points aliases. With Amazon S3 Access Points aliases, you can make the access points backwards-compatible with a large amount of existing code that is programmed to interact with S3 buckets rather than access points.
To understand the importance of this launch, we have to go back to 2019 to the launch of Amazon S3 Access Points. Access points are a powerful mechanism for managing S3 bucket access. They provide a great simplification for managing and controlling access to shared datasets in S3 buckets. You can create up to 1,000 access points per Region within each of your AWS accounts. Although bucket access policies remain fully enforced, you can delegate access control from the bucket to its access points, allowing for distributed and granular control. Each access point enforces a customizable policy that can be managed by a particular workgroup, while also avoiding the problem of bucket policies needing to grow beyond their maximum size. Finally, you can also bind an access point to a particular VPC for its lifetime, to prevent access directly from the internet.
With the 2021 launch of Access Points aliases, Amazon S3 now generates a unique DNS name, or alias, for each access point. The Access Points aliases look and acts just like an S3 bucket to existing code. This means that you don’t need to make changes to older code to use Amazon S3 Access Points; just substitute an Access Points aliases wherever you previously used a bucket name. As a security team, it’s important to know that this flexible and powerful administrative feature is backwards-compatible and can be treated as a drop-in replacement in your various code bases that use Amazon S3 but haven’t been updated to use access point APIs. In addition, using Access Points aliases adds a number of powerful security-related controls, such as permanent binding of S3 access to a particular VPC.
S3 Bucket Keys were launched at the end of 2020, another great launch that security professionals should know about, so here is an overview in case you missed it. S3 Bucket Keys are data keys generated by AWS KMS to provide another layer of envelope encryption in which the outer layer (the S3 Bucket Key) is cached by S3 for a short period of time. This extra key layer increases performance and reduces the cost of requests to AWS KMS. It achieves this by decreasing the request traffic from Amazon S3 to AWS KMS from a one-to-one model—one request to AWS KMS for each object written to or read from Amazon S3—to a one-to-many model using the cached S3 Bucket Key. The S3 Bucket Key is never stored persistently in an unencrypted state outside AWS KMS, and so Amazon S3 ultimately must always return to AWS KMS to encrypt and decrypt the S3 Bucket Key, and thus, the data. As a result, you still retain control of the key hierarchy and resulting encrypted data through AWS KMS, and are still able to audit Amazon S3 returning periodically to AWS KMS to refresh the S3 Bucket Keys, as logged in CloudTrail.
Returning to our review of 2021, S3 Bucket Keys gained the ability to use Amazon S3 Inventory and Amazon S3 Batch Operations automatically to migrate objects from the higher cost, slightly lower-performance SSE-KMS model to the lower-cost, higher-performance S3 Bucket Keys model.
To understand this launch, we need to go in time to the origins of Amazon S3, which is one of the oldest services in AWS, created even before IAM was launched in 2011. In those pre-IAM days, a storage system like Amazon S3 needed to have some kind of access control model, so Amazon S3 invented its own: Amazon S3 access control lists (ACLs). Using ACLs, you could add access permissions down to the object level, but only with regard to access by other AWS account principals (the only kind of identity that was available at the time), or public access (read-only or read-write) to an object. And in this model, objects were always owned by the creator of the object, not the bucket owner.
After IAM was introduced, Amazon S3 added the bucket policy feature, a type of resource policy that provides the rich features of IAM, including full support for all IAM principals (users and roles), time-of-day conditions, source IP conditions, ability to require encryption, and more. For many years, Amazon S3 access decisions have been made by combining IAM policy permissions and ACL permissions, which has served customers well. But the object-writer-is-owner issue has often caused friction. The good news for security professionals has been that a deny by either type of access control type overrides an allow by the other, so there were no security issues with this bi-modal approach. The challenge was that it could be administratively difficult to manage both resource policies—which exist at the bucket and access point level—and ownership and ACLs—which exist at the object level. Ownership and ACLs might potentially impact the behavior of only a handful of objects, in a bucket full of millions or billions of objects.
With the features released in 2021, Amazon S3 has removed these points of friction, and now provides the features needed to reduce ownership issues and to make IAM-based policies the only access control system for a specified bucket. The first step came in 2020 with the ability to make object ownership track bucket ownership, regardless of writer. But that feature applied only to newly-written objects. The final step is the 2021 launch we’re highlighting here: the ability to disable at the bucket level the evaluation of all existing ACLs—including ownership and permissions—effectively nullifying all object ACLs. From this point forward, you have the mechanisms you need to govern Amazon S3 access with a combination of S3 bucket policies, S3 access point policies, and (within the same account) IAM principal policies, without worrying about legacy models of ACLs and per-object ownership.
Additional database and storage service features
AWS Backup Vault Lock
AWS Backup added an important new additional layer for backup protection with the availability of AWS Backup Vault Lock. A vault lock feature in AWS is the ability to configure a storage policy such that even the most powerful AWS principals (such as an account or Org root principal) can only delete data if the deletion conforms to the preset data retention policy. Even if the credentials of a powerful administrator are compromised, the data stored in the vault remains safe. Vault lock features are extremely valuable in guarding against a wide range of security and resiliency risks (including accidental deletion), notably in an era when ransomware represents a rising threat to data.
ACM Private CA achieved FedRAMP authorization for six additional AWS Regions in the US.
Additional certificate customization now allows administrators to tailor the contents of certificates for new use cases, such as identity and smart card certificates; or to securely add information to certificates instead of relying only on the information present in the certificate request.
Additional capabilities were added for sharing CAs across accounts by using AWS RAM to help administrators issue fully-customized certificates, or revoke them, from a shared CA.
Integration with Kubernetes provides a more secure certificate authority solution for Kubernetes containers.
Online Certificate Status Protocol (OCSP) provides a fully-managed solution for notifying endpoints that certificates have been revoked, without the need for you to manage or operate infrastructure yourself.
Network and application protection
We saw a lot of enhancements in network and application protection in 2021 that will help you to enforce fine-grained security policies at important network control points across your organization. The services and new capabilities offer flexible solutions for inspecting and filtering traffic to help prevent unauthorized resource access.
AWS WAF
AWS WAF launched AWS WAF Bot Control, which gives you visibility and control over common and pervasive bots that consume excess resources, skew metrics, cause downtime, or perform other undesired activities. The Bot Control managed rule group helps you monitor, block, or rate-limit pervasive bots, such as scrapers, scanners, and crawlers. You can also allow common bots that you consider acceptable, such as status monitors and search engines. AWS WAF also added support for custom responses, managed rule group versioning, in-line regular expressions, and Captcha. The Captcha feature has been popular with customers, removing another small example of “undifferentiated work” for customers.
AWS Shield Advanced
AWS Shield Advanced now automatically protects web applications by blocking application layer (L7) DDoS events with no manual intervention needed by you or the AWS Shield Response Team (SRT). When you protect your resources with AWS Shield Advanced and enable automatic application layer DDoS mitigation, Shield Advanced identifies patterns associated with L7 DDoS events and isolates this anomalous traffic by automatically creating AWS WAF rules in your web access control lists (ACLs).
Amazon CloudFront
In other edge networking news, Amazon CloudFront added support for response headers policies. This means that you can now add cross-origin resource sharing (CORS), security, and custom headers to HTTP responses returned by your CloudFront distributions. You no longer need to configure your origins or use custom Lambda@Edge or CloudFront Functions to insert these headers.
Following Route 53 Resolver’s much-anticipated launch of DNS logging in 2020, the big news for 2021 was the launch of its DNS Firewall capability. Route 53 Resolver DNS Firewall lets you create “blocklists” for domains you don’t want your VPC resources to communicate with, or you can take a stricter, “walled-garden” approach by creating “allowlists” that permit outbound DNS queries only to domains that you specify. You can also create alerts for when outbound DNS queries match certain firewall rules, allowing you to test your rules before deploying for production traffic. Route 53 Resolver DNS Firewall launched with two managed domain lists—malware domains and botnet command and control domains—enabling you to get started quickly with managed protections against common threats. It also integrated with Firewall Manager (see the following section) for easier centralized administration.
AWS Network Firewall and Firewall Manager
Speaking of AWS Network Firewall and Firewall Manager, 2021 was a big year for both. Network Firewall added support for AWS Managed Rules, which are groups of rules based on threat intelligence data, to enable you to stay up to date on the latest security threats without writing and maintaining your own rules. AWS Network Firewall features a flexible rules engine enabling you to define firewall rules that give you fine-grained control over network traffic. As of the launch in late 2021, you can enable managed domain list rules to block HTTP and HTTPS traffic to domains identified as low-reputation, or that are known or suspected to be associated with malware or botnets. Prior to that, another important launch was new configuration options for rule ordering and default drop, making it simpler to write and process rules to monitor your VPC traffic. Also in 2021, Network Firewall announced a major regional expansion following its initial launch in 2020, and a range of compliance achievements and eligibility including HIPAA, PCI DSS, SOC, and ISO.
Elastic Load Balancing now supports forwarding traffic directly from Network Load Balancer (NLB) to Application Load Balancer (ALB). With this important new integration, you can take advantage of many critical NLB features such as support for AWS PrivateLink and exposing static IP addresses for applications that still require ALB.
The AWS Networking team also made Amazon VPC private NAT gateways available in both AWS GovCloud (US) Regions. The expansion into the AWS GovCloud (US) Regions enables US government agencies and contractors to move more sensitive workloads into the cloud by helping them to address certain regulatory and compliance requirements.
Compute
Security professionals should also be aware of some interesting enhancements in AWS compute services that can help improve their organization’s experience in building and operating a secure environment.
Amazon Elastic Compute Cloud (Amazon EC2) launched the Global View on the console to provide visibility to all your resources across Regions. Global View helps you monitor resource counts, notice abnormalities sooner, and find stray resources. A few days into 2022, another simple but extremely useful EC2 launch was the new ability to obtain instance tags from the Instance Metadata Service (IMDS). Many customers run code on Amazon EC2 that needs to introspect about the EC2 tags associated with the instance and then change its behavior depending on the content of the tags. Prior to this launch, you had to associate an EC2 role and call the EC2 API to get this information. That required access to API endpoints, either through a NAT gateway or a VPC endpoint for Amazon EC2. Now, that information can be obtained directly from the IMDS, greatly simplifying a common use case.
Amazon EC2 launched sharing of Amazon Machine Images (AMIs) with AWS Organizations and Organizational Units (OUs). Previously, you could share AMIs only with specific AWS account IDs. To share AMIs within AWS Organizations, you had to explicitly manage sharing of AMIs on an account-by-account basis, as they were added to or removed from AWS Organizations. With this new feature, you no longer have to update your AMI permissions because of organizational changes. AMI sharing is automatically synchronized when organizational changes occur. This feature greatly helps both security professionals and governance teams to centrally manage and govern AMIs as you grow and scale your AWS accounts. As previously noted, this feature was also added to EC2 Image Builder. Finally, Amazon Data Lifecycle Manager, the tool that manages all your EBS volumes and AMIs in a policy-driven way, now supports automatic deprecation of AMIs. As a security professional, you will find this helpful as you can set a timeline on your AMIs so that, if the AMIs haven’t been updated for a specified period of time, they will no longer be considered valid or usable by development teams.
Looking ahead
In 2022, AWS continues to deliver experiences that meet administrators where they govern, developers where they code, and applications where they run. We will continue to summarize important launches in future blog posts. If you’re interested in learning more about AWS services, join us for AWS re:Inforce, the AWS conference focused on cloud security, identity, privacy, and compliance. AWS re:Inforce 2022 will take place July 26–27 in Boston, MA. Registration is now open. Register now with discount code SALxUsxEFCw to get $150 off your full conference pass to AWS re:Inforce. For a limited time only and while supplies last. We look forward to seeing you there!
To stay up to date on the latest product and feature launches and security use cases, be sure to read the What’s New with AWS announcements (or subscribe to the RSS feed) and the AWS Security Blog.
If you have feedback about this post, submit comments in the Comments section below. If you have questions about this post, contact AWS Support.
Want more AWS Security news? Follow us on Twitter.
It’s critical for your enterprise to understand where sensitive data is stored in your organization and how and why it is shared. The ability to efficiently find data that is shared with entities outside your account and the contents of that data is paramount. You need a process to quickly detect and report which accounts have access to sensitive data. Amazon Macie is an AWS service that can detect many sensitive data types. Macie is a fully managed data security and data privacy service that uses machine learning and pattern matching to discover and help protect your sensitive data in AWS.
AWS Identity and Access Management (IAM)Access Analyzer helps to identify resources in your organization and accounts, such as S3 buckets or IAM roles, that are shared with an external entity. When you enable IAM Access Analyzer, you create an analyzer for your entire organization or your account. The organization or account you choose is known as the zone of trust for the analyzer. The analyzer monitors the supported resources within your zone of trust. This analyzer enables IAM Access Analyzer to detect each instance of a resource shared outside the zone of trust and generates a finding about the resource and the external principals that have access to it.
Currently, you can use IAM Access Analyzer and Macie to detect external access and discover sensitive data as separate processes. You can join the findings from both to best evaluate the risk. The solution in this post integrates IAM Access Analyzer, Macie, and AWS Security Hub to automate the process of correlating findings between the services and presenting them in Security Hub.
How does the solution work?
First, IAM Access Analyzer discovers S3 buckets that are shared outside the zone of trust. Next, the solution schedules a Macie sensitive data discovery job for each of these buckets to determine if the bucket contains sensitive data. Upon discovery of shared sensitive data in S3, a custom high severity finding is created in Security Hub for review and incident response.
Solution architecture
This solution is based on a serverless architecture, and uses the following services:
IAM Access Analyzer detects shared S3 buckets outside of the zone of trust—the organization or account you choose is known as a zone of trust for the analyzer—and creates the event Access Analyzer Finding in EventBridge.
EventBridge triggers the Lambda function sda-aa-save-findings.
The sda-aa-save-findings function records each finding in DynamoDB.
An EventBridge scheduled event periodically starts a new cycle of the Step Function state machine, which immediately runs the Lambda function sda-macie-submit-scan. The template sets a 15-minute interval, but this is configurable.
The sda-macie-submit-scan function reads the IAM Access Analyzer findings that were created by sda-aa-save-findings from DynamoDB.
sda-macie-submit-scan launches a Macie classification job for each distinct S3 bucket that is related to one or more recent IAM Access Analyzer findings.
Macie performs a sensitive discovery scan on each requested S3 bucket.
The sda-macie-submit-scan function initiates the Lambda function sda-macie-check-status.
sda-macie-check-status periodically checks the status of each Macie classification job, waiting for all the Macie jobs initiated by this solution to complete.
Upon completion of the sda-macie-check-status function, the step function runs the Lambda function sda-sh-create-findings.
sda-sh-create-findings joins the resulting IAM Access Analyzer and Macie datasets for each S3 bucket.
sda-sh-create-findings publishes a finding to Security Hub for each bucket that has both external access and sensitive data.
Note: The Macie scan is skipped if the S3 bucket is tagged to be excluded or if it was recently scanned by Macie. See the Cost considerations section for more information on custom configurations.
Information security can review and act on the findings shown in Security Hub.
Sample Security Hub output
Figure 2 shows the sample findings that Security Hub will present. Each finding includes:
Severity
Workflow status
Record state
Company
Product
Title
Resource
Figure 2: Sample Security Hub findings
The output to Security Hub will display a severity of HIGH with workflow NEW, because this is the first time the event has been observed. The record state is ACTIVE because the workflow state is NEW. The title explains the reason for the event.
For example, if potentially sensitive data is discovered in a bucket that is shared outside a zone of trust, selecting an event will display the resources involved in the finding so you can investigate. For more information, see the Security Hub User Guide.
Notes:
Detection of public S3 buckets by IAM Access Analyzer will still occur through Security Hub and will be marked as critical severity. This solution does not add to or augment this finding in Security Hub.
If a finding in IAM Access Analyzer is archived, the solution does not update the related finding in Security Hub.
The Application code location, S3 Bucket and S3 Key fields will be pre-filled.
Under Service Activations, modify the activations based on the services you presently have running in your account.
Modify the Logging and Monitoring settings if required.
(Optional) Set an alert email address for errors.
Choose Next, then choose Next again.
Under Capabilities, select the check box.
Choose Create Stack. The solution will begin deploying; watch for the CREATE_COMPLETE message.
Figure 3: Sample CloudFormation deployment status
The solution is now deployed and will start monitoring for sensitive data that is being shared. It will send the findings to Security Hub for your teams to investigate.
Cost considerations
When you scan large S3 buckets with sensitive data, remember that Macie cost is based on the amount of data scanned. For more information on Macie costs, see Amazon Macie pricing.
This solution allows the following options, which you can use to help manage costs:
Use environment variables in Lambda to skip specific tagged buckets
Skip recently scanned S3 buckets and reuse prior findings
Figure 4: Screen shot of configurable environment variable
Conclusion
In this post, we discussed how the solution uses Lambda, Step Functions and EventBridge to integrate IAM Access Analyzer with Macie discovery jobs. We reviewed the components of the application, deployed it by using CloudFormation, and reviewed the output a security team would use to take the appropriate actions. We also provided two ways that you can manage the costs associated with the solution.
After you deploy this project, you can modify it to meet your organization’s needs. For example, you can modify the tags to skip specific S3 buckets your organization has already classified to hold sensitive data. Customers who use multiple AWS accounts can designate a centralized Security Hub administrator account to receive the solution alerts from each member account. For more information on this option, see Designating a Security Hub administrator account.
If you have feedback about this post, please submit it in the Comments section below. If you have questions about this post, please start a new thread on the AWS Identity and Access Management forum.
Other resources
For more information on correlating security findings with AWS Security Hub and Amazon EventBridge, refer to this blog post.
Want more AWS Security news? Follow us on Twitter.
In this blog post, we show you how to automatically resolve AWS Identity and Access Management (IAM) Access Analyzer findings generated in response to unintended cross-account access for IAM roles. The solution automates the resolution by responding to the Amazon EventBridge event generated by IAM Access Analyzer for each active finding.
You can use identity-based policies and resource-based policies to granularly control access to a specific resource and how you use it across the entire AWS Cloud environment. It is important to ensure that policies you create adhere to your organization’s requirements on data/resource access and security best practices. IAM Access Analyzer is a feature that you can enable to continuously monitor policies for changes, and generate detailed findings related to access from external entities to your AWS resources.
When you enable Access Analyzer, you create an analyzer for your entire organization or your account. The organization or account you choose is known as the zone of trust for the analyzer. The zone of trust determines what type of access is considered trusted by Access Analyzer. Access Analyzer continuously monitors all supported resources to identify policies that grant public or cross-account access from outside the zone of trust, and generates findings. In this post, we will focus on an IAM Access Analyzer finding that is generated when an IAM role is granted access to an external AWS principal that is outside your zone of trust. To resolve the finding, we will show you how to automatically block such unintended access by adding explicit deny statement to the IAM role trust policy.
Prerequisites
To ensure that the solution only prevents unintended cross account access for IAM roles, we highly recommend you to do the following within your AWS environment before deploying the solution described in the blog post:
Review the generated findings that are active, and create a baseline for intended cross-account access for IAM roles by creating archive rules and applying the rule on those existing findings.
Note: This solution adds an explicit deny in the IAM role trust policy to block the unintended access, which overrides any existing allow actions. We recommend that you carefully evaluate that this is the resolution action you want to apply.
Solution overview
To demonstrate this solution, we will take a scenario where you are asked to grant access to an external AWS account. In order to grant access, you create an IAM role named Audit_CrossAccountRole on your AWS account 123456789012. You grant permission to assume the role Audit_CrossAccountRole to an AWS principal named Alice in AWS account 999988887777, which is out-side of your AWS Organizations. The following is an example of the trust policy for the IAM role Audit_CrossAccountRole:
Assuming the principal arn:aws:iam::999988887777:user/Alice was not archived previously in Access Analyzer, you see an active finding in Access Analyzer as shown in Figure 1.
Figure 1: Sample IAM Access Analyzer finding in AWS Console
Typically, you will review this finding and determine whether this access is intended or not. If the access is unintended, you can block access to the principal 999988887777/Alice by adding an explicit deny to the IAM role trust policy, and then follow up with IAM role owner to find out if there is a reason to allow this cross-account access. If the access is intended, then you can create an archive rule that will archive the finding and suppress such findings in future.
We will walk through the solution to automate this resolution process in the remainder of this blog post.
Solution walkthrough
Access Analyzer sends an event to Amazon EventBridge for every active finding. This solution configures an event rule in EventBridge to match an active finding, and triggers a resolution AWS Lambda function. The Lambda function checks that the resource type in the finding is an IAM role, and then adds a deny statement to the associated IAM role trust policy as a resolution. The Lambda function also sends an email through Amazon Simple Notification Service (Amazon SNS) to the email address configured in the solution. The individual or group who receives the email can then review the automatic resolution and the IAM role. They can then decide either to remove the role for unintended access, or to delete the deny statement from the IAM trust policy and create an archive rule in Access Analyzer to suppress such findings in future.
Figure 2: Automated resolution followed by human review
Figure 2 shows the following steps of the resolution solution.
Access Analyzer scans resources and generates findings based on the zone of trust and the archive rules configuration. The following is an example of an Access Analyzer active finding event sent to Amazon EventBridge:
EventBridge receives an event for the Access Analyzer finding, and triggers the AWS Lambda function based on the event rule configuration. The following is an example of the EventBridge event pattern to match active Access Analyzer findings:
Then, the Lambda function adds an explicit deny statement in the trust policy of the IAM role where the Sid of the new statement references the Access Analyzer finding ID.
Note: After Access Analyzer adds the deny statement, on the next scan, Access Analyzer finds the resource is no longer shared outside of your zone of trust. Access Analyzer changes the status of the finding to Resolved and the finding appears in the Resolved findings table.
The Lambda function sends a notification to an SNS topic that sends an email to the configured email address (which should be the business owner or security team) subscribed to the SNS topic. The email notifies them that a specific IAM role has been blocked from the cross-account access. The following is an example of the SNS code for the notification.
def send_notifications(sns_topic,principal, resource_arn, finding_id):
    sns_client = boto3.client("sns")
    message = "The IAM Role resource {} allows access to the principal {}. Trust policy for the role has been updated to deny the external access. Please review the IAM Role and its trust policy. If this access is intended, update the IAM Role trust policy to remove a statement with SID matching with the finding id {} and mark the finding as archived or create an archive rule. If this access is not intended then delete the IAM Role.". format(
        resource_arn, principal)
    subject = "Access Analyzer finding {} was automatically resolved ".format(finding_id)
    snsResponse = sns_client.publish(
        TopicArn=sns_topic,
        Message=message,
        Subject=subject
    )
Figure 3 shows an example of the email notification.
Figure 3: Sample resolution email generated by the solution
The security team or business owner who receives the email reviews the role and does one of the following steps:
If you find that the IAM role with cross-account access is intended then:Remove the deny statement added in the trust policy through AWS CLI or AWS Management Console. As mentioned above, the solution adds the Access Analyzer finding ID as Sid for the deny statement. The following command shows removing the deny statement for role_name through AWS CLI using the finding id available in the email notification.
POLICY_DOCUMENT=`aws iam get-role --role-name '<role_name>' --query "Role.AssumeRolePolicyDocument.{Version: Version, Statement: Statement[?Sid!='<finding_id>']}"`
aws iam update-assume-role-policy --role-name '<role_name>' --policy-document "$POLICY_DOCUMENT"
Further, you can create an archive rule with criteria such as AWS Account ID, resource type, and principal, to automatically archive new findings that match the criteria.
If you find that the IAM role provides unintentional cross-account access then you may delete the IAM role. Also, you should investigate who created the IAM role by checking relevant AWS CloudTrail events like iam:createRole, so that you can plan for preventive actions.
To deploy the solution by using the AWS Management Console
In your AWS account, launch the template by choosing the Launch Stack button, which creates the stack the in us-east-1 Region.
On the Quick create stack page, for Stack name, enter a unique stack name for this account; for example, iam-accessanalyzer-findings-resolution, as shown in Figure 4.
Figure 4: Deploy the solution using CloudFormation template
For NotificationEmail, enter the email address to receive notifications for any resolution actions taken by the solution.
After deployment, you must confirm the AWS Amazon SNS email subscription to get the notifications from the solution.
To confirm the email address for notifications
Check your email inbox and choose Confirm subscription in the email from Amazon SNS.
Amazon SNS opens your web browser and displays a subscription confirmation with your subscription ID.
To test the solution
Create an IAM role with a trust policy with another AWS account as principal that is neither part of archive rule nor within your zone of trust. Also, for this test, do not attach any permission policies to the IAM role. You will receive an email notification after a few minutes, similar to the one shown previously in Figure 3.
As a next step, review the resolution action as described in step 5 in the solution walkthrough section above.
Clean up
If you launched the solution in the AWS Management Console by using the Launch Stack button, you can delete the stack by navigating to CloudFormation console, selecting the specific stack by its name, and then clicking the Delete button.
If you deployed the solution using AWS CDK, you can perform the cleanup using the following CDK command from the local directory where the solution was cloned from GitHub.
cdk destroy
Cost estimate
Deploying the solution alone will not incur any costs, but there is a cost associated with the AWS Lambda execution and Amazon SNS notifications through email, when the findings generated by IAM Access Analyzer match the EventBridge event rule and the notifications are sent. AWS Lambda and Amazon SNS have perpetual free tier and you will be charged only when the usage goes beyond the free tier usage each month.
Summary
In this blog post, we showed you how to automate the resolution of unintended cross-account IAM roles using IAM Access Analyzer. As a resolution, this solution added a deny statement into the IAM role’s trust policy.
You can expand the solution to resolve Access Analyzer findings for Amazon S3 and KMS, by modifying the associated resource policies. You can also include capabilities like automating the rollback of the resolution if the role is intended, or introducing an approval workflow to resolve the finding to suit to your organization’s process requirements. Also, IAM Access Analyzer now enables you to preview and validate public and cross-account access before deploying permissions changes.
If you have feedback about this post, submit comments in the Comments section below. If you have questions about this post, start a new thread on the AWS IAM forum.
Want more AWS Security how-to content, news, and feature announcements? Follow us on Twitter.
AWS Identity and Access Management (IAM)Access Analyzer generates comprehensive findings to help you identify resources that grant public and cross-account access. Now, you can also apply archive rules to existing findings, so you can better manage findings and focus on the findings that need your attention most.
You can think of archive rules as similar to email rules. You define email rules to automatically organize emails. With IAM Access Analyzer, you can define archive rules to automatically mark findings as intended access. Now, those rules can apply to existing as well as new IAM Access Analyzer findings. This helps you focus on findings for potential unintended access to your resources. You can then easily track and resolve these findings by reducing access, helping you to work towards least privilege.
In this post, first I give a brief overview of IAM Access Analyzer. Then I show you an example of how to create an archive rule to automatically archive findings for intended access. Finally, I show you how to update an archive rule to mark existing active findings as intended.
IAM Access Analyzer overview
IAM Access Analyzer helps you determine which resources can be accessed publicly or from other accounts or organizations. IAM Access Analyzer determines this by mathematically analyzing access control policies attached to resources. This form of analysis—called automated reasoning—applies logic and mathematical inference to determine all possible access paths allowed by a resource policy. This is how IAM Access Analyzer uses provable security to deliver comprehensive findings for potential unintended bucket access. You can enable IAM Access Analyzer in the IAM console by creating an analyzer for an account or an organization. Once you’ve created your analyzer, you can review findings for resources that can be accessed publicly or from other AWS accounts or organizations.
Create an archive rule to automatically archive findings for intended access
When you review findings and discover common patterns for intended access, you can create archive rules to automatically archive those findings. This helps you focus on findings for unintended access to your resources, just like email rules help streamline your inbox.
To create an archive rule
In the IAM console, choose Archive rules under Access Analyzer. Then, choose Create archive rule to display the Create archive rule page shown in Figure 1. There, you find the option to name the rule or use the name generated by default. In the Rule section, you define criteria to match properties of findings you want to archive. Just like email rules, you can add multiple criteria to the archive rule. You can define each criterion by selecting a finding property, an operator, and a value. To help ensure a rule doesn’t archive findings for public access, the criterion Public access is false is suggested by default.
Figure 1: IAM Access Analyzer create archive rule page where you add criteria to create a new archive rule
For example, I have a security audit role external to my account that I expect to have access to resources in my account. To mark that access as intended, I create a rule to archive all findings for Amazon S3 buckets in my account that can be accessed by the security audit role outside of the account. To do this, I include two criteria: Resource type matches S3 bucket, and the AWS Account value matches the security audit role ARN. Once I add these criteria, the Results section displays the list of existing active findings the archive rule matches, as shown in Figure 2.
Figure 2: A rule to archive all findings for S3 buckets in an account that can be accessed by the audit role outside of the account, with matching findings displayed
When you’re done adding criteria for your archive rule, select Create and archive active findings to archive new and existing findings based on the rule criteria. Alternatively, you can choose Create rule to create the rule for new findings only. In the preceding example, I chose Create and archive active findings to archive all findings—existing and new—that match the criteria.
Update an archive rule to mark existing findings as intended
You can also update an archive rule to archive existing findings retroactively and streamline your findings. To edit an archive rule, choose Archive rules under Access Analyzer, then select an existing rule and choose Edit. In the Edit archive rule page, update the archive rule criteria and review the list of existing active findings the archive rule applies to. When you save the archive rule, you can apply it retroactively to existing findings by choosing Save and archive active findings as shown in Figure 3. Otherwise, you can choose Save rule to update the rule and apply it to new findings only.
Note: You can also use the new IAM Access Analyzer API operation ApplyArchiveRule to retroactively apply an archive rule to existing findings that meet the archive rule criteria.
Figure 3: IAM Access Analyzer edit archive rule page where you can apply the rule retroactively to existing findings by choosing Save and archive active findings
Get started
To turn on IAM Access Analyzer at no additional cost, open the IAM console. IAM Access Analyzer is available at no additional cost in the IAM console and through APIs in all commercial AWS Regions, AWS China Regions, and AWS GovCloud (US). To learn more about IAM Access Analyzer and which resources it supports, visit the feature page.
If you have feedback about this post, submit comments in the Comments section below. If you have questions about this post, start a new thread on the AWS IAM forum or contact AWS Support.
Want more AWS Security how-to content, news, and feature announcements? Follow us on Twitter.
AWS Identity and Access Management (IAM) Access Analyzer continuously monitors your Amazon Web Services (AWS) resource-based policies for changes in order to identify resources that grant public or cross-account access from outside your AWS account or organization. Access Analyzer findings include detailed information that you can use to make an informed decision about whether access to the shared resource was intended or not. The findings information includes the affected AWS resource, the external principal that has access, the condition from the policy statement that grants the access, and the access level, such as read, write, or the ability to modify permissions.
In this blog post, we show you how to automatically archive Access Analyzer findings for expected events, such as authorized resource access. The benefit of automatically archiving expected findings is to help you reduce distraction from findings that don’t require action, enabling you to concentrate on remediating any unexpected access to your shared resources.
Access Analyzer provides you with the ability to archive findings that show intended cross-account sharing of your AWS resources. The AWS service-provided archive mechanism provides you with built-in archive rules that can automatically archive new findings that meet the criteria you define (such as directive controls). For example, your organizational access controls might allow your auditor to have read-only IAM role cross-account access from your security account into all of your accounts. In this security auditor scenario, you can define a built-in archive rule to automatically archive the findings related to the auditor cross-account IAM role that has authorized read-only access.
A limitation of the built-in archive rules is that they are static and based only on simple pattern matching. To build your own custom archiving logic, you can create an AWS Lambda function that listens to Amazon CloudWatch Events. Access Analyzer forwards all findings to CloudWatch Events, and you can easily configure a CloudWatch Events rule to trigger a Lambda function for each Access Analyzer finding. For example, if you want to look up the tags on a resource, you can make an AWS API call based on the Amazon Resource Name (ARN) for the resource in your Lambda function. As another example, you might want to compute an overall risk score based on the various parts of a finding and archive everything below a certain threshold score that you define.
In this blog post, we show you how to configure a built-in archive rule, how to add context enrichment for more complex rules, and how to trigger an alert for unintended findings. We first cover the scenario of the auditor role using a built-in archive rule. Then, we show how to perform automated archive remediation by using CloudWatch Events with AWS Step Functions to add context enrichment and automatically remediate the authorized sharing of a cross-account AWS Key Management Service (AWS KMS) key. Finally, we show how to trigger alerts for the unintended sharing of a public Amazon Simple Storage Service (Amazon S3) bucket.
Prerequisites
The solution we give here assumes that you have Access Analyzer enabled in your AWS account. You can find more details about enabling Access Analyzer in the Getting Started guide for that feature. Access Analyzer is available at no additional cost in the IAM console and through APIs in all commercial AWS Regions. Access Analyzer is also available through APIs in the AWS GovCloud (US) Regions.
How to use the built-in archive rules
In our first example, there is a security auditor cross-account IAM role that can be assumed by security automation tools from the central security AWS account. We use the built-in archive rules to automatically archive cross-account findings related to the cross-account security auditor IAM role.
To create a built-in archive rule
In the AWS Management Console, choose Identity and Access Management (IAM). On the dashboard, choose Access Analyzer, and then choose Archive rules.
Choose the Create archive rule button.
Figure 1: Create archive rule
You can select archive rule criteria based on your use case. For this example, in the search box, choose AWS Account as the criteria, since we want to automatically archive the security auditor account.
Figure 2: Select archive rule criteria
You can now enter the value for the selected criteria. In this case, for Criteria, choose AWS Account, and then choose the equals operator.
After you’ve entered your criteria, choose the Create archive rule button.
Figure 3: Finish creating the archive rule
You should see a message confirming that you’ve successfully created a new archive rule.
Figure 4: Successful creation of a new archive rule
How to automatically archive expected findings
We now show you how to automatically archive expected findings by using a serverless workflow that you define by using AWS Step Functions. We show you how to leverage Step Functions to enrich an Access Analyzer finding, evaluate the finding against your customized rule engine logic, and finally either archive the finding or send a notification. A CloudWatch Event Rule will trigger the Step Functions workflow when Access Analyzer generates a new finding.
Solution architecture – serverless workflow
The CloudWatch event bus delivers the Access Analyzer findings to the Step Functions workflow. The Step Functions workflow responds to each Access Analyzer finding and either archives the finding for authorized access or sends an Amazon Simple Notification Service (Amazon SNS) email notification for an unauthorized access finding, as shown in figure 5.
Figure 5: Solution architecture for automatic archiving
The Step Functions workflow enriches the finding and provides contextual information to the rules engine for evaluation, as shown in figure 6. The Access Analyzer finding is either archived or generates an alert, based on the result of the rules engine evaluation and the associated risk level. If you’re interested in remediating the finding, you can learn more by watching the talk AWS re:Invent 2019: [NEW LAUNCH!] Dive Deep into IAM Access Analyzer (SEC309).
Figure 6: Finding analysis and archival
This example uses four Lambda functions. One function is for context enrichment, a second function is for rule evaluation logic, a third function is to archive expected findings, and finally a fourth function is to send a notification for findings that require investigation by your security operations team.
First, the enrichment Lambda function retrieves the tags associated with the AWS resource. The following code example retrieves the S3 bucket tags.
The Lambda function can perform additional enrichment beyond looking up tags, such as looking up the AWS KMS key alias, as shown in the next code example.
def additional_enrichment(resource_type, resource_arn):
  additional_context = {}

  if resource_type == "AWS::KMS::Key":
    kms_client = boto3.client("kms")
    aliases = kms_client.list_aliases(KeyId=resource_arn)["Aliases"]
    additional_context["key_aliases"] = [alias["AliasName"] for alias in aliases]

  return additional_context
Next, the evaluation rule Lambda function determines whether the finding is authorized and can be archived, or whether the finding is unauthorized and a notification needs to be generated. In this example, we first check whether the resource is shared publicly and then immediately alert if there’s an unexpected public sharing of a resource. Additionally, we explicitly don’t want public sharing of resources that are tagged Confidential. Our example method checks whether the value “Confidential” is set as the “Data Classification” tag and correspondingly returns False in order to trigger a notification.
Also, we allow cross-account sharing of a key in the development environment with the tag key “IsAllowedToShare” and tag value “true”, tag key “Environment” with tag value “development”, and a key alias of “DevelopmentKey”.
# Evaluate Risk Level
# Return True to raise alert if risk level exceeds threshold
# Return False to archive finding
def should_raise_alert(finding_details, tags, additional_context):
  if (
      finding_details["isPublic"]
      and not is_allowed_public(finding_details, tags, additional_context)
     ):
    return True
  elif (
        tags.get("IsAllowedToShare") == "true"
        and tags.get("Environment") == "development"
        and "DevelopmentKey" in additional_context.get("key_aliases", [])
    ):
    return False

  return True

def is_allowed_public(finding_details, tags, additional_context):
  # customize your logic here
  # for example, Data Classification is Confidential, return False for no public access
  if "Data Classification" in tags and tags["Data Classification"] == "Confidential":
    return False

  return True
  if should_raise_alert(finding_details, tags, additional_context):
    return {"status": "NOTIFY"}
  else:
    return {"status": "ARCHIVE"}
We then use the Choice condition to trigger either the archive or notification step.
To deploy the solution by using the AWS Management Console
In your security account, launch the template by choosing the following Launch Stack button.
Provide the following parameter for the security account: EmailSubscriptionParameter: The email address to receive subscription notifications for any findings that exceed your defined risk level.
To deploy the solution by using the AWS CDK
Additionally, you can find the latest code on GitHub, where you can also contribute to the sample code. The following commands shows how to deploy the solution by using the AWS Cloud Development Kit (AWS CDK). First, upload the Lambda assets to S3. Then, deploy the solution to your account.
Create a cross-account KMS key. You should receive an email notification after several minutes.
Create a cross-account KMS key with the tags IsAllowedToShare=true and Environment=development. Also, create a KMS key alias named alias/DevelopmentKey for this key. After a few seconds, you should see that the finding was automatically archived.
Summary
In this blog post, we showed you how IAM Access Analyzer can help you identify resources in your organization and accounts that are shared with an external identity. We explained how to automatically archive expected findings by using the built-in archive rules. Then, we walked you through how to automatically archive expected shared resources. We showed you how to create a serverless workflow that uses AWS Step Functions, which performs context enrichment and then automatically archives your findings for expected shared resources.
After you follow the steps in this blog post for automatic archiving, you will only receive Access Analyzer findings for unexpected AWS resource sharing. A good way to manage these unexpected Access Analyzer findings is with AWS Security Hub, alongside your other findings. Visit Getting started with AWS Security Hub to learn more. You can also see the blog post Automated Response and Remediation with AWS Security Hub for event patterns and remediation code examples.
If you have feedback about this post, submit comments in the Comments section below.
Want more AWS Security how-to content, news, and feature announcements? Follow us on Twitter.