Amazon SageMaker Catalog, part of the next generation of Amazon SageMaker, now supports authorization policy for asset type usage — a new governance capability that gives organizations fine-grained control over who can create and manage custom assets based on specific asset types. This enhancement brings scalable, policy-driven governance to enterprise data publishing workflows across diverse business domains.
Challenge: Scaling governance across diverse asset types
In large organizations, teams often define custom asset templates (also known as asset types) to standardize how specific business data is cataloged, discovered, and governed. For example, a life sciences company might define a ClinicalStudyAsset template to capture trial metadata, while a financial institution could use a FinancialReportAsset template for regulatory filings.
However, as usage of custom asset types grows across departments and teams, organizations face new governance challenges:
Who should be allowed to create assets using certain templates?
How can sensitive or business-specific templates be restricted to specific users or projects?
How do you avoid template misuse, duplication, or accidental exposure of critical data formats?
Without built-in enforcement, asset governance relies heavily on user knowledge or manual oversight—both error-prone and difficult to scale.
Solution: Authorization policies for asset type usage
To address this, SageMaker Catalog now enables domain administrators, project owners and domain unit owners to define authorization policies that control which asset types can be used by specific project users. These policies allow organizations to enforce usage boundaries for sensitive or business-critical templates, aligning asset publishing with security and compliance requirements. For example:
A life sciences organization can restrict the ClinicalStudyAsset template to R&D users only, ensuring clinical trial data is handled in controlled environments.
A financial services firm can limit the use of the FinancialReportAsset template to audit and compliance teams, safeguarding regulatory disclosures.
With this capability, customers can:
Define policies at the asset type level to allow or deny creation of assets using specific templates.
Apply policies to project members (users or groups) — supporting flexible governance at scale.
Maintain centralized oversight while empowering decentralized teams to operate within clear, enforceable boundaries.
Customer Spotlight
As a large-scale organization with diverse data needs, Amazon’s Business Data Technologies (BDT) team manages thousands of assets. BDT team wants to ensure that these asset types can be used by specific groups responsible for those assets.
BDT team would use asset type usage policies in Amazon SageMaker Catalog. These policies enable them to control which teams can use specific Andes asset types to create and govern these assets in the catalog.
“This new addition is instrumental in helping us scale data onboarding across business units without compromising governance. By enforcing who can use specific Andes asset templates to create assets in the SageMaker Catalog, we’re able to accelerate consolidation of siloed data across the company while maintaining tight control over ownership and governance. This not only strengthens compliance, but also reduces duplication, prevents mismanagement, and enables us to move fast with confidence.”
— Eunji Kang, Principal Product Manager Tech, Business Data Technologies, Amazon.com
Key Benefits
The introduction of asset type usage policies in Amazon SageMaker Catalog delivers meaningful governance at scale—especially for organizations managing hundreds of teams, projects, and templates. Here’s how this capability adds value:
Enforce authorization policies for cataloging asset. With asset type usage policies, governance shifts from after-the-fact audits to proactive controls. By defining who can create assets using a specific template, organizations prevent accidental or unauthorized use of sensitive formats. This ensures the right teams are working with the right templates—aligned with compliance, domain policies, or business criticality.
Minimize asset sprawl and reduce duplication. Without controls, teams may clone or re-create similar templates across business units, leading to inconsistencies and catalog clutter. By standardizing usage boundaries, asset type usage policies promote template reuse and ensure data is structured consistently across businesses.
Strengthen compliance and audit posture. In regulated environments (e.g., financial reporting, healthcare data management), template misuse can lead to compliance violations. Usage policies enforce access controls automatically—helping security and audit teams ensure that critical templates are used in accordance with internal and external standards.
Accelerate onboarding while preserving control. Central data teams can define and expose approved templates to relevant users without opening the door to misuse. This allows new teams to onboard quickly, using standardized asset types, while still operating within clearly defined governance boundaries.
Solution overview : Asset type usage policy
In the following sections, we walk through how to create a custom asset and associate a usage policy with it. In this scenario, the marketing team from AnyCompany.com creates a custom asset MarketingMetric asset type, which only users from projects in the Marketing domain unit can use. Users using projects associated with the Sales domain unit can’t create a MarketingMetric custom asset.
Prerequisites
To follow this post, you should have an Amazon SageMaker Unified Studio domain set up with domain owner privileges. Create two domain units, Sales and Marketing, and have a project associated with each domain unit. For instructions, refer to the following Getting started guide.
Create a metadata form in the Marketing domain unit
Complete the following steps to create a metadata form in the Marketing domain unit:
On the SageMaker Unified Studio console, choose the project in the Marketing domain unit where you want to create the custom asset.
Choose Metadata entities in the navigation pane.
Choose Create metadata form.
In this solution, we create a custom asset type of MarketingMetric, which only users belonging to projects in the Marketing domain can use to create assets.
Provide details about the form and choose Create metadata form.
In this form, we create two fields: Calculation and Dashboard Link.
Choose Create field.
Create Dashboard Link as the first field.
Choose Create field to create the second field.
Provide details for the Calculation field.
Turn on Enabled to enable the metadata form.
Create a custom asset using the metadata form and associate the usage policy
Complete the following steps to create a custom asset (MarketingMetric) using the metadata form you created and associate the usage policy:
On the project page, choose Metadata entities in the navigation pane.
On the Asset types tab, choose Create asset type.
Project owners or domain unit owners can have permissions to create assets of this selected asset type, and usage permissions can be provided to:
All projects – Any project in the domain can create an asset using this asset type
Owning project – Only the project creating this asset type can create assets
Selected projects or domain units – Specific projects or domain units can create assets using this asset type
For Name, enter a name (for this example, MarketingMetric).
For Metric, select Required and add the metadata form you created.
For Usage Permission, select Selected projects or domain units.
Choose Add usage permission.
Select all projects in the Marketing domain unit and choose Add policy grant.
Choose Create to create the asset type.
The MarketingMetric asset type is created.
Create a marketing metric from a project associated to the Marketing domain unit
For this step, we use project publish-1, which belongs to the Marketing domain unit, to create a new marketing metric. Complete the following steps:
On your project page, choose Assets in the navigation pane.
On the Create menu, choose Create asset.
Provide a metric name and description, then choose Next.
For Asset type, choose MarketingMetric.
Provide details for the metadata form and choose Apply.
Choose Create.
The asset Conversion Rate Metric with asset type MarketingMetric is created.
Test the asset type usage policy
When a user tries to create a marketing metric from a project associated with the Sales domain unit, they will get an error.
As defined in the usage policy, only projects associated with the Marketing domain unit can create MarketingMetric assets.
Clean up
To avoid incurring additional charges, delete the SageMaker domain. Refer to Delete domains for instructions.
Conclusion
In this post, we introduced authorization policies for custom asset types—a new governance capability in Amazon SageMaker that gives organizations fine-grained control over who can create and manage assets using specific templates. This feature enhances data governance by allowing teams to enforce usage policies that align with business and security requirements across the organization.
Asset type usage policies are available in all AWS Commercial Regions where Amazon SageMaker is supported.
To get started, refer to the user guide and begin defining policies for your custom asset types today.
About the Authors
Pradeep Misra is a Principal Analytics Solutions Architect at AWS. He works across Amazon to architect and design modern distributed analytics and AI/ML platform solutions. He is passionate about solving customer challenges using data, analytics, and AI/ML. Outside of work, Pradeep likes exploring new places, trying new cuisines, and playing board games with his family. He also likes doing science experiments, building LEGOs and watching anime with his daughters.
Ramesh H Singh is a Senior Product Manager Technical (External Services) at AWS in Seattle, Washington, currently with the Amazon SageMaker team. He is passionate about building high-performance ML/AI and analytics products that enable enterprise customers to achieve their critical goals using cutting-edge technology. Connect with him on LinkedIn.
Harsh Singh is a Software Dev. Engineer at AWS based in the Bay Area. He currently works with the Amazon DataZone team, enhancing security for Amazon DataZone and SageMaker Unified Studio while developing features that help customers achieve their data, analytics, and AI goals faster. With a background in building ML and analytics systems at scale, Harsh enjoys solving complex problems in data engineering, AI/ML, and security. Outside of work, he can be found hiking the west coast trails and exploring new cuisines.
The next generation of SageMaker brings together widely adopted AWS machine learning and analytics capabilities, delivering an integrated experience with unified access to all data. Amazon SageMaker Lakehouse supports unified data access, and Amazon SageMaker Catalog, built on Amazon DataZone, offers catalog and governance features to meet enterprise security needs. Amazon SageMaker Catalog now supports metadata rules allowing organizations to enforce metadata standards across data publishing and subscription workflows.
A rule is a formal agreement that enforces specific metadata requirements across user workflows (e.g., publishing assets to the catalog, requesting data access) within the Amazon SageMaker Unified Studio portal. For instance, a metadata enforcement rule can specify the required information for creating a subscription request or publishing a data asset or a data product to the catalog, ensuring alignment with organizational standards. Metadata rules also enable the creation of custom approval workflows for subscriptions to assets, using collected metadata to facilitate access decisions or auto-fulfillment—outside of SageMaker.
By standardizing metadata practices, Amazon SageMaker Catalog enables customers to meet compliance requirements, enhance audit readiness, and streamline access workflows for greater efficiency and control. One such customer is Amazon Shipping Tech, which uses SageMaker Catalog for cataloging, discovery, sharing, and governance across their data ecosystem:
“We’re building an Analytics Ecosystem to drive discovery across the organization—but without consistent metadata, even our most valuable data can go unused. This feature empowers more teams to actively contribute to metadata curation with the right governance in place. It allows us to set clear standards for data producers while streamlining the collection of required subscription details—no extra templates needed. By enforcing standard metadata attributes, we improve discoverability, add context to each request, and strengthen support for analytics and GenAI solutions.”
— Saurabh Pandey, Principal Data Engineer at Amazon Shipping Tech
Sample use-cases
Metadata rules could help in the following use cases:
A producer at an automobile company is preparing to publish a new dataset into the organization’s data catalog. The domain owner for the automotive domain requires that the producer include metadata fields such as Model Year, Region, and Compliance Status. Before the dataset can be published, automated checks make sure that these fields are correctly filled out according to the predefined standards.
A consumer is requesting access to data assets in SageMaker. To meet organization standards and support audit and reporting needs, they must complete the subscription request, fill out a detailed form that includes the project purpose, and attach an email link with pre-approval and compliance training evidence to request subscription for financial data product. The data owner reviews the request, checking that all required metadata are provided before granting access.
Key benefits
Key benefits of new metadata enforcement rules include:
Enhanced control for domain (unit) owners – Admins can enforce additional metadata fields on subscription and publishing workflows, which must be adhered to by data users. This process supports thorough reviews and enforces organizational compliance.
Custom workflow support – You can create custom workflows for fulfilling subscriptions on non-managed assets by capturing essential metadata from data consumers. This metadata is used to configure access or support specific business requirements.
In this post, we guide you through two workflows: setting up metadata enforcement rules for a specific domain and publishing an asset or data product in a catalog, and setting up metadata enforcement rules for a specific domain and subscribing to an asset or data product that is owned by a project within that domain.
Solution Overview: Metadata Enforcement for Publishing
In this solution, we’ll walk through two workflows: setting up metadata enforcement for publishing, and setting up metadata enforcement for subscription.
Prerequisites
To follow this post, you should have a SageMaker Unified Studio domain set up with a domain owner or domain unit owner privileges. For instructions, refer to the following Getting started guide.
Set up metadata enforcement for publishing
In this section, we show you how to set up metadata rules for a specific domain as a domain admin. We also explain what happens when you publish an asset or data product in a catalog with these rules applied.
Create a domain unit for the marketing team
As a domain admin, complete the following steps:
On the SageMaker Unified Studio console, choose the Govern dropdown menu and choose Domain units.
Choose CREATE DOMAIN UNIT.
Provide details shown in the following screenshot and choose CREATE DOMAIN UNIT.
You can see the domain unit as shown in the following screenshot.
Enable a metadata form creation policy in the Marketing domain unit
Complete the following steps:
Navigate to the AUTHORIZATION POLICIES tab in the Marketing domain unit and choose Metadata form creation policy.
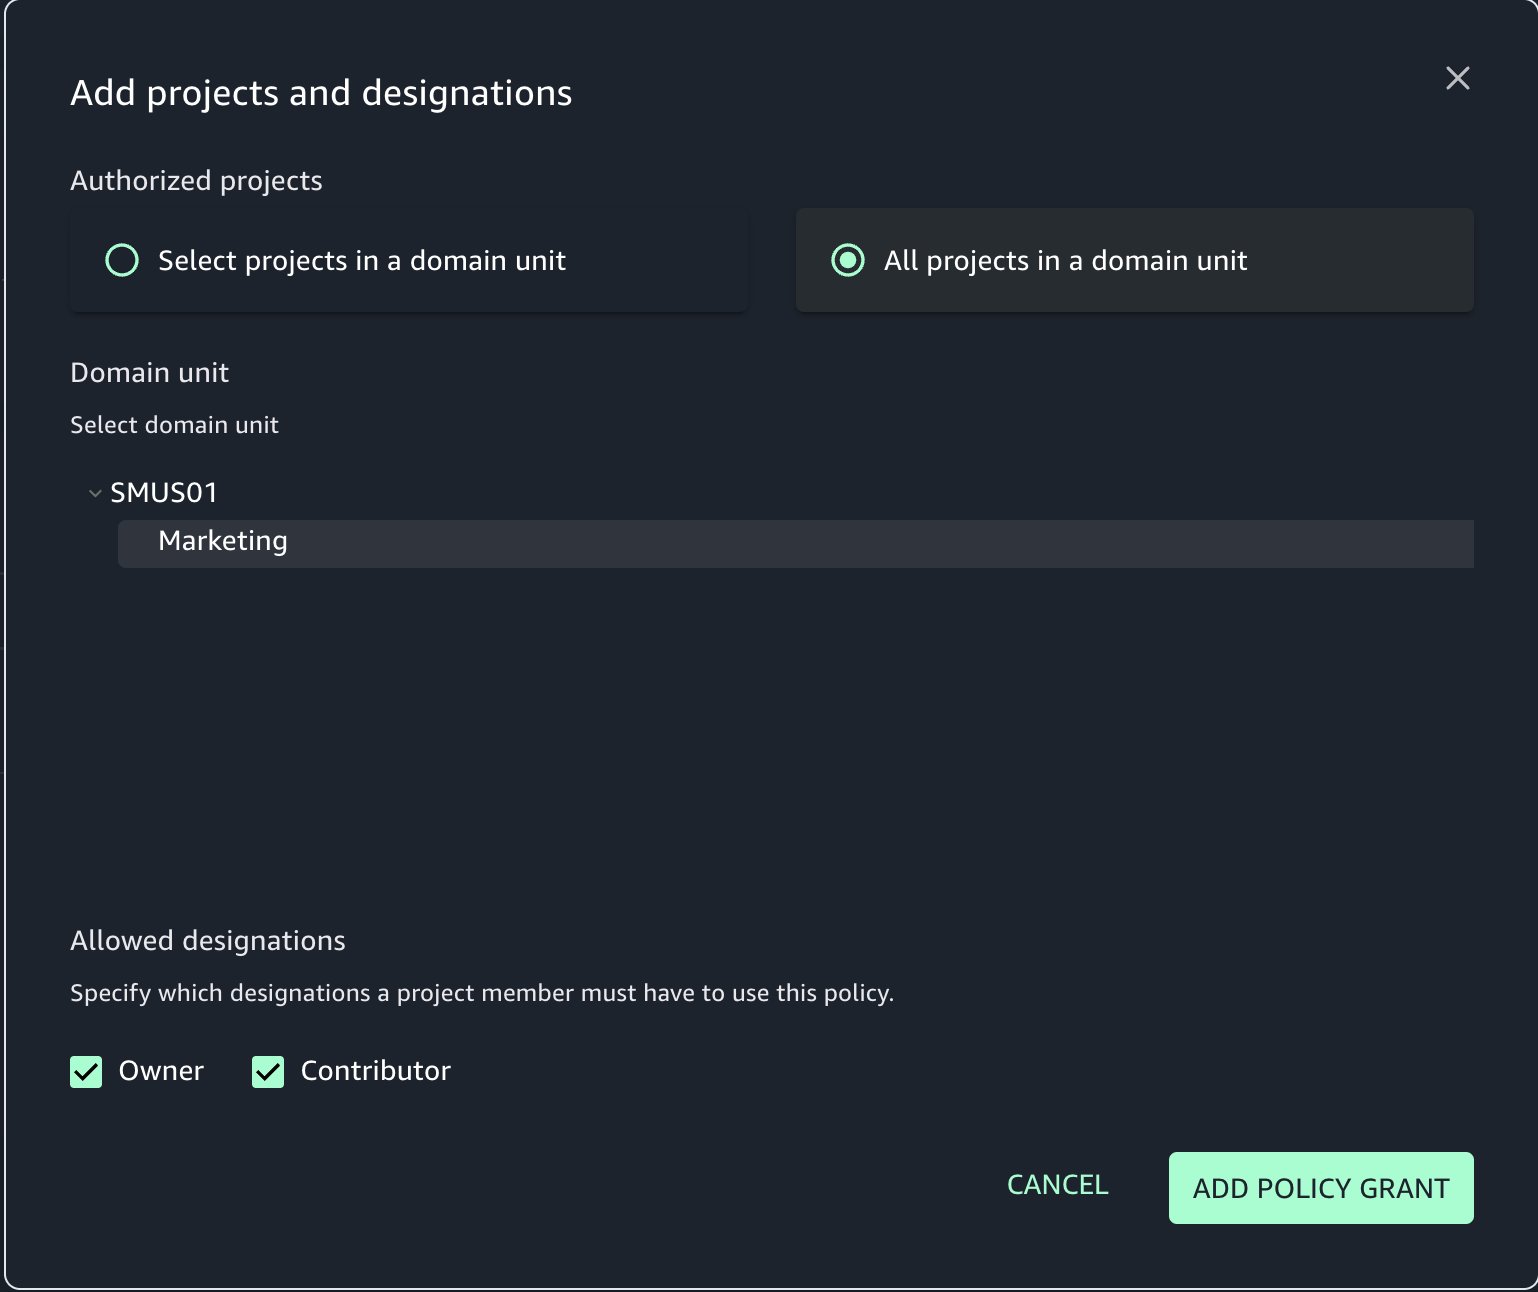
Choose ADD POLICY GRANT.
Select All projects in a domain unit and add a policy grant.
You can also select specific projects that can create metadata forms.
Choose ADD POLICY GRANT.
You can see the policy now created for the Marketing domain unit.
Create a metadata form to be enforced for assets before publishing
To create a metadata form, complete the following steps:
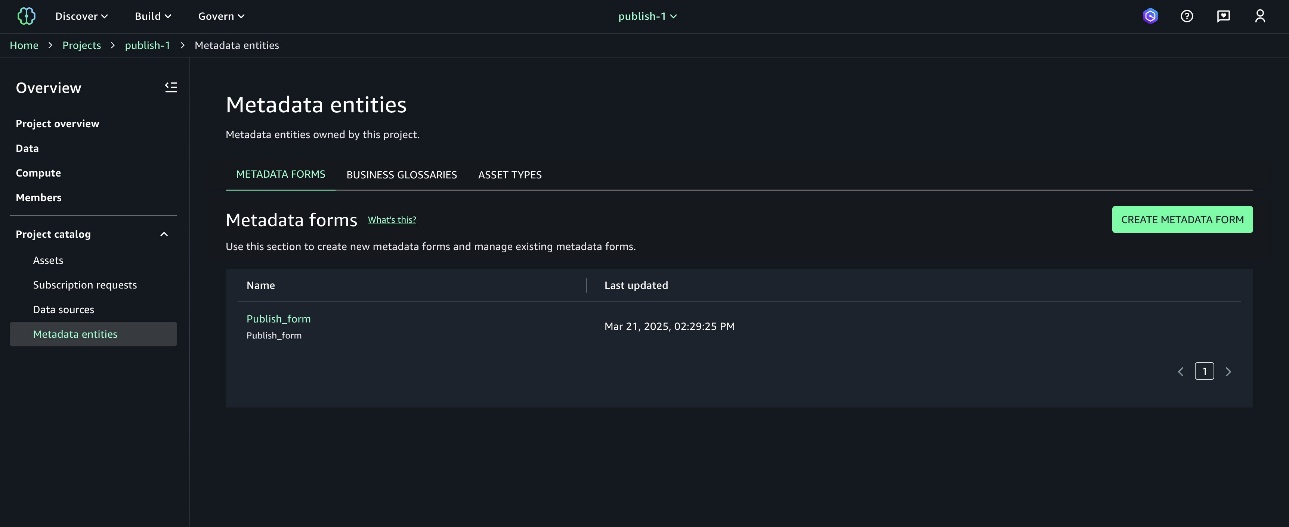
In the publish-1 project, choose Metadata entities under Project catalog in the navigation pane.
On the Metadata forms tab, choose CREATE METADATA FORM.
Provide a display name, technical name, and description.
Choose CREATE METADATA FORM.
After you create the form, you can choose CREATE FIELD to enforce fields that should be there in all published assets.
Provide details as shown in the following screenshot.
Select Searchable, Required, and Publishing because these fields are required before publishing.
Choose CREATE FIELD.
Add another field as shown in the following screenshot.
Both fields created with the Publishing action will require values before publishing to the catalog.
Create rules for asset publishing
Complete the following steps:
In the publish-1 project, under Domain Management in the navigation pane, choose Domain units.
Choose the Marketing domain unit.
On the Rules tab, choose ADD.
Create the rule configuration with details in the following screenshot and add the metadata form created in the previous step.
You can select the scope of enforcement by asset type and projects.
Choose ADD RULE to create the rule.
The publishing enforcement rule publish_rules is now created.
Create a project in the Marketing domain unit
Create a project named publish-1 in the Marketing domain unit. To learn how to create a project, refer to Create a project.
Create an asset in the project
Rules work on assets managed by the SageMaker Catalog or on custom assets. To create an asset, complete the following steps:
In the publish-1 project, choose Assets under Project catalog in the navigation pane.
On the Create dropdown menu, choose Create asset.
Provide an asset name and description, then choose Next.
For S3 location ARN¸ enter the Amazon Resource Name (ARN) of the S3 object.
Choose Next.
Choose CREATE.
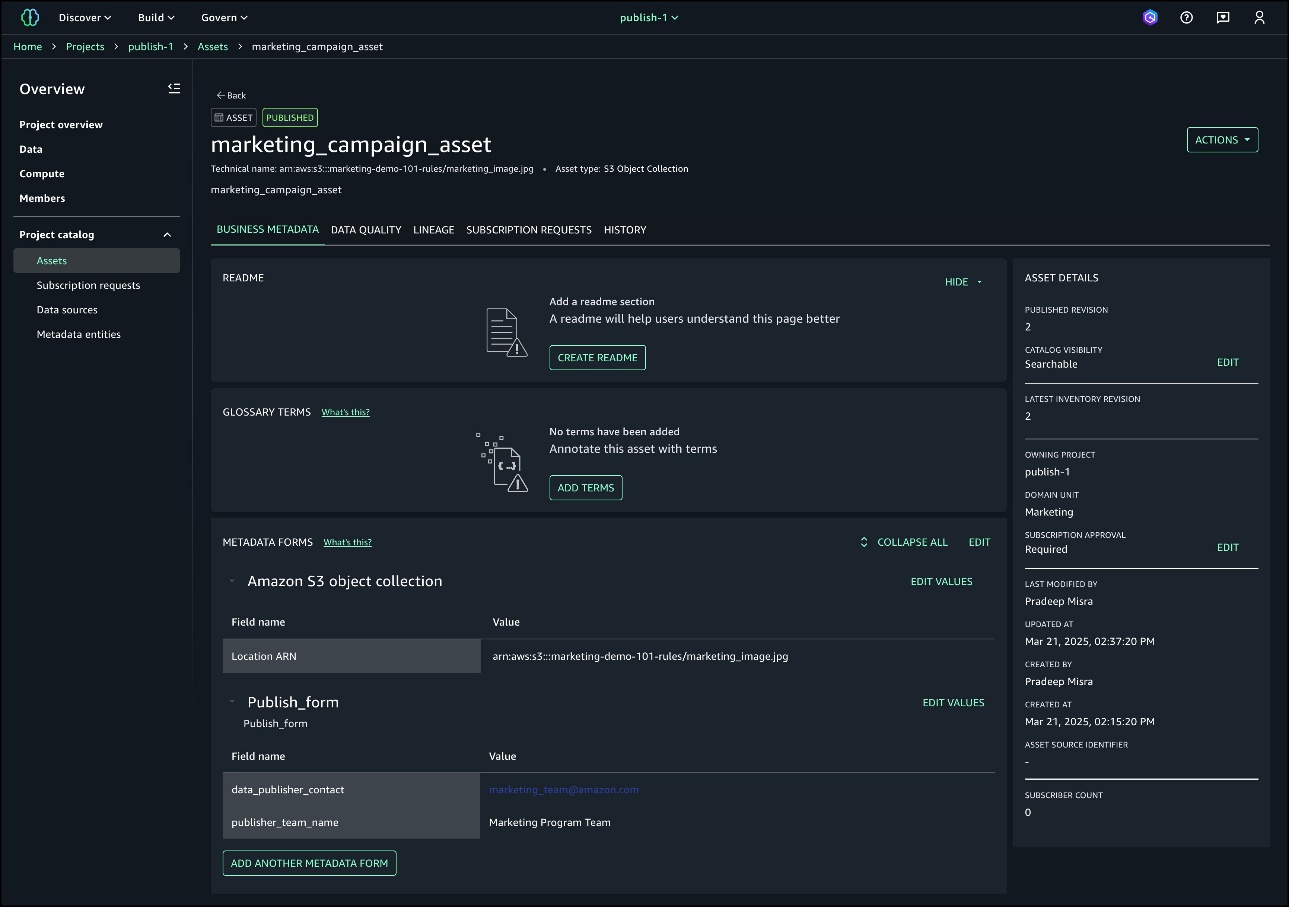
The asset marketing_campaign_asset is now created. This is still an inventory asset and not published to the catalog.
Publish rules enforcement
Asset details now show that the required values are missing for the mandatory form Publish_form.
You can try to publish without the required fields and the system will throw an error to enforce publishing metadata rules, as shown in the following screenshot.
To fix the issue, edit the value for the metadata form to provide the required info.
Provide details for the fields and choose SAVE.
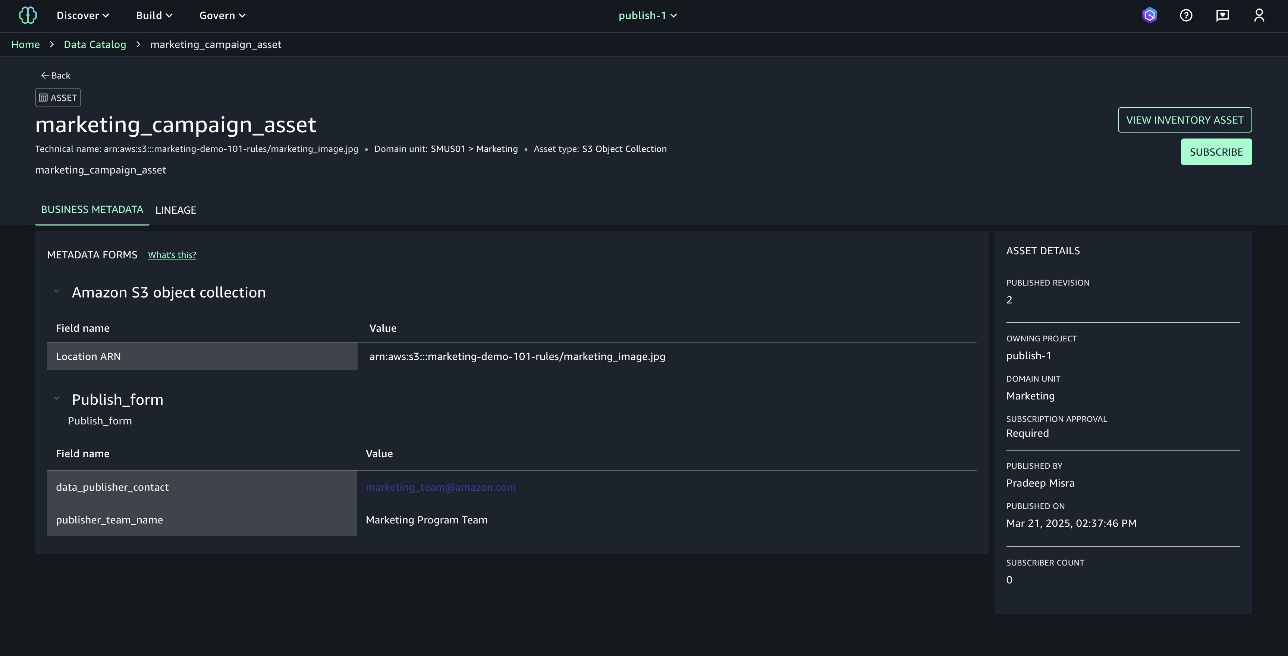
Choose PUBLISH ASSET now and the asset will be published to the catalog.
You can see the asset is published with the required fields enforced with rules.
Set up metadata enforcement for subscription requests
In this section, we show you how to set up metadata rules for a specific domain as a domain admin. We also explain what happens when you subscribe to an asset or data product with these rules applied.
Create rules for asset subscription
Complete the following steps:
Navigate to the project used in the previous section and choose Metadata entities under Project catalog in the navigation pane.
On the Metadata forms tab, choose CREATE METADATA FORM to create a new form.
Provide a form name and description, then choose CREATE METADATA FORM.
Add fields to the form by choosing CREATE FIELD and turning on Enabled.
Add a field for subscribers to explain the use case when requesting access.
Create rules for asset subscription
Complete the following steps:
On the project page, choose Domain units under Domain Management in the navigation pane.
Choose the Marketing domain unit.
We already have a publishing rule.
On the Rules tab, choose ADD to add a new rule.
Provide details for the new rule.
Specify the action as Subscription request.
Add the metadata form created in the previous steps (Subscribe_form).
Choose the scope and projects for enforcement as shown in the following screenshot.
Choose ADD RULE.
You will see the subscription enforcement rule is now created.
Subscribe the asset
Complete the following steps to subscribe the asset:
On the project page, navigate to the marketing asset.
Choose SUBSCRIBE.
The subscribe form is now attached in the request for the user to provide information.
After a data consumer submits a subscription request, the data producer receives it along with the provided metadata—such as Use Case. This allows producers to review the request before granting access.
Clean up
To avoid incurring additional charges, delete the Amazon SageMaker domain. Refer to Delete domains for the process.
Conclusion
In this post, we discussed metadata rules and how to implement them for both publishing and subscribing to assets across different domains, demonstrating effective metadata governance practices.
The new metadata enforcement rule in Amazon SageMaker strengthens data governance by enabling domain unit owners to establish clear metadata requirements for data users, streamlining catalog health and enhancing data governance process for access request. This feature enables organizations to align with organization’s metadata standards, implement custom workflows, and provide a consistent, governed data workflow experience.
The feature is supported in AWS Commercial Regions where Amazon SageMaker is currently available. To get started with metadata rules—
Read the user guide for creating rules in the publishing workflow
Read the user guide for creating rules in subscription requests
About the Authors
Pradeep Misra is a Principal Analytics Solutions Architect at AWS. He works across Amazon to architect and design modern distributed analytics and AI/ML platform solutions. He is passionate about solving customer challenges using data, analytics, and AI/ML. Outside of work, Pradeep likes exploring new places, trying new cuisines, and playing board games with his family. He also likes doing science experiments, building LEGOs and watching anime with his daughters.
Ramesh H Singh is a Senior Product Manager Technical (External Services) at AWS in Seattle, Washington, currently with the Amazon SageMaker team. He is passionate about building high-performance ML/AI and analytics products that enable enterprise customers to achieve their critical goals using cutting-edge technology. Connect with him on LinkedIn.
Sandhya Edupuganti is a Senior Engineering Leader spearheading Amazon DataZone (aka) SageMaker Catalog. She is based in Seattle Metro area and has been with Amazon for over 17 years leading strategic initiatives in Amazon Advertising, Amazon-Retail, Latam-Expansion and AWS Analytics.
To enable your workforce users for analytics with fine-grained data access controls and audit data access, you might have to create multiple AWS Identity and Access Management (IAM) roles with different data permissions and map the workforce users to one of those roles. Multiple users are often mapped to the same role where they need similar privileges to enable data access controls at the corporate user or group level and audit data access.
AWS IAM Identity Center enables centralized management of workforce user access to AWS accounts and applications using a local identity store or by connecting corporate directories via identity providers (IdPs). IAM Identity Center now supports trusted identity propagation, a streamlined experience for users who require access to data with AWS analytics services.
Amazon EMR Studio is an integrated development environment (IDE) that makes it straightforward for data scientists and data engineers to build data engineering and data science applications. With trusted identity propagation, data access management can be based on a user’s corporate identity and can be propagated seamlessly as they access data with single sign-on to build analytics applications with Amazon EMR (EMR Studio and Amazon EMR on EC2).
AWS Lake Formation allows data administrators to centrally govern, secure, and share data for analytics and machine learning (ML). With trusted identity propagation, data administrators can directly provide granular access to corporate users using their identity attributes and simplify the traceability of end-to-end data access across AWS services. Because access is managed based on a user’s corporate identity, they don’t need to use database local user credentials or assume an IAM role to access data.
In this post, we show how to bring your workforce identity to EMR Studio for analytics use cases, directly manage fine-grained permissions for the corporate users and groups using Lake Formation, and audit their data access.
Solution overview
For our use case, we want to enable a data analyst user named analyst1 to use their own enterprise credentials to query data they have been granted permissions to and audit their data access. We use Okta as the IdP for this demonstration. The following diagram illustrates the solution architecture.
This architecture is based on the following components:
Okta is responsible for maintaining the corporate user identities, related groups, and user authentication.
IAM Identity Center connects Okta users and centrally manages their access across AWS accounts and applications.
Lake Formation provides fine-grained access controls on data directly to corporate users using trusted identity propagation.
EMR Studio is an IDE for users to build and run applications. It allows users to log in directly with their corporate credentials without signing in to the AWS Management Console.
For this setup, we have created two users, analyst1 and engineer1, and assigned them to the corresponding Okta application. You can validate the integration is working by navigating to the Users page on the IAM Identity Center console, as shown in the following screenshot. Both enterprise users from Okta are provisioned in IAM Identity Center.
The following exact users will not be listed in your account. You can either create similar users or use an existing user.
Each provisioned user in IAM Identity Center has a unique user ID. This ID does not originate from Okta; it’s created in IAM Identity Center to uniquely identify this user. With trusted identity propagation, this user ID will be propagated across services and also used for traceability purposes in CloudTrail. The following screenshot shows the IAM Identity Center user matching the provisioned Okta user analyst1.
Choose the link under AWS access portal URL and log in with the analyst1 Okta user credentials that are already assigned to this application.
If you are able to log in and see the landing page, then all your configurations up to this step are set correctly. You will not see any applications on this page yet.
Set up EMR Studio
In this step, we demonstrate the actions needed from the data lake administrator to set up EMR Studio enabled for trusted identity propagation and with IAM Identity Center integration. This allows users to directly access EMR Studio with their enterprise credentials.
Note: All Amazon S3 buckets (created after January 5, 2023) have encryption configured by default (Amazon S3 managed keys (SSE-S3)), and all new objects that are uploaded to an S3 bucket are automatically encrypted at rest. To use a different type of encryption, to meet your security needs, please update the default encryption configuration for the bucket. See Protecting data for server-side encryption for further details.
On the Amazon EMR console, choose Studios in the navigation pane under EMR Studio.
Choose Create Studio.
For Setup options¸ select Custom.
For Studio name, enter a name (for this post, emr-studio-with-tip).
For S3 location for Workspace storage, select Select existing location and enter an existing S3 bucket (if you have one). Otherwise, select Create new bucket.
For Service role to let Studio access your AWS resources, choose View permissions details to get the trust and IAM policy information that is needed and create a role with those specific policies in IAM. In this case, we create a new role called emr_tip_role.
For Service role to let Studio access your AWS resources, choose the IAM role you created.
For Workspace name, enter a name (for this post, studio-workspace-with-tip).
For Authentication, select IAM Identity Center.
For User role¸ you can create a new role or choose an existing role. For this post, we choose the role we created (emr_tip_role).
To use the same role, add the following statement to the trust policy of the service role:
Select Enable trusted identity propagation to allow you to control and log user access across connected applications.
For Choose who can access your application, select All users and groups.
Later, we restrict access to resources using Lake Formation. However, there is an option here to restrict access to only assigned users and groups.
In the Networking and security section, you can provide optional details for your VPC, subnets, and security group settings.
Choose Create Studio.
On the Studios page of the Amazon EMR console, locate your Studio enabled with IAM Identity Center.
Copy the link for Studio Access URL.
Enter the URL into a web browser and log in using Okta credentials.
You should be able to successfully sign in to the EMR Studio console.
Create an AWS Identity Center enabled security configuration for EMR clusters
EMR security configurations allow you to configure data encryption, Kerberos authentication, and Amazon S3 authorization for the EMR File System (EMRFS) on the clusters. The security configuration is available to use and reuse when you create clusters.
To integrate Amazon EMR with IAM Identity Center, you need to first create an IAM role that authenticates with IAM Identity Center from the EMR cluster. Amazon EMR uses IAM credentials to relay the IAM Identity Center identity to downstream services such as Lake Formation. The IAM role should also have the respective permissions to invoke the downstream services.
Create a role (for this post, called emr-idc-application) with the following trust and permission policy. The role referenced in the trust policy is the InstanceProfile role for EMR clusters. This allows the EC2 instance profile to assume this role and act as an identity broker on behalf of the federated users.
Upload my-certs.zip to an S3 location that will be used to create the security configuration.
The EMR service role should have access to the S3 location. The key allows access to the issuer’s EMR cluster instances in the us-west-2 Region as specified by the *.us-west-2.compute.internal domain name as the common name. You can change this to the Region your cluster is in.
You can view the security configuration on the Amazon EMR console.
Create a Service Catalog product template to create EMR clusters
EMR Studio with trusted identity propagation enabled can only work with clusters created from a template. Complete the following steps to create a product template in Service Catalog:
On the Service Catalog console, choose Portfolios under Administration in the navigation pane.
Choose Create portfolio.
Enter a name for your portfolio (for this post, EMR Clusters Template) and an optional description.
Choose Create.
On the Portfolios page, choose the portfolio you just created to view its details.
On the Products tab, choose Create product.
For Product type, select CloudFormation.
For Product name, enter a name (for this post, EMR-7.0.0).
Use the security configuration IdentityCenterConfiguration-with-lf-tip you created in previous steps with the appropriate Amazon EMR service roles.
Choose Create product.
The following is an example CloudFormation template. Update the account-specific values for SecurityConfiguration, JobFlowRole, ServiceRole, LogUri, Ec2KeyName, and Ec2SubnetId. We provide a sample Amazon EMR service role and trust policy in Appendix A at the end of this post.
Trusted identity propagation is supported from Amazon EMR 6.15 onwards. For Amazon EMR 6.15, add the following bootstrap action to the CloudFormation script:
The portfolio now should have the EMR cluster creation product added.
Grant the EMR Studio role emr_tip_role access to the portfolio.
Grant Lake Formation permissions to users to access data
In this step, we enable Lake Formation integration with IAM Identity Center and grant permissions to the Identity Center user analyst1. If Lake Formation is not already enabled, refer to Getting started with Lake Formation.
To use Lake Formation with Amazon EMR, create a custom role to register S3 locations. You need to create a new custom role with Amazon S3 access and not use the default role AWSServiceRoleForLakeFormationDataAccess. Additionally, enable external data filtering in Lake Formation. For more details, refer to Enable Lake Formation with Amazon EMR.
Complete the following steps to manage access permissions in Lake Formation:
On the Lake Formation console, choose IAM Identity Center integration under Administration in the navigation pane.
Lake Formation will automatically specify the correct IAM Identity Center instance.
Choose Create.
You can now view the IAM Identity Center integration details.
For this post, we have a Marketing database and a customer table on which we grant access to our enterprise user analyst1. You can use an existing database and table in your account or create a new one. For more examples, refer to Tutorials.
The following screenshot shows the details of our customer table.
On the Lake Formation console, choose Data lake permissions under Permissions in the navigation pane.
Choose Grant.
Select Named Data Catalog resources.
For Databases, choose your database (marketing).
For Tables, choose your table (customer).
For Table permissions, select Select and Describe.
For Data permissions, select All data access.
Choose Grant.
The following screenshot shows a summary of permissions that user analyst1 has. They have Select access on the table and Describe permissions on the databases.
Test the solution
To test the solution, we log in to EMR Studio as enterprise user analyst1, create a new Workspace, create an EMR cluster using a template, and use that cluster to perform an analysis. You could also use the Workspace that was created during the Studio setup. In this demonstration, we create a new Workspace.
You need additional permissions in the EMR Studio role to create and list Workspaces, use a template, and create EMR clusters. For more details, refer to Configure EMR Studio user permissions for Amazon EC2 or Amazon EKS. Appendix B at the end of this post contains a sample policy.
When the cluster is available, we attach the cluster to the Workspace and run queries on the customer table, which the user has access to.
User analyst1 is now able to run queries for business use cases using their corporate identity. To open a PySpark notebook, we choose PySpark under Notebook.
When the notebook is open, we run a Spark SQL query to list the databases:
%%sql
show databases
In this case, we query the customer table in the marketing database. We should be able to access the data.
%%sql
select * from marketing.customer
Audit data access
Lake Formation API actions are logged by CloudTrail. The GetDataAccess action is logged whenever a principal or integrated AWS service requests temporary credentials to access data in a data lake location that is registered with Lake Formation. With trusted identity propagation, CloudTrail also logs the IAM Identity Center user ID of the corporate identity who requested access to the data.
The following screenshot shows the details for the analyst1 user.
Choose View event to view the event logs.
The following is an example of the GetDataAccess event log. We can trace that user analyst1, Identity Center user ID c8c11390-00a1-706e-0c7a-bbcc5a1c9a7f, has accessed the customer table.
In this post, we demonstrated how to set up and use trusted identity propagation using IAM Identity Center, EMR Studio, and Lake Formation for analytics. With trusted identity propagation, a user’s corporate identity is seamlessly propagated as they access data using single sign-on across AWS analytics services to build analytics applications. Data administrators can provide fine-grained data access directly to corporate users and groups and audit usage. To learn more, see Integrate Amazon EMR with AWS IAM Identity Center.
About the Authors
Pradeep Misra is a Principal Analytics Solutions Architect at AWS. He works across Amazon to architect and design modern distributed analytics and AI/ML platform solutions. He is passionate about solving customer challenges using data, analytics, and AI/ML. Outside of work, Pradeep likes exploring new places, trying new cuisines, and playing board games with his family. He also likes doing science experiments with his daughters.
Deepmala Agarwal works as an AWS Data Specialist Solutions Architect. She is passionate about helping customers build out scalable, distributed, and data-driven solutions on AWS. When not at work, Deepmala likes spending time with family, walking, listening to music, watching movies, and cooking!
Abhilash Nagilla is a Senior Specialist Solutions Architect at Amazon Web Services (AWS), helping public sector customers on their cloud journey with a focus on AWS analytics services. Outside of work, Abhilash enjoys learning new technologies, watching movies, and visiting new places.
Appendix A
Sample Amazon EMR service role and trust policy:
Note: This is a sample service role. Fine grained access control is done using Lake Formation. Modify the permissions as per your enterprise guidance and to comply with your security team.
Note: This is a sample service role. Fine grained access control is done using Lake Formation. Modify the permissions as per your enterprise guidance and to comply with your security team.
To provide the best experiences, we use technologies like cookies to store and/or access device information. Consenting to these technologies will allow us to process data such as browsing behavior or unique IDs on this site. Not consenting or withdrawing consent, may adversely affect certain features and functions.
Functional
Always active
The technical storage or access is strictly necessary for the legitimate purpose of enabling the use of a specific service explicitly requested by the subscriber or user, or for the sole purpose of carrying out the transmission of a communication over an electronic communications network.
Preferences
The technical storage or access is necessary for the legitimate purpose of storing preferences that are not requested by the subscriber or user.
Statistics
The technical storage or access that is used exclusively for statistical purposes.The technical storage or access that is used exclusively for anonymous statistical purposes. Without a subpoena, voluntary compliance on the part of your Internet Service Provider, or additional records from a third party, information stored or retrieved for this purpose alone cannot usually be used to identify you.
Marketing
The technical storage or access is required to create user profiles to send advertising, or to track the user on a website or across several websites for similar marketing purposes.


 Pradeep Misra is a Principal Analytics Solutions Architect at AWS. He works across Amazon to architect and design modern distributed analytics and AI/ML platform solutions. He is passionate about solving customer challenges using data, analytics, and AI/ML. Outside of work, Pradeep likes exploring new places, trying new cuisines, and playing board games with his family. He also likes doing science experiments, building LEGOs and watching anime with his daughters.
 Ramesh H Singh is a Senior Product Manager Technical (External Services) at AWS in Seattle, Washington, currently with the Amazon SageMaker team. He is passionate about building high-performance ML/AI and analytics products that enable enterprise customers to achieve their critical goals using cutting-edge technology. Connect with him on LinkedIn.
 Harsh Singh is a Software Dev. Engineer at AWS based in the Bay Area. He currently works with the Amazon DataZone team, enhancing security for Amazon DataZone and SageMaker Unified Studio while developing features that help customers achieve their data, analytics, and AI goals faster. With a background in building ML and analytics systems at scale, Harsh enjoys solving complex problems in data engineering, AI/ML, and security. Outside of work, he can be found hiking the west coast trails and exploring new cuisines.


 Sandhya Edupuganti is a Senior Engineering Leader spearheading Amazon DataZone (aka) SageMaker Catalog. She is based in Seattle Metro area and has been with Amazon for over 17 years leading strategic initiatives in Amazon Advertising, Amazon-Retail, Latam-Expansion and AWS Analytics.


 Pradeep Misra is a Principal Analytics Solutions Architect at AWS. He works across Amazon to architect and design modern distributed analytics and AI/ML platform solutions. He is passionate about solving customer challenges using data, analytics, and AI/ML. Outside of work, Pradeep likes exploring new places, trying new cuisines, and playing board games with his family. He also likes doing science experiments with his daughters.
 Deepmala Agarwal works as an AWS Data Specialist Solutions Architect. She is passionate about helping customers build out scalable, distributed, and data-driven solutions on AWS. When not at work, Deepmala likes spending time with family, walking, listening to music, watching movies, and cooking!
 Abhilash Nagilla is a Senior Specialist Solutions Architect at Amazon Web Services (AWS), helping public sector customers on their cloud journey with a focus on AWS analytics services. Outside of work, Abhilash enjoys learning new technologies, watching movies, and visiting new places.