Post Syndicated from Sumit Patel original https://aws.amazon.com/blogs/security/how-to-automate-incident-response-to-security-events-with-aws-systems-manager-incident-manager/
Incident response is a core security capability for organizations to develop, and a core element in the AWS Cloud Adoption Framework (AWS CAF). Responding to security incidents quickly is important to minimize their impacts. Automating incident response helps you scale your capabilities, rapidly reduce the scope of compromised resources, and reduce repetitive work by your security team.
In this post, I show you how to use Incident Manager, a capability of AWS Systems Manager, to build an effective automated incident management and response solution to security events.
You’ll walk through three common security-related events and how you can use Incident Manager to automate your response.
- AWS account root user activity: An Amazon Web Services (AWS) account root user has full access to all your resources for all AWS services, including billing information. It’s therefore elemental to adhere to the best practice of using the root user only to create your first IAM user and securely lock away the root user credentials and use them to perform only a few account and service management tasks. And it is critical to be aware when root user activity occurs in your AWS account.
- Amazon GuardDuty high severity findings: Amazon GuardDuty is a threat detection service that continuously monitors for malicious or unauthorized behavior to help protect your AWS accounts and workloads. In this blog post, you’ll learn how to initiate an incident response plan whenever a high severity finding is discovered.
- AWS Config rule change and S3 bucket allowing public access: AWS Config enables continuous monitoring of your AWS resources, making it simple to assess, audit, and record resource configurations and changes. You will use AWS Config to monitor your Amazon Simple Storage Service (S3) bucket ACLs and policies for settings that allow public read or public write access.
Prerequisites
If this is your first time using Incident Manager, follow the initial onboarding steps in Getting prepared with Incident Manager.
Incident Manager can start managing incidents automatically using Amazon CloudWatch or Amazon EventBridge. For the solution in this blog post, you will use EventBridge to capture events and start an incident.
To complete the steps in this walkthrough, you need the following:
- An AWS account and AWS Identity Access and Management (IAM) permissions to access Systems Manager, GuardDuty, Config, S3, and EventBridge. Your IAM user or role should also have iam:CreateServiceLinkedRole permissions. Incident Manager uses this permission to create the service-linked role AWSServiceRoleforIncidentManager in your account. For more information, see Using service-linked roles for Incident Manager.
- To enable Systems Manager, follow the steps in the Manage instances using AWS Systems Manager Quick Setup blog post. If you want to customize Systems Manager beyond the quick setup, see Setting up AWS Systems Manager.
- To enable GuardDuty in your account, follow the steps in Getting started with GuardDuty.
- To enable AWS Config in your account, follow the steps in Getting started with AWS Config.
Create an Incident Manager response plan
A response plan ties together the contacts, escalation plan, and runbook. When an incident occurs, a response plan defines who to engage, how to engage, which runbook to initiate, and which metrics to monitor. By creating a well-defined response plan, you can save your security team time down the road.
Add contacts
Your contacts should include everyone who might be involved in the incident. Follow these steps to add a contact.
To add contacts
- Open the AWS Management Console, and then go to Systems Manager within the console, expand Operations Management, and then expand Incident Manager.
- Choose Contacts, and then choose Create contact.

Figure 1: Adding contact details
- On Contact information, enter names and define contact channels for your contacts.
- Under Contact channel, you can select Email, SMS, or Voice. You can also add multiple contact channels.
- In Engagement plan, specify how fast to engage your responders. In the example illustrated below, the incident responder will be engaged through email immediately (0 minutes) when an incident is detected and then through SMS 10 minutes into an incident. Complete the fields and then choose Create.

Figure 2: Engagement plan


Create a response plan
Once you’ve created your contacts, you can create a response plan to define how to respond to incidents. Refer to the Best Practices for Response Plans.
Note: (Optional) You can also create an escalation plan that lets you further define the escalation path for your contacts. You can learn more in Create an escalation plan.
To create a response plan
- Open the Incident Manager console, and choose Response plans in the left navigation pane.
- Choose Create response plan.
- Enter a unique and identifiable name for your response plan.
- Enter an incident title. The incident title helps to identify an incident on the incidents home page.
- Select an appropriate Impact based on the potential scope of the incident.

Figure 3: Selecting your impact level
- (Optional) Choose a chat channel for the incident responders to interact in during an incident. For more information about chat channels, see Chat channels.
- (Optional) For Engagement, you can choose any number of contacts and escalation plans. For this solution, select the security team responder that you created earlier as one of your contacts.

Figure 4: Adding engagements
- (Optional) You can also create a runbook that can drive the incident mitigation and response. For further information, refer to Runbooks and automation.
- Under Execution permissions, choose Create an IAM role using a template. Under Role name, select the IAM role you created in the prerequisites that allows Incident Manager to run SSM automation documents, and then choose Create response plan.


Monitor AWS account root activity
When you first create an AWS account, you begin with a single sign-in identity that has complete access to all AWS services and resources in the account. This identity is called the root user and is accessed by signing in with the email address and password that you used to create the account.
An AWS account root user has full access to all your resources for all AWS services, including billing information. It is critical to prevent root user access from unauthorized use and to be aware whenever root user activity occurs in your AWS account. For more information about AWS recommendations, see Security best practices in IAM.
To be certain that all root user activity is authorized and expected, it’s important to monitor root API calls to a given AWS account and to be notified when root user activity is detected.
Create an EventBridge rule
Create and validate an EventBridge rule to capture AWS account root activity.
To create an EventBridge rule
- Open the EventBridge console.
- In the navigation pane, choose Rules, and then choose Create rule.
- Enter a name and description for the rule.
- For Define pattern, choose Event pattern.
- Choose Custom pattern.
- Enter the following event pattern:
- For Select targets, choose Incident Manager response plan.
- For Response plan, choose SecurityEventResponsePlan, which you created when you set up Incident Manager.
- To create an IAM role automatically, choose Create a new role for this specific resource. To use an existing IAM role, choose Use existing role.
- (Optional) Enter one or more tags for the rule.
- Choose Create.
To validate the rule
- Sign in using root credentials.
- This console login activity by a root user should invoke the Incident Manager response plan and show an open incident as illustrated below. The respective contact channels that you defined earlier in your Engagement Plan, will be engaged.
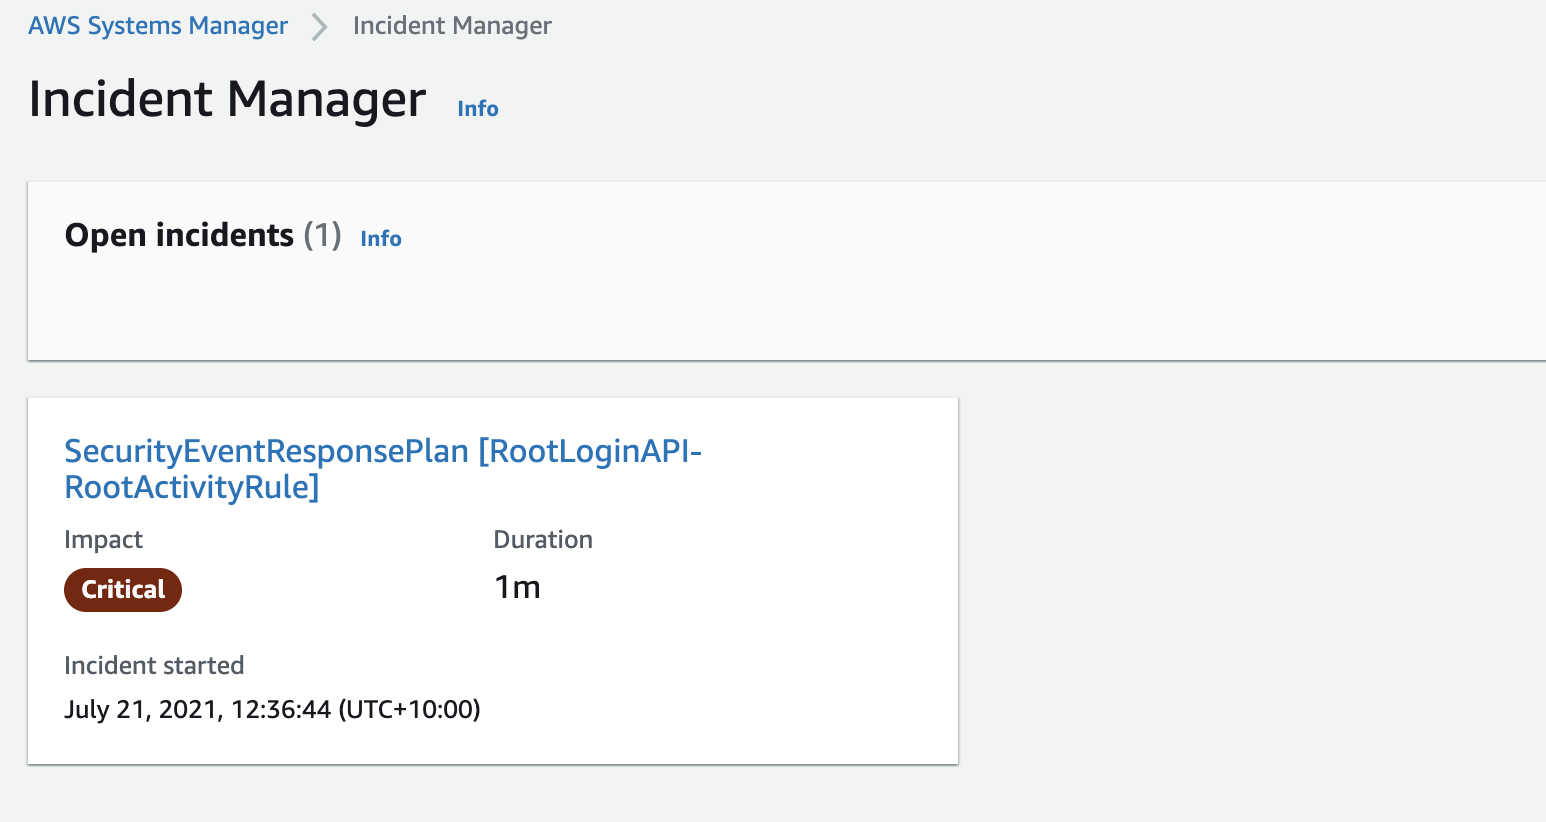
Figure 5: Incident Manager open incidents
Watch for GuardDuty high severity findings
GuardDuty is a monitoring service that analyzes AWS CloudTrail management and Amazon S3 data events, Amazon Virtual Private Cloud (Amazon VPC) flow logs, and Amazon Route 53 DNS logs to generate security findings for your account. Once GuardDuty is enabled, it immediately starts monitoring your environment.
GuardDuty integrates with EventBridge, which can be used to send findings data to other applications and services for processing. With EventBridge, you can use GuardDuty findings to invoke automatic responses to your findings by connecting finding events to targets such as Incident Manager response plan.
Create an EventBridge rule
You’ll use an EventBridge rule to capture GuardDuty high severity findings.
To create an EventBridge rule
- Open the EventBridge console.
- In the navigation pane, select Rules, and then choose Create rule.
- Enter a name and description for the rule.
- For Define pattern, choose Event pattern.
- Choose Custom pattern
- Enter the following event pattern which will filter on GuardDuty high severity findings
- For Select targets, choose Incident Manager response plan.
- For Response plan, select SecurityEventResponsePlan, which you created when you set up Incident Manager.
- To create an IAM role automatically, choose Create a new role for this specific resource. To use an IAM role that you created before, choose Use existing role.
- (Optional) Enter one or more tags for the rule.
- Choose Create.
To validate the rule
To test and validate whether the above rule is now functional, you can generate sample findings within the GuardDuty console.
- Open the GuardDuty console.
- In the navigation pane, choose Settings.
- On the Settings page, under Sample findings, choose Generate sample findings.
- In the navigation pane, choose Findings. The sample findings are displayed on the Current findings page with the prefix [SAMPLE].
Once you have generated sample findings, your Incident Manager response plan will be invoked almost immediately and the engagement plan with your contacts will begin.
You can select an open incident in the Incident Manager console to see additional details from the GuardDuty finding. Figure 6 shows a high severity finding.
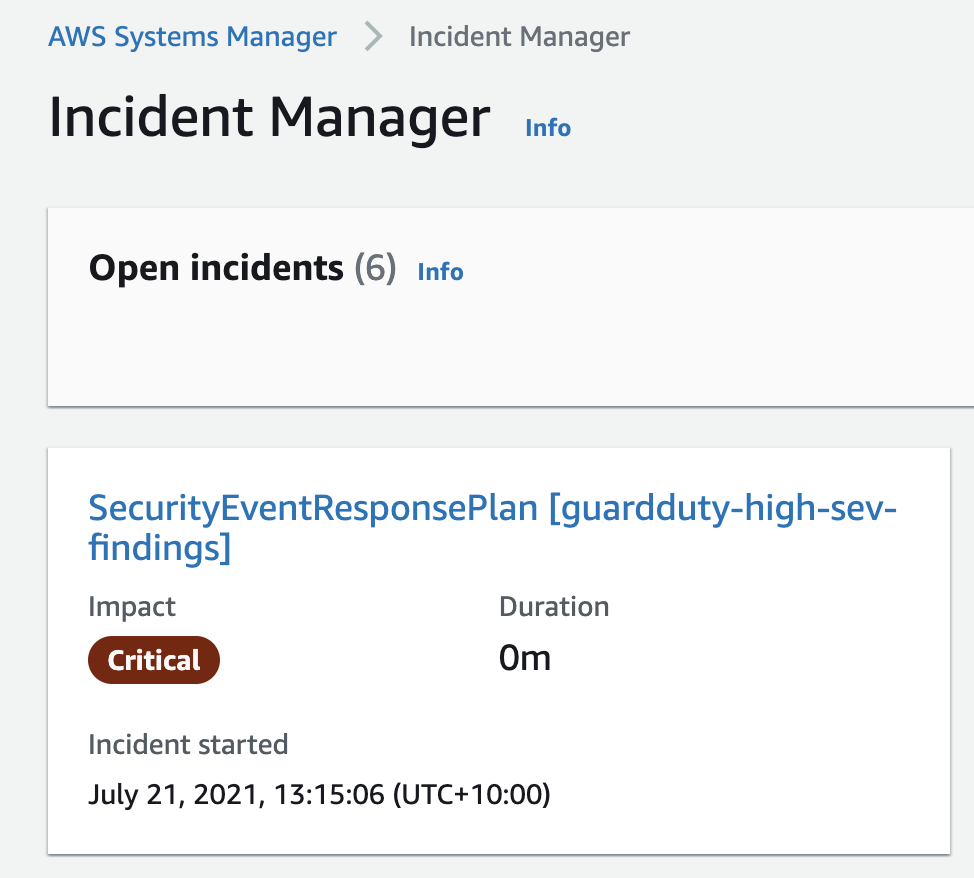
Figure 6: Incident Manager open incident for GuardDuty high severity finding
Monitor S3 bucket settings for public access
AWS Config enables continuous monitoring of your AWS resources, making it easier to assess, audit, and record resource configurations and changes. AWS Config does this through rules that define the desired configuration state of your AWS resources. AWS Config provides a number of AWS managed rules that address a wide range of security concerns such as checking that your Amazon Elastic Block Store (Amazon EBS) volumes are encrypted, your resources are tagged appropriately, and multi-factor authentication (MFA) is enabled for root accounts.
Set up AWS Config and EventBridge
You will use AWS Config to monitor your S3 bucket ACLs and policies for violations which could allow public read or public write access. If AWS Config finds a policy violation, it will initiate an AWS EventBridge rule to invoke your Incident Manager response plan.
To create the AWS Config rule to capture S3 bucket public access
- Sign in to the AWS Config console.
- If this is your first time in the AWS Config console, refer to the Getting Started guide for more information.
- Select Rules from the menu and choose Add Rule.
- On the AWS Config rules page, enter S3 in the search box and select the s3-bucket-public-read-prohibited and s3-bucket-public-write-prohibited rules, and then choose Next.

Figure 7: AWS Config rules
- Leave the Configure rules page as default and select Next.
- On the Review page, select Add Rule. AWS Config is now analyzing your S3 buckets, capturing their current configurations, and evaluating the configurations against the rules you selected.

To create the EventBridge rule
- Open the Amazon EventBridge console
- In the navigation pane, choose Rules, and then choose Create rule.
- Enter a name and description for the rule.
- For Define pattern, choose Event pattern.
- Choose Custom pattern
- Enter the following event pattern, which will filter on AWS Config rule s3-bucket-public-write-prohibited being non-compliant.
- For Select targets, choose Incident Manager response plan.
- For Response plan, choose SecurityEventResponsePlan, which you created earlier when setting up Incident Manager.
- To create an IAM role automatically, choose Create a new role for this specific resource. To use an existing IAM role, choose Use existing role.
- (Optional) Enter one or more tags for the rule.
- Choose Create.
To validate the rule
- Create a compliant test S3 bucket with no public read or write access through either an ACL or a policy.
- Change the ACL of the bucket to allow public listing of objects so that the bucket is non-compliant.

Figure 8: Amazon S3 console
- After a few minutes, you should see the AWS Config rule initiated which invokes the EventBridge rule and therefore your Incident Manager response plan.

Summary
In this post, I showed you how to use Incident Manager to monitor for security events and invoke a response plan via Amazon CloudWatch or Amazon EventBridge. AWS CloudTrail API activity (for a root account login), Amazon GuardDuty (for high severity findings), and AWS Config (to enforce policies like preventing public write access to an S3 bucket). I demonstrated how you can create an incident management and response plan to ensure you have used the power of cloud to create automations that respond to and mitigate security incidents in a timely manner. To learn more about Incident Manager, see What Is AWS Systems Manager Incident Manager in the AWS documentation.
If you have feedback about this post, submit comments in the comments section below. If you have questions about this post, start a new thread on the Systems Manager forum or contact AWS Support.
Want more AWS Security how-to content, news, and feature announcements? Follow us on Twitter.