Tag Archives: AWS CloudTrail

Controlling AWS API Calls from Amazon Q Developer: Enterprise Governance with Built-in User Agent Markers

Post Syndicated from Kirankumar Chandrashekar original https://aws.amazon.com/blogs/devops/controlling-aws-api-calls-from-amazon-q-developer-enterprise-governance-with-built-in-user-agent-markers/

As organizations increasingly adopt AI-powered development tools, a critical challenge emerges: how do you maintain security governance when AI assistants execute AWS operations on behalf of users? Organizations want to leverage AI assistance for development and read operations while maintaining strict controls over write operations that impact production systems and auditing calls made via AI assistants. Consider this scenario: A developer asks Amazon Q Developer “List my S3 buckets”, Q Developer suggests aws s3 ls, the developer approves, and Q Developer executes the command via AWS CLI. From an AWS perspective, this looks identical to the developer manually running the aws s3 ls command on the terminal outside of Amazon Q Developer. But what if your organization needs to distinguish between AI-assisted operations and manual commands for governance or compliance?

Amazon Q Developer, the most capable generative AI–powered assistant for software development, generates AWS CLI commands in response to user requests and executes them using its use_aws and execute_bash built-in tools. The challenge of distinguishing AI-assisted operations from manual commands is a key consideration for Amazon Q Developer adoption in enterprise environments. To address this governance challenge, Amazon Q Developer includes a built-in solution: user-agent markers that automatically identify AWS CLI calls made through Q Developer in CloudTrail logs, enabling precise IAM policy controls.

This blog post explores how Amazon Q Developer’s built-in user agent markers set for AWS CLI calls enable precise IAM policy controls, allowing organizations to distinguish and govern AI-assisted AWS operations while maintaining the productivity benefits of AI-powered development. The following sections demonstrate how these user agent markers work, how to implement IAM policies that leverage them, and how to monitor their effectiveness in your environment.

Understanding Amazon Q Developer User Agent Markers

Prerequisites

This section builds on your knowledge of these concepts and assumes you have the necessary setup in place. These foundational elements are essential for understanding how user agent markers work and for implementing the governance controls discussed later in this post. If you need guidance on any of these topics, please refer to the linked documentation:

Amazon Q Developer automatically includes identifiable markers in the user agent string of all AWS API calls it makes via AWS CLI. These markers appear in two primary contexts: CLI tool operations and IDE integration operations.

Q Developer CLI Tool

When using Amazon Q Developer CLI (both use_aws and execute_bash tools), all AWS CLI calls include:

exec-env/AmazonQ-For-CLI-Version-<QCLI-VersionNo>

How It Works: Amazon Q Developer CLI automatically sets:

AWS_EXECUTION_ENV=AmazonQ-For-CLI-Version-<QCLI-VersionNo>

This means all AWS CLI commands executed through Q Developer CLI – whether via the use_aws tool or execute_bash commands – automatically include this marker.

Q Developer IDE Integration

When using Amazon Q Developer from IDE integrations, AWS CLI calls include:

exec-env/AmazonQ-For-IDE-Version-<QIDE-Plugin-VersionNo>

How It Works: Amazon Q Developer IDE plugin automatically sets:

AWS_EXECUTION_ENV=AmazonQ-For-IDE-Version-<QIDE-Plugin-VersionNo>

This applies when Q Developer makes AWS API calls through IDE integrations, such as when analyzing your codebase or suggesting AWS resource configurations. The IDE marker enables you to distinguish between CLI-based and IDE-based Q Developer operations.

Complete User Agent Example

Here’s how a complete user agent string appears in CloudTrail:

From Q Developer CLI:

"userAgent": "aws-cli/2.27.17 md/awscrt#0.26.1 ua/2.1 os/macos#24.6.0 md/arch#x86_64 lang/python#3.13.3 md/pyimpl#CPython exec-env/AmazonQ-For-CLI-Version-1.15.0 
cfg/retry-mode#standard md/installer#exe md/prompt#off md/command#sts.get-caller-identity"

From Q Developer IDE Integration:

"user-agent": "aws-cli/2.27.17 md/awscrt#0.26.1 ua/2.1 os/macos#24.6.0 md/arch#x86_64 lang/python#3.13.3 md/pyimpl#CPython exec-env/AmazonQ-For-IDE-Version-1.93.0 
cfgretry-mode#standard md/installer#exe md/prompt#off md/command#sts.get-caller-identity"

The key identifiers are exec-env/AmazonQ-For-CLI-Version-* and exec-env/AmazonQ-For-IDE-Version-*, which clearly distinguish Amazon Q Developer operations from regular AWS CLI/SDK usage executed outside of Q Developer.

Architecture Diagram

┌─────────────────────────────────────────────────────────────────────────────┐
│                           Amazon Q Developer Flow                           │
└─────────────────────────────────────────────────────────────────────────────┘

┌──────────────────┐    ┌──────────────────┐    ┌──────────────────┐
│   Developer      │    │   Amazon Q       │    │   AWS APIs       │
│                  │    │   Developer      │    │                  │
│ ┌──────────────┐ │    │                  │    │                  │
│ │ Q CLI        │ │    │ ┌──────────────┐ │    │ ┌──────────────┐ │
│ │ use_aws tool │ │────┼─│ Adds marker: │ │────┼─│ CloudTrail   │ │
│ └──────────────┘ │    │ │ exec-env/    │ │    │ │ Event with   │ │
│                  │    │ │ AmazonQ-For- │ │    │ │ User Agent   │ │
│ ┌──────────────┐ │    │ │ CLI-Version  │ │    │ │ Marker       │ │
│ │ IDE          │ │    │ └──────────────┘ │    │ └──────────────┘ │
│ │ Integration  │ │────┼─│ Adds marker: │ │    │                  │
│ └──────────────┘ │    │ │ exec-env/    │ │    │                  │
│                  │    │ │ AmazonQ-For- │ │    │                  │
│ ┌──────────────┐ │    │ │ IDE-Version  │ │    │                  │
│ │ execute_bash │ │────┼─└──────────────┘ │    │                  │
│ │ commands     │ │    │                  │    │                  │
│ └──────────────┘ │    │                  │    │                  │
└──────────────────┘    └──────────────────┘    └──────────────────┘
         │                        │                        │
         │                        │                        │
         ▼                        ▼                        ▼
┌──────────────────────────────────────────────────────────────────────────────┐
│                              IAM Policy Engine                               │
│                                                                              │
│  ┌─────────────────────────────────────────────────────────────────────────┐ │
│  │ Condition: StringLike                                                   │ │
│  │ "aws:userAgent": "*exec-env/AmazonQ-For-*"                              │ │
│  │                                                                         │ │
│  │ ┌─────────────────┐              ┌─────────────────┐                    │ │
│  │ │ Q Developer     │              │ Regular AWS     │                    │ │
│  │ │ Operations      │              │ CLI Operations  │                    │ │
│  │ │                 │              │                 │                    │ │
│  │ │ • Block writes  │              │ • Allow writes  │                    │ │
│  │ │ • Allow reads   │              │ • Allow reads   │                    │ │
│  │ └─────────────────┘              └─────────────────┘                    │ │
│  └─────────────────────────────────────────────────────────────────────────┘ │
└──────────────────────────────────────────────────────────────────────────────┘

IAM Policy Implementation

Use the aws:userAgent condition in IAM policies to control Amazon Q Developer operations through two approaches:

IAM Policies: Deploy in each AWS account where developers have access for deploying workloads or performing AWS operations. Q Developer operates using the developer’s existing AWS credentials and permissions – it doesn’t have additional access beyond what the user already possesses. Attach these policies to the same IAM users, groups, or roles that developers use for their regular AWS work.

Service Control Policies (SCPs): Deploy once at the AWS Organizations level for organization-wide governance. SCPs apply to all member accounts automatically and cannot be overridden by account-level policies.

The following policy allows read operations from Q Developer, blocks write operations from Q Developer, and allows write operations from regular AWS CLI executed outside Q Developer:

Note: This IAM policy example is for illustration purposes only. Follow least privilege principles in production environments. For more details refer prepare for least previlege permissions.

{
  "Version": "2012-10-17",
  "Statement": [
    {
      "Sid": "AllowReadOperationsFromQDeveloper",
      "Effect": "Allow",
      "Action": [
        "s3:GetObject*",
        "s3:ListBucket*",
        "ec2:Describe*"
      ],
      "Resource": "*",
      "Condition": {
        "StringLike": {
          "aws:userAgent": "*exec-env/AmazonQ-For-*"
        }
      }
    },
    {
      "Sid": "BlockWriteOperationsFromQDeveloper",
      "Effect": "Deny",
      "Action": [
        "s3:DeleteObject*",
        "ec2:TerminateInstances",
        "iam:DeleteUser"
      ],
      "Resource": "*",
      "Condition": {
        "StringLike": {
          "aws:userAgent": "*exec-env/AmazonQ-For-*"
        }
      }
    },
    {
      "Sid": "AllowWriteOperationsFromRegularCLI",
      "Effect": "Allow",
      "Action": [
        "s3:DeleteObject*",
        "ec2:TerminateInstances",
        "iam:DeleteUser"
      ],
      "Resource": "*",
      "Condition": {
        "StringNotLike": {
          "aws:userAgent": "*exec-env/AmazonQ-For-*"
        }
      }
    }
  ]
}

Note on User Agent Reliability: While AWS warns that user agents can be “spoofed,” this concern is reduced for Q Developer governance use cases. The user agent is automatically set by Q Developer’s tools, not manually controlled by users. Any spoofing would require deliberate effort and would be detectable through usage pattern analysis. This approach is designed for operational governance and policy differentiation, not as a sole security control.

Additional Control Layer: Custom Agent Configuration

For an additional layer of control, you can create a custom agent configuration that restricts which AWS services Amazon Q Developer can access using allowedServices and deniedServices parameters for the use_aws tool:

{
  "toolsSettings": {
    "use_aws": {
      "allowedServices": ["s3", "lambda", "ec2"],
      "deniedServices": ["eks", "rds"]
    }
  }
}

This custom agent configuration works in conjunction with IAM policies to provide defense-in-depth governance of AI-assisted AWS operations. For more details, refer to the agent configuration documentation.

Verification and Monitoring

CloudTrail Event Analysis

To verify that your policies are working correctly, examine CloudTrail events. Here’s what to look for:

Amazon Q Developer Event

{
  "eventTime": "2025-01-15T10:30:00Z",
  "eventName": "GetCallerIdentity",
  "userAgent": "aws-cli/2.27.17 md/awscrt#0.26.1 ua/2.1 os/macos#24.6.0 md/arch#x86_64 lang/python#3.13.3 md/pyimpl#CPython exec-env/AmazonQ-For-CLI-Version-1.15.0 cfg/retry-mode#standard md/installer#exe md/prompt#off md/command#sts.get-caller-identity",
  "sourceIPAddress": "203.0.113.12",
  "userIdentity": {
    "type": "IAMUser",
    "principalId": "AIDACKCEVSQ6C2EXAMPLE",
    "arn": "arn:aws:iam::123456789012:user/developer"
  }
}

Regular AWS CLI Event

{
  "eventTime": "2025-01-15T10:35:00Z",
  "eventName": "GetCallerIdentity", 
  "userAgent": "aws-cli/2.27.17 md/awscrt#0.26.1 ua/2.1 os/macos#24.6.0 md/arch#x86_64 lang/python#3.13.3 md/pyimpl#CPython cfg/retry-mode#standard md/installer#exe md/prompt#off md/command#sts.get-caller-identity",
  "sourceIPAddress": "203.0.113.12",
  "userIdentity": {
    "type": "IAMUser",
    "principalId": "AIDACKCEVSQ6C2EXAMPLE", 
    "arn": "arn:aws:iam::123456789012:user/developer"
  }
}

Monitoring Script Example

Create a simple monitoring script to track Amazon Q Developer usage:

#!/bin/bash
# Monitor Amazon Q Developer AWS API usage
# Get events from last 24 hours and filter for Q Developer user agents
aws cloudtrail lookup-events \
  --start-time $(date -u -v-24H '+%Y-%m-%dT%H:%M:%SZ') \
  --lookup-attributes AttributeKey=EventName,AttributeValue=GetCallerIdentity \
  --query 'Events[?contains(CloudTrailEvent, `AmazonQ-For-CLI`)].[EventTime,EventName,UserIdentity.userName]' \
  --output table

Conclusion

Amazon Q Developer’s built-in user agent markers provide a powerful foundation for implementing enterprise-grade security controls around AI-assisted AWS operations. By leveraging these markers in IAM policies, organizations can:

  • Distinguish between AI-assisted and manual AWS operations
  • Implement differentiated security policies based on operation source
  • Maintain detailed audit trails for compliance requirements
  • Enable secure Amazon Q Developer adoption in enterprise environments while maintaining strict controls over write operations that could impact production systems

For organizations currently evaluating Amazon Q Developer adoption, implementing user agent marker-based controls is a key component of your deployment strategy. This approach enables you to realize the productivity benefits of AI-assisted development while maintaining the governance and security controls your organization requires.

Experience the power of Amazon Q Developer as your AI-powered coding assistant, and implement the governance controls outlined in this post to ensure secure adoption in your enterprise environment. These built-in user agent markers enable you to maintain enterprise-grade security while unlocking the productivity benefits of AI-assisted development.

To learn more about Amazon Q Developer’s features and capabilities, visit the Amazon Q Developer product page.

About the Author

kirankumar.jpeg

Kirankumar Chandrashekar is a Generative AI Specialist Solutions Architect at AWS, focusing on Amazon Q Developer/Kiro and developer productivity. Bringing deep expertise in AWS cloud services, DevOps, modernization, and infrastructure as code, he helps customers accelerate their development cycles and elevate developer productivity through innovative AI-powered solutions. By leveraging Amazon Q Developer and Kiro, he enables teams to build applications faster, automate routine tasks, and streamline development workflows. Kirankumar is dedicated to enhancing developer efficiency while solving complex customer challenges, and enjoys music, cooking, and traveling.

AWS Weekly Roundup: Strands Agents 1M+ downloads, Cloud Club Captain, AI Agent Hackathon, and more (September 15, 2025)

Post Syndicated from Channy Yun (윤석찬) original https://aws.amazon.com/blogs/aws/aws-weekly-roundup-strands-agents-1m-downloads-cloud-club-captain-ai-agent-hackathon-and-more-september-15-2025/

Last week, Strands Agents, AWS open source for agentic AI SDK just hit 1 million downloads and earned 3,000+ GitHub Stars less than 4 months since launching as a preview in May 2025. With Strands Agents, you can build production-ready, multi-agent AI systems in a few lines of code.

We’ve continuously improved features including support for multi-agent patterns, A2A protocol, and Amazon Bedrock AgentCore. You can use a collection of sample implementations to help you get started with building intelligent agents using Strands Agents. We always welcome your contribution and feedback to our project including bug reports, new features, corrections, or additional documentation.

Here is the latest research article of Amazon Science about the future of agentic AI and questions that scientists are asking about agent-to-agent communications, contextual understanding, common sense reasoning, and more. You can understand the technical topic of agentic AI with with relatable examples, including one about our personal behaviors about leaving doors open or closed, locked or unlocked.

Last week’s launches
Here are some launches that got my attention:

  • Amazon EC2 M4 and M4 Pro Mac instances – New M4 Mac instances offer up to 20% better application build performance compared to M2 Mac instances, while M4 Pro Mac instances deliver up to 15% better application build performance compared to M2 Pro Mac instances. These instances are ideal for building and testing applications for Apple platforms such as iOS, macOS, iPadOS, tvOS, watchOS, visionOS, and Safari.
  • LocalStack integration in Visual Studio Code (VS Code) – You can use LocalStack to locally emulate and test your serverless applications using the familiar VS Code interface without switching between tools or managing complex setup, thus simplifying your local serverless development process.
  • AWS Cloud Development Kit (AWS CDK) Refactor (Preview) –You can rename constructs, move resources between stacks, and reorganize CDK applications while preserving the state of deployed resources. By using AWS CloudFormation’s refactor capabilities with automated mapping computation, CDK Refactor eliminates the risk of unintended resource replacement during code restructuring.
  • AWS CloudTrail MCP Server – New AWS CloudTrail MCP server allows AI assistants to analyze API calls, track user activities, and perform advanced security analysis across your AWS environment through natural language interactions. You can explore more AWS MCP servers for working with AWS service resources.
  • Amazon CloudFront support for IPv6 origins – Your applications can send IPv6 traffic all the way to their origins, allowing them to meet their architectural and regulatory requirements for IPv6 adoption. End-to-end IPv6 support improves network performance for end users connecting over IPv6 networks, and also removes concerns for IPv4 address exhaustion for origin infrastructure.

For a full list of AWS announcements, be sure to keep an eye on the What’s New with AWS? page.

Other AWS news
Here are some additional news items that you might find interesting:

  • A city in the palm of your hand – Check out this interactive feature that explains how our AWS Trainium chip designers think like city planners, optimizing every nanometer to move data at near light speed.
  • Measuring the effectiveness of software development tools and practices – Read how Amazon developers that identified specific challenges before adopting AI tools cut costs by 15.9% year-over-year using our cost-to-serve-software framework (CTS-SW). They deployed more frequently and reduced manual interventions by 30.4% by focusing on the right problems first.
  • Become an AWS Cloud Club Captain – Join a growing network of student cloud enthusiasts by becoming an AWS Cloud Club Captain! As a Captain, you’ll get to organize events and building cloud communities while developing leadership skills. Application window is open September 1-28, 2025.

Upcoming AWS events
Check your calendars and sign up for these upcoming AWS events as well as AWS re:Invent and AWS Summits:

  • AWS AI Agent Global Hackathon – This is your chance to dive deep into our powerful generative AI stack and create something truly awesome. From September 8 to October 20, you have the opportunity to create AI agents using AWS suite of AI services, competing for over $45,000 in prizes and exclusive go-to-market opportunities.
  • AWS Gen AI Lofts – You can learn AWS AI products and services with exclusive sessions and meet industry-leading experts, and have valuable networking opportunities with investors and peers. Register in your nearest city: Mexico City (September 30–October 2), Paris (October 7–21), London (Oct 13–21), and Tel Aviv (November 11–19).
  • AWS Community Days – Join community-led conferences that feature technical discussions, workshops, and hands-on labs led by expert AWS users and industry leaders from around the world: Aotearoa and Poland (September 18), South Africa (September 20), Bolivia (September 20), Portugal (September 27), Germany (October 7), and Hungary (October 16).

You can browse all upcoming AWS events and AWS startup events.

That’s all for this week. Check back next Monday for another Weekly Roundup!

Channy

AWS Backup adds new Multi-party approval for logically air-gapped vaults

Post Syndicated from Veliswa Boya original https://aws.amazon.com/blogs/aws/aws-backup-adds-new-multi-party-approval-for-logically-air-gapped-vaults/

Today, we’re announcing the general availability of a new capability that integrates AWS Backup logically air-gapped vaults with Multi-party approval to provide access to your backups even when your AWS account is inaccessible due to inadvertent or malicious events. AWS Backup is a fully managed service that centralizes and automates data protection across AWS services and hybrid workloads. It provides core data protection features, ransomware recovery capabilities, and compliance insights and analytics for data protection policies and operations.

As a backup administrator, you use AWS Backup logically air-gapped vaults to securely share backups across accounts and organizations, logically isolate your backup storage, and support direct restore to help reduce recovery time following an inadvertent or malicious event. However, if a bad or unintended actor gains root access to your backup account or the management account of your organization, your backups suddenly become inaccessible, even though they’re still safely stored in the logically air-gapped vault. While traditional account recovery involved working through support channels, AWS Backup with Multi-party approval delivers immediate access to recovery tools, empowering you with faster resolution times and greater control over your recovery timeline.

Multi-party approval for AWS Backup logically air-gapped vaults adds an additional layer of protection for you to recover your application data even when your AWS account becomes completely inaccessible. Using Multi-party approval, you can create approval teams which consist of highly trusted individuals in your organization, then associate them with your logically air-gapped vault. If you get locked out of your AWS accounts due to inadvertent or malicious actions, you can request your own approval team to authorize sharing of your vault from any account, even those outside your AWS Organizations account. Once approved, you gain authorized access to your backups and can begin your recovery process.

How it works
Multi-party approval for AWS Backup logically air-gapped vaults combines the security of logically air-gapped vaults with the governance of Multi-party approval to create a recovery mechanism that works even when your AWS account is compromised. Here’s how it works:

1. Approval team creation
First, you create an approval team in your AWS Organizations management account. If the management account is new, first create an AWS Identity and Access Management (IAM) Identity Center instance before creating the approval team. The approval team consists of trusted individuals (IAM Identity Center users) who will be authorized to approve vault sharing requests. Each approver receives an invitation to join the approval team through a new Approval portal.

2. Vault association
When your approval team is active, you share it with accounts that own logically air-gapped vaults using AWS Resource Access Manager (AWS RAM) to safeguard against requests for approval from arbitrary accounts. Backup administrators can then associate this approval team with new or existing logically air-gapped vaults.

3. Protection against compromise
If your AWS account becomes compromised or inaccessible, you can request access to your backups from a different account (a clean recovery account). This request includes the Amazon Resource Name (ARN) of the logically air-gapped vault in the format arn:aws:backup:<region>:<account>:backup-vault:<name> and an optional vault name and comment.

4. Multi-party approval
The request is sent to the approval team, who review it through the approval portal. When the minimum required number of approvers authorize the request, the vault is automatically shared with the requesting account. All requests and approvals are comprehensively logged in AWS CloudTrail.

5. Recovery process
With access granted, you can immediately start restoring or copying your data in the new recovery account without waiting for your compromised account to be remediated.

This approach provides an entirely separate authentication path to access and recover your backups, completely independent of your AWS account credentials. Even if the bad actor has root access to your account, they can’t prevent the approval team-based recovery process.

1. Create a new logically air-gapped vault
To create a new logically air-gapped vault, provide a name, tags (optional), and vault lock properties.

2. Assign an approval team
When the vault has been created, choose Assign approval team to assign it with an existing approval team.

Choose an existing approval team from the drop-down menu then select Submit to finalize the assignment.

Now your approval team is assigned to your logically air-gapped vault.

Good to know
It’s essential to test your recovery process before an actual emergency:

  1. From a different AWS account, use the AWS Backup console or API to request sharing of your logically air-gapped vault by providing the vault ID and ARN.
  2. Request approval of your request from the approval team.
  3. Once approved, verify that you can access and restore backups from the vault in your testing account.

As a best practice, monitor the health of your approval team regularly using AWS Backup Audit Manager to ensure they have sufficient active participants to meet your approval threshold.

Multi-party approval for enhanced cloud governance
Today, we’re also announcing the general availability of a new capability that AWS account administrators can use to add Multi-party approval to their product offerings. As highlighted in this post, AWS Backup is the first service to integrate this capability. With Multi-party approval, administrators can enable application owners to guard sensitive service operations with a distributed review process.

Good to know
Multi-party approval provides several significant security advantages:

  • Distributed decision-making, eliminating single points of failure
  • Full auditability through AWS CloudTrail integration
  • Protection against compromised credentials
  • Formal governance for compliance-sensitive operations
  • Consistent approval experience across integrated services

Now available

Multi-party approval is available today in all AWS Regions where AWS Organizations is available. Multi-party approval for AWS Backup logically air-gapped vaults is available in all AWS Regions where AWS Backup is available.

Veliswa.

Enhancing multi-account activity monitoring with event-driven architectures

Post Syndicated from Anton Aleksandrov original https://aws.amazon.com/blogs/compute/enhancing-multi-account-activity-monitoring-with-event-driven-architectures/

Enterprise cloud environments are growing increasingly complex as they scale, with organizations managing hundreds to thousands of Amazon Web Services (AWS) accounts across multiple business units and AWS Regions. Organizations need efficient ways to collect, transport, and analyze activity data for threat detection and compliance monitoring. This presents unique challenges for enterprise Application Security (AppSec) teams, cloud security vendors, and DevSecOps professionals, because traditional polling-based monitoring approaches struggle to provide real-time activity insights needed for modern cloud operations.

In this post, you will learn to use AWS CloudTrail and Amazon EventBridge for real-time cloud activity monitoring and automated response.

Overview

As organizations expand their cloud footprint, account activity monitoring that comprehensively tracks user actions and successfully identifies security threats becomes crucial for threat detection and compliance. Although AWS provides native tools—such as CloudTrail for API activity capture, EventBridge for real-time event routing, AWS Organizations for multi-account management, and AWS Config for resource evaluation—many enterprises struggle with the volume of activities while maintaining efficiency and controlling costs. Organizations need to carefully architect solutions to effectively use these tools as their environments scale.

Traditional polling-based techniques, which worked well for smaller environments, can become unsustainable when scaled to enterprise deployments, where the volume of activity data grows exponentially with each new account and service. API polling limitations, growing data volumes, and increasing demand for real-time analysis are pushing teams to rethink their architectural approach.

Figure 1. Poll model, periodically retrieving the latest state.

Adopting push-based event-driven architectures offers a compelling solution for AppSec teams and cloud security vendors facing these challenges. Using AWS services, such as CloudTrail and EventBridge, allows these teams and vendors to build scalable activity monitoring solutions that overcome the limitations of traditional polling-based approaches and provide real-time notifications across thousands of AWS accounts. This approach not only enables security use cases but also supports broader real-time operational monitoring, compliance reporting, and automation requirements.

“By integrating AWS CloudTrail and Amazon EventBridge, we’ve built a scalable architecture to monitor activity across thousands of AWS accounts. This provides the visibility needed to detect threats in real time and protect large, distributed AWS environments.” — Rob Solomon, Senior Cloud Solution Architect, CrowdStrike

Solution components

Enterprise AppSec teams and cloud security vendors share common requirements when building multi-account monitoring solutions. They need to efficiently collect activity data across thousands of accounts, transport it to a centralized location for analysis, and process it in real-time to detect threats and compliance violations. The solution must scale seamlessly from dozens to thousands of accounts while remaining highly-performant and cost-efficient. At its core, a scalable multi-account activity monitoring solution consists of three components: activity data collection, cross-account transport to a centralized location, and processing. In the following sections, you will learn how AppSec teams and cloud security vendors can implement each step efficiently while avoiding common pitfalls.

Figure 2. Push model. Account activity is collected at the source, and pushed to the AppSec or cloud security vendor account for further processing.

Data collection strategies

Many teams begin their cloud activity monitoring journey by polling the resource status through service management APIs. Although this approach works good for retrieving the latest resource state on-demand, its fundamental limitation is inability to detect state changes efficiently, necessitating continuous querying of all resources at fixed intervals. Consider a scenario where you’re monitoring 1,000 accounts, with 100 resources in each account. A single polling cycle would necessitate 100,000 API requests, consuming over 28 million API calls daily if running at five-minute intervals. This inefficiency compounds as environments grow, leading to throttling issues, increased costs, and scaling challenges.

AWS Config improved upon this by offering continuous resource configuration tracking without manual polling. Although this works excellent for configuration compliance and a history of changes for auditing, AWS Config reports changes on a best-effort basis and is not optimal for real-time threat detection.

To overcome this constraint, your solution can use services such as CloudTrail and EventBridge as primary data sources, complemented by intelligent on-demand targeted API polling. CloudTrail records API activity across AWS services, providing a detailed history of actions taken by users, roles, and AWS services in your accounts. Over 250 AWS services automatically report their activity and API calls to CloudTrail and EventBridge in real-time. This allows you to capture this information, providing a detailed history of actions taken in your accounts, and enabling security analysis, resource state change tracking, and compliance audit.

Figure 3. Over 250 AWS services are automatically emitting activity events to CloudTrail.

When a resource state changes, commonly as a result of a management API call, the affected service sends an event to CloudTrail and EventBridge. Your monitoring solution can examine the event payload to determine if polling for supplementary data is necessary, particularly when the initial payload lacks complete information. This provides you with comprehensive service coverage with reduced maintenance effort. This hybrid approach guarantees delivery of activity data to eliminate monitoring blind spots, while significantly reducing AWS management API quota consumption.

Cross-account data transport

Your solution should transport activity data from thousands of tenant accounts into a small number of centralized accounts, such as a regional AppSec account, for further processing and analysis. The solution must be secure, scalable, resilient, and cost-efficient while maintaining real-time delivery.

The most direct way to achieve it is to enable Amazon S3 event notifications for new objects that are created in the CloudTrail trails S3 bucket. When you receive the notification, you can retrieve and process new activities.

Figure 4. Exporting CloudTrail events into an S3 bucket and retrieving after receiving a notification.

This direct way to consume CloudTrail events has one important consideration: typically it can take an average of five minutes to deliver events to Amazon S3. Teams and vendors looking for lower mean-time-to-detect (MTTD) and mean-time-to-respond (MTTR) should evaluate transporting CloudTrail events across accounts with EventBridge, which provides close-to-real-time delivery.

Transporting events with EventBridge

EventBridge is a serverless event router that connects applications. It receives events from various sources, such as CloudTrail, and routes them to multiple targets based on defined rules.

Using EventBridge for cross-account data transport comes with several major benefits:

There are two approaches you can take for delivering cross-account events with EventBridge: direct service-to-service or service-to-API-endpoint.

The first approach uses the EventBridge direct bus-to-bus and bus-to-service delivery capabilities. This method is most suitable when you want AWS to handle data ingestion on the receiving end. The delivery target is always either an EventBridge bus, or another AWS service, such as an Amazon Simple Queue Service (Amazon SQS) queue, Amazon Kinesis Data Streams stream, or an AWS Lambda function. With support for up to 18,750 target invocations per second and native AWS Identity and Access Management (IAM) integration, this method is particularly suitable for large multi-account deployments.

The second approach uses the EventBridge API destinations feature. This method is most suitable when you have existing HTTP-based ingestion endpoints in place. Although it offers lower throughput, it provides greater flexibility for ingestion endpoint and authentication methods implementation, making it attractive for AppSec teams and cloud security vendors integrating with existing ingestion infrastructure.

Figure 5. Emitting CloudTrail events in real-time through EventBridge.

The following table summarizes two approaches for transporting events across accounts with EventBridge.

Direct bus-to-bus or bus-to-service API destinations
Data ingestion implementation effort Minimal Needed
Default target invocations per second (TPS) quotas Up to 18,750 (region dependent) Up to 300 (region dependent)
Can the TPS quota be increased Yes Yes
Authorization support Native AWS IAM, fully handled by AWS Basic, OAuth2, API Key. You’re responsible for implementing credentials validation during ingestion.
Cross-account delivery costs $1 per million events $0.20 per million events

Go to the EventBridge quotas and pricing pages for more details.

Processing architecture

Processing would commonly be done by existing products and services the AppSec team or cloud security vendor provides for activity analysis. The architecture for event processing pipeline operating at enterprise scale must consider design decisions to handle large and potentially irregular event volumes while maintaining high performance, as shown in the following figure.

Figure 6. An activity event processing pipeline, with priority-based processing.

Use the following best practices for a robust processing architecture:

  • Buffer ingested events Use services such as Amazon SQS, Amazon Kinesis Data Streams, or Amazon Managed Streaming for Apache Kafka to buffer incoming events, handle traffic surges, and make sure of reliable processing.
  • Use serverless services that scale automatically, or invest in automated scaling mechanisms that adjust processing capacity based on event volume
  • Minimize polling: Resort to intelligent on-demand polling, only poll when you need additional data that is not available in the CloudTrail event payload.
  • Routing and classification: Rather than processing all events equally, implement intelligent classification and routing early in your pipeline. Security-related events such as IAM changes or security group modifications should take priority over routine activities or data events. This approach helps to control costs while maintaining rapid detection of important security events.
  • Cost optimization: At the enterprise scale, cost optimization becomes crucial. Use EventBridge rules in source accounts to filter out irrelevant events before they enter your processing pipeline. Consider implementing regional collection points to optimize data transfer costs. When using Lambda functions for data processing, use batch processing to reduce invocation costs. Evaluate which event types must be delivered in real-time through EventBridge, which event types can be delayed and collected through S3 bucket export, and which events should be discarded.
  • Observability: Monitor the ingestion and processing throughput to react to potential slowdowns early. Detect when source accounts are approaching EventBridge quotas. Consider using AWS Service Quotas to request quota increases automatically through APIs.
  • Cross-Region considerations: Design your architecture to support efficient cross-Region event collection while respecting data sovereignty requirements. Consider implementing regional processing nodes with centralized aggregation for global security analysis.
  • Integration patterns: Modern security solutions must integrate with existing security tools and workflows. Implement standardized output formats that allow seamless integration with SIEM systems, ticketing platforms, and automation frameworks. Consider publishing security findings back to EventBridge buses to enable automated remediation workflows. If you’re a cloud security vendor, then consider integrating with EventBridge as an SaaS partner.

Conclusion

Event-driven architectures present a powerful opportunity for building scalable multi-account activity monitoring solutions. Using services such as AWS CloudTrail and Amazon EventBridge allows teams to overcome the limitations of traditional polling-based approaches while achieving close to real-time delivery.The shift to event-driven security monitoring isn’t just an architectural choice—it’s becoming a necessity for teams operating at enterprise scale. This approach enables security teams to achieve the real-time threat detection capabilities needed in today’s cloud environments while maintaining operational efficiency and cost control.

AWS Weekly Roundup: Strands Agents, AWS Transform, Amazon Bedrock Guardrails, AWS CodeBuild, and more (May 19, 2025)

Post Syndicated from Danilo Poccia original https://aws.amazon.com/blogs/aws/aws-weekly-roundup-strands-agents-aws-transform-amazon-bedrock-guardrails-aws-codebuild-and-more-may-19-2025/

Many events are taking place in this period! Last week I was at the AI Week in Italy. This week I’ll be in Zurich for the AWS Community Day – Switzerland. On May 22, you can join us remotely for AWS Cloud Infrastructure Day to learn about cutting-edge advances across compute, AI/ML, storage, networking, serverless technologies, and global infrastructure. Look for events near you for an opportunity to share your knowledge and learn from others.

What got me particularly excited last Friday was the introduction of Strands Agents, an open source SDK that you can use to build and run AI agents in just a few lines of code. It can scale from simple to complex use cases, including local development and production deployment. By default, it uses Amazon Bedrock as model provider, but many others are supported, including Ollama (to run models locally), Anthropic, Llama API, and LiteLLM (to provide a unified interface for other providers such as Mistral). With Strands, you can use any Python function as a tool for your agent with the @tool decorator. Strands provides many example tools for manipulating files, making API requests, and interacting with AWS APIs. You can also choose from thousands of published Model Context Protocol (MCP) servers, including this suite of specialized MCP servers that help you get the most out of AWS. Multiple teams at AWS already use Strands for their AI agents in production, including Amazon Q Developer, AWS Glue, and VPC Reachability Analyzer. Read it all in Clare’s post.

Strands Agents SDK agentic loop

Last week’s launches
Here are the other launches that got my attention:

Additional updates
Here are some additional projects, blog posts, and news items that you might find interesting:

  • Securing Amazon S3 presigned URLs for serverless applications – Focusing on the security ramifications of using Amazon S3 presigned URLs, explaining mitigation steps that developers can take to improve the security of their systems using S3 presigned URLs, and walking through an AWS Lambda function that adheres to the provided recommendations.
    Architectural diagram.
  • Running GenAI Inference with AWS Graviton and Arcee AI Models – While large language models (LLMs) are capable of a wide variety of tasks, they require compute resources to support hundreds of billions and sometimes trillions of parameters. Small language models (SLMs) in contrast typically have a range of 3 to 15 billion parameters and can provide responses more efficiently. In this post, we share how to optimize SLM inference workloads using AWS Graviton based instances.
    AWS Graviton processors.

Upcoming AWS events
Check your calendars and sign up for these upcoming AWS events:

  • AWS Summits – Join free online and in-person events that bring the cloud computing community together to connect, collaborate, and learn about AWS. Register in your nearest city: Dubai (May 21), Tel Aviv (May 28), Singapore (May 29), Stockholm (June 4), Sydney (June 4–5), Washington (June 10-11), and Madrid (June 11)
  • AWS Cloud Infrastructure Day – On May 22, discover the latest innovations in AWS Cloud infrastructure technologies at this exclusive technical event.
  • AWS re:Inforce – Mark your calendars for AWS re:Inforce (June 16–18) in Philadelphia, PA. AWS re:Inforce is a learning conference focused on AWS security solutions, cloud security, compliance, and identity.
  • AWS Partners Events – You’ll find a variety of AWS Partner events that will inspire and educate you, whether you’re just getting started on your cloud journey or you’re looking to solve new business challenges.
  • AWS Community Days – Join community-led conferences that feature technical discussions, workshops, and hands-on labs led by expert AWS users and industry leaders from around the world: Zurich, Switzerland (May 22), Bengaluru, India (May 23), Yerevan, Armenia (May 24), Milwaukee, USA (June 5), and Nairobi, Kenya (June 14)

That’s all for this week. Check back next Monday for another Weekly Roundup!

Danilo

AWS CloudTrail network activity events for VPC endpoints now generally available

Post Syndicated from Esra Kayabali original https://aws.amazon.com/blogs/aws/aws-cloudtrail-network-activity-events-for-vpc-endpoints-now-generally-available/

Today, I’m happy to announce the general availability of network activity events for Amazon Virtual Private Cloud (Amazon VPC) endpoints in AWS CloudTrail. This feature helps you to record and monitor AWS API activity traversing your VPC endpoints, helping you strengthen your data perimeter and implement better detective controls.

Previously, it was hard to detect potential data exfiltration attempts and unauthorized access to the resources within your network through VPC endpoints. While VPC endpoint policies could be configured to prevent access from external accounts, there was no built-in mechanism to log denied actions or detect when external credentials were used at a VPC endpoint. This often required you to build custom solutions to inspect and analyze TLS traffic, which could be operationally costly and negate the benefits of encrypted communications.

With this new capability, you can now opt in to log all AWS API activity passing through your VPC endpoints. CloudTrail records these events as a new event type called network activity events, which capture both control plane and data plane actions passing through a VPC endpoint.

Network activity events in CloudTrail provide several key benefits:

  • Comprehensive visibility – Log all API activity traversing VPC endpoints, regardless of the AWS account initiating the action.
  • External credential detection – Identify when credentials from outside your organization are accessing your VPC endpoint.
  • Data exfiltration prevention – Detect and investigate potential unauthorized data movement attempts.
  • Enhanced security monitoring – Gain insights into all AWS API activity at your VPC endpoints without the need to decrypt TLS traffic.
  • Visibility for regulatory compliance – Improve your ability to meet regulatory requirements by tracking all API activity passing through.

Getting started with network activity events for VPC endpoint logging
To enable network activity events, I go to the AWS CloudTrail console and choose Trails in the navigation pane. I choose Create trail to create a new one. I enter a name in the Trail name field and choose an Amazon Simple Storage Service (Amazon S3) bucket to store the event logs. When I create a trail in CloudTrail, I can specify an existing Amazon S3 bucket or create a new bucket to store my trail’s event logs.

If you set Log file SSE-KMS encryption to Enabled, you have two options: Choose New to create a new AWS Key Management Service (AWS KMS) key or choose Existing to choose an existing KMS key. If you chose New, you need to type an alias in the AWS KMS alias field. CloudTrail encrypts your log files with this KMS key and adds the policy for you. The KMS key and Amazon S3 must be in the same AWS Region. For this example, I use an existing KMS key. I enter the alias in the AWS KMS alias field and leave the rest as default for this demo. I choose Next for the next step.

In the Choose log events step, I choose Network activity events under Events. I choose the event source from the list of AWS services, such as cloudtrail.amazonaws.com, ec2.amazonaws.com, kms.amazonaws.com, s3.amazonaws.com, and secretsmanager.amazonaws.com. I add two network activity event sources for this demo. For the first source, I select ec2.amazonaws.com option. For Log selector template, I can use templates for common use cases or create fine-grained filters for specific scenarios. For example, to log all API activities traversing the VPC endpoint, I can choose the Log all events template. I choose Log network activity access denied events template to log only access denied events. Optionally, I can enter a name in the Selector name field to identify the log selector template, such as Include network activity events for Amazon EC2.

As a second example, I choose Custom to create custom filters on multiple fields, such as eventName and vpcEndpointId. I can specify specific VPC endpoint IDs or filter the results to include only the VPC endpoints that match specific criteria. For Advanced event selectors, I choose vpcEndpointId from the Field dropdown, choose equals as Operator, and enter the VPC endpoint ID. When I expand the JSON view, I can see my event selectors as a JSON block. I choose Next and after reviewing the selections, I choose Create trail.

After it’s configured, CloudTrail will begin logging network activity events for my VPC endpoints, helping me analyze and act on this data. To analyze AWS CloudTrail network activity events, you can use the CloudTrail console, AWS Command Line Interface (AWS CLI), and AWS SDK to retrieve relevant logs. You can also use CloudTrail Lake to capture, store and analyze your network activity events. If you are using Trails, you can use Amazon Athena to query and filter these events based on specific criteria. Regular analysis of these events can help you maintain security, comply with regulations, and optimize your network infrastructure in AWS.

Now available
CloudTrail network activity events for VPC endpoint logging provide you with a powerful tool to enhance your security posture, detect potential threats, and gain deeper insights into your VPC network traffic. This feature addresses your critical needs for comprehensive visibility and control over your AWS environments.

Network activity events for VPC endpoints are available in all commercial AWS Regions.

For pricing information, visit AWS CloudTrail pricing.

To get started with CloudTrail network activity events, visit AWS CloudTrail. For more information on CloudTrail and its features, refer to the AWS CloudTrail documentation.

— Esra

Introducing new capabilities to AWS CloudTrail Lake to enhance your cloud visibility and investigations

Post Syndicated from Esra Kayabali original https://aws.amazon.com/blogs/aws/introducing-new-capabilities-to-aws-cloudtrail-lake-to-enhance-your-cloud-visibility-and-investigations/

Today, I’m excited to announce new updates to AWS CloudTrail Lake, which is a managed data lake you can use to aggregate, immutably store, and query events recorded by AWS CloudTrail for auditing, security investigation, and operational troubleshooting.

The new updates in CloudTrail Lake are:

  • Enhanced filtering options for CloudTrail events
  • Cross-account sharing of event data stores
  • General availability of the generative AI–powered natural language query generation
  • AI-powered query results summarization capability in preview
  • Comprehensive dashboard capabilities, including a high-level overview dashboard with AI-powered insights (AI-powered insights is in preview), a suite of 14 pre-built dashboards for various use cases, and the ability to create custom dashboards with scheduled refreshes

Let’s look into the new features one by one.

Enhanced filtering options for CloudTrail events ingested into event data stores
Enhanced event filtering capabilities give you greater control over which CloudTrail events are ingested into your event data stores. These enhanced filtering options provide tighter control over your AWS activity data, improving the efficiency and precision of security, compliance, and operational investigations. Additionally, the new filtering options help you reduce your analysis workflow costs by ingesting only the most relevant event data into your CloudTrail Lake event data stores.

You can filter both management and data events based on attributes such as eventSource, eventType, eventName, userIdentity.arn, and sessionCredentialFromConsole.

I go to the AWS CloudTrail console and choose Event data stores under Lake in the navigation pane. I choose Create event data store. In the first step, I enter a name in the Event data store name field. For this demo, I leave other fields as default. You can choose the pricing and retention options that suit your needs. In the next step, I choose Managements events and Data events under CloudTrail events. You can include all the options you need under CloudTrail events. You also have the option to choose ingestion options. I choose Ingest events to start ingesting when it’s created. There may be scenarios, when you want to deselect the Ingest events option to stop an event data store from ingesting events. For example, you may be copying trail events to the event data store and do not want the event data store to collect any future events. You can also choose to enable ingestion for all accounts in your organization or include only the current region in your event data store.

The following example shows an out of the box template for filtering, which excludes any management events that are initiated by an AWS Service. I choose Advanced event collection under the Management events. I choose Exclude AWS service-initiated events from the Log selector template dropdown. You can also expand the JSON view to see how the filters actually apply.

Under the Data events, the following example creates a filter to include DynamoDB data events initiated by a certain user, helping me to log events based on an IAM principal. I choose DynamoDB as Resource type. I choose Custom as Log selector template. Under the Advanced event selector, I choose userIdentity.arn as Field and equals as Operator. I enter the user’s ARN as Value. I choose Next and choose Create event data store in the final step.

Now, I have my event data store that gives me granular control over the ingested CloudTrail data.

This expanded set of filtering options helps you to be more selective in capturing only the most relevant events for your security, compliance, and operational needs.

Cross-account sharing of event data stores
You can use the cross-account sharing feature of event data stores to enhance collaborative analysis within organizations. It enables secure sharing of event data stores with selected AWS principals through Resource-Based Policies (RBP). This functionality allows authorized entities to query shared event data stores within the same AWS Region where they were created. 

To use this feature, I go to the AWS CloudTrail console and choose Event data stores under Lake in the navigation pane. I choose an event data store from the list and navigate to its details page. I choose Edit in the Resource policy section. The following example policy includes a statement that allows root users in accounts 111111111111, 222222222222, and 333333333333 to run queries and get query results on the event data store owned by account ID 999999999999. I choose Save changes to save the policy.

Generative AI–powered natural language query generation in CloudTrail Lake is now generally available
In June, we announced this feature for CloudTrail Lake in preview. With this launch, you can generate SQL queries using natural language questions to easily explore and analyze AWS activity logs (only management, data, and network activity events) without needing technical SQL expertise. The feature uses generative AI to convert natural language questions into ready-to-use SQL queries you can run directly in the CloudTrail Lake console. This simplifies the process of exploring event data stores and retrieving insights such as error counts, top services used, and the causes of errors. This feature is also accessible through the AWS Command Line Interface (AWS CLI), providing additional flexibility for users who prefer command-line operations. The preview blog post provides step-by-step instructions on how to get started with the natural language query generation feature in CloudTrail Lake.

CloudTrail Lake generative AI–powered query results summarization capability in preview
Building on the capability of natural language query generation, we’re introducing a new AI-powered query results summarization feature in preview to further simplify the process of analyzing AWS account activity. With this feature, you can easily extract valuable insights from your AWS activity logs (only management, data, and network activity events) by automatically summarizing the key points from your query results in natural language, reducing the time and effort required to understand the information.

To try this feature, I go to the AWS CloudTrail console and choose Query under Lake in the navigation pane. I choose an event data store for my CloudTrail Lake query from the dropdown list in Event data store. You can use summarization regardless of whether the query was written manually or generated by generative AI. For this example, I will use the natural language query generation capability. In the Query generator, I enter the following prompt in the Prompt field using natural language:

How many errors were logged during the past month for each service and what was the cause of each error?

Then, I choose Generate query. The following SQL query is automatically generated:

SELECT eventsource,
    errorcode,
    errormessage,
    count(*) as errorcount
FROM a0******
WHERE eventtime >= '2024-10-14 00:00:00'
    AND eventtime <= '2024-11-14 23:59:59'
    AND (
        errorcode IS NOT NULL
        OR errormessage IS NOT NULL
    )
GROUP BY 1,
    2,
    3
ORDER BY 4 DESC;

I choose Run to get the results. To use the summarization capability, I choose Summarize results in the Query results tab. CloudTrail automatically analyzes the query results and provides a natural language summary of the key insights. It’s important to note that there’s a monthly quota of 3 MB for query results that can be summarized.

This new summarization capability can save you time and effort in understanding your AWS activity data by automatically generating meaningful summaries of the key findings.

Comprehensive dashboard capabilities
Lastly, let me tell you about the new dashboard capabilities of CloudTrail Lake to enhance visibility and analysis across your AWS environments.

The first one is a Highlights dashboard that provides you with an easy-to-view summary of the data captured in your CloudTrail Lake management and data events stored in event data stores. This dashboard makes it easier to quickly identify and understand important insights, such as the top failed API calls, trends in failed login attempts, and spikes in resource creation. It surfaces any anomalies or unusual trends in the data.

I go to the AWS CloudTrail console and choose Dashboard under Lake in the navigation pane to check out the Highlights dashboard. First, I enable Highlights dashboard by choosing Agree and enable Highlights.

I check out the Highlights dashboard once it populates with data.

The second addition to the new dashboard capabilities is a suite of 14 pre-built dashboards. These dashboards are designed for different personas and use cases. For example, the security-focused dashboards help you to track and analyze key security indicators, such as top access denied events, failed console login attempts, and users who have disabled multi-factor authentication (MFA). There are also pre-built dashboards for operational monitoring, highlighting trends in errors and availability issues, such as top APIs with throttling errors and top users with errors. You can also use the dashboards focused on specific AWS services such as Amazon EC2 and Amazon DynamoDB, which help you identify security risks or operational problems within those particular service environments.

You can create your own dashboards and optionally set schedules for refreshing them. This level of customization helps you tailor the CloudTrail Lake analysis capabilities to your precise monitoring and investigative needs across your AWS environments.

I switch to the Managed and custom dashboards to observe the custom and pre-built dashboards.

I choose IAM activity dashboard pre-built dashboard to observe overall IAM activity. You can choose Save as new dashboard to customize this dashboard.

To create a custom dashboard from scratch, I go to Dashboard under Lake in the navigation pane and choose Build my own dashboard. I enter a name in the Enter a name for the dashboard field and choose event data stores under Permissions, to visualize the events. Next, I choose Create dashboard.

Now, I can add widgets to my dashboard. You have the flexibility to customize your dashboards in multiple ways. You can select from a list of pre-built sample widgets using Add sample widget, or you can create your own custom widgets using Create new widget. For each widget, you can choose the type of visualization you prefer, such as a line graph, bar graph, or other options to best represent your data.

Now available
The new features in AWS CloudTrail Lake represent a major advancement in providing a comprehensive audit logging and analysis solution. These enhancements provide the ability to gain more profound understanding and conduct investigations more rapidly, assisting with more preventative monitoring and faster incident handling across your entire AWS environments.

You can now start using generative AI–powered natural language query generation in CloudTrail Lake in US East (N. Virginia), US West (Oregon), Asia Pacific (Mumbai), Asia Pacific (Sydney), Asia Pacific (Tokyo), Canada (Central), and Europe (London) AWS Regions.

CloudTrail Lake generative AI–powered query results summarization capability is available in preview in US East (N. Virginia), US West (Oregon), and Asia Pacific (Tokyo) Regions.

Enhanced filtering options, cross-account sharing of event data stores and dashboards are available in all the Regions where CloudTrail Lake is available, with the exception of generative AI–powered summarization feature on the Highlights dashboard being available only in US East (N. Virginia), US West (Oregon), and Asia Pacific (Tokyo) Regions.

Running queries will incur CloudTrail Lake query charges. For more details on pricing, visit AWS CloudTrail pricing.

— Esra

Important changes to CloudTrail events for AWS IAM Identity Center

Post Syndicated from Arthur Mnev original https://aws.amazon.com/blogs/security/modifications-to-aws-cloudtrail-event-data-of-iam-identity-center/

AWS IAM Identity Center is streamlining its AWS CloudTrail events by including only essential fields that are necessary for workflows like audit and incident response. This change simplifies user identification in CloudTrail, addressing customer feedback. It also enhances correlation between IAM Identity Center users and external directory services, such as Okta Universal Directory or Microsoft Active Directory.

Effective January 13, 2025, IAM Identity Center will stop emitting userName and principalId fields under the user identity element in CloudTrail events. These fields will be excluded from the CloudTrail events that are initiated when users sign in to IAM Identity Center, use the AWS access portal, and access AWS accounts through the AWS CLI. Instead, IAM Identity Center now emits user ID and Identity Store Amazon Resource Name (ARN) fields to replace the userName and principalId fields, simplifying user identification. IAM Identity Center CloudTrail events will also specify IdentityCenterUser as the identity type instead of Unknown, providing a clear identifier for users. Additionally, IAM Identity Center will omit the value of a group’s displayName in CloudTrail events when you create or update a group. You can access group attributes, such as displayName, by using the Identity Store DescribeGroup API operation for authorized workflows.

We recommend that you update your workflows that process the userName, principalId, userIdentity type, or group displayName fields in CloudTrail events for IAM Identity Center before these changes take effect on January 13, 2025. This blog post provides guidance for these updates.

How to prepare your workflows for the upcoming changes to IAM Identity Center user identification in CloudTrail

To simplify user identification, IAM Identity Center is making changes to the user identity element for its CloudTrail events. Based on these changes, you can update your workflows to link CloudTrail events to a specific user, associate users with their external directories, and track user activity within the same session. The updated user identity element for a sample CloudTrail event is shared at the end of this section.

IAM Identity Center will update the userIdentity type for CloudTrail events that are emitted when users sign in, use the AWS access portal, and access AWS accounts through the AWS CLI. For authenticated users, the userIdentity type will change from Unknown to IdentityCenterUser. For unauthenticated users, the userIdentity type will remain Unknown. We recommend that you update your workflows to accept both values.

To identify the user linked to a CloudTrail event, IAM Identity Center now emits userId and identityStoreArn fields to replace the userName and principalId fields. The userId is a unique and immutable user identifier that IAM Identity Center assigns to every user in the Identity Store, its native directory referenced by the identityStoreArn. These new fields enhance user identification and action tracking in CloudTrail and are present in the CloudTrail entries where the userIdentity type is IdentityCenterUser. For an example of the user identity element with the new fields and the describe-user CLI command to retrieve user attributes using the user ID and Identity Store ARN, see the Identifying the user and session in IAM Identity Center user-initiated CloudTrail events section of the IAM Identity Center User Guide.

Among other user attributes, you can use the describe-user CLI command to retrieve the external ID associated with a user in the Identity Store. You can use the external ID to associate Identity Store users with their external directories. The external ID maps the user to an immutable user identifier in their external directory, such as Microsoft Active Directory or Okta Universal Directory.

Note: IAM Identity Center doesn’t emit an external ID in CloudTrail. You need access to the Identity Store to retrieve an external ID based on the userId and identityStoreArn fields in CloudTrail.

If you have access to the CloudTrail events but not the Identity Store, you can use the UserName field emitted under the additionalEventData element to correlate your users with their external directories. This field represents the username that the user authenticates or federates with when signing in to IAM Identity Center. For more details, see the Correlating users between IAM Identity Center and external directories section of the IAM Identity Center User Guide.

Notes:

  • When the identity source is the AWS Directory Service, the UserName value logged in the additionalEventData element in CloudTrail is equal to the username that the user enters during authentication. For example, a user who has the username [email protected], can authenticate with anyuser, [email protected], or company.com\anyuser, and in each case the entered value is emitted in CloudTrail respectively.
  • For a sign-in failure caused by incorrect username input, IAM Identity Center emits the UserName field in its CloudTrail event as a fixed-text value of HIDDEN_DUE_TO_SECURITY_REASONS. This is because the username value input by the user in such a scenario could contain sensitive information, such as a user’s password.

To track user activity within the same session, IAM Identity Center now emits the credentialId field in CloudTrail events for user actions that take place in the AWS access portal or that use the AWS CLI. The credentialId field contains the AWS access portal session ID for a user, to help you track user actions during their session.

The following table shows a CloudTrail event example that illustrates the fields, highlighted in yellow, that will change on January 13, 2025. IAM Identity Center recently started emitting userId, identityStoreArn, credentialId, and UserName in the additional event data for its CloudTrail events. Therefore, this example considers them as existing fields.

Before the upcoming changes
"eventName": "CredentialChallenge",
"eventSource": "signin.amazonaws.com",
"userIdentity": {
  "type": "Unknown",
  "userName": "anyuser",
  "accountId": "123456789012",
  "principalId": "123456789012",
  "onBehalfOf": {
    "userId": "a11111-1111-1111-11a1-111aa111aa11",
    "identityStoreArn": "arn:aws:identitystore::111111111:identitystore/d-111111a1a"
  },
  "credentialId": "1111a111111111a1a11111a1a[…]"
},
"additionalEventData": {
    "CredentialType": "PASSWORD",
    "UserName": "anyuser"
}
After the upcoming changes
"eventName": "CredentialChallenge",
"eventSource": "signin.amazonaws.com",
"userIdentity": {
  "type": "IdentityCenterUser",
  "accountId": "123456789012",
  "onBehalfOf": {
    "userId": "a11111-1111-1111-11a1-111aa111aa11",
    "identityStoreArn": "arn:aws:identitystore::111111111:identitystore/d-111111a1a"
  },
  "credentialId": "1111a111111111a1a11111a1a[…]"
},
"additionalEventData": {
    "CredentialType": "PASSWORD",
    "UserName": "anyuser"
}

How to prepare your workflows for the upcoming changes to IAM Identity Center group management events in CloudTrail

Your workflows that require access to group attributes, such as displayName, can retrieve them by using the Identity Store DescribeGroup API operation. Beginning January 13, 2025, IAM Identity Center will replace the displayName value in the administrative CloudTrail events for CreateGroup and UpdateGroup with a fixed text value of HIDDEN_DUE_TO_SECURITY_REASONS. This update restricts access to the group displayName only to workflows that are authorized to access group attributes in the Identity Store.

The following table shows a CloudTrail event example that illustrates the upcoming change in the displayName field, which is highlighted in yellow.

Before the upcoming changes
"eventName": "CreateGroup",
"eventSource": "sso-directory.amazonaws.com",
"userIdentity": {
  "type": "AssumedRole",
  "userName": "GroupManagerRole",
  "accountId": "123456789012",
  "principalId": "123456789012"
}
…
"group": {
    "groupId": "11a1a111-1111-1010-aaa1-01111a1111a0",
    "displayName": "PowerUserGroup",
    "groupAttributes": {
        "description": {
            "stringValue": "HIDDEN_DUE_TO_SECURITY_REASONS"
        }
    }
}
After the upcoming changes
"eventName": "CreateGroup",
"eventSource": "sso-directory.amazonaws.com",
"userIdentity": {
  "type": "AssumedRole",
  "userName": "GroupManagerRole",
  "accountId": "123456789012",
  "principalId": "123456789012"
}
…
"group": {
    "groupId": "11a1a111-1111-1010-aaa1-01111a1111a0",
    "displayName": "HIDDEN_DUE_TO_SECURITY_REASONS",
    "groupAttributes": {
        "description": {
            "stringValue": "HIDDEN_DUE_TO_SECURITY_REASONS"
        }
    }
}

Gain a deeper understanding of the specific CloudTrail events impacted by the changes

Earlier in this post, we said that IAM Identity Center emits the relevant CloudTrail events when users sign in to IAM Identity Center, use the AWS access portal, and access AWS accounts through the AWS CLI, or when administrators create and update groups. These CloudTrail events belong to four event groups that the IAM Identity Center User Guide refers to as AWS access portal, OIDC, Sign-in, and Identity Store events. The following list provides more details about the use cases that lead to the emission of these CloudTrail events:

  1. The AWS access Portal events cover sign-in and sign-out from the AWS access portal, as well as the retrieval of a user’s account and application assignments, which are necessary to display the portal. IAM Identity Center also emits these events when configuring AWS CLI or IDE toolkits for access to AWS accounts as an IAM Identity Center user.
  2. The relevant OpenID Connect (OIDC) event is CreateToken. IAM Identity Center emits this event when starting a session for an authenticated user (for example, to access assigned AWS accounts through AWS CLI or IDE toolkits).
  3. The Sign-in events cover password-based and federated authentication, as well as multi-factor authentication (MFA).
  4. The relevant Identity Store events include the end-user management of MFA devices inside the AWS access portal and the two administrative Identity Store events, CreateGroup and UpdateGroup.

Note that some of the API operations behind the CloudTrail events in scope are also available as AWS CLI commands:

The two tables in this section provide a detailed record of the changes and their relation to CloudTrail events.

The following table lists the changes to fields emitted by IAM Identity Center and the relevant CloudTrail events.

Changes AWS access portal
(Use of the portal)
OIDC
(Sign-in to IAM Identity Center through AWS CLI and IDE toolkits)
Sign-in
(authentication, including MFA, federation)
Identity Store
(MFA device and group management)
Available as of January 13, 2025
Exclusion of userName from the userIdentity element for authenticated users Yes Yes, limited to the CreateToken event Yes Yes, limited to MFA management in the AWS access portal
Exclusion of principalId from the userIdentity element Yes Yes, limited to the CreateToken event Yes Yes, limited to MFA management in the AWS access portal
Modified userIdentity’s type value from Unknown to IdentityCenterUser Yes Yes, limited to the CreateToken event Yes, limited to successful authentications Yes, limited to MFA management in the AWS access portal
Exclusion of the group displayName value from the requestParameters and responseElements elements No No No Yes, limited to administrative CreateGroup and UpdateGroup events
Exclusion of the UserName (in the additionalEventData element) a user keys in on failed authentication attempts No No Yes, limited to the CredentialChallenge event No
Available as of October 2024
Addition of the onBehalfOf element with userId and identityStoreArn, and credentialId in the userIdentity element Yes Yes, limited to the CreateToken event Yes, limited to successful authentications Yes, limited to MFA management in the AWS access portal
Addition of UserName in additionalEventData element No No Yes, limited to CredentialChallenge and UserAuthentication events in specific cases No

The following table summarizes the relevant IAM Identity Center CloudTrail event groups, event sources, and event names.

Event group Source Event names
AWS access portal sso.amazonaws.com Authenticate
Federate
ListAccountRoles
ListAccounts
ListApplications
ListProfilesForApplication
GetRoleCredentials
Logout
OIDC sso.amazonaws.com CreateToken
Sign-in signin.amazon.com CredentialChallenge
CredentialVerification
UserAuthentication
Identity Store sso-directory.amazonaws.com or
identitystore.amazonaws.com
ListMfaDevicesForUser
DeleteMfaDeviceForUser
UpdateMfaDeviceForUser
StartWebAuthnDeviceRegistration
StartVirtualMfaDeviceRegistration
CompleteWebAuthnDeviceRegistration
CompleteVirtualMfaDeviceRegistration
CreateGroup
UpdateGroup

Conclusion

In this post, we reviewed several important upcoming and recently completed changes to CloudTrail events that IAM Identity Center emits. We recommend that you update your CloudTrail based workflows before January 13, 2025 if they rely on the userName, principalId, or type fields in the CloudTrail user identity element when users sign in to IAM Identity Center, use the AWS access portal, access AWS accounts through the AWS CLI, or set a group’s displayName field in group management administrative events. AWS has recently introduced the fields userId, identityStoreArn, and credentialId in the CloudTrail user identity element to help you complete your updates.

Please contact your AWS account team or AWS support if you need additional assistance.

Arthur Mnev
Arthur Mnev

Arthur is a Senior Specialist Security Architect for AWS Industries. He spends his day working with customers and designing innovative approaches to help customers move forward with their initiatives, improve their security posture, and reduce security risks in their cloud journeys. Outside of work, Arthur enjoys being a father, skiing, scuba diving, and Krav Maga.
Alex Milanovic
Alex Milanovic

Alex is a Senior Product Manager at AWS Identity, with over a decade of expertise in Identity and Access Management (IAM) and more than 25 years in the tech sector. His work centers on empowering organizations of all sizes, from large enterprises to small and medium-sized businesses, to effectively adopt and implement IAM cloud services.

Create security observability using generative AI with Security Lake and Amazon Q in QuickSight

Post Syndicated from Priyank Ghedia original https://aws.amazon.com/blogs/security/create-security-observability-using-generative-ai-with-security-lake-and-amazon-q-in-quicksight/

Generative artificial intelligence (AI) is now a household topic and popular across various public applications. Users enter prompts to get answers to questions, write code, create images, improve their writing, and synthesize information. As people become familiar with generative AI, businesses are looking for ways to apply these concepts to their enterprise use cases in a simple, scalable, and cost-effective way. These same needs are shared by a variety of security stakeholders. For example, if security directors want to summarize their security posture in natural language, a security architect will need to triage alerts or findings and investigate AWS CloudTrail logs to identify high priority remediation actions or detect potential threat actors by identifying potentially malicious activity. There are many ways to deploy solutions for these use cases.

In this blog post, we review a fully serverless solution for querying data stored in Amazon Security Lake using natural language (human language) with Amazon Q in QuickSight. This solution has multiple use cases, such as generating visualizations and querying vulnerability information for vulnerability management using tools such as Amazon Inspector that feed into AWS Security Hub. The solution helps reduce the time from detection to investigation by using natural language to query CloudTrail logs and Amazon Virtual Private Cloud (VPC) Flow Logs, resulting in quicker response to threats in your environment.

Amazon Security Lake is a fully managed security data lake service that automatically centralizes security data from AWS environments, software as a service (SaaS) providers, and on-premises and cloud sources into a purpose-built data lake that’s stored in your AWS account. The data lake is backed by Amazon Simple Storage Service (Amazon S3) buckets, and you retain ownership over your data. Security Lake converts ingested data into Apache Parquet format and a standard open source schema called the Open Cybersecurity Schema Framework (OCSF). With OCSF support, Security Lake normalizes and combines security data from AWS and a broad range of enterprise security data sources.

Amazon QuickSight is a cloud-scale business intelligence (BI) service that delivers insights to stakeholders, wherever they are. QuickSight connects to your data in the cloud and combines data from a variety of different sources. With QuickSight, users can meet varying analytic needs from the same source of truth through interactive dashboards, reports, natural language queries, and embedded analytics. With Amazon Q in QuickSight, business analysts and users can use natural language to build, discover, and share meaningful insights.

The recent announcements for Amazon Q in QuickSight, Security Lake, and the OCSF present a unique opportunity to apply generative AI to fully managed hybrid multi-cloud security related logs and findings from over 100 independent software vendors and partners.

Solution overview

The solution uses Security Lake as the data lake which has native ingestion for CloudTrail, VPC Flow Logs, and Security Hub findings as shown in Figure 1. Logs from these sources are sent to S3 buckets in your AWS account and are maintained by Security Lake. We then create Amazon Athena views from tables created by Security Lake for Security Hub findings, CloudTrail logs, and VPC Flow Logs to define the interesting fields from each of the log sources. Each of these views are ingested into a QuickSight dataset. From these datasets, we generate analyses and dashboards. We use Amazon Q topics to label columns in the dataset that are human-readable and create a named entity to present contextual and multi-visual answers in response to questions. After the topics are created, users can perform their analysis using Q topics, QuickSight analyses, or QuickSight dashboards.

Figure 1: Solution architecture

Figure 1: Solution architecture

You can use the rollup AWS Region feature in Security Lake to aggregate logs from multiple Regions into a single Region. Specifying a rollup Region can help you adhere to regional compliance requirements. If you use rollup Regions, you must set up the solution described in this post for datasets only in rollup Regions. If you don’t use a rollup Region, you must deploy this solution for each Region you that want to collect data from.

Prerequisites

To implement the solution described in this post, you must meet the following requirements:

  1. Basic understanding of Security Lake, Athena, and QuickSight.
  2. Security Lake is already deployed and accepting CloudTrail management events, VPC Flow Logs, and Security Hub findings as sources. If you haven’t deployed Security Lake yet, we recommend following the best practices established in the security reference architecture.
  3. This solution uses Security Lake data source version 2 to create the dashboards and visualizations. If you aren’t already using data source version 2, you will see a banner in your Security Lake console with instructions to update.
  4. An existing QuickSight deployment that will be used to visualize Security Lake data or an account that is able to sign up for QuickSight to create visualizations.
  5. QuickSight Author Pro and Reader Pro licenses are needed for using Amazon Q features in QuickSight. Non-pro Authors and Readers can still access Q topics if an Author Pro or Admin Pro user shares the topic with them. Non-pro Authors and Readers can also access data stories if a Reader Pro, Author Pro, or Admin Pro shares one with them. Review Generative AI features supported by each QuickSight licensing tiers.
  6. AWS Identity and Access Manager (IAM) permissions for QuickSight, Athena, Lake Formation, Security Lake, and AWS Resource Access Manager.

In the following section, we walk through the steps to ingest Security Lake data into QuickSight using Athena views and then using Amazon Q in QuickSight to create visualizations and query data using natural language.

Provide cross-account query access

In alignment with our security reference architecture, it’s a best practice to isolate the Security Lake account from the accounts that are running the visualization and querying workloads. It’s recommended that QuickSight for security use cases be deployed in the security tooling account. See How to visualize Amazon Security Lake findings with Amazon QuickSight for information on how to set up cross-account query access. Follow the steps in the Configure a Security Lake subscriber section and configure Athena to visualize your data section.

When you get to the create resource link steps, create a resource link for data source version 2 for Security Hub, CloudTrail, and VPC flow log tables for a total of three resource links. The way to identify data source version 2 tables is by their name; it ends in _2_0. For example:

  • amazon_security_lake_table_us_east_1_sh_findings_2_0
  • amazon_security_lake_table_us_east_1_cloud_trail_mgmt_2_0
  • amazon_security_lake_table_us_east_1_vpc_flow_2_0

For the remainder of this post, we will be referencing the database name security_lake_visualization and the resource link names for Security Hub findings, CloudTrail logs, and VPC Flow Logs respectively, as shown in Figure 2:

  • securitylake_shared_resourcelink_securityhub_2_0_us_east_1
  • securitylake_shared_resourcelink_cloudtrail_2_0_us_east_1
  • securitylake_shared_resourcelink_vpcflow_2_0_us_east_1

Figure 2: Lake Formation table snapshot

Figure 2: Lake Formation table snapshot

We will call the QuickSight account the visualization account. If you plan to use same account as the Security Lake delegated administrator and QuickSight, then skip this step and go to the next section where you will create views in Athena.

Create views in Athena

A view in Athena is a logical table that helps simplify your queries by working with only a subset of the relevant data. Follow these steps to create three views in Athena, one each for Security Hub findings, CloudTrail logs, and the VPC Flow Logs in the visualization account.

These queries default to the previous week’s data starting from the previous day, but you can change the time frame by modifying the last line in the query from 8 to the number of days you prefer. Keep in mind that there is a limitation on the size of each SPICE table of 1 TB. If you want to limit the volume of data, you can delete the rows that you find unnecessary. We included the fields customers have identified as relevant to reduce the burden of writing the parsing details yourself.

To create views:

  1. Sign in to the AWS Management Console in the visualization account and navigate to the Athena console.
  2. If a Security Lake rollup Region is used, select the rollup Region.
  3. Choose Launch Query Editor.
  4. If this is the first time you’re using Athena, you will need to choose a bucket to store your query results.
    1. Choose Edit Settings.
    2. Choose Browse S3.
    3. Search for your bucket name.
    4. Select the radio button next to the name of your bucket.
    5. Select Choose.
  5. For Data Source, select AWSDataCatalog.
  6. Select Database as security_lake_visualization. If you used a different name for the database for cross account query access, then select that database.

    Figure 3: Athena database selection

    Figure 3: Athena database selection

  7. Copy the query for the security_hub_view from the GitHub repo for this post. If you’re using a different name for the database and table resource link than the one specified in this post, edit the FROM statement at the bottom of the query to reflect the correct names.
  8. Paste the query in the query editor and then choose Run. The name of the view is set in the first line of the query which is security_insights_security_hub_vw2.
  9. To confirm this view was created correctly, choose the three dots next to the view that was created and select Preview View.

    Figure 4: Previewing the view

    Figure 4: Previewing the view

  10. Repeat steps 5–9 to create the CloudTrail and VPC Flow Logs views. The queries for each can be found in the GitHub repo.

    Figure 5: Athena views

    Figure 5: Athena views

Create QuickSight dataset

Now that you’ve created the views, use Athena as the data source to create a dataset in QuickSight. Repeat these steps for the Security Hub findings, CloudTrail logs, and VPC Flow Logs. Start by creating a dataset for the Security Hub findings.

To configure permissions on tables:

  1. Sign in to the QuickSight console in the visualization account. If a Security Lake rollup Region is used, select the rollup Region.
  2. If this is the first time you’re using QuickSight, you must sign up for a QuickSight subscription.
  3. Although there are multiple ways to sign in to QuickSight, we used IAM based access to build the dashboards. To use QuickSight with Athena and Lake Formation, you first need to authorize connections through Lake Formation.
  4. When using a cross-account configuration with AWS Glue Data Catalog, you need to configure permissions on tables that are shared through Lake Formation. For the use case in this post, use the following steps to grant access on the cross-account tables in the Glue Catalog. You must perform these steps for each of the Security Hub, CloudTrail, and VPC Flow Logs tables that you created in the preceding cross-account query access section. Because granting permissions on a resource link doesn’t grant permissions on the target (linked) database or table, you will grant permission twice, once to the target (linked table) and then to the resource link.
    1. In the Lake Formation console, navigate to the Tables section and select the resource link for the Security Hub table. For example:

      securitylake_shared_resourcelink_securityhub_2_0_us_east_1

    2. Select Actions. Under Permissions, select Grant on target.
    3. For the next step, you need the Amazon Resource Name (ARN) of the QuickSight users or groups that need access to the table. To obtain the ARN through the AWS Command Line Interface (AWS CLI), run following commands (replacing account ID and Region with that of the visualization account.) You can use AWS CloudShell for this purpose.
      1. For users

        aws quicksight list-users --aws-account-id 111122223333 --namespace default --region us-east-1

      2. For groups

        aws quicksight list-groups --aws-account-id 111122223333 --namespace default --region us-east-1

    4. After you have the ARN of the user or group, copy it and go back to the LakeFormation console Grant on Target page. For Principals, select SAML users and groups, and then add the QuickSight user’s ARN.

      Figure 6: Selecting principals

      Figure 6: Selecting principals

    5. For LF-Tags or catalog resources, keep the default settings.

      Figure 7: Table grant on target permissions

      Figure 7: Table grant on target permissions

    6. For Table permissions, select Select for both Table Permissions and Grantable Permissions, and then choose Grant.

      Figure 8: Selecting table permissions

      Figure 8: Selecting table permissions

    7. Navigate back to the Tables section and select the resource link for the Security Hub table. For example:

      securitylake_shared_resourcelink_securityhub_2_0_us_east_1

    8. Select Actions. This time under Permissions, and then choose Grant.
    9. For Principals, select SAML users and groups, and then add the QuickSight user’s ARN captured earlier.
    10. For the LF-Tags or catalog resources section, use the default settings.
    11. For Resource link permissions choose Describe for both Table Permissions and Grantable Permissions.
    12. Repeat steps a–k for the CloudTrail and VPC Flow Logs resource links.

To create datasets from views:

  1. After permissions are in place, you create three datasets from the views created earlier. Because both Quicksight and Lake Formation are Regional services, verify that you’re using QuickSight in the same Region where Lake Formation is sharing the data. The simplest way to determine your Region is to check the QuickSight URL in your web browser. The Region will be at the beginning of the URL, such as us-east-1. To change the Region, select the settings icon in the top right of the QuickSight screen and select the correct Region from the list of available Regions in the drop-down menu.
  2. Navigate back to the QuickSight console.
  3. Select Datasets, and then choose New dataset.
  4. Select Athena from the list of available data sources.
  5. Enter a Data source name, for example security_lake_securityhub_dataset and leave the Athena workgroup as [primary]. Choose Create data source.
  6. At the Choose your table prompt, for Catalog, select AwsDataCatalog. For Database, select security_lake_visualization. If you used a different name for the database for cross-account query access, then select that database. For Tables, select the view name security_insights_security_hub_vw2 to build your dashboards for Security Hub findings. Then choose Select.

    Figure 9: Choose a table during QuickSight dataset creation

    Figure 9: Choose a table during QuickSight dataset creation

  7. At the Finish dataset creation prompt, select Import to SPICE for quicker analytics. Choose Visualize. This will create a new dataset in QuickSight using the name of the Athena view, which is security_insights_security_hub_vw2. You will be taken to the Analysis page, exit out of it.
  8. Go back to the QuickSight console and repeat steps 3–8 for the CloudTrail and VPC Flow Log datasets.

Create a topic

Now that you have created a dataset, you can create a topic. Q topics are collections of one or more datasets that represent a subject area for your business users to ask questions. Topics allow users to ask questions in natural language and to build visualizations using natural language.

To create a Q topic:

  1. Navigate to the QuickSight console.
  2. Choose Topics in the left navigation pane.

    Figure 10: QuickSight navigation pane

    Figure 10: QuickSight navigation pane

  3. Choose New topic. Create one topic each for the Security Hub findings, CloudTrail logs, and VPC Flow Logs

    Figure 11: QuickSight topic creation

    Figure 11: QuickSight topic creation

  4. On the New topic page, do the following:
    1. For Topic name, enter a descriptive name for the topic. Name the first one SecurityHubTopic. Your business users will identify the topic by this name and use it to ask questions.
    2. For Description, enter a description for the topic. Your users can use this description to get more details about the topic.
    3. Choose Continue.
  5. On the Add data to topic page, choose the dataset you created in the Create a QuickSight dataset section. Start with the Security Hub dataset security_insights_security_hub_vw2.
  6. Choose Continue. It will take a few minutes to create the topic.
  7. Now that your topic has been created, navigate to the Data tab of the topic.
  8. Your Data Fields sub-tab should be selected already. If not, choose Data Fields.

    Figure 12: Topics data fields

    Figure 12: Topics data fields

  9. For each of the fields in the list, turn on Include to make sure that all fields are included. For this example, we selected all fields, but you can adjust the included columns as needed for your use case. Note, you might see a banner at the top of the page indicating that the indexing is in progress. Depending on the size of your data, it might take some time for Q to make those fields available for querying. Most of the time, indexing is complete in less than 15 minutes.
  10. Review the Synonyms column. These alternate representations of your column name are automatically generated by Amazon Q. You can add and remove synonyms as needed for your use case.
  11. At this point, you’re ready to ask questions about your data using Amazon Q in QuickSight. Choose Ask a question about SecurityHubTopic at the top of the page.

    Figure 13: Ask questions using Q

    Figure 13: Ask questions using Q

  12. You can now ask questions about Security Hub findings in the prompt. Enter Show me findings with compliance status failed along with control id.

    Figure 14: Q answers

    Figure 14: Q answers

  13. Under the question, you will see how it was interpreted by QuickSight.
  14. Repeat steps 1–13 to create CloudTrail and VPC Flow Log QuickSight topics.

Create named entities for your topics

Now that you’ve created your topics, you will now add named entities. Named entities are optional, but we’re using them in the solution to help make queries more effective. The information contained in named entities, the ordering of fields, and their ranking make it possible to present contextual, multi-visual answers in response to even vague questions.

To create a named entity:

  1. In the QuickSight console, navigate to Topics.
  2. Select the Security Hub topic that you created in the previous section.
  3. Under the Data tab, select the Named Entity subtab, and choose Add Named Entity.

    Figure 15: Named entity subtab

    Figure 15: Named entity subtab

  4. Enter Security Findings as the entity name.
  5. Select the following datafields: Status, Metadata Product Name, Finding Info Title, Region, Severity, Cloud Account Uid, Time Dt, Compliance Status, and AccountId. The order of the fields helps Q to prioritize the data, so rearrange your data fields as needed.

    Figure 16: Security hub finding names entity creation

    Figure 16: Security hub finding names entity creation

  6. Choose Save in the top right corner to save your results.
  7. Repeat steps 1–6 with the CloudTrail dataset using the following datafields: API operation, Time Dt, Region, Status, AccountId, API Response Error, Actor User Credential Uid, Actor User Name, Actor User Type, Api Service Name, Actor Idp Name, Cloud Provider, Session Issuer, and Unmapped.

    Figure 17: CloudTrail named entity creation

    Figure 17: CloudTrail named entity creation

  8. Repeat steps 1–6 with the VPC Flow Log dataset using the following datafields: Src Endpoint IP, Src Endpoint Port, Dst Endpoint IP, Dst Endpoint Port, Connection Info Direction, Traffic Bytes, Action, Accountid, Time Dt, and Region.

    Figure 18: VPC Flow log named entity creation

    Figure 18: VPC Flow log named entity creation

Create visualizations using natural language

After your topic is done indexing, you can start creating visualizations using natural language. In QuickSight, an analysis is the same thing as a dashboard, but is only accessible by the authors. You can keep it private and make it as robust and detailed as you want. When you decide to publish it, the shared version is called a dashboard.

To create visualizations:

  1. Open the QuickSight console and navigate to the Analysis tab.
  2. In the top right, select New analysis.
  3. Select the dataset you created previously, it will have the same naming convention as the Athena view. For reference, the Athena view query created a Security Hub dataset called security_insights_security_hub_vw2.
  4. Validate the information about the data set you’re going to use in the analysis and choose USE IN ANALYSIS.
  5. On the pop up, select the interactive sheet option and choose Create.
  6. For datasets that have a corresponding Q topic, which you created in a previous step, choose Build visual at the top of the screen.

    Figure 19: Build visual using natural language

    Figure 19: Build visual using natural language

  7. Enter your prompt and choose BUILD. For example, enter findings with product security hub group by control id include count. Q automatically generates a visualization.

    Figure 20: Q response

    Figure 20: Q response

  8. To add to your dashboard, choose ADD TO ANALYSIS to see your new visualization module in your current analysis.
  9. The supplied questions are targeted towards a Security Hub findings topic, where you can ask questions about your security hub findings data. For example, show all Security Hub findings for critical severity for a specific resource or ARN.
  10. If you use Amazon Inspector for software vulnerability management and you want to monitor top common vulnerabilities and exposures (CVEs) affecting your organization, choose Build visual and enter show all ACTIVE findings with product inspector group by Title add count in the prompt. We used the keyword ACTIVE because ACTIVE is a finding state in Security Hub that indicates the finding is still active as per the finding source and Amazon Inspector has not closed the finding yet. If Amazon Inspector has closed the finding, the finding will have a state of ARCHIVED.

    Figure 21: Q Response for an Amazon Inspector findings question

    Figure 21: Q Response for an Amazon Inspector findings question

  11. After you add visualization to the analysis, you can customize it further using various QuickSight visualization options.
  12. To add the remaining datasets, which allows you to visualize data from multiple datasets in a single view, select the dropdown in the left navigation under Dataset.
    1. Select Add a new dataset.
    2. Search the name of the remaining datasets you created previously.
    3. Select anywhere on the name of the dataset to make the radial button blue for the single dataset you want to add. Choose Select.
  13. Repeat steps 7–12 in this section to add all the corresponding datasets you created previously.

Note: When you add additional datasets to the same Analysis and use Build visual to generate visualizations using natural language, the corresponding datasets with Q Topics are populated in the drop down under the prompt. Be sure to choose the correct dataset when asking questions.

Figure 22: Choosing a QuickSight dataset

Figure 22: Choosing a QuickSight dataset

To create dashboards:

  1. After you’ve created the visual and are ready to publish the analysis as a dashboard, select PUBLISH in the top right corner.
    1. Enter a name for your dashboard.
    2. Choose Publish Dashboard.
  2. After your dashboard is published, your users can ask questions about the data through the dashboard as well. This dashboard can be shared with other users. Users with QuickSight Reader Pro licenses can ask questions using Amazon Q.

To ask questions using the dashboard:

  1. Navigate to the Dashboards section on the left navigation.
  2. Select the dashboard you previously published.
  3. Select Ask a question about [Topic Name] at the top of the screen. A module will open from the side of your screen. Questions can only be addressed to a single topic. To change the topic, select the name of the topic and a drop-down will appear. Select the name of the current topic to see other options and select the topic you want to ask a question about. For this example, select CloudTrailTopic.

    Figure 23: Selecting a topic

    Figure 23: Selecting a topic

  4. Enter a question in the prompt. For this example, enter show top API operations in the last 24 hours with accessdenied.

    Figure 24: CloudTrail question 1

    Figure 24: CloudTrail question 1

  5. Enter show all activity by user johndoe in the last 3 days.

    Figure 25: CloudTrail question 2

    Figure 25: CloudTrail question 2

  6. Q will automatically build a small dashboard based on the questions provided.
  7. Now change the topic to VPCFlowTopic as described in step 3.
  8. Enter show me the top 5 dst ip by bytes for outbound traffic with dst port 443.

    Figure 26: VPC Flow Log question

    Figure 26: VPC Flow Log question

You can build executive summaries using QuickSight data stories, which also use generative AI. Data stories use Amazon Q prompts and visuals to produce a draft that incorporates the details that you provide. For example, you can create a data story about how a specific CVE affects your organization by asking Q questions, then add visuals from analyses you already created.

Conclusion

In this blog post, you learned how to use generative AI for your security use cases. We showed you how to use cross-account query access to allow a QuickSight visualization account to subscribe to Security Lake data for Security Hub findings, CloudTrail logs, and VPC Flow Logs. We then provided instructions for creating, Athena views, QuickSight datasets, Q topics, named entities, and for using natural language to build dashboards and query your data. You can customize the Athena views to create, update, or delete columns and column names as needed for your use case. You can also customize the Q topics and named entities to use naming conventions and structure responses based on your organization’s needs.

 
If you have feedback about this post, submit comments in the Comments section below. If you have questions about this post, contact AWS Support.

Priyank Ghedia
Priyank Ghedia

Priyank is a Senior Security Specialist Solutions Architect focused on threat detection and incident response. Priyank helps customers meet their security visibility and response objectives by building architectures using AWS security services and tools. Before AWS, he spent eight years advising customers on global networking and security operations.
Matt Meck
Matt Meck

Matt is a Sr. Worldwide Security Specialist in New York, covering the AWS Detection and Response domain and advises customers on how they can enhance their security posture and shares feedback to service teams about how AWS can enhance its services. Hiking, competitive soccer, skiing, and being with friends and family are his favorite pass times.
Anthony Harvey
Anthony Harvey

Anthony is a Senior Security Specialist Solutions Architect for AWS in the worldwide public sector group. Prior to joining AWS, he was a chief information security officer in local government for half a decade. He has a passion for figuring out how to do more with less and using that mindset to enable customers in their security journey.

How AWS powered Prime Day 2024 for record-breaking sales

Post Syndicated from Channy Yun (윤석찬) original https://aws.amazon.com/blogs/aws/how-aws-powered-prime-day-2024-for-record-breaking-sales/

The last Amazon Prime Day 2024 (July 17-18) was Amazon’s biggest Prime Day shopping event ever, with record sales and more items sold during the two-day event than any previous Prime Day event. Prime members shopped for millions of deals and saved billions across more than 35 categories globally.

I live in South Korea, but luckily I was staying in Seattle to attend the AWS Heroes Summit during Prime Day 2024. I signed up for a Prime membership and used Rufus, my new AI-powered conversational shopping assistant, to search for items quickly and easily. Prime members in the U.S. like me chose to consolidate their deliveries on millions of orders during Prime Day, saving an estimated 10 million trips. This consolidation results in lower carbon emissions on average.

We know from Jeff’s annual blog post that AWS runs the Amazon website and mobile app that makes these short-term, large scale global events feasible. (check out his 2016, 2017, 2019, 2020, 2021, 2022, and 2023 posts for a look back). Today I want to share top numbers from AWS that made my amazing shopping experience possible.

Prime Day 2024 – all the numbers
Here are some of the most interesting and/or mind-blowing metrics:

Amazon EC2 – Since many of Amazon.com services such as Rufus and Search use AWS artificial intelligence (AI) chips under the hood, Amazon deployed a cluster of over 80,000 Inferentia and Trainium chips for Prime Day. During Prime Day 2024, Amazon used over 250K AWS Graviton chips to power more than 5,800 distinct Amazon.com services (double that of 2023).

Amazon EBS – In support of Prime Day, Amazon provisioned 264 PiB of Amazon EBS storage in 2024, a 62 percent increase compared to 2023. When compared to the day before Prime Day 2024, Amazon.com performance on Amazon EBS jumped by 5.6 trillion read/write I/O operations during the event, or an increase of 64 percent compared to Prime Day 2023. Also, when compared to the day before Prime Day 2024, Amazon.com transferred an incremental 444 petabytes of data during the event, or an increase of 81 percent compared to Prime Day 2023.

Amazon Aurora – On Prime Day, 6,311 database instances running the PostgreSQL-compatible and MySQL-compatible editions of Amazon Aurora processed more than 376 billion transactions, stored 2,978 terabytes of data, and transferred 913 terabytes of data.

Amazon DynamoDB – DynamoDB powers multiple high-traffic Amazon properties and systems including Alexa, the Amazon.com sites, and all Amazon fulfillment centers. Over the course of Prime Day, these sources made tens of trillions of calls to the DynamoDB API. DynamoDB maintained high availability while delivering single-digit millisecond responses and peaking at 146 million requests per second.

Amazon ElastiCache – ElastiCache served more than quadrillion requests on a single day with a peak of over 1 trillion requests per minute.

Amazon QuickSight – Over the course of Prime Day 2024, one Amazon QuickSight dashboard used by Prime Day teams saw 107K unique hits, 1300+ unique visitors, and delivered over 1.6M queries.

Amazon SageMaker – SageMaker processed more than 145B inference requests during Prime Day.

Amazon Simple Email Service (Amazon SES) – SES sent 30 percent more emails for Amazon.com during Prime Day 2024 vs 2023, delivering 99.23 percent of those emails to customers.

Amazon GuardDuty – During Prime Day 2024, Amazon GuardDuty monitored nearly 6 trillion log events per hour, a 31.9% increase from the previous year’s Prime Day.

AWS CloudTrail – CloudTrail processed over 976 billion events in support of Prime Day 2024.

Amazon CloudFront – CloudFront handled a peak load of over 500 million HTTP requests per minute, for a total of over 1.3 trillion HTTP requests during Prime Day 2024, a 30 percent increase in total requests compared to Prime Day 2023.

Prepare to Scale
As Jeff noted in every year, rigorous preparation is key to the success of Prime Day and our other large-scale events. For example, 733 AWS Fault Injection Service experiments were run to test resilience and ensure Amazon.com remains highly available on Prime Day.

If you are preparing for a similar business-critical events, product launches, and migrations, I strongly recommend that you take advantage of newly-branded AWS Countdown, a support program designed for your project lifecycle to assess operational readiness, identify and mitigate risks, and plan capacity, using proven playbooks developed by AWS experts. For example, with additional help from AWS Countdown, Legal Zoom successfully migrated 450 servers with minimal issues and continues to leverage AWS Countdown Premium to streamline and expedite the launch of SaaS applications.

We look forward to seeing what other records will be broken next year!

Channy & Jeff;

Create a customizable cross-company log lake for compliance, Part I: Business Background

Post Syndicated from Colin Carson original https://aws.amazon.com/blogs/big-data/create-a-customizable-cross-company-log-lake-for-compliance-part-i-business-background/

As described in a previous postAWS Session Manager, a capability of AWS Systems Manager, can be used to manage access to Amazon Elastic Compute Cloud (Amazon EC2) instances by administrators who need elevated permissions for setup, troubleshooting, or emergency changes. While working for a large global organization with thousands of accounts, we were asked to answer a specific business question: “What did employees with privileged access do in Session Manager?”

This question had an initial answer: use logging and auditing capabilities of Session Manager and integration with other AWS services, including recording connections (StartSession API calls) with AWS CloudTrail, and recording commands (keystrokes) by streaming session data to Amazon CloudWatch Logs.

This was helpful, but only the beginning. We had more requirements and questions:

  • After session activity is logged to CloudWatch Logs, then what?
  • How can we provide useful data structures that minimize work to read out, delivering faster performance, using more data, with more convenience?
  • How do we support a variety of usage patterns, such as ongoing system-to-system bulk transfer, or an ad-hoc query by a human for a single session?
  • How should we share and implement governance?
  • Thinking bigger, what about the same question for a different service or across more than one use case? How do we add what other API activity happened before or after a connection—in other words, context?

We needed more comprehensive functionality, more customization, and more control than a single service or feature could offer. Our journey began where previous customer stories about using Session Manager for privileged access (similar to our situation), least privilege, and guardrails ended. We had to create something new that combined existing approaches and ideas:

  • Low-level primitives such as Amazon Simple Storage Service (Amazon S3).
  • Latest features and approaches of AWS, such as vertical and horizontal scaling in AWS Glue.
  • Our experience working with legal, audit, and compliance in large enterprise environments.
  • Customer feedback.

In this post, we introduce Log Lake, a do-it-yourself data lake based on logs from CloudWatch and AWS CloudTrail. We share our story in three parts:

  • Part 1: Business background – We share why we created Log Lake and AWS alternatives that might be faster or easier for you.
  • Part 2: Build – We describe the architecture and how to set it up using AWS CloudFormation templates.
  • Part 3: Add – We show you how to add invocation logs, model input, and model output from Amazon Bedrock to Log Lake.

Do you really want to do it yourself?

Before you build your own log lake, consider the latest, highest-level options already available in AWS–they can save you a lot of work. Whenever possible, choose AWS services and approaches that abstract away undifferentiated heavy lifting to AWS so you can spend time on adding new business value instead of managing overhead. Know the use cases services were designed for, so you have a sense of what they already can do today and where they’re going tomorrow.

If that doesn’t work, and you don’t see an option that delivers the customer experience you want, then you can mix and match primitives in AWS for more flexibility and freedom, as we did for Log Lake.

Session Manager activity logging

As we mentioned in our introduction, you can save logging data to AmazonS3add a table on top, and query that table using Amazon Athena—this is what we recommend you consider first because it’s straightforward.

This would result in files with the sessionid in the name. If you want, you can process these files into a calendarday, sessionid, sessiondata format using an S3 event notification that invokes a function (and make sure to save it to a different bucket, in a different table, to avoid causing recursive loops). The function could derive the calendarday and sessionid from the S3 key metadata, and sessiondata would be the entire file contents.

Alternatively, you can sign to one log group in CloudWatch logs, have an Amazon Data Firehose subscription filter move that to S3 (this file would have additional metadata in the JSON content and more customization potential from filters). This was used in our situation, but it wasn’t enough by itself.

AWS CloudTrail Lake

CloudTrail Lake is for running queries on events over years of history and with near real-time latency and offers a deeper and more customizable view of events than CloudTrail Event history. CloudTrail Lake enables you to federate an event data store, which lets you view the metadata in the AWS Glue catalog and run Athena queries. For needs involving one organization and ongoing ingesting from a trail (or point-in-time import from Amazon S3, or both), you can consider CloudTrail Lake.

We considered CloudTrail Lake, as either a managed lake option or source for CloudTrail only, but ended up creating our own AWS Glue job instead. This was because of a combination of reasons, including full control over schema and jobs, ability to ingest data from an S3 bucket of our choosing as an ongoing source, fine-grained filtering on account, AWS Region, and eventName (eventName filtering wasn’t supported for management events ), and cost.

The cost of CloudTrail lake based on uncompressed data ingested (data size can be 10 times larger than in Amazon S3) was a factor for our use case. In one test, we found CloudTrail Lake to be 38 times faster to process the same workload as Log Lake, but Log Lake was 10–100 times less costly depending on filters, timing, and account activity. Our test workload was 15.9 GB file size in S3, 199 million events, and 400 thousand files, spread across over 150 accounts and 3 Regions. Filters Log Lake applied were eventname='StartSession', 'AssumeRole', 'AssumeRoleWithSAML', and five arbitrary allow listed accounts. These tests might be different from your use case, so you should do your own testing, gather your own data, and decide for yourself.

Other services

The products mentioned previously are the most relevant to the outcomes we were trying to accomplish, but you should consider security, identity, and compliance products on AWS, too. These products and features can be used either as an alternative to Log Lake or to add functionality.

As an example, Amazon Bedrock can add functionality in three ways:

  • To skip the search and query Log Lake for you
  • To summarize across logs
  • As a source for logs (similar to Session Manager as a source for CloudWatch logs)

Querying means you can have an AI agent query your AWS Glue catalog (such as the Log Lake catalog) for data-based results. Summarizing means you can use generative artificial intelligence (AI) to summarize your text logs from a knowledge base as part of retrieval augmented generation (RAG), to ask questions like “How many log files are exactly the same? Who changed IAM roles last night?” Considerations and limitations apply.

Adding Amazon Bedrock as a source means using invocation logging to collect requests and responses.

Because we wanted to store very large amounts of data frugally (compressed and columnar format, not text) and produce non-generative (data-based) results that can be used for legal compliance and security, we didn’t use Amazon Bedrock in Log Lake—but we will revisit this topic in Part 3 when we detail how to use the approach we used for Session Manager for Amazon Bedrock.

Business background

When we began talking with our business partners, sponsors, and other stakeholders, important questions, problems, opportunities, and requirements emerged.

Why we needed to do this

Legal, security, identity, and compliance authorities of the large enterprise we were working for had created a customer-specific control. To comply with the control objective, use of elevated privileges required a manager to manually review all available data (including any session manager activity) to confirm or deny if use of elevated privileges was justified. This was a compliance use case that, when solved, could be applied to more use cases such as auditing and reporting.

Note on terms:

  • Here, the customer in customer-specific control means a control that is solely the responsibility of a customer, not AWS, as described in the AWS Shared Responsibility Model.
  • In this article, we define auditing broadly as testing information technology (IT) controls to mitigate risk, by anyone, at any cadence (ongoing as part of day-to-day operations, or one time only). We don’t refer to auditing that is financial, only conducted by an independent third-party, or only at certain times. We use self-review and auditing interchangeably.
  • We also define reporting broadly as presenting data for a specific purpose in a specific format to evaluate business performance and facilitate data-driven decisions—such as answering “how many employees had sessions last week?”

The use case

Our first and most important use case was a manager who needed to review activity, such as from an after-hours on-call page the previous night. If the manager needed to have additional discussions with their employee or needed additional time to consider activity, they had up to a week (7 calendar days) before they needed to confirm or deny elevated privileges were needed, based on their team’s procedures. A manager needed to review an entire set of events that all share the same session, regardless of known keywords or specific strings, as part of all available data in AWS. This was the workflow:

  1. Employee uses homegrown application and standardized workflow to access Amazon EC2 with elevated privileges using Session Manager.
  2. API activity in CloudTrail and continuous logging to CloudWatch logs.
  3. The problem space – Data somehow gets procured, processed, and provided (this would become Log Lake later).
  4. Another homegrown system (different from step 1) presents session activity to managers and applies access controls (a manager should only review activity for their own employees, and not be able to peruse data outside their team). This data might be only one StartSession API call and no session details, or might be thousands of lines from cat file
  5. The manager reviews all available activity, makes an informed decision, and confirms or denies if use was justified.

This was an ongoing day-to-day operation, with a narrow scope. First, this meant only data available in AWS; if something couldn’t be captured by AWS, it was out of scope. If something was possible, it should be made available. Second, this meant only certain workflows; using Session Manager with elevated privileges for a specific, documented standard operating procedure.

Avoiding review

The simplest solution would be to block sessions on Amazon EC2 with elevated privileges, and fully automate build and deployment. This was possible for some but not all workloads, because some workloads required initial setup, troubleshooting, or emergency changes of Marketplace AMIs.

Is accurate logging and auditing possible?

We won’t extensively detail ways to bypass controls here, but there are important limitations and considerations we had to consider, and we recommend you do too.

First, logging isn’t available for sessionType Port, which includes SSH. This could be mitigated by ensuring employees can only use a custom application layer to start sessions without SSH. Blocking direct SSH access to EC2 instances using security group policies is another option.

Second, there are many ways to intentionally or accidentally hide or obfuscate activity in a session, making review of a specific command difficult or impossible. This was acceptable for our use case for multiple reasons:

  • A manager would always know if a session started and needed review from CloudTrail (our source signal). We joined to CloudWatch to meet our all available data requirement.
  • Continuous streaming to CloudWatch logs would log activity as it happened. Additionally, streaming to CloudWatch Logs supported interactive shell access, and our use case only used interactive shell access (sessionType Standard_Stream). Streaming isn’t supported for sessionType, InteractiveCommands, or NonInteractiveCommands.
  • The most important workflow to review involved an engineered application with one standard operating procedure (less variety than all the ways Session Manager could be used).
  • Most importantly, the manager was responsible for reviewing the reports and expected to apply their own judgement and interpret what happened. For example, a manager review could result in a follow up conversation with the employee that could improve business processes. A manager might ask their employee, “Can you help me understand why you ran this command? Do we need to update our runbook or automate something in deployment?”

To protect data against tampering, changes, or deletion, AWS provides tools and features such as AWS Identity and Access Management (IAM) policies and permissions and Amazon S3 Object Lock.

Security and compliance are a shared responsibility between AWS and the customer, and customers need to decide what AWS services and features to use for their use case. We recommend customers consider a comprehensive approach that considers overall system design and includes multiple layers of security controls (defense in depth). For more information, see the Security pillar of the AWS Well-Architected Framework.

Avoiding automation

Manual review can be a painful process, but we couldn’t automate review for two reasons: Legal requirements and to add friction to the feedback loop felt by a manager whenever an employee used elevated privileges, to discourage using elevated privileges.

Works with existing

We had to work with existing architecture, spanning thousands of accounts and multiple AWS Organizations. This meant sourcing data from buckets as an edge and point of ingress. Specifically, CloudTrail data was managed and consolidated outside of CloudTrail, across organizations and trails, into S3 buckets. CloudWatch data was also consolidated to S3 buckets, from Session Manager to CloudWatch Logs, with Amazon Data Firehose subscription filters on CloudWatch Logs pointing to S3. To avoid negative side effects on existing business processes, our business partners didn’t want to change settings in CloudTrail, CloudWatch, and Firehose. This meant Log Lake needed features and flexibility that enabled changes without impacting other workstreams using the same sources.

Event filtering is not a data lake

Before we were asked to help, there were attempts to do event filtering. One attempt tried to monitor session activity using Amazon EventBridge. This was limited to AWS API operations recorded by CloudTrail such as StartSession and didn’t include the information from inside the session, which was in CloudWatch Logs. Another attempt tried event filtering CloudWatch in the form of a subscription filter. Also, an attempt was made using EventBridge Event Bus with EventBridge rules, and storage in Amazon DynamoDB. These attempts didn’t deliver the expected results because of a combination of factors:

Size

Couldn’t accept large session log payloads because of the EventBridge PutEvents limit of 256 KB entry size. Saving large entries to Amazon S3 and using the object URL in the PutEvents entry would avoid this limitation in EventBridge, but wouldn’t pass the most important information the manager needed to review (the event’s sessionData element). This meant managing files and physical dependencies, and losing the metastore benefit of working with data as logical sets and objects.

Storage

Event filtering was a way to process data, not storage or a source of truth. We asked, how do we restore data lost in flight or destroyed after landing? If components are deleted or undergoing maintenance, can we still procure, process, and provide data—at all three layers independently? Without storage, no.

Data quality

No source of truth meant data quality checks weren’t possible.  We couldn’t answer questions like: “Did the last job process more than 90 percent of events from CloudTrail in DynamoDB?” or“What percentage are we missing from source to target?”

Anti-patterns

DynamoDB as long-term storage wasn’t the most appropriate data store for large analytical workloads, low I/O, and highly complex many-to-many joins.

Reading out

Deliveries were fast, but work (and time and cost) was needed after delivery. In other words, queries had to do extra work to transform raw data into the needed format at time of read, which had a significant, cumulative effect on performance and cost. Imagine users running a select * from table without any filters on years of data and paying for storage and compute of those queries.

Cost of ownership

Filtering by event contents (sessionData from CloudWatch) required knowledge of session behavior, which was business logic. This meant changes to business logic required changes to event filtering. Imagine being asked to change CloudWatch filters or EventBridge rules based on a business process change, and trying to remember where to make the change, or troubleshoot why expected events weren’t being passed. This meant a higher cost of ownership and slower cycle times at best, and inability to meet SLA and scale at worst.

Accidental coupling

Creates accidental coupling between downstream consumers and low-level events. Consumers who directly integrate against events might get different schemas at different times for the same events, or events they don’t need. There’s no way to manage data at a higher level than event, at the level of sets (like all events for one sessionid), or at the object level (a table designed for dependencies). In other words, there was no metastore layer that separated the schema from the files, like in a data lake.

More sources (data to load in)

There were other, less important use cases that we wanted to expand to later: inventory management and security.

For inventory management, such as identifying EC2 instances running a Systems Manager agent that’s missing a patch, finding IAM users with inline policies, or finding Redshift clusters with nodes that aren’t RA3. This data would come from AWS Config unless it isn’t a supported resource type. We cut inventory management from scope because AWS Config data could be added to an AWS Glue catalog later, and queried from Athena using an approach like the one described in How to query your AWS resource configuration states using AWS Config and Amazon Athena.

For security, Splunk and OpenSearch were already in use for serviceability and operational analysis, sourcing files from Amazon S3. Log Lake is a complementary approach sourcing from the same data, which adds metadata and simplified data structures at the cost of latency. For more information about having different tools analyze the same data, see Solving big data problems on AWS.

More use cases (reasons to read out)

We knew from the first meeting that this was a bigger opportunity than just building a dataset for sessions from Systems Manager for manual manager review. Once we had procured logs from CloudTrail and CloudWatch, set up Glue jobs to process logs into convenient tables, and were able to join across these tables, we could change filters and configuration settings to answer questions about additional services and use cases, too. Similar to how we process data for Session Manager, we could expand the filters on Log Lake’s Glue jobs, and add data for Amazon Bedrock model invocation logging. For other use cases, we could use Log Lake as a source for automation (rules-based or ML), deep forensic investigations, or string-match searches (such as IP addresses or user names).

Additional technical considerations

*How did we define session? We would always know if a session started from StartSession event in CloudTrail API activity. Regarding when a session ended, we did not use TerminateSession because this was not always present and we considered this domain-specific logic. Log Lake enabled downstream customers to decide how to interpret the data. For example, our most important workflow had a Systems Manager timeout of 15 minutes, and our SLA was 90 minutes. This meant managers knew a session with a start time more than 2 hours prior to the current time was already ended.

*CloudWatch data required additional processing compared to CloudTrail, because CloudWatch logs from Firehose were saved in gzip format without gz suffix and had multiple JSON documents in the same line that needed to be processed to be on separate lines. Firehose can transform and convert records, such as invoking a Lambda function to transform, convert JSON to ORC, and decompress data, but our business partners didn’t want to change existing settings.

How to get the data (a deep dive)

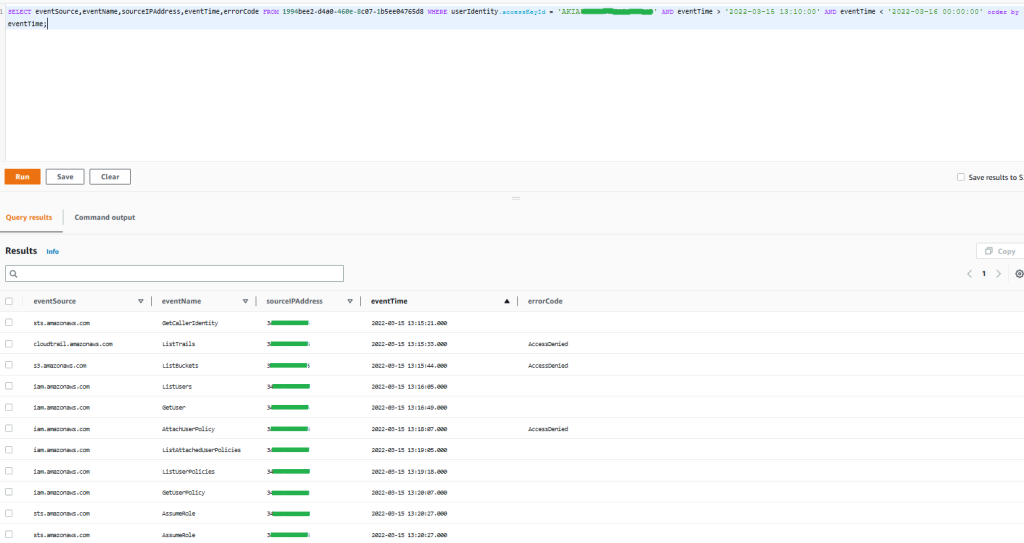
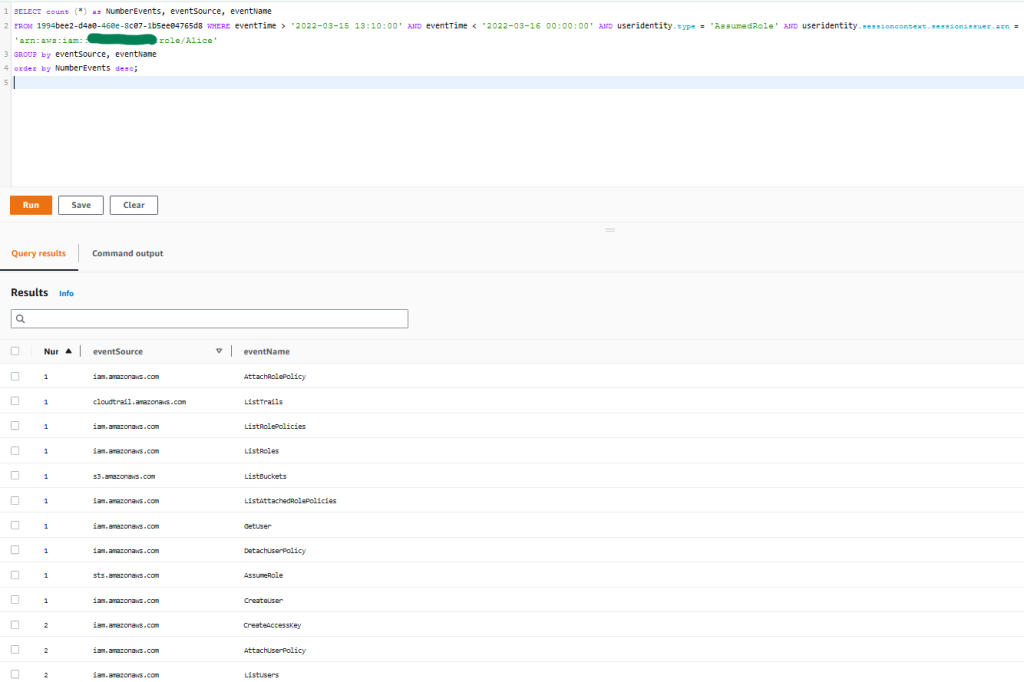
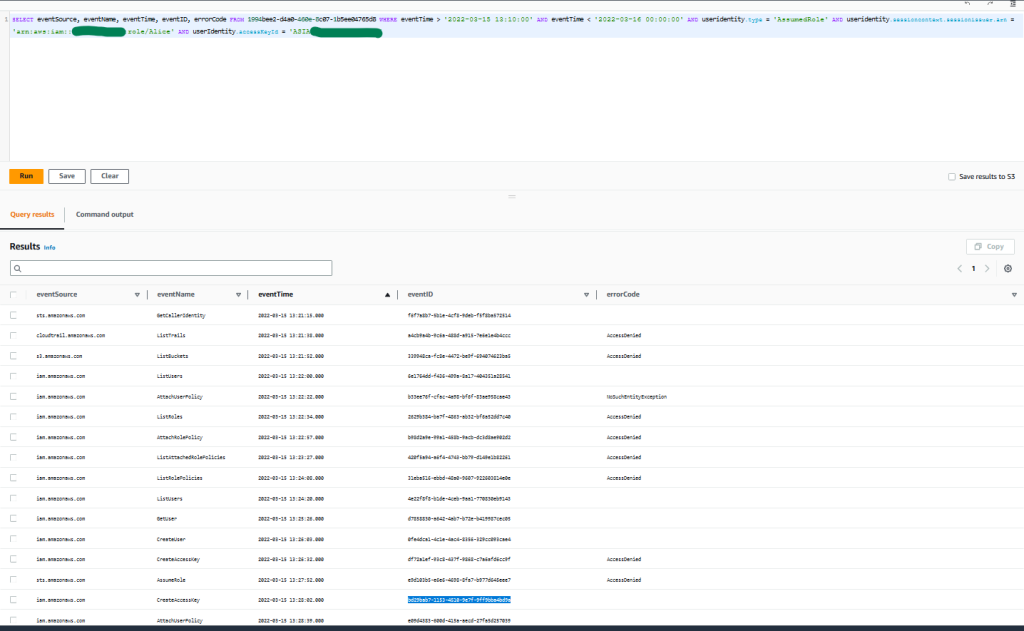
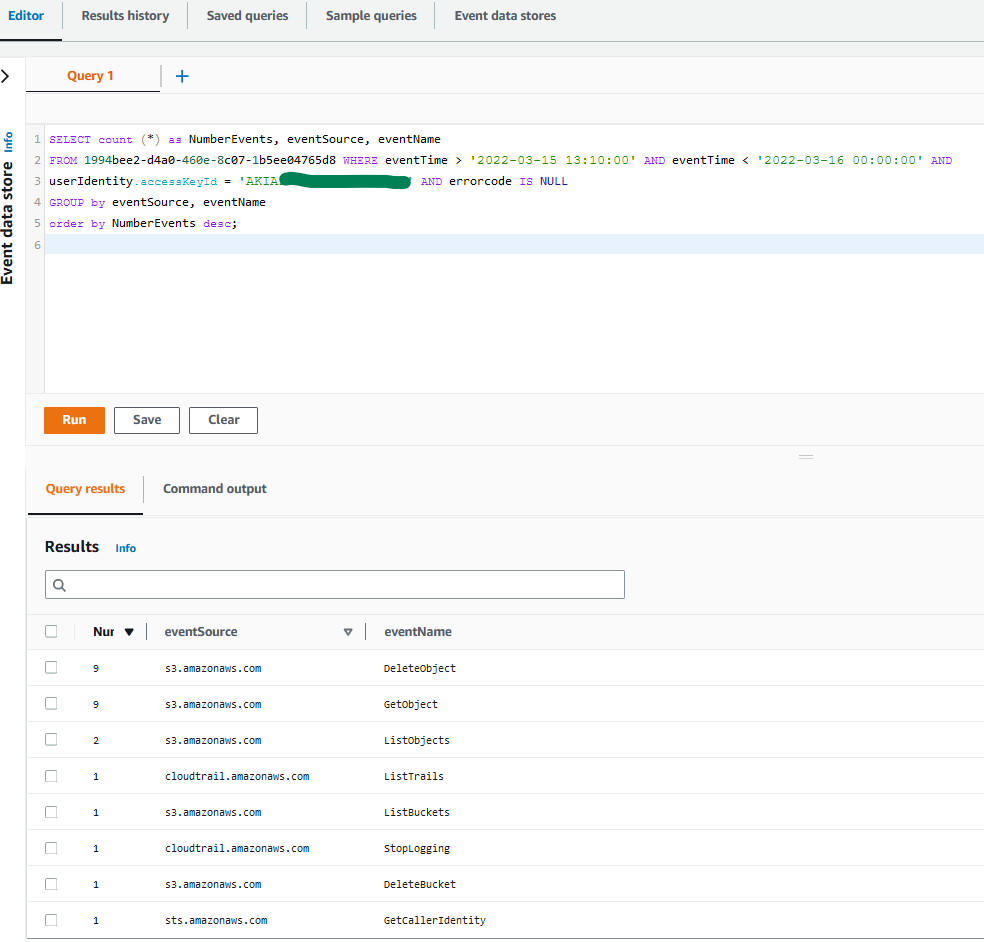
To support the dataset needed for a manager to review, we needed to identify API-specific metadata (time, event source, and event name), and then join it to session data. CloudTrail was necessary because it was the most authoritative source for AWS API activity, specifically StartSession and AssumeRole and AssumeRoleWithSAML events, and contained context that didn’t exist in CloudWatch Logs (such as the error code AccessDenied) which could be useful for compliance and investigation. CloudWatch was necessary because it contained the keystrokes in a session, in the CloudWatch log’s sessionData element. We needed to obtain the AWS source of record from CloudTrail, but we recommend you check with your authorities to confirm you really need to join to CloudTrail. We mention this in case you hear this question “why not derive some sort of earliest eventTime from CloudWatch logs, and skip joining to CloudTrail entirely? That would cut size and complexity by half.”

To join CloudTrail (eventTime, eventname, errorCode, errorMessage, and so on) with CloudWatch (sessionData), we had to do the following:

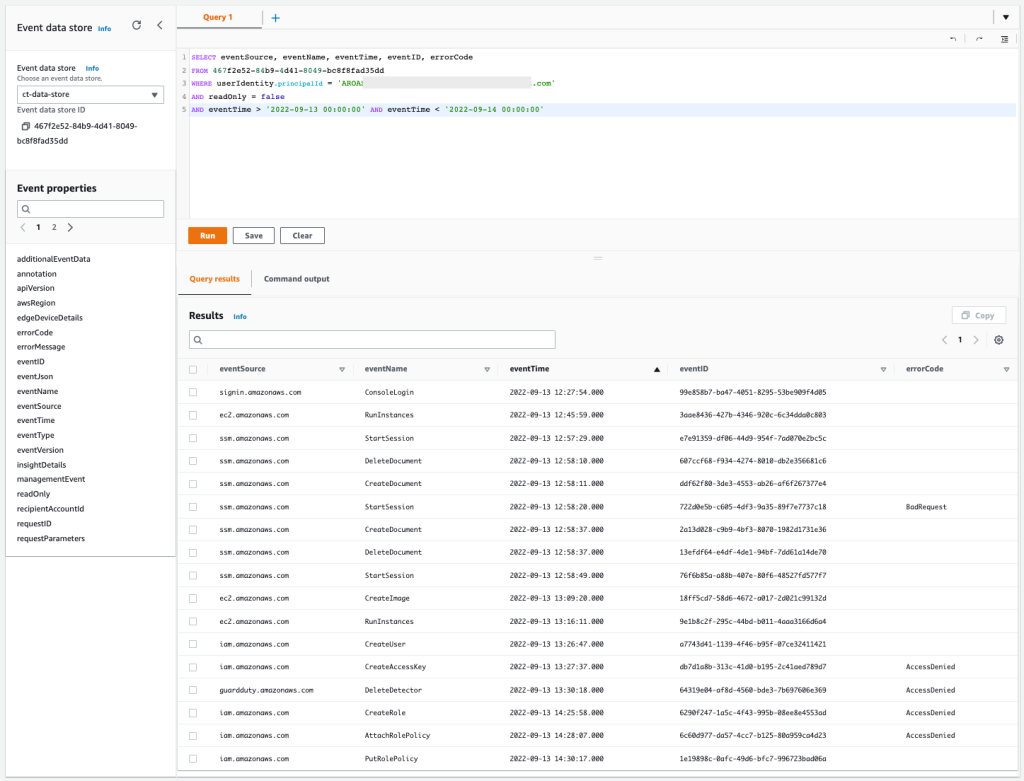
  1. Get the higher level API data from CloudTrail (time, event source, and event name), as the authoritative source for auditing Session Manager. To get this, we needed to look inside all CloudTrail logs and get only the rows with 
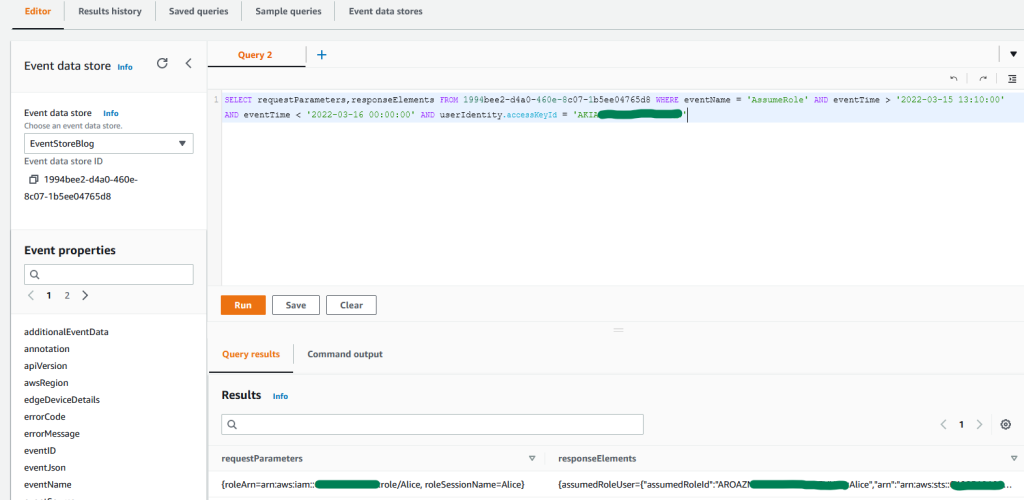
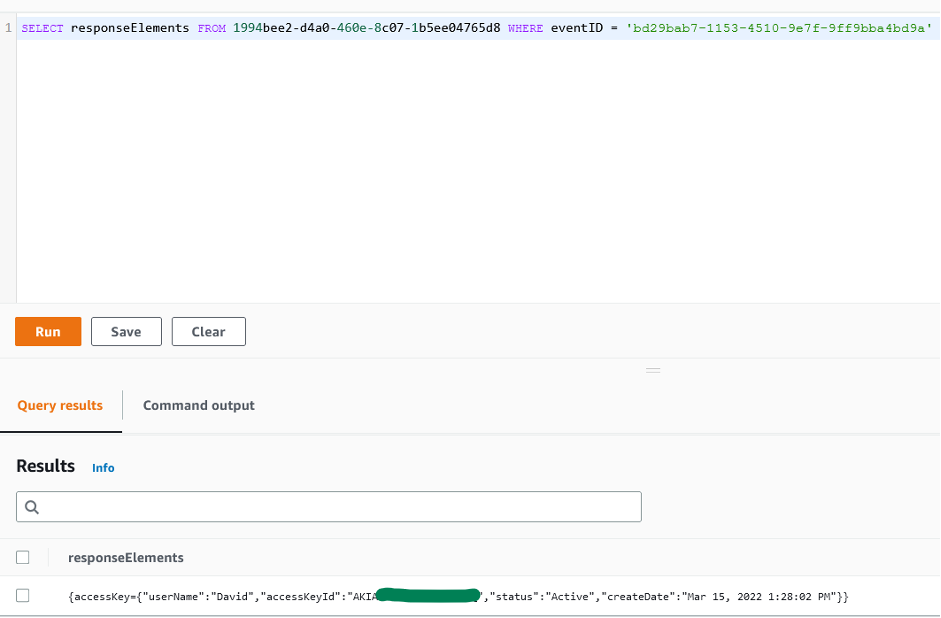
eventname=‘StartSession’ and eventsource=‘ssm.amazonaws.com’ (events from Systems Manager)—our business partners described this as looking for a needle in a haystack, because this could be only one session event across millions or billions of files. After we obtained this metadata, we needed to extract the sessionid to know what session to join it to, and we chose to extract sessionid from responseelements. Alternatively, we could use useridentity.sessioncontext.sourceidentity if a principal provided it while assuming a role (requires sts:SetSourceIdentity in the role trust policy).

Sample of a single record’s responseelements.sessionid value: "sessionid":"theuser-thefederation-0b7c1cc185ccf51a9"

The actual sessionid was the final element of the logstream: 0b7c1cc185ccf51a9.

  1. Next we needed to get all logs for a single session from CloudWatch. Similarly to CloudTrail, we needed to look inside all CloudWatch logs landing in Amazon S3 from Firehose to identify only the needles that contained "logGroup":"/aws/ssm/sessionlogs". Then, we could get sessionid from logstream or sessionId, and get session activity from the message.sessionData.

Sample of a single record’s logStream element: "sessionId": "theuser-thefederation-0b7c1cc185ccf51a9"

Note: Looking inside the log isn’t always necessary. We did it because we had to work with existing logs Firehose put to Amazon S3, which didn’t have the logstream (and sessionid) in the file name. For example, a file from Firehose might have a name like

cloudwatch-logs-otherlogs-3-2024-03-03-22-22-55-55239a3d-622e-40c0-9615-ad4f5d4381fa

If we were able to use the ability of Session Manager to send to S3 directly, the file name in S3 is the loggroup (theuser-thefederation-0b7c1cc185ccf51a9.dms)and could be used to derive sessionid without looking inside the file.

  1. Downstream of Log Lake, consumers could join on sessionid which was derived in the previous step.

What’s different about Log Lake

If you remember one thing about Log Lake, remember this: Log Lake is a data lake for compliance-related use cases, uses CloudTrail and CloudWatch as data sources, has separate tables for writing (original raw) and reading (read-optimized or readready), and gives you control over all components so you can customize it for yourself.

Here are some of the signature qualities of Log Lake:

Legal, identity, or compliance use cases

This includes deep dive forensic investigation, meaning use cases that are large volume, historical, and analytical. Because Log Lake uses Amazon S3, it can meet regulatory requirements that require write-once-read-many (WORM) storage.

AWS Well-Architected Framework

Log Lake applies real-world, time-tested design principles from the AWS Well-Architected Framework. This includes, but is not limited to:

Operational Excellence also meant knowing service quotas, performing workload testing, and defining and documenting runbook processes. If we hadn’t tried to break something to see where the limit is, then we considered it untested and inappropriate for production use. To test, we would determine the highest single day volume we’d seen in the past year, and then run that same volume in an hour to see if (and how) it would break.

High-Performance, Portable Partition Adding (AddAPart)

Log Lake adds partitions to tables using Lambda functions with SQS, a pattern we call AddAPart. This uses Amazon Simple Query Service (SQS) to decouple triggers (files landing in Amazon S3) from actions (associating that file with metastore partition). Think of this as having four F’s:

This means no AWS Glue crawlers, no alter table or msck repair table to add partitions in Athena, and can be reused across sources and buckets. The management of partitions in Log Lake makes using partition-related features available in AWS Glue, including AWS Glue partition indexes and workload partitioning and bounded execution.

File name filtering uses the same central controls for lower cost of ownership, faster changes, troubleshooting from one location, and emergency levers—this means that if you want to avoid log recursion happening from a specific account, or want to exclude a Region because of regulatory compliance, you can do it in one place, managed by your change control process, before you pay for processing in downstream jobs.

If you want to tell a team, “onboard your data source to our log lake, here are the steps you can use to self-serve,” you can use AddAPart to do that. We describe this in Part 2.

Readready Tables

In Log Lake, data structures offer differentiated value to users, and original raw data isn’t directly exposed to downstream users by default. For each source, Log Lake has a corresponding read-optimized readready table.

Instead of this:

from_cloudtrail_raw

from_cloudwatch_raw

Log Lake exposes only these to users:

from_cloudtrail_readready

from_cloudwatch_readready

In Part 2, we describe these tables in detail. Here are our answers to frequently asked questions about readready tables:

Q: Doesn’t this have an up-front cost to process raw into readready? Why not pass the work (and cost) to downstream users?

A: Yes, and for us the cost of processing partitions of raw into readready happened once and was fixed, and was offset by the variable costs of querying, which was from many company-wide callers (systemic and human), with high frequency, and large volume.

Q: How much better are readready tables in terms of performance, cost, and convenience? How do you achieve these gains? How do you measure “convenience”?

A: In most tests, readready tables are 5–10 times faster to query and more than 2 times smaller in Amazon S3. Log Lake applies more than one technique: omitting columns, partition design, AWS Glue partition indexes, data types (readready tables don’t allow any nested complex data types within a column, such as struct<struct>), columnar storage (ORC), and compression (ZLIB). We measure convenience as the amount of operations required to join on a sessionid; using Log Lake’s readready tables this is 0 (zero).

Q: Do raw and readready use the same files or buckets?

A: No, files and buckets are not shared. This decouples writes from reads, improves both write and read performance, and adds resiliency.

This question is important when designing for large sizes and scaling, because a single job or downstream read alone can span millions of files in Amazon S3. S3 scaling doesn’t happen immediately, so queries against raw or original data involving many tiny JSON files can cause S3 503 errors when it exceeds 5,500 GET/HEAD per second. More than one bucket helps avoid resource saturation. There is another option that we didn’t have when we created Log Lake: S3 Express One Zone. For reliability, we still recommend not putting all your files in one bucket. Also, don’t forget to filter your data.

Customization and control

You can customize and control all components (columns or schema, data types, compression, job logic, job schedule, and so on) because Log Lake is built using AWS primitives—such as Amazon SQS and Amazon S3—for the most comprehensive combination of features with the most freedom to customize. If you want to change something, you can.

From mono to many

Rather than one large, monolithic lake that is tightly coupled to other systems, Log Lake is just one node in a larger network of distributed data products across different data domains—this concept is data mesh. Just like the AWS APIs it is built on, Log Lake abstracts away heavy lifting and enables users to move faster, more efficiently, and not wait for centralized teams to make changes. Log Lake does not try to cover all use cases—instead, Log Lake’s data can be accessed and consumed by domain-specific teams, empowering business experts to self-serve.

When you need more flexibility and freedom

As builders, sometimes you want to dissect a customer experience, find problems, and figure out ways to make it better. That means going a layer down to mix and match primitives together to get more comprehensive features and more customization, flexibility, and freedom.

We built Log Lake for our long-term needs, but it would have been easier in the short-term to save Session Manager logs to Amazon S3 and query them with Athena. If you have considered what already exists in AWS, and you’re sure you need more comprehensive abilities or customization, read on to Part 2: Build, which explains Log Lake’s architecture and how you can set it up.

If you have feedback and questions, let us know in the comments section.

References


About the authors

Colin Carson is a Data Engineer at AWS ProServe. He has designed and built data infrastructure for multiple teams at Amazon, including Internal Audit, Risk & Compliance, HR Hiring Science, and Security.

Sean O’Sullivan is a Cloud Infrastructure Architect at AWS ProServe. He has over 8 years industry experience working with customers to drive digital transformation projects, helping architect, automate, and engineer solutions in AWS.

Monitor data events in Amazon S3 Express One Zone with AWS CloudTrail

Post Syndicated from Elizabeth Fuentes original https://aws.amazon.com/blogs/aws/monitor-data-events-in-amazon-s3-express-one-zone-with-aws-cloudtrail/

In a News Blog post for re:Invent 2023, we introduced you to Amazon S3 Express One Zone, a high-performance, single-Availability Zone (AZ) storage class purpose-built to deliver consistent single-digit millisecond data access for your most frequently accessed data and latency-sensitive applications. It is well-suited for demanding applications and is designed to deliver up to 10x better performance than S3 Standard. S3 Express One Zone uses S3 directory buckets to store objects in a single AZ.

Starting today, S3 Express One Zone supports AWS CloudTrail data event logging, allowing you to monitor all object-level operations like PutObject, GetObject, and DeleteObject, in addition to bucket-level actions like CreateBucket and DeleteBucket that were already supported. This enables auditing for governance and compliance, and can help you take advantage of S3 Express One Zone’s 50% lower requests costs compared to the S3 Standard storage class.

Using this new capability, you can quickly determine which S3 Express One Zone objects were created, read, updated, or deleted, and identify the source of the API calls. If you detect unauthorized S3 Express One Zone object access, you can take immediate action to restrict access. Additionally, you can use the CloudTrail integration with Amazon EventBridge to create rule-based workflows that are triggered by data events.

Using CloudTrail data event logging for Amazon S3 Express One Zone
I start in the Amazon S3 console. Following the steps to create a directory bucket, I create an S3 bucket and choose Directory as the bucket type and apne1-az4 as the Availability Zone. In Base Name, I enter s3express-one-zone-cloudtrail and a suffix that includes Availability Zone ID of the Availability Zone is automatically added to create the final name. Finally, I select the checkbox to acknowledge that Data is stored in a single Availability Zone and choose Create bucket.

To enable data event logging for S3 Express One Zone, I go to the CloudTrail console. I enter the name and create the CloudTrail trail responsible for tracking the events of my S3 directory bucket.

In Step 2: Choose log events, I select Data events with Advanced event selectors are enabled selected.

For Data event type, I choose S3 Express. I can choose Log all events as the Log selector template to manage data events for all S3 directory buckets.

However, I want the event data store to log events only for my S3 directory bucket s3express-one-zone-cloudtrail--apne1-az4--x-s3. In this case, I choose Custom as the Log selector template and indicate the ARN of my directory bucket. Learn more in the documentation on filtering data events by using advanced event selectors.

Finish up with Step 3: review and create. Now, you have logging with CloudTrail enabled.

CloudTrail data event logging for S3 Express One Zone in action:
Using the S3 console, I upload and download a file to my S3 directory bucket.

Using AWS CLI, I send Put_Object and Get_Object.

$ aws s3api put-object --bucket s3express-one-zone-cloudtrail--apne1-az4--x-s3 \
  --key cloudtrail_test  \ 
--body cloudtrail_test.txt
$ aws s3api get-object --bucket s3express-one-zone-cloudtrail--apne1-az4--x-s3 \ 
--key cloudtrail_test response.txt

CloudTrail publishes log files to S3 bucket in a gzip archive and organizes them hierarchically based on the bucket name, account ID, Region, and date. Using the AWS CLI, I list the bucket associated with my Trail and retrieve the log files for the date when I did the test.

$ aws s3 ls s3://aws-cloudtrail-logs-MY-ACCOUNT-ID-3b49f368/AWSLogs/MY-ACCOUNT-ID/CloudTrail/ap-northeast-1/2024/07/01/

I get the following four files name, two from the console tests and two from the CLI tests:

2024-07-05 20:44:16 317 MY-ACCOUNT-ID_CloudTrail_ap-northeast-1_20240705T2044Z_lzCPfDRSf9OdkdC1.json.gz
2024-07-05 20:47:36 387 MY-ACCOUNT-ID_CloudTrail_ap-northeast-1_20240705T2047Z_95RwiqAHCIrM9rcl.json.gz
2024-07-05 21:37:48 373 MY-ACCOUNT-ID_CloudTrail_ap-northeast-1_20240705T2137Z_Xk17zhf0cTY0N5bH.json.gz
2024-07-05 21:42:44 314 MY-ACCOUNT-ID_CloudTrail_ap-northeast-1_20240705T21415Z_dhyTsSb3ZeAhU6hR.json.gz

Let’s search for the PutObject event among these files. When I open the first file, I can see the PutObject event type. If you recall, I just made two uploads, once via the S3 console in a browser and once using the CLI. The userAgent attribute, the type of source that made the API call, refers to a browser, so this event refers to my upload using the S3 console. Learn more about CloudTrail events in the documentation on understanding CloudTrail events.

{...},
"eventTime": "2024-07-05T20:44:16Z",
"eventSource": "s3express.amazonaws.com",
"eventName": "PutObject",
"awsRegion": "ap-northeast-1",
"sourceIPAddress": "MY-IP",
"userAgent": "Mozilla/5.0 (Macintosh; Intel Mac OS X 10_15_7) AppleWebKit/537.36 (KHTML, like Gecko) Chrome/125.0.0.0 Safari/537.36",
"requestParameters": {
...
},
"responseElements": {...},
"additionalEventData": {...},
...
"resources": [
{
"type": "AWS::S3Express::Object",
"ARN": "arn:aws:s3express:ap-northeast-1:MY-ACCOUNT-ID:bucket/s3express-one-zone-cloudtrail--apne1-az4--x-s3/cloudtrail_example.png"
},
{
"accountId": "MY-ACCOUNT-ID",
"type": "AWS::S3Express::DirectoryBucket",
"ARN": "arn:aws:s3express:ap-northeast-1:MY-ACCOUNT-ID:bucket/s3express-one-zone-cloudtrail--apne1-az4--x-s3"
}
],
{...}

Now, when I review the third file for the event corresponding to the PutObject command sent using AWS CLI, I see that there is a small difference in the userAgent attribute. In this case, it refers to the AWS CLI.

{...},
"eventTime": "2024-07-05T21:37:19Z",
"eventSource": "s3express.amazonaws.com",
"eventName": "PutObject",
"awsRegion": "ap-northeast-1",
"sourceIPAddress": "MY-IP",
"userAgent": "aws-cli/2.17.9 md/awscrt#0.20.11 ua/2.0 os/linux#5.10.218-208.862.amzn2.x86_64 md/arch#x86_64 lang/python#3.11.8 md/pyimpl#CPython cfg/retry-mode#standard md/installer#exe md/distrib#amzn.2 md/prompt#off md/command#s3api.put-object",
"requestParameters": {
...
},
"responseElements": {...},
"additionalEventData": {...},
...
"resources": [
{
"type": "AWS::S3Express::Object",
"ARN": "arn:aws:s3express:ap-northeast-1:MY-ACCOUNT-ID:bucket/s3express-one-zone-cloudtrail--apne1-az4--x-s3/cloudtrail_example.png"
},
{
"accountId": "MY-ACCOUNT-ID",
"type": "AWS::S3Express::DirectoryBucket",
"ARN": "arn:aws:s3express:ap-northeast-1:MY-ACCOUNT-ID:bucket/s3express-one-zone-cloudtrail--apne1-az4--x-s3"
}
],
{...}

Now, let’s look at the GetObject event in the second file. I can see that the event type is GetObject and that the userAgent refers to a browser, so this event refers to my download using the S3 console.

{...},
"eventTime": "2024-07-05T20:47:41Z",
"eventSource": "s3express.amazonaws.com",
"eventName": "GetObject",
"awsRegion": "ap-northeast-1",
"sourceIPAddress": "MY-IP",
"userAgent": "Mozilla/5.0 (Macintosh; Intel Mac OS X 10_15_7) AppleWebKit/537.36 (KHTML, like Gecko) Chrome/125.0.0.0 Safari/537.36",
"requestParameters": {
...
},
"responseElements": {...},
"additionalEventData": {...},
...
"resources": [
{
"type": "AWS::S3Express::Object",
"ARN": "arn:aws:s3express:ap-northeast-1:MY-ACCOUNT-ID:bucket/s3express-one-zone-cloudtrail--apne1-az4--x-s3/cloudtrail_example.png"
},
{
"accountId": "MY-ACCOUNT-ID",
"type": "AWS::S3Express::DirectoryBucket",
"ARN": "arn:aws:s3express:ap-northeast-1:MY-ACCOUNT-ID:bucket/s3express-one-zone-cloudtrail--apne1-az4--x-s3"
}
],
{...}

And finally, let me show the event in the fourth file, with details of the GetObject command that I sent from the AWS CLI. I can see that the eventName and userAgent are as expected.

{...},
"eventTime": "2024-07-05T21:42:04Z",
"eventSource": "s3express.amazonaws.com",
"eventName": "GetObject",
"awsRegion": "ap-northeast-1",
"sourceIPAddress": "MY-IP",
"userAgent": "aws-cli/2.17.9 md/awscrt#0.20.11 ua/2.0 os/linux#5.10.218-208.862.amzn2.x86_64 md/arch#x86_64 lang/python#3.11.8 md/pyimpl#CPython cfg/retry-mode#standard md/installer#exe md/distrib#amzn.2 md/prompt#off md/command#s3api.put-object",
"requestParameters": {
...
},
"responseElements": {...},
"additionalEventData": {...},
...
"resources": [
{
"type": "AWS::S3Express::Object",
"ARN": "arn:aws:s3express:ap-northeast-1:MY-ACCOUNT-ID:bucket/s3express-one-zone-cloudtrail--apne1-az4--x-s3/cloudtrail_example.png"
},
{
"accountId": "MY-ACCOUNT-ID",
"type": "AWS::S3Express::DirectoryBucket",
"ARN": "arn:aws:s3express:ap-northeast-1:MY-ACCOUNT-ID:bucket/s3express-one-zone-cloudtrail--apne1-az4--x-s3"
}
],
{...}

Things to know

Getting started – You can enable CloudTrail data event logging for S3 Express One Zone using the CloudTrail console, CLI, or SDKs.

Regions – CloudTrail data event logging is available in all AWS Regions where S3 Express One Zone is currently available.

Activity logging – With CloudTrail data event logging for S3 Express One Zone, you can object-level activity, such as PutObjectGetObject , and DeleteObject, as well as bucket-level activity, such as CreateBucket and DeleteBucket.

Pricing – As with S3 storage classes, you pay for logging S3 Express One Zone data events in CloudTrail based on the number of events logged and the period during which you retain the logs. For more information, see the AWS CloudTrail Pricing page.

You can enable CloudTrail data event logging for S3 Express One Zone to simplify governance and compliance for your high-performance storage. To learn more about this new capability, visit the S3 User Guide.

Eli.

Simplify AWS CloudTrail log analysis with natural language query generation in CloudTrail Lake (preview)

Post Syndicated from Esra Kayabali original https://aws.amazon.com/blogs/aws/simplify-aws-cloudtrail-log-analysis-with-natural-language-query-generation-in-cloudtrail-lake-preview/

Today, I am happy to announce in preview the generative artificial intelligence (generative AI)–powered natural language query generation in AWS CloudTrail Lake, which is a managed data lake for capturing, storing, accessing, and analyzing AWS CloudTrail activity logs to meet compliance, security, and operational needs. You can ask a question using natural language about these activity logs (management and data events) stored in CloudTrail Lake without having the technical expertise to write a SQL query or spend time to decode the exact structure of activity events. For example, you might ask, “Tell me how many database instances are deleted without a snapshot”, and the feature will convert that question to a CloudTrail Lake query, which you can run as-is or modify to get the requested event information. Natural language query generation makes the process of exploration of AWS activity logs simpler.

Now, let me show you how to start using natural language query generation.

Getting started with natural language query generation
The natural language query generator uses generative AI to produce a ready-to-use SQL query from your prompt, which you can then choose to run in the query editor of CloudTrail Lake.

In the AWS CloudTrail console, I choose Query under Lake. The query generator can only generate queries for event data stores that collect CloudTrail management and data events. I choose an event data store for my CloudTrail Lake query from the dropdown list in Event data store. In the Query generator, I enter the following prompt in the Prompt field using natural language:

How many errors were logged during the past month?

Then, I choose Generate query. The following SQL query is automatically generated:

SELECT COUNT(*) AS error_count
FROM 8a6***
WHERE eventtime >= '2024-04-21 00:00:00'
    AND eventtime <= '2024-05-21 23:59:59'
    AND (
        errorcode IS NOT NULL
        OR errormessage IS NOT NULL
    )

I choose Run to see the results.

This is interesting, but I want to know more details. I want to see which services had the most errors and why these actions were erroring out. So I enter the following prompt to request additional details:

How many errors were logged during the past month for each service and what was the cause of each error?

I choose Generate query, and the following SQL query is generated:

SELECT eventsource,
    errorcode,
    errormessage,
    COUNT(*) AS errorCount
FROM 8a6***
WHERE eventtime >= '2024-04-21 00:00:00'
    AND eventtime <= '2024-05-21 23:59:59'
    AND (
        errorcode IS NOT NULL
        OR errormessage IS NOT NULL
    )
GROUP BY 1,
    2,
    3
ORDER BY 4 DESC;

I choose Run to see the results.

In the results, I see that my account experiences most number of errors related to Amazon S3, and top errors are related to CORS and object level configuration. I can continue to dig deeper to see more details by asking further questions. But now let me give natural language query generator another instruction. I enter the following prompt in the Prompt field:

What are the top 10 AWS services that I used in the past month? Include event name as well.

I choose Generate query, and the following SQL query is generated. This SQL statement retrieves the field names (eventSource,
eventName, COUNT(*) AS event_count), restricts the rows with the date interval of the past month in the WHERE clause, groups the rows by eventSource and eventName, sorts them by the usage count, and limit the result to 10 rows as I requested in a natural language.

SELECT eventSource,
    eventName,
    COUNT(*) AS event_count
FROM 8a6***
WHERE eventTime >= timestamp '2024-04-21 00:00:00'
    AND eventTime <= timestamp '2024-05-21 23:59:59'
GROUP BY 1,
    2
ORDER BY 3 DESC
LIMIT 10;

Again, I choose Run to see the results.

I now have a better understanding of how many errors were logged during the past month, what service the error was for, and what caused the error. You can try asking questions in plain language and run the generated queries over your logs to see how this feature works with your data.

Join the preview
Natural language query generation is available in preview in the US East (N. Virginia) Region as part of CloudTrail Lake.

You can use natural language query generation in preview for no additional cost. CloudTrail Lake query charges apply when running the query to generate results. For more information, visit AWS CloudTrail Pricing.

To learn more and get started using natural language query generation, visit AWS CloudTrail Lake User Guide.

— Esra

Analyze Elastic IP usage history using Amazon Athena and AWS CloudTrail

Post Syndicated from Aidin Khosrowshahi original https://aws.amazon.com/blogs/big-data/analyze-elastic-ip-usage-history-using-amazon-athena-and-aws-cloudtrail/

An AWS Elastic IP (EIP) address is a static, public, and unique IPv4 address. Allocated exclusively to your AWS account, the EIP remains under your control until you decide to release it. It can be allocated to your Amazon Elastic Compute Cloud (Amazon EC2) instance or other AWS resources such as load balancers.

EIP addresses are designed for dynamic cloud computing because they can be re-mapped to another instance to mask any disruptions. These EIPs are also used for applications that must make external requests to services that require a consistent address for allow listed inbound connections. As your application usage varies, these EIPs might see sporadic use over weeks or even months, leading to potential accumulation of unused EIPs that may inadvertently inflate your AWS expenditure.

In this post, we show you how to analyze EIP usage history using AWS CloudTrail and Amazon Athena to have a better insight of your EIP usage pattern in your AWS account. You can use this solution regularly as part of your cost-optimization efforts to safely remove unused EIPs to reduce your costs.

Solution overview

This solution uses activity logs from CloudTrail and the power of Athena to conduct a comprehensive analysis of historical EIP attachment activity within your AWS account. CloudTrail, a critical AWS service, meticulously logs API activity within an AWS account.

Athena is an interactive query service that simplifies data analysis in Amazon Simple Storage Service (Amazon S3) using standard SQL. It is a serverless service, eliminating the need for infrastructure management and costing you only for the queries you run.

By extracting detailed information from CloudTrail and querying it using Athena, this solution streamlines the process of data collection, analysis, and reporting of EIP usage within an AWS account.

To gather EIP usage reporting, this solution compares snapshots of the current EIPs, focusing on their most recent attachment within a customizable 3-month period. It then determines the frequency of EIP attachments to resources. An attachment count greater than zero suggests that the EIPs are actively in use. In contrast, an attachment count of zero indicates that these EIPs are idle and can be released, aiding in identifying potential areas for cost reduction.

In the following sections, we show you how to deploy the solution using AWS CloudFormation and then run an analysis.

Prerequisites

Complete the following prerequisite steps:

  1. If your account doesn’t have CloudTrail enabled, create a trail, then capture the S3 bucket name to use later in the implementation steps.
  2. Download the CloudFormation template from the repository. You need this template.yaml file for the implementation steps.

Deploy the solution

In this section, you use AWS CloudFormation to create the required resources. AWS CloudFormation is a service that helps you model and set up your AWS resources so that you can spend less time managing those resources and more time focusing on your applications that run in AWS.

The CloudFormation template creates Athena views and a table to search past AssociateAddress events in CloudTrail, an AWS Lambda function to collect snapshots of existing EIPs, and an S3 bucket to store the analysis results.

Complete the following steps:

  1. On the AWS CloudFormation console, choose on Create stack and choose With new resources (standard).
  2. In the Specify Template section, choose an existing template and upload the template.yaml file downloaded from the prerequisites.
  3. In the Specify stack details section, enter your preferred stack name and the existing CloudTrail S3 location, and maintain the default settings for the other parameters.
  4. At the bottom of the Review and create page, select the acknowledgement check box, then choose Submit.

Wait for the stack to be created. It should take a few minutes to complete. You can open the AWS CloudFormation console to view the stack creation process.

Run an analysis

You have configured the solution to run your EIP attachments analysis. Complete the following steps to analyze your EIP attachment history. If you’re using Athena for the first time in your account, you need to set up a query result location in Amazon S3.

  1. On the Athena console, navigate to the query editor.
  2. For Database, choose default.
  3. Enter the following query and choose Run query:
select 
eip.publicip,
eip.allocationid,
eip.region,
eip.accountid,
eip.associationid, 
eip.PublicIpv4Pool,
max(associate_ip_event.eventtime) as latest_attachment,
count(associate_ip_event.associationid) as attachmentCount
from eip LEFT JOIN associate_ip_event on associate_ip_event.allocationid = eip.allocationid 
group by 1,2,3,4,5,6

All the required tables are created under the default database.

You can now run a query on the CloudTrail logs to look back in time for the EIP attachment. This query provides you with better insight to safely release idle EIPs in order to reduce costs by displaying how frequently each specific EIP was previously attached to any resources.

This report will provide the following information:

  • Public IP
  • Allocation ID (the ID that AWS assigns to represent the allocation of the EIP address for use with instances in a VPC)
  • Region
  • Account ID
  • latest_attachment date (the last time EIP was attached to a resource)
  • attachmentCount (number of attachments)
  • The association ID for the address (if this field is empty, the EIP is idle and not attached to any resources)

The following screenshot shows the query results.

Clean up

To optimize cost, clean up the resources you deployed for this post by completing the following steps:

  1. Delete the contents in your S3 buckets (eip-analyzer-eipsnapshot-* and eip-analyzer-athenaresulteipanalyzer-*).
  2. Delete the S3 buckets.
  3. On the AWS CloudFormation console, delete the stack you created.

Conclusion

This post demonstrated how you can analyze Elastic IP usage history to have a better insight of EIP attachment patterns using Athena and CloudTrail. Check out the GitHub repo to regularly run this analysis as part of your cost-optimization strategy to identify and release inactive EIPs to reduce costs.

You can also use Athena to analyze logs from other AWS services; for more information, see Querying AWS service logs.

Additionally, you can analyze activity logs with AWS CloudTrail Lake and Amazon Athena. AWS CloudTrail Lake is a managed data lake that enables organizations to aggregate, immutably store, and query events recorded by CloudTrail for auditing, security investigation, and operational troubleshooting. AWS CloudTrail Lake supports the collection of events from multiple AWS regions and AWS accounts. For CloudTrail Lake, you pay for data ingestion, retention, and analysis. Refer to AWS CloudTrail Lake pricing page for pricing details.


About the Author

Aidin Khosrowshahi is a Senior Technical Account Manager with Amazon Web Services based out of San Francisco. He focuses on reliability, optimization, and improving operational mechanisms with his customers.

Prime Day 2023 Powered by AWS – All the Numbers

Post Syndicated from Jeff Barr original https://aws.amazon.com/blogs/aws/prime-day-2023-powered-by-aws-all-the-numbers/

As part of my annual tradition to tell you about how AWS makes Prime Day possible, I am happy to be able to share some chart-topping metrics (check out my 2016, 2017, 2019, 2020, 2021, and 2022 posts for a look back).

This year I bought all kinds of stuff for my hobbies including a small drill press, filament for my 3D printer, and irrigation tools. I also bought some very nice Alphablock books for my grandkids. According to our official release, the first day of Prime Day was the single largest sales day ever on Amazon and for independent sellers, with more than 375 million items purchased.

Prime Day by the Numbers
As always, Prime Day was powered by AWS. Here are some of the most interesting and/or mind-blowing metrics:

Amazon Elastic Block Store (Amazon EBS) – The Amazon Prime Day event resulted in an incremental 163 petabytes of EBS storage capacity allocated – generating a peak of 15.35 trillion requests and 764 petabytes of data transfer per day. Compared to the previous year, Amazon increased the peak usage on EBS by only 7% Year-over-Year yet delivered +35% more traffic per day due to efficiency efforts including workload optimization using Amazon Elastic Compute Cloud (Amazon EC2) AWS Graviton-based instances. Here’s a visual comparison:

AWS CloudTrail – AWS CloudTrail processed over 830 billion events in support of Prime Day 2023.

Amazon DynamoDB – DynamoDB powers multiple high-traffic Amazon properties and systems including Alexa, the Amazon.com sites, and all Amazon fulfillment centers. Over the course of Prime Day, these sources made trillions of calls to the DynamoDB API. DynamoDB maintained high availability while delivering single-digit millisecond responses and peaking at 126 million requests per second.

Amazon Aurora – On Prime Day, 5,835 database instances running the PostgreSQL-compatible and MySQL-compatible editions of Amazon Aurora processed 318 billion transactions, stored 2,140 terabytes of data, and transferred 836 terabytes of data.

Amazon Simple Email Service (SES) – Amazon SES sent 56% more emails for Amazon.com during Prime Day 2023 vs. 2022, delivering 99.8% of those emails to customers.

Amazon CloudFront – Amazon CloudFront handled a peak load of over 500 million HTTP requests per minute, for a total of over 1 trillion HTTP requests during Prime Day.

Amazon SQS – During Prime Day, Amazon SQS set a new traffic record by processing 86 million messages per second at peak. This is 22% increase from Prime Day of 2022, where SQS supported 70.5M messages/sec.

Amazon Elastic Compute Cloud (EC2) – During Prime Day 2023, Amazon used tens of millions of normalized AWS Graviton-based Amazon EC2 instances, 2.7x more than in 2022, to power over 2,600 services. By using more Graviton-based instances, Amazon was able to get the compute capacity needed while using up to 60% less energy.

Amazon Pinpoint – Amazon Pinpoint sent tens of millions of SMS messages to customers during Prime Day 2023 with a delivery success rate of 98.3%.

Prepare to Scale
Every year I reiterate the same message: rigorous preparation is key to the success of Prime Day and our other large-scale events. If you are preparing for a similar chart-topping event of your own, I strongly recommend that you take advantage of AWS Infrastructure Event Management (IEM). As part of an IEM engagement, my colleagues will provide you with architectural and operational guidance that will help you to execute your event with confidence!

Jeff;

How to Receive Alerts When Your IAM Configuration Changes

Post Syndicated from Dylan Souvage original https://aws.amazon.com/blogs/security/how-to-receive-alerts-when-your-iam-configuration-changes/

July 27, 2023: This post was originally published February 5, 2015, and received a major update July 31, 2023.


As an Amazon Web Services (AWS) administrator, it’s crucial for you to implement robust protective controls to maintain your security configuration. Employing a detective control mechanism to monitor changes to the configuration serves as an additional safeguard in case the primary protective controls fail. Although some changes are expected, you might want to review unexpected changes or changes made by a privileged user. AWS Identity and Access Management (IAM) is a service that primarily helps manage access to AWS services and resources securely. It does provide detailed logs of its activity, but it doesn’t inherently provide real-time alerts or notifications. Fortunately, you can use a combination of AWS CloudTrail, Amazon EventBridge, and Amazon Simple Notification Service (Amazon SNS) to alert you when changes are made to your IAM configuration. In this blog post, we walk you through how to set up EventBridge to initiate SNS notifications for IAM configuration changes. You can also have SNS push messages directly to ticketing or tracking services, such as Jira, Service Now, or your preferred method of receiving notifications, but that is not discussed here.

In any AWS environment, many activities can take place at every moment. CloudTrail records IAM activities, EventBridge filters and routes event data, and Amazon SNS provides notification functionality. This post will guide you through identifying and setting alerts for IAM changes, modifications in authentication and authorization configurations, and more. The power is in your hands to make sure you’re notified of the events you deem most critical to your environment. Here’s a quick overview of how you can invoke a response, shown in Figure 1.

Figure 1: Simple architecture diagram of actors and resources in your account and the process for sending notifications through IAM, CloudTrail, EventBridge, and SNS.

Figure 1: Simple architecture diagram of actors and resources in your account and the process for sending notifications through IAM, CloudTrail, EventBridge, and SNS.

Log IAM changes with CloudTrail

Before we dive into implementation, let’s briefly understand the function of AWS CloudTrail. It records and logs activity within your AWS environment, tracking actions such as IAM role creation, deletion, or modification, thereby offering an audit trail of changes.

With this in mind, we’ll discuss the first step in tracking IAM changes: establishing a log for each modification. In this section, we’ll guide you through using CloudTrail to create these pivotal logs.

For an in-depth understanding of CloudTrail, refer to the AWS CloudTrail User Guide.

In this post, you’re going to start by creating a CloudTrail trail with the Management events type selected, and read and write API activity selected. If you already have a CloudTrail trail set up with those attributes, you can use that CloudTrail trail instead.

To create a CloudTrail log

  1. Open the AWS Management Console and select CloudTrail, and then choose Dashboard.
  2. In the CloudTrail dashboard, choose Create Trail.
    Figure 2: Use the CloudTrail dashboard to create a trail

    Figure 2: Use the CloudTrail dashboard to create a trail

  3. In the Trail name field, enter a display name for your trail and then select Create a new S3 bucket. Leave the default settings for the remaining trail attributes.
    Figure 3: Set the trail name and storage location

    Figure 3: Set the trail name and storage location

  4. Under Event type, select Management events. Under API activity, select Read and Write.
  5. Choose Next.
    Figure 4: Choose which events to log

    Figure 4: Choose which events to log

Set up notifications with Amazon SNS

Amazon SNS is a managed service that provides message delivery from publishers to subscribers. It works by allowing publishers to communicate asynchronously with subscribers by sending messages to a topic, a logical access point, and a communication channel. Subscribers can receive these messages using supported endpoint types, including email, which you will use in the blog example today.

For further reading on Amazon SNS, refer to the Amazon SNS Developer Guide.

Now that you’ve set up CloudTrail to log IAM changes, the next step is to establish a mechanism to notify you about these changes in real time.

To set up notifications

  1. Open the Amazon SNS console and choose Topics.
  2. Create a new topic. Under Type, select Standard and enter a name for your topic. Keep the defaults for the rest of the options, and then choose Create topic.
    Figure 5: Select Standard as the topic type

    Figure 5: Select Standard as the topic type

  3. Navigate to your topic in the topic dashboard, choose the Subscriptions tab, and then choose Create subscription.
    Figure 6: Choose Create subscription

    Figure 6: Choose Create subscription

  4. For Topic ARN, select the topic you created previously, then under Protocol, select Email and enter the email address you want the alerts to be sent to.
    Figure 7: Select the topic ARN and add an endpoint to send notifications to

    Figure 7: Select the topic ARN and add an endpoint to send notifications to

  5. After your subscription is created, go to the mailbox you designated to receive notifications and check for a verification email from the service. Open the email and select Confirm subscription to verify the email address and complete setup.

Initiate events with EventBridge

Amazon EventBridge is a serverless service that uses events to connect application components. EventBridge receives an event (an indicator of a change in environment) and applies a rule to route the event to a target. Rules match events to targets based on either the structure of the event, called an event pattern, or on a schedule.

Events that come to EventBridge are associated with an event bus. Rules are tied to a single event bus, so they can only be applied to events on that event bus. Your account has a default event bus that receives events from AWS services, and you can create custom event buses to send or receive events from a different account or AWS Region.

For a more comprehensive understanding of EventBridge, refer to the Amazon EventBridge User Guide.

In this part of our post, you’ll use EventBridge to devise a rule for initiating SNS notifications based on IAM configuration changes.

To create an EventBridge rule

  1. Go to the EventBridge console and select EventBridge Rule, and then choose Create rule.
    Figure 8: Use the EventBridge console to create a rule

    Figure 8: Use the EventBridge console to create a rule

  2. Enter a name for your rule, keep the defaults for the rest of rule details, and then choose Next.
    Figure 9: Rule detail screen

    Figure 9: Rule detail screen

  3. Under Target 1, select AWS service.
  4. In the dropdown list for Select a target, select SNS topic, select the topic you created previously, and then choose Next.
    Figure 10: Target with target type of AWS service and target topic of SNS topic selected

    Figure 10: Target with target type of AWS service and target topic of SNS topic selected

  5. Under Event source, select AWS events or EventBridge partner events.
    Figure 11: Event pattern with AWS events or EventBridge partner events selected

    Figure 11: Event pattern with AWS events or EventBridge partner events selected

  6. Under Event pattern, verify that you have the following selected.
    1. For Event source, select AWS services.
    2. For AWS service, select IAM.
    3. For Event type, select AWS API Call via CloudTrail.
    4. Select the radio button for Any operation.
    Figure 12: Event pattern details selected

    Figure 12: Event pattern details selected

Now that you’ve set up EventBridge to monitor IAM changes, test it by creating a new user or adding a new policy to an IAM role and see if you receive an email notification.

Centralize EventBridge alerts by using cross-account alerts

If you have multiple accounts, you should be evaluating using AWS Organizations. (For a deep dive into best practices for using AWS Organizations, we recommend reading this AWS blog post.)

By standardizing the implementation to channel alerts from across accounts to a primary AWS notification account, you can use a multi-account EventBridge architecture. This allows aggregation of notifications across your accounts through sender and receiver accounts. Figure 13 shows how this works. Separate member accounts within an AWS organizational unit (OU) have the same mechanism for monitoring changes and sending notifications as discussed earlier, but send notifications through an EventBridge instance in another account.

Figure 13: Multi-account EventBridge architecture aggregating notifications between two AWS member accounts to a primary management account

Figure 13: Multi-account EventBridge architecture aggregating notifications between two AWS member accounts to a primary management account

You can read more and see the implementation and deep dive of the multi-account EventBridge solution on the AWS samples GitHub, and you can also read more about sending and receiving Amazon EventBridge notifications between accounts.

Monitor calls to IAM

In this blog post example, you monitor calls to IAM.

The filter pattern you selected while setting up EventBridge matches CloudTrail events for calls to the IAM service. Calls to IAM have a CloudTrail eventSource of iam.amazonaws.com, so IAM API calls will match this pattern. You will find this simple default filter pattern useful if you have minimal IAM activity in your account or to test this example. However, as your account activity grows, you’ll likely receive more notifications than you need. This is when filtering only the relevant events becomes essential to prioritize your responses. Effectively managing your filter preferences allows you to focus on events of significance and maintain control as your AWS environment grows.

Monitor changes to IAM

If you’re interested only in changes to your IAM account, you can modify the event pattern inside EventBridge, the one you used to set up IAM notifications, with an eventName filter pattern, shown following.

"eventName": [
      "Add*",
      "Attach*",
      "Change*",
      "Create*",
      "Deactivate*",
      "Delete*",
      "Detach*",
      "Enable*",
      "Put*",
      "Remove*",
      "Set*",
      "Update*",
      "Upload*"
    ]

This filter pattern will only match events from the IAM service that begin with Add, Change, Create, Deactivate, Delete, Enable, Put, Remove, Update, or Upload. For more information about APIs matching these patterns, see the IAM API Reference.

To edit the filter pattern to monitor only changes to IAM

  1. Open the EventBridge console, navigate to the Event pattern, and choose Edit pattern.
    Figure 14: Modifying the event pattern

    Figure 14: Modifying the event pattern

  2. Add the eventName filter pattern from above to your event pattern.
    Figure 15: Use the JSON editor to add the eventName filter pattern

    Figure 15: Use the JSON editor to add the eventName filter pattern

Monitor changes to authentication and authorization configuration

Monitoring changes to authentication (security credentials) and authorization (policy) configurations is critical, because it can alert you to potential security vulnerabilities or breaches. For instance, unauthorized changes to security credentials or policies could indicate malicious activity, such as an attempt to gain unauthorized access to your AWS resources. If you’re only interested in these types of changes, use the preceding steps to implement the following filter pattern.

    "eventName": [
      "Put*Policy",
      "Attach*",
      "Detach*",
      "Create*",
      "Update*",
      "Upload*",
      "Delete*",
      "Remove*",
      "Set*"
    ]

This filter pattern matches calls to IAM that modify policy or create, update, upload, and delete IAM elements.

Conclusion

Monitoring IAM security configuration changes allows you another layer of defense against the unexpected. Balancing productivity and security, you might grant a user broad permissions in order to facilitate their work, such as exploring new AWS services. Although preventive measures are crucial, they can potentially restrict necessary actions. For example, a developer may need to modify an IAM role for their task, an alteration that could pose a security risk. This change, while essential for their work, may be undesirable from a security standpoint. Thus, it’s critical to have monitoring systems alongside preventive measures, allowing necessary actions while maintaining security.

Create an event rule for IAM events that are important to you and have a response plan ready. You can refer to Security best practices in IAM for further reading on this topic.

If you have questions or feedback about this or any other IAM topic, please visit the IAM re:Post forum. You can also read about the multi-account EventBridge solution on the AWS samples GitHub and learn more about sending and receiving Amazon EventBridge notifications between accounts.

If you have feedback about this post, submit comments in the Comments section below. If you have questions about this post, contact AWS Support.

Want more AWS Security news? Follow us on Twitter.

Dylan Souvage

Dylan Souvage

Dylan is a Solutions Architect based in Toronto, Canada. Dylan loves working with customers to understand their business and enable them in their cloud journey. In his spare time, he enjoys martial arts, sports, anime, and traveling to warm, sunny places to spend time with his friends and family.

Abhra Sinha

Abhra Sinha

Abhra is a Toronto-based Enterprise Solutions Architect at AWS. Abhra enjoys being a trusted advisor to customers, working closely with them to solve their technical challenges and help build a secure, scalable architecture on AWS. In his spare time, he enjoys Photography and exploring new restaurants.

AWS Week in Review – Amazon EC2 Instance Connect Endpoint, Detective, Amazon S3 Dual Layer Encryption, Amazon Verified Permission – June 19, 2023

Post Syndicated from Sébastien Stormacq original https://aws.amazon.com/blogs/aws/aws-week-in-review-amazon-ec2-instance-connect-endpoint-detective-amazon-s3-dual-layer-encryption-amazon-verified-permission-june-19-2023/

This week, I’ll meet you at AWS partner’s Jamf Nation Live in Amsterdam where we’re showing how to use Amazon EC2 Mac to deploy your remote developer workstations or configure your iOS CI/CD pipelines in the cloud.Mac in an instant

Last Week’s Launches
While I was traveling last week, I kept an eye on the AWS News. Here are some launches that got my attention.

Amazon EC2 Instance Connect Endpoint. Endpoint for EC2 Instance Connect allows you to securely access Amazon EC2 instances using their private IP addresses, making the use of bastion hosts obsolete. Endpoint for EC2 Instance Connect is by far my favorite launch from last week. With EC2 Instance Connect, you use AWS Identity and Access Management (IAM) policies and principals to control SSH access to your instances. This removes the need to share and manage SSH keys. We also updated the AWS Command Line Interface (AWS CLI) to allow you to easily connect or open a secured tunnel to an instance using only its instance ID. I read and contributed to a couple of threads on social media where you pointed out that AWS Systems Manager Session Manager already offered similar capabilities. You’re right. But the extra advantage of EC2 Instance Connect Endpoint is that it allows you to use your existing SSH-based tools and libraries, such as the scp command.

Amazon Inspector now supports code scanning of AWS Lambda functions. This expands the existing capability to scan Lambda functions and associated layers for software vulnerabilities in application package dependencies. Amazon Detective also extends finding groups to Amazon Inspector. Detective automatically collects findings from Amazon Inspector, GuardDuty, and other AWS security services, such as AWS Security Hub, to help increase situational awareness of related security events.

Amazon Verified Permissions is generally available. If you’re designing or developing business applications that need to enforce user-based permissions, you have a new option to centrally manage application permissions. Verified Permissions is a fine-grained permissions management and authorization service for your applications that can be used at any scale. Verified Permissions centralizes permissions in a policy store and helps developers use those permissions to authorize user actions within their applications. Similarly to the way an identity provider simplifies authentication, a policy store lets you manage authorization in a consistent and scalable way. Read Danilo’s post to discover the details.

Amazon S3 Dual-Layer Server-Side Encryption with keys stored in AWS Key Management Service (DSSE-KMS). Some heavily regulated industries require double encryption to store some type of data at rest. Amazon Simple Storage Service (Amazon S3) offers DSSE-KMS, a new free encryption option that provides two layers of data encryption, using different keys and different implementation of the 256-bit Advanced Encryption Standard with Galois Counter Mode (AES-GCM) algorithm. My colleague Irshad’s post has all the details.

AWS CloudTrail Lake Dashboards provide out-of-the-box visibility and top insights from your audit and security data directly within the CloudTrail Lake console. CloudTrail Lake features a number of AWS curated dashboards so you can get started right away – with no required detailed dashboard setup or SQL experience.

AWS IAM Identity Center now supports automated user provisioning from Google Workspace. You can now connect your Google Workspace to AWS IAM Identity Center (successor to AWS Single Sign-On) once and manage access to AWS accounts and applications centrally in IAM Identity Center.

AWS CloudShell is now available in 12 additional regions. AWS CloudShell is a browser-based shell that makes it easier to securely manage, explore, and interact with your AWS resources. The list of the 12 new Regions is detailed in the launch announcement.

For a full list of AWS announcements, be sure to keep an eye on the What’s New at AWS page.

Other AWS News
Here are some other updates and news that you might have missed:

  • AWS Extension for Stable Diffusion WebUI. WebUI is a popular open-source web interface that allows you to easily interact with Stable Diffusion generative AI. We built this extension to help you to migrate existing workloads (such as inference, train, and ckpt merge) from your local or standalone servers to the AWS Cloud.
  • GoDaddy developed a multi-Region, event-driven system. Their system handles 400 millions events per day. They plan to scale it to process 2 billion messages per day in a near future. My colleague Marcia explains the detail of their architecture in her post.
  • The Official AWS Podcast – Listen each week for updates on the latest AWS news and deep dives into exciting use cases. There are also official AWS podcasts in several languages. Check out the podcasts in FrenchGermanItalian, and Spanish.
  • AWS Open Source News and Updates – This is a newsletter curated by my colleague Ricardo to bring you the latest open source projects, posts, events, and more.

Upcoming AWS Events
Check your calendars and sign up for these AWS events:

  • AWS Silicon Innovation Day (June 21) – A one-day virtual event that will allow you to better understand AWS Silicon and how you can use the Amazon EC2 chip offerings to your benefit. My colleague Irshad shared the details in this post. Register today.
  • AWS Global Summits – There are many AWS Summits going on right now around the world: Milano (June 22), Hong Kong (July 20), New York (July 26), Taiwan (Aug 2 & 3), and Sao Paulo (Aug 3).
  • AWS Community Day – Join a community-led conference run by AWS user group leaders in your region: Manila (June 29–30), Chile (July 1), and Munich (September 14).
  • AWS User Group Perú Conf 2023 (September 2023). Some of the AWS News blog writer team will be present: Marcia, Jeff, myself, and our colleague Startup Developer Advocate Mark. Save the date and register today.
  • CDK Day CDK Day is happening again this year on September 29. The call for papers for this event is open, and this year we’re also accepting talks in Spanish. Submit your talk here.

That’s all for this week. Check back next Monday for another Week in Review!

This post is part of our Week in Review series. Check back each week for a quick roundup of interesting news and announcements from AWS!
— seb

Simplify AWS Glue job orchestration and monitoring with Amazon MWAA

Post Syndicated from Rushabh Lokhande original https://aws.amazon.com/blogs/big-data/simplify-aws-glue-job-orchestration-and-monitoring-with-amazon-mwaa/

Organizations across all industries have complex data processing requirements for their analytical use cases across different analytics systems, such as data lakes on AWS, data warehouses (Amazon Redshift), search (Amazon OpenSearch Service), NoSQL (Amazon DynamoDB), machine learning (Amazon SageMaker), and more. Analytics professionals are tasked with deriving value from data stored in these distributed systems to create better, secure, and cost-optimized experiences for their customers. For example, digital media companies seek to combine and process datasets in internal and external databases to build unified views of their customer profiles, spur ideas for innovative features, and increase platform engagement.

In these scenarios, customers looking for a serverless data integration offering use AWS Glue as a core component for processing and cataloging data. AWS Glue is well integrated with AWS services and partner products, and provides low-code/no-code extract, transform, and load (ETL) options to enable analytics, machine learning (ML), or application development workflows. AWS Glue ETL jobs may be one component in a more complex pipeline. Orchestrating the run of and managing dependencies between these components is a key capability in a data strategy. Amazon Managed Workflows for Apache Airflows (Amazon MWAA) orchestrates data pipelines using distributed technologies including on-premises resources, AWS services, and third-party components.

In this post, we show how to simplify monitoring an AWS Glue job orchestrated by Airflow using the latest features of Amazon MWAA.

Overview of solution

This post discusses the following:

  • How to upgrade an Amazon MWAA environment to version 2.4.3.
  • How to orchestrate an AWS Glue job from an Airflow Directed Acyclic Graph (DAG).
  • The Airflow Amazon provider package’s observability enhancements in Amazon MWAA. You can now consolidate run logs of AWS Glue jobs on the Airflow console to simplify troubleshooting data pipelines. The Amazon MWAA console becomes a single reference to monitor and analyze AWS Glue job runs. Previously, support teams needed to access the AWS Management Console and take manual steps for this visibility. This feature is available by default from Amazon MWAA version 2.4.3.

The following diagram illustrates our solution architecture.

Prerequisites

You need the following prerequisites:

Set up the Amazon MWAA environment

For instructions on creating your environment, refer to Create an Amazon MWAA environment. For existing users, we recommend upgrading to version 2.4.3 to take advantage of the observability enhancements featured in this post.

The steps to upgrade Amazon MWAA to version 2.4.3 differ depending on whether the current version is 1.10.12 or 2.2.2. We discuss both options in this post.

Prerequisites for setting up an Amazon MWAA environment

You must meet the following prerequisites:

Upgrade from version 1.10.12 to 2.4.3

If you’re using Amazon MWAA version 1.10.12, refer to Migrating to a new Amazon MWAA environment to upgrade to 2.4.3.

Upgrade from version 2.0.2 or 2.2.2 to 2.4.3

If you’re using Amazon MWAA environment version 2.2.2 or lower, complete the following steps:

  1. Create a requirements.txt for any custom dependencies with specific versions required for your DAGs.
  2. Upload the file to Amazon S3 in the appropriate location where the Amazon MWAA environment points to the requirements.txt for installing dependencies.
  3. Follow the steps in Migrating to a new Amazon MWAA environment and select version 2.4.3.

Update your DAGs

Customers who upgraded from an older Amazon MWAA environment may need to make updates to existing DAGs. In Airflow version 2.4.3, the Airflow environment will use the Amazon provider package version 6.0.0 by default. This package may include some potentially breaking changes, such as changes to operator names. For example, the AWSGlueJobOperator has been deprecated and replaced with the GlueJobOperator. To maintain compatibility, update your Airflow DAGs by replacing any deprecated or unsupported operators from previous versions with the new ones. Complete the following steps:

  1. Navigate to Amazon AWS Operators.
  2. Select the appropriate version installed in your Amazon MWAA instance (6.0.0. by default) to find a list of supported Airflow operators.
  3. Make the necessary changes in the existing DAG code and upload the modified files to the DAG location in Amazon S3.

Orchestrate the AWS Glue job from Airflow

This section covers the details of orchestrating an AWS Glue job within Airflow DAGs. Airflow eases the development of data pipelines with dependencies between heterogeneous systems such as on-premises processes, external dependencies, other AWS services, and more.

Orchestrate CloudTrail log aggregation with AWS Glue and Amazon MWAA

In this example, we go through a use case of using Amazon MWAA to orchestrate an AWS Glue Python Shell job that persists aggregated metrics based on CloudTrail logs.

CloudTrail enables visibility into AWS API calls that are being made in your AWS account. A common use case with this data would be to gather usage metrics on principals acting on your account’s resources for auditing and regulatory needs.

As CloudTrail events are being logged, they are delivered as JSON files in Amazon S3, which aren’t ideal for analytical queries. We want to aggregate this data and persist it as Parquet files to allow for optimal query performance. As an initial step, we can use Athena to do the initial querying of the data before doing additional aggregations in our AWS Glue job. For more information about creating an AWS Glue Data Catalog table, refer to Creating the table for CloudTrail logs in Athena using partition projection data. After we’ve explored the data via Athena and decided what metrics we want to retain in aggregate tables, we can create an AWS Glue job.

Create an CloudTrail table in Athena

First, we need to create a table in our Data Catalog that allows CloudTrail data to be queried via Athena. The following sample query creates a table with two partitions on the Region and date (called snapshot_date). Be sure to replace the placeholders for your CloudTrail bucket, AWS account ID, and CloudTrail table name:

create external table if not exists `<<<CLOUDTRAIL_TABLE_NAME>>>`(
  `eventversion` string comment 'from deserializer', 
  `useridentity` struct<type:string,principalid:string,arn:string,accountid:string,invokedby:string,accesskeyid:string,username:string,sessioncontext:struct<attributes:struct<mfaauthenticated:string,creationdate:string>,sessionissuer:struct<type:string,principalid:string,arn:string,accountid:string,username:string>>> comment 'from deserializer', 
  `eventtime` string comment 'from deserializer', 
  `eventsource` string comment 'from deserializer', 
  `eventname` string comment 'from deserializer', 
  `awsregion` string comment 'from deserializer', 
  `sourceipaddress` string comment 'from deserializer', 
  `useragent` string comment 'from deserializer', 
  `errorcode` string comment 'from deserializer', 
  `errormessage` string comment 'from deserializer', 
  `requestparameters` string comment 'from deserializer', 
  `responseelements` string comment 'from deserializer', 
  `additionaleventdata` string comment 'from deserializer', 
  `requestid` string comment 'from deserializer', 
  `eventid` string comment 'from deserializer', 
  `resources` array<struct<arn:string,accountid:string,type:string>> comment 'from deserializer', 
  `eventtype` string comment 'from deserializer', 
  `apiversion` string comment 'from deserializer', 
  `readonly` string comment 'from deserializer', 
  `recipientaccountid` string comment 'from deserializer', 
  `serviceeventdetails` string comment 'from deserializer', 
  `sharedeventid` string comment 'from deserializer', 
  `vpcendpointid` string comment 'from deserializer')
PARTITIONED BY ( 
  `region` string,
  `snapshot_date` string)
ROW FORMAT SERDE 
  'com.amazon.emr.hive.serde.CloudTrailSerde' 
STORED AS INPUTFORMAT 
  'com.amazon.emr.cloudtrail.CloudTrailInputFormat' 
OUTPUTFORMAT 
  'org.apache.hadoop.hive.ql.io.HiveIgnoreKeyTextOutputFormat'
LOCATION
  's3://<<<CLOUDTRAIL_BUCKET>>>/AWSLogs/<<<ACCOUNT_ID>>>/CloudTrail/'
TBLPROPERTIES (
  'projection.enabled'='true', 
  'projection.region.type'='enum',
  'projection.region.values'='us-east-2,us-east-1,us-west-1,us-west-2,af-south-1,ap-east-1,ap-south-1,ap-northeast-3,ap-northeast-2,ap-southeast-1,ap-southeast-2,ap-northeast-1,ca-central-1,eu-central-1,eu-west-1,eu-west-2,eu-south-1,eu-west-3,eu-north-1,me-south-1,sa-east-1',
  'projection.snapshot_date.format'='yyyy/mm/dd', 
  'projection.snapshot_date.interval'='1', 
  'projection.snapshot_date.interval.unit'='days', 
  'projection.snapshot_date.range'='2020/10/01,now', 
  'projection.snapshot_date.type'='date',
  'storage.location.template'='s3://<<<CLOUDTRAIL_BUCKET>>>/AWSLogs/<<<ACCOUNT_ID>>>/CloudTrail/${region}/${snapshot_date}')

Run the preceding query on the Athena console, and note the table name and AWS Glue Data Catalog database where it was created. We use these values later in the Airflow DAG code.

Sample AWS Glue job code

The following code is a sample AWS Glue Python Shell job that does the following:

  • Takes arguments (which we pass from our Amazon MWAA DAG) on what day’s data to process
  • Uses the AWS SDK for Pandas to run an Athena query to do the initial filtering of the CloudTrail JSON data outside AWS Glue
  • Uses Pandas to do simple aggregations on the filtered data
  • Outputs the aggregated data to the AWS Glue Data Catalog in a table
  • Uses logging during processing, which will be visible in Amazon MWAA
import awswrangler as wr
import pandas as pd
import sys
import logging
from awsglue.utils import getResolvedOptions
from datetime import datetime, timedelta

# Logging setup, redirects all logs to stdout
LOGGER = logging.getLogger()
formatter = logging.Formatter('%(asctime)s.%(msecs)03d %(levelname)s %(module)s - %(funcName)s: %(message)s')
streamHandler = logging.StreamHandler(sys.stdout)
streamHandler.setFormatter(formatter)
LOGGER.addHandler(streamHandler)
LOGGER.setLevel(logging.INFO)

LOGGER.info(f"Passed Args :: {sys.argv}")

sql_query_template = """
select
region,
useridentity.arn,
eventsource,
eventname,
useragent

from "{cloudtrail_glue_db}"."{cloudtrail_table}"
where snapshot_date='{process_date}'
and region in ('us-east-1','us-east-2')
"""

required_args = ['CLOUDTRAIL_GLUE_DB',
                'CLOUDTRAIL_TABLE',
                'TARGET_BUCKET',
                'TARGET_DB',
                'TARGET_TABLE',
                'ACCOUNT_ID']
arg_keys = [*required_args, 'PROCESS_DATE'] if '--PROCESS_DATE' in sys.argv else required_args
JOB_ARGS = getResolvedOptions ( sys.argv, arg_keys)

LOGGER.info(f"Parsed Args :: {JOB_ARGS}")

# if process date was not passed as an argument, process yesterday's data
process_date = (
    JOB_ARGS['PROCESS_DATE']
    if JOB_ARGS.get('PROCESS_DATE','NONE') != "NONE" 
    else (datetime.today() - timedelta(days=1)).strftime("%Y-%m-%d") 
)

LOGGER.info(f"Taking snapshot for :: {process_date}")

RAW_CLOUDTRAIL_DB = JOB_ARGS['CLOUDTRAIL_GLUE_DB']
RAW_CLOUDTRAIL_TABLE = JOB_ARGS['CLOUDTRAIL_TABLE']
TARGET_BUCKET = JOB_ARGS['TARGET_BUCKET']
TARGET_DB = JOB_ARGS['TARGET_DB']
TARGET_TABLE = JOB_ARGS['TARGET_TABLE']
ACCOUNT_ID = JOB_ARGS['ACCOUNT_ID']

final_query = sql_query_template.format(
    process_date=process_date.replace("-","/"),
    cloudtrail_glue_db=RAW_CLOUDTRAIL_DB,
    cloudtrail_table=RAW_CLOUDTRAIL_TABLE
)

LOGGER.info(f"Running Query :: {final_query}")

raw_cloudtrail_df = wr.athena.read_sql_query(
    sql=final_query,
    database=RAW_CLOUDTRAIL_DB,
    ctas_approach=False,
    s3_output=f"s3://{TARGET_BUCKET}/athena-results",
)

raw_cloudtrail_df['ct']=1

agg_df = raw_cloudtrail_df.groupby(['arn','region','eventsource','eventname','useragent'],as_index=False).agg({'ct':'sum'})
agg_df['snapshot_date']=process_date

LOGGER.info(agg_df.info(verbose=True))

upload_path = f"s3://{TARGET_BUCKET}/{TARGET_DB}/{TARGET_TABLE}"

if not agg_df.empty:
    LOGGER.info(f"Upload to {upload_path}")
    try:
        response = wr.s3.to_parquet(
            df=agg_df,
            path=upload_path,
            dataset=True,
            database=TARGET_DB,
            table=TARGET_TABLE,
            mode="overwrite_partitions",
            schema_evolution=True,
            partition_cols=["snapshot_date"],
            compression="snappy",
            index=False
        )
        LOGGER.info(response)
    except Exception as exc:
        LOGGER.error("Uploading to S3 failed")
        LOGGER.exception(exc)
        raise exc
else:
    LOGGER.info(f"Dataframe was empty, nothing to upload to {upload_path}")

The following are some key advantages in this AWS Glue job:

  • We use an Athena query to ensure initial filtering is done outside of our AWS Glue job. As such, a Python Shell job with minimal compute is still sufficient for aggregating a large CloudTrail dataset.
  • We ensure the analytics library-set option is turned on when creating our AWS Glue job to use the AWS SDK for Pandas library.

Create an AWS Glue job

Complete the following steps to create your AWS Glue job:

  1. Copy the script in the preceding section and save it in a local file. For this post, the file is called script.py.
  2. On the AWS Glue console, choose ETL jobs in the navigation pane.
  3. Create a new job and select Python Shell script editor.
  4. Select Upload and edit an existing script and upload the file you saved locally.
  5. Choose Create.

  1. On the Job details tab, enter a name for your AWS Glue job.
  2. For IAM role, choose an existing role or create a new role that has the required permissions for Amazon S3, AWS Glue, and Athena. The role needs to query the CloudTrail table you created earlier and write to an output location.

You can use the following sample policy code. Replace the placeholders with your CloudTrail logs bucket, output table name, output AWS Glue database, output S3 bucket, CloudTrail table name, AWS Glue database containing the CloudTrail table, and your AWS account ID.

{
    "Version": "2012-10-17",
    "Statement": [
        {
            "Action": [
                "s3:List*",
                "s3:Get*"
            ],
            "Resource": [
                "arn:aws:s3:::<<<CLOUDTRAIL_LOGS_BUCKET>>>/*",
                "arn:aws:s3:::<<<CLOUDTRAIL_LOGS_BUCKET>>>*"
            ],
            "Effect": "Allow",
            "Sid": "GetS3CloudtrailData"
        },
        {
            "Action": [
                "glue:Get*",
                "glue:BatchGet*"
            ],
            "Resource": [
                "arn:aws:glue:us-east-1:<<<YOUR_AWS_ACCT_ID>>>:catalog",
                "arn:aws:glue:us-east-1:<<<YOUR_AWS_ACCT_ID>>>:database/<<<GLUE_DB_WITH_CLOUDTRAIL_TABLE>>>",
                "arn:aws:glue:us-east-1:<<<YOUR_AWS_ACCT_ID>>>:table/<<<GLUE_DB_WITH_CLOUDTRAIL_TABLE>>>/<<<CLOUDTRAIL_TABLE>>>*"
            ],
            "Effect": "Allow",
            "Sid": "GetGlueCatalogCloudtrailData"
        },
        {
            "Action": [
                "s3:PutObject*",
                "s3:Abort*",
                "s3:DeleteObject*",
                "s3:GetObject*",
                "s3:GetBucket*",
                "s3:List*",
                "s3:Head*"
            ],
            "Resource": [
                "arn:aws:s3:::<<<OUTPUT_S3_BUCKET>>>",
                "arn:aws:s3:::<<<OUTPUT_S3_BUCKET>>>/<<<OUTPUT_GLUE_DB>>>/<<<OUTPUT_TABLE_NAME>>>/*"
            ],
            "Effect": "Allow",
            "Sid": "WriteOutputToS3"
        },
        {
            "Action": [
                "glue:CreateTable",
                "glue:CreatePartition",
                "glue:UpdatePartition",
                "glue:UpdateTable",
                "glue:DeleteTable",
                "glue:DeletePartition",
                "glue:BatchCreatePartition",
                "glue:BatchDeletePartition",
                "glue:Get*",
                "glue:BatchGet*"
            ],
            "Resource": [
                "arn:aws:glue:us-east-1:<<<YOUR_AWS_ACCT_ID>>>:catalog",
                "arn:aws:glue:us-east-1:<<<YOUR_AWS_ACCT_ID>>>:database/<<<OUTPUT_GLUE_DB>>>",
                "arn:aws:glue:us-east-1:<<<YOUR_AWS_ACCT_ID>>>:table/<<<OUTPUT_GLUE_DB>>>/<<<OUTPUT_TABLE_NAME>>>*"
            ],
            "Effect": "Allow",
            "Sid": "AllowOutputToGlue"
        },
        {
            "Action": [
                "logs:CreateLogGroup",
                "logs:CreateLogStream",
                "logs:PutLogEvents"
            ],
            "Resource": "arn:aws:logs:*:*:/aws-glue/*",
            "Effect": "Allow",
            "Sid": "LogsAccess"
        },
        {
            "Action": [
                "s3:GetObject*",
                "s3:GetBucket*",
                "s3:List*",
                "s3:DeleteObject*",
                "s3:PutObject",
                "s3:PutObjectLegalHold",
                "s3:PutObjectRetention",
                "s3:PutObjectTagging",
                "s3:PutObjectVersionTagging",
                "s3:Abort*"
            ],
            "Resource": [
                "arn:aws:s3:::<<<ATHENA_RESULTS_BUCKET>>>",
                "arn:aws:s3:::<<<ATHENA_RESULTS_BUCKET>>>/*"
            ],
            "Effect": "Allow",
            "Sid": "AccessToAthenaResults"
        },
        {
            "Action": [
                "athena:StartQueryExecution",
                "athena:StopQueryExecution",
                "athena:GetDataCatalog",
                "athena:GetQueryResults",
                "athena:GetQueryExecution"
            ],
            "Resource": [
                "arn:aws:glue:us-east-1:<<<YOUR_AWS_ACCT_ID>>>:catalog",
                "arn:aws:athena:us-east-1:<<<YOUR_AWS_ACCT_ID>>>:datacatalog/AwsDataCatalog",
                "arn:aws:athena:us-east-1:<<<YOUR_AWS_ACCT_ID>>>:workgroup/primary"
            ],
            "Effect": "Allow",
            "Sid": "AllowAthenaQuerying"
        }
    ]
}

For Python version, choose Python 3.9.

  1. Select Load common analytics libraries.
  2. For Data processing units, choose 1 DPU.
  3. Leave the other options as default or adjust as needed.

  1. Choose Save to save your job configuration.

Configure an Amazon MWAA DAG to orchestrate the AWS Glue job

The following code is for a DAG that can orchestrate the AWS Glue job that we created. We take advantage of the following key features in this DAG:

"""Sample DAG"""
import airflow.utils
from airflow.providers.amazon.aws.operators.glue import GlueJobOperator
from airflow import DAG
from datetime import timedelta
import airflow.utils

# allow backfills via DAG run parameters
process_date = '{{ dag_run.conf.get("process_date") if dag_run.conf.get("process_date") else "NONE" }}'

dag = DAG(
    dag_id = "CLOUDTRAIL_LOGS_PROCESSING",
    default_args = {
        'depends_on_past':False, 
        'start_date':airflow.utils.dates.days_ago(0),
        'retries':1,
        'retry_delay':timedelta(minutes=5),
        'catchup': False
    },
    schedule_interval = None, # None for unscheduled or a cron expression - E.G. "00 12 * * 2" - at 12noon Tuesday
    dagrun_timeout = timedelta(minutes=30),
    max_active_runs = 1,
    max_active_tasks = 1 # since there is only one task in our DAG
)

## Log ingest. Assumes Glue Job is already created
glue_ingestion_job = GlueJobOperator(
    task_id="<<<some-task-id>>>",
    job_name="<<<GLUE_JOB_NAME>>>",
    script_args={
        "--ACCOUNT_ID":"<<<YOUR_AWS_ACCT_ID>>>",
        "--CLOUDTRAIL_GLUE_DB":"<<<GLUE_DB_WITH_CLOUDTRAIL_TABLE>>>",
        "--CLOUDTRAIL_TABLE":"<<<CLOUDTRAIL_TABLE>>>",
        "--TARGET_BUCKET": "<<<OUTPUT_S3_BUCKET>>>",
        "--TARGET_DB": "<<<OUTPUT_GLUE_DB>>>", # should already exist
        "--TARGET_TABLE": "<<<OUTPUT_TABLE_NAME>>>",
        "--PROCESS_DATE": process_date
    },
    region_name="us-east-1",
    dag=dag,
    verbose=True
)

glue_ingestion_job

Increase observability of AWS Glue jobs in Amazon MWAA

The AWS Glue jobs write logs to Amazon CloudWatch. With the recent observability enhancements to Airflow’s Amazon provider package, these logs are now integrated with Airflow task logs. This consolidation provides Airflow users with end-to-end visibility directly in the Airflow UI, eliminating the need to search in CloudWatch or the AWS Glue console.

To use this feature, ensure the IAM role attached to the Amazon MWAA environment has the following permissions to retrieve and write the necessary logs:

{
  "Version": "2012-10-17",
  "Statement": [
    {
      "Effect": "Allow",
      "Action": [
        "logs:CreateLogGroup",
        "logs:CreateLogStream",
        "logs:PutLogEvents",
        "logs:GetLogEvents",
        "logs:GetLogRecord",
        "logs:DescribeLogStreams",
        "logs:FilterLogEvents",
        "logs:GetLogGroupFields",
        "logs:GetQueryResults",
        
      ],
      "Resource": [
        "arn:aws:logs:*:*:log-group:airflow-243-<<<Your environment name>>>-*"--Your Amazon MWAA Log Stream Name
      ]
    }
  ]
}

If verbose=true, the AWS Glue job run logs show in the Airflow task logs. The default is false. For more information, refer to Parameters.

When enabled, the DAGs read from the AWS Glue job’s CloudWatch log stream and relay them to the Airflow DAG AWS Glue job step logs. This provides detailed insights into an AWS Glue job’s run in real time via the DAG logs. Note that AWS Glue jobs generate an output and error CloudWatch log group based on the job’s STDOUT and STDERR, respectively. All logs in the output log group and exception or error logs from the error log group are relayed into Amazon MWAA.

AWS admins can now limit a support team’s access to only Airflow, making Amazon MWAA the single pane of glass on job orchestration and job health management. Previously, users needed to check AWS Glue job run status in the Airflow DAG steps and retrieve the job run identifier. They then needed to access the AWS Glue console to find the job run history, search for the job of interest using the identifier, and finally navigate to the job’s CloudWatch logs to troubleshoot.

Create the DAG

To create the DAG, complete the following steps:

  1. Save the preceding DAG code to a local .py file, replacing the indicated placeholders.

The values for your AWS account ID, AWS Glue job name, AWS Glue database with CloudTrail table, and CloudTrail table name should already be known. You can adjust the output S3 bucket, output AWS Glue database, and output table name as needed, but make sure the AWS Glue job’s IAM role that you used earlier is configured accordingly.

  1. On the Amazon MWAA console, navigate to your environment to see where the DAG code is stored.

The DAGs folder is the prefix within the S3 bucket where your DAG file should be placed.

  1. Upload your edited file there.

  1. Open the Amazon MWAA console to confirm that the DAG appears in the table.

Run the DAG

To run the DAG, complete the following steps:

  1. Choose from the following options:
    • Trigger DAG – This causes yesterday’s data to be used as the data to process
    • Trigger DAG w/ config – With this option, you can pass in a different date, potentially for backfills, which is retrieved using dag_run.conf in the DAG code and then passed into the AWS Glue job as a parameter

The following screenshot shows the additional configuration options if you choose Trigger DAG w/ config.

  1. Monitor the DAG as it runs.
  2. When the DAG is complete, open the run’s details.

On the right pane, you can view the logs, or choose Task Instance Details for a full view.

  1. View the AWS Glue job output logs in Amazon MWAA without using the AWS Glue console thanks to the GlueJobOperator verbose flag.

The AWS Glue job will have written results to the output table you specified.

  1. Query this table via Athena to confirm it was successful.

Summary

Amazon MWAA now provides a single place to track AWS Glue job status and enables you to use the Airflow console as the single pane of glass for job orchestration and health management. In this post, we walked through the steps to orchestrate AWS Glue jobs via Airflow using GlueJobOperator. With the new observability enhancements, you can seamlessly troubleshoot AWS Glue jobs in a unified experience. We also demonstrated how to upgrade your Amazon MWAA environment to a compatible version, update dependencies, and change the IAM role policy accordingly.

For more information about common troubleshooting steps, refer to Troubleshooting: Creating and updating an Amazon MWAA environment. For in-depth details of migrating to an Amazon MWAA environment, refer to Upgrading from 1.10 to 2. To learn about the open-source code changes for increased observability of AWS Glue jobs in the Airflow Amazon provider package, refer to the relay logs from AWS Glue jobs.

Finally, we recommend visiting the AWS Big Data Blog for other material on analytics, ML, and data governance on AWS.


About the Authors

Rushabh Lokhande is a Data & ML Engineer with the AWS Professional Services Analytics Practice. He helps customers implement big data, machine learning, and analytics solutions. Outside of work, he enjoys spending time with family, reading, running, and golf.

Ryan Gomes is a Data & ML Engineer with the AWS Professional Services Analytics Practice. He is passionate about helping customers achieve better outcomes through analytics and machine learning solutions in the cloud. Outside of work, he enjoys fitness, cooking, and spending quality time with friends and family.

Vishwa Gupta is a Senior Data Architect with the AWS Professional Services Analytics Practice. He helps customers implement big data and analytics solutions. Outside of work, he enjoys spending time with family, traveling, and trying new food.

Investigate security events by using AWS CloudTrail Lake advanced queries

Post Syndicated from Rodrigo Ferroni original https://aws.amazon.com/blogs/security/investigate-security-events-by-using-aws-cloudtrail-lake-advanced-queries/

This blog post shows you how to use AWS CloudTrail Lake capabilities to investigate CloudTrail activity across AWS Organizations in response to a security incident scenario. We will walk you through two security-related scenarios while we investigate CloudTrail activity. The method described in this post will help you with the investigation process, allowing you to gain comprehensive understanding of the incident and its implications. CloudTrail Lake is a managed audit and security lake that allows you to aggregate, immutably store, and query your activity logs for auditing, security investigation, and operational troubleshooting.

Prerequisites

You must have the following AWS services enabled before you start the investigation.

  • CloudTrail Lake — To learn how to enable this service and use sample queries, see the blog post Announcing AWS CloudTrail Lake – a managed audit and security Lake. When you create a new event data store at the organization level, you will need to enable CloudTrail Lake for all of the accounts in the organization. We advise that you include not only management events but also data events.

    When you use CloudTrail Lake with AWS Organizations, you can designate an account within the organization to be the CloudTrail Lake delegated administrator. This provides a convenient way to perform queries from a designated AWS security account—for example, you can avoid granting access to your AWS management account.

  • Amazon GuardDuty — This is a threat detection service that continuously monitors your AWS accounts and workloads for malicious activity and delivers detailed security findings for visibility and remediation. To learn about the benefits of the service and how to get started, see Amazon GuardDuty.

Incident scenario 1: AWS access keys compromised

In the first scenario, you have observed activity within your AWS account from an unauthorized party. This example covers a situation where a threat actor has obtained and misused one of your AWS access keys that was exposed publicly by mistake. This investigation starts after Amazon GuardDuty generates an IAM finding identifying that the malicious activity came from the exposed AWS access key. Following the Incident Response Playbook Compromised IAM Credentials, focusing on step 12 in the playbook ([DETECTION AND ANALYSIS] Review CloudTrail Logs), you will use CloudTrail Lake capabilities to investigate the activity that was performed with this key. To do so, you will use the following nine query examples that we provide for this first scenario.

Query 1.1: Activity performed by access key during a specific time window

The first query is aimed at obtaining the specific activity that was performed by this key, either successfully or not, during the time the malicious activity took place. You can use the GuardDuty finding details “EventFirstSeen” and “EventLastSeen” to define the time window of the query. Also, and for further queries, you want to fetch artifacts that could be considered possible indicators of compromise (IoC) related to this security incident, such as IP addresses.

You can build and run the following query on CloudTrail Lake Editor, either in the CloudTrail console or programmatically.

Query 1.1


SELECT eventSource,eventName,sourceIPAddress,eventTime,errorCode FROM 1994bee2-d4a0-460e-8c07-1b5ee04765d8 WHERE userIdentity.accessKeyId = 'AKIAIOSFODNN7EXAMPLE' AND eventTime > '2022-03-15 13:10:00' AND eventTime < '2022-03-16 00:00:00' order by eventTime;

The results of the query are as follows:

Figure 1: Sample query 1.1 and results in the AWS Management Console

Figure 1: Sample query 1.1 and results in the AWS Management Console

The results demonstrate that the activity performed by the access key tried to unsuccessfully list Amazon Simple Storage Services (Amazon S3) buckets and CloudTrail trails. You can also see specific write activity related to AWS Identity and Access Management (IAM) that was denied, and afterwards there was activity possibly related to reconnaissance tactics in IAM to finally be able to assume a role, which indicates a possible attempt to perform an escalation of privileges. You can observe only one source IP from which this activity was performed.

Query 1.2: Confirm which IAM role was assumed by the threat actor during a specific time window

As you observed from the previous query results, the threat actor was able to assume an IAM role. In this query, you would like to confirm which IAM role was assumed during the security incident.

Query 1.2


SELECT requestParameters,responseElements FROM 1994bee2-d4a0-460e-8c07-1b5ee04765d8 WHERE eventName = 'AssumeRole' AND eventTime > '2022-03-15 13:10:00' AND eventTime < '2022-03-16 00:00:00' AND userIdentity.accessKeyId = 'AKIAIOSFODNN7EXAMPLE'

The results of the query are as follows:

Figure 2: Sample query 1.2 and results in the console

Figure 2: Sample query 1.2 and results in the console

The results show that an IAM role named “Alice” was assumed in a second account. For future queries, keep the temporary access key from the responseElements result to obtain activity performed by this role session.

Query 1.3: Activity performed from an IP address in an expanded time window search

Investigating the incident only from the time of discovery may result in overlooking signs or indicators of potential past incidents that were not detected related to this threat actor. For this reason, you want to expand the investigation window time, which might result in expanding the search back weeks, months, or even years, depending on factors such as the nature and severity of the incident, available resources, and so on. In this example, for balance and urgency, the window of time searched is expanded to a month. You want to also review whether there is past activity related to this account by the IP you previously observed.

Query 1.3

The results of the query are as follows:


SELECT eventSource,eventName,sourceIPAddress,eventTime,errorCode FROM 1994bee2-d4a0-460e-8c07-1b5ee04765d8 WHERE sourceIPAddress = '192.0.2.76' AND useridentity.accountid = '555555555555 AND eventTime > '2022-02-15 13:10:00' AND eventTime < '2022-03-15 13:10:00' order by eventTime;

Figure 3: Sample query 1.3 and results in the console

Figure 3: Sample query 1.3 and results in the console

As you can observe from the results, there is no activity coming from this IP address in this account in the previous month.

Query 1.4: Activity performed from an IP address in any other account in your organization during a specific time window

Before you start investigating what activity was performed by the role assumed in the second account, and considering that this malicious activity now involves cross-account access, you will want to review whether any other account in your organization has activity related to the specific IP address observed. You will need to expand the window of time to an entire month in order to see if previous activity was performed before this incident from this source IP, and you will need to exclude activity coming from the first account.

Query 1.4


SELECT useridentity.accountid,eventTime FROM 1994bee2-d4a0-460e-8c07-1b5ee04765d8 WHERE sourceIPAddress = '192.0.2.76' AND eventTime > '2022-02-15 13:10:00' AND eventTime < '2022-03-16 00:00:00' AND useridentity.accountid != '555555555555'GROUP by useridentity.accountid

The results of the query are as follows:

Figure 4: Sample query 1.4 and results in the console

Figure 4: Sample query 1.4 and results in the console

As you can observe from the results, there is activity only in the second account where the role was assumed. You can also confirm that there was no activity performed in other accounts in the previous month from this IP address.

Query 1.5: Count activity performed by an IAM role during a specific time period

For the next query example, you want to count and group activity based on the API actions that were performed in each service by the role assumed. This query helps you quantify and understand the impact of the possible unauthorized activity that might have happened in this second account.

Query 1.5


SELECT count (*) as NumberEvents, eventSource, eventName
FROM 1994bee2-d4a0-460e-8c07-1b5ee04765d8 WHERE eventTime > '2022-03-15 13:10:00' AND eventTime < '2022-03-16 00:00:00' AND useridentity.type = 'AssumedRole' AND useridentity.sessioncontext.sessionissuer.arn = 'arn:aws:iam::111122223333:role/Alice'
GROUP by eventSource, eventName
order by NumberEvents desc;

The results of the query are as follows:

Figure 5: Sample query 1.5 and results in the console

Figure 5: Sample query 1.5 and results in the console

You observe that the activity is consistent with what was shown in the first account, and the threat actor seems to be targeting trails, S3 buckets, and IAM activity related to possible further escalation of privileges.

Query 1.6: Confirm successful activity performed by an IAM role during a specific time window

Following the example in query 1.1, you will fetch the information related to activity that was successful or denied. This helps you confirm modifications that took place in the environment, or the creation of new resources. For this example, you will also want to obtain the event ID in case you need to dig further into one specific API call. You will then filter out activity done by any other session by using the temporary access key obtained from query 1.2.

Query 1.6


SELECT eventSource, eventName, eventTime, eventID, errorCode FROM 1994bee2-d4a0-460e-8c07-1b5ee04765d8 WHERE eventTime > '2022-03-15 13:10:00' AND eventTime < '2022-03-16 00:00:00' AND useridentity.type = 'AssumedRole' AND useridentity.sessioncontext.sessionissuer.arn = 'arn:aws:iam::111122223333:role/Alice' AND userIdentity.accessKeyId = 'ASIAZNYXHMZ37EXAMPLE '

The results of the query are as follows:

Figure 6: Sample query 1.6 and results in the console

Figure 6: Sample query 1.6 and results in the console

You can observe that the threat actor was again not able to perform activity upon the trails, S3 buckets, or IAM roles. But as you can see, the threat actor was able to perform specific IAM activity, which led to the creation of a new IAM user, policy attachment, and access key.

Query 1.7: Obtain new access key ID created

By making use of the event ID from the CreateAccesskey event displayed in the previous query, you can obtain the access key ID so that you can further dig into what activity was performed by it.

Query 1.7


SELECT responseElements FROM 1994bee2-d4a0-460e-8c07-1b5ee04765d8 WHERE eventID = 'bd29bab7-1153-4510-9e7f-9ff9bba4bd9a'

The results of the query are as follows:

Figure 7: Sample query 1.7 and results in the console

Figure 7: Sample query 1.7 and results in the console

Query 1.8: Obtain successful API activity that was performed by the access key during a specific time window

Following previous examples, you will count and group the API activity that was successfully performed by this access key ID. This time, you will exclude denied activity in order to understand the activity that actually took place.

Query 1.8


SELECT count (*) as NumberEvents, eventSource, eventName
FROM 1994bee2-d4a0-460e-8c07-1b5ee04765d8 WHERE eventTime > '2022-03-15 13:10:00' AND eventTime < '2022-03-16 00:00:00' AND
userIdentity.accessKeyId = 'AKIAI44QH8DHBEXAMPLE' AND errorcode IS NULL
GROUP by eventSource, eventName
order by NumberEvents desc;

The results of the query are as follows:

Figure 8: Sample query 1.8 and results in the console

Figure 8: Sample query 1.8 and results in the console

You can observe that this time, the threat actor was able to perform specific activities targeting your trails and buckets due to privilege escalation. In these results, you observe that a trail was successfully stopped, and S3 objects were downloaded and deleted.

You can also see bucket deletion activity. At first glance, this might indicate activity related to a data exfiltration scenario in the case where the bucket was not properly secured, and possible future ransom demands could be made if proper preventive controls and measures to recover the data were not in place. For more details on this scenario, see this AWS Security blog post.

Query 1.9: Obtain bucket and object names affected during a specific time window

After you obtain the activities on the S3 buckets by using sample query 1.8, you can use the following query to show what objects this activity was related to, and from which buckets. You can expand the query to exclude denied activity.

Query 1.9


SELECT element_at(requestParameters, 'bucketName') as BucketName, element_at(requestParameters, 'key') as ObjectName, eventName FROM 1994bee2-d4a0-460e-8c07-1b5ee04765d8 WHERE (eventName = 'GetObject' OR eventName = 'DeleteObject') AND eventTime > '2022-03-15 13:10:00' AND eventTime < '2022-03-16 00:00:00' AND userIdentity.accessKeyId = 'AKIAI44QH8DHBEXAMPLE' AND errorcode IS NULL

The results of the query are as follows:

Figure 9: Sample query 1.9 and results in the console

Figure 9: Sample query 1.9 and results in the console

As you can observe, the unauthorized user was able to first obtain and exfiltrate S3 objects, and then delete them afterwards.

Summary of incident scenario 1

This scenario describes a security incident involving a publicly exposed AWS access key that is exploited by a threat actor. Here is a summary of the steps taken to investigate this incident by using CloudTrail Lake capabilities:

  • Investigated AWS activity that was performed by the compromised access key
  • Observed possible adversary tactics and techniques that were used by the threat actor
  • Collected artifacts that could be potential indicators of compromise (IoC), such as IP addresses
  • Confirmed role assumption by the threat actor in a second account
  • Expanded the time window of your investigation and the scope to your entire organization in AWS Organizations; and searched for any activity that might have taken place originating from the IP address related to the unauthorized activity
  • Investigated AWS activity that was performed by the role assumed in the second account
  • Identified new resources that were created by the threat actor, and malicious activity performed by the actor
  • Confirmed the modifications caused by the threat actor and their impact in your environment

Incident scenario 2: AWS IAM Identity Center user credentials compromised

In this second scenario, you start your investigation from a GuardDuty finding stating that an Amazon Elastic Compute Cloud (Amazon EC2) instance is querying an IP address that is associated with cryptocurrency-related activity. There are several sources of logs that you might want to explore when you conduct this investigation, including network, operation system, or application logs, among others. In this example, you will use CloudTrail Lake capabilities to investigate API activity logged in CloudTrail for this security event. To understand what exactly happened and when, you start by querying information from the resource involved, in this case an EC2 instance, and then continue digging into the AWS IAM Identity Center (successor to AWS Single Sign-On) credentials that were used to launch that EC2 instance, to finally confirm what other actions were performed.

Query 2.1: Confirm who has launched the EC2 instance involved in the cryptocurrency-related activity

You can begin by looking at the finding CryptoCurrency:EC2/BitcoinTool.B to get more information related to this event, for example when (timestamp), where (AWS account and AWS Region), and also which resource (EC2 instance ID) was involved with the security incident and when it was launched. With this information, you can perform the first query for this scenario, which will confirm what type of user credentials were used to launch the instance involved.

Query 2.1


SELECT userIdentity.principalid, eventName, eventTime, recipientAccountId, awsRegion FROM 467f2e52-84b9-4d41-8049-bc8f8fad35dd
WHERE responseElements IS NOT NULL AND
element_at(responseElements, 'instancesSet') like '%"instanceId":"i-053a7e6164c0f0473"%' AND
eventTime > '2022-09-13 12:45:59' AND eventName='RunInstances'

The results of the query are as follows:

Figure 10: Sample query 2.1 and results in the console

Figure 10: Sample query 2.1 and results in the console

The results demonstrate that the IAM Identity Center user as principal ID AROASVPO5CIEXAMPLE:[email protected] was used to launch the EC2 instance that was involved in the incident.

Query 2.2: Confirm in which AWS accounts the IAM Identity Center user has federated and authenticated

You want to confirm which AWS accounts this specific IAM Identity Center user has federated and authenticated with, and also which IAM role was assumed. This is important information to make sure that the security event happened only within the affected AWS account. The window of time for this query is based on the maximum value for the permission sets’ session duration in IAM Identity Center.

Query 2.2


SELECT element_at(serviceEventDetails, 'account_id') as AccountID, element_at(serviceEventDetails, 'role_name') as SSORole, eventID, eventTime FROM 467f2e52-84b9-4d41-8049-bc8f8fad35dd WHERE eventSource = 'sso.amazonaws.com' AND eventName = 'Federate' AND userIdentity.username = '[email protected]' AND eventTime > '2022-09-13 00:00:00' AND eventTime < '2022-09-14 00:00:00'

The results of the query are as follows:

Figure 11: Sample query 2.2 and results in the console

Figure 11: Sample query 2.2 and results in the console

The results show that only one AWS account has been accessed during the time of the incident, and only one AWS role named AdministratorAccess has been used.

Query 2.3: Count and group activity based on API actions that were performed by the user in each AWS service

You now know exactly where the user has gained access, so next you can count and group the activity based on the API actions that were performed in each AWS service. This information helps you confirm the types of activity that were performed.

Query 2.3


SELECT eventSource, eventName, COUNT(*) AS apiCount
FROM 467f2e52-84b9-4d41-8049-bc8f8fad35dd
WHERE userIdentity.principalId = 'AROASVPO5CIEXAMPLE:[email protected]'
AND eventTime > '2022-09-13 00:00:00' AND eventTime < '2022-09-14 00:00:00'
GROUP BY eventSource, eventName ORDER BY apiCount DESC

The results of the query are as follows:

Figure 12: Sample query 2.3 and results in the console

Figure 12: Sample query 2.3 and results in the console

You can see that the list of APIs includes the read activities Get, Describe, and List. This activity is commonly associated with the discovery stage, when the unauthorized user is gathering information to determine credential permissions.

Query 2.4: Obtain mutable activity based on API actions performed by the user in each AWS service

To get a better understanding of the mutable actions performed by the user, you can add a new condition to hide the read-only actions by setting the readOnly parameter to false. You will want to focus on mutable actions to know whether there were new AWS resources created or if existing AWS resources were deleted or modified. Also, you can add the possible error code from the response element to the query, which will tell you if the actions were denied.

Query 2.4


SELECT eventSource, eventName, eventTime, eventID, errorCode
FROM 467f2e52-84b9-4d41-8049-bc8f8fad35dd
WHERE userIdentity.principalId = 'AROASVPO5CIEXAMPLE:[email protected]'
AND readOnly = false
AND eventTime > '2022-09-13 00:00:00' AND eventTime < '2022-09-14 00:00:00'

The results of the query are as follows:

Figure 13: Sample query 2.4 and results in the console

Figure 13: Sample query 2.4 and results in the console

You can confirm that some actions, like EC2 RunInstances, EC2 CreateImage, SSM StartSession, IAM CreateUser, and IAM PutRolePolicy were allowed. And in contrast, IAM CreateAccessKey, IAM CreateRole, IAM AttachRolePolicy, and GuardDuty DeleteDetector were denied. The IAM-related denied actions are commonly associated with persistence tactics, where an unauthorized user may try to maintain access to the environment. The GuardDuty denied action is commonly associated with defense evasion tactics, where the unauthorized user is trying to cover their tracks and avoid detection.

Query 2.5: Obtain more information about API action EC2 RunInstances

You can focus first on the API action EC2 RunInstances to understand how many EC2 instances were created by the same user. This information will confirm which other EC2 instances were involved in the security event.

Query 2.5


SELECT awsRegion, recipientAccountId, eventID, element_at(responseElements, 'instancesSet') as instances
FROM 467f2e52-84b9-4d41-8049-bc8f8fad35dd
WHERE userIdentity.principalId = 'AROASVPO5CIEXAMPLE:[email protected]'
AND eventName='RunInstances'
AND eventTime > '2022-09-13 00:00:00' AND eventTime < '2022-09-14 00:00:00'

The results of the query are as follows:

Figure 14: Sample query 2.5 and results in the console

Figure 14: Sample query 2.5 and results in the console

You can confirm that the API was called twice, and if you expand the column InstanceSet in the response element, you will see the exact number of EC2 instances that were launched. Also, you can find that these EC2 instances were launched with an IAM instance profile called ec2-role-ssm-core. By checking in the IAM console, you can confirm that the IAM role associated has only the AWS managed policy AmazonSSMManagedInstanceCore attached, which enables AWS Systems Manager core functionality.

Query 2.6: Get the list of denied API actions performed by the user for each AWS service

Now, you can filter more to focus only on those denied API actions by performing the following query. This is important because it can help you to identify what kind of malicious event was attempted.

Query 2.6


SELECT recipientAccountId, awsRegion, eventSource, eventName, eventID, eventTime
FROM 467f2e52-84b9-4d41-8049-bc8f8fad35dd
WHERE userIdentity.principalId = 'AROASVPO5CIEXAMPLE:[email protected]'
AND errorCode = 'AccessDenied'
AND eventTime > '2022-09-13 00:00:00' AND eventTime < '2022-09-14 00:00:00'

The results of the query are as follows:

Figure 15: Sample query 2.6 and results in the console

Figure 15: Sample query 2.6 and results in the console

You can see that the user has tried to stop GuardDuty by calling DeleteDetector, and has also performed actions within IAM that you should examine more closely to know if new unwanted access to the environment was created.

Query 2.7: Obtain more information about API action IAM CreateUserAccessKeys

With the previous query, you confirmed that more actions were denied within IAM. You can now focus on the failed attempt to create IAM user access keys that could have been used to gain persistent and programmatic access to the AWS account. With the following query, you can make sure that the actions were denied and determine the reason why.

Query 2.7


SELECT recipientAccountId, awsRegion, eventID, eventTime, errorCode, errorMessage
FROM 467f2e52-84b9-4d41-8049-bc8f8fad35dd
WHERE userIdentity.principalId = 'AROASVPO5CIEXAMPLE:[email protected]'
AND eventName='CreateAccessKey'
AND eventTime > '2022-09-13 00:00:00' AND eventTime < '2022-09-14 00:00:00'

The results of the query are as follows:

Figure 16: Sample query 2.7 and results in the console

Figure 16: Sample query 2.7 and results in the console

If you copy the errorMessage element from the response, you can confirm that the action was denied by a service control policy, as shown in the following example.


"errorMessage":"User: arn:aws:sts::111122223333:assumed-role/AWSReservedSSO_AdministratorAccess_f53d10b0f8a756ac/[email protected] is not authorized to perform: iam:CreateAccessKey on resource: user production-user with an explicit deny in a service control policy"

Query 2.8: Obtain more information about API IAM CreateUser

From the query error message in query 2.7, you can confirm the name of the IAM user that was used. Now you can check the allowed API action IAM CreateUser that you observed before to see if the IAM users match. This helps you confirm that there were no other IAM users involved in the security event.

Query 2.8


SELECT recipientAccountId, awsRegion, eventID, eventTime, element_at(responseElements, 'user') as userInfo
FROM 467f2e52-84b9-4d41-8049-bc8f8fad35dd
WHERE userIdentity.principalId = 'AROASVPO5CIEXAMPLE:[email protected]'
AND eventName='CreateUser'
AND eventTime > '2022-09-13 00:00:00' AND eventTime < '2022-09-14 00:00:00'

The results of the query are as follows:

Figure 17: Sample query 2.8 and results in the console

Figure 17: Sample query 2.8 and results in the console

Based on this output, you can confirm that the IAM user is indeed the same. This user was created successfully but was denied the creation of access keys, confirming the failed attempt to get new persistent and programmatic credentials.

Query 2.9: Get more information about the IAM role creation attempt

Now you can figure out what happened with the IAM CreateRole denied action. With the following query, you can see the full error message for the denied action.

Query 2.9


SELECT recipientAccountId, awsRegion, eventID, eventTime, errorCode, errorMessage
FROM 467f2e52-84b9-4d41-8049-bc8f8fad35dd
WHERE userIdentity.principalId = 'AROASVPO5CIEXAMPLE:[email protected]'
AND eventName='CreateRole'
AND eventTime > '2022-09-13 00:00:00' AND eventTime < '2022-09-14 00:00:00'

The results of the query are as follows:

Figure 18: Sample query 2.9 and results in the console

Figure 18: Sample query 2.9 and results in the console

If you copy the output of this query, you will see that the role was denied by a service control policy, as shown in the following example:


"errorMessage":"User: arn:aws:sts::111122223333:assumed-role/AWSReservedSSO_AdministratorAccess_f53d10b0f8a756ac/[email protected] is not authorized to perform: iam:CreateRole on resource: arn:aws:iam::111122223333:role/production-ec2-role with an explicit deny in a service control policy"

Query 2.10: Get more information about IAM role policy changes

With the previous query, you confirmed that the unauthorized user failed to create a new IAM role to replace the existing EC2 instance profile in an attempt to grant more permissions. And with another of the previous queries, you confirmed that the IAM API action AttachRolePolicy was also denied, in another attempt for the same goal, but this time trying to attach a new AWS managed policy directly. However, with this new query, you can confirm that the unauthorized user successfully applied an inline policy to the EC2 role associated with the existing EC2 instance profile, with full admin access.

Query 2.10


SELECT recipientAccountId, eventID, eventTime, element_at(requestParameters, 'roleName') as roleName, element_at(requestParameters, 'policyDocument') as policyDocument FROM 467f2e52-84b9-4d41-8049-bc8f8fad35dd WHERE userIdentity.principalId = 'AROASVPO5CIEXAMPLE:[email protected]' AND eventName = 'PutRolePolicy' AND eventTime > '2022-09-13 00:00:00' AND eventTime < '2022-09-14 00:00:00'

The results of the query are as follows:

Figure 19: Sample query 2.10 and results in the console

Figure 19: Sample query 2.10 and results in the console

Summary of incident scenario 2

This second scenario describes a security incident that involves an IAM Identity Center user that has been compromised. To investigate this incident by using CloudTrail Lake capabilities, you did the following:

  • Started the investigation by looking at metadata from the GuardDuty EC2 finding
  • Confirmed the AWS credentials that were used for the creation of that resource
  • Looked at whether the IAM Identity Center user credentials were used to access other AWS accounts
  • Did further investigation on the AWS APIs that were called by the IAM Identity Center user
  • Obtained the list of denied actions, confirming the unauthorized user’s attempt to get persistent access and cover their tracks
  • Obtained the list of EC2 resources that were successfully created in this security event

Conclusion

In this post, we’ve shown you how to use AWS CloudTrail Lake capabilities to investigate CloudTrail activity in response to security incidents across your organization. We also provided sample queries for two security incident scenarios. You now know how to use the capabilities of CloudTrail Lake to assist you and your security teams during the investigation process in a security incident. Additionally, you can find some of the sample queries related to this post and other topics in the following GitHub repository, and additional examples in the sample queries tab in the CloudTrail console. To learn more, see Working with CloudTrail Lake in the CloudTrail User Guide.

Regarding pricing for CloudTrail Lake, you pay for ingestion and storage together, where the billing is based on the amount of uncompressed data ingested. If you’re a new customer, you can try AWS CloudTrail Lake for a 30-day free trial or when you reach the free usage limits of 5GB of data. For more information, see see AWS CloudTrail pricing.

Finally, in combination with the investigation techniques shown in this post, we also recommend that you explore the use of Amazon Detective, an AWS managed and dedicated service that simplifies the investigative process and helps security teams conduct faster and more effective investigations. With the Amazon Detective prebuilt data aggregations, summaries, and context, you can quickly analyze and determine the nature and extent of possible security issues.

 
If you have feedback about this post, submit comments in the Comments section below. If you have questions about this post, contact AWS Support.

Want more AWS Security news? Follow us on Twitter.

Author

Rodrigo Ferroni

Rodrigo Ferroni is a senior Security Specialist at AWS Enterprise Support. He is certified in CISSP, AWS Security Specialist, and AWS Solutions Architect Associate. He enjoys helping customers to continue adopting AWS security services to improve their security posture in the cloud. Outside of work, he loves to travel as much as he can. In every winter he enjoys snowboarding with his friends.

Eduardo Ortiz Pineda

Eduardo Ortiz Pineda

Eduardo is a Senior Security Specialist at AWS Enterprise Support. He is interested in different security topics, automation, and helping customers to improve their security posture. Outside of work, he spends his free time with family and friends, enjoying sports, reading and traveling.

Week in Review – February 13, 2023

Post Syndicated from Sébastien Stormacq original https://aws.amazon.com/blogs/aws/week-in-review-february-13-2023/

AWS announced 32 capabilities since we published the last Week in Review blog post a week ago. I also read a couple of other news and blog posts.

Here is my summary.

The VPC section of the AWS Management Console now allows you to visualize your VPC resources, such as the relationships between a VPC and its subnets, routing tables, and gateways. This visualization was available at VPC creation time only, and now you can go back to it using the Resource Map tab in the console. You can read the details in Channy’s blog post.

CloudTrail Lake now gives you the ability to ingest activity events from non-AWS sources. This lets you immutably store and then process activity events without regard to their origin–AWS, on-premises servers, and so forth. All of this power is available to you with a single API call: PutAuditEvents. We launched AWS CloudTrail Lake about a year ago. It is a managed organization-scale data lake that aggregates, immutably stores, and allows querying of events recorded by CloudTrail. You can use it for auditing, security investigation, and troubleshooting. Again, my colleague Channy wrote a post with the details.

There are three new Amazon CloudWatch metrics for asynchronous AWS Lambda function invocations: AsyncEventsReceived, AsyncEventAge, and AsyncEventsDropped. These metrics provide visibility for asynchronous Lambda function invocations. They help you to identify the root cause of processing issues such as throttling, concurrency limit, function errors, processing latency because of retries, or missing events. You can learn more and have access to a sample application in this blog post.

Amazon Simple Notification Service (Amazon SNS) now supports AWS X-Ray to visualize, analyze, and debug applications. Developers can now trace messages going through Amazon SNS, making it easier to understand or debug microservices or serverless applications.

Amazon EC2 Mac instances now support replacing root volumes for quick instance restoration. Stopping and starting EC2 Mac instances trigger a scrubbing workflow that can take up to one hour to complete. Now you can swap the root volume of the instance with an EBS snapshot or an AMI. It helps to reset your instance to a previous known state in 10–15 minutes only. This significantly speeds up your CI and CD pipelines.

Amazon Polly launches two new Japanese NTTS voices. Neural Text To Speech (NTTS) produces the most natural and human-like text-to-speech voices possible. You can try these voices in the Polly section of the AWS Management Console. With this addition, according to my count, you can now choose among 52 NTTS voices in 28 languages or language variants (French from France or from Quebec, for example).

The AWS SDK for Java now includes the AWS CRT HTTP Client. The HTTP client is the center-piece powering our SDKs. Every single AWS API call triggers a network call to our API endpoints. It is therefore important to use a low-footprint and low-latency HTTP client library in our SDKs. AWS created a common HTTP client for all SDKs using the C programming language. We also offer 11 wrappers for 11 programming languages, from C++ to Swift. When you develop in Java, you now have the option to use this common HTTP client. It provides up to 76 percent cold start time reduction on AWS Lambda functions and up to 14 percent less memory usage compared to the Netty-based HTTP client provided by default. My colleague Zoe has more details in her blog post.

X in Y Jeff started this section a while ago to list the expansion of new services and capabilities to additional Regions. I noticed 10 Regional expansions this week:

Other AWS News
This week, I also noticed these AWS news items:

My colleague Mai-Lan shared some impressive customer stories and metrics related to the use and scale of Amazon S3 Glacier. Check it out to learn how to put your cold data to work.

Space is the final (edge) frontier. I read this blog post published on avionweek.com. It explains how AWS helps to deploy AIML models on observation satellites to analyze image quality before sending them to earth, saving up to 40 percent satellite bandwidth. Interestingly, the main cause for unusable satellite images is…clouds.

Upcoming AWS Events
Check your calendars and sign up for these AWS events:

AWS re:Invent recaps in your area. During the re:Invent week, we had lots of new announcements, and in the next weeks, you can find in your area a recap of all these launches. All the events are posted on this site, so check it regularly to find an event nearby.

AWS re:Invent keynotes, leadership sessions, and breakout sessions are available on demand. I recommend that you check the playlists and find the talks about your favorite topics in one collection.

AWS Summits season will restart in Q2 2023. The dates and locations will be announced here. Paris and Sidney are kicking off the season on April 4th. You can register today to attend these in-person, free events (Paris, Sidney).

Stay Informed
That was my selection for this week! To better keep up with all of this news, do not forget to check out the following resources:

— seb
This post is part of our Week in Review series. Check back each week for a quick roundup of interesting news and announcements from AWS!