All posts by Svenja Raether

Announcing the General Availability of the Amazon EventBridge Scheduler L2 Construct

Post Syndicated from Svenja Raether original https://aws.amazon.com/blogs/devops/announcing-the-general-availability-of-the-amazon-eventbridge-scheduler-l2-construct/

Today we’re announcing the general availability (GA) of the Amazon EventBridge Scheduler and Targets Level 2 (L2) constructs in the AWS Cloud Development Kit (AWS CDK) construct library. EventBridge Scheduler is a serverless scheduler that enables users to schedule tasks and events at scale. Prior to the launch of these L2 constructs, developers had to define all relevant properties (via L1 constructs) across schedules and provide the glue logic between resources when defining their AWS CDK applications. The graduated constructs make it easier for users to configure EventBridge schedules, groups, and targets for AWS service integrations. They follow the AWS CDK L2 higher-level API design simplifications and provide a backwards-compatible guarantee across minor versions. Developers can use those alongside other existing stable AWS CDK constructs ready for production use.

Background

The AWS Cloud Development Kit (CDK) is an open-source software development framework for defining cloud infrastructure in code and provisioning it through AWS CloudFormation. It contains pre-written modular and reusable cloud components known as constructs. Constructs are the basic building blocks representing one or more AWS CloudFormation resources and their configuration. They are available in different abstraction levels. L1 constructs are the lowest-level constructs which map directly to AWS CloudFormation resources without abstractions. L2 constructs are thoughtfully developed and provide a higher-level abstraction through an intuitive intent-based API. They leverage default property configurations, best practice security policies, and convenience methods that make it simpler and quicker to define and deploy resources.

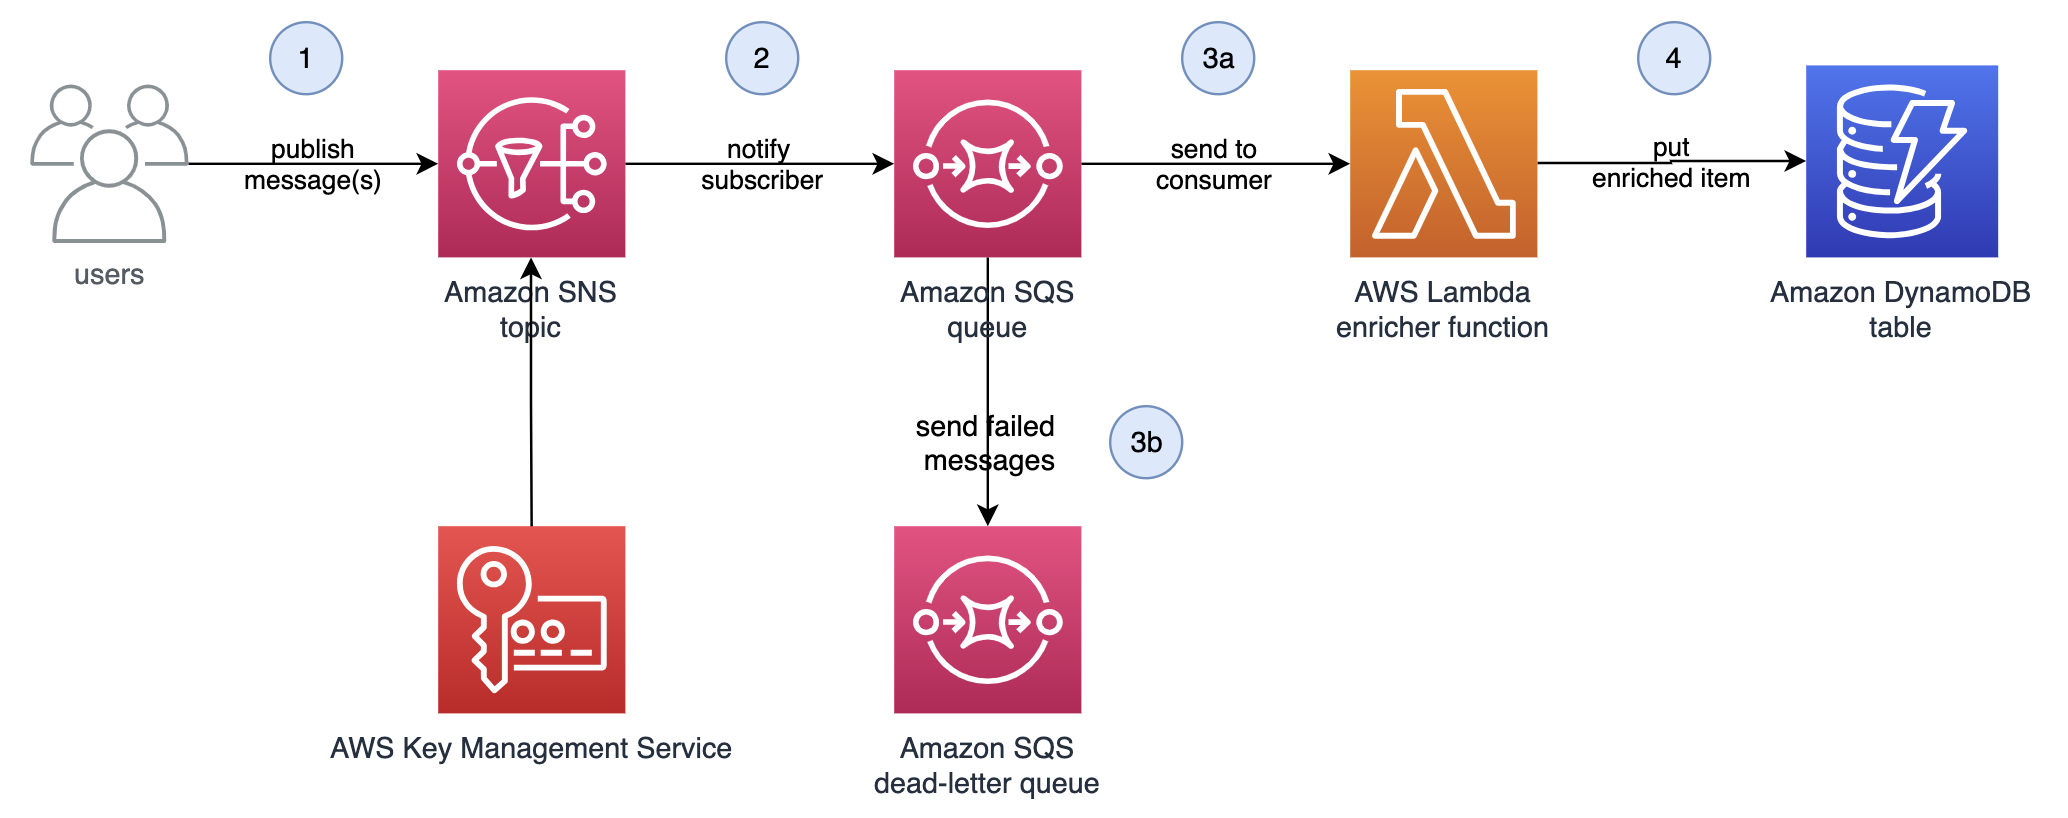
Amazon EventBridge Scheduler is a serverless scheduler that allows users to create, run, and manage tasks from one central, managed service. With EventBridge Scheduler, users can create schedules using cron and rate expressions for recurring patterns, or configure one-time invocations. EventBridge supports templated and universal targets. Templated targets include common API operations across a group of core AWS services, such as publishing a message to an Amazon Simple Notification Service (Amazon SNS) topic or invoking an AWS Lambda function. Universal targets are customized triggers supporting more than 270 AWS services and over 6,000 API operations on a schedule. Users can use schedule groups to organize their schedules.

With the L2 constructs for Amazon EventBridge Scheduler and Targets, it becomes even simpler for users to configure and integrate those resources into their CDK applications. Let’s explore the benefits by looking at some examples.

Using the L2 EventBridge Scheduler construct

We introduce two use cases for the EventBridge Scheduler and Targets L2 constructs to demonstrate their usage within common scenarios. Each example is equipped with sample code, emphasizing the simplifications achieved by the L2 constructs.

Example 1 – One time reminder through Amazon SNS

In the first use case, users want to configure one-time notifications to receive reminders of their favorite conferences at a specific time, for example a user may want to set a reminder one month before the start of AWS re:Invent to be reminded of their participation.

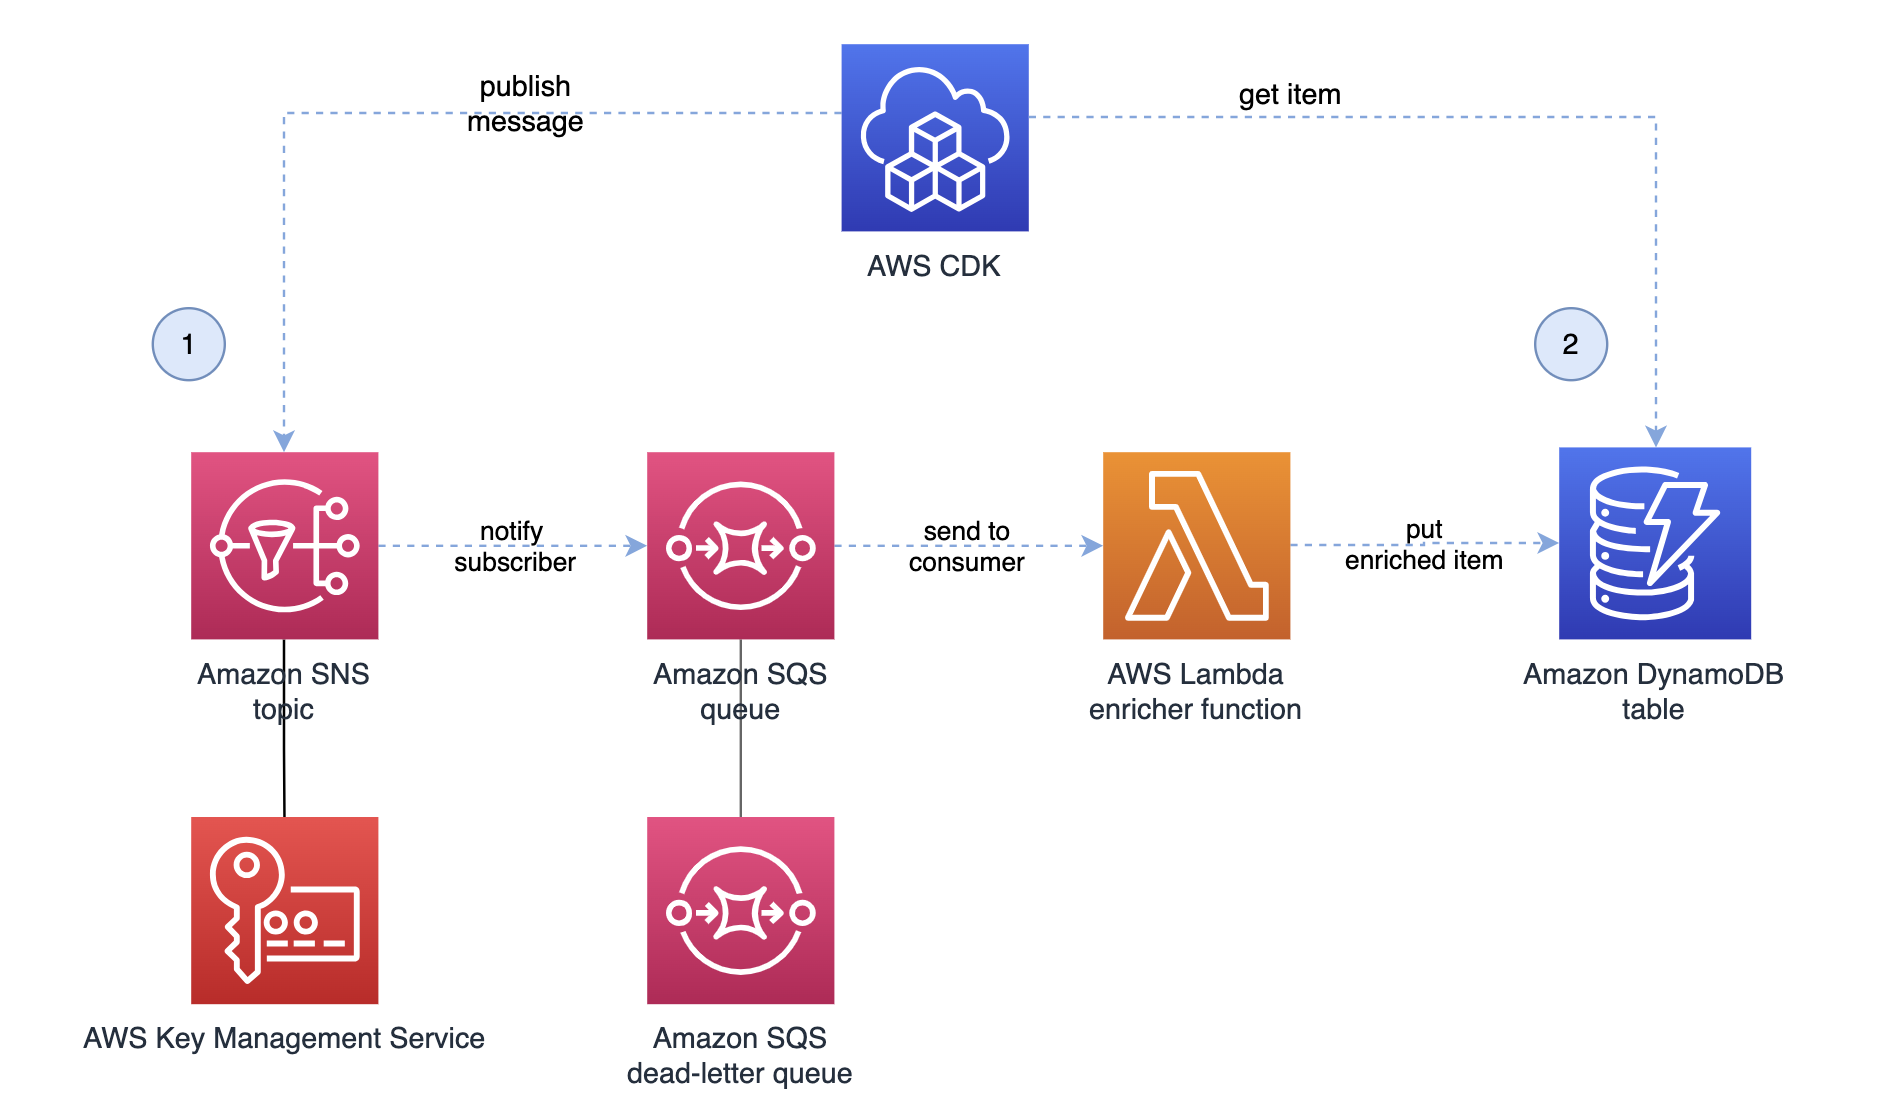
The example below uses the EventBridge Scheduler construct with a templated Amazon SNS target. The target applies an on-time schedule configuration and is configured with an Amazon Simple Queue Service (Amazon SQS) dead-letter queue to capture and retry failed events. The schedule payload is encrypted using a customer-managed AWS Key Management Service (AWS KMS) key.

const snsTarget = new targets.SnsPublish(topic, {
   input: ScheduleTargetInput.fromObject({
     message: "Reminder: AWS re:Invent starts in one month.",
   }),
   deadLetterQueue: deadLetterQueue,
});
 
const schedule = new Schedule(this, "ReminderSchedule", {
  description:
     "This schedule publishes a one-time notification to an Amazon SNS topic.",
   schedule: ScheduleExpression.at(
     new Date(2025, 10, 1), // Nov 01, 2025
     cdk.TimeZone.AMERICA_LOS_ANGELES
   ),
   target: snsTarget,
   key: key,
});

From the code example, we can see that well-defined interfaces for ScheduleTargetInput, and ScheduleExpression make it easy to select matching configuration values.

The SnsPublish target and Schedule constructs seamlessly integrate with the existing L2 constructs for Amazon SNS, Amazon SQS, and Amazon KMS. They abstract away the gluing logic used to configure the target API operation, dead-letter queue, and encryption settings with correct references. Instead of manually crafting permissions, the construct generates an AWS Identity and Access Management (IAM) execution role with the minimum necessary permissions to interact with the templated target, as shown in the policy below.

{
 "Version": "2012-10-17",
 "Statement": [
 {
 "Action": "sns:Publish",
 "Resource": "arn:aws:sns:us-east-1:123456789012:<TOPIC_NAME>",
 "Effect": "Allow"
 },
 {
 "Action": "kms:Decrypt",
 "Resource": "arn:aws:kms:us-east-1:123456789012:key/<UUID>",
 "Effect": "Allow"
 },
 {
 "Action": "sqs:SendMessage",
 "Resource": "arn:aws:sqs:us-east-1:123456789012:<QUEUE_NAME>",
 "Effect": "Allow"
 }
 ]
 }

The construct sets default properties. For example, it applies default configurations for the retry policy if not explicitly stated. As shown in Figure 1, the above defined schedule has been defined with a 1-day maximum event retention time and 185 maximum retries.

Default configurations for the Retry Policy

Example 2 – Start / Stop EC2 instance during business hours

In the second scenario, a recurring cron schedule is used to automatically stop Amazon EC2 instances during the business hours of a specific time zone.

The example below uses the EventBridge Scheduler construct with a universal target to perform the Amazon EC2 stopInstance API operation. It creates a custom schedule group to organize the schedules by time zone and allows an Amazon Lambda function to read all schedules in it for administrative purposes.

const group = new ScheduleGroup(this, "ScheduleGroup", {
  scheduleGroupName: "Europe-London",
});
 
new Schedule(this, "Schedule", {
  schedule: ScheduleExpression.cron({
minute: "0",
hour: "23",
timeZone: cdk.TimeZone.EUROPE_LONDON,
  }),
  target: new targets.Universal({
service: "ec2",
action: "stopInstances",
input: ScheduleTargetInput.fromObject({
  InstanceIds: [ec2Instance.instanceId],
}),
  }),
  scheduleGroup: group,
});
 
group.grantReadSchedules(lambdaFunction);

Similar to the first example, the ScheduleExpression and ScheduleTargetInput help users to define the correct input types. The universal target is one of the options allowed by the scheduler-target constructs that allow users to perform SDK API operations on AWS services such as Amazon EC2.

The ScheduleGroup construct is used to create the group, which is used as a property on the Schedule construct. The group implements convenience methods that allow simplified permissions management. The example above grants read permissions for the schedule group to an Amazon Lambda function, which is applied to the resources without additional configuration.

Community Shout-Outs

The CDK team would like to give a huge shout-out to the awesome members of the community that contributed to this construct to help get it where it is today! Thank you to:

sakurai-ryo

Kenta Goto

Hiroki Yamazaki

Joshua Weber

Manuel

Jacco Kulman

Conclusion

In this post, we introduced the general availability of the AWS CDK L2 construct for Amazon EventBridge Scheduler and Targets. We showcased practical implementations of the new construct, leveraging two example use cases. For more details on the EventBridge Scheduler L2 construct and examples of its use, see the Scheduler CDK Documentation.

If you’re new to AWS CDK and want to get started, we highly recommend checking out the CDK documentation and the CDK workshop.

Testing your applications with Amazon Q Developer

Post Syndicated from Svenja Raether original https://aws.amazon.com/blogs/devops/testing-your-applications-with-amazon-q-developer/

Testing code is a fundamental step in the field of software development. It ensures that applications are reliable, meet quality standards, and work as intended. Automated software tests help to detect issues and defects early, reducing impact to end-user experience and business. In addition, tests provide documentation and prevent regression as code changes over time.

In this blog post, we show how the integration of generative AI tools like Amazon Q Developer can further enhance unit testing by automating test scenarios and generating test cases.

Amazon Q Developer helps developers and IT professionals with all of their tasks across the software development lifecycle – from coding, testing, and upgrading, to troubleshooting, performing security scanning and fixes, optimizing AWS resources, and creating data engineering pipelines. It integrates into your Integrated Development Environment (IDE) and aids with providing answers to your questions. Amazon Q Developer supports you across the Software Development Lifecycle (SLDC) by enriching feature and test development with step-by-step instructions and best practices. It learns from your interactions and training itself over time to output personalized, and tailored answers.

Solution overview

In this blog, we show how to use Amazon Q Developer to:

  • learn about software testing concepts and frameworks
  • identify unit test scenarios
  • write unit test cases
  • refactor test code
  • mock dependencies
  • generate sample data

Note: Amazon Q Developer may generate an output different from this blog post’s examples due to its nondeterministic nature.

Using Amazon Q Developer to learn about software testing frameworks and concepts

As you start gaining experience with testing, Amazon Q Developer can accelerate your learning through conversational Q&A directly within the AWS Management Console or the IDE. It can explain topics, provide general advice and share helpful resources on testing concepts and frameworks. It gives personalized recommendations on resources which makes the learning experience more interactive and accelerates the time to get started with writing unit tests. Let’s introduce an example conversation to demonstrate how you can leverage Amazon Q Developer for learning before attempting to write your first test case.

Example – Select and install frameworks

A unit testing framework is a software tool used for test automation, design and management of test cases. Upon starting a software project, you may be faced with the selection of a framework depending on the type of tests, programming language, and underlying technology. Let’s ask for recommendations around unit testing frameworks for Python code running in an AWS Lambda function.

In the Visual Studio Code IDE, a user asks Amazon Q Developer for recommendations on unit test frameworks suitable for AWS Lambda functions written in Python using the following prompt: “Can you recommend unit testing frameworks for AWS Lambda functions in Python?”. Amazon Q Developer returns a numbered list of popular unit testing frameworks, including Pytest, unittest, Moto, AWS SAM Local, and AWS Lambda Powertools. Amazon Q Developer returns two URLs in the Sources section. The first URL links to an article called “AWS Lambda function testing in Python – AWS Lambda” from the AWS documentation, and the other URL to an AWS DevOps Blog post with the title “Unit Testing AWS Lambda with Python and Mock AWS Services”.

Figure 1: Recommend unit testing frameworks for AWS Lambda functions in Python

In Figure 1, Amazon Q Developer answers with popular frameworks (pytest, unittest, Moto, AWS SAM Command Line Interface, and Powertools for AWS Lambda) including a brief description for each of them. It provides a reference to the sources of its response at the bottom and suggested follow up questions. As a next step, you may want to refine what you are looking for with a follow-up question. Amazon Q Developer uses the context from your previous questions and answers to give more precise answers as you continue the conversation. For example, one of the frameworks it suggested using was pytest. If you don’t know how to install that locally, you can ask something like “What are the different options to install pytest on my Linux machine?”. As shown in Figure 2, Amazon Q Developer provides installation recommendation using Python.

In the Visual Studio Code IDE, a user asks Amazon Q Developer about the different options to install pytest on a Linux machine using the following prompt: “What are the different options to install pytest on my Linux machine?”. Amazon Q Developer replies with four different options: using pip, using a package manager, using a virtual environment, and using a Python distribution. Each option includes the steps to install pytest. A source URL is included for an article called “How to install pytest in Python? – Be on the Right Side of Change”.

Figure 2: Options to install pytest

Example – Explain concepts

Amazon Q Developer can also help you to get up to speed with testing concepts, such as mocking service dependencies. Let’s ask another follow up question to explain the benefits of mocking AWS services.

In the Visual Studio Code IDE, a user asks Amazon Q Developer about the key benefits of mocking AWS Services’ API calls to create unit tests for Lambda function code using the following prompt: “What are the key benefits of mocking AWS Services' API calls to create unit tests for Lambda function code?”. Amazon Q Developer replies with six key benefits, including: Isolation of the Lambda function code, Faster feedback loop, Consistent and repeatable tests, Cost savings, Improved testability, and Easier debugging. Each benefit has a brief explanation attached to it. The Sources section includes one URL to an AWS DevOps Blog post with the title “Unit Testing AWS Lambda with Python and Mock AWS Services”.

Figure 3: Benefits of mocking AWS services

The above conversation in Figure 3 shows how Amazon Q Developer can help to understand concepts. Let’s learn more about Moto.

In the Visual Studio Code IDE, a user asks Amazon Q Developer: “What is Moto used for?”. Amazon Q Developer provides a brief explanation of the Moto library, and how it can be used to create simulations of various AWS resources, such as: AWS Lambda, Amazon Dynamo DB, Amazon S3, Amazon EC2, AWS IAM, and many other AWS services. Amazon Q Developer provides a simple code example of how to use Moto to mock the AWS Lambda service in a Pytest test case by using the @mock_lambda decorator.

Figure 4: Follow up question about Moto

In Figure 4, Amazon Q Developer gives more details about the Moto framework and provides a short example code snippet for mocking an AWS Lambda service.

Best Practice – Write clear prompts

Writing clear prompts helps you to get the desired answers from Amazon Q. A lack of clarity and topic understanding may result in unclear questions and irrelevant or off-target responses. Note how those prompts contain specific description of what the answer should provide. For example, Figure 1 includes the programming language (Python) and service (AWS Lambda) to be considered in the expected answer. If unfamiliar with a topic, leverage Amazon Q Developer as part of your research, to better understand that topic.

Using Amazon Q Developer to identify unit test cases

Understanding the purpose and intended functionality of the code is important for developing relevant test cases. We introduce an example use case in Python, which handles payroll calculation for different hour rates, hours worked, and tax rates.

"""
This module provides a Payroll class to calculate the net pay for an employee.

The Payroll class takes in the hourly rate, hours worked, and tax rate, and
calculates the gross pay, tax amount, and net pay.
"""

class Payroll:
    """
    A class to handle payroll calculations.
    """

    def __init__(self, hourly_rate: float, hours_worked: float, tax_rate: float):
        self._validate_inputs(hourly_rate, hours_worked, tax_rate)
        self.hourly_rate = hourly_rate
        self.hours_worked = hours_worked
        self.tax_rate = tax_rate

    def _validate_inputs(self, hourly_rate: float, hours_worked: float, tax_rate: float) -> None:
        """
        Validate the input values for the Payroll class.

        Args:
            hourly_rate (float): The employee's hourly rate.
            hours_worked (float): The number of hours the employee worked.
            tax_rate (float): The tax rate to be applied to the employee's gross pay.

        Raises:
            ValueError: If the hourly rate, hours worked, or tax rate is not a positive number, 
            or if the tax rate is not between 0 and 1.
        """
        if hourly_rate <= 0:
            raise ValueError("Hourly rate must be a non-negative number.")
        if hours_worked < 0:
            raise ValueError("Hours worked must be a non-negative number.")
        if tax_rate < 0 or tax_rate >= 1:
            raise ValueError("Tax rate must be between 0 and 1.")

    def gross_pay(self) -> float:
        """
        Calculate the employee's gross pay.

        Returns:
            float: The employee's gross pay.
        """
        return self.hourly_rate * self.hours_worked

    def tax_amount(self) -> float:
        """
        Calculate the tax amount to be deducted from the employee's gross pay.

        Returns:
            float: The tax amount.
        """
        return self.gross_pay() * self.tax_rate

    def net_pay(self) -> float:
        """
        Calculate the employee's net pay after deducting taxes.

        Returns:
            float: The employee's net pay.
        """
        return self.gross_pay() - self.tax_amount()

The example shows how Amazon Q Developer can be used to identify test scenarios before writing the actual cases. Let’s ask Amazon Q Developer to suggest test cases for the Payroll class.

In the Visual Studio Code IDE, a user has a Payroll Python class open on the right side of the editor. The Payroll class is a module used to calculate the net pay for an employee. It takes the hourly rate, hours worked, and tax rate to calculate the gross pay, tax amount, and net pay. The user asks Amazon Q Developer to list unit test scenarios for the Payroll class using the following prompt: “Can you list unit test scenarios for the Payroll class?”. Amazon Q Developer provides eight different unit test scenarios: Test valid input values, Test invalid input values, Test edge cases, Test methods behavior, Test error handling, Test data types, Test rounding behavior, and Test consistency.

Figure 5: Suggest unit test scenarios

In Figure 5, Amazon Q Developer provides a list of different scenarios specific to the Payroll class, including valid, error, and edge cases.

Using Amazon Q Developer to write unit tests

Developers can have a collaborative conversation with Amazon Q Developer, which helps to unpack the code and think through testing cases to check that important test cases are captured but also edge cases are identified. This section focuses on how to facilitate the quick generation of unit test cases, based on the cases recommended in the previous section. Let’s start with a question around best practices when writing unit tests with pytest.

In the Visual Studio Code IDE, a user asks Amazon Q Developer “What are the best practices for unit testing with pytest?”. Amazon Q Developer replies with ten best practices, including: Keep tests simple and focused, Use descriptive test function names, Organize your tests, Run tests multiple times in random order, Utilize static code analysis tools, Focus on behavior not implementation, Use fixtures to set up test data, Parameterize your tests, and Integrate with continuous integration. A source URL is also provided for a Medium article called “Python Unit Tests with pytest Guide”

Figure 6: Recommended best practices for testing with pytest

In Figure 6, Amazon Q Developer provides a list of best practices for writing effective unit tests. Let’s follow up by asking to generate one of the suggested test cases.

In the Visual Studio Code IDE, a user asks Amazon Q Developer to generate a test case using pytest to make sure that the Payroll class raises a ValueError when the hourly rate holds a negative value. Amazon Q Developer generates a code sample using the pytest.raises() context manager to satisfy the requirement. It also provides instructions on how to run the text by prefixing the test module with pytest and running the command in the terminal. The user can now click on Insert at cursor button to insert the test case into the module, and run the test.

Figure 7: Generate a unit test case

Amazon Q Developer includes code in its response which you can copy or insert directly into your file by choosing Insert at cursor. Figure 7 displays valid unit tests covering some of the suggested scenarios and best practices, such as being simple and holding descriptive naming. It also states how to run the test using a command for the terminal.

Best Practice – Provide context

Context allows Amazon Q Developer to offer tailored responses that are more in sync with the conversation. In the chat interface, the flow of the ongoing conversation and past interactions are a critical contextual element. Other ways to provide context are selecting the code-under-test, keeping any relevant files, such as test examples, open in the editor and leveraging conversation context such as asking for best practices and example test scenarios before writing the test cases.

Using Amazon Q Developer to refactor unit tests

To improve code quality, Amazon Q Developer can be used to recommend improvements and refactor parts of the code base. To illustrate Amazon Q Developer refactoring functionality, we prepared test cases for the Payroll class which deviate from some of the suggested best practices.

Example – Send to Amazon Q Refactor

Let’s follow up by asking to refactor the code built-in Amazon Q > Refactor functionality.

In the Visual Studio Code IDE, a user selects the code in test_payroll_refactor module and asks Amazon Q Developer to refactor it via the Amazon Q Developer Refactor functionality, accessible through right click. This code contains ambiguous function and variable names, and might be hard to read without context. Amazon Q Developer then generates the refactored code and outlines the changes made: renamed test functions, removed variable names, and unnecessary comments, as functions are now self-explanatory. The user can now use the Insert at Cursor feature to add the code to the test_payroll_refactored module, and run the tests.

Figure 8: Refactor test cases

In Figure 8, the refactoring renamed the function and variable names to be more descriptive and therefore removed the comments. The recommendation is inserted in the second file to verify it runs correctly.

Best Practice – Apply human judgement and continuously interact with Amazon Q Developer

Note that code generations should always be reviewed and adjusted before used in your projects. Amazon Q Developer can provide you with initial guidance, but you might not get a perfect answer. A developer’s judgement should be applied to value usefulness of the generated code and iterations should be used to continuously improve the results.

Using Amazon Q Developer for mocking dependencies and generating sample data

More complex application architectures may require developers to mock dependencies and use sample data to test specific functionalities. The second code example contains a save_to_dynamodb_table function that writes a job_posting object into a specific Amazon DynamoDB table. This function references the TABLE_NAME environment variable to specify the name of the table in which the data should be saved.

We break down the tasks for Amazon Q Developer into three smaller steps for testing: Generate a fixture for mocking the TABLE_NAME environment variable name, generate instances of the given class to be used as test data, and generate the test.

Example – Generate fixtures

Pytest provides the capability to define fixtures to set defined, reliable, and consistent context for tests. Let’s ask Amazon Q Developer to write a fixture for the TABLE_NAME environment variable.

In the Visual Studio Code IDE, a user asks Amazon Q Developer to create a pytest fixture to mock the TABLE_NAME environment variable using the following prompt: “Create a pytest fixture which mocks my TABLE_NAME environment variable”. Amazon Q Developer replies with a code example showing how the fixture uses the os.environ dictionary to temporarily set the environment variable value to a mock value just for the duration of any test case using the fixture. The code example also includes a yield keyword to pause the fixture, and then delete the mock environment variable to restore the actual value once the test is completed.

Figure 9: Generate a pytest fixture

The result in Figure 9 shows that Amazon Q Developer generated a simple fixture for the TABLE_NAME environment variable. It provides code showing how to use the fixture in the actual test case with additional comments for its content.

Example – Generate data

Amazon Q Developer provides capabilities that can help you generate input data for your tests based on a schema, data model, or table definition. The save_to_dynamodb_table saves an instance of the job posting class to the table. Let’s ask Amazon Q Developer to create a sample instance based on this definition.

In the Visual Studio Code IDE, a user asks Amazon Q Developer to create a sample valid instance of the selected JobPosting class using the following prompt: “Create a sample valid instance of the selected JobPostings class”. The JobPosting class includes multiple fields, including: id, title, description, salary, location, company, employment type, and application_deadline. Amazon Q Developer provides a valid snippet for the JobPosting class, incorporating a UUID for the id field, nested amount and currency for the Salary class, and generic sample values for the remaining fields.

Figure 10: Generate sample data

The answer shows a valid instance of the class in Figure 10 containing common example values for the fields.

Example – Generate unit test cases with context

The code being tested relies on an external library, boto3. To make sure that this dependency is included, we leave a comment specifying that boto3 should be mocked using the Moto library. Additionally, we tell Amazon Q Developer to consider the test instance named job_posting and the fixture named mock_table_name for reference. Developers can now provide a prompt to generate the test case using the context from previous tasks or use comments as inline prompts to generate the test within the test file itself.

In the Visual Studio Code IDE, a user is leveraging inline prompts to generate an autocomplete suggestion from Amazon Q Developer. The inline prompt response is trying to fill out the test_save_to_dynamodb_table function with a mock test asserting the previous JobPosting fields. The user can decide to accept or reject the provided code completion suggestion.

Figure 11: Inline prompts for generating unit test case

Figure 11 shows the recommended code using inline prompts, which can be accepted as the unit test for the save_to_dynamodb_table function.

Best Practice – Break down larger tasks into smaller ones

For cases where Amazon Q Developer does not have much context or example code to refer to, such as writing unit tests from scratch, it is helpful to break down the tasks into smaller tasks. Amazon Q Developer will get more context with each step and can result in more effective responses.

Conclusion

Amazon Q Developer is a powerful tool that simplifies the process of writing and executing unit tests for your application. The examples provided in this post demonstrated that it can be a helpful companion throughout different stages of your unit test process. From initial learning to investigation and writing of test cases, the Chat, Generate, and Refactor capabilities allow you to speed up and improve your test generation. Using clear and concise prompts, context, an iterative approach, and small scoped tasks to interact with Amazon Q Developer improves the generated answers.

To learn more about Amazon Q Developer, see the following resources:

About the authors

Iris Kraja

Iris is a Cloud Application Architect at AWS Professional Services based in New York City. She is passionate about helping customers design and build modern AWS cloud native solutions, with a keen interest in serverless technology, event-driven architectures and DevOps. Outside of work, she enjoys hiking and spending as much time as possible in nature.

Svenja Raether

Svenja is a Cloud Application Architect at AWS Professional Services based in Munich.

Davide Merlin

Davide is a Cloud Application Architect at AWS Professional Services based in Jersey City. He specializes in backend development of cloud-native applications, with a focus on API architecture. In his free time, he enjoys playing video games, trying out new restaurants, and watching new shows.

How to write and execute integration tests for AWS CDK applications

Post Syndicated from Svenja Raether original https://aws.amazon.com/blogs/devops/how-to-write-and-execute-integration-tests-for-aws-cdk-applications/

Automated integration testing validates system components and boosts confidence for new software releases. Performing integration tests on resources deployed to the AWS cloud enables the validation of AWS Identity and Access Management (IAM) policies, service limits, application configuration, and runtime code. For developers that are currently leveraging AWS Cloud Development Kit (AWS CDK) as their Infrastructure as Code tool, there is a testing framework available that makes integration testing easier to implement in the software release.

AWS CDK is an open-source framework for defining and provisioning AWS cloud infrastructure using supported programming languages. The framework includes constructs for writing and running unit and integration tests. The assertions construct can be used to write unit tests and assert against the generated CloudFormation templates. CDK integ-tests construct can be used for defining integration test cases and can be combined with CDK integ-runner for executing these tests. The integ-runner handles automatic resource provisioning and removal and supports several customization options. Unit tests using assertion functions are used to test configurations in the CloudFormation templates before deploying these templates, while integration tests run assertions in the deployed resources. This blog post demonstrates writing automated integration tests for an example application using AWS CDK.

Solution Overview

Architecture Diagram for the serverless data enrichment application

Figure 1: Serverless data enrichment application

The example application shown in Figure 1 is a sample serverless data enrichment application. Data is processed and enriched in the system as follows:

  1. Users publish messages to an Amazon Simple Notification Service (Amazon SNS) topic. Messages are encrypted at rest using an AWS Key Management Service (AWS KMS) customer-managed key.
  2. Amazon Simple Queue Service (Amazon SQS) queue is subscribed to the Amazon SNS topic, where published messages are delivered.
  3. AWS Lambda consumes messages from the Amazon SQS queue, adding additional data to the message. Messages that cannot be processed successfully are sent to a dead-letter queue.
  4. Successfully enriched messages are stored in an Amazon DynamoDB table by the Lambda function.
Architecture diagram for the integration test with one assertion

Figure 2: Integration test with one assertion

For this sample application, we will use AWS CDK’s integration testing framework to validate the processing for a single message as shown in Figure 2. To run the test, we configure the test framework to do the following steps:

  1. Publish a message to the Amazon SNS topic. Wait for the application to process the message and save to DynamoDB.
  2. Periodically check the Amazon DynamoDB table and verify that the saved message was enriched.

Prerequisites

The following are the required to deploy this solution:

The structure of the sample AWS CDK application repository is as follows:

  • /bin folder contains the top-level definition of the AWS CDK app.
  • /lib folder contains the stack definition of the application under test which defines the application described in the section above.
  • /lib/functions contains the Lambda function runtime code.
  • /integ-tests contains the integration test stack where we define and configure our test cases.

The repository is a typical AWS CDK application except that it has one additional directory for the test case definitions. For the remainder of this blog post, we focus on the integration test definition in /integ-tests/integ.sns-sqs-ddb.ts and walk you through its creation and the execution of the integration test.

Writing integration tests

An integration test should validate expected behavior of your AWS CDK application. You can define an integration test for your application as follows:

  1. Create a stack under test from the CdkIntegTestsDemoStack definition and map it to the application.
    // CDK App for Integration Tests
    const app = new cdk.App();
    
    // Stack under test
    const stackUnderTest = new CdkIntegTestsDemoStack(app, ‘IntegrationTestStack’, {
      setDestroyPolicyToAllResources: true,
      description:
        “This stack includes the application’s resources for integration testing.”,
    });
  2. Define the integration test construct with a list of test cases. This construct offers the ability to customize the behavior of the integration runner tool. For example, you can force the integ-runner to destroy the resources after the test run to force the cleanup.
    // Initialize Integ Test construct
    const integ = new IntegTest(app, ‘DataFlowTest’, {
      testCases: [stackUnderTest], // Define a list of cases for this test
      cdkCommandOptions: {
        // Customize the integ-runner parameters
        destroy: {
          args: {
            force: true,
          },
        },
      },
      regions: [stackUnderTest.region],
    });
  3. Add an assertion to validate the test results. In this example, we validate the single message flow from the Amazon SNS topic to the Amazon DynamoDB table. The assertion publishes the message object to the Amazon SNS topic using the AwsApiCall method. In the background this method utilizes a Lambda-backed CloudFormation custom resource to execute the Amazon SNS Publish API call with the AWS SDK for JavaScript.
    /**
     * Assertion:
     * The application should handle single message and write the enriched item to the DynamoDB table.
     */
    const id = 'test-id-1';
    const message = 'This message should be validated';
    /**
     * Publish a message to the SNS topic.
     * Note - SNS topic ARN is a member variable of the
     * application stack for testing purposes.
     */
    const assertion = integ.assertions
      .awsApiCall('SNS', 'publish', {
        TopicArn: stackUnderTest.topicArn,
        Message: JSON.stringify({
          id: id,
          message: message,
        }),
      })
  4. Use the next helper method to chain API calls. In our example, a second Amazon DynamoDB GetItem API call gets the item whose primary key equals the message id. The result from the second API call is expected to match the message object including the additional attribute added as a result of the data enrichment.
    /**
     * Validate that the DynamoDB table contains the enriched message.
     */
      .next(
        integ.assertions
          .awsApiCall('DynamoDB', 'getItem', {
            TableName: stackUnderTest.tableName,
            Key: { id: { S: id } },
          })
          /**
           * Expect the enriched message to be returned.
           */
          .expect(
            ExpectedResult.objectLike({
              Item: { id: { S: id, },
                message: { S: message, },
                additionalAttr: { S: 'enriched', },
              },
            }),
          )
  5. Since it may take a while for the message to be passed through the application, we run the assertion asynchronously by calling the waitForAssertions method. This means that the Amazon DynamoDB GetItem API call is called in intervals until the expected result is met or the total timeout is reached.
    /**
     * Timeout and interval check for assertion to be true.
     * Note - Data may take some time to arrive in DynamoDB.
     * Iteratively executes API call at specified interval.
     */
          .waitForAssertions({
            totalTimeout: Duration.seconds(25),
            interval: Duration.seconds(3),
          }),
      );
  6. The AwsApiCall method automatically adds the correct IAM permissions for both API calls to the AWS Lambda function. Given that the example application’s Amazon SNS topic is encrypted using an AWS KMS key, additional permissions are required to publish the message.
    // Add the required permissions to the api call
    assertion.provider.addToRolePolicy({
      Effect: 'Allow',
      Action: [
        'kms:Encrypt',
        'kms:ReEncrypt*',
        'kms:GenerateDataKey*',
        'kms:Decrypt',
      ],
      Resource: [stackUnderTest.kmsKeyArn],
    });

The full code for this blog is available on this GitHub project.

Running integration tests

In this section, we show how to run integration test for the introduced sample application using the integ-runner to execute the test case and report on the assertion results.

Install and build the project.

npm install 

npm run build

Run the following command to initiate the test case execution with a list of options.

npm run integ-test

The directory option specifies in which location the integ-runner needs to recursively search for test definition files. The parallel-regions option allows to define a list of regions to run tests in. We set this to us-east-1 and ensure that the AWS CDK bootstrapping has previously been performed in this region. The update-on-failed option allows to rerun the integration tests if the snapshot fails. A full list of available options can be found in the integ-runner Github repository.

Hint: if you want to retain your test stacks during development for debugging, you can specify the no-clean option to retain the test stack after the test run.

The integ-runner initially checks the integration test snapshots to determine if any changes have occurred since the last execution. Since there are no previous snapshots for the initial run, the snapshot verification fails. As a result, the integ-runner begins executing the integration tests using the ephemeral test stack and displays the result.

Verifying integration test snapshots...

  NEW        integ.sns-sqs-ddb 2.863s

Snapshot Results: 

Tests:    1 failed, 1 total

Running integration tests for failed tests...

Running in parallel across regions: us-east-1
Running test <your-path>/cdk-integ-tests-demo/integ-tests/integ.sns-sqs-ddb.js in us-east-1
  SUCCESS    integ.sns-sqs-ddb-DemoTest/DefaultTest 587.295s
       AssertionResultsAwsApiCallDynamoDBgetItem - success

Test Results: 

Tests:    1 passed, 1 total
The AWS CloudFormation console deploys the IntegrationTestStack and DataFlowDefaultTestDeployAssert stack

Figure 3: AWS CloudFormation deploying the IntegrationTestStack and DataFlowDefaultTestDeployAssert stacks

The integ-runner generates two AWS CloudFormation stacks, as shown in Figure 3. The IntegrationTestStack stack includes the resources from our sample application, which serves as an isolated application representing the stack under test. The DataFlowDefaultTestDeployAssert stack contains the resources required for executing the integration tests as shown in Figure 4.

AWS CloudFormation displays the resources for the DataFlowDefaultTestDeployAssert stack

Figure 4: AWS CloudFormation resources for the DataFlowDefaultTestDeployAssert stack

Cleaning up

Based on the specified RemovalPolicy, the resources are automatically destroyed as the stack is removed. Some resources such as Amazon DynamoDB tables have the default RemovalPolicy set to Retain in AWS CDK. To set the removal policy to Destroy for the integration test resources, we leverage Aspects.

/**
 * Aspect for setting all removal policies to DESTROY
 */
class ApplyDestroyPolicyAspect implements cdk.IAspect {
  public visit(node: IConstruct): void {
    if (node instanceof CfnResource) {
      node.applyRemovalPolicy(cdk.RemovalPolicy.DESTROY);
    }
  }
}
Deleting AWS CloudFormation stack from the AWS Console

Figure 5: Deleting AWS CloudFormation stacks from the AWS Console

If you set the no-clean argument as part of the integ-runner CLI options, you need to manually destroy the stacks. This can be done from the AWS Console, via AWS CloudFormation as shown in Figure 5 or by using the following command.

cdk destroy --all

To clean up the code repository build files, you can run the following script.

npm run clean

Conclusion

The AWS CDK integ-tests construct is a valuable tool for defining and conducting automated integration tests for your AWS CDK applications. In this blog post, we have introduced a practical code example showcasing how AWS CDK integration tests can be used to validate the expected application behavior when deployed to the cloud. You can leverage the techniques in this guide to write your own AWS CDK integration tests and improve the quality and reliability of your application releases.

For information on how to get started with these constructs, please refer to the following documentation.

Call to Action

Integ-runner and integ-tests constructs are experimental and subject to change. The release notes for both stable and experimental modules are available in the AWS CDK Github release notes. As always, we welcome bug reports, feature requests, and pull requests on the aws-cdk GitHub repository to further shape these alpha constructs based on your feedback.

About the authors

Iris Kraja

Iris is a Cloud Application Architect at AWS Professional Services based in New York City. She is passionate about helping customers design and build modern AWS cloud native solutions, with a keen interest in serverless technology, event-driven architectures and DevOps. Outside of work, she enjoys hiking and spending as much time as possible in nature.

Svenja Raether

Svenja is an Associate Cloud Application Architect at AWS Professional Services based in Munich.

Ahmed Bakry

Ahmed is a Security Consultant at AWS Professional Services based in Amsterdam. He obtained his master’s degree in Computer Science at the University of Twente and specialized in Cyber Security. And he did his bachelor degree in Networks Engineering at the German University in Cairo. His passion is developing secure and robust applications that drive success for his customers.

Philip Chen

Philip is a Senior Cloud Application Architect at AWS Professional Services. He works with customers to design cloud solutions that are built to achieve business goals and outcomes. He is passionate about his work and enjoys the creativity that goes into architecting solutions.