Tag Archives: Integration & Automation

How to automate incident response for Amazon EKS on Amazon EC2

Post Syndicated from Jonathan Nguyen original https://aws.amazon.com/blogs/security/how-to-automate-incident-response-for-amazon-eks-on-amazon-ec2/

Triaging and quickly responding to security events is important to minimize impact within an AWS environment. Acting in a standardized manner is equally important when it comes to capturing forensic evidence and quarantining resources. By implementing automated solutions, you can respond to security events quickly and in a repeatable manner. Before implementing automated security solutions, it’s important for your security team to have a defined process and understanding of which actions to take for specific AWS resources.

In a previous two-part post, we discussed using Amazon GuardDuty and Amazon Detective to detect security issues for an Amazon Elastic Kubernetes Service (Amazon EKS) cluster. In this post, we walk through the differences of Amazon Elastic Cloud Compute (Amazon EC2) and EKS clusters on EC2 when responding to security events. By understanding the differences between the two AWS resource types, you can enhance your existing EC2 incident response (IR) automation to include EKS. Then, we walk you through the deployment and use of a sample solution based on the Automated Forensics Orchestrator for Amazon EC2 solution to automate the end-to-end incident response process for EKS, which includes acquisition, isolation, investigation and reporting.

If you’re familiar with the differences between responding and investigating Amazon EC2 and Amazon EKS resources and want to skip to the solution, skip to the Solution prerequisites.

Note: Amazon EKS on AWS Fargate, which is an AWS managed serverless computing engine, isn’t covered in this post.

Amazon EC2 compared to Amazon EKS resources for incident response

Although Amazon EKS clusters are running on EC2 instances, it’s important to understand the differences between the two and how to handle incident response automation for each resource type. EC2 is a virtual machine where you can install customized applications and packages to complete a task. Amazon EKS is an AWS managed service that you can use to run Kubernetes on EC2 instances without needing to install, operate, and maintain your own Kubernetes control plane or nodes. You can use existing plugins and tooling from the Kubernetes community. EKS clusters can have managed node groups, which create and manage the underlying EC2 instances. Because of Kubernetes cluster architecture, multiple EC2 instances within a node group can be tied to a single EKS cluster. There can also be multiple pods—each running different processes—running on an EC2 instance. GuardDuty can monitor and detect security events for EKS resources and provide information to help identify which resources are impacted, such as EKS cluster name, Kubernetes workload details, tags, and AWS Identity and Access Management (IAM) principals.

For incident response automation purposes, security teams need to understand the relationship between Amazon EKS and Amazon EC2 to determine the appropriate response to a possible security event. For example, if GuardDuty identifies Execution:Kubernetes/AnomalousBehavior.ExecInPod, you might want to investigate the command invoked on the identified pod along with other pods within the EKS cluster. To expand the investigation, you would need to capture and investigate evidence on the entire EKS cluster, which can include multiple EC2 instances.

Accessing Amazon EKS clusters using kubectl

To collect relevant forensic evidence, such as volatile memory, there might be instances where you need to run commands on Amazon EKS clusters. Kubectl is a command line tool that you can use to manage and run commands on EKS clusters using the Kubernetes API. Access with kubectl is limited to the container environment and doesn’t provide full shell access to the host. Although AWS Systems Manager (AWS SSM) can be used to interact with an EKS cluster’s EC2 instances, kubectl allows administrators to manage pods, scale applications, and view cluster logs. We dive into specific actions where kubectl is used in the later sections of this post.

When automating the workflow of response actions to an Amazon EKS cluster, you can incorporate the kubectl commands within Amazon Lambda functions. To invoke commands using kubectl, you need to get credentials for the EKS cluster to:

  1. Authenticate to an IAM principal authorized to work with Amazon EKS
  2. Obtain the EKS cluster endpoint
  3. Verify the certificate authority data for the EKS endpoint
  4. Generate a bearer token from the IAM principal
  5. Create a kubeconfig configuration dictionary

For more detailed information, see A Container-Free Way to Configure Kubernetes Using AWS Lambda and a deep dive into simplified Amazon EKS access management.

Capturing volatile memory on EKS

Volatile memory (RAM) in a memory dump is important because it contains the EC2 instance’s in-progress operations. Volatile memory is extremely important in determining the root cause of a security event. Although the commands for capturing volatile memory between EC2 instances and Amazon EKS clusters are similar, there is one important difference to keep in mind. For Linux operating systems, you can use the insmod command with the appropriate LiME kernel module (.ko file) to capture volatile memory:

sudo insmod $lime.ko "path=/path/to/dump.mem format=lime"

For Amazon EKS cluster EC2 instances, there can be multiple pods on a single EC2 instance. Knowing which process ID (PID) is associated to a pod is important to map the actions that could have resulted in a security event or compromise.

Figure 1: EKS cluster node list

Figure 1: EKS cluster node list

To get a list of PIDs on the EC2 instance, as shown in Figure 1, the following crictl command needs to be invoked:

crictl inspect $(crictl ps | grep [pod-name] | awk '{print $1}') | grep -i pid

After the crictl command is invoked, you will see the output of existing PIDs for the EC2 instance to use in the nsenter command, as shown in the following figure.

Figure 2: EKS node process ID list

Figure 2: EKS node process ID list

To create a mapping between a pod and the PID from a memory dump, the following nsenter command needs to be invoked on the target EC2 instance:

nsenter -t $PID -u hostname

After the nsenter command is invoked, you will see the output of pod and PID information for the EC2 instance, as shown in the following figure.

Figure 3: EKS node process ID to pod mapping commands

Figure 3: EKS node process ID to pod mapping commands

After you have the pod-to-PID mapping, you can export that information for later investigation. If you skip this step, the memory dump output will still have the PID information, but you won’t be able to map it back to previously running pods. It’s important to work with your security teams during forensic investigations to determine if this information is used during an investigation and update the automated workflow accordingly.

Network segmentation on EKS

After relevant forensic artifacts, such as volatile memory, disk volumes, and application logs, are collected from an Amazon EKS cluster, you might want to isolate compromised resources from the rest of your application resources. During resource isolation, EC2 instances can be isolated using security groups and network access control lists (NACLs). For EKS clusters, you can cordon the worker node, which makes the node tainted and unschedulable. When a node is cordoned, the Kubernetes scheduler is also blocked from placing new pods on the node. Another mechanism for isolating the EKS cluster is applying a Network Policy to deny ingress or egress traffic to the pod. Network policies, like NACLs, are stateless and control network traffic at the IP address or port level in an EKS cluster.

Depending on the scope of isolation, you can take the following approaches to isolating a pod on an EKS cluster in your automation.

  • Apply a network policy – You can add a network policy rule to limit ingress or egress from your pod. This will not impact other pods in the cluster unless there are additional rules applied. You would use this option if you’re sure that the compromise hasn’t gained access to the underlying EC2 instance.
  • Cordon the node – Removing the node won’t impact other nodes on the cluster but will block the scheduling of pods on the node. It doesn’t affect other nodes within the cluster.
  • Apply a security group – Applying a security group can impact the entire EC2 instance and limit traffic between Amazon EKS cluster nodes, the Kubernetes control plane, the cluster’s worker nodes, and external destinations. This is an option if you believe the underlying EC2 instance has been compromised.
  • Add a NACL rule – Like the security group option, this will impact the entire EC2 instance. Depending on the rule, it can also affect non-EKS workloads within the subnet.

Identity and access management for EKS

In addition to the IAM role associated to an EC2 instance profile, Amazon EKS uses service-linked IAM roles and Kubernetes role-based authorization control (RBAC) configuration. The IAM principal that creates the EKS cluster has system:masters permissions within the RBAC configuration on the EKS cluster. RBAC provides Kubernetes identities access for cluster-specific components and workflows. In addition to default identities created on EKS clusters, application-specific roles can be used within an EKS cluster. For example, IAM roles for service accounts (IRSA) can be used to associate an IAM role with a Kubernetes service account and assigned to containers within an EKS Pod. IRSA can help implement least privilege by restricting the Pod’s container to retrieve credentials for the IAM role associated with the Kubernetes service account. For a deeper dive into EKS IAM and how IAM roles are used within EKS, see Identity and access management for Amazon EKS.

Deciding how to revoke Amazon EKS permissions using automation can be challenging because revoking the AWS Security Token Service (AWS STS) credentials or changing the instance profile on the EC2 instance will impact all pods on the EC2 instance. Updating or changing the RBAC configurations on an EKS cluster requires application-specific knowledge to determine which identities are authorized to have specific permissions. It’s important to discuss with your application and security teams how permissions should be handled in the event of a compromised EKS cluster.

Moving to automated EKS incident response

Now that you understand the nuances of Amazon EKS on Amazon EC2 as it relates to incident response, you can decide how to incorporate functionality to respond to EKS in an existing solution your team might be using. It’s also important to understand where a human-in-the-loop needs to be incorporated to follow internal processes and procedures. Before incorporating automation into IR capabilities, you should walk through each step and verify the action the automation takes to make sure that the security and application teams are aligned. In this post, we incorporated Amazon EKS IR capabilities across acquisition, isolation, and investigation into the Automated Forensics Orchestrator for Amazon EC2 solution.

Solution prerequisites

For this walkthrough, you need to have the following elements in place:

Solution overview

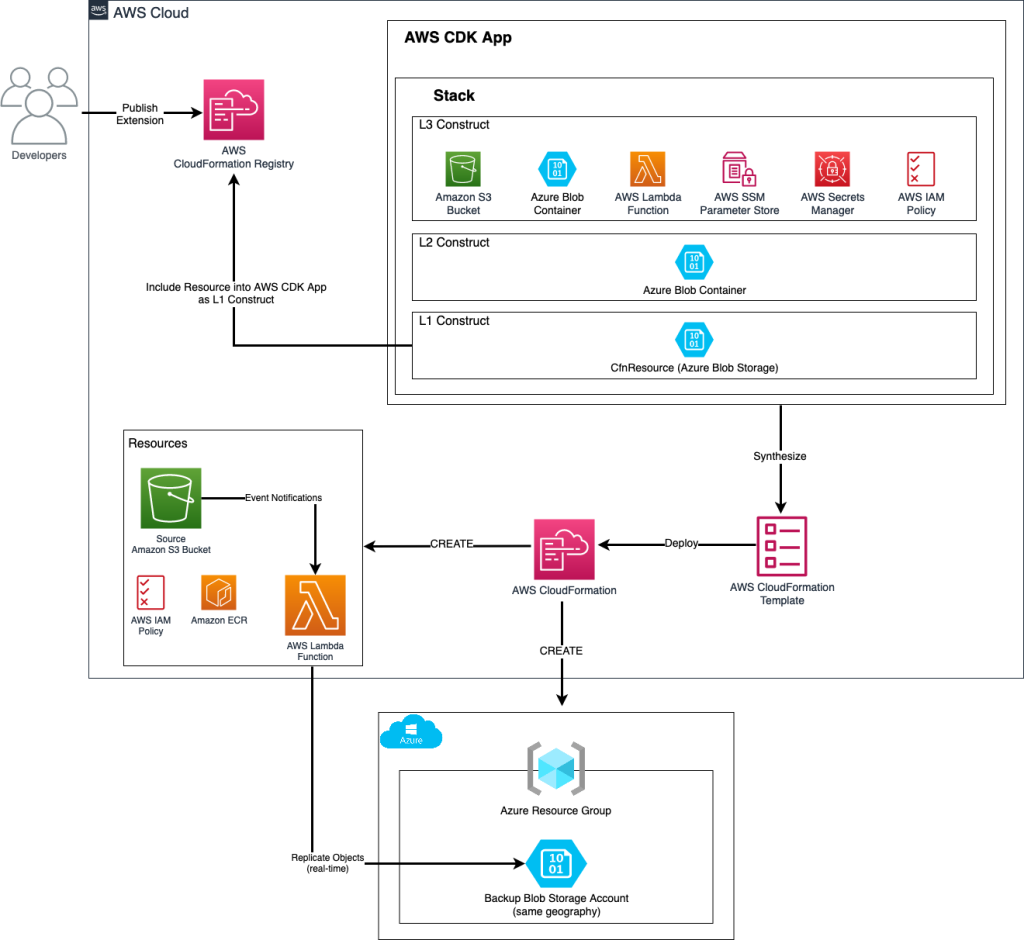
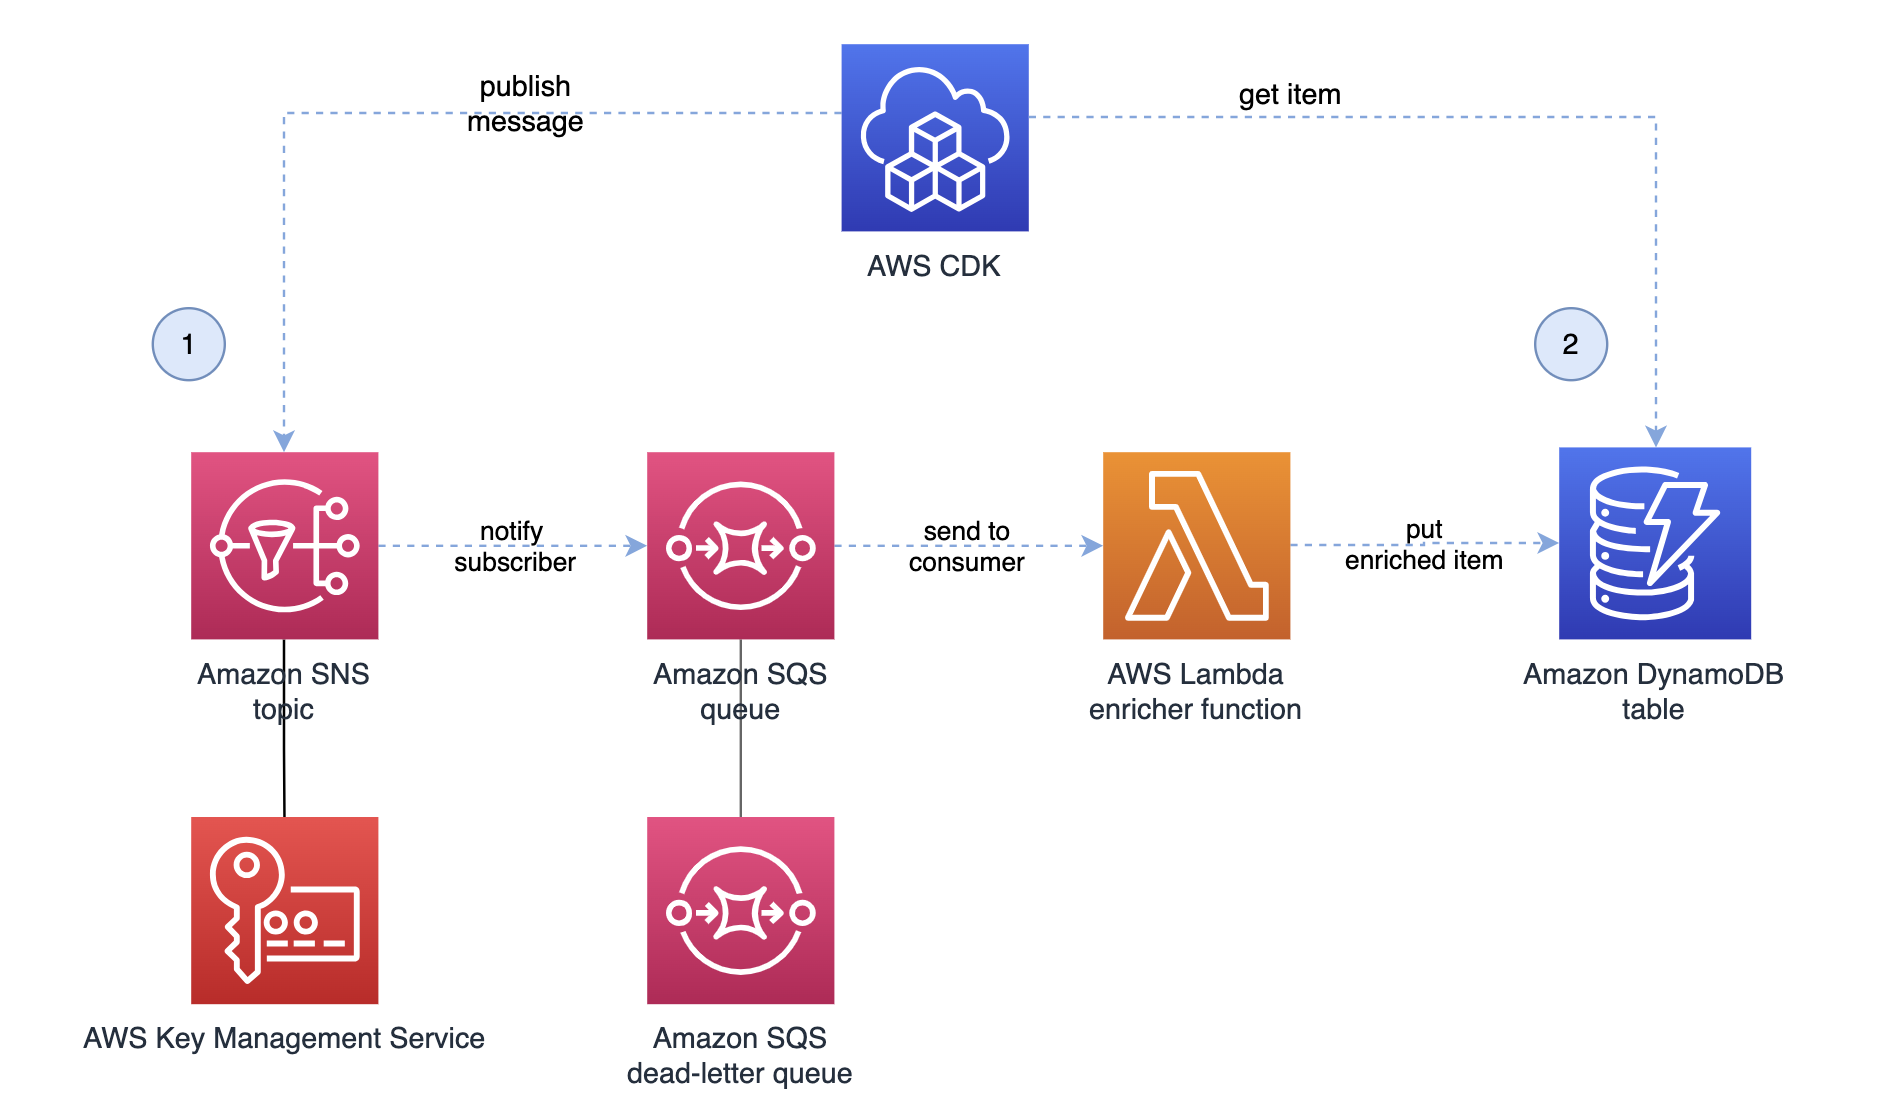
The solution follows a similar pattern and workflow as the Automated Forensics Orchestrator for Amazon EC2 but has been customized for Amazon EKS.

Figure 4: Automated Forensics Orchestrator for Amazon EKS architecture

Figure 4: Automated Forensics Orchestrator for Amazon EKS architecture

The workflow, as shown in Figure 4, is:

  1. In the AWS application account, GuardDuty monitors for malicious activities that are specific to Amazon EKS resources. For example, a pod within an EKS cluster is invoking API commands using an unauthenticated system:anonymous user. GuardDuty findings are sent to Security Hub in the security account using native integration.
  2. Security Hub custom actions send finding information to Amazon EventBridge to invoke automated downstream workflows.
  3. For a specified event, EventBridge provides the EKS resource information for the forensics process to target and initiates an AWS Step Functions workflow.
  4. Step Functions triages the request as follows:
    1. Gets the EKS information, including which EC2 instances the pod is hosted on.
    2. Determines if isolation is required based on the Security Hub custom action.
    3. Determines if acquisition is required based on tags associated with the EC2 instance. The current tag that is evaluated is the following:
      • Tag name: IsTriageRequired
      • Tag key: true or false
    4. Initiates the acquisition flow based on triaging output
  5. Triaging details are stored in Amazon DynamoDB.
  6. The following two acquisition flows are initiated in parallel:
    1. Memory forensics flow – The Step Functions workflow captures the memory data and stores it in Amazon Simple Storage Service (Amazon S3). Post memory acquisition completion, the node is isolated by cordoning the node, creating a network policy, and applying a restricted security group to the cluster. To help maintain the chain of custody, a new security group is attached to the targeted instance and removes access for users, admins, or developers.
    2. Note: The isolation action is initiated based on the selected Security Hub custom action.

    3. Disk forensics flow – The Step Functions workflow takes a snapshot of the Amazon Elastic Block Storage (Amazon EBS) volume and shares it with the forensic account.
  7. Acquisition details are stored in DynamoDB.
  8. After the disk or memory acquisition process is complete, and the evidence has been captured successfully, a notification is sent to an investigation Step Functions state machine to begin the automated investigation of the captured data.
  9. The investigation Step Functions starts a forensic instance from a forensic AMI loaded with customer forensic tools:
    1. Loads the memory data from Amazon S3 for memory investigation.
    2. Creates an Amazon EBS volume from the snapshot and attaches it for disk analysis.
  10. Systems Manager documents (SSM documents) are used to run a forensic investigation.
  11. DynamoDB stores the state of the forensic tasks and their result when the jobs are complete. Investigation job details are stored in DynamoDB.
  12. Investigation details are shared with customers using Amazon Simple Notification Service (Amazon SNS).
  13. Forensic AMI is used by investigation Step Functions to perform memory and disk investigation.

Solution deployment

You can deploy the Amazon EKS IR automation solution using the AWS CDK or synthesizing a CDK into AWS CloudFormation templates and deploying them using AWS Management Console. Although the solution can be deployed in a single AWS account, the AWS Security Reference Architecture (AWS SRA) recommends that you use separate AWS accounts for forensic evidence and security tooling. The solution deployment follows AWS SRA recommendations.

The latest code for the Amazon EKS IR automation solution can be found at sample-eks-incident-response-automation, where you can also contribute to the sample code. For instructions and more information about using the AWS CDK, see Getting Started with AWS CDK.

Deploy the automation that collects, stores, and investigates forensic artifacts in the forensic AWS account:

  1. To build the app when navigating to the project’s root folder, use the following commands.
    • npm ci
    • npm run-build-lambda
  2. Run the following commands in your terminal while authenticated in your forensic solution AWS account. Be sure to replace <INSERT_AWS_ACCOUNT> with your account number and replace <INSERT_REGION> with the AWS Region that you want the solution deployed to.
  3. cdk bootstrap aws://<INSERT_AWS_ACCOUNT>/<INSERT_REGION>
    
    cdk deploy --all -c account=<INSERT Forensic AWS Account> -c region=<INSERT_FORENSIC_SOLUTION_REGION> --require-approval=never -c secHubAccount=<INSERT SECURITY_HUB_AGGREGATOR_AWS_ACCOUNT> -c STACK_BUILD_TARGET_ACCT=forensicAccount
    

    Example:

    cdk deploy —all -c account=1234567890 -c region=us-east-1 —require-approval=never -c secHubAccount=0987654321 -c STACK_BUILD_TARGET_ACCT=forensicAccount

Deploy the Security Hub custom action and EventBridge in the Security Hub Region of the delegated administrator account where security findings are consolidated:

  1. To build the app when navigating to the project’s root folder, use the following commands.
    • npm ci
    • npm run build-lambda
  2. Run the following commands in your terminal while authenticated in your Security Hub aggregator AWS account. Be sure to replace <INSERT_AWS_ACCOUNT> with your account number and replace <INSERT_REGION> with the AWS Region that you want the solution deployed to.
  3. cdk bootstrap aws://<INSERT_AWS_ACCOUNT>/<INSERT_REGION>
    	
    	cdk deploy --all -c account=<INSERT_SECURITY_HUB_AGGREGATOR_AWS_ACCOUNT> -c region=<INSERT_FORENSIC_SOLUTION_REGION> --require-approval=never -c forensicAccount=<INSERT_FORENSIC_SOLUTION_AWS_ACCOUNT> -c STACK_BUILD_TARGET_ACCT=securityHubAccount -c sechubregion=<INSERT_SECURITY_HUB_AGGREGRATOR_REGION>
    

    Example:

    cdk deploy --all -c account=0987654321 -c region=us-east-1 --require-approval=never -c forensicAccount=1234567890 -c STACK_BUILD_TARGET_ACCT=securityHubAccount -c sechubregion=us-east-1

Deploy the cross-account IAM role the security automation will use in the application AWS account where the EKS workload exists:

  1. Sign in to the AWS CloudFormation console of the application AWS account.
  2. Launch the CloudFormation cross-account-role.yml stack.
  3. Pass the following CloudFormation input parameters:
    1. solutionInstalledAccount=<Forensic Solution AWS Account Number>
    2. solutionAccountRegion=<Region of solution deployment>
    3. kmsKey=<ARN of the application account EBS volume encryption KMS key>

Use the solution to respond to an EKS GuardDuty alert

You can now use the automated solution on an Amazon EKS cluster with a GuardDuty finding that’s integrated with Security Hub. If you need to create GuardDuty findings, see How to generate security findings to help your security team with incident response simulations.

After you have an EKS security finding, you can go through either one of the IR workflows:

  • Forensic triage – This workflow evaluates in-scope EKS resources, collects volatile and non-volatile memory, conducts an investigation, and exports investigation artifacts to a forensic S3 bucket.
  • Forensic isolation – In addition to components of the previous workflow, the in-scope EKS resources are quarantined at the network and IAM layers.

In this example, you’ll use the forensic isolation workflow because that covers the end-to-end capabilities of the solution.

Run the forensic isolation workflow:

  1. Open the AWS Security Hub console in the Security Hub aggregator account.
  2. Choose Findings in the navigation pane and then select a security finding for Amazon EKS.
  3. Select the custom action for Forensic Isolation. This will start the workflow in the Security Hub aggregator account and invoke the Step Functions in the forensic account.
  4. Open the AWS Step Functions console in the forensic account.
  5. In the navigation pane, choose State Machines and then select the Forensic-Triage-Function to view the workflow graph status. In the following figure, the Step Functions workflow has successfully completed.
    Figure 5: EKS triage Step Functions graph view

    Figure 5: EKS triage Step Functions graph view

    1. In the Get Resource Info Case step, the pod name from the GuardDuty finding is extracted to identify the EKS cluster it’s part of and the related EC2 resources.
    2. Note: Per the solution, a guardrail is added to block action on an EC2 instance that is part of an EKS cluster with the IsTriageRequired tag with a value set to false. If automation is invoked against a protected EC2 instance resource, acquisitionFlow is skipped and a notification will be sent to the SNS topic.

  6. Because the EKS cluster isn’t excluded through the IsTriageRequired tag, a parallel invocation of Step Functions is invoked to capture forensic evidence.
  7. Select the Disk-Forensics-Acquisition-Function. The workflow here is similar to a normal EC2 incident response flow to capture snapshots and EBS volumes with the caveat that the EKS cluster can have multiple EC2 instances. In the following figure, the Step Functions workflow has successfully completed.
    Figure 6: Disk forensics acquisition Step Functions graph view

    Figure 6: Disk forensics acquisition Step Functions graph view

  8. Select the Memory-Forensics-Acquisition-Function; In the following figure, the Step Function workflow has successfully completed.
    Figure 7: Memory forensics acquisition Step Functions graph view

    Figure 7: Memory forensics acquisition Step Functions graph view

    1. As previously mentioned, you will need to determine if you want to map pods to process ID (PID) as part of this workflow. The automation captures the volatile memory where you will be able see the PIDs on the EC2 instance but does not map the PID to node for deeper investigation.
    2. Note: One reason you might not want to automatically map pods to PIDs is to minimize interaction with the possibly compromised cluster and quickly move towards isolation.

    3. After the Is Memory Acquisition Complete step is complete and if the Security Hub custom action for Forensic Isolation was selected, the isolation workflow of the EKS cluster begins. The isolation workflow will go through EKS-specific steps to:
      1. Label the affected pods on the EKS cluster.
      2. Apply a network policy to the affected pods.
      3. Revoke IAM role sessions.
      4. Cordon the node.
  9. Note: Depending on your desired workflow, you can edit these steps or add additional isolation steps to change instance profiles, security groups, or NACL rules.

  10. To expedite the investigation process, the
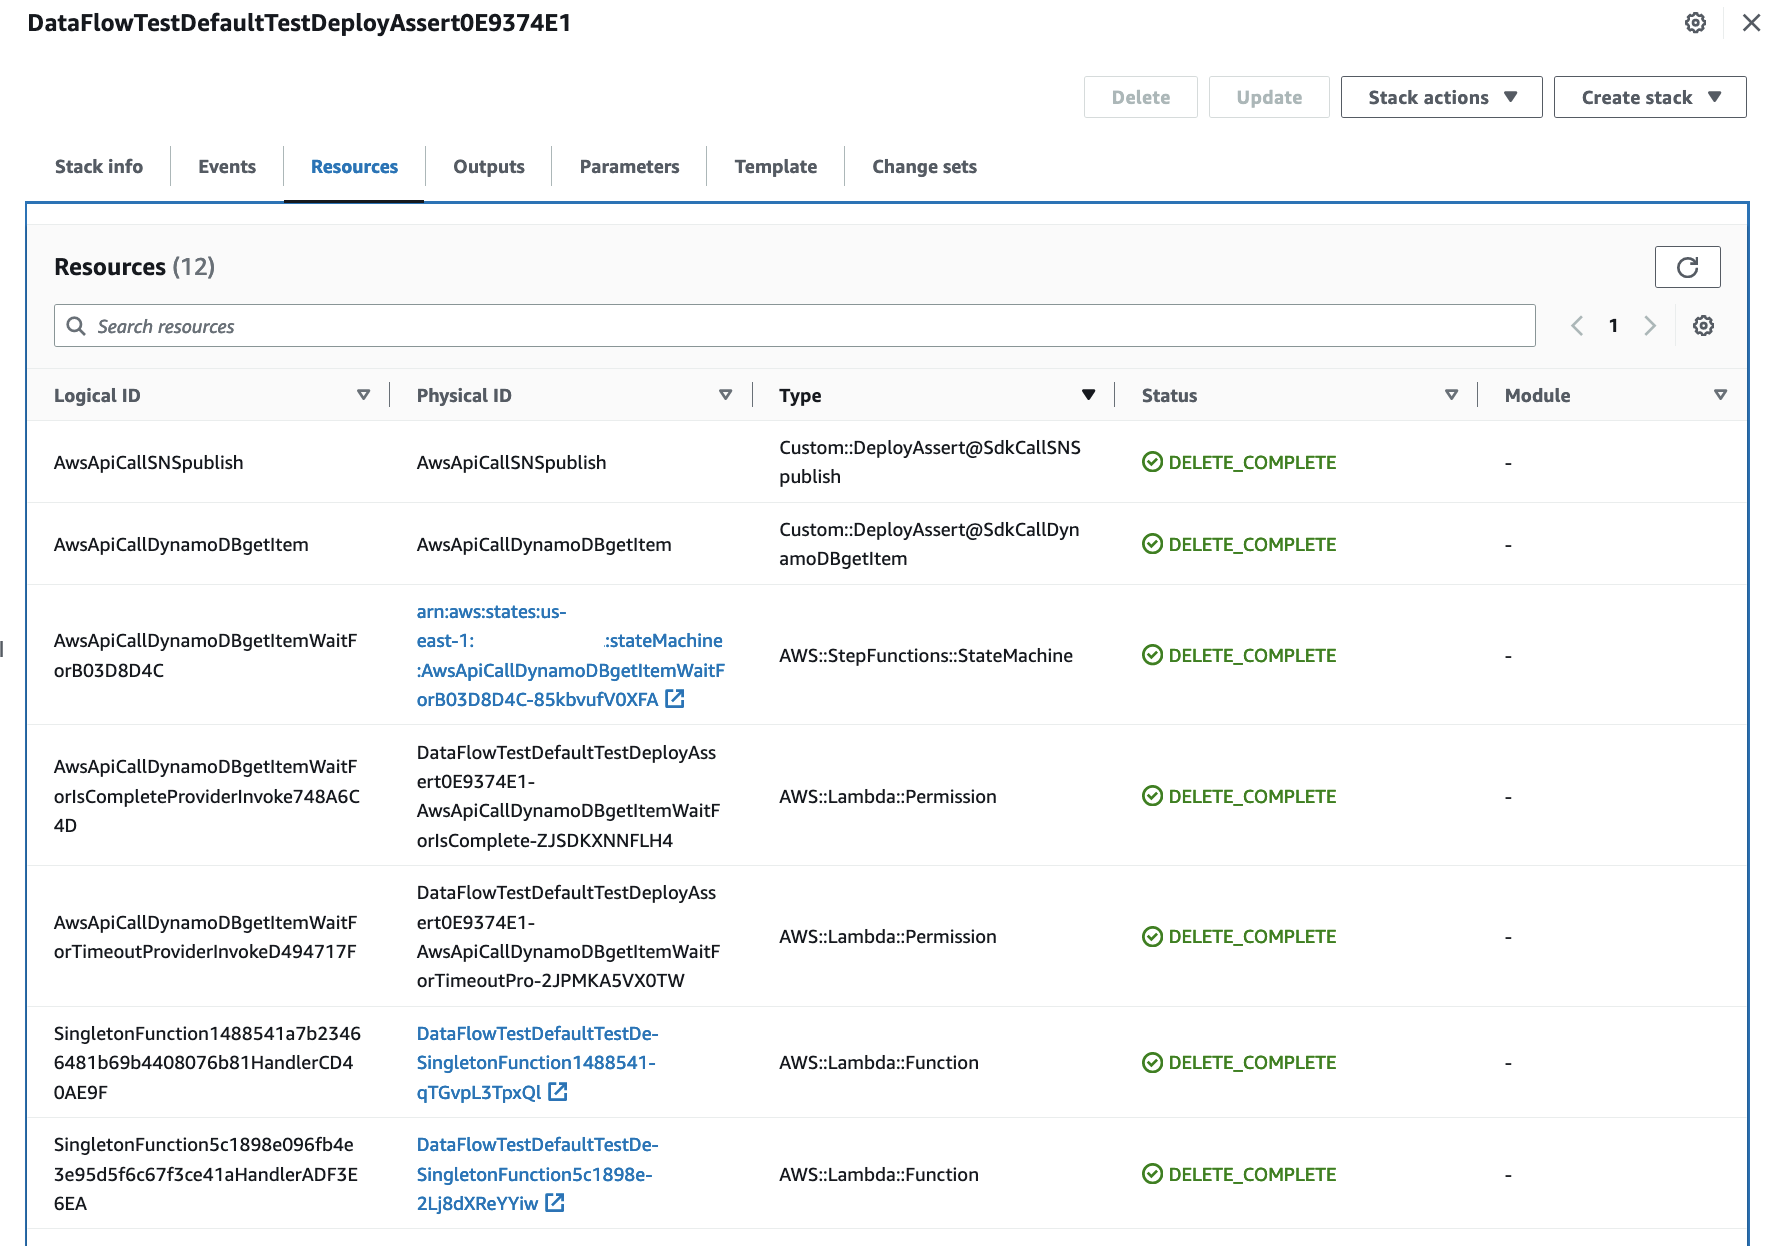
 Forensic-Investigation-Function is invoked when the Memory-Forensics-Acquisition-Function is completed and separately by the Disk-Forensics-Acquisition-Function. This is because of the disk and memory forensic evidence collection completing at different times. A forensic EC2 instance will be launched and begin conducting the investigation on the forensic artifacts. The completed investigation artifacts will be sent to Amazon S3 as they’re completed.
    1. You can use the console to view EKS artifacts within the dedicated S3 bucket in the forensic AWS account.
    2. Figure 8: Completed memory investigation artifacts for EKS

      Figure 8: Completed memory investigation artifacts for EKS

    3. The forensic investigation results from the automated workflow are also saved to the dedicated S3 bucket in the forensic AWS account.
Figure 9: Completed disk investigation artifacts for EKS

Figure 9: Completed disk investigation artifacts for EKS

As part of the automation, the forensic investigation EC2 instance in the forensic account is terminated after investigation is completed. The automation can be updated to retain the EC2 instance to so that your security teams can continue their investigation and review investigation artifacts to expedite root cause analysis.

As previously mentioned, the workflow you just went through encompasses both investigation and isolation of Amazon EKS resources. If your security teams want to conduct a more thorough investigation prior to isolating EKS resources, select the Forensic Triage custom action in Security Hub. Additionally, if you want to update the solution to be invoked from your security incident and event management (SIEM) tool, you can directly invoke the Forensic-Triage-Function Step Functions from your SIEM.

Clean up

For the cross-account IAM role in the application account, you can:

  1. Go to the AWS CloudFormation console for the application account and Region where you deployed the cross-account IAM role, select the cross-account-role stack.
  2. Choose the option to Delete the stack.

To clean up the CDK stacks, run the following command in the source folder in the Security Hub aggregator account and forensic account.

cdk destroy --all

Conclusion

In this post, we showed you the differences between Amazon EKS and Amazon EC2 resources and how to handle EKS automation for incident response. Even though EKS clusters are on EC2 instances, it’s important to understand the differences before implementing an automated solution that will affect EKS resources. We also walked through the deployment of an EKS-customized Automated Forensics Orchestrator for Amazon EC2 solution and showed you the end-to-end IR lifecycle to respond to a possible EKS compromise. The same approach to customize existing EC2 IR automated solutions can be used to expand support for EKS resources within your AWS environment to increase your security posture.

If you have feedback about this post, submit comments in the comments section that follows. If you have questions about this post, start a thread on re:Post.

Jonathan Nguyen
Jonathan Nguyen

Jonathan is a Principal Security Solution Architect at AWS. He helps large financial services customers develop a comprehensive security strategy and solutions to meet their security and compliance requirements in AWS.
Gopinath Jagadesan
Gopinath Jagadesan

Gopi is a Senior Solution Architect at AWS. In his role, he works with Amazon as his customer helping design, build, and deploy well architected solutions on AWS. He holds a master’s degree in electrical and computer engineering from the University of Illinois at Chicago. Outside of work, he enjoys playing soccer and spending time with his family and friends.

Accelerate Serverless Streamlit App Deployment with Terraform

Post Syndicated from Kevon Mayers original https://aws.amazon.com/blogs/devops/accelerate-serverless-streamlit-app-deployment-with-terraform/

Image depicting the HashiCorp Terraform and Amazon Web Services (AWS) logos. Underneath the AWS logo are AWS service logos for Amazon Elastic Container Service (ECS), AWS CodePipeline, AWS CodeBuild, and Amazon CloudFront

Graphic created by Kevon Mayers.

Introduction

As customers increasingly seek to harness the power of generative AI (GenAI) and machine learning to deliver cutting-edge applications, the need for a flexible, intuitive, and scalable development platform has never been greater. In this landscape, Streamlit has emerged as a standout tool, making it easy for developers to prototype, build, and deploy GenAI-powered apps with minimal friction. It is an open-source Python framework designed to simplify the development of custom web applications for data science, machine learning, and GenAI projects. With Streamlit, developers can quickly transform Python scripts into interactive dashboards, LLM-powered chatbots, and web apps, using just a few lines of code. Its unique combination of simplicity, interactivity, and speed is the perfect complement to the rapid advancements in AI.

When deploying Streamlit applications, customers often face the challenge of ensuring their applications are highly available and can scale to meet a variable amount of demand. To achieve these goals, customers are looking at serverless approaches to deploying their Streamlit apps. With a serverless application, you only pay for the resources required and do not want have to worry about managing servers or capacity planning.

In this post, we will walk you through deploying containerized, serverless Streamlit applications automatically via HashiCorp Terraform, an Infrastructure as Code (IaC) tool that enables users to define and provision infrastructure across cloud platforms.

Solution Overview

For this solution, we have the Streamlit app running on an Amazon Elastic Container Service (ECS) cluster across multiple availability zones (AZs), using AWS Fargate to manage the compute. Fargate is a serverless, pay-as-you-go compute engine that lets you focus on building apps without managing servers. Using Fargate helps reduce the undifferentiated heavy lifting that can come with building and maintaining web applications. It is also often desirable to use a Content Delivery Network (CDN) to ensure low latency for users globally by caching the content at edge locations closer to where the users are geographically located.

Let’s zoom in on the two architectures – the Streamlit App hosting architecture, and the Streamlit App deployment pipeline.

Streamlit app hosting

Image depicting the AWS data flow architecture for the solution. The architecture shows an Amazon Elastic Container Service (ECS) cluster that spans across two availability zones. Within each availability zone are a public and private subnet. A NAT gateway is within the public subnet, and an ECS Cluster with AWS Fargate deployment type is in the private subnet. An Internet Gateway (IGW) is used to allow traffic to flow through the NAT Gateway out to the internet.An Application Load Balancer (ALB) is used to distribute the load to the ECS cluster. Amazon CloudFront is used as the content delivery network (CDN).

In the above architecture, the following flow applies:

  1. Users access the Streamlit App using the public DNS endpoint for an Amazon CloudFront distribution.
  2. Using an Internet Gateway (IGW), user requests are routed to a public-facing Application Load Balancer (ALB).
  3. This ALB has target groups which map to ECS task nodes that are part of an ECS cluster running in two AZs (us-east-1a and us-east-1b in this example).
  4. Fargate will automatically scale the underlying compute nodes in the ECS cluster based on the demand.

Streamlit app deployment pipeline

Image depicting the Streamlit app deployment pipeline architecture. Within it, a developer uploads a .zip file called streamlit-app-assets.zip to an Amazon S3 Bucket. This upload event is processed by Amazon EventBridge, which in turn invokes an AWS CodePipeline to run. Related artifacts are stored in a connected CodePipeline S3 bucket. CodePipeline orchestrates an AWS CodeBuild project that creates a new Docker image using the .zip file that was uploaded, and stores in an Amazon Elastic Container Registry (ECR) repository. This image upload triggers a new Amazon Elastic Container Service (ECS) deployment. Terraform then creates a Amazon CloudFront invalidation to serve the new version of the application to customers.

In the above architecture, the following flow applies:

  1. User develops a local Streamlit App and defines the path of these assets in the module configuration, then runs terraform apply to generate a local .zip file comprised of the Streamlit App directory, and upload this to an Amazon S3 bucket (Streamlit Assets) with versioning enabled, which is configured to trigger the Streamlit CI/CD pipeline to run.
  2. AWS CodePipeline (Streamlit CI/CD pipeline) begins running. The pipeline copies the .zip file from the Streamlit Assets S3 Bucket, stores the contents in a connected CodePipeline Artifacts S3 bucket, and passes the asset to the AWS CodeBuild project that is also part of the pipeline.
  3. CodeBuild (Streamlit CodeBuild Project) configures a compute/build environment and fetches a Python Docker Image from a public Amazon ECR repository. CodeBuild uses Docker to build a new Streamlit App image based on what is defined in the Dockerfile within the .zip file, and pushes the new image to a private ECR repository. It tags the image with latest, an app_version (user-defined in Terraform), as well as the S3 Version ID of the .zip file and pushes the image to ECR.
  4. ECS has a task definition that references the image in ECR based on the S3 Version ID tag which will always be a unique value, as it is generated whenever a new version of the file is created. This also serves as data lineage so versions of the Streamlit App .zip files in S3 can be linked to versions of the image stored in ECR. Once a new image is pushed to ECR (with a unique image tag), the task definition is updated and the ECS service begins a new deployment using the new version of the Streamlit App.
  5. When a new image is pushed to ECR, the Terraform Module is configured to use the local-exec provisioner to run an AWS CLI command that creates a CloudFront invalidation. This enables users of the Streamlit app to use the new version without waiting for the time-to-live (TTL) of the cached file to expire on the edge locations (default is 24 hours).
    Both of these pipelines are built and packaged into a Terraform module that can be reused efficiently with only a few lines of code.

Both of these pipelines are built and packaged into a Terraform module that can be reused efficiently with only a few lines of code.

Prerequisites

This solution requires the following prerequisites:

  • An AWS account. If you don’t have an account, you can sign up for one.
  • Terraform v1.0.0 or newer installed.
  • python v3.8 or newer installed.
  • A Streamlit app. If you don’t have a Streamlit project already, you can download this app directory as a sample Streamlit app for this post and save it to a local folder.

Your folder structure will look something like this:

terraform_streamlit_folder
├── README.md
└── app                 # Streamlit app directory
    ├── home.py         # Streamlit app entry point
    ├── Dockerfile      # Dockerfile
     └── pages/          # Streamlit pages

Create and initialize a Terraform project

In the same folder where you have the your Streamlit app saved, in the above example in the terraform_streamlit_folder, you will create and initialize a new Terraform project.

  1.  In your preferred terminal, create a new file named main.tf by running the following command on Unix/Linux machines, or an equivalent command on Windows machines:
    touch main.tf
  2. Open up the main.tf file and add the following code to it:
    module "serverless-streamlit-app" {
      source          = "aws-ia/serverless-streamlit-app/aws"
      app_name        = "streamlit-app"
      app_version     = "v1.1.0" 
      path_to_app_dir = "./app" # Replace with path to your app
    }

    This code utilizes a module block with a source pointing to the Terraform module, and the appropriate input variables passed in. When Terraform encounters a module block, it loads and processes that module’s configuration files using the source. The Serverless Streamlit App Terraform module has many optional input variables. If you have existing resources, such as an existing VPC, subnets, and security groups that you’d like to reuse instead of deploying new ones, you can use the module’s input variables to reference your existing resources. However, in this post, we’re deploying all of the resources in the above architecture from scratch. Here, we simply define the source that references the module hosted in the Terraform Registry, provide an app_name that will be used as a prefix for naming your resources, the app_version that is used for tracking changes to your app, and the path_to_app_dir which is the path to the local directory where the assets for your Streamlit app are stored.

  3. Save the file.
  4. To initialize the Terraform working directory, run the following command in your terminal:
    terraform init

    The output will contain a successful message like the following:

    "Terraform has been successfully initialized"

Output the CloudFront URL

To be able to easily access the Cloudfront URL of the deployed Streamlit application, you can add the URL as a Terraform output.

  1. In your terminal, create a new file named outputs.tf by running the following command on Unix/Linux machines, or an equivalent command on Windows machines:
    touch outputs.tf
  2. Open up the outputs.tf file and add the following code to it:
    output "streamlit_cloudfront_distribution_url" {
      value = module.serverless-streamlit-app.streamlit_cloudfront_distribution_url
    }
  3. Save the file.
    Now, your folder structure will look like:

    terraform_streamlit_folder
    ├── README.md
    ├── app                 # Streamlit app directory
    │   ├── home.py         # Streamlit app entry point
    │   ├── Dockerfile      # Dockerfile
    │   └── pages/          # Streamlit pages
    │     
    ├── main.tf             # Terraform Code (where you call the module) 
    └── outputs.tf          # Outputs definition

Deploy the solution

Now you can use Terraform to deploy the resources defined in your main.tf file.

  1. In your terminal, run the following command to apply to deploy the infrastructure. This includes the hosting for your Streamlit application using ECS and CloudFront, as well as the pipeline that is used to push updates.
    terraform apply

    When the apply command finishes running, you’ll see the Terraform outputs displayed in the terminal.

  2. Navigate to the streamlit_cloudfront_distribution_url to see your Streamlit application that is hosted on AWS.
  3. When you make changes to your Streamlit codebase, you can go ahead and re-run terraform apply to push your new changes to your cloud environment.

When updating the Streamlit codebase, the CodePipeline and CodeBuild processes kick off to automatically update your new changes, which get reflected on your Streamlit application. CodePipeline automates the entire software release process, managing stages like source retrieval, building, testing, and deployment. It integrates with AWS services and third-party tools (such as GitHub and Jenkins) to enhance automation, speed, and security. CodeBuild focuses on automating code compilation, testing, and packaging, supporting multiple languages and custom Docker environments, while integrating with CodePipeline for scalable, secure builds. With this CI/CD pipeline, when you make changes to your code, all you need to run is terraform apply to update your cloud environment. For an example buildspec, see the example in the repo.

You can find full examples of deploying the infrastructure with and without existing resources in the GitHub repository.

Clean up

When you no longer need the resources deployed in this post, you can clean up the resources by using the Terraform destroy command. Simply run terraform destroy . This will remove all of the resources you have deployed in this post with Terraform.

Conclusion

Building serverless Streamlit applications with Terraform on AWS offers a powerful combination of scalability, efficiency, and automation. As you continue to build and refine your Streamlit applications, Terraform’s flexibility ensures that your infrastructure can evolve seamlessly, supporting rapid innovation and agile development. With Streamlit and Terraform, you have the tools to create dynamic, serverless applications that scale effortlessly and operate reliably in the cloud.

Authors

Image depicting Kevon Mayers, a Solutions Architect at AWS

Kevon Mayers

Kevon Mayers is a Solutions Architect at AWS. Kevon is a Terraform Contributor and has led multiple Terraform initiatives within AWS. Prior to joining AWS he was working as a DevOps Engineer and Developer, and before that was working with the GRAMMYs/The Recording Academy as a Studio Manager, Music Producer, and Audio Engineer. He also owns a professional production company, MM Productions.

Image depicting Alexa Perlov, a Prototyping Architect at AWS

Alexa Perlov

Alexa Perlov is a Prototyping Architect with the Prototyping Acceleration team at AWS. She helps customers build with emerging technologies by open sourcing repeatable projects. She is currently based out of Pittsburgh, PA.

Image depicting Shravani Malipeddi, a Solutions Architect at AWS

Shravani Malipeddi

Shravani Malipeddi is a Solutions Architect at AWS who came out of the TechU Program. She currently supports strategic accounts and is based out of San Francisco, CA. .

Quickly adopt new AWS features with the Terraform AWS Cloud Control provider

Post Syndicated from Welly Siauw original https://aws.amazon.com/blogs/devops/quickly-adopt-new-aws-features-with-the-terraform-aws-cloud-control-provider/

Introduction

Today, we are pleased to announce the general availability of the Terraform AWS Cloud Control (AWS CC) Provider, enabling our customers to take advantage of AWS innovations faster. AWS has been continually expanding its services to support virtually any cloud workload; supporting over 200 fully featured services and delighting customers through its rapid pace of innovation with over 3,400 significant new features in 2023. Our customers use Infrastructure as Code (IaC) tools such as HashiCorp Terraform among others as a best-practice to provision and manage these AWS features and services as part of their cloud infrastructure at scale. With the Terraform AWS CC Provider launch, AWS customers using Terraform as their IaC tool can now benefit from faster time-to-market by building cloud infrastructure with the latest AWS innovations that are typically available on the Terraform AWS CC Provider on the day of launch. For example, AWS customer Meta’s Oculus Studios was able to quickly leverage Amazon GameLift to support their game development. “AWS and Hashicorp have been great partners in helping Oculus Studios standardize how we deploy our GameLift infrastructure using industry best practices.” said Mick Afaneh, Meta’s Oculus Studios Central Technology.

The Terraform AWS CC Provider leverages AWS Cloud Control API to automatically generate support for hundreds of AWS resource types, such as Amazon EC2 instances and Amazon S3 buckets. Since the AWS CC provider is automatically generated, new features and services on AWS can be supported as soon as they are available on AWS Cloud Control API, addressing any coverage gaps in the existing Terraform AWS standard provider. This automated process allows the AWS CC provider to deliver new resources faster because it does not have to wait for the community to author schema and resource implementations for each new service. Today, the AWS CC provider supports 950+ AWS resources and data sources, with more support being added as AWS service teams continue to adopt the Cloud Control API standard.

As a Terraform practitioner, using the AWS CC Provider would feel familiar to the existing workflow. You can employ the configuration blocks shown below, while specifying your preferred region.

terraform {
  required_providers {
    awscc = {
      source  = "hashicorp/awscc"
      version = "~> 1.0"
    }
    aws = {
      source  = "hashicorp/aws"
      version = "~> 5.0"
    }
  }
}

provider "awscc" {
  region = "us-east-1"
}

provider "aws" {
  region = "us-east-1"
}

During Terraform plan or apply, the AWS CC Terraform provider interacts with AWS Cloud Control API to provision the resources by calling its consistent Create, Read, Update, Delete, or List (CRUD-L) APIs.

AWS Cloud Control API

AWS service teams own, publish, and maintain resources on the AWS CloudFormation Registry using a standardized resource model. This resource model uses uniform JSON schemas and provisioning logic that codifies the expected behavior and error handling associated with CRUD-L operations. This resource model enables AWS service teams to expose their service features in an easily discoverable, intuitive, and uniform format with standardized behavior. Launched in September 2021, AWS Cloud Control API exposes these resources through a set of five consistent CRUD-L operations without any additional work from service teams. Using Cloud Control API, developers can manage the lifecycle of hundreds of AWS and third-party resources with consistent resource-oriented API instead of using distinct service-specific APIs. Furthermore, Cloud Control API is up-to-date with the latest AWS resources as soon as they are available on the CloudFormation Registry, typically on the day of launch. You can read more on launch day requirement for Cloud Control API in this blog post. This enables AWS Partners such as HashiCorp to take advantage of consistent CRUD-L API operations and integrate Terraform with Cloud Control API just once, and then automatically access new AWS resources without additional integration work.

History and Evolution of the Terraform AWS CC Provider

The general availability of Terraform AWS CC Provider project is a culmination of 4+ years of collaboration between AWS and HashiCorp. Our teams partnered across the Product, Engineering, Partner, and Customer Support functions in influencing, shaping, and defining the customer experience leading up to the the technical preview announcement of the AWS CC provider in September 2021. At technical preview, the provider supported more than 300 resources. Since then, we have added an additional 600+ resources to the provider, bringing the total to 950+ supported resources at general availability.

Beyond just increasing resource coverage, we gathered additional signals from customer feedback during the technical preview and rolled out several improvements since September 2021. Customers care deeply about the user experience on the providers available on the Terraform registry. Customers sought practical examples in the form of sample HCL configurations for each resource that they could use to immediately test in order to confidently start using the provider. This prompted us to enrich the AWS CC provider with hundreds of practical examples for popular AWS CC provider resources in the Terraform registry. This was made possible by contributions of hundreds of Amazonians who became early adopters of the AWS CC provider. We also published a how-to guide for anyone interested in contributing to AWS CC provider examples. Furthermore, customers also wanted to minimize context switching by moving between Terraform and AWS service documentation on what each attribute of a resource signified and the type of values it needed as part of configuration. This empowered us to prioritize augmenting the provider with rich resource attribute description with information taken from AWS documentation. The documentation provides detailed information of how to use the attributes, enumerations of the accepted attribute values and other relevant information for dozens of popularly used AWS resources.

We also worked with HashiCorp on various bug fixes and feature enhancements for the AWS CC provider, as well as the upstream Cloud Control API dependencies. We improved handling for resources with complex nested attribute schemas, implemented various bug fixes to resolve unintended resource replacement, and refined provider behavior under various conditions to support the idempotency expected by Terraform practitioners. While this are not an exhaustive list of improvements, we continue to listen to customer feedback and iterate on improving the experience. We encourage you to try out the provider and share feedback on the AWS CC provider’s GitHub page.

Using the AWS CC Provider

Let’s take an example of a recently introduced service, Amazon Q Business, a fully managed, generative AI-powered assistant that you can configure to answer questions, provide summaries, generate content, and complete tasks based on your enterprise data. Amazon Q Business resources were available in AWS CC provider shortly after the April 30th 2024 launch announcement. In the following example, we’ll create a demo Amazon Q Business application and deploy the web experience.

data "aws_caller_identity" "current" {}

data "aws_ssoadmin_instances" "example" {}

resource "awscc_qbusiness_application" "example" {
  description                  = "Example QBusiness Application"
  display_name                 = "Demo_QBusiness_App"
  attachments_configuration    = {
    attachments_control_mode = "ENABLED"
  }
  identity_center_instance_arn = data.aws_ssoadmin_instances.example.arns[0]
}

resource "awscc_qbusiness_web_experience" "example" {
  application_id              = awscc_qbusiness_application.example.id
  role_arn                    = awscc_iam_role.example.arn
  subtitle                    = "Drop a file and ask questions"
  title                       = "Demo Amazon Q Business"
  welcome_message             = "Welcome, please enter your questions"
}

resource "awscc_iam_role" "example" {
  role_name   = "Amazon-QBusiness-WebExperience-Role"
  description = "Grants permissions to AWS Services and Resources used or managed by Amazon Q Business"
  assume_role_policy_document = jsonencode({
    Version = "2012-10-17"
    Statement = [
      {
        Sid    = "QBusinessTrustPolicy"
        Effect = "Allow"
        Principal = {
          Service = "application.qbusiness.amazonaws.com"
        }
        Action = [
          "sts:AssumeRole",
          "sts:SetContext"
        ]
        Condition = {
          StringEquals = {
            "aws:SourceAccount" = data.aws_caller_identity.current.account_id
          }
          ArnEquals = {
            "aws:SourceArn" = awscc_qbusiness_application.example.application_arn
          }
        }
      }
    ]
  })
  policies = [{
    policy_name = "qbusiness_policy"
    policy_document = jsonencode({
      Version = "2012-10-17"
      Statement = [
        {
          Sid = "QBusinessConversationPermission"
          Effect = "Allow"
          Action = [
            "qbusiness:Chat",
            "qbusiness:ChatSync",
            "qbusiness:ListMessages",
            "qbusiness:ListConversations",
            "qbusiness:DeleteConversation",
            "qbusiness:PutFeedback",
            "qbusiness:GetWebExperience",
            "qbusiness:GetApplication",
            "qbusiness:ListPlugins",
            "qbusiness:GetChatControlsConfiguration"
          ]
          Resource = awscc_qbusiness_application.example.application_arn
        }
      ]
    })
  }]
}

As you see in this example, you can use both the AWS and AWS CC providers in the same configuration file. This allows you to easily incorporate new resources available in the AWS CC provider into your existing configuration with minimal changes. The AWS CC provider also accepts the same authentication method and provider-level features available in the AWS provider. This means you don’t have to add additional configuration in your CI/CD pipeline to start using the AWS CC provider. In addition, you can also add custom agent information inside the provider block as described in this documentation.

Things to know

The AWS CC provider is unique due to how it was developed and its dependencies with Cloud Control API and AWS resource model in the CloudFormation registry. As such, there are things that you should know before you start using the AWS CC provider.

  • The AWS CC provider is generated from the latest CloudFormation schemas, and will release weekly containing all new AWS services and enhancements added to Cloud Control API.
  • Certain resources available in the CloudFormation schema are not compatible with the AWS CC provider due to nuances in the schema implementation. You can find them on the GitHub issue list here. We are actively working to add these resources to the AWS CC provider.
  • The AWS CC provider requires Terraform CLI version 1.0.7 or higher.
  • Every AWS CC provider resource includes a top-level attribute `id` that acts as the resource identifier. If the CloudFormation resource schema also has a similarly named top-level attribute `id`, then that property is mapped to a new attribute named `<type>_id`. For example `web_experience_id` for `awscc_qbusiness_web_experience` resource.
  • If a resource attribute is not defined in the Terraform configuration, the AWS CC provider will honor the default values specified in the CloudFormation resource schema. If the resource schema does not include a default value, AWS CC provider will use attribute value stored in the Terraform state (taken from Cloud Control API GetResponse after resource was created).
  • In correlation to the default value behavior as stated above, when an attribute value is removed from the Terraform configuration (e.g. by commenting the attribute), the AWS CC provider will use the previous attribute value stored in the Terraform state. As such, no drift will be detected on the resource configuration when you run Terraform plan / apply.
  • The AWS CC provider data sources are either plural or singular with filters based on `id` attribute. Currently there is no native support for metadata sources such as `aws_region` or `aws_caller_identity`. You can continue to leverage the AWS provider data sources to complement your Terraform configuration.

If you want to dive deeper into AWS CC provider resource behavior, we encourage you to check the documentation here.

Conclusion

The AWS CC provider is now generally available and will be the fastest way for customers to access newly launched AWS features and services using Terraform. We will continue to add support for more resources, additional examples and enriching the schema descriptions. You can start using the AWS CC provider alongside your existing AWS standard provider. To learn more about the AWS CC provider, please check the HashiCorp announcement blog post. You can also follow the workshop on how to get started with AWS CC provider. If you are interested in contributing with practical examples for AWS CC provider resources, check out the how-to guide. For more questions or if you run into any issues with the new provider, don’t hesitate to submit your issue in the AWS CC provider GitHub repository.

Authors

Manu Chandrasekhar

Manu is an AWS DevOps consultant with close to 19 years of industry experience wearing QA/DevOps/Software engineering and management hats. He looks to enable teams he works with to be self-sufficient in
modelling/provisioning Infrastructure in cloud and guides them in cloud adoption. He believes that by improving the developer experience and reducing the barrier of entry to any technology with the advancements in automation and AI, software deployment and delivery can be a non-event.

Rahul Sharma

Rahul is a Principal Product Manager-Technical at Amazon Web Services with over three and a half years of cumulative product management experience spanning Infrastructure as Code (IaC) and Customer Identity and Access Management (CIAM) space.

Welly Siauw

As a Principal Partner Solution Architect, Welly led the co-build and co-innovation strategy with AWS ISV partners. He is passionate about Terraform, Developer Experience and Cloud Governance. Welly joined AWS in 2018 and carried with him almost 2 decades of experience in IT operations, application development, cyber security, and oil exploration. In between work, he spent time tinkering with espresso machines and outdoor hiking.

Terraform CI/CD and testing on AWS with the new Terraform Test Framework

Post Syndicated from Kevon Mayers original https://aws.amazon.com/blogs/devops/terraform-ci-cd-and-testing-on-aws-with-the-new-terraform-test-framework/

Image of HashiCorp Terraform logo and Amazon Web Services (AWS) Logo. Underneath the AWS Logo are the service logos for AWS CodeCommit, AWS CodeBuild, AWS CodePipeline, and Amazon S3. Graphic created by Kevon Mayers

Graphic created by Kevon Mayers

 Introduction

Organizations often use Terraform Modules to orchestrate complex resource provisioning and provide a simple interface for developers to enter the required parameters to deploy the desired infrastructure. Modules enable code reuse and provide a method for organizations to standardize deployment of common workloads such as a three-tier web application, a cloud networking environment, or a data analytics pipeline. When building Terraform modules, it is common for the module author to start with manual testing. Manual testing is performed using commands such as terraform validate for syntax validation, terraform plan to preview the execution plan, and terraform apply followed by manual inspection of resource configuration in the AWS Management Console. Manual testing is prone to human error, not scalable, and can result in unintended issues. Because modules are used by multiple teams in the organization, it is important to ensure that any changes to the modules are extensively tested before the release. In this blog post, we will show you how to validate Terraform modules and how to automate the process using a Continuous Integration/Continuous Deployment (CI/CD) pipeline.

Terraform Test

Terraform test is a new testing framework for module authors to perform unit and integration tests for Terraform modules. Terraform test can create infrastructure as declared in the module, run validation against the infrastructure, and destroy the test resources regardless if the test passes or fails. Terraform test will also provide warnings if there are any resources that cannot be destroyed. Terraform test uses the same HashiCorp Configuration Language (HCL) syntax used to write Terraform modules. This reduces the burden for modules authors to learn other tools or programming languages. Module authors run the tests using the command terraform test which is available on Terraform CLI version 1.6 or higher.

Module authors create test files with the extension *.tftest.hcl. These test files are placed in the root of the Terraform module or in a dedicated tests directory. The following elements are typically present in a Terraform tests file:

  • Provider block: optional, used to override the provider configuration, such as selecting AWS region where the tests run.
  • Variables block: the input variables passed into the module during the test, used to supply non-default values or to override default values for variables.
  • Run block: used to run a specific test scenario. There can be multiple run blocks per test file, Terraform executes run blocks in order. In each run block you specify the command Terraform (plan or apply), and the test assertions. Module authors can specify the conditions such as: length(var.items) != 0. A full list of condition expressions can be found in the HashiCorp documentation.

Terraform tests are performed in sequential order and at the end of the Terraform test execution, any failed assertions are displayed.

Basic test to validate resource creation

Now that we understand the basic anatomy of a Terraform tests file, let’s create basic tests to validate the functionality of the following Terraform configuration. This Terraform configuration will create an AWS CodeCommit repository with prefix name repo-.

# main.tf

variable "repository_name" {
  type = string
}
resource "aws_codecommit_repository" "test" {
  repository_name = format("repo-%s", var.repository_name)
  description     = "Test repository."
}

Now we create a Terraform test file in the tests directory. See the following directory structure as an example:

├── main.tf 
└── tests 
└── basic.tftest.hcl

For this first test, we will not perform any assertion except for validating that Terraform execution plan runs successfully. In the tests file, we create a variable block to set the value for the variable repository_name. We also added the run block with command = plan to instruct Terraform test to run Terraform plan. The completed test should look like the following:

# basic.tftest.hcl

variables {
  repository_name = "MyRepo"
}

run "test_resource_creation" {
  command = plan
}

Now we will run this test locally. First ensure that you are authenticated into an AWS account, and run the terraform init command in the root directory of the Terraform module. After the provider is initialized, start the test using the terraform test command.

❯ terraform test
tests/basic.tftest.hcl... in progress
run "test_resource_creation"... pass
tests/basic.tftest.hcl... tearing down
tests/basic.tftest.hcl... pass

Our first test is complete, we have validated that the Terraform configuration is valid and the resource can be provisioned successfully. Next, let’s learn how to perform inspection of the resource state.

Create resource and validate resource name

Re-using the previous test file, we add the assertion block to checks if the CodeCommit repository name starts with a string repo- and provide error message if the condition fails. For the assertion, we use the startswith function. See the following example:

# basic.tftest.hcl

variables {
  repository_name = "MyRepo"
}

run "test_resource_creation" {
  command = plan

  assert {
    condition = startswith(aws_codecommit_repository.test.repository_name, "repo-")
    error_message = "CodeCommit repository name ${var.repository_name} did not start with the expected value of ‘repo-****’."
  }
}

Now, let’s assume that another module author made changes to the module by modifying the prefix from repo- to my-repo-. Here is the modified Terraform module.

# main.tf

variable "repository_name" {
  type = string
}
resource "aws_codecommit_repository" "test" {
  repository_name = format("my-repo-%s", var.repository_name)
  description = "Test repository."
}

We can catch this mistake by running the the terraform test command again.

❯ terraform test
tests/basic.tftest.hcl... in progress
run "test_resource_creation"... fail
╷
│ Error: Test assertion failed
│
│ on tests/basic.tftest.hcl line 9, in run "test_resource_creation":
│ 9: condition = startswith(aws_codecommit_repository.test.repository_name, "repo-")
│ ├────────────────
│ │ aws_codecommit_repository.test.repository_name is "my-repo-MyRepo"
│
│ CodeCommit repository name MyRepo did not start with the expected value 'repo-***'.
╵
tests/basic.tftest.hcl... tearing down
tests/basic.tftest.hcl... fail

Failure! 0 passed, 1 failed.

We have successfully created a unit test using assertions that validates the resource name matches the expected value. For more examples of using assertions see the Terraform Tests Docs. Before we proceed to the next section, don’t forget to fix the repository name in the module (revert the name back to repo- instead of my-repo-) and re-run your Terraform test.

Testing variable input validation

When developing Terraform modules, it is common to use variable validation as a contract test to validate any dependencies / restrictions. For example, AWS CodeCommit limits the repository name to 100 characters. A module author can use the length function to check the length of the input variable value. We are going to use Terraform test to ensure that the variable validation works effectively. First, we modify the module to use variable validation.

# main.tf

variable "repository_name" {
  type = string
  validation {
    condition = length(var.repository_name) <= 100
    error_message = "The repository name must be less than or equal to 100 characters."
  }
}

resource "aws_codecommit_repository" "test" {
  repository_name = format("repo-%s", var.repository_name)
  description = "Test repository."
}

By default, when variable validation fails during the execution of Terraform test, the Terraform test also fails. To simulate this, create a new test file and insert the repository_name variable with a value longer than 100 characters.

# var_validation.tftest.hcl

variables {
  repository_name = “this_is_a_repository_name_longer_than_100_characters_7rfD86rGwuqhF3TH9d3Y99r7vq6JZBZJkhw5h4eGEawBntZmvy”
}

run “test_invalid_var” {
  command = plan
}

Notice on this new test file, we also set the command to Terraform plan, why is that? Because variable validation runs prior to Terraform apply, thus we can save time and cost by skipping the entire resource provisioning. If we run this Terraform test, it will fail as expected.

❯ terraform test
tests/basic.tftest.hcl… in progress
run “test_resource_creation”… pass
tests/basic.tftest.hcl… tearing down
tests/basic.tftest.hcl… pass
tests/var_validation.tftest.hcl… in progress
run “test_invalid_var”… fail
╷
│ Error: Invalid value for variable
│
│ on main.tf line 1:
│ 1: variable “repository_name” {
│ ├────────────────
│ │ var.repository_name is “this_is_a_repository_name_longer_than_100_characters_7rfD86rGwuqhF3TH9d3Y99r7vq6JZBZJkhw5h4eGEawBntZmvy”
│
│ The repository name must be less than or equal to 100 characters.
│
│ This was checked by the validation rule at main.tf:3,3-13.
╵
tests/var_validation.tftest.hcl… tearing down
tests/var_validation.tftest.hcl… fail

Failure! 1 passed, 1 failed.

For other module authors who might iterate on the module, we need to ensure that the validation condition is correct and will catch any problems with input values. In other words, we expect the validation condition to fail with the wrong input. This is especially important when we want to incorporate the contract test in a CI/CD pipeline. To prevent our test from failing due introducing an intentional error in the test, we can use the expect_failures attribute. Here is the modified test file:

# var_validation.tftest.hcl

variables {
  repository_name = “this_is_a_repository_name_longer_than_100_characters_7rfD86rGwuqhF3TH9d3Y99r7vq6JZBZJkhw5h4eGEawBntZmvy”
}

run “test_invalid_var” {
  command = plan

  expect_failures = [
    var.repository_name
  ]
}

Now if we run the Terraform test, we will get a successful result.

❯ terraform test
tests/basic.tftest.hcl… in progress
run “test_resource_creation”… pass
tests/basic.tftest.hcl… tearing down
tests/basic.tftest.hcl… pass
tests/var_validation.tftest.hcl… in progress
run “test_invalid_var”… pass
tests/var_validation.tftest.hcl… tearing down
tests/var_validation.tftest.hcl… pass

Success! 2 passed, 0 failed.

As you can see, the expect_failures attribute is used to test negative paths (the inputs that would cause failures when passed into a module). Assertions tend to focus on positive paths (the ideal inputs). For an additional example of a test that validates functionality of a completed module with multiple interconnected resources, see this example in the Terraform CI/CD and Testing on AWS Workshop.

Orchestrating supporting resources

In practice, end-users utilize Terraform modules in conjunction with other supporting resources. For example, a CodeCommit repository is usually encrypted using an AWS Key Management Service (KMS) key. The KMS key is provided by end-users to the module using a variable called kms_key_id. To simulate this test, we need to orchestrate the creation of the KMS key outside of the module. In this section we will learn how to do that. First, update the Terraform module to add the optional variable for the KMS key.

# main.tf

variable "repository_name" {
  type = string
  validation {
    condition = length(var.repository_name) <= 100
    error_message = "The repository name must be less than or equal to 100 characters."
  }
}

variable "kms_key_id" {
  type = string
  default = ""
}

resource "aws_codecommit_repository" "test" {
  repository_name = format("repo-%s", var.repository_name)
  description = "Test repository."
  kms_key_id = var.kms_key_id != "" ? var.kms_key_id : null
}

In a Terraform test, you can instruct the run block to execute another helper module. The helper module is used by the test to create the supporting resources. We will create a sub-directory called setup under the tests directory with a single kms.tf file. We also create a new test file for KMS scenario. See the updated directory structure:

├── main.tf
└── tests
├── setup
│ └── kms.tf
├── basic.tftest.hcl
├── var_validation.tftest.hcl
└── with_kms.tftest.hcl

The kms.tf file is a helper module to create a KMS key and provide its ARN as the output value.

# kms.tf

resource "aws_kms_key" "test" {
  description = "test KMS key for CodeCommit repo"
  deletion_window_in_days = 7
}

output "kms_key_id" {
  value = aws_kms_key.test.arn
}

The new test will use two separate run blocks. The first run block (setup) executes the helper module to generate a KMS key. This is done by assigning the command apply which will run terraform apply to generate the KMS key. The second run block (codecommit_with_kms) will then use the KMS key ARN output of the first run as the input variable passed to the main module.

# with_kms.tftest.hcl

run "setup" {
  command = apply
  module {
    source = "./tests/setup"
  }
}

run "codecommit_with_kms" {
  command = apply

  variables {
    repository_name = "MyRepo"
    kms_key_id = run.setup.kms_key_id
  }

  assert {
    condition = aws_codecommit_repository.test.kms_key_id != null
    error_message = "KMS key ID attribute value is null"
  }
}

Go ahead and run the Terraform init, followed by Terraform test. You should get the successful result like below.

❯ terraform test
tests/basic.tftest.hcl... in progress
run "test_resource_creation"... pass
tests/basic.tftest.hcl... tearing down
tests/basic.tftest.hcl... pass
tests/var_validation.tftest.hcl... in progress
run "test_invalid_var"... pass
tests/var_validation.tftest.hcl... tearing down
tests/var_validation.tftest.hcl... pass
tests/with_kms.tftest.hcl... in progress
run "create_kms_key"... pass
run "codecommit_with_kms"... pass
tests/with_kms.tftest.hcl... tearing down
tests/with_kms.tftest.hcl... pass

Success! 4 passed, 0 failed.

We have learned how to run Terraform test and develop various test scenarios. In the next section we will see how to incorporate all the tests into a CI/CD pipeline.

Terraform Tests in CI/CD Pipelines

Now that we have seen how Terraform Test works locally, let’s see how the Terraform test can be leveraged to create a Terraform module validation pipeline on AWS. The following AWS services are used:

  • AWS CodeCommit – a secure, highly scalable, fully managed source control service that hosts private Git repositories.
  • AWS CodeBuild – a fully managed continuous integration service that compiles source code, runs tests, and produces ready-to-deploy software packages.
  • AWS CodePipeline – a fully managed continuous delivery service that helps you automate your release pipelines for fast and reliable application and infrastructure updates.
  • Amazon Simple Storage Service (Amazon S3) – an object storage service offering industry-leading scalability, data availability, security, and performance.
Terraform module validation pipeline Architecture. Multiple interconnected AWS services such as AWS CodeCommit, CodeBuild, CodePipeline, and Amazon S3 used to build a Terraform module validation pipeline.

Terraform module validation pipeline

In the above architecture for a Terraform module validation pipeline, the following takes place:

  • A developer pushes Terraform module configuration files to a git repository (AWS CodeCommit).
  • AWS CodePipeline begins running the pipeline. The pipeline clones the git repo and stores the artifacts to an Amazon S3 bucket.
  • An AWS CodeBuild project configures a compute/build environment with Checkov installed from an image fetched from Docker Hub. CodePipeline passes the artifacts (Terraform module) and CodeBuild executes Checkov to run static analysis of the Terraform configuration files.
  • Another CodeBuild project configured with Terraform from an image fetched from Docker Hub. CodePipeline passes the artifacts (repo contents) and CodeBuild runs Terraform command to execute the tests.

CodeBuild uses a buildspec file to declare the build commands and relevant settings. Here is an example of the buildspec files for both CodeBuild Projects:

# Checkov
version: 0.1
phases:
  pre_build:
    commands:
      - echo pre_build starting

  build:
    commands:
      - echo build starting
      - echo starting checkov
      - ls
      - checkov -d .
      - echo saving checkov output
      - checkov -s -d ./ > checkov.result.txt

In the above buildspec, Checkov is run against the root directory of the cloned CodeCommit repository. This directory contains the configuration files for the Terraform module. Checkov also saves the output to a file named checkov.result.txt for further review or handling if needed. If Checkov fails, the pipeline will fail.

# Terraform Test
version: 0.1
phases:
  pre_build:
    commands:
      - terraform init
      - terraform validate

  build:
    commands:
      - terraform test

In the above buildspec, the terraform init and terraform validate commands are used to initialize Terraform, then check if the configuration is valid. Finally, the terraform test command is used to run the configured tests. If any of the Terraform tests fails, the pipeline will fail.

For a full example of the CI/CD pipeline configuration, please refer to the Terraform CI/CD and Testing on AWS workshop. The module validation pipeline mentioned above is meant as a starting point. In a production environment, you might want to customize it further by adding Checkov allow-list rules, linting, checks for Terraform docs, or pre-requisites such as building the code used in AWS Lambda.

Choosing various testing strategies

At this point you may be wondering when you should use Terraform tests or other tools such as Preconditions and Postconditions, Check blocks or policy as code. The answer depends on your test type and use-cases. Terraform test is suitable for unit tests, such as validating resources are created according to the naming specification. Variable validations and Pre/Post conditions are useful for contract tests of Terraform modules, for example by providing error warning when input variables value do not meet the specification. As shown in the previous section, you can also use Terraform test to ensure your contract tests are running properly. Terraform test is also suitable for integration tests where you need to create supporting resources to properly test the module functionality. Lastly, Check blocks are suitable for end to end tests where you want to validate the infrastructure state after all resources are generated, for example to test if a website is running after an S3 bucket configured for static web hosting is created.

When developing Terraform modules, you can run Terraform test in command = plan mode for unit and contract tests. This allows the unit and contract tests to run quicker and cheaper since there are no resources created. You should also consider the time and cost to execute Terraform test for complex / large Terraform configurations, especially if you have multiple test scenarios. Terraform test maintains one or many state files within the memory for each test file. Consider how to re-use the module’s state when appropriate. Terraform test also provides test mocking, which allows you to test your module without creating the real infrastructure.

Conclusion

In this post, you learned how to use Terraform test and develop various test scenarios. You also learned how to incorporate Terraform test in a CI/CD pipeline. Lastly, we also discussed various testing strategies for Terraform configurations and modules. For more information about Terraform test, we recommend the Terraform test documentation and tutorial. To get hands on practice building a Terraform module validation pipeline and Terraform deployment pipeline, check out the Terraform CI/CD and Testing on AWS Workshop.

Authors

Kevon Mayers

Kevon Mayers is a Solutions Architect at AWS. Kevon is a Terraform Contributor and has led multiple Terraform initiatives within AWS. Prior to joining AWS he was working as a DevOps Engineer and Developer, and before that was working with the GRAMMYs/The Recording Academy as a Studio Manager, Music Producer, and Audio Engineer. He also owns a professional production company, MM Productions.

Welly Siauw

Welly Siauw is a Principal Partner Solution Architect at Amazon Web Services (AWS). He spends his day working with customers and partners, solving architectural challenges. He is passionate about service integration and orchestration, serverless and artificial intelligence (AI) and machine learning (ML). He has authored several AWS blog posts and actively leads AWS Immersion Days and Activation Days. Welly spends his free time tinkering with espresso machines and outdoor hiking.

Using AWS CloudFormation and AWS Cloud Development Kit to provision multicloud resources

Post Syndicated from Aaron Sempf original https://aws.amazon.com/blogs/devops/using-aws-cloudformation-and-aws-cloud-development-kit-to-provision-multicloud-resources/

Customers often need to architect solutions to support components across multiple cloud service providers, a need which may arise if they have acquired a company running on another cloud, or for functional purposes where specific services provide a differentiated capability. In this post, we will show you how to use the AWS Cloud Development Kit (AWS CDK) to create a single pane of glass for managing your multicloud resources.

AWS CDK is an open source framework that builds on the underlying functionality provided by AWS CloudFormation. It allows developers to define cloud resources using common programming languages and an abstraction model based on reusable components called constructs. There is a misconception that CloudFormation and CDK can only be used to provision resources on AWS, but this is not the case. The CloudFormation registry, with support for third party resource types, along with custom resource providers, allow for any resource that can be configured via an API to be created and managed, regardless of where it is located.

Multicloud solution design paradigm

Multicloud solutions are often designed with services grouped and separated by cloud, creating a segregation of resource and functions within the design. This approach leads to a duplication of layers of the solution, most commonly a duplication of resources and the deployment processes for each environment. This duplication increases cost, and leads to a complexity of management increasing the potential break points within the solution or practice. 

Along with simplifying resource deployments, and the ever-increasing complexity of customer needs, so too has the need increased for the capability of IaC solutions to deploy resources across hybrid or multicloud environments. Through meeting this need, a proliferation of supported tools, frameworks, languages, and practices has created “choice overload”. At worst, this scares the non-cloud-savvy away from adopting an IaC solution benefiting their cloud journey, and at best confuses the very reason for adopting an IaC practice.

A single pane of glass

Systems Thinking is a holistic approach that focuses on the way a system’s constituent parts interrelate and how systems work as a whole especially over time and within the context of larger systems. Systems thinking is commonly accepted as the backbone of a successful systems engineering approach. Designing solutions taking a full systems view, based on the component’s function and interrelation within the system across environments, more closely aligns with the ability to handle the deployment of each cloud-specific resource, from a single control plane.

While AWS provides a list of services that can be used to help design, manage and operate hybrid and multicloud solutions, with AWS as the primary cloud you can go beyond just using services to support multicloud. CloudFormation registry resource types model and provision resources using custom logic, as a component of stacks in CloudFormation. Public extensions are not only provided by AWS, but third-party extensions are made available for general use by publishers other than AWS, meaning customers can create their own extensions and publish them for anyone to use.

The AWS CDK, which has a 1:1 mapping of all AWS CloudFormation resources, as well as a library of abstracted constructs, supports the ability to import custom AWS CloudFormation extensions, enabling customers and partners to create custom AWS CDK constructs for their extensions. The chosen programming language can be used to inherit and abstract the custom resource into reusable AWS CDK constructs, allowing developers to create solutions that contain native AWS extensions along with secondary hybrid or alternate cloud resources.

Providing the ability to integrate mixed resources in the same stack more closely aligns with the functional design and often diagrammatic depiction of the solution. In essence, we are creating a single IaC pane of glass over the entire solution, deployed through a single control plane. This lowers the complexity and the cost of maintaining separate modules and deployment pipelines across multiple cloud providers.

A common use case for a multicloud: disaster recovery

One of the most common use cases of the requirement for using components across different cloud providers is the need to maintain data sovereignty while designing disaster recovery (DR) into a solution.

Data sovereignty is the idea that data is subject to the laws of where it is physically located, and in some countries extends to regulations that if data is collected from citizens of a geographical area, then the data must reside in servers located in jurisdictions of that geographical area or in countries with a similar scope and rigor in their protection laws. 

This requires organizations to remain in compliance with their host country, and in cases such as state government agencies, a stricter scope of within state boundaries, data sovereignty regulations. Unfortunately, not all countries, and especially not all states, have multiple AWS regions to select from when designing where their primary and recovery data backups will reside. Therefore, the DR solution needs to take advantage of multiple cloud providers in the same geography, and as such a solution must be designed to backup or replicate data across providers.

The multicloud solution

A multicloud solution to the proposed use case would be the backup of data from an AWS resource such as an Amazon S3 bucket to another cloud provider within the same geography, such as an Azure Blob Storage container, using AWS event driven behaviour to trigger the copying of data from the primary AWS resource to the secondary Azure backup resource.

Following the IaC single pane of glass approach, the Azure Blob Storage container is created as a resource type in the CloudFormation Registry, and imported into the AWS CDK to be used as a construct in the solution. However, before the extension resource type can be used effectively in the CDK as a reusable construct and added to your private library, you will first need to go through the import into CDK process for creating Constructs.

There are three different levels of constructs, beginning with low-level constructs, which are called CFN Resources (or L1, short for “layer 1”). These constructs directly represent all resources available in AWS CloudFormation. They are named CfnXyz, where Xyz is name of the resource.

Layer 1 Construct

In this example, an L1 construct named CfnAzureBlobStorage represents an Azure::BlobStorage AWS CloudFormation extension. Here you also explicitly configure the ref property, in order for higher level constructs to access the Output value which will be the Azure blob container url being provisioned.

import { CfnResource } from "aws-cdk-lib";
import { Secret, ISecret } from "aws-cdk-lib/aws-secretsmanager";
import { Construct } from "constructs";

export interface CfnAzureBlobStorageProps {
  subscriptionId: string;
  clientId: string;
  tenantId: string;
  clientSecretName: string;
}

// L1 Construct
export class CfnAzureBlobStorage extends Construct {
  // Allows accessing the ref property
  public readonly ref: string;

  constructor(scope: Construct, id: string, props: CfnAzureBlobStorageProps) {
    super(scope, id);

    const secret = this.getSecret("AzureClientSecret", props.clientSecretName);
    
    const azureBlobStorage = new CfnResource(
      this,
      "ExtensionAzureBlobStorage",
      {
        type: "Azure::BlobStorage",
        properties: {
          AzureSubscriptionId: props.subscriptionId,
          AzureClientId: props.clientId,
          AzureTenantId: props.tenantId,
          AzureClientSecret: secret.secretValue.unsafeUnwrap()
        },
      }
    );

    this.ref = azureBlobStorage.ref;
  }

  private getSecret(id: string, secretName: string) : ISecret {  
    return Secret.fromSecretNameV2(this, secretName.concat("Value"), secretName);
  }
}

As with every CDK Construct, the constructor arguments are scope, id and props. scope and id are propagated to the cdk.Construct base class. The props argument is of type CfnAzureBlobStorageProps which includes four properties all of type string. This is how the Azure credentials are propagated down from upstream constructs.

Layer 2 Construct

The next level of constructs, L2, also represent AWS resources, but with a higher-level, intent-based API. They provide similar functionality, but incorporate the defaults, boilerplate, and glue logic you’d be writing yourself with a CFN Resource construct. They also provide convenience methods that make it simpler to work with the resource.

In this example, an L2 construct is created to abstract the CfnAzureBlobStorage L1 construct and provides additional properties and methods.

import { Construct } from "constructs";
import { CfnAzureBlobStorage } from "./cfn-azure-blob-storage";

// L2 Construct
export class AzureBlobStorage extends Construct {
  public readonly blobContainerUrl: string;

  constructor(
    scope: Construct,
    id: string,
    subscriptionId: string,
    clientId: string,
    tenantId: string,
    clientSecretName: string
  ) {
    super(scope, id);

    const azureBlobStorage = new CfnAzureBlobStorage(
      this,
      "CfnAzureBlobStorage",
      {
        subscriptionId: subscriptionId,
        clientId: clientId,
        tenantId: tenantId,
        clientSecretName: clientSecretName,
      }
    );

    this.blobContainerUrl = azureBlobStorage.ref;
  }
}

The custom L2 construct class is declared as AzureBlobStorage, this time without the Cfn prefix to represent an L2 construct. This time the constructor arguments include the Azure credentials and client secret, and the ref from the L1 construct us output to the public variable AzureBlobContainerUrl.

As an L2 construct, the AzureBlobStorage construct could be used in CDK Apps along with AWS Resource Constructs in the same Stack, to be provisioned through AWS CloudFormation creating the IaC single pane of glass for a multicloud solution.

Layer 3 Construct

The true value of the CDK construct programming model is in the ability to extend L2 constructs, which represent a single resource, into a composition of multiple constructs that provide a solution for a common task. These are Layer 3, L3, Constructs also known as patterns.

In this example, the L3 construct represents the solution architecture to backup objects uploaded to an Amazon S3 bucket into an Azure Blob Storage container in real-time, using AWS Lambda to process event notifications from Amazon S3.

import { RemovalPolicy, Duration, CfnOutput } from "aws-cdk-lib";
import { Bucket, BlockPublicAccess, EventType } from "aws-cdk-lib/aws-s3";
import { DockerImageFunction, DockerImageCode } from "aws-cdk-lib/aws-lambda";
import { PolicyStatement, Effect } from "aws-cdk-lib/aws-iam";
import { LambdaDestination } from "aws-cdk-lib/aws-s3-notifications";
import { IStringParameter, StringParameter } from "aws-cdk-lib/aws-ssm";
import { Secret, ISecret } from "aws-cdk-lib/aws-secretsmanager";
import { Construct } from "constructs";
import { AzureBlobStorage } from "./azure-blob-storage";

// L3 Construct
export class S3ToAzureBackupService extends Construct {
  constructor(
    scope: Construct,
    id: string,
    azureSubscriptionIdParamName: string,
    azureClientIdParamName: string,
    azureTenantIdParamName: string,
    azureClientSecretName: string
  ) {
    super(scope, id);

    // Retrieve existing SSM Parameters
    const azureSubscriptionIdParameter = this.getSSMParameter("AzureSubscriptionIdParam", azureSubscriptionIdParamName);
    const azureClientIdParameter = this.getSSMParameter("AzureClientIdParam", azureClientIdParamName);
    const azureTenantIdParameter = this.getSSMParameter("AzureTenantIdParam", azureTenantIdParamName);    
    
    // Retrieve existing Azure Client Secret
    const azureClientSecret = this.getSecret("AzureClientSecret", azureClientSecretName);

    // Create an S3 bucket
    const sourceBucket = new Bucket(this, "SourceBucketForAzureBlob", {
      removalPolicy: RemovalPolicy.RETAIN,
      blockPublicAccess: BlockPublicAccess.BLOCK_ALL,
    });

    // Create a corresponding Azure Blob Storage account and a Blob Container
    const azurebBlobStorage = new AzureBlobStorage(
      this,
      "MyCustomAzureBlobStorage",
      azureSubscriptionIdParameter.stringValue,
      azureClientIdParameter.stringValue,
      azureTenantIdParameter.stringValue,
      azureClientSecretName
    );

    // Create a lambda function that will receive notifications from S3 bucket
    // and copy the new uploaded object to Azure Blob Storage
    const copyObjectToAzureLambda = new DockerImageFunction(
      this,
      "CopyObjectsToAzureLambda",
      {
        timeout: Duration.seconds(60),
        code: DockerImageCode.fromImageAsset("copy_s3_fn_code", {
          buildArgs: {
            "--platform": "linux/amd64"
          }
        }),
      },
    );

    // Add an IAM policy statement to allow the Lambda function to access the
    // S3 bucket
    sourceBucket.grantRead(copyObjectToAzureLambda);

    // Add an IAM policy statement to allow the Lambda function to get the contents
    // of an S3 object
    copyObjectToAzureLambda.addToRolePolicy(
      new PolicyStatement({
        effect: Effect.ALLOW,
        actions: ["s3:GetObject"],
        resources: [`arn:aws:s3:::${sourceBucket.bucketName}/*`],
      })
    );

    // Set up an S3 bucket notification to trigger the Lambda function
    // when an object is uploaded
    sourceBucket.addEventNotification(
      EventType.OBJECT_CREATED,
      new LambdaDestination(copyObjectToAzureLambda)
    );

    // Grant the Lambda function read access to existing SSM Parameters
    azureSubscriptionIdParameter.grantRead(copyObjectToAzureLambda);
    azureClientIdParameter.grantRead(copyObjectToAzureLambda);
    azureTenantIdParameter.grantRead(copyObjectToAzureLambda);

    // Put the Azure Blob Container Url into SSM Parameter Store
    this.createStringSSMParameter(
      "AzureBlobContainerUrl",
      "Azure blob container URL",
      "/s3toazurebackupservice/azureblobcontainerurl",
      azurebBlobStorage.blobContainerUrl,
      copyObjectToAzureLambda
    );      

    // Grant the Lambda function read access to the secret
    azureClientSecret.grantRead(copyObjectToAzureLambda);

    // Output S3 bucket arn
    new CfnOutput(this, "sourceBucketArn", {
      value: sourceBucket.bucketArn,
      exportName: "sourceBucketArn",
    });

    // Output the Blob Conatiner Url
    new CfnOutput(this, "azureBlobContainerUrl", {
      value: azurebBlobStorage.blobContainerUrl,
      exportName: "azureBlobContainerUrl",
    });
  }

}

The custom L3 construct can be used in larger IaC solutions by calling the class called S3ToAzureBackupService and providing the Azure credentials and client secret as properties to the constructor.

import * as cdk from "aws-cdk-lib";
import { Construct } from "constructs";
import { S3ToAzureBackupService } from "./s3-to-azure-backup-service";

export class MultiCloudBackupCdkStack extends cdk.Stack {
  constructor(scope: Construct, id: string, props?: cdk.StackProps) {
    super(scope, id, props);

    const s3ToAzureBackupService = new S3ToAzureBackupService(
      this,
      "MyMultiCloudBackupService",
      "/s3toazurebackupservice/azuresubscriptionid",
      "/s3toazurebackupservice/azureclientid",
      "/s3toazurebackupservice/azuretenantid",
      "s3toazurebackupservice/azureclientsecret"
    );
  }
}

Solution Diagram

Diagram 1: IaC Single Control Plane, demonstrates the concept of the Azure Blob Storage extension being imported from the AWS CloudFormation Registry into AWS CDK as an L1 CfnResource, wrapped into an L2 Construct and used in an L3 pattern alongside AWS resources to perform the specific task of backing up from and Amazon s3 Bucket into an Azure Blob Storage Container.

Multicloud IaC with CDK

Diagram 1: IaC Single Control Plan

The CDK application is then synthesized into one or more AWS CloudFormation Templates, which result in the CloudFormation service deploying AWS resource configurations to AWS and Azure resource configurations to Azure.

This solution demonstrates not only how to consolidate the management of secondary cloud resources into a unified infrastructure stack in AWS, but also the improved productivity by eliminating the complexity and cost of operating multiple deployment mechanisms into multiple public cloud environments.

The following video demonstrates an example in real-time of the end-state solution:

Next Steps

While this was just a straightforward example, with the same approach you can use your imagination to come up with even more and complex scenarios where AWS CDK can be used as a single pane of glass for IaC to manage multicloud and hybrid solutions.

To get started with the solution discussed in this post, this workshop will provide you with the instructions you need to understand the steps required to create the S3ToAzureBackupService.

Once you have learned how to create AWS CloudFormation extensions and develop them into AWS CDK Constructs, you will learn how, with just a few lines of code, you can develop reusable multicloud unified IaC solutions that deploy through a single AWS control plane.

Conclusion

By adopting AWS CloudFormation extensions and AWS CDK, deployed through a single AWS control plane, the cost and complexity of maintaining deployment pipelines across multiple cloud providers is reduced to a single holistic solution-focused pipeline. The techniques demonstrated in this post and the related workshop provide a capability to simplify the design of complex systems, improve the management of integration, and more closely align the IaC and deployment management practices with the design.

About the authors:

Aaron Sempf

Aaron Sempf is a Global Principal Partner Solutions Architect, in the Global Systems Integrators team. With over twenty years in software engineering and distributed system, he focuses on solving for large scale integration and event driven systems. When not working with AWS GSI partners, he can be found coding prototypes for autonomous robots, IoT devices, and distributed solutions.

 
Puneet Talwar

Puneet Talwar

Puneet Talwar is a Senior Solutions Architect at Amazon Web Services (AWS) on the Australian Public Sector team. With a background of over twenty years in software engineering, he particularly enjoys helping customers build modern, API Driven software architectures at scale. In his spare time, he can be found building prototypes for micro front ends and event driven architectures.

How to write and execute integration tests for AWS CDK applications

Post Syndicated from Svenja Raether original https://aws.amazon.com/blogs/devops/how-to-write-and-execute-integration-tests-for-aws-cdk-applications/

Automated integration testing validates system components and boosts confidence for new software releases. Performing integration tests on resources deployed to the AWS cloud enables the validation of AWS Identity and Access Management (IAM) policies, service limits, application configuration, and runtime code. For developers that are currently leveraging AWS Cloud Development Kit (AWS CDK) as their Infrastructure as Code tool, there is a testing framework available that makes integration testing easier to implement in the software release.

AWS CDK is an open-source framework for defining and provisioning AWS cloud infrastructure using supported programming languages. The framework includes constructs for writing and running unit and integration tests. The assertions construct can be used to write unit tests and assert against the generated CloudFormation templates. CDK integ-tests construct can be used for defining integration test cases and can be combined with CDK integ-runner for executing these tests. The integ-runner handles automatic resource provisioning and removal and supports several customization options. Unit tests using assertion functions are used to test configurations in the CloudFormation templates before deploying these templates, while integration tests run assertions in the deployed resources. This blog post demonstrates writing automated integration tests for an example application using AWS CDK.

Solution Overview

Architecture Diagram for the serverless data enrichment application

Figure 1: Serverless data enrichment application

The example application shown in Figure 1 is a sample serverless data enrichment application. Data is processed and enriched in the system as follows:

  1. Users publish messages to an Amazon Simple Notification Service (Amazon SNS) topic. Messages are encrypted at rest using an AWS Key Management Service (AWS KMS) customer-managed key.
  2. Amazon Simple Queue Service (Amazon SQS) queue is subscribed to the Amazon SNS topic, where published messages are delivered.
  3. AWS Lambda consumes messages from the Amazon SQS queue, adding additional data to the message. Messages that cannot be processed successfully are sent to a dead-letter queue.
  4. Successfully enriched messages are stored in an Amazon DynamoDB table by the Lambda function.
Architecture diagram for the integration test with one assertion

Figure 2: Integration test with one assertion

For this sample application, we will use AWS CDK’s integration testing framework to validate the processing for a single message as shown in Figure 2. To run the test, we configure the test framework to do the following steps:

  1. Publish a message to the Amazon SNS topic. Wait for the application to process the message and save to DynamoDB.
  2. Periodically check the Amazon DynamoDB table and verify that the saved message was enriched.

Prerequisites

The following are the required to deploy this solution:

The structure of the sample AWS CDK application repository is as follows:

  • /bin folder contains the top-level definition of the AWS CDK app.
  • /lib folder contains the stack definition of the application under test which defines the application described in the section above.
  • /lib/functions contains the Lambda function runtime code.
  • /integ-tests contains the integration test stack where we define and configure our test cases.

The repository is a typical AWS CDK application except that it has one additional directory for the test case definitions. For the remainder of this blog post, we focus on the integration test definition in /integ-tests/integ.sns-sqs-ddb.ts and walk you through its creation and the execution of the integration test.

Writing integration tests

An integration test should validate expected behavior of your AWS CDK application. You can define an integration test for your application as follows:

  1. Create a stack under test from the CdkIntegTestsDemoStack definition and map it to the application.
    // CDK App for Integration Tests
    const app = new cdk.App();
    
    // Stack under test
    const stackUnderTest = new CdkIntegTestsDemoStack(app, ‘IntegrationTestStack’, {
      setDestroyPolicyToAllResources: true,
      description:
        “This stack includes the application’s resources for integration testing.”,
    });
  2. Define the integration test construct with a list of test cases. This construct offers the ability to customize the behavior of the integration runner tool. For example, you can force the integ-runner to destroy the resources after the test run to force the cleanup.
    // Initialize Integ Test construct
    const integ = new IntegTest(app, ‘DataFlowTest’, {
      testCases: [stackUnderTest], // Define a list of cases for this test
      cdkCommandOptions: {
        // Customize the integ-runner parameters
        destroy: {
          args: {
            force: true,
          },
        },
      },
      regions: [stackUnderTest.region],
    });
  3. Add an assertion to validate the test results. In this example, we validate the single message flow from the Amazon SNS topic to the Amazon DynamoDB table. The assertion publishes the message object to the Amazon SNS topic using the AwsApiCall method. In the background this method utilizes a Lambda-backed CloudFormation custom resource to execute the Amazon SNS Publish API call with the AWS SDK for JavaScript.
    /**
     * Assertion:
     * The application should handle single message and write the enriched item to the DynamoDB table.
     */
    const id = 'test-id-1';
    const message = 'This message should be validated';
    /**
     * Publish a message to the SNS topic.
     * Note - SNS topic ARN is a member variable of the
     * application stack for testing purposes.
     */
    const assertion = integ.assertions
      .awsApiCall('SNS', 'publish', {
        TopicArn: stackUnderTest.topicArn,
        Message: JSON.stringify({
          id: id,
          message: message,
        }),
      })
  4. Use the next helper method to chain API calls. In our example, a second Amazon DynamoDB GetItem API call gets the item whose primary key equals the message id. The result from the second API call is expected to match the message object including the additional attribute added as a result of the data enrichment.
    /**
     * Validate that the DynamoDB table contains the enriched message.
     */
      .next(
        integ.assertions
          .awsApiCall('DynamoDB', 'getItem', {
            TableName: stackUnderTest.tableName,
            Key: { id: { S: id } },
          })
          /**
           * Expect the enriched message to be returned.
           */
          .expect(
            ExpectedResult.objectLike({
              Item: { id: { S: id, },
                message: { S: message, },
                additionalAttr: { S: 'enriched', },
              },
            }),
          )
  5. Since it may take a while for the message to be passed through the application, we run the assertion asynchronously by calling the waitForAssertions method. This means that the Amazon DynamoDB GetItem API call is called in intervals until the expected result is met or the total timeout is reached.
    /**
     * Timeout and interval check for assertion to be true.
     * Note - Data may take some time to arrive in DynamoDB.
     * Iteratively executes API call at specified interval.
     */
          .waitForAssertions({
            totalTimeout: Duration.seconds(25),
            interval: Duration.seconds(3),
          }),
      );
  6. The AwsApiCall method automatically adds the correct IAM permissions for both API calls to the AWS Lambda function. Given that the example application’s Amazon SNS topic is encrypted using an AWS KMS key, additional permissions are required to publish the message.
    // Add the required permissions to the api call
    assertion.provider.addToRolePolicy({
      Effect: 'Allow',
      Action: [
        'kms:Encrypt',
        'kms:ReEncrypt*',
        'kms:GenerateDataKey*',
        'kms:Decrypt',
      ],
      Resource: [stackUnderTest.kmsKeyArn],
    });

The full code for this blog is available on this GitHub project.

Running integration tests

In this section, we show how to run integration test for the introduced sample application using the integ-runner to execute the test case and report on the assertion results.

Install and build the project.

npm install 

npm run build

Run the following command to initiate the test case execution with a list of options.

npm run integ-test

The directory option specifies in which location the integ-runner needs to recursively search for test definition files. The parallel-regions option allows to define a list of regions to run tests in. We set this to us-east-1 and ensure that the AWS CDK bootstrapping has previously been performed in this region. The update-on-failed option allows to rerun the integration tests if the snapshot fails. A full list of available options can be found in the integ-runner Github repository.

Hint: if you want to retain your test stacks during development for debugging, you can specify the no-clean option to retain the test stack after the test run.

The integ-runner initially checks the integration test snapshots to determine if any changes have occurred since the last execution. Since there are no previous snapshots for the initial run, the snapshot verification fails. As a result, the integ-runner begins executing the integration tests using the ephemeral test stack and displays the result.

Verifying integration test snapshots...

  NEW        integ.sns-sqs-ddb 2.863s

Snapshot Results: 

Tests:    1 failed, 1 total

Running integration tests for failed tests...

Running in parallel across regions: us-east-1
Running test <your-path>/cdk-integ-tests-demo/integ-tests/integ.sns-sqs-ddb.js in us-east-1
  SUCCESS    integ.sns-sqs-ddb-DemoTest/DefaultTest 587.295s
       AssertionResultsAwsApiCallDynamoDBgetItem - success

Test Results: 

Tests:    1 passed, 1 total
The AWS CloudFormation console deploys the IntegrationTestStack and DataFlowDefaultTestDeployAssert stack

Figure 3: AWS CloudFormation deploying the IntegrationTestStack and DataFlowDefaultTestDeployAssert stacks

The integ-runner generates two AWS CloudFormation stacks, as shown in Figure 3. The IntegrationTestStack stack includes the resources from our sample application, which serves as an isolated application representing the stack under test. The DataFlowDefaultTestDeployAssert stack contains the resources required for executing the integration tests as shown in Figure 4.

AWS CloudFormation displays the resources for the DataFlowDefaultTestDeployAssert stack

Figure 4: AWS CloudFormation resources for the DataFlowDefaultTestDeployAssert stack

Cleaning up

Based on the specified RemovalPolicy, the resources are automatically destroyed as the stack is removed. Some resources such as Amazon DynamoDB tables have the default RemovalPolicy set to Retain in AWS CDK. To set the removal policy to Destroy for the integration test resources, we leverage Aspects.

/**
 * Aspect for setting all removal policies to DESTROY
 */
class ApplyDestroyPolicyAspect implements cdk.IAspect {
  public visit(node: IConstruct): void {
    if (node instanceof CfnResource) {
      node.applyRemovalPolicy(cdk.RemovalPolicy.DESTROY);
    }
  }
}
Deleting AWS CloudFormation stack from the AWS Console

Figure 5: Deleting AWS CloudFormation stacks from the AWS Console

If you set the no-clean argument as part of the integ-runner CLI options, you need to manually destroy the stacks. This can be done from the AWS Console, via AWS CloudFormation as shown in Figure 5 or by using the following command.

cdk destroy --all

To clean up the code repository build files, you can run the following script.

npm run clean

Conclusion

The AWS CDK integ-tests construct is a valuable tool for defining and conducting automated integration tests for your AWS CDK applications. In this blog post, we have introduced a practical code example showcasing how AWS CDK integration tests can be used to validate the expected application behavior when deployed to the cloud. You can leverage the techniques in this guide to write your own AWS CDK integration tests and improve the quality and reliability of your application releases.

For information on how to get started with these constructs, please refer to the following documentation.

Call to Action

Integ-runner and integ-tests constructs are experimental and subject to change. The release notes for both stable and experimental modules are available in the AWS CDK Github release notes. As always, we welcome bug reports, feature requests, and pull requests on the aws-cdk GitHub repository to further shape these alpha constructs based on your feedback.

About the authors

Iris Kraja

Iris is a Cloud Application Architect at AWS Professional Services based in New York City. She is passionate about helping customers design and build modern AWS cloud native solutions, with a keen interest in serverless technology, event-driven architectures and DevOps. Outside of work, she enjoys hiking and spending as much time as possible in nature.

Svenja Raether

Svenja is an Associate Cloud Application Architect at AWS Professional Services based in Munich.

Ahmed Bakry

Ahmed is a Security Consultant at AWS Professional Services based in Amsterdam. He obtained his master’s degree in Computer Science at the University of Twente and specialized in Cyber Security. And he did his bachelor degree in Networks Engineering at the German University in Cairo. His passion is developing secure and robust applications that drive success for his customers.

Philip Chen

Philip is a Senior Cloud Application Architect at AWS Professional Services. He works with customers to design cloud solutions that are built to achieve business goals and outcomes. He is passionate about his work and enjoys the creativity that goes into architecting solutions.

Directing ML-powered Operational Insights from Amazon DevOps Guru to your Datadog event stream

Post Syndicated from Bineesh Ravindran original https://aws.amazon.com/blogs/devops/directing_ml-powered_operational_insights_from_amazon_devops_guru_to_your_datadog_event_stream/

Amazon DevOps Guru is a fully managed AIOps service that uses machine learning (ML) to quickly identify when applications are behaving outside of their normal operating patterns and generates insights from its findings. These insights generated by DevOps Guru can be used to alert on-call teams to react to anomalies for business mission critical workloads. If you are already utilizing Datadog to automate infrastructure monitoring, application performance monitoring, and log management for real-time observability of your entire technology stack, then this blog is for you.

You might already be using Datadog for a consolidated view of your Datadog Events interface to search, analyze and filter events from many different sources in one place. Datadog Events are records of notable changes relevant for managing and troubleshooting IT Operations, such as code, deployments, service health, configuration changes and monitoring alerts.

Wherever DevOps Guru detects operational events in your AWS environment that could lead to outages, it generates insights and recommendations. These insights/recommendations are then pushed to a user specific Datadog endpoint using Datadog events API. Customers can then create dashboards, incidents, alarms or take corrective automated actions based on these insights and recommendations in Datadog.

Datadog collects and unifies all of the data streaming from these complex environments, with a 1-click integration for pulling in metrics and tags from over 90 AWS services. Companies can deploy the Datadog Agent directly on their hosts and compute instances to collect metrics with greater granularity—down to one-second resolution. And with Datadog’s out-of-the-box integration dashboards, companies get not only a high-level view into the health of their infrastructure and applications but also deeper visibility into individual services such as AWS Lambda and Amazon EKS.

This blogpost will show you how to utilize Amazon DevOps guru with Datadog to get real time insights and recommendations on their AWS Infrastructure. We will demonstrate how an insight generated by Amazon DevOps Guru for an anomaly can automatically be pushed to Datadog’s event streams which can then be used to create dashboards, create alarms and alerts to take corrective actions.

Solution Overview

When an Amazon DevOps Guru insight is created, an Amazon EventBridge rule is used to capture the insight as an event and routed to an AWS Lambda Function target. The lambda function interacts with Datadog using a REST API to push corresponding DevOps Guru events captured by Amazon EventBridge

The EventBridge rule can be customized to capture all DevOps Guru insights or narrowed down to specific insights. In this blog, we will be capturing all DevOps Guru insights and will be performing actions on Datadog for the below DevOps Guru events:

  • DevOps Guru New Insight Open
  • DevOps Guru New Anomaly Association
  • DevOps Guru Insight Severity Upgraded
  • DevOps Guru New Recommendation Created
  • DevOps Guru Insight Closed
Figure 1: Amazon DevOps Guru Integration with Datadog with Amazon EventBridge and AWS.

Figure 1: Amazon DevOps Guru Integration with Datadog with Amazon EventBridge and AWS.

Solution Implementation Steps

Pre-requisites

Before you deploy the solution, complete the following steps.

    • Datadog Account Setup: We will be connecting your AWS Account with Datadog. If you do not have a Datadog account, you can request a free trial developer instance through Datadog.
    • Datadog Credentials: Gather the credentials of Datadog keys that will be used to connect with AWS. Follow the steps below to create an API Key and Application Key
      Add an API key or client token

        1. To add a Datadog API key or client token:
        2. Navigate to Organization settings, then click the API keys or Client Tokens
        3. Click the New Key or New Client Token button, depending on which you’re creating.
        4. Enter a name for your key or token.
        5. Click Create API key or Create Client Token.
        6. Note down the newly generated API Key value. We will need this in later steps
        7. Figure 2: Create new API Key.

          Figure 2: Create new API Key.

      Add application keys

      • To add a Datadog application key, navigate to Organization Settings > Application Keys.If you have the permission to create application keys, click New Key.Note down the newly generated Application Key. We will need this in later steps

Add Application Key and API Key to AWS Secrets Manager : Secrets Manager enables you to replace hardcoded credentials in your code, including passwords, with an API call to Secrets Manager to retrieve the secret programmatically. This helps ensure the secret can’t be compromised by someone examining your code,because the secret no longer exists in the code.
Follow below steps to create a new secret in AWS Secrets Manager.

  1. Open the Secrets Manager console at https://console.aws.amazon.com/secretsmanager/
  2. Choose Store a new secret.
  3. On the Choose secret type page, do the following:
    1. For Secret type, choose other type of secret.
    2. In Key/value pairs, either enter your secret in Key/value
      pairs
Figure 3: Create new secret in Secret Manager.

Figure 3: Create new secret in Secret Manager.

Click next and enter “DatadogSecretManager” as the secret name followed by Review and Finish

Figure 4: Configure secret in Secret Manager.

Figure 4: Configure secret in Secret Manager.

Option 1: Deploy Datadog Connector App from AWS Serverless Repository

The DevOps Guru Datadog Connector application is available on the AWS Serverless Application Repository which is a managed repository for serverless applications. The application is packaged with an AWS Serverless Application Model (SAM) template, definition of the AWS resources used and the link to the source code. Follow the steps below to quickly deploy this serverless application in your AWS account

      • Login to the AWS management console of the account to which you plan to deploy this solution.
      • Go to the DevOps Guru Datadog Connector application in the AWS Serverless Repository and click on “Deploy”.
      • The Lambda application deployment screen will be displayed where you can enter the Datadog Application name
        Figure 5: DevOps Guru Datadog connector.

        Figure 5: DevOps Guru Datadog connector.

         Figure 6: Serverless Application DevOps Guru Datadog connector.

        Figure 6: Serverless Application DevOps Guru Datadog connector.

      • After successful deployment the AWS Lambda Application page will display the “Create complete” status for the serverlessrepo-DevOps-Guru-Datadog-Connector application. The CloudFormation template creates four resources,
        1. Lambda function which has the logic to integrate to the Datadog
        2. Event Bridge rule for the DevOps Guru Insights
        3. Lambda permission
        4. IAM role
      • Now skip Option 2 and follow the steps in the “Test the Solution” section to trigger some DevOps Guru insights/recommendations and validate that the events are created and updated in Datadog.

Option 2: Build and Deploy sample Datadog Connector App using AWS SAM Command Line Interface

As you have seen above, you can directly deploy the sample serverless application form the Serverless Repository with one click deployment. Alternatively, you can choose to clone the GitHub source repository and deploy using the SAM CLI from your terminal.

The Serverless Application Model Command Line Interface (SAM CLI) is an extension of the AWS CLI that adds functionality for building and testing serverless applications. The CLI provides commands that enable you to verify that AWS SAM template files are written according to the specification, invoke Lambda functions locally, step-through debug Lambda functions, package and deploy serverless applications to the AWS Cloud, and so on. For details about how to use the AWS SAM CLI, including the full AWS SAM CLI Command Reference, see AWS SAM reference – AWS Serverless Application Model.

Before you proceed, make sure you have completed the pre-requisites section in the beginning which should set up the AWS SAM CLI, Maven and Java on your local terminal. You also need to install and set up Docker to run your functions in an Amazon Linux environment that matches Lambda.

Clone the source code from the github repo

git clone https://github.com/aws-samples/amazon-devops-guru-connector-datadog.git

Build the sample application using SAM CLI

$cd DatadogFunctions

$sam build
Building codeuri: $\amazon-devops-guru-connector-datadog\DatadogFunctions\Functions runtime: java11 metadata: {} architecture: x86_64 functions: Functions
Running JavaMavenWorkflow:CopySource
Running JavaMavenWorkflow:MavenBuild
Running JavaMavenWorkflow:MavenCopyDependency
Running JavaMavenWorkflow:MavenCopyArtifacts

Build Succeeded

Built Artifacts  : .aws-sam\build
Built Template   : .aws-sam\build\template.yaml

Commands you can use next
=========================
[*] Validate SAM template: sam validate
[*] Invoke Function: sam local invoke
[*] Test Function in the Cloud: sam sync --stack-name {{stack-name}} --watch
[*] Deploy: sam deploy --guided

This command will build the source of your application by installing dependencies defined in Functions/pom.xml, create a deployment package and saves it in the. aws-sam/build folder.

Deploy the sample application using SAM CLI

$sam deploy --guided

This command will package and deploy your application to AWS, with a series of prompts that you should respond to as shown below:

      • Stack Name: The name of the stack to deploy to CloudFormation. This should be unique to your account and region, and a good starting point would be something matching your project name.
      • AWS Region: The AWS region you want to deploy your application to.
      • Confirm changes before deploy: If set to yes, any change sets will be shown to you before execution for manual review. If set to no, the AWS SAM CLI will automatically deploy application changes.
      • Allow SAM CLI IAM role creation:Many AWS SAM templates, including this example, create AWS IAM roles required for the AWS Lambda function(s) included to access AWS services. By default, these are scoped down to minimum required permissions. To deploy an AWS CloudFormation stack which creates or modifies IAM roles, the CAPABILITY_IAM value for capabilities must be provided. If permission isn’t provided through this prompt, to deploy this example you must explicitly pass --capabilities CAPABILITY_IAM to the sam deploy command.
      • Disable rollback [y/N]: If set to Y, preserves the state of previously provisioned resources when an operation fails.
      • Save arguments to configuration file (samconfig.toml): If set to yes, your choices will be saved to a configuration file inside the project, so that in the future you can just re-run sam deploy without parameters to deploy changes to your application.

After you enter your parameters, you should see something like this if you have provided Y to view and confirm ChangeSets. Proceed here by providing ‘Y’ for deploying the resources.

Initiating deployment
=====================

        Uploading to sam-app-datadog/0c2b93e71210af97a8c57710d0463c8b.template  1797 / 1797  (100.00%)


Waiting for changeset to be created..

CloudFormation stack changeset
---------------------------------------------------------------------------------------------------------------------
Operation                     LogicalResourceId             ResourceType                  Replacement
---------------------------------------------------------------------------------------------------------------------
+ Add                         FunctionsDevOpsGuruPermissi   AWS::Lambda::Permission       N/A
                              on
+ Add                         FunctionsDevOpsGuru           AWS::Events::Rule             N/A
+ Add                         FunctionsRole                 AWS::IAM::Role                N/A
+ Add                         Functions                     AWS::Lambda::Function         N/A
---------------------------------------------------------------------------------------------------------------------


Changeset created successfully. arn:aws:cloudformation:us-east-1:867001007349:changeSet/samcli-deploy1680640852/bdc3039b-cdb7-4d7a-a3a0-ed9372f3cf9a


Previewing CloudFormation changeset before deployment
======================================================
Deploy this changeset? [y/N]: y

2023-04-04 15:41:06 - Waiting for stack create/update to complete

CloudFormation events from stack operations (refresh every 5.0 seconds)
---------------------------------------------------------------------------------------------------------------------
ResourceStatus                ResourceType                  LogicalResourceId             ResourceStatusReason
---------------------------------------------------------------------------------------------------------------------
CREATE_IN_PROGRESS            AWS::IAM::Role                FunctionsRole                 -
CREATE_IN_PROGRESS            AWS::IAM::Role                FunctionsRole                 Resource creation Initiated
CREATE_COMPLETE               AWS::IAM::Role                FunctionsRole                 -
CREATE_IN_PROGRESS            AWS::Lambda::Function         Functions                     -
CREATE_IN_PROGRESS            AWS::Lambda::Function         Functions                     Resource creation Initiated
CREATE_COMPLETE               AWS::Lambda::Function         Functions                     -
CREATE_IN_PROGRESS            AWS::Events::Rule             FunctionsDevOpsGuru           -
CREATE_IN_PROGRESS            AWS::Events::Rule             FunctionsDevOpsGuru           Resource creation Initiated
CREATE_COMPLETE               AWS::Events::Rule             FunctionsDevOpsGuru           -
CREATE_IN_PROGRESS            AWS::Lambda::Permission       FunctionsDevOpsGuruPermissi   -
                                                            on
CREATE_IN_PROGRESS            AWS::Lambda::Permission       FunctionsDevOpsGuruPermissi   Resource creation Initiated
                                                            on
CREATE_COMPLETE               AWS::Lambda::Permission       FunctionsDevOpsGuruPermissi   -
                                                            on
CREATE_COMPLETE               AWS::CloudFormation::Stack    sam-app-datadog               -
---------------------------------------------------------------------------------------------------------------------


Successfully created/updated stack - sam-app-datadog in us-east-1

Once the deployment succeeds, you should be able to see the successful creation of your resources. Also, you can find your Lambda, IAM Role and EventBridge Rule in the CloudFormation stack output values.

You can also choose to test and debug your function locally with sample events using the SAM CLI local functionality.Test a single function by invoking it directly with a test event. An event is a JSON document that represents the input that the function receives from the event source. Refer the Invoking Lambda functions locally – AWS Serverless Application Model link here for more details.

$ sam local invoke Functions -e ‘event/event.json’

Once you are done with the above steps, move on to “Test the Solution” section below to trigger some DevOps Guru insights and validate that the events are created and pushed to Datadog.

Test the Solution

To test the solution, we will simulate a DevOps Guru Insight. You can also simulate an insight by following the steps in this blog. After an anomaly is detected in the application, DevOps Guru creates an insight as shown below

 Figure 7: DevOps Guru insight for DynamoDB

Figure 7: DevOps Guru insight for DynamoDB

For the DevOps Guru insight shown above, a corresponding event is automatically created and pushed to Datadog as shown below. In addition to the events creation, any new anomalies and recommendations from DevOps Guru is also associated with the events

Figure 8 : DevOps Guru Insight pushed to Datadog event stream.

Figure 8 : DevOps Guru Insight pushed to Datadog event stream.

Cleaning Up

To delete the sample application that you created, In your Cloud 9 environment open a new terminal. Now type in the AWS CLI command below and pass the stack name you provided in the deploy step

aws cloudformation delete-stack --stack-name <Stack Name>

Alternatively ,you could also use the AWS CloudFormation Console to delete the stack

Conclusion

This article highlights how Amazon DevOps Guru monitors resources within a specific region of your AWS account, automatically detecting operational issues, predicting potential resource exhaustion, identifying probable causes, and recommending remediation actions. It describes a bespoke solution enabling integration of DevOps Guru insights with Datadog, enhancing management and oversight of AWS services. This solution aids customers using Datadog to bolster operational efficiencies, delivering customized insights, real-time alerts, and management capabilities directly from DevOps Guru, offering a unified interface to swiftly restore services and systems.

To start gaining operational insights on your AWS Infrastructure with Datadog head over to Amazon DevOps Guru documentation page.

About the authors:

Bineesh Ravindran

Bineesh Ravindran

Bineesh is Solutions Architect at Amazon Webservices (AWS) who is passionate about technology and love to help customers solve problems. Bineesh has over 20 years of experience in designing and implementing enterprise applications. He works with AWS partners and customers to provide them with architectural guidance for building scalable architecture and execute strategies to drive adoption of AWS services. When he’s not working, he enjoys biking, aquascaping and playing badminton..

David Ernst

David is a Sr. Specialist Solution Architect – DevOps, with 20+ years of experience in designing and implementing software solutions for various industries. David is an automation enthusiast and works with AWS customers to design, deploy, and manage their AWS workloads/architectures.

Quick Restoration through Replacing the Root Volumes of Amazon EC2 instances

Post Syndicated from Sheila Busser original https://aws.amazon.com/blogs/compute/quick-restoration-through-replacing-the-root-volumes-of-amazon-ec2/

This blog post is written by Katja-Maja Krödel, IoT Specialist Solutions Architect, and Benjamin Meyer, Senior Solutions Architect, Game Tech.

Customers use Amazon Elastic Compute Cloud (Amazon EC2) instances to develop, deploy, and test applications. To use those instances most effectively, customers have expressed the need to set back their instance to a previous state within minutes or even seconds. They want to find a quick and automated way to manage setting back their instances at scale.

The feature of replacing Root Volumes of Amazon EC2 instances enables customers to replace the root volumes of running EC2 instances to a specific snapshot or its launch state. Without stopping the instance, this allows customers to fix issues while retaining the instance store data, networking, and AWS Identity and Access Management (IAM) configuration. Customers can resume their operations with their instance store data intact. This works for all virtualized EC2 instances and bare metal EC2 Mac instances today.

In this post, we show you how to design your architecture for automated Root Volume Replacement using this Amazon EC2 feature. We start with the automated snapshot creation, continue with automatically replacing the root volume, and finish with how to keep your environment clean after your replacement job succeeds.

What is Root Volume Replacement?

Amazon EC2 enables customers to replace the root Amazon Elastic Block Store (Amazon EBS) volume for an instance without stopping the instance to which it’s attached. An Amazon EBS root volume is replaced to the launch state, or any snapshot taken from the EBS volume itself. This allows issues to be fixed, such as root volume corruption or guest OS networking errors. Replacing the root volume of an instance includes the following steps:

  • A new EBS volume is created from a previously taken snapshot or the launch state
  • Reboot of the instance
  • While rebooting, the current root volume is detached and the new root volume is attached

The previous EBS root volume isn’t deleted and can be attached to an instance for later investigation of the volume. If replacing to a different state of the EBS than the launch state, then a snapshot of the current root volume is used.

An example use case is a continuous integration/continuous deployment (CI/CD) System that builds on EC2 instances to build artifacts. Within this system, you could alter the installed tools on the host and may cause failing builds on the same machine. To prevent any unclean builds, the introduced architecture is used to clean up the machine by replacing the root volume to a previously known good state. This is especially interesting for EC2 Mac Instances, as their Dedicated Host won’t undergo the scrubbing process, and the instance is more quickly restored than launching a fresh EC2 Mac instance on the same host.

Overview

The feature of replacing Root Volumes was introduced in April 2021 and has just been <TBD> extended to work for Bare Metal EC2 Mac Instances. This means that EC2 Mac Instances are included. If you want to reset an EC2 instance to a previously known good state, then you can create Snapshots of your EBS volumes. To reset the root volume to its launch state, no snapshot is needed. For non-root volumes, you can use these Snapshots to create new EBS volumes, and then attach those to your instance as well as detach them. To automate the process of replacing your root volume not only once, but also in a repeatable manner, we’re introducing you to an architecture that can fully-automate this process.

In the case that you use a snapshot to create a new root volume, you must take a new snapshot of that volume to be able to get back to that state later on. You can’t use a snapshot of a different volume to restore to, which is the reason that the architecture includes the automatic snapshot creation of a fresh root volume.

The architecture is built in three steps:

  1. Automation of Snapshot Creation for new EBS volumes
  2. Automation of replacing your Root Volume
  3. Preparation of the environment for the next Root Volume Replacement

The following diagram illustrates the architecture of this solution.

 Architecture of the automated creation of Root Volumes for Amazon EC2 Instances

In the next sections, we go through these concepts to design the automatic Root Volume Replacement Task.

Automation of Snapshot Creation for new EBS volumes

Architecture of the automated creation of Snapshots of new EBS Volumes.

The figure above illustrates the architecture for automatically creating a snapshot of an existing EBS volume. In this architecture, we focus on the automation of creating a snapshot whenever a new EBS root volume is created.

Amazon EventBridge is used to invoke an AWS Lambda function on an emitted createVolume event. For automated reaction to the event, you can add a rule to the EventBridge which will forward the event to an AWS Lambda function whenever a new EBS volume is created. The rule within EventBridge looks like this:

{
  "source": ["aws.ec2"],
  "detail-type": ["EBS Volume Notification"],
  "detail": {
    "event": ["createVolume"]
  }
}

An example event is emitted when an EBS root volume is created, which will then invoke the Lambda function to look like this:

{
   "version": "0",
   "id": "01234567-0123-0123-0123-012345678901",
   "detail-type": "EBS Volume Notification",
   "source": "aws.ec2",
   "account": "012345678901",
   "time": "yyyy-mm-ddThh:mm:ssZ",
   "region": "us-east-1",
   "resources": [
      "arn:aws:ec2:us-east-1:012345678901:volume/vol-01234567"
   ],
   "detail": {
      "result": "available",
      "cause": "",
      "event": "createVolume",
      "request-id": "01234567-0123-0123-0123-0123456789ab"
   }
}

The code of the function uses the resource ARN within the received event and requests resource details about the EBS volume from the Amazon EC2 APIs. Since the event doesn’t include information if it’s a root volume, then you must verify this using the Amazon EC2 API.

The following is a summary of the tasks of the Lambda function:

  1. Extract the EBS ARN from the EventBridge Event
  2. Verify that it’s a root volume of an EC2 Instance
  3. Call the Amazon EC2 API create-snapshot to create a snapshot of the root volume and add a tag replace-snapshot=true

Then, the tag is used to clean up the environment and get rid of snapshots that aren’t needed.

As an alternative, you can emit your own event to EventBridge. This can be used to automatically create snapshots to which you can restore your volume. Instead of reacting to the createVolume event, you can use a customized approach for this architecture.

Automation of replacing your Root Volume

Architecture of the automated creation of Snapshots of new EBS Volumes.

The figure above illustrates the procedure of replacing the EBS root volume. It starts with the event, which is created through the AWS Command Line Interface (AWS CLI), console, or usage of the API. This leads to creating a new volume from a snapshot or using the initial launch state. The EC2 instance is rebooted, and during that time the old root volume is detached and a new volume gets attached as the root volume.

To invoke the create-replace-root-volume-task, you can call the Amazon EC2 API with the following AWS CLI command:

aws ec2 create-replace-root-volume-task --instance-id <value> --snapshot <value> --tag-specifications ResourceType=string,Tags=[{Key=replaced-volume,Value=true}]

If you want to restore to launch state, then omit the --snapshot parameter:

aws ec2 create-replace-root-volume-task --instance-id <value> --tag-specifications ResourceType=string,Tags=[{Key=delete-volume,Value=true}]

After running this command, AWS will create a new EBS volume, add the tag to the old EBS replaced-volume=true, restart your instance, and attach the new volume to the instance as the root volume. The tag is used later to detect old root volumes and clean up the environment.

If this is combined with the earlier explained automation, then the automation will immediately take a snapshot from the new EBS volume. A restore operation can only be done to a snapshot of the current EBS root volume. Therefore, if no snapshot is taken from the freshly restored EBS volume, then no restore operation is possible except the restore to launch state.

Preparation of the Environment for the next Root Volume Replacement

After the task is completed, the old root volume isn’t removed. Additionally, snapshots of previous root volumes can’t be used to restore current root volumes. To clean up your environment, you can schedule a Lambda function which does the following steps:

  • Delete detached EBS volumes with the tag delete-volume=true
  • Delete snapshots with the tag replace-snapshot=true, which aren’t associated with an existing EBS volume

Conclusion

In this post, we described an architecture to quickly restore EC2 instances through Root Volume Replacement. The feature of replacing Root Volumes of Amazon EC2 instances, now including Bare Metal EC2 Mac instances, enables customers to replace the root volumes of running EC2 instances to a specific snapshot or its launch state. Customers can resume their operations with their instance store data intact. We’ve split the process of doing this in an automated and quick manner into three steps: Create a snapshot, run the replacement task, and reset your environment to be prepared for a following replacement task. If you want to learn more about this feature, then see the Announcement of replacing Root Volumes, as well as the documentation for this feature. <TBD Announcement Bare Metal>