Streamline your AWS infrastructure development with AI-powered documentation search, validation, and troubleshooting
Introduction
Today, we’re excited to introduce the AWS Infrastructure-as-Code (IaC) MCP Server, a new tool that bridges the gap between AI assistants and your AWS infrastructure development workflow. Built on the Model Context Protocol (MCP), this server enables AI assistants like Kiro CLI, Claude or Cursor to help you search AWS CloudFormation and Cloud Development Kit (CDK) documentation, validate templates, troubleshoot deployments, and follow best practices – all while maintaining the security of local execution.
Whether you’re writing AWS CloudFormation templates or AWS Cloud Development Kit (CDK) code, the IaC MCP Server acts as an intelligent companion that understands your infrastructure needs and provides contextual assistance throughout your development lifecycle.
The Model Context Protocol (MCP) is an open standard that enables AI assistants to securely connect to external data sources and tools. Think of it as a universal adapter that lets AI models interact with your development tools while keeping sensitive operations local and under your control.
The IaC MCP Server provides nine specialized tools organized into two categories:
Remote Documentation Search Tools
These tools connect to the AWS Knowledge MCP backend to retrieve relevant, up-to-date information:
search_cdk_documentation Search the AWS CDK knowledge base for APIs, concepts, and implementation guidance.
search_cdk_samples_and_constructs Discover pre-built AWS CDK constructs and patterns from the AWS Construct Library.
search_cloudformation_documentation Query CloudFormation documentation for resource types, properties, and intrinsic functions.
read_cdk_documentation_page Retrieve and read full documentation pages returned from searches or provided URLs.
Local Validation and Troubleshooting Tools
These tools run entirely on your machine
cdk_best_practices Access a curated collection of AWS CDK best practices and design principles.
validate_cloudformation_template Perform syntax and schema validation using cfn-lint to catch errors before deployment.
check_cloudformation_template_compliance Run security and compliance checks against your templates using AWS Guard rules and cfn-guard.
troubleshoot_cloudformation_deployment Analyze CloudFormation stack deployment failures with integrated CloudTrail event analysis. This tool will use your AWS credentials to analyze your stack status.
get_cloudformation_pre_deploy_validation_instructions Returns instructions for CloudFormation’s pre-deployment validation feature, which validates templates during change set creation.
Key Use Cases
Intelligent Documentation Assistant
Instead of manually searching through documentation, ask your AI assistant natural language questions:
“How do I create an S3 bucket with encryption enabled in CDK?”
The server searches CDK best practic and samples, returning relevant code examples and explanations.
2. Proactive Template Validation
Before deploying infrastructure changes:
User: “Validate my CloudFormation template and check for security issues”
AI Agent: [Uses validate_cloudformation_template and check_cloudformation_template_compliance]
“Found 2 issues: Missing encryption on EBS volumes,
and S3 bucket lacks public access block configuration”
3. Rapid Deployment Troubleshooting
When a stack deployment fails:
User: “My stack ‘stack_03’ in us-east-1 failed to deploy. What happened?”
AI Agent: [Uses troubleshoot_stack_deployment with CloudTrail integration]
“The deployment failed due to insufficient IAM permissions.
CloudTrail shows AccessDenied for ec2:CreateVpc.
You need to add VPC permissions to your deployment role.”
4. Learning and Exploration
New to AWS CDK? The server helps you discover constructs and patterns:
User: “Show me how to build a serverless API”
AI Agent: [Searches CDK constructs and samples]
“Here are three approaches using API Gateway + Lambda…”
Architecture and Security
Security Design
Local Execution: The MCP server runs entirely on your local machine using uv (the fast Python package manager). No code or templates are sent to external services except for documentation searches.
AWS Credentials: The server uses your existing AWS credentials (from ~/.aws/credentials, environment variables, or IAM roles) to access CloudFormation and CloudTrail APIs. This follows the same security model as the AWS CLI.
stdio Communication: The server communicates with AI assistants over standard input/output (stdio), with no network ports opened.
Minimal Permissions: For full functionality, the server requires read-only access to CloudFormation stacks and CloudTrail events—no write permissions needed for validation and troubleshooting workflows.
Getting Started
Prerequisites
Python 3.10 or later uv package manager AWS credentials configured locally MCP-compatible AI client (e.g., Kiro CLI, Claude Desktop)
Configuration
Configure the MCP server in your MCP client configuration. For this blog we will focus on Kiro CLI. Edit .kiro/settings/mcp.json):
Privacy Notice: This MCP server executes AWS API calls using your credentials and shares the response data with your third-party AI model provider (e.g., Amazon Q, Claude Desktop, Cursor, VS Code). Users are responsible for understanding your AI provider’s data handling practices and ensuring compliance with your organization’s security and privacy requirements when using this tool with AWS resources.
IAM Permissions
The MCP server requires the following AWS permissions:
For Template Validation and Compliance:
No AWS permissions required (local validation only)
For Deployment Troubleshooting:
cloudformation:DescribeStacks
cloudformation:DescribeStackEvents
cloudformation:DescribeStackResources
cloudtrail:LookupEvents (for CloudTrail deep links)
IMPORTANT: Ensure you have satisfied all prerequisites before attempting these commands.
1. With the mcp.json file correctly set, try to run a sample prompt. In your terminal, run kiro-cli chat to start using Kiro-cli in the CLI.
Figure 1: Kiro-CLI with AWS IaC MCP server
Scenarios:
“What are the CDK best practices for Lambda functions?”
Figure 2: Search the CDK best practices for Lambda functions
“Search for CDK samples that use DynamoDB with Lambda”
Figure 3: Search for CDK samples that use DynamoDB with Lambda
“Validate my CloudFormation template at ./template.yaml”
Figure 4: Validate my CloudFormation template with AWS IaC MCP Server
“Check if my template complies with security best practices”
Figure 5: Check if my template complies with security best practices with AWS IaC MCP Server
Best Practices
Start with Documentation Search: Before writing code, search for existing constructs and patterns
Validate Early and Often: Run validation tools before attempting deployment
Check Compliance: Use check_template_compliance to catch security issues during development
Leverage CloudTrail: When troubleshooting, the CloudTrail integration provides detailed failure context
Follow CDK Best Practices: Use the cdk_best_practices tool to align with AWS recommendations
What’s Next?
The IAC MCP Server represents a new paradigm in the AI agentic workflow infrastructure development – one where AI assistants understand your tools, help you navigate complex documentation, and provide intelligent assistance throughout the development lifecycle.
Feedback: We welcome issues and pull requests! Or respond to our IaC survey here.
Ready to supercharge your infrastructure as code development? Install the IaC MCP Server today and experience AI-powered assistance for your AWS CDK and CloudFormation workflows.
Have questions or feedback? Reach out to the blog authors on the AWS Developer Forums.
Is configuration drift preventing you from accessing the speed, safety, and governance benefits of AWS CloudFormation for infrastructure management? Configuration drift occurs when cloud resources are modified outside of CloudFormation, leading to a mismatch in the actual state and template definition of resources. Drift tends to accumulate from infrastructure changes that engineers make via the AWS Management Console to resolve production incidents or troubleshoot malfunctioning applications. Drift can cause unexpected changes during subsequent IaC deployments or leave resources in a non-compliant state. Unresolved drift can lead to cost increases when resources are over-provisioned outside of template definitions, or compliance violations that may result in audit penalties. Additionally, drift makes it hard to reproduce applications for testing or disaster recovery.
CloudFormation now offers drift-aware change sets that allow you to safely handle configuration drift and keep your infrastructure in sync with your templates. In this post, we will explore the process of leveraging drift-aware change sets to resolve common scenarios in which drift impacts the availability or security of your application.
Solution Overview
Drift-aware change sets are a type of CloudFormation change sets that can bring drifted resources in line with template definitions and preview the required changes to actual infrastructure states before deployment. Drift-aware change sets surface a three-way comparison of your new template, actual resource states, and previous template before deployment, allowing you to prevent unexpected overwrites of drift. Additionally, drift-aware change sets offer you a systematic mechanism to restore drifted resources to approved template definitions, strengthening the reproducibility and compliance posture of applications. You can create drift-aware change sets either from the CloudFormation Management Console or from the AWS CLI or SDK by passing the --deployment-mode REVERT_DRIFT parameter to the CreateChangeSet API.
Prerequisites
• AWS CLI latest version with CloudFormation permissions configured.
Important Note: These sample templates are provided for educational purposes only and should not be used in production environments without proper security review and testing. You are responsible for testing, securing, and optimizing these templates based on your specific quality control practices and standards. Deploying these templates may incur AWS charges for creating or using AWS resources. Work with your security and legal teams to meet your organizational security, regulatory, and compliance requirements before any production deployment.
Scenario 1: Prevent Dangerous Overwrites
This scenario demonstrates how drift-aware change sets prevent dangerous overwrites when Lambda function memory is increased outside of CloudFormation during an outage, and a subsequent template update could accidentally reduce memory, causing performance issues.
Story: Your team deploys a Lambda function with 128 MB memory via CloudFormation. During a production outage, an engineer increases the memory to 512 MB through the Lambda Console to resolve performance issues. Later, another developer updates the template to 256 MB for a code change, unaware of the console modification. Without drift-aware change sets, CloudFormation would unexpectedly reduce memory from 512 MB to 256 MB—potentially causing the outage to recur.
User journey: Create stack with 128MB => Increase memory to 512MB via console during outage => Create drift-aware change set with 256MB template => Review three-way comparison showing dangerous memory reduction => Cancel change set to prevent outage => Update template to match production state (512MB) => Create and execute drift-aware change set with updated template (512MB) to resolve drift
Scenario Flow
1. Create Stack
Deploy CloudFormation stack with Lambda function (128 MB memory).
CloudFormation stack “lambda-memory-drift-test” successfully deployed with CREATE_COMPLETE status
2. Emergency Memory Increase (Console)
Manually increase Lambda memory to 512 MB through AWS Console (simulating emergency performance fix during outage).
Initial Lambda function showing 128 MB memory as configured in template
Lambda memory increased to 512 MB through console during outage, creating drift from template
3. Create Drift-Aware Change Set
Create change set with 256 MB template using drift-aware mode to reveal the dangerous memory reduction.
CloudFormation console showing the new “Drift aware change set” option selected. This compares the new template with the live state of your stack and shows changes to drifted resources before deployment, unlike standard change sets that only compare templates.
4. Review Change Set – The Critical Three-Way Comparison
Examine the drift-aware change set to see the dangerous memory reduction that would occur.
Critical insight revealed: The change set shows Live resource state (512 MB) vs Proposed resource state (256 MB), revealing a dangerous memory reduction that would impact performance.
Drift analysis: Clicking “View drift” reveals the complete picture – Previous template (128 MB) vs Live resource state (512 MB). This shows the live state has 4x more memory than the original template, indicating emergency changes were made during the outage that must be preserved.
Key Insight: The drift-aware change set reveals that:
Previous template: 128 MB (original deployment)
Live resource state: 512 MB (emergency change during outage)
Proposed template: 256 MB (new deployment)
This would cause a dangerous reduction from 512 MB to 256 MB, potentially recreating the original performance issue. Without drift-aware change sets, this critical information would be hidden.
5. Recreate Drift-aware Change Set with Updated Template (512MB) to Resolve Drift
Update the template to match the live production state (512 MB) and create a new drift-aware change set to safely resolve the drift.
Resolution confirmed: The drift-aware change set shows both Live resource state and Proposed resource state at 512 MB, with change set action ” Sync with live”. This verifies that the updated template now matches production, preventing the dangerous memory reduction and safely resolving the drift without impacting performance.
This scenario demonstrates how drift-aware change sets systematically remediate unauthorized changes when a developer adds temporary debugging rules to a security group but forgets to remove them, creating a compliance violation.
Story: Your team deploys a security group with only HTTP access via CloudFormation for compliance. During debugging, a developer adds SSH access (port 22) through the AWS Console for their IP address to troubleshoot an application issue. They forget to remove this rule after debugging. Later, security compliance requires reverting to the original template state. A standard change set shows no changes since the template is unchanged, but a drift-aware change set can detect and systematically remove the unauthorized SSH rule.
User journey: Create stack with HTTP-only access => Add SSH rule via console for debugging => Forget to remove SSH rule => Create drift-aware change set with REVERT_DRIFT mode => Review change set showing SSH rule removal => Execute change set to restore compliance
Scenario Flow
1. Create Stack
Deploy CloudFormation stack with security group allowing only HTTP traffic.
CloudFormation stack “sg-revert-drift-test” successfully deployed with DriftTestSecurityGroup resource
2. Make Unauthorized Changes (Console)
Manually add SSH ingress rule through AWS Console (simulating developer debugging access that wasn’t removed).
Initial security group showing only HTTP (port 80) access as configured in template – compliant state
Security group now shows 2 permission entries: SSH (port 22) for specific IP and HTTP (port 80) for all traffic. The SSH rule creates drift and a compliance violation that needs systematic removal.
3. Create Drift-Aware Change Set
Create change set using REVERT_DRIFT mode to systematically remove the unauthorized SSH rule.
Creating drift-aware change set for security group compliance restoration. Note the “Drift aware change set” option is selected to compare with live state and detect unauthorized changes.
4. Review Change Set – Systematic Compliance Restoration
Examine the drift-aware change set to see systematic removal of unauthorized SSH rule.
Compliance violation detected: The drift -aware change set shows that the SSH rule in the live resource state (rule 232 for IP 15.248.7.53/32 on port 22) is not present in the proposed resource state derived from the template. This unauthorized SSH rule violates security policy and will be systematically removed
Key Insight: The drift-aware change set enables systematic compliance restoration by:
Previous template: Only HTTP (port 80) access – compliant state
Live resource state: HTTP + SSH (port 22) for 15.248.7.53/32 – compliance violation
Action: Remove unauthorized SSH rule to restore compliance
This provides a systematic, auditable way to remove unauthorized changes rather than manual cleanup.
Stack events showing successful execution of the drift-aware change set – SSH rule removed
CloudFormation Templates
security-group-drift-scenario.yaml:
Resources:
  DriftTestSecurityGroup:
    Type: AWS::EC2::SecurityGroup
    Properties:
      GroupDescription: "Security group for drift testing"
      SecurityGroupIngress:
        - IpProtocol: tcp
          FromPort: 80
          ToPort: 80
          CidrIp: 0.0.0.0/0
          Description: "Allow HTTP traffic for demo purposes"
      SecurityGroupEgress:
        - IpProtocol: -1
          CidrIp: 0.0.0.0/0
          Description: "Allow all outbound traffic"
This scenario demonstrates drift detection when a dependent resource (logs bucket) is accidentally deleted outside of CloudFormation during troubleshooting. The main application bucket depends on this logs bucket for access logging. You need to recreate the deleted resource while maintaining the existing infrastructure dependencies.
Story: Your team deploys a main S3 bucket with a dependent logs bucket for access logging via CloudFormation. During troubleshooting, an operator accidentally deletes the logs bucket through the AWS Console. The main bucket still exists but its logging configuration now references a non-existent bucket. You need to recreate the deleted logs bucket while maintaining the dependency relationship.
User journey: Create stack with main and logs buckets => Accidentally delete logs bucket => Create drift-aware change set with REVERT_DRIFT mode => Review change set showing LogBucket will be recreated => Execute change set to restore deleted resource
Scenario Flow
1. Create Stack
Deploy CloudFormation stack with main S3 bucket and dependent logs bucket.
CloudFormation stack “s3-deletion-drift-test” successfully deployed with both LogBucket and MainBucket resources in CREATE_COMPLETE status
2. Accidental Deletion (Console)
Manually delete the logs bucket through AWS Console (simulating accidental deletion during troubleshooting).
LogBucket accidentally deleted outside of CloudFormation during troubleshooting, creating drift – the MainBucket still exists but its logging configuration now references a non-existent bucket
3. Create Drift-Aware Change Set
Create change set using REVERT_DRIFT mode to recreate the deleted LogBucket.
Creating drift-aware change set with “Drift aware change set” option selected to detect and recreate the deleted resource by comparing template with live state
When working with drift-aware change sets, consider these best practices:
• Always review three-way comparisons before executing change sets to understand the full impact
• Use REVERT_DRIFT deployment mode when you want to bring resources back to template compliance
• Document emergency changes made outside of CloudFormation to inform future template updates
• Implement change management processes to minimize unauthorized drift
• Regular drift detection helps identify configuration changes before they become problematic
• Test drift-aware change sets in non-production environments first
Cleanup
Important: Execute these cleanup commands promptly after completing the scenarios to avoid incurring unnecessary AWS charges. Resources such as Lambda functions, S3 buckets (even if empty), and security groups may incur costs if left running. Ensure all stacks are successfully deleted by verifying the DELETE_COMPLETE status.
Note: CloudFormation will automatically clean up all resources created by the stacks, including Lambda functions, security groups, and S3 buckets.
Conclusion
Drift-aware change sets enable you to mitigate the operational and security risks of configuration drift, allowing you to confidently automate and govern your infrastructure updates with CloudFormation. Through the scenarios described in this post, you have seen how you can leverage drift-aware change sets to prevent outages in production environments, maintain the integrity of your test environments, and manage the compliance posture of all environments. Remember to thoroughly review the infrastructure changes previewed by drift-aware change sets before executing deployments.
Available Now
Drift-aware change sets are available in AWS Regions where CloudFormation is available. Please refer to the AWS Region table to learn more.
AWS CloudFormation makes it easy to model and provision your cloud application infrastructure as code. CloudFormation templates can be written directly in JSON or YAML, or they can be generated by tools like the AWS Cloud Development Kit (CDK). Resources are created and managed by CloudFormation as units called Stacks. Additionally, change set enable you to preview the stack changes before deployment.
CloudFormation now offers powerful new features that transform how you develop and troubleshoot infrastructure as code, pre-deployment validation that catches errors in seconds, enhanced operation tracking, and simplified failure debugging. These capabilities shift-left infrastructure code validation, helping you prevent infrastructure deployment failures that impacts development velocity.
In this blog post, we’ll explore how these new features accelerate development cycles by catching common errors during change set creation and providing precise troubleshooting through operation tracking and failure filtering. Whether you’re a platform engineer managing complex multi-service deployments or a developer iterating on infrastructure templates, we’ll show you how to:
Validate resource properties and detect naming conflicts before deployment
Prevent deployment failures by checking S3 bucket emptiness before deletion operations
Track operations with unique IDs for focused troubleshooting
Quickly identify root causes using the new describe-events API
This comprehensive guide will walk through real-world scenarios demonstrating how these capabilities can reduce infrastructure deployment failures from hours of debugging to seconds of validation, helping you deliver cloud infrastructure faster and more reliably.
Key Capabilities
Pre-deployment Validation: Catch template errors instantly instead of discovering them after resource provisioning attempts. These include pre-deployment validation for resource property syntax errors, resource naming conflicts for existing resources in your account, and S3 bucket emptiness constraint violations on delete operations.
Operation Tracking: Say goodbye to long debugging sessions. Each stack action now comes with a unique Operation ID, transforming the “needle in haystack” troubleshooting experience into precise, targeted problem-solving.
Streamlined Events API for simplified Debugging: Use the new describe-events API and FailedEvents=true filter to instantly pinpoint issues. One command tells you exactly what went wrong, eliminating the need to scroll through endless logs.
Immediate Feedback: Transform your CI/CD pipeline from a potential bottleneck into a rapid iteration engine. Get immediate feedback on common deployment issues, allowing your team to fix and deploy faster than ever before.
How It works
Pre-deployment Validation
The following scenarios show how you can leverage CloudFormation pre-deployment validation to detect property syntax errors, resource naming conflicts, and constraint violations during change set creation.
Understanding Validation Modes CloudFormation pre-deployment validation operates in two modes that determine how validation failures are handled.
FAIL mode prevents change set execution when validation detects errors, ensuring problematic templates cannot proceed to deployment. This applies to property syntax errors and resource naming conflicts.
WARN mode allows change set creation to succeed despite validation failures, providing warnings that developers can review and address before execution. This applies to constraint violations like S3 bucket emptiness that may be resolvable through manual intervention.
Understanding these modes helps you anticipate whether validation issues will block your deployment workflow or simply require attention before execution.
Let’s walk you through practical scenarios:
Scenario 1: Validate Resource Property Syntax
CloudFormation evaluates each resource property definition or value before provisioning begins. The following example illustrates several common resource property errors:
The “AWS::Lambda::Function” Role property requires an ARN pattern.
The “AWS::Lambda::Function” Timeout property expects an integer instead of a string.
The “AWS::Lambda::Function” TracingConfig.Mode nested property ENUM value is invalid.
The “AWS::Lambda::Alias” Name property is required but not defined.
The “AWS::Lambda::Alias” the extra property Description in a nested path RoutingConfig.AdditionalVersionWeights.0 is not supported.
Prior to this launch, these resource configuration errors would be detected at the resource provisioning time only. However, with the pre-deployment validations feature, these errors can be identified ahead of the deployment phase, streamlining the development-test lifecycle efficiency and minimizing rollbacks during deployments.
You can see the status of the change set is failed with a detailed status reason. You can now proceed to review the change set validation results.
Step 3: Review validation results
Console
With the console, you can review multiple validation errors in a single interface. When you click on a validation, CloudFormation pinpoints the location of the invalid property error in your template.
Figure 3: Pre-deployment validations view
Use Case: Invalid ENUM value for nested property Catching invalid configuration values before deployment. This demonstrates validation of nested properties like TracingConfig.Mode. The tool helpfully shows the supported values “Active” & “Pass through” as well as the provided invalid value “DISABLED”.
Figure 4: Validation of Invalid ENUM value for nested property
Use Case: Lambda Function Timeout property type mismatch Preventing type-related deployment failures. Shows how validation catches string values (“30s”) where integers are required, saving developers from runtime errors.
Figure 5: Validation of Lambda Function Timeout property type mismatch
Use Case: Lambda Function Role property pattern mismatch Validating ARN format requirements. Demonstrates pattern validation ensuring Role properties match required ARN format.
Figure 6: Lambda Function Role property pattern mismatch
Use Case: Undefined required Lambda Alias Name property Catching missing required properties. Shows validation detecting absent mandatory fields, preventing incomplete resource definitions from reaching deployment.
Figure 7: Validation of undefined required Lambda Alias Name property
Notice how the validation Path field (e.g., “/Resources/MyLambdaFunction/Properties/TracingConfig/Mode”) pinpoints the exact template location of each error. This eliminates manual searching through hundreds of lines of infrastructure code – a common time sink that can take minutes in complex templates.
Use case: Unsupported property Shows how CloudFormation validation catches unsupported properties. In this example, the AWS::Lambda::Alias resource had an unsupported extra property Description in a nested path RoutingConfig.AdditionalVersionWeights.0.
Figure 8: CloudFormation validation of unsupported resource property
CLI command You can also use the new describe-events API to review the validation responses.
Scenario 2: Resource Name Conflict Validation Resource name conflict validation makes sure that new resources added to a template are not already present in your AWS account or globally (e.g: Amazon S3, Amazon Route 53 DNS), preventing deployment errors caused due to resource name conflicts
After reviewing the property validation exceptions, let’s assume that you resolved all the issues and successfully deployed the stack. Next, the you have decided to include a S3 bucket resource in the template. You name the bucket “dev-thumbnails” but didn’t verify if the bucket with this name already exists. If a bucket with this name already exists, the CreateChangeSet operation will fail, reporting to the developer that the bucket already exists.
Step 2: Review Deployment Validations Use CloudFormation change set console to review validations response or use the new DescribeEvents API in the CLi.
Scenario 3: S3 bucket not empty Since AWS S3 service does not allow customers to delete S3 Buckets when there are objects in them, the new pre-deployment validations will warn you if you try to delete a bucket that is not empty.
Resuming our journey, let’s assume that you fix the name conflict issue by renaming the bucket to “dev-test-tumbnails”, and then updates the stack. After testing the lambda function’s integration with S3, the dev-cycle generated a few thumbnail objects in the S3 bucket.
Later, you decide to fix the bucket name because you notice a typo: “dev-test-tumbnails” should be “dev-test-thumbnails” (missing “h”). When you update the template to use the corrected name, CloudFormation will need to create the new bucket then delete the old one during the clean-up phase.
{
  "OperationEvents": [
    {
      "EventId": "24920e0f-1941-45a5-9177-786bc805b724",
      "StackId": "arn:aws:cloudformation:us-west-2:123456789012:stack/dev-lambda-stack/2d2c3240-bb59-11f0-b080-0613dc96740d",
      "OperationId": "8fef2b60-b411-4d0e-920e-7ec7c7aa39f2",
      "OperationType": "CREATE_CHANGESET",
      "OperationStatus": "SUCCEEDED",
      "EventType": "STACK_EVENT",
      "Timestamp": "2025-11-06T22:52:26.355000+00:00",
      "StartTime": "2025-11-06T22:52:21.071000+00:00",
      "EndTime": "2025-11-06T22:52:26.355000+00:00"
    },
    {
      "EventId": "c117e02d-a652-4755-9586-6d4ccb0f6504",
      "StackId": "arn:aws:cloudformation:us-west-2:123456789012:stack/dev-lambda-stack/2d2c3240-bb59-11f0-b080-0613dc96740d",
      "OperationId": "8fef2b60-b411-4d0e-920e-7ec7c7aa39f2",
      "OperationType": "CREATE_CHANGESET",
      "EventType": "VALIDATION_ERROR",
      "LogicalResourceId": "MyDevThumbnailsBucket",
      "PhysicalResourceId": "",
      "ResourceType": "AWS::S3::Bucket",
      "Timestamp": "2025-11-06T22:52:25.960000+00:00",
      "ValidationFailureMode": "WARN", "ValidationName": "BUCKET_EMPTINESS_VALIDATION", "ValidationStatus": "FAILED", "ValidationStatusReason": "The bucket 'dev-tumbnails' is not empty. You must either delete all objects and versions or use the deletion policy to retain it, otherwise the delete operation will fail.", "ValidationPath": "/Resources/MyDevThumbnailsBucket"
    },
    {
      "EventId": "6c66ff53-6751-4b4c-96b8-d1a33fc43b4f",
      "StackId": "arn:aws:cloudformation:us-west-2:123456789012:stack/dev-lambda-stack/2d2c3240-bb59-11f0-b080-0613dc96740d",
      "OperationId": "8fef2b60-b411-4d0e-920e-7ec7c7aa39f2",
      "OperationType": "CREATE_CHANGESET",
      "OperationStatus": "IN_PROGRESS",
      "EventType": "STACK_EVENT",
      "Timestamp": "2025-11-06T22:52:21.071000+00:00",
      "StartTime": "2025-11-06T22:52:21.071000+00:00"
    }
  ]
}
Bucket emptiness validation uses WARN mode, which allows change set creation to succeed even when the validation check fails. This gives you time to review and empty the bucket before execution. However, if you execute the change set without emptying the bucket, the delete operation will fail.
Notice in the output above:
ValidationStatus: "FAILED" – The emptiness check detected objects in the bucket
ValidationFailureMode: "WARN" – This is a warning, not a blocking error
OperationStatus: "SUCCEEDED" – Change set creation completed successfully despite the warning
This design allows you to review the warning, take corrective action (such as emptying the bucket), and then proceed with execution.
Beyond catching errors early, these capabilities also transform how you troubleshoot failed deployments with enhanced operation tracking and filtering.
New DescribeEvents API with Operation IDs and root cause filtering
The new DescribeEvents API retrieves CloudFormation events based on flexible query criteria. It groups stack operations by operation ID, enabling you to focus specifically on individual stack operations involved during your stack deployment.
Operation: An operation is any action performed on a stack, including stack lifecycle actions (Create, Update, Delete, Rollback), change set creation, nested stack creation, and automatic rollbacks triggered by failures. Each operation has a unique identifier and represents a discrete change attempt on the stack.
Figure 11: Stack Events grouped by Operation Id
Scenario When an update operation on an existing stack fails and results in a rollback, and you want to understand the reason behind the update stack failure. Using the operation ID obtained from the update stack response or from the describe stacks response, you can call describe events to get details on the failure.
The stack description available via describe-stacks API now includes LastOperations information showing recent operation IDs and their types. This enables you to quickly identify which operations occurred and their current status without parsing through event logs.
Figure 11: CloudFormation Stack Info page showing new operation IDs
Step 3: Review operation status with describe events API and operation id Using the operation ID from the previous step, you can now query specific operation events to understand exactly what happened during that operation. This targeted approach eliminates the need to search through all stack events to find relevant information.
Figure 12: New CloudFormation stack operation page
Step 4: Identify failure root cause(s) with FailedEvents filter The new failure root cause filter instantly surfaces only the events that caused the operation to fail. This eliminates the need to manually scan through progress events to identify the root cause of deployment failures.
The FailedEvents=true filter transforms troubleshooting from parsing dozens of progress events to instantly seeing only what matters. This can make diagnosis of issues during an incident much easier..
Real-World Impact These features improve your Infrastructure development experience with CloudFormation:
Template syntax errors: Previously discovered after minutes of provisioning, now caught in seconds
Resource conflicts: No more failed deployments due to existing resources
Debugging complexity: Transform troubleshooting sessions into faster targeted fixes
CI/CD reliability: Reduce pipeline failures and improve deployment confidence
Getting Started
These capabilities are available today in all AWS Regions where CloudFormation is supported. Pre-deployment validation is automatically enabled for all change set operations, no configuration required.
Try it now:
Create any change set from the CloudFormation console or via SDK or CLI with aws cloudformation create-change-set
Use `aws cloudformation describe-events –change-set-name <your-changeset-arn>` to see validation results
Filter failure root causes instantly: via console or CLI with aws cloudformation describe-events –operation-id <id> –filter FailedEvents=true
Best Practices
Always use change sets: Even for simple updates, change sets now provide validation feedback
Leverage Operation IDs: Use the unique identifiers for focused troubleshooting
Filter events strategically: Use –filters FailedEvents=true to focus on problems
Automate validation: Integrate the describe-events API into your CI/CD pipelines
Use Console: CloudFormation console provides a visual experience with error source mapping to the specific line on your template.
Conclusion
Start using these features today in your development workflow. Whether you’re building new infrastructure or maintaining existing stacks, early validation and enhanced troubleshooting will accelerate your deployment cycles and make it easier to manage infrastructure.
Ready to experience faster CloudFormation development? Create your first change set and see validation in action.
As organizations adopt multi-account strategies for improved security features and governance, AWS CloudFormation StackSets enables organizations to deploy infrastructure across multiple accounts and regions. However, monitoring and tracking these distributed deployments across multiple accounts presents operational challenges. When a critical security baseline deployed across 50 accounts suddenly starts failing, teams face the daunting task of logging into each account individually to understand what went wrong and which accounts were affected.
This operational overhead scales exponentially with organization growth, requiring platform teams to spend countless hours switching between accounts and manually correlating deployment events. The lack of centralized visibility slows incident response and makes it difficult to identify patterns or implement proactive monitoring. In this blog post, we’ll explore a solution that centralizes AWS CloudFormation logs from multiple accounts into a single management account, making it easier to monitor and troubleshoot StackSets deployments.
Solution Architecture
Our solution creates a centralized logging system that collects AWS CloudFormation events from all target accounts and forwards them to a central management account. This approach provides a single pane of glass for monitoring and troubleshooting AWS CloudFormation deployments across your entire organization.
Figure 1. Architecture diagram showing event flow from member accounts to management account through EventBridge and CloudWatch Logs.
The architecture consists of four main components:
Management Account Setup: Creates a central event bus, log group, and necessary permissions in the organization’s management account.
Target Account Configuration: Deployed via StackSets to configure event rules that forward AWS CloudFormation events to the management account.
Resource Deployment: Uses StackSets to deploy common resources across target accounts, generating the events we want to monitor.
Monitoring and Visualization: Provides dashboards and queries for operational insights.
Event Capture:Amazon EventBridge rules in each target account capture these AWS CloudFormation events based on defined patterns.
Cross-Account Forwarding: Events are forwarded to a custom event bus in the management account using cross-account permissions.
Centralized Logging: The central event bus routes all events to a Amazon CloudWatch Log Group with structured logging.
Monitoring and Alerting: Administrators can view consolidated logs, create custom queries, and set up alerts from a single location.
Prerequisites
Before implementing this solution, ensure you have the following prerequisites in place:
AWS account: Ensure you have valid AWS account.
AWS Organizations: You must have an AWS Organization structure set up with a primary management account and several member accounts under the management account.
Appropriate Permissions: You must have access to the management account or be configured as a delegated administrator to create and manage StackSets. For detailed information about permissions and security considerations when using StackSets with AWS Organizations, please review the Prerequisites in the AWS CloudFormation StackSets documentation.
Implementation Deep Dive
The solution is implemented using two AWS CloudFormation templates that work together to create a comprehensive monitoring system:
This template establishes the central logging infrastructure in the management account by creating a custom Amazon EventBridge event bus with cross-account access policies and an encrypted Amazon CloudWatch Log Group using a customer-managed AWS Key Management Service (AWS KMS) key. A key feature is the included stack set resource that automatically deploys the target account configuration to all member accounts, eliminating manual setup and ensuring consistent configuration across the entire organization.
This template creates a service-managed stack set that deploys common resources to all accounts in specified organizational units. The StackSet is configured with auto-deployment enabled to automatically provision new accounts added to the organization and includes operation preferences for parallel regional deployment with fault tolerance settings.
On the Stacks page, choose Create stack at top right, and then choose With new resources (standard).
On the Create stack page, Upload a template file, choose Choose File to choose a template file from your local computer.
Choose Next to continue and to validate the template.
On the Specify stack details page, type a stack name in the Stack name box.
In the Parameters section, specify values for the parameters that were defined in the template.
Choose Next to continue creating the stack.
Acknowledge capabilities and transforms.
Choose Next to continue.
Choose Submit to launch your stack.
This creates a stack set that deploys Amazon Simple Storage Service (Amazon S3) infrastructure to all target accounts, generating AWS CloudFormation events that will be captured by your centralized logging system.
Figure 3: Screenshot showing successful deployment of common-resources-stackset.yaml template for target accounts
Step 4: Validation and Testing
Confirm event flow and monitoring functionality by viewing the log streams in the ‘central-cloudformation-logs’ log group.
Monitoring and Visualization
The centralized logging solution provides advanced monitoring capabilities through Amazon CloudWatch Logs Insights and custom dashboards.
You can customize your queries to get:
Recent AWS CloudFormation events across all accounts.
Failed stack operations for quick troubleshooting.
Successful deployments for verification.
Event distribution by account and region.
Status breakdown of all AWS CloudFormation operations.
The following query helps you analyze CloudFormation events across your organization by showing:
You can customize your queries to filter for specific conditions such as failed deployment status, particular resource types, or specific accounts to quickly identify and troubleshoot issues across your organization’s AWS CloudFormation deployments.
Cost Implications
When implementing this centralized monitoring solution, you should consider the following cost components:
Amazon EventBridge pricing – Costs associated with events being published across accounts to the central event bus
Amazon CloudWatch pricing – Storage costs for the centralized log group storing CloudFormation events from all accounts. Query costs when analyzing the centralized logs
To clean up the resources created in this solution, follow these steps:
First, delete the common resources stack set (common-resources-stackset) from the AWS CloudFormation console in your management account. This will remove all the resources deployed across your member accounts.
After the stack set operations are complete, delete the management account logging setup stack (log-setup-management) to remove the centralized logging infrastructure, including the event bus, log groups, and associated IAM roles.
Note: Make sure all stack set operations are complete before deleting the management account logging setup to ensure proper cleanup of all resources.
Conclusion
Managing infrastructure across multiple AWS accounts doesn’t have to be complex. By centralizing AWS CloudFormation logs, you can gain visibility into your multi-account deployments, troubleshoot issues more efficiently, and help achieve consistent resource deployment across your organization.
This solution demonstrates how AWS services like AWS CloudFormation StackSets, Amazon EventBridge, and Amazon CloudWatch Logs can be combined to create a powerful monitoring system for your infrastructure as code deployments.
Get started today by implementing this solution in your AWS Organization to gain immediate visibility into your multi-account deployments. Download the templates from our GitHub repository and follow the step-by-step guide to enhance your cloud operations.
This post is cowritten by Danilo Tommasina and Lalit Kumar B from Thomson Reuters.
Large organizations often struggle with infrastructure management challenges including compliance issues, development bottlenecks and errors from inconsistent AWS resource creation across teams. Without standardized naming, tagging and policy enforcement, teams face repeated boilerplate code and difficulty accessing centrally-managed resources.
In this post, we will show you how Thomson Reuters developed an extension of the AWS Cloud Development Kit (CDK) to automate compliance, standardization and policy enforcement in Infrastructure as Code (IaC) scripts. We will explore the strategic reasoning behind this initiative, outline foundational design principles, and provide technical details on TR’s journey from concept to implementation. The solution accelerates and standardizes cloud infrastructure deployment and management through seamless integration between TR’s custom library and AWS CDK.
Thomson Reuters (TR) is one of the world’s leading information organizations for businesses and professionals. TR provides companies with the intelligence, technology, and human expertise they need to find trusted answers, enabling them to make better decisions more quickly. TR’s customers span the financial, risk, legal, tax, accounting, and media industries.
Overview
In a large organization that offers a variety of customer products, it is essential to manage numerous cloud resources effectively. This involves overseeing multiple AWS accounts, implementing access control or addressing financial tracking challenges. These tasks require the application of centrally defined standards and conventions, with additional requirements tailored to specific sub-organizations.
Infrastructure as Code (IaC) is an effective method for managing cloud resources. However, utilizing vanilla AWS CloudFormation for extensive and intricate infrastructure can pose challenges. It requires careful attention to naming conventions, tagging standards, security, and best practices for infrastructure deployments. Additionally, repeating infrastructure patterns across various services and products often leads to excessive use of copy-paste and dealing with boilerplate code. When projects require configurable and dynamic components – including conditionals, loops, repeatable patterns, and distribution to a large user base – delivering CloudFormation scripts can become quite cumbersome and prone to errors.
AWS CDK addresses these challenges by enabling IaC development in high-level programming languages like TypeScript, JavaScript, Python, Java. AWS CDK Level 2 and 3 constructs simplify and reduce the amount of code to be written to manage complex infrastructure. It allows TR to create custom libraries that extend the vanilla AWS CDK with additional patterns and utilities. The extension libraries can also be distributed for multiple programming languages and package managers thanks to JSII. JSII enables TypeScript libraries to be automatically compiled and packaged for native consumption in each target language, allowing CDK libraries to be written once but used in many different programming environments.
Solution to optimize the process
In a medium to large company, different teams provide the fundamental infrastructure services (e.g. authentication and authorization, networking, security, financial tracking and optimization, base infrastructure provisioning, etc.) to enable use of the cloud for a large community of developers.
Figure 1 illustrates the conventional method involving teams producing documentation that outlines the usage of pre-deployed infrastructure. This includes naming and tagging standards, required security boundaries, default settings and other relevant guidelines. Subsequently, the implementation team reviews these documents and integrates the established rules into their tool chain consistently, often working in isolation. This results in inefficiencies, misinterpretation risks and maintenance challenges when specifications change.
Figure 1: The traditional approach
TR’s optimized approach replaces documentation with working code as shown in Figure 2.
Figure 2: The optimized approach
Infrastructure teams contribute their specifications into an extension library for AWS CDK, while the implementation teams can also contribute common patterns back into the central extension. The central extension library is released as polyglot packages allowing the implementation teams to pick the programming language that fits best to their knowledge.
With this approach, TR introduce a “shift-left” in the development and delivery lifecycle. Standards and best practices are introduced early, things are done right by default, and TR minimizes the risks of getting inappropriately configured resources to be deployed, which leads to a reduction in the number of governance and security incidents. Implementation delivery teams can share well architected patterns for re-use by other teams to improve overall effectiveness.
Implementation
Design principles
Key factors for the adoption of a framework are:
Simplicity, ease-of-use, self-service, and fast onboarding
Low maintenance effort and cost
Controlled roll-out, ability to quickly roll-back
With the above in mind, TR delivered a minimally invasive framework that can be enabled with a tiny set of custom code on top of vanilla AWS CDK code.
Using the TR-AWS CDK core library is straightforward – users simply import the package and adapt their entry point. From there, they can leverage standard AWS CDK code and documentation for most development tasks. There’s no need to learn custom construct classes or follow extensive specialized tutorials – vanilla AWS CDK knowledge is sufficient for most requirements. Additionally, developers can quickly incorporate open-source construct libraries through standard package managers. These third-party libraries integrate seamlessly with the TR implementation, automatically conforming to company standards without requiring additional configuration.
By managing distribution of the library following standard software packaging and release procedures TR enable consumers to adopt new capabilities in a controlled way, with the ability to roll-back to previous versions if something goes wrong during an update.
All this together allows TR to tick off the key factors listed above.
The monorepo approach
TR created a monorepo (monolithic repository) which is a version control strategy where multiple projects or packages are stored in a single repository. This approach offers several advantages over maintaining separate repositories for each package: unified versioning, simplified dependency management, consistent tooling, atomic changes across packages and improved collaboration.
This setup mirrors the configuration used by AWS CDK itself.
TR organized their monorepo following this structure:
repo/package.json: Defines dev dependencies and global scripts used by all packages
repo/packages: contains the different modules
repo/packages/core/package.json: deps of core module and scripts for core module
repo/packages/core/lib/*: typescript code that composes the core module
repo/packages/core/lib/augmentation/*: module augmentations for AWS CDK core components
repo/packages/constructs-pattern-X: define multiple reusable and independent level 3 constructs
repo/packages/tr-cdk-lib/package.json: assembly module that defines scripts to assemble the final mono package that will be shared via a npm repository
Figure 3: Repo structure
This structure enables TR to maintain a collection of related, but distinct CDK constructs while making sure they work together seamlessly.
The modules are assembled and released into one single versioned package which simplifies the end-user’s consumption.
The core module: Foundation of TR AWS CDK library
The core module is the foundation of TR’s CDK extension library, it consists of several key components that work together to “TR-ify” AWS resources and offer simplified access to centrally managed infrastructure resources that are provided by TR’s AWS landing zone teams.
TR refers to “TR-ification”, as the process of dynamically adapting AWS CDK constructs to meet their standards and best practices. From a user perspective, the process happens in a minimally invasive way, for most of the time the user is coding with vanilla AWS CDK components, while having access to short-cuts to a variety of TR specific resources.
The core module serves several critical purposes:
Standardization: makes sure the AWS resources follow TR naming conventions and tagging standards
Simplification: abstracts away complex configurations required for TR compliance
Integration: provides seamless access to TR-managed resources like VPCs, security groups, and Route53 hosted zones
Policy Enforcement: automatically applies custom security and financial optimization policies
The “TR-ification” process happens on every construct following a consistent order, for each construct it will:
If applicable, set a name following a consistent pattern
Apply custom initialization logic (e.g. set IAM permission boundary)
Apply security and financial optimization defaults (if not set)
Perform custom validations
Verify security and financial optimization policies
Tag resources
TR uses a single root-level Aspect instead of multiple Aspects to avoid complex resource type checking and improve maintainability:
// This is the entrypoint that triggers the trification process on all CDK constructs
// we apply all TR specific transformations at this point
Aspects.of(this).add({
  visit: (node: IConstruct) => {
    node.getTRifier().trify();
  },
});
The careful readers at this point will scream: Wait a moment! node.getTRifier().trify() won’t compile!
Which is absolutely correct… unless you know a topic in TypeScript called module augmentation, in TR’s case, they augment the IConstruct interface and Construct class as follows:
/** Defines the set of functionality needed when trifying resources */
export interface ITRifier {
    trify(): void;
    readonly name: string | undefined;
    readonly nameFromTree: string;
}

declare module 'constructs/lib/construct' {
    interface IConstruct {
        /** Obtain the ITRifier responsible to add TR specific features to this CDK IConstruct */
        getTRifier(): ITRifier;

        trContext(): AppContext | StageContext | StackContext;
    }

    interface Construct extends IConstruct {
        /** Build the ITRifier responsible to add TR specific features to this CDK IConstruct */
        buildTRifier(): ITRifier;
    }
}
Then provide default implementations for the generic Construct:
Construct.prototype.getTRifier = function () {
    // Lazy getter, build the TRifier only when needed and cache it
    return ObjectUtils.lazyGetFrom(this, 'trifier', () => this.buildTRifier());
};

Construct.prototype.buildTRifier = function () {
    return new ConstructTRifier(this); // Default dummy implementation
};

Construct.prototype.trContext = function (): StackContext {
    return Stack.of(this).trContext() as StackContext;
};
Since AWS CDK constructs implement the IConstruct interface, respectively extend the Construct class automatically, the “TR-ification” process becomes available for many types of constructs. All you need to do now is inject your custom logic for all resources you need customization and make sure the module is loaded, e.g. in case of a Lambda function, it uses:
lambda.CfnFunction.prototype.buildTRifier = function () {
    return new CfnResourceTRifierLambda.CfnFunction(
        this,
        () => { // Accessor for retrieving the lambda function name
            return this.functionName;
        },
        (name: string) => { // Accessor for setting the lambda function name
                this.functionName = name;
        },
        () => {
            // Our own stuff to set defaults for financial optimizations
            const policyChecker = FinOps.Lambda.Defaults.apply(this);

            this.node.addValidation({
                validate: () => {
                    // Inject a custom validation logic to check compliance with financial policies
                    return policyChecker.addErrorIfNotCompliant(this);
                }
            });
        }
    );
};
TR targets L1 (Cfn) constructs like CfnFunction because the higher-level L2 and L3 constructs internally create L1 constructs during synthesis. This architectural decision makes sure TR-ification is applied universally, whether users write new lambda.Function() or new lambda.CfnFunction(), both will be TR-ified. This approach provides complete coverage with a single implementation point while remaining completely transparent to library users who can continue using their preferred abstraction level without awareness of this internal mechanism.
Naming standardization
TR uses standardized naming to support IAM policy filtering and consistent resource management. In order to support a broad range of use-cases, TR defined the resource name pattern as follows: <segregationPrefix>[-appPrefix]-<resourceName>[-region]-<envSuffix> where the elements mean:
segregationPrefix: A prefix used for grouping resources for a specific asset, it implies that a segregated administrative group is responsible for this resource, where applicable it is used for ARN based IAM resource filtering.
appPrefix: Optional, a prefix used to map a resource to a specific application or service, this is shared across stacks within a CDK app.
resourceName: The name of a resource indicating its purpose.
region: Optional, applied only to resources that are global but are part of a CDK stack that is bound to a specific region.
envSuffix: A suffix used to segregate different deployment environments, e.g. development, continuous integration, quality assurance, production.
Traditional approaches require developers to manually construct these names, propagating prefixes and suffixes throughout their code:
new lambda.Function(stack, 'foo', {
    runtime: lambda.Runtime.NODEJS_LATEST,
    handler: 'index.handler',
    code: new lambda.InlineCode('bar'),
    functionName: `\${segregationPrefix}-\${appPrefix}-compute-stats-\${envSuffix}`,
});
With TR AWS CDK extension, the code is simplified to:
new lambda.Function(stack, 'MyFunction', {
  runtime: lambda.Runtime.NODEJS_LATEST,
  handler: 'index.handler',
  code: new lambda.InlineCode('foo'),
  functionName: 'compute-stats',
});
The functionName describes what the function does without “noise”, TR AWS CDK will transparently generate and inject the name into the synthetized CloudFormation script, matching the specification. Note that functionName is optional and TR-CDK will either TR-ify a provided name or automatically generate a valid one if the user omits it, making sure CloudFormation receives a properly formatted name.
Access to “Landing Zone” resources
TR’s central AWS Landing Zone team is responsible of inflating a set of standard resources (e.g. VPC, subnets, security groups, Route 53 zones, golden AMIs, etc.) into AWS accounts that are made available to application development teams.
Through module augmentation (shown earlier), the TR-ifier defines the function trContext() which provides access to a context-aware utility. When calling this function on a resource that resides within a Stack, it will return an object that implements StackContext interface.
export interface StackContext extends StageContext {
  /** Get access to the TR IVpc */
  readonly vpc: IVpc;

  /** Provides access to standard security groups that are available in all TR accounts */
  readonly securityGroups: trparams.ISecurityGroupsResolver;

  /** Provides access to private and public hosted zones (with numeric digits) that are available in all TR accounts */
  readonly route53: trparams.IRoute53Resolver;

  /** Provides access to TR golden AMIs that are available in all TR accounts */
  readonly goldenAMI: TRGoldenAMI;
}
The readonly attributes are accessors for the AWS Landing Zones resources listed above. With calls like the following examples, you have a simple way to obtain access to the standard VPC, subnets selections, route 53 private hosted zone, …
// Get the IVpc:
const trVpc: IVpc = stack.trContext().vpc;

// Get the private subnets as array
const privateSubnets: ISubnet[] = trVpc.privateSubnets;

// Get the private subnets as SubnetSelection
const privateSubSel: SubnetSelection = trVpc.selectSubnets({
    subnetType: SubnetType.PRIVATE_WITH_EGRESS,
});

// Get the private Route53 hosted zone
const privateHZ = stack.trContext().route53.privateHostedZone;
You might now wonder how TR resolves the resources and obtain objects implementing IVpc, ISubnet, ISecurityGroup, …
Instead of using hard-coded resource attributes (e.g. Id, ARN, …) or complex lookups, TR uses CloudFormation’s ability to resolve Systems Manager parameters at execution time, as part of the AWS account initial inflation along with the resources, Systems Manager parameters are registered as well. The parameter names are the same across TR’s AWS accounts, the value contains e.g. the id of the matching AWS Landing Zone standard resource, e.g. /landing-zone/vpc/vpc-id, /landing-zone/vpc/subnets/private-1-id, /landing-zone/vpc/subnets/private-2-id, …
TR then defined custom IVpc, ISubnet, IHostedZone… implementations and for each function they implemented dynamic resolution of resource attributes via Systems Manager parameters. With this approach, TR obtains portable code that runs on AWS accounts initialized via TR inflation process. There are no hard-coded resource identifiers, and there is no need for lookups via AWS SDK during synthesis.
As a user of the TR AWS CDK library, TR developers interact with an object implementing the IVpc interface and do not have to care about how to obtain e.g. the VPC-id and subnet ids. The same principle applies to Route53 hosted zones, Golden AMI ids, etc.
Application initialization
As mentioned previously, one key design principle is to minimize the custom code that a user of TR AWS CDK is required to use compared to using vanilla AWS CDK. This approach leverages existing AWS CDK and reduces the learning curve for developers.
This is how TR developers initialize an App with vanilla CDK, compared to how they initialize it with TR AWS CDK.
From this point on, the developers can continue using vanilla AWS CDK code, the value returned by TRCdk.newApp(…) is an instance of an extension of CDK’s App class and is fully compatible with it. It, however, injects the TR-ification aspect, manages the tagging process, and initializes contextual information.
Here and there, e.g. when they need to pass the VPC into a construct, they will need to call TR AWS CDK code via the trContext() entry point that is exposed on CDK constructs through TypeScript’s module augmentation feature, but that’s it! 99% of the code is vanilla AWS CDK code.
The segregationId, namingProps, and deploymentEnv attributes are used for multiple purposes like formatting resource names and tagging resources.
Standardized Tagging
TR defines tagging standards, there are mandatory tags (e.g. for attribution to a specific product asset and for tracking resource ownership), and there are optional tags (e.g. for specifying resources that belong to different services within the same product asset).
The segregationId, the resourceOwner, and deploymentEnv attributes are used to set mandatory tags using CDK’s built-in functionality for tagging. TR also defines a standardized set of optional tags that can be passed into the application context or set ad-hoc on individual constructs.
This approach maintains consistency in the use of tag names and setting the values, it happens automatically behind the scenes and will be applied to the taggable constructs. No copy-pasting of tag definitions like in AWS CloudFormation, no issues dealing with CloudFormation’s inconsistent syntax for tag declarations, no forgetting of tagging resources.
Conclusion
In this post, we discussed how the monorepo approach to AWS CDK development, centered around the core module, has significantly improved the infrastructure management at Thomson Reuters. By providing well-architected L3 constructs, standardizing and simplifying AWS resource creation, they’ve reduced errors, enhanced governance, and accelerated development.
The core module’s ability to enforce policies, standardize naming and tagging, and provide access to TR-managed resources makes it an invaluable tool for teams working with AWS infrastructure at Thomson Reuters.
To get started with AWS CDK and build your CDK solutions, check out the AWS CDK Developer Guide.
This is a guest post written by Ramanathan Nachiappan from GoDaddy.
In the world of infrastructure as code, the AWS Cloud Development Kit (AWS CDK) has revolutionized how teams define and provision cloud resources. Central to its operation is the bootstrapping process, which ensures all required resources and permissions are in place to enable secure and scalable deployments.
At GoDaddy, our cloud journey has always prioritized governance, compliance, and a great developer experience. As our AWS footprint expanded across hundreds of teams and thousands of deployments, we faced a classic engineering dilemma: how do we uphold rigorous governance standards without compromising developer velocity?
AWS CDK’s default bootstrapping process—while essential—often clashed with our governance model, creating friction, workarounds, and wasted cycles. This post details how we evolved beyond that friction, eliminating the explicit bootstrap step entirely and replacing it with a seamless, zero-touch experience. The result: a “bootstrapless” CDK deployment flow that enforces governance invisibly and empowers developers to deploy with a single command.
The Governance Imperative: Security by Design
GoDaddy’s governance model isn’t just a checkbox for compliance; it’s the foundation of our cloud security posture. Our approach requires all AWS resource modifications to flow through AWS CloudFormation, with each deployment evaluated against our rule sets covering:
Our CloudFormation hooks evaluate every resource against these rules pre-deployment, helping to reduce the likelihood of non-compliant resources being created. This proactive approach is designed to support governance from day one, rather than retroactively detecting violations.
The CDK Bootstrap Challenge
AWS CDK V1 vs AWS CDK V2:
AWS CDK v1: Used the active AWS CLI credentials for all deployments.
AWS CDK v2: Introduced a new bootstrap template with five new AWS Identity and Access Management (IAM) roles, designed primarily for CDK Pipelines. These roles must be assumed or passed by the AWS CLI. It’s worth noting that AWS CDK v2 still fully supports the legacy synthesizer, allowing users to maintain their existing v1-style workflows.
When AWS CDK v2 arrived, its bootstrap process introduced crucial changes designed to standardize authentication across multiple deployment tools and scenarios (CLI, cross-account deployments, pipelines, etc.). The standard cdk bootstrap command creates several essential components:
# Creates the default bootstrap stack with resources cdk bootstrap
A collection of five IAM roles enabling AWS CDK’s deployment capabilities
Here’s where things got interesting for GoDaddy. While the default AWS CDK setup includes security measures (like encrypted Amazon S3 buckets), our enterprise governance requirements had additional specifications that created some difficulty with the default bootstrap resources:
Amazon S3 buckets needed additional encryption, logging, and compliance settings beyond the defaults
IAM roles required alignment with our specific permission boundaries and organizational policies
Amazon ECR repositories needed mandatory GoDaddy tags and access configurations
Additional compliance requirements around resource naming, backup policies, and monitoring
These GoDaddy-specific governance requirements meant the default bootstrap resources do not pass our validation checks, creating deployment slowdown for developers and increasing support overhead for GoDaddy’s governance platform as teams worked around the governance failures.
Phase 1: Custom Bootstrap Templates
Our first step toward enhancing the developer experience was creating a customized bootstrap approach using two key components:
1. The GDStack and Conformers
We developed a specialized CDK construct called GDStack extending the native CDK Stack. This custom stack framework used CDK Aspects to automatically ensure governance compliance:
Automatic Resource Conformers: We built a system of “conformers” that apply company-wide governance standards to every resource automatically. For example, our S3Conformer ensures all buckets have required encryption, logging, and access settings.
CDK Aspects Under the Hood: These conformers use AWS CDK’s powerful Aspects system—a visitor pattern that traverses all constructs in a stack and applies transformations. This allowed us to inspect and modify any non-compliant resources during synthesis without requiring developers to learn complicated rules.
Seamless Governance: When developers added resources to a GDStack, these aspects would automatically transform the resources to align with our governance rules before deployment—all invisible to the developer.
This approach dramatically reduced turnaround time for developers, who previously had to manually correct violations in their application specific CloudFormation stacks after failed deployments. Instead, the system intelligently fixed issues before they became deployment failures.
2. CliCredentialsStackSynthesizer
Instead of using AWS CDK’s default deployment roles, we used the CliCredentialsStackSynthesizer to:
Use the developer’s CLI credentials directly for deployments
Eliminate the need for complex cross-account role assumptions
This approach worked well, but still required teams to run a bootstrap step with precise GoDaddy-specific parameters. Although our platform documentation was extensive, some users still encountered issues as they continued to use the native cdk bootstrap command instead of the custom command. This behavior likely stemmed from the habit of running cdk bootstrap first, as trained by the native AWS CDK workflow. As a result, this approach still maintained some support troubleshooting workload for teams. We needed a more elegant solution for our needs!
Phase 2: The Revolutionary Bootstrapless Approach
As AWS CDK evolved, so did our thinking. The introduction of the AppStagingSynthesizer opened new possibilities, leading us to develop a completely bootstrapless solution.
The Factory Pattern Solution
We engineered an elegant chain of specialized components:
Bootstrapless CDK Factory Pattern Design
Each component plays a crucial role:
1. GDStack: The Developer Interface
This is the only component developers interact with directly:
// Developer simply extends GDStack instead of Stack
export class MyApplicationStack extends GDStack {
  constructor(scope: Construct, id: string, props: GDStackProps) {
    super(scope, id, props);

    // Normal CDK resource definitions
    new s3.Bucket(this, 'MyBucket', { ... });
  }
}
2. GDStackSynthesizerFactory: The Orchestrator
This factory connects our custom components with CDK’s synthesis system:
4. GDStagingStack: The Resource Producer for App-Level bootstrapping
This stack implements IStagingResources and creates rule-compliant assets on demand:
export class GDStagingStack extends cdk.Stack implements IStagingResources {
    constructor(scope: Construct, id: string, props: GDStagingStackProps) {
        super(scope, id, {
            ...props,
            // The magic ingredient - BootstraplessCliSynthesizer
            synthesizer: new BootstraplessCliSynthesizer(),
            description: `This stack includes resources needed to deploy the AWS CDK app ${props.appId} into this environment`,
        });

        // Apply governance conformers to everything
        this.applyGovernanceConformers();

        // Create compliant resources
        const bucket = new s3.Bucket(this, "CdkStagingBucket", {
            bucketName: `cdk-${this.appId}-staging-${this.account}-${this.region}`,
            // Conformers ensure encryption, logging, and other requirements
        });

        // Additional resource creation...
    }
}
The Secret Sauce: BootstraplessCliSynthesizer
The cornerstone of our solution is a custom synthesizer BootstraplessCliSynthesizer that combines the best aspects of AWS CDK’s built-in synthesizers BootstraplessSynthesizer and CliCredentialsStackSynthesizer.
It brings together key features from both AWS CDK synthesizers while adding our own innovations:
From CliCredentialsStackSynthesizer: Uses the CLI credentials directly for all operations
From BootstraplessSynthesizer: Eliminates the need for bootstrap resources
Our custom approach: Purpose-built specifically for the GDStagingStack with explicit asset rejection where GDStagingStack itself essentially creates the required asset resources on demand for the CDK Application.
This synthesizer:
Requires no bootstrapping in any region
Uses AWS CLI credentials directly for all operations
Maintains a minimal implementation focused solely on template generation
export class BootstraplessCliSynthesizer extends cdk.StackSynthesizer {
    constructor() {
        super();
    }

    // Prevent asset uploads to enforce governance compliance
    public addFileAsset(_asset: cdk.FileAssetSource): cdk.FileAssetLocation {
        throw new Error(
            "Cannot add assets to a Stack that uses the BootstraplessCliSynthesizer",
        );
    }

    public addDockerImageAsset(
        _asset: cdk.DockerImageAssetSource,
    ): cdk.DockerImageAssetLocation {
        throw new Error(
            "Cannot add assets to a Stack that uses the BootstraplessCliSynthesizer",
        );
    }

    // Minimal synthesis - just template generation and artifact emission
    public synthesize(session: cdk.ISynthesisSession): void {
        // Same as LegacySynthesizer
        this.synthesizeTemplate(session);
        this.emitArtifact(session);
    }
}
Our innovation was creating a synthesizer used only for the GDStagingStack that works in concert with our factory pattern. Rather than assuming pre-existing bootstrap resources, it enables the staging stack itself to create the required asset resources on demand, achieving enhanced bootstrapless deployments while maintaining governance compliance.
The Elegant Workflow: Dynamic Asset Management
Our solution transformed the developer experience through intelligent, on-demand resource provisioning:
# Deploy directly - compliant staging resources created automatically when needed npx cdk deploy
The key advantage is our intelligent asset management:
On-Demand Resource Creation: Staging resources (Amazon S3 buckets, Amazon ECR repositories) are created automatically when needed, rather than requiring pre-provisioning
Governance Integration: All staging resources are created with full compliance built-in from the start
Simplified Credential Flow: Uses existing CLI credentials without complex role assumption chains
Multi-Account Scalability: Works seamlessly across any number of AWS accounts and regions
Behind the scenes, our architecture:
Creates governance-compliant staging resources dynamically as applications require them
Uses the developer’s existing CLI credentials for all operations
Applies security and compliance requirements transparently
Eliminates the need to manage bootstrap stacks across environments
Evolution of Approaches
Approach
Bootstrap Required
Security Model
Asset Management
GoDaddy Governance
Developer Workflow
AWS CDK v2 Default
Yes (one-time)
5 deployment roles
Pre-provisioned bootstrap stack
Failed validation checks
Standard setup + deploy
Custom Template + CliCredentialsStackSynthesizer
Yes (one-time)
CLI credentials
Compliant bootstrap stack via custom template
Passes all checks
Setup + deploy
GDStagingStack + BootstraplessCliSynthesizer
No
CLI credentials
Compliant staging resources created dynamically on-demand
Passes all checks
Deploy only
Business Impact: GoDaddy’s Transformation
The business value of our bootstrapless approach has been significant for GoDaddy’s infrastructure teams:
Streamlined developer focus: Our teams now focus entirely on writing infrastructure implementation logic, with AWS CDK bootstrapping fully abstracted and automated. Developers no longer need to work with bootstrap configurations, even though it was a one-time setup per environment previously.
Automated compliance: Deployments automatically meet GoDaddy’s governance requirements without developer intervention, addressing the validation failures we experienced with default bootstrap resources.
Simplified support model: Our platform support team handles fewer bootstrap-related configuration requests, allowing them to focus on broader platform improvements.
Broader CDK adoption: The streamlined workflow has encouraged more teams at GoDaddy to adopt AWS CDK from native CloudFormation YAML code for their infrastructure management.
This bootstrapless approach has worked well for GoDaddy’s specific governance requirements and development workflow preferences, demonstrating one way to integrate enterprise compliance seamlessly into AWS CDK deployments.
Conclusion: The Invisible Framework
The evolution from bootstrap – dependent to bootstrapless CDK deployments represents more than a technical improvement—it demonstrates a pathway to eliminate friction while strengthening organization specific governance. Our implementation at GoDaddy validates that enterprise compliance and developer productivity can be achieved simultaneously.
Organizations seeking to implement similar solutions should begin by evaluating the AppStagingSynthesizer capabilities within their current AWS CDK deployment patterns. This assessment will reveal opportunities to reduce bootstrap dependencies while maintaining security and compliance standards. For comparison, teams can also examine the BootstraplessSynthesizer to understand alternative approaches to eliminating traditional bootstrap resources.
The implementation approach we’ve outlined leverages established AWS CDK patterns, including the CliCredentialsStackSynthesizer for credential management and dynamic resource provisioning interfaces. These core AWS CDK interfaces — IStagingResourcesFactory and IStagingResources — form the foundation for creating governance-compliant, bootstrapless deployment workflows that scale across enterprise environments.
The future of infrastructure as code lies in systems that enforce governance invisibly while empowering developers to focus on business logic. As AWS CDK continues to evolve, the patterns we’ve demonstrated at GoDaddy provide a foundation for organizations to build their own invisible frameworks—where compliance becomes a catalyst for velocity rather than an obstacle to innovation.
The content and opinions in this blog are those of the third-party author and AWS is not responsible for the content or accuracy of this blog.
We are excited to announce a new AWS Cloud Development Kit (CDK) feature that makes it easier and safer to refactor your infrastructure as code. CDK Refactor aims to preserve your AWS resources as you rename constructs, move resources between stacks, and reorganize your CDK applications – operations that previously risked resource replacement.
When writing infrastructure as code with the CDK, developers occasionally need to rename Constructs or move them between Stacks or directories. Whether they need to better organize their code, adhere to coding best practices, or take advantage of object-oriented programming patterns like class inheritance, these changes can be risky in environments with deployed resources, because they change the CDK-generated logical ID of those resources. During a CDK deploy, AWS CloudFormation interprets these changes as new resources, which often requires deletion of the existing resource and creation of a new resource with the new logical ID. For stateful resources, this could cause potential downtime and even data loss. To mitigate this effect of ID changes, developers had to stage their changes to create new resources, create a data or network migration plan, and then delete the old resources to prevent these refactoring effects. Sometimes, developers decide the risk of these changes outweigh the benefit of the refactor and choose not perform the refactor at all.
Today, developers can use the new CDK refactor command to detect, review, confirm, and safely apply refactored changes to their resources without resource replacement. This feature leverages the recently-launched AWS CloudFormation refactor feature, but the CDK automatically computes the mappings that CloudFormation needs to redefine the refactored resources, providing a layer of abstraction that allows developers to focus on code rather than resource configuration. Let’s walk through an example to demonstrate the benefits of this refactor capability.
Prerequisites
Along with the usual CDK prerequisites, if you bootstrapped your CDK project before this launch, you need to re-bootstrap your environment to obtain the new permissions associated with the CDK refactor capabilities before attempting your refactor.
Monolith to micro-service example
For this example, let’s say that we have a legacy CDK App that deploys a monolithic Stack with Amazon DynamoDB tables for users, products, and orders, and an AWS Lambda function that implements CRUD operations on all entities.
Monolithic application
function monolithApp() {
  const monolith = new CdkAppStack(app, monolithStackName, {env});
  const usersTable = makeTable(monolith, 'users');
  const productsTable = makeTable(monolith, 'products');
  const ordersTable = makeTable(monolith, 'orders');

  // We have a single Lambda function in our application
  const func = new Function(monolith, `MonolithFunction`, {
    code: Code.fromInline(`Some code that accesses all three tables`),
    runtime: Runtime.NODEJS_22_X,
    handler: 'index.handler',
  });

  usersTable.grantReadWriteData(func);
  productsTable.grantReadWriteData(func);
  ordersTable.grantReadWriteData(func);

  // This function creates a REST API, resources, methods, and links
  // everything together to the functions. Right now, we are passing
  // the same function in three places.
  makeApi(monolith, {
    usersFunction: func,
    productsFunction: func,
    ordersFunction: func,
  });
}

monolithApp();
We’ve been asked to adhere to Well Architected Framework best practices and break up the monolith into separate Lambda functions so they can scale independently. Because they’re so similar, we’re also going to create an inheritable Lambda class that we can reuse to improve readability and maintainability of the code, and avoid having to re-define Lambda configuration settings that are consistent across all of the functions.
Finally, the monolith uses only L1 CDK Constructs. To further abstract our code and take advantage of helper functions, we’re going to start using L2 CDK Constructs for DynamoDB, Lambda, and API Gateway. This change will allow the IAM Roles and permissions to be defined automatically, further simplifying our code.
Proposed refactored application into separate stacks for each domain.
Without the refactor feature, CloudFormation would delete and re-create the Lambda and DynamoDB resources, which would cause all of the data in the latter to be lost. Alternatively, you could create net-new Lambdas and Amazon DynamoDB tables in one deployment, execute an out-of-band, point-in time and streaming data migration from the old tables to the new ones, update the API Gateway configuration to target the new Lambdas in a second deploy, and turn off the streaming migration process.
With the refactor feature, we can move the resource definitions to new files, update them to L2 Constructs, and leave the stateful resources in place!
Replace stateless resources First, let’s refactor our CDK code to break the monolithic Lambda into 3 domain-specific Lambdas. CloudFormation’s refactor capability doesn’t support creating new resources or updating configuration of existing resources, so we will deploy these changes as usual, without using the new refactor feature. All resources will stay inside the monolithic stack for now.
Refactor stateless single lambda function into 3 functions as a prerequisite to the refactor of stateful DynamoDB tables.
function singleStackMicroservicesApp() {
  // We still have a single stack
  const monolith = new CdkAppStack(app, monolithStackName, {env});

  // makeFunctionAndTable creates a different Lambda function and a DynamoDB table
  // for each domain that is passed as a parameter.
  // In a real CDK application, you would probably define each of them independently.
  makeApi(monolith, {
    usersFunction: makeFunctionAndTable(monolith, 'users'),
    productsFunction: makeFunctionAndTable(monolith, 'products'),
    ordersFunction: makeFunctionAndTable(monolith, 'orders'),
  });
}

singleStackMicroservicesApp();
Refactor stateful resources Now we can refactor the stateful DynamoDB tables and their respective Lambdas to their own stacks, using cdk refactor to map their new IDs without replacing the resources.
Before refactoring, though, we need to create the new stacks that will receive the functions and tables:
  singleStackMicroservicesApp();

  const usersStack = new Stack(app, 'Users', {env});
  const productsStack = new Stack(app, 'Products', {env});
  const ordersStack = new Stack(app, 'Orders', {env});
Refactored Lambda functions and DynamoDB tables into their own separate stacks.
function fullMicroservicesApp() {
    const monolith = new Stack(app, monolithStackName, {env});

    const usersStack = new Stack(app, 'Users', {env});
    const productsStack = new Stack(app, 'Products', {env});
    const ordersStack = new Stack(app, 'Orders', {env});

    makeApi(monolith, {
        // Now each pair function + table is in its own stack
        usersFunction: makeFunctionAndTable(usersStack, 'users'),
        productsFunction: makeFunctionAndTable(productsStack, 'products'),
        ordersFunction: makeFunctionAndTable(ordersStack, 'orders'),
    });
}

fullMicroservicesApp();
Running cdk refactor –unstable=refactor starts the process. (The unstable flag is required as this feature is still subject to breaking changes.) The CDK will compare the current state of your application (the deployed monolithic app) with the new state (the output of your refactored CDK application).
CDK refactor confirmation dialog
As expected, it shows a table of resources that were moved from the Monolith stack to their respective refactored stacks. By default, the CLI asks for confirmation before proceeding. Bypass the confirmation by passing the –force flag, or confirm the changes and execute the refactor: All resources, including the stateful tables, were safely moved to other stacks, and we now have our well-architected application.
CDK refactor results
Conclusion With the CDK refactor feature, developers can take full advantage of the object-oriented definition of AWS resources, including the ability to change the structure and layers of abstraction without orchestrating complex migration mechanisms or scheduled downtime. Since the CDK is open source, you can learn more about how the CDK automatically determines what resources need to be refactored via the README. Understanding when resources need to be replaced and refactored will help you plan your infrastructure as code roadmap and when you should use this new refactoring capability.
If you’ve got a refactor that you’ve been waiting to execute, read more about the feature set in the CDK refactor documentation and start refactoring your own CDK App today!
On November 30th, 2025, the AWS Cloud Development Kit (CDK) will no longer support Node.js 18.x, which reached end of life on April 30, 2025. This change applies to all AWS CDK components that depend on Node.js, including the AWS CDK CLI, the Construct Library, and broader CDK ecosystem projects such as JSII, Projen, and CDK8s.
We encourage you to upgrade to a Node.js Active Long Term Support (LTS) version, which is Node.js 22.x as of July 6, 2025. Given that Node.js 18.x is past end of life, we recommend migrating your CDK projects to newer Node.js LTS versions as soon as possible.
Why are we doing this?
Node.js 18.x reached its End of Life support on April 30, 2025, per the Node.js Release Schedule. This means the Node.js community no longer provides bug fixes or security updates for this version. By dropping support for end-of-life versions, we ensure that AWS CDK users benefit from the latest security patches, performance improvements, and modern Node.js capabilities. This approach aligns with AWS’s commitment to security best practices and our standard policy of supporting only actively maintained runtime versions.
What’s changing?
Starting December 1, 2025, AWS CDK will officially end support for Node.js 18.x. While your existing CDK deployments may continue to function, we will no longer address issues, provide bug fixes, or offer technical support for problems that occur specifically with Node.js 18.x. Any support cases or bug reports related to Node.js 18.x will require reproduction on a supported Node.js version (20.x or 22.x as of June 2025) before we can assist.
Key points
Moving forward, projects that remain on Node.js 18.x will gradually lose access to new AWS CDK capabilities as we develop features using modern Node.js APIs that are not available in older versions. This creates a growing compatibility gap that will make it increasingly challenging to leverage CDK innovations and improvements. The security implications are equally concerning, as any vulnerabilities discovered in the unsupported Node.js 18.x runtime will not receive patches or workarounds from our development team, potentially exposing your infrastructure to known security risks.
The challenges extend throughout the development lifecycle. Without regular compatibility testing against Node.js 18.x, we cannot ensure reliable CDK behavior, and you may encounter unexpected issues in production environments. When problems do arise, our support team will need to reproduce any reported issues on supported Node.js versions before providing assistance, which could delay resolution during critical incidents. Additionally, the broader CDK ecosystem, including third-party libraries and tools your projects depend on, will likely follow similar deprecation schedules, creating compounding compatibility challenges that become more difficult to resolve over time.
Timeline
We’re announcing this change in July 2025, to provide you with a five-month transition period before support officially ends on November 30th, 2025. During this transition window, our team will continue to address issues that arise with Node.js 18.x, giving you time to plan, test, and execute your upgrade strategy without immediate pressure. This period is designed to help you thoroughly validate your CDK projects against newer Node.js versions and ensure smooth deployments in your production environment.
Beginning December 1st, 2025, AWS CDK will officially discontinue support for Node.js 18.x across all components and ecosystem projects. From this point forward, all bug fixes, security patches, and new feature development will target only supported Node.js versions, currently 20.x and 22.x as of June 2025. We strongly recommend using this transition period to migrate to Node.js 22.x, the current Active Long Term Support version, which will provide the longest runway for future compatibility as the Node.js release cycle continues.
Version validation and update steps
Begin your migration by checking which Node.js version you’re currently running across all environments where you deploy CDK projects. Run `node -v` in your local development environment, CI/CD pipelines, and any automated deployment systems to get a complete picture of your current setup.
Once you’ve identified all instances of Node.js 18.x, update your runtime to a supported version using either a version manager like nvm or by downloading the official installer from nodejs.org. We recommend upgrading directly to Node.js 22.x since it’s the current Active Long Term Support version and will provide the longest compatibility runway. After updating your runtime, thoroughly test your CDK projects in non-production environments to ensure your deployment scripts and third-party dependencies work correctly with the new version. Pay particular attention to any custom constructs or complex deployment workflows that may be sensitive to changes in Node.js versions.
Finally, establish a process for staying current with future Node.js releases by bookmarking the AWS CDK Node.js Version Support Timeline, which provides up-to-date information on runtime compatibility and upcoming deprecations. This proactive approach will help you anticipate future changes and plan your upgrade strategies well in advance, avoiding the pressure of last-minute migrations when support windows close.
Conclusion
This deprecation is part of our ongoing commitment to provide a secure, high-quality experience for AWS CDK users. By migrating to a Node.js Active Long Term Support (LTS) version, you will benefit from enhanced performance, ongoing security updates, and continued AWS CDK advancements. If you have any questions or concerns about this deprecation, please reach out and open an issue in our GitHub repo.
Today we’re announcing the general availability (GA) of the Amazon EventBridge Scheduler and Targets Level 2 (L2) constructs in the AWS Cloud Development Kit (AWS CDK) construct library. EventBridge Scheduler is a serverless scheduler that enables users to schedule tasks and events at scale. Prior to the launch of these L2 constructs, developers had to define all relevant properties (via L1 constructs) across schedules and provide the glue logic between resources when defining their AWS CDK applications. The graduated constructs make it easier for users to configure EventBridge schedules, groups, and targets for AWS service integrations. They follow the AWS CDK L2 higher-level API design simplifications and provide a backwards-compatible guarantee across minor versions. Developers can use those alongside other existing stable AWS CDK constructs ready for production use.
Background
The AWS Cloud Development Kit (CDK) is an open-source software development framework for defining cloud infrastructure in code and provisioning it through AWS CloudFormation. It contains pre-written modular and reusable cloud components known as constructs. Constructs are the basic building blocks representing one or more AWS CloudFormation resources and their configuration. They are available in different abstraction levels. L1 constructs are the lowest-level constructs which map directly to AWS CloudFormation resources without abstractions. L2 constructs are thoughtfully developed and provide a higher-level abstraction through an intuitive intent-based API. They leverage default property configurations, best practice security policies, and convenience methods that make it simpler and quicker to define and deploy resources.
Amazon EventBridge Scheduler is a serverless scheduler that allows users to create, run, and manage tasks from one central, managed service. With EventBridge Scheduler, users can create schedules using cron and rate expressions for recurring patterns, or configure one-time invocations. EventBridge supports templated and universal targets. Templated targets include common API operations across a group of core AWS services, such as publishing a message to an Amazon Simple Notification Service (Amazon SNS) topic or invoking an AWS Lambda function. Universal targets are customized triggers supporting more than 270 AWS services and over 6,000 API operations on a schedule. Users can use schedule groups to organize their schedules.
With the L2 constructs for Amazon EventBridge Scheduler and Targets, it becomes even simpler for users to configure and integrate those resources into their CDK applications. Let’s explore the benefits by looking at some examples.
Using the L2 EventBridge Scheduler construct
We introduce two use cases for the EventBridge Scheduler and Targets L2 constructs to demonstrate their usage within common scenarios. Each example is equipped with sample code, emphasizing the simplifications achieved by the L2 constructs.
Example 1 – One time reminder through Amazon SNS
In the first use case, users want to configure one-time notifications to receive reminders of their favorite conferences at a specific time, for example a user may want to set a reminder one month before the start of AWS re:Invent to be reminded of their participation.
The example below uses the EventBridge Scheduler construct with a templated Amazon SNS target. The target applies an on-time schedule configuration and is configured with an Amazon Simple Queue Service (Amazon SQS) dead-letter queue to capture and retry failed events. The schedule payload is encrypted using a customer-managed AWS Key Management Service (AWS KMS) key.
const snsTarget = new targets.SnsPublish(topic, {
   input: ScheduleTargetInput.fromObject({
     message: "Reminder: AWS re:Invent starts in one month.",
   }),
   deadLetterQueue: deadLetterQueue,
});

const schedule = new Schedule(this, "ReminderSchedule", {
  description:
     "This schedule publishes a one-time notification to an Amazon SNS topic.",
   schedule: ScheduleExpression.at(
     new Date(2025, 10, 1), // Nov 01, 2025
     cdk.TimeZone.AMERICA_LOS_ANGELES
   ),
   target: snsTarget,
   key: key,
});
From the code example, we can see that well-defined interfaces for ScheduleTargetInput, and ScheduleExpression make it easy to select matching configuration values.
The SnsPublish target and Schedule constructs seamlessly integrate with the existing L2 constructs for Amazon SNS, Amazon SQS, and Amazon KMS. They abstract away the gluing logic used to configure the target API operation, dead-letter queue, and encryption settings with correct references. Instead of manually crafting permissions, the construct generates an AWS Identity and Access Management (IAM) execution role with the minimum necessary permissions to interact with the templated target, as shown in the policy below.
The construct sets default properties. For example, it applies default configurations for the retry policy if not explicitly stated. As shown in Figure 1, the above defined schedule has been defined with a 1-day maximum event retention time and 185 maximum retries.
Example 2 – Start / Stop EC2 instance during business hours
In the second scenario, a recurring cron schedule is used to automatically stop Amazon EC2 instances during the business hours of a specific time zone.
The example below uses the EventBridge Scheduler construct with a universal target to perform the Amazon EC2 stopInstance API operation. It creates a custom schedule group to organize the schedules by time zone and allows an Amazon Lambda function to read all schedules in it for administrative purposes.
const group = new ScheduleGroup(this, "ScheduleGroup", {
  scheduleGroupName: "Europe-London",
});

new Schedule(this, "Schedule", {
  schedule: ScheduleExpression.cron({
minute: "0",
hour: "23",
timeZone: cdk.TimeZone.EUROPE_LONDON,
  }),
  target: new targets.Universal({
service: "ec2",
action: "stopInstances",
input: ScheduleTargetInput.fromObject({
  InstanceIds: [ec2Instance.instanceId],
}),
  }),
  scheduleGroup: group,
});

group.grantReadSchedules(lambdaFunction);
Similar to the first example, the ScheduleExpression and ScheduleTargetInput help users to define the correct input types. The universal target is one of the options allowed by the scheduler-target constructs that allow users to perform SDK API operations on AWS services such as Amazon EC2.
The ScheduleGroup construct is used to create the group, which is used as a property on the Schedule construct. The group implements convenience methods that allow simplified permissions management. The example above grants read permissions for the schedule group to an Amazon Lambda function, which is applied to the resources without additional configuration.
Community Shout-Outs
The CDK team would like to give a huge shout-out to the awesome members of the community that contributed to this construct to help get it where it is today! Thank you to:
In this post, we introduced the general availability of the AWS CDK L2 construct for Amazon EventBridge Scheduler and Targets. We showcased practical implementations of the new construct, leveraging two example use cases. For more details on the EventBridge Scheduler L2 construct and examples of its use, see the Scheduler CDK Documentation.
If you’re new to AWS CDK and want to get started, we highly recommend checking out the CDK documentation and the CDK workshop.
On May 30th, 2025, the AWS Cloud Development Kit (CDK) will no longer support Node.js 14.x and 16.x, which reached end of life on 4/30/2023 (14.x) and 9/11/2023 (16.x). This change applies to all AWS CDK components that depend on Node.js, including the AWS CDK CLI, the Construct Library, and broader CDK ecosystem projects such as JSII, Projen, and CDK8s.
We encourage you to upgrade to a Node.js Active Long Term Support (LTS) version, which is Node.js 22.x as of March 11th, 2025. Given that Node.js 14.x and 16.x are past end of life, we recommend migrating your CDK projects to newer Node.js LTS versions as soon as possible.
Why are we doing this?
Node.js 14x and 16.x are past their End of Life and are no longer supported by the Node.js community. This means that there have not been any bug fixes or security updates to these versions. To make sure that we are providing up-to-date and secure libraries, we will drop support for these versions.
What’s changing?
After May 30th, 2025, the AWS CDK will no longer support Node.js 14.x and 16.x. While your existing deployments may continue to work, we will not address issues specific to these versions. Any bug reports or support cases that stem from using Node.js 14.x or 16.x will require reproducing the issue on a supported version of Node.js (18.x, 20.x, 22.x – as of February 26th, 2025) before further assistance can be provided.
Key points
New features for the AWS CDK may rely on APIs or functionalities only available in supported versions of Node.js.
Critical security patches and fixes related to Node.js 14.x or 16.x will not be backported.
Compatibility testing will no longer be performed for Node.js 16.x, making it difficult to guarantee the CDK’s behavior with that runtime.
Timeline
March 11, 2025 through May 30, 2025
We will continue to support that arise for Node.js 14.x and 16.x during this period.
The AWS CDK is officially dropping support for Node.js 14.x and 16.x.
Any bug fixes or security patches will target only supported versions of Node.js (18.x, 20.x, 22.x – as of March 11th, 2025)
Version validation and update steps
Check your current Node.js version
Run node -v in your environment or CI/CD pipelines to see which version of Node.js you’re currently using.
Update your environment
Install or switch your runtime to Node.js using a supported version via a version manager (e.g., nvm) or by downloading an official installer from nodejs.org.
Validate your AWS CDK projects
Ensure your deployment scripts, and any third-party dependencies work correctly under a supported version. Test thoroughly in non-production environments.
Looking ahead
For more information on our deprecation strategy moving forward, please see this RFC, which provides more details.
Conclusion
This deprecation is part of our ongoing commitment to provide a secure, high-quality experience for AWS CDK users. By moving to a Node.js Active Long Term Support (LTS) version, you’ll benefit from improved performance, ongoing security patches, and continued AWS CDK innovations. If you have any questions or concerns about this deprecation, please reach out and open an issue in our GitHub repo.
The AWS Cloud Development Kit (CDK) is an open source framework that enables developers to define cloud infrastructure using a familiar programming language. Additionally, CDK provides higher level abstractions (Constructs), which reduce the complexity required to define and integrate AWS services together when building on AWS. CDK also provides core functionality like CDK Assets, which gives users the ability to bundle application assets into their CDK applications. These assets can be local files (main.py), directories (python_app/), or Docker images (Dockerfile). CDK Assets are stored in an Amazon Simple Storage Service (Amazon S3) Bucket or Amazon Elastic Container Registry (Amazon ECR) Repository that is created during CDK bootstrapping.
For CDK developers that leverage assets at scale, they may notice over time that the bootstrapped bucket or repository accumulated old or unused data. If users wanted to clean this data on their own, CDK didn’t provide a clear way of determining which data is safe to delete. To solve this problem, we are excited to announce the preview launch of CDK Garbage Collection, a new feature of the CDK that automatically deletes old assets in your bootstrapped Amazon S3 Bucket and Amazon ECR Repository, saving users time and money. This feature is available starting in AWS CDK version 2.165.0.
We expect CDK Garbage Collection to help AWS CDK customers save on storage costs associated with using the product while not affecting how customers use CDK.
Quickstart
CDK Garbage Collection is exposed as a CDK CLI command named gc. To use CDK Garbage Collection in its default configuration, run the following command on a terminal in your CDK application.
cdk gc --unstable=gc
The --unstable flag is meant to acknowledge that CDK Garbage Collection is in preview mode. This indicates that the scope and API of the feature might still change, but otherwise the feature is generally production ready and fully supported.
Walkthrough
CDK Garbage Collection works at the environment level, so it will attempt to delete isolated assets in the AWS account / region that you call it in. For the purposes of this walkthrough, you will be re-bootstrapping the environment with a custom qualifier so that you do not delete isolated assets before you are ready.
You now have a new bootstrap template under the name CDKToolkitDemo and bootstrap resources associated with it. Next, set up a CDK application with both Amazon S3 and Amazon ECR assets:
mkdir garbage-collection-demo && cd garbage-collection-demo
cdk init -l typescript app
Your next step is to replace the existing code In lib/garbage-collection-demo-stack.ts with the following CDK Stack:
import * as path from 'path';
import * as cdk from 'aws-cdk-lib';
import { Construct } from 'constructs';
import * as lambda from 'aws-cdk-lib/aws-lambda';

export class GarbageCollectionDemoStack extends cdk.Stack {
  constructor(scope: Construct, id: string, props?: cdk.StackProps) {
    super(scope, id, props);

    const fn1 = new lambda.Function(this, 'my-function-s3', {
    code: lambda.Code.fromAsset(path.join(__dirname, '..', 'lambda')),
    runtime: lambda.Runtime.NODEJS_LATEST,
    handler: 'index.handler',
    });

    const fn2 = new lambda.Function(this, 'my-function-ecr', {
    code: lambda.Code.fromAssetImage(path.join(__dirname, '..', 'docker')),
    runtime: lambda.Runtime.FROM_IMAGE,
    handler: lambda.Handler.FROM_IMAGE,
    });
  }
}
This creates two AWS Lambda functions, one which uses an Amazon S3 asset as its source code and one that uses an Amazon ECR image as its source code. You need to add the assets that are referenced to our CDK application. In lambda/index.js add a simple Lambda function:
At this point you can check to make sure that assets have been correctly added into the bootstrapped Amazon S3 bucket and Amazon ECR repository:
Two objects exist in the bootstrapped Amazon S3 Bucket after the initial AWS CDK Deploy.
One image exists in the bootstrapped Amazon ECR Repository after the initial AWS CDK Deploy.
The output shows that you have the data you expect in both bootstrapped resources. The Amazon S3 Bucket also stores the json file of the AWS CloudFormation Template that was generated when you ran cdk deploy.
You can now simulate a typical CDK development cycle by updating both assets. Add a small change to the Amazon S3 asset that lives in lambda/index.js:
FROM public.ecr.aws/docker/library/alpine:latest
CMD echo 'Hello World'
You can now run cdk deploy again, and both assets should be re-uploaded under a new hash.
Four objects exist in the bootstrapped Amazon S3 Bucket after the second AWS CDK Deploy.
Two images exist in the bootstrapped Amazon ECR Repository after the second AWS CDK Deploy.
This output confirms that everything is as expected and the new assets have been added in. Because you are using new bootstrapped resources, you can still tell which resources are currently isolated and which are not. Right now, only the zipfile prefixed with 50f409b9 is referenced in AWS CloudFormation, and in Amazon ECR, only the image prefixed a5801b5b is referenced. That means that every other asset — 3 objects in Amazon S3 and 1 object in Amazon ECR — are isolated and can be deleted.
One item to note is the additional files in Amazon S3 that are not your local assets — these are AWS CloudFormation templates that are uploaded to Amazon S3 as an intermediary step before being sent to AWS CloudFormation. They are not needed after being copied over and are a perfect candidate for deletion via CDK Garbage Collection.
Here is where CDK Garbage Collection comes in. With the right parameters, you are able to clean up the isolated objects while not disturbing the assets that are actively in use.
Because you want to delete assets immediately, and not tag them for deletion later, set rollback-buffer-days to 0. You also want to delete assets that were just created, so be sure to set created-buffer-days to 0 as well. The default for created-buffer-days is 1.
 ⏳ Garbage Collecting environment aws://912331974472/us-east-1...
Found 3 objects to delete based off of the following criteria:
- objects have been isolated for > 0 days
- objects were created > 0 days ago

Delete this batch (yes/no/delete-all)?
CDK Garbage Collection found three assets to be deleted from Amazon S3, which is to be expected. It prompts you to verify that you want to delete, which you do, so enter yes. You will then get this response:
Found 1 image to delete based off of the following criteria:
- images have been isolated for > 0 days
- images were created > 0 days ago

Delete this batch (yes/no/delete-all)?
Once again, this is to be expected for Amazon ECR, so you enter yes again. You then get the response:
At this point, CDK Garbage Collection is finished.
Details
CDK Garbage Collection exposes some parameters to help you customize the experience to your specific scenario. These options help you determine how aggressive you want your garbage collection to be.
rollback-buffer-days: this is the amount of days an asset has to be marked as isolated before it is eligible for deletion.
created-buffer-days: this is the amount of days an asset must live before it is eligible for deletion.
Rollback Buffer Days should be considered when you are not using cdk deploy and instead use a deployment method that operates on templates only, like a pipeline. If your pipeline can rollback without any involvement of the CDK CLI, this parameter will help ensure that assets are not prematurely deleted. When used, instead of deleting unused objects, cdk gc tags them with the current date. Subsequent runs of cdk gc will check this tag and delete the asset only after it has been tagged for longer than the specified buffer days.
Created Buffer Days should be considered if you want to be extra safe about assets that have been recently uploaded. When used, cdk gc filters out any assets that have not persisted that number of days. Note that this may not include assets that have been shared across multiple CDK Apps CDK reuses assets that are identical, and its possible that a recent deploy of a CDK App references an asset that was uploaded earlier.
For example, if you want to ensure that only assets that are over a month old and have been isolated for a week are deleted, you can specify:
Decision flow diagram of an asset as it gets audited for garbage collection.
Limitations of CDK Garbage Collection
During CDK Garbage Collection, we collect all stack templates to see what assets are in use. If garbage collection runs between the asset upload and stack deployment, there is a chance that it does not pick up the latest stack deployment, but it does pick up the latest asset. In this scenario, CDK Garbage Collection may delete those assets.
We recommend not deploying stacks while running CDK Garbage Collection. If that is unavoidable, setting --created-buffer-days will help as garbage collection will avoid deleting assets that are recently created. Finally, if you do experience a failed deployment, the mitigation is to redeploy, as the asset upload step will be able to re-upload the missing asset. In practice, this race condition is only for a specific edge case and unlikely to happen. However, we are working on a new method of storing CDK Assets to reduce the risk of this race condition. That work is being tracked in this issue.
Conclusion
CDK Garbage Collection helps users manage the lifecycle of unused CDK Assets in their AWS account. As users continue to scale with the CDK, tools like CDK Garbage Collection will play a crucial role in maintaining clean, efficient, and cost-effective cloud environments. We encourage CDK users to explore this feature, provide feedback, and incorporate it into their workflows to optimize their AWS resource management.
AWS CloudFormation enables you to model and provision your cloud application infrastructure as code-base templates. Whether you prefer writing templates directly in JSON or YAML, or using programming languages like Python, Java, and TypeScript with the AWS Cloud Development Kit (CDK), CloudFormation and CDK provide the flexibility you need. For organizations adopting multi-account strategies, CloudFormation StackSets offers a powerful capability to deploy resources across multiple regions and accounts in parallel.
Last year, we delivered broad set of enhancements that accelerated the development cycle, simplified troubleshooting, and introduced new deployment safety and configuration governance capabilities. Let’s dive into the key launches that shaped CloudFormation in 2024.
Development cycle improvements
Deploy stacks up to 40% faster with optimistic stabilization and configuration complete
In March, we introduced optimistic stabilization with the new CONFIGURATION_COMPLETE event, delivering up to 40% faster stack creation times. This new event signals that CloudFormation has created the resource and applied the configuration as defined in the stack template, allowing us to begin parallel creation of dependent resources. For example, if your stack contains resource B that depends on resource A, CloudFormation will now start provisioning resource B when resource A reaches the CONFIGURATION_COMPLETE state, rather than waiting for full stabilization. Read How we sped up AWS CloudFormation deployments with optimistic stabilization to learn more.
Figure 1: CloudFormation’s old and new deployment strategy
Catch template errors before deployment with early validation
In March, we launched early resource properties validation checks. This feature validates your stack operation upfront for invalid resource property errors, helping you fail fast and minimize the steps required for a successful deployment. Previously, you had to wait until CloudFormation attempted to provision a resource before discovering property-related errors. Now, we validate your template before deploying the first resource and provide clear error messages upfront.
Figure 2: CloudFormation’s early template properties validation feature
Safely clean up failed stacks with enhanced deletion controls
In May, we enhanced the DeleteStack API with a new DeletionMode parameter, allowing you to safely delete stacks that are in DELETE_FAILED state. By passing the FORCE_DELETE_STACK value to this parameter, you can now resolve stuck stacks more efficiently during your development and testing cycles.
Accelerate feedback loops with CloudFormation custom resource timeout controls
In June, we introduced the ServiceTimeout property for custom resources. This new capability allows you to set custom timeout values for your custom resource logic execution. Previously, custom resources had a fixed one-hour timeout, which could lead to long wait times when debugging custom resource logic. Now, you can set appropriate timeout values to accelerate your development feedback loops. Refer to the custom resourcesdocumentation to learn more about the ServiceTimeout property.
Figure 3: CloudFormation’s ServiceTimeout property for Custom resource
Streamlined Troubleshooting Experience
Resolve deployment issues faster with one-click CloudTrail access
In May, we launched integration with AWS CloudTrail in the Events tab of the CloudFormation console. Troubleshooting some failed stack operations can be time-consuming, so we have streamlined this process by providing direct links from stack operation events to relevant CloudTrail events. When you click ‘Detect Root Cause’ in the CloudFormation Console, you’ll now see a pre-configured CloudTrail deep-link to the API events generated by your stack operation, eliminating multiple manual steps from the troubleshooting process.
Figure 4: CloudFormation troubleshooting with CloudTrail integration
Visualize your entire deployment process with timeline view
In November, we launched deployment timeline view. It gives you unprecedented visibility into your stack operations. This visual tool shows the sequence of actions CloudFormation takes during a deployment, helping you understand resource dependencies and provisioning duration. You can see which resources are being created in parallel, track their status through color-coding, and quickly identify bottlenecks in your deployments.
Get instant troubleshooting help with Amazon Q Developer
We integrated Amazon Q Developer to provide AI-powered assistance for troubleshooting. When you encounter a failed stack operation, you can now click “Diagnose with Q” to receive a clear, human-readable analysis of the error. Need more help? The “Help me resolve” button provides actionable steps tailored to your specific scenario.
Figure 6: CloudFormation troubleshooting with Q feature
We’ve also improved how change sets handle references. When referenced values are available before deployment, Change sets can now resolve them to their expected values, giving you a more accurate preview of your planned changes.
Figure 7: CloudFormation’s change sets feature
Easy onboarding to Infrastructure-as-Code (IaC)
Eliminate weeks of manual effort with IaC Generator
In February, we launched the CloudFormation IaC Generator, a capability addressing one of our customers’ biggest challenges: onboarding existing cloud resources to CloudFormation. This feature makes it easier to generate CloudFormation templates for existing AWS resources. You can now onboard workloads to IaC in minutes instead of spending weeks writing templates manually.
The IaC generator supports over 600 AWS resource types and provides recommendations for related resources. For instance, when you select an S3 bucket, it automatically suggests including associated bucket policies. You can use the generated templates to import resources into CloudFormation, download them for deployment.
Figure 8: CloudFormation’s IaC Generator
In August, we enhanced the IaC Generator with two improvements. First, we added a graphical summary view that helps you quickly find resources after the account scan completes. Second, we integrated with AWS Infrastructure Composer to visualize your application architecture, making it easier to understand resource relationships and configurations.
Figure 9: IaC generator resource scan
Proactive Control Improvements
In November, we launched major enhancements to CloudFormation Hooks, giving you easier ways to author proactive configuration controls and more points to enforce them with your cloud infrastructure provisioning.
CloudFormation Hooks for stack and change set target invocation points
First, we introduced stack and change set target invocation points for CloudFormation Hooks. This extends Hooks beyond individual resource validation, allowing you to run validation checks against entire templates and examine resource relationships. For example, you can now create hooks that validate architectural patterns across multiple resources or enforce team-specific deployment standards. With the change set invocation point, you can automate your change set reviews and reduce the time needed to resolve compliance issues. Refer to the Hooks developer guide to learn more.
Figure 10: CloudFormation’s Hooks for stack and change set target invocation points
Managed hooks for the CloudFormation Guard domain specific language
We introduced the managed hooks to author configuration controls using CloudFormation Guard domain-specific language. This simplifies the hook creation process—you can now write hooks by providing your Guard rule set stored as an S3 object. This is particularly valuable if you’re already using Guard for static template validation, as you can extend these rules to dynamic checks before deployments. To learn more about the Guard hook, check out the AWS DevOps Blog or refer to the Guard Hook User Guide.
Figure 11: CloudFormation Hooks’ Guard language feature
Figure 12: CloudFormation Hooks’ Lambda function feature
CloudFormation Hooks for AWS Cloud Control API target invocation points
Lastly, we extended Hooks to support AWS Cloud Control API (CCAPI) resource configurations. This means your existing resource Hooks can now evaluate configurations from CCAPI create and update operations, allowing you to standardize your proactive control evaluation regardless your IaC tool. If you’re already using pre-built Lambda or Guard hooks, you simply need to specify “Cloud_Control” as a target in your hooks’ configuration to extend their coverage. Learn the detail of this feature from this AWS DevOps Blog. Figure 13: CloudFormation Hooks for AWS Cloud Control API target invocation point
Additional Platform Improvements
StackSets ListStackSetAutoDeploymentTargets API
In March, we enhanced StackSets with the ListStackSetAutoDeploymentTargets API. This new capability gives you better visibility into your auto-deployment configurations by allowing you to list existing target Organizational Units (OUs) and AWS Regions for a given stack set. Instead of logging into individual accounts to understand your deployment scope, you can now get this information in a single API call.
CloudFormation Git sync with request review support
In September, we improved CloudFormation Git sync with pull request workflow support. When you create or update a pull request in a linked repository, CloudFormation automatically posts change set information as PR comments. This integration provides a clear overview of proposed changes within your familiar Git workflow, allowing team members to review infrastructure changes alongside code changes. Visit our user guide and launch blog to learn more.
Figure 14: CloudFormation Git sync with request review support feature
Early 2025 improvements
Reshape your AWS CloudFormation stacks seamlessly with stack refactoring
In February 2025, CloudFormation introduced a new capability called stack refactoring that makes it easy to reorganize cloud resources across your CloudFormation stacks. Stack refactoring enables you to move resources from one stack to another, split monolithic stacks into smaller components, and rename the logical name of resources within a stack. This enables you to adapt your stacks to meet architectural patterns, operational needs, or business requirements. To explore an example scenario, read Introducing AWS CloudFormation Stack Refactoring.
Learn more
Here are some resources to help you get started learning and using CloudFormation to manage your cloud infrastructure:
As we are starting 2025, our focus remains on making infrastructure deployment faster, safer, and more manageable. These enhancements reflect our commitment to solving real customer challenges and improving the CloudFormation experience. We are excited about the roadmap ahead and look forward to bringing you more innovations in 2025.
We encourage you to try these new features and share your feedback. For more detailed information about any of these launches, visit our documentation or check out the AWS DevOps Blog.
Recently, we launched a new AWS Cloud Development Kit (CDK) L2 construct for Amazon CloudFront Origin Access Control (OAC). This construct simplifies the configuration and maintenance of securing Amazon Simple Storage Service (Amazon S3) CloudFront origins with CDK. Launched in 2022, OAC is the recommended way to secure your CloudFront distributions due to additional security features compared to the legacy Origin Access Identity (OAI). This new construct makes it easier for you to use the latest origin access best practices to build and manage your CloudFront distributions.
CDK is an open-source software development framework for defining cloud infrastructure in code and provisioning it through AWS CloudFormation. A primary part of CDK is the AWS CDK Construct Library which is a collection of pre-written constructs. Constructs are the basic building blocks of CDK applications. They help reduce the complexity required to define and integrate AWS services together.
There are different levels of constructs, starting with Level 1 (L1) which map directly to a single CloudFormation resource and offer no abstraction. L1 constructs are auto-generated, which means you can build any CloudFormation resource using CDK. The power of the CDK starts with Level 2 (L2) and higher constructs. L2 constructs, also known as curated constructs, are developed by the CDK team and provide a higher-level abstraction through an intuitive intent-based API. You can read more about constructs and their benefits in the CDK user guide.
In this post we’ll explore:
The reasoning behind the creation of a new L2 construct for OAC
How to use the new OAC construct
How to migrate from the legacy OAI construct to the new OAC construct
Background
Amazon CloudFront is a global content delivery network that reduces latency by delivering data to viewers anywhere in the world. CloudFront can connect to different types of locations or origins, such as S3, AWS Lambda function URLs, and custom origins. A full list of supported origins can be found in the CloudFront user guide.
At launch, the new L2 construct supports OAC with S3 origins. Using OAC with S3 allows you to keep your S3 bucket private, yet accessible, through CloudFront. This forces users to access content only through CloudFront where other security features can be applied, like AWS WAF.
There are two ways to restrict buckets to only CloudFront, using OAI (legacy) or OAC (recommended). Both OAI and OAC allow you to secure your buckets, but OAC offers additional benefits, including support for:
Enhanced security practices like short term credentials, frequent credential rotations, and resource-based policies
Prior to this release, customers had to piece together L1 constructs as well as use escape hatches in order to implement OAC.
The introduction of the new L2 construct simplifies the process by enhancing abstraction and reducing complexity. It makes it easy to use OAC while still offering the flexibility to customize all existing properties available by building with L1’s.
Let’s see the construct in action!
Using the L2
We modified the existing CloudFront Origins L2 to add OAC support. With this change, the S3Origin class has been deprecated in favor of S3BucketOrigin for standard S3 origins, and S3StaticWebsiteOrigin for static website S3 origins.
Using OAC with a standard S3 origin is as simple as passing your bucket as a parameter to the new S3BucketOrigin class using the withOriginAccessControl method.
In the example below, we define a private bucket and let the new L2 construct handle all the OAC configuration for us.
const s3bucket = new s3.Bucket(this, "myBucket", {
    bucketName: `${cdk.Stack.of(this).stackName.toLowerCase()}-oacbucket`,
    blockPublicAccess: s3.BlockPublicAccess.BLOCK_ALL,
    accessControl: s3.BucketAccessControl.PRIVATE,
    enforceSSL: true,
});

const distribution = new cloudfront.Distribution(this, "myDist", {
    defaultBehavior: {
        origin: origins.S3BucketOrigin.withOriginAccessControl(s3bucket),
    }
});
This code defines a S3 bucket configured to block all public access, enforces SSL, and uses private access control. It also defines a CloudFront distribution with the S3 bucket as its origin using the default OAC settings from the OAC construct. By default, the signing behavior is set to “always” and the signing protocol to “sigv4” as is shown below:
Figure 1 – Default OAC Settings for the S3 Origin
In typical CDK fashion, the L2 provides sane defaults out-of-the-box but allows you to customize. Some examples of customizing with the L2, include:
Granting permissions for dynamic requests (write/delete access)
Migrating to the new construct but continuing to use OAI
S3 Origin with Customer Managed KMS
It is a recommended security best practice to encrypt S3 objects at rest. As detailed in the S3 user guide, using SSE-KMS gives you additional flexibility to meet encryption-related compliance requirements.
If using SSE-KMS, CloudFront must have permission to at least decrypt objects using your AWS KMS key. With the new changes, simply configure your bucket to use an AWS KMS key and the construct will take care of the permissions updates.
The following example shows how to create an SSE-KMS encrypted S3 bucket and use it as a CloudFront origin with OAC:
Create an AWS KMS Key.
Create the S3 Bucket with the encryptionKey property set to the AWS KMS key and encryption as KMS.
Create the CloudFront distribution and use the new S3BucketOrigin class with OAC.
const kmsKey = new kms.Key(this, "myKey");

const myBucket = new s3.Bucket(this, 'myEncryptedBucket', {
  encryption: s3.BucketEncryption.KMS,
  encryptionKey: kmsKey,
  objectOwnership: s3.ObjectOwnership.BUCKET_OWNER_ENFORCED,
});

new cloudfront.Distribution(this, 'myDist', {
  defaultBehavior: {
    origin: origins.S3BucketOrigin.withOriginAccessControl(myBucket)
  },
});
Due to circular dependencies between the bucket, the KMS key, and the CloudFront distribution, when we synthesize the above code, a warning message similar to the following may appear:
To avoid a circular dependency between the KMS key, Bucket, and Distribution during the initial deployment, a wildcard is used in the Key policy condition to match all Distribution IDs.
After the initial deployment, it is recommended to further restrict the policy to adhere to security best practices. Here is an example of how to use an escape hatch to update the policy:
Note: update the existing KMS Key policy to include the statements in scopedDownKeyPolicy
const scopedDownKeyPolicy = {
    Version: "2012-10-17",
    Statement: [
        {
            Effect: "Allow",
            Principal: {
                AWS: `arn:aws:iam::${this.account}:root`,
            },
            Action: "kms:*",
            Resource: "*",
        },
        {
            Effect: "Allow",
            Principal: {
                Service: "cloudfront.amazonaws.com",
            },
            Action: ["kms:Decrypt", "kms:Encrypt", "kms:GenerateDataKey*"],
            Resource: "*",
            Condition: {
                StringEquals: {
                    "AWS:SourceArn": `arn:aws:cloudfront::${this.account}:distribution/<Distribution ID>`//replace <Distribution ID> with the ID of the deployed CloudFront Distribution
                },
            },
        },
    ],
};

const cfnKey = kmsKey.node.defaultChild as kms.CfnKey;
cfnKey.addOverride("Properties.KeyPolicy", scopedDownKeyPolicy);
Considerations when migrating to the new construct
If you have an existing OAI implementation using the now-deprecated S3Origin class, switching to OAC has potential for application downtime. CloudFront could temporarily lose access to the S3 bucket while the CloudFormation is deploying.
To avoid downtime, it is recommended to perform the upgrade across multiple deployments. This will explicitly give CloudFront permissions to both OAC and OAI in the S3 bucket policy before the migration is performed.
At a high level, the three steps are:
Deployment 1: update the bucket policy to explicitly allow CloudFront access
Deployment 2: switch to the new construct
Deployment 3: optionally remove the code that updated the bucket policy in step 1
For detailed instructions, see the Migrating from OAI to OAC section of the CDK API docs.
Conclusion
In this post, we introduced the new AWS CDK L2 construct for Amazon CloudFront Origin Access Control (OAC), highlighting the advantages of using OAC instead of OAI to secure your Amazon S3 CloudFront origins. We showcased practical implementations of the new construct, focusing on using defaults of the L2 construct along with how to customize for your use case.
To summarize, the new L2 construct and OAC offers these benefits:
Simplified configuration: the L2 construct simplifies the process of configuring OAC in your CDK application to set up secure access controls between CloudFront and S3 buckets
Using SSE-KMS encryption: the L2 construct will automatically add the IAM policy statement to the AWS KMS key to allow access to OAC
Ability to customize: the L2 construct offers properties to override defaults, like changing the signing behavior
Easily migrate from OAI to OAC: the L2 construct offers options to migrate from OAI to OAC based on your application’s downtime tolerance
At launch, the construct supports an Amazon S3 origin. If there is a particular origin that you are looking to see added to the construct library for OAC, please submit a feature request issue in the aws-cdk GitHub repo. For example, if you are interested in Lambda support for OAC, add your feedback to this feature request.
If you’re new to CDK and want to get started, we highly recommend checking out the CDK documentation and the CDK workshop.
Any organization that manages software libraries and applications needs a standardized way to catalog, reference, import, fix bugs and update the versions of those libraries and applications. Semantic Versioning enables developers, testers, and project managers to have a more standardized process for committing code and managing different versions. It’s benefits also extend beyond development teams to end users by using change logs and transparent feature documentation. This alleviates the operational burden of communicating changes for each release cycle.
In this post, we dive deep into how Semantic Versioning works and how to use the NodeJS package semantic-release/npm in a GitHub Actions continuous integration and continuous delivery (CI/CD) pipeline to automatically version an Amazon Web Services (AWS) Cloud Development Kit (AWS CDK) project. Once we’re done, you’ll be ready to deliver AWS CDK projects that are automatically versioned so your team can focus more on code instead of versioning for each release.
How does Semantic Versioning work?
With Semantic Versioning, version number changes convey a specific meaning about the underlying code change. This helps others to understand what has changed from one version to the next.
Semantic Versioning is defined in a Major.Minor.Patch format, which is a guideline to track the scope and potential impact of changes for feature development, major updates and bug fixes. The Major version number change signifies that this release will have breaking changes and any upgrade to this version should be validated for backward compatibility. The Minor version number change signifies a feature release in a backward-compatible manner. Finally, the Patch version number signifies a small insignificant change or a bug fix and users can upgrade to this version without introducing breaking changes or new features.
Each version number is always incremented by one digit and when a higher digit increments, the lower digits reset to zero. For example, version 1.5.2 means that the software is in its first major version, and has released 5 features with 2 patches implemented. When a new feature is added, it will be released as version 1.6.0. If there are any bugs reported and a fix is release for that bug, the next release version will be 1.6.1. For a version 2.0.0 release there will be breaking changes, and may not be backward compatible with previous 1.x.x versions.
What is semantic-release?
Now that we have covered how Semantic Versioning works, and why it’s useful in software projects, let’s review semantic-release. It is a Node.js tool that simplifies Semantic Versioning management. Semantic-release can do more than just apply Semantic Versioning to your projects. With a variety of plugins available, you can track what sort of changes are being made with commit analysis or by generating a changelog for each release. This automates what would otherwise have been a manual and time-consuming process to create and review roadmaps and documentation tracking the new features and fixes that comprise a release. Semantic-release is also straightforward to integrate with CI tools such as GitHub Actions, GitLab CI, Travis CI, and CircleCI 2.0 workflows.
Unfortunately, if your commit messages don’t match the format semantic-release requires, the automatic versioning won’t work correctly. To verify that commit messages are in the right format, you can integrate tools such as commitizen or commitlint, which can validate that commit messages are in a valid format.
Using semantic-release
Commit message formats
By default, semantic-release uses Angular Commit Message Conventions, however the commit message format can be altered by using config options. Let’s take a quick look at the three different types of commit messages, fixes, features, and breaking changes.
Patches and fixes
For patch or fix commits, you need to start your commit message with “fix(context):”. This tells semantic-release that this is a minor patch—meaning that if your version is 0.0.1, after this commit is merged the version will be incremented to 0.0.2. Following is an example commit message.
fix(printer): inform user when printer is out of paper
Features
Feature commit messages start with “feat(context):” which indicates to semantic-release that this is a feature release, also referred to as a minor release. If your version is 0.1.0, after a feature commit is merged, the version will be incremented to 0.2.0. Following is an example of a feature commit.
feat(printer): add option for printing in color
Breaking changes
Breaking change commits are intended for marking a major breaking change—meaning that the commit introduces changes that are not compatible with existing or previous versions. The way that commit messages are marked as breaking changes is slightly different than the previous commit types. For a breaking change, the commit footer needs to include “BREAKING CHANGE:”. For example, a breaking change commit, might look like the following.
perf(printer): remove color printing option
BREAKING CHANGE: The color printing option has been removed. The default black and white printing option is always used for performance reasons.
Release change log
To generate a release change log, we only need to add the semantic-release/changelog plugin to the package.json file. We’ll demonstrate how to do this in the next section.
Adding Semantic Release to an AWS CDK project
To demonstrate semantic-release in action we will build an example with AWS CDK and the NPM semantic-release library. All code provided in the remainder of this blog can be found in the semantic-versioning demo repository (aws-cdk-semantic-release) on GitHub.
To get started we’ll need to create a Node.js CDK application, add semantic-release and its plugins, commit changes, then build the project. If you don’t have AWS CDK installed yet, check out the Getting Stated with CDK guide.
To begin, navigate to the folder where the project will be saved. Next, we initialize a new AWS CDK project and add semantic-release. Then, we configure the branches that Semantic Versioning should be applied to and add a few NPM plugins to extend the functionality of semantic-release. While there are many plugins available, only a few are needed to get started. Below, we’ll walk through which plugins to install and how to install them.
Initiate a new AWS CDK Typescript project and add semantic-release
In a command terminal, navigate to the folder where you want to store your AWS CDK project and run the following three commands. The first line will create the project and the next two will install the semantic-release NPM and Git plugins in the AWS CDK project.
We need to tell NPM which branches can trigger a new release. In the example we’ll use the main branch and the staging branches for release. We will add a new section to the package.json file along with the branches we want to use for releases.
"release": {
  "branches": ["main"]
}
Add supporting plugins to package.json
In order for semantic-release to pick up commits, generate release notes, and be able to perform a release with GitHub we need to add the commit-analyzer, release-notes-generator, changelog, NPM, Git, and GitHub plugins. Add the following plugins section to the package.json file after the “release” section we added in the previous step.
Now that we have everything configured, new merges and commits to the main branch will kick off a CI/CD pipeline through GitHub Actions that builds the project and increments the version. To verify that everything is working correctly, we’ll alter the CDK code to include an AWS Lambda function. Afterward, we’ll commit changes to the main branch to verify that semantic-release is working correctly.
Make a change, commit, push and verify
In the AWS CDK project lib/aws-cdk-semantic-release-stack.ts file we’ll update the visibilityTimeout duration to 600, then commit the changes. We want to be sure to use the Semantic Versioning format for the commit message so that our changes are versioned correctly. For this we use the following commit message.
“fix(sqs-visibility): increased visibility timeout to 600”
After committing the changes, we push the changes to the remote GitHub repository to initiate the GitHub Actions build process. Once the build is complete, we see that the build number has been incremented from the previous version. You can review the releases for the sample code to see how it has been versioned. Following are examples of what it should look like before and after executing this. Please note that the version numbers depicted may not match yours.
Screenshot of GitHub releases page showing release 1.0.0 and the associated features changelog
Figure 1 – Before the new commits
Screenshot of GitHub releases page showing a previous release and the latest release along with their respective versions of 1.1.0 and 1.1.1
Figure 2 – After GitHub Actions generates a new build
Conclusion
Semantic Versioning offers a structured and reliable way to manage software changes. When paired with the significant benefits of using Node.js packages like semantic-release, version management can become effortless. All of this enables automated version management Node.js projects such as AWS CDK pipelines for automated code deployment. It enhances clarity, stability, and collaboration, while also supporting automation and fostering user confidence.
By adopting Semantic Versioning, development teams can achieve more predictable and efficient workflows, ultimately leading to higher quality software. It also builds confidence among users without going into much details with respect to software upgrades and backward compatibility. As a best practice, start incorporating Semantic Versioning for existing and future applications.
Contact an AWS Representative to know how we can help accelerate your business.
Reference
CDK setup and deployment of application with CDK V2 Construct:
For several years, AWS Solutions Constructs have helped thousands of AWS Cloud Development Kit (CDK) users accelerate their creation of well-architected workloads by providing small, composable patterns linking two or more AWS services, such as an Amazon S3 bucket triggering an AWS Lambda function. Over this time, customers with use cases that don’t match an existing Solutions Construct have expressed a desire to create individual well-architected resources directly. Solutions Constructs Factories allow clients to create well-architected individual resources using the same internal code that Solutions Constructs use when composing larger patterns. While deploying a single AWS resource using the AWS CDK is often a trivial task, deploying that resource following all the best practices requires more knowledge and effort. For instance, a properly configured S3 bucket should include versioning, encryption, access logging, bucket policies allowing only TLS calls, and lifecycle policies. The AWS Solutions Constructs S3BucketFactory()method implements a fully well-architected CDK S3 bucket with all the best practices configured, including an additional bucket to hold S3 Access Logs. At the same time, every aspect of each resource can be overridden to satisfy any unique requirements for your use case. Best of all, the resources created are all standard CDK L2 constructs that integrate with any CDK stack.
Solutions Constructs Factories are a new feature of AWS Solutions Constructs, a library of common architectural patterns built on top of the AWS CDK. These multi-service patterns allow you to deploy multiple resources with a single CDK Construct. Solutions Constructs follow best practices by default – both for the configuration of the individual resources as well as their interaction. While each Solutions Construct implements a very small architectural pattern, they are designed so that multiple constructs can be combined by sharing a common resource. For instance, a Solutions Construct that implements an S3 bucket invoking a Lambda function can be deployed along with a second Solutions Construct that deploys a Lambda function that writes to an Amazon SQS queue by sharing the same Lambda function between the two constructs. There are currently over 70 Solutions Constructs available, covering Amazon API Gateway, Amazon Simple Storage Service (S3), Amazon SNS, Amazon Simple Queue Service (SQS), AWS Lambda, AWS Secrets Manager, IoT, Amazon ElasticCache, AWS Step Functions, AWS Fargate, AWS WAF, Application Load Balancers, Amazon Kinesis, Amazon Data Firehose, Amazon Sagemaker, AWS Elemental Mediastore, and more.
The AWS CDK provides a programming model above the static AWS CloudFormation template, representing all AWS resources with instantiated objects in a high-level programming language. When you instantiate CDK objects in your Typescript (or other language) code, the CDK “compiles” those objects into a JSON template, then deploys that template with CloudFormation. The use of programming languages such as Typescript or Python rather than the declarative YAML or JSON allows much more flexibility in defining your infrastructure. If you are not yet familiar with the AWS CDK you should check it out.
Infrastructure as Code Abstraction Layers
How Constructs Factories Work
This demo will guide you through building a small CDK stack that uses one of the new Solutions Constructs Factories. The app will use a factory to create an S3 bucket that fully implements all the recommended best practices with a single function call.
First, create a Typescript CDK app and install the Solutions Constructs libraries:
md factories-blog
cd factories-blog
cdk init -l=typescript
npm install @aws-solutions-constructs/aws-constructs-factories
Next, open lib/factories-blog-stack.ts, delete the comments and add the indicated new lines of code:
import * as cdk from 'aws-cdk-lib';
import { Construct } from 'constructs';
// Add this import statement:
import { ConstructsFactories } from '@aws-solutions-constructs/aws-constructs-factories';

export class FactoriesBlogStack extends cdk.Stack {
  constructor(scope: Construct, id: string, props?: cdk.StackProps) {
    super(scope, id, props);

    // Add these two lines
    const factories = new ConstructsFactories(this, 'constructs-factories');
    const response = factories.s3BucketFactory('default-bucket', {});
  }
}
Now build and deploy the app:
npm run build
cdk deploy
A key consideration for Constructs Factories is that the resources they create integrate seamlessly with the rest of your CDK stack. That’s why factories are implemented as methods that return standard AWS CDK L2 constructs rather than L3 constructs. Instantiating the ConstructsFactories object gives you access to the factory methods, but on its own adds nothing to your stack. In this case you called s3BucketFactory(), passing two arguments: a string id upon which all resource names will be based, and an empty S3BucketFactoryProps object. The method added 4 resources to your CDK stack. You can explore everything this app just deployed either in the console or through the synthesized template in ./cdk.out. Here’s a synopsis of what you’ll find:
An S3 bucket for storage (the goal of the call), with the following configuration:
AES-256 server side encryption
All public ACLs and policies blocked
Versioning enabled
A bucket policy blocking all access not via aws:SecureTransport (TSL)
Access logging enabled to a separate bucket
A lifecycle rule transitioning non-current versions to Glacier after 90 days
A second S3 bucket to contain the access logs, with a similar configuration:
AES-256 server side encryption
All public ACLs and policies blocked
Versioning enabled
A bucket policy blocking all access not via aws:SecureTransport (TSL)
A single call has deployed two resources with all best practices configured by default! As most workloads have some unique requirements, all of these resources can be customized to integrate into the overall stack. Diving a little deeper, recall the empty S3BucketFactoryProps object you passed to the factory call. The S3BucketFactoryProps argument allows you to send any properties to override the default settings for the main bucket and the logging bucket. For instance, if you need the bucket to send notifications to EventBridge you can enable that through the properties:
Second, the factory call returned an S3FactoryResponse object, which exposes standard CDK L2 Bucket constructs for both the main and logging buckets (you can also access the new BucketPolicies through these Bucket constructs).
const arn = response.s3Bucket.bucketArn;
Available Factories
The first release of Solutions Constructs Factories focuses on services where configuring a resource according to best practices requires the launch of additional resources, or other additional complexity. We currently support 3 different resources:
CloudWatch logs names prefixed with /aws/vendedlogs/ and unique to your stack, avoiding any issues with resource policy size without risk of name collisions in your account.
A DLQ configured to accept messages that can’t be processed
A resource policy ensuring that only the queue owner can perform operations on the queue
Conclusion
A single call to an AWS Solutions Constructs Factory deploys a resource with all best practice settings, as well as any additional infrastructure required to make the resource part of a well-architected application. Since the factories return standard AWS CDK L2 constructs, you can use them in any new or existing CDK stack. The first Solutions Constructs Factories were launched earlier this year and more will be added soon. If you have factories you’d like to see implemented, enter an Issue on the Solutions Constructs github page. The next time you launch any of these three resources in a stack, try using a Constructs factory – you may never directly instantiate a CDK construct again.
Did you know that Amazon Q Developer, a new type of Generative AI-powered (GenAI) assistant, can help developers and DevOps engineers accelerate Infrastructure as Code (IaC) development using the AWS Cloud Development Kit (CDK)?
IaC is a practice where infrastructure components such as servers, networks, and cloud resources are defined and managed using code. Instead of manually configuring and deploying infrastructure, with IaC, the desired state of the infrastructure is specified in a machine-readable format, like YAML, JSON, or modern programming languages. This allows for consistent, repeatable, and scalable infrastructure management, as changes can be easily tracked, tested, and deployed across different environments. IaC reduces the risk of human errors, increases infrastructure transparency, and enables the application of DevOps principles, such as version control, testing, and automated deployment, to the infrastructure itself.
There are different IaC tools available to manage infrastructure on AWS. To manage infrastructure as code, one needs to understand the DSL (domain-specific language) of each IaC tool and/or construct interface and spend time defining infrastructure components using IaC tools. With the use of Amazon Q Developer, developers can minimize time spent on this undifferentiated task and focus on business problems. In this post, we will go over how Amazon Q Developer can help deploy a fully functional three-tier web application infrastructure on AWS using CDK. AWS CDK is an open-source software development framework to define cloud infrastructure in modern programming languages and provision it through AWS CloudFormation.
Amazon Q Developer is a generative artificial intelligence (AI)-powered conversational assistant that can help you understand, build, extend, and operate AWS applications. You can ask questions about AWS architecture, your AWS resources, best practices, documentation, support, and more. Amazon Q Developer is constantly updating its capabilities so your questions get the most contextually relevant and actionable answers.
In the following sections, we will take a real-world three-tier web application that uses serverless architecture and showcase how you can accelerate AWS CDK code development using Amazon Q Developer as an AI coding companion and thus improve developer productivity.
Prerequisites
To begin using Amazon Q Developer, the following are required:
You are a DevOps engineer at a software company and have been tasked with building and launching a new customer-facing web application using a serverless architecture. It will have three tiers, as shown below, consisting of the presentation layer, application layer, and data layer. You have decided to utilize Amazon Q Developer to deploy the application components using AWS CDK.
Figure 1 – Serverless Application Architecture
Accelerating application deployment using Amazon Q Developer as an AI coding companion
Let’s dive into how Amazon Q Developer can be used as an expert companion to accelerate the deployment of the above serverless application resources using AWS CDK.
1. Deploy Presentation Layer Resources
Creating a secured Amazon S3 bucket to host static assets and front it using Amazon CloudFront
When building modern serverless web applications that host large static content, a key architecture consideration is how to efficiently and securely serve static assets such as images, CSS, and JavaScript files. Simply serving these from your application servers can lead to scaling and performance bottlenecks with increased resource utilization (e.g., CPU, I/O, network) on servers. This is where leveraging AWS services like Amazon Simple Storage Service (Amazon S3) and Amazon CloudFront can be a game-changer. By hosting your static content in a secured S3 bucket, you unlock several powerful benefits. First and foremost, you get robust security controls through S3 bucket policies and CloudFront Origin Access Control (OAC) to ensure only authorized access. This is critical for protecting your assets. Secondly, you take load off your application servers by having CloudFront directly serve static assets from its globally distributed edge locations. This improves application performance and reduces operational costs. AWS CDK helps to simplify the infrastructure provisioning by allowing developers to define S3 bucket and CloudFront resource configurations in a modern programming language using CDK constructs that enhance security and include best practices recommendations.
In this application architecture, we will use Amazon Q Developer to develop AWS CDK code to provision presentation layer resources, which include a secured S3 bucket with public access disabled and an Origin Access Control (OAC) that is used to grant CloudFront access to the S3 bucket to securely serve the static assets of the application.
Prompt: Create a cdk stack with python that creates an s3 bucket for cloudfront/s3 static asset, ensure it is secured by using Origin Access Control (OAC)
Using Amazon Q to Generate python CDK code for the presentation layer resources
Developers can customize these configurations using Amazon Q Developer based on your specific security requirements, such as implementing access controls through IAM policies or enabling bucket logging for audit trails. This approach ensures that the S3 bucket is configured securely, aligning with best practices for data protection and access management.
Lets look at an example of adding CloudTrail logging to the S3 bucket:
Prompt: Update the code to include cloudtrail logging to the S3 bucket created
Using Amazon Q Developer to add CloudTrail logging to the S3 bucket
2. Deploy Application Layer Resources
Provision AWS Lambda and Amazon API Gateway to serve end-user requests
Amazon Q Developer makes it easy to provision serverless application backend infrastructure such as AWS Lambda and Amazon API Gateway using AWS CDK. In the above architecture, you can deploy the Lambda function hosting application code, with just a few lines of CDK code along with Lambda configuration such as function name, runtime, handler, timeouts, and environment variables. This Lambda function is fronted using Amazon API Gateway to serve user requests. Anything from a simple micro-service to a complex serverless application can be defined through code in CDK using Amazon Q assistance and deployed repeatedly through CI/CD pipelines. This enables infrastructure automation and consistent governance for applications on AWS.
Prompt: Create a CDK stack that creates a AWS Lambda function that is invoked by Amazon API Gateway
Using Amazon Q Developer to generate CDK code to create an AWS Lambda function that is invoked by Amazon API Gateway
3. Deploy Data Layer Resources
Provision Amazon DynamoDB tables to host application data
By leveraging Amazon Q Developer, we can generate CDK code to provision DynamoDB tables using CDK constructs that offer AWS default best practice recommendations. With Amazon Q Developer, using the CDK construct library, we can define DynamoDB table names, attributes, secondary indexes, encryption, and auto-scaling in just a few lines of CDK code in our programming language of choice. With CDK, this table definition is synthesized into an AWS CloudFormation template that is deployed as a stack to provision the DynamoDB table with all the desired settings. Any data layer resources can be defined this way as Infrastructure as Code (IAC) using Amazon Q Developer. Overall, Amazon Q Developer drastically simplifies deploying managed data backends on AWS through CDK while enforcing best practices around data security, access control, and scalability leveraging CDK constructs.
Prompt: Create a CDK stack of a DynamoDB table with 100 read capacity units and 100 write capacity units.
Using Amazon Q Developer to generate CDK code to create a DynamoDB with 100 read capacity units and 100 write capacity units
4. Monitoring the Application Components
Monitoring using Amazon CloudWatch
Once the application infrastructure stack has been provisioned, it’s important to setup observability to monitor key metrics, detect any issues proactively, and alert operational teams to troubleshoot and fix issues to minimize application downtime. To get started with observability, developers can leverage Amazon CloudWatch, a fully managed monitoring service. With the use of AWS CDK, it is easy to codify CloudWatch components such as dashboards, metrics, log groups, and alarms alongside the application infrastructure and deploy them in an automated and repeatable way leveraging the AWS CDK construct library. Developers can customize these metrics and alarms to meet their workload requirements. All the monitoring configuration gets deployed as part of the infrastructure stack.
Developers can use Amazon Q Developer to assist with setting up application monitoring in AWS using CloudWatch and CDK. With Q, you can describe the resources you want to monitor, such as EC2 instances, Lambda functions, and RDS databases. Q will then generate the necessary CDK code to provision the appropriate CloudWatch alarms, metrics, and dashboards to monitor the resources. By describing what you want to monitor in natural language, Q handles the underlying complexity of generating code.
Prompt: Create a CDK stack of a Cloudwatch event rule to stop web instance EC2 instance every day at 15:00 UTC
Using Amazon Q Developer to generate CDK code to create a CloudWatch event rule to stop an EC2 instance at 15:00 UTC
5. Automate CI/CD of the application
Build a CDK Pipeline for Continuous Integration(CI) and Continuous Deployment(CD) of the Infrastructure
As you iterate on your serverless application, you’ll want a smooth, automated way to reliably deploy infrastructure changes using a CI/CD pipeline. This is where implementing a CDK pipeline, an automated deployment pipeline, becomes useful. As we’ve seen, AWS Cloud Development Kit (CDK) allows you to define your entire multi-tier infrastructure as a reusable, version-controlled code construct. From S3 buckets to CloudFront, API Gateway, Lambda functions, databases and more, all of these can be deployed with IaC. This CI/CD pipeline streamlines the process of deploying both infrastructure and application code, integrating seamlessly with CI/CD best practices.
Here’s how you can leverage Amazon Q Developer to streamline the process of creating a CDK pipeline.
Prompt: Using python, create a CDK pipeline that deploys a three tier serverless application.
Using Amazon Q Developer to generate CDK pipeline using Python
By leveraging Amazon Q Developer in your IDE for CDK pipeline creation, you can speed up adoption of CI/CD best practices, and receive real-time guidance on CDK deployment patterns, making the development process smoother. This CI/CD integration accelerates your CDK development experience, and allows you to focus on building robust and scalable AWS applications.
Conclusion
In this post, you have learned how developers can leverage Amazon Q Developer, a generative-AI powered assistant, as a true expert AI companion in assisting with accelerating Infrastructure As Code (IaC) Development using AWS CDK and seen how to deploy and manage AWS resources of a three-tier serverless application using AWS CDK. In addition to Infrastructure As Code, Amazon Q Developer can be leveraged to accelerate software development, minimize time spent on undifferentiated coding tasks, and help with troubleshooting, so that developers can focus on creative business problems to delight end-users. See the Amazon Q Developer documentation to get started.
Managing data across diverse environments can be a complex and daunting task. Amazon DataZone simplifies this so you can catalog, discover, share, and govern data stored across AWS, on premises, and third-party sources.
Many organizations manage vast amounts of data assets owned by various teams, creating a complex landscape that poses challenges for scalable data management. These organizations require a robust infrastructure as code (IaC) approach to deploy and manage their data governance solutions. In this post, we explore how to deploy Amazon DataZone using the AWS Cloud Development Kit (AWS CDK) to achieve seamless, scalable, and secure data governance.
Overview of solution
By using IaC with the AWS CDK, organizations can efficiently deploy and manage their data governance solutions. This approach provides scalability, security, and seamless integration across all teams, allowing for consistent and automated deployments.
The AWS CDK is a framework for defining cloud IaC and provisioning it through AWS CloudFormation. Developers can use any of the supported programming languages to define reusable cloud components known as constructs. A construct is a reusable and programmable component that represents AWS resources. The AWS CDK translates the high-level constructs defined by you into equivalent CloudFormation templates. AWS CloudFormation provisions the resources specified in the template, streamlining the usage of IaC on AWS.
Amazon DataZone core components are the building blocks to create a comprehensive end-to-end solution for data management and data governance. The following are the Amazon DataZone core components. For more details, see Amazon DataZone terminology and concepts.
Amazon DataZone domain – You can use an Amazon DataZone domain to organize your assets, users, and their projects. By associating additional AWS accounts with your Amazon DataZone domains, you can bring together your data sources.
Data portal – The data portal is outside the AWS Management Console. This is a browser-based web application where different users can catalog, discover, govern, share, and analyze data in a self-service fashion.
Business data catalog – You can use this component to catalog data across your organization with business context and enable everyone in your organization to find and understand data quickly.
Projects – In Amazon DataZone, projects are business use case-based groupings of people, assets (data), and tools used to simplify access to AWS analytics.
Environments – Within Amazon DataZone projects, environments are collections of zero or more configured resources on which a given set of AWS Identity and Access Management (IAM) principals (for example, users with a contributor permissions) can operate.
Publish and subscribe workflows – You can use these automated workflows to secure data between producers and consumers in a self-service manner and make sure that everyone in your organization has access to the right data for the right purpose.
We use an AWS CDK app to demonstrate how to create and deploy core components of Amazon DataZone in an AWS account. The following diagram illustrates the primary core components that we create.
In addition to the core components deployed with the AWS CDK, we provide a custom resource module to create Amazon DataZone components such as glossaries, glossary terms, and metadata forms, which are not supported by AWS CDK constructs (at the time of writing).
Prerequisites
The following local machine prerequisites are required before starting:
An AWS Glue table to be registered as a sample data source in an Amazon DataZone project.
As part of this post, we want to publish AWS Glue tables from an AWS Glue database that already exists. For this, you must explicitly provide Amazon DataZone with the permissions to access tables in this existing AWS Glue database. For more information, refer to Configure Lake Formation permissions for Amazon DataZone.
Make sure you have disabled the default permissions under the Data Catalog settings in Lake Formation (see the following screenshot).
Deploy the solution
Complete the following steps to deploy the solution:
Clone the GitHub repository and go to the root of your downloaded repository folder:
git clone https://github.com/aws-samples/amazon-datazone-cdk-example.git
cd amazon-datazone-cdk-example
Install local dependencies:
$ npm ci ### this will install the packages configured in package-lock.json
Sign in to your AWS account using the AWS CLI by configuring your credential file (replace <PROFILE_NAME> with the profile name of your deployment AWS account):
$ export AWS_PROFILE=<PROFILE_NAME>
Bootstrap the AWS CDK environment (this is a one-time activity and not needed if your AWS account is already bootstrapped):
$ npm run cdk bootstrap
Run the script to replace the placeholders for your AWS account and AWS Region in the config files:
The preceding command will replace the AWS_ACCOUNT_ID_PLACEHOLDER and AWS_REGION_PLACEHOLDER values in the following config files:
lib/config/project_config.json
lib/config/project_environment_config.json
lib/constants.ts
Next, you configure your Amazon DataZone domain, project, business glossary, metadata forms, and environments with your data source.
Go to the file lib/constants.ts. You can keep the DOMAIN_NAME provided or update it as needed.
Go to the file lib/config/project_config.json. You can keep the example values for projectName and projectDescription or update them. An example value for projectMembers has also been provided (as shown in the following code snippet). Update the value of the memberIdentifier parameter with an IAM role ARN of your choice that you would like to be the owner of this project.
Go to the file lib/config/project_glossary_config.json. An example business glossary and glossary terms are provided for the projects; you can keep them as is or update them with your project name, business glossary, and glossary terms.
Go to the lib/config/project_form_config.json file. You can keep the example metadata forms provided for the projects or update your project name and metadata forms.
Go to the lib/config/project_enviornment_config.json file. Update EXISTING_GLUE_DB_NAME_PLACEHOLDER with the existing AWS Glue database name in the same AWS account where you are deploying the Amazon DataZone core components with the AWS CDK. Make sure you have at least one existing AWS Glue table in this AWS Glue database to publish as a data source within Amazon DataZone. Replace DATA_SOURCE_NAME_PLACEHOLDER and DATA_SOURCE_DESCRIPTION_PLACEHOLDER with your choice of Amazon DataZone data source name and description. An example of a cron schedule has been provided (see the following code snippet). This is the schedule for your data source run; you can keep the same or update it.
"Schedule":{
   "schedule":"cron(0 7 * * ? *)"
}
Next, you update the trust policy of the AWS CDK deployment IAM role to deploy a custom resource module.
On the IAM console, update the trust policy of the IAM role for your AWS CDK deployment that starts with cdk-hnb659fds-cfn-exec-role- by adding the following permissions. Replace ${ACCOUNT_ID} and ${REGION} with your specific AWS account and Region.
Now you can configure data lake administrators in Lake Formation.
On the Lake Formation console, choose Administrative roles and tasks in the navigation pane.
Under Data lake administrators, choose Add and add the IAM role for AWS CDK deployment that starts with cdk-hnb659fds-cfn-exec-role- as an administrator.
This IAM role needs permissions in Lake Formation to create resources, such as an AWS Glue database. Without these permissions, the AWS CDK stack deployment will fail.
Deploy the solution:
$ npm run cdk deploy --all
During deployment, enter y if you want to deploy the changes for some stacks when you see the prompt Do you wish to deploy these changes (y/n)?.
After the deployment is complete, sign in to your AWS account and navigate to the AWS CloudFormation console to verify that the infrastructure deployed.
You should see a list of the deployed CloudFormation stacks, as shown in the following screenshot.
Open the Amazon DataZone console in your AWS account and open your domain.
Open the data portal URL available in the Summary section.
Find your project in the data portal and run the data source job.
This is a one-time activity if you want to publish and search the data source immediately within Amazon DataZone. Otherwise, wait for the data source runs according to the cron schedule mentioned in the preceding steps.
Troubleshooting
If you get the message "Domain name already exists under this account, please use another one (Service: DataZone, Status Code: 409, Request ID: 2d054cb0-0 fb7-466f-ae04-c53ff3c57c9a)" (RequestToken: 85ab4aa7-9e22-c7e6-8f00-80b5871e4bf7, HandlerErrorCode: AlreadyExists), change the domain name under lib/constants.ts and try to deploy again.
If you get the message "Resource of type 'AWS::IAM::Role' with identifier 'CustomResourceProviderRole1' already exists." (RequestToken: 17a6384e-7b0f-03b3 -1161-198fb044464d, HandlerErrorCode: AlreadyExists), this means you’re accidentally trying to deploy everything in the same account but a different Region. Make sure to use the Region you configured in your initial deployment. For the sake of simplicity, the DataZonePreReqStack is in one Region in the same account.
If you get the message “Unmanaged asset” Warning in the data asset on your datazone project, you must explicitly provide Amazon DataZone with Lake Formation permissions to access tables in this external AWS Glue database. For instructions, refer to Configure Lake Formation permissions for Amazon DataZone.
Clean up
To avoid incurring future charges, delete the resources. If you have already shared the data source using Amazon DataZone, then you have to remove those manually first in the Amazon DataZone data portal because the AWS CDK isn’t able to automatically do that.
Remove the created IAM roles from Lake Formation administrative roles and tasks.
Conclusion
Amazon DataZone offers a comprehensive solution for implementing a data mesh architecture, enabling organizations to address advanced data governance challenges effectively. Using the AWS CDK for IaC streamlines the deployment and management of Amazon DataZone resources, promoting consistency, reproducibility, and automation. This approach enhances data organization and sharing across your organization.
Bandana Das is a Senior Data Architect at Amazon Web Services and specializes in data and analytics. She builds event-driven data architectures to support customers in data management and data-driven decision-making. She is also passionate about enabling customers on their data management journey to the cloud.
Gezim Musliaj is a Senior DevOps Consultant with AWS Professional Services. He is interested in various things CI/CD, data, and their application in the field of IoT, massive data ingestion, and recently MLOps and GenAI.
Sameer Ranjha is a Software Development Engineer on the Amazon DataZone team. He works in the domain of modern data architectures and software engineering, developing scalable and efficient solutions.
Sindi Cali is an Associate Consultant with AWS Professional Services. She supports customers in building data-driven applications in AWS.
Bhaskar Singh is a Software Development Engineer on the Amazon DataZone team. He has contributed to implementing AWS CloudFormation support for Amazon DataZone. He is passionate about distributed systems and dedicated to solving customers’ problems.
Serverless technologies not only minimize the time that builders spend managing infrastructure, they also help builders reduce the amount of application code they need to write. Replacing application code with fully managed cloud services improves both the operational characteristics and the maintainability of your applications thanks to a cleaner separation between business logic and application topology. This blog post shows you how.
Serverless isn’t a runtime; it’s an architecture
Since the launch of AWS Lambda in 2014, serverless has evolved to be more than just a cloud runtime. The ability to easily deploy and scale individual functions, coupled with per-millisecond billing, has led to the evolution of modern application architectures from monoliths towards loosely-coupled applications. Functions typically communicate through events, an interaction model that’s supported by a combination of serverless integration services, such as Amazon EventBridge and Amazon SNS, and Lambda’s asynchronous invocation model.
Modern distributed architectures with independent runtime elements (like Lambda functions or containers) have a distinct topology graph that represents which elements talk to others. In the diagram below, Amazon API Gateway, Lambda, EventBridge, and Amazon SQS interact to process an order in a typical Order Processing System. The topology has a major influence on the application’s runtime characteristics like latency, throughput, or resilience.
The role of cloud automation evolves
Cloud automation languages, commonly referred to as IaC (Infrastructure as Code), date back to 2011 with the launch of CloudFormation, which allowed users to declare a set of cloud resources in configuration files instead of issuing a series of API calls or CLI commands. Initial document-oriented automation languages like AWS CloudFormation and Terraform were soon complemented by frameworks like AWS Cloud Development Kit (CDK), CDK for Terraform, and Pulumi that introduced the ability to write cloud automation code in popular general-purpose languages like TypeScript, Python, or Java.
The role of cloud automation evolved alongside serverless application architectures. Because serverless technologies free builders from having to manage infrastructure, there really isn’t any “I” in serverless IaC anymore. Instead, serverless cloud automation primarily defines the application’s topology by connecting Lambda functions with event sources or targets, which can be other Lambda functions. This approach more closely resembles “AaC” – Architecture as Code – as the automation now defines the application’s architecture instead of provisioning infrastructure elements.
Improving serverless applications with automation code
By utilizing AWS serverless runtime features, automation code can frequently achieve the same functionality as your application code.
For example, the Lambda function below, written in TypeScript, sends a message to EventBridge:
You can achieve the same behavior using AWS Lambda Destinations, which instructs the Lambda runtime to publish an event after the completion of the function. You can configure Lambda destinations via below AWS CDK code, also written in TypeScript:
import {EventBridgeDestination} from "aws-cdk-lib/aws-lambda-destinations"

const createOrderLambda = new Function(this,'createOrderLambda', {
    functionName: `OrderService`,
    runtime: Runtime.NODEJS_20_X,
    code: Code.fromAsset('lambda-fns/send-message-using-destination'),
    handler: 'OrderService.handler',
 onSuccess: new EventBridgeDestination(eventBus)
});
With the AWS CDK, you can use the same programming languages for both application and automation code, allowing you to switch easily between the two.
The Lambda function can now focus on the business logic and doesn’t contain any reference to message sending or EventBridge. This separation of concerns is a best practice because changes to the business logic do not run the risk of breaking the architecture and vice versa.
Instructing the serverless Lambda runtime to send the event has several advantages over hand-coding it inside the application code
It decouples application logic from topology. The message destination, consisting of the type of the service (e.g., EventBridge vs. another Lambda Function) and the destination’s ARN, define the application’s architecture (or topology). Embedding message sending in the application code mixes architecture with business logic. Handling the sending of the message in the runtime separates concerns and avoids having to touch the application code for a topology change.
It makes the composition explicit. If application code sends a message, it will likely read the destination from an environment variable, which is passed to the Lambda function. The name of the variable that is used for this purpose is buried in the application code, forcing you to rely on naming conventions. Defining all dependencies between service instances in automation code keeps them in a central location, and allows you to use code analysis and refactoring tools to reason about your architecture or make changes to it.
It avoids simple mistakes. Redundant code can lead to mistakes. For example, debugging a Lambda function that accidentally swapped day and month in the message’s date field took hours. Letting the runtime send messages avoids such errors.
Higher-level constructs simplify permission grants. Cloud automation libraries like CDK allow the creation of higher-level constructs, which can combine multiple resources and include necessary IAM permissions. You’ll write less code and avoid debugging cycles.
The runtime is more robust. Delegating message sending to the serverless runtime takes care of any required retries, ensuring the message to be sent and freeing builders from having to write extra code for such undifferentiated heavy lifting.
In summary, letting the managed service handle message passing makes your serverless application cleaner and more robust. We also like to say that it becomes “serverless-native” because it fully utilizes the native services available to the application.
Refactoring to serverless-native
Shifting code from application to automation is what we call “Refactoring to Serverless”. Refactoring is a term popularized by Martin Fowler in the late 90s to describe the restructuring of source code to alter its structure without changing its external behavior. Code refactoring can be as simple as extracting code into a separate method or more sophisticated like replacing conditional expressions with polymorphism.
Developers refactor their code to improve its readability and maintainability. A common approach in Test-Driven Development (TDD) is the so-called red-green-refactor cycle: write a test, which will be red because the functionality isn’t implemented, then write the code to make the test green, and finally refactor to counteract the growing entropy in the codebase.
Serverless refactoring takes inspiration from this concept but augments it to the context of serverless automation:
Serverless refactoring: A controlled technique for improving the design of serverless applications by replacing application code with equivalent automation code.
Let’s explore how serverless refactoring can enhance the design and runtime characteristics of a serverless application. The diagram below shows an AWS Step Functions workflow that performs a quality check through image recognition. An early implementation, shown on the left, would use an intermediate AWS Lambda function to call the Amazon Rekognition service. Thanks to the launch of Step Functions’ AWS SDK service integrations in 2021, you can refactor the workflow to directly call the Rekognition API. This refactored design, seen on the right, eliminates the Lambda function (assuming it didn’t perform any additional tasks), thereby reducing costs and runtime complexity.
See the AWS CDK implementation for this refactoring, in TypeScript, on GitHub.
Refactoring Limitations
The initial example of replacing application code to send a message to SQS via Lambda Destinations reveals that refactoring from application to automation code isn’t 100% behavior-preserving.
First, Lambda Destinations are only triggered when the function is invoked asynchronously. For synchronous invocations, the function passes the results back to the caller, and does not invoke the destination. Second, the serverless runtime wraps the data returned from the function inside a message envelope, affecting how the message recipient parses the JSON object. The message data is placed inside the responsePayload field if sending to another Lambda function or the detail field if sending to an EventBridge destination. Last, Lambda Destinations sends a message after the function completes, whereas application code could send the message at any point during the execution.
The last change in behavior will be transparent to well-architected asynchronous applications because they won’t depend on the timing of message delivery. If a Lambda function continues processing after sending a message (for example, to EventBridge), that code can’t assume that the message has been processed because delivery is asynchronous. A rare exception could be a loop waiting for the results from the downstream message processing, but such loops violate the principles of asynchronous integration and also waste compute resources (Amazon Step Functions is a great choice for asynchronous callbacks). If such behavior is required, it can be achieved by splitting the Lambda function into two parts.
Can Serverless Refactoring be Automated?
Traditional code refactoring like “Extract Method” is automated thanks to built-in support by many code editors. Serverless refactoring isn’t (yet) a fully automatic, 100%-equivalent code transformation because it translates application code into automation code (or vice versa). While AI-powered tools like Amazon Q Developer are getting us closer to that vision, we consider serverless refactoring primarily as a design technique for developers to better utilize the AWS runtime. Improved code design and runtime characteristics outweigh behavior differences, especially if your application includes automated tests.
Incorporating refactoring into your team structures
If a single team owns both the application and the automation code, refactoring takes place inside the team. However, serverless refactoring can cross team boundaries when separate teams develop business logic versus managing the underlying infrastructure, configuration, and deployment.
In such a model, AWS recommends that the development team be responsible for both the application code and the application-specific automation, such as the CDK code to configure Lambda Destinations, Step Functions workflows, or EventBridge routing. Splitting application and application-specific automation across teams would make the development team dependent on the platform team for each refactoring and introduce unnecessary friction.
If both teams use the same Infrastructure-as-Code (IaC) tool, say AWS CDK, the platform team can build reusable templates and constructs that encapsulate organizational requirements and guardrails, such as CDK constructs for S3 buckets with encryption enabled. Development teams can easily consume those resources across CDK stacks.
However, teams could use different IaC tools, for example, the infrastructure team prefers CloudFormation but the development team prefers AWS CDK. In this setup, development teams can build their automation on top of the CFN Modules provided by the infrastructure team. However, they won’t benefit from the same high-level programming abstractions as they do with CDK.
Continuous Refactoring
Just like traditional code refactoring, refactoring to serverless isn’t a one-time activity but an essential aspect of your software delivery. Because adding functionality increases your application’s complexity, regular refactoring can help keep complexity at bay and maintain your development velocity. Like with Continuous Delivery, you can improve your software delivery with Continuous Refactoring.
Teams who encounter difficulties with serverless refactoring might be lacking automated test coverage or cloud automation. So, refactoring can become a useful forcing function for teams to exercise software delivery hygiene, for example by implementing automated tests.
Getting Started
The refactoring samples discussed here are a subset of an extensive catalog of open source code examples, which you can find along with AWS CDK implementation examples at refactoringserverless.com. You can also dive deeper into how serverless refactoring can make your application architecture more loosely coupled in a separate blog post.
Use the examples to accelerate your own refactoring effort. Now Go Refactor!
This post is written by Jeff Kammerer, Senior Solutions Architect.
The PGA TOUR is the world’s premier membership organization for touring professional golfers, co-sanctioning tournaments on the PGA TOUR along with several other developmental, senior, and international tournament series.
The PGA TOUR is passionate about bringing its fans closer to the players, tournaments, and courses. They developed a new mobile app and the PGATOUR.com website to give fans immersive, enhanced, and personalized access to near-real-time leaderboards, shot-by-shot data, video highlights, sports news, statistics, and 3D shot tracking. It is critical for PGA TOUR, which operates in a highly competitive space, to keep up with fans’ demands and deliver engaging content. The maturing DevOps culture, partnered with accelerating the development process, was crucial to the PGA TOUR’s fan engagement transformation.
The PGA TOUR’s fans want near real-time and highly accurate data. To deliver and evolve engaging fan experiences, the PGA TOUR needed to empower their team of developers to quickly release new updates and features. However, the TOUR’s previous architecture required separate code bases for their website and mobile app in a monolithic technology stack. Each update required changes in both code bases, causing feature turnaround time of a minimum of two weeks. The cost and time required to deliver features fans wanted to see in both the app and website were not sustainable. As a result, the TOUR redesigned their mobile app and website using AWS native services and a microservice based architecture to alleviate these pain points.
Accelerating Development with Infrastructure as Code (IaC)
The TOUR’s cloud infrastructure team used AWS CloudFormation for several years to model, provision, and manage their cloud infrastructure. However, the app and web development team within the PGA Tour were not familiar with and did not want to use the JSON and YAML templates that CloudFormation requires, and preferred the coding languages that the AWS Cloud Development Kit (CDK) supports. The developers use TypeScript to develop the new mobile app and website using services like AWS AppSync, AWS Lambda, AWS Step Functions, and AWS Batch. Additionally, the PGA TOUR wanted to simplify how they assigned the correct and minimal IAM permissions needed. As a result, the TOUR developers started using the CDK for IaC because it offered a natural extension to how they were already writing code.
The TOUR leverages all three layers of the AWS CDK Construct Library. They take advantage of higher-layer Pattern Constructs for key services like AWS Lambda and AWS Elastic Container Service (Amazon ECS). The CDK pattern constructs provide a reference architecture or design patterns intended to help complete common tasks. The pattern constructs for AWS Lambda, Amazon ECS, and existing patterns saved the TOUR hours and weeks of development time. They also use the lower-level Layer 2 and Layer 1 Constructs for services like Amazon DynamoDB and AWS AppSync.
Using AWS CDK enabled and empowered the platform and development teams and changed how the PGA TOUR operates their technical environments. They create and de-provision environments as needed to build, test, and deploy new features into production. Automating changes in their underlying infrastructure has become very easy for the PGA TOUR. As an example, the TOUR wanted to update their Lambda runtimes to release 18. With AWS CDK, this change was implemented with a single-line change in their Lambda Common stack and pushed to the over 300 Lambda functions they deployed.
The CDK provides flexibility and agility, which helps the TOUR manage constant change in the appearance of their mobile app and website content given they run different tournaments each week. The TOUR uses the CDK to provision parallel environments where they prepare for the next tournament with unique functions and content without risking impact to services during the current tournament. Once the current tournament is complete, they can flip to the new stack and de-provision the old. The CDK has allowed the TOUR to move from a bi-weekly three-hour maintenance window release schedule to multiple as needed releases per day that take approximately 7 minutes. It has enabled the TOUR to push production releases and fixes, even in the middle of tournament play which previously had been deemed too risky under the prior monolithic technology stack. In one case, the TOUR developers could go from identifying a bug to coding a fix with push through User Acceptance Testing (UAT) and into production in 42 minutes. This is a process that was previously measured in hours or days.
Figure2. High level AWS CDK/App Architecture
Expressing the organizational capability change AWS CDK facilitates for the PGA TOUR Digital team in context of the widely accepted DevOps Research & Assessment (DORA) metrics which assesses organizational maturity in DevOps:
One of the best benefits the TOUR realized using AWS CDK was how much it helped reduce complexity of managing AWS Identity and Access Management (IAM) permissions. The TOUR understands how important it is to maintain granular control of IAM trust policies, especially when working in a serverless architecture. David Provan, shared “AWS CDK encourages security by design and you end up considering security through the entire project rather than coming back to do security hardening after development”. AWS CDK automates the necessary IAM permissions at an atomic level in a manner where they are set and managed correctly. When the PGA TOUR takes resources down, AWS CDK removes the IAM permissions.
Lessons Learned and Looking Forward
The steepest learning curve for the PGA TOUR was in the granularity of their CDK Stacks. They initially started with a single large stack, but found that breaking the application into smaller stacks allowed them to be more surgical with granular deployments and updates. They found some services like AWS Lambda update very quickly, whereas DynamoDB deployed with global tables across multiple regions takes longer and benefit from being in their own stack. This balance is something the TOUR is still working on as they iterate after the initial launch.
Looking forward, the PGA TOUR sees longer-range benefits where the CDK will allow them to reuse their stacks and accelerate development for other departments or entities in the future. They also see benefit for reusing code and patterns across different workloads entirely.
Conclusion
The AWS Cloud Development Kit has been transformational to how the PGA TOUR is deploying their services on AWS and working to bring exciting and immersive experiences to fans. To learn more, review the AWS CDK Developer Guide to read about best practices for developing cloud applications, and review this blog that provides an overview of Working with the AWS Cloud Development kit and AWS Construct Library. Also, explore what CDK can do for you.
AWS Infrastructure as Code (IaC) enables customers to manage, model, and provision infrastructure at scale. You can declare your infrastructure as code in YAML or JSON by using AWS CloudFormation, in a general purpose programming language using the AWS Cloud Development Kit (CDK), or visually using Application Composer. IaC configurations can then be audited and version controlled in a version control system of your choice. Finally, deploying AWS IaC enables deployment previews using change sets, automated rollbacks, proactive enforcement of resource compliance using hooks, and more. Millions of customers enjoy the safety and reliability of AWS IaC products.
Not every resource starts in IaC, however. Customers create non-IaC resources for various reasons: they didn’t know about IaC, or they prefer to work in the CLI or management console. In 2019, we introduced the ability to import existing resources into CloudFormation. While this feature proved integral for bringing resources into IaC on an individual basis, the process of manually creating templates to match those resources wasn’t ideal. Customers were required to look up documentation on resources and painstakingly copy values manually. Customers also told us they traditionally engaged with applications (that is, groupings of related resources), so dealing with individual resources didn’t match that experience. We set out to create a more holistic flow for managing resources and their relations.
Recently, we announced the IaC generator and CDK Migrate, an end-to-end experience that enables customers to create an IaC configuration based off a resource as well as its relationships. This works by scanning an AWS account and using the CloudFormation resource type schema to find relationships between resources. Once this configuration is created, you can use it to either import those resources into an existing stack, or create a brand new stack from scratch. It’s now possible to bring entire applications into a managed CloudFormation stack without having to recreate any resources!
In this post, I’ll explore a common use case we’ve seen and expect the IaC generator to solve: an existing network architecture, created outside of any IaC tool, needs to be managed by CloudFormation.
IaC generator in Action
Consider the following scenario:
As a new hire to an organization that’s just starting its cloud adoption journey, you’ve been tasked with continuing the development of the team’s shared Amazon Virtual Private Cloud (VPC) resources. These are actively in use by the development teams. As you dig around, you find out that these resources were created without any form of IaC. There’s no documentation, and the person who set it up is no longer with the team. Confounding the problem, you have multiple VPCs and their related resources, such subnets, route tables, and internet gateways.
You understand the benefits of IaC – repeatability, reliability, auditability, and safety. Bringing these resources under CloudFormation management will extend these benefits to your existing resources. You’ve imported resources into CloudFormation before, so you set about the task of finding all related resources manually to create a template. You quickly discover, however, that this won’t be a simple task. VPCs don’t store relations to items; instead, relations are reversed – items know which VPC they belong to, but VPCs don’t know which items belong to them. In order to find all the resources that are related to a VPC, you’ll have to manually go through all the VPC-related resources and scan to see which vpc-id they belong to. You’ll have to be diligent, as it’s very easy to miss a resource because you weren’t aware that it existed or it may even be different class of resource altogether! For example, some resources may use an elastic network interface (ENI) to attach to the VPC, like an Amazon Relational Database Service instance.
You, however, recently learned about the IaC generator. The generator works by running a scan of your account and creating an up-to-date inventory of resources. CloudFormation will then leverage the resource type schema to find relationships between resources. For example, it can determine that a subnet has a relationship to a VPC via a vpc-id property. Once these relationships have been determined, you can then select the top-level resources you want to generate a template for. Finally, you’ll be able to leverage the wizard to create a stack from this existing template.
You can navigate to the IaC generator page in the Amazon Management Console and start a scan on your account. Scans last for 30 days, and you can run three scans per day in an account.
Once the scan completes, you create a template by selecting the Create Template button. After selecting Start from a new template, you fill out the relevant details about the stack, including the Template name and any stack policies. In this case, you leave it as Retain.
On the next page, you’ll see all the scanned resources. You can add filters to the resource such as tags to view a subset of scanned resources. This example will only use a Resource type prefix filter. More information on filters can be found here. Once you find the VPC, you can select it from the list.
On the next page, you’ll see the list of resources that CloudFormation has determined to have a link to this VPC. You see this includes a myriad of networking related resource. You keep these all selected to create a template from them.
At this point, you select Create template and CloudFormation will generate a template from the existing resources. Since you don’t have an existing stack to import these resource into, you must create a new stack. You now select this template and then select the Import to stack button.
After entering the Stack name, you can then enter any Parameters your template needs.
CloudFormation will create a change set for your new stack. Change sets allow you to see the changes CloudFormation will apply to a stack. In this example, all of the resources will have the Import status. You see the resources CloudFormation found, and once you’re satisfied, you create the stack.
At this point, the create stack operation will proceed as normal, going through each resource and importing it into the stack. You can report back to your team that you have successfully imported your entire networking stack! As next steps, you should source this template in a version control system. We recently announced a new feature to keep CloudFormation templates synced with popular version control systems. Finally, make sure to make any changes through CloudFormation to avoid a configuration drift between the stated configuration and the existing configuration.
This example was primarily CloudFormation-based, but CDK customers can use CDK Migrate to import this configuration into a CDK application.
Available Now
The IaC generator is now available in all regions where CloudFormation is supported. You can access the IaC generator using the console, CLI, and SDK.
Conclusion
In this post, we explored the new IaC generator feature of CloudFormation. We walked through a scenario of needing to manage previously existing resources and using the IaC generator’s provided wizard flow to generate a CloudFormation template. We then used that template and created a stack to manage these resources. These resources will now enjoy the safety and repeatability that IaC provides. Though this is just one example, we foresee other use cases for this feature, such as enabling a console-first development experience. We’re really excited to hear your thoughts about the feature. Please let us know how you feel!
The collective thoughts of the interwebz
Manage Consent
To provide the best experiences, we use technologies like cookies to store and/or access device information. Consenting to these technologies will allow us to process data such as browsing behavior or unique IDs on this site. Not consenting or withdrawing consent, may adversely affect certain features and functions.
Functional
Always active
The technical storage or access is strictly necessary for the legitimate purpose of enabling the use of a specific service explicitly requested by the subscriber or user, or for the sole purpose of carrying out the transmission of a communication over an electronic communications network.
Preferences
The technical storage or access is necessary for the legitimate purpose of storing preferences that are not requested by the subscriber or user.
Statistics
The technical storage or access that is used exclusively for statistical purposes.The technical storage or access that is used exclusively for anonymous statistical purposes. Without a subpoena, voluntary compliance on the part of your Internet Service Provider, or additional records from a third party, information stored or retrieved for this purpose alone cannot usually be used to identify you.
Marketing
The technical storage or access is required to create user profiles to send advertising, or to track the user on a website or across several websites for similar marketing purposes.
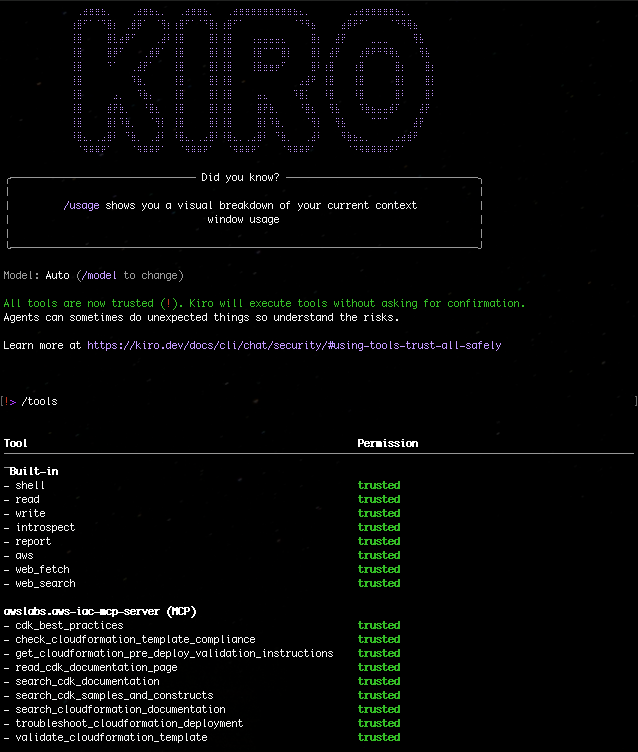
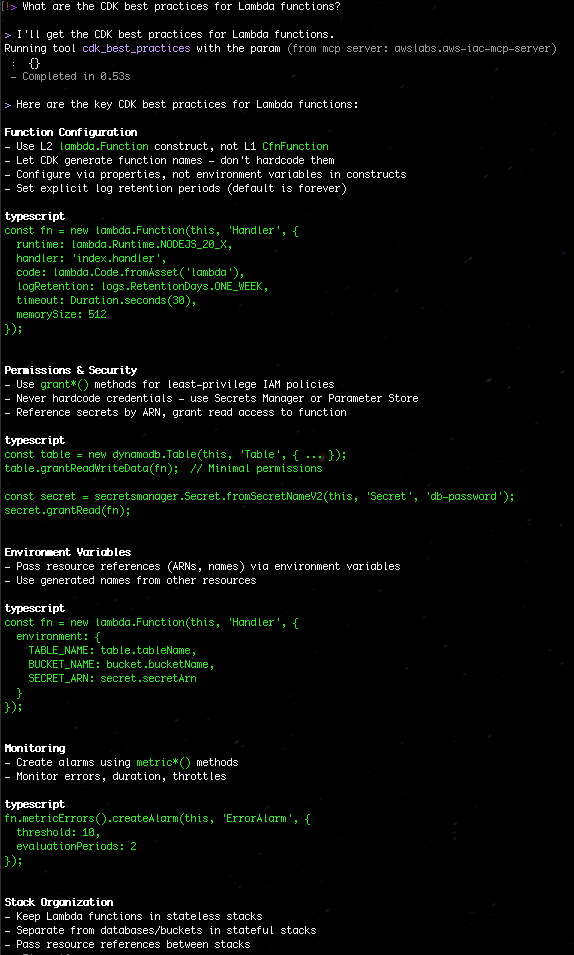

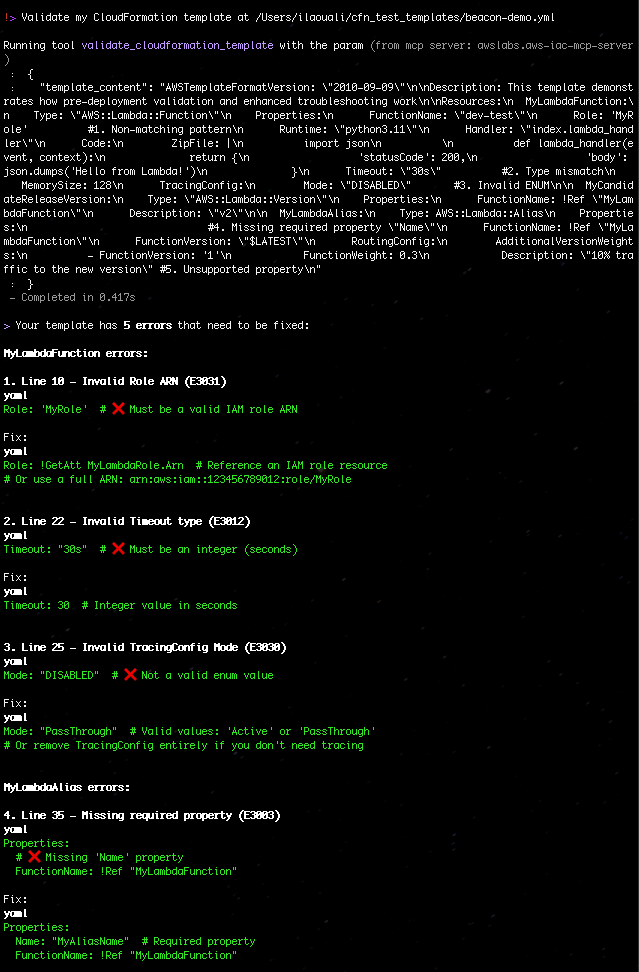
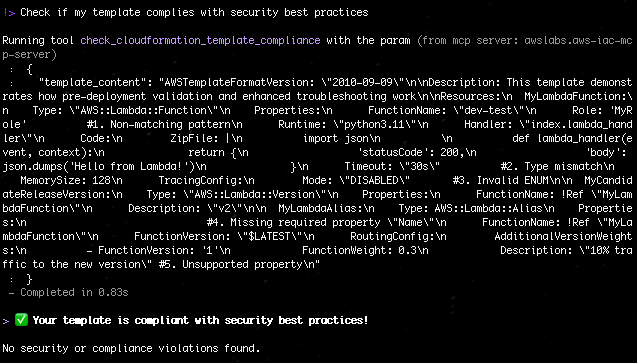


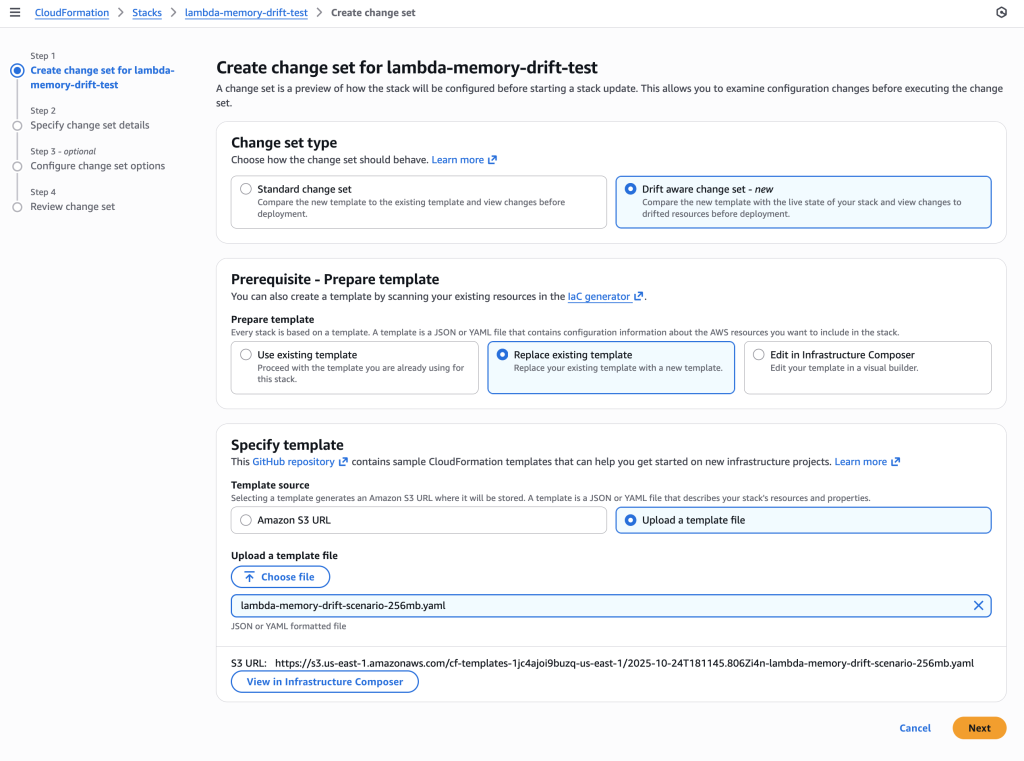
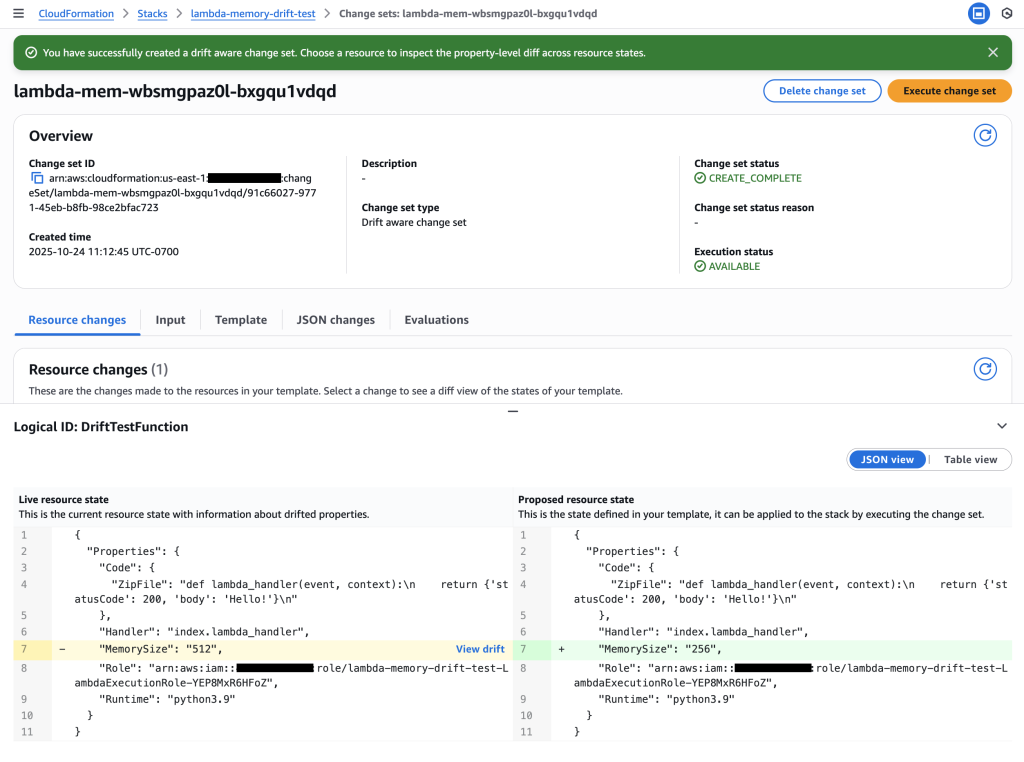
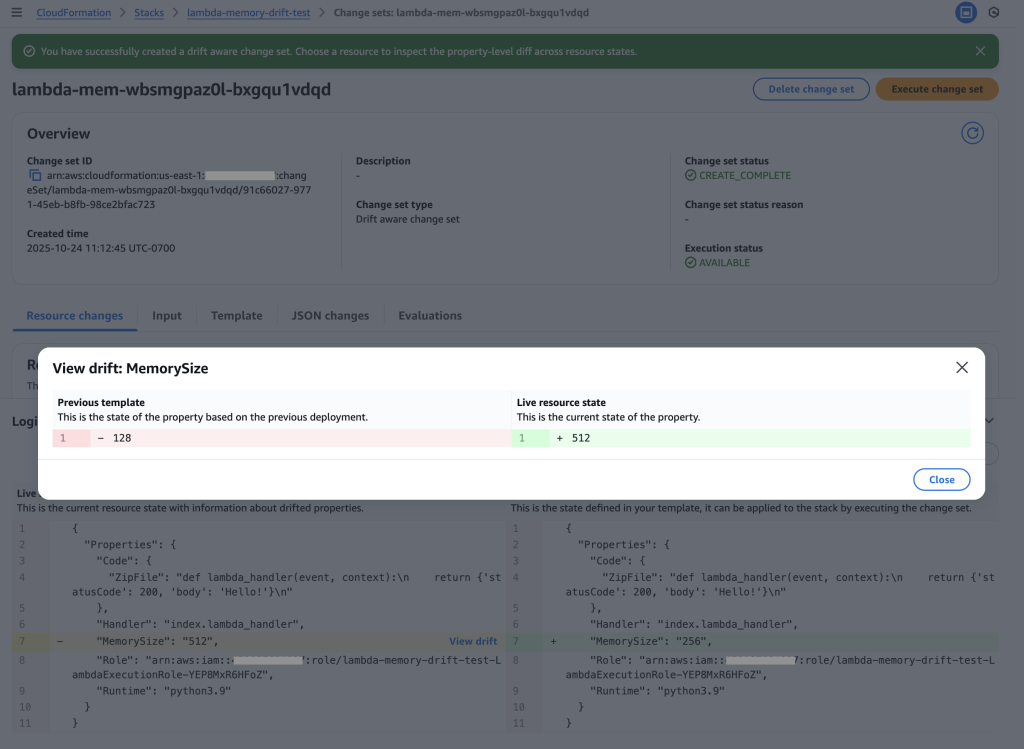
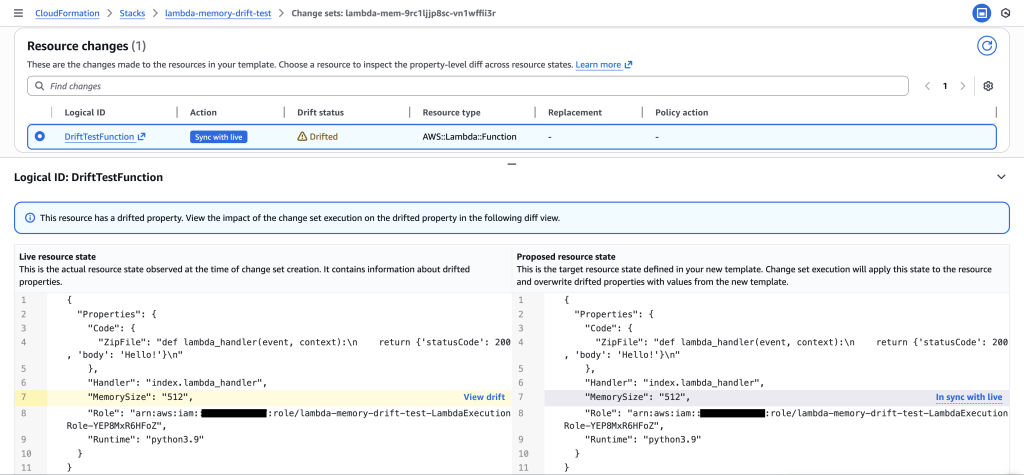
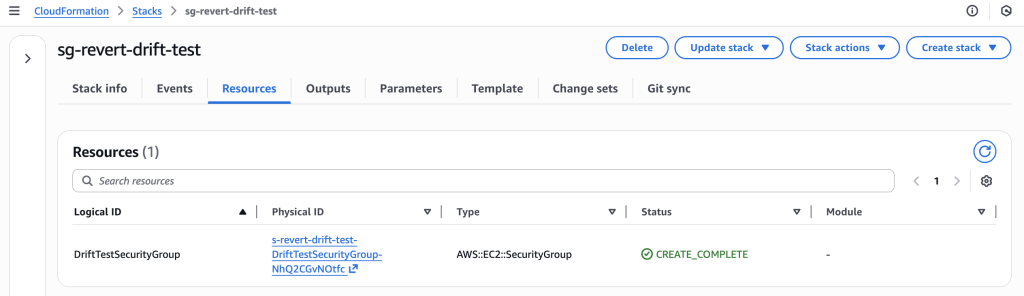
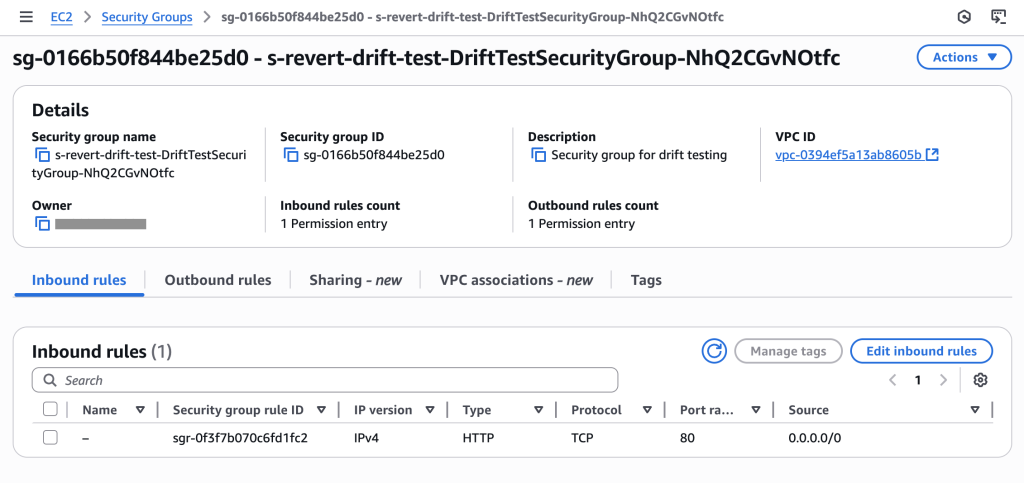
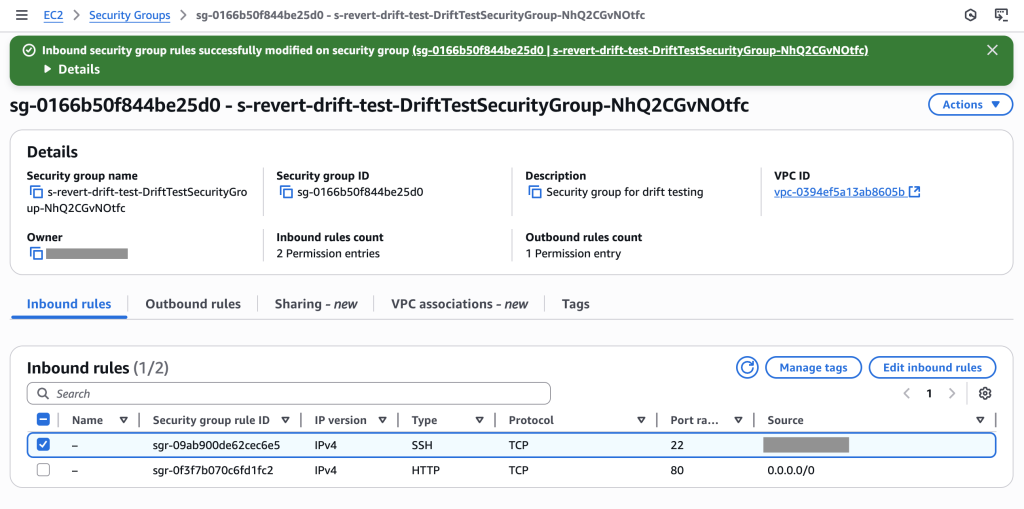
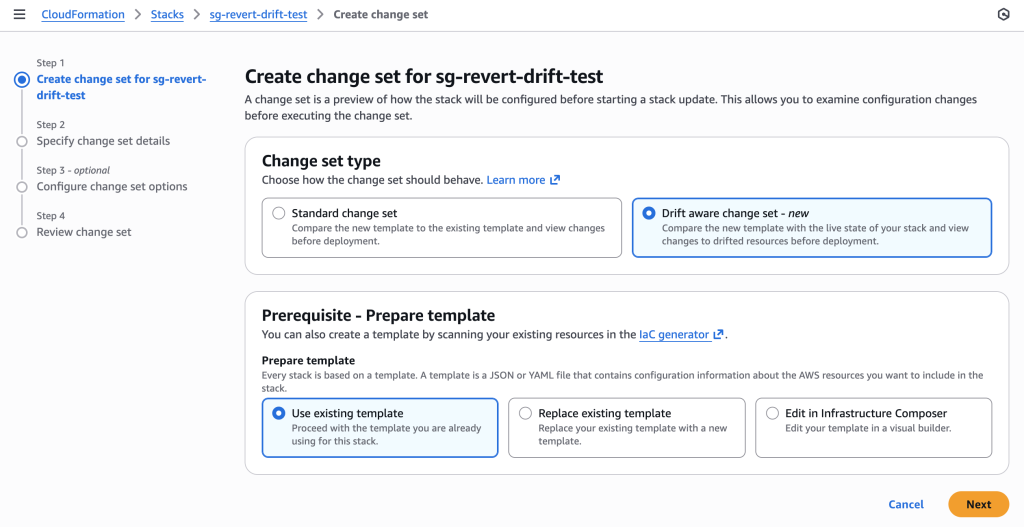
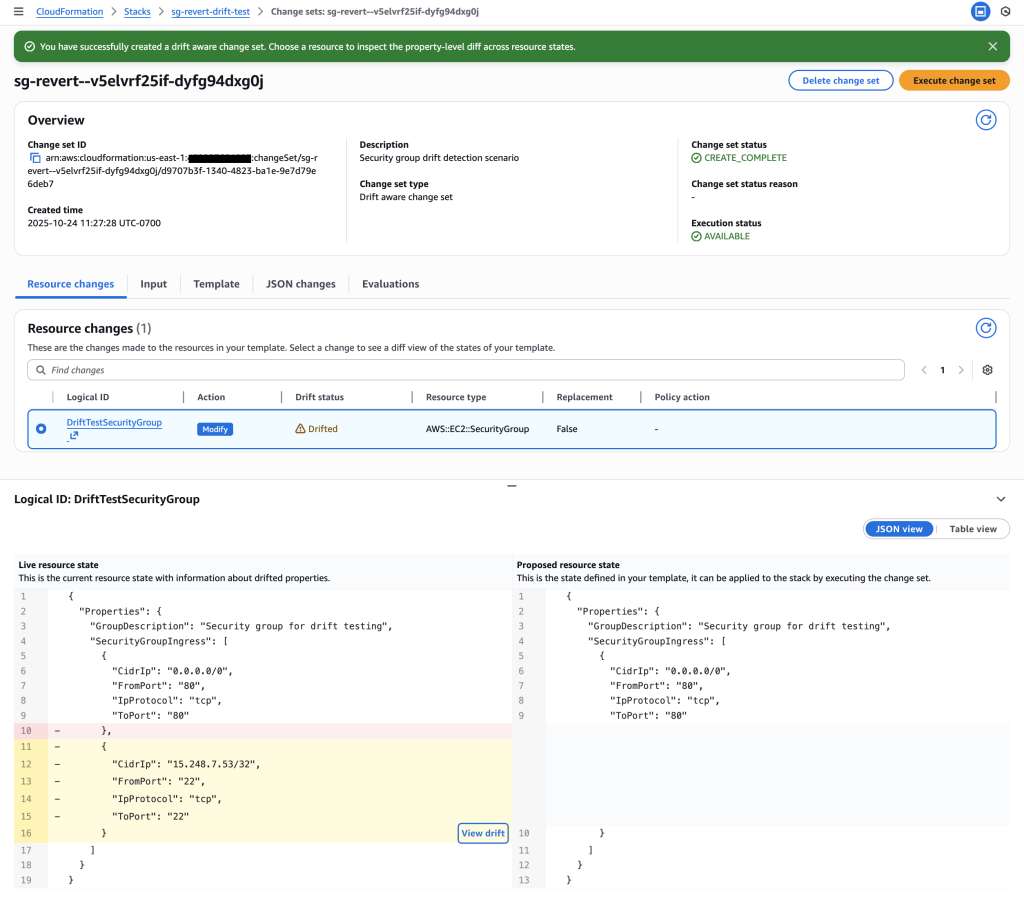
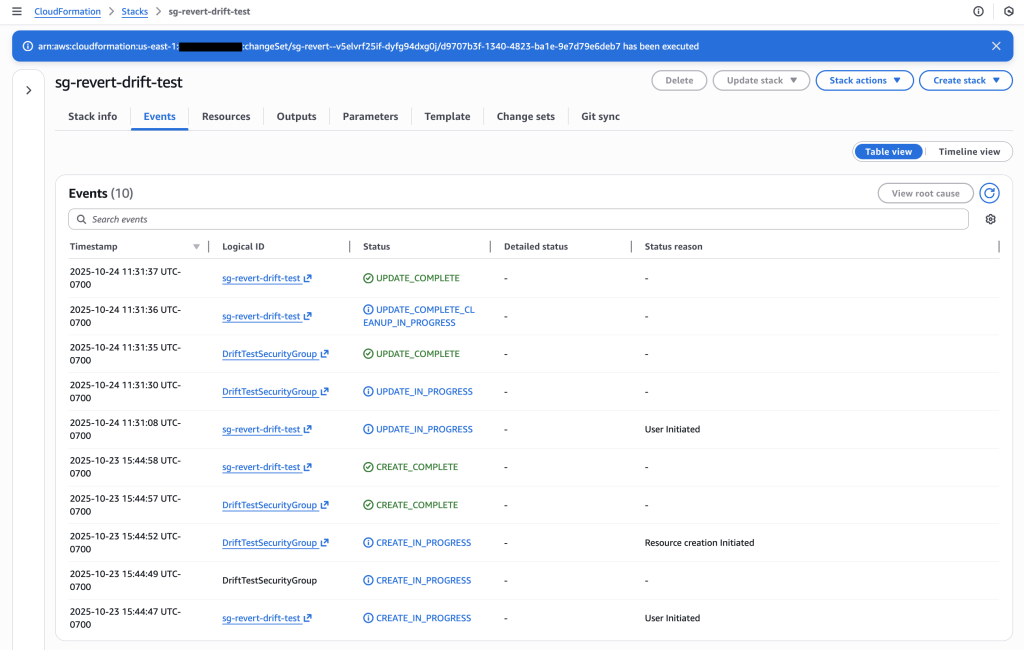

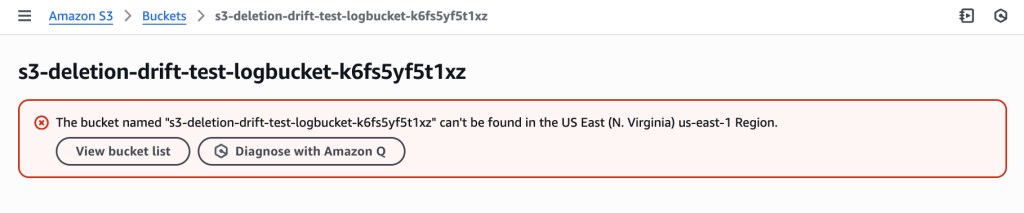

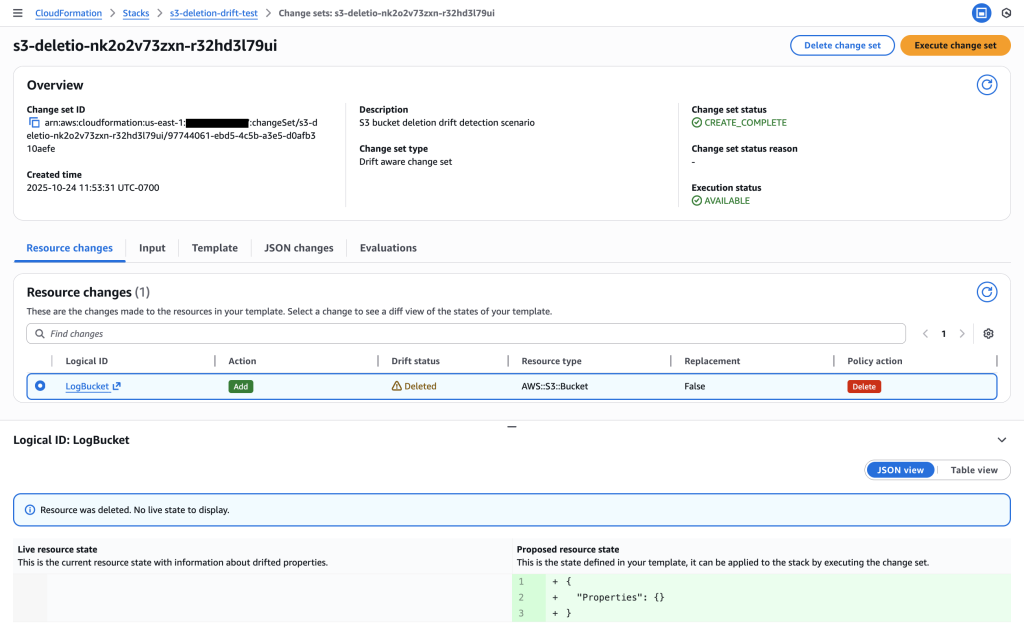
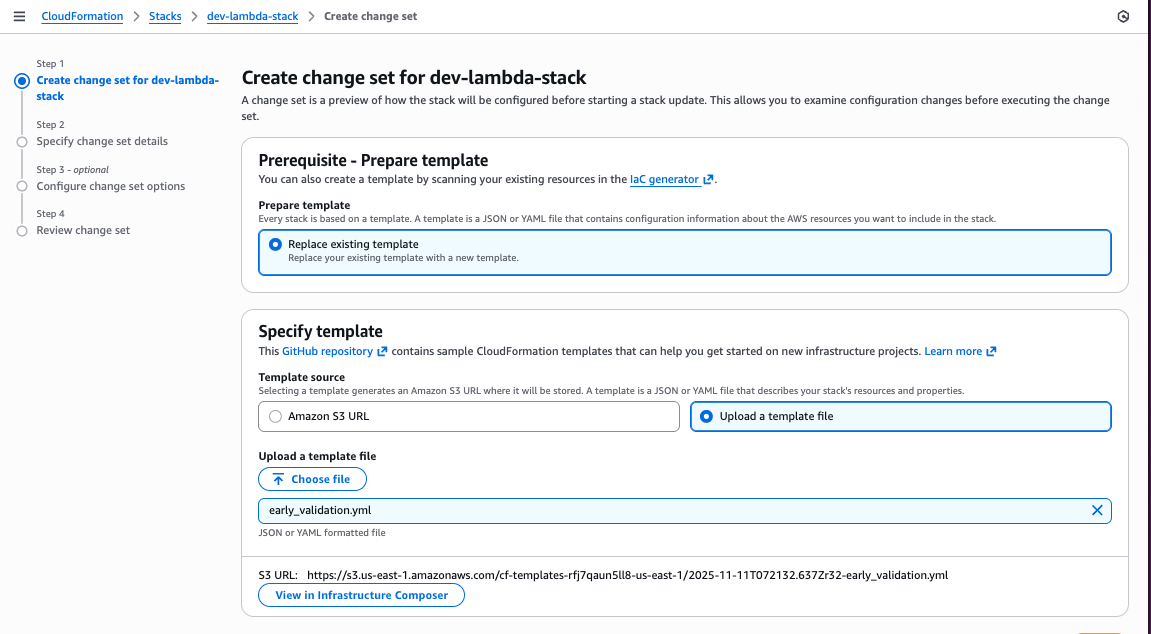
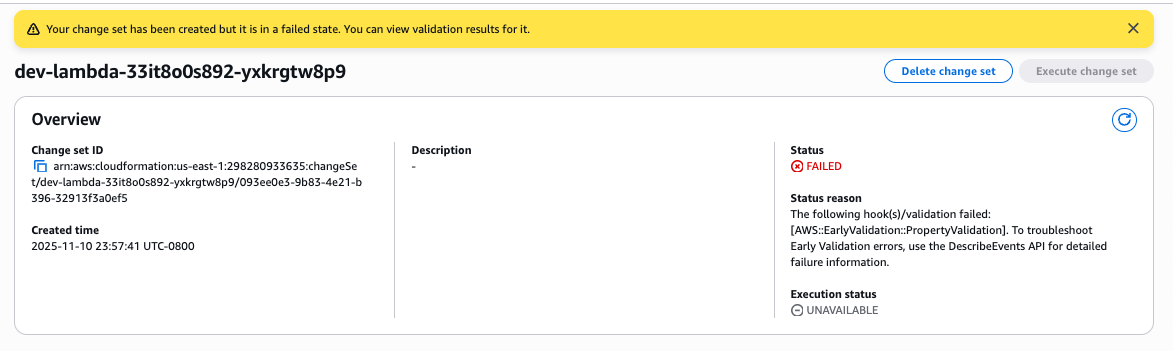
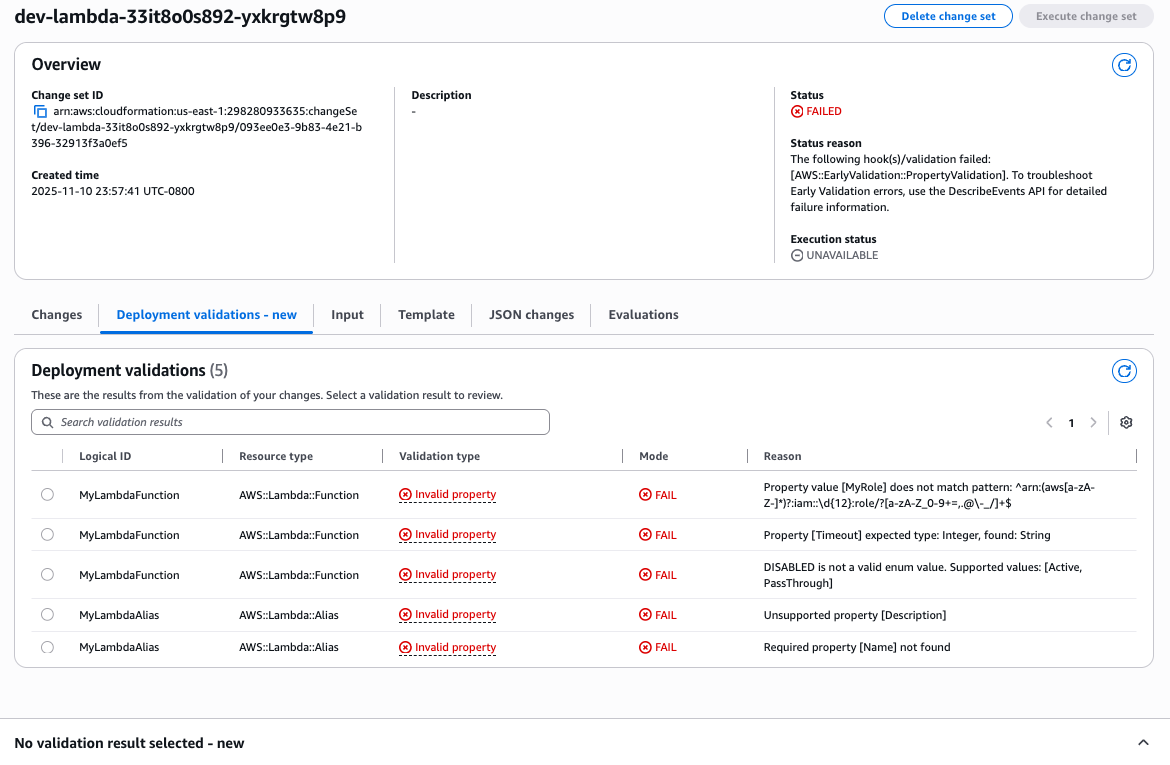
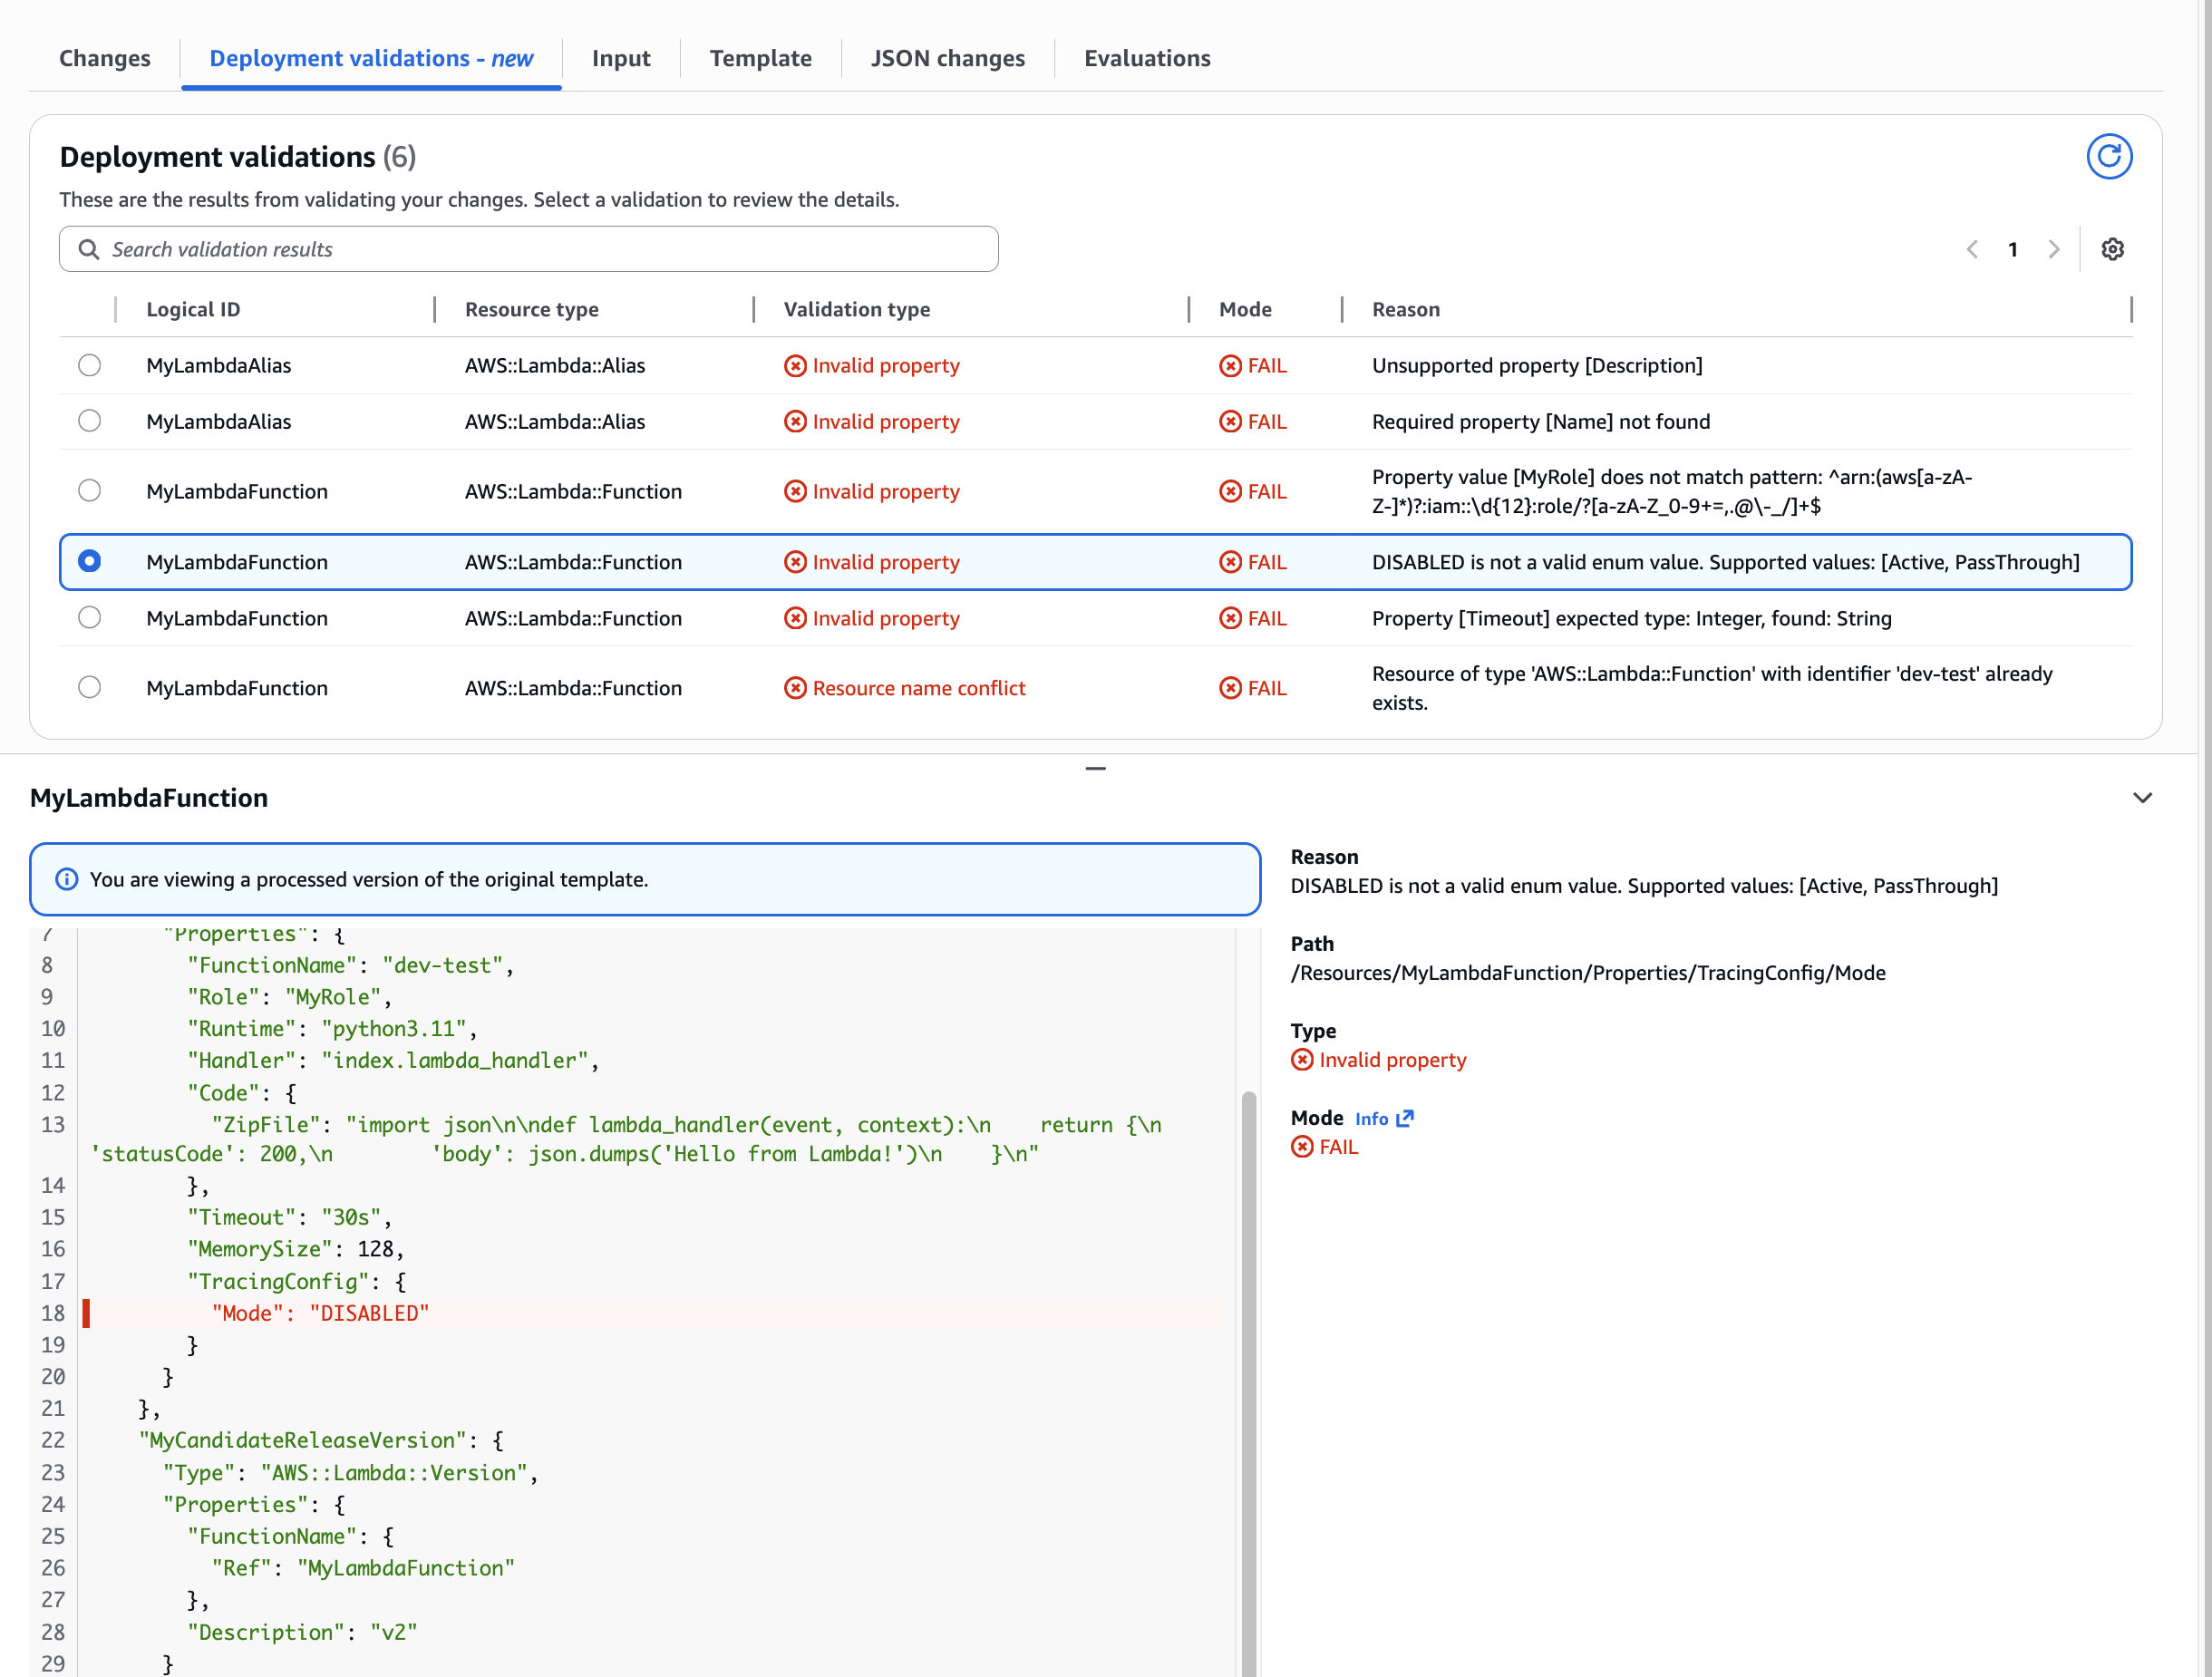
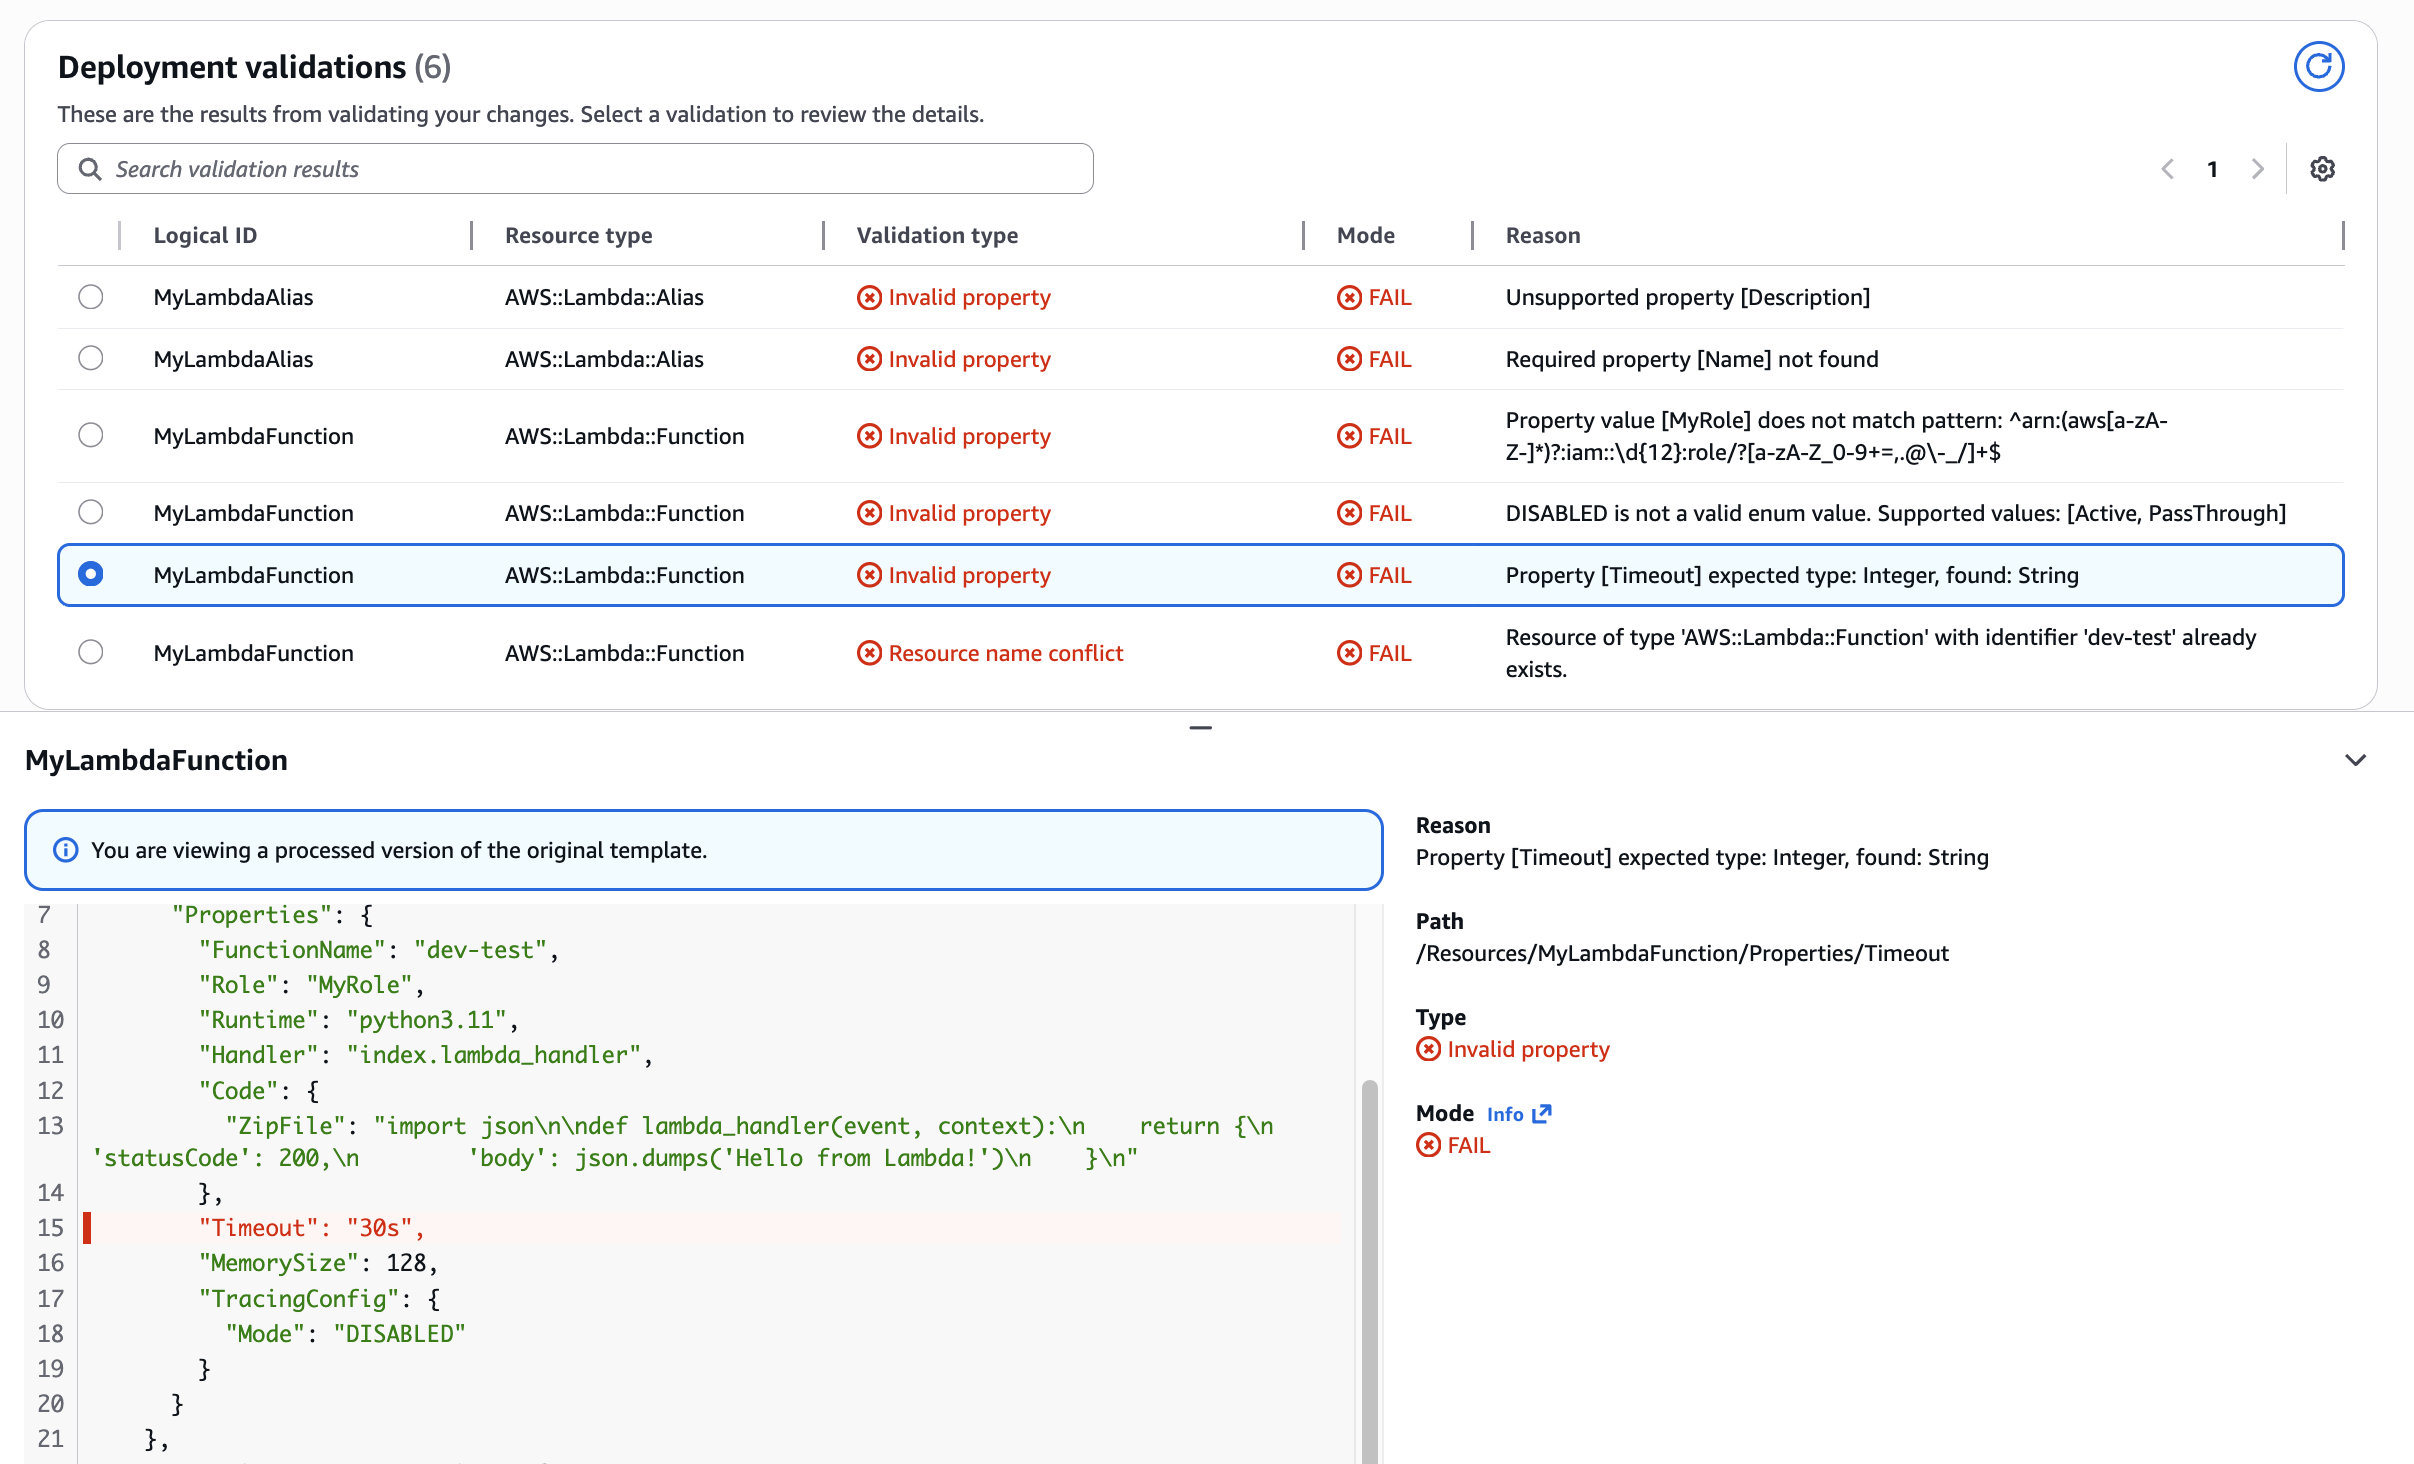
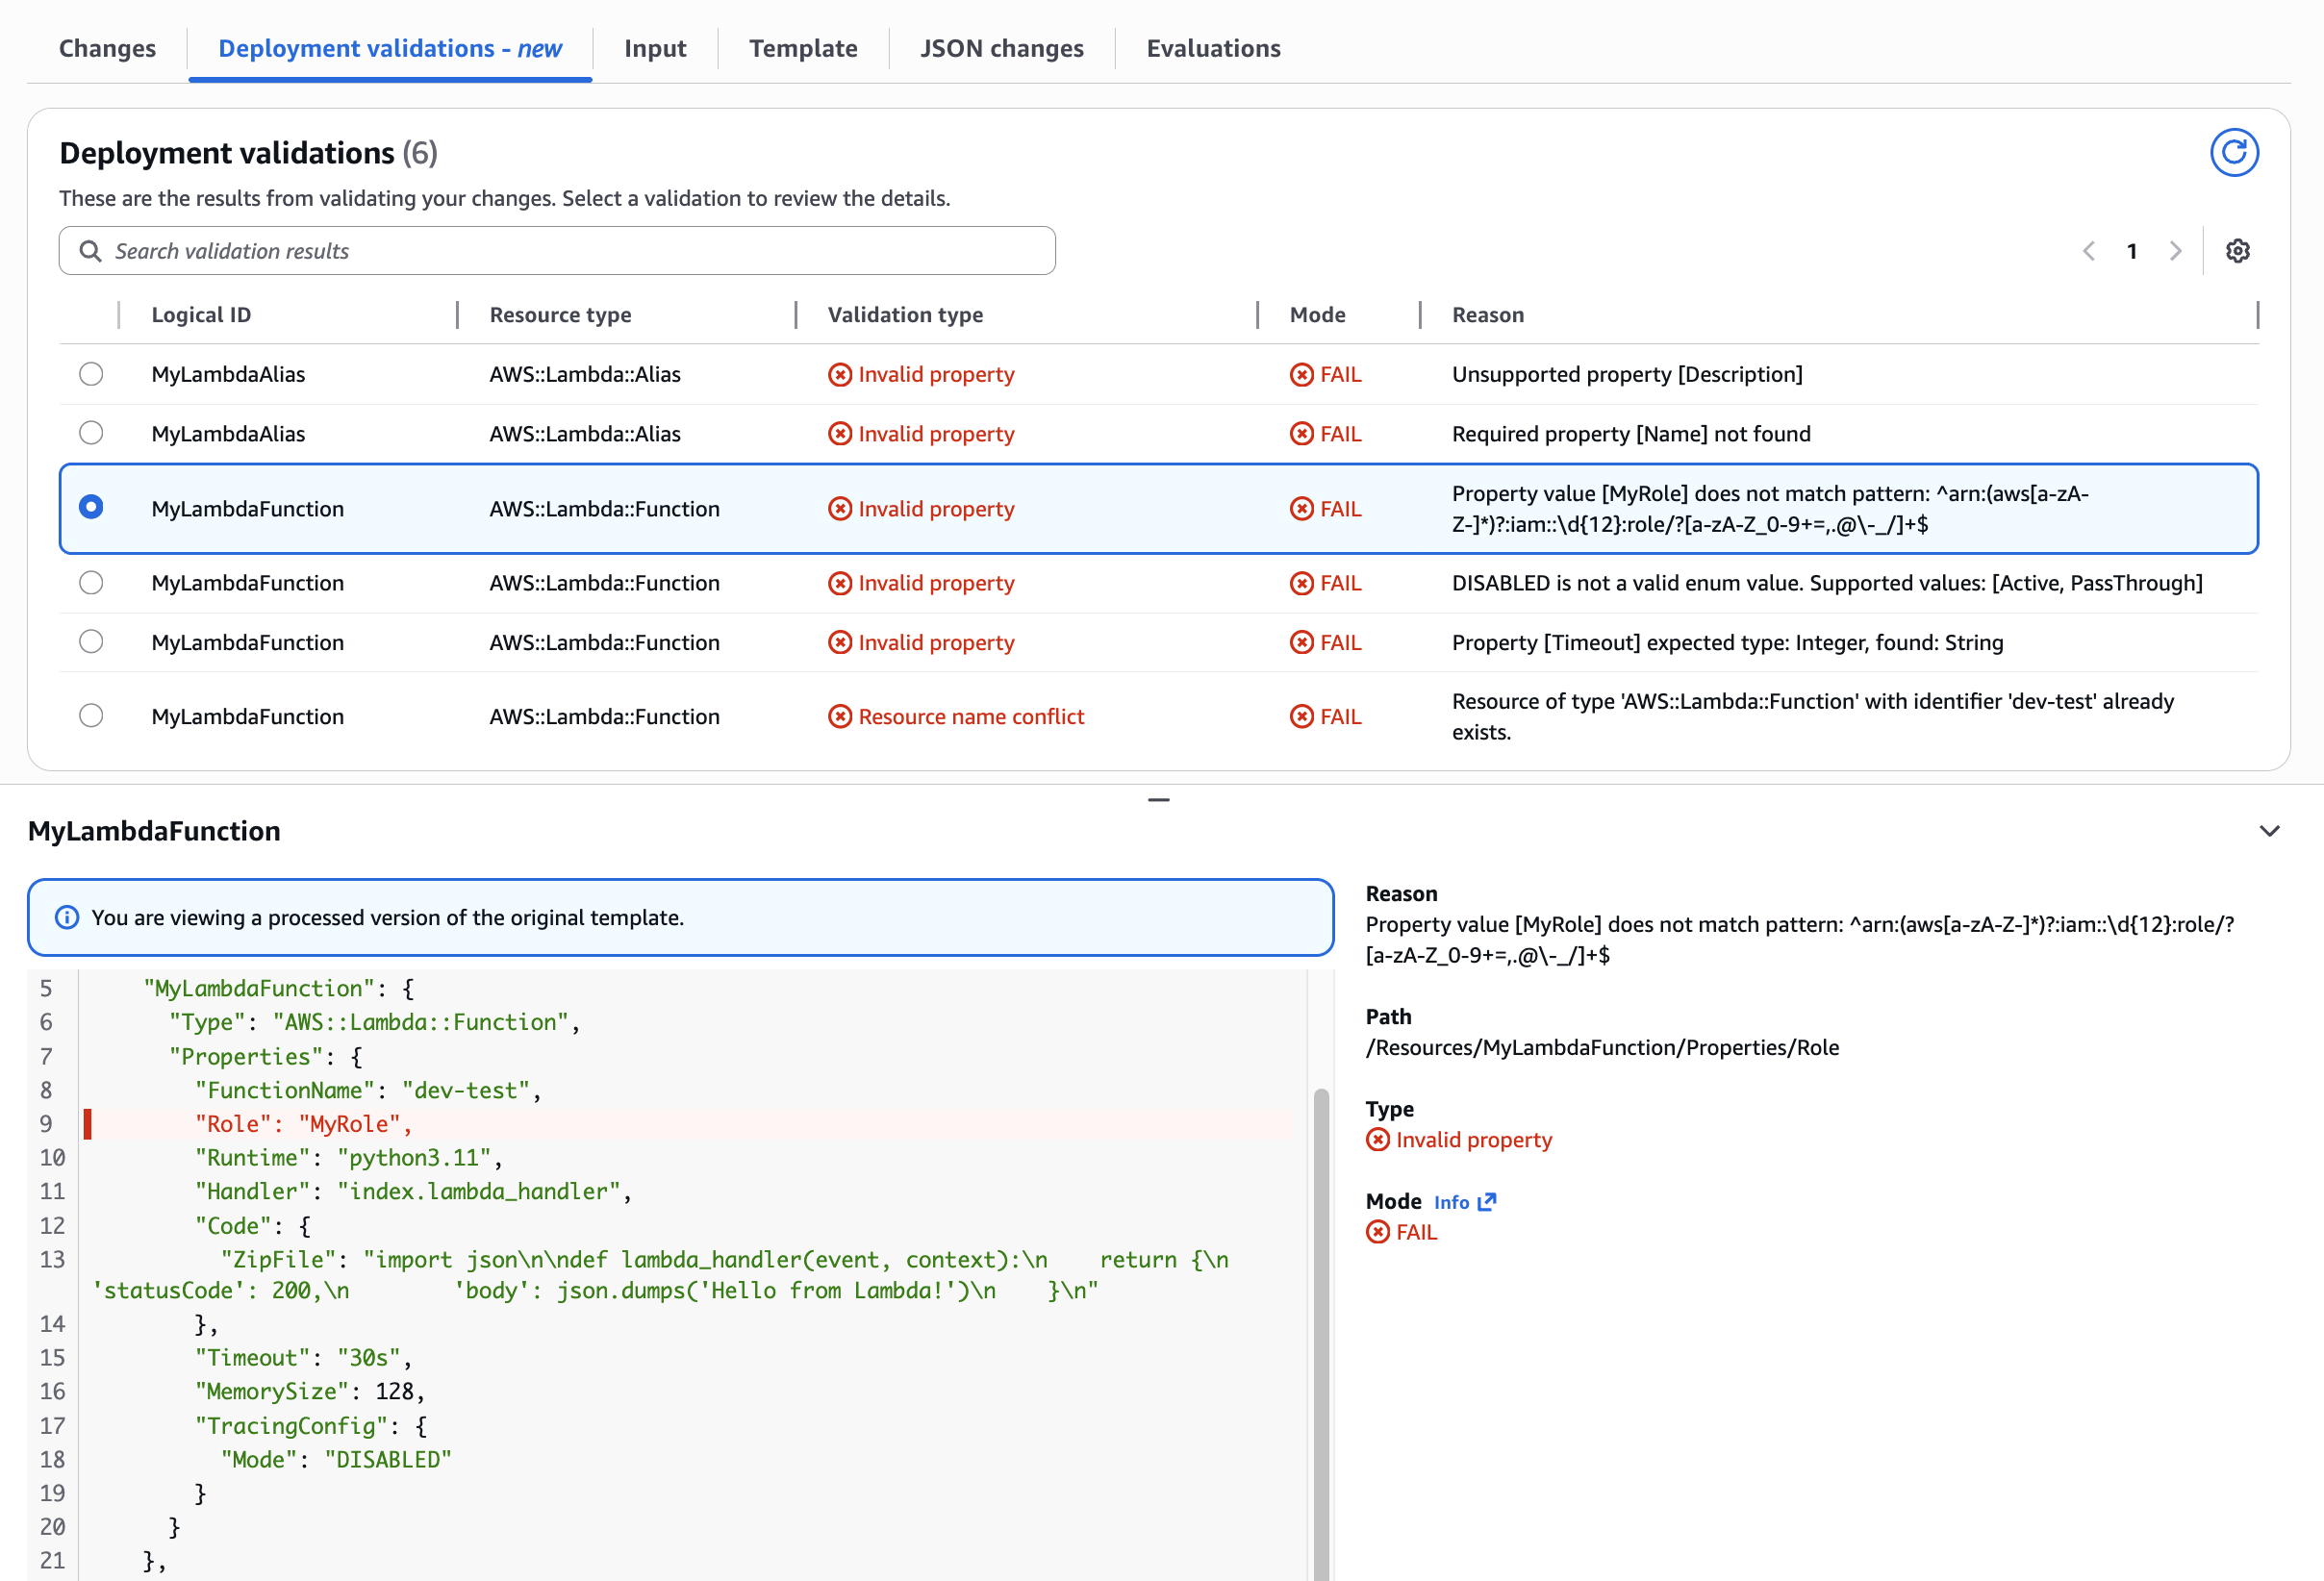
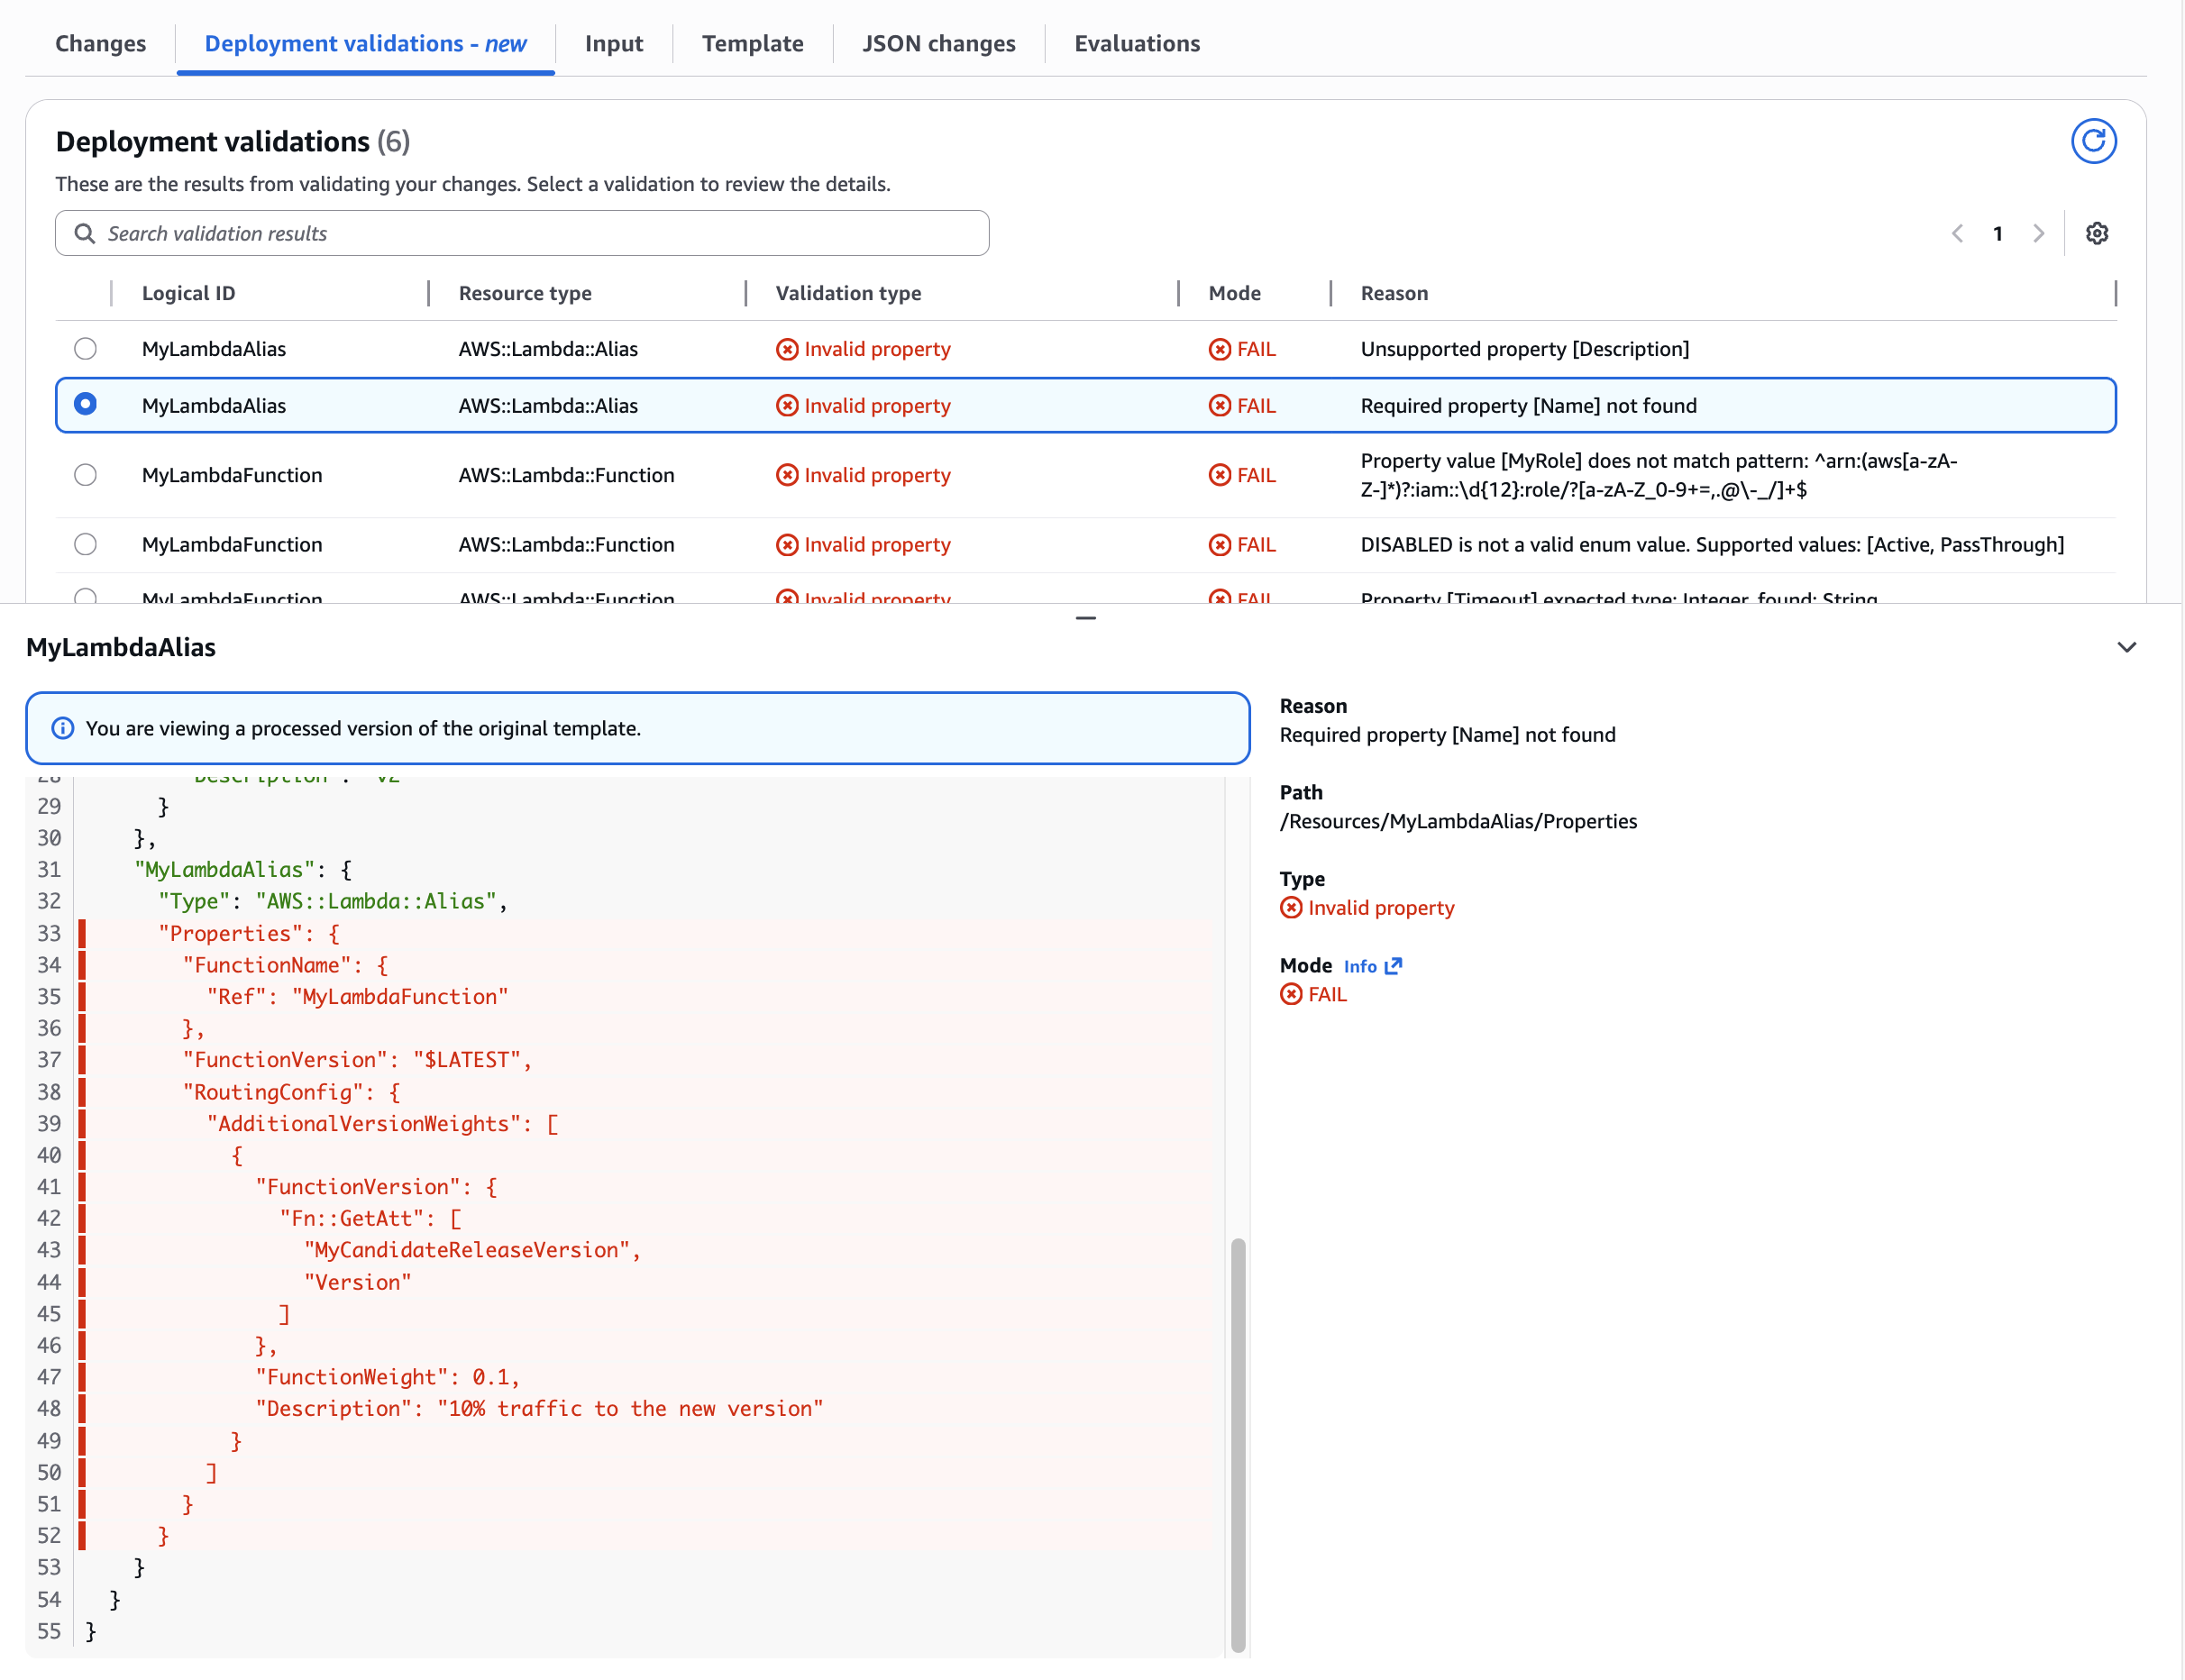
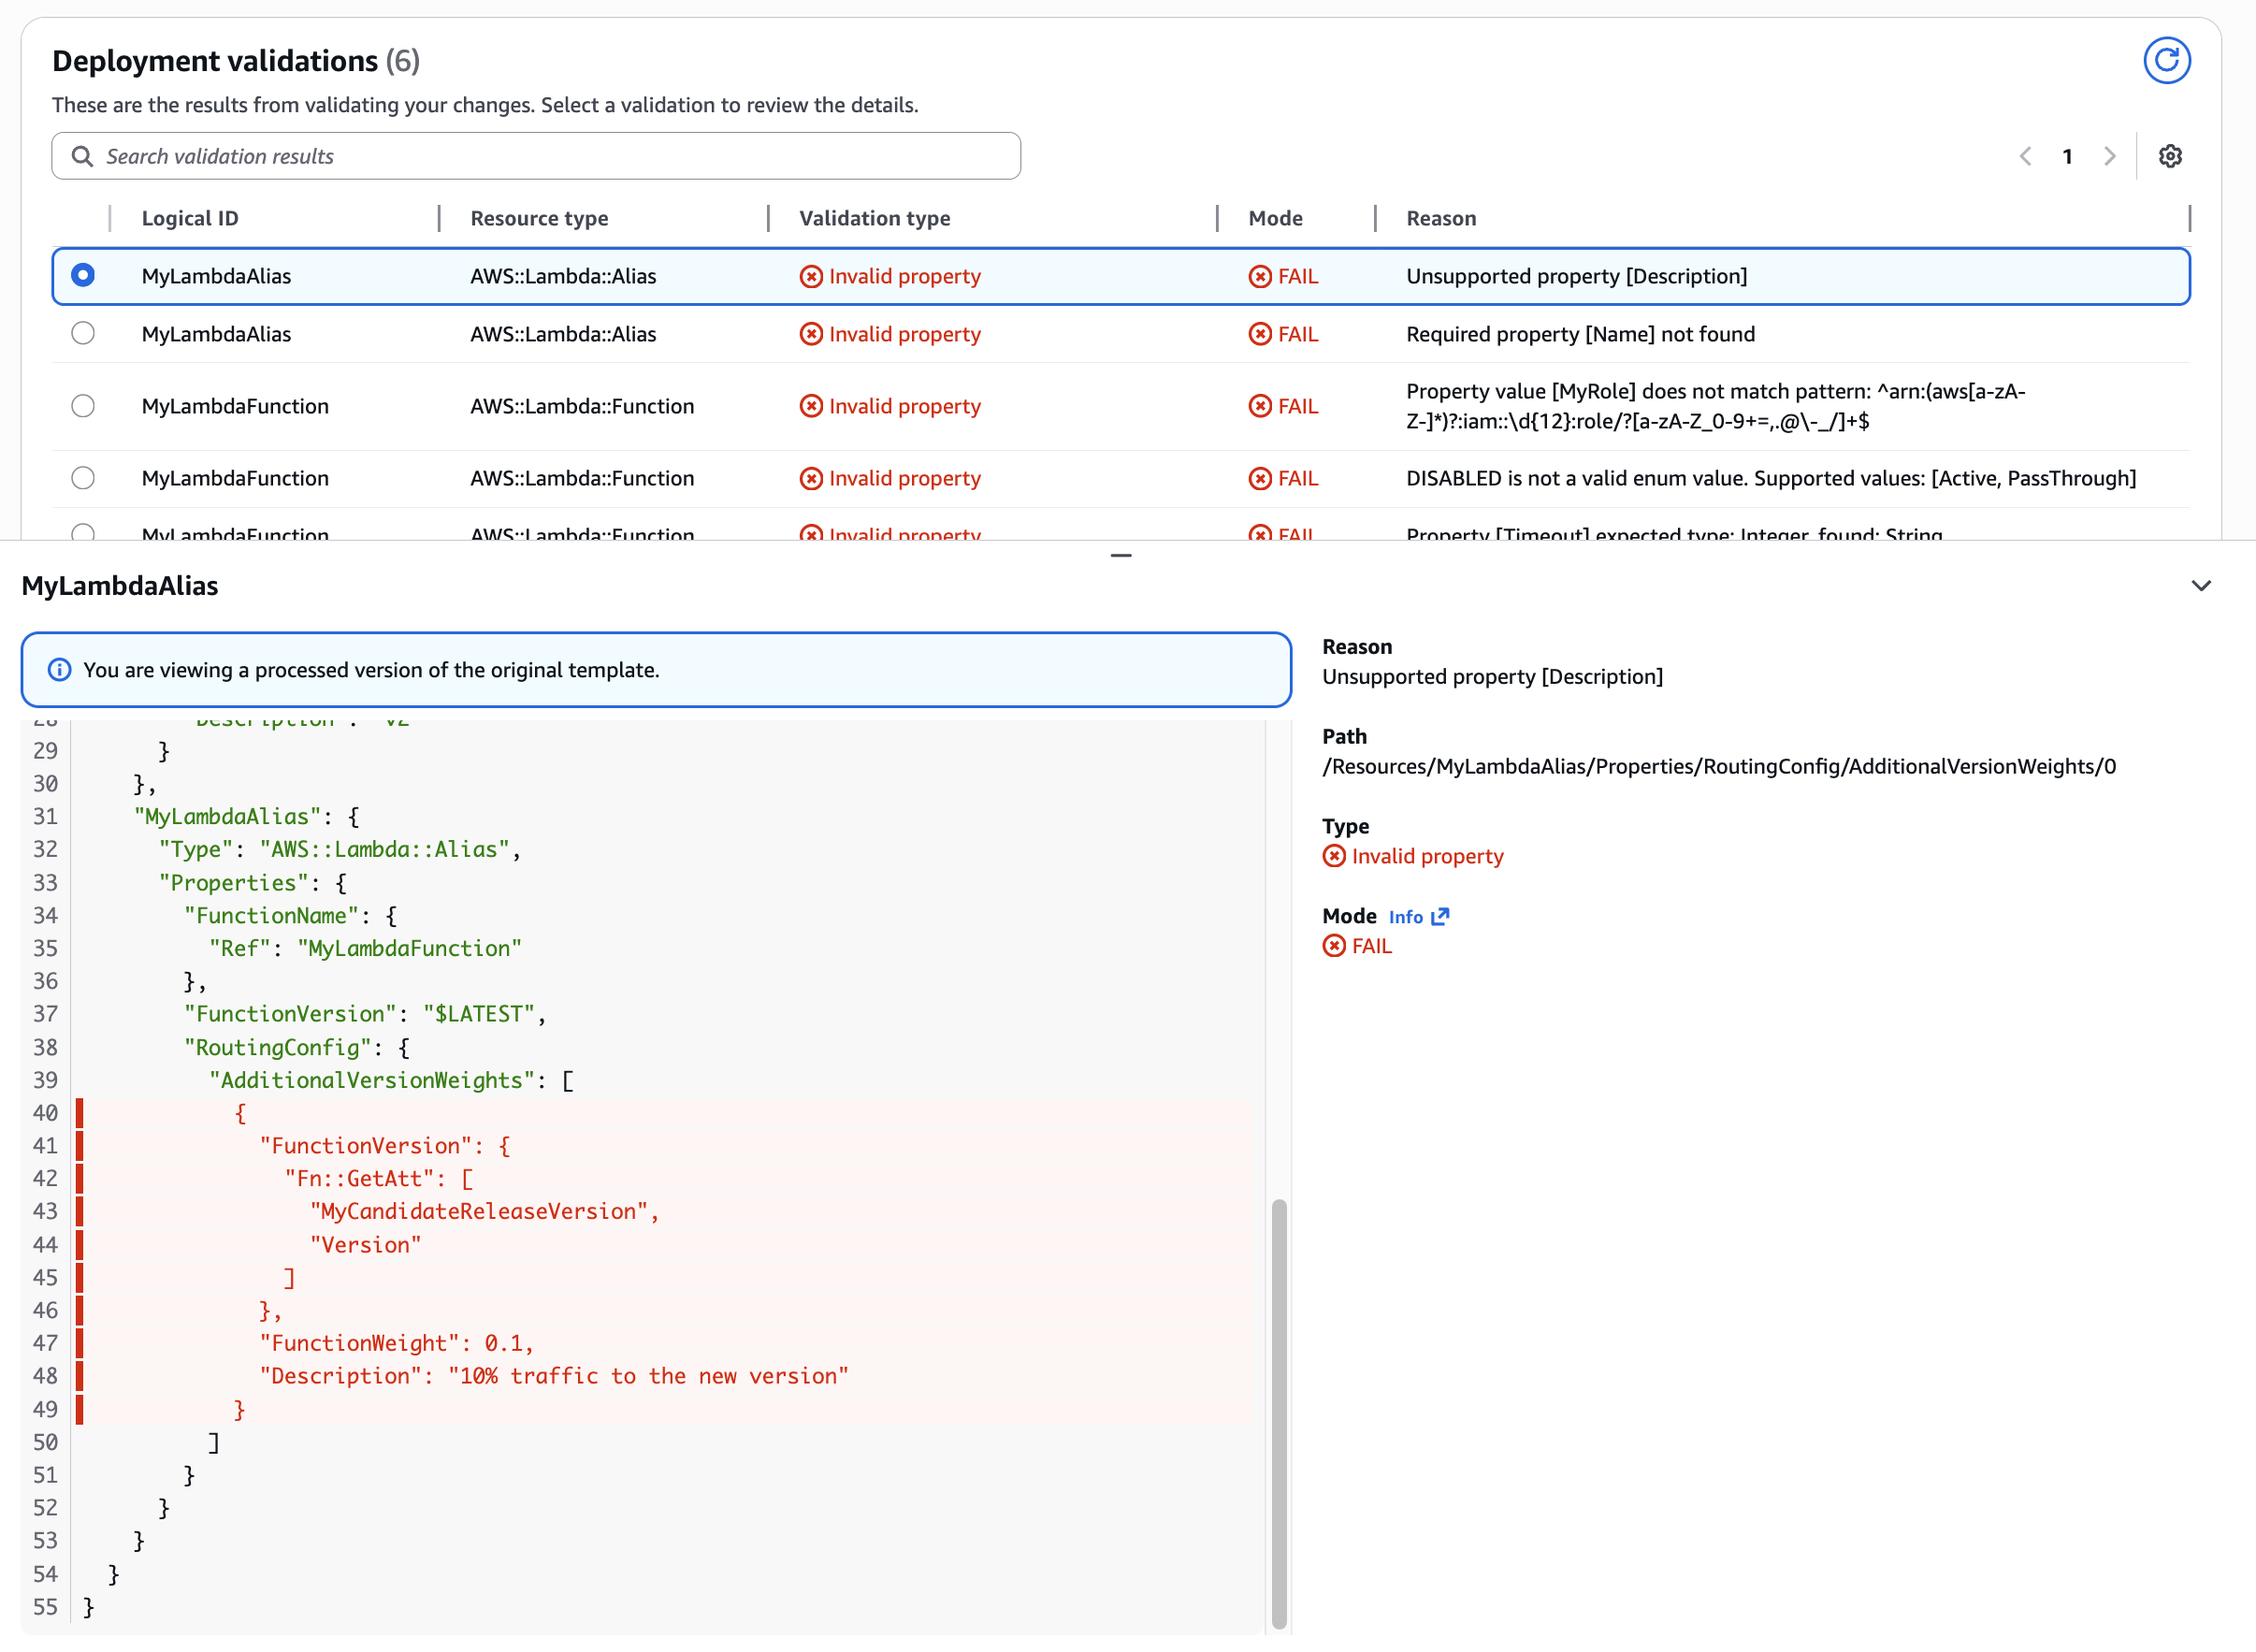
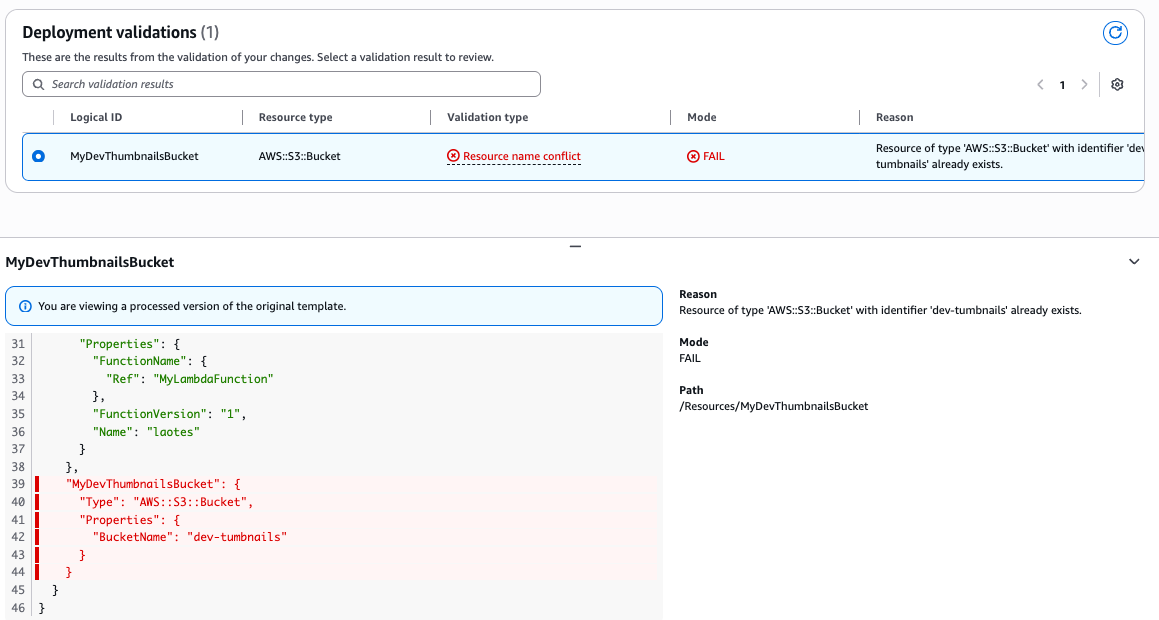
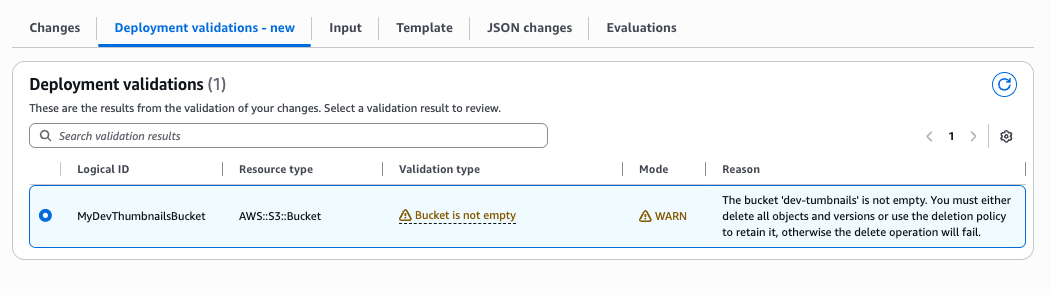
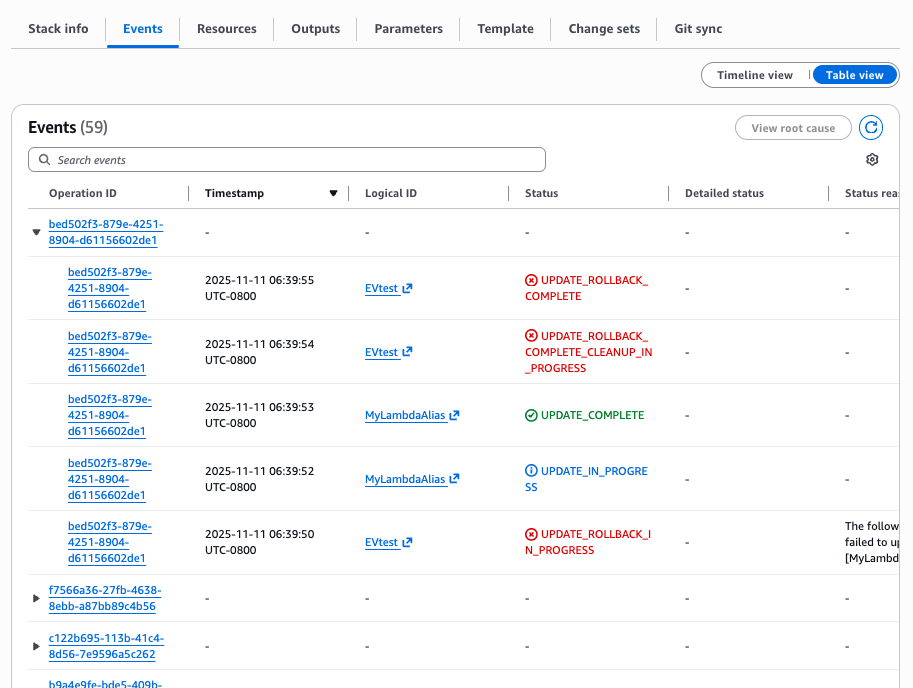
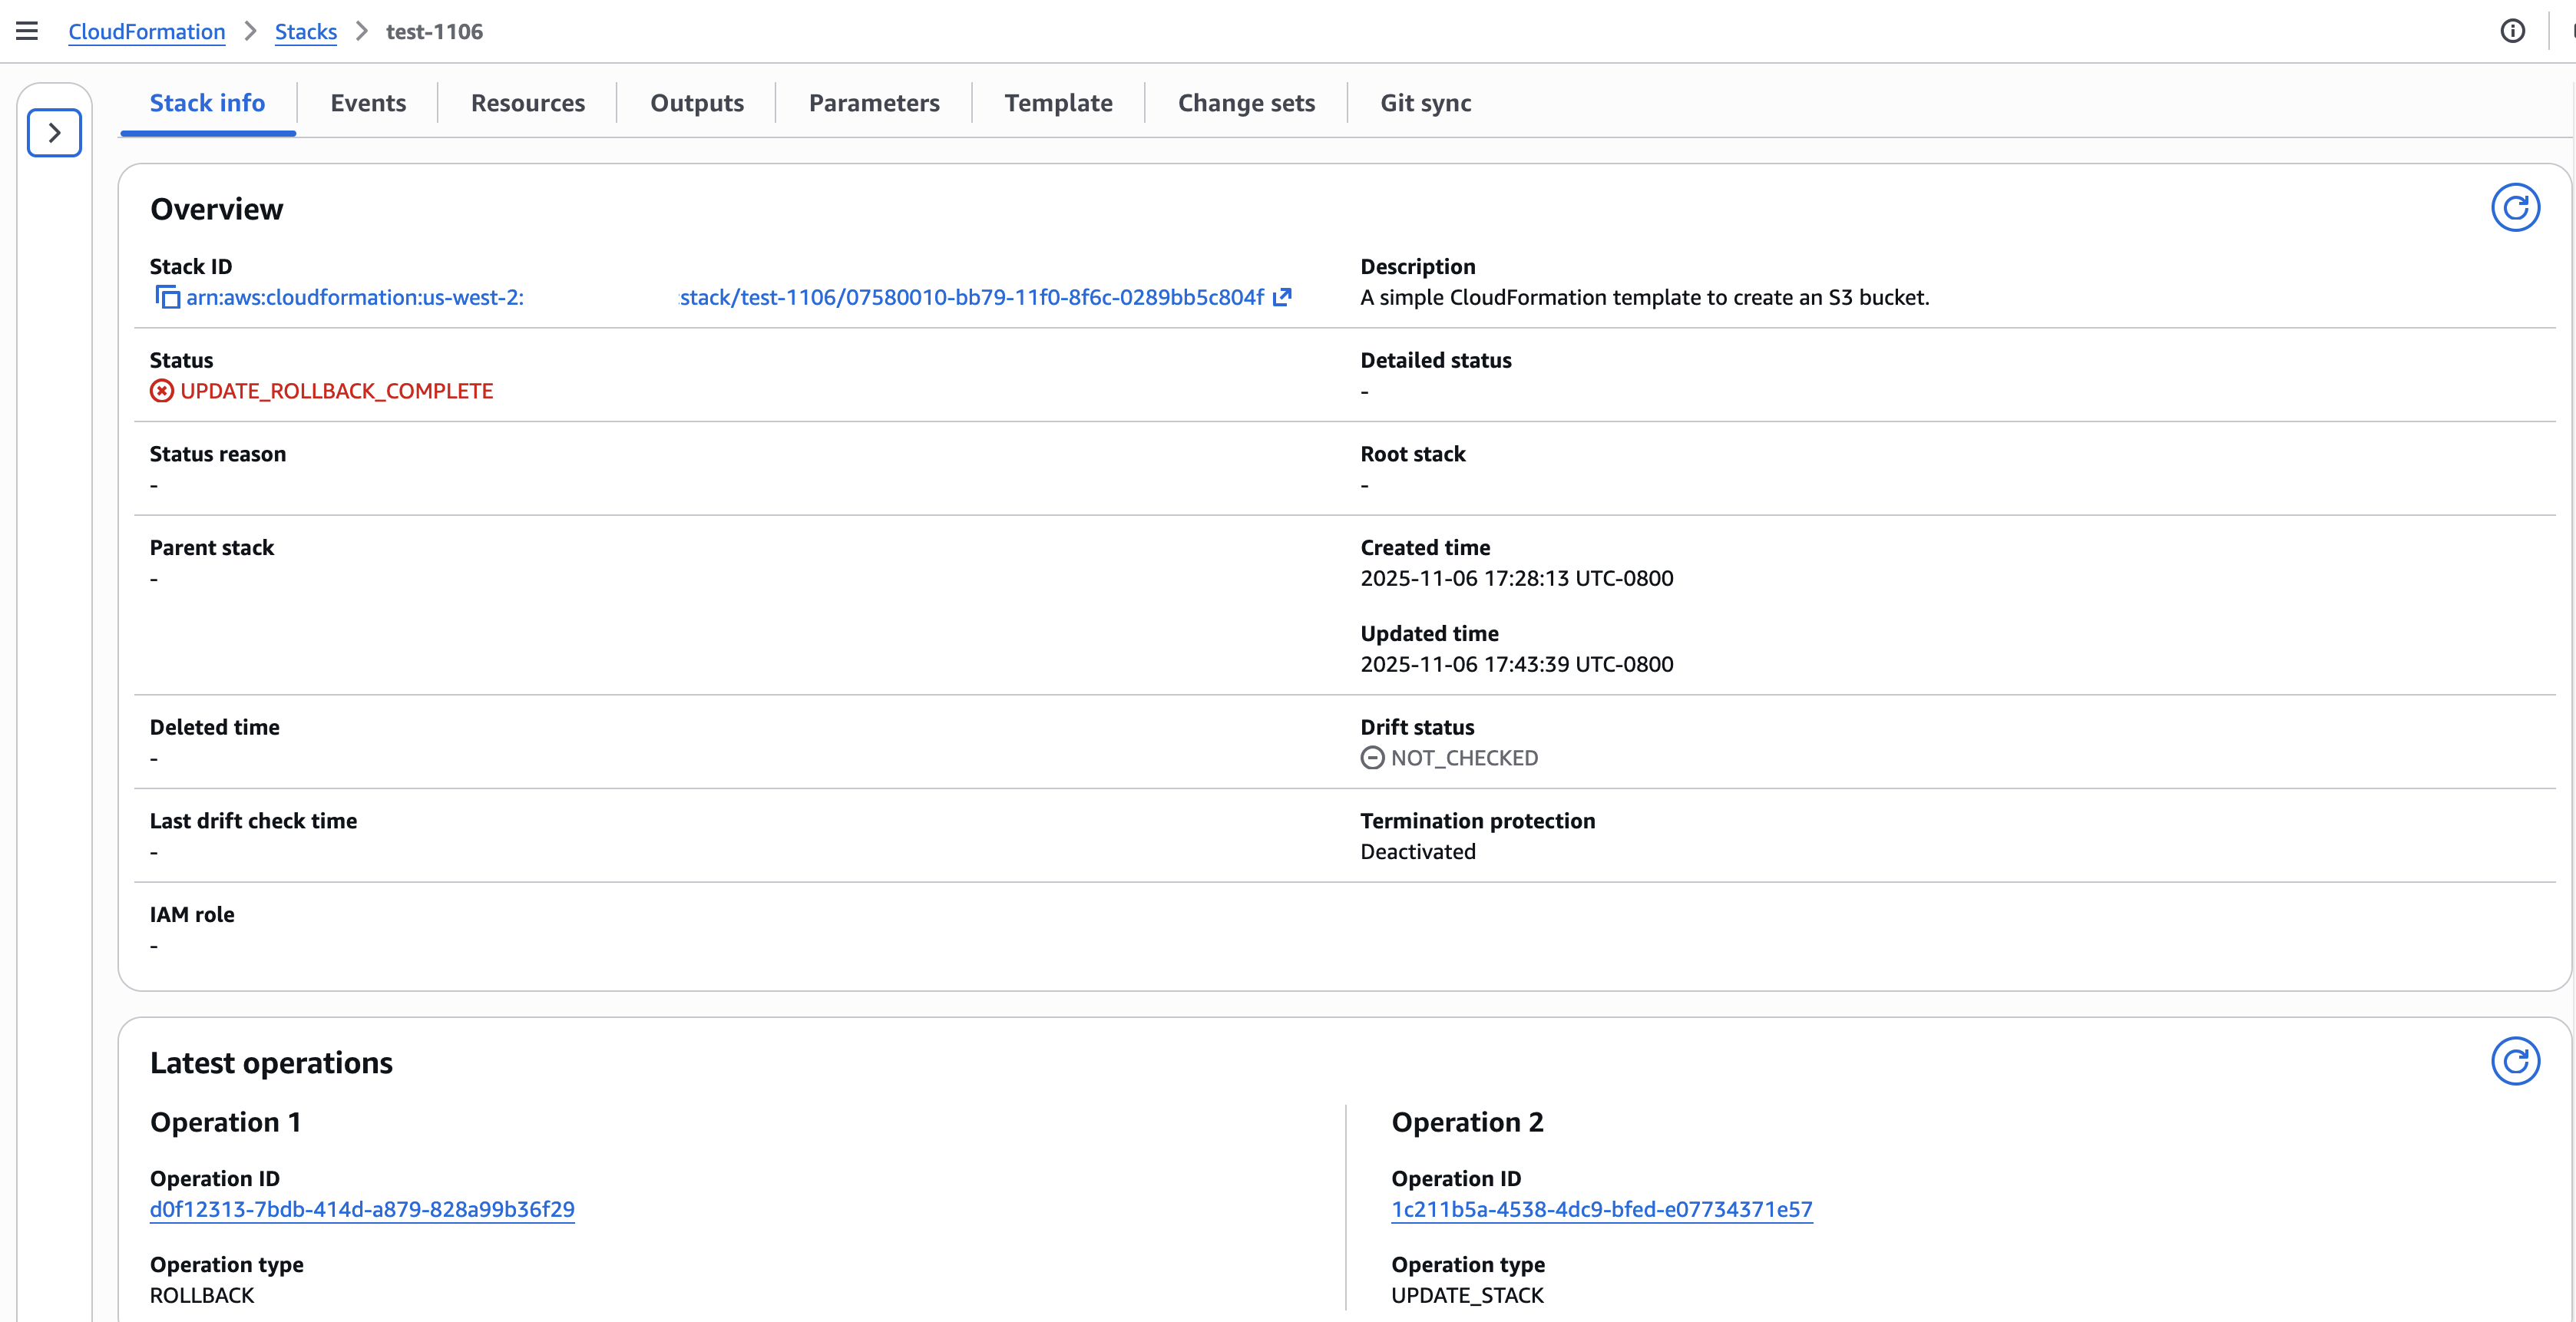
 Figure 12: New CloudFormation stack operation page
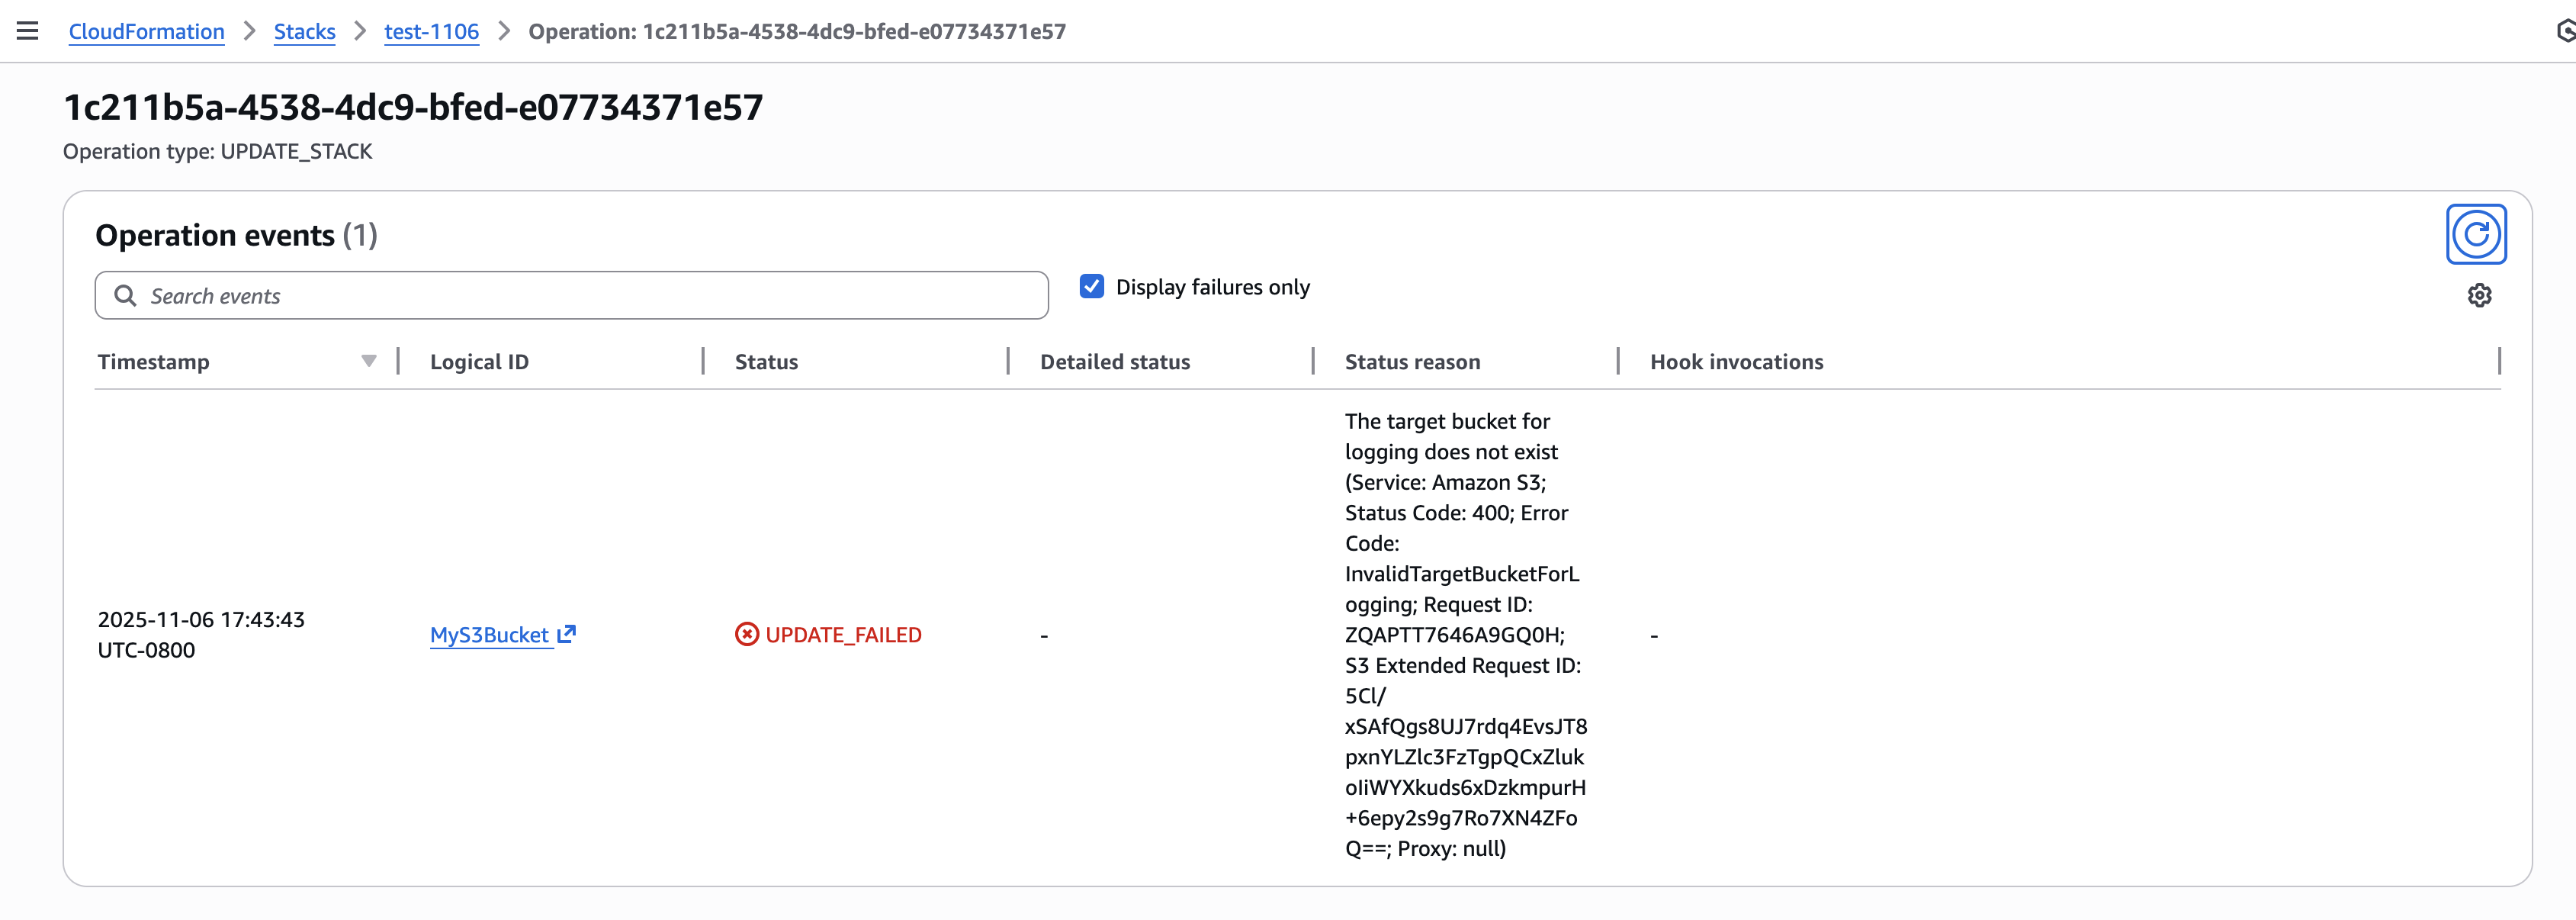
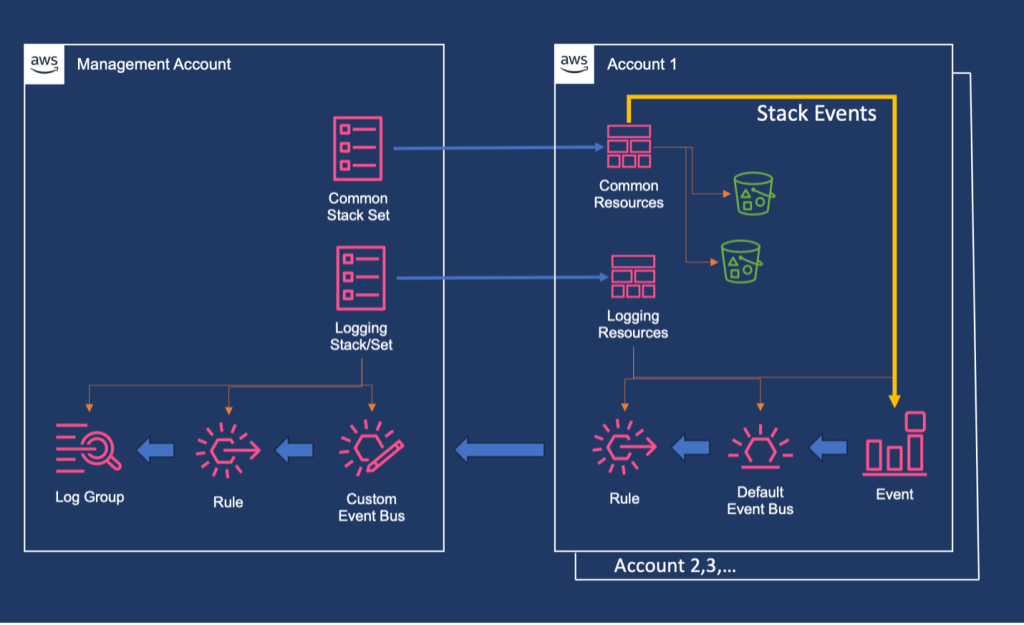
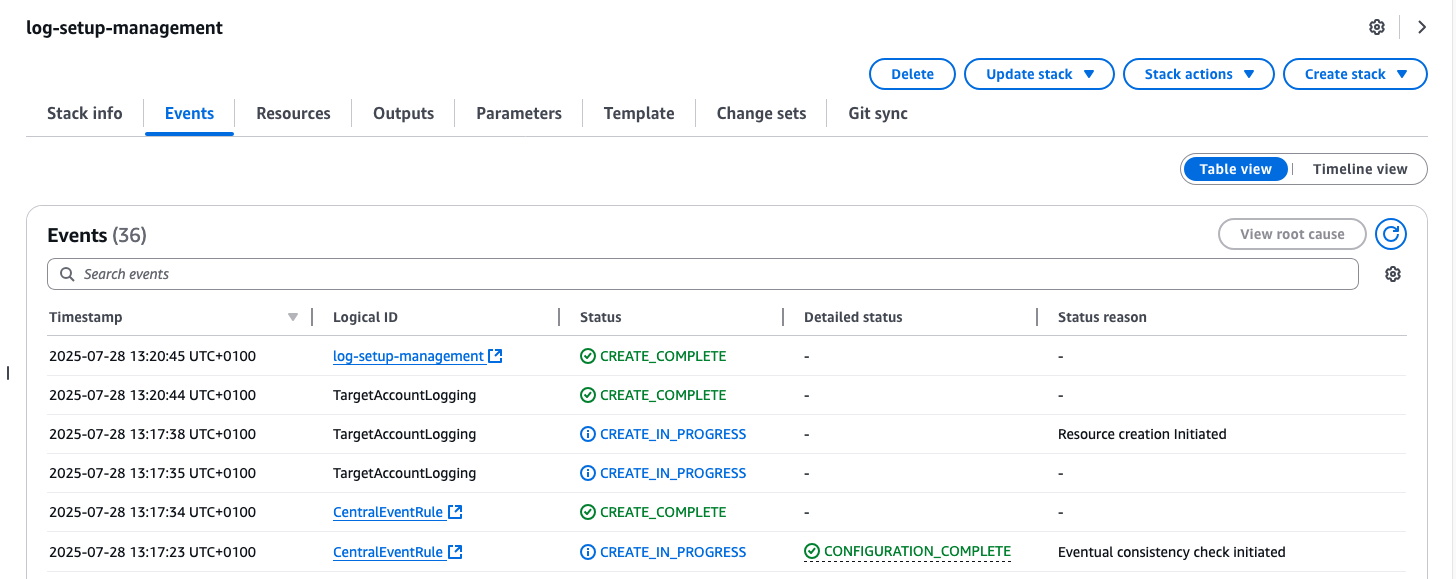
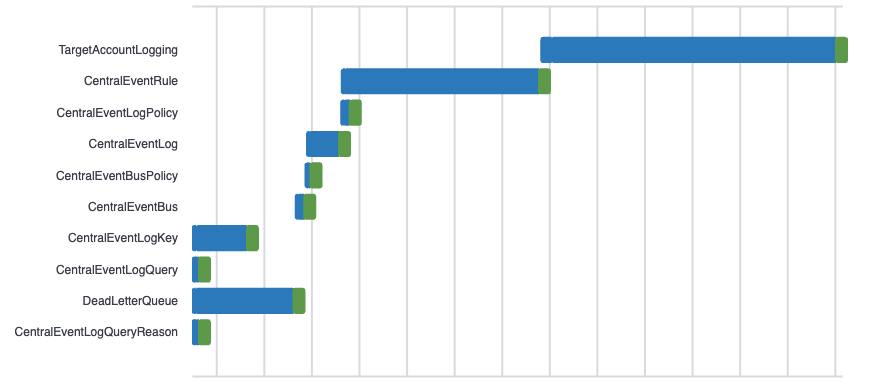
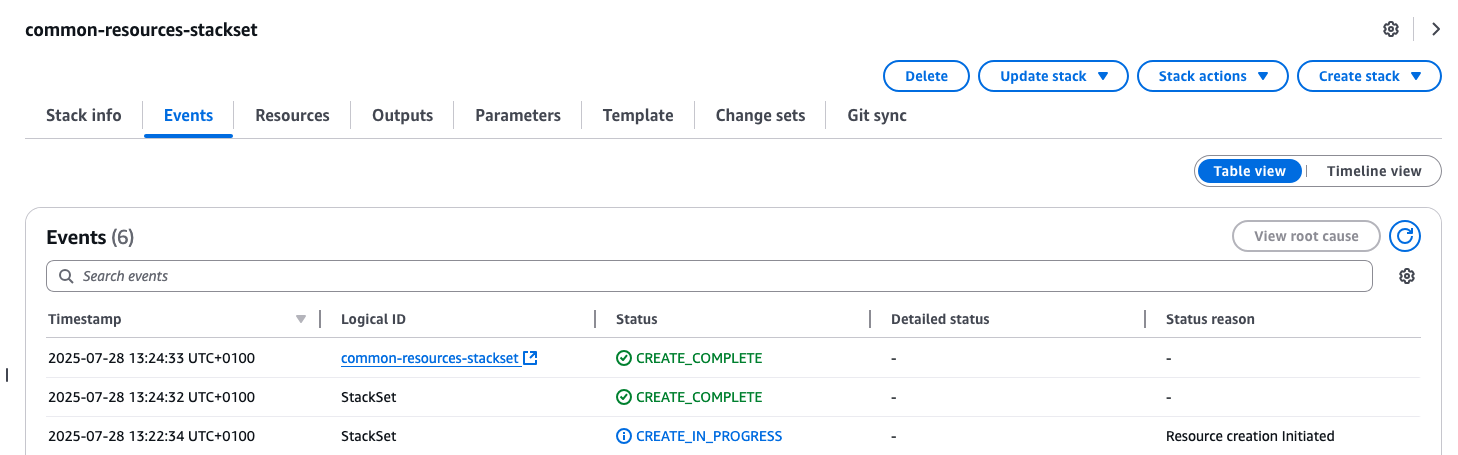
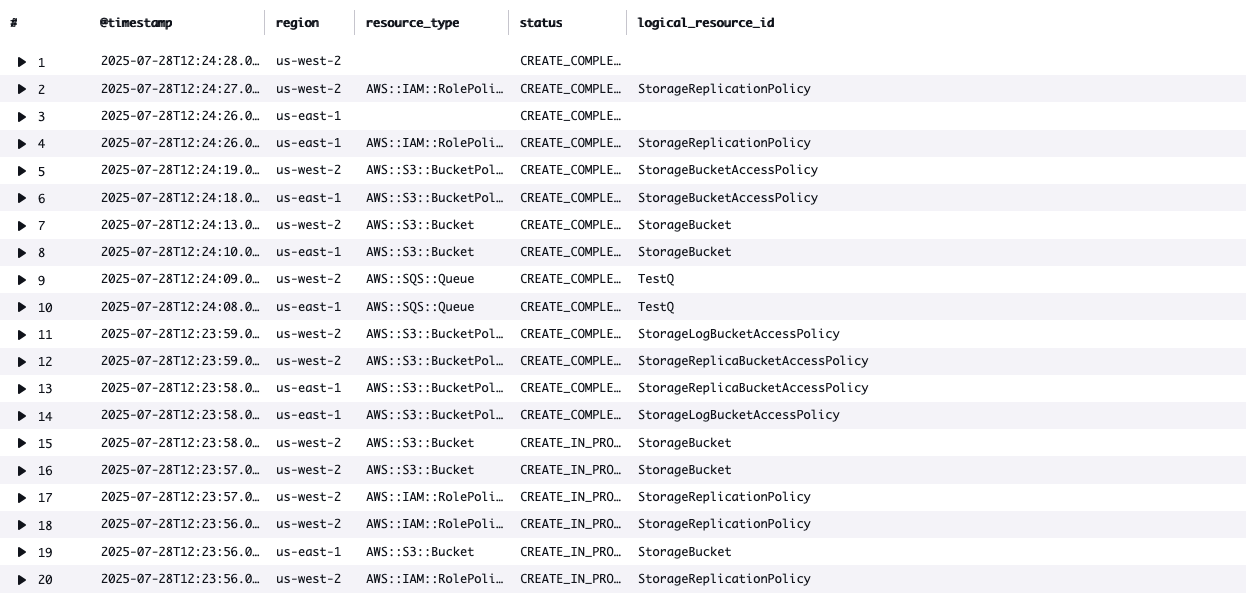
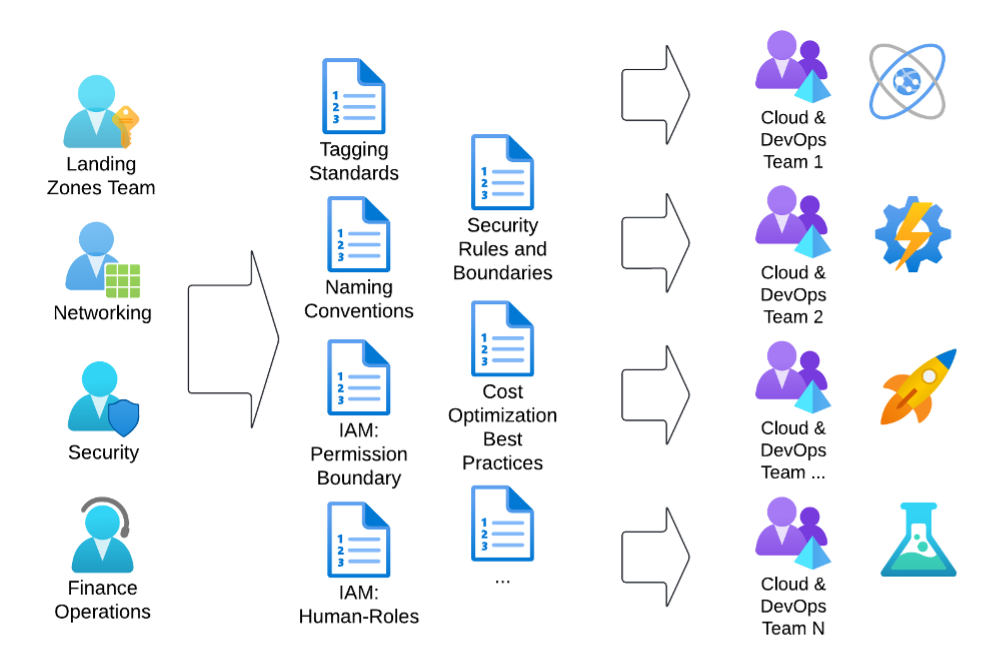
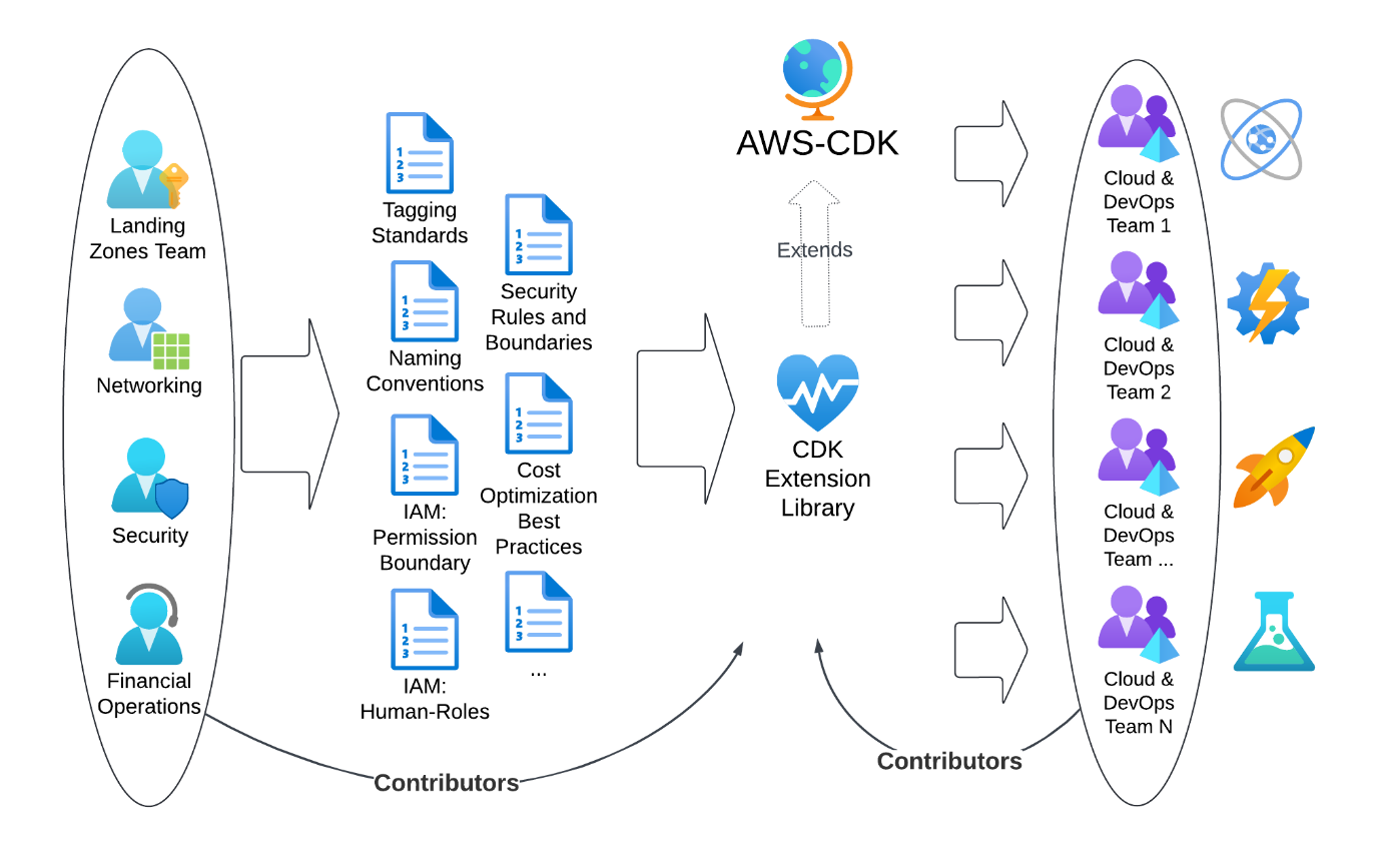
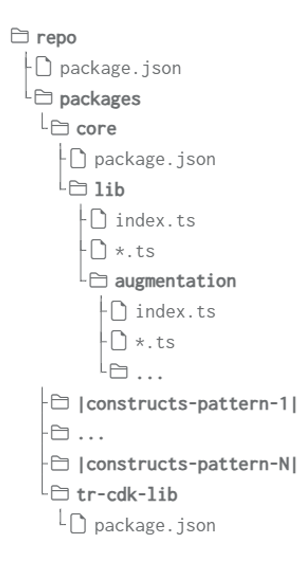
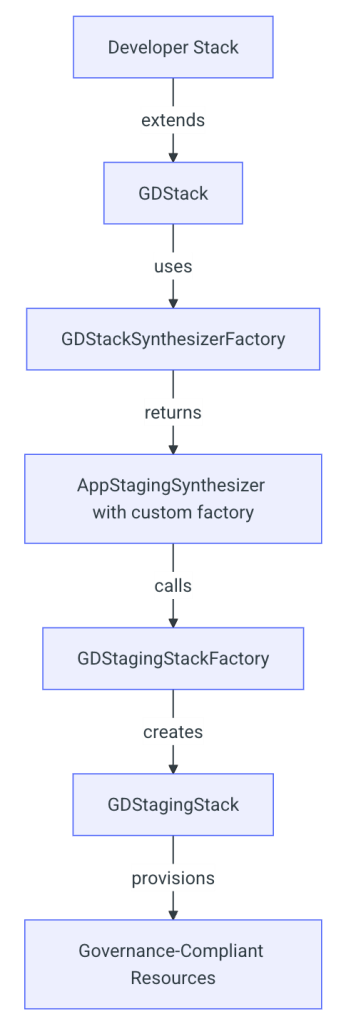
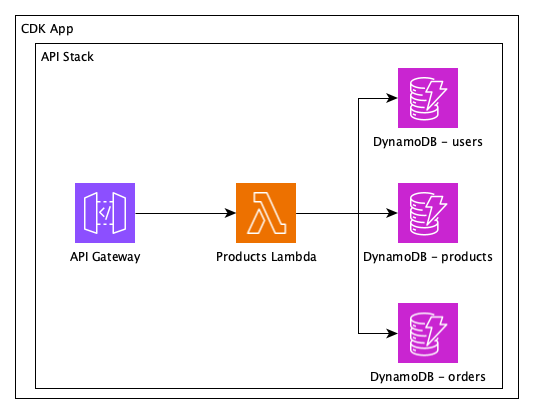
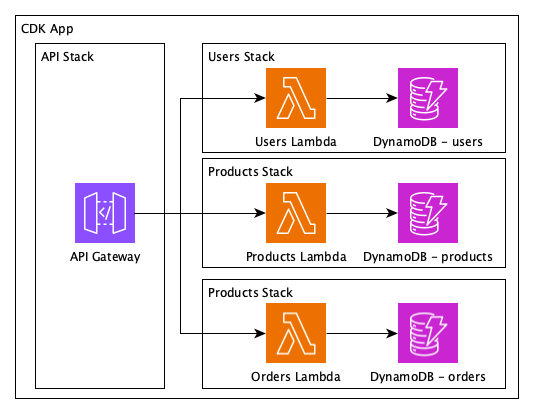
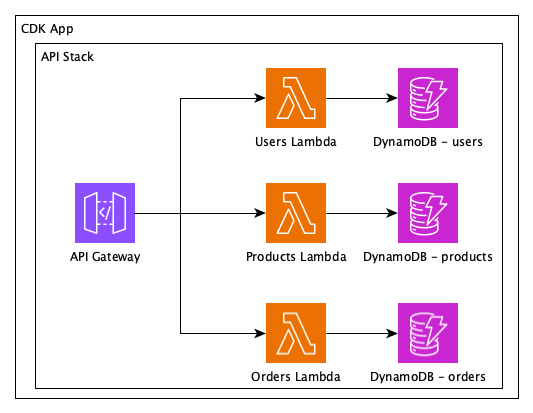
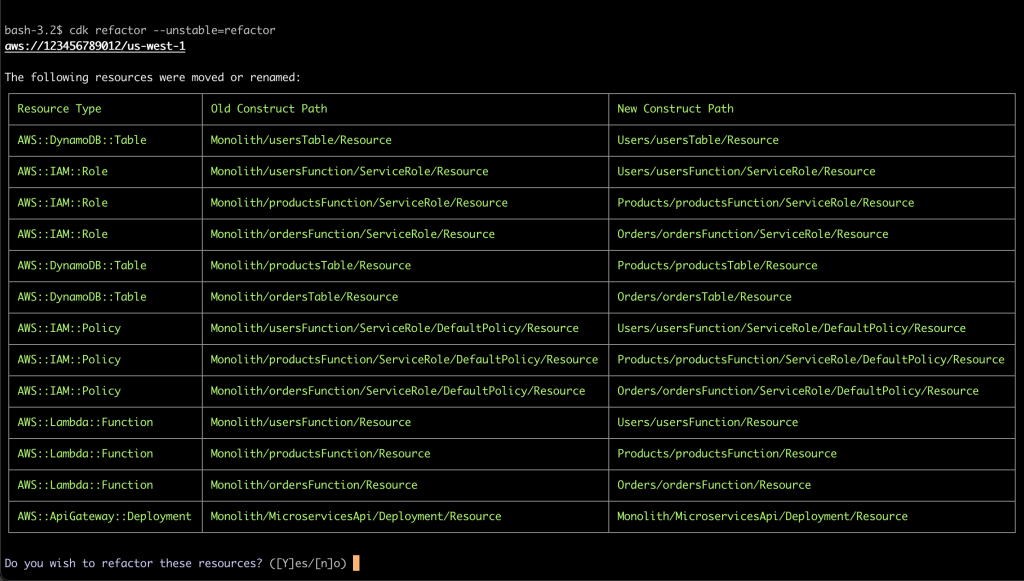
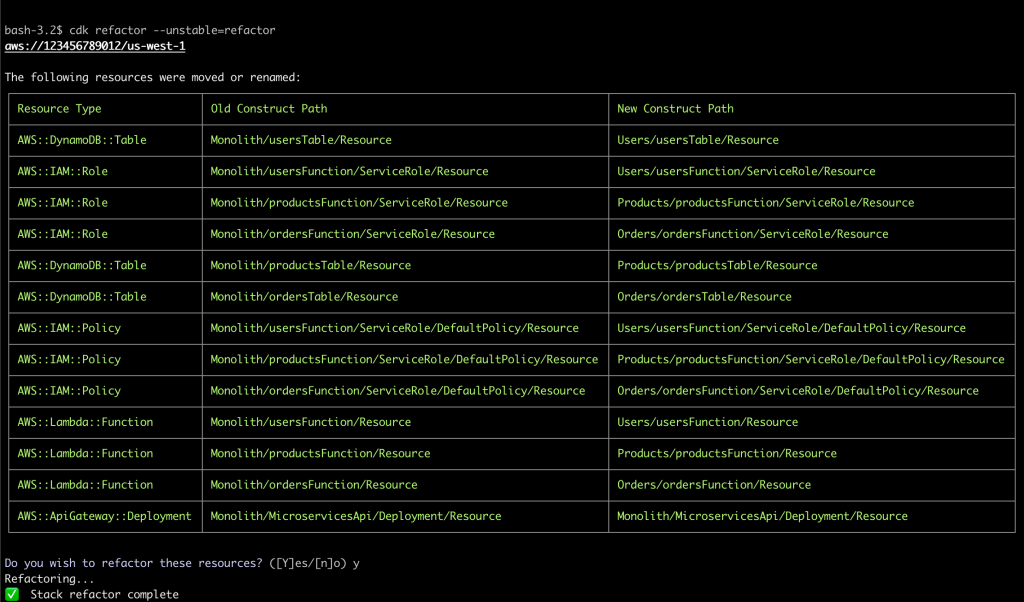


 Figure 4: CloudFormation troubleshooting with CloudTrail integration
 Figure 6: CloudFormation troubleshooting with Q feature

 Figure 9: IaC generator resource scan

 Figure 12: CloudFormation Hooks’ Lambda function feature
 Figure 14: CloudFormation Git sync with request review support feature
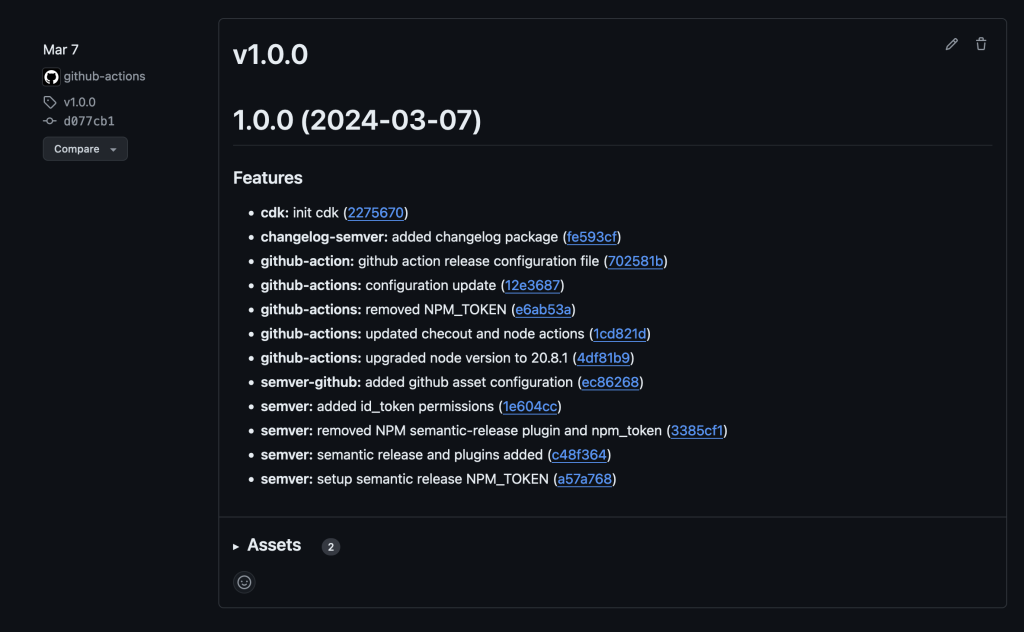


 Bandana Das is a Senior Data Architect at Amazon Web Services and specializes in data and analytics. She builds event-driven data architectures to support customers in data management and data-driven decision-making. She is also passionate about enabling customers on their data management journey to the cloud.
 Gezim Musliaj is a Senior DevOps Consultant with AWS Professional Services. He is interested in various things CI/CD, data, and their application in the field of IoT, massive data ingestion, and recently MLOps and GenAI.
 Sameer Ranjha is a Software Development Engineer on the Amazon DataZone team. He works in the domain of modern data architectures and software engineering, developing scalable and efficient solutions.
 Sindi Cali is an Associate Consultant with AWS Professional Services. She supports customers in building data-driven applications in AWS.
 Bhaskar Singh is a Software Development Engineer on the Amazon DataZone team. He has contributed to implementing AWS CloudFormation support for Amazon DataZone. He is passionate about distributed systems and dedicated to solving customers’ problems.


![A VPC selected in the scanned resources list]](https://d2908q01vomqb2.cloudfront.net/7719a1c782a1ba91c031a682a0a2f8658209adbf/2024/01/11/add-resources-to-template.png)


