Post Syndicated from Tyler Caslin original https://blog.cloudflare.com/waiting-room-random-queueing-and-custom-web-mobile-apps/

Today, we are announcing the general availability of Cloudflare Waiting Room to customers on our Enterprise plans, making it easier than ever to protect your website against traffic spikes. We are also excited to present several new features that have user experience in mind — an alternative queueing method and support for custom web/mobile applications.
First-In-First-Out (FIFO) Queueing
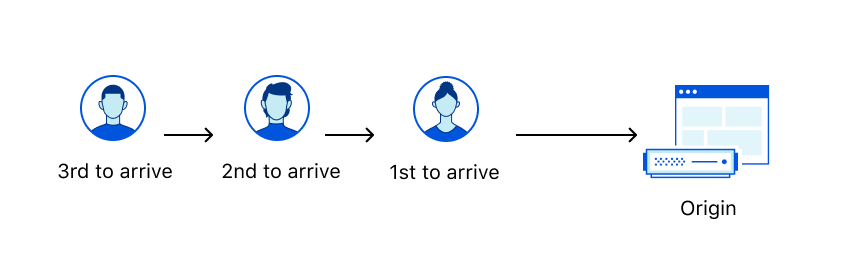
Whether you’ve waited to check out at a supermarket or stood in line at a bank, you’ve undoubtedly experienced FIFO queueing. FIFO stands for First-In-First-Out, which simply means that people are seen in the order they arrive — i.e., those who arrive first are processed before those who arrive later.
When Waiting Room was introduced earlier this year, it was first deployed to protect COVID-19 vaccine distributors from overwhelming demand — a service we offer free of charge under Project Fair Shot. At the time, FIFO queueing was the natural option due to its wide acceptance in day-to-day life and accurate estimated wait times. One problem with FIFO is that users who arrive later could see long estimated wait times and decide to abandon the website.
We take customer feedback seriously and improve products based on it. A frequent request was to handle users irrespective of the time they arrive in the Waiting Room. In response, we developed an additional approach: random queueing.
A New Approach to Fairness: Random Queueing
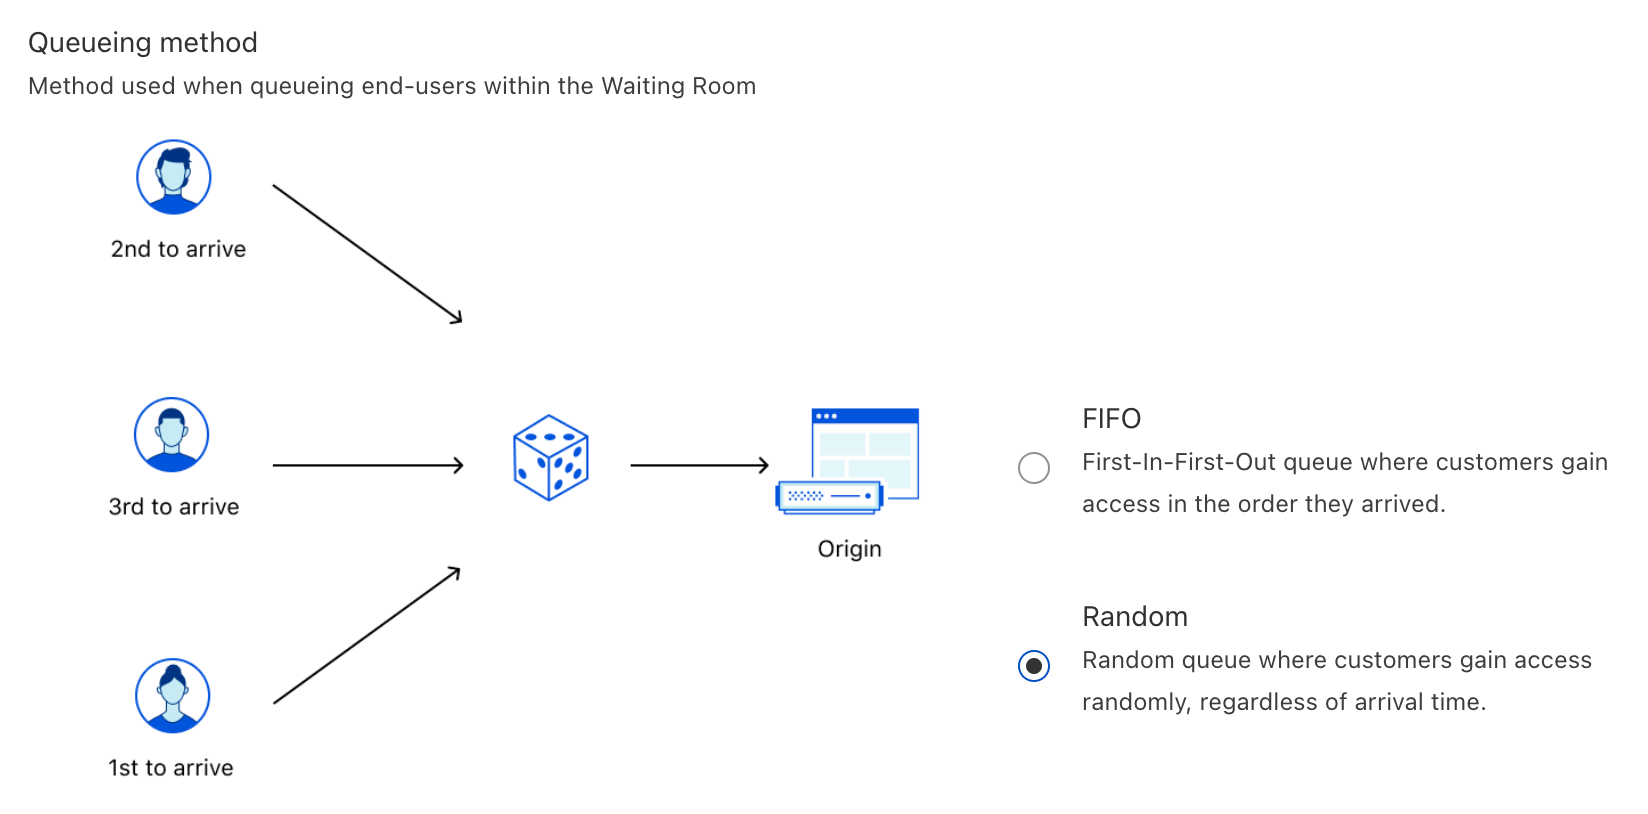
You can think of random queueing as participating in a raffle for a prize. In a raffle, people obtain tickets and put them into a big container. Later, tickets are drawn at random to determine the winners. The more time you spend in the raffle, the better your chances of winning at least once, since there will be fewer tickets in the container. No matter what, everyone participating in the raffle has an opportunity to win.
Similarly, in a random queue, users are selected from the Waiting Room at random, regardless of their initial arrival time. This means that you could be let into the application before someone who arrived earlier than you, or vice versa. Just like how you can buy more tickets in a raffle, joining a random queue earlier than someone else will give you more attempts to be accepted, but does not guarantee you will be let in. However, at any particular time, you will have the same chance to be let into the website as anyone else. This is different from a raffle, where you could have more tickets than someone else at a given time, providing you with an advantage.
Random queueing is designed to give everyone a fair chance. Imagine waking up excited to purchase new limited-edition sneakers only to find that the FIFO queue is five hours long and full of users that either woke up in the middle of the night to get in line or joined from earlier time zones. Even if you waited five hours, those sneakers would likely be sold out by the time you reach the website. In this case, you’d probably abandon the Waiting Room completely and do something else. On the other hand, if you were aware that the queue was random, you’d likely stick around. After all, you have a chance to be accepted and make a purchase!
As a result, random queueing is perfect for short-lived scenarios with lots of hype, such as product launches, holiday traffic, special events, and limited-time sales.
By contrast, when the event ends and traffic returns to normal, a FIFO queue is likely more suitable, since its widely accepted structure and accurate estimated wait times provide a consistent user experience.
How Does Random Queueing Work?
Perhaps the best part about random queueing is that it maintains the same internal structure that powers FIFO. As a result, if you change the queueing method in the dashboard — even when you may be actively queueing users — the transition to the new method is seamless. Imagine you have users 1, 2, 3, 4, and 5 waiting in a FIFO queue in the order 5 → 4 → 3 → 2 → 1, where user 1 will be the next user to access the application. Let’s assume you switch to random queueing. Now, any user can be accepted next. Let’s assume user 4 is accepted. If you decide to immediately switch back to FIFO queueing, the queue will reflect the order 5 → 3 → 2 → 1. In other words, transitioning from FIFO to random and back to FIFO will respect the initial queue positions of the users! But how does this work? To understand, we first need to remember how we built Waiting Room for FIFO.
Recall the Waiting Room configurations:
- Total Active Users. The total number of active users that can be using the application at any given time.
- New Users Per Minute. The maximum number of new users per minute that can be accepted to the application.
Next, remember that Waiting Room is powered by cookies. When you join the Waiting Room for the first time, you are assigned an encrypted cookie. You bring this cookie back to the Waiting Room and update it with every request, using it to prove your initial arrival time and status.
Properties in the Waiting Room cookie include:
- bucketId. The timestamp rounded down to the nearest minute of the user’s first request to the Waiting Room. If you arrive at 10:23:45, you will be grouped into a bucket for 10:23:00.
- acceptedAt. The timestamp when the user got accepted to the origin website for the first time.
- refreshIntervalSeconds. When queueing, this is the number of seconds the user must wait before sending another request to the Waiting Room.
- lastCheckInTime. The last time each user checked into the Waiting Room or origin website. When queueing, this is only updated for requests every refreshIntervalSeconds.
For any given minute, we can calculate the number of users we can let into the origin website. Let’s say we deploy a Waiting Room on “https://example.com/waitingroom” that can support 10,000 Total Active Users, and we allow up to 2,000 New Users Per Minute. If there are currently 7,000 active users on the website, we have 10,000 – 7,000 = 3,000 open slots. However, we need to take the minimum (3,000, 2,000) = 2,000 since we need to respect the New Users Per Minute limit. Thus, we have 2,000 available slots we can give out.
Let’s assume there are 2,500 queued users that joined over the last three minutes in groups of 500, 1,000, and 1,000, respectively for the timestamps 15:54, 15:55, and 15:56. To respect FIFO queueing, we will take our 2,000 available slots and try to reserve them for users who joined first. Thus, we will reserve 500 available slots for the users who joined at 15:54 and then reserve 1000 available slots for the users who joined at 15:55. When we get to the users for 15:56, we see that we only have 500 slots left, which is not enough for the 1,000 queued users for this minute:
{
	"activeUsers": 7000,
	"buckets": [{
			"key": "Thu, 27 May 2021 15:54:00 GMT",
			"data": {
				"waiting": 500,
				"reservedSlots": 500
			}
		},
		{
			"key": "Thu, 27 May 2021 15:55:00 GMT",
			"data": {
				"waiting": 1000,
				"reservedSlots": 1000
			}
		},
		{
			"key": "Thu, 27 May 2021 15:56:00 GMT",
			"data": {
				"waiting": 1000,
				"reservedSlots": 500
			}
		}
	]
}
Since we have reserved slots for all users with bucketIds of 15:54 and 15:55, they can be let into the origin website from any data center. However, we can only let in a subset of the users who initially arrived at 15:56.
| Timestamp (bucketId) | Queued Users | Reserved Slots | Strategy |
|---|---|---|---|
| 15:54 | 500 | 500 | Accept all users |
| 15:55 | 1,000 | 1,000 | Accept all users |
| 15:56 | 1,000 | 500 | Accept subset of users |
These 500 slots for 15:56 are allocated to each Cloudflare edge data center based on its respective historical traffic data, and further divided for each Cloudflare Worker within the data center. For example, let’s assume there are two data centers — Nairobi and Dublin — which share 60% and 40% of the traffic, respectively, for this minute. In this case, we will allocate 500 * .6 = 300 slots for Nairobi and 500 * .4 = 200 slots for Dublin. In Nairobi, let’s say there are 3 active workers, so we will grant each of them 300 / 3 = 100 slots. If you make a request to a worker in Nairobi and your bucketId is 15:56, you will be allowed in and consume a slot if the worker still has at least one of its 100 slots available. Since we have reserved all 2,000 available slots, users with bucketIds after 15:56 will have to continue queueing.
Let’s modify this case and assume we only have 200 queued users, all of which are in the 15:54 bucket. First, we reserve 200 slots for these queued users, leaving us 2,000 – 200 = 1,800 remaining slots. Since we have reserved slots for all queued users, we can use the remaining 1,800 slots on new users — people who have just made their first request to the Waiting Room and don’t have a cookie or bucketId yet. Similar to how we handle buckets with fewer slots than queued users, we will distribute these 1,800 slots to each data center, allocating 1,800 * .6 = 1,080 to Nairobi and 1,800 * .4 = 720 to Dublin. In Nairobi, we will split these equally across the 3 workers, giving them 1,080 / 3 = 360 slots each. If you are a new user making a request to a worker in Nairobi, you will be accepted and take a slot if the worker has at least one of its 360 slots available, otherwise you will be marked as a queued user and enter the Waiting Room.
Now that we have outlined the concepts for FIFO, we can understand how random queueing operates. Simply put, random queueing functions the same way as FIFO, except we pretend that every user is new. In other words, we will not look at reserved slots when making the decision if the user should be let in. Let’s revisit the last case with 200 queued users in the 15:54 bucket and 2,000 available slots. When random queueing, we allocate the full 2,000 slots to new users, meaning Nairobi gets 2,000 * .6 = 1,200 slots and each of its 3 workers gets 1,200 / 3 = 400 slots. No matter how many users are queued or freshly joining the Waiting Room, all of them will have a chance at taking these slots.
Finally, let’s reiterate that we are only pretending that all users are new — we still assign them to bucketIds and reserve slots as if we were FIFO queueing, but simply don’t make any use of this logic while random queueing is active. That way, we can maintain the same FIFO structure while we are random queueing so that if necessary, we can smoothly transition back to FIFO queueing and respect initial user arrival times.
How “Random” is Random Queueing?
Since random queueing is basically a race for available slots, we were concerned that it could be exploited if the available user slots and the queued user check-ins did not occur randomly.
To ensure all queued users can attempt to get into the website at the same rate, we store (in the encrypted cookie) the last time each user checked into the Waiting Room (lastCheckInTime) to prevent them from attempting to gain access to the website until a number of seconds have passed (refreshIntervalSeconds). This means that spamming the page refresh button will not give you an advantage over other queued users! Be patient — the browser will refresh automatically the moment you are eligible for another chance.
Next, let’s imagine five queued users checking into the Waiting Room every refreshIntervalSeconds=30 at approximately the :00 and :30 minute marks. A new queued user joins the Waiting Room and checks in at approximately :15 and :45. If new slots are randomly released, this new user will have about a 50% chance of being selected next, since it monopolizes over the :00-15 and :30-45 ranges. On the other hand, the other five queued users share the :15-30 and :45-00 ranges, giving them about a 50% / 5 = 10% chance each. Let’s consider that new slots are not randomly released and assume they are always released at :59. In this case, the new queued user will have virtually no chance to be selected before the other five queued users because these users will always check in one second later at :00, immediately consuming any newly released slots.
To address this vulnerability, we changed our implementation to ensure that slots are released randomly and encouraged users to check in at random offsets from each other. To help split up users that are checking in at similar times, we vary each user’s refreshIntervalSeconds by a small, pseudo-randomly generated offset for each check-in and store this new refresh interval in the encrypted Waiting Room cookie for validation on the next request. Thus, a user who previously checked in every 30 seconds might now check in after 29 seconds, then 31 seconds, then 27 seconds, and so on — but still averaging a 30-second refresh interval. Over time, these slight check-in variations become significant, spreading out user check-in times and strengthening the randomness of the queue. If you are curious to learn more about the apparent “randomness” behind mixing user check-in intervals, you can think of it as a chaotic system subjected to the butterfly effect.
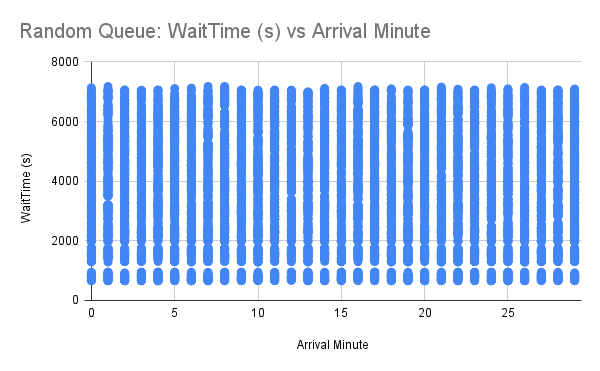
Nevertheless, we weren’t convinced our efforts were enough and wanted to test random queueing empirically to validate its integrity. We conducted a simulation of 10,000 users joining a Waiting Room uniformly across 30 minutes. When let into the application, users spent approximately 1 minute “browsing” before they stopped checking in. We ran this experiment for both FIFO and random queueing and graphed each user’s observed wait time in seconds in the Waiting Room against the minute they initially arrived (starting from 0). Recall that users are grouped by minute using bucketIds, so each user’s arrival minute is truncated down to the current minute.
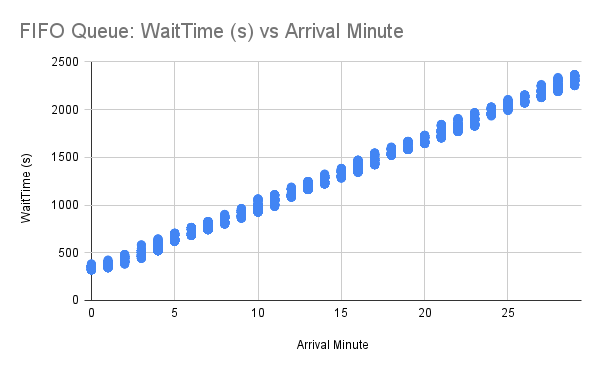
Based on our data, we can see immediately for FIFO queueing that, as the arrival minute increases, the observed wait time increases linearly. This makes sense for a FIFO queue, since the “line” will just get longer if there are more users entering the queue than leaving it. For each arrival minute, there is very little variation among user wait times, meaning that if you and your friend join a Waiting Room at approximately the same time, you will both be accepted around the same time. If you join a couple of minutes before your friend, you will almost always be accepted first.
When looking at the results for random queueing, we observe users experiencing varied wait times regardless of the arrival minute. This is expected, and helps prove the “randomness” of the random queue! We can see that, if you join five minutes after your friend, although your friend will have more chances to get in, you may still be accepted first! However, there are so many data points overlapping with each other in the plot that it is hard to tell how they are distributed. For instance, it could be possible that most of these data points experience extreme wait times, but as humans we aren’t able to tell.
As a result, we created heatmaps of these plots in Python using numpy.histogram2d and displayed them with matplotlib.pyplot:
import json
import numpy as np
import matplotlib.pyplot as plt
import sys

filename = sys.argv[1]

with open(filename) as file:
   data = json.load(file)

   x = data["ArrivalMinutes"]
   y = data["WaitTimeSeconds"]

   heatmap, _, _ = np.histogram2d(x, y, bins=(30, 30))

   plt.clf()
   plt.title(filename)
   plt.xlabel('Arrival Minute Buckets')
   plt.ylabel('WaitTime Buckets')
   plt.imshow(heatmap.T, origin='lower')
   plt.show()
The heatmaps display where the data points are concentrated in the original plot, using brighter (hotter) colors to represent areas containing more points:
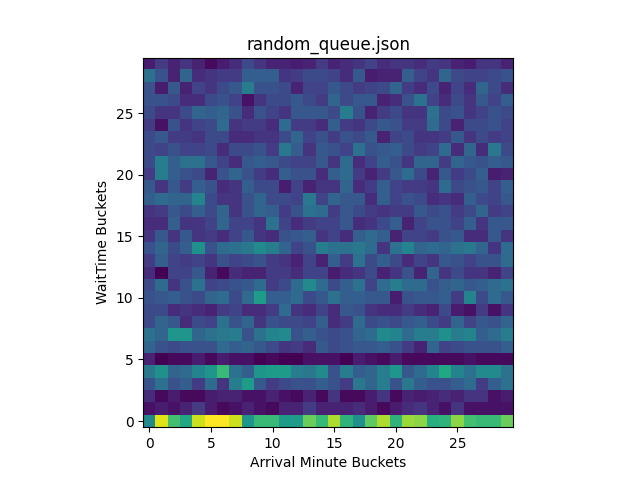
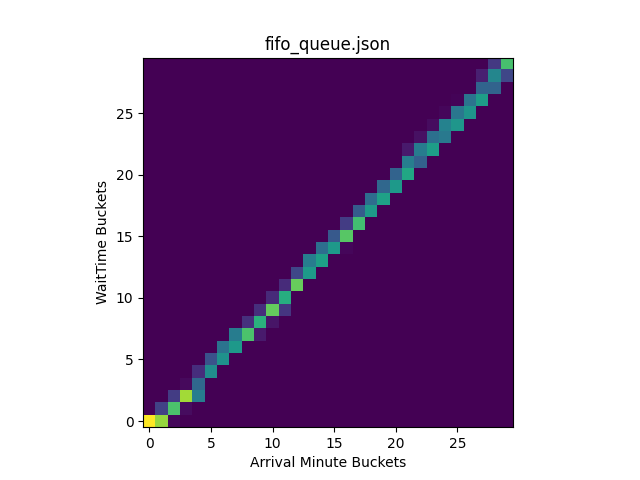
By inspecting the generated heatmaps, we can conclude that FIFO and random queueing are working properly. For FIFO queueing, users are being accepted in the order they arrive. For random queueing, we can see that users are accepted to the origin regardless of arrival time. Overall, we can see the heatmap for random queueing is well distributed, indicating it is sufficiently random!
If you are curious why random queueing has very hot colors along the lowest wait times followed by very dark colors afterward, it is actually because of how we are simulating the queue. For the simulation, we spoofed the bucketIds of the users and let them all join the Waiting Room at once to see who would be let in first. In the random queueing heatmap, the bright colors along the lowest wait time buckets indicate that many users were accepted quickly after joining the queue across all bucketIds. This is expected, demonstrating that random queueing does not give an edge to users who join earlier, giving each user a fair chance regardless of its bucketId. The reason why these users were almost immediately accepted in WaitTime Bucket 0 is because this simulation started with no users on the origin, meaning new users would be accepted until the Waiting Room limits were reached. Since this first wave of accepted users “browsed” on the origin for a minute before leaving, no additional users during this time were let in. Thus, the colors are very dark for WaitTime Buckets 1 and 2. Similarly, the second wave of users is randomly selected afterward, followed by another period of time when no users were accepted in WaitTime Bucket 5. As the wait time increases, the more attempts a particular user will have to be let in, meaning it is unlikely for users to have extreme wait times. We can see this by observing the colors grow darker as the WaitTime Bucket approaches 29.
How Is Estimated Time Calculated for Random Queueing?
In a random queue, you can be accepted at any moment… so how can you display an estimated wait time? For a particular user, this is an impossible task, but when you observe all the users together, you can accurately account for most user experiences using a probabilistic estimated wait time range.
At any given moment, we know:
- letInPerMinute. The current average users per minute being let into the origin.
- currentlyWaiting. The current number of users waiting in the queue.
Therefore, we can calculate the probability of a user being let into the origin in the next minute:
P(LetInOverMinute) = letInPerMinute / currentlyWaiting
If there are 100 users waiting in the queue, and we are currently letting in 10 users per minute, the probability a user will be let in over the next minute is 10 / 100 = .1 (10%).
Using P(LetInOverMinute), we can determine the n minutes needed for a p chance of being let into the origin:
p = 1 – (1 – P(LetInOverMinute))n
Recall that the probability of getting in at least once is the complement of not getting in at all. The probability of not being let into the origin over n minutes is (1 – P(LetInOverMinutes))n. Therefore, the probability of getting in at least once is 1 – (1 – P(LetInOverMinute))n. This equation can be simplified further:
n = log(1 – p) / log(1 – P(LetInOverMinute))
Thus, if we want to calculate the estimated wait time to have a p = .5 (50%) chance of getting into the origin with the probability of getting let in during a particular minute P(LetInOverMinute) = .1 (10%), we calculate:
n = log(1 – .5) / log(1 – .1) ≈ 6.58 minutes or 6 minutes and 35 seconds
In this case, we estimate that 50% of users will wait less than 6 minutes and 35 seconds and the remaining 50% of users will wait longer than this.
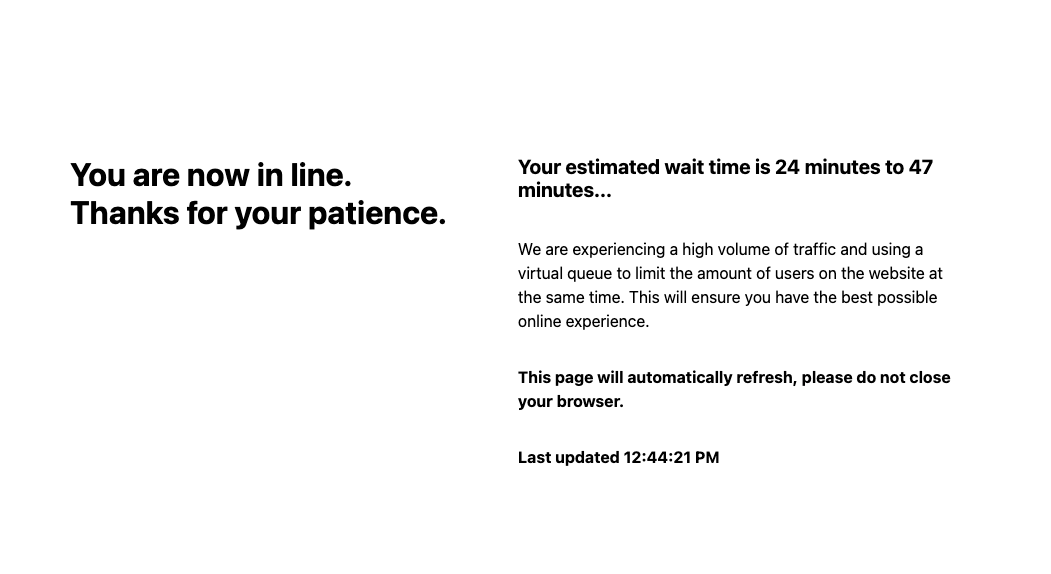
So, which estimated wait times are displayed to the user? It is up to you! If you create a Mustache HTML template for a Waiting Room, you will now be able to use the variables waitTime25Percentile, waitTime50Percentile, and waitTime75Percentile to display the estimated wait times in minutes when p = .25, p = .5, and p = .75, respectively. There are also new variables that are used to display and determine the queueing method, such as queueingMethod, isFIFOQueue, and isRandomQueue. If you want to display something more dynamic like a custom view in a mobile app, keep reading to learn about our new JSON response, which provides a REST API for the same set of variables.
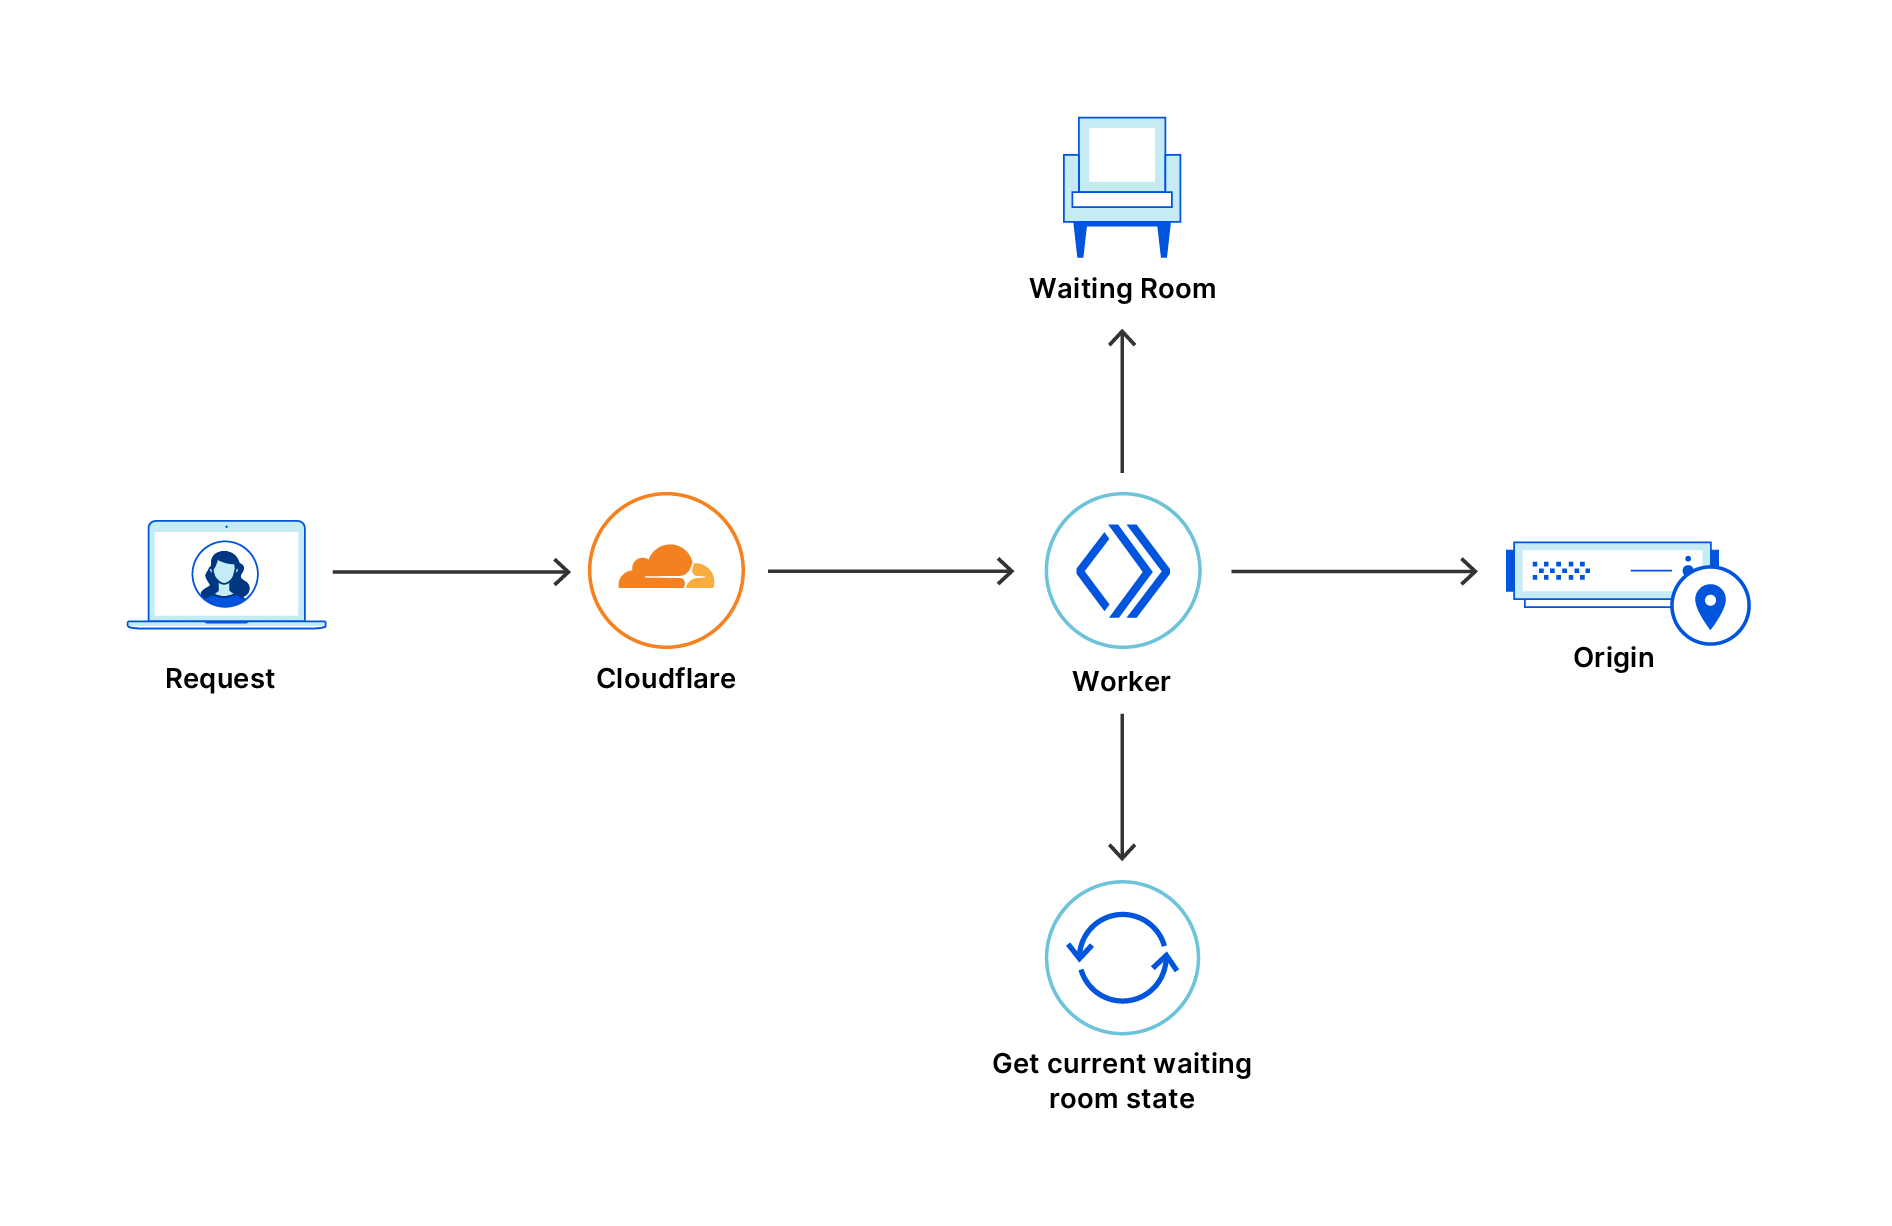
Supporting Dynamic Applications with a JSON Response
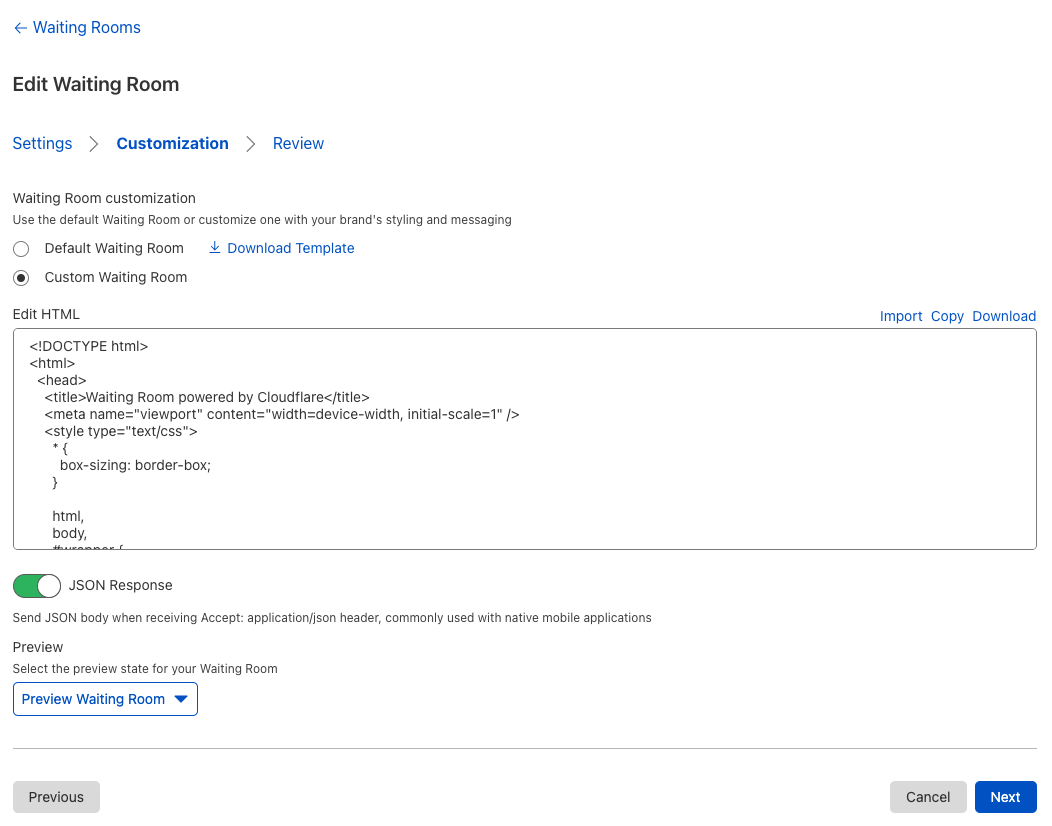
Before, customers could only deploy static Mustache HTML templates to customize the style of their Waiting Rooms. These templates work well for most use cases, but fall short if you want to display anything that requires state. Let’s imagine you’re queueing to buy concert tickets on your mobile device, and you see an embedded video of your favorite song. Naturally, you click on it and start singing along! A couple seconds later, the browser refreshes the page automatically to update your status in the Waiting Room, resetting your video to the start.
The purpose of the new JSON response is to give full control to a custom application, allowing it to determine what to display to the user and when to refresh. As a result, the application can maintain state and make sure your videos are never interrupted again!
Once the JSON response is enabled for a Waiting Room, any request to the Waiting Room with the header Accept: application/json will receive a JSON object with all the fields from the Mustache template.
An example request when the queueing method is FIFO:
curl -X GET "https://example.com/waitingroom" \
    -H "Accept: application/json"
{
    "cfWaitingRoom": {
        "inWaitingRoom": true,
        "waitTimeKnown": true,
        "waitTime": 10,
        "waitTime25Percentile": 0,
        "waitTime50Percentile": 0,
        "waitTime75Percentile": 0,
        "waitTimeFormatted": "10 minutes",
        "queueIsFull": false,
        "queueAll": false,
        "lastUpdated": "2020-08-03T23:46:00.000Z",
        "refreshIntervalSeconds": 20,
        "queueingMethod": "fifo",
        "isFIFOQueue": true,
        "isRandomQueue": false
    }
}
An example request when the queueing method is random:
curl -X GET "https://example.com/waitingroom" \
    -H "Accept: application/json"
{
    "cfWaitingRoom": {
        "inWaitingRoom": true,
        "waitTimeKnown": true,
        "waitTime": 10,
        "waitTime25Percentile": 5,
        "waitTime50Percentile": 10,
        "waitTime75Percentile": 15,
        "waitTimeFormatted": "5 minutes to 15 minutes",
        "queueIsFull": false,
        "queueAll": false,
        "lastUpdated": "2020-08-03T23:46:00.000Z",
        "refreshIntervalSeconds": 20,
        "queueingMethod": "random",
        "isFIFOQueue": false,
        "isRandomQueue": true
    }
}
A few important reminders before you get started:
- Don’t forget that Waiting Room uses a cookie to maintain a user’s status! Without a cookie in the request, the Waiting Room will think the user has just joined the queue.
- Don’t forget to refresh! Inspect the ‘Refresh’ HTTP response header or the refreshIntervalSeconds property and send another request to the Waiting Room after that number of seconds.
- Keep in mind that if the user’s request is let into the origin, JSON may not necessarily be returned. To gracefully parse all responses, send JSON from the origin website if the header
Accept: application/jsonis present. For example, the origin could return:
{
	"cfWaitingRoom": {
		"inWaitingRoom": false
	},
	"authToken": "abcd"
}
Embedding a Waiting Room in a Webpage: SameSite Cookies and IFrames
What are SameSite cookies and IFrames?
SameSite and Secure are attributes in the HTTP response Set-Cookie header. SameSite is used to determine when cookies are sent to a website while Secure indicates if there must be a secure context (HTTPS).
There are three different values of SameSite:
- SameSite=Lax. This is the default value when the SameSite attribute is not present. Cookies are not sent on cross-site sub-requests unless the user is following a link to the third-party site. If you are on example1.com, cookies will not be sent to example2.com unless you click a link that navigates to example2.com.
- SameSite=Strict. Cookies are sent only in first-party contexts. If you are on example1.com, cookies will never be sent to example2.com even if you click a link that navigates to example2.com.
- SameSite=None. Cookies are sent for all contexts, but the Secure attribute must be set. If you are on example1.com, cookies will be sent to example2.com for all sub-requests. If Secure is not set, the browser will block the cookie.
IFrames (Inline Frames) allow HTML documents to embed other HTML documents, such as an advertisement, video, or webpage. When an application from a third-party website is rendered inside an IFrame, cookies will only be sent to it if SameSite=None is set.
Why is this all important? In the past, we did not set SameSite, meaning it defaulted to SameSite=Lax for all responses. As a result, a user queueing through an IFrame would never have its cookie updated and appear to the Waiting Room as joining for the first time on every request. Today, we are introducing customization for both the SameSite and Secure attributes, which will allow Waiting Rooms to be displayed in IFrames!
At the moment, this is only configurable through the Cloudflare API. By default, the configuration for SameSite and Secure will be set to “auto”, automatically selecting the most flexible option. In this case, SameSite will be set to None if Always Use HTTPS is enabled, otherwise it will be set to Lax. Similarly, Secure will only be set if Always Use HTTPS is enabled. In other words, Waiting Room IFrames will work properly by default as long as Always Use HTTPS is toggled. If you are wondering why Always Use HTTPS is used here, remember that SameSite=None requires that Secure is also set, or else the browser will block the Waiting Room cookie.
If you decide to manually configure the behavior of SameSite and Secure through the API, be careful! We do guard against setting SameSite=None without Secure, but if you decide to set Secure on every request (secure=”always”) and don’t have Always Use HTTPS enabled, this means that a user who sends an insecure (HTTP) request to the Waiting Room will have its cookie blocked by its browser!
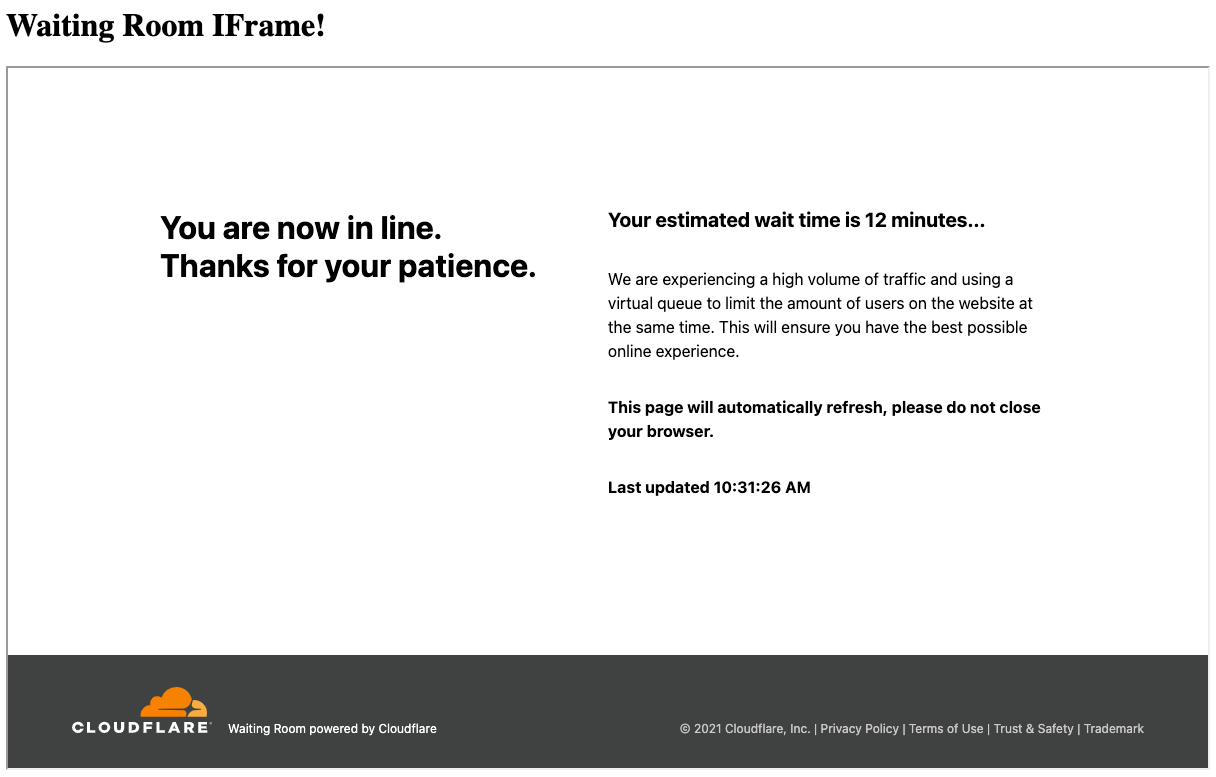
If you want to explore using IFrames with Waiting Room yourself, here is a simple example of a Cloudflare Worker that renders the Waiting Room on “https://example.com/waitingroom” in an IFrame:
const html = `<!DOCTYPE html>
<html>
 <head>
   <meta charset="UTF-8" />
   <meta name="viewport" content="width=device-width,initial-scale=1" />
   <title>Waiting Room IFrame Example</title>
 </head>
 <body>
   <h1>Waiting Room IFrame!</h1>
   <iframe src="https://example.com/waitingroom" width="1200" height="700"></iframe>
 </body>
</html>
`

addEventListener('fetch', event => {
 event.respondWith(handleRequest(event.request))
})

async function handleRequest(request) {
 return new Response(html, {
   headers: { "Content-Type": "text/html" },
 })
}
Looking Forward
Waiting Room still has plenty of room to grow! Every day, we are seeing more Waiting Rooms deployed to protect websites from traffic spikes. As Waiting Room continues to be used for new purposes, we will keep adding features to make it as customizable and user-friendly as possible.
Stay tuned — what we have announced today is just the tip of the iceberg of what we have planned for Waiting Room!