Post Syndicated from Rachel Wyatt original https://blog.cloudflare.com/banish-bots-from-your-waiting-room-and-improve-wait-times-for-real-users/
With Cloudflare Waiting Room, you can safeguard your site from traffic surges by placing visitors in a customizable, virtual queue. Previously, many site visitors waited in the queue alongside bots, only to find themselves competing for inventory once in the application. This competition is inherently unfair, as bots are much faster and more efficient than humans. As a result, humans inevitably lose out in these high-demand situations, unable to secure inventory before bots sweep it all up. This creates a frustrating experience for real customers, who feel powerless against the speed and automation of bots, leading to a diminished experience overall. Those days are over! Today, we are thrilled to announce the launch of two Waiting Room solutions that significantly improve the visitor experience.
Now, all Waiting Room customers can add an invisible Turnstile challenge to their queueing page, robustly challenging traffic and gathering analytics on bot activity within their queue. With Advanced Waiting Rooms, you can select between an invisible, managed, or non-interactive widget mode. But, we won’t just block these bots! Instead, traffic with definite bot signals that have failed the Turnstile challenge can be sent to an Infinite Queue, a completely customizable page that mimics a real user experience. This prolongs the time it takes bots to realize they have not actually joined the queue, wasting their resources without impacting real users. This feature not only protects your site against bots, but also reduces wait times and protects inventory by ensuring the queue only consists of genuine users. To offset the environmental impact of wasting bot resources, we’re contributing to a tree planting initiative, helping to reduce the carbon footprint of inefficient bots.
The second solution we have launched to improve the visitor experience is Session Revocation, which allows you to end a user’s session based on an action, dynamically opening up spots and admitting users from the queue. This new capability allows you to integrate Waiting Room more seamlessly with your customer journey, resulting in increased throughput, decreased wait times, and increased fairness by giving more users the opportunity to make it through the queue during high demand events.
This feature has proven to be extremely impactful for our customers, including a large online retailer that frequently has high-demand limited edition product drops. A common challenge in this space is maximizing the number of customers who can make a purchase during a limited-time event, all while maintaining a fair and efficient system for everyone involved. Previously, this customer had to limit their users to only one item in the cart and force them to wait for a period of time after each checkout before allowing them to rejoin the queue. This led to an awkward experience for end users, longer wait times, and reduced site throughput. With session revocation, this online retailer can now end the user’s session immediately after a purchase is complete, placing the user back in the queue if applicable, without being forced to wait for a preset timeout period. This significantly improves the end user experience by reducing unnecessary wait times and streamlining the purchase process.
Let’s deep dive into these two capabilities and how they improve the overall user experience.
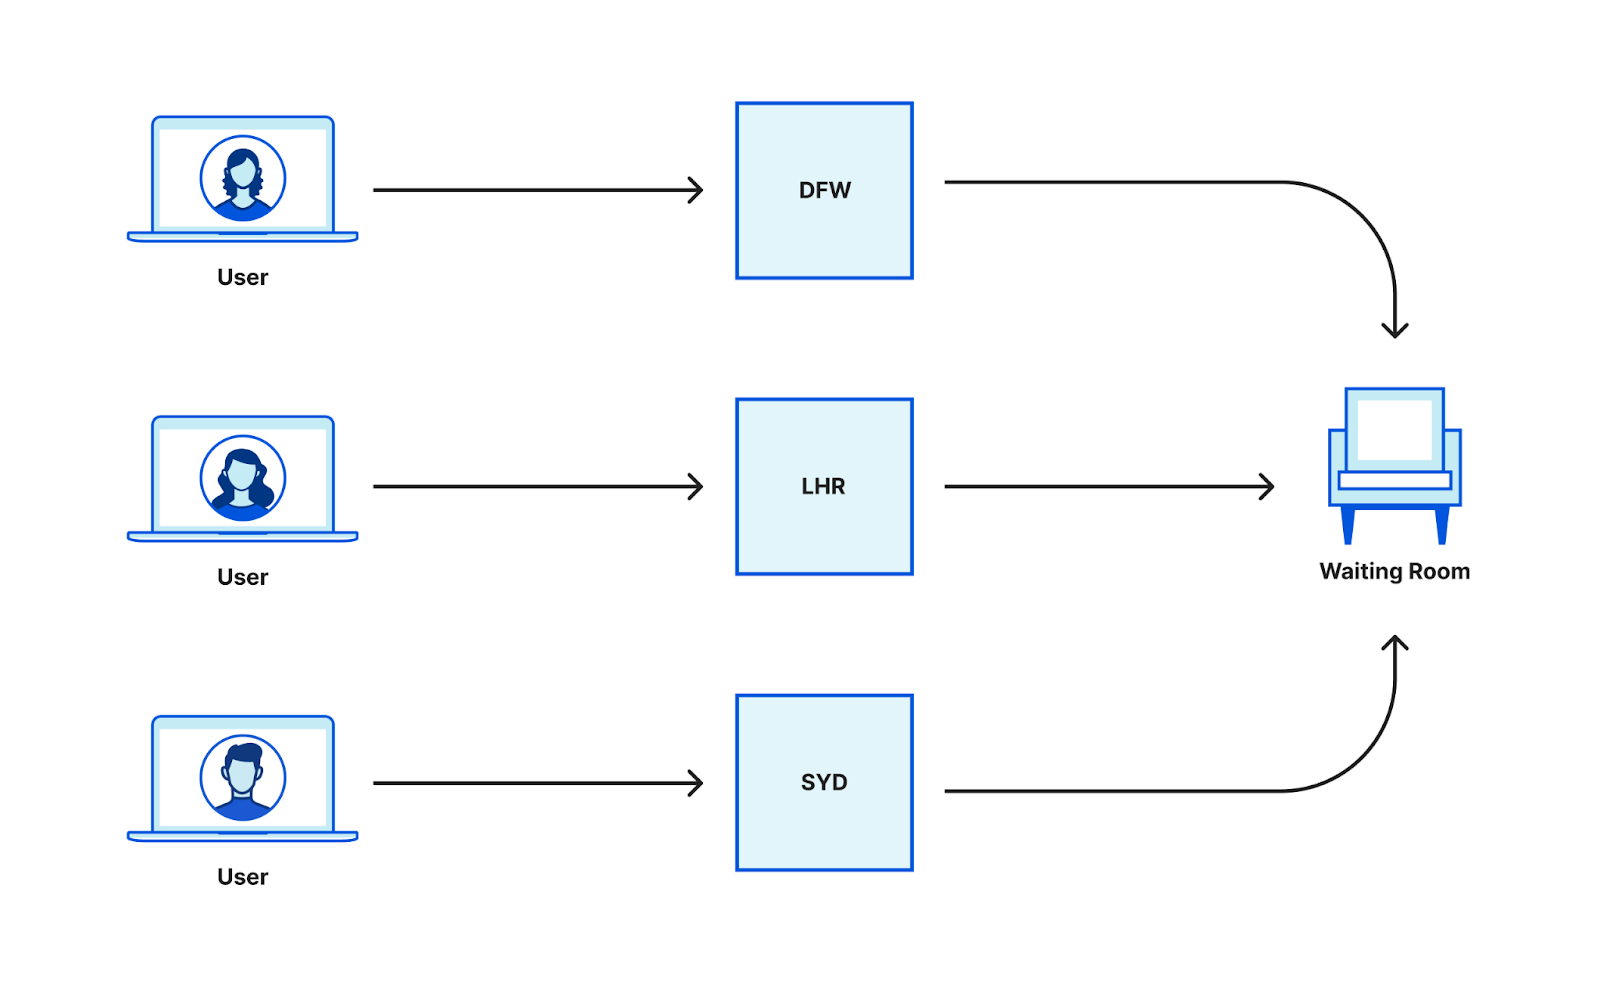
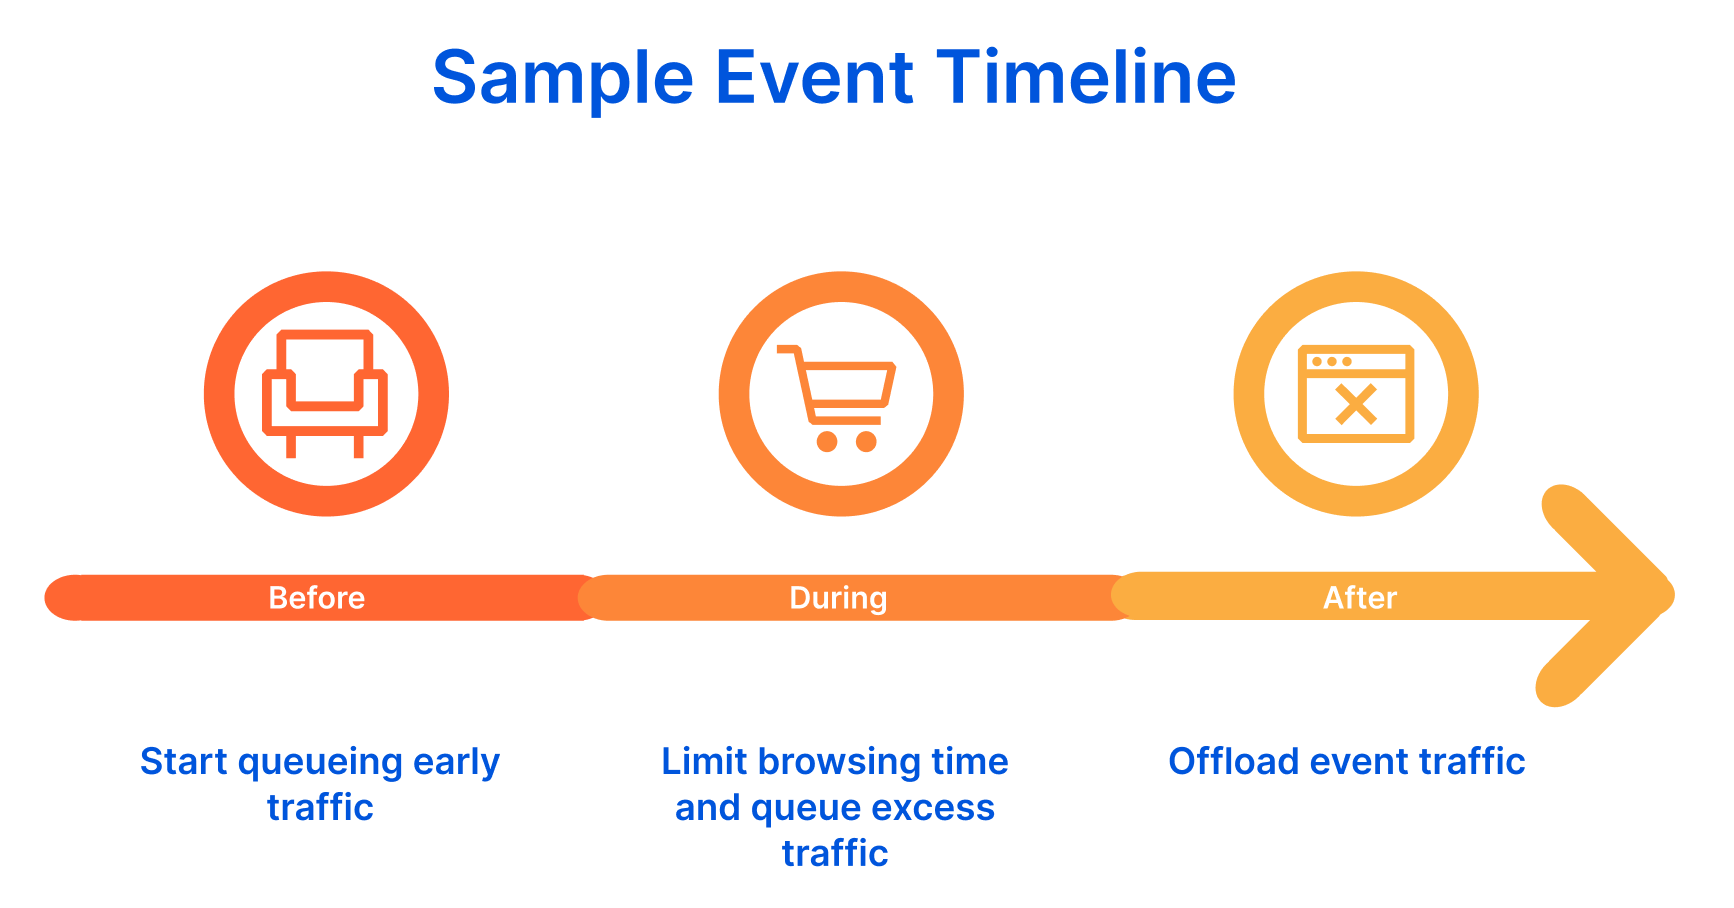
Waiting Room is often used to protect sites from being overwhelmed by traffic surges during high demand online events. These high demand events, such as ticket or e-commerce product sales, attract both a deluge of genuine users, and sophisticated bots, such as scalper bots. This type of bot traffic is unique, as they can complete the checkout process or user journey much quicker than normal human traffic. Bots in the queue negatively affect the user experience by increasing wait times, as they often occupy multiple spots. Additionally, their behavior can exacerbate the issue — if they don’t handle cookies properly, they fail to take their spot in the application when their turn comes, further preventing the queue from progressing smoothly. Once past the queue, bots can also contribute to inventory hoarding, as they often reserve or consume large quantities of stock without genuine intent to purchase. An example of this is the PlayStation 5’s launch in November 2020. Due to high demand and production limitations during the COVID-19 pandemic, scalper bots bought up stock quickly, making it difficult for average consumers to purchase the console at retail prices. This led to extreme frustration for retailers and consumers as these bots drove the prices up significantly.
Waiting Room customers have long been curious about the nature of large traffic spikes. Historically, bot scores and managed challenges have been the primary methods of collecting this data and acting on it. While these can provide some insight into the distribution of traffic, the Turnstile invisible challenge gives us the ability to actively interrogate the browser, providing the most complete set of data on whether that browser is being operated by a human or a bot.
To start quantifying bot traffic to waiting rooms, we have added an invisible Turnstile challenge to all basic rooms. With the purchase of an Advanced Waiting Room, customers can select between invisible, managed, or non-interactive widget modes. This Turnstile team blog post has more details on the different widget modes.
Waiting Room’s integration with Turnstile aims to protect your site with minimal impact to the user experience by placing a Turnstile challenge on your waiting room’s queuing page. Unlike a standard WAF challenge, the Waiting Room Turnstile challenge is presented only when the waiting room is queuing. This way, users won’t face any interruptions once they are past the queue and into the application.

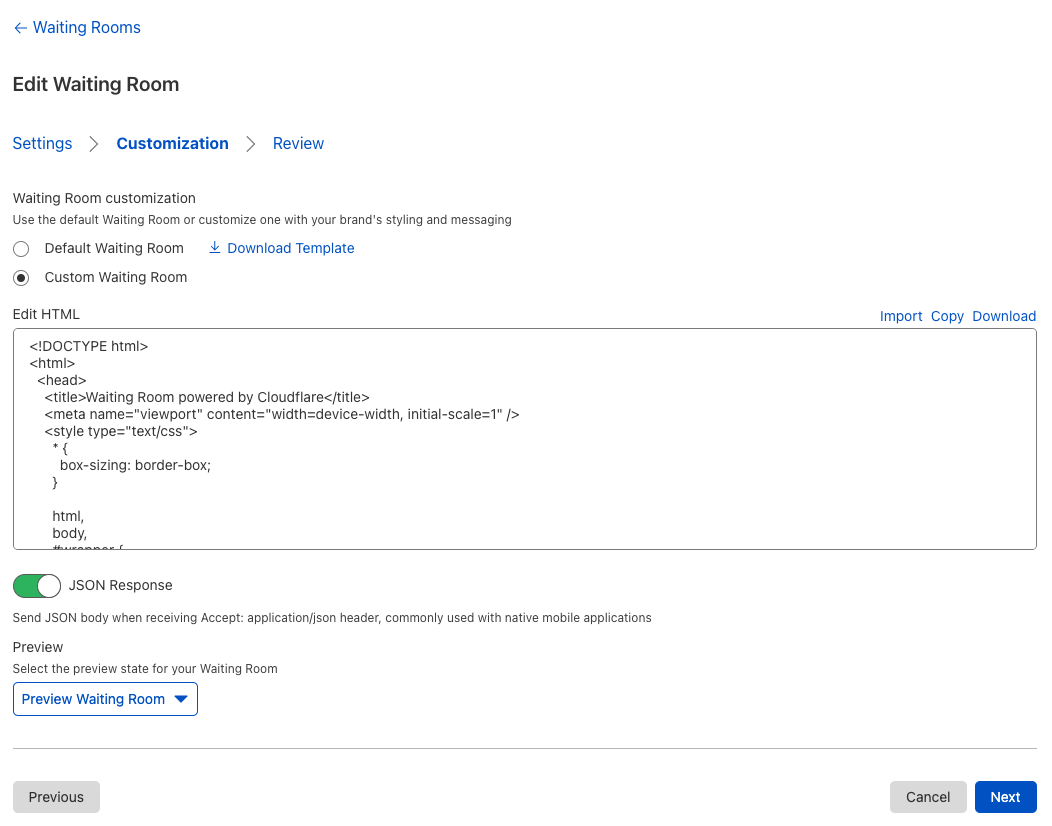
With an advanced waiting room, you can configure the type of Turnstile challenge from the Cloudflare dashboard and API.
From the analytics we’ve gathered with the invisible Turnstile challenge on all basic waiting rooms, we’ve been able to determine that many large traffic spikes come from user agents that don’t even attempt to run the challenge, leaving it unsolved. In other words, we send the challenge widget in the HTML for the queuing page, but sometimes those challenges never get completed. By subtracting the number of times we see solved challenges from the total number of times we send challenges, we can get a count of requests that are likely from unsophisticated bots. These requests are reported to Waiting Room Analytics as “Likely Bots.” We’ve seen small businesses with low baseline traffic hit with tens of thousands of such requests (or more) in a short period of time. When a large influx of non-human traffic like this comes in, every visitor to the website ends up queued in a waiting room, not just the bots.
These bots could be any software that simply sends out HTTP requests. This data can help determine whether a traffic spike and subsequent queueing is coming from real human users, or a bunch of simple bots that don’t even bother to run JavaScript.
With the Turnstile integration, we are also catching sophisticated bots. While many of the bots we see don’t attempt to run the challenge, there are a few that do. Detecting these bots is more difficult than detecting simple bots that don’t run JavaScript. The Turnstile widget runs a series of checks against the browser to find evidence that a browser isn’t being operated by a human, and is instead being driven by something like Selenium. If Turnstile isn’t able to determine that the browser is being operated by a human, we count that as a failed challenge and report those users to Waiting Room Analytics as “Bots,” since we are quite confident that these users are not human.
About 1 in 20 “users” that run the challenge end up not passing. Just like the previously mentioned unsophisticated bots, these more sophisticated bots inflate the size of the queue, making it more difficult for real humans to make it through to your website.
The remaining 19 in 20 “users” that successfully pass the challenge are counted in Waiting Room Analytics as “Likely Humans.”
These new metrics related to Turnstile challenge outcomes are available in your Waiting Room Analytics dashboard and the analytics GraphQL API, so you can see the distribution of bot to human traffic in your waiting room. Once you know what your traffic looks like, the real question is: what can you do about it?

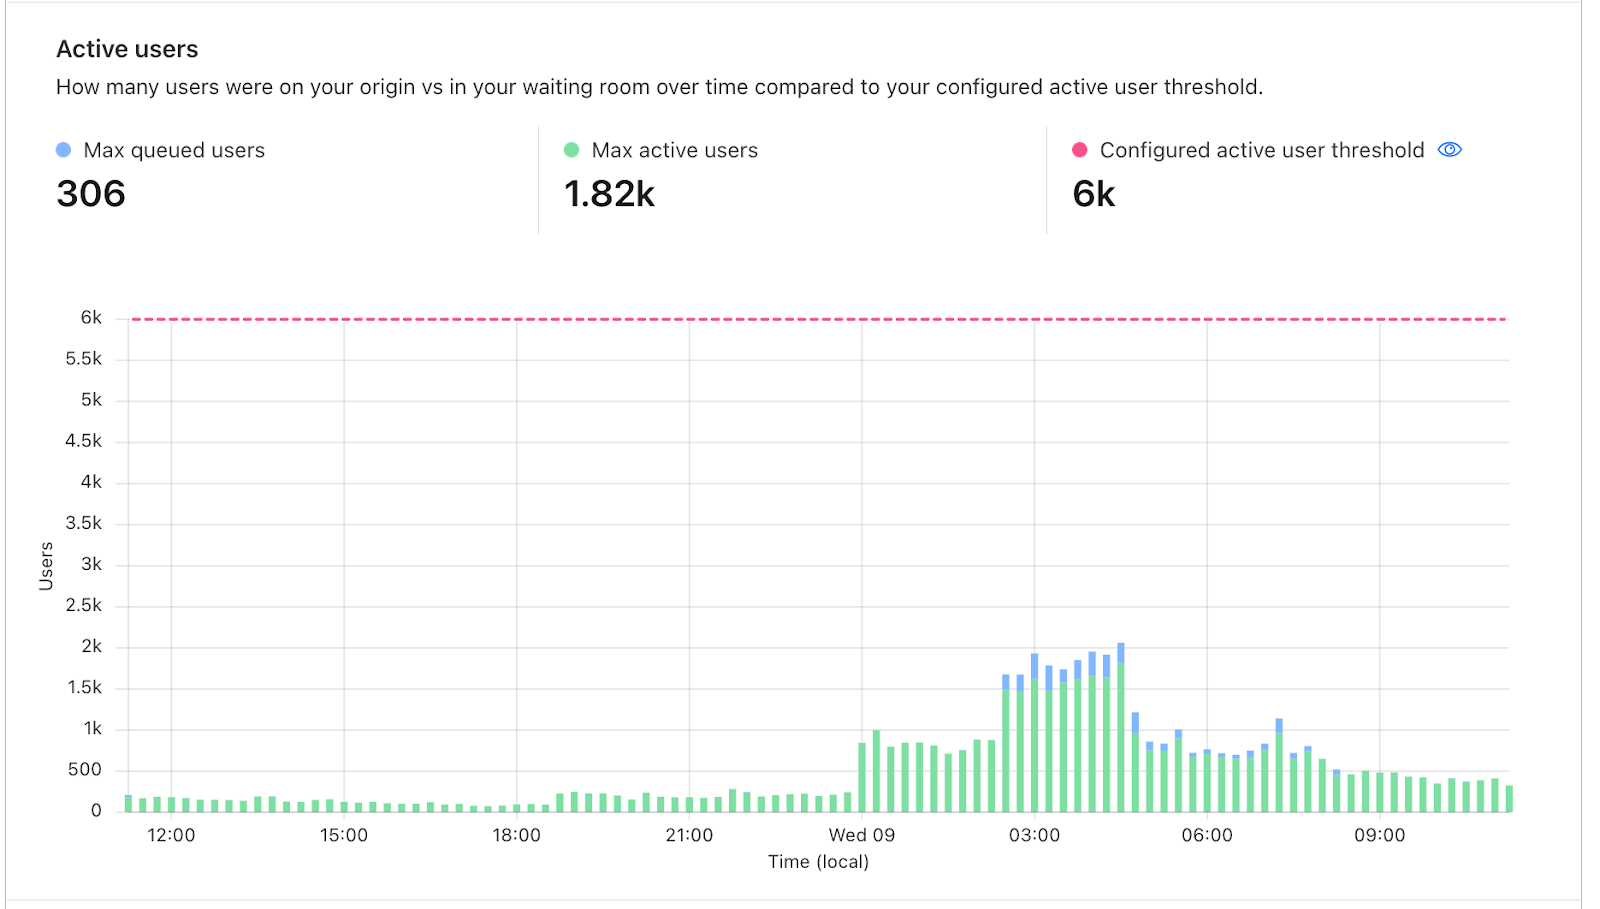
View the distribution of traffic and challenges issued in Waiting Room Analytics
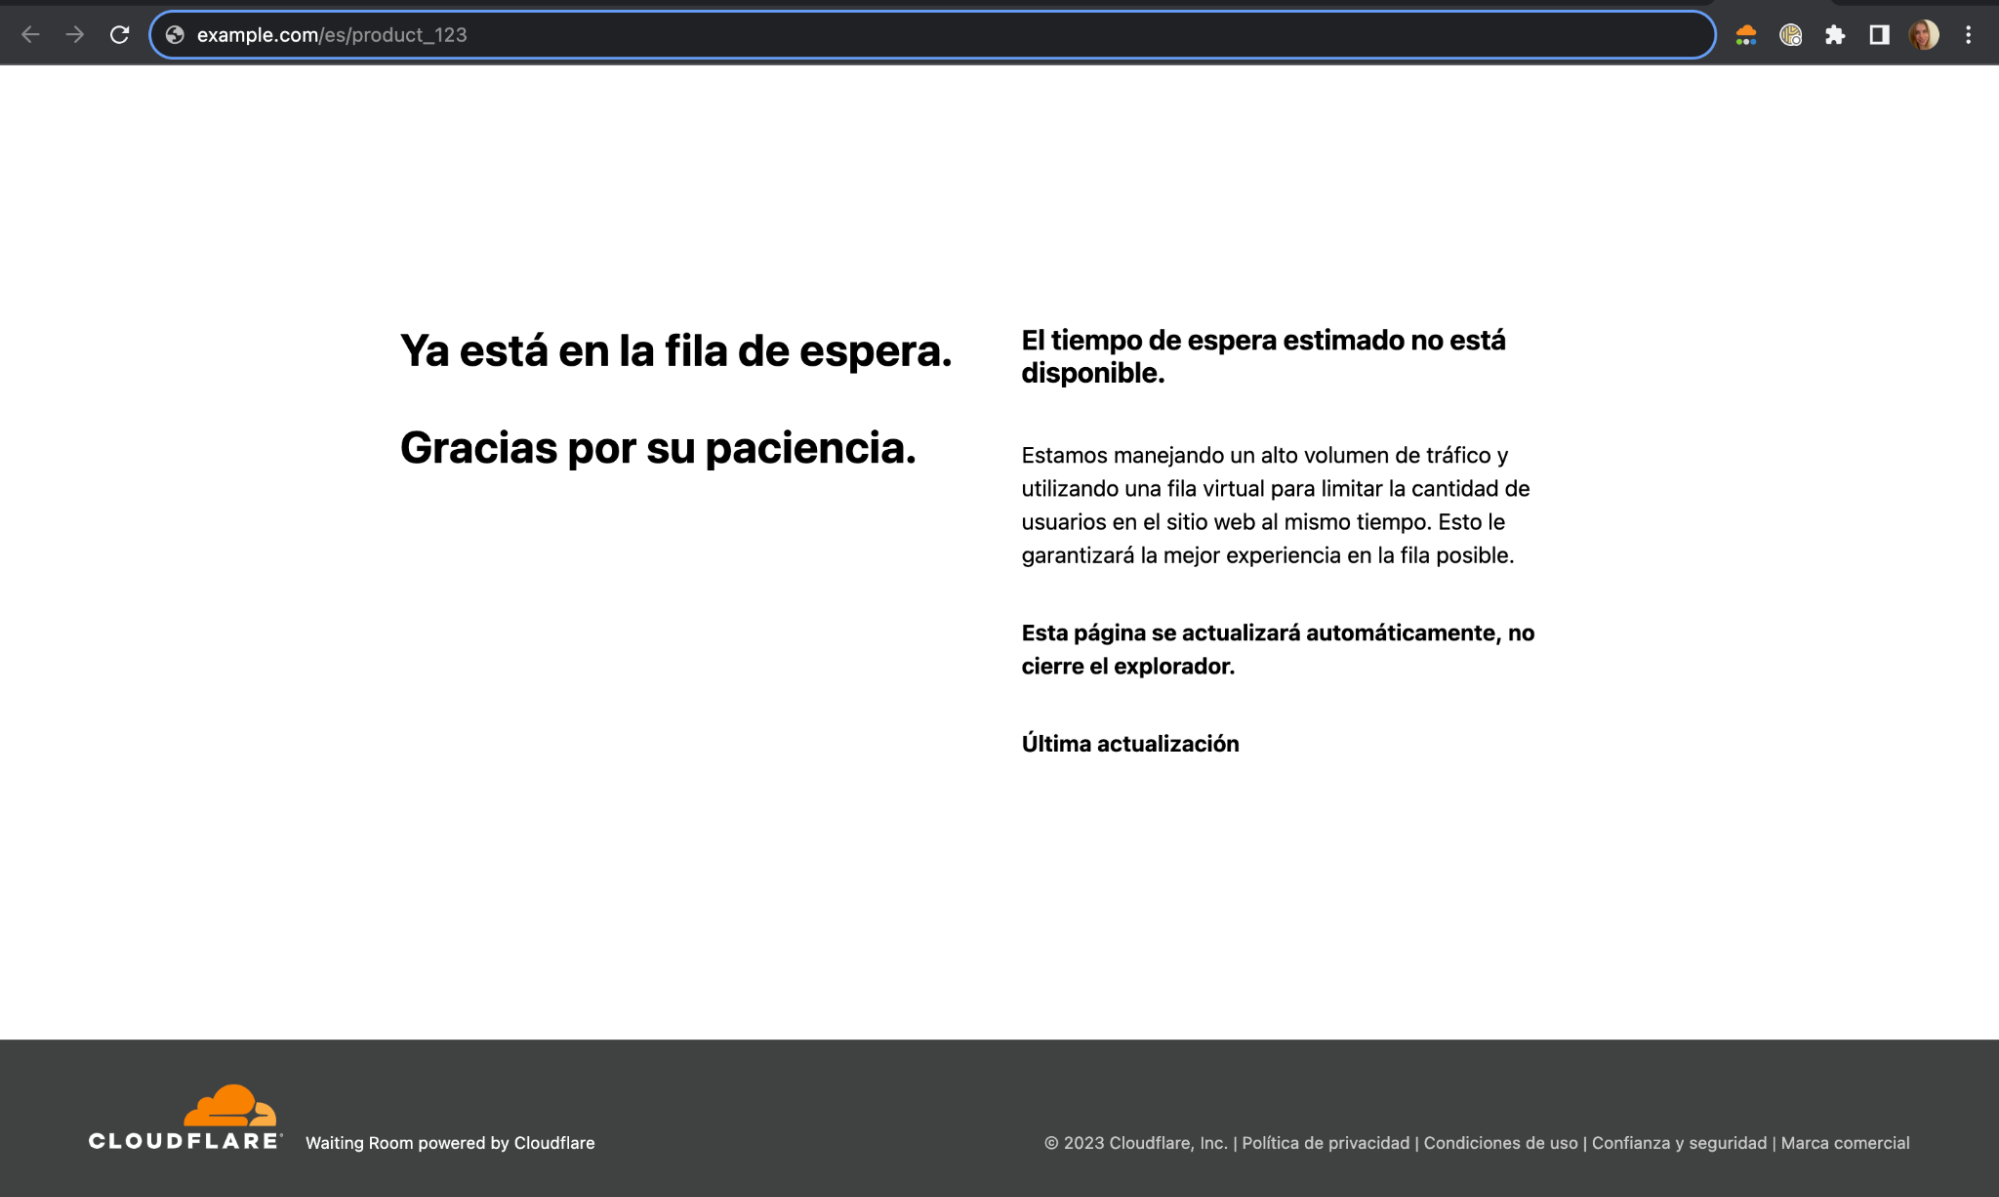
Beyond logging your Turnstile challenge outcomes, Advanced Waiting Room customers have the option to select the Infinite Queue feature. With this feature, all traffic that fails the Turnstile challenge, such as a bot, will be sent to an Infinite Queue page. The Infinite Queue matches the normal queuing experience, prolonging the time it takes the bot to recognize they are being blocked and effectively consuming their resources. While the Infinite Queue will have the same look and feel as the Waiting Room page, the bot is not actually a part of the real queue.
With the infinite Queue enabled, all traffic will have to pass the challenge to enter the real queue. By blocking bots from joining the queue, we will reduce wait times for humans and prevent bots from using up server resources during a traffic spike.

Enable the Infinite Queue option through the Cloudflare dashboard or API.
Bots will be none the wiser, wasting their time and resources waiting in an infinite queue that will never get them to where they’re trying to go.
We keep track of the traffic hitting the infinite queue, counting the number of times they refresh their queuing page in Waiting Room Analytics. This appears as the “infinite queue refreshes” count in the analytics dash and GraphQL API. This metric gives you a good idea of the amount of time these bots have wasted trying to reach your website.
Turnstile is a powerful and versatile product that anyone, Cloudflare and others alike, can use to build systems to thwart bot traffic. Waiting Room integrates Turnstile the same as any other Turnstile user.
<!DOCTYPE html>
<html>
	<head>
		<title>Waiting Room</title>
	</head>
	<body>
		<h1>You are currently in the queue.</h1>
		{{#waitTimeKnown}}
			<h2>Your estimated wait time is {{waitTimeFormatted}}.</h2>
		{{/waitTimeKnown}}
		{{^waitTimeKnown}}
			<h2>Your estimated wait time is unknown.</h2>
		{{/waitTimeKnown}}
		{{#turnstile}}
			<!-- for a managed (and potentially interactive) challenge, you may want to instruct the user to complete the challenge -->
			<p>Please complete this challenge so we know you're a human:</p>
			{{{turnstile}}} <!-- include the turnstile widget -->
		{{/turnstile}}
	</body>
</html>
The Turnstile widget can be embedded in custom queuing page templates by including the {{{turnstile}}} variable.
<!DOCTYPE html>
<html>
<head>
<title>Waiting Room</title>
</head>
<body>
{{#turnstile}}
<h1>This website is currently using a waiting room.</h1>
<p>We use a Turnstile challenge to ensure you aren't waiting in line behind bots. Complete this challenge to enter the queue.</p>
{{{turnstile}}} <!-- include the turnstile widget -->
{{/turnstile}}
{{^turnstile}}
<h1>You are currently in the queue.</h1>
{{#waitTimeKnown}}
<h2>Your estimated wait time is {{waitTimeFormatted}}.</h2>
{{/waitTimeKnown}}
{{^waitTimeKnown}}
<h2>Your estimated wait time is unknown.</h2>
{{/waitTimeKnown}}
{{/turnstile}}
</body>
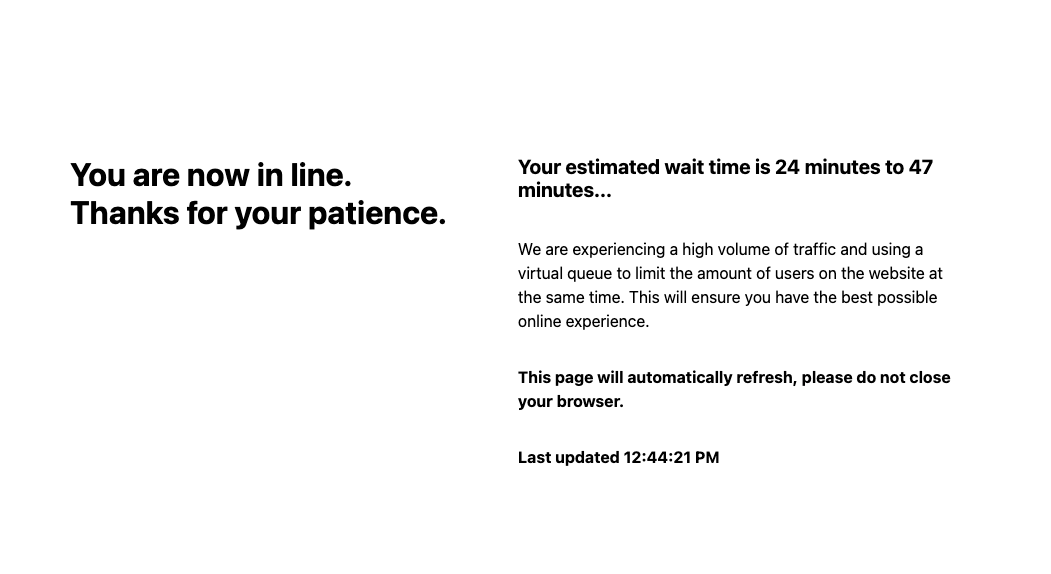
</html>When using Infinite Queue (especially with managed challenges which may be interactive), you may want to tell users they will not be in the queue until they complete the challenge.
We embed a plain Turnstile challenge in the queuing page by passing the HTML to the queuing page template in a turnstile variable. The default queuing page template and any newly created custom templates include this variable already. If you have an existing custom HTML template and wish to enable the Turnstile integration, you will need to add {{{turnstile}}} somewhere in the template to tell Waiting Room where the widget should be placed. Waiting Room uses Mustache templates, so including raw HTML within your template without escaping requires three curly braces instead of two.

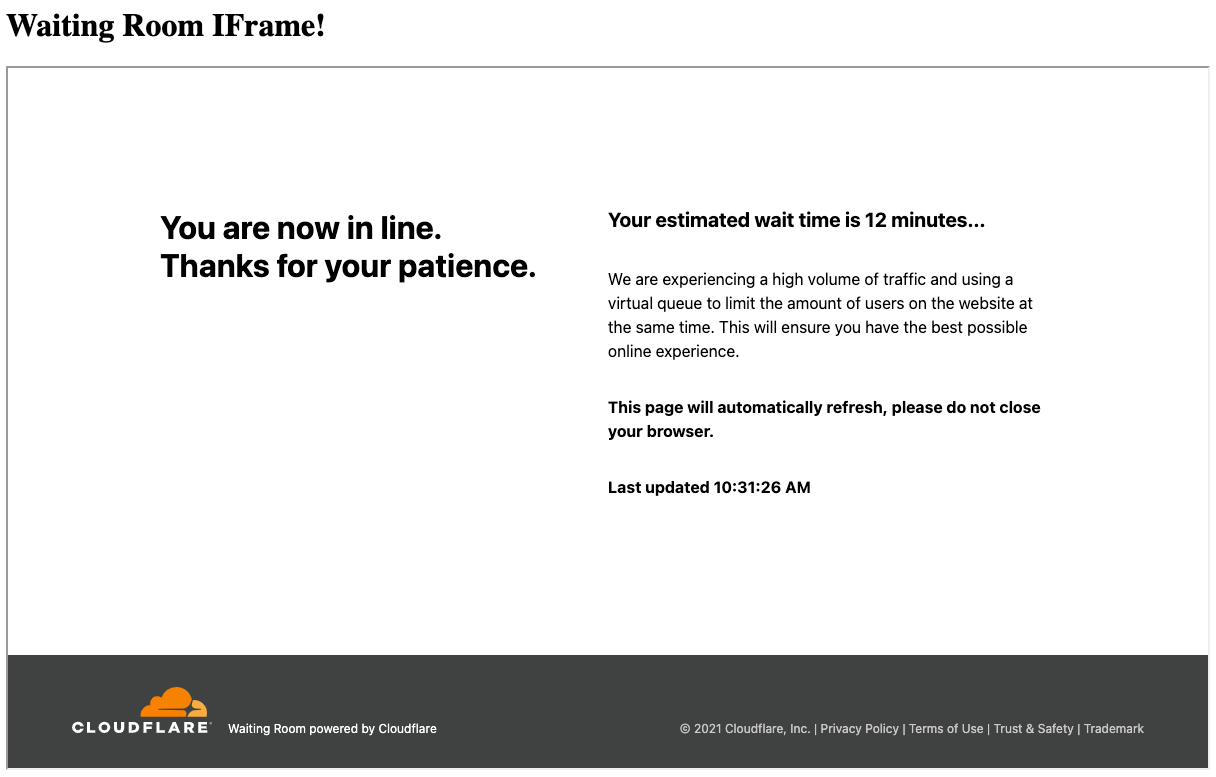
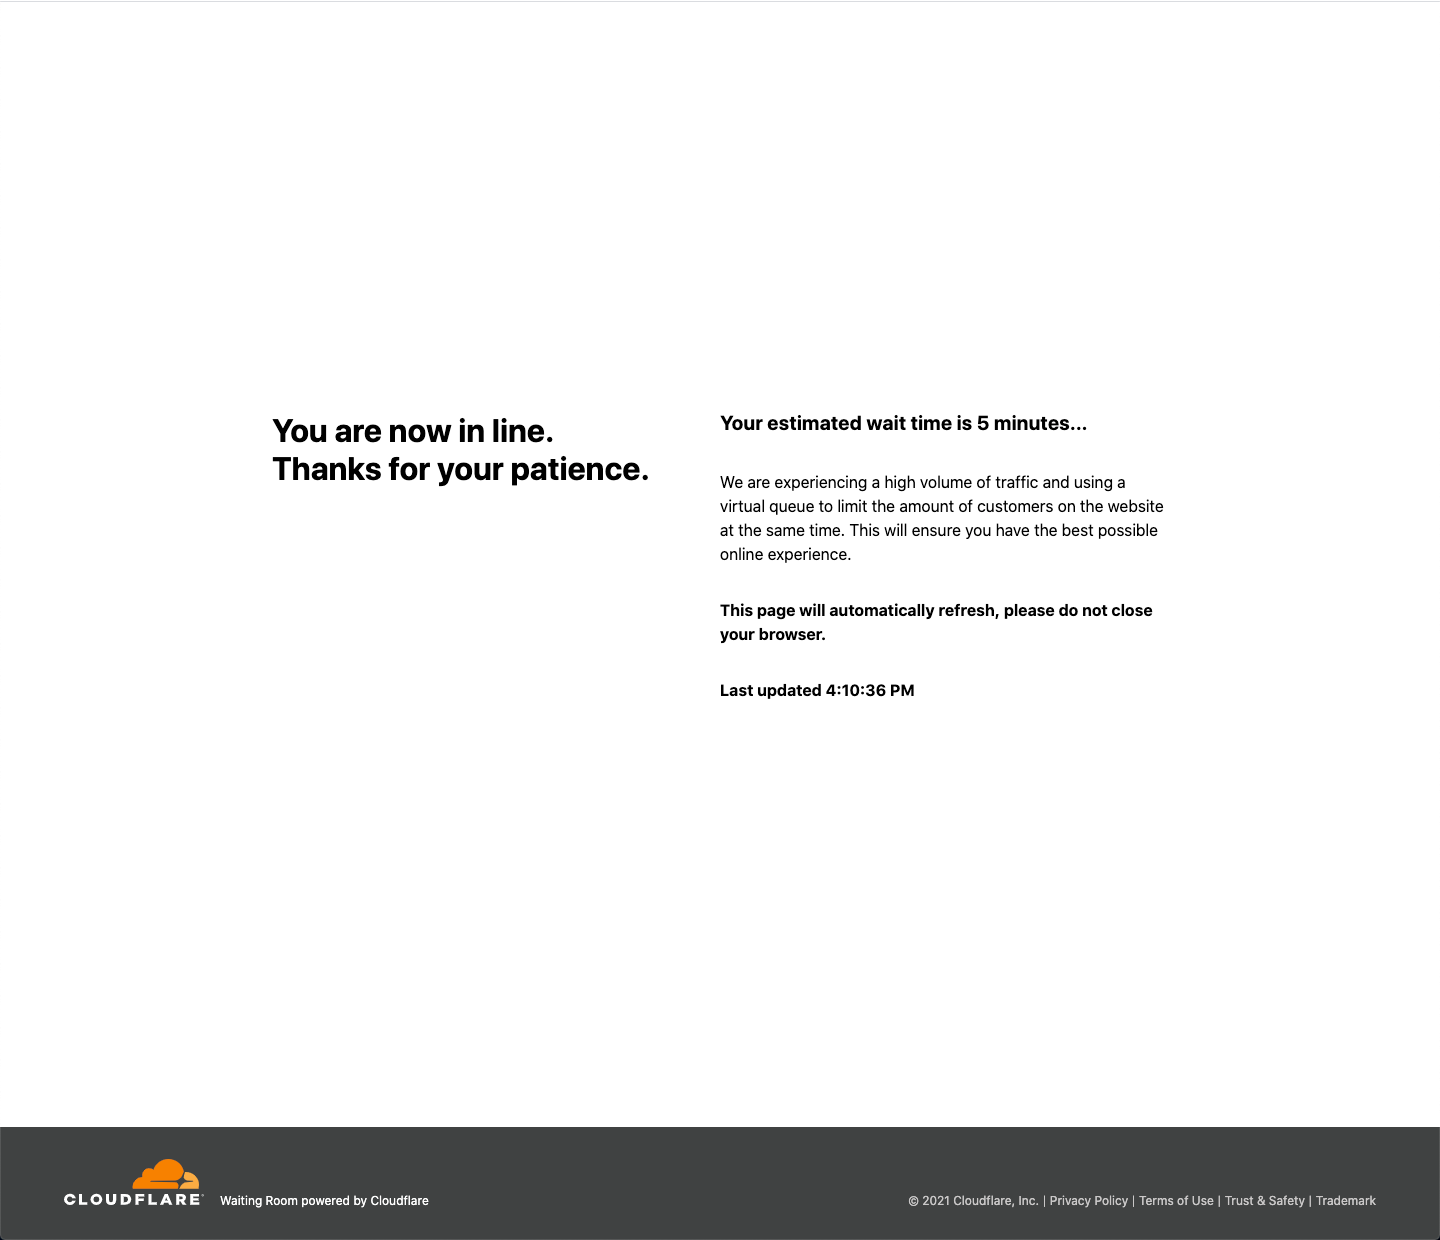
A managed Turnstile challenge on the default Waiting Room queuing page template
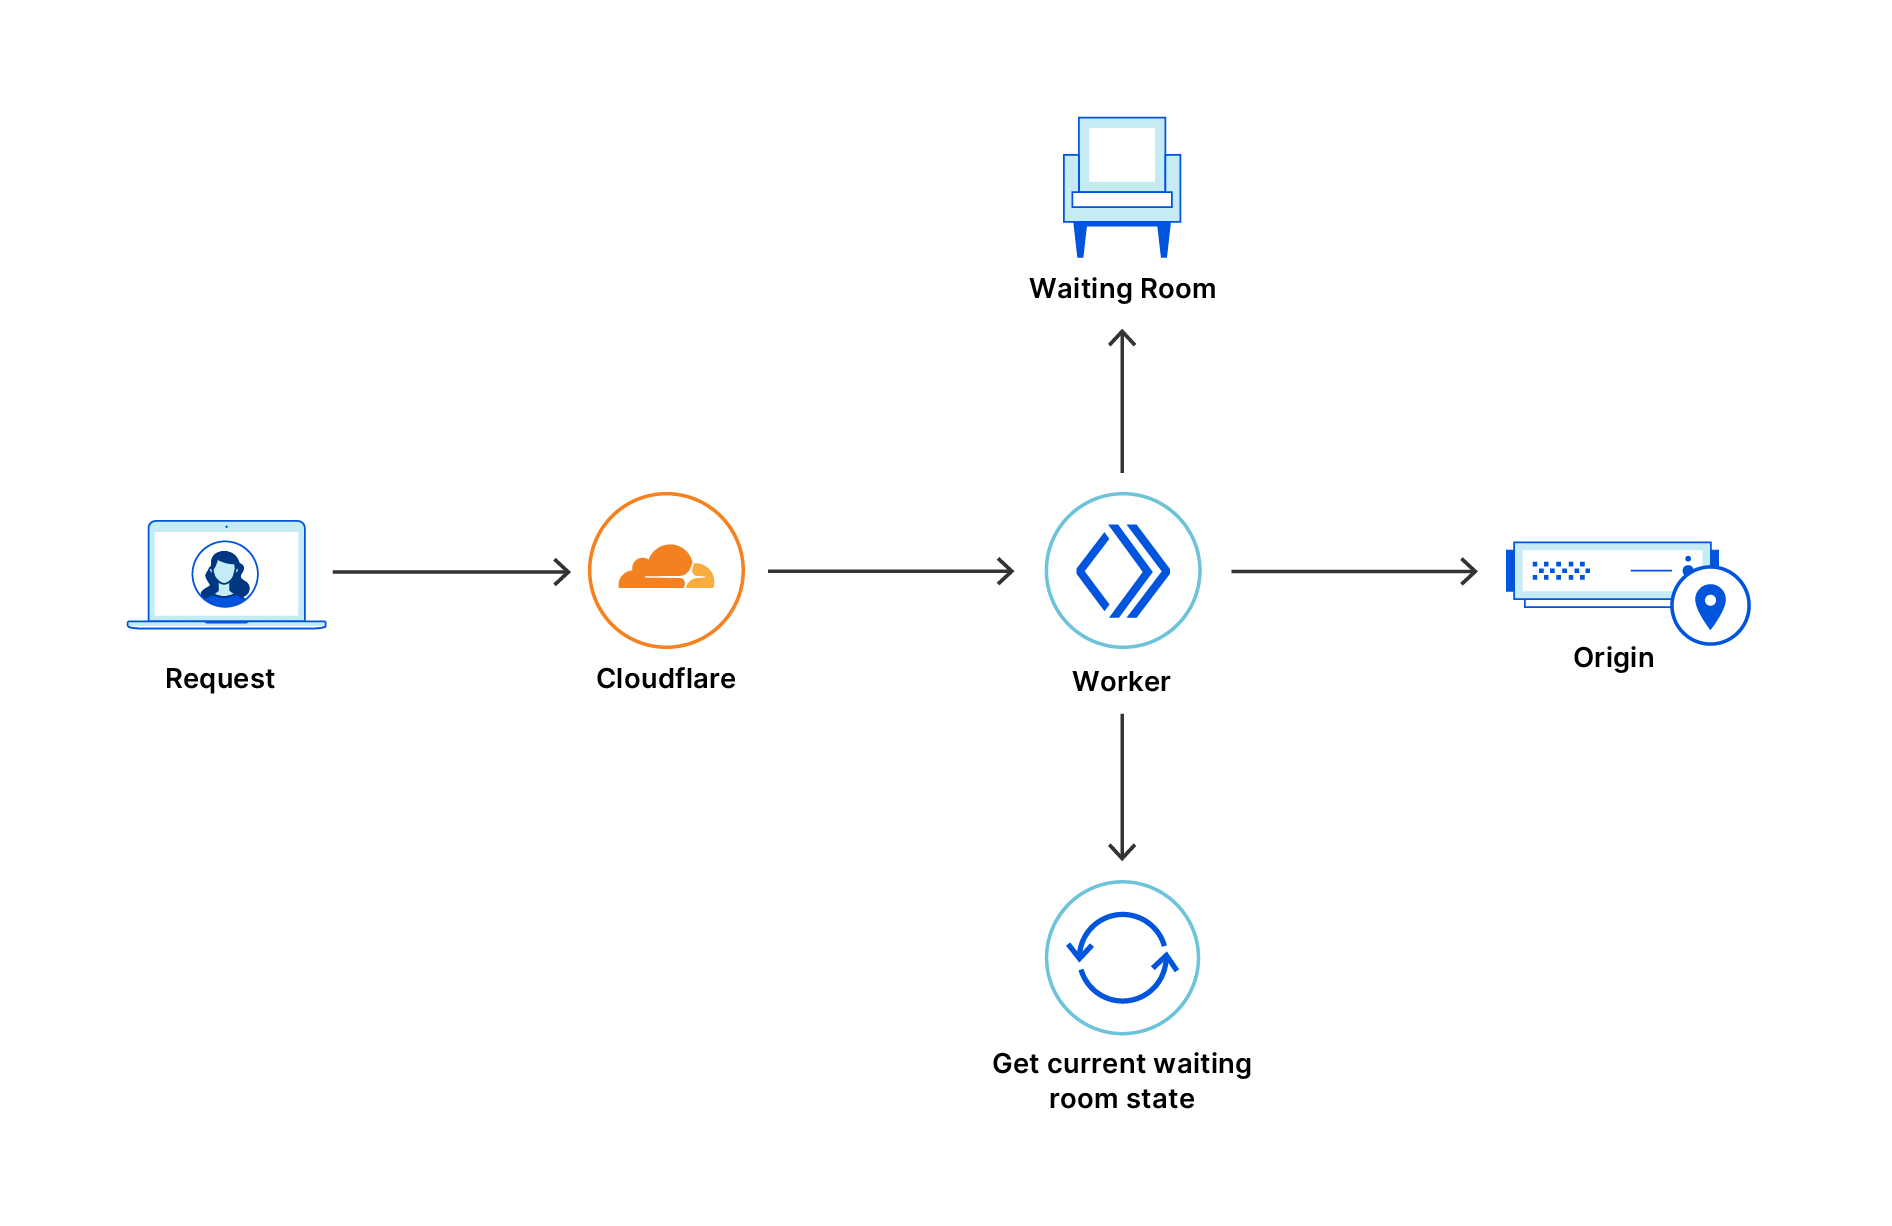
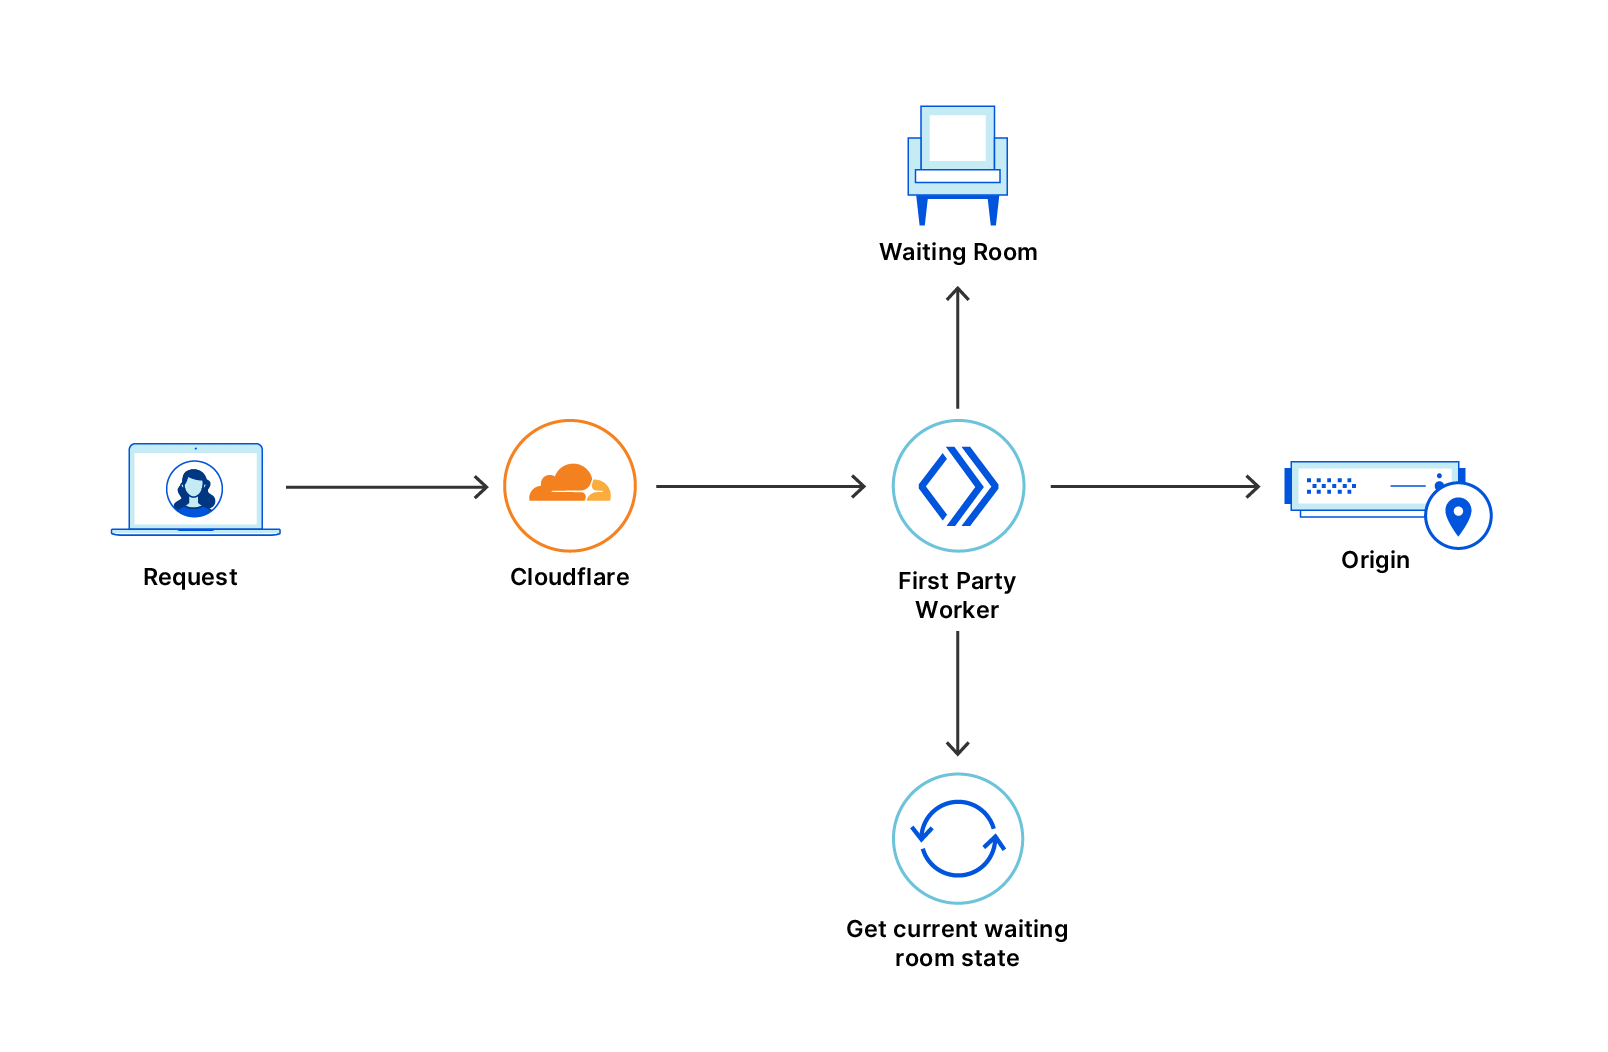
Once the challenge completes, fails, or times out, the page refreshes and passes the Turnstile token to Waiting Room’s worker. Next, we check in with Turnstile’s siteverify endpoint to make sure the challenge was successful. From there, we report the outcome to the Waiting Room’s analytics and optionally send failed traffic (bots) to an infinite queue.
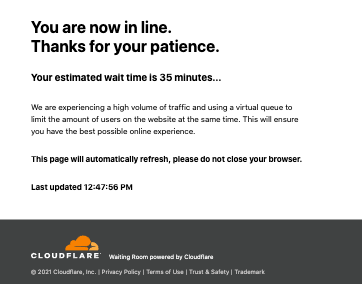
The infinite queue itself is designed to be as close to normal queuing as possible. When a bot is sent to the infinite queue, we issue it a cookie which looks like a normal waiting room cookie. Inside the cookie’s encryption though, we have a boolean flag that tells our worker to send the bot’s requests to the infinite queue. When we see that flag, we skip all the normal queuing logic and just render a queuing page.
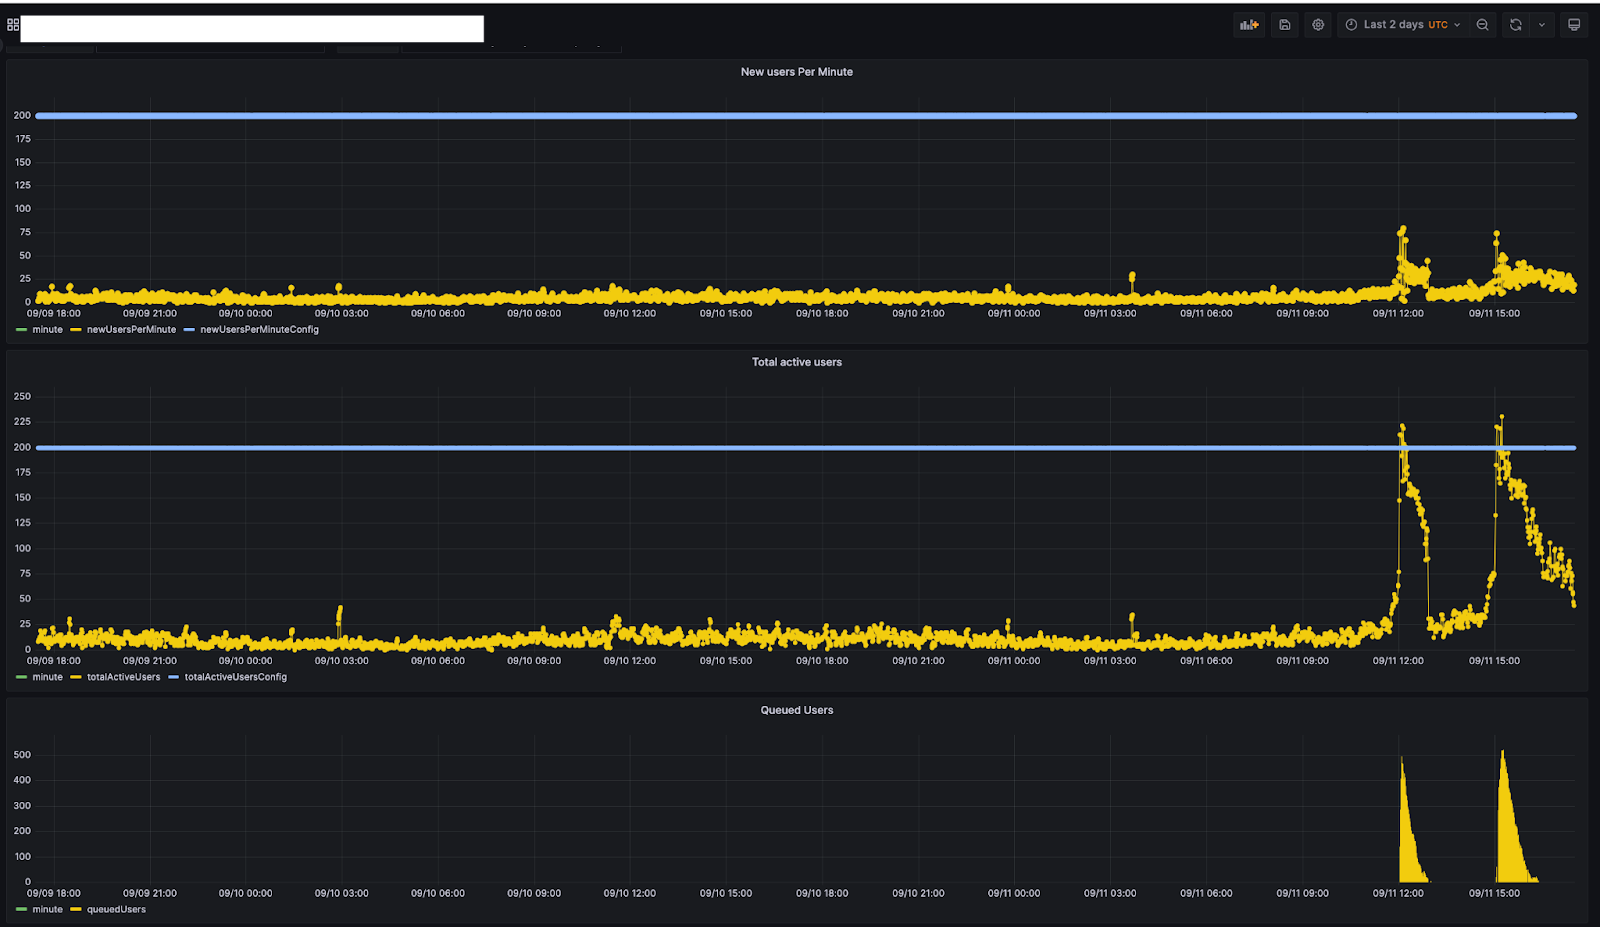
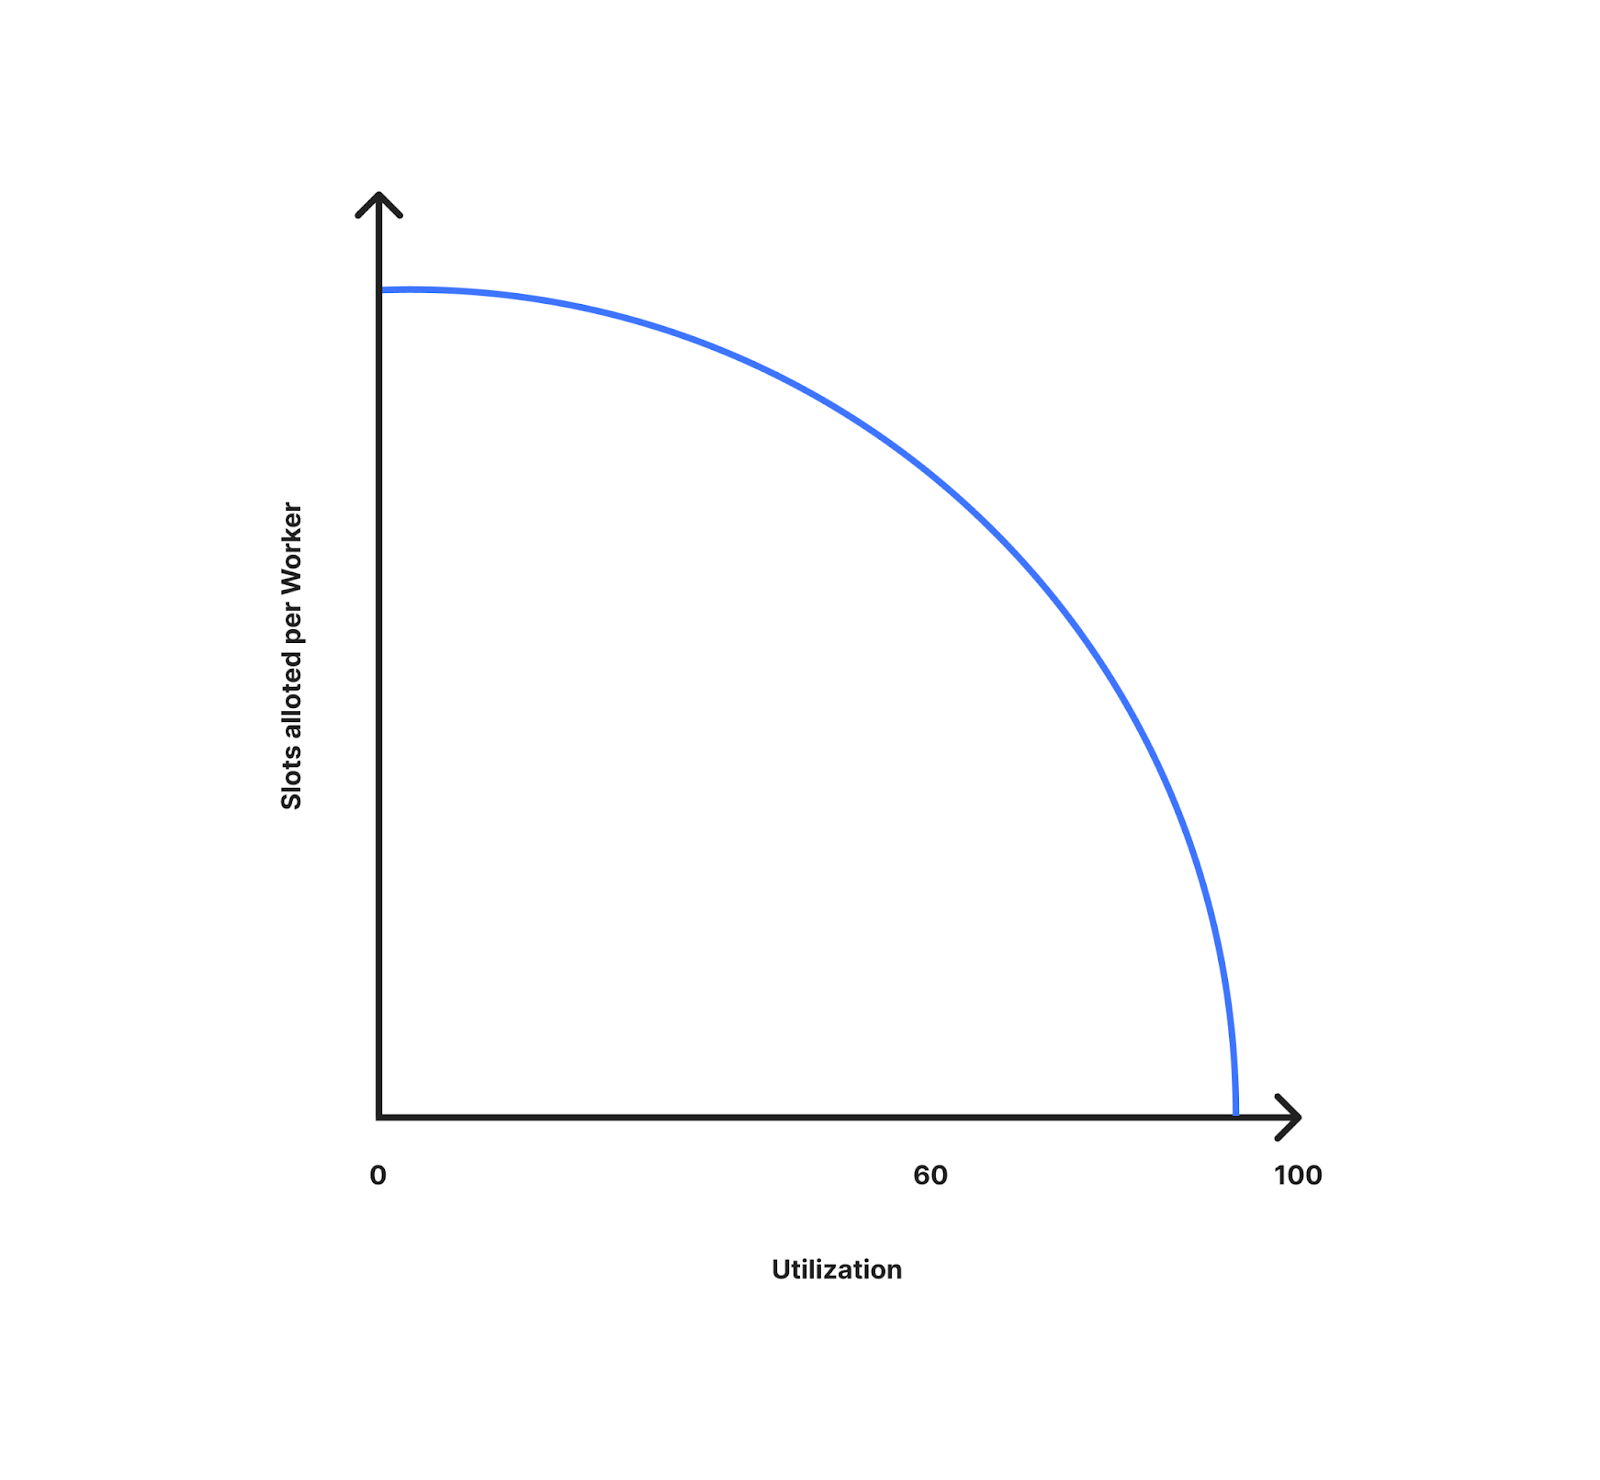
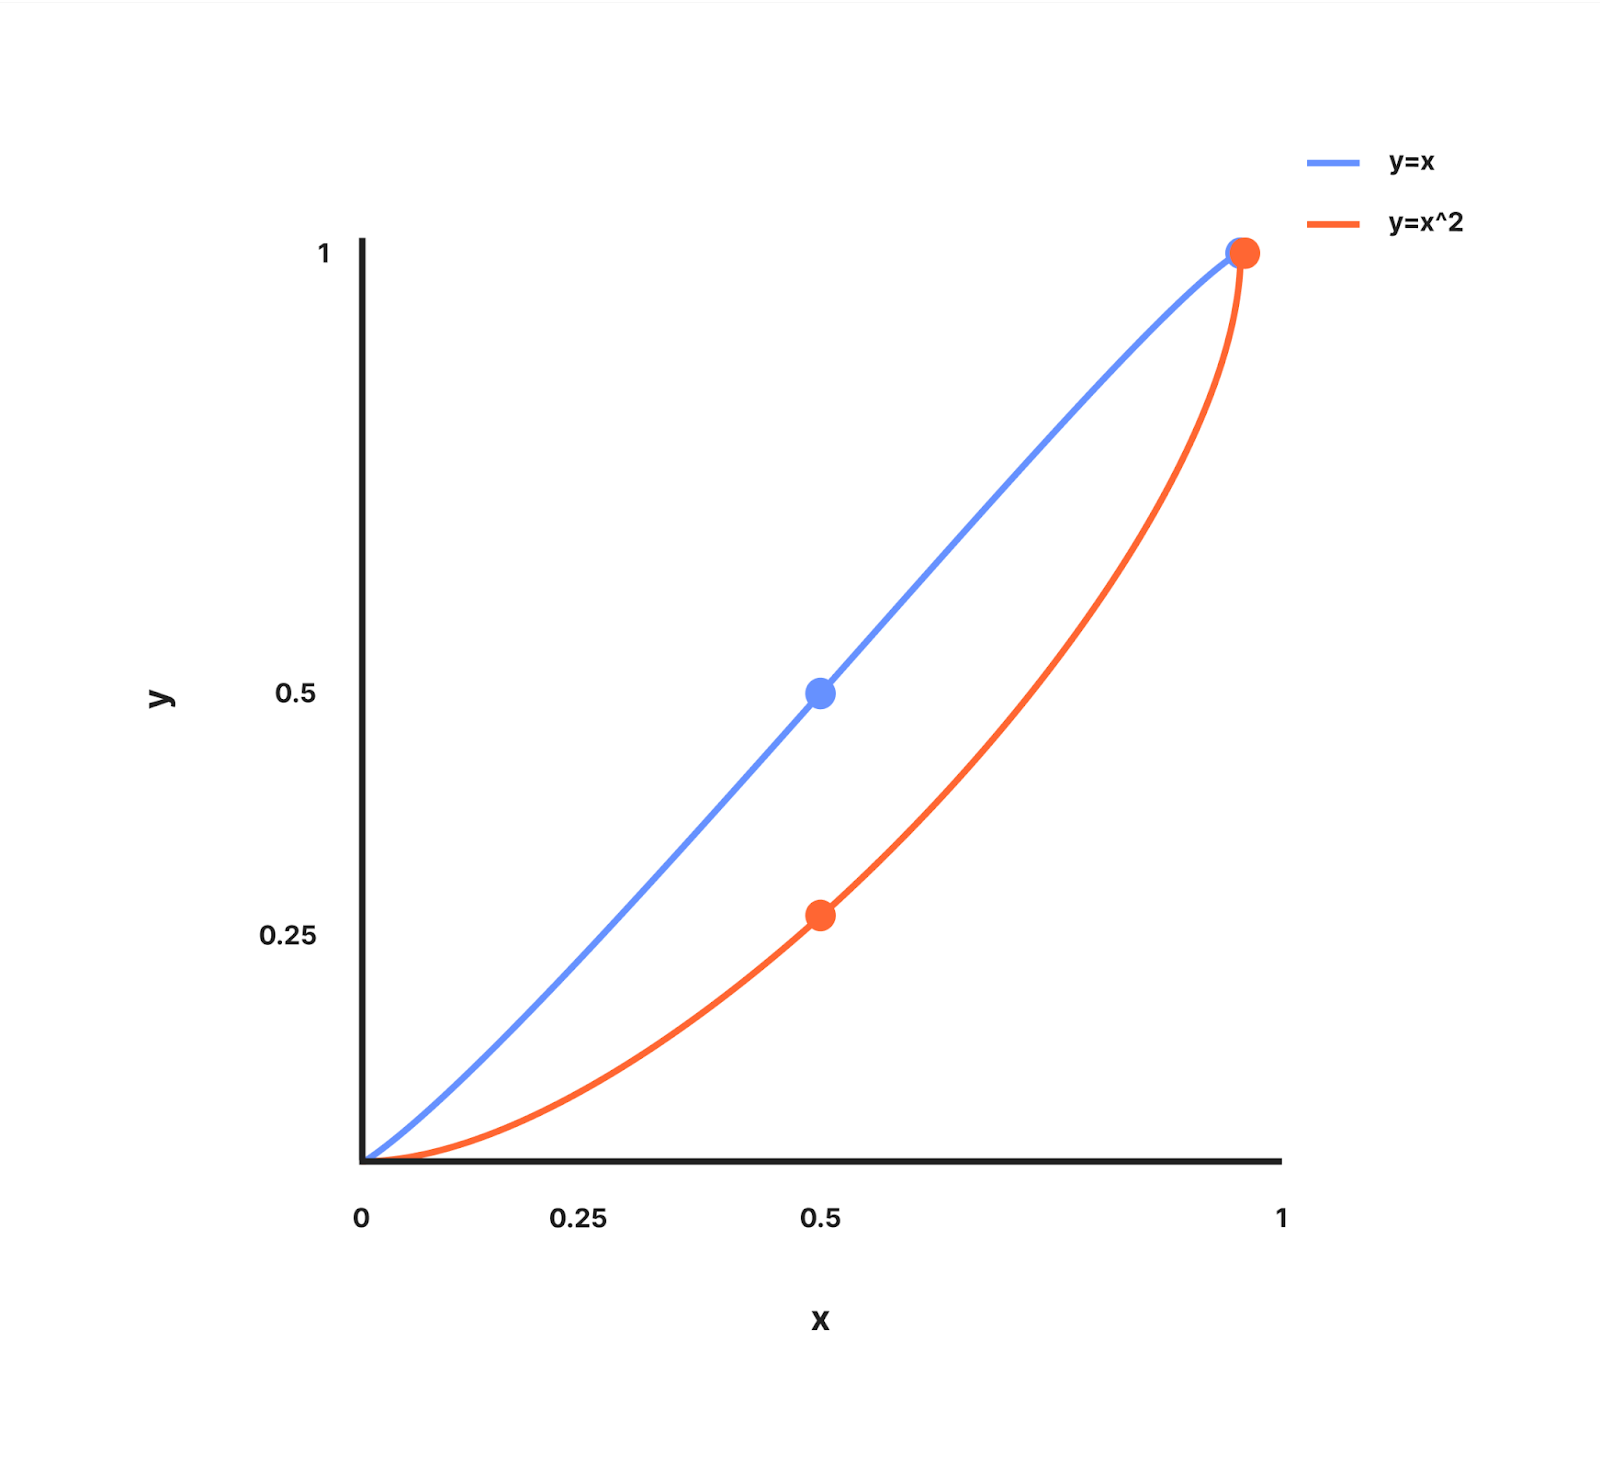
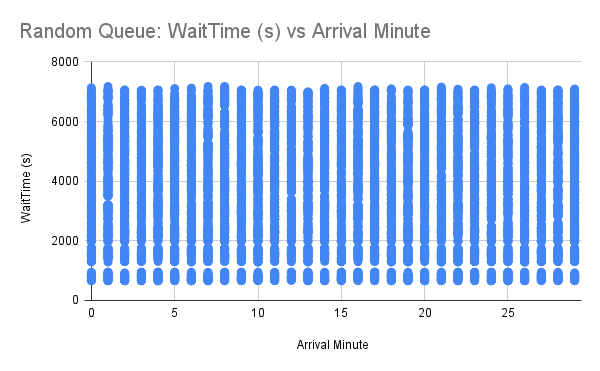
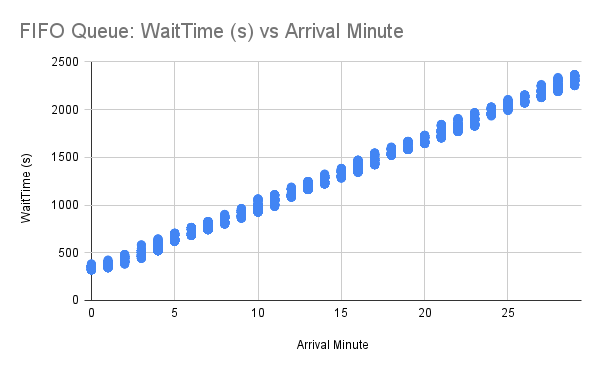
That queuing page shows a fake estimated time remaining. It’s based on an asymptotic curve which appears to decrease linearly from the start. As time goes on, the curve gets flatter (and progress through the “queue” gets slower), so the estimated time remaining never quite reaches 0.

This graph is an approximation of the time remaining (y-axis, minutes) that bots will see, compared to the amount of time they’ve waited in the infinite queue (x-axis, minutes).
We reuse much of the same code for rendering the queuing page for the infinite queue and the normal queue. We do this to reduce the amount of signal bots may have that they are in the infinite queue rather than the normal queue.
let cookie
if (query['cf_wr_turnstile']) {
    const turnstileToken = query['cf_wr_turnstile']
    const tokenOk = await siteverify(turnstileToken)
    if (tokenOk) {
        analytics.turnstileSuccesses++
        cookie = newCookie()
    } else {
        analytics.turnstileFailures++
        cookie = { infiniteQueuing: true }
    }
    response.headers['Set-Cookie'] = encryptCookie(cookie)
}
if (!cookie) {
    cookie = decryptCookie(headers['Cookie'])
}
if (!cookie) {
    analytics.turnstileChallenges++
    return await queuingPage(await estimateTimeRemaining(), { turnstileChallenge: true })
} else if (cookie.infiniteQueuing) {
    analytics.infiniteQueueRequests++
    return await queuingPage(fakeTimeRemaining())
} else if (cookie.accepted) {
    return await sendToOrigin()
} else {
    // run Waiting Room's distributed queuing logic to check whether
    // this user has made it to the front of the queue, but only after
    // the user has completed a Turnstile challenge and isn't in the
    // fake infinite queue
    const { letThrough, timeRemaining } = calculateQueuing(cookie)
    if (letThrough) {
        cookie.accepted = true
        response.headers['Set-Cookie'] = encryptCookie(cookie)
        return await sendToOrigin()
    } else {
        return await queuingPage(timeRemaining)
    }
}
Approximate psuedocode for how we handle incoming requests when infinite queue is enabled in the Waiting Room worker
Thanks to the versatility of Turnstile, we only needed to rely on public Turnstile APIs to build this integration.
Adding Turnstile to Waiting Room is a proactive step in managing traffic that directly contributes to a smoother, faster experience for end users. Building on that efficiency, let’s dive into how you can add an additional layer of control to increase throughput and minimize wait times for your customers.
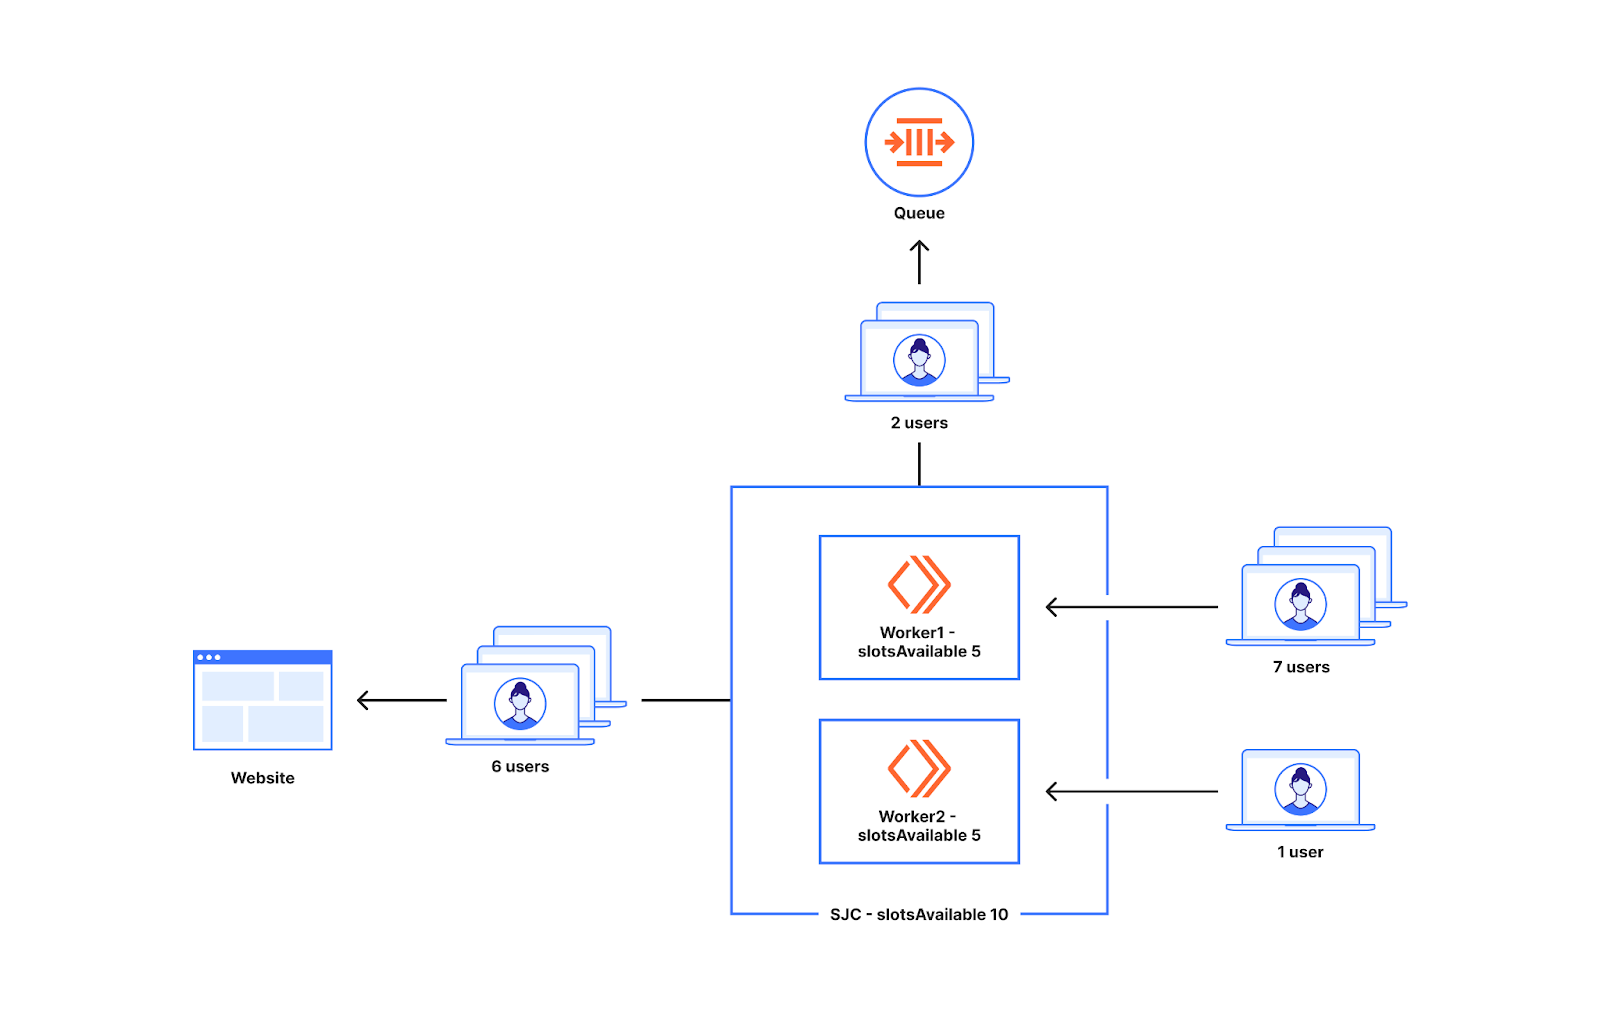
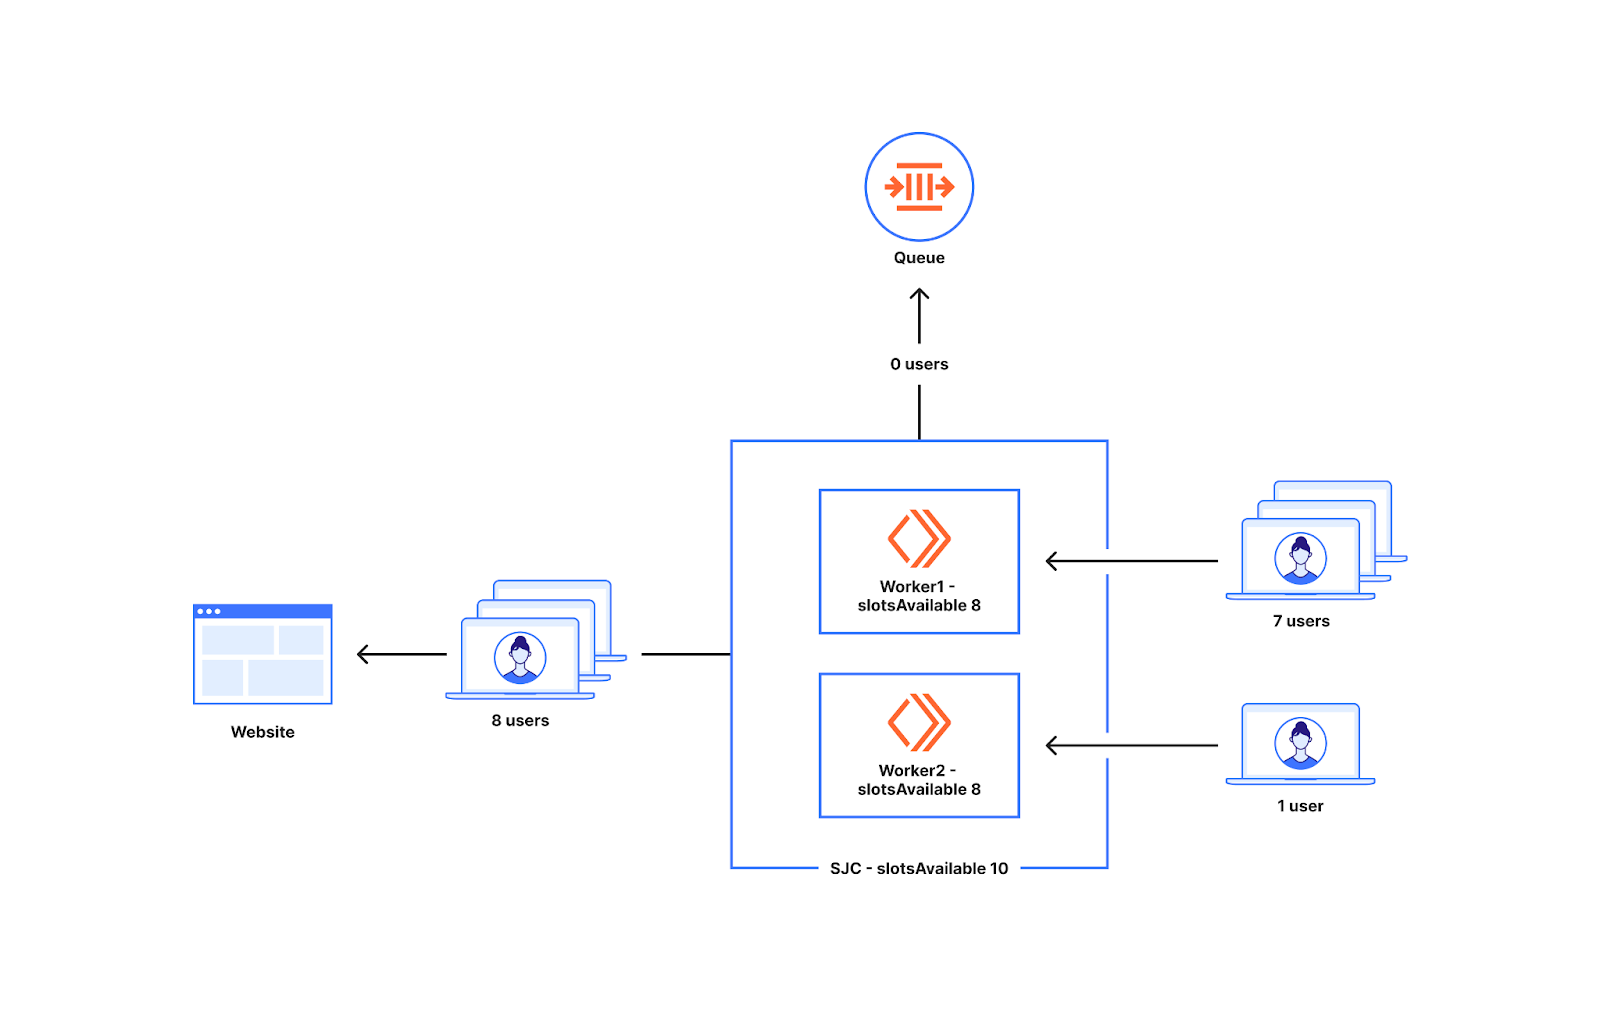
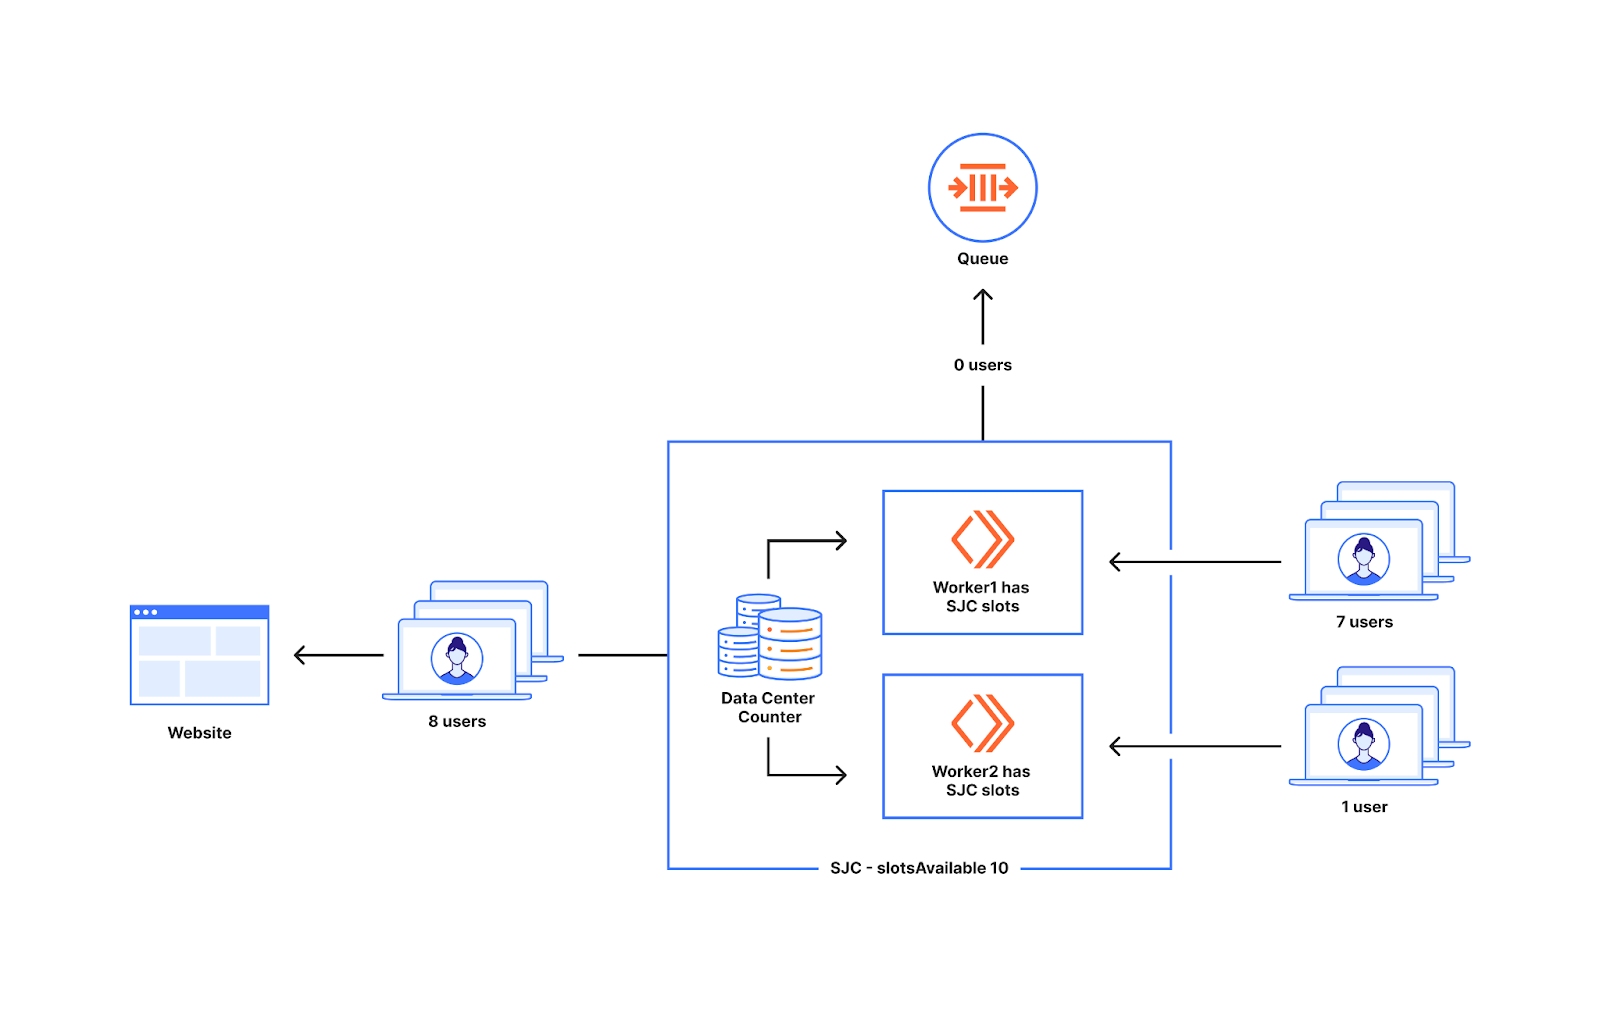
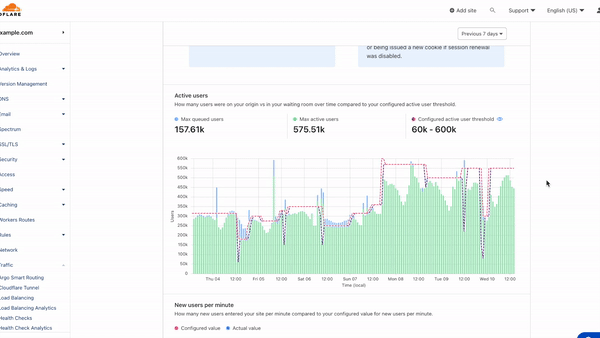
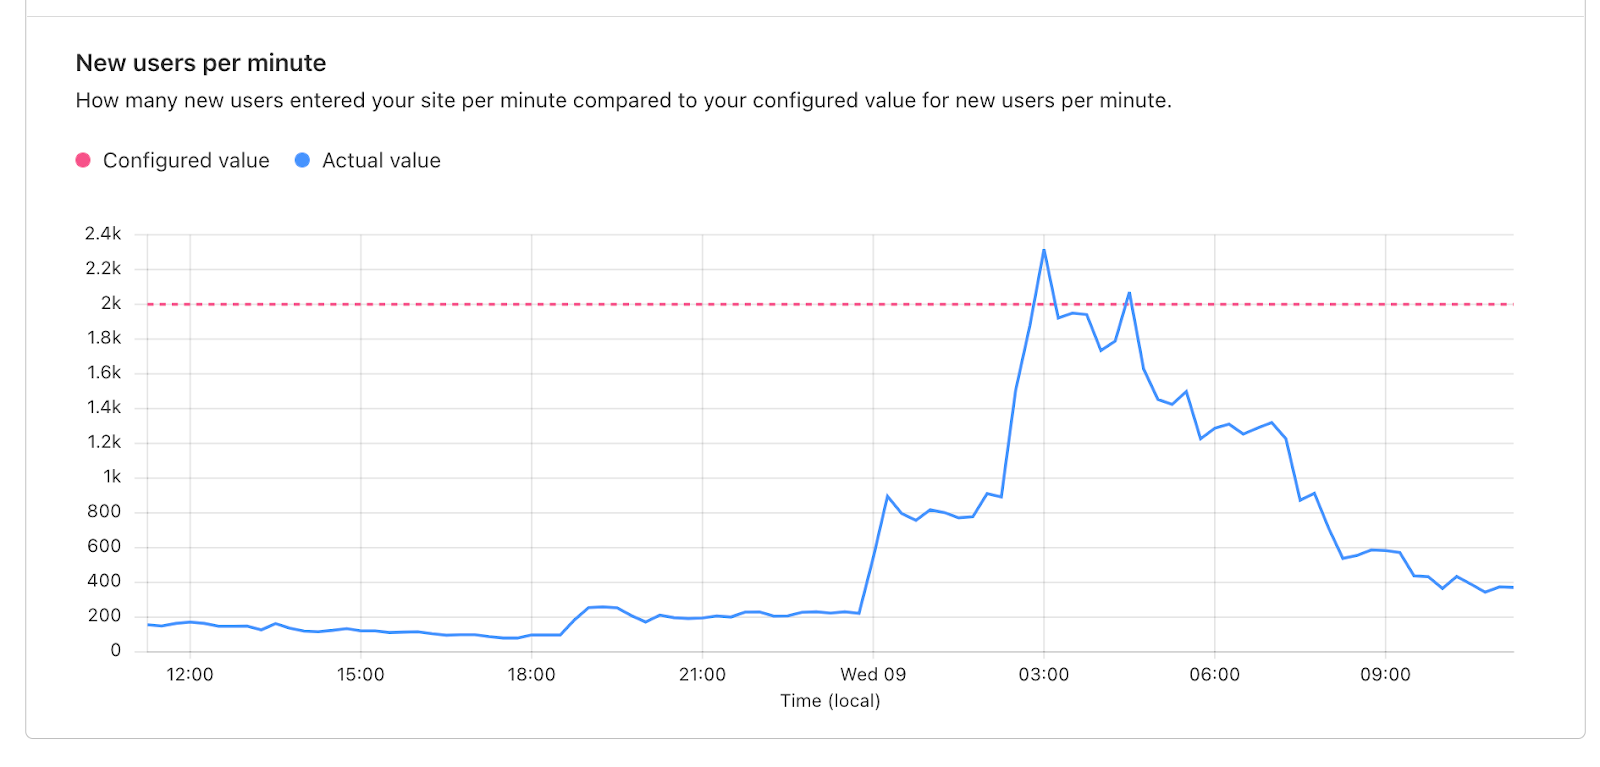
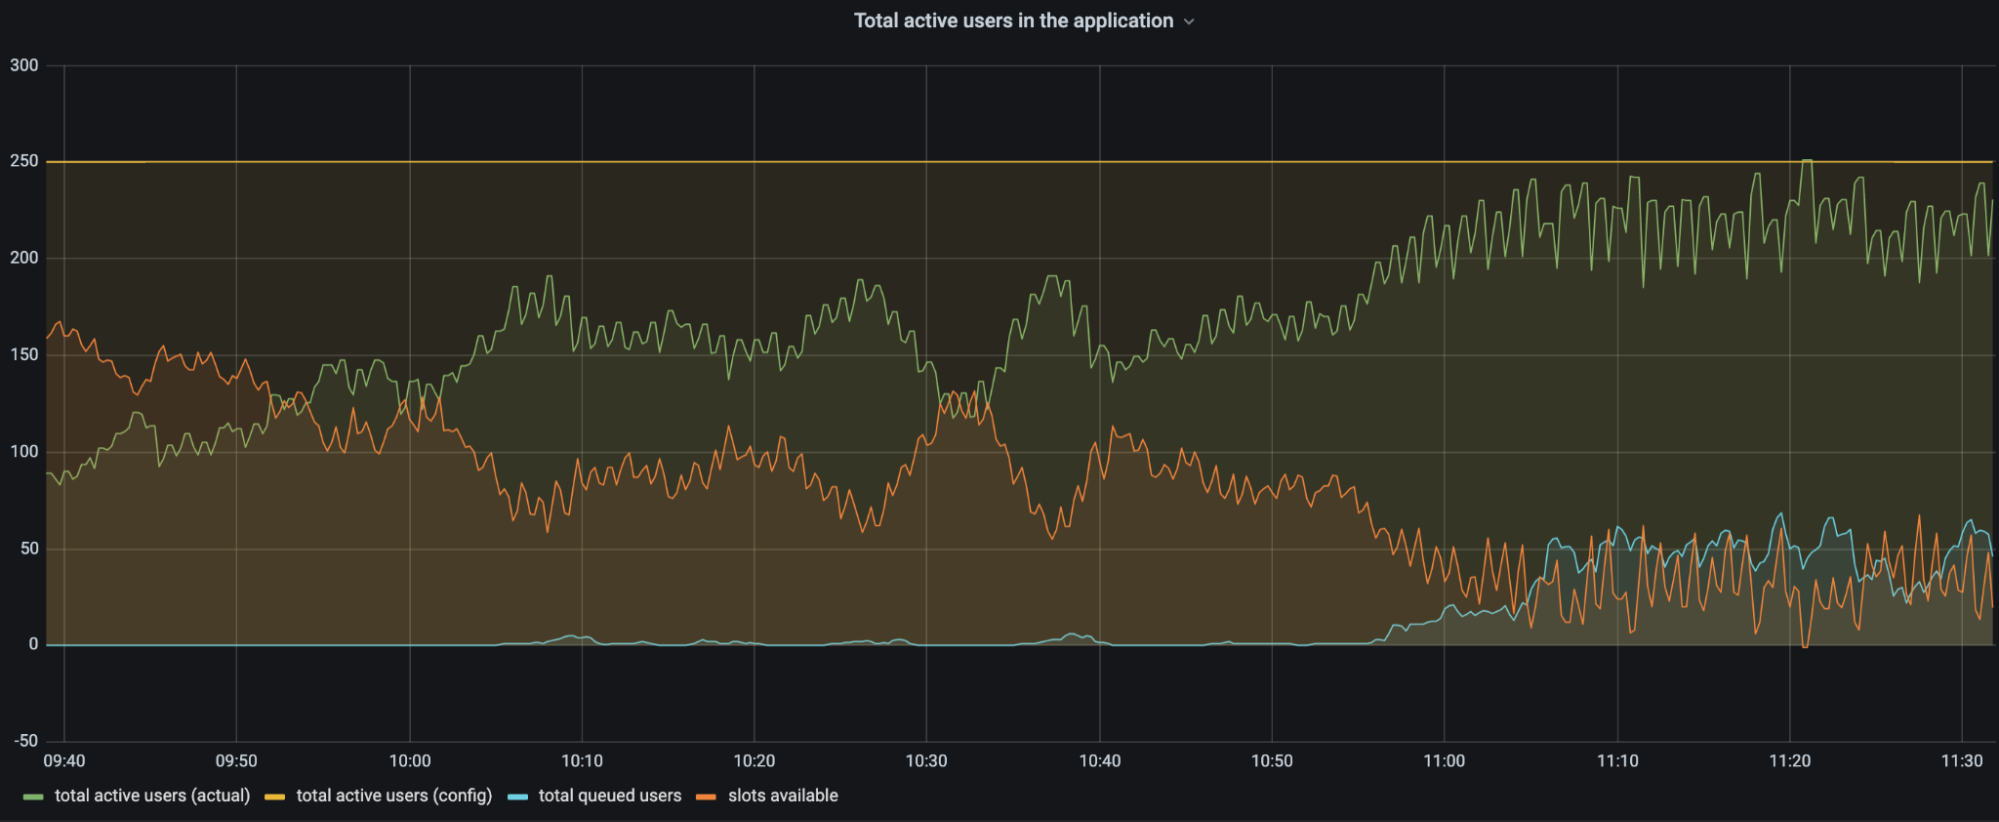
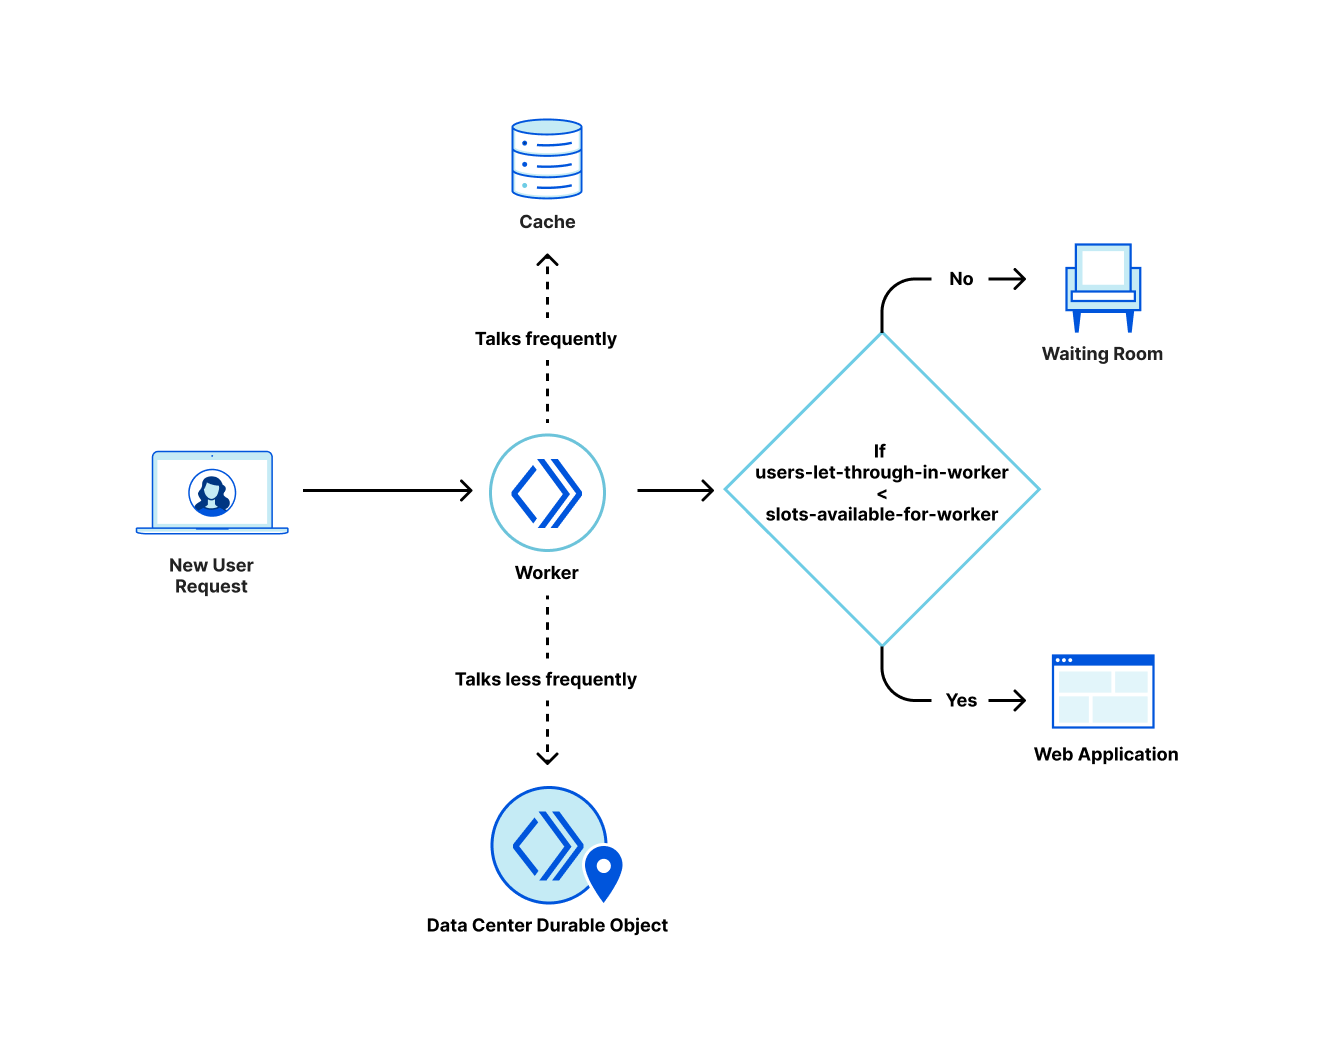
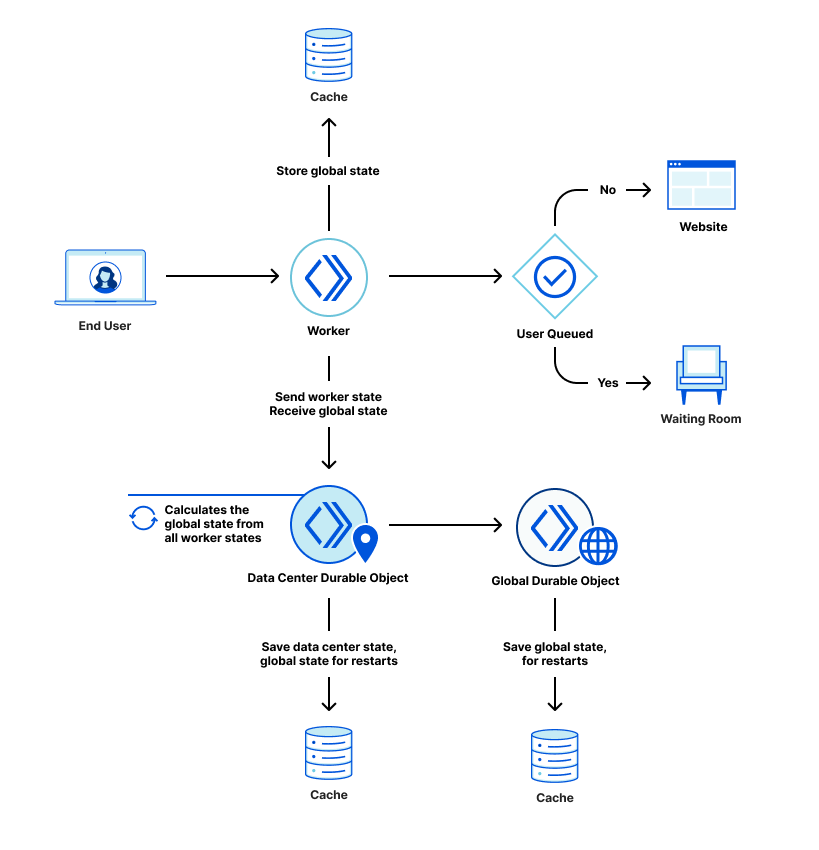
We have talked extensively in a previous blog post about how we queue users with respect to the current active users on the application and the defined limits, and, in the same blog post, what state and calculations we use to determine the amount of total active users. Here is a quick summary for those who have not read that post:
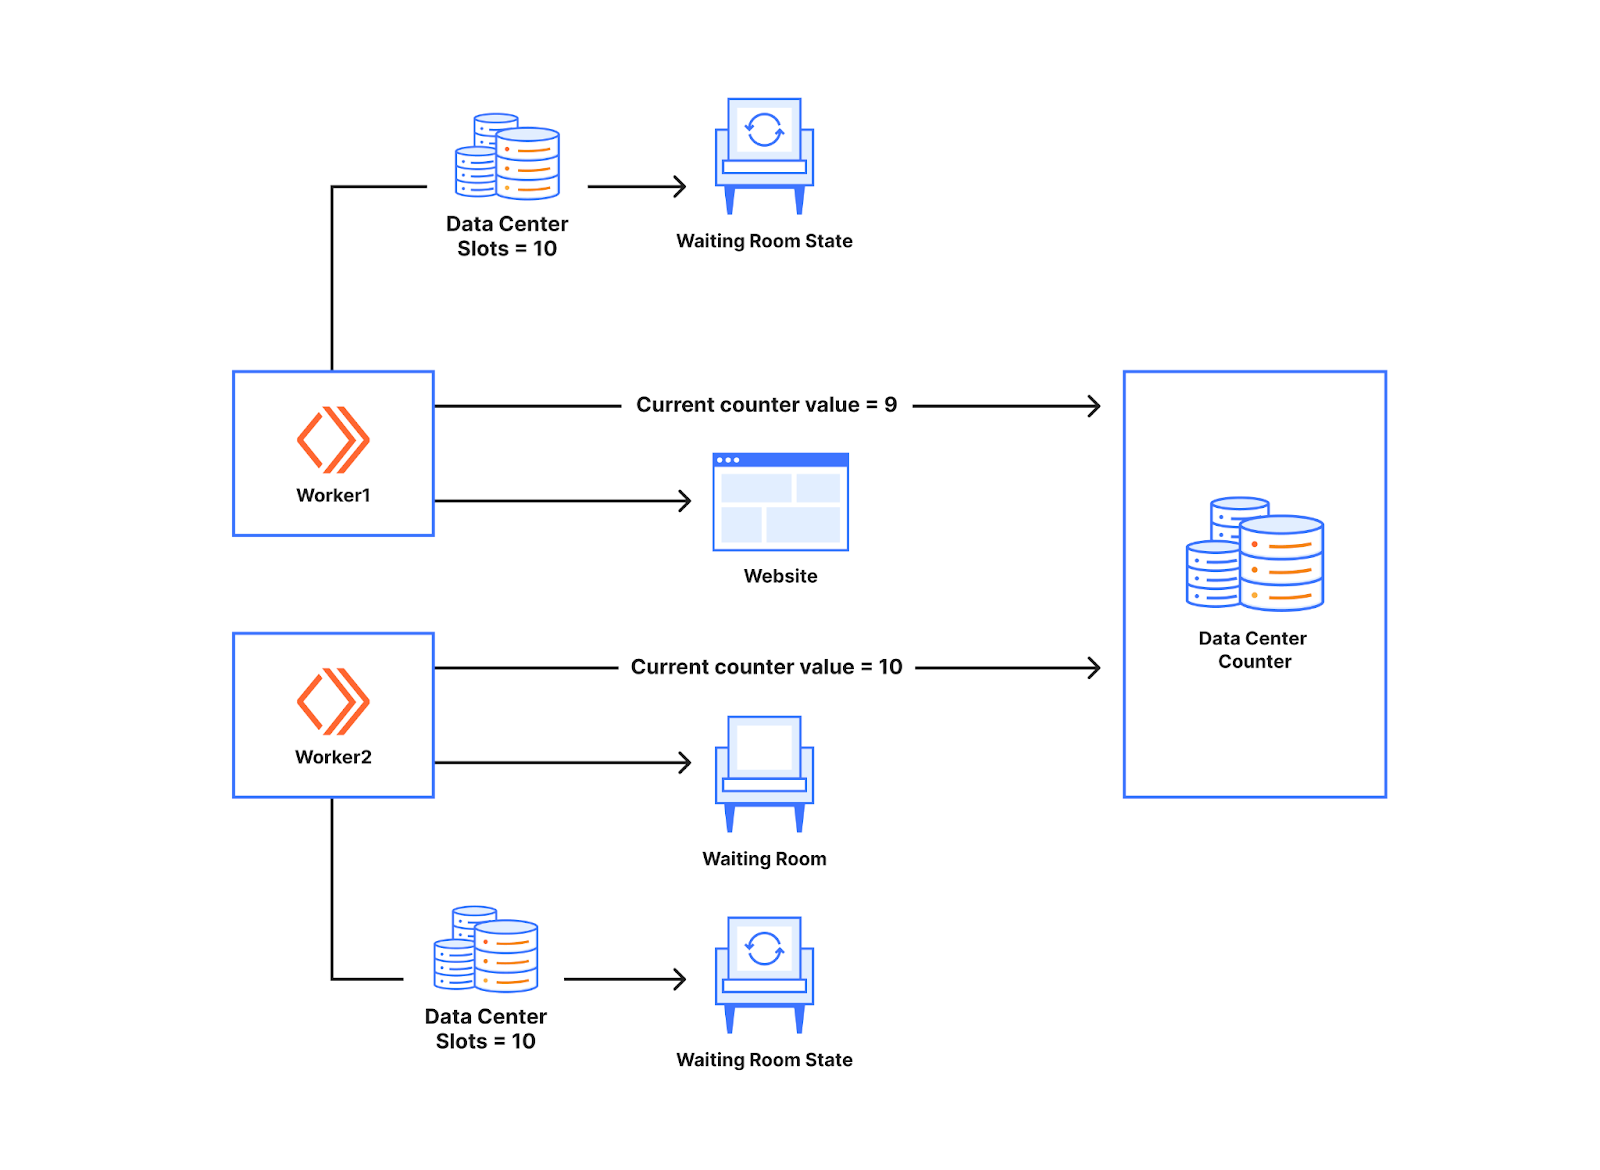
When a user navigates to a page behind a waiting room, they receive a cookie and are associated with a time period called a bucket. We use these buckets to track the number of users either waiting in the queue or accessing the application for that specific time period. Whenever a user makes a request, we move their session from their previous bucket to the latest bucket. Once a bucket is older than the configured session duration, we know that those user sessions are no longer valid (expired) and we can clean up those values. Thus, that user session expires, and new slots are opened for the next users to enter the application.
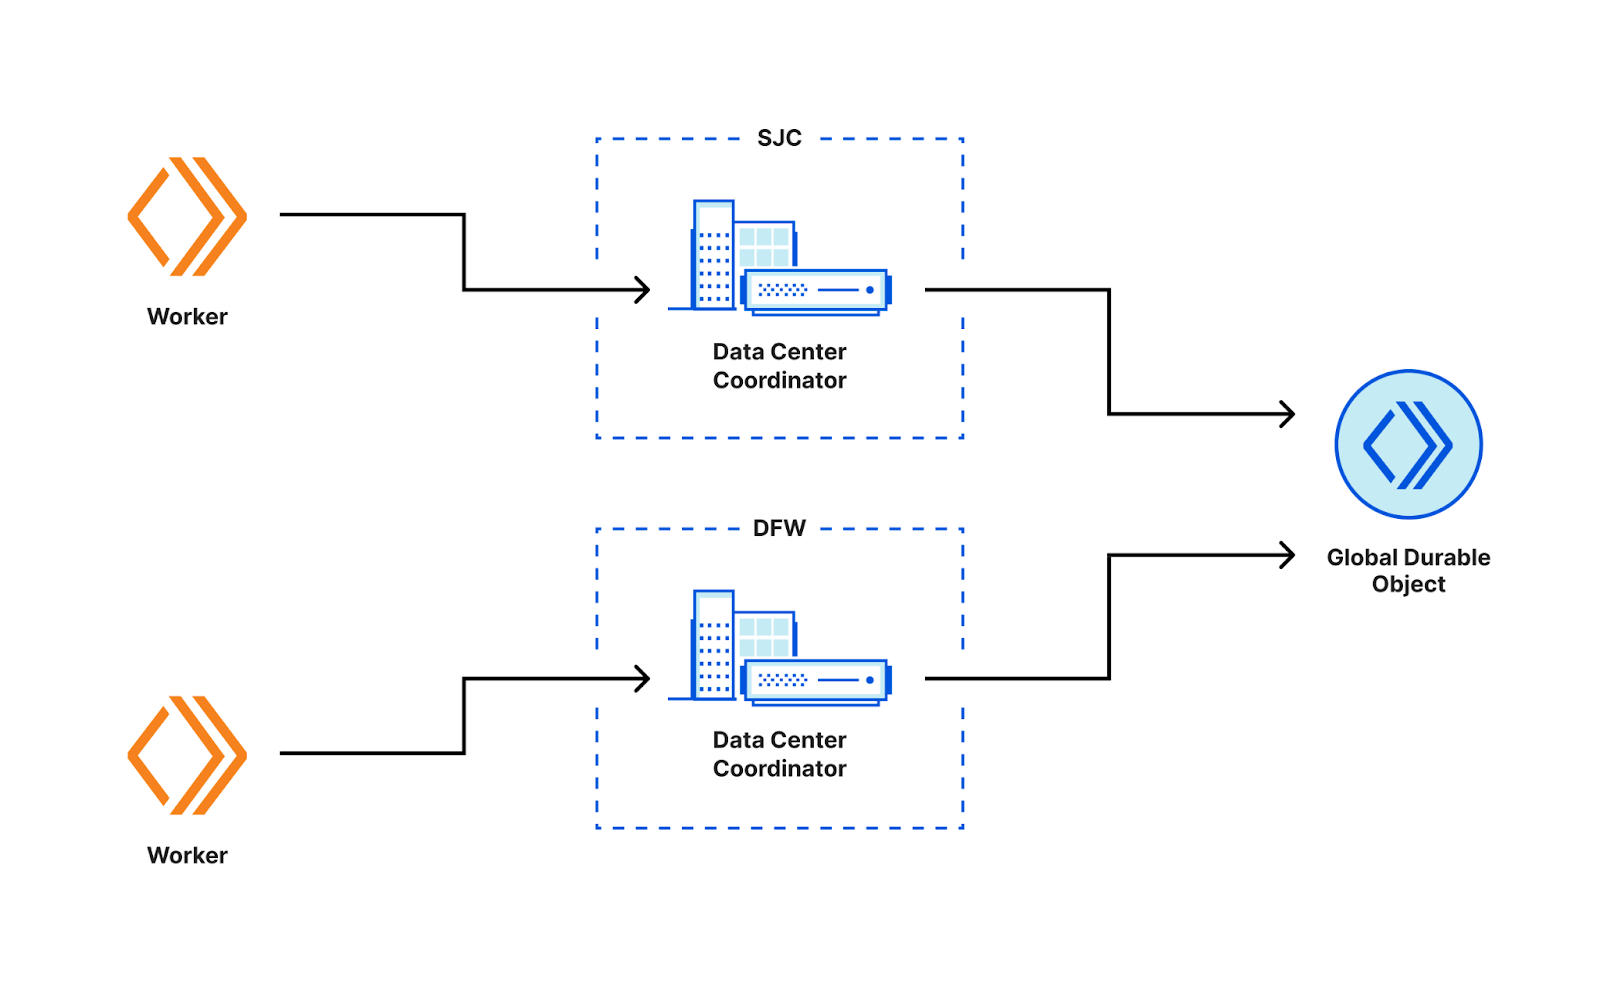
These buckets are aggregated at Cloudflare data centers and then globally via the internal state of the waiting room, which is structured as multiple CRDT counters and registers. This allows us to merge the distributed state of the waiting room stored in multiple data centers as a single global state without conflicts.
To calculate the total active users on an application, we first merge the state from all data centers. Then, we sum the active users for all the buckets where a session can still be active.

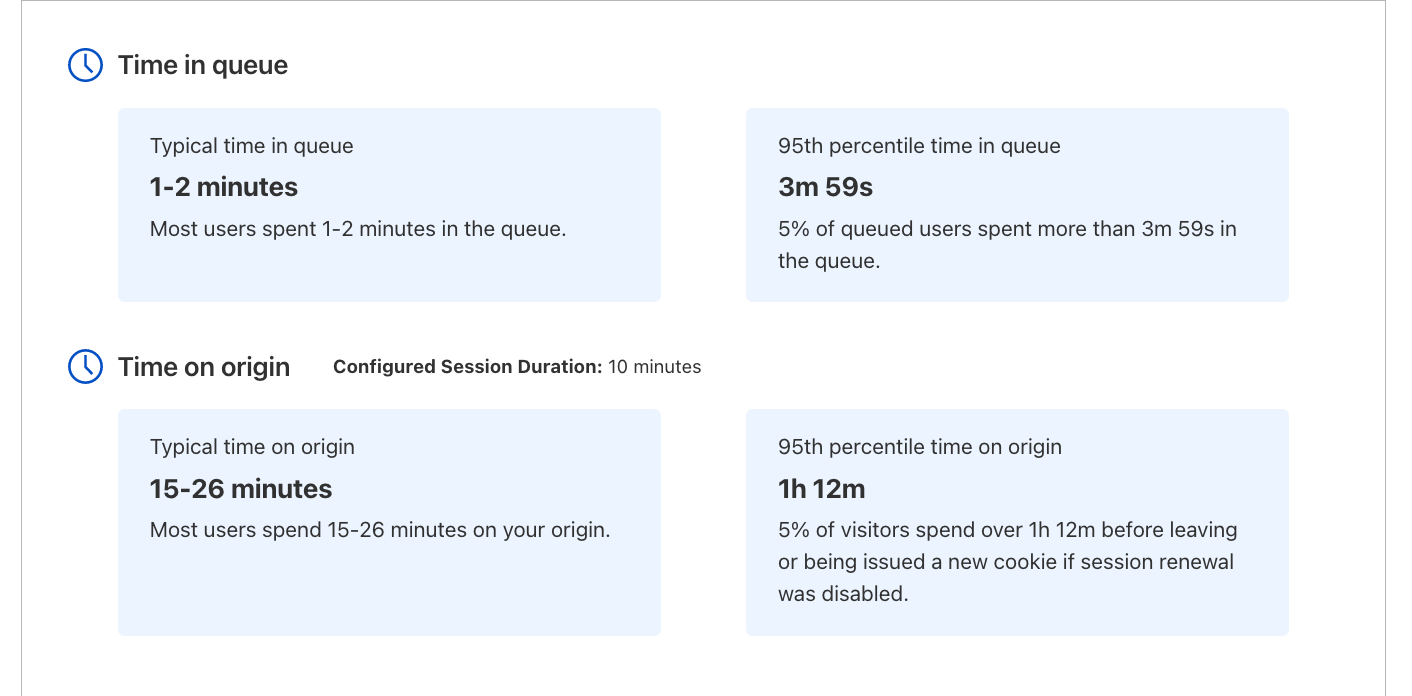
Because the Waiting Room runs per user request, we do not explicitly know when a user has stopped accessing the application, and instead we only stop receiving requests from them. So, we must consider their session active and as a contributor to the total active users count until it is older than the session duration limit. For waiting rooms that have a high session duration value configured, a user might navigate to the site for a small duration of time but contribute to the total active users count for up to the configured session duration even after they have stopped accessing the application. This can cause decreased throughput and longer wait times for users in the queue.
With the Session Revocation feature, we now allow origins to return a command to the waiting room via an HTTP header (Cf-Waiting-Room-Command) to notify the Waiting Room to revoke the user session associated with the current response. This command removes the current user’s session and decreases the number of total active users for the bucket the session was last tracked in. This allows origins to terminate a user’s session early without needing to wait for the session to expire naturally.

This can improve the throughput of waiting rooms in front of applications which have a dynamic user flow where the session duration is set very high to account for users who send infrequent requests to the application.
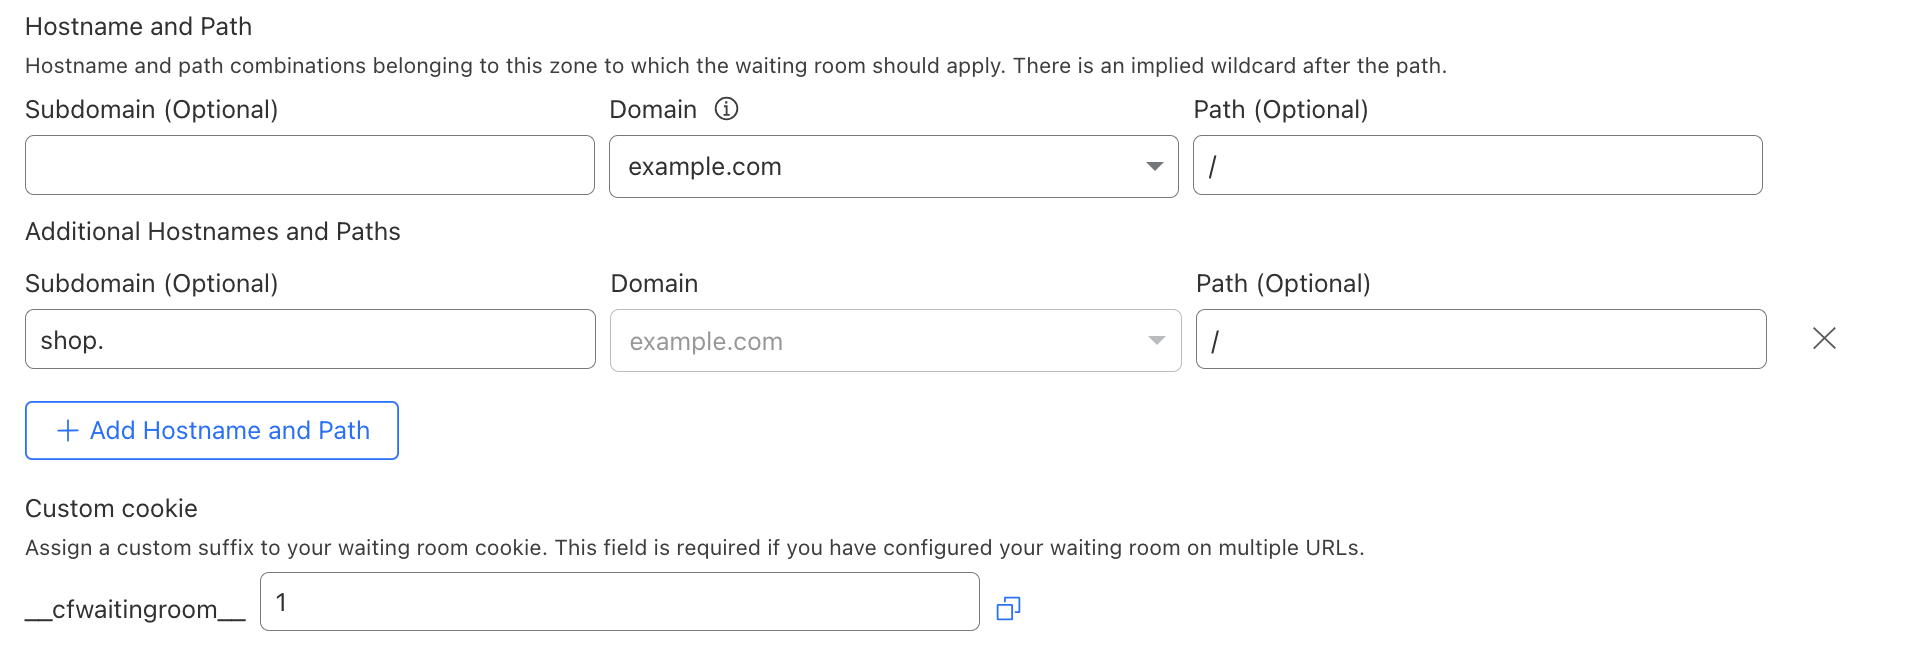
To set up session revocation in your waiting room, in the user session settings section in the configuration, check the “Allow session termination via origin commands” box. You must also configure your origin to return a session revocation HTTP header (Cf-Waiting-Room-Command: revoke) on the response when you want the session associated with that response to be revoked. For more information on how to do this, refer to our developer documentation.

Enable session revocation in the user session settings configuration
In Waiting Room Analytics, you can view the number of sessions revoked per minute. The sessionsRevoked field is the count of how many sessions were revoked in that minute in the analytics GraphQL API.
In summary, Waiting Room Turnstile Integration and Session Revocation work together to enhance both security and user experience. The addition of a Turnstile challenge in the Waiting Room helps identify and block bots, ensuring that legitimate users don’t face unnecessary delays. Meanwhile, the Session Revocation feature optimizes resource usage by allowing you to end user sessions after key actions, like completing a purchase, freeing up space for other users.
Together, these features successfully increase throughput and reduce wait times, providing a faster, more efficient experience for your customers. For more information on these features, check out our developer documentation.