All posts by Tyler McGoffin

Agent-driven development in Copilot Applied Science

Post Syndicated from Tyler McGoffin original https://github.blog/ai-and-ml/github-copilot/agent-driven-development-in-copilot-applied-science/


I may have just automated myself into a completely different job…

This is a familiar pattern among software engineers, who often, through inspiration, frustration, or sometimes even laziness, build systems to remove toil and focus on more creative work. We then end up owning and maintaining those systems, unlocking that automated goodness for the rest of those around us.

As an AI researcher, I recently took this beyond what was previously possible and have automated away my intellectual toil. And now I find myself maintaining this tool to enable all my peers on the Copilot Applied Science team to do the same.

During this process, I learned a lot about how to effectively create and collaborate using GitHub Copilot. Applying these learnings has unlocked an incredibly fast development loop for myself as well as enabled my team mates to build solutions to fit their needs.

Before I get into explaining how I made this possible, let me set the stage for what spawned this project so you better understand the scope of what you can do with GitHub Copilot.

The impetus

A large part of my job involves analyzing coding agent performance as measured against standardized evaluation benchmarks, like TerminalBench2 or SWEBench-Pro. This often involves poring through tons of what are called trajectories, which are essentially lists of the thought processes and actions agents take while performing tasks.

Each task in an evaluation dataset produces its own trajectory, showing how the agent attempted to solve that task. These trajectories are often .json files with hundreds of lines of code. Multiply that over dozens of tasks in a benchmark set and again over the many benchmark runs needing analysis on any given day, and we’re talking hundreds of thousands of lines of code to analyze.

It’s an impossible task to do alone, so I would typically turn to AI to help. When analyzing new benchmark runs, I found that I kept repeating the same loop: I used GitHub Copilot to surface patterns in the trajectories then investigated them myself—reducing the number of lines of code I had to read from hundreds of thousands to a few hundred.

However, the engineer in me saw this repetitive task and said, “I want to automate that.” Agents provide us with the means to automate this kind of intellectual work, and thus eval-agents was born.

The plan

Engineering and science teams work better together. That was my guiding principle as I set about solving this new challenge.

Thus, I approached the design and implementation strategy of this project with a couple of goals in mind:

  1. Make these agents easy to share and use
  2. Make it easy to author new agents
  3. Make coding agents the primary vehicle for contributions

Bullets one and two are in GitHub’s lifeblood and are values and skills I’ve gained throughout my career, especially during my stint as an OSS maintainer on the GitHub CLI.

However, goal three shaped the project the most. I noticed that when I set GitHub Copilot up to help me build the tool effectively, it also made the project easier to use and collaborate on. That experience taught me a few key lessons, which ultimately helped push the first and second goals forward in ways I didn’t expect.

Making coding agents your primary contributor

I’ll start by describing my agentic coding setup:

  • Coding agent: Copilot CLI
  • Model used: Claude Opus 4.6
  • IDE: VSCode

It’s also noteworthy that I leveraged the Copilot SDK to accelerate agent creation, which is powered under the hood by the Copilot CLI. This gave me access to existing tools and MCP servers, a way to register new tools and skills, and a whole bunch of other agentic goodness out of the box that I didn’t have to reinvent myself.

With that out of the way, I could streamline the whole development process very quickly by following a few core principles:

  • Prompting strategies: agents work best when you’re conversational, verbose, and when you leverage planning modes before agent modes.
  • Architectural strategies: refactor often, update docs often, clean up often.
  • Iteration strategies: “trust but verify” is now “blame process, not agents.”

Uncovering and following these strategies led to an incredible phenomenon: adding new agents and features was fast and easy. We had five folks jump into the project for the first time, and we created a total of 11 new agents, four new skills, and the concept of eval-agent workflows (think scientist streams of reasoning) in less than three days. That amounted to a change of +28,858/-2,884 lines of code across 345 files.

Holy crap!

Below, I’ll go into detail about these three principles and how they enabled this amazing feat of collaboration and innovation.

Prompting strategies

We know that AI coding agents are really good at solving well-scoped problems but need handholding for the more complex problems you’d only entrust to your more senior engineers.

So, if you want your agent to act like an engineer, treat it like one. Guide its thinking, over-explain your assumptions, and leverage its research speed to plan before jumping into changes. I found it far more effective to put some stream-of-consciousness musings about a problem I was chewing on into a prompt and working with Copilot in planning mode than to give it a terse problem statement or solution.

Here’s an example of a prompt I wrote to add more robust regression tests to the tool:

> /plan I've recently observed Copilot happily updating tests to fit its new paradigms even though those tests shouldn't be updated. How can I create a reserved test space that Copilot can't touch or must reserve to protect against regressions?

This resulted in a back and forth that ultimately led to a series of guardrails akin to contract testing that can only be updated by humans. I had an idea of what I wanted, and through conversation, Copilot helped me get to the right solution.

It turns out that the things that make human engineers the most effective at doing their jobs are the same things that make these agents effective at doing theirs.

Architectural strategies

Engineers, rejoice! Remember all those refactors you wanted to do to make the codebase more readable, the tests you never had time to write, and the docs you wish had existed when you onboarded? They’re now the most important thing you can be working on when building an agent-first repository.

Gone are the days where deprioritizing this work over new feature work was necessary, because delivering features with Copilot becomes trivial when you have a well-maintained, agent-first project.

I’ve spent most of my time on this project refactoring names and file structures, documenting new features or patterns, and adding test cases for problems that I’ve uncovered as I go. I’ve even spent a few cycles cleaning up the dead code that the agents (like your junior engineers) may have missed while implementing all these new features and changes.

This work makes it easy for Copilot to navigate the codebase and understand the patterns, just like it would for any other engineer.

I can even ask, “Knowing what I know now, how would I design this differently?” And I can then justify actually going back and rearchitecting the whole project (with the help of Copilot, of course).

It’s a dream come true!

And this leads me to my last bit of guidance.

Iteration strategies

As agents and models have improved, I have moved from a “trust but verify” mindset to one that is more trusting than doubtful. This mirrors how the industry treats human teams: “blame process, not people.” It’s how the most effective teams operate, because people make mistakes, so we build systems around that reality.

This idea of blameless culture provides psychological safety for teams to iterate and innovate, knowing that they won’t be blamed if they make a mistake. The core principle is that we implement processes and guardrails to protect against mistakes, and if a mistake does happen, we learn from it and introduce new processes and guardrails so that our teams won’t make the same mistake again.

Applying this same philosophy to agent-driven development has been fundamental to unlocking this incredibly rapid iteration pipeline. That means we add processes and guardrails to help prevent the agent from making mistakes, but when it does make a mistake, we add additional guardrails and processes—like more robust tests and better prompts—so the agent can’t make the same mistake again. Taking this one step further means that practicing good CI/CD principles is a must.

Practices like strict typing ensure the agent conforms to interfaces. Robust linters impose implementation rules on the agent that keep it following good patterns and practices. And integration, end-to-end, and contract tests—which can be expensive to build manually—become much cheaper to implement with agent assistance, while giving you confidence that new changes don’t break existing features.

When Copilot has these tools available in its development loop, it can check its own work. You’re setting it up for success, much in the same way you’d set up a junior engineer for success in your project.

Putting it all together

Here’s what all this means for your development loop when you’ve got your codebase set up for agent-driven development:

  1. Plan a new feature with Copilot using /plan.
    • Iterate on the plan.
    • Ensure that testing is included in the plan.
    • Ensure that docs updates are included in the plan and done before code is implemented. These can serve as additional guidelines that live beside your plan.
  2. Let Copilot implement the feature on /autopilot.
  3. Prompt Copilot to initiate a review loop with the Copilot Code Review agent. For me, it’s often something like: request Copilot Code Review, wait for the review to finish, address any relevant comments, and then re-request review. Continue this loop until there are no more relevant comments.
  4. Human review. This is where I enforce the patterns I discussed in the previous sections.

Additionally, outside of your feature loop, be sure you’re prompting Copilot early and often with the following:

  • /plan Review the code for any missing tests, any tests that may be broken, and dead code
  • /plan Review the code for any duplication or opportunities for abstraction
  • /plan Review the documentation and code to identify any documentation gaps. Be sure to update the copilot-instructions.md to reflect any relevant changes

I have these run automatically once a week, but I often find myself running them throughout the week as new features and fixes go in to maintain my agent-driven development environment.

Take this with you

What started as a frustration with an impossibly repetitive analysis task turned into something far more interesting: a new way of thinking about how we build software, how we collaborate, and how we grow as engineers.

Building agents with a coding agent-first mindset has fundamentally changed how I work. It’s not just about the automation wins—though watching four scientists ship 11 agents, four skills, and a brand-new concept in under three days is nothing short of remarkable. It’s about what this style of development forces you to prioritize: clean architecture, thorough documentation, meaningful tests, and thoughtful design—the things we always knew mattered but never had time for.

The analogy to a junior engineer keeps proving itself out. You onboard them well, give them clear context, build guardrails so their mistakes don’t become disasters, and then trust them to grow. If something goes wrong, you blame the process. Not the agent. If there’s one thing I want you to take away from this, it’s that the skills that make you a great engineer and a great teammate are the same skills that make you great at building with Copilot. The technology is new. The principles aren’t.

So go clean up that codebase, write that documentation you’ve been putting off, and start treating your Copilot like the newest member of your team. You might just automate yourself into the most interesting work of your career.

Think I’m crazy? Well, try this:

  1. Download Copilot CLI
  2. Activate Copilot CLI in any repo: cd <repo_path> && copilot
  3. Paste in the following prompt: /plan Read <link to this blog post> and help me plan how I could best improve this repo for agent-first development

The post Agent-driven development in Copilot Applied Science appeared first on The GitHub Blog.
How the GitHub CLI can now enable triangular workflows

Post Syndicated from Tyler McGoffin original https://github.blog/open-source/git/how-the-github-cli-can-now-enable-triangular-workflows/


Most developers are familiar with the standard Git workflow. You create a branch, make changes, and push those changes back to the same branch on the main repository. Git calls this a centralized workflow. It’s straightforward and works well for many projects.

However, sometimes you might want to pull changes from a different branch directly into your feature branch to help you keep your branch updated without constantly needing to merge or rebase. However, you’ll still want to push local changes to your own branch. This is where triangular workflows come in.

It’s possible that some of you have already used triangular workflows, even without knowing it. When you fork a repo, contribute to your fork, then open a pull request back to the original repo, you’re working in a triangular workflow. While this can work seamlessly on github.com, the process hasn’t always been seamless with the GitHub CLI.

The GitHub CLI team has recently made improvements (released in v2.71.2) to better support these triangular workflows, ensuring that the gh pr commands work smoothly with your Git configurations. So, whether you’re working on a centralized workflow or a more complex triangular one, the GitHub CLI will be better equipped to handle your needs.

If you’re already familiar with how Git handles triangular workflows, feel free to skip ahead to learn about how to use gh pr commands with triangular workflows. Otherwise, let’s get into the details of how Git and the GitHub CLI have historically differed, and how four-and-a-half years after it was first requested, we have finally unlocked managing pull requests using triangular workflows in the GitHub CLI.

First, a lesson in Git fundamentals

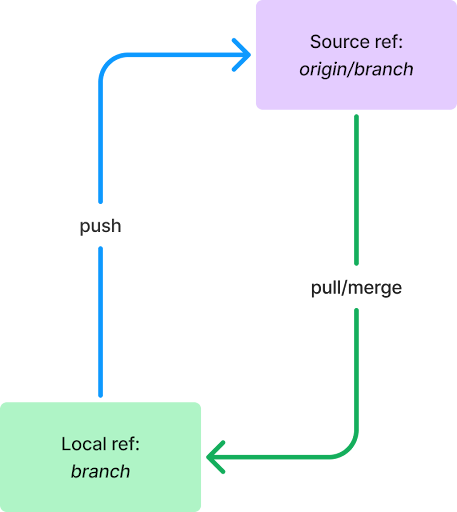
To provide a framework for what we set out to do, it’s important to first understand some Git basics. Git, at its core, is a way to store and catalog changes on a repository and communicate those changes between copies of that repository. This workflow typically looks like the diagram below:

Figure 1: A typical git branch setup

The building blocks of this diagram illustrate two important Git concepts you likely use every day, a ref and push/pull.

Refs

A ref is a reference to a repository and branch. It has two parts: the remote, usually a name like origin or upstream, and the branch. If the remote is the local repository, it is blank. So, in the example above, origin/branch in the purple box is a remote ref, referring to a branch named branch on the repository name origin, while branch in the green box is a local ref, referring to a branch named branch on the local machine.

While working with GitHub, the remote ref is usually the repository you are hosting on GitHub. In the diagram above, you can consider the purple box GitHub and the green box your local machine.

Pushing and pulling

A push and a pull refer to the same action, but from two different perspectives. Whether you are pushing or pulling is determined by whether you are sending or receiving the changes. I can push a commit to your repo, or you can pull that commit from my repo, and the references to that action would be the same.

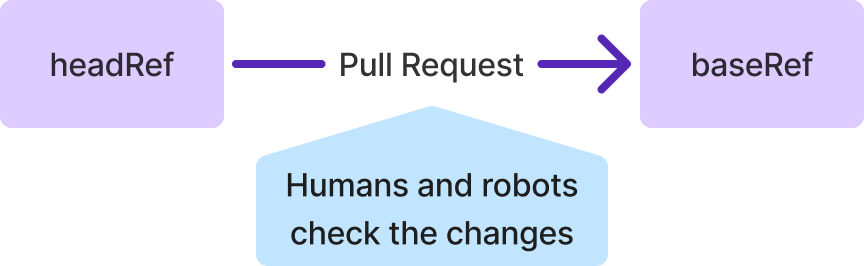
To disambiguate this, we will refer to different refs as the headRef or baseRef, where the headRef is sending the changes (pushing them) and the baseRef is receiving the changes (pulling them).

Figure 2: Disambiguating headRef and baseRef for push/pull operations.
Figure 2: Disambiguating headRef and baseRef for push/pull operations

When dealing with a branch, we’ll often refer to the headRef of its pull operations as its pullRef and the baseRef of its push operations as its pushRef. That’s because, in these instances, the working branch is the pull’s baseRef and the push’s headRef, so they’re already disambiguated.

The @{push} revision syntax

Turns out, Git has a handy built-in tool for referring to the pushRef for a branch: the @{push} revision syntax. You can usually determine a branch’s pushRef by running the following command:

git rev-parse --abbrev-ref @{push}

This will result in a human-readable ref, like origin/branch, if one can be determined.

Pull Requests

On GitHub, a pull request is a proposal to integrate changes from one ref to another. In particular, they act as a simple “pause” before performing the actual integration operation, often called a merge, when changes are being pushed from ref to another. This pause allows for humans (code reviews) and robots (GitHub Copilot reviews and GitHub Actions workflows) to check the code before the changes are integrated. The name pull request came from this language specifically: You are requesting that a ref pulls your changes into itself.

Figure 3: Demonstrating how GitHub Pull Requests correspond to pushing and pulling.
Figure 3: Demonstrating how GitHub Pull Requests correspond to pushing and pulling

Common Git workflows

Now that you understand the basics, let’s talk about the workflows we typically use with Git every day.

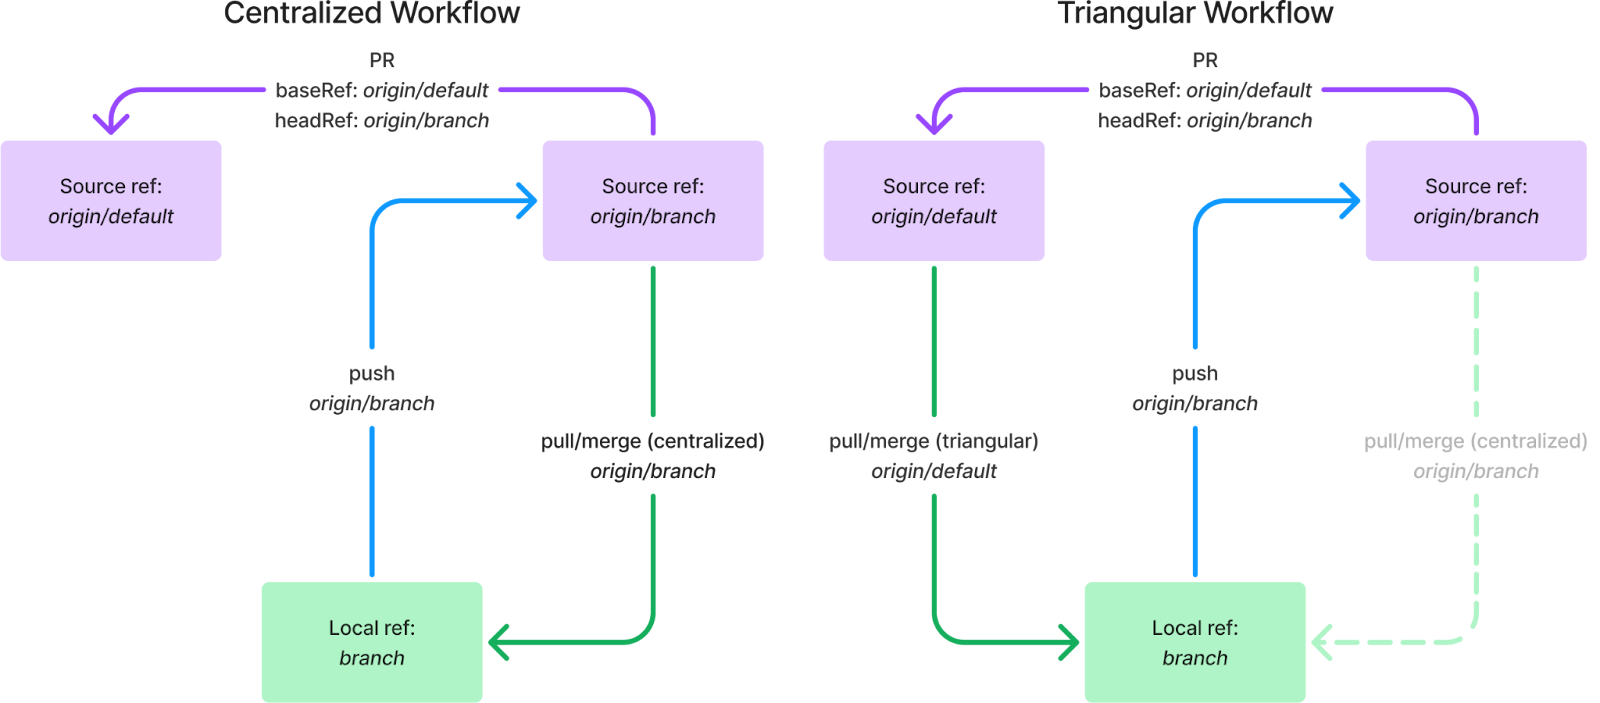
A centralized workflow is how most folks interact with Git and GitHub. In this configuration, any given branch is pushing and pulling from a remote ref with the same branch name. For most of us, this type of configuration is set up by default when we clone a repo and push a branch. It is the situation shown in Figure 1.

In contrast, a triangular workflow pushes to and pulls from different refs. A common use case for this configuration is to pull directly from a remote repository’s default branch into your local feature branch, eliminating the need to run commands like git rebase <default> or git merge <default> on your feature branch to ensure the branch you’re working on is always up to date with the default branch. However, when pushing changes, this configuration will typically push to a remote ref with the same branch name as the feature branch.

Figure 4: juxtaposing centralized workflows from triangular workflows.

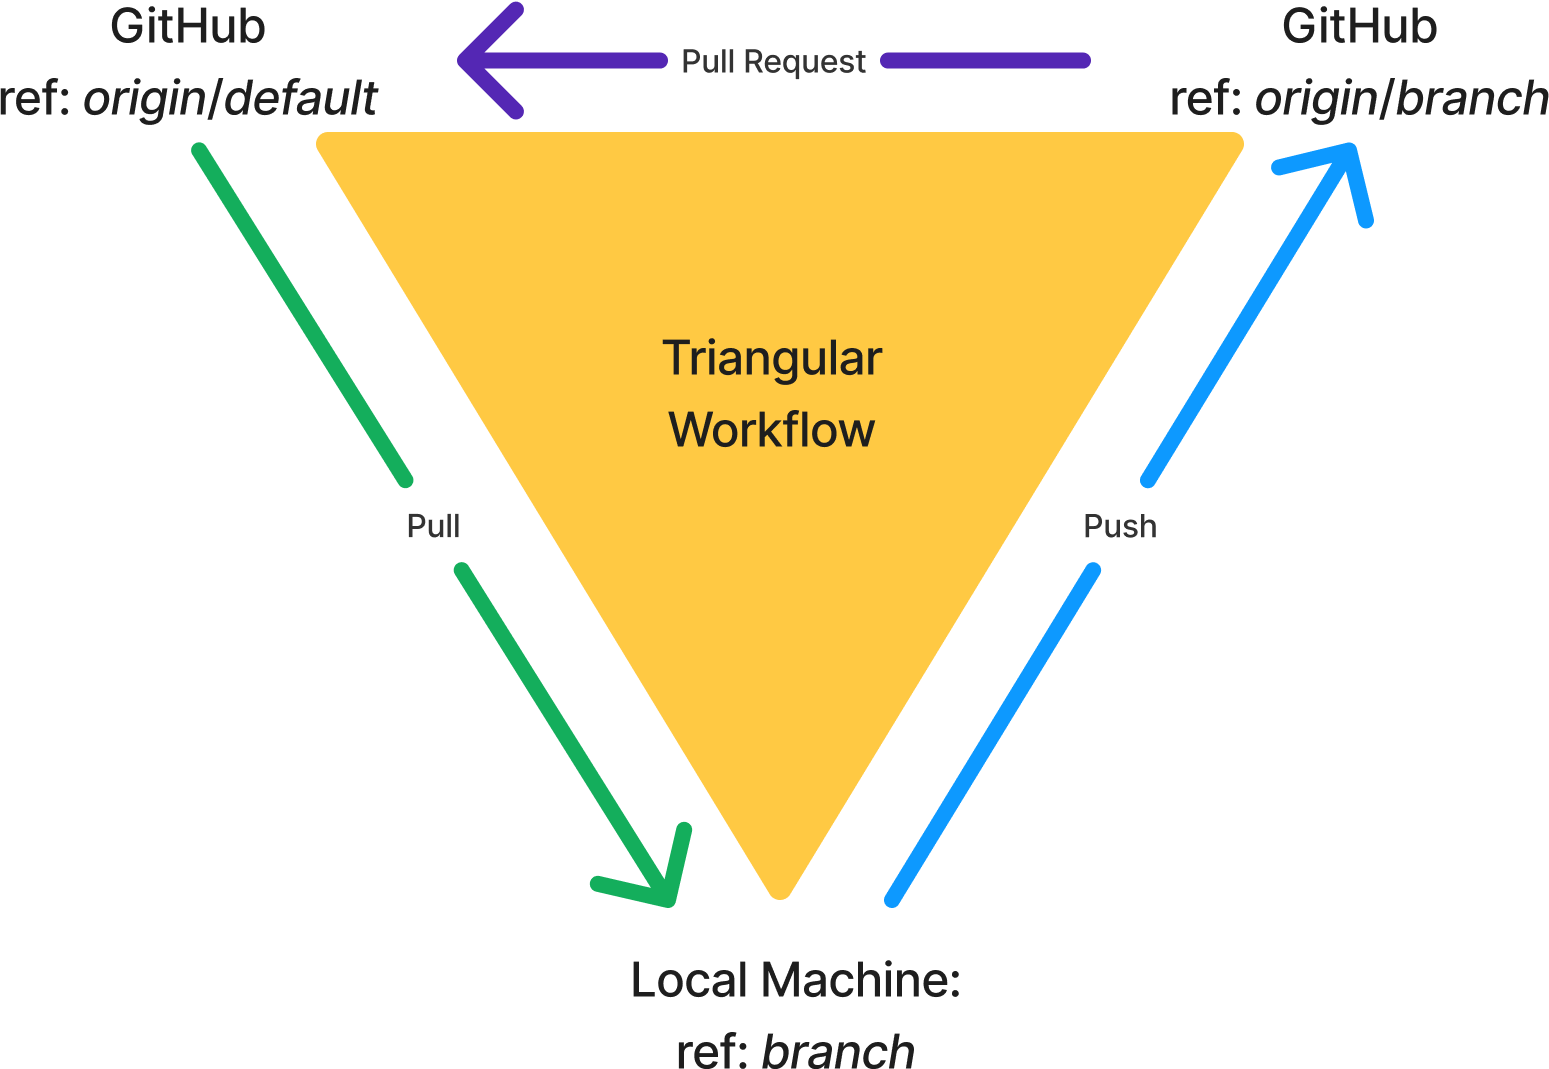
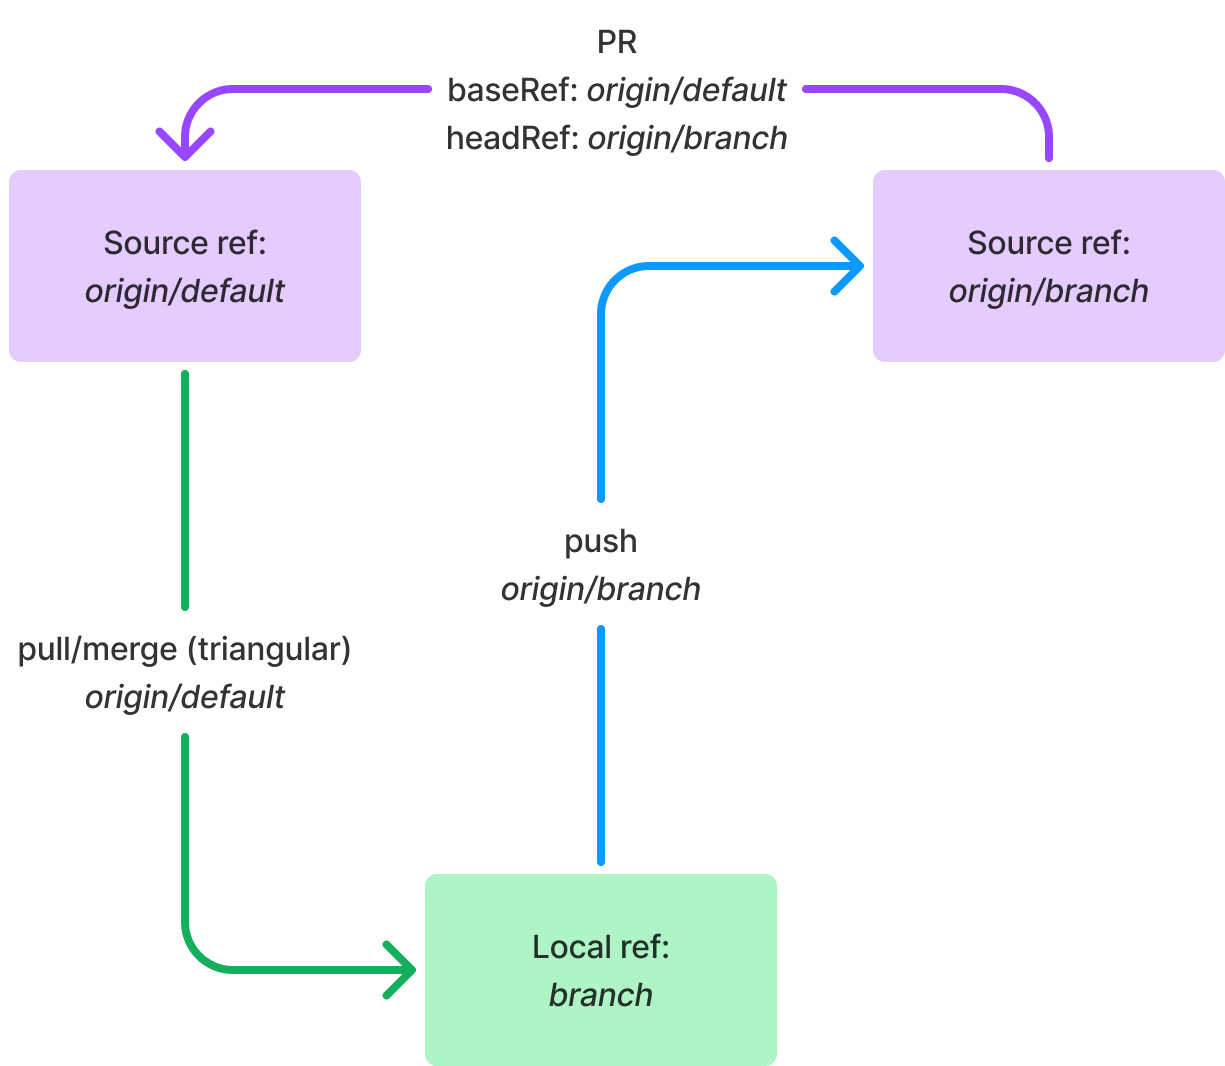
We complete the triangle when considering pull requests: the headRef is the pushRef for the local ref and the baseRef is the pullRef for the local branch:

Figure 5: a triangular workflow

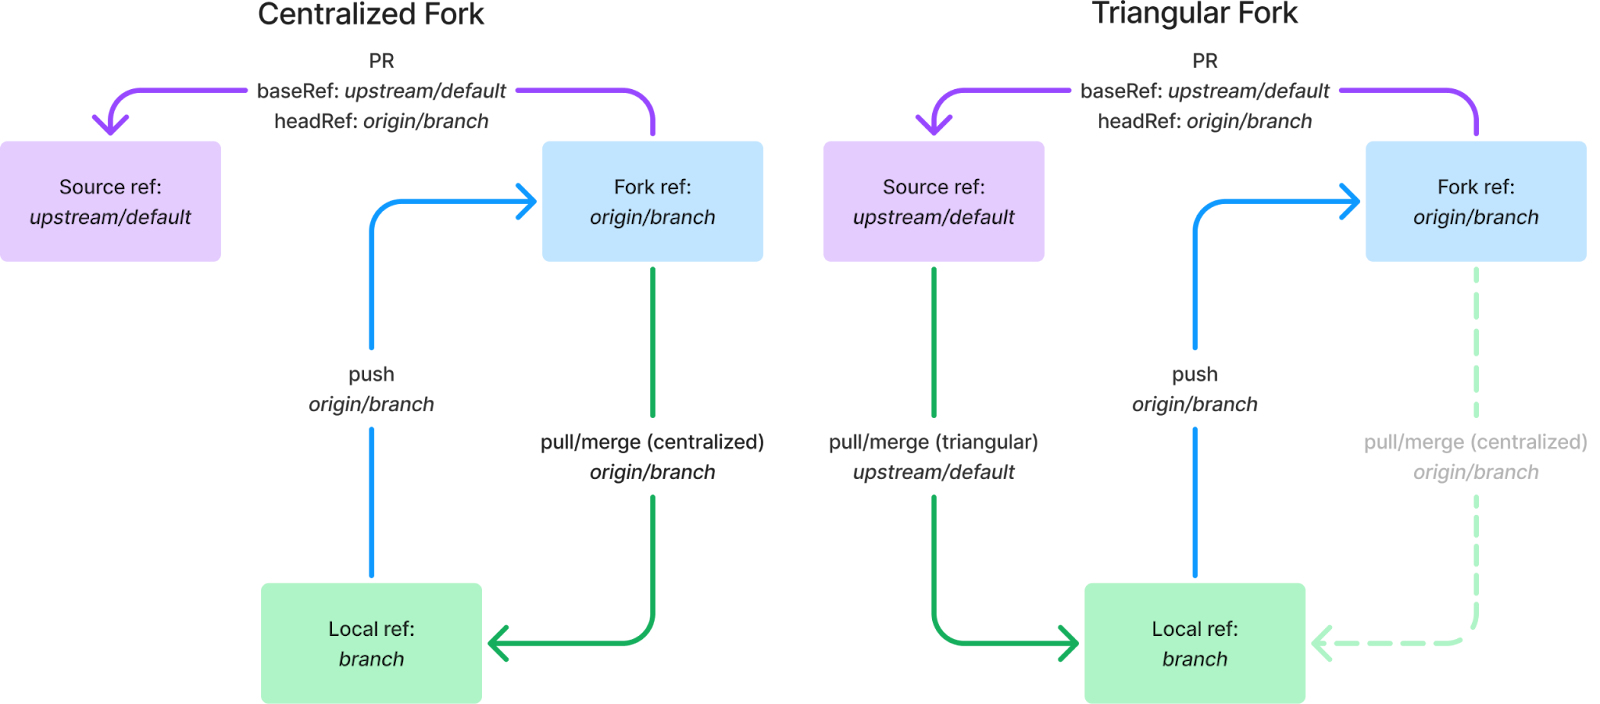
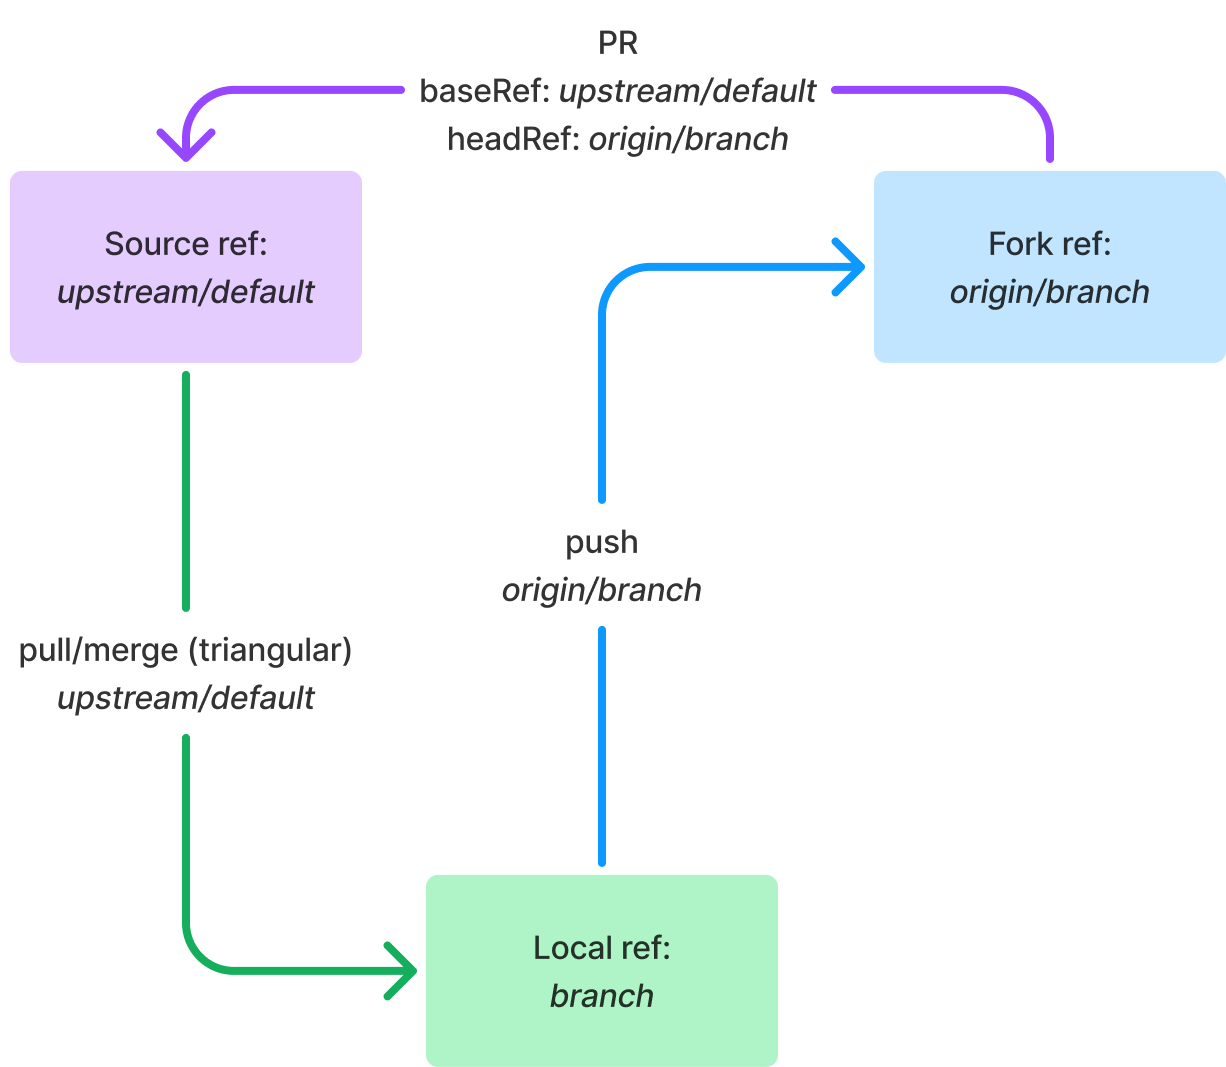
We can go one step further and set up triangular workflows using different remotes as well. This most commonly occurs when you’re developing on a fork. In this situation, you usually give the fork and source remotes different names. I’ll use origin for the fork and upstream for the source, as these are common names used in these setups. This functions exactly the same as the triangular workflows above, but the remotes and branches on the pushRef and pullRef are different:

Figure 6: juxtaposing triangular workflows and centralized workflows with different remotes such as with forks

Using a Git configuration file for triangular workflows

There are two primary ways that you can set up a triangular workflow using the Git configuration – typically defined in a `.git/config` or `.gitconfig` file. Before explaining these, let’s take a look at what the relevant bits of a typical configuration look like in a repo’s `.git/config` file for a centralized workflow:

[remote “origin”] 
    url = https://github.com/OWNER/REPO.git 
    fetch = +refs/heads/*:refs/remotes/origin/*  
[branch “default”]
    remote = origin  
    merge = refs/heads/default  
[branch “branch”]
    remote = origin 
    merge = refs/heads/branch

Figure 7: A typical Git configuration setup found in .git/config

The [remote “origin”] part is naming the Git repository located at github.com/OWNER/REPO.git to origin, so we can reference it elsewhere by that name. We can see that reference being used in the specific [branch] configurations for both the default and branch branches in their remote keys. This key, in conjunction with the branch name, typically makes up the branch’s pushRef: in this example, it is origin/branch.

The remote and merge keys are combined to make up the branch’s pullRef: in this example, it is origin/branch.

Setting up a triangular branch workflow

The simplest way to assemble a triangular workflow is to set the branch’s merge key to a different branch name, like so:

[branch “branch”]
    remote = origin
    merge = refs/heads/default

Figure 8: a triangular branch’s Git configuration found in .git/config

This will result in the branch pullRef as origin/default, but pushRef as origin/branch, as shown in Figure 9.

Figure 9: A triangular branch workflow

Setting up a triangular fork workflow

Working with triangular forks requires a bit more customization than triangular branches because we are dealing with multiple remotes. Thus, our remotes in the Git config will look different than the one shown previously in Figure 7:

[remote “upstream”]
    url = https://github.com/ORIGINALOWNER/REPO.git 
    fetch = +refs/heads/*:refs/remotes/upstream/* 
[remote “origin”]
    url = https://github.com/FORKOWNER/REPO.git  
    fetch = +refs/heads/*:refs/remotes/origin/*

Figure 10: a Git configuration for a multi-remote Git setup found in .git/config

Upstream and origin are the most common names used in this construction, so I’ve used them here, but they can be named anything you want1.

However, toggling a branch’s remote key between upstream and origin won’t actually set up a triangular fork workflow—it will just set up a centralized workflow with either of those remotes, like the centralized workflow shown in Figure 6. Luckily, there are two common Git configuration options to change this behavior.

Setting a branch’s pushremote

A branch’s configuration has a key called pushremote that does exactly what the name suggests: configures the remote that the branch will push to. A triangular fork workflow config using pushremote may look like this:

[branch “branch”]
    remote = upstream  
    merge = refs/heads/default  
    pushremote = origin

Figure 11: a triangular fork’s Git config using pushremote found in .git/config

This assembles the triangular fork repo we see in Figure 12. The pullRef is upstream/default, as determined by combining the remote and merge keys, while the pushRef is origin/branch, as determined by combining the pushremote key and the branch name.

Figure 12: A triangular fork workflow

Setting a repo’s remote.pushDefault

To configure all branches in a repository to have the same behavior as what you’re seeing in Figure 12, you can instead set the repository’s pushDefault. The config for this is below:

[remote] 
    pushDefault = origin 
[branch “branch”]
    remote = upstream 
    merge = refs/heads/default

Figure 13: a triangular fork’s Git config using remote.pushDefault found in .git/config

This assembles the same triangular fork repo as shown in Figure 12 above, however this time the pushRef is determined by combining the remote.pushDefault key and the branch name, resulting in origin/branch.

When using the branch’s pushremote and the repo’s remote.pushDefault keys together, Git will preferentially resolve the branch’s configuration over the repo’s, so the remote set on pushremote supersedes the remote set on remote.pushDefault.

Updating the gh pr command set to reflect Git

Previously, the gh pr command set did not resolve pushRefs and pullRefs in the same way that Git does. This was due to technical design decisions that made this change both difficult and complex. Instead of discussing that complexity—a big enough topic for a whole article in itself—I’m going to focus here on what you can now do with the updated gh pr command set.

If you set up triangular Git workflows in the manner described above, we will automatically resolve gh pr commands in accordance with your Git configuration.

To be slightly more specific, when trying to resolve a pull request for a branch, the GitHub CLI will respect whatever @{push} resolves to first, if it resolves at all. Then it will fall back to respect a branch’s pushremote, and if that isn’t set, finally look for a repo’s remote.pushDefault config settings.

What this means is that the CLI is assuming your branch’s pullRef is the pull request’s baseRef and the branch’s pushRef is the pull requests headRef. In other words, if you’ve configured git pull and git push to work, then gh pr commands should just work.2 The diagram below, a general version of Figure 5, demonstrates this nicely:

Figure 14: the triangular workflow supported by the GitHub CLI with respect to a branch’s pullRef and pushRef. This is the generalized version of Figure 5

Conclusion

We’re constantly working to improve the GitHub CLI, and we’d like the behavior of the GitHub CLI to reasonably reflect the behavior of Git. This was a team effort—everyone contributed to understanding, reviewing, and testing the code to enable this enhanced gh pr command set functionality.

It also couldn’t have happened without the support of our contributors, so we extend our thanks to them:

CLI native support for triangular workflows was 4.5 years in the making, and we’re proud to have been able to provide this update for the community.

The GitHub CLI Team
@andyfeller, @babakks, @bagtoad, @jtmcg, @mxie, @RyanHecht, and @williammartin


  1. Some commands in gh are opinionated about remote names and will resolve remotes in this order: upstream, github, origin, <other remotes unstably sorted>. There is a convenience command you can run to supersede this:* gh repo set-default [<repository>] to override the default behavior above and preferentially resolve <repository> as the default remote repo. 
  2. If you find a git configuration that doesn’t work, please open an issue in the OSS repo so we can fix it. 

The post How the GitHub CLI can now enable triangular workflows appeared first on The GitHub Blog.