Managing consent online can be challenging. After you’ve figured out the necessary regulations, you usually need to configure some Consent Management Platform (CMP) to load all third-party tools and scripts on your website in a way that respects these demands. Cloudflare Zaraz manages the loading of all of these third-party tools, so it was only natural that in April 2023 we announced the Cloudflare Zaraz CMP: the simplest way to manage consent in a way that seamlessly integrates with your third-party tools manager.
As more and more third-party tool vendors are required to handle consent properly, our CMP has evolved to integrate with these new technologies and standardization efforts. Today, we’re happy to announce that the Cloudflare Zaraz CMP is now compatible with the Interactive Advertising Bureau Transparency and Consent Framework (IAB TCF) requirements, and fully supports Google’s Consent Mode v2 signals. Separately, we’ve taken efforts to improve the way Cloudflare Zaraz handles traffic coming from online bots.
IAB TCF Compatibility
Earlier this year, Google announced that websites that would like to use AdSense and other advertising solutions in the European Economic Area (EEA), the UK, and Switzerland, will be required to use a CMP that is approved by IAB Europe, an association for digital marketing and advertising. Their Transparency and Consent Framework sets guidelines for how CMPs should operate. Since March 2024, the Cloudflare Zaraz CMP is compliant with these guidelines, and Zaraz users in Europe can use Google’s advertising products without any restrictions.
Since the IAB TCF requirements can make the consent modal a little complex for users, we have made this compliance mode an opt-in feature. See the official documentation for information on how to enable it.
Google Consent Mode v2
Another new requirement from Google was the need to send “Consent Signals”. These signals are part of what is also known as “Consent Mode”, and later, Consent Mode v2. Together with each event sent to Google Analytics and Google Ads, they tell the Google servers about the consent status of the current visitor – did they agree to have their data used for personalized advertising? Did they accept cookies? These and other questions are answered by Consent Mode v2, telling the Google servers how to treat the data it receives.
Consent Mode v2 usually requires setting two values for each consent category – a default value and an updated one. The default value represents the consent status (granted or denied) a certain category (e.g. using cookies) has before the user has submitted their personal preferences. Usually, and especially within the EU, the default value would be `denied`. Once the user submits their preferences, Consent Mode v2 sends an additional “updated” value that represents the choice the user made.
Implementing Consent Mode v2 is quick and easy with Cloudflare Zaraz, although the specific implementation depends on your CMP. Examples, including integration with the Cloudflare Zaraz CMP, are available in our official documentation.
We believe that better standardization around online consent benefits everyone, and we are glad to be working on tools that respect users’ privacy and improve online user experience.
Bot Management
We also recently integrated better Bot Management support within Cloudflare Zaraz. You often want crawlers to be able to access your website, but you don’t want them to trigger your analytics and conversion pixels. Using the Bot Management feature in the Cloudflare Zaraz Settings page allows you to fine tune which requests will make it to Cloudflare Zaraz and which ones will be skipped. Since Zaraz pricing is based on the total number of Zaraz Events, this can also be useful if you want more control over your Cloudflare Zaraz costs, ensuring you will not be paying for events triggered by bots. Like all other Cloudflare Zaraz features, these new features are also available to users on all plans, including the free plan. For us, it is part of making sure that everyone can benefit from a faster, safer, and more private way to manage third parties online. If you haven’t started using Cloudflare Zaraz already, now is a great time. Go to the Cloudflare dashboard and set it up in just a few clicks.
In July, 2023, we announced that Zaraz was transitioning out of beta and becoming available to all Cloudflare users. Zaraz helps users manage and optimize the ever-growing number of third-party tools on their websites — analytics, marketing pixels, chatbots, and more — without compromising on speed, privacy, or security. Soon after the announcement went online, we received feedback from users who were concerned about the new pricing system. We discovered that in some scenarios the proposed pricing could cause high charges, which was not the intention, and so we promised to look into it. Since then, we have iterated over different pricing options, talked with customers of different sizes, and finally reached a new pricing system that we believe is affordable, predictable, and simple. The new pricing for Zaraz will take effect on April 15, 2024, and is described below.
Introducing Zaraz Events
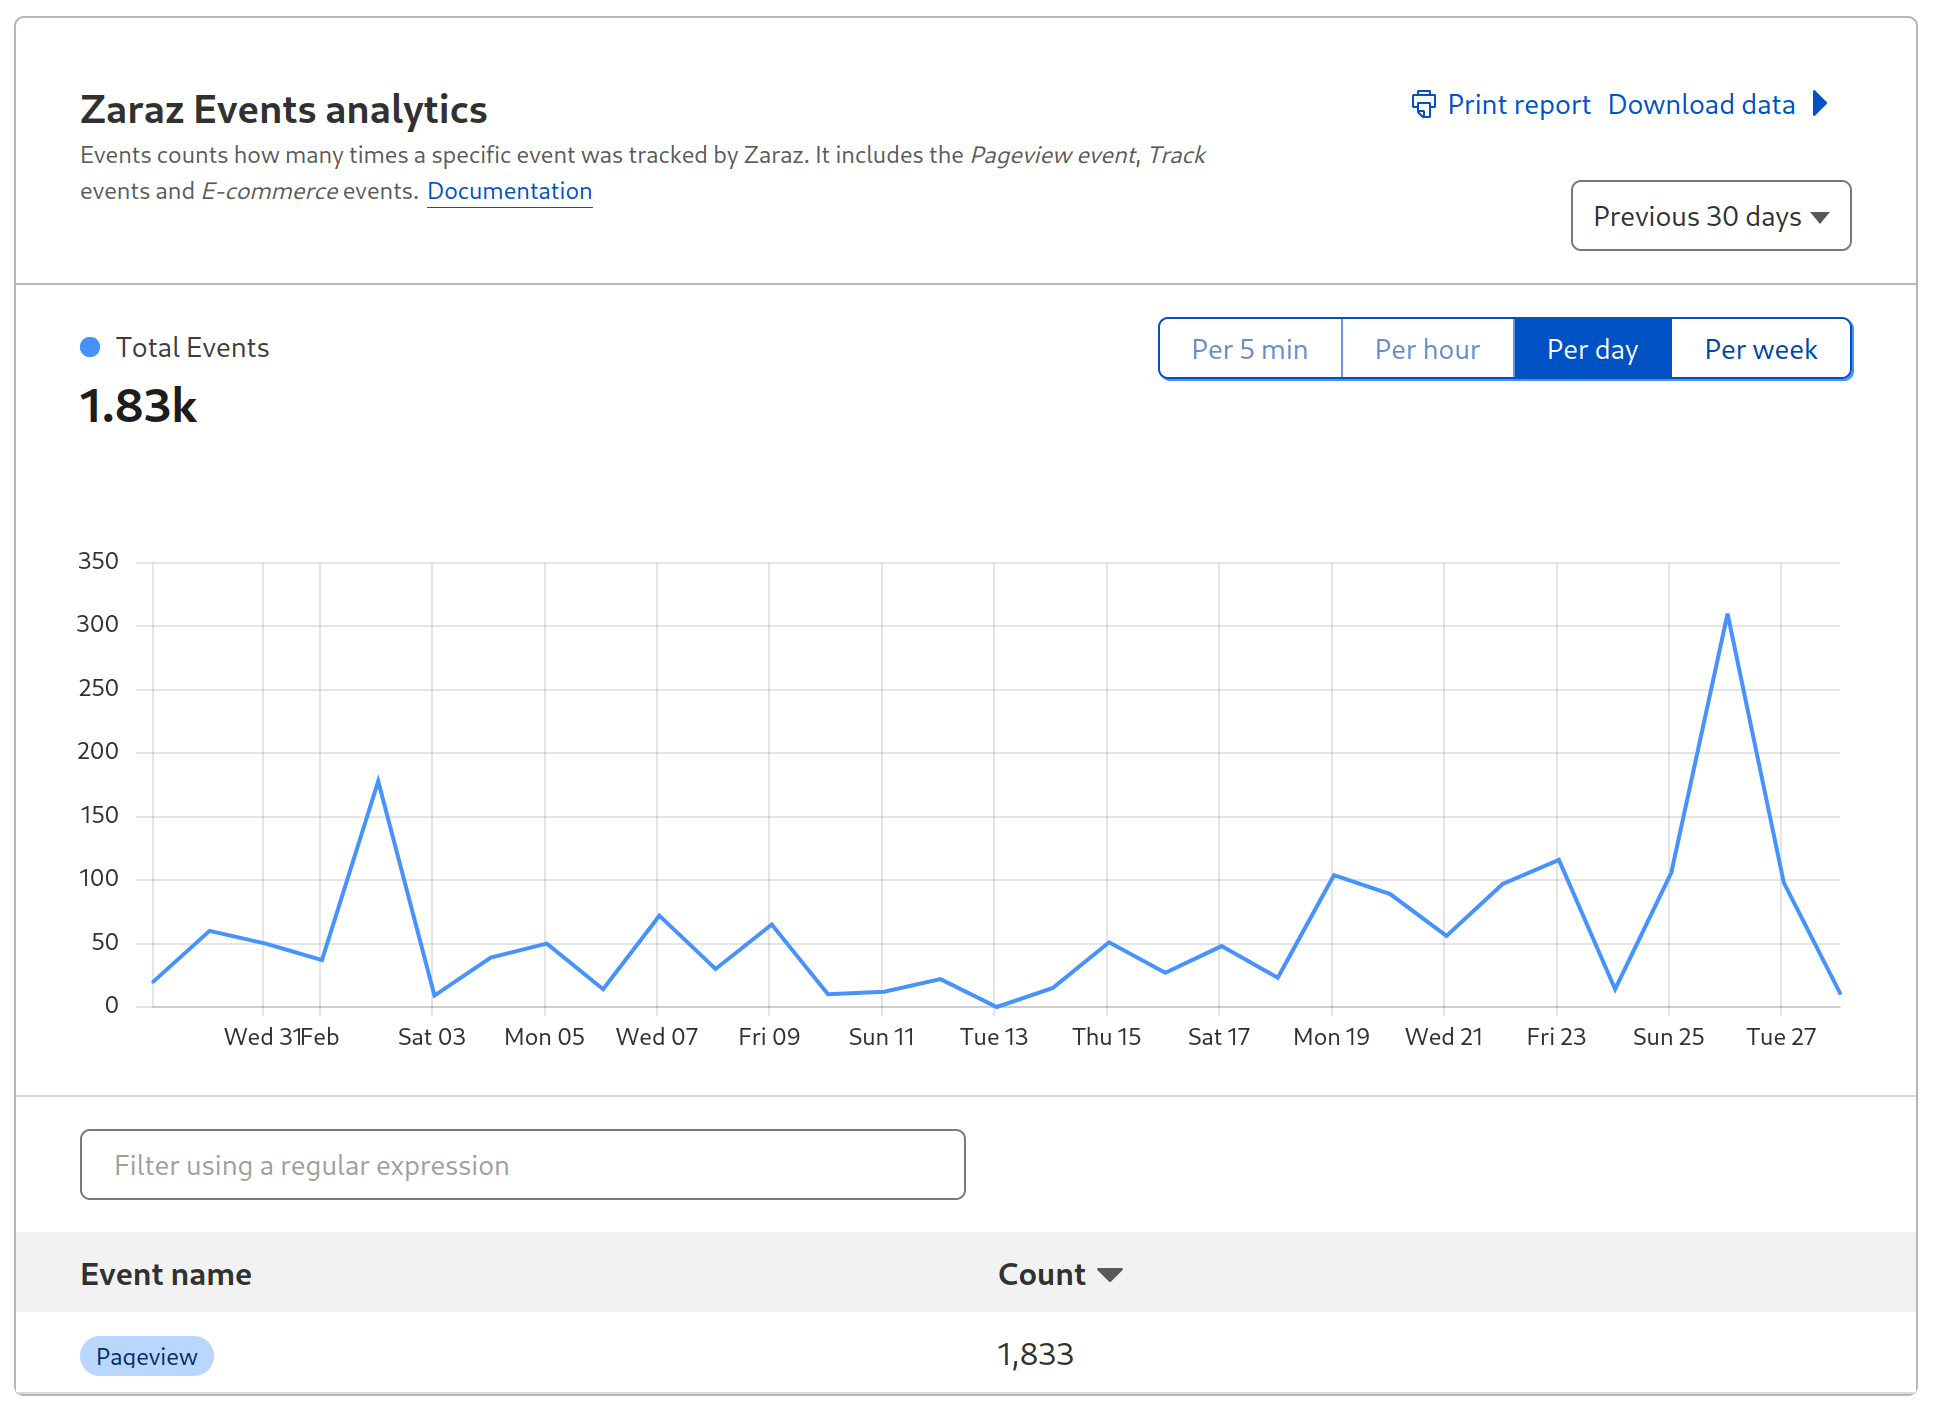
One of the biggest changes we made was changing the metric we used for pricing Zaraz. One Zaraz Event is an event you’re sending to Zaraz, whether that’s a pageview, a zaraz.track event, or similar. You can easily see the total number of Zaraz Events you’re currently using under the Monitoring section in the Cloudflare Zaraz Dashboard. Every Cloudflare account can use 1,000,000 Zaraz Events completely for free, every month.
The Zaraz Monitoring page shows exactly how many Zaraz Events your website is using
We believe that Zaraz Events are a better representation of the usage of Zaraz. As the web progresses and as Single-Page-Applications are becoming more and more popular, the definition of a “pageview”, which was used for the old pricing system, is becoming more and more vague. Zaraz Events are agnostic to different tech stacks, and work the same when using the Zaraz HTTP API. It’s a simpler metric that should better reflect the way Zaraz is used.
Predictable costs for high volume websites
With the new Zaraz pricing model, every Cloudflare account gets 1,000,000 Zaraz Events per month for free. If your account needs more than that, every additional 1,000,000 Zaraz Events are only $5 USD, with volume discounting available for Enterprise accounts. Compared with other third-party managers and tag management software, this new pricing model makes Zaraz an affordable and user-friendly solution for server-side loading of tools and tags.
Available for all
We also decided that all Zaraz features should be available for everyone. We want users to make the most of Zaraz, no matter how big or small their website is. This means that advanced features like making custom HTTP requests, using the Consent Management API, loading custom Managed Components, configuring custom endpoints, using the Preview & Publish Workflow, and even using the Zaraz Ecommerce features are now available on all plans, from Free to Enterprise.
Try it out
We’re announcing this new affordable price for Zaraz while retaining all the features that make it the perfect solution for managing third-party tools on your website. Zaraz is a one-click installation that requires no server, and it’s lightning fast thanks to Cloudflare’s network, which is within 50 milliseconds of approximately 95% of the Internet-connected population. Zaraz is extremely extensible using the Open Source format of Managed Components, allowing you to change tools and create your own, and it’s transparent about what information is shared with tools on your website, allowing you to control and improve the privacy of your website visitors.
Zaraz recently completed the migration of all tools to Managed Components. This makes tools on your website more like apps on your phone, allowing you to granularly decide what permissions to grant tools. For example, it allows you to prevent a tool from making client-side network requests or storing cookies. With the Zaraz Context Enricher you can create custom data manipulation processes in a Cloudflare Worker, and do things like attach extra information to payloads from your internal CRM, or automatically remove and mask personally-identifiable information (PII) like email addresses before it reaches your providers.
We would like to thank all the users that provided us with their feedback. We acknowledge that the previous pricing might have caused some to think twice about choosing Zaraz, and we hope that this will encourage them to reconsider. Cloudflare Zaraz is a tool that is meant first and foremost to serve the people building websites on the Internet, and we thank everyone for sharing their feedback to help us get to a better product in the end.
The new pricing for Zaraz will take effect starting April 15, 2024.
Cloudflare users leverage Zaraz for loading their third-party JavaScript tools. Tools like analytics, conversion pixels, widgets and alike, load faster and safer when loaded through Zaraz.
When configuring a tool in Zaraz, users can specify the payload to be included when sending information to it. This allows for the transmission of more detailed data. For example, when sending the "Button Clicked" event to Google Analytics, users can include additional information such as the ID of the button element and the content of the user_id cookie at the time of the button press. In Zaraz, users have the flexibility to add as many fields as desired when configuring the action.
Typically, information reaches Zaraz through the execution of zaraz.track("event name", { properties }) within the website's code. The properties object can contain relevant details that will be sent to third-party tools, such as the button ID in the previous example. However, there are cases where users may need to process and manipulate the information before sending it to their third-party tools.
To address this requirement, we recently introduced Worker Variables, which enables users to send information to a Cloudflare Worker, perform manipulations on it, and return a modified value. This feature offers immense power and flexibility. For instance, users can communicate with their backend server to retrieve data and leverage JavaScript to perform necessary calculations. With Worker Variables, users have access to a fully-featured Worker, opening up endless possibilities.
However, feedback from our users highlighted the need for a middle-ground solution. Sometimes, the data manipulation required is minor, and employing a Cloudflare Worker might feel like overkill. It is in response to this feedback that we decided to integrate with JSONata.
What is JSONata?
JSONata calls itself a JSON query and transformation language. While some developers may already be familiar with jq, the command-line JSON processor, JSONata offers similar features with a syntax that we believe is more intuitive and easier to understand. Since JSONata is a JavaScript library, it was very easy to integrate into Cloudflare Zaraz.
Let’s say we have JSON document like the following:
With JSONata, with JSONata, one can run interesting queries on the document:
$count(pets) // 3

address.city // London

pets[type="parrot"].name // ["Alfie", "Milo"]
The JSONata documentation includes many examples for what you do with it, and there’s even a playground where you can try your JSONata queries live.
Using JSONata with Zaraz
JSONata has been tightly integrated with Cloudflare Zaraz, allowing you to leverage its capabilities in the fields of all Actions, Triggers, and Variables. Before diving into writing your JSONata expressions, it's essential to understand the JSON document you'll be working with.
Similar to Worker Variables or the HTTP Request tool, JSONata has access to the Zaraz Context. This object contains information from your zaraz.track() and zaraz.ecommerce() calls, as well as automatically gathered data by Zaraz, such as the current page URL, cookies, page title, user-agent string, and more. You can find the complete reference for this object in the Zaraz documentation.
Using your JSONata query is straightforward once you are familiar with it. To incorporate the query into your field content, simply enclose it within double curly brackets. The expression will be passed to JSONata along with the Zaraz Context object, and the resulting value will be used for the field.
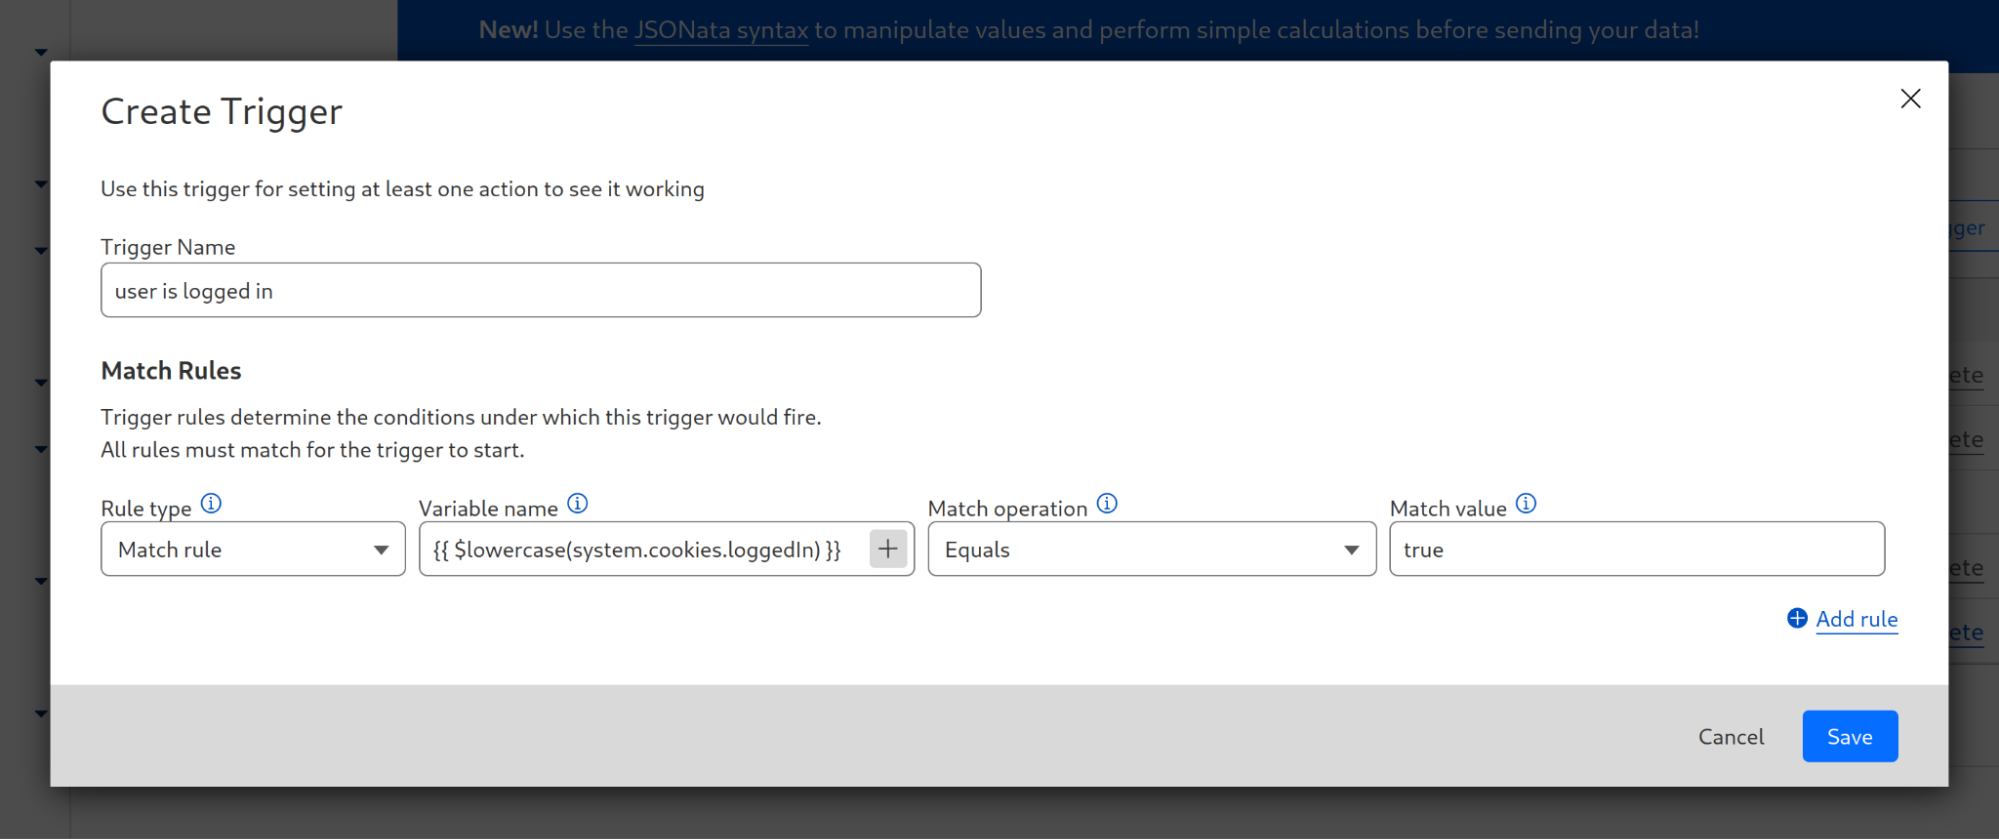
Let's explore two examples from our documentation. Often, there's a need to convert a string to lowercase, such as when comparing it to another value in a regular expression. Suppose the original string is derived from a cookie named loggedIn, that specifies if the current user is logged in. In that case, we can use JSONata to transform the value to lowercase using the expression $lowercase(system.cookies.loggedIn). If we want to use this expression within a trigger, we navigate to the Zaraz dashboard and choose our trigger, locate the relevant match rule, and enter {{ $lowercase(system.cookies.loggedIn) }} as the value. Now, the cookie value will be compared in its lowercase format.
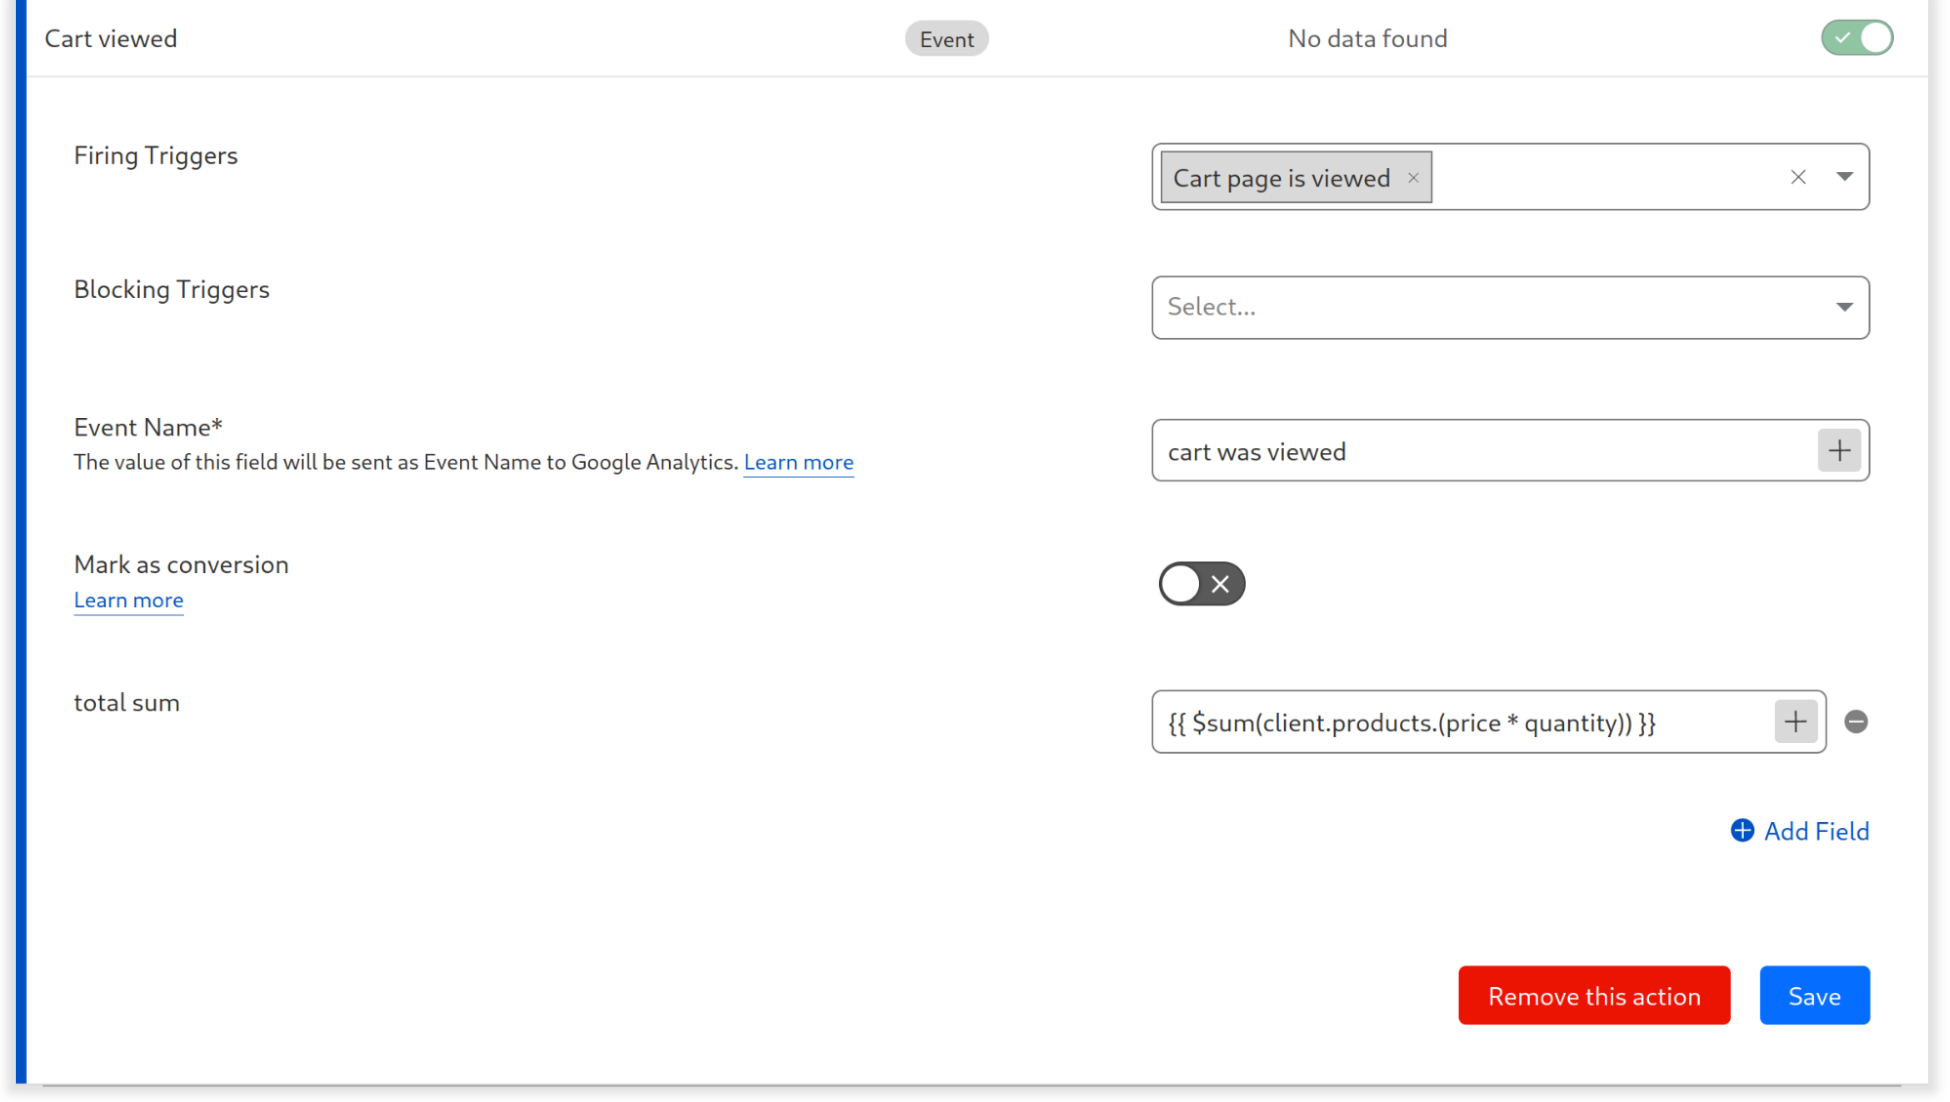
You can also run simple calculations. Assuming you are using zaraz.track() to send the cart content like this:
If the field in which you want to include the total sum of all products, you will enter {{ $sum(client.products.(price * quantity)) }}. This will multiply the price of each product by its quantity, and then sum up the total.
Start using JSONata today
JSONata support is available to all Zaraz users at no cost, and it is enabled automatically for all websites. Start using JSONata today to send finely tuned data to your providers or APIs with minimal code and zero maintenance for your data infrastructure. If you need any help – join our Discord channel!
When it comes to privacy, much is in your control as a website owner. You decide what information to collect, how to transmit it, how to process it, and where to store it. If you care for the privacy of your users, you’re probably taking action to ensure that these steps are handled sensitively and carefully. If your website includes no third party tools at all – no analytics, no conversion pixels, no widgets, nothing at all – then it’s probably enough! But… If your website is one of the other 94% of the Internet, you have some third-party code running in it. Unfortunately, you probably can’t tell what exactly this code is doing.
Third-party tools are great. Your product team, marketing team, BI team – they’re all right when they say that these tools make a better website. Third-party tools can help you understand your users better, embed information such as maps, chat widgets, or measure and attribute conversions more accurately. The problem doesn’t lay with the tools themselves, but with the way they are implemented – third party scripts.
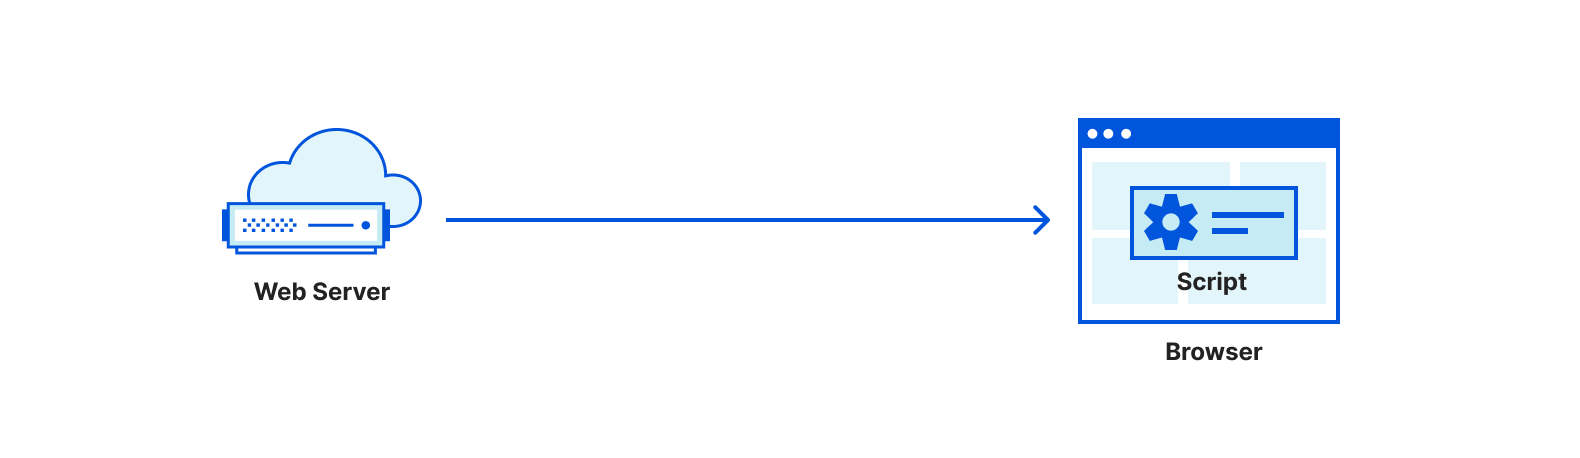
Third-party scripts are pieces of JavaScript that your website is loading, often from a remote web server. Those scripts are then parsed by the browser, and they can generally do everything that your website can do. They can change the page completely, they can write cookies, they can read form inputs, URLs, track visitors and more. It is mostly a restrictions-less system. They were built this way because it used to be the only way to create a third-party tool.
Over the years, companies have suffered a lot of third party scripts. Those scripts were sometimes hacked, and started hijacking information from visitors to websites that were using them. More often, third party scripts are simply collecting information that could be sensitive, exposing the website visitors in ways that the website owner never intended.
Recently we announced that we’re open sourcing Managed Components. Managed Components are a new API to load third-party tools in a secure and privacy-aware way. It changes the way third-party tools load, because by default there are no more third-party scripts in it at all. Instead, there are components, which are controlled with a Components Manager like Cloudflare Zaraz.
In this blogpost we will discuss how to use Cloudflare Zaraz for granting and revoking permissions from components, and for controlling what information flows into components. Even more exciting, we’re also announcing the upcoming DLP features of Cloudflare Zaraz, that can report, mask and remove PII from information shared with third-parties by mistake.
How are Managed Components better
Because Managed Components run isolated inside a Component Manager, they are more private by design. Unlike a script that gets unlimited access to everything on your website, a Managed Component is transparent about what kind of access it needs, and operates under a Component Manager that grants and revokes permissions.
When you add a Managed Component to your website, the Component Manager will list all the permissions required for this component. Such permissions could be “setting cookies”, “making client-side network requests”, “installing a widget” and more. Depending on the tool, you’ll be able to remove permissions that are optional, if your website maintains a more restrictive approach to privacy.
Aside from permissions, the Component Manager also lets you choose what information is exposed to each Managed Component. Perhaps you don’t want to send IP addresses to Facebook? Or rather not send user agent strings to Mixpanel? Managed Components put you in control by telling you exactly what information is consumed by each tool, and letting you filter, mask or hide it according to your needs.
Data Loss Prevention with Cloudflare Zaraz
Another area we’re working on is developing DLP features that let you decide what information to forward to different Managed Components not only by the field type, e.g. “user agent header” or “IP address”, but by the actual content. DLP filters can scan all information flowing into a Managed Component and detect names, email addresses, SSN and more – regardless of which field they might be hiding under.
Our DLP Filters will be highly flexible. You can decide to only enable them for users from specific geographies, for users on specific pages, for users with a certain cookie, and you can even mix-and-match different rules. After configuring your DLP filter, you can set what Managed Components you want it to apply for – letting you filter information differently according to the receiving target.
For each DLP filter you can choose your action type. For example, you might want to not send any information in which the system detected a SSN, but to only report a warning if a first name was detected. Masking will allow you to replace an email address like [email protected] with [email protected], making sure events containing email addresses are still sent, but without exposing the address itself.
While there are many DLP tools available in the market, we believe that the integration between Cloudflare Zaraz’s DLP features and Managed Components is the safest approach, because the DLP rules are effectively fencing the information not only before it is being sent, but before the component even accesses it.
Getting started with Managed Components and DLP
Cloudflare Zaraz is the most advanced Component Manager, and you can start using it today. We recently also announced an integrated Consent Management Platform. If your third-party tool of course is missing a Managed Component, you can always write a Managed Component of your own, as the technology is completely open sourced.
While we’re working on bringing advanced permissions handling, data masking and DLP Filters to all users, you can sign up for the closed beta, and we’ll contact you shortly.
Managed Components are here to shake up the way third-party tools integrate with websites. Two months ago we announced that we’re open sourcing parts of the most innovative technologies behind Cloudflare Zaraz, making them accessible and usable to everyone online. Since then, we’ve been working hard to make sure that the code is well documented and all pieces are fun and easy to use. In this article, I want to show you how Managed Components can be useful for you right now, if you manage a website or if you’re building third-party tools. But before we dive in, let’s talk about the past.
Third-party scripts are a threat to your website
For decades, if you wanted to add an analytics tool to your site, a chat widget, a conversion pixel or any other kind of tool – you needed to include an external script. That usually meant adding some code like this to your website:
If you think about it – it’s a pretty terrible idea. Not only that you’re now asking the browser to connect to another server, fetch and execute more JavaScript code – you’re also completely giving up the control on your website. How much do you really trust this script? And how much do you trust that the script’s server wasn’t hacked, or will never get hacked in the future? In the previous blog post we showed how including one script usually results in more network calls, hogging the browser and slowing everything down. But the worst thing about these scripts is that they are completely unrestricted: JavaScript code running in the browser can hijack users, steal their credentials or credit card information, use their devices to mine cryptocurrencies, manipulate your website, leak PII, and more. Since the code in those scripts is usually minified, it’s practically impossible for you to read it and figure out what it’s doing.
Managed Components change all that. Like apps on your phone, they’re built around a permissions system. You decide if you allow a component to connect to a remote server, if you allow it to use cookies, to run code, to inject a widget to pages and more. Unlike the world of minified external scripts, it is a framework that promotes transparency. Website owners can toggle permissions on and off, and if a Managed Component wasn’t granted a permission, it will not have access to the relevant API.
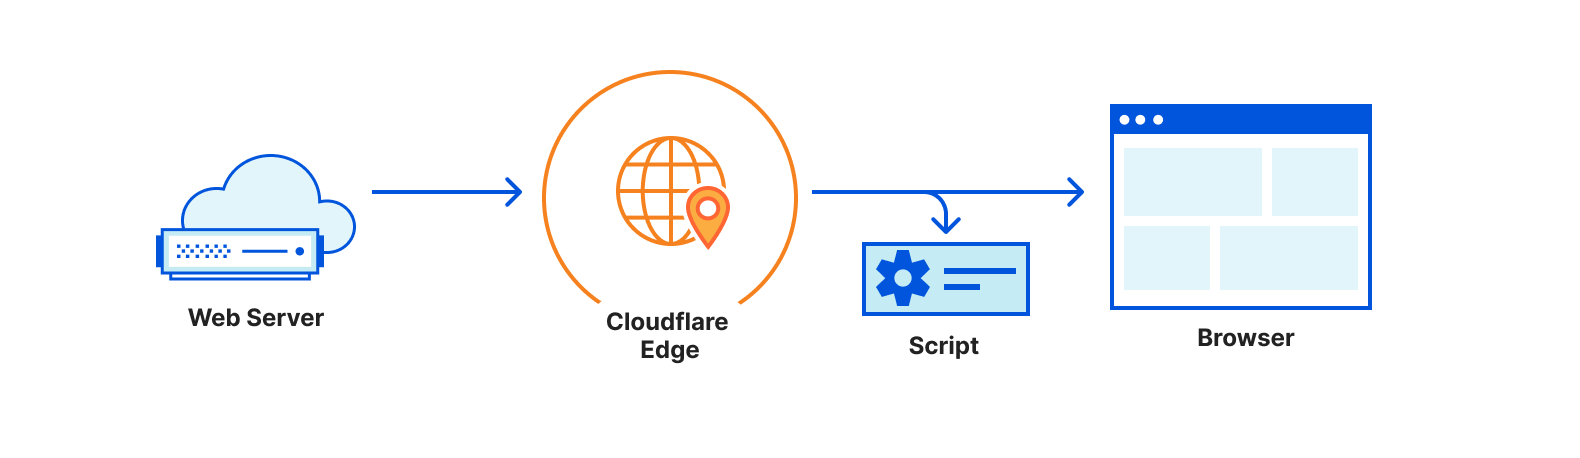
But Managed Components do more than wrapping the current system with permissions – they also provide functionality that was never available before: making server-side connections, caching information, using a key-value store, manipulating responses before they are handed to the browser and more. The core of this functionality comes from the ability to execute code outside the browser. Freeing the browser from running code that was previously executed in the browser, means that your website can become approximately 40% faster. It also results in a smaller attack surface in case your tool’s vendor gets hacked.
All of this is possible thanks to the new Managed Components API. We designed it together with vendors, to make sure you can use them to write any tool, while keeping performance, security and privacy a top priority. At its core, a Managed Component is just a JavaScript module, and so every JavaScript developer should feel right at home when building one. Check out the two examples in our previous blog post to see how they actually look like, or see some Managed Components we already open sourced on GitHub.
WebCM is the open source Component Manager
When tools are loaded with a <script> tag, their code is executed by the browser. Since Managed Components don’t run in the browser, their code needs to be executed somewhere else. This is the Component Manager. We designed the APIs around Managed Components deliberately to not be tied to a specific Component Manager, and in fact, there are already two in the world: Cloudflare Zaraz, and WebCM.
WebCM, Web-based Component Manager, is our open source reference implementation of a Component Manager. If you run a website, you can use WebCM today to run Managed Components on your website, even if you’re not a Cloudflare user. If you want to create a Managed Component, you can use it like an SDK.
Over the last few months, we’ve been helping vendors to write their own Managed Components, and we will continue to do so. We open sourced WebCM to ensure that Managed Components are a technology of the Web as a whole. Everyone should be able to use WebCM to load and create Managed Components. Let’s see how to use it!
Getting started with WebCM in 5 minutes
Getting started with WebCM is easier than you think. Because WebCM works like a proxy, you can use it regardless of how your website is built. In a new folder, create a simple HTML file and call it index.html:
components is an array that lists all the Managed Components you want to load. For now, we will load the demo component. Note that all we needed was to specify “demo”, and WebCM will go and get it from NPM for us. Other Managed Components are available on NPM too, and you can install components from other sources too. For each component, we’re defining what permissions we are giving it. You can read more about the permissions in the specifications. If we try to add the component without granting it its required permissions, WebCM will alert us.
target is where our origin HTTP server runs. In the previous step, we set it to run on port 8000.
port is the port under which WebCM will serve our website.
hostname is the host WebCM will bind to.
trackPath, clientEventsPath, ecommerceEventsPath are paths that WebCM will use to send events from the browser to its backend. We can leave these paths as they are for now, and will see how they’re used later.
! Note: Node version 17 or higher is needed for the next section
While keeping your HTTP server running, and in the same directory as webcm.config.ts, run npx webcm. Node will fetch WebCM and start it for you, and WebCM will read the configuration. First, it will fetch the required components to a components folder. When done, it will start another server that proxies your origin.
If you open http://localhost:8080/index.html in your browser now, you’d see the same page you saw at http://localhost:8000/index.html. While the pages might look similar, the one running on port 8080 has our demo Managed Component running. Moving your mouse and clicking around the page should result in messages being printed in your WebCM terminal, showing that the component was loaded and that it is receiving data. You will also notice that the page now displays a simple weather widget – this a Managed Component Widget that got appended to your page. The weather information was fetched without the browser needing to contact any additional server, and WebCM can cache that information to make sure it is served fast. Lastly, if you go to http://localhost:8080/webcm/demo/cheese, you’ll see that the component is serving a static image of a cheese. This is an example of how Managed Components can expose new endpoints on your servers, if you allow them.
The Demo Component, like its name suggests, is just a demo. We use it to showcase and test the Managed Components APIs. What if we want to add a real Managed Component to our site? Google Analytics is used by more than half of the websites on the internet, so let’s see how we edit our webcm.config.ts file to load it.
In the above example, we just replaced our demo component with the Google Analytics Managed Component. Note that this component requires much fewer permissions to run – that’s because it is running 100% server-side. Remember to replace UA-XXXXXX with your real Google Universal Analytics (version 3) account identifier.
Re-running `npx webcm` will now fetch the google-analytics Managed Component and run it, with the settings you provided. If you go now to your proxied website, you won’t see anything changed. But if you go to your Google Analytics dashboard, you will start seeing page views appearing on the Real Time view. WebCM loaded the component and is sending information server-side to Google Analytics.
Managed Components isn’t a closed library of tools you can use. As mentioned before – we are gradually open sourcing more tools from our library on GitHub. If you think our components are doing something weird – please let us know with an issue, or even make a PR. Managed Components are for the benefit of everyone. Over the past few months, the Cloudflare Zaraz community on Discord and on the Cloudflare Community Forum was extremely helpful in actively reporting issues, and so we’re excited to give them the option to take one step closer to the internals behind Cloudflare Zaraz.
While improving existing Managed Components is great, the thing we’re most thrilled about is that you can now build your own Managed Components too. If you’re a third-party tool vendor – this is a way for you to create a version of your tool that is safe and performant, so customers can discover and adopt your tool easily. If you’re a website developer, you might want to tinker with Managed Components to see what kind of things you can easily move away from the browser, for performance gains.
Let’s see how easy it is to create a Managed Component that listens to every page view on our website. Run npm init managed-component in the components directory that WebCM created, and create-managed-component will take you through the process of scaffolding your component files. To start with, our component will not use any special permissions, so you can select none.
Once we’re done with the wizard, we can open our src/index.ts file. By default, our component will add a listener to all page views:
import { ComponentSettings, Manager } from '@managed-components/types'

export default async function (manager: Manager, settings: ComponentSettings) {
  manager.addEventListener('pageview', event => {
    // do the things
  })
}
Let’s edit the comment line so that we can see whenever a page view happens. Note we also prefixed settings with a _ because we’re not using it now:
import { ComponentSettings, Manager } from '@managed-components/types'

export default async function (manager: Manager, _settings: ComponentSettings) {
  manager.addEventListener('pageview', event => {
    console.log(`New pageview at ${event.client.url}`)
  })
}
With these changes, the component will print the current URL whenever a page is viewed on the website. Before trying it out, we need to build our component. In the folder of your component run npm i && npm run build. Then, use the namespace of your component to add it to your webcm.config.ts file and restart WebCM:
This is a very simple component, but it shows how easy it is to build functionality that was previously only available in the browser. You can easily extend your component: use fetch next to the console.log statement and send information to your own analytics warehouse whenever a pageview happens on your site. Read about all the other Managed Components APIs to create widgets, listen to clicks, store cookies, use cache, and much more. These APIs allow you to build richer tools than it was ever possible before.
Your tool is better as a Managed Component
When we started working on Managed Components, many people were asking what would be the motivation of a tool vendor to build a Managed Component. During these last few months, we’ve learned that vendors are often excited about Managed Components for the same reasons we are – it provides a safe way to use their tools, and a streamlined way to integrate their tools in websites. Customers care deeply for these things, so having a Managed Component means that customers are more likely to try out your technology. Vendors will also get huge discoverability benefits, as their tools could be featured in the Cloudflare Zaraz dashboard, exposing them to tens of thousands of Zaraz-enabled websites. We are getting a lot of interest from major vendors in building a Managed Component, and we’re doing our best in actively supporting them in the process. If your company is interested in having a Managed Component, contact us.
We strongly believe that Managed Components can change the way third-party tools are used online. This is only the beginning of making them faster, secure and private. Together with users, and vendors, we will work on constantly improving the capabilities of Managed Components as a community, for the benefit of every user of the World Wide Web. To get started with building your Managed Component, head to managedcomponents.dev and start building. Our team is available to help you at [email protected].
In early 2020, we sat down and tried thinking if there’s a way to load third-party tools on the Internet without slowing down websites, without making them less secure, and without sacrificing users’ privacy. In the evening, after scanning through thousands of websites, our answer was “well, sort of”. It seemed possible: many types of third-party tools are merely collecting information in the browser and then sending it to a remote server. We could theoretically figure out what it is that they’re collecting, and then instead just collect it once efficiently, and send it server-side to their servers, mimicking their data schema. If we do this, we can get rid of loading their JavaScript code inside websites completely. This means no more risk of malicious scripts, no more performance losses, and fewer privacy concerns.
But the answer wasn’t a definite “YES!” because we realized this is going to be very complicated. We looked into the network requests of major third-party scripts, and often it seemed cryptic. We set ourselves up for a lot of work, looking at the network requests made by tools and trying to figure out what they are doing – What is this parameter? When is this network request sent? How is this value hashed? How can we achieve the same result more securely, reliably and efficiently? Our team faced these questions on a daily basis.
When we joined Cloudflare, the scale of everything changed. Suddenly we were on thousands of websites, serving more than 10,000 requests per second. Users are writing to us every single day over our Discord channel, the community forum, and sometimes even directly on Twitter. More often than not, their messages would be along the lines of “Hi! Can you please add support for X?” Cloudflare Zaraz launched with around 30 tools in its library, but this market is vast and new tools are popping up all the time.
Changing our trust model
In my previous blog post on how Zaraz uses Cloudflare Workers, I included some examples of how tool integrations are written in Zaraz today. Usually, a “tool” in Zaraz would be a function that prepares a payload and sends it. This function could return one thing – clientJS, JavaScript code that the browser would later execute. We’ve done our best so that tools wouldn’t use clientJS, if it wasn’t really necessary, and in reality most Zaraz-built tool integrations are not using clientJS at all.
This worked great, as long as we were the ones coding all tool integrations. Customers trusted us that we’d write code that is performant and safe, and they trusted the results they saw when trying Zaraz. Upon joining Cloudflare, many third-party tool vendors contacted us and asked to write a Zaraz integration. We quickly realized that our system wasn’t enforcing speed and safety – vendors could literally just dump their old browser-side JavaScript into our clientJS variable, and say “We have a Cloudflare Zaraz integration!”, and that wasn’t our vision at all.
We want third-party tool vendors to be able to write their own performant, safe server-side integrations. We want to make it possible for them to reimagine their tools in a better way. We also want website owners to have transparency into what is happening on their website, to be able to manage and control it, and to trust that if a tool is running through Zaraz, it must be a good tool — not because of who wrote it, but because of the technology it is constructed within. We realized that to achieve that we needed a new format for defining third-party tools.
Introducing Managed Components
We started rethinking how third-party code should be written. Today, it’s a black box – you usually add a script to your site, and you have zero clue what it does and when. You can’t properly read or analyze the minified code. You don’t know if the way it behaves for you is the same way it behaves for everyone else. You don’t know when it might change. If you’re a website owner, you’re completely in the dark.
Tools do many different things. The simple ones just collected information and sent it somewhere. Often, they’d set some cookies. Sometimes, they’d install some event listeners on the page. And widget-based tools can literally manipulate the page DOM, providing new functionality like a social media embed or a chatbot. Our new format needed to support all of this.
Managed Components is how we imagine the future of third-party tools online. It provides vendors with an API that allows them to do much more than a normal script can, including keeping code execution outside the browser. We designed this format together with vendors, for vendors, while having in mind that users’ best interest is everyone’s best interest long-term.
From the get-go, we built Managed Components to use a permission-based system. We want to provide even more transparency than Zaraz does today. As the new API allows tools to set cookies, change the DOM or collect IP addresses, all those abilities require being granted a permission. Installing a third-party tool on your site is similar to installing an app on your phone – you get an explanation of what the tool can and can’t do, and you can allow or disallow features to a granular level. We previously wrote about how you can use Zaraz to not send IP addresses to Google Analytics, and now we’re doubling down in this direction. It’s your website, and it’s your decision to make.
Every Managed Component is a JavaScript module at its core. Unlike today, this JavaScript code isn’t sent to the browser. Instead, it is executed by a Components Manager. This manager implements the APIs that are then used by the component. It dispatches server-side events that originate in the browser, providing the components with access to information while keeping them sandboxed and performant. It handles caching, storage and more — all so that the Managed Components can implement their logic without worrying so much about the surrounding.
An example analytics Managed Component can look something like this:
The above component gets notified whenever a page view occurs, and it then creates some payload with the visitor user-agent and page URL and sends that as a POST request to the vendor’s server. This is very similar to how things are done today, except this doesn’t require running any code at all in the browser.
But Managed Components aren’t just doing what was previously possible but better, they also provide dramatic new functionality. See for example how we’re exposing server-side endpoints:
export default function (manager) {
  const api = manager.proxy("/api", "https://api.example.com");
  const assets = manager.serve("/assets", "assets");
  const ping = manager.route("/ping", (request) => new Response(204));
}
These three lines are a complete shift in what’s possible for third-parties. If granted the permissions, they can proxy some content, serve and expose their own endpoints – all under the same domain as the one running the website. If a tool needs to do some processing, it can now off-load that from the browser completely without forcing the browser to communicate with a third-party server.
Exciting new capabilities
Every third-party tool vendor should be able to use the Managed Components API to build a better version of their tool. The API we designed is comprehensive, and the benefits for vendors are huge:
Same domain: Managed Components can serve assets from the same domain as the website itself. This allows a faster and more secure execution, as the browser needs to trust and communicate with only one server instead of many. This can also reduce costs for vendors as their bandwidth will be lowered.
Website-wide events system: Managed Components can hook to a pre-existing events system that is used by the website for tracking events. Not only is there no need to provide a browser-side API to your tool, it’s also easier for your users to send information to your tool because they don’t need to learn your methods.
Server logic: Managed Components can provide server-side logic on the same domain as the website. This includes proxying a different server, or adding endpoints that generate dynamic responses. The options are endless here, and this, too, can reduce the load on the vendor servers.
Server-side rendered widgets and embeds: Did you ever notice how when you’re loading an article page online, the content jumps when some YouTube or Twitter embed suddenly appears between the paragraphs? Managed Components provide an API for registering widgets and embed that render server-side. This means that when the page arrives to the browser, it already includes the widget in its code. The browser doesn’t need to communicate with another server to fetch some tweet information or styling. It’s part of the page now, so expect a better CLS score.
Reliable cross-platform events: Managed Components can subscribe to client-side events such as clicks, scroll and more, without needing to worry about browser or device support. Not only that – those same events will work outside the browser too – but we’ll get to that later.
Pre-Response Actions: Managed Components can execute server-side actions before the network response even arrives in the browser. Those actions can access the response object, reading it or altering it.
Integrated Consent Manager support: Managed Components are predictable and scoped. The Component Manager knows what they’ll need and can predict what kind of consent is needed to run them.
The right choice: open source
As we started working with vendors on creating a Managed Component for their tool, we heard a repeating concern – “What Components Managers are there? Will this only be useful for Cloudflare Zaraz customers?”. While Cloudflare Zaraz is indeed a Components Manager, and it has a generous free tier plan, we realized we need to think much bigger. We want to make Managed Components available for everyone on the Internet, because we want the Internet as a whole to be better.
Today, we’re announcing much more than just a new format.
WebCM is a reference implementation of the Managed Components API. It is a complete Components Manager that we will soon release and maintain. You will be able to use it as an SDK when building your Managed Component, and you will also be able to use it in production to load Managed Components on your website, even if you’re not a Cloudflare customer. WebCM works as a proxy – you place it before your website, and it rewrites your pages when necessary and adds a couple of endpoints. This makes WebCM 100% framework-agnostic – it doesn’t matter if your website uses Node.js, Python or Ruby behind the scenes: as long as you’re sending out HTML, it supports that.
That’s not all though! We’re also going to open source a few Managed Components of our own. We converted some of our classic Zaraz integrations to Managed Components, and they will soon be available for you to use and improve. You will be able to take our Google Analytics Managed Component, for example, and use WebCM to run Google Analytics on your website, 100% server-side, without Cloudflare.
Tech-leading vendors are already joining
Revolutionizing third-party tools on the internet is something we could only do together with third-party vendors. We love third-party tools, and we want them to be even more popular. That’s why we worked very closely with a few leading companies on creating their own Managed Components. These new Managed Components extend Zaraz capabilities far beyond what’s possible now, and will provide a safe and secure onboarding experience for new users of these tools.
Drift – Drift helps businesses connect with customers in moments that matter most. Drift’s integration will let customers use their fully-featured conversation solution while also keeping it completely sandboxed and without making third-party network connections, increasing privacy and security for our users.
CrazyEgg – Crazy Egg helps customers make their websites better through visual heatmaps, A/B testing, detailed recordings, surveys and more. Website owners, Cloudflare, and Crazy Egg all care deeply about performance, security and privacy. Managed Components have enabled Crazy Egg to do things that simply aren’t possible with third-party JavaScript, which means our mutual customers will get one of the most performant and secure website optimization tools created.
We also already have customers that are eager to implement Managed Components:
Hopin Quote:
“I have been really impressed with Cloudflare’s Zaraz ability to move Drift’s JS library to an Edge Worker while loading it off the DOM. My work is much more effective due to the savings in page load time. It’s a pleasure to work with two companies that actively seek better ways to increase both page speed and load times with large MarTech stacks.” – Sean Gowing, Front End Engineer, Hopin
If you’re a third-party vendor, and you want to join these tech-leading companies, do reach out to us, and we’d be happy to support you on writing your own Managed Component.
What’s next for Managed Components
We’re working on Managed Components on many fronts now. While we develop and maintain WebCM, work with vendors and integrate Managed Components into Cloudflare Zaraz, we’re already thinking about what’s possible in the future.
We see a future where many open source runtimes exist for Managed Components. Perhaps your infrastructure doesn’t allow you to use WebCM? We want to see Managed Components runtimes created as service workers, HTTP servers, proxies and framework plugins. We’re also working on making Managed Components available on mobile applications. We’re working on allowing unofficial Managed Components installs on Cloudflare Zaraz. We’re fixing a long-standing issue of the WWW, and there’s so much to do.
We will very soon publish the full specs of Managed Components. We will also open source WebCM, the reference implementation server, as well as many components you can use yourself. If this is interesting to you, reach out to us at [email protected], or join us on Discord.
We decided to create Zaraz around the end of March 2020. We were working on another product when we noticed everyone was asking us about the performance impact of having many third-parties on their website. Third-party content is an important part of the majority of websites today, powering analytics, chatbots, conversion pixels, widgets — you name it. The definition of third-party is an asset, often JavaScript, hosted outside the primary site-user relationship, that is not under the direct control of the site owner but is present with ‘approval’. Yair wrote in detail about the process of measuring the impact of these third-party tools, and how we pivoted our startup, but I wanted to write about how we built Zaraz and what it actually does behind the scenes.
Third parties are great in that they let you integrate already-made solutions with your website, and you barely need to do any coding. Analytics? Just drop this code snippet. Chat widget? Just add this one. Third-party vendors will usually instruct you on how to add their tool, and from that point on things should just be working. Right? But when you add third-party code, it usually fetches even more code from remote sources, meaning you have less and less control over whatever is happening in your visitors’ browsers. How can you guarantee that none of the multitude of third parties you have on your website wasn’t hacked, and started stealing information, mining cryptocurrencies or logging key presses on your visitors’ computers?
It doesn’t even have to be a deliberate hack. As we investigated more and more third-party tools, we noticed a pattern — sometimes it’s easier for a third-party vendor to collect everything, rather than being selective or careful about it. More often than not, user emails would find their way into a third-party tool, which could very easily put the website owner in trouble due to GDPR, CCPA, or similar.
How third-party tools work today
Usually, when you add a third party to your page, you’re asked to add a piece of JavaScript code to the <head> of your HTML. Google Analytics is by far the most popular third-party, so let’s see how it’s done there:
<!-- Google Analytics -->
<script>
(function(i,s,o,g,r,a,m){i['GoogleAnalyticsObject']=r;i[r]=i[r]||function(){
(i[r].q=i[r].q||[]).push(arguments)},i[r].l=1*new Date();a=s.createElement(o),
m=s.getElementsByTagName(o)[0];a.async=1;a.src=g;m.parentNode.insertBefore(a,m)
})(window,document,'script','https://www.google-analytics.com/analytics.js','ga');

ga('create', 'UA-XXXXX-Y', 'auto');
ga('send', 'pageview');
</script>
<!-- End Google Analytics -->
In this case, and in most other cases, the snippet that you’re pasting actually calls more JavaScript code to be executed. The snippet above creates a new <script> element, gives it the https://www.google-analytics.com/analytics.jssrc attribute, and appends it to the DOM. The browser then loads the analytics.js script, which includes more JavaScript code than the snippet itself, and sometimes asks the browser to download even more scripts, some of them bigger than analytics.js itself. So far, however, no analytics data has been captured at all, although this is why you’ve added Google Analytics in the first place.
The last line in the snippet, ga('send', 'pageview');, uses a function defined in the analytics.js file to finally send the pageview. The function is needed because it is what is capturing the analytics data — it fetches the kind of browser, the screen resolution, the language, etc… Then, it constructs a URL that includes all the data, and sends a request to this URL. It’s only after this step that the analytics information gets captured. Every user behavior event you record using Google Analytics will result in another request.
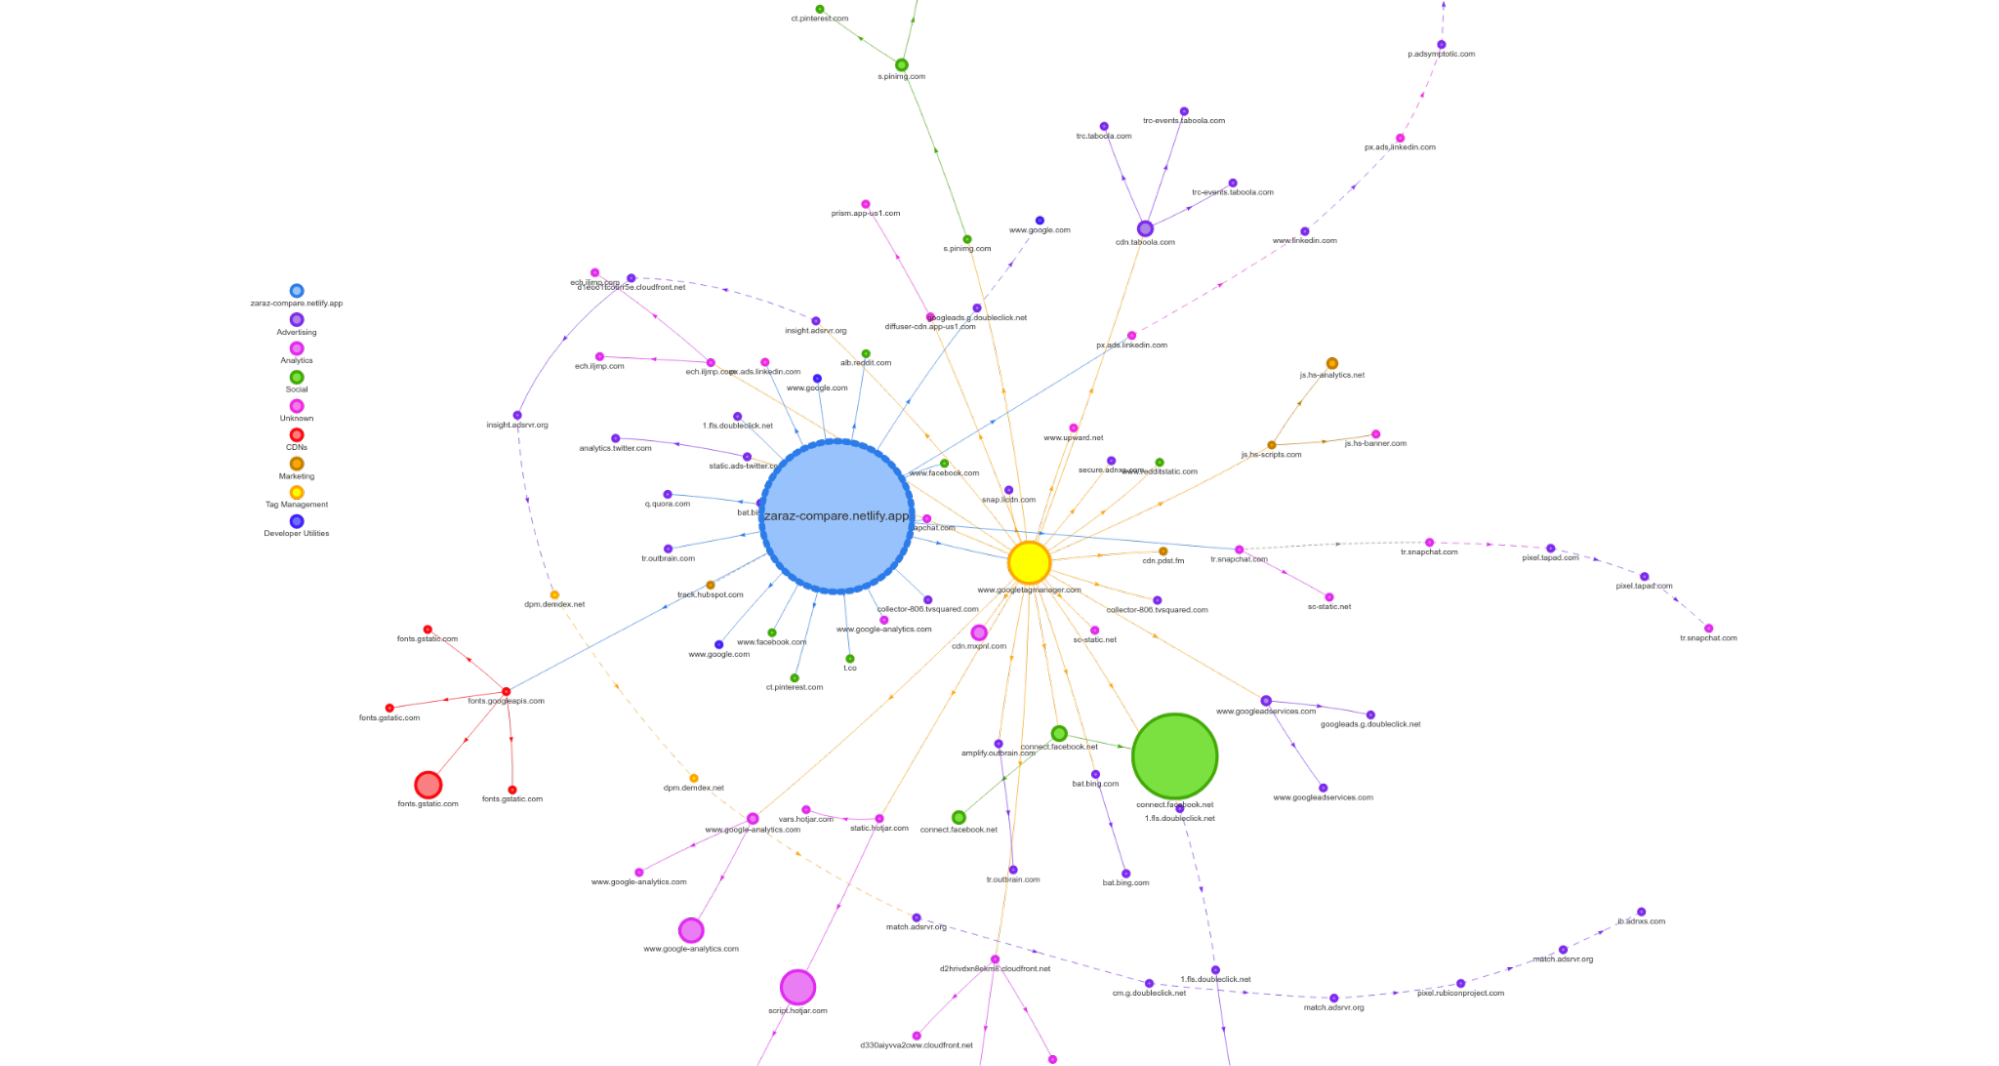
The reality is that the vast majority of tools consist of more than one resource file, and that it’s practically impossible to know in advance what a tool is going to load without testing it on your website. You can use Request Map Generator to get a visual representation of all the resources loaded on your website, including how they call each other. Below is a Request Map of a demo e-commerce website we created:
That big blue circle is our website’s resources, and all other circles are third-party tools. You can see how the big green circle is actually a sub-request of the main Facebook pixel (fbevents.js), and how many tools, like LinkedIn on top right, are creating a redirect chain in order to sync some data, on the expense of forcing the browser to make more and more network requests.
A new place to run a tag manager — the edge
Since we want to make third-parties faster, more secure, and private, we had to develop a fundamental new way of thinking about them and a new system for how they run. We came up with a plan: build a platform where third-parties can run code outside the browser, while still getting access to the information they need and being able to talk with the DOM when necessary. We don’t believe third parties are evil: they never intended to slow down the Internet for everyone, they just didn’t have another option. Being able to run code on the edge and run it fast opened up new possibilities and changed all that, but the transition is hard.
By moving third-party code to run outside the browser, we get multiple wins.
The website will load faster and be more interactive. The browser rendering your website can now focus on the most important thing — your website. The downloading, parsing and execution of all the third-party scripts will no longer compete or even block the rendering and interactivity of your website.
Control over the data sent to third-parties. Third-party tools often automatically collect information from the page and from the browser to, for example, measure site behaviour/usage. In many cases, this information should stay private. For example, most tools collect the document.location, but we often see a “reset password” page including the user email in the URL, meaning emails are unknowingly being sent and saved by third-party providers, usually without consent. Moving the execution of the third parties to the edge means we have full visibility into what is being sent. This means we can provide alerts and filters in case tools are trying to collect Personally Identifiable Information or mask the private parts of the data before they reach third-party servers. This feature is currently not available on the public beta, but contact us if you want to start using it today.
By reducing the amount of code being executed in the browser and by scanning all code that is executed in it, we can continuously verify that the code hasn’t been tampered with and that it only does what it is intended to do. We are working to connect Zaraz with Cloudflare Page Shield to do this automatically.
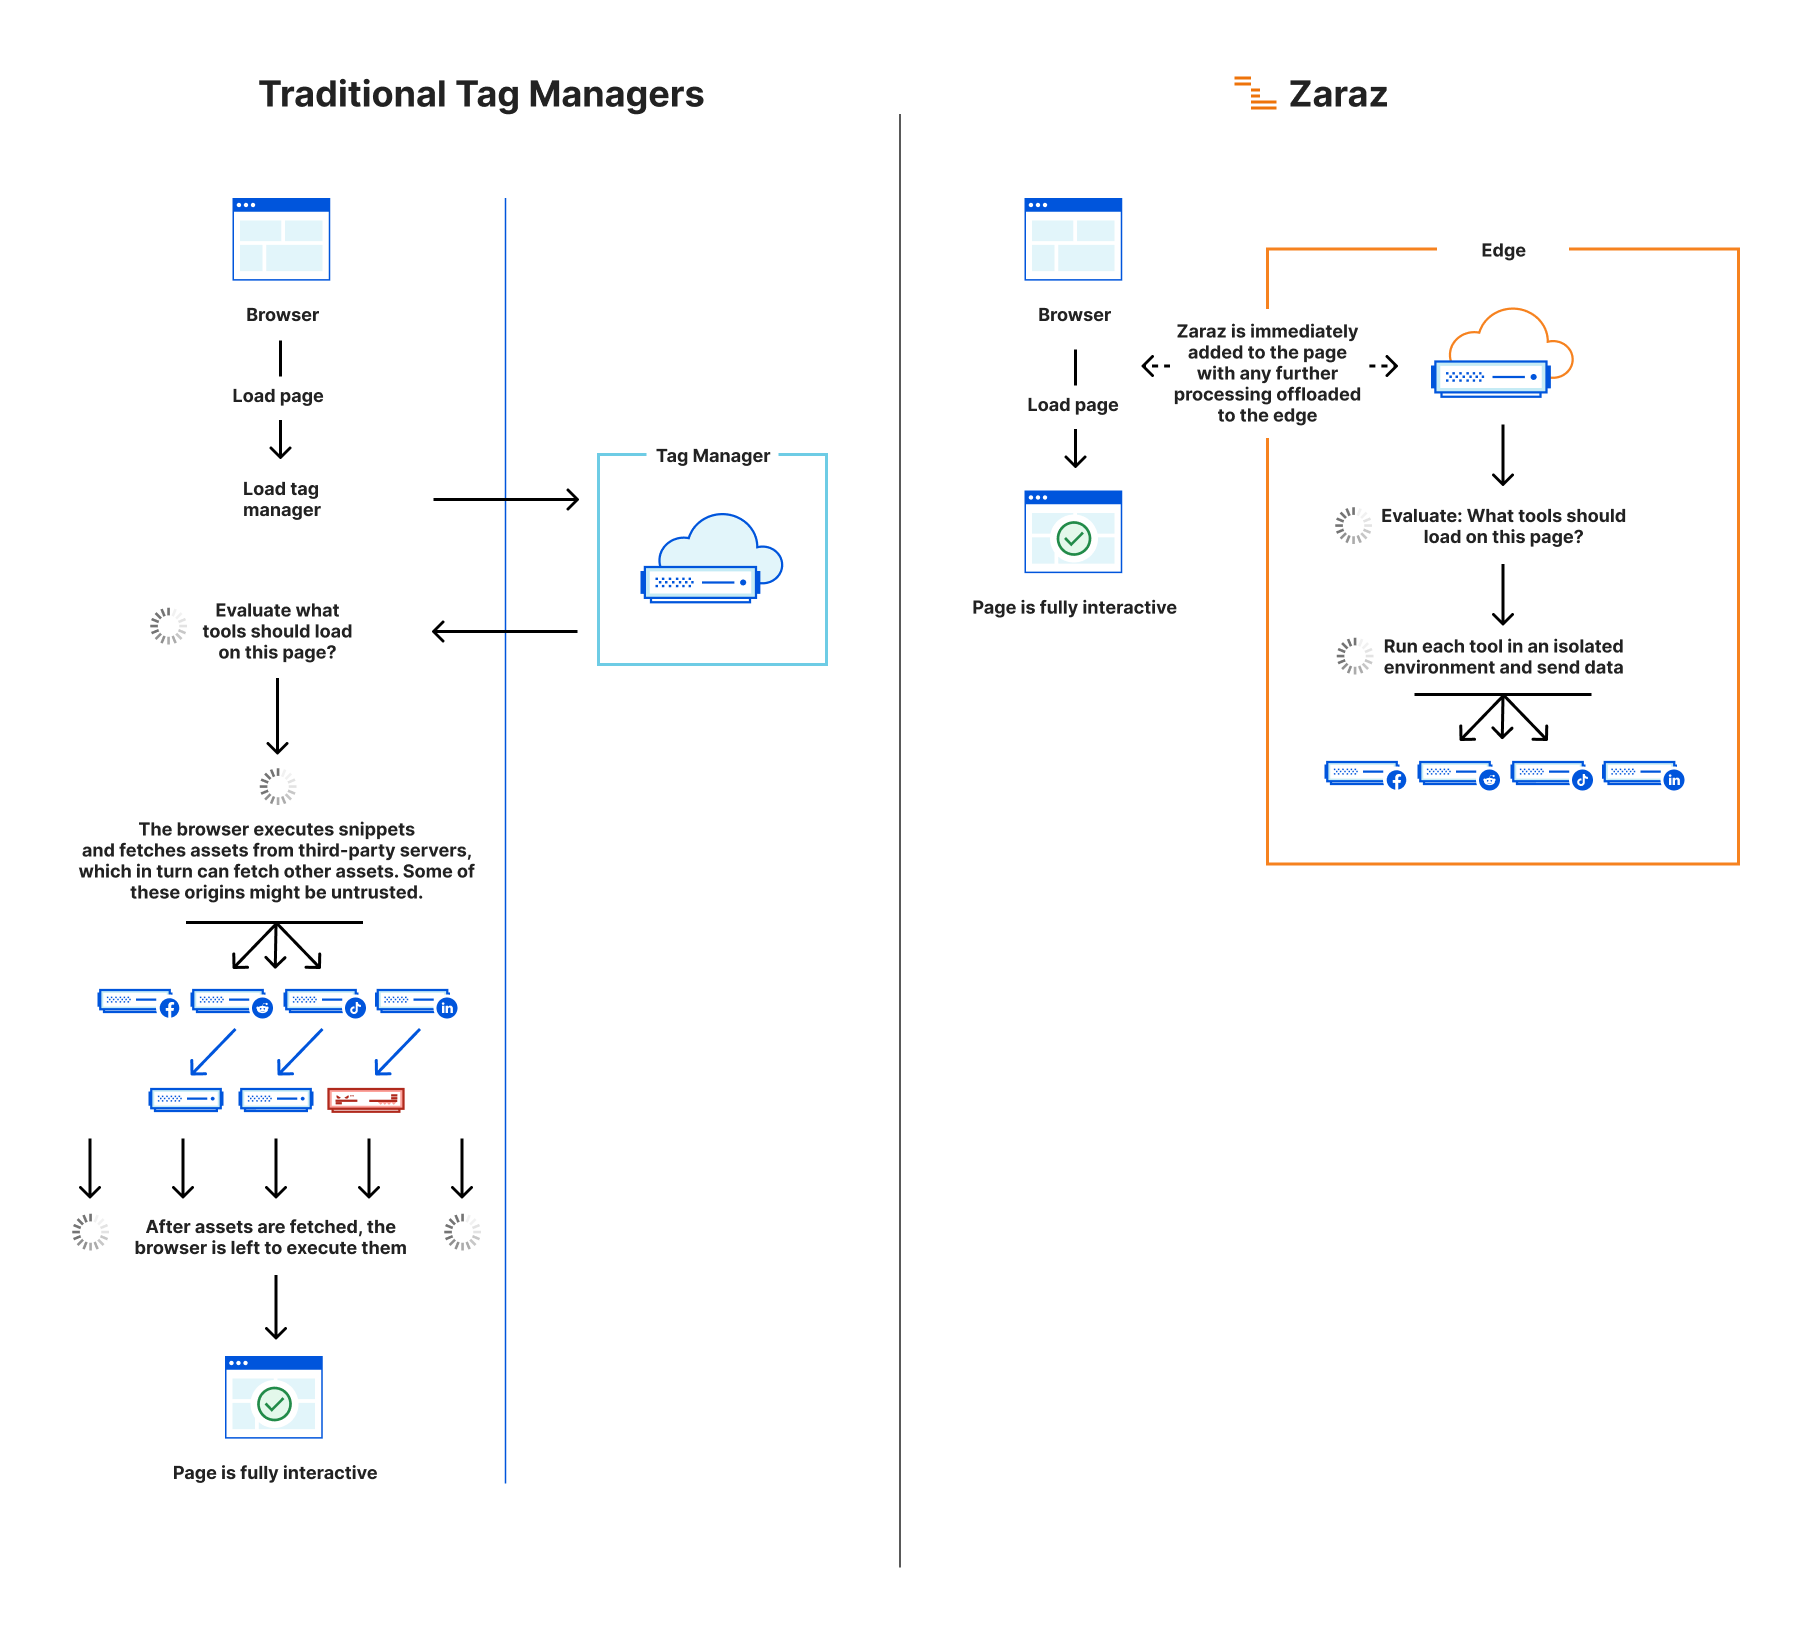
When you configure a third-party tool through a normal tag manager, a lot happens in the browsers of your visitors which is out of your control. The tag manager will load and then evaluate all trigger rules to decide which tools to load. It would then usually append the script tags of those tools to the DOM of the page, making the browser fetch the scripts and execute them. These scripts come from untrusted or unknown origins, increasing the risk of malicious code execution in the browser. They can also block the browser from becoming interactive until they are completely executed. They are generally free to do whatever they want in the browser, but most commonly they would then collect some information and send it to some endpoint on the third-party server. With Zaraz, the browser essentially does none of that.
Choosing Cloudflare Workers
When we set about coding Zaraz, we quickly understood that our infrastructure decisions would have a massive impact on our service. In fact, choosing the wrong one could mean we have no service at all. The most common alternative to Zaraz is traditional Tag Management software. They generally have no server-side component: whenever a user “publishes” a configuration, a JavaScript file is rendered and hosted as a static asset on a CDN. With Zaraz the idea is to move most of the evaluation of code out of the browser, and respond with a dynamically generated JavaScript code each time. We needed to find a solution that would allow us to have a server-side component, but would be as fast as a CDN. Otherwise, there was a risk we might end up slowing down websites instead of making them faster.
We needed Zaraz to be served from a place close to the visiting user. Since setting up servers all around the world seemed like too big of a task for a very young startup, we looked at a few distributed serverless platforms. We approached this search with a small list of requirements:
Run JavaScript: Third-party tools all use JavaScript. If we were to port them to run in a cloud environment, the easiest way to do so would be to be able to use JavaScript as well.
Secure: We are processing sensitive data. We can’t afford the risk of someone hacking into our EC2 instance. We wanted to make sure that data doesn’t stay on some server after we sent our HTTP response.
Fully programmable: Some CDNs allow setting complicated rules for handling a request, but altering HTTP headers, setting redirects or HTTP response codes isn’t enough. We need to generate JavaScript code on the fly, meaning we need full control over the responses. We also need to use some external JavaScript libraries.
Extremely fast and globally distributed: In the very early stages of the company, we already had customers in the USA, Europe, India, and Israel. As we were preparing to show them a Proof of Concept, we needed to be sure it would be fast wherever they are. We were competing with tag managers and Customer Data Platforms that have a pretty fast response time, so we need to be able to respond as fast as if our content was statically hosted on a CDN, or faster.
Initially we thought we would need to create Docker containers that would run around the globe and would use their own HTTP server, but then a friend from our Y Combinator batch said we should check out Cloudflare Workers.
At first, we thought it wouldn’t work — Workers doesn’t work like a Node.js application, and we felt that limitation would prevent us from building what we wanted. We planned to let Workers handle the requests coming from users’ browsers, and then use an AWS Lambda for the heavy lifting of actually processing data and sending it to third-party vendors.
Our first attempt with Workers was very simple: just confirming we could use it to actually return dynamic browser-side JavaScript that is generated on-the-fly:
addEventListener('fetch', (event) => {
 event.respondWith(handleRequest(event.request))
})

async function handleRequest(request) {
   let code = '(function() {'

   if (request.headers.get('user-agent').includes('Firefox')) {
     code += `console.log('Hello Firefox!');`
   } else {
     code += `console.log('Hey other browsers...');`
   }

   code += '})();'

   return new Response(code, {
     headers: { 'content-type': 'text/javascript' }
   });
}
It was a tiny example, but I remember calling Yair afterwards and saying “this could actually work!”. It proved the flexibility of Workers. We just created an endpoint that served a JavaScript file, this JavaScript file was dynamically generated, and the response time was less than 10ms. We could now put <script src="path/to/worker.js"> in our HTML and treat this Worker like a normal JavaScript file.
As we took a deeper look, we found Workers answering demand after demand from our list, and learned we could even do the most complicated things inside Workers. The Lambda function started doing less and less, and was eventually removed. Our little Node.js proof-of-concept was easily converted to Workers.
Using the Cloudflare Workers platform: “standing on the shoulders of giants”
When we raised our seed round we heard many questions like “if this can work, how come it wasn’t built before?” We often said that while the problem has been a long standing one, accessible edge computing is a new possibility. Later, on our first investors update after creating the prototype, we told them about the unbelievably fast response time we managed to achieve and got much praise for it — talk about “standing on the shoulders of giants”. Workers simply checked all our boxes. Running JavaScript and using the same V8 engine as the browser meant that we could keep the same environment when porting tools to run on the cloud (it also helped with hiring). It also opened the possibility of later on using WebAssembly for certain tasks. The fact that Workers are serverless and stateless by default was a selling point for our own trustworthiness: we told customers we couldn’t save their personal data even by mistake, which was true. The integration between webpack and Wrangler meant that we could write a full-blown application — with modules and external dependencies — to shift 100% of our logic into our Worker. And the performance helped us ace all our demos.
As we were building Zaraz, the Workers platform got more advanced. We ended up using Workers KV for storing user configuration, and Durable Objects for communicating between Workers. Our main Worker holds server-side implementations of more than 50 popular third-party tools, replacing hundreds of thousands of JavaScript lines of code that traditionally run inside browsers. It’s an ever growing list, and we recently also published an SDK that allows third-party vendors to build support for their tools by themselves. For the first time, they can do it in a secure, private, and fast environment.
A new way to build third-parties
Most third-party tools do two fundamental things: First, they collect some information from the browser such as screen resolution, current URL, page title or cookie content. Second, they send it to their server. It is often simple, but when a website has tens of these tools, and each of them query for the information it needs and then sends its requests, it can cause a real slowdown. On Zaraz, this looks very different: Every tool provides a run function, and when Zaraz evaluates the user request and decides to load a tool, it executes this run function. This is how we built integrations for over 50 different tools, all from different categories, and this is how we’re inviting third-party vendors to write their own integrations into Zaraz.
run({system, utils}) {
  // The `system` object includes information about the current page, browser, and more
  const { device, page, cookies } = system
  // The `utils` are a set of functions we found useful across multiple tools
  const { getCookieString, waitUntil } = utils

  // Get the existing cookie content, or create a new UUID instead
  const cookieName = 'visitor-identifier'
  const sessionCookie = cookies[cookieName] || crypto.randomUUID()

  // Build the payload
  const payload = {
    session: sessionCookie,
    ip: device.ip,
    resolution: device.resolution,
    ua: device.userAgent,
    url: page.url.href,
    title: page.title,
  }

  // Construct the URL
  const baseURL = 'https://example.com/collect?'
  const params = new URLSearchParams(payload)
  const finalURL = baseURL + params

  // Send a request to the third-party server from the edge
  waitUntil(fetch(finalURL))

  // Save or update the cookie in the browser
  return getCookieString(cookieName, sessionCookie)
}
The above code runs in our Cloudflare Worker, instead of the browser. Previously, having 10x more tools meant 10x more requests browsers rendering your website needed to make, and 10x more JavaScript code they needed to evaluate. This code would often be repetitive, for example, almost every tool implements their own “get cookie” function. It’s also 10x more origins you have to trust no one is tampering with. When running tools on the edge, this doesn’t affect the browser at all: you can add as many tools as you want, but they wouldn’t be loading in the browser, so they will have no effect.
In this example, we first check for the existence of a cookie that identifies the session, called “visitor-identifier”. If it exists, we read its value; if not, we generate a new UUID for it. Note that the power of Workers is all accessible here: we use crypto.randomUUID() just like we can use any other Workers functionality. We then collect all the information our example tool needs — user agent, current URL, page title, screen resolution, client IP address — and the content of the “visitor-identifier” cookie. We construct the final URL that the Worker needs to send a request to, and we then use waitUntil to make sure the request gets there. Zaraz’s version of fetch gives our tools automatic logging, data loss prevention and retries capabilities.
Lastly, we return the value of the getCookieString function. Whatever string is returned by the run function is passed to the visitor as browser-side JavaScript. In this case, getCookieString returns something like document.cookie = 'visitor-identifier=5006e6fa-7ce6-45ef-8724-c846f1953369; Path=/; Max-age=31536000';, causing the browser to create a first-party cookie. The next time a user loads a page, the visitor-identifier cookie should exist, causing Zaraz to reuse the UUID instead of creating a new one.
This system of run functions allows us to separate and isolate each tool to run independently of the rest of the system, while still providing it with all the required context and data coming from the browser, and the capabilities of Workers. We are inviting third-party vendors to work with us to build the future of secure, private and fast third-party tools.
A new events system
Many third-party tools need to collect behavioral information during a user visit. For example, you might want to place a conversation pixel right after a user clicked “submit” on the credit card form. Since we moved tools to the cloud, you can’t access their libraries from the browser context anymore. For that we created zaraz.track() — a method that allows you to call tools programmatically, and optionally provide them with more information:
In this example, we’re letting Zaraz know about a trigger called “card-submission”, and we associate some data with it — the value of the transaction that we’re taking from an element with the ID total, and a transaction code that is hardcoded and gets printed directly from our backend.
In the Zaraz interface, configured tools can be subscribed to different and multiple triggers. When the code above gets triggered, Zaraz checks, on the edge, what tools are subscribed to the card-submission trigger, and it then calls them with the right additional data supplied, populating their requests with the transaction code and its value.
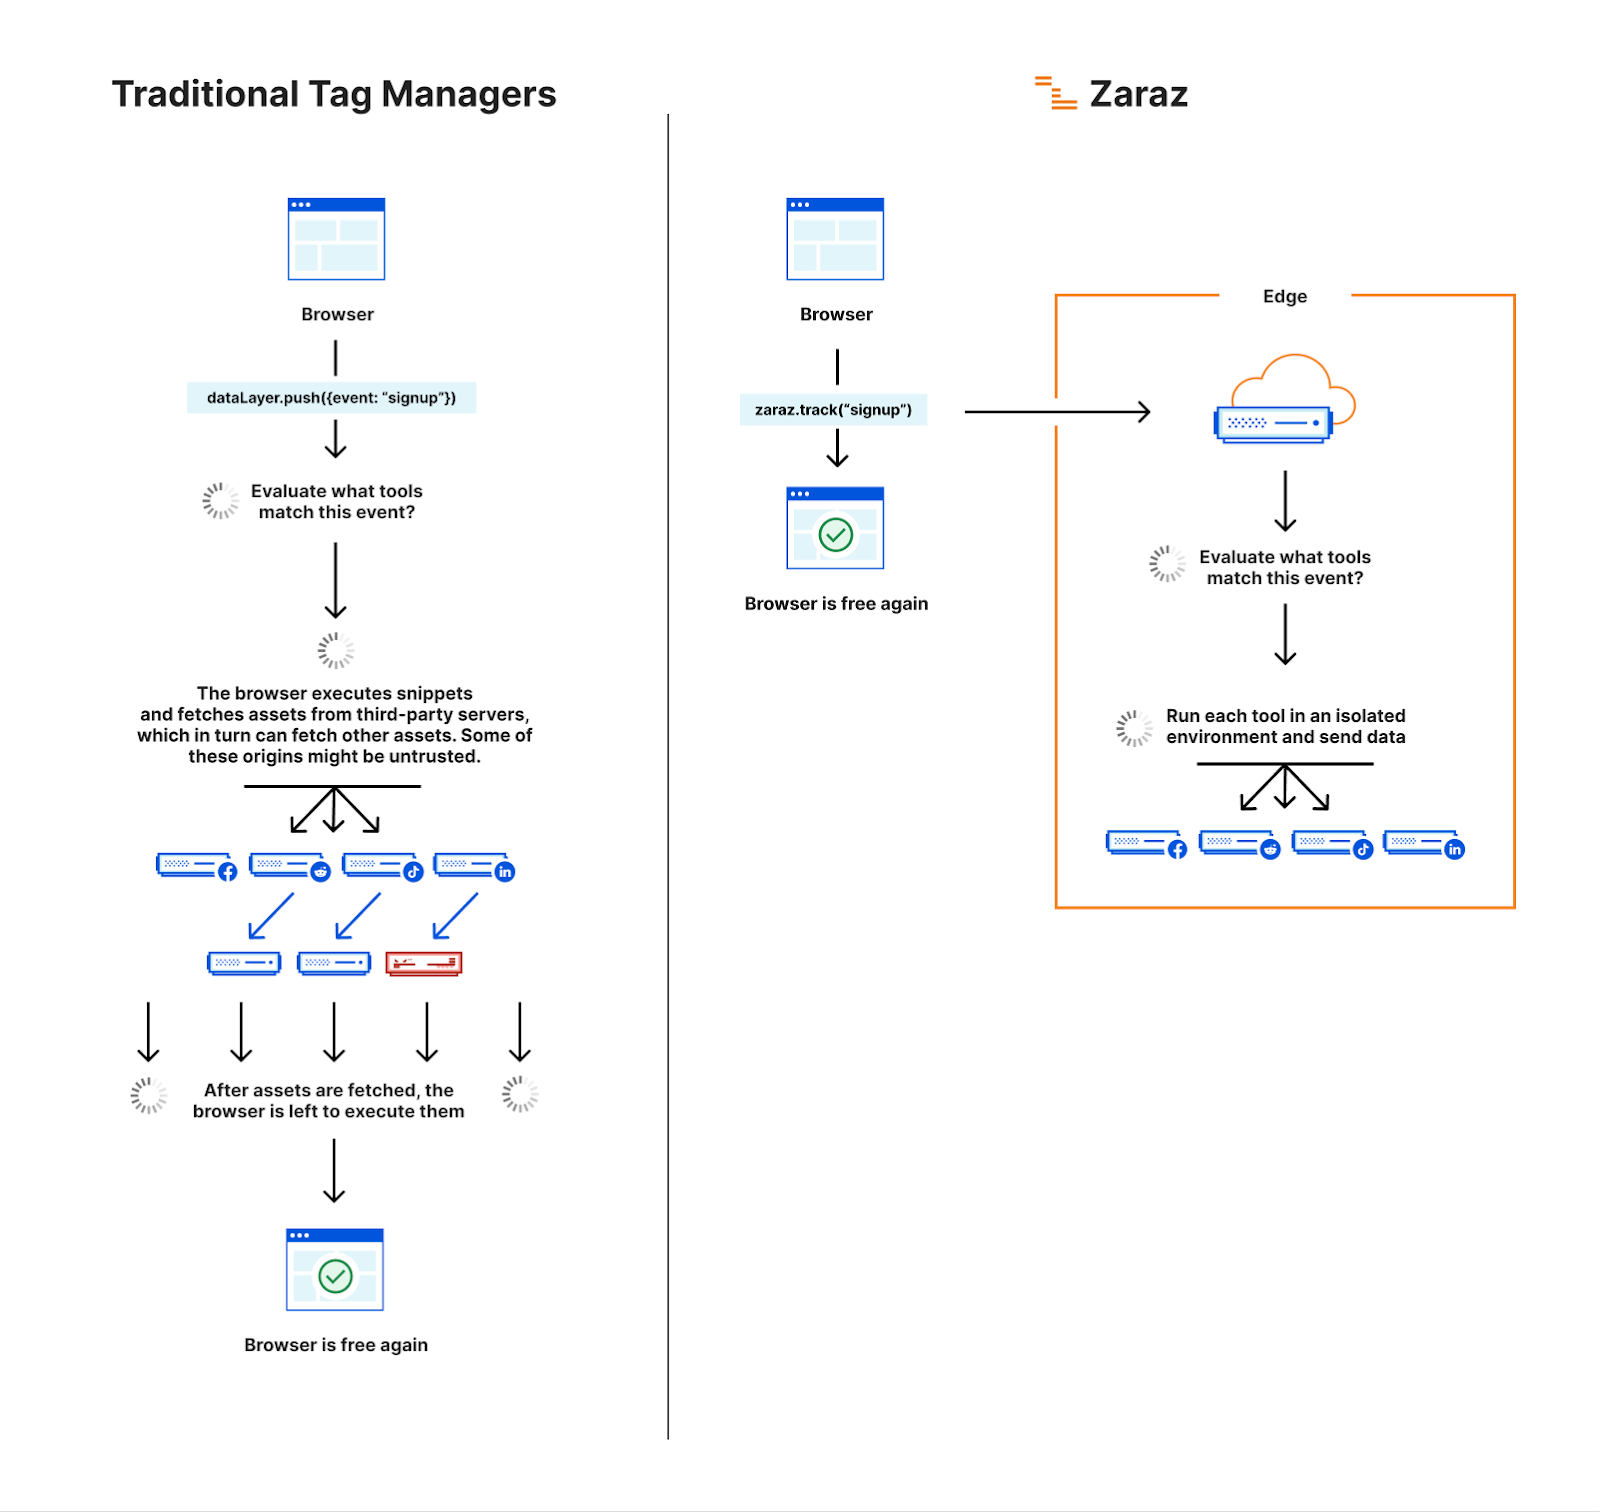
This is different from how traditional tag managers work: GTM’s dataLayer.push serves a similar purpose, but is evaluated client-side. The result is that GTM itself, when used intensively, will grow its script so much that it can become the heaviest tool a website loads. Each event sent using dataLayer.push will cause repeated evaluation of code in the browser, and each tool that will match the evaluation will execute code in the browser, and might call more external assets again. As these events are usually coupled with user interactions, this often makes interacting with a website feel slow, because running the tools is occupying the main thread. With Zaraz, these tools exist and are evaluated only at the edge, improving the website’s speed and security.
You don’t have to be coder to use triggers. The Zaraz dashboard allows you to choose from a predefined set of templates like click listeners, scroll events and more, that you can attach to any element on your website without touching your code. When you combine zaraz.track() with the ability to program your own tools, what you get is essentially a one-liner integration of Workers into your website. You can write any backend code you want and Zaraz will take care of calling it exactly at the right time with the right parameters.
Joining Cloudflare
When new customers started using Zaraz, we noticed a pattern: the best teams we worked with chose Cloudflare, and some were also moving parts of their backend infrastructure to Workers. We figured we could further improve performance and integration for companies using Cloudflare as well. We could inline parts of the code inside the page and then further reduce the amount of network requests. Integration also allowed us to remove the time it takes to DNS resolve our script, because we could use Workers to proxy Zaraz into our customers’ domains. Integrating with Cloudflare made our offering even more compelling.
Back when we were doing Y Combinator in Winter 2020 and realized how much third parties could affect a websites’ performance, we saw a grand mission ahead of us: creating a faster, private, and secure web by reducing the amount of third-party bloat. This mission remained the same to this day. As our conversations with Cloudflare got deeper, we were excited to realize that we’re talking with people who share the same vision. We are thrilled for the opportunity to scale our solutions to millions of websites on the Internet, making them faster and safer and even reducing carbon emissions.
If you would like to explore the free beta version, please click here. If you are an enterprise and have additional/custom requirements, please click here to join the waitlist. To join our Discord channel, click here.
The collective thoughts of the interwebz
Manage Consent
To provide the best experiences, we use technologies like cookies to store and/or access device information. Consenting to these technologies will allow us to process data such as browsing behavior or unique IDs on this site. Not consenting or withdrawing consent, may adversely affect certain features and functions.
Functional
Always active
The technical storage or access is strictly necessary for the legitimate purpose of enabling the use of a specific service explicitly requested by the subscriber or user, or for the sole purpose of carrying out the transmission of a communication over an electronic communications network.
Preferences
The technical storage or access is necessary for the legitimate purpose of storing preferences that are not requested by the subscriber or user.
Statistics
The technical storage or access that is used exclusively for statistical purposes.The technical storage or access that is used exclusively for anonymous statistical purposes. Without a subpoena, voluntary compliance on the part of your Internet Service Provider, or additional records from a third party, information stored or retrieved for this purpose alone cannot usually be used to identify you.
Marketing
The technical storage or access is required to create user profiles to send advertising, or to track the user on a website or across several websites for similar marketing purposes.