All posts by Ziad Wali

Best practices for upgrading from Amazon Redshift DC2 to RA3 and Amazon Redshift Serverless

Post Syndicated from Ziad Wali original https://aws.amazon.com/blogs/big-data/best-practices-for-upgrading-from-amazon-redshift-dc2-to-ra3-and-amazon-redshift-serverless/

Amazon Redshift is a fast, petabyte-scale cloud data warehouse that makes it simple and cost-effective to analyze your data using standard SQL and your existing business intelligence (BI) tools. Tens of thousands of customers rely on Amazon Redshift to analyze exabytes of data and run complex analytical queries, delivering the best price-performance.

With a fully managed, AI-powered, massively parallel processing (MPP) architecture, Amazon Redshift drives business decision-making quickly and cost-effectively. Previously, Amazon Redshift offered DC2 (Dense Compute) node types optimized for compute-intensive workloads. However, they lacked the flexibility to scale compute and storage independently and didn’t support many of the modern features now available. As analytical demands grow, many customers are upgrading from DC2 to RA3 or Amazon Redshift Serverless, which offer independent compute and storage scaling, along with advanced capabilities such as data sharing, zero-ETL integration, and built-in artificial intelligence and machine learning (AI/ML) support with Amazon Redshift ML.

This post provides a practical guide to plan your target architecture and migration strategy, covering upgrade options, key considerations, and best practices to facilitate a successful and seamless transition.

Upgrade process from DC2 nodes to RA3 and Redshift Serverless

The first step towards upgrade is to understand how the new architecture should be sized; for this, AWS provides a recommendation table for provisioned clusters. When determining the configuration for Redshift Serverless endpoints, you can assess compute capacity details by examining the relationship between RPUs and memory. Each RPU allocates 16 GiB of RAM. To estimate the base RPU requirement, divide your DC2 nodes cluster’s total RAM by 16. These recommendations provide guidance in sizing the initial target architecture but depend on the computing requirements of your workload. To better estimate your requirements, consider conducting a proof of concept that uses Redshift Test Drive to run potential configurations. To learn more, see Find the best Amazon Redshift configuration for your workload using Redshift Test Drive and Successfully conduct a proof of concept in Amazon Redshift. After you decide on the target configuration and architecture, you can build the strategy for upgrading.

Architecture patterns

The first step is to define the target architecture for your solution. You can choose the main architecture pattern that best aligns with your use case from the options presented in Architecture patterns to optimize Amazon Redshift performance at scale. There are two main scenarios, as illustrated in the following diagram.

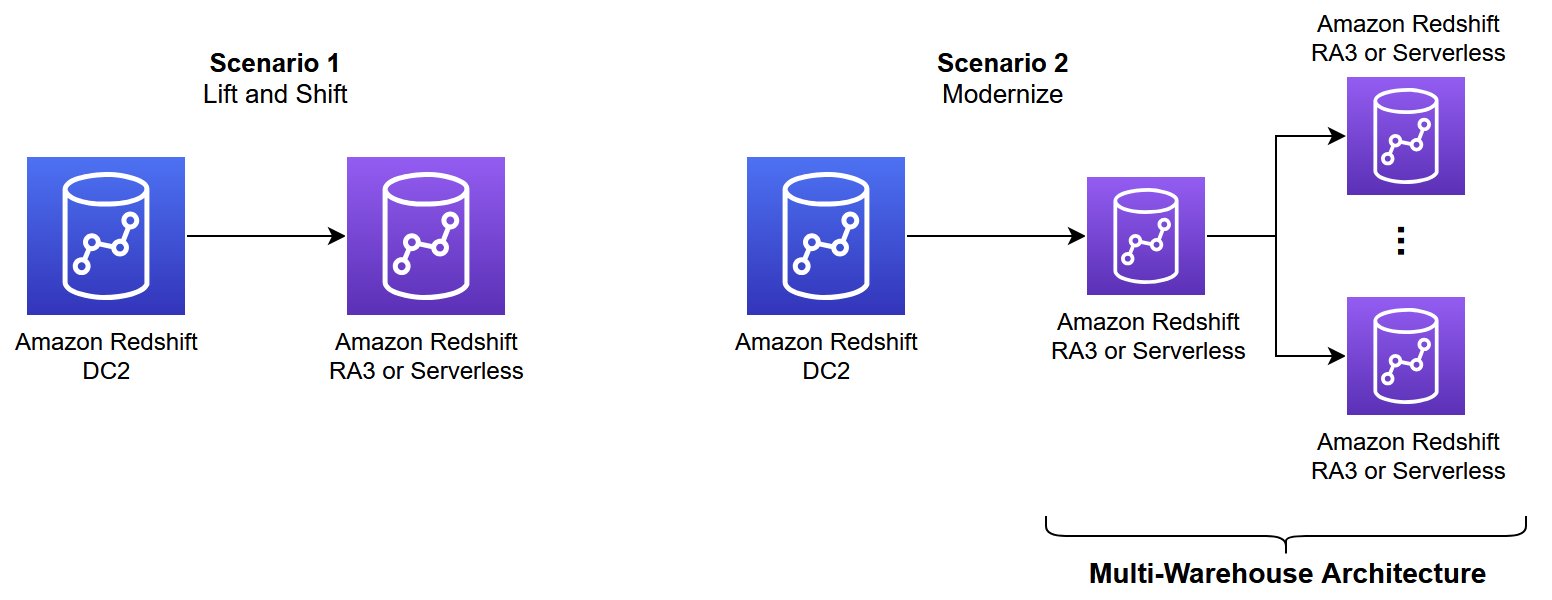
At the time of writing, Redshift Serverless doesn’t have manual workload management; everything runs with automatic workload management. Consider isolating your workload into multiple endpoints based on use case to enable independent scaling and better performance. For more information, refer to Architecture patterns to optimize Amazon Redshift performance at scale.

Upgrade strategies

You can choose from two possible upgrade options when upgrading from DC2 nodes to RA3 nodes or Redshift Serverless:

  • Full re-architecture – The first step is to evaluate and assess the workloads to determine whether you could benefit from a modern data architecture, then re-architect the existing platform during the upgrade process from DC2 nodes.
  • Phased approach– This is a two-stage strategy. The first stage involves a straightforward migration to the target RA3 or Serverless configuration. In the second stage, you can modernize the target architecture by taking advantage of cutting-edge Redshift features.

We usually recommend a phased approach, which allows for a smoother transition while enabling future optimization. The first stage of a phased approach consists of the following steps:

  • Evaluate an equivalent RA3 nodes or Redshift Serverless configuration for your existing DC2 cluster, using the sizing guidelines for provisioned clusters or the compute capacity options for serverless endpoints.
  • Thoroughly validate the chosen target configuration in a non-production environment using Redshift Test Drive. This automated tool simplifies the process of simulating your production workloads on various potential target configurations, enabling a comprehensive what-if analysis. This step is strongly recommended.
  • Proceed to the upgrade process when you are satisfied with the price-performance ratio of a particular target configuration, using one of the methods detailed in the following section.

Redshift RA3 instances and Redshift Serverless provide access to powerful new capabilities, including zero-ETL, Amazon Redshift Streaming Ingestion, data sharing writes, and independent compute and storage scaling. To maximize these benefits, we recommend conducting a comprehensive review of your current architecture (the second stage of a phased approach) to identify opportunities for modernization using Amazon Redshift’s latest features. For example:

Upgrade options

You can choose from three ways to resize or upgrade a Redshift cluster from DC2 to RA3 or Redshift Serverless: snapshot restore, classic resize, and elastic resize.

Snapshot restore

The snapshot restore method follows a sequential process that begins with capturing a snapshot of your existing (source) cluster. This snapshot is then used to create a new target cluster with your desired specifications. After creation, it’s essential to verify data integrity by confirming that data has been correctly transferred to the target cluster. An important consideration is that any data written to the source cluster after the initial snapshot must be manually transferred to maintain synchronization.

This method offers the following advantages:

  • Allows for the validation of the new RA3 or Serverless setup without affecting the existing DC2 cluster
  • Provides the flexibility to restore to different AWS Regions or Availability Zones
  • Minimizes cluster downtime for write operations during the transition

Keep in mind the following considerations:

  • Setup and data restore might take longer than elastic resize.
  • You might encounter data synchronization challenges. Any new data written to the source cluster after snapshot creation requires manual copying to the target. This process might need multiple iterations to achieve full synchronization and require downtime before cutoff.
  • A new Redshift endpoint is generated, necessitating connection updates. Consider renaming both clusters in order to maintain the original endpoint (make sure the new target cluster adopts the original source cluster’s name)

Classic resize

Amazon Redshift creates a target cluster and migrates your data and metadata to it from the source cluster using a backup and restore operation. All your data, including database schemas and user configurations, is accurately transferred to the new cluster. The source cluster restarts initially and is unavailable for a few minutes, causing minimal downtime. It quickly resumes, allowing both read and write operations as the resize continues in the background.

Classic resize is a two-stage process:

  • Stage 1 (critical path) – During this stage, metadata migration occurs between the source and target configurations, temporarily placing the source cluster in read-only mode. This initial phase is typically brief. When this phase is complete, the cluster is made available for read and write queries. Although tables originally configured with KEY distribution style are temporarily stored using EVEN distribution, they will be redistributed to their original KEY distribution during Stage 2 of the process.
  • Stage 2 (background operations) – This stage focuses on restoring data to its original distribution patterns. This operation runs in the background with low priority without interfering with the primary migration process. The duration of this stage varies based on multiple factors, including the volume of data being redistributed, ongoing cluster workload, and the target configuration being used.

The overall resize duration is primarily determined by the data volume being processed. You can monitor progress on the Amazon Redshift console or by using the SYS_RESTORE_STATE system view, which displays the percentage completed for the table being converted (accessing this view requires superuser privileges).

The classic resize approach offers the following advantages:

  • All possible target node configurations are supported
  • A comprehensive reconfiguration of the source cluster rebalances the data slices to default per node, leading to even data distribution across the nodes

However, keep in mind the following:

  • Stage 2 redistributes the data for optimal performance. However, Stage 2 runs at a lower priority, and in busy clusters, it can take a long time to complete. To speed up the process, you can manually run the ALTER TABLE DISTSTYLE command on your tables having KEY DISTSTYLE. By executing this command, you can prioritize the data redistribution to happen faster, mitigating any potential performance degradation due to the ongoing Stage 2 process.
  • Due to the Stage 2 background redistribution process, queries can take longer to complete during the resize operation. Consider enabling concurrency scaling as a mitigation strategy.
  • Drop unnecessary and unused tables before initiating a resize to speed up data distribution.
  • The snapshot used for the resize operation becomes dedicated to this operation only. Therefore, it can’t be used for a table restore or other purpose.
  • The cluster must operate within a virtual private cloud (VPC).
  • This approach requires a new or a recent manual snapshot taken before initiating a classic resize.
  • We recommend scheduling the operation during off-peak hours or maintenance windows for minimal business impact.

Elastic resize

When using elastic resize to change the node type, Amazon Redshift follows a sequential process. It begins by creating a snapshot of your existing cluster, then provisions a new target cluster using the most recent data from that snapshot. While data transfers to the new cluster in the background, the system remains in read-only mode. As the resize operation approaches completion, Amazon Redshift automatically redirects the endpoint to the new cluster and stops all connections to the original one. If any issues arise during this process, the system typically performs an automatic rollback without requiring manual intervention, though such failures are rare.

Elastic resize offers several advantages:

  • It’s a quick process that takes 10–15 minutes on average
  • Users maintain read access to their data during the process, experiencing only minimal interruption
  • The cluster endpoint remains unchanged throughout and after the operation

When considering this approach, keep in mind the following:

  • Elastic resize operations can only be performed on clusters using the EC2-VPC platform. Therefore, it’s not available for Redshift Serverless.
  • The target node configuration must provide sufficient storage capacity for existing data.
  • Not all target cluster configurations support elastic resize. In such cases, consider using classic resize or snapshot restore.
  • After the process is started, elastic resize can’t be stopped.
  • Data slices remain unchanged; this can potentially cause some data or CPU skew.

Upgrade recommendations

The following flowchart visually guides the decision-making process for choosing the appropriate Amazon Redshift upgrade method.

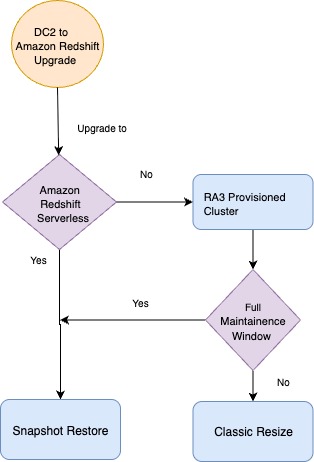
When upgrading Amazon Redshift, the method depends on the target configuration and operational constraints. For Redshift Serverless, always use the snapshot restore method. If upgrading to an RA3 provisioned cluster, you can choose from two options: use snapshot restore if a full maintenance window with downtime is acceptable, or choose classic resize for minimal downtime, because it rebalances the data slices to default per node, leading to even data distribution across the nodes. Although you can use elastic resize for certain node type changes (for example, DC2 to RA3) within specific ranges, it’s not recommended because elastic resize doesn’t change the number of slices, potentially leading to data or CPU skew, which can later impact the performance of the Redshift cluster. However, elastic resize remains the primary recommendation when you need to add or reduce nodes in an existing cluster.

Best practices for migration

When planning your migration, consider the following best practices:

  • Conduct a pre-migration assessment using Amazon Redshift Advisor or Amazon CloudWatch.
  • Choose the right target architecture based on your use cases and workloads. You can use Redshift Test Drive to determine the right target architecture.
  • Backup using manual snapshots, and enable automated rollback.
  • Communicate timelines, downtime, and changes to stakeholders.
  • Update runbooks with new architecture details and endpoints.
  • Validate workloads using benchmarks and data checksum.
  • Use maintenance windows for final syncs and cutovers.

By following these practices, you can achieve a controlled, low-risk migration that balances performance, cost, and operational continuity.

Conclusion

Migrating from Redshift DC2 nodes to RA3 nodes or Redshift Serverless requires a structured approach to support performance, cost-efficiency, and minimal disruption. By selecting the right architecture for your workload, and validating data and workloads post-migration, organizations can seamlessly modernize their data platforms. This upgrade facilitates long-term success, helping teams fully harness RA3’s scalable storage or Redshift Serverless auto scaling capabilities while optimizing costs and performance.


About the authors

Ziad Wali

Ziad Wali

Ziad is an Analytics Specialist Solutions Architect at AWS. He has over 10 years of experience in databases and data warehousing, where he enjoys building reliable, scalable, and efficient solutions. Outside of work, he enjoys sports and spending time in nature.

Omama Khurshid

Omama Khurshid

Omama is an Analytics Solutions Architect at Amazon Web Services. She focuses on helping customers across various industries build reliable, scalable, and efficient solutions. Outside of work, she enjoys spending time with her family, watching movies, listening to music, and learning new technologies.

Srikant Das

Srikant Das

Srikant is an Analytics Specialist Solutions Architect at Amazon Web Services, designing scalable, robust cloud solutions in Analytics & AI. Beyond his technical expertise, he shares travel adventures and data insights through engaging blogs, blending analytical rigor with storytelling on social media.

Modernize Amazon Redshift authentication by migrating user management to AWS IAM Identity Center

Post Syndicated from Ziad Wali original https://aws.amazon.com/blogs/big-data/modernize-amazon-redshift-authentication-by-migrating-user-management-to-aws-iam-identity-center/

Amazon Redshift is a powerful cloud-based data warehouse that organizations can use to analyze both structured and semi-structured data through advanced SQL queries. As a fully managed service, it provides high performance and scalability while allowing secure access to the data stored in the data warehouse. Organizations worldwide rely on Amazon Redshift to handle massive datasets, upgrade their analytics capabilities, and deliver valuable business intelligence to their stakeholders.

AWS IAM Identity Center serves as the preferred platform for controlling workforce access to AWS tools, including Amazon Q Developer. It allows for a single connection to your existing identity provider (IdP), creating a unified view of users across AWS applications and applying trusted identity propagation for a smooth and consistent experience.

You can access data in Amazon Redshift using local users or external users. A local user in Amazon Redshift is a database user account that is created and managed directly within the Redshift cluster itself. Amazon Redshift also integrates with IAM Identity Center, and supports trusted identity propagation, so you can use third-party IdPs such as Microsoft Entra ID (Azure AD), Okta, Ping, OneLogin, or use IAM Identity Center as an identity source. The IAM Identity Center integration with Amazon Redshift supports centralized authentication and SSO capabilities, simplifying access management across multi-account environments. As organizations grow in scale, it is recommended to use external users for cross-service integration and centralized access management.

In this post, we walk you through the process of smoothly migrating your local Redshift user management to IAM Identity Center users and groups using the RedshiftIDCMigration utility.

Solution overview

The following diagram illustrates the solution architecture.

The RedshiftIDCMigration utility accelerates the migration of your local Redshift users, groups, and roles to your IAM Identity Center instance by performing the following activities:

  • Create users in IAM Identity Center for every local user in a given Redshift instance.
  • Create groups in IAM Identity Center for every group or role in a given Redshift instance.
  • Assign users to groups in IAM Identity Center according to existing assignments in the Redshift instance.
  • Create IAM Identity Center roles in the Redshift instance matching the groups created in IAM Identity Center.
  • Grant permissions to IAM Identity Center roles in the Redshift instance based on the current permissions given to local groups and roles.

Prerequisites

Before running the utility, complete the following prerequisites:

  1. Enable IAM Identity Center in your account.
  2. Follow the steps in the post Integrate Identity Provider (IdP) with Amazon Redshift Query Editor V2 and SQL Client using AWS IAM Identity Center for seamless Single Sign-On (specifically, follow Steps 1–8, skipping Steps 4 and 6).
  3. Configure the IAM Identity Center application assignments:
    1. On the IAM Identity Center console, choose Application Assignments and Applications.
    2. Select your application and on the Actions dropdown menu, choose Edit details.
    3. For User and group assignments, choose Do not require assignments. This setting makes it possible to test Amazon Redshift connectivity without configuring specific data access permissions.
  4. Configure IAM Identity Center authentication with administrative access from either Amazon Elastic Compute Cloud (Amazon EC2) or AWS CloudShell.

The utility will be run from either an EC2 instance or CloudShell. If you’re using an EC2 instance, an IAM role is attached to the instance. Make sure that the IAM role used during the execution has the following permissions (if not, create a new policy with those permissions and attach it to the IAM role):

  • Amazon Redshift permissions (for serverless):
{
    "Version": "2012-10-17",
    "Statement": [
        {
            "Sid": "VisualEditor0",
            "Effect": "Allow",
            "Action": [
                "redshift-serverless:GetCredentials",
                "redshift-serverless:GetNamespace",
                "redshift-serverless:GetWorkgroup"
            ],
            "Resource": [
                "arn:aws:redshift-serverless:${region}:${account-id}:namespace/${namespace-id}",
                "arn:aws:redshift-serverless:${region}:${account-id}:workgroup/${workgroup-id}"
            ]
        },
        {
            "Sid": "VisualEditor1",
            "Effect": "Allow",
            "Action": [
                "redshift-serverless:ListNamespaces",
                "redshift-serverless:ListWorkgroups"
            ],
            "Resource": "*"
        },
        {
            "Sid": "VisualEditor2",
            "Effect": "Allow",
            "Action": [
                "redshift:CreateClusterUser",
                "redshift:JoinGroup",
                "redshift:GetClusterCredentials",
                "redshift:ExecuteQuery",
                "redshift:FetchResults",
                "redshift:DescribeClusters",
                "redshift:DescribeTable"
            ],
            "Resource": [
                "arn:aws:redshift:${region}:${account-id}:cluster:redshift-serverless-${workgroup-name}",
                "arn:aws:redshift:${region}:${account-id}:dbgroup:redshift-serverless-${workgroup-name}/${dbgroup}",
                "arn:aws:redshift:${region}:${account-id}:dbname:redshift-serverless-${workgroup-name}/${dbname}",
                "arn:aws:redshift:${region}:${account-id}:dbuser:redshift-serverless-${workgroup-name}/${dbuser}"
            ]
        }
    ]
}
  • Amazon Redshift permissions (for provisioned):
{
    "Version": "2012-10-17",
    "Statement": [
        {
            "Sid": "VisualEditor0",
            "Effect": "Allow",
            "Action": "redshift:GetClusterCredentials",
            "Resource": [
                "arn:aws:redshift: ${region}:${account-id}:dbname:${cluster_name}/${dbname}",
                "arn:aws:redshift: ${region}: ${account-id}:dbuser:${cluster-name}/${dbuser}"
            ]
        },
        {
            "Sid": "VisualEditor1",
            "Effect": "Allow",
            "Action": [
                "redshift:DescribeClusters",
                "redshift:ExecuteQuery",
                "redshift:FetchResults",
                "redshift:DescribeTable"
            ],
            "Resource": "*"
        }
    ]
}
{
    "Version": "2012-10-17",
    "Statement": [
        {
            "Sid": "VisualEditor0",
            "Effect": "Allow",
            "Action": [
                "s3:PutObject",
                "s3:GetObject",
                "s3:GetEncryptionConfiguration",
                "s3:ListBucket",
                "s3:DeleteObject"
            ],
            "Resource": [
                "arn:aws:s3:::${s3_bucket_name}/*",
                "arn:aws:s3:::${s3_bucket_name}"
            ]
        }
    ]
}
  • Identity store permissions:
{
    "Version": "2012-10-17",
    "Statement": [
        {
            "Sid": "VisualEditor0",
            "Effect": "Allow",
            "Action": "identitystore:*",
            "Resource": [
                "arn:aws:identitystore:::group/*",
                "arn:aws:identitystore:::user/*",
                "arn:aws:identitystore::${account_id}:identitystore/${identity_store_id}",
                "arn:aws:identitystore:::membership/*"
            ]
        },
        {
            "Sid": "VisualEditor1",
            "Effect": "Allow",
            "Action": "identitystore:*",
            "Resource": [
                "arn:aws:identitystore:::membership/*",
                "arn:aws:identitystore:::user/*",
                "arn:aws:identitystore:::group/*"
            ]
        }
    ]
}

Artifacts

Download the following utility artifacts from the GitHub repo:

  • idc_redshift_unload_indatabase_groups_roles_users.py – A Python script to unload users, groups, roles and their associations.
  • redshift_unload.ini – The config file used in the preceding script to read Redshift data warehouse details and Amazon S3 locations to unload the files.
  • idc_add_users_groups_roles_psets.py – A Python script to create users and groups in IAM Identity Center, and then associate the users to groups in IAM Identity Center.
  • idc_config.ini – The config file used in the preceding script to read IAM Identity Center details.
  • vw_local_ugr_to_idc_urgr_priv.sql – A script that generates SQL statements that perform two tasks in Amazon Redshift:
    • Create roles that exactly match your IAM Identity Center group names, adding a specified prefix.
    • Grant appropriate permissions to these newly created Redshift roles.

Testing scenario

This test case is designed to offer practical experience and familiarize you with the utility’s functionality. The scenario is structured around a hierarchical nested roles system, starting with object-level permissions assigned to technical roles. These technical roles are then allocated to business roles. Finally, business roles are granted to individual users. To enhance the testing environment, the scenario also incorporates a user group.The following diagram illustrates this hierarchy.

Create datasets

Set up two separate schemas (tickit and tpcds) in a Redshift database using the create schema command. Then, create and populate a few tables in each schema using the tickit and tpcds sample datasets.

Specify the appropriate IAM role Amazon Resource Name (ARN) in the copy commands if necessary.

Create users

Create users with the following code:

-- ETL users
create user etl_user_1 password 'EtlUser1!';
create user etl_user_2 password 'EtlUser2!';
create user etl_user_3 password 'EtlUser3!';

-- Reporting users
create user reporting_user_1 password 'ReportingUser1!';
create user reporting_user_2 password 'ReportingUser2!';
create user reporting_user_3 password 'ReportingUser3!';

-- Adhoc users
create user adhoc_user_1 password 'AdhocUser1!';
create user adhoc_user_2 password 'AdhocUser2!';

-- Analyst users
create user analyst_user_1 password 'AnalystUser1!';

Create business roles

Create business users with the following code:

-- ETL business roles
create role role_bn_etl_tickit;
create role role_bn_etl_tpcds;

-- Reporting business roles
create role role_bn_reporting_tickit;
create role role_bn_reporting_tpcds;

-- Analyst business roles
create role role_bn_analyst_tickit;

Create technical roles

Create technical roles with the following code:

-- Technical roles for tickit schema
create role role_tn_sel_tickit;
create role role_tn_dml_tickit;
create role role_tn_cte_tickit;

-- Technical roles for tpcds schema
create role role_tn_sel_tpcds;
create role role_tn_dml_tpcds;
create role role_tn_cte_tpcds;

Create groups

Create groups with the following code:

-- Adhoc users group
create group group_adhoc;

Grant rights to technical roles

To grant rights to the technical roles, use the following code:

-- role_tn_sel_tickit
grant usage on schema tickit to role role_tn_sel_tickit;
grant select on all tables in schema tickit to role role_tn_sel_tickit;

-- role_tn_dml_tickit
grant usage on schema tickit to role role_tn_dml_tickit;
grant insert, update, delete on all tables in schema tickit to role role_tn_dml_tickit;

-- role_tn_cte_tickit
grant usage, create on schema tickit to role role_tn_cte_tickit;
grant drop on all tables in schema tickit to role role_tn_cte_tickit;

-- role_tn_sel_tpcds
grant usage on schema tpcds to role role_tn_sel_tpcds;
grant select on all tables in schema tpcds to role role_tn_sel_tpcds;

-- role_tn_dml_tpcds
grant usage on schema tpcds to role role_tn_dml_tpcds;
grant insert, update, delete on all tables in schema tpcds to role role_tn_dml_tpcds;

-- role_tn_cte_tpcds
grant usage, create on schema tpcds to role role_tn_cte_tpcds;
grant drop on all tables in schema tpcds to role role_tn_cte_tpcds;

Grant technical roles to business roles

To grant the technical roles to the business roles, use the following code:

-- Business role role_bn_etl_tickit
grant role role_tn_sel_tickit to role role_bn_etl_tickit;
grant role role_tn_dml_tickit to role role_bn_etl_tickit;
grant role role_tn_cte_tickit to role role_bn_etl_tickit;

-- Business role role_bn_etl_tpcds
grant role role_tn_sel_tpcds to role role_bn_etl_tpcds;
grant role role_tn_dml_tpcds to role role_bn_etl_tpcds;
grant role role_tn_cte_tpcds to role role_bn_etl_tpcds;

-- Business role role_bn_reporting_tickit
grant role role_tn_sel_tickit to role role_bn_reporting_tickit;

-- Business role role_bn_reporting_tpcds
grant role role_tn_sel_tpcds to role role_bn_reporting_tpcds;

-- Business role role_bn_analyst_tickit
grant role role_tn_sel_tickit to role role_bn_analyst_tickit;

Grant business roles to users

To grant the business roles to users, use the following code:

-- etl_user_1
grant role role_bn_etl_tickit to etl_user_1;

-- etl_user_2
grant role role_bn_etl_tpcds to etl_user_2;

-- etl_user_3
grant role role_bn_etl_tickit to etl_user_3;
grant role role_bn_etl_tpcds to etl_user_3;

-- reporting_user_1
grant role role_bn_reporting_tickit to reporting_user_1;

-- reporting_user_2
grant role role_bn_reporting_tpcds to reporting_user_2;

-- reporting_user_3
grant role role_bn_reporting_tickit to reporting_user_3;
grant role role_bn_reporting_tpcds to reporting_user_3;

-- analyst_user_1
grant role role_bn_analyst_tickit to analyst_user_1;

Grant rights to groups

To grant rights to the groups, use the following code:

-- Group group_adhoc
grant usage on schema tickit to group group_adhoc;
grant select on all tables in schema tickit to group group_adhoc;

grant usage on schema tpcds to group group_adhoc;
grant select on all tables in schema tpcds to group group_adhoc;

Add users to groups

To add users to the groups, use the following code:

alter group group_adhoc add user adhoc_user_1;
alter group group_adhoc add user adhoc_user_2;

Deploy the solution

Complete the following steps to deploy the solution:

  1. Update Redshift cluster or serverless endpoint details and Amazon S3 location in redshift_unload.ini:
    • cluster_type = provisioned or serverless
    • cluster_id = ${cluster_identifier} (required if cluster_type is provisioned)
    • db_user = ${database_user}
    • db_name = ${database_name}
    • host = ${host_url} (required if cluster_type is provisioned)
    • port = ${port_number}
    • workgroup_name = ${workgroup_name} (required if cluster_type is serverless)
    • region = ${region}
    • s3_bucket = ${S3_bucket_name}
    • roles = roles.csv
    • users = users.csv
    • role_memberships = role_memberships.csv
  2. Update IAM Identity Center details in idc_config.ini:
    • region = ${region}
    • account_id = ${account_id}
    • identity_store_id = ${identity_store_id} (available on the IAM Identity Center console Settings page)
    • instance_arn = ${iam_identity_center_instance_arn} (available on the IAM Identity Center console Settings page)
    • permission_set_arn = ${permission_set_arn}
    • assign_permission_set = True or False (True if permission_set_arn is defined)
    • s3_bucket = ${S3_bucket_name}
    • users_file = users.csv
    • roles_file = roles.csv
    • role_memberships_file = role_memberships.csv
  3. Create a directory in CloudShell or on your own EC2 instance with connectivity to Amazon Redshift.
  4. Copy the two .ini files and download the Python scripts to that directory.
  5. Run idc_redshift_unload_indatabase_groups_roles_users.py either from CloudShell or your EC2 instance:python idc_redshift_unload_indatabase_groups_roles_users.py
  6. Run idc_add_users_groups_roles_psets.py either from CloudShell or your EC2 instance:python idc_add_users_groups_roles_psets.py
  7. Connect your Redshift cluster using the Amazon Redshift query editor v2 or preferred SQL client, using superuser credentials.
  8. Copy the SQL in the vw_local_ugr_to_idc_urgr_priv.sql file and run it in the query editor to create the vw_local_ugr_to_idc_urgr_priv view.
  9. Run following SQL command to generate the SQL statements for creating roles and permissions:
    select existing_grants,idc_based_grants from vw_local_ugr_to_idc_urgr_priv;

    For example, consider the following existing grants:

    CREATE GROUP "group_adhoc";
    CREATE ROLE "role_bn_etl_tickit";
    GRANT USAGE ON SCHEMA tpcds TO role "role_tn_sel_tpcds" ;

    These grants are converted to the following code:

    CREATE role "AWSIDC:group_adhoc";
    CREATE role "AWSIDC:role_bn_etl_tickit";
    GRANT USAGE ON SCHEMA tpcds TO role "AWSIDC:role_tn_sel_tpcds";

  10. Review the statements in the idc_based_grants column.
    This might not be a comprehensive list of permissions, so review them carefully.
  11. If everything is correct, run the statements from the SQL client.

When you have completed the process, you should have the following configuration:

  • IAM Identity Center now contains newly created users from Amazon Redshift
  • The Redshift local groups and roles are created as groups in IAM Identity Center
  • New roles are established in Amazon Redshift, corresponding to the groups created in IAM Identity Center
  • The newly created Redshift roles are assigned appropriate permissions

If you encounter an issue while connecting to Amazon Redshift with the query editor using IAM Identity Center, refer to Troubleshooting connections from Amazon Redshift query editor v2.

Considerations

Consider the following when using this solution:

  • At the time of writing, creating permissions in AWS Lake Formation is not in scope.
  • IAM Identity Center and IdP integration setup is out of scope for this utility. However, you can use the view vw_local_ugr_to_idc_urgr_priv.sqlto create roles and grant permissions to the IdP users and groups passed through IAM Identity Center.
  • If you have permissions given directly to local user IDs (not using groups or roles), you must change that to a role-based permission approach for IAM Identity Center integration. Create roles and provide permissions using roles instead of directly giving permissions to users.

Clean up

If you have completed the testing scenario, clean up your environment:

  1. Remove the new Redshift roles that were created by the utility, corresponding to the groups established in IAM Identity Center.
  2. Delete the users and groups created by the utility within IAM Identity Center.
  3. Delete the users, groups, and roles specified in the testing scenario.
  4. Drop the tickit and tpcds schemas.

You can use the FORCE parameter when dropping the roles to remove associated assignments.

Conclusion

In this post, we showed how to migrate your Redshift local user management to IAM Identity Center. This transition offers several key advantages for your organization, such as simplified access management through centralized user and group administration, a streamlined user experience across AWS services, and reduced administrative overhead. You can implement this migration process step by step, so you can test and validate each step before fully transitioning your production environment.

As organizations continue to scale their AWS infrastructure, using IAM Identity Center becomes increasingly valuable for maintaining secure and efficient access management, including Amazon SageMaker Unified Studio for an integrated experience for all your data and AI.


About the authors

Ziad Wali

Ziad Wali

Ziad is an Analytics Specialist Solutions Architect at AWS. He has over 10 years of experience in databases and data warehousing, where he enjoys building reliable, scalable, and efficient solutions. Outside of work, he enjoys sports and spending time in nature.

Satesh Sonti

Satesh Sonti

Satesh is a Sr. Analytics Specialist Solutions Architect based out of Atlanta, specializing in building enterprise data platforms, data warehousing, and analytics solutions. He has over 19 years of experience in building data assets and leading complex data platform programs for banking and insurance clients across the globe.

Maneesh Sharma

Maneesh Sharma

Maneesh is a Senior Database Engineer at AWS with more than a decade of experience designing and implementing large-scale data warehouse and analytics solutions. He collaborates with various Amazon Redshift Partners and customers to drive better integration.

Sumanth Punyamurthula

Sumanth Punyamurthula

Sumanth is a Senior Data and Analytics Architect at AWS with more than 20 years of experience in leading large analytical initiatives, including analytics, data warehouse, data lakes, data governance, security, and cloud infrastructure across travel, hospitality, financial, and healthcare industries.

Successfully conduct a proof of concept in Amazon Redshift

Post Syndicated from Ziad Wali original https://aws.amazon.com/blogs/big-data/successfully-conduct-a-proof-of-concept-in-amazon-redshift/

Amazon Redshift is a fast, scalable, and fully managed cloud data warehouse that allows you to process and run your complex SQL analytics workloads on structured and semi-structured data. It also helps you securely access your data in operational databases, data lakes, or third-party datasets with minimal movement or copying of data. Tens of thousands of customers use Amazon Redshift to process large amounts of data, modernize their data analytics workloads, and provide insights for their business users.

In this post, we discuss how to successfully conduct a proof of concept in Amazon Redshift by going through the main stages of the process, available tools that accelerate implementation, and common use cases.

Proof of concept overview

A proof of concept (POC) is a process that uses representative data to validate whether a technology or service fulfills a customer’s technical and business requirements. By testing the solution against key metrics, a POC provides insights that allow you to make an informed decision on the suitability of the technology for the intended use case.

There are three major POC validation areas:

  • Workload – Take a representative portion of an existing workload and test it on Amazon Redshift, such as an extract, transform, and load (ETL) process, reporting, or management
  • Capability – Demonstrate how a specific Amazon Redshift feature, such as zero-ETL integration with Amazon Redshift, data sharing, or Amazon Redshift Spectrum, can simplify or enhance your overall architecture
  • Architecture – Understand how Amazon Redshift fits into a new or existing architecture along with other AWS services and tools

A POC is not:

  • Planning and implementing a large-scale migration
  • User-facing deployments, such as deploying a configuration for user testing and validation over extended periods (this is more of a pilot)
  • End-to-end implementation of a use case (this is more of a prototype)

Proof of concept process

For a POC to be successful, it is recommended to follow and apply a well-defined and structured process. For a POC on Amazon Redshift, we recommend a three-phase process of discovery, implementation, and evaluation.

Discovery phase

The discovery phase is considered the most essential among the three phases and the longest. It defines through multiple sessions the scope of the POC and the list of tasks that need to be completed and later evaluated. The scope should contain inputs and data points on the current architecture as well as the target architecture. The following items need to be defined and documented to have a defined scope for the POC:

  • Current state architecture and its challenges
  • Business goals and the success criteria of the POC (such as cost, performance, and security) along with their associated priorities
  • Evaluation criteria that will be used to evaluate and interpret the success criteria, such as service-level agreements (SLAs)
  • Target architecture (the communication between the services and tools that will be used during the implementation of the POC)
  • Dataset and the list of tables and schemas

After the scope has been clearly defined, you should proceed with defining and planning the list of tasks that need to be run during the next phase in order to implement the scope. Also, depending on the technical familiarity with the latest developments in Amazon Redshift, a technical enablement session on Amazon Redshift is also highly recommended before starting the implementation phase.

Optionally, a responsibility assignment matrix (RAM) is recommended, especially in large POCs.

Implementation phase

The implementation phase takes the output of the previous phase as input. It consists of the following steps:

  1. Set up the environment by respecting the defined POC architecture.
  2. Complete the implementation tasks such as data ingestion and performance testing.
  3. Collect data metrics and statistics on the completed tasks.
  4. Analyze the data and then optimize as necessary.

Evaluation phase

The evaluation phase is the POC assessment and the final step of the process. It aggregates the implementation results of the preceding phase, interprets them, and evaluates the success criteria described in the discovery phase.

It is recommended to use percentiles instead of averages whenever possible for a better interpretation.

Challenges

In this section, we discuss the major challenges that you may encounter while planning your POC.

Scope

You may face challenges during the discovery phase while defining the scope of the POC, especially in complex environments. You should focus on the crucial requirements and prioritized success criteria that need to be evaluated so you avoid ending up with a small migration project instead of a POC. In terms of technical content (such as data structures, transformation jobs, and reporting queries), make sure to identify and consider as little as possible of the content that will still provide you with all the necessary information at the end of the implementation phase in order to assess the defined success criteria. Additionally, document any assumptions you are making.

Time

A time period should be defined for any POC project to ensure it stays focused and achieves clear results. Without an established time frame, scope creep can occur as requirements shift and unnecessary features get added. This may lead to misleading evaluations about the technology or concept being tested. The duration set for the POC depends on factors like workload complexity and resource availability. If a period such as 3 weeks has been committed to already without accounting for these considerations, the scope and planned content should be scaled to feasibly fit that fixed time period.

Cost

Cloud services operate on a pay-as-you-go model, and estimating costs accurately can be challenging during a POC. Overspending or underestimating resource requirements can impact budget allocations. It’s important to carefully estimate the initial sizing of the Redshift cluster, monitor resource usage closely, and consider setting service limits along with AWS Budget alerts to avoid unexpected expenditures.

Technical

The team running the POC has to be ready for initial technical challenges, especially during environment setup, data ingestion, and performance testing. Each data warehouse technology has its own design and architecture, which sometimes requires some initial tuning at the data structure or query level. This is an expected challenge that needs to be considered in the implementation phase timeline. Having a technical enablement session beforehand can alleviate such hurdles.

Amazon Redshift POC tools and features

In this section, we discuss tools that you can adapt based on the specific requirements and nature of the POC being conducted. It’s essential to choose tools that align with the scope and technologies involved.

AWS Analytics Automation Toolkit

The AWS Analytics Automation Toolkit enables automatic provisioning and integration of not only Amazon Redshift, but database migration services like AWS Database Migration Service (AWS DMS), AWS Schema Conversion Tool (AWS SCT), and Apache JMeter. This toolkit is essential in most POCs because it automates the provisioning of infrastructure and setup of the necessary environment.

AWS SCT

The AWS SCT makes heterogeneous database migrations predictable, secure, and fast by automatically converting the majority of the database code and storage objects to a format that is compatible with the target database. Any objects that can’t be automatically converted are clearly marked so that they can be manually converted to complete the migration.

In the context of a POC, the AWS SCT becomes crucial by streamlining and enhancing the efficiency of the schema conversion process from one database system to another. Given the time-sensitive nature of POCs, the AWS SCT automates the conversion process, facilitating planning, and estimation of time and efforts. Additionally, the AWS SCT plays a role in identifying potential compatibility issues, data mapping challenges, or other hurdles at an early stage of the process.

Furthermore, the database migration assessment report summarizes all the action items for schemas that can’t be converted automatically to your target database. Getting started with AWS SCT is a straightforward process. Also, consider following the best practices for AWS SCT.

Amazon Redshift auto-copy

The Amazon Redshift auto-copy (preview) feature can automate data ingestion from Amazon Simple Storage Service (Amazon S3) to Amazon Redshift with a simple SQL command. COPY statements are invoked and start loading data when Amazon Redshift auto-copy detects new files in the specified S3 prefixes. This also makes sure that end-users have the latest data available in Amazon Redshift shortly after the source files are available.

You can use this feature for the purpose of data ingestion throughout the POC. To learn more about ingesting from files located in Amazon S3 using a SQL command, refer to Simplify data ingestion from Amazon S3 to Amazon Redshift using auto-copy (preview). The post also shows you how to enable auto-copy using COPY jobs, how to monitor jobs, and considerations and best practices.

Redshift Auto Loader

The custom Redshift Auto Loader framework automatically creates schemas and tables in the target database and continuously loads data from Amazon S3 to Amazon Redshift. You can use this during the data ingestion phase of the POC. Deploying and setting up the Redshift Auto Loader framework to transfer files from Amazon S3 to Amazon Redshift is a straightforward process.

For more information, refer to Migrate from Google BigQuery to Amazon Redshift using AWS Glue and Custom Auto Loader Framework.

Apache JMeter

Apache JMeter is an open-source load testing application written in Java that you can use to load test web applications, backend server applications, databases, and more. In a database context, it’s an extremely valuable tool for repeating benchmark tests in a consistent manner, simulating concurrency workloads, and scalability testing on different database configurations.

When implementing your POC, benchmarking Amazon Redshift is often one of the main components of evaluation and a key source of insight into the price-performance of different Amazon Redshift configurations. With Apache JMeter, you can construct high-quality benchmark tests for Amazon Redshift.

Workload Replicator

If you are currently using Amazon Redshift and looking to replicate your existing production workload or isolate specific workloads in a POC, you can use the Workload Replicator to run them across different configurations of Redshift clusters (ra3.xlplus, ra3.4xl,ra3.16xl, serverless) for performance evaluation and comparison.

This utility has the ability to mimic COPY and UNLOAD workloads and can run the transactions and queries in the same time interval as they’re run in the production cluster. However, it’s crucial to assess the limitations of the utility and AWS Identity and Access Management (IAM) security and compliance requirements.

Node Configuration Comparison utility

If you’re using Amazon Redshift and have stringent SLAs for query performance in your Amazon Redshift cluster, or you want to explore different Amazon Redshift configurations based on the price-performance of your workload, you can use the Amazon Redshift Node Configuration Comparison utility.

This utility helps evaluate performance of your queries using different Redshift cluster configurations in parallel and compares the end results to find the best cluster configuration that meets your need. Similarly, If you’re already using Amazon Redshift and want to migrate from your existing DC2 or DS2 instances to RA3, you can refer to our recommendations on node count and type when upgrading. Before doing that, you can use this utility in your POC to evaluate the new cluster’s performance by replaying your past workloads, which integrates with the Workload Replicator utility to evaluate performance metrics for different Amazon Redshift configurations to meet your needs.

This utility functions in a fully automated manner and has similar limitations as the workload replicator. However, it requires full permissions across various services for the user running the AWS CloudFormation stack.

Use cases

You have the opportunity to explore various functionalities and aspects of Amazon Redshift by defining and selecting a business use case you want to validate during the POC. In this section, we discuss some specific use cases you can explore using a POC.

Functionality evaluation

Amazon Redshift consists of a set of functionalities and options that simplify data pipelines and effortlessly integrate with other services. You can use a POC to test and evaluate one or more of those capabilities before refactoring your data pipeline and implementing them in your ecosystem. Functionalities could be existing features or new ones such as zero-ETL integration, streaming ingestion, federated queries, or machine learning.

Workload isolation

You can use the data sharing feature of Amazon Redshift to achieve workload isolation across diverse analytics use cases and achieve business-critical SLAs without duplicating or moving the data.

Amazon Redshift data sharing enables a producer cluster to share data objects with one or more consumer clusters, thereby eliminating data duplication. This facilitates collaboration across isolated clusters, allowing data to be shared for innovation and analytic services. Sharing can occur at various levels such as databases, schemas, tables, views, columns, and user-defined functions, offering fine-grained access control. It is recommended to use Workload Replicator for performance evaluation and comparison in a workload isolation POC.

The following sample architectures explain workload isolation using data sharing. The first diagram illustrates the architecture before using data sharing.

The following diagram illustrates the architecture with data sharing.

Migrating to Amazon Redshift

If you’re interested in migrating from your existing data warehouse platform to Amazon Redshift, you can try out Amazon Redshift by developing a POC on a selected business use case. In this type of POC, it is recommended to use the AWS Analytics Automation Toolkit for setting up the environment, auto-copy or Redshift Auto Loader for data ingestion, and AWS SCT for schema conversion. When the development is complete, you can perform performance testing using Apache JMeter, which provides data points to measure price-performance and compare results with your existing platform. The following diagram illustrates this process.

Moving to Amazon Redshift Serverless

You can migrate your unpredictable and variable workloads to Amazon Redshift Serverless, which enables you to scale as and when needed and pay as per usage, making your infrastructure scalable and cost-efficient. If you’re migrating your full workload from provisioned (DC2, RA3) to serverless, you can use the Node Configuration Comparison utility for performance evaluation. The following diagram illustrates this workflow.

Conclusion

In a competitive environment, conducting a successful proof of concept is a strategic imperative for businesses aiming to validate the feasibility and effectiveness of new solutions. Amazon Redshift provides you with better price-performance compared to other cloud-centered data warehouses, and a large list of features that help you modernize and optimize your data pipelines. For more details, see Amazon Redshift continues its price-performance leadership.

With the process discussed in this post and by choosing the tools needed for your specific use case, you can accelerate the process of conducting a POC. This allows you to collect the data metrics that can help you understand the potential challenges, benefits, and implications of implementing the proposed solution on a larger scale. A POC provides essential data points that evaluate price-performance as well as feasibility, which plays a vital role in decision-making.


About the Authors

Ziad WALI is an Acceleration Lab Solutions Architect at Amazon Web Services. He has over 10 years of experience in databases and data warehousing, where he enjoys building reliable, scalable, and efficient solutions. Outside of work, he enjoys sports and spending time in nature.

Omama Khurshid is an Acceleration Lab Solutions Architect at Amazon Web Services. She focuses on helping customers across various industries build reliable, scalable, and efficient solutions. Outside of work, she enjoys spending time with her family, watching movies, listening to music, and learning new technologies.

Srikant Das is an Acceleration Lab Solutions Architect at Amazon Web Services. His expertise lies in constructing robust, scalable, and efficient solutions. Beyond the professional sphere, he finds joy in travel and shares his experiences through insightful blogging on social media platforms.

Build an ETL process for Amazon Redshift using Amazon S3 Event Notifications and AWS Step Functions

Post Syndicated from Ziad Wali original https://aws.amazon.com/blogs/big-data/build-an-etl-process-for-amazon-redshift-using-amazon-s3-event-notifications-and-aws-step-functions/

Data warehousing provides a business with several benefits such as advanced business intelligence and data consistency. It plays a big role within an organization by helping to make the right strategic decision at the right moment which could have a huge impact in a competitive market. One of the major and essential parts in a data warehouse is the extract, transform, and load (ETL) process which extracts the data from different sources, applies business rules and aggregations and then makes the transformed data available for the business users.

This process is always evolving to reflect new business and technical requirements, especially when working in an ambitious market. Nowadays, more verification steps are applied to source data before processing them which so often add an administration overhead. Hence, automatic notifications are more often required in order to accelerate data ingestion, facilitate monitoring and provide accurate tracking about the process.

Amazon Redshift is a fast, fully managed, cloud data warehouse that allows you to process and run your complex SQL analytics workloads on structured and semi-structured data. It also helps you to securely access your data in operational databases, data lakes or third-party datasets with minimal movement or copying. AWS Step Functions is a fully managed service that gives you the ability to orchestrate and coordinate service components. Amazon S3 Event Notifications is an Amazon S3 feature that you can enable in order to receive notifications when specific events occur in your S3 bucket.

In this post we discuss how we can build and orchestrate in a few steps an ETL process for Amazon Redshift using Amazon S3 Event Notifications for automatic verification of source data upon arrival and notification in specific cases. And we show how to use AWS Step Functions for the orchestration of the data pipeline. It can be considered as a starting point for teams within organizations willing to create and build an event driven data pipeline from data source to data warehouse that will help in tracking each phase and in responding to failures quickly. Alternatively, you can also use Amazon Redshift auto-copy from Amazon S3 to simplify data loading from Amazon S3 into Amazon Redshift.

Solution overview

The workflow is composed of the following steps:

  1. A Lambda function is triggered by an S3 event whenever a source file arrives at the S3 bucket. It does the necessary verifications and then classifies the file before processing by sending it to the appropriate Amazon S3 prefix (accepted or rejected).
  2. There are two possibilities:
    • If the file is moved to the rejected Amazon S3 prefix, an Amazon S3 event sends a message to Amazon SNS for further notification.
    • If the file is moved to the accepted Amazon S3 prefix, an Amazon S3 event is triggered and sends a message with the file path to Amazon SQS.
  3. An Amazon EventBridge scheduled event triggers the AWS Step Functions workflow.
  4. The workflow executes a Lambda function that pulls out the messages from the Amazon SQS queue and generates a manifest file for the COPY command.
  5. Once the manifest file is generated, the workflow starts the ETL process using stored procedure.

The following image shows the workflow.

Prerequisites

Before configuring the previous solution, you can use the following AWS CloudFormation template to set up and create the infrastructure

  • Give the stack a name, select a deployment VPC and define the master user for the Amazon Redshift cluster by filling in the two parameters MasterUserName and MasterUserPassword.

The template will create the following services:

  • An S3 bucket
  • An Amazon Redshift cluster composed of two ra3.xlplus nodes
  • An empty AWS Step Functions workflow
  • An Amazon SQS queue
  • An Amazon SNS topic
  • An Amazon EventBridge scheduled rule with a 5-minute rate
  • Two empty AWS Lambda functions
  • IAM roles and policies for the services to communicate with each other

The names of the created services are usually prefixed by the stack’s name or the word blogdemo. You can find the names of the created services in the stack’s resources tab.

Step 1: Configure Amazon S3 Event Notifications

Create the following four folders in the S3 bucket:

  • received
  • rejected
  • accepted
  • manifest

In this scenario, we will create the following three Amazon S3 event notifications:

  1. Trigger an AWS Lambda function on the received folder.
  2. Send a message to the Amazon SNS topic on the rejected folder.
  3. Send a message to Amazon SQS on the accepted folder.

To create an Amazon S3 event notification:

  1. Go to the bucket’s Properties tab.
  2. In the Event Notifications section, select Create Event Notification.
  3. Fill in the necessary properties:
    • Give the event a name.
    • Specify the appropriate prefix or folder (accepted/, rejected/ or received/).
    • Select All object create events as an event type.
    • Select and choose the destination (AWS lambda, Amazon SNS or Amazon SQS).
      Note: for an AWS Lambda destination, choose the function that starts with ${stackname}-blogdemoVerify_%

At the end, you should have three Amazon S3 events:

  • An event for the received prefix with an AWS Lambda function as a destination type.
  • An event for the accepted prefix with an Amazon SQS queue as a destination type.
  • An event for the rejected prefix with an Amazon SNS topic as a destination type.

The following image shows what you should have after creating the three Amazon S3 events:

Step 2: Create objects in Amazon Redshift

Connect to the Amazon Redshift cluster and create the following objects:

  1. Three schemas:
    create schema blogdemo_staging; -- for staging tables
    create schema blogdemo_core; -- for target tables
    create schema blogdemo_proc; -- for stored procedures

  2. A table in the blogdemo_staging and blogdemo_core schemas:
    create table ${schemaname}.rideshare
    (
      id_ride bigint not null,
      date_ride timestamp not null,
      country varchar (20),
      city varchar (20),
      distance_km smallint,
      price decimal (5,2),
      feedback varchar (10)
    ) distkey(id_ride);

  3. A stored procedure to extract and load data into the target schema:
    create or replace procedure blogdemo_proc.elt_rideshare (bucketname in varchar(200),manifestfile in varchar (500))
    as $$
    begin
    -- purge staging table
    truncate blogdemo_staging.rideshare;
    
    -- copy data from s3 bucket to staging schema
    execute 'copy blogdemo_staging.rideshare from ''s3://' + bucketname + '/' + manifestfile + ''' iam_role default delimiter ''|'' manifest;';
    
    -- apply transformation rules here
    
    -- insert data into target table
    insert into blogdemo_core.rideshare
    select * from blogdemo_staging.rideshare;
    
    end;
    $$ language plpgsql;

  4. Set the role ${stackname}-blogdemoRoleRedshift_% as a default role:
    1. In the Amazon Redshift console, go to clusters and click on the cluster blogdemoRedshift%.
    2. Go to the Properties tab.
    3. In the Cluster permissions section, select the role ${stackname}-blogdemoRoleRedshift%.
    4. Click on Set default then Make default.

Step 3: Configure Amazon SQS queue

The Amazon SQS queue can be used as it is; this means with the default values. The only thing you need to do for this demo is to go to the created queue ${stackname}-blogdemoSQS% and purge the test messages generated (if any) by the Amazon S3 event configuration. Copy its URL in a text file for further use (more precisely, in one of the AWS Lambda functions).

Step 4: Setup Amazon SNS topic

  1. In the Amazon SNS console, go to the topic ${stackname}-blogdemoSNS%
  2. Click on the Create subscription button.
  3. Choose the blogdemo topic ARN, email protocol, type your email and then click on Create subscription.
  4. Confirm your subscription in your email that you received.

Step 5: Customize the AWS Lambda functions

  1. The following code verifies the name of a file. If it respects the naming convention, it will move it to the accepted folder. If it does not respect the naming convention, it will move it to the rejected one. Copy it to the AWS Lambda function ${stackname}-blogdemoLambdaVerify and then deploy it:
    import boto3
    import re
    
    def lambda_handler (event, context):
        objectname = event['Records'][0]['s3']['object']['key']
        bucketname = event['Records'][0]['s3']['bucket']['name']
        
        result = re.match('received/rideshare_data_20[0-5][0-9]((0[1-9])|(1[0-2]))([0-2][1-9]|3[0-1])\.csv',objectname)
        targetfolder = ''
        
        if result: targetfolder = 'accepted'
        else: targetfolder = 'rejected'
        
        s3 = boto3.resource('s3')
        copy_source = {
            'Bucket': bucketname,
            'Key': objectname
        }
        target_objectname=objectname.replace('received',targetfolder)
        s3.meta.client.copy(copy_source, bucketname, target_objectname)
        
        s3.Object(bucketname,objectname).delete()
        
        return {'Result': targetfolder}

  2. The second AWS Lambda function ${stackname}-blogdemonLambdaGenerate% retrieves the messages from the Amazon SQS queue and generates and stores a manifest file in the S3 bucket manifest folder. Copy the following content, replace the variable ${sqs_url} by the value retrieved in Step 3 and then click on Deploy.
    import boto3
    import json
    import datetime
    
    def lambda_handler(event, context):
    
        sqs_client = boto3.client('sqs')
        queue_url='${sqs_url}'
        bucketname=''
        keypath='none'
        
        manifest_content='{\n\t"entries": ['
        
        while True:
            response = sqs_client.receive_message(
                QueueUrl=queue_url,
                AttributeNames=['All'],
                MaxNumberOfMessages=1
            )
            try:
                message = response['Messages'][0]
            except KeyError:
                break
            
            message_body=message['Body']
            message_data = json.loads(message_body)
            
            objectname = message_data['Records'][0]['s3']['object']['key']
            bucketname = message_data['Records'][0]['s3']['bucket']['name']
    
            manifest_content = manifest_content + '\n\t\t{"url":"s3://' +bucketname + '/' + objectname + '","mandatory":true},'
            receipt_handle = message['ReceiptHandle']
    
            sqs_client.delete_message(
                QueueUrl=queue_url,
                ReceiptHandle=receipt_handle
            )
            
        if bucketname != '':
            manifest_content=manifest_content[:-1]+'\n\t]\n}'
            s3 = boto3.resource("s3")
            encoded_manifest_content=manifest_content.encode('utf-8')
            current_datetime=datetime.datetime.now()
            keypath='manifest/files_list_'+current_datetime.strftime("%Y%m%d-%H%M%S")+'.manifest'
            s3.Bucket(bucketname).put_object(Key=keypath, Body=encoded_manifest_content)
    
        sf_tasktoken = event['TaskToken']
        
        step_function_client = boto3.client('stepfunctions')
        step_function_client.send_task_success(taskToken=sf_tasktoken,output='{"manifestfilepath":"' + keypath + '",\"bucketname":"' + bucketname +'"}')

Step 6: Add tasks to the AWS Step Functions workflow

Create the following workflow in the state machine ${stackname}-blogdemoStepFunctions%.

If you would like to accelerate this step, you can drag and drop the content of the following JSON file in the definition part when you click on Edit. Make sure to replace the three variables:

  • ${GenerateManifestFileFunctionName} by the ${stackname}-blogdemoLambdaGenerate% arn.
  • ${RedshiftClusterIdentifier} by the Amazon Redshift cluster identifier.
  • ${MasterUserName} by the username that you defined while deploying the CloudFormation template.

Step 7: Enable Amazon EventBridge rule

Enable the rule and add the AWS Step Functions workflow as a rule target:

  1. Go to the Amazon EventBridge console.
  2. Select the rule created by the Amazon CloudFormation template and click on Edit.
  3. Enable the rule and click Next.
  4. You can change the rate if you want. Then select Next.
  5. Add the AWS Step Functions state machine created by the CloudFormation template blogdemoStepFunctions% as a target and use an existing role created by the CloudFormation template ${stackname}-blogdemoRoleEventBridge%
  6. Click on Next and then Update rule.

Test the solution

In order to test the solution, the only thing you should do is upload some csv files in the received prefix of the S3 bucket. Here are some sample data; each file contains 1000 rows of rideshare data.

If you upload them in one click, you should receive an email because the ridesharedata2022.csv does not respect the naming convention. The other three files will be loaded in the target table blogdemo_core.rideshare. You can check the Step Functions workflow to verify that the process finished successfully.

Clean up

  1. Go to the Amazon EventBridge console and delete the rule ${stackname}-blogdemoevenbridge%.
  2. In the Amazon S3 console, select the bucket created by the CloudFormation template ${stackname}-blogdemobucket% and click on Empty.
  3. Go to Subscriptions in the Amazon SNS console and delete the subscription created in Step 4.
  4. In the AWS CloudFormation console, select the stack and delete it.

Conclusion

In this post, we showed how different AWS services can be easily implemented together in order to create an event-driven architecture and automate its data pipeline, which targets the cloud data warehouse Amazon Redshift for business intelligence applications and complex queries.


About the Author

Ziad WALI is an Acceleration Lab Solutions Architect at Amazon Web Services. He has over 10 years of experience in databases and data warehousing where he enjoys building reliable, scalable and efficient solutions. Outside of work, he enjoys sports and spending time in nature.