Tag Archives: ETL Pipelines

Modernize your ETL platform with AWS Glue Studio: A case study from BMS

Post Syndicated from Sivaprasad Mahamkali original https://aws.amazon.com/blogs/big-data/modernize-your-etl-platform-with-aws-glue-studio-a-case-study-from-bms/

This post is co-written with Ramesh Daddala, Jitendra Kumar Dash and Pavan Kumar Bijja from Bristol Myers Squibb.

Bristol Myers Squibb (BMS) is a global biopharmaceutical company whose mission is to discover, develop, and deliver innovative medicines that help patients prevail over serious diseases. BMS is consistently innovating, achieving significant clinical and regulatory successes. In collaboration with AWS, BMS identified a business need to migrate and modernize their custom extract, transform, and load (ETL) platform to a native AWS solution to reduce complexities, resources, and investment to upgrade when new Spark, Python, or AWS Glue versions are released. In addition to using native managed AWS services that BMS didn’t need to worry about upgrading, BMS was looking to offer an ETL service to non-technical business users that could visually compose data transformation workflows and seamlessly run them on the AWS Glue Apache Spark-based serverless data integration engine. AWS Glue Studio is a graphical interface that makes it easy to create, run, and monitor ETL jobs in AWS Glue. Offering this service reduced BMS’s operational maintenance and cost, and offered flexibility to business users to perform ETL jobs with ease.

For the past 5 years, BMS has used a custom framework called Enterprise Data Lake Services (EDLS) to create ETL jobs for business users. Although this framework met their ETL objectives, it was difficult to maintain and upgrade. BMS’s EDLS platform hosts over 5,000 jobs and is growing at 15% YoY (year over year). Each time the newer version of Apache Spark (and corresponding AWS Glue version) was released, it required significant operational support and time-consuming manual changes to upgrade existing ETL jobs. Manually upgrading, testing, and deploying over 5,000 jobs every few quarters was time consuming, error prone, costly, and not sustainable. Because another release for the EDLS framework was pending, BMS decided to assess alternate managed solutions to reduce their operational and upgrade challenges.

In this post, we share how BMS will modernize leveraging the success of the proof of concept targeting BMS’s ETL platform using AWS Glue Studio.

Solution overview

This solution addresses BMS’s EDLS requirements to overcome challenges using a custom-built ETL framework that required frequent maintenance and component upgrades (requiring extensive testing cycles), avoid complexity, and reduce the overall cost of the underlying infrastructure derived from the proof of concept. BMS had the following goals:

  • Develop ETL jobs using visual workflows provided by the AWS Glue Studio visual editor. The AWS Glue Studio visual editor is a low-code environment that allows you to compose data transformation workflows, seamlessly run them on the AWS Glue Apache Spark-based serverless data integration engine, and inspect the schema and data results in each step of the job.
  • Migrate over 5,000 existing ETL jobs using native AWS Glue Studio in an automated and scalable manner.

EDLS job steps and metadata

Every EDLS job comprises one or more job steps chained together and run in a predefined order orchestrated by the custom ETL framework. Each job step incorporates the following ETL functions:

  • File ingest – File ingestion enables you to ingest or list files from multiple file sources, like Amazon Simple Storage Service (Amazon S3), SFTP, and more. The metadata holds configurations for the file ingestion step to connect to Amazon S3 or SFTP endpoints and ingest files to target location. It retrieves the specified files and available metadata to show on the UI.
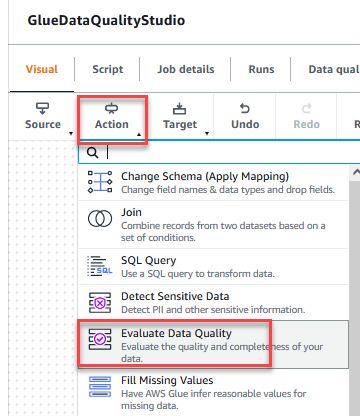
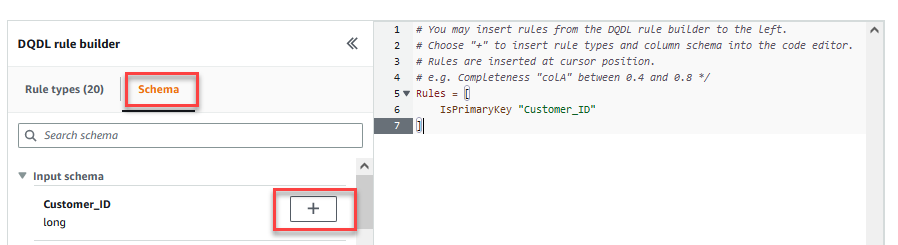
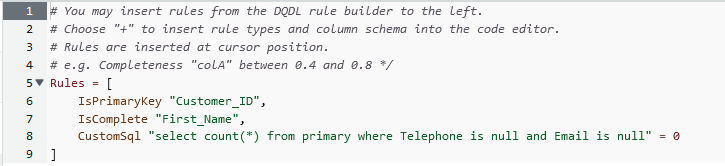
  • Data quality check – The data quality module enables you to perform quality checks on a huge amount of data and generate reports that describe and validate the data quality. The data quality step uses an EDLS ingested source object from Amazon S3 and runs one to many data conformance checks that are configured by the tenant.
  • Data transform join – This is one of the submodules of the data transform module that can perform joins between the datasets using a custom SQL based on the metadata configuration.
  • Database ingest – The database ingestion step is one of the important service components in EDLS, which facilitates you to obtain and import the desired data from the database and export it to a specific file in the location of your choice.
  • Data transform – The data transform module performs various data transformations against the source data using JSON-driven rules. Each data transform capability has its own JSON rule and, based on the specific JSON rule you provide, EDLS performs the data transformation on the files available in the Amazon S3 location.
  • Data persistence – The data persistence module is one of the important service components in EDLS, which enables you to obtain the desired data from the source and persist it to an Amazon Relational Database Service (Amazon RDS) database.

The metadata corresponding to each job step includes ingest sources, transformation rules, data quality checks, and data destinations stored in an RDS instance.

Migration utility

The solution involves building a Python utility that reads EDLS metadata from the RDS database and translating each of the job steps into an equivalent AWS Glue Studio visual editor JSON node representation.

AWS Glue Studio provides two types of transforms:

  • AWS Glue-native transforms – These are available to all users and are managed by AWS Glue.
  • Custom visual transforms – This new functionality allows you to upload custom-built transforms used in AWS Glue Studio. Custom visual transforms expand the managed transforms, enabling you to search and use transforms from the AWS Glue Studio interface.

The following is a high-level diagram depicting the sequence flow of migrating a BMS EDLS job to an AWS Glue Studio visual editor job.

Migrating BMS EDLS jobs to AWS Glue Studio includes the following steps:

  1. The Python utility reads existing metadata from the EDLS metadata database.
  2. For each job step type, based on the job metadata, the Python utility selects either the native AWS Glue transform, if available, or a custom-built visual transform (when the native functionality is missing).
  3. The Python utility parses the dependency information from metadata and builds a JSON object representing a visual workflow represented as a Directed Acyclic Graph (DAG).
  4. The JSON object is sent to the AWS Glue API, creating the AWS Glue ETL job. These jobs are visually represented in the AWS Glue Studio visual editor using a series of sources, transforms (native and custom), and targets.

Sample ETL job generation using AWS Glue Studio

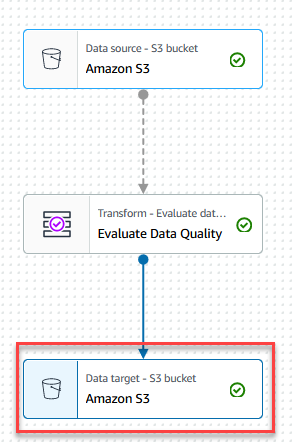
The following flow diagram depicts a sample ETL job that incrementally ingests the source RDBMS data in AWS Glue based on modified timestamps using a custom SQL and merges it into the target data on Amazon S3.

The preceding ETL flow can be represented using the AWS Glue Studio visual editor through a combination of native and custom visual transforms.

Custom visual transform for incremental ingestion

Post POC, BMS and AWS identified there will be a need to leverage custom transforms to execute a subset of jobs leveraging their current EDLS Service where Glue Studio functionality will not be a natural fit. The BMS team’s requirement was to ingest data from various databases without depending on the existence of transaction logs or specific schema, so AWS Database Migration Service (AWS DMS) wasn’t an option for them. AWS Glue Studio provides the native SQL query visual transform, where a custom SQL query can be used to transform the source data. However, in order to query the source database table based on a modified timestamp column to retrieve new and modified records since the last ETL run, the previous timestamp column state needs to be persisted so it can be used in the current ETL run. This needs to be a recurring process and can also be abstracted across various RDBMS sources, including Oracle, MySQL, Microsoft SQL Server, SAP Hana, and more.

AWS Glue provides a job bookmark feature to track the data that has already been processed during a previous ETL run. An AWS Glue job bookmark supports one or more columns as the bookmark keys to determine new and processed data, and it requires that the keys are sequentially increasing or decreasing without gaps. Although this works for many incremental load use cases, the requirement is to ingest data from different sources without depending on any specific schema, so we didn’t use an AWS Glue job bookmark in this use case.

The SQL-based incremental ingestion pull can be developed in a generic way using a custom visual transform using a sample incremental ingestion job from a MySQL database. The incremental data is merged into the target Amazon S3 location in Apache Hudi format using an upsert write operation.

In the following example, we’re using the MySQL data source node to define the connection but the DynamicFrame of the data source itself is not used. The custom transform node (DB incremental ingestion) will act as the source for reading the data incrementally using the custom SQL query and the previously persisted timestamp from the last ingestion.

The transform accepts as input parameters the preconfigured AWS Glue connection name, database type, table name, and custom SQL (parameterized timestamp field).

The following is the sample visual transform Python code:

import boto3
from awsglue import DynamicFrame
from datetime import datetime

region_name = "us-east-1"

dyna_client = boto3.client('dynamodb')
HISTORIC_DATE = datetime(1970,1,1).strftime("%Y-%m-%d %H:%M:%S")
DYNAMODB_TABLE = "edls_run_stats"

def db_incremental(self, transformation_node, con_name, con_type, table_name, sql_query):
    logger = self.glue_ctx.get_logger()

    last_updt_tmst = get_table_last_updt_tmst(logger, DYNAMODB_TABLE, transformation_node)

    logger.info(f"Last updated timestamp from the DynamoDB-> {last_updt_tmst}")

    sql_query = sql_query.format(**{"lastmdfdtmst": last_updt_tmst})

    connection_options_source = {
        "useConnectionProperties": "true",
        "connectionName": con_name,
        "dbtable": table_name,
        "sampleQuery": sql_query
    }

    df = self.glue_ctx.create_dynamic_frame.from_options(connection_type= con_type, connection_options= connection_options_source )
                                         
    return df

DynamicFrame.db_incremental = db_incremental

def get_table_last_updt_tmst(logger, table_name, transformation_node):
    response = dyna_client.get_item(TableName=table_name,
                                    Key={'transformation_node': {'S': transformation_node}}
                                    )
    if 'Item' in response and 'last_updt_tmst' in response['Item']:
        return response['Item']['last_updt_tmst']['S']
    else:
        return HISTORIC_DATE

To merge the source data into the Amazon S3 target, a data lake framework like Apache Hudi or Apache Iceberg can be used, which is natively supported in AWS Glue 3.0 and later.

You can also use Amazon EventBridge to detect the final AWS Glue job state change and update the Amazon DynamoDB table’s last ingested timestamp accordingly.

Build the AWS Glue Studio job using the AWS SDK for Python (Boto3) and AWS Glue API

For the sample ETL flow and the corresponding AWS Glue Studio ETL job we showed earlier, the underlying CodeGenConfigurationNode struct (an AWS Glue job definition pulled using the AWS Command Line Interface (AWS CLI) command aws glue get-job –job-name <jobname>) is represented as a JSON object, shown in the following code:

"CodeGenConfigurationNodes": {<br />"node-1679802581077": {<br />"DynamicTransform": {<br />"Name": "DB Incremental Ingestion",<br />"TransformName": "db_incremental",<br />"Inputs": [<br />"node-1679707801419"<br />],<br />"Parameters": [<br />{<br />"Name": "node_name",<br />"Type": "str",<br />"Value": [<br />"job_123_incr_ingst_table1"<br />],<br />"IsOptional": false<br />},<br />{<br />"Name": "jdbc_url",<br />"Type": "str",<br />"Value": [<br />"jdbc:mysql://database.xxxx.us-west-2.rds.amazonaws.com:3306/db_schema"<br />],<br />"IsOptional": false<br />},<br />{<br />"Name": "db_creds",<br />"Type": "str",<br />"Value": [<br />"creds"<br />],<br />"IsOptional": false<br />},<br />{<br />"Name": "table_name",<br />"Type": "str",<br />"Value": [<br />"tables"<br />],<br />"IsOptional": false<br />}<br />]<br />}<br />}<br />}<br />}

The JSON object (ETL job DAG) represented in the CodeGenConfigurationNode is generated through a series of native and custom transforms with the respective input parameter arrays. This can be accomplished using Python JSON encoders that serialize the class objects to JSON and subsequently create the AWS Glue Studio visual editor job using the Boto3 library and AWS Glue API.

Inputs required to configure the AWS Glue transforms are sourced from the EDLS jobs metadata database. The Python utility reads the metadata information, parses it, and configures the nodes automatically.

The order and sequencing of the nodes is sourced from the EDLS jobs metadata, with one node becoming the input to one or more downstream nodes building the DAG flow.

Benefits of the solution

The migration path will help BMS achieve their core objectives of decomposing their existing custom ETL framework to modular, visually configurable, less complex, and easily manageable pipelines using visual ETL components. The utility aids the migration of the legacy ETL pipelines to native AWS Glue Studio jobs in an automated and scalable manner.

With consistent out-of-the box visual ETL transforms in the AWS Glue Studio interface, BMS will be able to build sophisticated data pipelines without having to write code.

The custom visual transforms will extend AWS Glue Studio capabilities and fulfill some of the BMS ETL requirements where the native transforms are missing that functionality. Custom transforms will help define, reuse, and share business-specific ETL logic among all the teams. The solution increases the consistency between teams and keeps the ETL pipelines up to date by minimizing duplicate effort and code.

With minor modifications, the migration utility can be reused to automate migration of pipelines during future AWS Glue version upgrades.

Conclusion

The successful outcome of this proof of concept has shown that migrating over 5,000 jobs from BMS’s custom application to native AWS services can deliver significant productivity gains and cost savings. By moving to AWS, BMS will be able to reduce the effort required to support AWS Glue, improve DevOps delivery, and save an estimated 58% on AWS Glue spend.

These results are very promising, and BMS is excited to embark on the next phase of the migration. We believe that this project will have a positive impact on BMS’s business and help us achieve our strategic goals.


About the authors

Sivaprasad Mahamkali is a Senior Streaming Data Engineer at AWS Professional Services. Siva leads customer engagements related to real-time streaming solutions, data lakes, analytics using opensource and AWS services. Siva enjoys listening to music and loves to spend time with his family.

Dan Gibbar is a Senior Engagement Manager at AWS Professional Services. Dan leads healthcare and life science engagements collaborating with customers and partners to deliver outcomes. Dan enjoys the outdoors, attempting triathlons, music and spending time with family.

Shrinath Parikh as a Senior Cloud Data Architect with AWS. He works with customers around the globe to assist them with their data analytics, data lake, data lake house, serverless, governance and NoSQL use cases. In Shrinath’s off time, he enjoys traveling, spending time with family and learning/building new tools using cutting edge technologies.

Ramesh Daddala is a Associate Director at BMS. Ramesh leads enterprise data engineering engagements related to enterprise data lake services (EDLs) and collaborating with Data partners to deliver and support enterprise data engineering and ML capabilities. Ramesh enjoys the outdoors, traveling and loves to spend time with family.

Jitendra Kumar Dash is a Senior Cloud Architect at BMS with expertise in hybrid cloud services, Infrastructure Engineering, DevOps, Data Engineering, and Data Analytics solutions. He is passionate about food, sports, and adventure.

Pavan Kumar Bijja is a Senior Data Engineer at BMS. Pavan enables data engineering and analytical services to BMS Commercial domain using enterprise capabilities. Pavan leads enterprise metadata capabilities at BMS. Pavan loves to spend time with his family, playing Badminton and Cricket.

Shovan Kanjilal is a Senior Data Lake Architect working with strategic accounts in AWS Professional Services. Shovan works with customers to design data and machine learning solutions on AWS.

Build an ETL process for Amazon Redshift using Amazon S3 Event Notifications and AWS Step Functions

Post Syndicated from Ziad Wali original https://aws.amazon.com/blogs/big-data/build-an-etl-process-for-amazon-redshift-using-amazon-s3-event-notifications-and-aws-step-functions/

Data warehousing provides a business with several benefits such as advanced business intelligence and data consistency. It plays a big role within an organization by helping to make the right strategic decision at the right moment which could have a huge impact in a competitive market. One of the major and essential parts in a data warehouse is the extract, transform, and load (ETL) process which extracts the data from different sources, applies business rules and aggregations and then makes the transformed data available for the business users.

This process is always evolving to reflect new business and technical requirements, especially when working in an ambitious market. Nowadays, more verification steps are applied to source data before processing them which so often add an administration overhead. Hence, automatic notifications are more often required in order to accelerate data ingestion, facilitate monitoring and provide accurate tracking about the process.

Amazon Redshift is a fast, fully managed, cloud data warehouse that allows you to process and run your complex SQL analytics workloads on structured and semi-structured data. It also helps you to securely access your data in operational databases, data lakes or third-party datasets with minimal movement or copying. AWS Step Functions is a fully managed service that gives you the ability to orchestrate and coordinate service components. Amazon S3 Event Notifications is an Amazon S3 feature that you can enable in order to receive notifications when specific events occur in your S3 bucket.

In this post we discuss how we can build and orchestrate in a few steps an ETL process for Amazon Redshift using Amazon S3 Event Notifications for automatic verification of source data upon arrival and notification in specific cases. And we show how to use AWS Step Functions for the orchestration of the data pipeline. It can be considered as a starting point for teams within organizations willing to create and build an event driven data pipeline from data source to data warehouse that will help in tracking each phase and in responding to failures quickly. Alternatively, you can also use Amazon Redshift auto-copy from Amazon S3 to simplify data loading from Amazon S3 into Amazon Redshift.

Solution overview

The workflow is composed of the following steps:

  1. A Lambda function is triggered by an S3 event whenever a source file arrives at the S3 bucket. It does the necessary verifications and then classifies the file before processing by sending it to the appropriate Amazon S3 prefix (accepted or rejected).
  2. There are two possibilities:
    • If the file is moved to the rejected Amazon S3 prefix, an Amazon S3 event sends a message to Amazon SNS for further notification.
    • If the file is moved to the accepted Amazon S3 prefix, an Amazon S3 event is triggered and sends a message with the file path to Amazon SQS.
  3. An Amazon EventBridge scheduled event triggers the AWS Step Functions workflow.
  4. The workflow executes a Lambda function that pulls out the messages from the Amazon SQS queue and generates a manifest file for the COPY command.
  5. Once the manifest file is generated, the workflow starts the ETL process using stored procedure.

The following image shows the workflow.

Prerequisites

Before configuring the previous solution, you can use the following AWS CloudFormation template to set up and create the infrastructure

  • Give the stack a name, select a deployment VPC and define the master user for the Amazon Redshift cluster by filling in the two parameters MasterUserName and MasterUserPassword.

The template will create the following services:

  • An S3 bucket
  • An Amazon Redshift cluster composed of two ra3.xlplus nodes
  • An empty AWS Step Functions workflow
  • An Amazon SQS queue
  • An Amazon SNS topic
  • An Amazon EventBridge scheduled rule with a 5-minute rate
  • Two empty AWS Lambda functions
  • IAM roles and policies for the services to communicate with each other

The names of the created services are usually prefixed by the stack’s name or the word blogdemo. You can find the names of the created services in the stack’s resources tab.

Step 1: Configure Amazon S3 Event Notifications

Create the following four folders in the S3 bucket:

  • received
  • rejected
  • accepted
  • manifest

In this scenario, we will create the following three Amazon S3 event notifications:

  1. Trigger an AWS Lambda function on the received folder.
  2. Send a message to the Amazon SNS topic on the rejected folder.
  3. Send a message to Amazon SQS on the accepted folder.

To create an Amazon S3 event notification:

  1. Go to the bucket’s Properties tab.
  2. In the Event Notifications section, select Create Event Notification.
  3. Fill in the necessary properties:
    • Give the event a name.
    • Specify the appropriate prefix or folder (accepted/, rejected/ or received/).
    • Select All object create events as an event type.
    • Select and choose the destination (AWS lambda, Amazon SNS or Amazon SQS).
      Note: for an AWS Lambda destination, choose the function that starts with ${stackname}-blogdemoVerify_%

At the end, you should have three Amazon S3 events:

  • An event for the received prefix with an AWS Lambda function as a destination type.
  • An event for the accepted prefix with an Amazon SQS queue as a destination type.
  • An event for the rejected prefix with an Amazon SNS topic as a destination type.

The following image shows what you should have after creating the three Amazon S3 events:

Step 2: Create objects in Amazon Redshift

Connect to the Amazon Redshift cluster and create the following objects:

  1. Three schemas:
    create schema blogdemo_staging; -- for staging tables
    create schema blogdemo_core; -- for target tables
    create schema blogdemo_proc; -- for stored procedures

  2. A table in the blogdemo_staging and blogdemo_core schemas:
    create table ${schemaname}.rideshare
    (
      id_ride bigint not null,
      date_ride timestamp not null,
      country varchar (20),
      city varchar (20),
      distance_km smallint,
      price decimal (5,2),
      feedback varchar (10)
    ) distkey(id_ride);

  3. A stored procedure to extract and load data into the target schema:
    create or replace procedure blogdemo_proc.elt_rideshare (bucketname in varchar(200),manifestfile in varchar (500))
    as $$
    begin
    -- purge staging table
    truncate blogdemo_staging.rideshare;
    
    -- copy data from s3 bucket to staging schema
    execute 'copy blogdemo_staging.rideshare from ''s3://' + bucketname + '/' + manifestfile + ''' iam_role default delimiter ''|'' manifest;';
    
    -- apply transformation rules here
    
    -- insert data into target table
    insert into blogdemo_core.rideshare
    select * from blogdemo_staging.rideshare;
    
    end;
    $$ language plpgsql;

  4. Set the role ${stackname}-blogdemoRoleRedshift_% as a default role:
    1. In the Amazon Redshift console, go to clusters and click on the cluster blogdemoRedshift%.
    2. Go to the Properties tab.
    3. In the Cluster permissions section, select the role ${stackname}-blogdemoRoleRedshift%.
    4. Click on Set default then Make default.

Step 3: Configure Amazon SQS queue

The Amazon SQS queue can be used as it is; this means with the default values. The only thing you need to do for this demo is to go to the created queue ${stackname}-blogdemoSQS% and purge the test messages generated (if any) by the Amazon S3 event configuration. Copy its URL in a text file for further use (more precisely, in one of the AWS Lambda functions).

Step 4: Setup Amazon SNS topic

  1. In the Amazon SNS console, go to the topic ${stackname}-blogdemoSNS%
  2. Click on the Create subscription button.
  3. Choose the blogdemo topic ARN, email protocol, type your email and then click on Create subscription.
  4. Confirm your subscription in your email that you received.

Step 5: Customize the AWS Lambda functions

  1. The following code verifies the name of a file. If it respects the naming convention, it will move it to the accepted folder. If it does not respect the naming convention, it will move it to the rejected one. Copy it to the AWS Lambda function ${stackname}-blogdemoLambdaVerify and then deploy it:
    import boto3
    import re
    
    def lambda_handler (event, context):
        objectname = event['Records'][0]['s3']['object']['key']
        bucketname = event['Records'][0]['s3']['bucket']['name']
        
        result = re.match('received/rideshare_data_20[0-5][0-9]((0[1-9])|(1[0-2]))([0-2][1-9]|3[0-1])\.csv',objectname)
        targetfolder = ''
        
        if result: targetfolder = 'accepted'
        else: targetfolder = 'rejected'
        
        s3 = boto3.resource('s3')
        copy_source = {
            'Bucket': bucketname,
            'Key': objectname
        }
        target_objectname=objectname.replace('received',targetfolder)
        s3.meta.client.copy(copy_source, bucketname, target_objectname)
        
        s3.Object(bucketname,objectname).delete()
        
        return {'Result': targetfolder}

  2. The second AWS Lambda function ${stackname}-blogdemonLambdaGenerate% retrieves the messages from the Amazon SQS queue and generates and stores a manifest file in the S3 bucket manifest folder. Copy the following content, replace the variable ${sqs_url} by the value retrieved in Step 3 and then click on Deploy.
    import boto3
    import json
    import datetime
    
    def lambda_handler(event, context):
    
        sqs_client = boto3.client('sqs')
        queue_url='${sqs_url}'
        bucketname=''
        keypath='none'
        
        manifest_content='{\n\t"entries": ['
        
        while True:
            response = sqs_client.receive_message(
                QueueUrl=queue_url,
                AttributeNames=['All'],
                MaxNumberOfMessages=1
            )
            try:
                message = response['Messages'][0]
            except KeyError:
                break
            
            message_body=message['Body']
            message_data = json.loads(message_body)
            
            objectname = message_data['Records'][0]['s3']['object']['key']
            bucketname = message_data['Records'][0]['s3']['bucket']['name']
    
            manifest_content = manifest_content + '\n\t\t{"url":"s3://' +bucketname + '/' + objectname + '","mandatory":true},'
            receipt_handle = message['ReceiptHandle']
    
            sqs_client.delete_message(
                QueueUrl=queue_url,
                ReceiptHandle=receipt_handle
            )
            
        if bucketname != '':
            manifest_content=manifest_content[:-1]+'\n\t]\n}'
            s3 = boto3.resource("s3")
            encoded_manifest_content=manifest_content.encode('utf-8')
            current_datetime=datetime.datetime.now()
            keypath='manifest/files_list_'+current_datetime.strftime("%Y%m%d-%H%M%S")+'.manifest'
            s3.Bucket(bucketname).put_object(Key=keypath, Body=encoded_manifest_content)
    
        sf_tasktoken = event['TaskToken']
        
        step_function_client = boto3.client('stepfunctions')
        step_function_client.send_task_success(taskToken=sf_tasktoken,output='{"manifestfilepath":"' + keypath + '",\"bucketname":"' + bucketname +'"}')

Step 6: Add tasks to the AWS Step Functions workflow

Create the following workflow in the state machine ${stackname}-blogdemoStepFunctions%.

If you would like to accelerate this step, you can drag and drop the content of the following JSON file in the definition part when you click on Edit. Make sure to replace the three variables:

  • ${GenerateManifestFileFunctionName} by the ${stackname}-blogdemoLambdaGenerate% arn.
  • ${RedshiftClusterIdentifier} by the Amazon Redshift cluster identifier.
  • ${MasterUserName} by the username that you defined while deploying the CloudFormation template.

Step 7: Enable Amazon EventBridge rule

Enable the rule and add the AWS Step Functions workflow as a rule target:

  1. Go to the Amazon EventBridge console.
  2. Select the rule created by the Amazon CloudFormation template and click on Edit.
  3. Enable the rule and click Next.
  4. You can change the rate if you want. Then select Next.
  5. Add the AWS Step Functions state machine created by the CloudFormation template blogdemoStepFunctions% as a target and use an existing role created by the CloudFormation template ${stackname}-blogdemoRoleEventBridge%
  6. Click on Next and then Update rule.

Test the solution

In order to test the solution, the only thing you should do is upload some csv files in the received prefix of the S3 bucket. Here are some sample data; each file contains 1000 rows of rideshare data.

If you upload them in one click, you should receive an email because the ridesharedata2022.csv does not respect the naming convention. The other three files will be loaded in the target table blogdemo_core.rideshare. You can check the Step Functions workflow to verify that the process finished successfully.

Clean up

  1. Go to the Amazon EventBridge console and delete the rule ${stackname}-blogdemoevenbridge%.
  2. In the Amazon S3 console, select the bucket created by the CloudFormation template ${stackname}-blogdemobucket% and click on Empty.
  3. Go to Subscriptions in the Amazon SNS console and delete the subscription created in Step 4.
  4. In the AWS CloudFormation console, select the stack and delete it.

Conclusion

In this post, we showed how different AWS services can be easily implemented together in order to create an event-driven architecture and automate its data pipeline, which targets the cloud data warehouse Amazon Redshift for business intelligence applications and complex queries.


About the Author

Ziad WALI is an Acceleration Lab Solutions Architect at Amazon Web Services. He has over 10 years of experience in databases and data warehousing where he enjoys building reliable, scalable and efficient solutions. Outside of work, he enjoys sports and spending time in nature.

Getting started with AWS Glue Data Quality for ETL Pipelines

Post Syndicated from Deenbandhu Prasad original https://aws.amazon.com/blogs/big-data/getting-started-with-aws-glue-data-quality-for-etl-pipelines/

Today, hundreds of thousands of customers use data lakes for analytics and machine learning. However, data engineers have to cleanse and prepare this data before it can be used. The underlying data has to be accurate and recent for customer to make confident business decisions. Otherwise, data consumers lose trust in the data and make suboptimal or incorrect decisions. It is a common task for data engineers to evaluate whether the data is accurate and recent or not. Today there are various data quality tools. However, common data quality tools usually require manual processes to monitor data quality.

AWS Glue Data Quality is a preview feature of AWS Glue that measures and monitors the data quality of Amazon Simple Storage Service (Amazon S3) data lakes and in AWS Glue extract, transform, and load (ETL) jobs. This is an open preview feature so it is already enabled in your account in the available Regions. You can easily define and measure the data quality checks in AWS Glue Studio console without writing codes. It simplifies your experience of managing data quality.

This post is Part 2 of a four-post series to explain how AWS Glue Data Quality works. Check out the previous post in this series:

Getting started with AWS Glue Data Quality

In this post, we show how to create an AWS Glue job that measures and monitors the data quality of a data pipeline. We also show how to take action based on the data quality results.

Solution overview

Let’s consider an example use case in which a data engineer needs to build a data pipeline to ingest the data from a raw zone to a curated zone in a data lake. As a data engineer, one of your key responsibilities—along with extracting, transforming, and loading data—is validating the quality of data. Identifying data quality issues upfront helps you prevent placing bad data in the curated zone and avoid arduous data corruption incidents.

In this post, you’ll learn how to easily set up built-in and custom data validation checks in your AWS Glue job to prevent bad data from corrupting the downstream high-quality data.

The dataset used for this post is synthetically generated; the following screenshot shows an example of the data.

Set up resources with AWS CloudFormation

This post includes an AWS CloudFormation template for a quick setup. You can review and customize it to suit your needs.

The CloudFormation template generates the following resources:

  • An Amazon Simple Storage Service (Amazon S3) bucket (gluedataqualitystudio-*).
  • The following prefixes and objects in the S3 bucket:
    • datalake/raw/customer/customer.csv
    • datalake/curated/customer/
    • scripts/
    • sparkHistoryLogs/
    • temporary/
  • AWS Identity and Access Management (IAM) users, roles, and policies. The IAM role (GlueDataQualityStudio-*) has permission to read and write from the S3 bucket.
  • AWS Lambda functions and IAM policies required by those functions to create and delete this stack.

To create your resources, complete the following steps:

  1. Sign in to the AWS CloudFormation console in the us-east-1 Region.
  2. Choose Launch Stack:

  3. Select I acknowledge that AWS CloudFormation might create IAM resources.
  4. Choose Create stack and wait for the stack creation step to complete.

Implement the solution

To start configuring your solution, complete the following steps:

  1. On the AWS Glue Studio console, choose Jobs in the navigation pane.
  2. Select Visual with a blank canvas and choose Create.
  3. Choose the Job Details tab to configure the job.
  4. For Name, enter GlueDataQualityStudio.
  5. For IAM Role, choose the role starting with GlueDataQualityStudio-*.
  6. For Glue version, choose Glue 3.0.
  7. For Job bookmark, choose Disable. This allows you to run this job multiple times with the same input dataset.
  8. For Number of retries, enter 0.
  9. In the Advanced properties section, provide the S3 bucket created by the CloudFormation template (starting with gluedataqualitystudio-*).
  10. Choose Save.
  11. After the job is saved, choose the Visual tab and on the Source menu, choose Amazon S3.
  12. On the Data source properties – S3 tab, for S3 source type, select S3 location.
  13. Choose Browse S3 and navigate to prefix /datalake/raw/customer/ in the S3 bucket starting with gluedataqualitystudio-* .
  14. Choose Infer schema.
  15. On the Action menu, choose Evaluate Data Quality.
  16. Choose the Evaluate Data Quality node.

    On the Transform tab, you can now start building data quality rules. The first rule you create is to check if Customer_ID is unique and not null using the isPrimaryKey rule.
  17. On the Rule types tab of the DQDL rule builder, search for isprimarykey and choose the plus sign.
  18. On the Schema tab of the DQDL rule builder, choose the plus sign next to Customer_ID.
  19. In the rule editor, delete id.

    The next rule we add checks that the First_Name column value is present for all the rows.
  20. You can also enter the data quality rules directly in the rule editor. Add a comma (,) and enter IsComplete "First_Name", after the first rule.

    Next, you add a custom rule to validate that no row exists without Telephone or Email.
  21. Enter the following custom rule in the rule editor:
    CustomSql "select count(*) from primary where Telephone is null and Email is null" = 0


    The Evaluate Data Quality feature provides actions to manage the outcome of a job based on the job quality results.

  22. For this post, select Fail job when data quality fails and choose Fail job without loading target data actions. In the Data quality output setting section, choose Browse S3 and navigate to prefix dqresults in the S3 bucket starting with gluedataqualitystudio-*.
  23. On the Target menu, choose Amazon S3.
  24. Choose the Data target – S3 bucket node.
  25. On the Data target properties – S3 tab, for Format, choose Parquet, and for Compression Type, choose Snappy.
  26. For S3 Target Location, choose Browse S3 and navigate to the prefix /datalake/curated/customer/ in the S3 bucket starting with gluedataqualitystudio-*.
  27. Choose Save, then choose Run.
    You can view the job run details on the Runs tab. In our example, the job fails with the error message “AssertionError: The job failed due to failing DQ rules for node: <node>.”
    You can review the data quality result on the Data quality tab. In our example, the custom data quality validation failed because one of the rows in the dataset had no Telephone or Email value.Evaluate Data Quality results is also written to the S3 bucket in JSON format based on the data quality result location parameter of the node.
  28. Navigate to dqresults prefix under the S3 bucket starting gluedataqualitystudio-*. You will see that the data quality result is partitioned by date.

The following is the output of the JSON file. You can use this file output to build custom data quality visualization dashboards.

You can also monitor the Evaluate Data Quality node through Amazon CloudWatch metrics and set alarms to send notifications about data quality results. To learn more on how to set up CloudWatch alarms, refer to Using Amazon CloudWatch alarms.

Clean up

To avoid incurring future charges and to clean up unused roles and policies, delete the resources you created:

  1. Delete the GlueDataQualityStudio job you created as part of this post.
  2. On the AWS CloudFormation console, delete the GlueDataQualityStudio stack.

Conclusion

AWS Glue Data Quality offers an easy way to measure and monitor the data quality of your ETL pipeline. In this post, you learned how to take necessary actions based on the data quality results, which helps you maintain high data standards and make confident business decisions.

To learn more about AWS Glue Data Quality, check out the documentation:


About the Authors

Deenbandhu Prasad is a Senior Analytics Specialist at AWS, specializing in big data services. He is passionate about helping customers build modern data architecture on the AWS Cloud. He has helped customers of all sizes implement data management, data warehouse, and data lake solutions.

Yannis Mentekidis is a Senior Software Development Engineer on the AWS Glue team.