All posts by Pratik Patel

Amazon Kinesis Data Streams launches On-demand Advantage for instant throughput increases and streaming at scale

Post Syndicated from Pratik Patel original https://aws.amazon.com/blogs/big-data/amazon-kinesis-data-streams-launches-on-demand-advantage-for-instant-throughput-increases-and-streaming-at-scale/

Today, AWS announced the new Amazon Kinesis Data Streams On-demand Advantage mode, which includes warm throughput capability and an updated pricing structure. With this feature you can enable instant scaling for traffic surges while optimizing costs for consistent streaming workloads. On-demand Advantage mode is a cost-effective way to stream with Kinesis Data Streams for use cases that ingest at least 10 MiB/s in aggregate or have hundreds of data streams in an AWS Region.

In this post, we explore this new feature, including key use cases, configuration options, pricing considerations, and best practices for optimal performance.

Real-world use cases

As streaming data volumes grow and use cases evolve, you can face two common challenges with your streaming workloads:

Challenge 1: Preparing for traffic spikes

Many businesses experience predictable but significant traffic surges during events like product launches, content releases, or holiday sales. Using an on-demand capacity mode, you have to complete several steps when preparing for traffic spikes:

  • Transition to provisioned mode
  • Manually estimate and increase shards based on anticipated peak demand
  • Wait for scaling operations to finish
  • Subsequently return to on-demand mode

This mode-switching process was time consuming, required careful planning, and introduced operational complexity, forcing customers to either accept this operational burden, overprovision capacity well in advance, or risk throttling during critical business periods when data ingestion reliability matters most.

Challenge 2: Cost optimization for consistent workloads

Organizations with large, consistent streaming workloads want to optimize costs without sacrificing the simplicity and scalability available with on-demand streams. On-demand capacity mode serves well for fluctuating data traffic, yet customers desired a more economical approach to handle high-volume streaming workloads.

On-demand Advantage directly address both challenges by providing the capability to warm on-demand streams and a new pricing structure. With the new On-demand Advantage mode, there is no longer a fixed, per-stream charge, and the throughput usage is priced at a lower rate. The only requirement is that the account commits to streaming with at least 25 MiB/s of data ingest and 25 MiB/s of data retrieval usage.

This launch improves data streaming across multiple industries:

  • Online gaming companies can now prepare their streams for game launches without the cumbersome process of switching between modes and manually calculating shard requirements
  • Media and entertainment providers can support smooth data ingestion during major content releases and live events
  • E-commerce services can handle holiday sales traffic while optimizing costs for their baseline workloads.

By combining instant scaling with cost efficiency, you can confidently manage both predictable traffic surges and consistent streaming volumes without compromising on performance or budget.

How it works

The key features of On-demand Advantage mode are warm throughput and committed-usage pricing.

Warm throughput

With the warm throughput feature, available once you’ve enabled On-demand Advantage mode, you can configure your Kinesis Data Streams on-demand streams to have instantly available throughput capacity up to 10 GiB/s. This means you can proactively prepare on-demand streams for expected peak traffic events without the cumbersome process of switching between provisioned modes and manually calculating shard requirements. Key benefits include:

  • The ability to prepare for peak events so you can handle traffic surges smoothly
  • Alleviation of the need to build custom scaling solutions
  • The capability to continue scaling automatically beyond warm throughput if needed, up to 10 GiB/s or 10 million events per second
  • No additional fee for maintaining warm capacity

Committed-usage pricing

When you’ve enabled On-demand Advantage mode, the billing for the on-demand streams switches to a new structure that removes the stream hour charge and offers a discount of at least 60% for the throughput usage. Based on US East (N. Virginia) pricing, data ingested is priced 60% lower, data retrieval is priced 60% lower, Enhanced fan-out data retrieval is 68% lower, and extended retention is priced 77% lower. In return, you commit to stream 25 MiB/s for at least 24 hours. Even when actual usage is lower, if you enable this setting, you’re charged for the minimum 25 MiB/s throughput at the discounted price. Overall, the signficant discounts offered means that On-demand Advantage is more cost-effective for use cases that ingest at least 10 MiB/s in aggregate, fan out to more than two consumer applications, or have hundreds of data streams in an AWS Region.

Getting started

Follow these steps to start using On-demand Advantage mode.

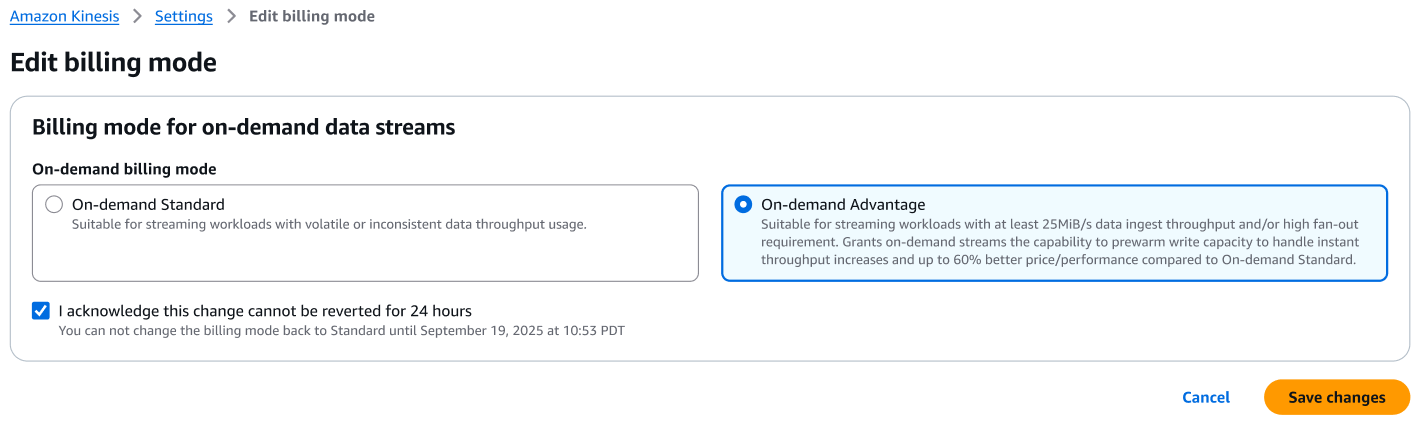
Enabling On-demand Advantage mode

To start using the On-demand Advantage mode:

In the AWS Management Console

  1. Navigate to the Kinesis Data Streams console
  2. Navigate to the Account Settings tab
  3. Choose Edit billing mode
  4. Select the On-demand Advantage option
  5. Select the checkbox, I acknowledge this change cannot be reverted for 24 hours
  6. Choose Save changes

on-demand-billing-mode

Using the AWS CLI

You can run the following CLI command to enable the minimum throughput billing commitment:

aws kinesis update-account-settings \
--minimum-throughput-billing-commitment Status=ENABLED

Using the AWS SDK

You can use the SDK to enable the minimum throughput billing commitment. The following Python example shows how to do it:

import boto3

client = boto3.client('kinesis')
response = client.update_account_settings(
    MinimumThroughputBillingCommitment={"Status": "ENABLED"}
)

Once enabled, you commit your stream to this pricing mode for a minimum period of 24 hours, after which you can opt out as needed.

Configuring warm throughput

To start using warm throughput for Kinesis Data Streams On-demand:

Using the AWS Management Console

  1. Navigate to the Kinesis Data Streams console
  2. Select your stream and go to the Configuration tab
  3. Choose Edit next to Warm Throughput
  4. Set your desired warm throughput (up to 10 GiB/s)
  5. Save your changes

Using the AWS CLI

You can run the following CLI command to enable the warm throughput:

aws kinesis update-stream-warm-throughput \
  --stream-name MyStream \
  --warm-throughput-mi-bps 1000

Using the AWS SDK:

You can use the SDK to enable warm throughput. The following Python example shows how to do it:

import boto3

client = boto3.client('kinesis')
response = client.update_stream_warm_throughput(
    StreamName='MyStream',
    WarmThroughputMiBps=1000
)

You can also create a new on-demand stream with warm throughput using the existing CreateStream API, or set warm throughput when converting a data stream from provisioned to On-demand Advantage mode.

Throttling and best practices for optimal performance

When working with warm throughput, it’s important to understand how capacity is managed. Each stream can instantly handle traffic up to the configured warm throughput level and will automatically scale beyond that as needed.

For optimal performance with warm throughput:

  1. Use a uniformly distributed partition key strategy to evenly distribute records across shards and avoid hotspots and consider your partition key strategy carefully as you can ingest a maximum of 1 MiB/s of data per partition key, regardless of the warm throughput configured.
  2. Monitor throughput metrics to adjust warm throughput settings based on actual usage patterns.
  3. Implement backoff and retry logic in producer applications to handle potential throttling.

For cost optimization with committed usage pricing:

  1. Analyze your daily throughput to verify it is at least 10 MiB/s.
  2. Consider consolidating streams across your organization to maximize the benefit of the discount for on-demand streams.
  3. Use cost effective data retrievals with – Use Enhanced Fan-Out – Use Enhanced Fan-Out consumers for applications that need dedicated throughput with 68% lower data retrievals cost in advantage mode.

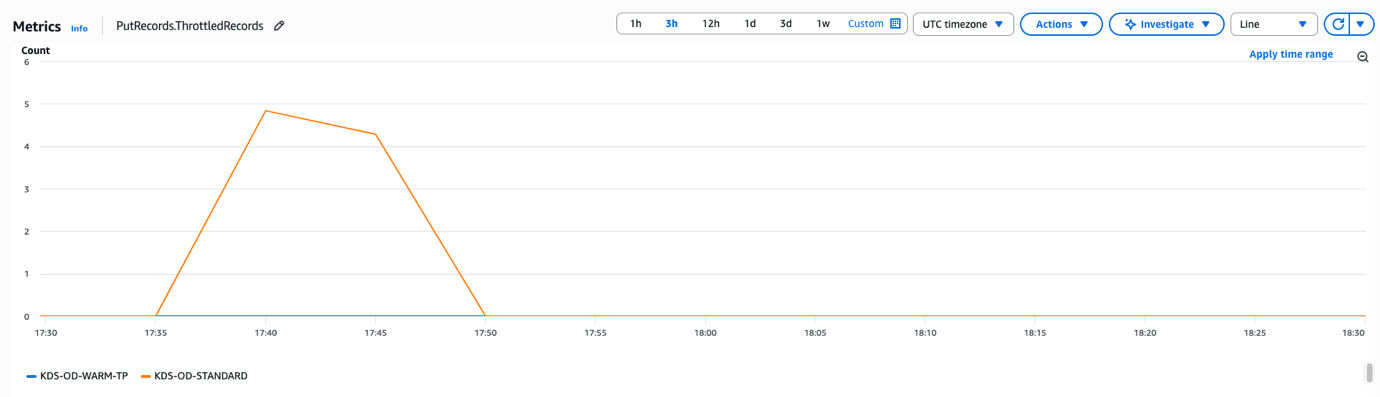
Warm throughput in action

To demonstrate how warm throughput behaves, we enabled committed pricing in an AWS account and created two on-demand streams: “KDS-OD-STANDARD” and “KDS-OD-WARM-TP”. The “KDS-OD-WARM-TP” stream was configured with 100 MiB/second warm throughput, while “KDS-OD-STANDARD” remained as a regular on-demand stream without warm throughput, as demonstrated in the following screenshot.

od-standard-warm-streams

In our experiment, we initially simulated approximately 2 MiB/second traffic ingest for both “KDS-OD-STANDARD” and “KDS-OD-WARM-TP” streams. We used a UUID as a partition key so that traffic was evenly distributed across the shards of the Kinesis data streams, helping prevent potential hotspots that might skew our results. After establishing this baseline, we increased the ingest traffic to around 28 MiB/second within 10 minutes. We then further escalated the traffic to exceed 60 MiB/second within 15 minutes of the initial increase, as illustrated in the following screenshot.

streams-ingest-mb-second-metric

The following graph shows the ThrottledRecords CloudWatch metric for both “KDS-OD-STANDARD” and “KDS-OD-WARM-TP” that the warm throughput-enabled stream (“KDS-OD-WARM-TP”) did not encounter throttles during both traffic spikes, as it had 100 MiB/second warm throughput configured. In contrast, the standard on-demand stream (“KDS-OD-STANDARD”) experienced throttling when we increased traffic by 14x initially and by 2x later, before eventually scaling to bring throttles back to zero. This experiment demonstrates that you can use warm throughput to instantly prepare for peak usage times and avoid throttling during sudden traffic increases.

streams-throttle-metrics

Conclusion

As we outlined in this post, the new Amazon Kinesis Data Streams On-demand Advantage mode provides significant benefits for organizations of different sizes:

  • Instant scaling for predictable traffic surges without overprovisioning.
  • Cost optimization for consistent streaming workloads with at least 60% discount.
  • Simplified operations with no need to switch between different capacity modes.
  • Enhanced flexibility to handle both expected and unexpected traffic patterns.

With these enhancements you can build and operate real-time streaming applications at many scales. Kinesis Data Streams now provides the ideal combination of scalability, performance, and cost-efficiency.

To learn more about these new features, visit the Amazon Kinesis Data Streams documentation.


About the authors

Roy (KDS) Wang

Roy (KDS) Wang

Roy is a Senior Product Manager with Amazon Kinesis Data Streams. He is passionate about learning from and collaborating with customers to help organizations run faster and smarter. Outside of work, Roy strives to be a good dad to his new son and builds plastic model kits.

Pratik Patel

Pratik Patel

Pratik is Sr. Technical Account Manager and streaming analytics specialist. He works with AWS customers and provides ongoing support and technical guidance to help plan and build solutions using best practices and proactively keep customers’ AWS environments operationally healthy.

Umesh Chaudhari

Umesh Chaudhari

Umesh is a Sr. Streaming Solutions Architect at AWS. He works with customers to design and build real-time data processing systems. He has extensive working experience in software engineering, including architecting, designing, and developing data analytics systems. Outside of work, he enjoys traveling, following tech trends.

Simon Peyer

Simon Peyer

Simon is a Solutions Architect at AWS based in Switzerland. He is a practical doer and passionate about connecting technology and people using AWS Cloud services. A special focus for him is data streaming and automations. Besides work, Simon enjoys his family, the outdoors, and hiking in the mountains.20

Stream data from Amazon MSK to Apache Iceberg tables in Amazon S3 and Amazon S3 Tables using Amazon Data Firehose

Post Syndicated from Pratik Patel original https://aws.amazon.com/blogs/big-data/stream-data-from-amazon-msk-to-apache-iceberg-tables-in-amazon-s3-and-amazon-s3-tables-using-amazon-data-firehose/

In today’s data-driven/fast-paced landscape/environment real-time streaming analytics has become critical for business success. From detecting fraudulent transactions in financial services to monitoring Internet of Things (IoT) sensor data in manufacturing, or tracking user behavior in ecommerce platforms, streaming analytics enables organizations to make split-second decisions and respond to opportunities and threats as they emerge.

Increasingly, organizations are adopting Apache Iceberg, an open source table format that simplifies data processing on large datasets stored in data lakes. Iceberg brings SQL-like familiarity to big data, offering capabilities such as ACID transactions, row-level operations, partition evolution, data versioning, incremental processing, and advanced query scanning. It seamlessly integrates with popular open source big data processing frameworks Apache Spark, Apache Hive, Apache Flink, Presto, and Trino. Amazon Simple Storage Service (Amazon S3) supports Iceberg tables both directly using the Iceberg table format and in Amazon S3 Tables.

Although Amazon Managed Streaming for Apache Kafka (Amazon MSK) provides robust, scalable streaming capabilities for real-time data needs, many customers need to efficiently and seamlessly deliver their streaming data from Amazon MSK to Iceberg tables in Amazon S3 and S3 Tables. This is where Amazon Data Firehose (Firehose) comes in. With its built-in support for Iceberg tables in Amazon S3 and S3 Tables, Firehose makes it possible to seamlessly deliver streaming data from provisioned MSK clusters to Iceberg tables in Amazon S3 and S3 Tables.

As a fully managed extract, transform, and load (ETL) service, Firehose reads data from your Apache Kafka topics, transforms the records, and writes them directly to Iceberg tables in your data lake in Amazon S3. This new capability requires no code or infrastructure management on your part, allowing for continuous, efficient data loading from Amazon MSK to Iceberg in Amazon S3.In this post, we walk through two solutions that demonstrate how to stream data from your Amazon MSK provisioned cluster to Iceberg-based data lakes in Amazon S3 using Firehose.

Solution 1 overview: Amazon MSK to Iceberg tables in Amazon S3

The following diagram illustrates the high-level architecture to deliver streaming messages from Amazon MSK to Iceberg tables in Amazon S3.

bdb-4769-image-1

Prerequisites

To follow the tutorial in this post, you need the following prerequisites:

Verify permission

Before configuring the Firehose delivery stream, you must verify the destination table available in the Data Catalog.

  1. On the AWS Glue console, go to Glue Data Catalog and verify the Iceberg table is available with the required attributes.

bdb-4769-image-2

  1. Verify your Amazon MSK provisioned cluster is up and running with IAM authentication, and multi-VPC connectivity is enabled for it.

bdb-4769-image-3

  1. Grant Firehose access to your private MSK cluster:
    1. On the Amazon MSK console, go to the cluster and choose Properties and Security settings.
    2. Edit the cluster policy and define a policy similar to the following example:
{
  "Version": "2012-10-17",
  "Statement": [
    {
      "Principal": {
        "Service": [
          "firehose.amazonaws.com"
        ]
    },
    "Effect": "Allow",
    "Action": [
      "kafka:CreateVpcConnection"
    ],
    "Resource": "<Amazon MSK cluster-arn>"
    }
  ]
}

This ensures Firehose has the necessary permissions on the source Amazon MSK provisioned cluster.

Create a Firehose role

This section describes the permissions that grant Firehose access to ingest, process, and deliver data from source to destination. You must specify an IAM role that grants Firehose permissions to ingest source data from the specified Amazon MSK provisioned cluster. Make sure that the following trust policies are attached to that role so that Firehose can assume it:

{
  "Version": "2012-10-17",
  "Statement": [
    {
      "Principal": {
        "Service": [
          "firehose.amazonaws.com"
        ]
      },
      "Effect": "Allow",
      "Action": "sts:AssumeRole"
    }
  ]
}

Make sure that this role grants Firehose the following permissions to ingest source data from the specified Amazon MSK provisioned cluster:

{
   "Version": "2012-10-17",      
   "Statement": [{
        "Effect":"Allow",
        "Action": [
           "kafka:GetBootstrapBrokers",
           "kafka:DescribeCluster",
           "kafka:DescribeClusterV2",
           "kafka-cluster:Connect"
         ],
         "Resource": "<CLUSTER-ARN>"
       },
       {
         "Effect":"Allow",
         "Action": [
           "kafka-cluster:DescribeTopic",
           "kafka-cluster:DescribeTopicDynamicConfiguration",
           "kafka-cluster:ReadData"
         ],
         "Resource": "<TOPIC-ARN>"
       }]
}

Make sure the Firehose role has permissions to the Glue Data Catalog and S3 bucket:

{
    "Version": "2012-10-17",  
    "Statement":
    [    
        {      
            "Effect": "Allow",      
            "Action": [
                "glue:GetTable",
                "glue:GetDatabase",
                "glue:UpdateTable"
            ],      
            "Resource": [   
                "arn:aws:glue:<region>:<aws-account-id>:catalog",
                "arn:aws:glue:<region>:<aws-account-id>:database/*",
                "arn:aws:glue:<region>:<aws-account-id>:table/*/*"             
            ]    
        },        
        {      
            "Effect": "Allow",      
            "Action": [
                "s3:AbortMultipartUpload",
                "s3:GetBucketLocation",
                "s3:GetObject",
                "s3:ListBucket",
                "s3:ListBucketMultipartUploads",
                "s3:PutObject",
                "s3:DeleteObject"
            ],      
            "Resource": [   
                "arn:aws:s3:::<S3 bucket name>",
                "arn:aws:s3:::<S3 bucket name>/*"              
            ]    
        } 
    ]
}    

For detailed policies, refer to the following resources:

Now you have verified that your source MSK cluster and destination Iceberg table are available, you’re ready to set up Firehose to deliver streaming data to the Iceberg tables in Amazon S3.

Create a Firehose stream

Complete the following steps to create a Firehose stream:

  1. On the Firehose console, choose Create Firehose stream.
  2. Choose Amazon MSK for Source and Apache Iceberg Tables for Destination.

bdb-4769-image-4

  1. Provide a Firehose stream name and specify the cluster configurations.

bdb-4769-image-5

  1. You can choose an MSK cluster in the current account or another account.
  2. To choose the cluster, it must be in active state with IAM as one of its access control methods and multi-VPC connectivity should be enabled.

bdb-4769-image-6

  1. Provide the MSK topic name from which Firehose will read the data.

bdb-4769-image-7

  1. Enter the Firehose stream name.

bdb-4769-image-8

  1. Enter the destination settings where you can opt to send data in the current account or across accounts.
  2. Select the account location as Current account, choose an appropriate AWS Region, and for Catalog, choose the current account ID.

bdb-4769-image-9

To route streaming data to different Iceberg tables and perform operations such as insert, update, and delete, you can use Firehose JQ expressions. You can find the required information here.

  1. Provide the unique key configuration, which makes it possible to perform update and delete actions on your data.

bdb-4769-image-10

  1. Go to Buffer hints and configure Buffer size to 1 MiB and Buffer interval to 60 seconds. You can tune these settings according to your use case needs.
  2. Configure your backup settings by providing an S3 backup bucket.

With Firehose, you can configure backup settings by specifying an S3 backup bucket with custom prefixes like error, so failed records are automatically preserved and accessible for troubleshooting and reprocessing.

bdb-4769-image-11

  1. Under Advanced settings, enable Amazon CloudWatch error logging.

bdb-4769-image-12

  1. Under Service access, choose the IAM role you created earlier for Firehose.
  2. Verify your configurations and choose Create Firehose stream.

bdb-4769-image-14

The Firehose stream will be available and it will stream data from the MSK topic to the Iceberg table in Amazon S3.

bdb-4769-image-15

You can query the table with Amazon Athena to validate the streaming data.

  1. On the Athena console, open the query editor.
  2. Choose the Iceberg table and run a table preview.

You will be able to access the streaming data in the table.

bdb-4769-image-16

Solution 2 overview: Amazon MSK to S3 Tables

S3 Tables is built on Iceberg’s open table format, providing table-like capabilities directly to Amazon S3. You can organize and query data using familiar table semantics while using Iceberg’s features for schema evolution, partition evolution, and time travel capabilities. The feature performs ACID-compliant transactions and supports INSERT, UPDATE, and DELETE operations in Amazon S3 data, making data lake management more efficient and reliable.

You can use Firehose to deliver streaming data from an Amazon MSK provisioned cluster to Iceberg tables in Amazon S3. You can create an S3 table bucket using the Amazon S3 console, and it registers the bucket to AWS Lake Formation, which helps you manage fine-grained access control for your Iceberg-based data lake on S3 Tables. The following diagram illustrates the solution architecture.

Prerequisites

You should have the following prerequisites:

  • An AWS account
  • An active Amazon MSK provisioned cluster with IAM access control authentication enabled and multi-VPC connectivity
  • The Firehose role mentioned earlier with the additional IAM policy:
{
    "Version": "2012-10-17",
    "Statement": [
        {
            "Sid": "Statement1",
            "Effect": "Allow",
            "Action": [
                "lakeformation:GetDataAccess"
            ],
            "Resource": [
                "*"
            ]
        }
    ]
}

Further, in your Firehose role, add s3tablescatalog as a resource to provide access to S3 Table as shown below.

Create an S3 table bucket

To create an S3 table bucket on the Amazon S3 console, refer to Creating a table bucket.

When you create your first table bucket with the Enable integration option, Amazon S3 attempts to automatically integrate your table bucket with AWS analytics services. This integration makes it possible to use AWS analytics services to query all tables in the current Region. This is an important step for the further set up. If this integration is already in place, you can use the AWS Command Line Interface (AWS CLI) as follows:

aws s3tables create-table-bucket --region <region id> --name <bucket name>

bdb-4769-image-18

Create a namespace

An S3 table namespace is a logical construct within an S3 table bucket. Each table belongs to a single namespace. Before creating a table, you must create a namespace to group tables under. You can create a namespace by using the Amazon S3 REST API, AWS SDK, AWS CLI, or integrated query engines.

You can use the following AWS CLI to create a table namespace:

aws s3tables create-namespace --table-bucket-arn arn:aws:s3tables:us-east-1:111122223333:bucket/amzn-s3-demo-bucket --namespace example_namespace

Create a table

An S3 table is a sub-resource of a table bucket. This resource stores S3 tables in Iceberg format so you can work with them using query engines and other applications that support Iceberg. You can create a table with the following AWS CLI command:

aws s3tables create-table --cli-input-json file://mytabledefinition.json

The following code is for mytabledefinition.json:

{
    "tableBucketARN": "arn:aws:s3tables:us-east-1:111122223333:bucket/amzn-s3-demo-table-bucket",
    "namespace": "example_namespace ",
    "name": "example_table",
    "format": "ICEBERG",
    "metadata": {
        "iceberg": {
            "schema": {
                "fields": [
                     {"name": "id", "type": "int", "required": true},
                     {"name": "name", "type": "string"},
                     {"name": "value", "type": "int"}
                ]
            }
        }
    }
}

Now you have the required table with the relevant attributes available in Lake Formation.

Grant Lake Formation permissions on your table resources

After integration, Lake Formation manages access to your table resources. It uses its own permissions model (Lake Formation permissions) that enables fine-grained access control for Glue Data Catalog resources. To allow Firehose to write data to S3 Tables, you can grant a principal Lake Formation permission on a table in the S3 table bucket, either through the Lake Formation console or AWS CLI. Complete the following steps:

  1. Make sure you’re running AWS CLI commands as a data lake administrator. For more information, see Create a data lake administrator.
  2. Run the following command to grant Lake Formation permissions on the table in the S3 table bucket to an IAM principal (Firehose role) to access the table:
aws lakeformation grant-permissions \
--region <region e.g. us-east-1> \
--cli-input-json \
'{
    "Principal": {
        "DataLakePrincipalIdentifier": "<Amazon Data Firehose role ARN e.g. arn:aws:iam::<accound-id>:role/ExampleRole>"
    },
    "Resource": {
        "Table": {
            "CatalogId": "<account-id>:<s3tablescatalog>/<S3 table bucket name>",
            "DatabaseName": "<S3 table bucket namespace e.g. test_namespace>",
            "Name": "<S3 table bucket table name e.g. test_table>"
        }
    },
    "Permissions": [
        "ALL"
    ]
}'

Set up a Firehose stream to S3 Tables

To set up a Firehose stream to S3 Tables using the Firehose console, complete the following steps:

  1. On the Firehose console, choose Create Firehose stream.
  2. For Source, choose Amazon MSK.
  3. For Destination, choose Apache Iceberg Tables.
  4. Enter a Firehose stream name.
  5. Configure your source settings.
  6. For Destination settings, select Current Account, choose your Region, and enter the name of the table bucket you want to stream in.
  7. Configure the database and table names using Unique Key configuration settings, JSONQuery expressions, or in an AWS Lambda function.

For more information, refer to Route incoming records to a single Iceberg table and Route incoming records to different Iceberg tables.

  1. Under Backup settings, specify a S3 backup bucket.
  2. For Existing IAM roles under Advanced settings, choose the IAM role you created for Firehose.
  3. Choose Create Firehose stream.

The Firehose stream will be available and it will stream data from the Amazon MSK topic to the Iceberg table. You can verify it by querying the Iceberg table using an Athena query.

bdb-4769-image-19

Clean up

It’s always a good practice to clean up the resources created as part of this post to avoid additional costs. To clean up your resources, delete the MSK cluster, Firehose stream, Iceberg S3 table bucket, S3 general purpose bucket, and CloudWatch logs.

Conclusion

In this post, we demonstrated two approaches for data streaming from Amazon MSK to data lakes using Firehose: direct streaming to Iceberg tables in Amazon S3, and streaming to S3 Tables. Firehose alleviates the complexity of traditional data pipeline management by offering a fully managed, no-code approach that handles data transformation, compression, and error handling automatically. The seamless integration between Amazon MSK, Firehose, and Iceberg format in Amazon S3 demonstrates AWS’s commitment to simplifying big data architectures while maintaining the robust features of ACID compliance and advanced query capabilities that modern data lakes demand. We hope you found this post helpful and encourage you to try out this solution and simplify your streaming data pipelines to Iceberg tables.


About the authors

bdb-4769-image-21Pratik Patel is Sr. Technical Account Manager and streaming analytics specialist. He works with AWS customers and provides ongoing support and technical guidance to help plan and build solutions using best practices and proactively keep customers’ AWS environments operationally healthy.

Amar is a seasoned Data Analytics specialist at AWS UK, who helps AWS customers to deliver large-scale data solutions. With deep expertise in AWS analytics and machine learning services, he enables organizations to drive data-driven transformation and innovation. He is passionate about building high-impact solutions and actively engages with the tech community to share knowledge and best practices in data analytics.

bdb-4769-image-22Priyanka Chaudhary is a Senior Solutions Architect and data analytics specialist. She works with AWS customers as their trusted advisor, providing technical guidance and support in building Well-Architected, innovative industry solutions.

Sink Amazon Kinesis Data Analytics Apache Flink output to Amazon Keyspaces using Apache Cassandra Connector

Post Syndicated from Pratik Patel original https://aws.amazon.com/blogs/big-data/sink-amazon-kinesis-data-analytics-apache-flink-output-to-amazon-keyspaces-using-apache-cassandra-connector/

Amazon Keyspaces (for Apache Cassandra) is a scalable, highly available, and managed Apache Cassandra–compatible database service. With Amazon Keyspaces you don’t have to provision, patch, or manage servers, and you don’t have to install, maintain, or operate software. Amazon Keyspaces is serverless, so you only pay for the resources that you use and the service can automatically scale tables up and down in response to application traffic. You can use Amazon Keyspaces to store large volumes of data, such as entries in a log file or the message history for a chat application as Amazon Keyspaces offers virtually unlimited throughput and storage. You can also use Amazon Keyspaces to store information about devices for Internet of Things (IoT) applications or player profiles for games.

A popular use case in the wind energy sector is to protect wind turbines from wind speed. Engineers and analysts often want to see real-time aggregated wind turbine speed data to analyze the current situation out in the field. Furthermore, they need access to historical aggregated wind turbine speed data to build machine learning (ML) models which can help them take preventative actions on wind turbines. Customers often ingest high-velocity IoT data into Amazon Kinesis Data Streams and use Amazon Kinesis Data Analytics, AWS Lambda, or Amazon Kinesis Client Library (KCL) applications to aggregate IoT data in real-time and store it in Amazon Keyspaces, Amazon DynamoDB, or Amazon Timestream.

In this post, we demonstrate how to aggregate sensor data using Amazon Kinesis Data Analytics and persist aggregated sensor data in to Amazon Keyspaces using Apache Flink’s Apache Cassandra Connector.

Architecture

BDB-2063-kda-keyspaces-architecture

In the architecture diagram above, Lambda simulates wind speed sensor data and ingests sensor data into Amazon Kinesis Data Stream. Amazon Kinesis Data Analytics Apache Flink application reads wind speed sensor data from Amazon Kinesis Data Stream in real-time and aggregates wind speed sensor data using a five minutes tumbling window and storing aggregated wind speed sensor data into Amazon Keyspaces table. Aggregated wind speed sensor data stored in Amazon Keyspaces can be used by engineers and analysts to review real-time dashboards or to perform historical analysis on specific wind turbine.

Deploying resources using AWS CloudFormation

After you sign in to your AWS account, launch the AWS CloudFormation template by choosing Launch Stack:

BDB-2063-launch-cloudformation-stack

The CloudFormation template configures the following resources in your account:

  • One Lambda function which simulates wind turbine data
  • One Amazon Kinesis Data Stream
  • One Amazon Kinesis Data Analytics Apache Flink application
  • An AWS Identity and Access Management (IAM) role (service execution role) for Amazon Kinesis Data Analytics Apache Flink application
  • One Amazon Keyspaces Table: turbine_aggregated_sensor_data

After you complete the setup, sign in to the Kinesis Data Analytics console. On the Kinesis Data Analytics applications page, choose the Streaming applications tab, where you can see the Streaming application in the ready status. Select the Streaming application, choose Run, and wait until the Streaming application is in running status. It can take a couple of minutes for the Streaming application to get into running status.

Now that we have deployed all of the resources using CloudFormation template, let’s review deployed resources and how they function.

Format of wind speed sensor data

Lambda simulates wind turbine speed data every one minute and ingests it into Amazon Kinesis Data Stream. Each wind turbine sensor data message consists of two attributes: turbineId and speed.

{
  "turbineId": "turbine-0001",
  "speed": 60
}

Schema of destination Amazon Keyspaces table

We’ll store aggregated sensor data in to destination turbine_aggregated_sensor_data Amazon Keyspaces table. turbine_aggregated_sensor_data table has on-demand capacity mode enabled. Amazon Keyspaces (for Apache Cassandra) on-demand capacity mode is a flexible billing option capable of serving thousands of requests per second without capacity planning. This option offers pay-per-request pricing for read and write requests so that you pay only for what you use. When you choose on-demand mode, Amazon Keyspaces can scale the throughput capacity for your table up to any previously reached traffic level instantly, and then back down when application traffic decreases. If a workload’s traffic level hits a new peak, then the service adapts rapidly to increase throughput capacity for your table.

BDB-2063-keyspaces-table BDB-2063-keyspaces-table-def-1 BDB-2063-keyspaces-table-def-2

Apache Flink code to aggregate and persist data in Amazon Keyspaces Table

Apache Flink source code used by this post can be found on the KeyspacesSink section of Kinesis Data Analytics Java Examples public git repository.

The following code snippet demonstrates how incoming wind turbine messages are getting aggregated using a five-minute tumbling window and produces a DataStream of TurbineAggregatedRecord records.

DataStream<TurbineAggregatedRecord> result = input
.map(new WindTurbineInputMap())
.keyBy(t -> t.turbineId)
.window(TumblingProcessingTimeWindows.of(Time.minutes(5)))
.reduce(new AggregateReducer())
.map(new AggregateMap());

The following code snippet demonstrates how Amazon Keyspaces table name and column names are annotated on the TurbineAggregatedRecord class.

@Table(keyspace = "sensor_data", name = "turbine_aggregated_sensor_data", readConsistency = "LOCAL_QUORUM", writeConsistency = "LOCAL_QUORUM")
public class TurbineAggregatedRecord {

@Column(name = "turbineid")
@PartitionKey(0)
private String turbineid = "";

@Column(name = "reported_time")
private long reported_time = 0;

@Column(name = "max_speed")
private long max_speed = 0;

@Column(name = "min_speed")
private long min_speed = 0;

@Column(name = "avg_speed")
private long avg_speed = 0;

The following code snippet demonstrates the implementation of Apache Cassandra Connector to sink aggregated wind speed sensor data TurbineAggregatedRecord into Amazon Keyspaces table. We’re using SigV4AuthProvider with Apache Cassandra Connector. The SigV4 authentication plugin lets you use IAM credentials for users or roles when connecting to Amazon Keyspaces. Instead of requiring a user name and password, this plugin signs API requests using access keys.

CassandraSink.addSink(result)
                .setClusterBuilder(
                        new ClusterBuilder() {

                            private static final long serialVersionUID = 2793938419775311824L;

                            @Override
                            public Cluster buildCluster(Cluster.Builder builder) {
                                return builder
                                        .addContactPoint("cassandra."+ region +".amazonaws.com")
                                        .withPort(9142)
                                        .withSSL()
                                        .withAuthProvider(new SigV4AuthProvider(region))
                                        .withLoadBalancingPolicy(
                                                DCAwareRoundRobinPolicy
                                                        .builder()
                                                        .withLocalDc(region)
                                                        .build())
                                        .withQueryOptions(queryOptions)
                                        .build();
                            }
                        })
                .setMapperOptions(() -> new Mapper.Option[] {Mapper.Option.saveNullFields(true)})
                .setDefaultKeyspace("sensor_data")
                .build();

Review output in Amazon Keyspaces Table

Once Amazon Kinesis Data Analytics Apache Flink application aggregates wind turbine sensor data and persists aggregated data in Amazon Keyspaces table, we can query and review aggregated data using Amazon Keyspaces CQL editor as illustrated in the following.

select * from sensor_data.turbine_aggregated_sensor_data

BDB-2063-cql-editor BDB-2063-cql-editor-result

Clean up

To avoid incurring future charges, complete the following steps:

  1. Empty Amazon S3 bucket created by AWS CloudFormation stack.
  2. Delete AWS CloudFormation stack.

Conclusion

As you’ve learned in this post, you can build Amazon Kinesis Data Analytics Apache Flink application to read sensor data from Amazon Kinesis Data Streams, perform aggregations, and persist aggregated sensor data in Amazon Keyspaces using Apache Cassandra Connector. There are several use cases in IoT and Application development to move data quickly through the analytics pipeline and persist data in Amazon Keyspaces.

We look forward to hearing from you about your experience. If you have questions or suggestions, please leave a comment.


About the Author

Pratik Patel is a Sr Technical Account Manager and streaming analytics specialist. He works with AWS customers and provides ongoing support and technical guidance to help plan and build solutions using best practices and proactively helps in keeping customer’s AWS environments operationally healthy.