Tag Archives: AWS Well-Architected

How to approach threat modeling

Post Syndicated from Darran Boyd original https://aws.amazon.com/blogs/security/how-to-approach-threat-modeling/

In this post, I’ll provide my tips on how to integrate threat modeling into your organization’s application development lifecycle. There are many great guides on how to perform the procedural parts of threat modeling, and I’ll briefly touch on these and their methodologies. However, the main aim of this post is to augment the existing guidance with some additional tips on how to handle the people and process components of your threat modeling approach, which in my experience goes a long way to improving the security outcomes, security ownership, speed to market, and general happiness of all involved. Furthermore, I’ll also provide some guidance specific to when you’re using Amazon Web Services (AWS).

Let’s start with a primer on threat modeling.

Why use threat modeling

IT systems are complex, and are becoming increasingly more complex and capable over time, delivering more business value and increased customer satisfaction and engagement. This means that IT design decisions need to account for an ever-increasing number of use cases, and be made in a way that mitigates potential security threats that may lead to business-impacting outcomes, including unauthorized access to data, denial of service, and resource misuse.

This complexity and number of use-case permutations typically makes it ineffective to use unstructured approaches to find and mitigate threats. Instead, you need a systematic approach to enumerate the potential threats to the workload, and to devise mitigations and prioritize these mitigations to make sure that the limited resources of your organization have the maximum impact in improving the overall security posture of the workload. Threat modeling is designed to provide this systematic approach, with the aim of finding and addressing issues early in the design process, when the mitigations have a low relative cost compared to later in the lifecycle.

The AWS Well-Architected Framework calls out threat modeling as a specific best practice within the Security Pillar, under the area of foundational security, under the question SEC 1: How do you securely operate your workload?:

“Identify and prioritize risks using a threat model: Use a threat model to identify and maintain an up-to-date register of potential threats. Prioritize your threats and adapt your security controls to prevent, detect, and respond. Revisit and maintain this in the context of the evolving security landscape.”

Threat modeling is most effective when done at the workload (or workload feature) level, in order to ensure that all context is available for assessment. AWS Well-Architected defines a workload as:

“A set of components that together deliver business value. The workload is usually the level of detail that business and technology leaders communicate about. Examples of workloads are marketing websites, e-commerce websites, the back-ends for a mobile app, analytic platforms, etc. Workloads vary in levels of architectural complexity, from static websites to architectures with multiple data stores and many components.”

The core steps of threat modeling

In my experience, all threat modeling approaches are similar; at a high level, they follow these broad steps:

  1. Identify assets, actors, entry points, components, use cases, and trust levels, and include these in a design diagram.
  2. Identify a list of threats.
  3. Per threat, identify mitigations, which may include security control implementations.
  4. Create and review a risk matrix to determine if the threat is adequately mitigated.

To go deeper into the general practices associated with these steps, I would suggest that you read the SAFECode Tactical Threat Modeling whitepaper and the Open Web Application Security Project (OWASP) Threat Modeling Cheat Sheet. These guides are great resources for you to consider when adopting a particular approach. They also reference a number of tools and methodologies that are helpful to accelerate the threat modeling process, including creating threat model diagrams with the OWASP Threat Dragon project and determining possible threats with the OWASP Top 10, OWASP Application Security Verification Standard (ASVS) and STRIDE. You may choose to adopt some combination of these, or create your own.

When to do threat modeling

Threat modeling is a design-time activity. It’s typical that during the design phase you would go beyond creating a diagram of your architecture, and that you may also be building in a non-production environment—and these activities are performed to inform and develop your production design. Because threat modeling is a design-time activity, it occurs before code review, code analysis (static or dynamic), and penetration testing; these all come later in the security lifecycle.

Always consider potential threats when designing your workload from the earliest phases—typically when people are still on the whiteboard (whether physical or virtual). Threat modeling should be performed during the design phase of a given workload feature or feature change, as these changes may introduce new threats that require you to update your threat model.

Threat modeling tips

Ultimately, threat modeling requires thought, brainstorming, collaboration, and communication. The aim is to bridge the gap between application development, operations, business, and security. There is no shortcut to success. However, there are things I’ve observed that have meaningful impacts on the adoption and success of threat modeling—I’ll be covering these areas in the following sections.

1. Assemble the right team

Threat modeling is a “team sport,” because it requires the knowledge and skill set of a diverse team where all inputs can be viewed as equal in value. For all listed personas in this section, the suggested mindset is to start from your end-customers’ expectations, and work backwards. Think about what your customers expect from this workload or workload feature, both in terms of its security properties and maintaining a balance of functionality and usability.

I recommend that the following perspectives be covered by the team, noting that a single individual can bring more than one of these perspectives to the table:

The Business persona – First, to keep things grounded, you’ll want someone who represents the business outcomes of the workload or feature that is part of the threat modeling process. This person should have an intimate understanding of the functional and non-functional requirements of the workload—and their job is to make sure that these requirements aren’t unduly impacted by any proposed mitigations to address threats. Meaning that if a proposed security control (that is, mitigation) renders an application requirement unusable or overly degraded, then further work is required to come to the right balance of security and functionality.

The Developer persona – This is someone who understands the current proposed design for the workload feature, and has had the most depth of involvement in the design decisions made to date. They were involved in design brainstorming or whiteboarding sessions leading up to this point, when they would typically have been thinking about threats to the design and possible mitigations to include. In cases where you are not developing your own in-house application (e.g. COTS applications) you would bring in the internal application owner.

The Adversary persona – Next, you need someone to play the role of the adversary. The aim of this persona is to put themselves in the shoes of an attacker, and to critically review the workload design and look for ways to take advantage of a design flaw in the workload to achieve a particular objective (for example, unauthorized sharing of data). The “attacks” they perform are a mental exercise, not actual hands-on-keyboard exploitation. If your organization has a so-called Red Team, then they could be a great fit for this role; if not, you may want to have one or more members of your security operations or engineering team play this role. Or alternately, bring in a third party who is specialized in this area.

The Defender persona – Then, you need someone to play the role of the defender. The aim of this persona is to see the possible “attacks” designed by the adversary persona as potential threats, and to devise security controls that mitigate the threats. This persona also evaluates whether the possible mitigations are reasonably manageable in terms of on-going operational support, monitoring, and incident response.

The AppSec SME persona – The Application Security (AppSec) subject matter expert (SME) persona should be the most familiar with the threat modeling process and discussion moderation methods, and should have a depth of IT security knowledge and experience. Discussion moderation is crucial for the overall exercise process to make sure that the overall objectives of the process are kept on-track, and that the appropriate balance between security and delivery of the customer outcome is maintained. Ultimately, it’s this persona who endorses the threat model and advises the scope of the actions beyond the threat modeling exercise—for example, penetration testing scope.

2. Have a consistent approach

In the earlier section, I listed some of the popular threat modeling approaches, and which one you select is not as important as using it consistently both within and across your teams.

By using a consistent approach and format, teams can move faster and estimate effort more accurately. Individuals can learn from examples, by looking at threat models developed by other team members or other teams—saving them from having to start from scratch.

When your team estimates the effort and time required to create a threat model, the experience and time taken from previous threat models can be used to provide more accurate estimations of delivery timelines.

Beyond using a consistent approach and format, consistency in the granularity and relevance of the threats being modeled is key. Later in this post I describe a recommendation for creating a catalog of threats for reuse across your organization.

Finally, and importantly, this approach allows for scalability: if a given workload feature that’s undergoing a threat modeling exercise is using components that have an existing threat model, then the threat model (or individual security controls) of those components can be reused. With this approach, you can effectively take a dependency on a component’s existing threat model, and build on that model, eliminating re-work.

3. Align to the software delivery methodology

Your application development teams already have a particular workflow and delivery style. These days, Agile-style delivery is most popular. Ensure that the approach you take for threat modeling integrates well with both your delivery methodology and your tools.

Just like for any other deliverable, capture the user stories related to threat modeling as part of the workload feature’s sprint, epic, or backlog.

4. Use existing workflow tooling

Your application development teams are already using a suite of tools to support their delivery methodology. This would typically include collaboration tools for documentation (for example, a team wiki), and an issue-tracking tool to track work products through the software development lifecycle. Aim to use these same tools as part of your security review and threat modeling workflow.

Existing workflow tools can provide a single place to provide and view feedback, assign actions, and view the overall status of the threat modeling deliverables of the workload feature. Being part of the workflow reduces the friction of getting the project done and allows threat modeling to become as commonplace as unit testing, QA testing, or other typical steps of the workflow.

By using typical workflow tools, team members working on creating and reviewing the threat model can work asynchronously. For example, when the threat model reviewer adds feedback, the author is notified, and then the author can address the feedback when they have time, without having to set aside dedicated time for a meeting. Also, this allows the AppSec SME to more effectively work across multiple threat model reviews that they may be engaged in.

Having a consistent approach and language as described earlier is an important prerequisite to make this asynchronous process feasible, so that each participant can read and understand the threat model without having to re-learn the correct interpretation each time.

5. Break the workload down into smaller parts

It’s advisable to decompose (break down) the workload into features and perform the threat modeling exercise at the feature level, rather than create a single threat model for an entire workload. This approach has a number of key benefits:

  1. Having smaller chunks of work allows more granular tracking of progress, which aligns well with development teams that are following Agile-style delivery, and gives leadership a constant view of progress.
  2. This approach tends to create threat models that are more detailed, which results in more findings being identified.
  3. Decomposing also opens up the opportunity for the threat model to be reused as a dependency for other workload features that use the same components.
  4. By considering threat mitigations for each component, at the overall workload level this means that a single threat may have multiple mitigations, resulting in an improved resilience against those threats.
  5. Issues with a single threat model, for example a critical threat which is not yet mitigated, does not become launch blocking for the entire workload, but rather just for the individual feature.

The question then becomes, how far should you decompose the workload?

As a general rule, in order to create a threat model, the following context is required, at a minimum:

  • One asset. For example, credentials, customer records, and so on.
  • One entry point. For example, Amazon API Gateway REST API deployment.
  • Two components. For example, a web browser and an API Gateway REST API; or API Gateway and an AWS Lambda function.

Creating a threat model for a given AWS service (for example, API Gateway) in isolation wouldn’t fully meet this criteria—given that the service is a single component, there is no movement of the data from one component to another. Furthermore, the context of all the possible use cases of the service within a workload isn’t known, so you can’t comprehensively derive the threats and mitigations. AWS performs threat modeling of the multiple features that make up a given AWS service. Therefore, for your workload feature that leverages a given AWS service, you wouldn’t need to threat model the AWS service, but instead consider the various AWS service configuration options and your own workload-specific mitigations when you look to mitigate the threats you’ve identified. I go into more depth on this in the “Identify and evaluate mitigations” section, where I go into the concept of baseline security controls.

6. Distribute ownership

Having a central person or department responsible for creation of threat models doesn’t work in the long run. These central entities become bottlenecks and can only scale up with additional head count. Furthermore, centralized ownership doesn’t empower those who are actually designing and implementing your workload features.

Instead, what scales well is distributed ownership of threat model creation by the team that is responsible for designing and implementing each workload feature. Distributed ownership scales and drives behavior change, because now the application teams are in control, and importantly they’re taking security learnings from the threat modeling process and putting those learnings into their next feature release, and therefore constantly improving the security of their workload and features.

This creates the opportunity for the AppSec SME (or team) to effectively play the moderator and security advisor role to all the various application teams in your organization. The AppSec SME will be in a position to drive consistency, adoption, and communication, and to set and raise the security bar among teams.

7. Identify entry points

When you look to identify entry points for AWS services that are components within your overall threat model, it’s important to understand that, depending on the type of AWS service, the entry points may vary based on the architecture of the workload feature included in the scope of the threat model.

For example, with Amazon Simple Storage Service (Amazon S3), the possible types of entry-points to an S3 bucket are limited to what is exposed through the Amazon S3 API, and the service doesn’t offer the capability for you, as a customer, to create additional types of entry points. In this Amazon S3 example, as a customer you make choices about how these existing types of endpoints are exposed—including whether the bucket is private or publicly accessible.

On the other end of the spectrum, Amazon Elastic Compute Cloud (Amazon EC2) allows customers to create additional types of entry-points to EC2 instances (for example, your application API), besides the entry-point types that are provided by the Amazon EC2 API and those native to the operating system running on the EC2 instance (for example, SSH or RDP).

Therefore, make sure that you’re applying the entry points that are specific to the workload feature, in additional to the native endpoints for AWS services, as part of your threat model.

8. Come up with threats

Your aim here is to try to come up with answers to the question “What can go wrong?” There isn’t any canonical list that lists all the possible threats, because determining threats depends on the context of the workload feature that’s under assessment, and the types of threats that are unique to a given industry, geographical area, and so on.

Coming up with threats requires brainstorming. The brainstorming exercise can be facilitated by using a mnemonic like STRIDE (Spoofing, Tampering, Repudiation, Information Disclosure, Denial of Service, and Elevation of Privilege), or by looking through threat lists like the OWASP Top 10 or HiTrust Threat Catalog to get the ideas flowing.

Through this process, it’s recommended that you develop and contribute to a threat catalog that is contextual to your organization and will accelerate the brainstorming process going forward, as well as drive consistency in the granularity of threats that you model.

9. Identify and evaluate mitigations

Here, your aim is to identify the mitigations (security controls) within the workload design and evaluate whether threats have been adequately addressed. Keep in mind that there are typically multiple layers of controls and multiple responsibilities at play.

For your own in-house applications and code, you would want to review the mitigations you’ve included in your design—including, but not limited to, input validation, authentication, session handling, and bounds handling.

Consider all other components of your workload (for example, software as a service (SaaS), infrastructure supporting your COTS applications, or components hosted within your on-premises data centers) and determine the security controls that are part of the workload design.

When you use AWS services, Security and Compliance is a shared responsibility between AWS and you as our customer. This is described on the AWS Shared Responsibility Model page.

This means, for the portions of the AWS services that you’re using that are the responsibility of AWS (Security of the Cloud), the security controls are managed by AWS, along with threat identification and mitigation. The distribution of responsibility between AWS (Security of the Cloud) and you (Security in the Cloud) depends on which AWS service you use. Below, I provide examples of infrastructure, container, and abstracted AWS services to show how your responsibility for identifying and mitigating threats can vary:

  • Amazon EC2 is a good example of an infrastructure service, where you are able to access a virtual server in the cloud, you get to choose the operating system, and you have control of the service and all aspects you run on it—so you would be responsible for mitigating the identified threats.
  • Amazon Relational Database Service (Amazon RDS) is a representative example of a container service, where there is no operating system exposed for you, and instead AWS exposes the selected database engine to you (for example, MySQL). AWS is responsible for the security of the operating system in this example, and you don’t need to devise mitigations. However, the database engine is under your control as well as all aspects above it, so you would need to consider mitigations for these areas. Here, AWS is taking on a larger portion of the responsibility compared to infrastructure services.
  • Amazon S3, AWS Key Management Service (AWS KMS), and Amazon DynamoDB are examples of an abstracted service where AWS exposes the entire service control plane and data plane to you through the service API. Again, here there are no operating systems, database engines, or platforms exposed to you—these are an AWS responsibility. However, the API actions and associated policies are under your control and so are all aspects above the API level, so you should be considering mitigations for these. For this type of service, AWS takes a larger portion of responsibility compared to container and infrastructure types of services.

While these examples do not encompass all types of AWS services that may be in your workload, they demonstrate how your Security and Compliance responsibilities under the Shared Responsibility Model will vary in this context. Understanding the balance of responsibilities between AWS and yourself for the types of AWS services in your workload helps you scope your threat modeling exercise to the mitigations that are under your control, which are typically a combination of AWS service configuration options and your own workload-specific mitigations. For the AWS portion of the responsibility, you will find that AWS services are in-scope of many compliance programs, and the audit reports are available for download for AWS customers (at no cost) from AWS Artifact.

Regardless of which AWS services you’re using, there’s always an element of customer responsibility, and this should be included in your workload threat model.

Specifically, for security control mitigations for the AWS services themselves, you’d want to consider security controls across domains, including these domains: Identity and Access Management (Authentication/Authorization), Data Protection (At-Rest, In-Transit), Infrastructure Security, and Logging and Monitoring. AWS services each have a dedicated security chapter in the documentation, which provides guidance on the security controls to consider as mitigations. When capturing these security controls and mitigations in your threat model, you should aim to include references to the actual code, IAM policies, and AWS CloudFormation templates located in the workload’s infrastructure-as-code repository, and so on. This helps the reviewer or approver of your threat model to get an unambiguous view of the intended mitigation.

As in the case for threat identification, there’s no canonical list enumerating all the possible security controls. Through the process described here, you should consciously develop baseline security controls that align to your organization’s control objectives, and where possible, implement these baseline security controls as platform-level controls, including AWS service-level configurations (for example, encryption at rest) or guardrails (for example, through service control policies). By doing this, you can drive consistency and scale, so that these implemented baseline security controls are automatically inherited and enforced for other workload features that you design and deploy.

When you come up with the baseline security controls, it’s important to note that the context of a given workload feature isn’t known. Therefore, it’s advisable to consider these controls as a negotiable baseline that you can deviate from, provided that when you perform the workload threat modeling exercise, you find that the threat that the baseline control was designed to mitigate isn’t applicable, or there are other mitigations or compensating controls that adequately mitigate the threat. Compensating controls and mitigating factors could include: reduced data asset classification, non-human access, or ephemeral data/workload.

To learn more about how to start thinking about baseline security controls as part of your overall cloud security governance, have a look at the How to think about cloud security governance blog post.

10. Decide when enough is enough

There’s no perfect answer to this question. However, it’s important to have a risk-based perspective on the threat modeling process to create a balanced approach, so that the likelihood and impact of a risk are appropriately considered. Over-emphasis on “let’s build and ship it” could lead to significant costs and delays later. Conversely, over-emphasis on “let’s mitigate every conceivable threat” could lead to the workload feature shipping late (or never), and your customers might move on. In the recommendation I made earlier in the “Assemble the right team” section, the selection of personas is deliberate to make sure that there’s a natural tension between shipping the feature, and mitigating threats. Embrace this healthy tension.

11. Don’t let paralysis stop you before you start

Earlier in the “Break the workload down into smaller parts” section, I gave the recommendation that you should scope your threat models down to a workload feature. You may be thinking to yourself, “We’ve already shipped <X number> of features, how do we threat model those?” This is a completely reasonable question.

My view is that rather than go back to threat model features that are already live, aim to threat model any new features that you are working on now and improve the security properties of the code you ship next, and for each feature you ship after that. During this process you, your team, and your organization will learn—not just about threat modeling—but how to communicate effectively with one another. Make adjustments, iterate, improve. Sometime in the future, when you’re routinely providing high quality, consistent and reusable threat models for your new features, you can start putting activities to perform threat modeling for existing features into your backlog.

Conclusion

Threat modeling is an investment—in my view, it’s a good one, because finding and mitigating threats in the design phase of your workload feature can reduce the relative cost of mitigation, compared to finding the threats later. Consistently implementing threat modeling will likely also improve your security posture over time.

I’ve shared my observations and tips for practical ways to incorporate threat modeling into your organization, which center around communication, collaboration, and human-led expertise to find and address threats that your end customer expects. Armed with these tips, I encourage you to look across the workload features you’re working on now (or have in your backlog) and decide which ones will be the first you’ll threat model.

If you have feedback about this post, submit comments in the Comments section below.

Want more AWS Security how-to content, news, and feature announcements? Follow us on Twitter.

Boyd author photo

Darran Boyd

Darran is a Principal Security Solutions Architect at AWS, responsible for helping customers make good security choices and accelerating their journey to the AWS Cloud. Darran’s focus and passion is to deliver strategic security initiatives that unlock and enable our customers at scale.

New – SaaS Lens in AWS Well-Architected Tool

Post Syndicated from Danilo Poccia original https://aws.amazon.com/blogs/aws/new-saas-lens-in-aws-well-architected-tool/

To help you build secure, high-performing, resilient, and efficient solutions on AWS, in 2015 we publicly launched the AWS Well-Architected Framework. It started as a single whitepaper but has expanded to include domain-specific lenses, hands-on labs, and the AWS Well-Architected Tool (available at no cost in the AWS Management Console) that provides a mechanism for regularly evaluating your workloads, identifying high risk issues, and recording your improvements.

To offer more workload-specific advice, in 2017 we extended the framework with the concept of “lens” to go beyond a general perspective and enter specific technology domains. Now, to help accelerate building Software-as-a-Service (SaaS) solutions, the AWS SaaS Factory team has led an effort to build a new AWS Well-Architected SaaS Lens.

SaaS is a licensing and delivery model by which software is centrally managed and hosted by a provider and available to customers on a subscription basis. In this way, software providers can innovate rapidly, optimize their costs, and gain operational efficiencies. At the same time, customers benefit from simplified IT management, speed, and a pay-for-what-you-use business model.

The Well-Architected SaaS Lens adds questions to the tool that are tailored to SaaS workloads and intended to drive critical thinking for developing and operating SaaS workloads. Each question has a list of best practices, and each best practice has a list of improvement plans to help guide you in implementing them. AWS Solution Architects from the AWS SaaS Factory Program, having worked with thousands of software developers and AWS Partners, view these well-architected patterns as a key component of building and operating a SaaS architecture on AWS.

Using the SaaS Lens in the Well-Architected Tool
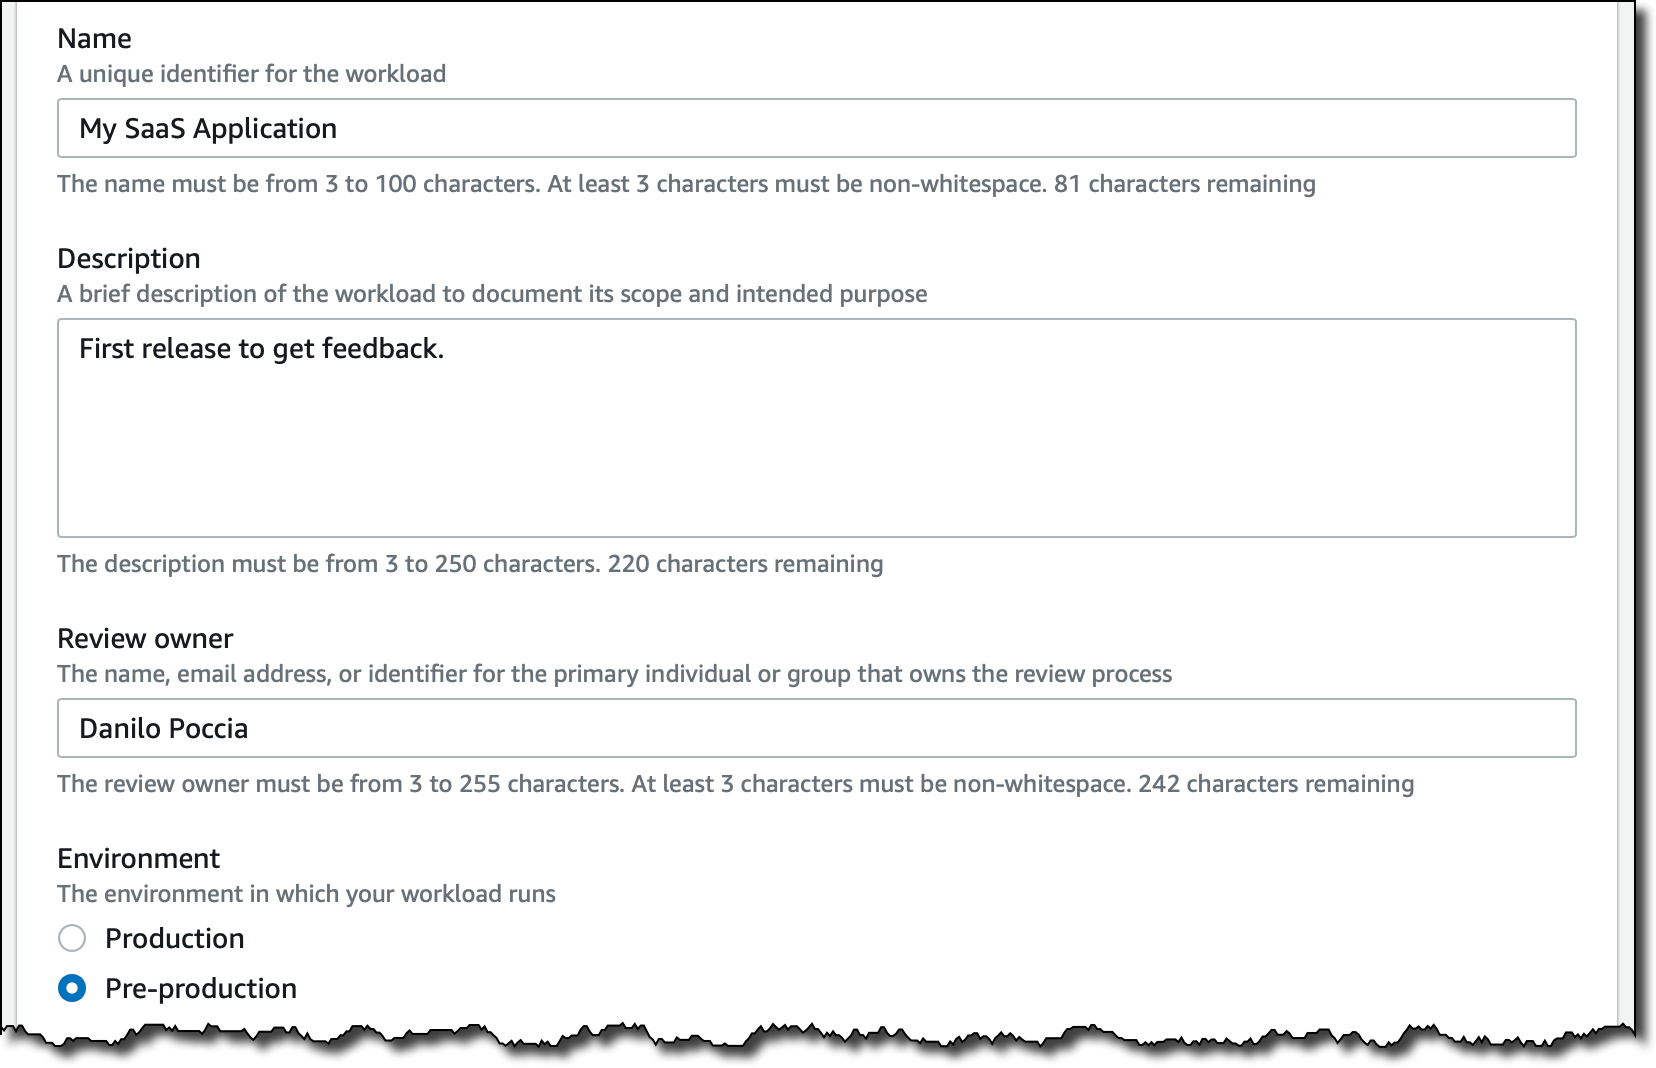
In the Well-Architected Tool console, I start by defining my workload. Today, I’m reviewing a pre-production environment of a SaaS application. It’s just a minimum viable product (MVP) version of what I want to build, with just enough features to be usable and get a first feedback.

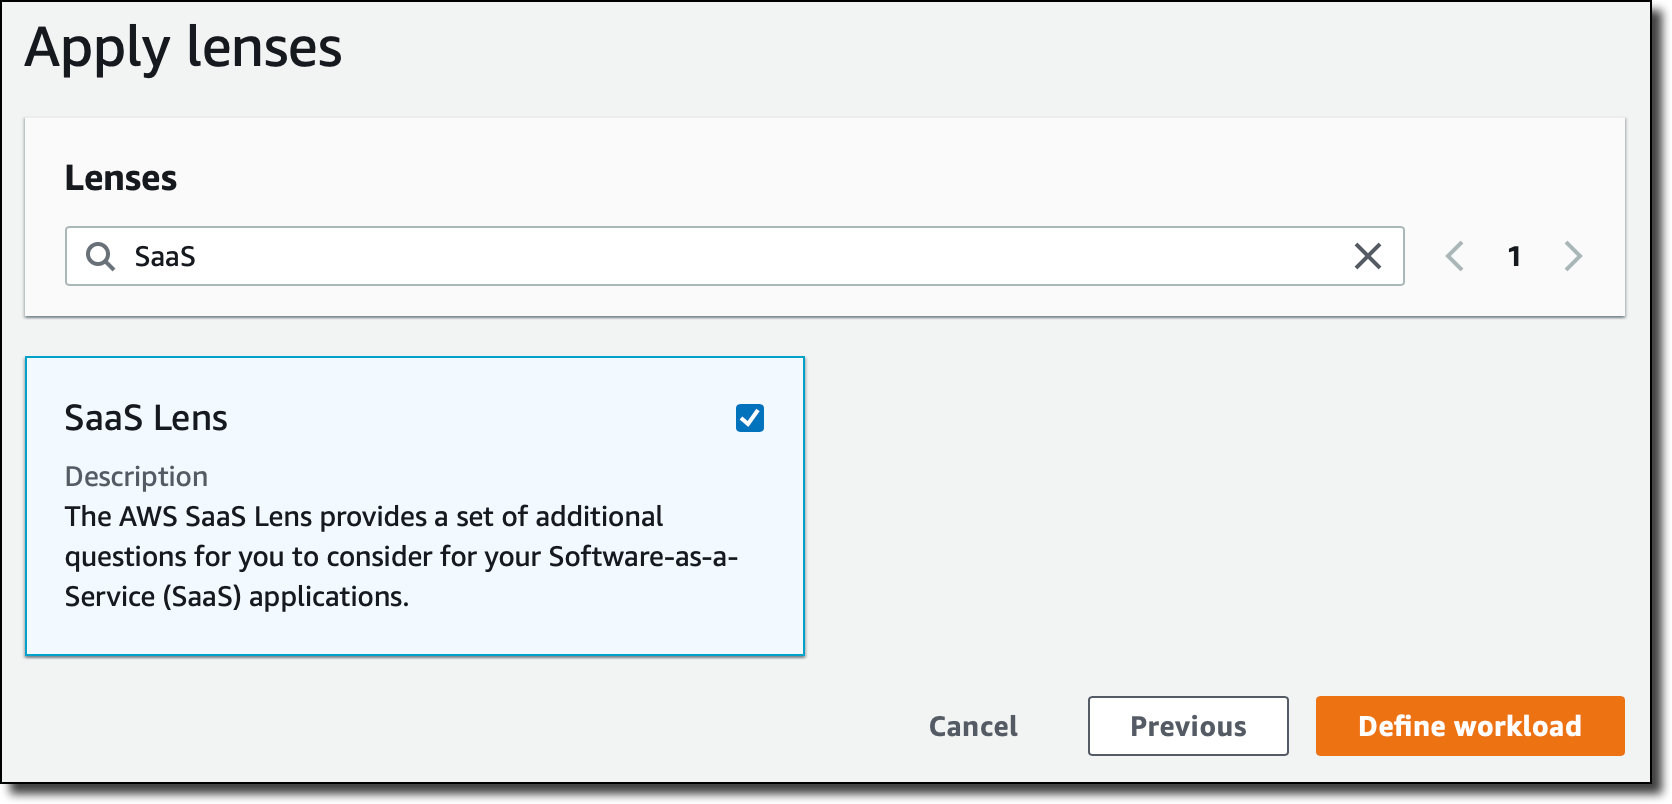
Now, I can choose which lenses to apply. The AWS Well-Architected Framework is there by default. I select the SaaS Lens. This is adding a set of additional questions that help me understand how to design, deploy, and architect my SaaS workload following the framework best practices. Other lenses are available in the tool, for example the Serverless Lens described here.

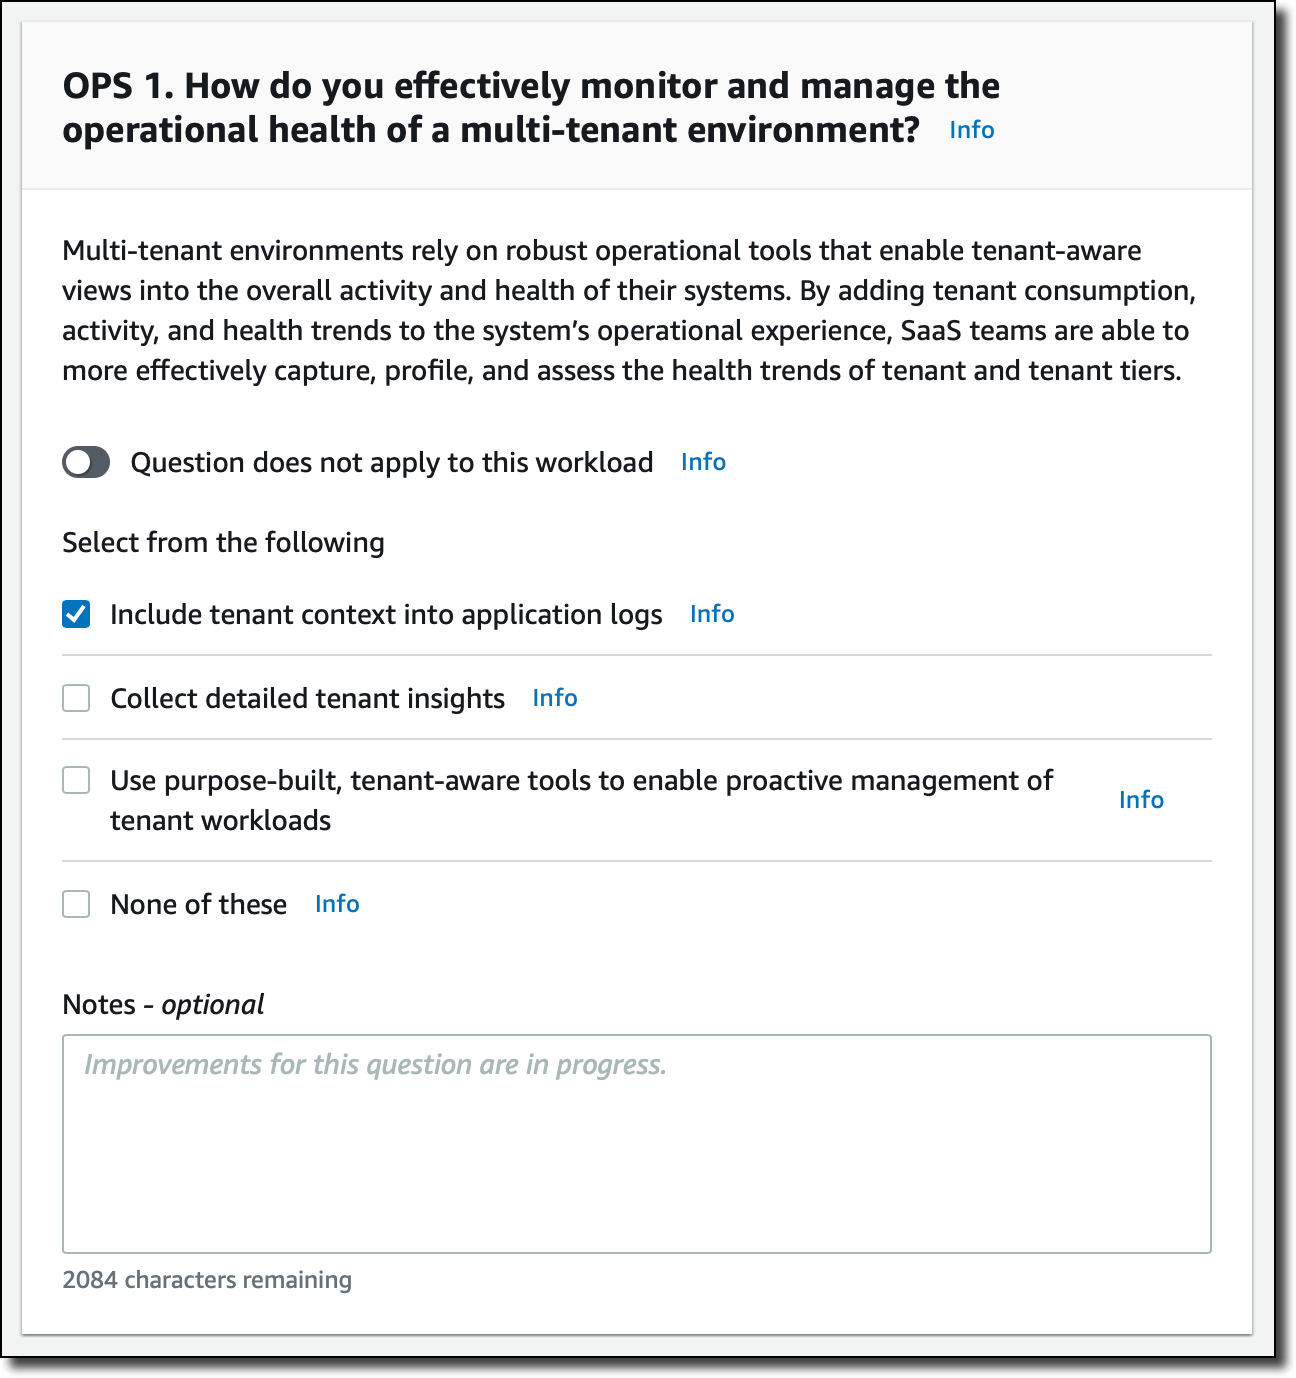
Now, I start my review. Many questions in the SaaS Lens are focused on how you are managing a multi-tenant application. This is the first question for the Operational Excellence pillar. I can also add some notes to explain my answer better or take note of what I want to improve.

I don’t need to answer all questions to start improving my SaaS application. For example, this is the improvement plan based on my answer to the previous question. For each point here, I can click and get more information on how to implement that on AWS.

Moving to the Reliability pillar, I feel more confident because of the techniques I used to separate individual tenants of my SaaS application in their own “sandbox” environment.

As I expect, no risks are detected this time!

When I finish reviewing the SaaS Lens for my workload, I get an overview of the detected risks. Here, I can also save a milestone that I can use later to compare my status and estimate my improvements.

Just below that, I get a suggestion on what to focus on next. Again, I can click and get in-depth suggestion on how to mitigate the risk.

As often happens in IT services, this is an iterative process. The AWS Well-Architected Tool helps quantify the risks and gives me a path to follow to continuously improve my SaaS application.

Available Now
The SaaS Lens is available today in all regions where the AWS Well-Architected Tool is offered, as described in the AWS Regional Services List. It can be applied to existing workloads, or used for new workloads you define in the tool.

There are no costs in using the AWS Well-Architected Tool; you can use it to improve the application you are working on, or to get visibility into multiple workloads used by the department or area you are working with.

Learn more about the new SaaS Lens and get started today with the AWS Well-Architected Tool!

Danilo

Techniques for writing least privilege IAM policies

Post Syndicated from Ben Potter original https://aws.amazon.com/blogs/security/techniques-for-writing-least-privilege-iam-policies/

In this post, I’m going to share two techniques I’ve used to write least privilege AWS Identity and Access Management (IAM) policies. If you’re not familiar with IAM policy structure, I highly recommend you read understanding how IAM works and policies and permissions.

Least privilege is a principle of granting only the permissions required to complete a task. Least privilege is also one of many Amazon Web Services (AWS) Well-Architected best practices that can help you build securely in the cloud. For example, if you have an Amazon Elastic Compute Cloud (Amazon EC2) instance that needs to access an Amazon Simple Storage Service (Amazon S3) bucket to get configuration data, you should only allow read access to the specific S3 bucket that contains the relevant data.

There are a number of ways to grant access to different types of resources, as some resources support both resource-based policies and IAM policies. This blog post will focus on demonstrating how you can use IAM policies to grant restrictive permissions to IAM principals to meet least privilege standards.

In AWS, an IAM principal can be a user, role, or group. These identities start with no permissions and you add permissions using a policy. In AWS, there are different types of policies that are used for different reasons. In this blog, I only give examples for identity-based policies that attach to IAM principals to grant permissions to an identity. You can create and attach multiple identity-based policies to your IAM principals, and you can reuse them across your AWS accounts. There are two types of managed policies. Customer managed policies are created and managed by you, the customer. AWS managed policies are provided as examples, cannot be modified, but can be copied, enhanced, and saved as Customer managed policies. The main elements of a policy statement are:

  • Effect: Specifies whether the statement will Allow or Deny an action.
  • Action: Describes a specific action or actions that will either be allowed or denied to run based on the Effect entered. API actions are unique to each service. For example, s3:ListBuckets is an Amazon S3 service API action that enables an IAM Principal to list all S3 buckets in the same account.
  • NotAction: Can be used as an alternative to using Action. This element will allow an IAM principal to invoke all API actions to a specific AWS service except those actions specified in this list.
  • Resource: Specifies the resources—for example, an S3 bucket or objects—that the policy applies to in Amazon Resource Name (ARN) format.
  • NotResource: Can be used instead of the Resource element to explicitly match every AWS resource except those specified.
  • Condition: Allows you to build expressions to match the condition keys and values in the policy against keys and values in the request context sent by the IAM principal. Condition keys can be service-specific or global. A global condition key can be used with any service. For example, a key of aws:CurrentTime can be used to allow access based on date and time.

Starting with the visual editor

The visual editor is my default starting place for building policies as I like the wizard and seeing all available services, actions, and conditions without looking at the documentation. If there is a complex policy with many services, I often look at the AWS managed policies as a starting place for the actions that are required, then use the visual editor to fine tune and check the resources and conditions.

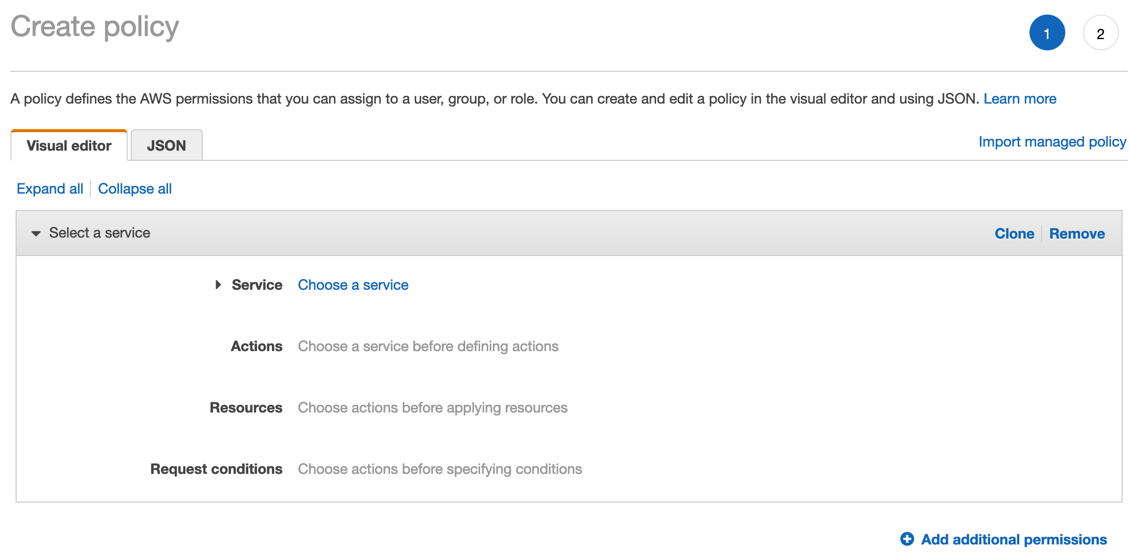
The policy I’m going to walk you through creating is to grant an AWS Lambda function permission to get specific objects from Amazon S3, and put items in a specific table in Amazon DynamoDB. You can access the visual editor when you choose Create policy under policies in the IAM console, or add policies when viewing a role, group, or user as shown in Figure 1. If you’re not familiar with creating policies, you can follow the full instructions in the IAM documentation.

Figure 1: Use the visual editor to create a policy

Figure 1: Use the visual editor to create a policy

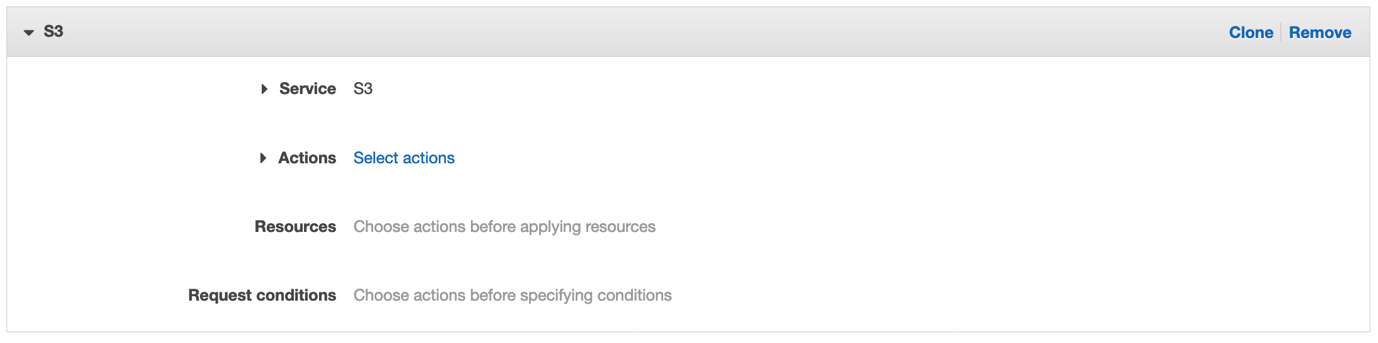
Begin by choosing the first service—S3—to grant access to as shown in Figure 2. You can only choose one service at a time, so you’ll need to add DynamoDB after.

Figure 2: Select S3 service

Figure 2: Select S3 service

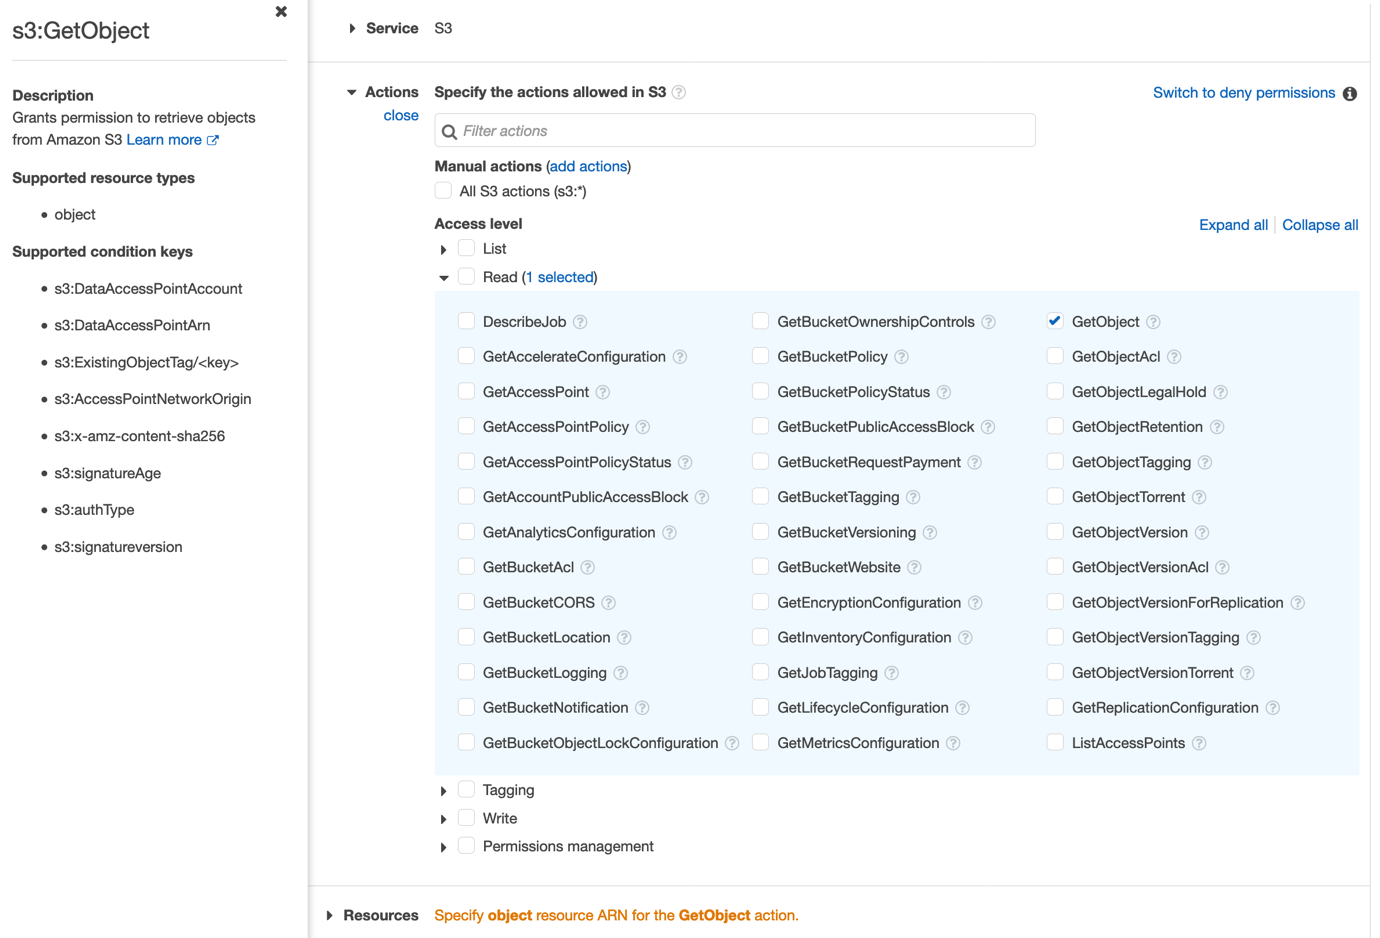
Now you will see a list of access levels with the option to manually add actions. Expand the read access level to show all read actions that are supported by the Amazon S3 service. You can now see all read access level actions. For getting an object, check the box for GetObject. Selecting the ? next to an action expands information including a description, supported resource types, and supported condition keys as shown in Figure 3.

Figure 3: Expand Read in Access level, select GetObject, and select the ? next to GetObject

Figure 3: Expand Read in Access level, select GetObject, and select the ? next to GetObject

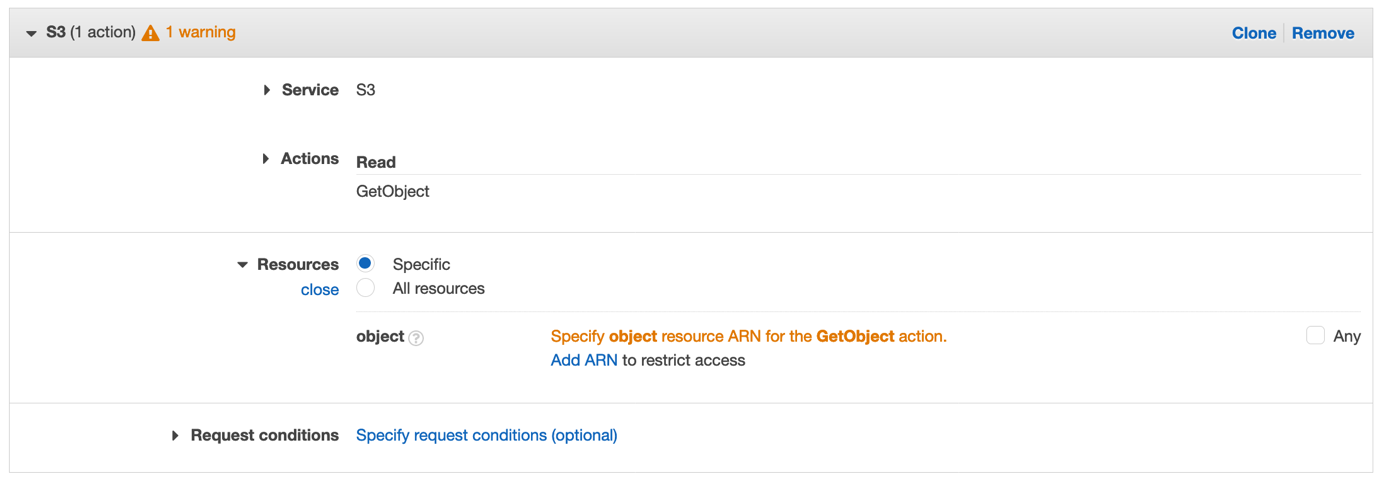
Expand Resources, you will see that the visual editor has listed object as that is the only resource supported by the GetObject action as shown in Figure 4.

Figure 4: Expand Resources

Figure 4: Expand Resources

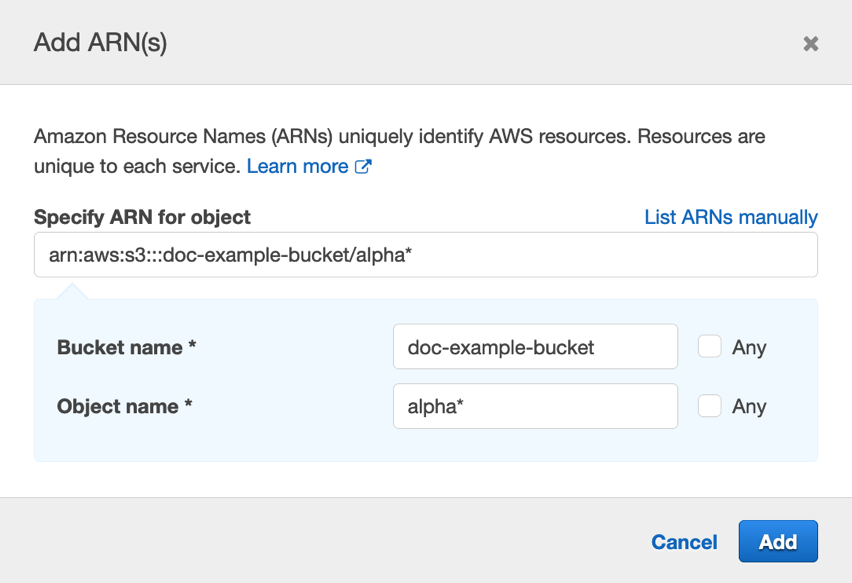
Select Add ARN, which opens a dialogue to help you specify the ARN for the objects. Enter a bucket name—such as doc-example-bucket—and then the object name. For the object name you can use a wildcard (*) as a suffix. For example, to allow objects beginning with alpha you would enter alpha*. This is an important step. For this least privileged policy, you are restricting to a specific bucket, and an object prefix. You could even specify an individual object depending on your use case.

Figure 5: Enter bucket name and object name

Figure 5: Enter bucket name and object name

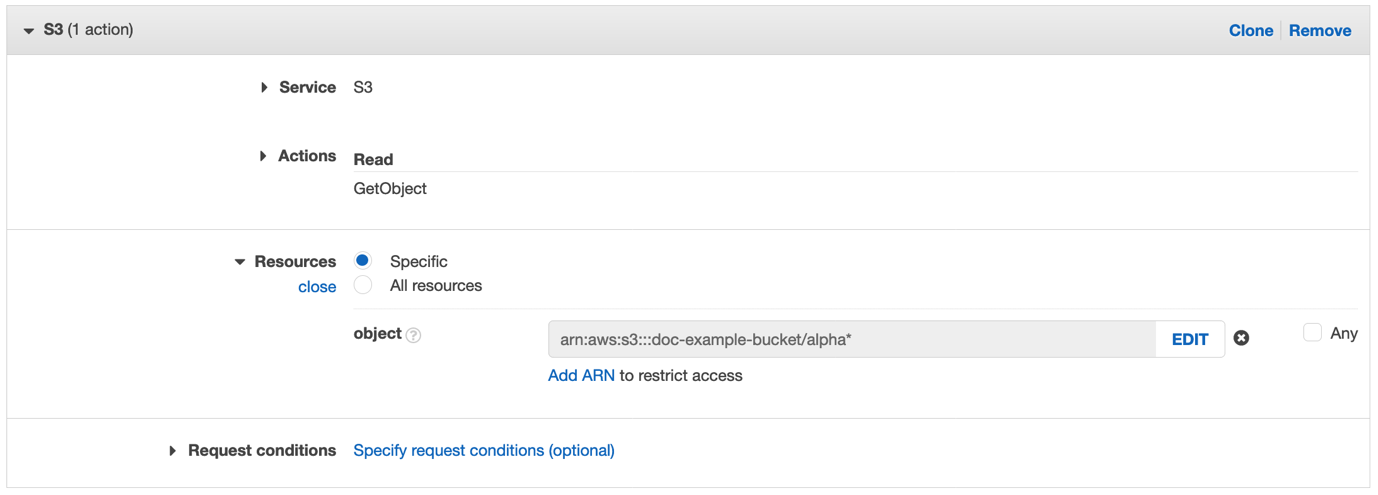
If you have multiple ARNs (bucket and objects) to allow, you can repeat the step.

Figure 6: ARN added for S3 object

Figure 6: ARN added for S3 object

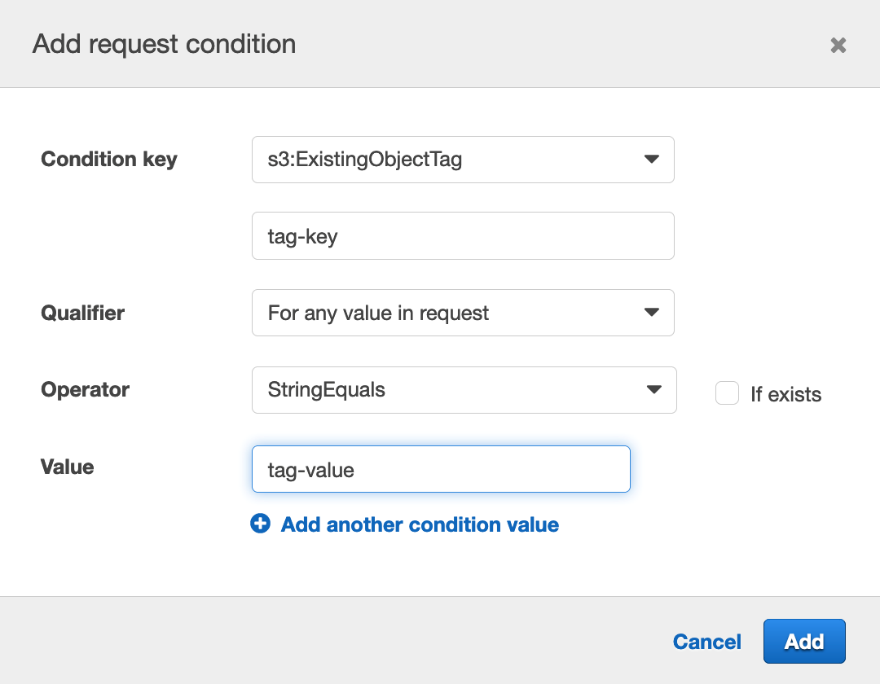
The final step is to expand the request conditions, and choose Add condition. The Add request condition dialogue will open. Select the drop down next to Condition key to list the global condition keys, then the service level condition keys are listed after. You’ll see that there’s an s3:ExistingObjectTag condition that—as the name suggests—matches an existing object tag. You can use this condition key to allow the GetObject request only when the object tag meets your condition. That means you can tag your objects with a specific tag key and value pair, and your policy condition must match this key-value pair to allow the action to execute. When you’re using condition keys with multiple keys or values, you can use condition operators and evaluation logic. As shown in Figure 7, tag-key is entered directly below the condition key. This is the key of the tag to match. For the Operator, select StringEquals to match the tag exactly. Checking If exists tests at least one member of the set of request values, and at least one member of the set of condition key values. The Value to enter is the actual tag value: tag-value as shown in figure 7.

Figure 7: ARN added for S3 object

Figure 7: ARN added for S3 object

That’s it for adding the S3 action, as shown in figure 8.

Figure 8: S3 GetObject action with resource and conditions configured

Figure 8: S3 GetObject action with resource and conditions configured

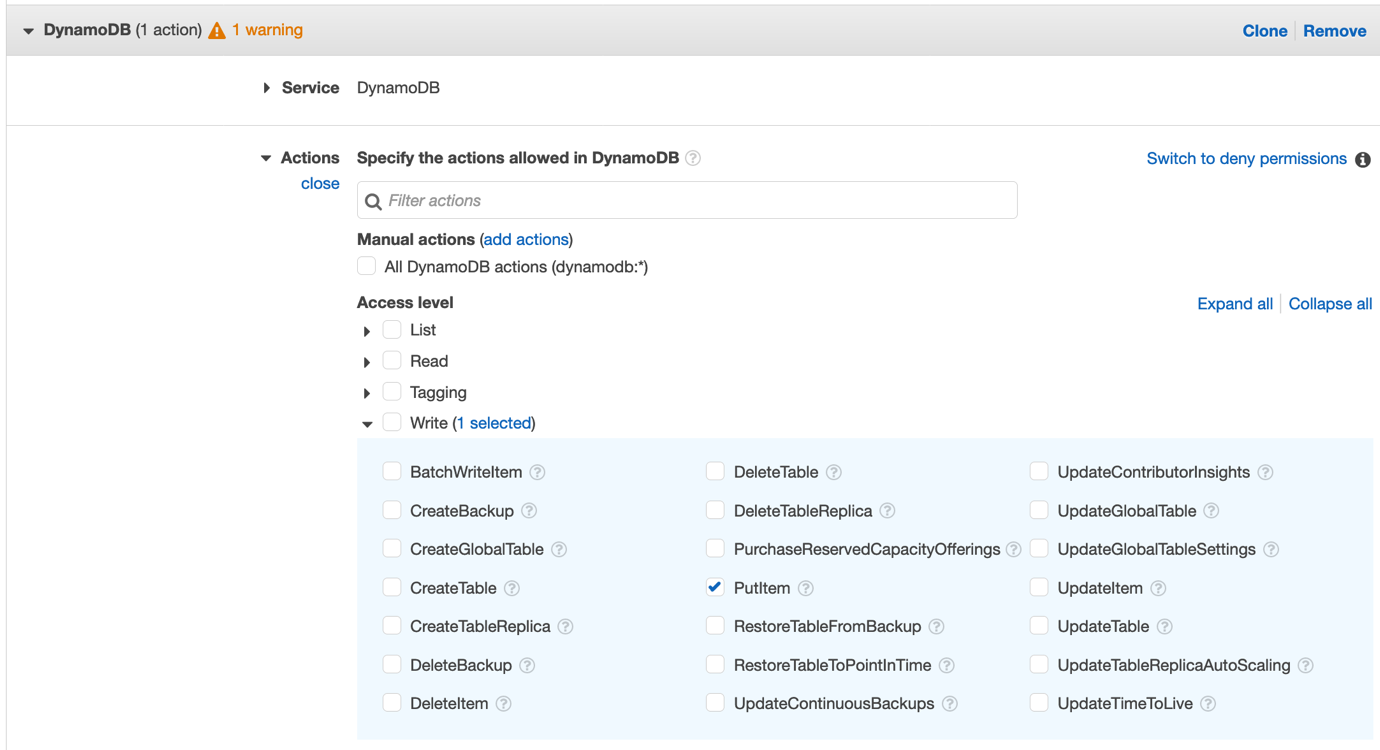
Now you need to add the DynamoDB permissions by selecting Add additional permissions. Select Choose a service and then select DynamoDB. For actions, expand the Write access level, then choose PutItem.

Figure 9: Choose write access level

Figure 9: Choose write access level

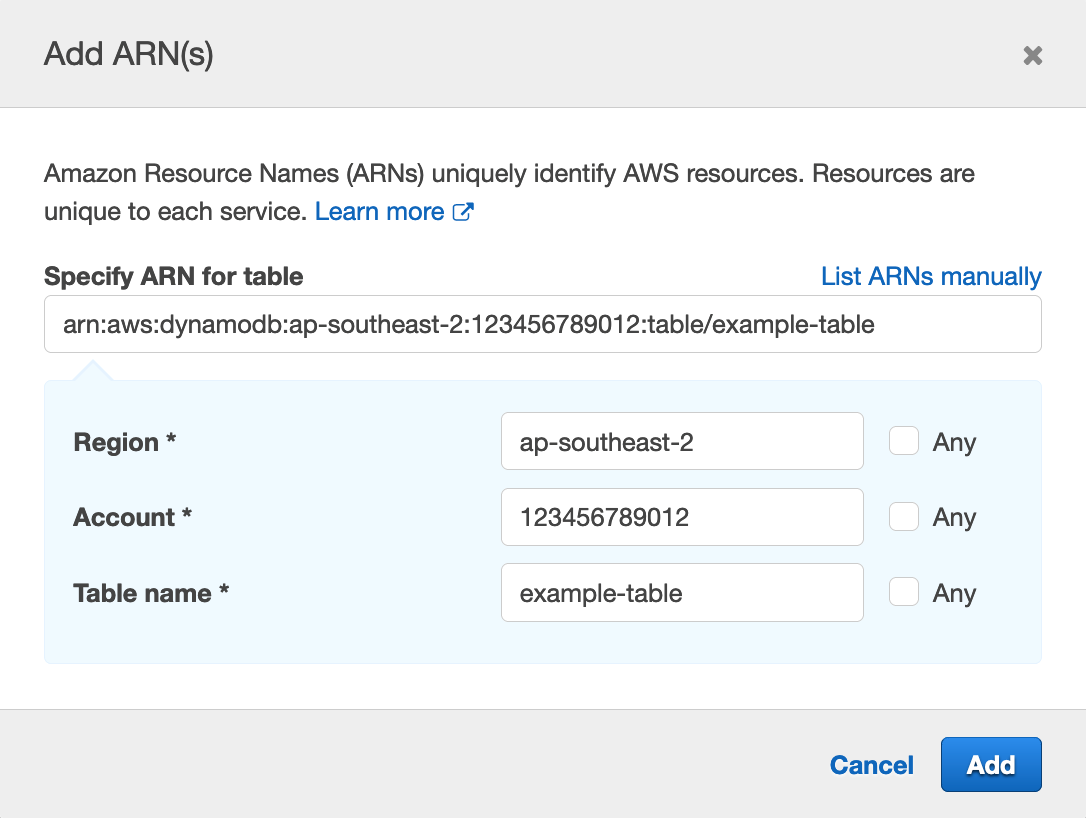
Expand Resources and then select Add ARN. The dialogue that appears will help you build the ARN just like it did for the Amazon S3 service. Enter the Region, for example the ap-southeast-2 (Sydney) Region, the account ID, and the table name. Choosing Add will add the resource ARN to your policy.

Figure 10: Enter Region, account, and table name

Figure 10: Enter Region, account, and table name

Now it’s time to add conditions. Expand Request conditions and then choose Add condition.

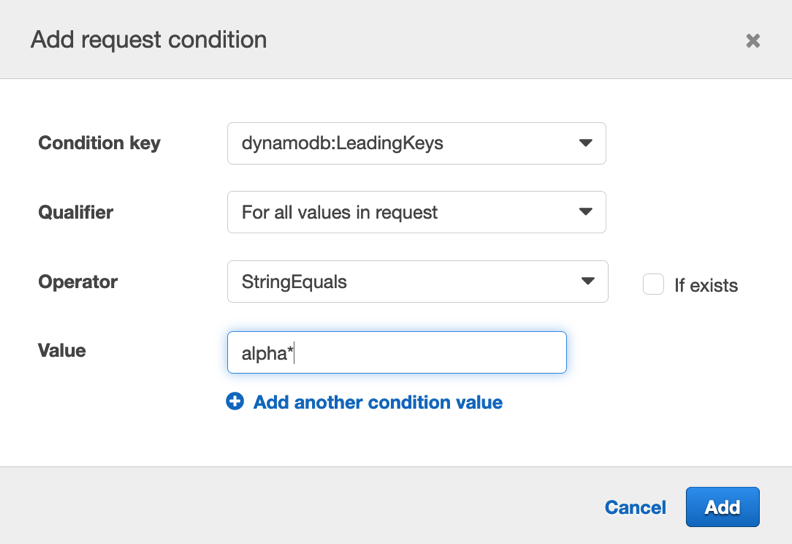
There are many DynamoDB conditions that you could use, however you can choose dynamodb:LeadingKeys to represent the first key, or partition keys in a table. You can see from the documentation that a qualifier of For all values in request is recommend. For the Operator you can use StringEquals as your string is going to exactly match, then a Value can use a prefix with wildcard, such as alpha* as shown in figure 11.

Figure 11: Add request conditions

Figure 11: Add request conditions

Choosing Add will take you back to the main visual editor where you can choose Review policy to continue. Enter a name and description for the policy, and then choose Create policy.

You can now attach it to a role to test.

You can see in this example that a policy can use least privilege by using specific resources and conditions. Note that sometimes when you use the AWS Management Console, it requires additional permissions to provide information for the console experience.

Starting with AWS managed policies

AWS managed policies can be a good starting place to see the actions typically associated with a particular service or job function. For example, you can attach the AmazonS3ReadOnlyAccess policy to a role used by an Amazon EC2 instance that allows read-only access to all Amazon S3 buckets. It has an effect of Allow to allow access, and there are two actions that use wildcards (*) to allow all Get and List actions for S3—for example, s3:GetObject and s3:ListBuckets. The resource is a wildcard to allow all S3 buckets the account has access to. A useful feature of this policy is that it only allows read and list access to S3, but not to any other services or types of actions.

Let’s make our own custom IAM policy to make it least privilege. Starting with the action element, you can use the reference for Amazon S3 to see all actions, a description of what each action does, the resource type for each action, and condition keys for each action. Now let’s imagine this policy is used by an Amazon EC2 instance to fetch an application configuration object from within an S3 bucket. Looking at the descriptions for actions starting with Get you can see that the only action that we really need is GetObject. You can then use the resource element to restrict an action to a set of objects prefixed with config within a specific bucket.

         "Effect": "Allow",
         "Action": "s3:GetObject",
         "Resource": "arn:aws:s3::: <doc-example-bucket>/<config*>"

Now that you’ve reduced the scope of what this policy can do for service actions and resources, you can add a condition element that uses attribute based access control (ABAC) to define conditions based on attributes—in this case, a resource tag. In this example, when you’re reading objects from a single bucket, you can set specific conditions to further reduce the scope of permissions given to an IAM principal. There’s an s3:ExistingObjectTag condition that you can use to allow the GetObject request only when the object tag meets your condition. That means you can tag your objects with a specific tag key and value pair, and your IAM policy condition must match this key-value pair to allow the API action to successfully run. When you’re using condition keys with multiple keys or values, you can use condition operators and evaluation logic. You can see that ForAnyValue tests at least one member of the set of request values, and at least one member of the set of condition key values. Alternatively, you can use global condition keys that apply to all services:

         "Effect": "Allow",
         "Action": "s3:GetObject",
         "Resource": "arn:aws:s3:::<doc-example-bucket>/<config*>",
         "Condition": {
                "ForAnyValue:StringEquals": {
                    "s3:ExistingObjectTag/<tag-key>": "<tag-value>"
            }

In the preceding policy example, the condition element only allows s3:GetObject permissions if the object is tagged with a key of tag-key and a value of tag-value. While you’re experimenting, you can identify errors in your custom policies by using the IAM policy simulator or reviewing the errors messages recorded in AWS CloudTrail logs.

Conclusion

In this post, I’ve shown two different techniques that you can use to create least privilege policies for IAM. You can adapt these methods to create AWS Single Sign-On permission sets and AWS Organizations service control policies (SCPs). Starting with managed policies is a useful strategy when an AWS supplied managed policy already exists for your use case, and then to reduce the scope of what it can do through permissions. I tend to use the visual editor the most for editing policies because it saves looking up the resource and conditions for each action. I suggest that you start by reviewing the policies you’re already using. Start with policies that grant excessive permissions—like the example Administrator policy—and tie them back to the use case of the users or things that need the access. Use the last accessed information, IAM best practices, and look at the AWS Well-Architected best practices and AWS Well-Architected tool.

If you have feedback about this post, submit comments in the Comments section below.

Want more AWS Security how-to content, news, and feature announcements? Follow us on Twitter.
Author

Ben Potter

Ben is the global security leader for the AWS Well-Architected Framework and is responsible for sharing best practices in security with customers and partners. Ben is also an ambassador for the No More Ransom initiative helping fight cyber crime with Europol, McAfee, and law enforcement across the globe. You can learn more about him in this interview.

How to think about cloud security governance

Post Syndicated from Paul Hawkins original https://aws.amazon.com/blogs/security/how-to-think-about-cloud-security-governance/

When customers first move to the cloud, their instinct might be to build a cloud security governance model based on one or more regulatory frameworks that are relevant to their industry. Although this can be a helpful first step, it’s also critically important that organizations understand what the control objectives for their workloads should be.

In this post, we discuss what you need to do both organizationally and technically with Amazon Web Services (AWS) to build an efficient and effective governance model. People who are taking their first steps in cloud can use this post to guide their thinking. It can also act as useful context for folks who have been running in the cloud for a while to evaluate their current governance approach.

But before you can build that model, it’s important to understand what governance is and to consider why you need it. Governance is how an organization ensures the consistent application of policies across all teams. The best way to implement consistent governance is by codifying as much of the process as possible. Security governance in particular is used to support business objectives by defining policies and controls to manage risk.

Moving to the cloud provides you with an opportunity to deliver features faster, react to the changing world in a more agile way, and return some decision making to the hands of the people closest to the business. In this fast-paced environment, it’s important to have a way to maintain consistency, scaleability, and security. This is where a strong governance model helps.

Creating the right governance model for your organization may seem like a complex task, but it doesn’t have to be.

Frameworks

Many customers use a standard framework that’s relevant to their industry to inform their decision-making process. Some frameworks that are commonly used to develop a security governance model include: NIST Cybersecurity Framework (CSF), Information Security Registered Assessors Program (IRAP), Payment Card Industry Data Security Standard (PCI DSS), or ISO/IEC 27001:2013

Some of these standards provide requirements that are specific to a particular regulator, or region and others are more widely applicable—you should choose one that fits the needs of your organization.

While frameworks are useful to set the context for a security program and give guidance on governance models, you shouldn’t build either one only to check boxes on a particular standard. It’s critical that you should build for security first and then use the compliance standards as a way to demonstrate that you’re doing the right things.

Control objectives

After you’ve selected a framework to use, the next considerations are controls. A control is a technical- or process-based implementation that’s designed to ensure that the likelihood or consequences of an identified risk are reduced to a level that’s acceptable to the organization’s risk appetite. Examples of controls include firewalls, logging mechanisms, access management tools, and many more.

Controls will evolve over time; sometimes they do so very quickly in the early stages of cloud adoption. During this rapid evolution, it’s easy to focus purely on the implementation of a control rather than the objective of it. However, if you want to build a robust and useful governance model, you must not lose sight of control objectives.

Consider the example of the firewall. When you use a firewall, you implement a control. The objective is to make sure that only traffic that should reach your environment is able to reach it. Although a firewall is one way to meet this objective, you can achieve the same outcome with a layered approach using Amazon Virtual Private Cloud (Amazon VPC) Security Groups, AWS WAF and Amazon VPC network access control lists (ACLs). Splitting the control implementation into multiple places can enable workload owners to have greater flexibility in how they configure resources while the baseline posture is delivered automatically.

Not all areas of a business necessarily have the same cloud maturity level, or use the same methods to deploy or run workloads. As a security architect, your job is to help those different parts of the business deliver outcomes in the way that is appropriate for their maturity or particular workload.

The best way to help drive this goal is for the security part of your organization to clearly communicate the necessary control objectives. As a security architect, it’s easier to have a discussion about the things that need tweaking in an application if the objectives are well communicated. It is much harder if the workload owner doesn’t know they have to meet certain security expectations.

What is the job of security?

At AWS, we talk to customers across a range of industries. One thing that consistently comes up in conversation is how to help customers understand the role of their security team in a distributed cloud-aware environment. The answer is always the same: we as security people are here to help the business deploy and run applications securely. Our job is to guide and educate the rest of the organization on the best way to meet the business objectives while meeting the security, risk, and compliance requirements.

So how do you do this?

Technology and culture are both important to an organization’s security posture, and they enable each other. AWS is a good example of an organization that has a strong culture of security ownership. One thing that all customers can take away from AWS: security is everyone’s job. When you understand that, it becomes easier to build the mechanisms that make the configuration and operation of appropriate security control objectives a reality.

The cloud environment that you build goes a long way to achieving this goal in two key ways. First, it provides guardrails and automated guidance for people building on the platform. Second, it allows solutions to scale.

One of the challenges organizations encounter is that there are more developers than there are security people. The traditional approach of point-in-time risk and control assessments performed by a human looking at an architecture diagram doesn’t scale. You need a way to scale that knowledge and capability without increasing the number of people. The best way to achieve this is to codify as much as possible, early in the build and release process.

One way to do this is to run the AWS platform as a product in its own right. Team members should be able to submit feature requests, and there should be metrics on the features that are enabled through the platform. The more security capability that teams building workloads can inherit from the platform, the less they have to implement at the workload level and the more time they can spend on product features. There will always be some security control objectives that can only be delivered by specific configuration at the workload level; this should build on top of what’s inherited from the cloud platform. Your security team and the other teams need to work together to make sure that the capabilities provided by the cloud platform are available to help people build and release securely.

One part of the governance model that we like to highlight is the concept of platform onboarding. The idea of this part of the governance model is to quickly and consistently get to a baseline set of controls that enable you to use a service safely in a particular environment. A good example here is to give developers access to evaluate a service in an experimentation account. To support this process, you don’t want to spend a long time building controls for every possible outcome. The best approach is to take advantage of the foundational controls that are delivered by the cloud platform as the starting point. Things like federation, logging, and service control policies can be used to provide guard rails that enable you to use services quickly. When the services are being evaluated, your security team can work together with your business to define more specific controls that make sense for the actual use cases.

AWS Well-Architected Framework

The cloud platform you use is the foundation of many of the security controls. These guard rails of federation, logging, service control polices, and automated response apply to workloads of all types. The security pillar in the AWS Well-Architected Framework builds on other risk management and compliance frameworks, provides you with best practices, and helps you to evaluate your architectures. These best practices are a great place to look for what you should do when building in the cloud. The categories—identity and access management, detection, infrastructure protection, data protection, and incident response—align with the most important areas to focus on when you build in AWS.

For example, identity is a foundational control in a cloud environment. One of the AWS Well-Architected security best practices is “Rely on a centralized identity provider.” You can use AWS Single Sign-On (AWS SSO) for this purpose or an equivalent centralized mechanism. If you centralize your identity provider, you can perform identity lifecycle management on users, provide them with access to only the resources that are required, and support users who move between teams. This can apply across the multiple AWS accounts in your AWS environment. AWS Organizations uses service control policies to enable you to use a subset of AWS services in particular environments; this is an identity-centric way of providing guard rails.

In addition to federating users, it’s important to enable logging and monitoring services across your environment. This allows you to generate an event when something unexpected happens, such as a user trying to call AWS Key Management Service (AWS KMS) to decrypt data that they should have access to. Securely storing logs means that you can perform investigations to determine the causes of any issues you might encounter. AWS customers who use Amazon GuardDuty and AWS CloudTrail, and have a set of AWS Config rules enabled, have access to security monitoring and logging capabilities as they build their applications.

The layer cake model

When you think about cloud security, we find it useful to use the layer cake as a good mental model. The base of the cake is the understanding of the below-the-line capability that AWS provides. This includes self-serving the compliance documentation from AWS Artifact and understanding the AWS shared responsibility model.

The middle of the cake is the foundational controls, including those described previously in this post. This is the most important layer, because it’s where the most controls are and therefore where the most value is for the security team. You could describe it as the “solve it once, consume it many times” layer.

The top of the cake is the application-specific layer. This layer includes things that are more context dependent, such as the correct control objectives for a certain type of application or data classification. The work in the middle layer helps support this layer, because the middle layer provides the mechanisms that make it easier to automatically deliver the top layer capability.

The middle and top layers are not just technology layers. They also include the people and process parts of the equation. The technology is just there to support the processes.

One thing to be aware of is that you shouldn’t try to define every possible control for a service before you allow your business to use the service. Make use of the various environments in your organization—experimenting, development, testing, and production—to get the services in the hands of developers as quickly as possible with the minimum guardrails to avoid accidental misconfiguration. Then, use the time when the services are being assessed to collaborate with the developers on control implementation. Control implementations can then be rolled into the middle layer of the cake, and the services can be adopted by other parts of the business.

This is also the ideal time to apply practical threat modelling techniques so you can understand what threats and risks you must address. Working with your business to define recommended implementation patterns also helps provide context for how services are typically used. This means you can focus on the controls that are most relevant.

The architecture, platform, or cloud center of excellence (CoE) teams can help at this stage. They can likely make a quick determination of whether an AWS service fits in with your organization’s architectural direction. This quick triage helps the security team focus their efforts in helping get services safely in the hands of the business without being seen as blocking adoption. A good mechanism for streamlining the use of new services is to make sure the backlog is well communicated, typically on a platform team wiki. This helps the security and non-security parts of your organization prioritize their time on services that deliver the most business value. A consistent development approach means that the services that are used are probably being used in more places across the organization. This helps your organization get the benefits of scale as consistent approaches to control implementation are replicated between teams.

Simplicity, metrics, and culture

The world moves fast. You can’t just define a security posture and control objectives, and then walk away. New services are launched that make it easier to do more complex things, business priorities change, and the threat landscape evolves. How do you keep up with all of it?

The answer is a combination of simplicity, metrics, and culture.

Simplicity is hard, but useful. For example, if you have 100 application teams all building in a different way, you have a large number of different configurations that you must ensure are sensibly defined. Ideally, you do this programmatically, which means that the work to define and maintain that set of security controls is significant. If you have 100 application teams using only 10 main patterns, it’s easier to build controls. This has the added benefit of reducing the complexity at the operations end, which applies to both the day-to-day operations and to incident responses. Simplification of your control environment means that your monitoring is less complex, troubleshooting is easier, and people have time to focus on the development of new controls or processes.

Metrics are important because you can make informed decisions based on data. A good example of the usefulness of metrics is patching. Patching is one of the easiest ways to improve your security posture. Having metrics on patch age, presented where this information is most important in your environment, enables you to focus on the most valuable areas. For example, infrastructure on your edge is more important to keep patched than infrastructure that is behind multiple layers of controls. You should patch everything, but you need to make it easy for application teams to do so as part of their build and release cycles. Exposing metrics to teams and leadership helps your organization learn from high performing areas in the business. These could be teams that are regularly meeting the patching expectations or have low instances of needing to remediate penetration testing findings. Metrics and data about your control effectiveness enables you to provide assurance internally and externally that you’re meeting your control objectives.

This brings us to culture. Security as an enabler is something that we think is the most important concept to take away from this post. You must build capabilities that enable people in your organization to have the secure configuration or design choice be the easiest option. This is the role of security. You should also make sure that, when there are problems, your security team works with the business to help everyone learn the cause and improve for next time.

AWS has a culture that uses trouble ticketing for everything. If our employees think they have a security problem, we tell them to open a ticket; if they’re not sure that they have a security problem, we tell them to open a ticket anyway to get guidance. This kind of culture encourages people to communicate and help means so we can identify and fix issues early. Issues that aren’t as severe thought can be downgraded quickly. This culture of ticketing gives us data to inform what we build, which helps people be more secure. You can get started with a system like this in your own environment, or look to extend the capability if you’ve already started.

Take our recommendation to turn on GuardDuty across all your accounts. We recommend that the resulting high and medium alerts are sent to a ticketing system. Look at how you resolve those issues and use that to prioritize the next two weeks of work. Now you can build automation to fix the issues and, more importantly, build to prevent the issues from happening in the first place. Ask yourself, “What information did I need to diagnose the problem?” Then, build automation to enrich the findings so your tickets have that context. Iterate on the automation to understand the context. For example, you may want to include information to show whether the environment is production or non-production.

Note that having production-like controls in non-production environments means that you reduce the chance of deployment failures. It also gets teams used to working within the security guardrails. This increased rigor earlier on in the process, and helps your change management team, too.

Summary

It doesn’t matter what security frameworks or standards you use to inform your business, and you might not even align with a particular industry standard. What does matter is building a governance model that empowers the people in your organization to consistently make good security decisions and provides the capability for your security team to enable this to happen. To get started or continue to evolve your governance model, follow the AWS Well-Architected security best practices. Then, make sure that the platform you implement helps you deliver the foundational security control objectives so that your business can spend more of its time on the business logic and security configuration that is specific to its workloads.

The technology and governance choices you make are the first step in building a positive security culture. Security is everyone’s job, and it’s key to make sure that your platform, automation, and metrics support making that job easy.

The areas of focus we’ve talked about in this post are what allow security to be an enabler for business and to ultimately help you better help your customers and earn their trust with everything you do.

If you have feedback about this post, submit comments in the Comments section below.

Want more AWS Security how-to content, news, and feature announcements? Follow us on Twitter.
Author

Paul Hawkins

Paul helps customers of all sizes understand how to think about cloud security so they can build the technology and culture where security is a business enabler. He takes an optimistic approach to security and believes that getting the foundations right is the key to improving your security posture.

Author

Maddie Bacon

Maddie (she/her) is a technical writer for AWS Security with a passion for creating meaningful content. She previously worked as a security reporter and editor at TechTarget and has a BA in Mathematics. In her spare time, she enjoys reading, traveling, and all things Harry Potter.