When it comes to AWS authentication, relying on long-term credentials, such as AWS Identity and Access Management (IAM) access keys, introduces unnecessary risks; including potential credential exposure, unauthorized sharing, or theft. In this post, I present five common use cases where AWS customers traditionally use IAM access keys and present more secure alternatives that you should consider.
AWS CLI access: Embrace CloudShell
If you’re primarily using access keys for AWS Command Line Interface (AWS CLI) access, consider AWS CloudShell—a browser-based CLI that minimizes the need for local credential management while providing the same powerful CLI capabilities that you’re accustomed to.
AWS CLI with enhanced security: IAM Identity Center
If you need a more robust solution, AWS CLI v2 combined with AWS IAM Identity Center offers a superior authentication approach. This integration enables:
For developers working in local environments, modern integrated development environments (IDEs) such as Visual Studio Code, with AWS Toolkit support offer secure authentication through IAM Identity Center. This alleviates the need for static access keys while maintaining a smooth development experience. Learn more about AWS IDE integrations.
AWS compute services and CI/CD access
When your applications and automation pipelines need AWS resource access, whether running on AWS compute services (Amazon Elastic Compute Cloud (Amazon EC2), Amazon Elastic Container Service (Amazon ECS), or AWS Lambda) or through continuous integration and delivery (CI/CD) tools, IAM roles can provide the ideal solution. These roles automatically manage temporary credential rotation and follow security best practices.
For AWS compute services: Use standard IAM roles with your compute resources. Review the EC2 IAM roles documentation for implementation details.
For CI/CD tools self-hosted on Amazon EC2: If you’re running tools such as Jenkins or GitLab on AWS resources, use the instance profile roles the same as you would with other compute services.
For third-party CI/CD services (such as GitHub Actions, CircleCI, and so on), see External access requirements.
External access requirements
For scenarios involving third-party applications or on-premises workloads, AWS offers three methods:
Third-party applications: Implement temporary security credentials through IAM roles instead of static access keys. Never use root account access keys. See third-party access documentation.
CI/CD software as a service (SaaS): For cloud-based CI/CD services, use OpenID Connect (OIDC) integration with IAM roles to minimize the need for long-term credentials. This allows your CI/CD pipelines to obtain temporary credentials through trust relationships. See the AWS OIDC provider documentation for implementation details.
Best practice: Principle of least privilege
Regardless of your authentication method, always implement the principle of least privilege. This helps make sure that users and applications have only the permissions they need. For guidance on crafting precise IAM policies, see Techniques for writing least privilege IAM policies.
Note: AWS also offers policy generation based on AWS CloudTrail logs, helping you create permission templates based on actual usage patterns. Learn about this feature in the IAM policy generation documentation.
Conclusion
As you’ve seen, there are numerous secure alternatives to IAM access keys that you can use to enhance your AWS authentication strategy while reducing security risks. By using tools such as CloudShell, IAM Identity Center, IDE integrations, IAM roles, and IAM Roles Anywhere, you can implement robust authentication mechanisms that align with modern security best practices.Key takeaways:
Prefer temporary credentials over long-term access keys
Choose the authentication method that best fits your use case
Implement the principle of least privilege across all access methods
Take advantage of the built-in tools provided by AWS for policy generation and management
Regularly review and update your authentication methods as new solutions become available
By making these changes, you can not only improve your security posture but also streamline your authentication processes across your AWS environment. Start small by identifying your current IAM access key use cases and gradually transition to these more secure alternatives. Your future self—and your security team—will thank you.
If you have feedback about this post, submit comments in the Comments section below.
Amazon Web Services (AWS) provides service reference information in JSON format to help you automate policy management workflows. With the service reference information, you can access available actions across AWS services from machine-readable files. The service reference information helps to address a key customer need: keeping up with the ever-growing list of services and actions in AWS. As new services launch and existing services expand their capabilities, you can now conveniently identify and incorporate available actions, resources, and condition keys for each AWS service into your policy authoring and validation workflows. As your business expands and your AWS footprint grows, you might decide to automate your policy management workflows. With the service authorization reference, you can build custom tools to make it easier to evaluate and use new actions, resources, and condition keys that AWS services introduce.
Getting started with service reference information
The service reference information is static information about the actions, resources, and condition keys available for each service in AWS. To obtain the list of AWS services for which reference information is available, go to the following URL: https://servicereference.us-east-1.amazonaws.com/v1/service-list.json
This URL endpoint provides a JSON file that contains an up-to-date catalog of AWS services with available reference information. By querying this endpoint, you can retrieve the most current list of services supported by the AWS Service Reference Information feature.
To retrieve the list of actions, resources, and condition keys for a specific AWS service, go to the following URL: https://servicereference.us-east-1.amazonaws.com/v1/<service-name>/<service-name>.json
Replace <service-name> with the name of the desired AWS service (for example, “s3” for Amazon Simple Storage service (Amazon S3) or “ec2” for Amazon Elastic Compute Cloud (Amazon EC2)). This URL endpoint provides a JSON file that contains the comprehensive list of actions, resources, and condition keys that are available for that particular service.
The following example shows the format of the output from the service-list.json file, which contains the service names and URLs for each service’s reference information:
You can navigate to the service information page by using the url field to view the list of permissions for the service. You can also download the JSON file to use in your policy authoring workflows. For example, you can download the permissions for Amazon S3 by following this URL: https://servicereference.us-east-1.amazonaws.com/v1/s3/s3.json
The following example shows a partial output of the permissions for Amazon S3. The AWS Identity and Access Management (IAM) actions are available in JSON format, and each action is its own JSON object. The Name field for those objects provides the name of the IAM action, the ActionConditionKeys field provides the available condition keys for this action, and the Resources field provides the available resources for this action.
What can you build with the service reference information?
Let’s explore how you can make use of the service reference information through practical examples. To help you get started, here are two custom tools that use the service reference information. You can find these tools in our GitHub repository, ready for you to use and adapt to your specific needs. You can download the source code for these tools by visiting the following links:
The SCP pre-processor provides a convenient way to write SCPs. You run the SCP pre-processor as a command-line tool. The tool takes a single, monolithic JSON file and runs a series of transformations and optimizations, then outputs a collection of valid service control policies that fit within policy size quotas. The tool uses AWS service reference information data in order to optimize lists of IAM actions.
Notification tool for new or removed IAM actions
You might find yourself needing to update various policies throughout your AWS environment when new IAM actions or services are released. You can use this tool to notify you when new services or new actions are added or removed. It works by downloading the service reference information and comparing it to the previous version of the file when the tool last ran. You can use these notifications to perform actions like automatically updating IAM policies when new actions are added or manually reviewing the notifications for new, sensitive actions.
The AWS service reference information makes it easier for you to create automation for policy authoring and validation. By providing the AWS service actions reference in JSON format, this feature enables you to create custom tools for policy authoring and management.
We’re excited to know what kind of policy authoring tools you can think up.
If you have feedback about this post, submit comments in the Comments section below. If you have questions about this post, contact AWS Support.
As your Amazon Web Services (AWS) environment grows, you might develop a need to grant cross-account access to resources. This could be for various reasons, such as enabling centralized operations across multiple AWS accounts, sharing resources across teams or projects within your organization, or integrating with third-party services. However, granting cross-account access requires careful consideration of your security, availability, and manageability requirements.
In this blog post, we explore four different ways to grant cross-account access using resource-based policies. Each method has its own unique tradeoffs, and the best choice depends on your specific requirements and use case.
Evaluating different techniques for granting cross-account access
Your choice of how to specify the principal in a resource-based policy impacts some aspects of both the confidentiality and the availability of your solution. Understanding this impact and making the right tradeoffs for your use case is the focus of this post.
An example scenario
Imagine that you have an S3 bucket in your AWS account (Account A) that needs to be accessed by different principals in another AWS account (Account B). For this scenario, we assume that the principals in Account B have the necessary access to S3 in their identity-based policies, and we will focus on authoring the resource-based policies in Account A. While the methods explained here use Amazon S3, the concepts discussed apply to all AWS services that support resource-based policies. In the following sections, we walk through four different ways to grant cross-account access in this scenario and discuss the tradeoffs of each.
Method 1: Grant access to a specific IAM role using the Principal element of the resource-based policy
In this example, you use an S3 bucket policy to grant access to a specific IAM role (RoleFromAccountB) in Account B by specifying the IAM role’s Amazon Resource Name (ARN) in the Principal element of the policy in Account A.
Using this bucket policy, if someone in Account B deletes or recreates the role (RoleFromAccountB), then that role can no longer access the amzn-s3-demo-bucket-account-a bucket, even if that role is recreated with the same name. The reason is that when you save this policy, the role ARN is mapped to the unique ID of the role, which looks something like this: AROADBQP57FF2AEXAMPLE. You will see a role identifier in the Principal element of your resource-based policies if you view them after you delete the role that they referenced.
This behavior is intentional. The resource-based policy only allows the specific instance of the role that you set as principal at the time of policy creation. This helps prevent unintended access to your resources if you delete a role, but forget to update your resource-based policy to remove that role. This behavior can also cause an availability risk because the role (RoleFromAccountB) will have a new unique ID when it is recreated and will no longer have access to the bucket. Roles can be recreated for a number of reasons, including accidentally when you use tools such as infrastructure as code.
You might consider choosing this method if:
You own the roles in both Account A and Account B and can control the creation and deletion of these roles.
You want your resource-based policy in Account A to stop granting access when the specified role (RoleFromAccountB) is deleted.
You prioritize granular access control over potential availability concerns if the role (RoleFromAccountB) is deleted.
Method 2: Grant access to an account using the Principal element of the resource-based policy
In this example, you grant access to a specific account in the Principal element of the resource-based policy. This resource-based policy of Account A allows any user or role from Account B that also has an identity-based policy that grants them access to read the objects.
Note: You can use either "Principal": {"AWS": "111122223333"} or "Principal": {"AWS": "arn:aws:iam::111122223333:root"} in the Principal element. They are equivalent, and the long-form ARN does not represent the root user.
This resource-based policy helps avoid the potential availability issue discussed for Method 1. If a role in Account B that needs to have access to the bucket is recreated, it will still have access after the recreation of that role. This is because you don’t specify a role in the Principal element—instead, you specify an account. If you use Method 2, you must be comfortable delegating access control decisions to the owner of that account.
This approach explicitly delegates access control decisions to IAM in the other account (Account B). Principals in Account B have access to this bucket if allowed by their identity-based policies.
You might consider choosing this method if:
You need to grant access to many principals in Account B.
You want to delegate the access decision in the account where the principal exists (Account B).
You prioritize ease of management and availability over granular access control.
Method 3: Grant access to a specific IAM role using the aws:PrincipalArn condition
This method expands on Method 2 and adds a condition that grants access only to a specific IAM role. Similar to Method 2, you use the account number as the value of the Principal element, but also use the aws:PrincipalArn condition key to limit access to a specific principal in Account B.
The aws:PrincipalArn condition key is a global condition key that compares the ARN of the principal that made the request with the ARN that you specify in the policy. For IAM roles, the request context returns the ARN of the role, not the ARN of the user that assumed the role.
This policy comes with the same availability benefits as the policy in Method 2: access to this resource will survive role recreation. This is because the role is translated to its unique identifier only when it is used in the Principal element. It is not translated to a unique identifier when it is used in a condition. If the role (RoleFromAccountB) in Account B is recreated, accidentally or intentionally, the policy will continue to grant access because the role matches the role ARN specified in the condition key of the resource-based policy in Account A. As a result, Method 3 provides a balanced approach to availability and security.
You might consider choosing this method if:
You are comfortable that this policy will continue to grant access to the role specified in the aws:PrincipalArn condition key if that role (RoleFromAccountB) is recreated.
You don’t own the Account B you are granting access to and don’t control when that role may be recreated.
You want a balance of availability and confidentiality.
Method 4: Grant access to an entire AWS Organizations organization
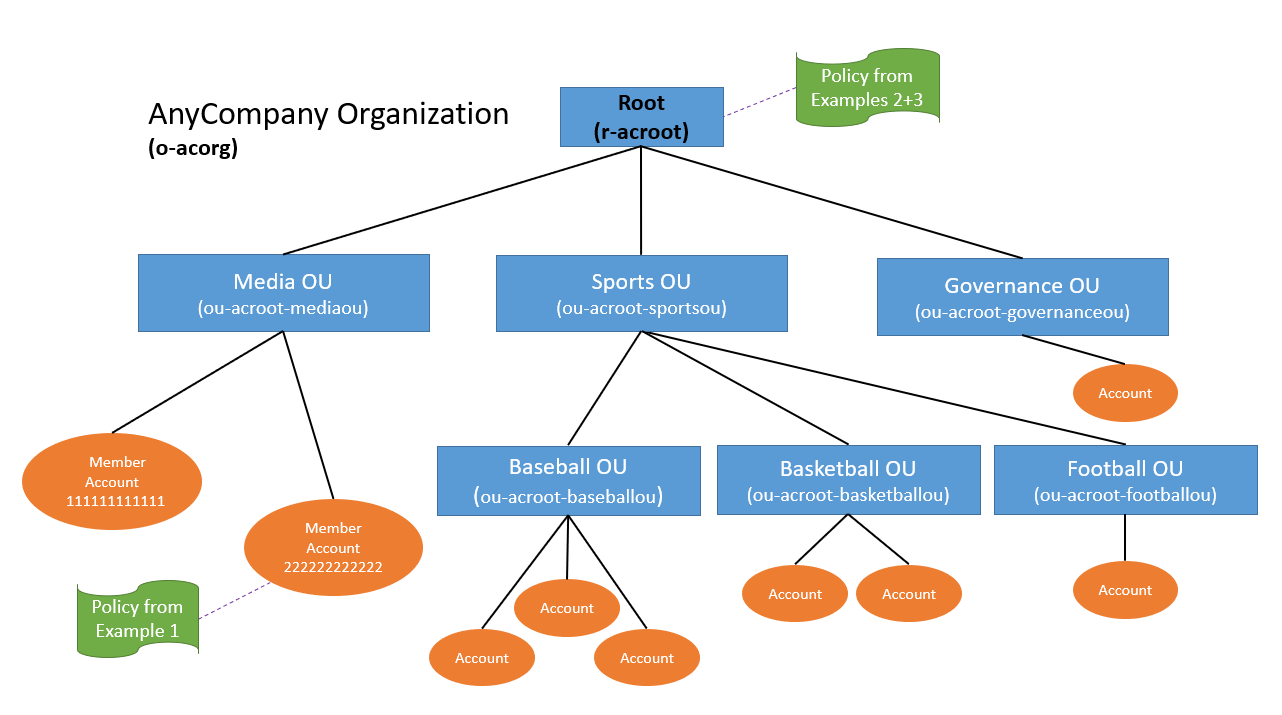
This method is focused on a different use case and is not an alternative to the methods listed earlier. Use this method if you have a resource (an S3 bucket, in this example) that you want to share with your entire organization, but not share with anyone outside of it.
There is no way to specify an organization by using the Principal element of a resource-based policy, so you must use the aws:PrincipalOrgId condition key to restrict access to a specific organization. In this policy, you specify a wildcard in the Principal element, which says that anyone can access the bucket. Then the condition reduces “anyone” to just those AWS account principals that belong to the specified organization and have an identity-based policy that allows them access.
You then add an additional conditional block that compares the aws:PrincipalAccount condition key to the aws:ResourceAccount condition key by using a policy variable. This extra conditional block is optional and excludes the account that owns the bucket (Account A) from the allow statement. The reason for using this extra conditional block is so that principals in Account A still require an allow statement in their identity-based policy to access this bucket. If you choose to exclude this aws:PrincipalAccount comparison, principals in Account A are granted access to the bucket without an explicit allow statement in their identity-based policy. Policy evaluation logic only requires either the identity-based policy or the resource-based policy (but not both) to allow a request when the principal and resource are in the same account.
You might consider choosing this method if:
You have a shared resource that should be accessible to your entire organization.
Conclusion
Choosing a method to grant cross-account access requires careful consideration of your requirements and use case. Each of the four methods discussed in this blog post has its own advantages and tradeoffs. By understanding these methods and their implications, you can decide on the most appropriate approach to grant cross-account access to your AWS resources. Remember to regularly review and audit your resource-based policies to verify that they align with your security and access requirements.
In this blog post, we show how you can integrate IAM Access Analyzer custom policy check capability into VS Code, so you can identify overly permissive IAM policies and fine-tune access controls early in the development process. This proactive approach to security and compliance helps to ensure that your IAM policies are validated before they are deployed, reducing the risk of introducing misconfigurations or granting unintended access. It also saves developer time by providing fast feedback to developers when they write a policy that does not meet organizational standards.
What is the problem?
Although security teams oversee an organization’s overall security posture, developers create applications that require specific permissions. To enable developers to work efficiently while maintaining high security standards, organizations often seek ways to safely delegate the authoring of AWS Identity and Access Management (IAM) policies to developers. Many AWS customers manually review developer-authored IAM policies before deploying them to production environments to help prevent granting excessive or unintended permissions. However, depending on the volume and complexity of policies, these manual reviews can be time-consuming, leading to development delays and potential bottlenecks in the deployment of applications and services. Organizations need to balance secure access management with the agility required for rapid application development and deployment.
How to use IAM Access Analyzer custom policy checks in VS Code
Custom policy checks are a feature in IAM Access Analyzer that are designed to help security teams proactively identify and analyze critical permissions within their IAM policies. In this section, we provide step-by-step instructions for using custom policy checks directly in VS Code.
Prerequisites
To complete the examples in our walkthrough, you first need to do the following:
Install Python version 3.6 or later.
Assuming you are already using the VS Code Integrated Development Environment (IDE), search for and install the AWS Toolkit extension.
So that you can open IAM Access Analyzer policy checks in the VS Code editor, open the VS Code Command Palette by pressing Ctrl+Shift+P, search for IAM Policy Checks, and then choose AWS: Open IAM Policy Checks as shown in Figure 1.
Figure 1: Search for the AWS: Open IAM Policy Checks option
By using the IAM policy checks option in VS Code, you can perform four types of checks:
We’ll walk through examples of each of these checks in the sections that follow.
Example 1: ValidatePolicy
In this example, we use the ValidatePolicy option provided by the IAM policy check plugin to validate IAM policies against IAM policy grammar and AWS best practices. When you run this check, you can view policy validation check findings that include security warnings, errors, general warnings, and suggestions for your policy. These actionable recommendations help you author policies that are aligned with AWS best practices.
To run the ValidatePolicy check
Let’s use the following IAM policy for illustration purposes. You can see that resource * (a wildcard) is being used in the first statement, which indicates that the iam:PassRole action is allowed for all resources.
In the VS Code editor, navigate to the IAM Policy Checks pane. Choose the document type JSON Policy Language and policy type Identity. Then choose Run Policy Validation.
Figure 2: IAM Access Analyzer ValidatePolicy check results
You can see that Access Analyzer has detected an issue, which is shown in the PROBLEMS pane.
Figure 3: Problems pane with finding details for the ValidatePolicy check
The security warning shown in Figure 3 states that the iam:PassRole action with a wildcard (*) in the resource can be overly permissive because it allows the ability to pass any IAM role in that account.
Now, let’s modify the IAM policy by replacing the wildcard (*) with a specific role Amazon Resource Name (ARN).
Verify the policy again by running the ValidatePolicy check to make sure that it doesn’t generate findings after you updated the IAM policy.
Figure 4: Results of the ValidatePolicy check after IAM policy correction
Example 2: CheckNoPublicAccess
With the CheckNoPublicAccess option, you can verify whether your resource policy grants public access for supported resource types.
To run the CheckNoPublicAccess check
To test whether a policy does not allow public access, create a new bucket using a CloudFormation template and attach a resource policy that grants access to any principal to see the objects in this bucket.
WARNING: This sample bucket policy should not be used in production. Using a wildcard in the principal element of a bucket policy would allow any IAM principal to view the contents of the bucket.
Select the document type CloudFormation template and then choose Run Custom Policy Check to see whether this resource policy passes the CheckNoPublicAccess check.
Figure 5: IAM Access Analyzer CheckNoPublicAccess check results
The policy check returns a failed result because this bucket does allow public access.
Figure 6: Problems pane finding details for CheckNoPublicAccess check
Next, fix this policy to allow access from a role within the same account by restricting the policy to a specific role ARN.
Re-run the CheckNoPublicAccess check. The resource policy no longer grants public access and the status of the policy check is PASS.
Example 3: CheckAccessNotGranted
The CheckAccessNotGranted option allows you to check whether a policy allows access to a list of IAM actions and resource ARNs. You can use this check to give developers fast feedback that certain permissions or access to certain resources are not allowed.
To run the CheckAccessNotGranted check
Identify sensitive actions and resources.
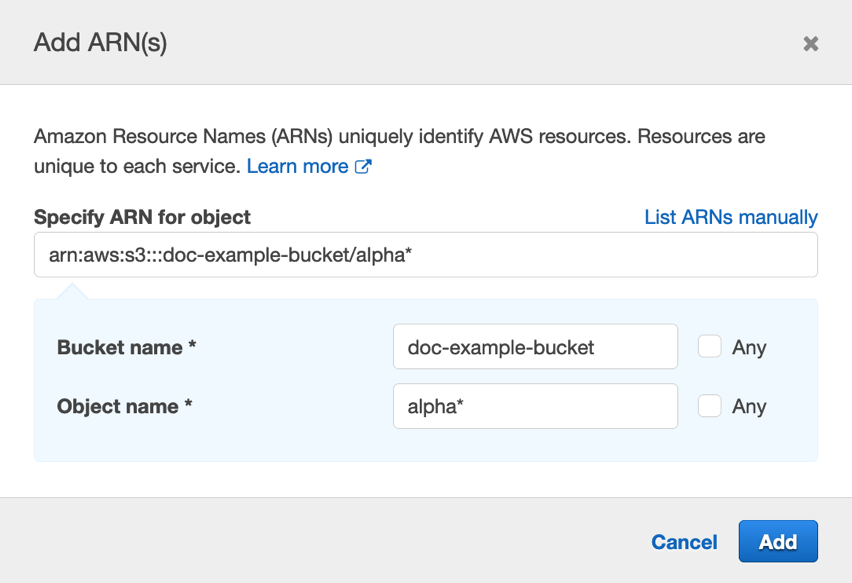
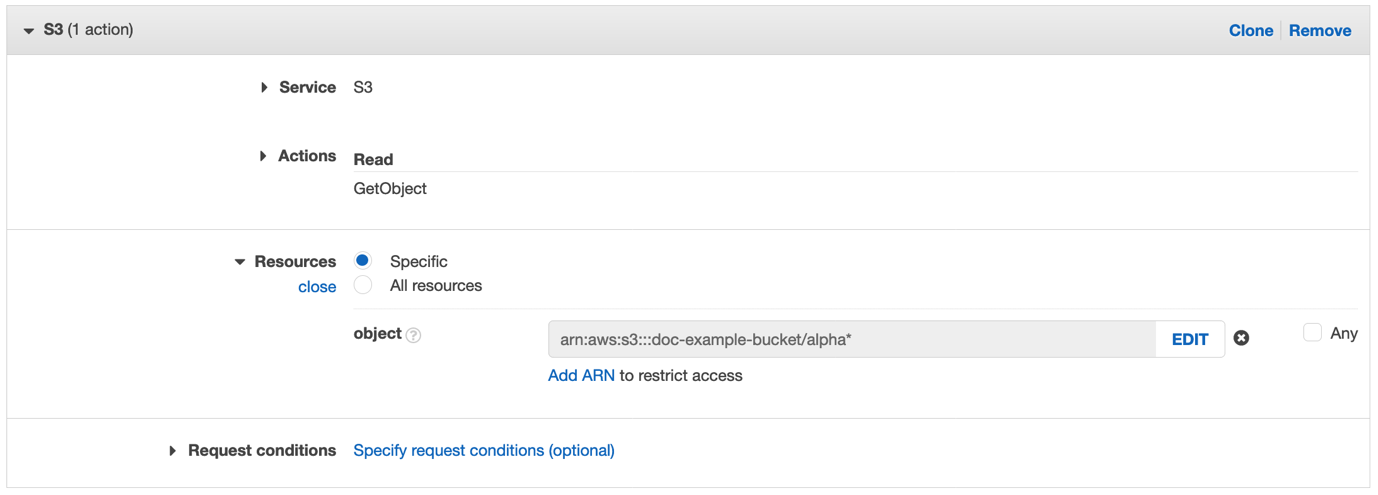
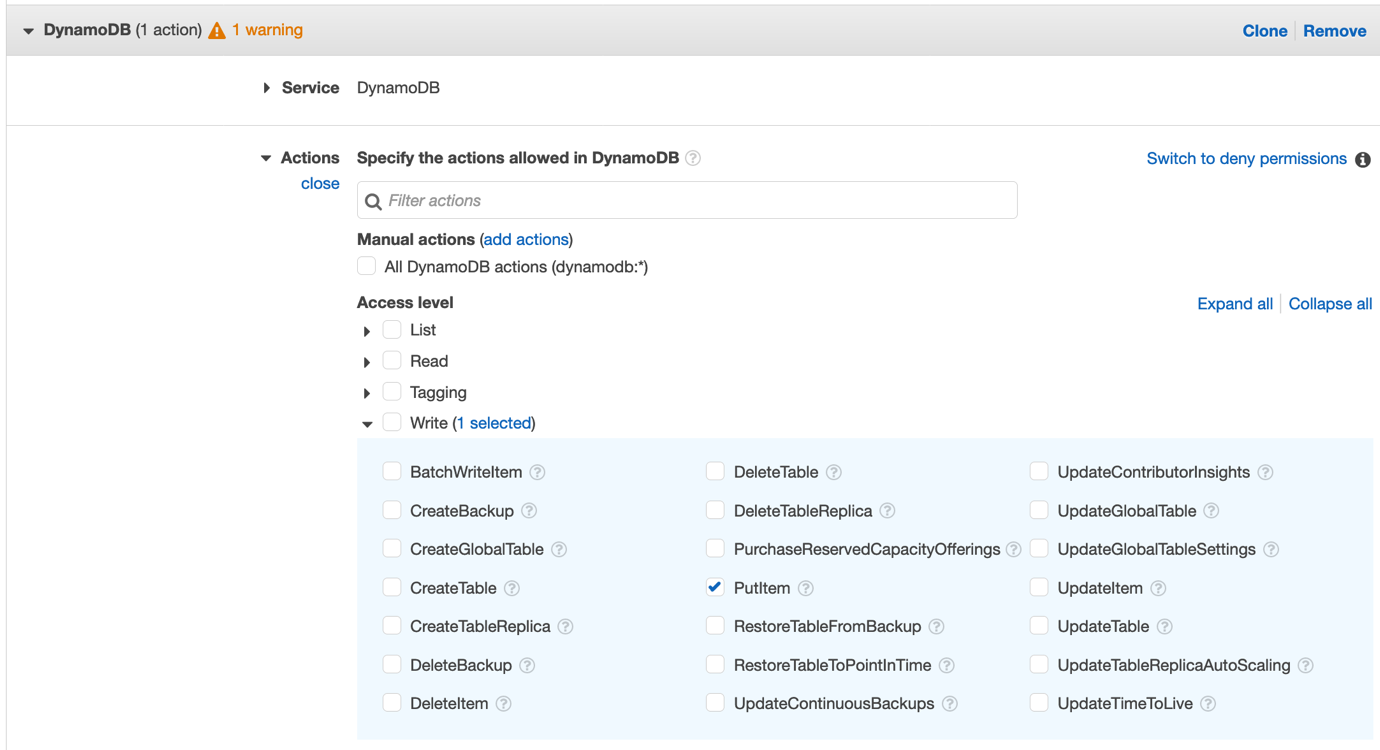
In the VS Code editor, under Custom Policy Checks, choose the check type CheckAccessNotGranted. Using a comma-separated list, create a list of actions and resource ARNs that you don’t want to allow in your IAM policy. You can also create a JSON file with your actions and resources by using the syntax shown in Figure 7. For this example, set the s3:PutBucketPolicy and dynamodb:DeleteTable IAM actions to “not allowed” in the IAM policy.
Figure 7: Configure the CheckAccessNotGranted check
Create a sample CloudFormation template that contains an IAM policy attached to an IAM role, as follows. This policy grants access to some of the actions that you deemed sensitive in Figure 7.
In the VS Code editor, choose Run Custom Policy Check to identify whether one of the sensitive actions or resources is allowed in the IAM policy. The policy check returns FAIL because the policy has the actions s3:PutBucketPolicy and dynamodb:DeleteTable, which you marked as actions that you don’t want developers to grant access to. Remove the restricted actions from the policy and run the check again to see a PASS result for the policy check.
Example 4: CheckNoNewAccess
The CheckNoNewAccess option is a custom policy check that verifies whether your policy grants new access compared to a reference policy.
You use a reference policy to check whether a candidate policy allows more access than the reference policy does. In other words, the check passes if the candidate policy is a subset of the reference policy. A reference policy typically starts by allowing all access. You then add a statement or statements that deny the access that you want the reference policy to check for. For more details and examples of reference policies, see the iam-access-analyzer-custom-policy-check-samples repository on GitHub.
The ability to use a reference policy provides you with the flexibility to look for almost anything in an IAM policy. This is useful when you have custom requirements for your organization that may not be met with some of the other custom policy checks.
To run the CheckNoNewAccess check
Create a reference policy: In your project, create a new JSON policy document that will serve as your reference policy.
The following reference policy checks that an IAM role trust policy only grants access to an allowlisted set of AWS services. This enables you to allow builders to create roles, but constrain the use of those roles to the set of AWS services specified.
In this reference policy, only the specified AWS service principals ec2.amazonaws.com, lambda.amazonaws.com, and ecs-tasks.amazonaws.com are allowed to assume the role.
Enter the reference policy in the VS Code editor. In the IAM Policy Checks pane, select the check type CheckNoNewAccess. Then set the reference policy type to Resource, because this is a trust policy that defines which principals can assume the role. In addition, provide the path of the reference policy that you created in Step 1. You can also directly enter the reference policy as a JSON policy document, as shown in Figure 8.
Figure 8: Enter the reference policy for the CheckNoNewAccess check
Create a CloudFormation template, as follows. This template creates an IAM role that allows the AWS service principals lambda.amazonaws.com and glue.amazonaws.com to assume the sample-application-role IAM role.
In the VS Code editor, choose Run Custom Policy Check to check your CloudFormation template against the reference policy you configured in Step 1. The check will return FAIL and you will see a security warning in the editor in the PROBLEMS pane.
Figure 9: Problems pane finding details for the CheckNoNewAccess check
The issue is that glue.amazonaws.com was not listed as a service principal that was allowed to assume a role in your reference policy. You can remove glue.amazonaws.com from the CloudFormation template and re-run the check to receive a PASS result.
Conclusion
In this post, we explored how you can use the integration of VS Code with IAM Access Analyzer in your development workflow to make sure that your IAM policies align with best practices and adhere to your organization’s security requirements. The four critical checks provided by IAM Access Analyzer can be summarized as follows:
The ValidatePolicy check provides actionable recommendations that help you author policies that are aligned with AWS best practices.
The CheckNoPublicAccess check helps protect resources from being exposed publicly and mitigates the risk of unauthorized public access.
The CheckAccesNotGranted check looks for specific IAM actions and resource ARNs to help enforce access restrictions and help prevent unauthorized access to critical data or services.
The CheckNoNewAccess check validates that the permissions granted in your IAM policies remain within the intended scope, as defined by your organization’s requirements.
AWS Identity and Access Management Access Analyzer simplifies inspecting unused access to guide you towards least privilege. You can use unused access findings to identify over-permissive access granted to AWS Identity and Access Management (IAM) roles and users in your accounts or organization. From a delegated administrator account for IAM Access Analyzer, you can use the dashboard to review unused access findings across your organization and prioritize the accounts to inspect based on the volume and type of findings. The findings highlight unused roles, unused access keys for IAM users, and unused passwords for IAM users. For active IAM users and roles, the findings provide visibility into unused services and actions. Recently, IAM Access Analyzer launched new configuration capabilities that you can use to customize the analysis. You can select accounts, roles, and users to exclude, and focus on the areas that matter the most to you. You can use identifiers such as account ID or scale configuration using tags. By scoping the IAM Access Analyzer to monitor a subset of accounts and roles, you can reduce noise from unwanted findings. You can update the configuration when needed to change the scope of analysis. With this new offering, IAM Access Analyzer provides enhanced controls to help you tailor the analysis more closely to your organization’s security needs.
In this post, we walk you through an example scenario. Imagine that you’re a cloud administrator in a company that uses Amazon Web Services (AWS). You use AWS Organizations to organize your workload into several organizational units (OUs) and accounts. You have dedicated accounts for testing and experimenting with new AWS features called sandbox accounts across your organization. The sandbox accounts can be created by anyone in your company and are centrally recorded. You’re using tags on IAM resources and have followed AWS best practices and strategies when tagging your AWS resources. Tags are applied to the IAM roles created by your teams.
To make sure that your teams are following the principle of least privilege and are working with only the required permissions to access the AWS accounts, you use IAM Access Analyzer. You created an unused access analyzer at the organization level so it will monitor the AWS accounts in your organization. You noticed that you have multiple unused access findings. After analysis, your security team suggests the exclusion of some AWS accounts, IAM roles, and users so they can focus on the relevant findings. They want the sandbox accounts and the IAM roles they use for security purposes (such as auditing, incident response) to be excluded from the unused access analysis.
You can select accounts and roles to exclude when you create a new analyzer or update the analyzer later. In this post, we show you how to configure IAM Access Analyzer unused access finding to exclude specific accounts across your organization and specific principals (IAM roles and IAM users) once you have set up an analyzer. There is no additional pricing for using the prescriptive recommendations after you have enabled unused access findings.
Prerequisites
The following are the prerequisites to configure IAM Access Analyzer for unused access analysis:
An unused access analyzer created at the organization level
Administrative level access to the IAM Access Analyzer delegated administrator account
A list of account IDs that you want to exclude
IAM roles with tags
In the following sections, you will learn how to customize your IAM Access Analyzer to better suit your organization’s needs. This includes the following:
Explore how to exclude specific AWS accounts from the analyzer’s unused access findings.
See how to exclude tagged IAM roles from the analysis, allowing you to focus on the most relevant security insights and you see how to review exclusions on your analyzer to modify them as needed.
By the end, you will have a tailored unused access analyzer that provides more meaningful and actionable results for your organization.
Exclude specific accounts across your organization
In this section, you will see how to update your existing unused access analyzer at the organization level through the AWS Management Console and AWS Command Line Interface (AWS CLI) to exclude specific AWS account IDs from its analysis.
If you don’t have an unused access analyzer in the organization, see this post for instructions on how to create one.
Use the console to update your unused access analyzer:
Connect to your IAM Access Analyzer delegated administrator account (by default, your organization management account).
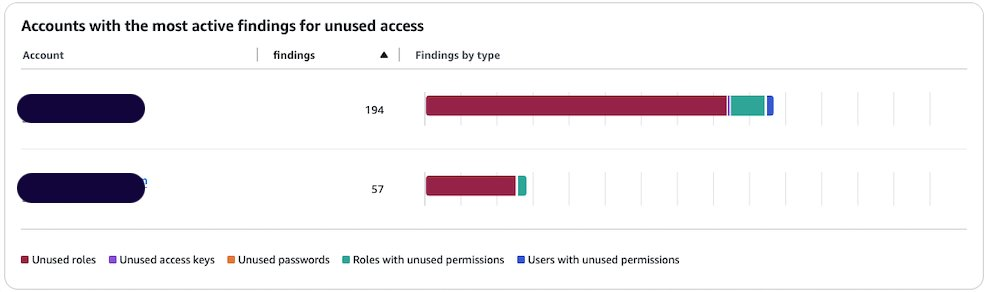
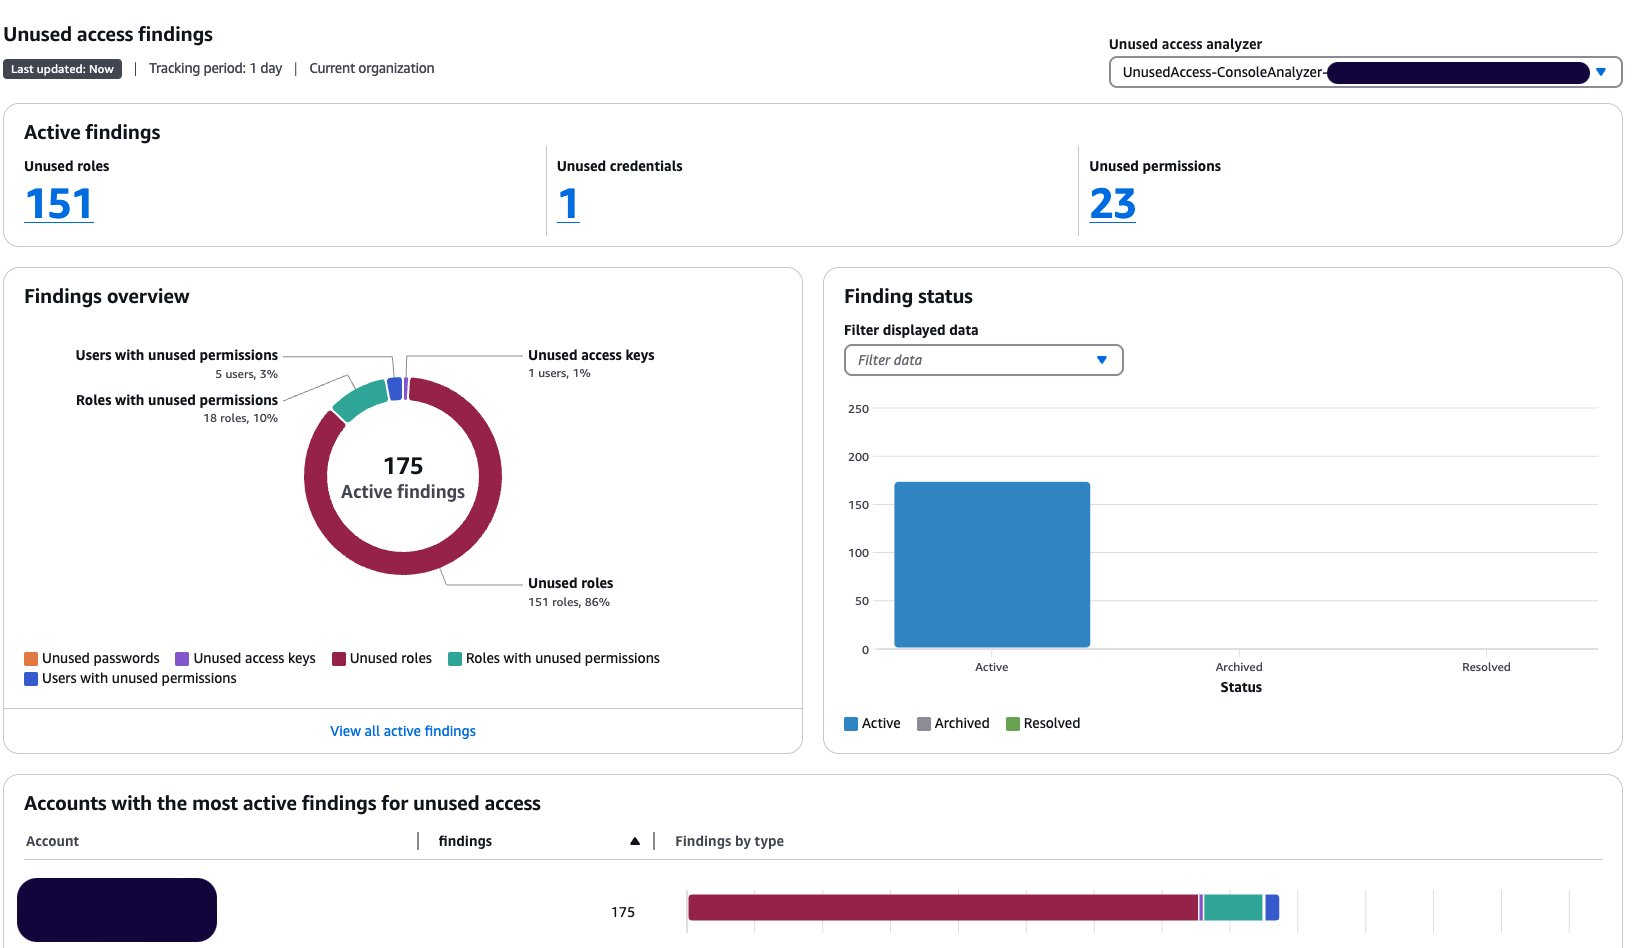
Open the IAM Access Analyzer console in your management account. You will see the dashboard with your active finding by selecting the analyzer of your choice on the top right. In this example, the analyzer has 251 active findings.
Figure 1: Unused access findings dashboard without exclusions
You can see the split of active findings per account. The example account has 57 active findings that you want to exclude from it.
Figure 2: Unused access findings per account
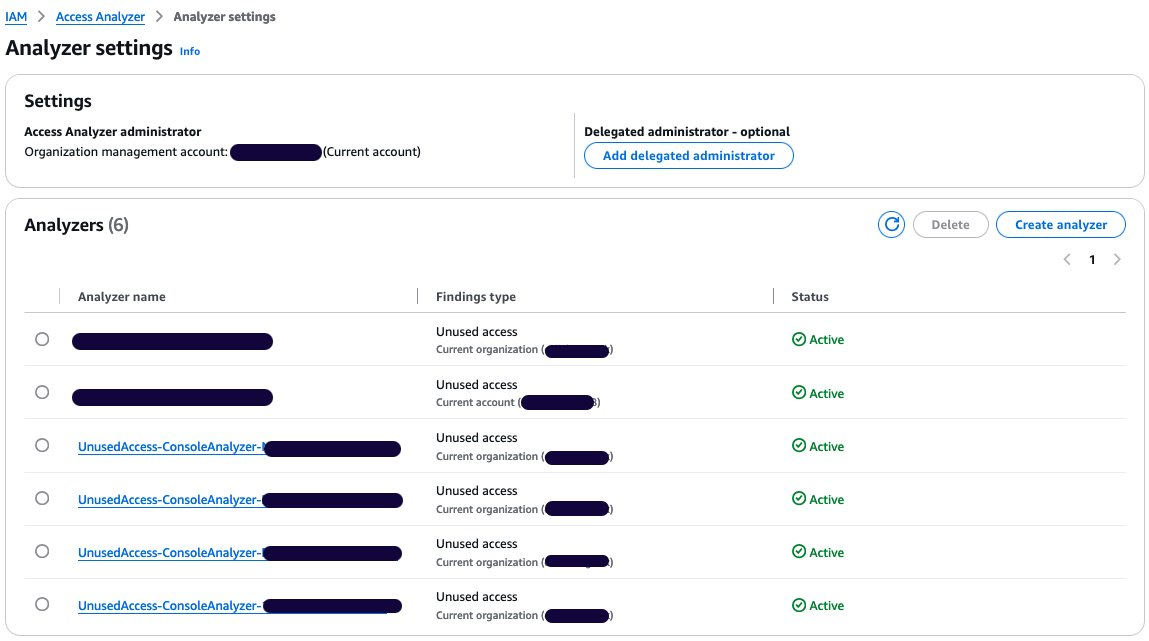
Select Analyzer settings under Access Analyzer in that navigation pane.
The analyzer settings page presents the analyzers in your AWS Region and their status.
Select your unused access analyzer in the list based on its name.
Figure 3: Active access analyzers
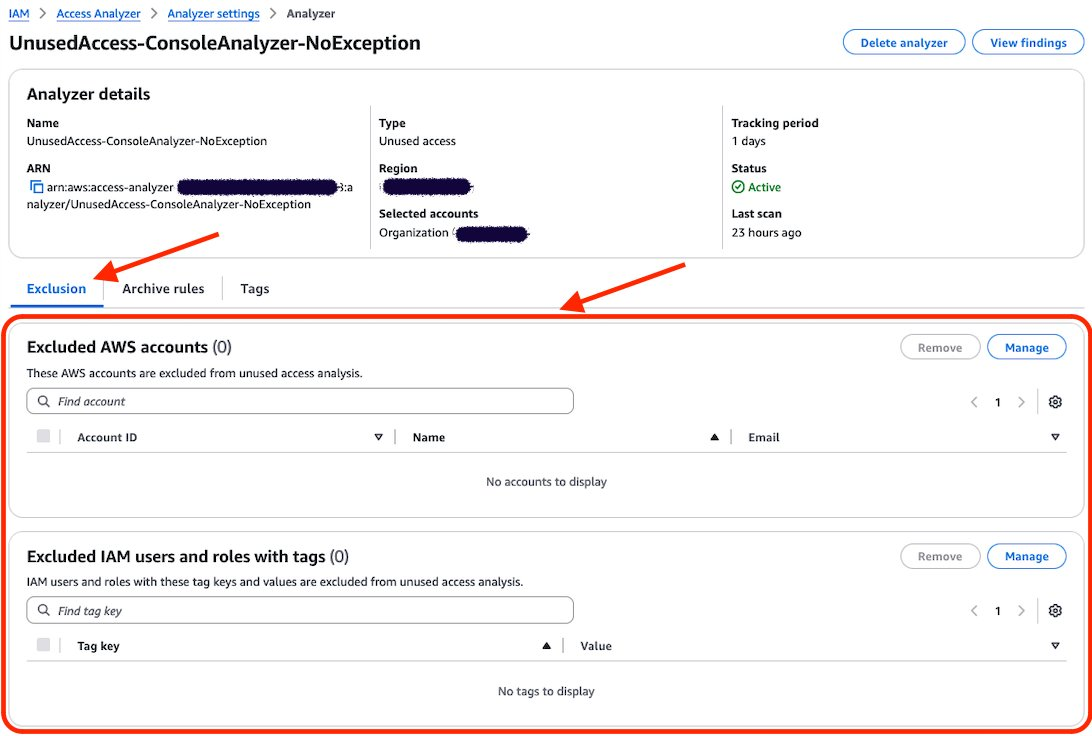
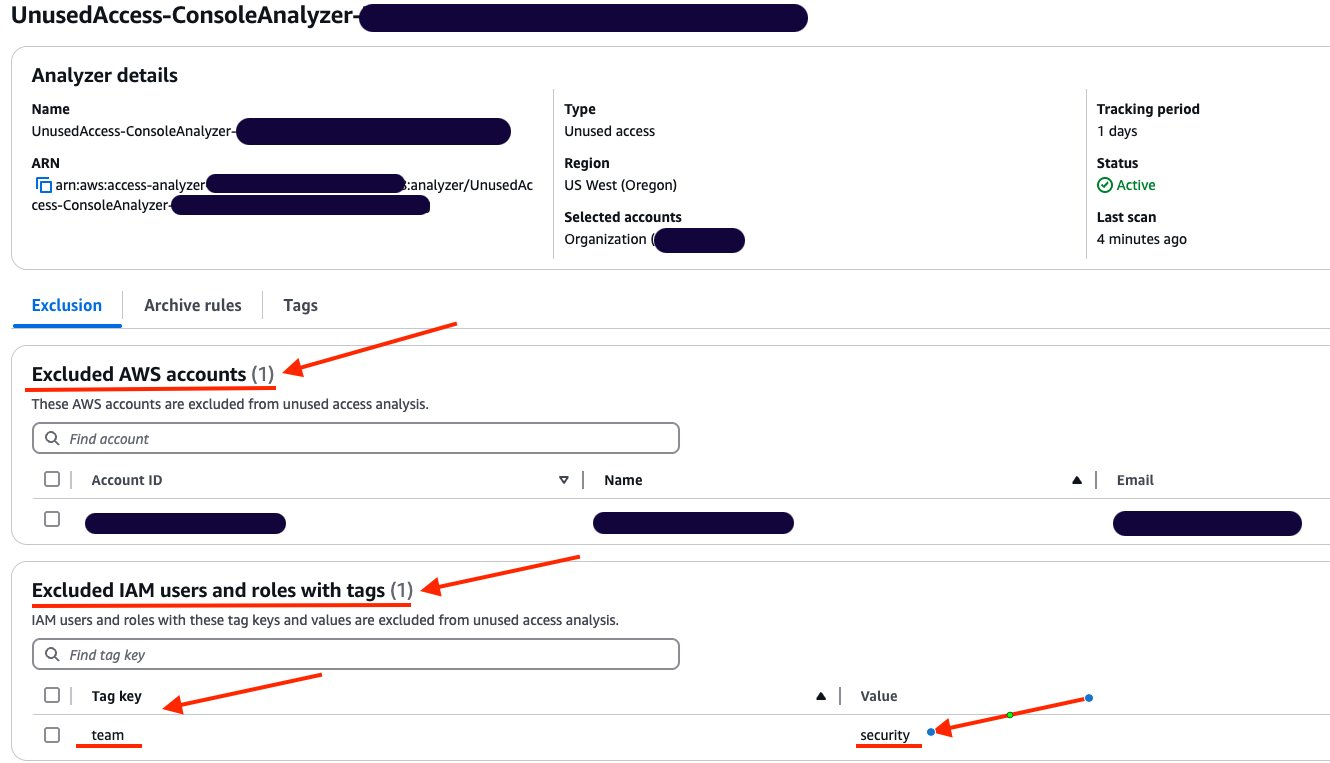
On the Analyzer page, you can see the analyzer settings and a new tab called Exclusion. Because you have no excluded AWS accounts, the count of Excluded AWS accounts is 0 and there are no accounts displayed.
Figure 4: Unused access analyzer exclusion tab
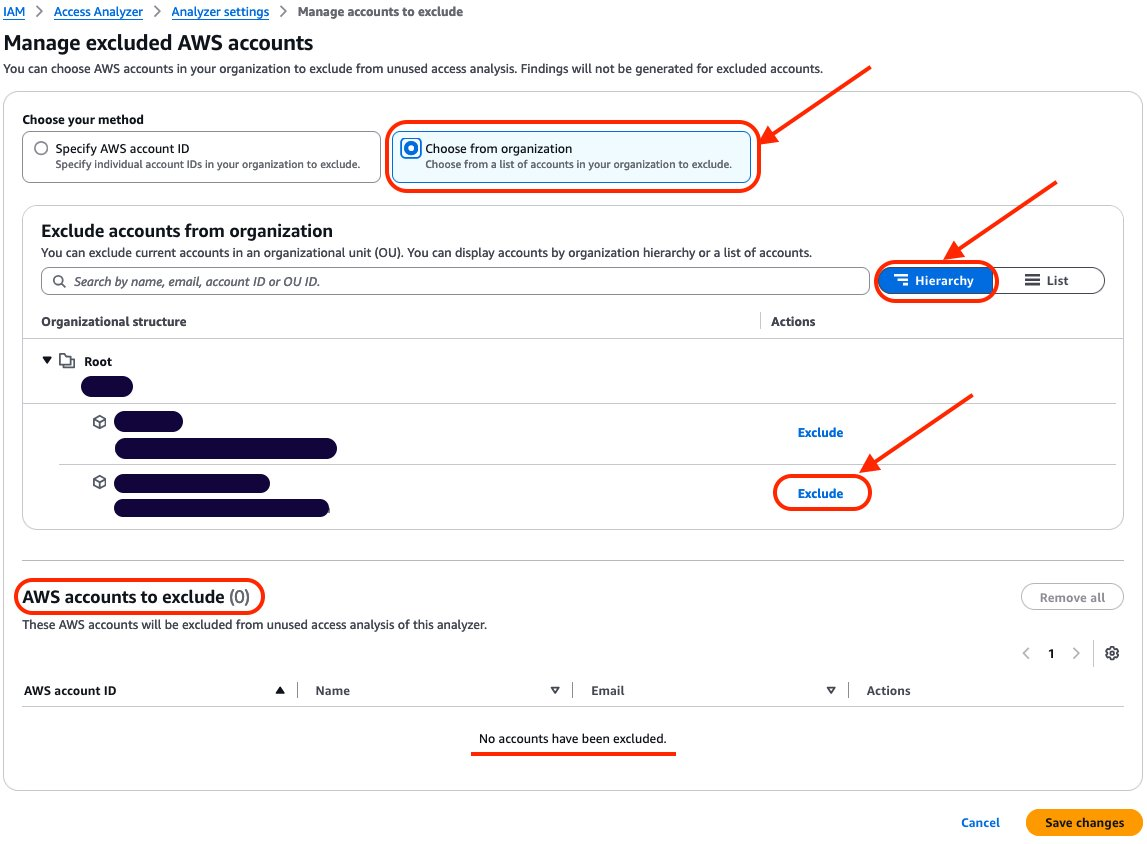
Choose Manage in the Excluded AWS accounts section.
Select Choose from organization and Hierarchy and choose Exclude next to the sandbox account that you want to exclude.
Figure 5: Exclude sandbox account
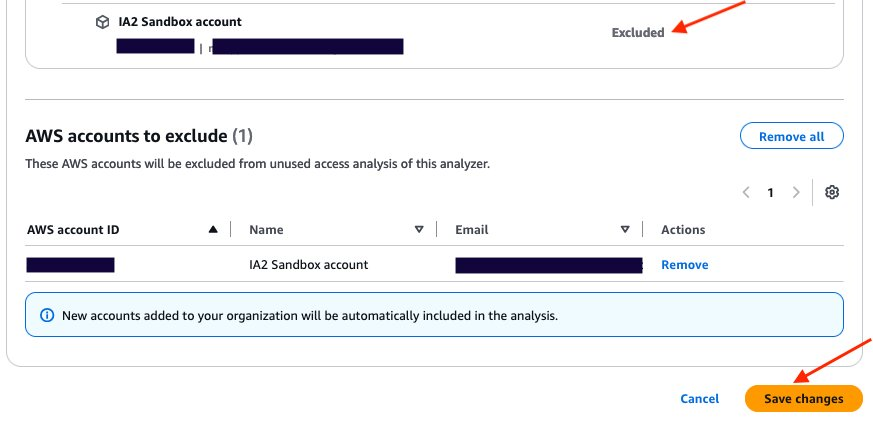
After you select Exclude for the sandbox account, the account will be deselected and will appear in AWS accounts to exclude. The count of accounts to exclude has changed from 0 to 1. After you have finished, choose Save changes.
Figure 6: Verify that the account is excluded and save changes
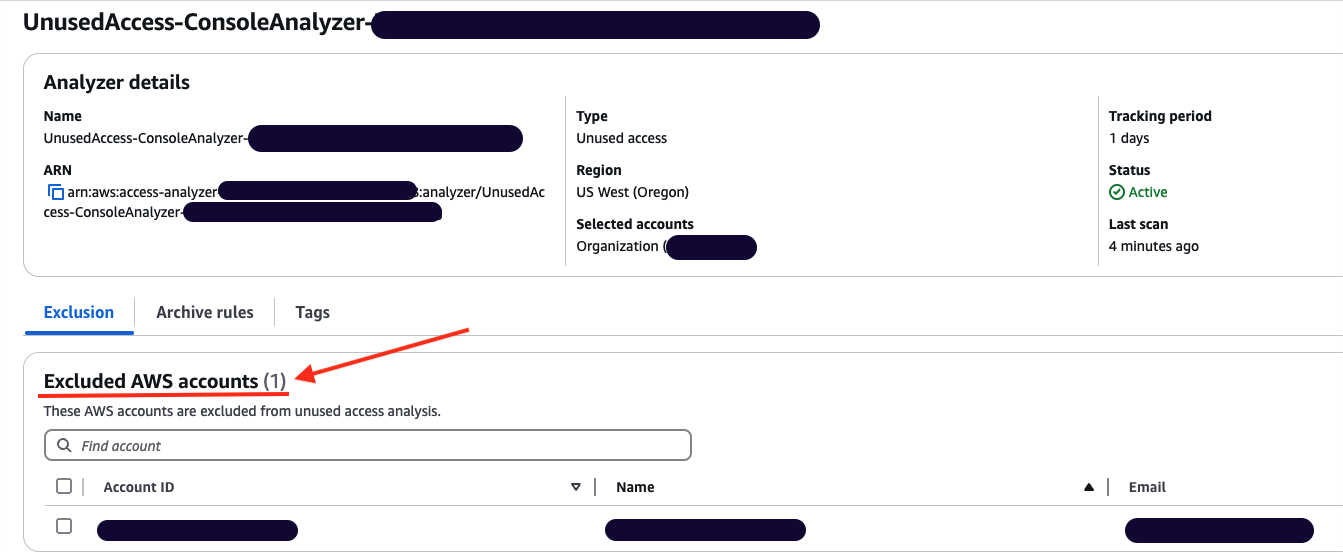
The page will be automatically updated with your changes. You can then review the Excluded AWS accounts and verify that your excluded account is correctly configured.
Figure 7: Analyzer configuration updated with excluded account
You can go back to the console dashboard and see the results. In this example, the exclusion of the sandbox account has caused the total number of active findings to go down from 251 to 194.
Figure 8: Dashboard showing a reduction in active findings
Use AWS CLI to update your unused access analyzer:
You can update your existing analyzer using the AWS CLI command aws accessanalyzer update-analyzer. Use the following command, replacing <YOUR-ANALYZER-NAME> with the name of your analyzer.
You have successfully excluded a sandbox account from the unused access analysis. Now you will exclude the IAM roles used by the security team to audit your accounts based on tags.
Excluding specific principals in your organization using tags
In this section, you will see how to update an existing unused access analyzer by excluding tagged IAM roles in your organization using the console and then AWS CLI.
Use the console to update your unused access analyzer:
Open the IAM Access Analyzer console.
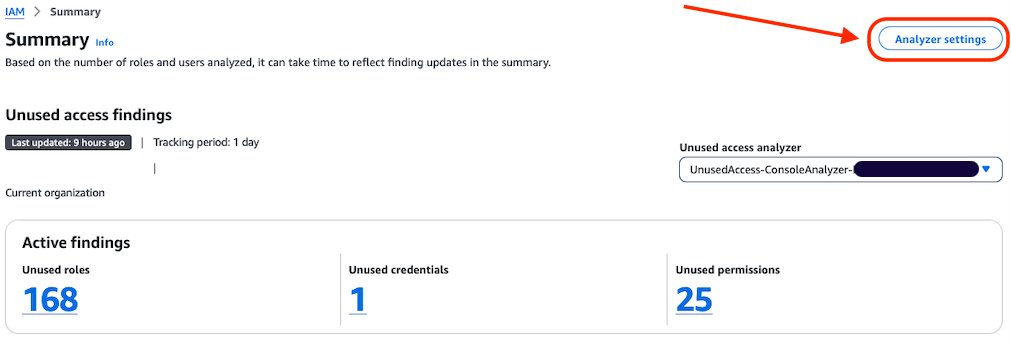
Review the summary dashboard containing your unused findings. Choose Analyzer settings at the top of the screen.
Figure 9: IAM Access Analyzer summary dashboard
You will see a list of analyzers created in your account in that Region. Select the analyzer that you want to update.
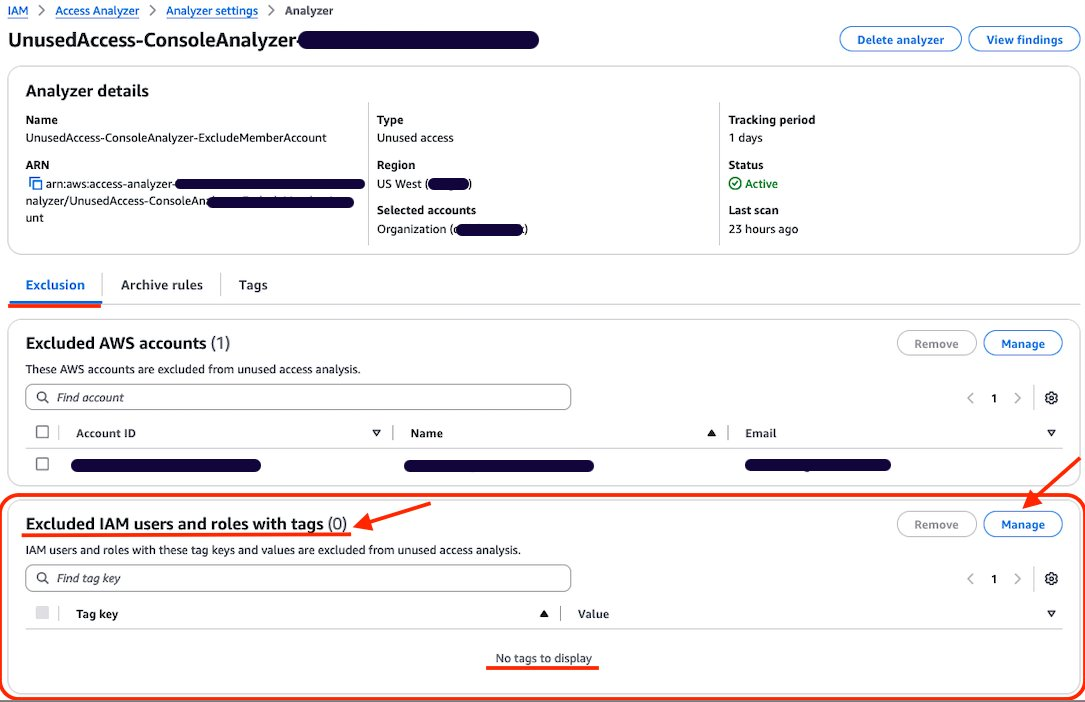
Review the analyzer page. On the Exclusion tab, you will see Exclude IAM users and roles with tags with a count of 0.
Figure 10: Configure exclusion of IAM roles using tag
Choose Manage in the Excluded IAM users and roles with tags section.
Add the tags attached to the roles that you want to exclude from the analysis and choose Save changes.
Figure 11: Add tag to exclude
You can now see that Excluded IAM users and roles with tags now has a count of 1, and you can see the tags in the list.
Figure 12: List of exclusion tags
Use AWS CLI to update your unused access analyzer:
You can also update your existing analyzer using the AWS CLI command aws accessanalyzer update-analyzer. Using the following command, replace <YOUR-ANALYZER-NAME> with the name of your analyzer.
You can review, remove, or update the exclusions configured on your analyzer by using the console or AWS CLI. For example, as a security administrator managing multiple accounts, you might initially exclude IAM roles that have the tag security from analysis. However, you might need to review these exclusions if your policies change, requiring analysis of certain security roles or removing the exclusion entirely. By adjusting your exclusions, you can make sure that your analyzer’s results remain relevant to your organization’s needs and account structure.
Review the exclusion on unused access analyzer using the console:
In this section, review the tags that have been excluded from an analyzer.
Open the IAM console.
Select Access Analyzer, under Access reports, you will see a summary dashboard of findings from an analyzer.
The Active findings section shows the number of active findings for unused roles, the number of active findings for unused credentials and the number of active findings for unused permissions.
The Findings overview section includes a breakdown of the active findings.
The Findings status section shows the status of findings (whether active, archived or resolved).
Figure 13: Unused access analyzer dashboard
Select the Analyzer settings at the top of the screen.
Select the analyzer that you want to review to see the exclusion tags.
After applying the tags, the updated dashboard is shown after the next scan.
Figure 15: Dashboard showing reduction of findings after exclusions
Review the exclusion on an unused access analyzer using AWS CLI:
Using the name of your analyzer, you can run the command get-analyzer to see the configured exclusion. Using the following command, replace <YOUR-ANALYZER-NAME> with the name of your analyzer:
In this post, you learned how to tailor your unused access analyzer to your needs by excluding specific accounts and IAM roles. To exclude the accounts in your organization from being monitored by IAM Access Analyzer, you can use a list of account IDs or select them from a hierarchical view of your organization structure. You can exclude IAM roles and IAM users based on tags. By customizing the exclusion on the unused access analyzer, you saw that the number of active findings went down, helping you focus on the findings that matter most. With this new offering, IAM Access Analyzer provides enhanced controls to help you tailor the analysis more closely to your organization’s security needs.
As a security team lead, your goal is to manage security for your organization at scale and ensure that your team follows AWS Identity and Access Management (IAM)security best practices, such as the principle of least privilege. As your developers build on AWS, you need visibility across your organization to make sure that teams are working with only the required privileges. Now, AWS Identity and Access Management Analyzer offers prescriptive recommendations with actionable guidance that you can share with your developers to quickly refine unused access.
In this post, we show you how to use IAM Access Analyzer recommendations to refine unused access. To do this, we start by focusing on the recommendations to refine unused permissions and show you how to generate the recommendations and the actions you can take. For example, we show you how to filter unused permissions findings, generate recommendations, and remediate issues. Now, with IAM Access Analyzer, you can include step-by-step recommendations to help developers refine unused permissions quickly.
Unused access recommendations
IAM Access Analyzer continuously analyzes your accounts to identify unused access and consolidates findings in a centralized dashboard. The dashboard helps review findings and prioritize accounts based on the volume of findings. The findings highlight unused IAM roles and unused access keys and passwords for IAM users. For active IAM roles and users, the findings provide visibility into unused services and actions. You can learn more about unused access analysis through the IAM Access Analyzer documentation.
For unused IAM roles, access keys, and passwords, IAM Access Analyzer provides quick links in the console to help you delete them. You can use the quick links to act on the recommendations or use export to share the details with the AWS account owner. For overly permissive IAM roles and users, IAM Access Analyzer provides policy recommendations with actionable steps that guide you to refine unused permissions. The recommended policies retain resource and condition context from existing policies, helping you update your policies iteratively.
Throughout this post, we use an IAM role in an AWS account and configure the permissions by doing the following:
We use an inline policy to demonstrate that IAM Access Analyzer unused access recommendations are applicable for that use case. The recommendations are also applicable when using AWS managed policies and customer managed policies.
In your AWS account, after you have configured an unused access analyzer, you can select an IAM role that you have used recently and see if there are unused access permissions findings and recommendations.
In this post we explore three options for generating recommendations for IAM Access Analyzer unused permissions findings: the console, AWS CLI, and AWS API.
Generate recommendations for unused permissions using the console
After you have created an unused access analyzer as described in the prerequisites, wait a few minutes to see the analysis results. Then use the AWS Management Console to view the proposed recommendations for the unused permissions.
To list unused permissions findings
Go to the IAM console and under Access Analyzer, choose Unused access from the navigation pane.
Search for active findings with the type Unused permissions in the search box.
Select Active from the Status drop-down list.
In the search box, select Findings type under Properties.
Select Equals as Operators.
Select Findings Type = Unused permissions.
This list shows the active findings for IAM resources with unused permissions.
Figure 1: Filter on unused permissions in the IAM console
Select a finding to learn more about the unused permissions granted to a given role or user.
To obtain recommendations for unused permissions
On the findings detail page, you will see a list of the unused permissions under Unused permissions.
Following that, there is a new section called Recommendations. The Recommendations section presents two steps to remediate the finding:
Review the existing permissions on the resource.
Create new policies with the suggested refined permissions and detach the existing policies.
Figure 2: Recommendations section
The generation of recommendations is on-demand and is done in the background when you’re using the console. The message Analysis in progress indicates that recommendations are being generated. The recommendations exclude the unused actions from the recommended policies.
When an IAM principal, such as an IAM role or user, has multiple permissions policies attached, an analysis of unused permissions is made for each of permissions policies:
If no permissions have been used, the recommended action is to detach the existing permissions policy.
If some permissions have been used, only the used permissions are kept in the recommended policy, helping you apply the principle of least privilege.
The recommendations are presented for each existing policy in the column Recommended policy. In this example, the existing policies are:
AmazonBedrockReadOnly
AmazonS3ReadOnlyAccess
InlinePolicyListLambda
And the recommended policies are:
None
AmazonS3ReadOnlyAccess-recommended
InlinePolicyListLambda-recommended
Figure 3: Recommended policies
There is no recommended policy for AmazonBedrockReadOnly because the recommended action is to detach it. When hovering over None, the following message is displayed: There are no recommended policies to create for the existing permissions policy.
AmazonS3ReadOnlyAccess and InlinePolicyListLambda and their associated recommended policy can be previewed by choosing Preview policy.
To preview a recommended policy
IAM Access Analyzer has proposed two recommended policies based on the unused actions.
To preview each recommended policy, choose Preview policy for that policy to see a comparison between the existing and recommended permissions.
Choose Preview policy for AmazonS3ReadOnlyAccess-recommended.
The existing policy has been analyzed and the broad permissions—s3:Get* and s3:List*—have been scoped down to detailed permissions in the recommended policy.
The permissions s3:Describe*, s3-object-lambda:Get*, and s3-object-lambda:List* can be removed because they weren’t used.
Figure 4: Preview of the recommended policy for AmazonS3ReadOnlyAccess
Choose Preview policy for InlinePolicyListLambda-recommended to see a comparison between the existing inline policy InlinePolicyListLambda and its recommended version.
The existing permissions, lambda:ListFunctions and lambda:ListLayers, are kept in the recommended policy, as well as the existing condition.
The permissions in lambda:ListAliases and lambda:ListFunctionUrlConfigs can be removed because they weren’t used.
Figure 5: Preview the recommended policy for the existing inline policy InlinePolicyListLambda
To download the recommended policies file
Choose Download JSON to download the suggested recommendations locally.
Figure 6: Download the recommended policies
A .zip file that contains the recommended policies in JSON format will be downloaded.
Figure 7: Downloaded recommended policies as JSON files
The content of the AmazonS3ReadOnlyAccess-recommended-1-2024-07-22T20/08/44.793Z.json file the same as the recommended policy shown in Figure 4.
Generate recommendations for unused permissions using AWS CLI
Use the following code to refine the results by filtering on the type UnusedPermission and selecting only the active findings. Copy the Amazon Resource Name (ARN) of your unused access analyzer and use it to replace the ARN in the following code:
This command provides the following results. For more information about the meaning and structure of the recommendations, see Anatomy of a recommendation later in this post.
Note: The recommendations consider AWS managed policies, customer managed policies, and inline policies. The IAM conditions in the initial policy are maintained in the recommendations if the actions they’re related to are used.
The remediations suggested are to do the following:
Detach AmazonBedrockReadOnly policy because it is unused: DETACH_POLICY
Create a new recommended policy with scoped down permissions from the managed policy AmazonS3ReadOnlyAccess: CREATE_POLICY
Detach AmazonS3ReadOnlyAccess: DETACH_POLICY
Embed a new recommended policy with scoped down permissions from the inline policy: CREATE_POLICY
To generate recommendations for unused permissions using the IAM Access Analyzer API
The findings are generated on-demand. For that purpose, IAM Access Analyzer API GenerateFindingRecommendation can be called with two parameters: the ARN of the analyzer and the finding ID.
After the recommendations are generated, they can be obtained by calling the API GetFindingRecommendation with the same parameters: the ARN of the analyzer and the finding ID.
Use AWS SDK for Python (boto3) for the API call as follows:
The recommendations are generated as actionable guidance that you can follow. They propose new IAM policies that exclude the unused actions, helping you rightsize your permissions.
Anatomy of a recommendation
The recommendations are usually presented in the following way:
Date and time: startedAt, completedAt. Respectively when the API call was made and when the analysis was completed and the results were provided.
Resource ARN: The ARN of the resource being analyzed.
Recommended steps: The recommended steps, such as creating a new policy based on the actions used and detaching the existing policy.
Status: The status of retrieving the finding recommendation. The status values include SUCCEEDED, FAILED, and IN_PROGRESS.
For more information about the structure of recommendations, see the output section of get-finding-recommendation.
Recommended policy review
You must review the recommended policy. The recommended actions depend on the original policy. The original policy will be one of the following:
An AWS managed policy: You need to create a new IAM policy using recommendedPolicy. Attach this newly created policy to your IAM role. Then detach the former policy.
A customer managed policy or an inline policy: Review the policy, verify its scope, consider how often it’s attached to other principals (customer managed policy only), and when you are confident to proceed, use the recommended policy to create a new policy and detach the former policy.
Use cases to consider when reviewing recommendations
During your review process, keep in mind that the unused actions are determined based on the time defined in your tracking period. The following are some use cases you might have where a necessary role or action might be identified as unused (this is not an exhaustive list of use cases). It’s important to review the recommendations based on your business needs. You can also archive some findings related to the use cases such as the ones that follow:
Backup activities: If your tracking period is 28 days and you have a specific role for your backup activities running at the end of each month, you might discover that after 29 days some of the permissions for that backup role are identified as unused.
IAM permissions associated to an infrastructure as code deployment pipeline: You should also consider the permissions associated to specific IAM roles such an IAM for infrastructure as code (IaC) deployment pipeline. Your pipeline can be used to deploy Amazon Simple Storage Service (Amazon S3) buckets based on your internal guidelines. After deployment is complete, the pipeline permissions can become unused after your tracking period, but removing those unused permissions can prevent you from updating your S3 buckets configuration or from deleting it.
IAM roles associated with disaster recovery activities: While it’s recommended to have a disaster recovery plan, the IAM roles used to perform those activities might be flagged by IAM Access Analyzer for having unused permissions or being unused roles.
To apply the suggested recommendations
Of the three original policies attached to IAMRole_IA2_Blog_EC2Role, AmazonBedrockReadOnly can be detached and AmazonS3ReadOnlyAccess and InlinePolicyListLambda can be refined.
DetachAmazonBedrockReadOnly
No permissions are used in this policy, and the recommended action is to detach it from your IAM role. To detach it, you can use the IAM console, the AWS CLI, or the AWS API.
Create a new policy called AmazonS3ReadOnlyAccess-recommended and detach AmazonS3ReadOnlyAccess.
The unused access analyzer has identified unused permissions in the managed policy AmazonS3ReadOnlyAccess and proposed a new policy AmazonS3ReadOnlyAccess-recommended that contains only the used actions. This is a step towards least privilege because the unused actions can be removed by using the recommended policy.
Create a new IAM policy named AmazonS3ReadOnlyAccess-recommended that contains only the following recommended policy or one based on the downloaded JSON file.
Embed a new inline policy InlinePolicyListLambda-recommended and delete InlinePolicyListLambda. This inline policy lists AWS Lambda aliases, functions, layers, and function URLs only when coming from a specific source IP address.
After updating the policies based on the Recommended policy proposed, the finding Status will change from Active to Resolved.
Figure 9: The finding is resolved
Pricing
There is no additional pricing for using the prescriptive recommendations after you have enabled unused access findings.
Conclusion
As a developer writing policies, you can use the actionable guidance provided in recommendations to continually rightsize your policies to include only the roles and actions you need. You can export the recommendations through the console or set up automated workflows to notify your developers about new IAM Access Analyzer findings.
This new IAM Access Analyzer unused access recommendations feature streamlines the process towards least privilege by selecting the permissions that are used and retaining the resource and condition context from existing policies. It saves an impressive amount of time by the actions used by your principals and guiding you to refine them.
By using the IAM Access Analyzer findings and access recommendations, you can quickly see how to refine the permissions granted. We have shown in this blog post how to generate prescriptive recommendations with actionable guidance for unused permissions using AWS CLI, API calls, and the console.
AWS Identity and Access Management (IAM) Access Analyzer offers tools that help you set, verify, and refine permissions. You can use IAM Access Analyzer external access findings to continuously monitor your AWS Organizations organization and Amazon Web Services (AWS) accounts for public and cross-account access to your resources, and verify that only intended external access is granted. Now, you can use IAM Access Analyzer unused access findings to identify unused access granted to IAM roles and users in your organization.
If you lead a security team, your goal is to manage security for your organization at scale and make sure that your team follows best practices, such as the principle of least privilege. When your developers build on AWS, they create IAM roles for applications and team members to interact with AWS services and resources. They might start with broad permissions while they explore AWS services for their use cases. To identify unused access, you can review the IAM last accessed information for a given IAM role or user and refine permissions gradually. If your company has a multi-account strategy, your roles and policies are created in multiple accounts. You then need visibility across your organization to make sure that teams are working with just the required access.
Now, IAM Access Analyzer simplifies inspection of unused access by reporting unused access findings across your IAM roles and users. IAM Access Analyzer continuously analyzes the accounts in your organization to identify unused access and creates a centralized dashboard with findings. From a delegated administrator account for IAM Access Analyzer, you can use the dashboard to review unused access findings across your organization and prioritize the accounts to inspect based on the volume and type of findings. The findings highlight unused roles, unused access keys for IAM users, and unused passwords for IAM users. For active IAM users and roles, the findings provide visibility into unused services and actions. With the IAM Access Analyzer integration with Amazon EventBridge and AWS Security Hub, you can automate and scale rightsizing of permissions by using event-driven workflows.
In this post, we’ll show you how to set up and use IAM Access Analyzer to identify and review unused access in your organization.
Generate unused access findings
To generate unused access findings, you need to create an analyzer. An analyzer is an IAM Access Analyzer resource that continuously monitors your accounts or organization for a given finding type. You can create an analyzer for the following findings:
An analyzer for unused access findings is a new analyzer that continuously monitors roles and users, looking for permissions that are granted but not actually used. This analyzer is different from an analyzer for external access findings; you need to create a new analyzer for unused access findings even if you already have an analyzer for external access findings.
You can centrally view unused access findings across your accounts by creating an analyzer at the organization level. If you operate a standalone account, you can get unused access findings by creating an analyzer at the account level. This post focuses on the organization-level analyzer setup and management by a central team.
Pricing
IAM Access Analyzer charges for unused access findings based on the number of IAM roles and users analyzed per analyzer per month. You can still use IAM Access Analyzer external access findings at no additional cost. For more details on pricing, see IAM Access Analyzer pricing.
Create an analyzer for unused access findings
To enable unused access findings for your organization, you need to create your analyzer by using the IAM Access Analyzer console or APIs in your management account or a delegated administrator account. A delegated administrator is a member account of the organization that you can delegate with administrator access for IAM Access Analyzer. A best practice is to use your management account only for tasks that require the management account and use a delegated administrator for other tasks. For steps on how to add a delegated administrator for IAM Access Analyzer, see Delegated administrator for IAM Access Analyzer.
To create an analyzer for unused access findings (console)
From the delegated administrator account, open the IAM Access Analyzer console, and in the left navigation pane, select Analyzer settings.
Choose Create analyzer.
On the Create analyzer page, do the following, as shown in Figure 1:
For Findings type, select Unused access analysis.
Provide a Name for the analyzer.
Select a Tracking period. The tracking period is the threshold beyond which IAM Access Analyzer considers access to be unused. For example, if you select a tracking period of 90 days, IAM Access Analyzer highlights the roles that haven’t been used in the last 90 days.
Set your Selected accounts. For this example, we select Current organization to review unused access across the organization.
Select Create.
Figure 1: Create analyzer page
Now that you’ve created the analyzer, IAM Access Analyzer starts reporting findings for unused access across the IAM users and roles in your organization. IAM Access Analyzer will periodically scan your IAM roles and users to update unused access findings. Additionally, if one of your roles, users or policies is updated or deleted, IAM Access Analyzer automatically updates existing findings or creates new ones. IAM Access Analyzer uses a service-linked role to review last accessed information for all roles, user access keys, and user passwords in your organization. For active IAM roles and users, IAM Access Analyzer uses IAM service and action last accessed information to identify unused permissions.
Note: Although IAM Access Analyzer is a regional service (that is, you enable it for a specific AWS Region), unused access findings are linked to IAM resources that are global (that is, not tied to a Region). To avoid duplicate findings and costs, enable your analyzer for unused access in the single Region where you want to review and operate findings.
IAM Access Analyzer findings dashboard
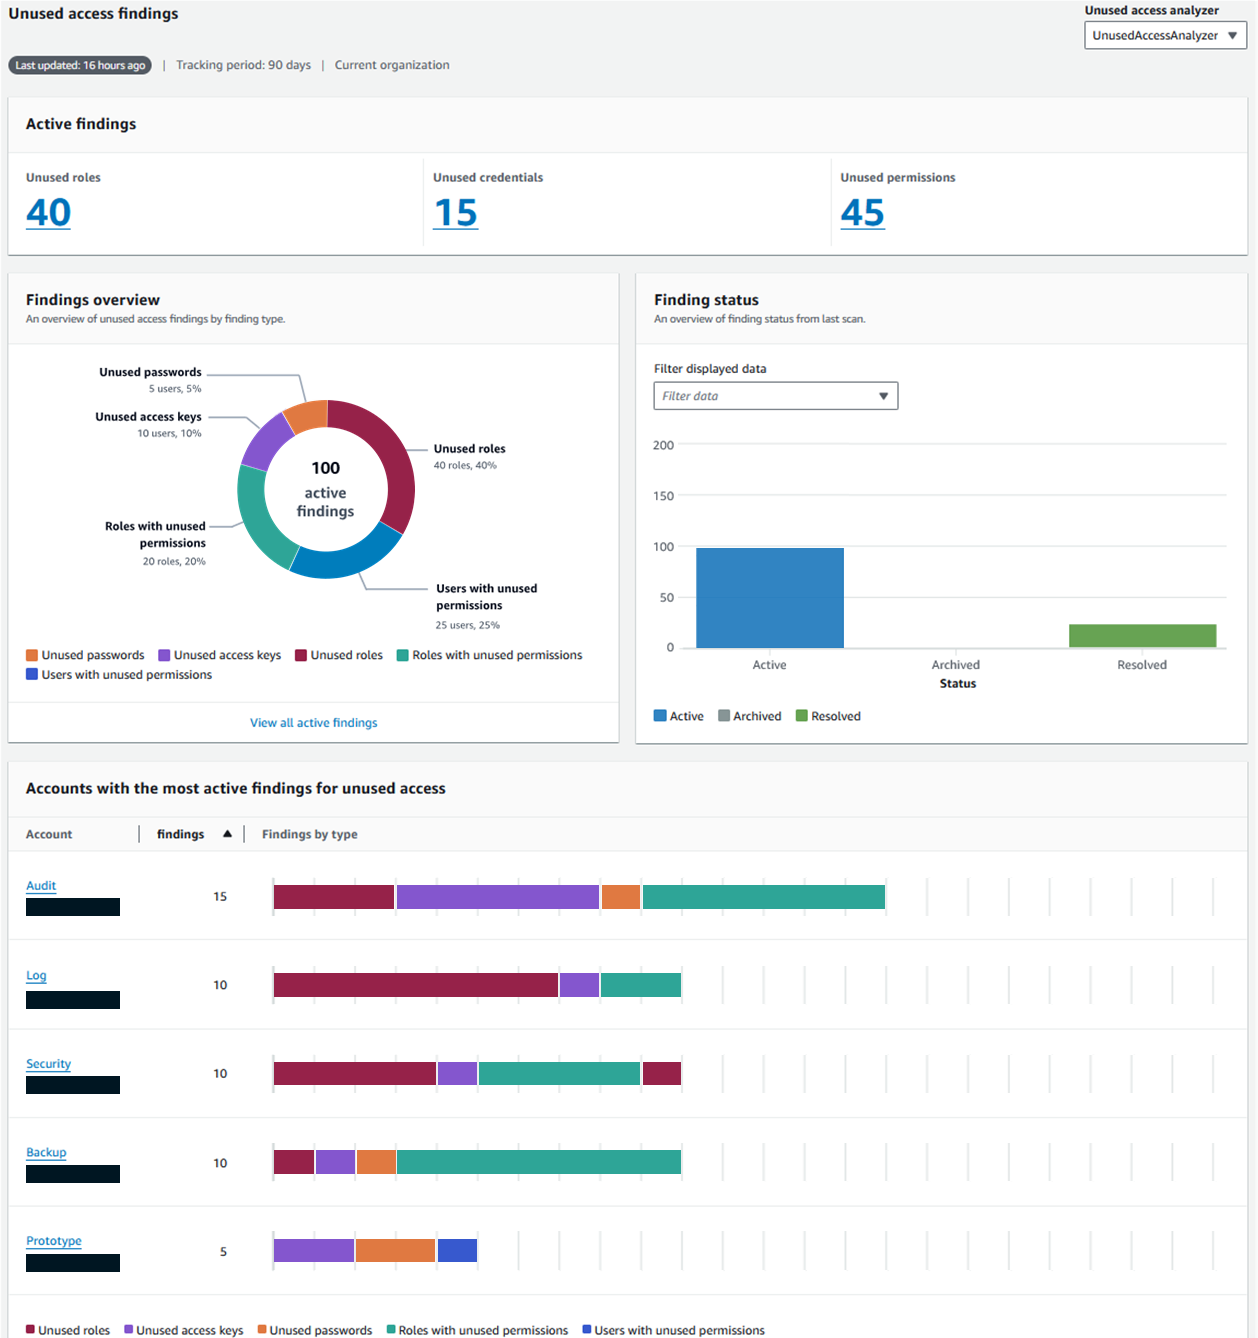
Your analyzer aggregates findings from across your organization and presents them on a dashboard. The dashboard aggregates, in the selected Region, findings for both external access and unused access—although this post focuses on unused access findings only. You can use the dashboard for unused access findings to centrally review the breakdown of findings by account or finding types to identify areas to prioritize for your inspection (for example, sensitive accounts, type of findings, type of environment, or confidence in refinement).
Review the findings overview to identify the total findings for your organization and the breakdown by finding type. Figure 2 shows an example of an organization with 100 active findings. The finding type Unused access keys is present in each of the accounts, with the most findings for unused access. To move toward least privilege and to avoid long-term credentials, the security team should clean up the unused access keys.
Figure 2: Unused access finding dashboard
Unused access findings dashboard – Accounts with most findings
Review the dashboard to identify the accounts with the highest number of findings and the distribution per finding type. In Figure 2, the Audit account has the highest number of findings and might need attention. The account has five unused access keys and six roles with unused permissions. The security team should prioritize this account based on volume of findings and review the findings associated with the account.
Review unused access findings
In this section, we’ll show you how to review findings. We’ll share two examples of unused access findings, including unused access key findings and unused permissions findings.
Finding example: unused access keys
As shown previously in Figure 2, the IAM Access Analyzer dashboard showed that accounts with the most findings were primarily associated with unused access keys. Let’s review a finding linked to unused access keys.
Select your analyzer to view the unused access findings.
In the search dropdown list, select the property Findings type, the Equals operator, and the value Unused access key to get only Findings type = Unused access key, as shown in Figure 3.
Figure 3: List of unused access findings
Select one of the findings to get a view of the available access keys for an IAM user, their status, creation date, and last used date. Figure 4 shows an example in which one of the access keys has never been used, and the other was used 137 days ago.
Figure 4: Finding example – Unused IAM user access keys
From here, you can investigate further with the development teams to identify whether the access keys are still needed. If they aren’t needed, you should delete the access keys.
Finding example: unused permissions
Another goal that your security team might have is to make sure that the IAM roles and users across your organization are following the principle of least privilege. Let’s walk through an example with findings associated with unused permissions.
To review findings for unused permissions
On the list of unused access findings, apply the filter on Findings type = Unused permissions.
The security team now has a view of the unused actions for this role and can investigate with the development teams to check if those permissions are still required.
The development team can then refine the permissions granted to the role to remove the unused permissions.
Unused access findings notify you about unused permissions for all service-level permissions and for 200 services at the action-level. For the list of supported actions, see IAM action last accessed information services and actions.
Take actions on findings
IAM Access Analyzer categorizes findings as active, resolved, and archived. In this section, we’ll show you how you can act on your findings.
Resolve findings
You can resolve unused access findings by deleting unused IAM roles, IAM users, IAM user credentials, or permissions. After you’ve completed this, IAM Access Analyzer automatically resolves the findings on your behalf.
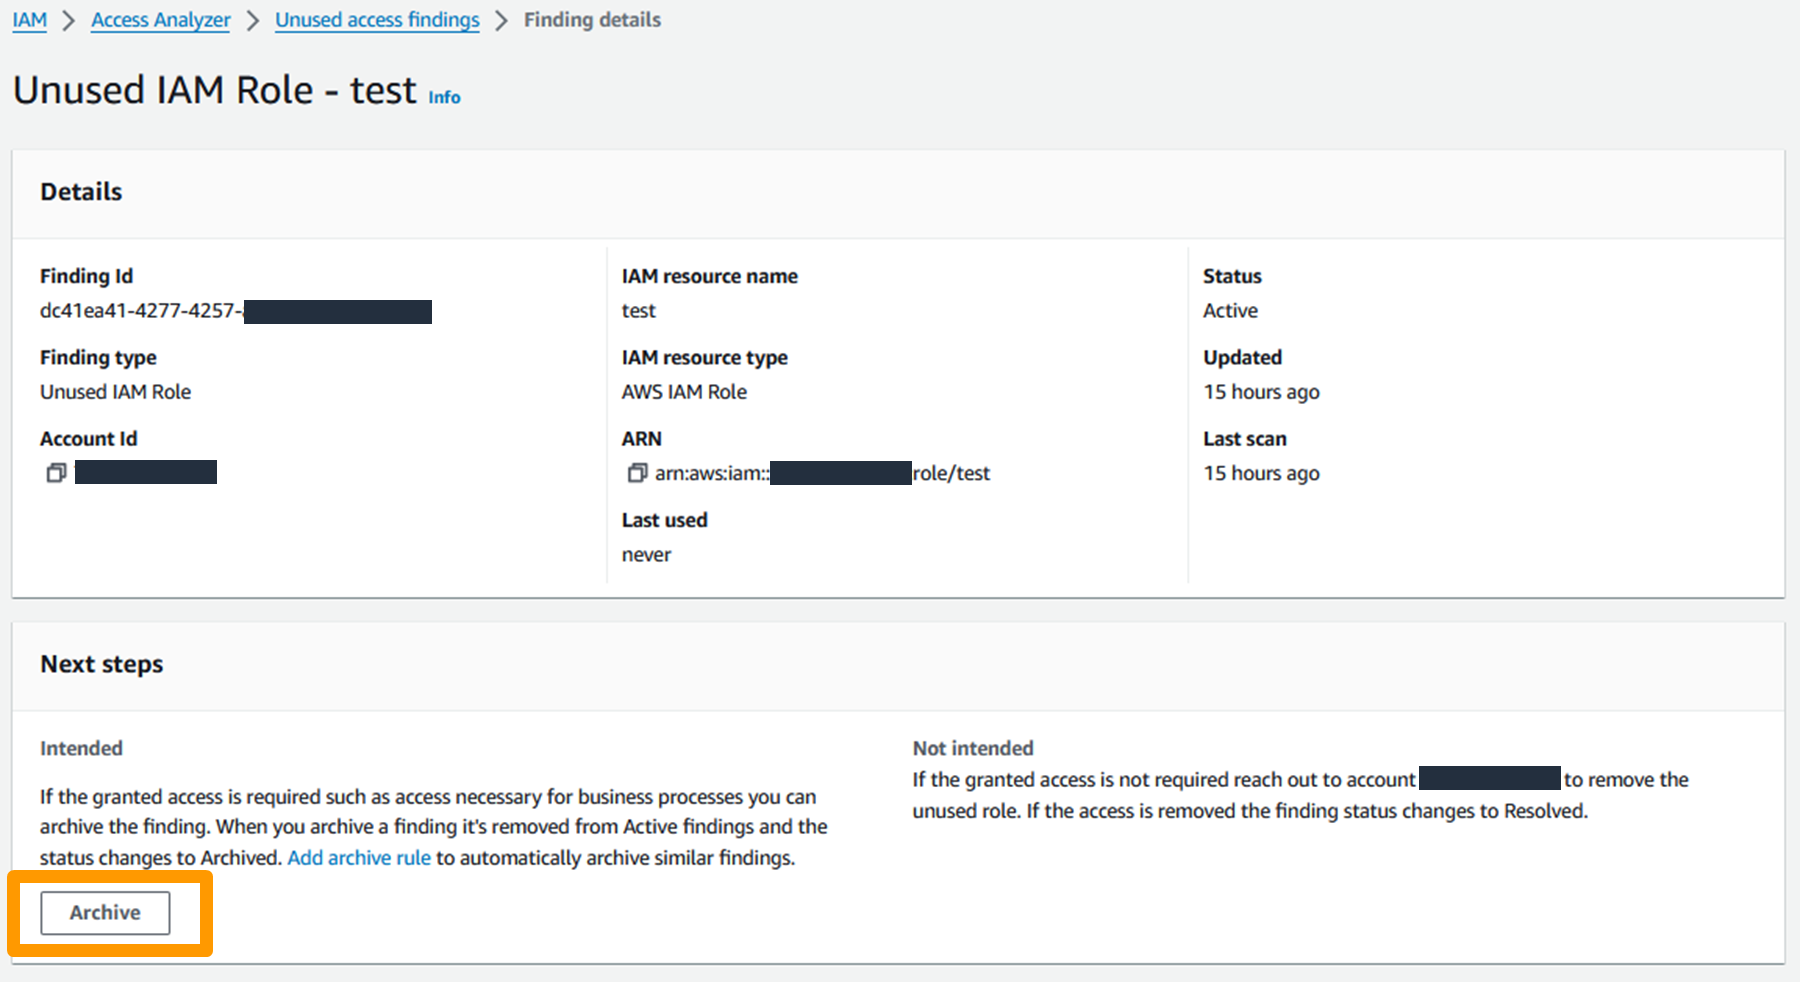
You can suppress a finding by archiving it, which moves the finding from the Active tab to the Archived tab in the IAM Access Analyzer console. To archive a finding, open the IAM Access Analyzer console, select a Finding ID, and in the Next steps section, select Archive, as shown in Figure 6.
Figure 6: Archive finding in the AWS management console
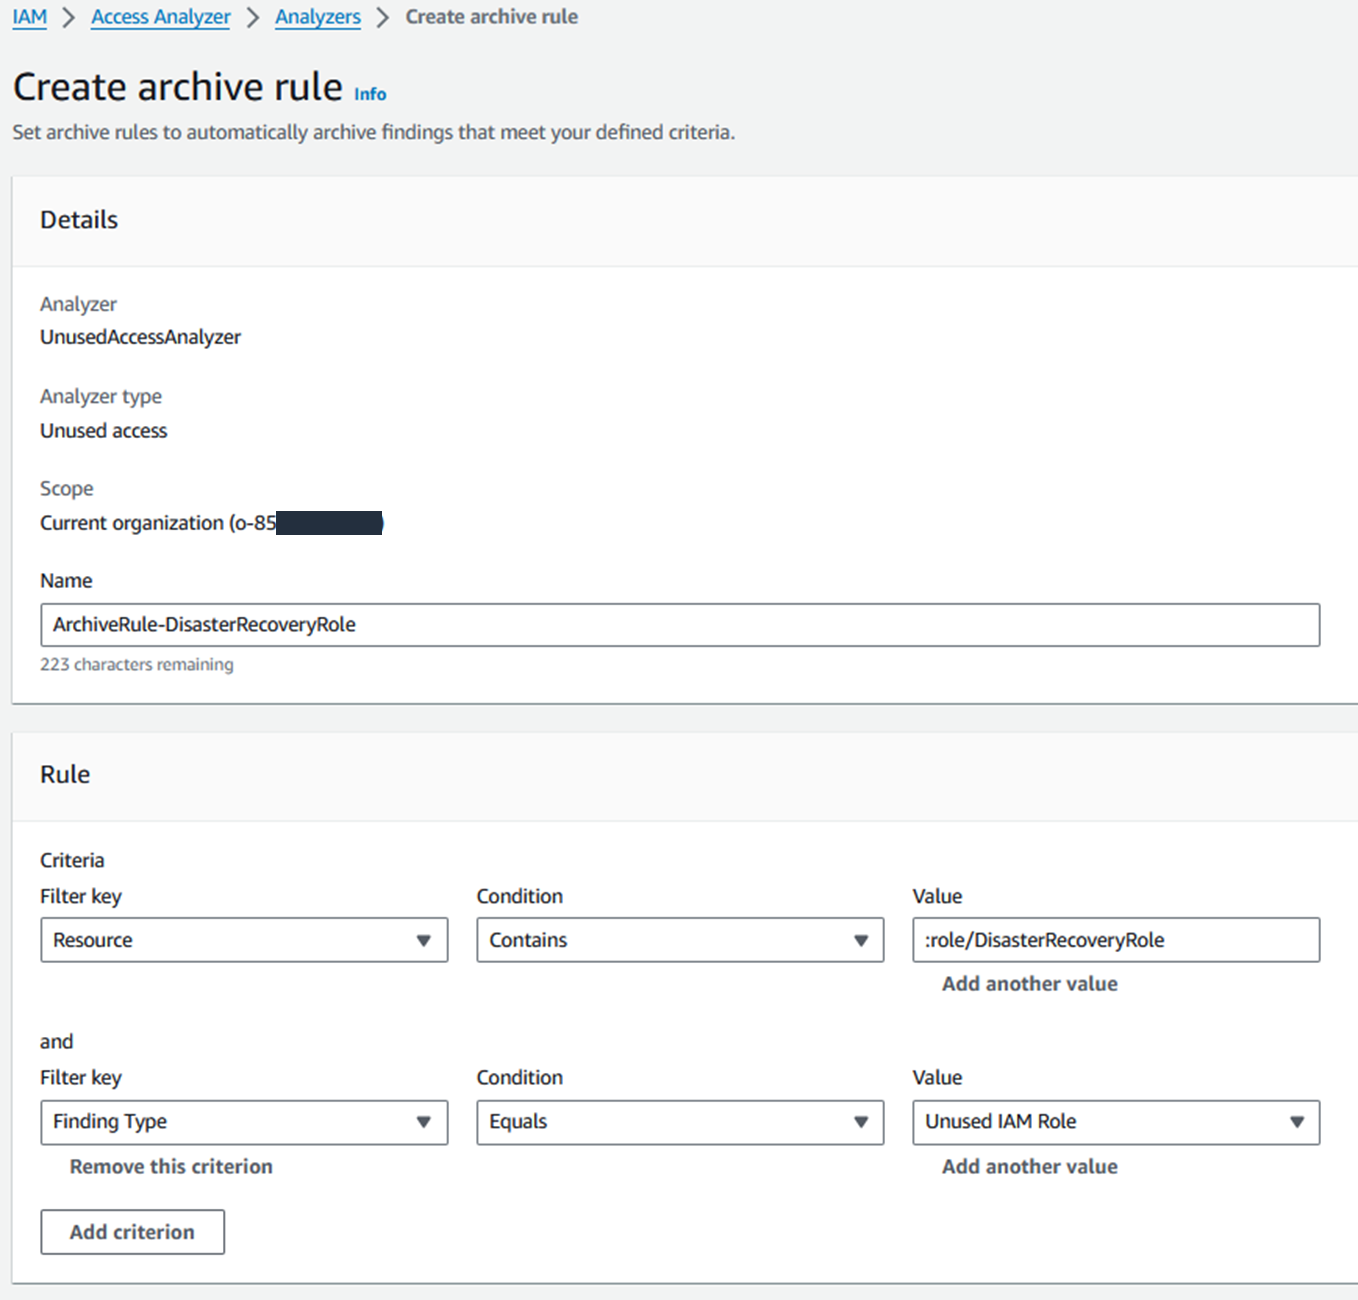
You can automate this process by creating archive rules that archive findings based on their attributes. An archive rule is linked to an analyzer, which means that you can have archive rules exclusively for unused access findings.
To illustrate this point, imagine that you have a subset of IAM roles that you don’t expect to use in your tracking period. For example, you might have an IAM role that is used exclusively for break glass access during your disaster recovery processes—you shouldn’t need to use this role frequently, so you can expect some unused access findings. For this example, let’s call the role DisasterRecoveryRole. You can create an archive rule to automatically archive unused access findings associated with roles named DisasterRecoveryRole, as shown in Figure 7.
Using an EventBridge rule, you can match the incoming events associated with IAM Access Analyzer unused access findings and send them to targets for processing. For example, you can notify the account owners so that they can investigate and remediate unused IAM roles, user credentials, or permissions.
With IAM Access Analyzer, you can centrally identify, review, and refine unused access across your organization. As summarized in Figure 8, you can use the dashboard to review findings and prioritize which accounts to review based on the volume of findings. The findings highlight unused roles, unused access keys for IAM users, and unused passwords for IAM users. For active IAM roles and users, the findings provide visibility into unused services and actions. By reviewing and refining unused access, you can improve your security posture and get closer to the principle of least privilege at scale.
Figure 8: Process to address unused access findings
The new IAM Access Analyzer unused access findings and dashboard are available in AWS Regions, excluding the AWS GovCloud (US) Regions and AWS China Regions. To learn more about how to use IAM Access Analyzer to detect unused accesses, see the IAM Access Analyzer documentation.
If you have feedback about this post, submit comments in the Comments section below. If you have questions about this post, contact AWS Support.
Want more AWS Security news? Follow us on Twitter.
AWS Identity and Access Management (IAM)Access Analyzer was launched in late 2019. Access Analyzer guides customers toward least-privilege permissions across Amazon Web Services (AWS) by using analysis techniques, such as automated reasoning, to make it simpler for customers to set, verify, and refine IAM permissions. Today, we are excited to announce the general availability of IAM Access Analyzer custom policy checks, a new IAM Access Analyzer feature that helps customers accurately and proactively check IAM policies for critical permissions and increases in policy permissiveness.
In this post, we’ll show how you can integrate custom policy checks into builder workflows to automate the identification of overly permissive IAM policies and IAM policies that contain permissions that you decide are sensitive or critical.
What is the problem?
Although security teams are responsible for the overall security posture of the organization, developers are the ones creating the applications that require permissions. To enable developers to move fast while maintaining high levels of security, organizations look for ways to safely delegate the ability of developers to author IAM policies. Many AWS customers implement manual IAM policy reviews before deploying developer-authored policies to production environments. Customers follow this practice to try to prevent excessive or unwanted permissions finding their way into production. Depending on the volume and complexity of the policies that need to be reviewed; these reviews can be intensive and take time. The result is a slowdown in development and potential delay in deployment of applications and services. Some customers write custom tooling to remove the manual burden of policy reviews, but this can be costly to build and maintain.
How do custom policy checks solve that problem?
Custom policy checks are a new IAM Access Analyzer capability that helps security teams accurately and proactively identify critical permissions in their policies. Custom policy checks can also tell you if a new version of a policy is more permissive than the previous version. Custom policy checks use automated reasoning, a form of static analysis, to provide a higher level of security assurance in the cloud. For more information, see Formal Reasoning About the Security of Amazon Web Services.
Custom policy checks can be embedded in a continuous integration and continuous delivery (CI/CD) pipeline so that checks can be run against policies without having to deploy the policies. In addition, developers can run custom policy checks from their local development environments and get fast feedback about whether or not the policies they are authoring are in line with your organization’s security standards.
How to analyze IAM policies with custom policy checks
In this section, we provide step-by-step instructions for using custom policy checks to analyze IAM policies.
Prerequisites
To complete the examples in our walkthrough, you will need the following:
An AWS account, and an identity that has permissions to use the AWS services, and create the resources, used in the following examples. For more information, see the full sample code used in this blog post on GitHub.
An installed and configured AWS CLI. For more information, see Configure the AWS CLI.
Example 1: Use custom policy checks to compare two IAM policies and check that one does not grant more access than the other
In this example, you will create two IAM identity policy documents, NewPolicyDocument and ExistingPolicyDocument. You will use the new CheckNoNewAccess API to compare these two policies and check that NewPolicyDocument does not grant more access than ExistingPolicyDocument.
Step 1: Create two IAM identity policy documents
Use the following command to create ExistingPolicyDocument.
Notice that ExistingPolicyDocument grants access to the ec2:StartInstances and ec2:StopInstances actions if the condition key aws:ResourceTag/Owner resolves to true. In other words, the value of the tag matches the policy variable aws:username. NewPolicyDocument grants access to the same actions, but does not include a condition key.
Step 2: Check the policies by using the AWS CLI
Use the following command to call the CheckNoNewAccess API to check whether NewPolicyDocument grants more access than ExistingPolicyDocument.
After a moment, you will see a response from Access Analyzer. The response will look similar to the following.
{
    "result": "FAIL",
    "message": "The modified permissions grant new access compared to your existing policy.",
    "reasons": [
        {
            "description": "New access in the statement with index: 1.",
            "statementIndex": 1
        }
    ]
}
In this example, the validation returned a result of FAIL. This is because NewPolicyDocument is missing the condition key, potentially granting any principal with this identity policy attached more access than intended or needed.
Example 2: Use custom policy checks to check that an IAM policy does not contain sensitive permissions
In this example, you will create an IAM identity-based policy that contains a set of permissions. You will use the CheckAccessNotGranted API to check that the new policy does not give permissions to disable AWS CloudTrail or delete any associated trails.
Step 1: Create a new IAM identity policy document
Use the following command to create IamPolicyDocument.
Use the following command to call the CheckAccessNotGranted API to check if the new policy grants permission to the set of sensitive actions. In this example, you are asking Access Analyzer to check that IamPolicyDocument does not contain the actions cloudtrail:StopLogging or cloudtrail:DeleteTrail (passed as a list to the access parameter).
Because the policy that you created contains both cloudtrail:StopLogging and cloudtrail:DeleteTrail actions, Access Analyzer returns a FAIL.
{
    "result": "FAIL",
    "message": "The policy document grants access to perform one or more of the listed actions.",
    "reasons": [
        {
            "description": "One or more of the listed actions in the statement with index: 0.",
            "statementIndex": 0
        }
    ]
}
Example 3: Integrate custom policy checks into the developer workflow
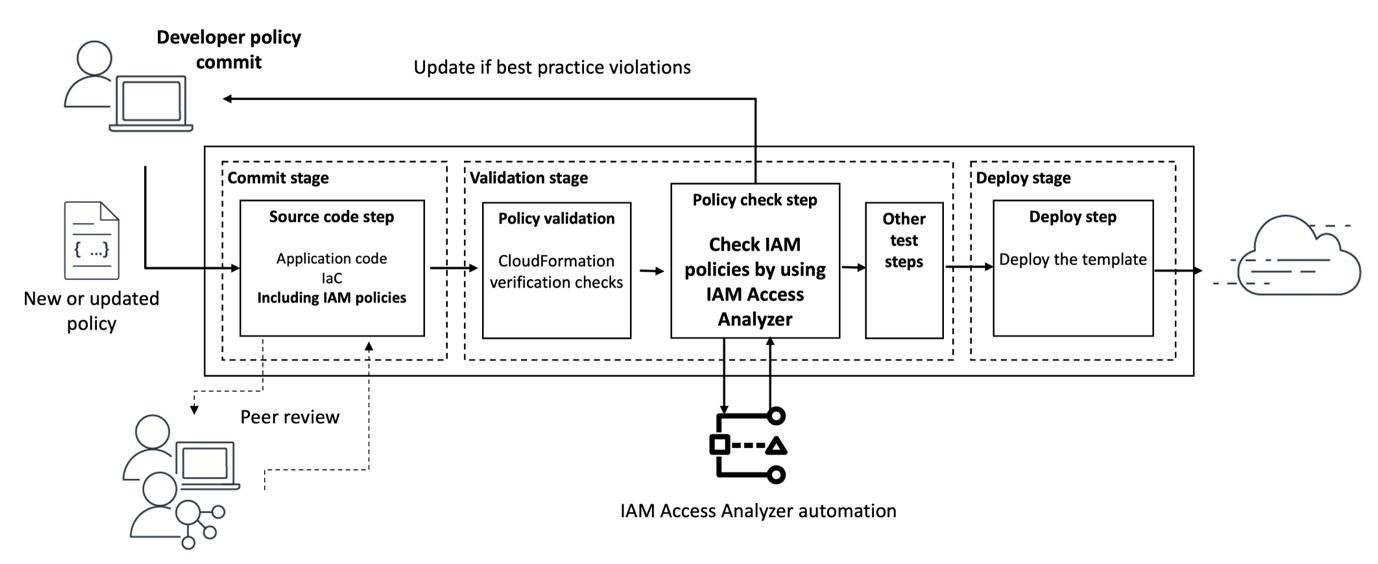
Building on the previous two examples, in this example, you will automate the analysis of the IAM policies defined in an AWS CloudFormation template. Figure 1 shows the workflow that will be used. The workflow will initiate each time a pull request is created against the main branch of an AWS CodeCommit repository called my-iam-policy (the commit stage in Figure 1). The first check uses the CheckNoNewAccess API to determine if the updated policy is more permissive than a reference IAM policy. The second check uses the CheckAccessNotGranted API to automatically check for critical permissions within the policy (the validation stage in Figure 1). In both cases, if the updated policy is more permissive, or contains critical permissions, a comment with the results of the validation is posted to the pull request. This information can then be used to decide whether the pull request is merged into the main branch for deployment (the deploy stage is shown in Figure 1).
Figure 1: Diagram of the pipeline that will check policies
Step 1: Deploy the infrastructure and set up the pipeline
Use the following command to download and unzip the Cloud Development Kit (CDK) project associated with this blog post.
git clone https://github.com/aws-samples/access-analyzer-automated-policy-analysis-blog.git
cd ./access-analyzer-automated-policy-analysis-blog
Create a virtual Python environment to contain the project dependencies by using the following command.
python3 -m venv .venv
Activate the virtual environment with the following command.
source .venv/bin/activate
Install the project requirements by using the following command.
pip install -r requirements.txt
Use the following command to update the CDK CLI to the latest major version.
npm install -g aws-cdk@2 --force
Before you can deploy the CDK project, use the following command to bootstrap your AWS environment. Bootstrapping is the process of creating resources needed for deploying CDK projects. These resources include an Amazon Simple Storage Service (Amazon S3) bucket for storing files and IAM roles that grant permissions needed to perform deployments.
cdk bootstrap
Finally, use the following command to deploy the pipeline infrastructure.
cdk deploy --require-approval never
The deployment will take a few minutes to complete. Feel free to grab a coffee and check back shortly.
When the deployment completes, there will be two stack outputs listed: one with a name that contains CodeCommitRepo and another with a name that contains ConfigBucket. Make a note of the values of these outputs, because you will need them later.
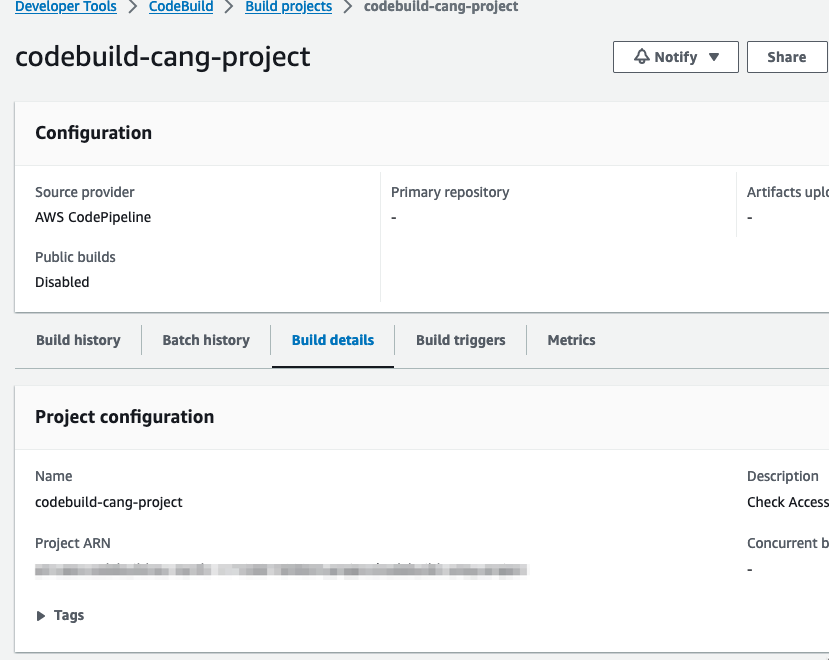
The deployed pipeline is displayed in the AWS CodePipeline console and should look similar to the pipeline shown in Figure 2.
Figure 2: AWS CodePipeline and CodeBuild Management Console view
In addition to initiating when a pull request is created, the newly deployed pipeline can also be initiated when changes to the main branch of the AWS CodeCommit repository are detected. The pipeline has three stages, CheckoutSources, IAMPolicyAnalysis, and deploy. The CheckoutSource stage checks out the contents of the my-iam-policy repository when the pipeline is triggered due to a change in the main branch.
The IAMPolicyAnalysis stage, which runs after the CheckoutSource stage or when a pull request has been created against the main branch, has two actions. The first action, Check no new access, verifies that changes to the IAM policies in the CloudFormation template do not grant more access than a pre-defined reference policy. The second action, Check access not granted, verifies that those same updates do not grant access to API actions that are deemed sensitive or critical. Finally, the Deploy stage will deploy the resources defined in the CloudFormation template, if the actions in the IAMPolicyAnalysis stage are successful.
To analyze the IAM policies, the Check no new access and Check access not granted actions depend on a reference policy and a predefined list of API actions, respectively.
Use the following command to create the reference policy.
This reference policy sets out the maximum permissions for policies that you plan to validate with custom policy checks. The iam:PassRole permission is a permission that allows an IAM principal to pass an IAM role to an AWS service, like Amazon Elastic Compute Cloud (Amazon EC2) or AWS Lambda. The reference policy says that the only way that a policy is more permissive is if it allows iam:PassRole on this group of sensitive resources: arn:aws:iam::*:role/my-sensitive-roles/*”.
Why might a reference policy be useful? A reference policy helps ensure that a particular combination of actions, resources, and conditions is not allowed in your environment. Reference policies typically allow actions and resources in one statement, then deny the problematic permissions in a second statement. This means that a policy that is more permissive than the reference policy allows access to a permission that the reference policy has denied.
In this example, a developer who is authorized to create IAM roles could, intentionally or unintentionally, create an IAM role for an AWS service (like EC2 for AWS Lambda) that has permission to pass a privileged role to another service or principal, leading to an escalation of privilege.
Use the following command to create a list of sensitive actions. This list will be parsed during the build pipeline and passed to the CheckAccessNotGranted API. If the policy grants access to one or more of the sensitive actions in this list, a result of FAIL will be returned. To keep this example simple, add a single API action, as follows.
So that the CodeBuild projects can access the dependencies, use the following command to copy the cnna-reference-policy.file and sensitive-actions.file to an S3 bucket. Refer to the stack outputs you noted earlier and replace <ConfigBucket> with the name of the S3 bucket created in your environment.
Step 2: Create a new CloudFormation template that defines an IAM policy
With the pipeline deployed, the next step is to clone the repository that was created and populate it with a CloudFormation template that defines an IAM policy.
Install git-remote-codecommit by using the following command.
pip install git-remote-codecommit
For more information on installing and configuring git-remote-codecommit, see the AWS CodeCommit User Guide.
With git-remote-codecommit installed, use the following command to clone the my-iam-policy repository from AWS CodeCommit.
git clone codecommit://my-iam-policy && cd ./my-iam-policy
If you’ve configured a named profile for use with the AWS CLI, use the following command, replacing <profile> with the name of your named profile.
git clone codecommit://<profile>@my-iam-policy && cd ./my-iam-policy
Use the following command to create the CloudFormation template in the local clone of the repository.
The actions in the IAMPolicyValidation stage are run by a CodeBuild project. CodeBuild environments run arbitrary commands that are passed to the project using a buildspec file. Each project has already been configured to use an inline buildspec file.
You can inspect the buildspec file for each project by opening the project’s Build details page as shown in Figure 3.
Figure 3: AWS CodeBuild console and build details
Step 3: Run analysis on the IAM policy
The next step involves checking in the first version of the CloudFormation template to the repository and checking two things. First, that the policy does not grant more access than the reference policy. Second, that the policy does not contain any of the sensitive actions defined in the sensitive-actions.file.
To begin tracking the CloudFormation template created earlier, use the following command.
git add ec2-instance-role.yaml
Commit the changes you have made to the repository.
git commit -m 'committing a new CFN template with IAM policy'
Finally, push these changes to the remote repository.
git push
Pushing these changes will initiate the pipeline. After a few minutes the pipeline should complete successfully. To view the status of the pipeline, do the following:
Navigate to https://<region>.console.aws.amazon.com/codesuite/codepipeline/pipelines (replacing <region> with your AWS Region).
Choose the pipeline called accessanalyzer-pipeline.
Scroll down to the IAMPolicyValidation stage of the pipeline.
For both the check no new access and check access not granted actions, choose View Logs to inspect the log output.
If you inspect the build logs for both the check no new access and check access not granted actions within the pipeline, you should see that there were no blocking or non-blocking findings, similar to what is shown in Figure 4. This indicates that the policy was validated successfully. In other words, the policy was not more permissive than the reference policy, and it did not include any of the critical permissions.
Figure 4: CodeBuild log entry confirming that the IAM policy was successfully validated
Step 4: Create a pull request to merge a new update to the CloudFormation template
In this step, you will make a change to the IAM policy in the CloudFormation template. The change deliberately makes the policy grant more access than the reference policy. The change also includes a critical permission.
Use the following command to create a new branch called add-new-permissions in the local clone of the repository.
git checkout -b add-new-permissions
Next, edit the IAM policy in ec2-instance-role.yaml to include an additional API action, dynamodb:Delete* and update the resource property of the inline policy to use an IAM role in the /my-sensitive-roles/*” path. You can copy the following example, if you’re unsure of how to do this.
Commit the policy change and push the updated policy document to the repo by using the following commands.
git add ec2-instance-role.yaml
git commit -m "adding new permission and allowing my ec2 instance to assume a pass sensitive IAM role"
The add-new-permissions branch is currently a local branch. Use the following command to push the branch to the remote repository. This action will not initiate the pipeline, because the pipeline only runs when changes are made to the repository’s main branch.
git push -u origin add-new-permissions
With the new branch and changes pushed to the repository, follow these steps to create a pull request:
Navigate to https://console.aws.amazon.com/codesuite/codecommit/repositories (don’t forget to the switch to the correct Region).
Choose the repository called my-iam-policy.
Choose the branch add-new-permissions from the drop-down list at the top of the repository screen.
Figure 5: my-iam-policy repository with new branch available
Choose Create pull request.
Enter a title and description for the pull request.
(Optional) Scroll down to see the differences between the current version and new version of the CloudFormation template highlighted.
Choose Create pull request.
The creation of the pull request will Initiate the pipeline to fetch the CloudFormation template from the repository and run the check no new access and check access not granted analysis actions.
After a few minutes, choose the Activity tab for the pull request. You should see a comment from the pipeline that contains the results of the failed validation.
Figure 6: Results from the failed validation posted as a comment to the pull request
Why did the validations fail?
The updated IAM role and inline policy failed validation for two reasons. First, the reference policy said that no one should have more permissions than the reference policy does. The reference policy in this example included a deny statement for the iam:PassRole permission with a resource of /my-sensitive-role/*. The new created inline policy included an allow statement for the iam:PassRole permission with a resource of arn:aws:iam::*:role/my-sensitive-roles/my-custom-admin-role. In other words, the new policy had more permissions than the reference policy.
Second, the list of critical permissions included the dynamodb:DeleteTable permission. The inline policy included a statement that would allow the EC2 instance to perform the dynamodb:DeleteTable action.
Cleanup
Use the following command to delete the infrastructure that was provisioned as part of the examples in this blog post.
cdk destroy
Conclusion
In this post, I introduced you to two new IAM Access Analyzer APIs: CheckNoNewAccess and CheckAccessNotGranted. The main example in the post demonstrated one way in which you can use these APIs to automate security testing throughout the development lifecycle. The example did this by integrating both APIs into the developer workflow and validating the developer-authored IAM policy when the developer created a pull request to merge changes into the repository’s main branch. The automation helped the developer to get feedback about the problems with the IAM policy quickly, allowing the developer to take action in a timely way. This is often referred to as shifting security left — identifying misconfigurations early and automatically supporting an iterative, fail-fast model of continuous development and testing. Ultimately, this enables teams to make security an inherent part of a system’s design and architecture and can speed up product development workflow.
You can find the full sample code used in this blog post on GitHub.
Sometimes you want to configure an AWS service to access your resource in another service. For example, you can configure AWS CloudTrail, a service that monitors account activity across your AWS infrastructure, to write log data to your bucket in Amazon Simple Storage Service (Amazon S3). When you do this, you want assurance that the service will only access your resource on your behalf—you don’t want an untrusted entity to be able to use the service to access your resource. Before today, you could achieve this by using the two AWS Identity and Access Management (IAM) condition keys, aws:SourceAccount and aws:SourceArn. You can use these condition keys to help make sure that a service accesses your resource only on behalf of specific accounts or resources that you trust. However, because these condition keys require you to specify individual accounts and resources, they can be difficult to manage at scale, especially in larger organizations.
Recently, IAM launched two new condition keys that can help you achieve this in a more scalable way that is simpler to manage within your organization:
aws:SourceOrgID — use this condition key to make sure that an AWS service can access your resources only when the request originates from a particular organization ID in AWS Organizations.
aws:SourceOrgPaths — use this condition key to make sure that an AWS service can access your resources only when the request originates from one or more organizational units (OUs) in your organization.
In this blog post, we describe how you can use the four available condition keys, including the two new ones, to help you control how AWS services access your resources.
Background
Imagine a scenario where you configure an AWS service to access your resource in another service. Let’s say you’re using Amazon CloudWatch to observe resources in your AWS environment, and you create an alarm that activates when certain conditions occur. When the alarm activates, you want it to publish messages to a topic that you create in Amazon Simple Notification Service (Amazon SNS) to generate notifications.
Figure 1 depicts this process.
Figure 1: Amazon CloudWatch publishing messages to an SNS topic
In this scenario, there’s a resource-based policy controlling access to your SNS topic. For CloudWatch to publish messages to it, you must configure the policy to allow access by CloudWatch. When you do this, you identify CloudWatch using an AWS service principal, in this case cloudwatch.amazonaws.com.
Cross-service access
This is an example of a common pattern known as cross-service access. With cross-service access, a calling service accesses your resource in a called service, and a resource-based policy attached to your resource grants access to the calling service. The calling service is identified using an AWS service principal in the form <SERVICE-NAME>.amazonaws.com, and it accesses your resource on behalf of an originating resource, such as a CloudWatch alarm.
Figure 2 shows cross-service access.
Figure 2: Cross-service access
When you configure cross-service access, you want to make sure that the calling service will access your resource only on your behalf. That means you want the originating resource to be controlled by someone whom you trust. If an untrusted entity creates their own CloudWatch alarm in their AWS environment, for example, then their alarm should not be able to publish messages to your SNS topic.
If an untrusted entity could use a calling service to access your resource on their behalf, it would be an example of what’s known as the confused deputy problem. The confused deputy problem is a security issue in which an entity that doesn’t have permission to perform an action coerces a more privileged entity (in this case, a calling service) to perform the action instead.
Use condition keys to help prevent cross-service confused deputy issues
AWS provides global condition keys to help you prevent cross-service confused deputy issues. You can use these condition keys to control how AWS services access your resources.
Before today, you could use the aws:SourceAccount or aws:SourceArn condition keys to make sure that a calling service accesses your resource only when the request originates from a specific account (with aws:SourceAccount) or a specific originating resource (with aws:SourceArn). However, there are situations where you might want to allow multiple resources or accounts to use a calling service to access your resource. For example, you might want to create many VPC flow logs in an organization that publish to a central S3 bucket. To achieve this using the aws:SourceAccount or aws:SourceArn condition keys, you must enumerate all the originating accounts or resources individually in your resource-based policies. This can be difficult to manage, especially in large organizations, and can potentially cause your resource-based policy documents to reach size limits.
Now, you can use the new aws:SourceOrgID or aws:SourceOrgPaths condition keys to make sure that a calling service accesses your resource only when the request originates from a specific organization (with aws:SourceOrgID) or a specific organizational unit (with aws:SourceOrgPaths). This helps avoid the need to update policies when accounts are added or removed, reduces the size of policy documents, and makes it simpler to create and review policy statements.
The following table summarizes the four condition keys that you can use to help prevent cross-service confused deputy issues. These keys work in a similar way, but with different levels of granularity.
Use case
Condition key
Value
Allowed operators
Single/multi valued
Example value
Allow a calling service to access your resource only on behalf of an organization that you trust.
Note: Only use these condition keys in resource-based policies that allow access by an AWS service. Don’t use them in other use cases, including identity-based policies and service control policies (SCPs), where these condition keys won’t be populated.
Use condition keys for defense in depth
AWS services use a variety of mechanisms to help prevent cross-service confused deputy issues, and the details vary by service. For example, where a calling service accesses an S3 bucket, some services use S3 prefixes to help prevent confused deputy issues. For more information, see the relevant service documentation.
Where supported by the service, AWS recommends that you use the condition keys we describe in this post regardless of whether the service has another mechanism in place to help prevent cross-service confused deputy issues. This helps to make your intentions explicit, provide defense in depth, and guard against misconfigurations.
Example use cases
Let’s walk through some example use cases to learn how to use these condition keys in practice.
First, imagine you’re using Amazon Virtual Private Cloud (Amazon VPC) to manage logically isolated virtual networks. In Amazon VPC, you can configure flow logs, which capture information about your network traffic. Let’s say you want a flow log to write data into an S3 bucket for later analysis. This process is depicted in Figure 3.
Figure 3: Amazon VPC writing flow logs to an S3 bucket
This constitutes another cross-service access scenario. In this case, Amazon VPC is the calling service, Amazon S3 is the called service, the VPC flow log is the originating resource, and the S3 bucket is your resource in the called service.
To allow access, the resource-based policy for your S3 bucket (known as a bucket policy) must allow Amazon VPC to put objects there. The Principal element in this policy specifies the AWS service principal of the service that will access the resource, which for VPC flow logs is delivery.logs.amazonaws.com.
Initial policy without confused deputy prevention
The following is an initial version of the bucket policy that allows Amazon VPC to put objects in the bucket but doesn’t yet provide confused deputy prevention. We’re showing this policy for illustration purposes; don’t use it in its current form.
Note: For simplicity, we only show one of the policy statements that you need to allow VPC flow logs to write to a bucket. In a real-life bucket policy for flow logs, you need two policy statements: one allowing actions on the bucket, and one allowing actions on the bucket contents. These are described in Publish flow logs to Amazon S3. Both policy statements work in the same way with respect to confused deputy prevention.
This policy statement allows Amazon VPC to put objects in the bucket. However, it allows Amazon VPC to do that on behalf of any flow log in any account. There’s nothing in the policy to tell Amazon VPC that it should access this bucket only if the flow log belongs to a specific organization, OU, account, or resource that you trust.
Let’s now update the policy to help prevent cross-service confused deputy issues. For the rest of this post, the remaining policy samples provide confused deputy protection, but at different levels of granularity.
Specify a trusted organization
Continuing with the previous example, imagine that you now have an organization in AWS Organizations, and you want to create VPC flow logs in various accounts within your organization that publish to a central S3 bucket. You want Amazon VPC to put objects in the bucket only if the request originates from a flow log that resides in your organization.
You can achieve this by using the new aws:SourceOrgID condition key. In a cross-service access scenario, this condition key evaluates to the ID of the organization that the request came from. You can use this condition key in the Condition element of a resource-based policy to allow actions only if aws:SourceOrgID matches the ID of a specific organization, as shown in the following example. In your own policy, make sure to replace <DOC-EXAMPLE-BUCKET> and <MY-ORGANIZATION-ID> with your own information.
The revised policy states that Amazon VPC can put objects in the bucket only if the request originates from a flow log in your organization. Now, if someone creates a flow log outside your organization and configures it to access your bucket, they will get an access denied error.
You can use aws:SourceOrgID in this way to allow a calling service to access your resource only if the request originates from a specific organization, as shown in Figure 4.
Figure 4: Specify a trusted organization using aws:SourceOrgID
Specify a trusted OU
What if you don’t want to trust your entire organization, but only part of it? Let’s consider a different scenario. Imagine that you want to send messages from Amazon SNS into a queue in Amazon Simple Queue Service (Amazon SQS) so they can be processed by consumers. This is depicted in Figure 5.
Figure 5: Amazon SNS sending messages to an SQS queue
Now imagine that you want your SQS queue to receive messages only if they originate from an SNS topic that resides in a specific organizational unit (OU) in your organization. For example, you might want to allow messages only if they originate from a production OU that is subject to change control.
You can achieve this by using the new aws:SourceOrgPaths condition key. As before, you use this condition key in a resource-based policy attached to your resource. In a cross-service access scenario, this condition key evaluates to the AWS Organizations entity path that the request came from. An entity path is a text representation of an entity within an organization.
You build an entity path for an OU by using the IDs of the organization, root, and all OUs in the path down to and including the OU. For example, consider the organizational structure shown in Figure 6.
Figure 6: Example organization structure
In this example, you can specify the Prod OU by using the following entity path:
Let’s now match the aws:SourceOrgPaths condition key against a specific entity path in the Condition element of a resource-based policy for an SQS queue. In your own policy, make sure to replace <MY-QUEUE-ARN> and <MY-ENTITY-PATH> with your own information.
Note:aws:SourceOrgPaths is a multivalued condition key, which means it’s capable of having multiple values in the request context. At the time of writing, it contains a single entity path if the request originates from an account in an organization, and a null value if the request originates from an account that’s not in an organization. Because this key is multivalued, you need to use both a set operator and a string operator to compare values.
In this policy, there are two conditions in the Condition block. The first uses the Null condition operator and compares with a false value to confirm that the condition key’s value is not null. The second uses set operator ForAllValues, which returns true if every condition key value in the request matches at least one value in your policy condition, and string operator StringEquals, which requires an exact match with a value specified in your policy condition.
Note: The reason for the null check is that set operator ForAllValuesreturns true when a condition key resolves to null. With an Allow effect and the null check in place, access is denied if the request originates from an account that’s not in an organization.
With this policy applied to your SQS queue, Amazon SNS can send messages to your queue only if the message came from an SNS topic in a specific OU.
You can use aws:SourceOrgPaths in this way to allow a calling service to access your resource only if the request originates from a specific organizational unit, as shown in Figure 7.
Figure 7: Specify a trusted OU using aws:SourceOrgPaths
Specify a trusted OU and its children
In the previous example, we specified a trusted OU, but that didn’t include its child OUs. What if you want to include its children as well?
You can achieve this by replacing the string operator StringEquals with StringLike. This allows you to use wildcards in the entity path. Using the organization structure from the previous example, the following Condition evaluates to true only if the condition key value is not null and the request originates from the Prod OU or any of its child OUs.
If you want to be more granular, you can allow a service to access your resource only if the request originates from a specific account. You can achieve this by using the aws:SourceAccount condition key. In a cross-service access scenario, this condition key evaluates to the ID of the account that the request came from.
The following Condition evaluates to true only if the request originates from the account that you specify in the policy. In your own policy, make sure to replace <MY-ACCOUNT-ID> with your own information.
You can use this condition element within a resource-based policy to allow a calling service to access your resource only if the request originates from a specific account, as shown in Figure 8.
Figure 8: Specify a trusted account using aws:SourceAccount
Specify a trusted resource
If you want to be even more granular, you can allow a service to access your resource only if the request originates from a specific resource. For example, you can allow Amazon SNS to send messages to your SQS queue only if the request originates from a specific topic within Amazon SNS.
You can achieve this by using the aws:SourceArn condition key. In a cross-service access scenario, this condition key evaluates to the Amazon Resource Name (ARN) of the originating resource. This provides the most granular form of cross-service confused deputy prevention.
The following Condition evaluates to true only if the request originates from the resource that you specify in the policy. In your own policy, make sure to replace <MY-RESOURCE-ARN> with your own information.
Note: AWS recommends that you use an ARN operator rather than a string operator when comparing ARNs. This example uses ArnEquals to match the condition key value against the ARN specified in the policy.
You can use this condition element within a resource-based policy to allow a calling service to access your resource only if the request comes from a specific originating resource, as shown in Figure 9.
Figure 9: Specify a trusted resource using aws:SourceArn
Specify multiple trusted resources, accounts, OUs, or organizations
The four condition keys allow you to specify multiple trusted entities by matching against an array of values. This allows you to specify multiple trusted resources, accounts, OUs, or organizations in your policies.
Conclusion
In this post, you learned about cross-service access, in which an AWS service communicates with another AWS service to access your resource. You saw that it’s important to make sure that such services access your resources only on your behalf in order to help avoid cross-service confused deputy issues.
We showed you how to help prevent cross-service confused deputy issues by using two new condition keys aws:SourceOrgID and aws:SourceOrgPaths, as well as the other available condition keys aws:SourceAccount and aws:SourceArn. You learned that you should use these condition keys in any resource-based policy statements that allow access by an AWS service, if the condition key is supported by the service. This helps make sure that a calling service can access your resource only when the request originates from a specific organization, OU, account, or resource that you trust.
If you have feedback about this post, submit comments in the Comments section below. If you have questions about this post, start a new thread on AWS IAM re:Post or contact AWS Support.
Want more AWS Security news? Follow us on Twitter.
AWS Identity and Access Management (IAM) recently launched new condition keys to make it simpler to control access to your resources along your Amazon Web Services (AWS) organizational boundaries. AWS recommends that you set up multiple accounts as your workloads grow, and you can use multiple AWS accounts to isolate workloads or applications that have specific security requirements. By using the new conditions, aws:ResourceOrgID, aws:ResourceOrgPaths, and aws:ResourceAccount, you can define access controls based on an AWS resource’s organization, organizational unit (OU), or account. These conditions make it simpler to require that your principals (users and roles) can only access resources inside a specific boundary within your organization. You can combine the new conditions with other IAM capabilities to restrict access to and from AWS accounts that are not part of your organization.
This post will help you get started using the new condition keys. We’ll show the details of the new condition keys and walk through a detailed example based on the following scenario. We’ll also provide references and links to help you learn more about how to establish access control perimeters around your AWS accounts.
Consider a common scenario where you would like to prevent principals in your AWS organization from adding objects to Amazon Simple Storage Service (Amazon S3) buckets that don’t belong to your organization. To accomplish this, you can configure an IAM policy to deny access to S3 actions unless aws:ResourceOrgID matches your unique AWS organization ID. Because the policy references your entire organization, rather than individual S3 resources, you have a convenient way to maintain this security posture across any number of resources you control. The new conditions give you the tools to create a security baseline for your IAM principals and help you prevent unintended access to resources in accounts that you don’t control. You can attach this policy to an IAM principal to apply this rule to a single user or role, or use service control policies (SCPs) in AWS Organizations to apply the rule broadly across your AWS accounts. IAM principals that are subject to this policy will only be able to perform S3 actions on buckets and objects within your organization, regardless of their other permissions granted through IAM policies or S3 bucket policies.
New condition key details
You can use the aws:ResourceOrgID, aws:ResourceOrgPaths, and aws:ResourceAccount condition keys in IAM policies to place controls on the resources that your principals can access. The following table explains the new condition keys and what values these keys can take.
Condition key
Description
Operator
Single/multi value
Value
aws:ResourceOrgID
AWS organization ID of the resource being accessed
Note: Of the three keys, only aws:ResourceOrgPaths is a multi-value condition key, while aws:ResourceAccount and aws:ResourceOrgID are single-value keys. For information on how to use multi-value keys, see Creating a condition with multiple keys or values in the IAM documentation.
Resource owner keys compared to principal owner keys
The new IAM condition keys complement the existing principal condition keys aws:PrincipalAccount, aws:PrincipalOrgPaths, and aws:PrincipalOrgID. The principal condition keys help you define which AWS accounts, organizational units (OUs), and organizations are allowed to access your resources. For more information on the principal conditions, see Use IAM to share your AWS resources with groups of AWS accounts in AWS Organizations on the AWS Security Blog.
Using the principal and resource keys together helps you establish permission guardrails around your AWS principals and resources, and makes it simpler to keep your data inside the organization boundaries you define as you continue to scale. For example, you can define identity-based policies that prevent your IAM principals from accessing resources outside your organization (by using the aws:ResourceOrgID condition). Next, you can define resource-based policies that prevent IAM principals outside your organization from accessing resources that are inside your organization boundary (by using the aws:PrincipalOrgID condition). The combination of both policies prevents any access to and from AWS accounts that are not part of your organization. In the next sections, we’ll walk through an example of how to configure the identity-based policy in your organization. For the resource-based policy, you can follow along with the example in An easier way to control access to AWS resources by using the AWS organization of IAM principals on the AWS Security blog.
Setup for the examples
In the following sections, we’ll show an example IAM policy for each of the new conditions. To follow along with Example 1, which uses aws:ResourceAccount, you’ll just need an AWS account.
To follow along with Examples 2 and 3 that use aws:ResourceOrgPaths and aws:ResourceOrgID respectively, you’ll need to have an organization in AWS Organizations and at least one OU created. This blog post assumes that you have some familiarity with the basic concepts in IAM and AWS Organizations. If you need help creating an organization or want to learn more about AWS Organizations, visit Getting Started with AWS Organizations in the AWS documentation.
Which IAM policy type should I use?
You can implement the following examples as identity-based policies, or in SCPs that are managed in AWS Organizations. If you want to establish a boundary for some of your IAM principals, we recommend that you use identity-based policies. If you want to establish a boundary for an entire AWS account or for your organization, we recommend that you use SCPs. Because SCPs apply to an entire AWS account, you should take care when you apply the following policies to your organization, and account for any exceptions to these rules that might be necessary for some AWS services to function properly.
Example 1: Restrict access to AWS resources within a specific AWS account
Let’s look at an example IAM policy that restricts access along the boundary of a single AWS account. For this example, say that you have an IAM principal in account 222222222222, and you want to prevent the principal from accessing S3 objects outside of this account. To create this effect, you could attach the following IAM policy.
Note: This policy is not meant to replace your existing IAM access controls, because it does not grant any access. Instead, this policy can act as an additional guardrail for your other IAM permissions. You can use a policy like this to prevent your principals from access to any AWS accounts that you don’t know or control, regardless of the permissions granted through other IAM policies.
This policy uses a Deny effect to block access to S3 actions unless the S3 resource being accessed is in account 222222222222. This policy prevents S3 access to accounts outside of the boundary of a single AWS account. You can use a policy like this one to limit your IAM principals to access only the resources that are inside your trusted AWS accounts. To implement a policy like this example yourself, replace account ID 222222222222 in the policy with your own AWS account ID. For a policy you can apply to multiple accounts while still maintaining this restriction, you could alternatively replace the account ID with the aws:PrincipalAccount condition key, to require that the principal and resource must be in the same account (see example #3 in this post for more details how to accomplish this).
Organization setup: Welcome to AnyCompany
For the next two examples, we’ll use an example organization called AnyCompany that we created in AWS Organizations. You can create a similar organization to follow along directly with these examples, or adapt the sample policies to fit your own organization. Figure 1 shows the organization structure for AnyCompany.
Figure 1: Organization structure for AnyCompany
Like all organizations, AnyCompany has an organization root. Under the root are three OUs: Media, Sports, and Governance. Under the Sports OU, there are three more OUs: Baseball, Basketball, and Football. AWS accounts in this organization are spread across all the OUs based on their business purpose. In total, there are six OUs in this organization.
Example 2: Restrict access to AWS resources within my organizational unit
Now that you’ve seen what the AnyCompany organization looks like, let’s walk through another example IAM policy that you can use to restrict access to a specific part of your organization. For this example, let’s say you want to restrict S3 object access within the following OUs in the AnyCompany organization:
Media
Sports
Baseball
Basketball
Football
To define a boundary around these OUs, you don’t need to list all of them in your IAM policy. Instead, you can use the organization structure to your advantage. The Baseball, Basketball, and Football OUs share a parent, the Sports OU. You can use the new aws:ResourceOrgPaths key to prevent access outside of the Media OU, the Sports OU, and any OUs under it. Here’s the IAM policy that achieves this effect.
Note: Like the earlier example, this policy does not grant any access. Instead, this policy provides a backstop for your other IAM permissions, preventing your principals from accessing S3 objects outside an OU-defined boundary. If you want to require that your IAM principals consistently follow this rule, we recommend that you apply this policy as an SCP. In this example, we attached this policy to the root of our organization, applying it to all principals across all accounts in the AnyCompany organization.
The policy denies access to S3 actions unless the S3 resource being accessed is in a specific set of OUs in the AnyCompany organization. This policy is identical to Example 1, except for the condition block: The condition requires that aws:ResourceOrgPaths contains any of the listed OU paths. Because aws:ResourceOrgPaths is a multi-value condition, the policy uses the ForAllValues:StringNotLike operator to compare the values of aws:ResourceOrgPaths to the list of OUs in the policy.
The first OU path in the list is for the Media OU. The second OU path is the Sports OU, but it also adds the wildcard character * to the end of the path. The wildcard * matches any combination of characters, and so this condition matches both the Sports OU and any other OU further down its path. Using wildcards in the OU path allows you to implicitly reference other OUs inside the Sports OU, without having to list them explicitly in the policy. For more information about wildcards, refer to Using wildcards in resource ARNs in the IAM documentation.
Example 3: Restrict access to AWS resources within my organization
Finally, we’ll look at a very simple example of a boundary that is defined at the level of an entire organization. This is the same use case as the preceding two examples (restrict access to S3 object access), but scoped to an organization instead of an account or collection of OUs.
Note: Like the earlier examples, this policy does not grant any access. Instead, this policy provides a backstop for your other IAM permissions, preventing your principals from accessing S3 objects outside your organization regardless of their other access permissions. If you want to require that your IAM principals consistently follow this rule, we recommend that you apply this policy as an SCP. As in the previous example, we attached this policy to the root of our organization, applying it to all accounts in the AnyCompany organization.
The policy denies access to S3 actions unless the S3 resource being accessed is in the same organization as the IAM principal that is accessing it. This policy is identical to Example 1, except for the condition block: The condition requires that aws:ResourceOrgID and aws:PrincipalOrgID must be equal to each other. With this requirement, the principal making the request and the resource being accessed must be in the same organization. This policy also applies to S3 resources that are created after the policy is put into effect, so it is simple to maintain the same security posture across all your resources.
In this post, we explored the new conditions, and walked through a few examples to show you how to restrict access to S3 objects across the boundary of an account, OU, or organization. These tools work for more than just S3, though: You can use the new conditions to help you protect a wide variety of AWS services and actions. Here are a few links that you may want to look at:
Whitepaper: Building an AWS Perimeter provides an in-depth overview of how to use these keys as part of a broader strategy to secure your AWS resources.
If you have any questions, comments, or concerns, contact AWS Support or start a new thread on the AWS Identity and Access Management forum. Thanks for reading about this new feature. If you have feedback about this post, submit comments in the Comments section below.
Want more AWS Security news? Follow us on Twitter.
There are a number of ways to grant access to different types of resources, as some resources support both resource-based policies and IAM policies. This blog post will focus on demonstrating how you can use IAM policies to grant restrictive permissions to IAM principals to meet least privilege standards.
In AWS, an IAM principal can be a user, role, or group. These identities start with no permissions and you add permissions using a policy. In AWS, there are different types of policies that are used for different reasons. In this blog, I only give examples for identity-based policies that attach to IAM principals to grant permissions to an identity. You can create and attach multiple identity-based policies to your IAM principals, and you can reuse them across your AWS accounts. There are two types of managed policies. Customer managed policies are created and managed by you, the customer. AWS managed policies are provided as examples, cannot be modified, but can be copied, enhanced, and saved as Customer managed policies. The main elements of a policy statement are:
Effect: Specifies whether the statement will Allow or Deny an action.
Action: Describes a specific action or actions that will either be allowed or denied to run based on the Effect entered. API actions are unique to each service. For example, s3:ListBuckets is an Amazon S3 service API action that enables an IAM Principal to list all S3 buckets in the same account.
NotAction: Can be used as an alternative to using Action. This element will allow an IAM principal to invoke all API actions to a specific AWS service except those actions specified in this list.
Resource: Specifies the resources—for example, an S3 bucket or objects—that the policy applies to in Amazon Resource Name (ARN) format.
NotResource: Can be used instead of the Resource element to explicitly match every AWS resource except those specified.
Condition: Allows you to build expressions to match the condition keys and values in the policy against keys and values in the request context sent by the IAM principal. Condition keys can be service-specific or global. A global condition key can be used with any service. For example, a key of aws:CurrentTime can be used to allow access based on date and time.
Starting with the visual editor
The visual editor is my default starting place for building policies as I like the wizard and seeing all available services, actions, and conditions without looking at the documentation. If there is a complex policy with many services, I often look at the AWS managed policies as a starting place for the actions that are required, then use the visual editor to fine tune and check the resources and conditions.
The policy I’m going to walk you through creating is to grant an AWS Lambda function permission to get specific objects from Amazon S3, and put items in a specific table in Amazon DynamoDB. You can access the visual editor when you choose Create policy under policies in the IAM console, or add policies when viewing a role, group, or user as shown in Figure 1. If you’re not familiar with creating policies, you can follow the full instructions in the IAM documentation.
Figure 1: Use the visual editor to create a policy
Begin by choosing the first service—S3—to grant access to as shown in Figure 2. You can only choose one service at a time, so you’ll need to add DynamoDB after.
Figure 2: Select S3 service
Now you will see a list of access levels with the option to manually add actions. Expand the read access level to show all read actions that are supported by the Amazon S3 service. You can now see all read access level actions. For getting an object, check the box for GetObject. Selecting the ? next to an action expands information including a description, supported resource types, and supported condition keys as shown in Figure 3.
Figure 3: Expand Read in Access level, select GetObject, and select the ? next to GetObject
Expand Resources, you will see that the visual editor has listed object as that is the only resource supported by the GetObject action as shown in Figure 4.
Figure 4: Expand Resources
Select Add ARN, which opens a dialogue to help you specify the ARN for the objects. Enter a bucket name—such as doc-example-bucket—and then the object name. For the object name you can use a wildcard (*) as a suffix. For example, to allow objects beginning with alpha you would enter alpha*. This is an important step. For this least privileged policy, you are restricting to a specific bucket, and an object prefix. You could even specify an individual object depending on your use case.
Figure 5: Enter bucket name and object name
If you have multiple ARNs (bucket and objects) to allow, you can repeat the step.
Figure 6: ARN added for S3 object
The final step is to expand the request conditions, and choose Add condition. The Add request condition dialogue will open. Select the drop down next to Condition key to list the global condition keys, then the service level condition keys are listed after. You’ll see that there’s an s3:ExistingObjectTag condition that—as the name suggests—matches an existing object tag. You can use this condition key to allow the GetObject request only when the object tag meets your condition. That means you can tag your objects with a specific tag key and value pair, and your policy condition must match this key-value pair to allow the action to execute. When you’re using condition keys with multiple keys or values, you can use condition operators and evaluation logic. As shown in Figure 7, tag-key is entered directly below the condition key. This is the key of the tag to match. For the Operator, select StringEquals to match the tag exactly. Checking If exists tests at least one member of the set of request values, and at least one member of the set of condition key values. The Value to enter is the actual tag value: tag-value as shown in figure 7.
Figure 7: ARN added for S3 object
That’s it for adding the S3 action, as shown in figure 8.
Figure 8: S3 GetObject action with resource and conditions configured
Now you need to add the DynamoDB permissions by selecting Add additional permissions. Select Choose a service and then select DynamoDB. For actions, expand the Write access level, then choose PutItem.
Figure 9: Choose write access level
Expand Resources and then select Add ARN. The dialogue that appears will help you build the ARN just like it did for the Amazon S3 service. Enter the Region, for example the ap-southeast-2 (Sydney) Region, the account ID, and the table name. Choosing Add will add the resource ARN to your policy.
Figure 10: Enter Region, account, and table name
Now it’s time to add conditions. Expand Request conditions and then choose Add condition.
There are many DynamoDB conditions that you could use, however you can choose dynamodb:LeadingKeys to represent the first key, or partition keys in a table. You can see from the documentation that a qualifier of For all values in request is recommend. For the Operator you can use StringEquals as your string is going to exactly match, then a Value can use a prefix with wildcard, such as alpha* as shown in figure 11.
Figure 11: Add request conditions
Choosing Add will take you back to the main visual editor where you can choose Review policy to continue. Enter a name and description for the policy, and then choose Create policy.
You can see in this example that a policy can use least privilege by using specific resources and conditions. Note that sometimes when you use the AWS Management Console, it requires additional permissions to provide information for the console experience.
Starting with AWS managed policies
AWS managed policies can be a good starting place to see the actions typically associated with a particular service or job function. For example, you can attach the AmazonS3ReadOnlyAccess policy to a role used by an Amazon EC2 instance that allows read-only access to all Amazon S3 buckets. It has an effect of Allow to allow access, and there are two actions that use wildcards (*) to allow all Get and List actions for S3—for example, s3:GetObject and s3:ListBuckets. The resource is a wildcard to allow all S3 buckets the account has access to. A useful feature of this policy is that it only allows read and list access to S3, but not to any other services or types of actions.
Let’s make our own custom IAM policy to make it least privilege. Starting with the action element, you can use the reference for Amazon S3 to see all actions, a description of what each action does, the resource type for each action, and condition keys for each action. Now let’s imagine this policy is used by an Amazon EC2 instance to fetch an application configuration object from within an S3 bucket. Looking at the descriptions for actions starting with Get you can see that the only action that we really need is GetObject. You can then use the resource element to restrict an action to a set of objects prefixed with config within a specific bucket.
Now that you’ve reduced the scope of what this policy can do for service actions and resources, you can add a condition element that uses attribute based access control (ABAC) to define conditions based on attributes—in this case, a resource tag. In this example, when you’re reading objects from a single bucket, you can set specific conditions to further reduce the scope of permissions given to an IAM principal. There’s an s3:ExistingObjectTag condition that you can use to allow the GetObject request only when the object tag meets your condition. That means you can tag your objects with a specific tag key and value pair, and your IAM policy condition must match this key-value pair to allow the API action to successfully run. When you’re using condition keys with multiple keys or values, you can use condition operators and evaluation logic. You can see that ForAnyValue tests at least one member of the set of request values, and at least one member of the set of condition key values. Alternatively, you can use global condition keys that apply to all services:
In the preceding policy example, the condition element only allows s3:GetObject permissions if the object is tagged with a key of tag-key and a value of tag-value. While you’re experimenting, you can identify errors in your custom policies by using the IAM policy simulator or reviewing the errors messages recorded in AWS CloudTrail logs.
Conclusion
In this post, I’ve shown two different techniques that you can use to create least privilege policies for IAM. You can adapt these methods to create AWS Single Sign-Onpermission sets and AWS Organizations service control policies (SCPs). Starting with managed policies is a useful strategy when an AWS supplied managed policy already exists for your use case, and then to reduce the scope of what it can do through permissions. I tend to use the visual editor the most for editing policies because it saves looking up the resource and conditions for each action. I suggest that you start by reviewing the policies you’re already using. Start with policies that grant excessive permissions—like the example Administrator policy—and tie them back to the use case of the users or things that need the access. Use the last accessed information, IAM best practices, and look at the AWS Well-Architected best practices and AWS Well-Architected tool.
If you have feedback about this post, submit comments in the Comments section below.
Want more AWS Security how-to content, news, and feature announcements? Follow us on Twitter.
The collective thoughts of the interwebz
Manage Consent
To provide the best experiences, we use technologies like cookies to store and/or access device information. Consenting to these technologies will allow us to process data such as browsing behavior or unique IDs on this site. Not consenting or withdrawing consent, may adversely affect certain features and functions.
Functional
Always active
The technical storage or access is strictly necessary for the legitimate purpose of enabling the use of a specific service explicitly requested by the subscriber or user, or for the sole purpose of carrying out the transmission of a communication over an electronic communications network.
Preferences
The technical storage or access is necessary for the legitimate purpose of storing preferences that are not requested by the subscriber or user.
Statistics
The technical storage or access that is used exclusively for statistical purposes.The technical storage or access that is used exclusively for anonymous statistical purposes. Without a subpoena, voluntary compliance on the part of your Internet Service Provider, or additional records from a third party, information stored or retrieved for this purpose alone cannot usually be used to identify you.
Marketing
The technical storage or access is required to create user profiles to send advertising, or to track the user on a website or across several websites for similar marketing purposes.