Public Key Infrastructure (PKI) is essential for securing and establishing trust in digital communications. As you scale your digital operations, you’ll issue and revoke certificates. Revoking certificates is useful especially when employees leave, migrate to a new certificate authority hierarchy, meet compliance, and respond to security incidents. Use the Certificate Revocation List (CRL) or Online Certificate Status Protocol (OCSP) method to track revoked certificates. You can use Amazon Web Services (AWS) Private Certificate Authority (AWS Private CA) to create a certificate authority (CA), which publishes revocation information through these methods so that systems can verify certificate validity.
As enterprises continue to scale their operations, they face limitations when using complete CRLs to issue and revoke more than 1 million certificates. The workaround of increasing CRL file sizes isn’t viable, because many applications can’t process large CRL files (with some needing a 1 MB maximum). Furthermore, alternative solutions like OCSP may be rejected by major trust stores and browser vendors due to privacy concerns and compliance requirements. These constraints significantly impact your ability to scale PKI infrastructure efficiently while maintaining security and compliance standards.
Feature release: Addressing challenges
AWS Private CA addresses these challenges with partitioned CRLs, which enable the issuance and revocation of up to 100 million certificates per CA. This feature distributes revocation information across multiple smaller, manageable CRL partitions, each maintaining a maximum size of 1 MB for more effective application compatibility. At the time of issuance, certificates are automatically bound to specific CRL partitions through a critical Issuer Distribution Point (IDP) extension, which contains a unique URI identifying the partition. Validation works by comparing the CRL URI in the certificate’s CRL Distribution Point (CDP) extension against the CRL’s IDP extension, which provides accurate certificate validation.
Partitioned CRL provides automatic scaling of certificate issuance limits from 1M to 100M certificates per CA, support for both new and existing CAs, flexible configuration options for CRL naming and paths, backward compatibility by preserving existing complete CRL functionality while offering partitioned CRL as an optional feature, and compliance with industry standards such as RFC5280 while maintaining security and operational efficiency.
Configuring Partitioned CRLs in AWS Private CA
You can configure Partitioned CRLs for existing CAs in AWS Private CA by using the following steps.
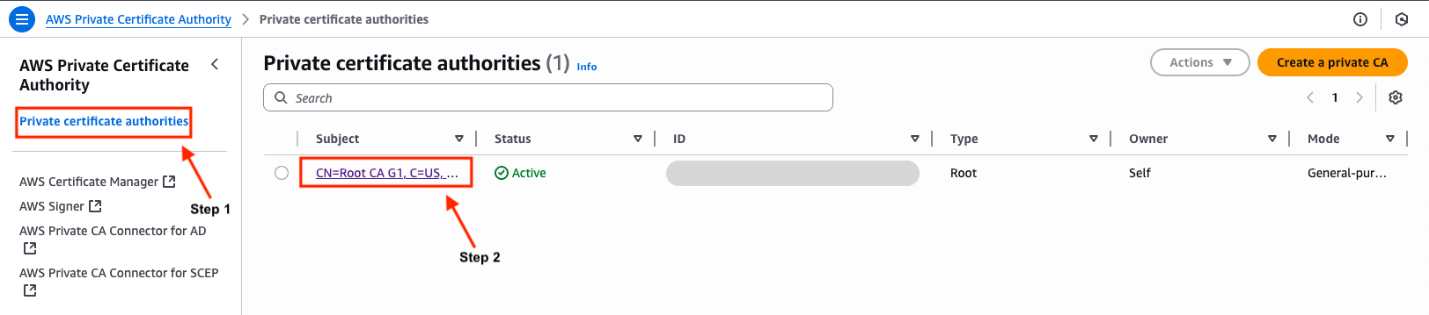
Choose Private certificate authorities in the left navigation bar.
Choose the hyperlink in the Subject column that is your CA to go into its details.
Note: Verify that you are in the correct AWS Region.
Figure 1: Certificate Authority selection
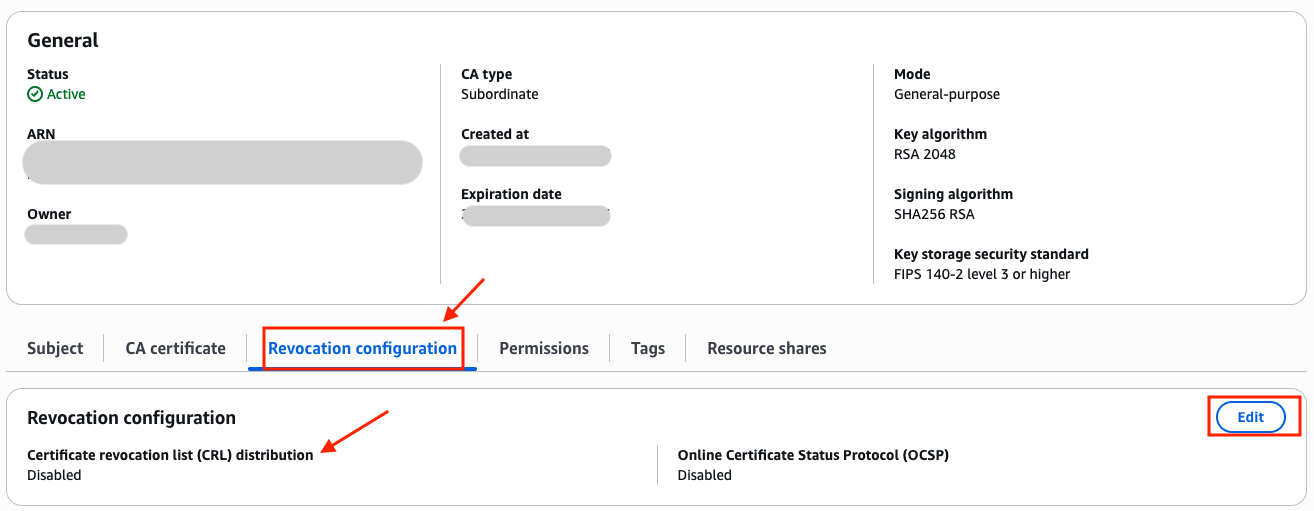
Choose the Revocation configuration tab and you should observe the CRL distribution enabled or disabled. If it is disabled, then you should enable it in the next steps.
Figure 2: Certification Authority general configuration information
If CRL distribution was enabled already, then skip to step 7.
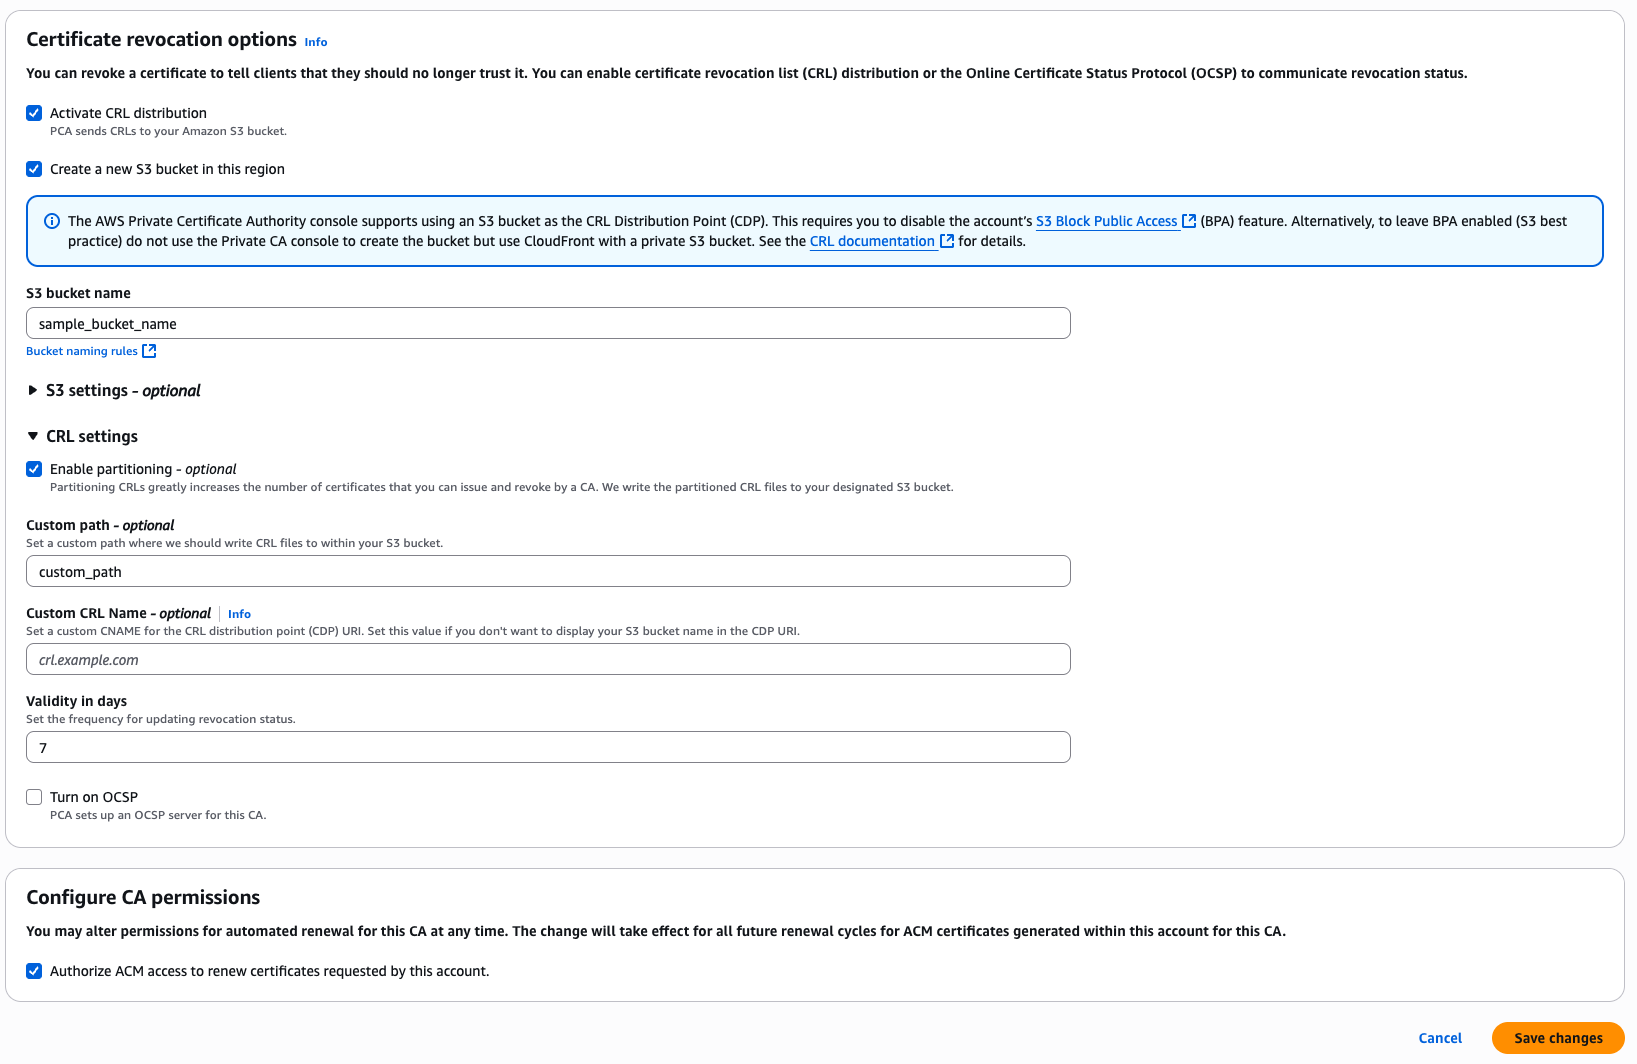
Under S3 bucket URI, choose an existing bucket from the list. You can observe detailed steps listed in Step 6 of the instructions in Create a private CA in AWS Private CA.
Expand CRL settings for more configuration options.
Check the Enable partitioning checkbox to enable partitioning of CRLs. This creates a partitioned CRL.
If you don’t enable partitioning, then a complete CRL is created and your CA is subject to the limit of 1M issued or revoked certificates. For more information, go to AWS Private CA quotas.
Figure 3: Certificate revocation options
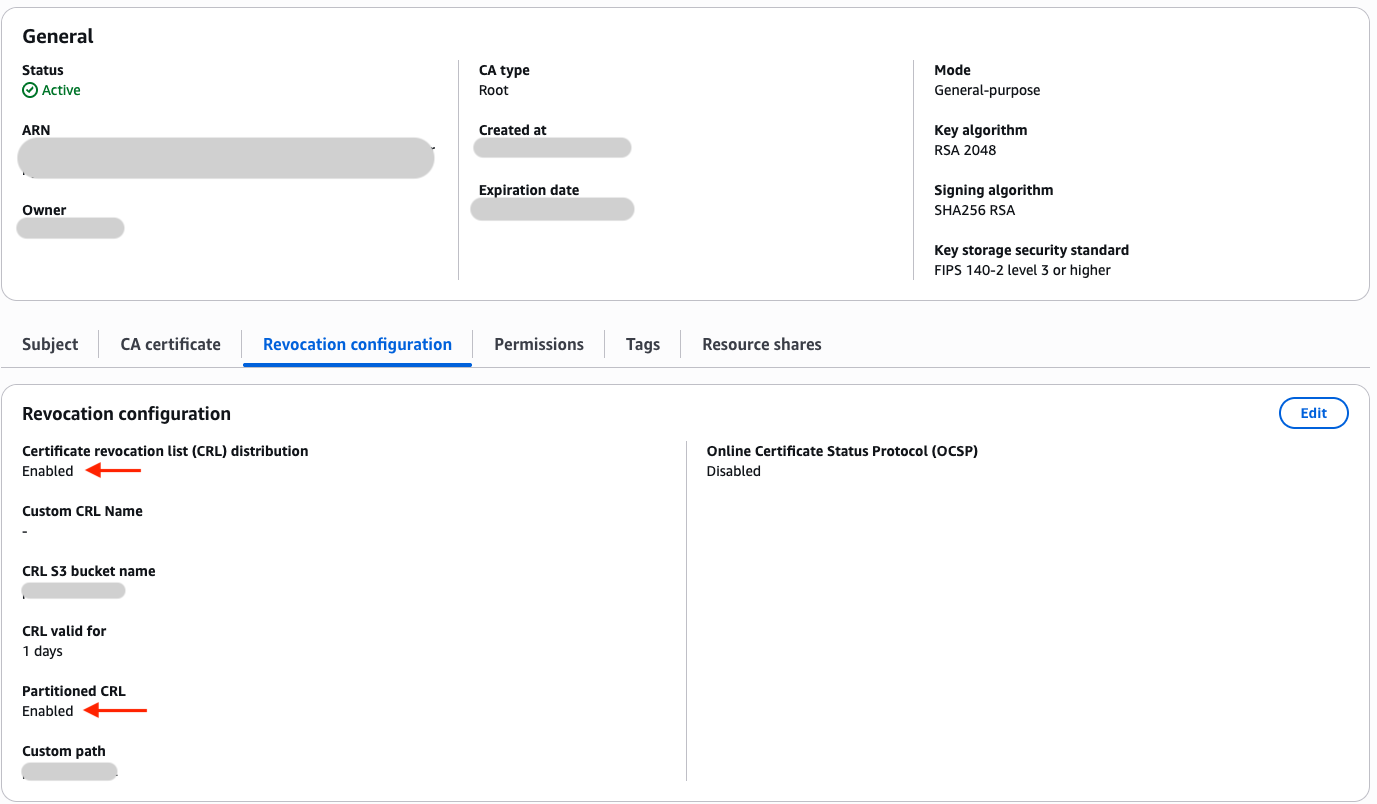
Choose Save changes.
CRL distribution shows as enabled with partitioned CRLs. The limit of 1M automatically updates to 100M per CA.
Figure 4: Certificate revocation configuration
Conclusion
The AWS Private CA partitioned CRLs can deliver substantial benefits across multiple dimensions. From a security perspective, the feature maintains certificate validation while supporting comprehensive revocation capabilities for up to 100M certificates per CA. Therefore, you can respond effectively to security incidents or key compromises. Operationally, it reduces CA rotation, lessening administrative overhead and streamlining PKI management. Furthermore, maintaining CRL partition sizes at 1 MB provides broad compatibility with applications while supporting automated partition management. Moreover, this makes it particularly valuable when you need scalable, standards-compliant certificate management. Regarding compliance, you can use the feature to comply with multiple industry requirements: it supports WebTrust principles and criteria and ETSI TSP standards, maintains compatibility with RFC5280, aligns with browser trust store requirements for both CRL and OCSP support, and provides the flexibility needed for emerging standards such as Matter.
Lastly, you can maximize the value of your general purpose or short-lived CA while all certificates remain revocable by enabling Partitioned CRL for no added charge on top of AWS Private CA and Amazon Simple Storage Service (Amazon S3).
A CRL is a list of certificates that have been revoked by the CA. Certificates can be revoked because they might have inadvertently been shared, or to discontinue their use, such as when someone leaves the company or an IoT device is decommissioned. In this solution, you use a combination of separate AWS accounts, Amazon S3 Block Public Access (BPA) settings, and a new parameter created by ACM Private CA called S3ObjectAcl to mark the CRL as private. This new parameter allows you to set the privacy of your CRL as PUBLIC_READ or BUCKET_OWNER_FULL_CONTROL. If you choose PUBLIC_READ, the CRL will be accessible over the internet. If you choose BUCKET_OWNER_FULL_CONTROL, then only the CRL S3 bucket owner can access it, and you will need to use Amazon CloudFront to serve the CRL stored in Amazon S3 using origin access identity (OAI). This is because most TLS implementations expect a public endpoint for access.
A best practice for Amazon S3 is to apply the principle of least privilege. To support least privilege, you want to ensure you have the BPA settings for Amazon S3 enabled. These settings deny public access to your S3 objects by using ACLs, bucket policies, or access point policies. I’m going to walk you through setting up your CRL as a private object in an isolated secondary account with BPA settings for access, and a CloudFront distribution with OAI settings enabled. This will confirm that access can only be made through the CloudFront distribution and not directly to your S3 bucket. This enables you to maintain your private CA in your primary account, accessible only by your public key infrastructure (PKI) security team.
As part of the private infrastructure setup, you will create a CloudFront distribution to provide access to your CRL. While not required, it allows access to private CRLs, and is helpful in the event you want to move the CRL to a different location later. However, this does come with an extra cost, so that’s something to consider when choosing to make your CRL private instead of public.
Prerequisites
For this walkthrough, you should have the following resources ready to use:
Two AWS accounts, with an AWS IAM role created that has Amazon S3, ACM Private CA, Amazon Route 53, and Amazon CloudFront permissions. One account will be for your private CA setup, the other will be for your CRL hosting.
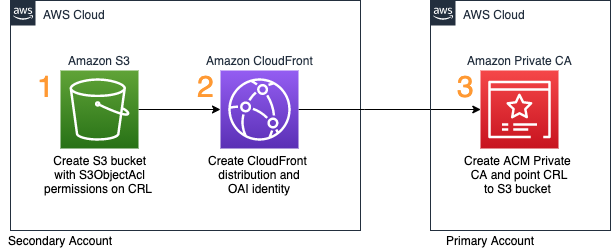
The solution consists of creating an S3 bucket in an isolated secondary account, enabling all BPA settings, creating a CloudFront OAI, and a CloudFront distribution.
Figure 1: Solution flow diagram
As shown in Figure 1, the steps in the solution are as follows:
Set up the S3 bucket in the secondary account with BPA settings enabled.
Create the CloudFront distribution and point it to the S3 bucket.
Create your private CA in AWS Certificate Manager (ACM).
In this post, I walk you through each of these steps.
Deploying the CRL solution
In this section, you walk through each item in the solution overview above. This will allow access to your CRL stored in an isolated secondary account, away from your private CA.
To create your S3 bucket
Sign in to the AWS Management Console of your secondary account. For Services, select S3.
In the S3 console, choose Create bucket.
Give the bucket a unique name. For this walkthrough, I named my bucket example-test-crl-bucket-us-east-1, as shown in Figure 2. Because S3 buckets are unique across all of AWS and not just within your account, you must create your own unique bucket name when completing this tutorial. Remember to follow the S3 naming conventions when choosing your bucket name.
Figure 2: Creating an S3 bucket
Choose Next, and then choose Next again.
For Block Public Access settings for this bucket, make sure the Block all public access check box is selected, as shown in Figure 3.
Figure 3: S3 block public access bucket settings
Choose Create bucket.
Select the bucket you just created, and then choose the Permissions tab.
For Bucket Policy, choose Edit, and in the text field, paste the following policy (remember to replace each <user input placeholder> with your own value).
Select Bucket owner preferred, and then choose Save changes.
To create your CloudFront distribution
Still in the console of your secondary account, from the Services menu, switch to the CloudFront console.
Choose Create Distribution.
For Select a delivery method for your content, under Web, choose Get Started.
On the Origin Settings page, do the following, as shown in Figure 4:
For Origin Domain Name, select the bucket you created earlier. In this example, my bucket name is example-test-crl-bucket-us-east-1.s3.amazonaws.com.
For Restrict Bucket Access, select Yes.
For Origin Access Identity, select Create a New Identity.
For Comment enter a name. In this example, I entered access-identity-crl.
For Grant Read Permissions on Bucket, select Yes, Update Bucket Policy.
Leave all other defaults.
Figure 4: CloudFront Origin Settings page
Choose Create Distribution.
To create your private CA
(Optional) If you have already created a private CA, you can update your CRL pointer by using the update-certificate-authority API. You must do this step from the CLI because you can’t select an S3 bucket in a secondary account for the CRL home when you create the CRL through the console. If you haven’t already created a private CA, follow the remaining steps in this procedure.
Use a text editor to create a file named ca_config.txt that holds your CA configuration information. In the following example ca_config.txt file, replace each <user input placeholder> with your own value.
From the CLI configured with a credential profile for your primary account, use the create-certificate-authority command to create your CA. In the following example, replace each <user input placeholder> with your own value.
With the CA created, use the describe-certificate-authority command to verify success. In the following example, replace each <user input placeholder> with your own value.
You should see the CA in the PENDING_CERTIFICATE state. Use the get-certificate-authority-csr command to retrieve the certificate signing request (CSR), and sign it with your ACM private CA. In the following example, replace each <user input placeholder> with your own value.
Now that you have your CSR, use it to issue a certificate. Because this example sets up a ROOT CA, you will issue a self-signed RootCACertificate. You do this by using the issue-certificate command. In the following example, replace each <user input placeholder> with your own value. You can find all allowable values in the ACM PCA documentation.
Now that the certificate is issued, you can retrieve it. You do this by using the get-certificate command. In the following example, replace each <user input placeholder> with your own value.
Import the certificate ca_cert.pem into your CA to move it into the ACTIVE state for further use. You do this by using the import-certificate-authority-certificate command. In the following example, replace each <user input placeholder> with your own value.
Use a text editor to create a file named revoke_config.txt that holds your CRL information pointing to your CloudFront distribution ID. In the following example revoke_config.txt, replace each <user input placeholder> with your own value.
Update your CA CRL CNAME to point to the CloudFront distribution you created. You do this by using the update-certificate-authority command. In the following example, replace each <user input placeholder> with your own value.
You can use the describe-certificate-authority command to verify that your CA is in the ACTIVE state. After the CA is active, ACM generates your CRL periodically for you, and places it into your specified S3 bucket. It also generates a new CRL list shortly after you revoke any certificate, so you have the most updated copy.
Now that the PCA, CRL, and CloudFront distribution are all set up, you can test to verify the CRL is served appropriately.
To test that the CRL is served appropriately
Create a CSR to issue a new certificate from your PCA. In the following example, replace each <user input placeholder> with your own value. Enter a secure PEM password when prompted and provide the appropriate field data.
Note: Do not enter any values for the unused attributes, just press Enter with no value.
Issue a new certificate using the issue-certificate command. In the following example, replace each <user input placeholder> with your own value. You can find all allowable values in the ACM PCA documentation.
After issuing the certificate, you can use the get-certificate command retrieve it, parse it, then get the CRL URL from the certificate just like a PKI client would. In the following example, replace each <user input placeholder> with your own value. This command uses the JQ package.
The following are some of the security best practices for setting up and maintaining your private CA in ACM Private CA.
Place your root CA in its own account. You want your root CA to be the ultimate authority for your private certificates, limiting access to it is key to keeping it secure.
Minimize access to the root CA. This is one of the best ways of reducing the risk of intentional or unintentional inappropriate access or configuration. If the root CA was to be inappropriately accessed, all subordinate CAs and certificates would need to be revoked and recreated.
Keep your CRL in a separate account from the root CA. The reason for placing the CRL in a separate account is because some external entities—such as customers or users who aren’t part of your AWS organization, or external applications—might need to access the CRL to check for revocation. To provide access to these external entities, the CRL object and the S3 bucket need to be accessible, so you don’t want to place your CRL in the same account as your private CA.
You’ve now successfully set up your private CA and have stored your CRL in an isolated secondary account. You configured your S3 bucket with Block Public Access settings, created a custom URL through CloudFront, enabled OAI settings, and pointed your DNS to it by using Route 53. This restricts access to your S3 bucket through CloudFront and your OAI only. You walked through the setup of each step, from bucket configurations, hosted zone setup, distribution setup, and finally, private CA configuration and setup. You can now store your private CA in an account with limited access, while your CRL is hosted in a separate account that allows external entity access.
If you have feedback about this post, submit comments in the Comments section below. If you have questions about this post, start a new thread on the AWS Certificate Manager forum or contact AWS Support.
Want more AWS Security how-to content, news, and feature announcements? Follow us on Twitter.
The collective thoughts of the interwebz
Manage Consent
To provide the best experiences, we use technologies like cookies to store and/or access device information. Consenting to these technologies will allow us to process data such as browsing behavior or unique IDs on this site. Not consenting or withdrawing consent, may adversely affect certain features and functions.
Functional
Always active
The technical storage or access is strictly necessary for the legitimate purpose of enabling the use of a specific service explicitly requested by the subscriber or user, or for the sole purpose of carrying out the transmission of a communication over an electronic communications network.
Preferences
The technical storage or access is necessary for the legitimate purpose of storing preferences that are not requested by the subscriber or user.
Statistics
The technical storage or access that is used exclusively for statistical purposes.The technical storage or access that is used exclusively for anonymous statistical purposes. Without a subpoena, voluntary compliance on the part of your Internet Service Provider, or additional records from a third party, information stored or retrieved for this purpose alone cannot usually be used to identify you.
Marketing
The technical storage or access is required to create user profiles to send advertising, or to track the user on a website or across several websites for similar marketing purposes.