Tag Archives: Amazon Simple Storage Services (S3)

Optimizing your AWS Infrastructure for Sustainability, Part II: Storage

Post Syndicated from Katja Philipp original https://aws.amazon.com/blogs/architecture/optimizing-your-aws-infrastructure-for-sustainability-part-ii-storage/

In Part I of this series, we introduced you to strategies to optimize the compute layer of your AWS architecture for sustainability. We provided you with success criteria, metrics, and architectural patterns to help you improve resource and energy efficiency of your AWS workloads.

This blog post focuses on the storage layer of your AWS infrastructure and provides recommendations that you can use to store your data sustainably.

Optimizing the storage layer of your AWS infrastructure

Managing your data lifecycle and using different storage tiers are key components to optimizing storage for sustainability. When you consider different storage mechanisms, remember that you’re introducing a trade-off between resource efficiency, access latency, and reliability. This means you’ll need to select your management pattern accordingly.

Reducing idle resources and maximizing utilization

Storing and accessing data efficiently, in addition to reducing idle storage resources results in a more efficient and sustainable architecture. Amazon CloudWatch offers storage metrics that can be used to assess storage improvements, as listed in the following table.

Service Metric Source
Amazon Simple Storage Service (Amazon S3) BucketSizeBytes Metrics and dimensions
S3 Object Access Logging requests using server access logging
Amazon Elastic Block Store (Amazon EBS) VolumeIdleTime Amazon EBS metrics
Amazon Elastic File System (Amazon EFS) StorageBytes Amazon CloudWatch metrics for Amazon EFS
Amazon FSx for Lustre FreeDataStorageCapacity Monitoring Amazon FSx for Lustre
Amazon FSx for Windows File Server FreeStorageCapacity Monitoring with Amazon CloudWatch

You can monitor these metrics with the architecture shown in Figure 1. CloudWatch provides a unified view of your resource metrics.

CloudWatch for monitoring your storage resources

Figure 1. CloudWatch for monitoring your storage resources

In the following sections, we present four concepts to reduce idle resources and maximize utilization for your AWS storage layer.

Analyze data access patterns and use storage tiers

Choosing the right storage tier after analyzing data access patterns gives you more sustainable storage options in the cloud.

  • By storing less volatile data on technologies designed for efficient long-term storage, you will optimize your storage footprint. More specifically, you’ll reduce the impact you have on the lifetime of storage resources by storing slow-changing or unchanging data on magnetic storage, as opposed to solid state memory. For archiving data or storing slow-changing data, consider using Amazon EFS Infrequent Access, Amazon EBS Cold HDD volumes, and Amazon S3 Glacier.
  • To store your data efficiently throughout its lifetime, create an Amazon S3 Lifecycle configuration that automatically transfers objects to a different storage class based on your pre-defined rules. The Expiring Amazon S3 Objects Based on Last Accessed Date to Decrease Costs blog post shows you how to create custom object expiry rules for Amazon S3 based on the last accessed date of the object.
  • For data with unknown or changing access patterns, use Amazon S3 Intelligent-Tiering to monitor access patterns and move objects among tiers automatically. In general, you have to make a trade-off between resource efficiency, access latency, and reliability when considering these storage mechanisms. Figure 2 shows an overview of data access patterns for Amazon S3 and the resulting storage tier. For example, in S3 One Zone-IA, energy and server capacity are reduced, because data is stored only within one Availability Zone.
Data access patterns for Amazon S3

Figure 2. Data access patterns for Amazon S3

Use columnar data formats and compression

Columnar data formats like Parquet and ORC require less storage capacity compared to row-based formats like CSV and JSON.

  • Parquet consumes up to six times less storage in Amazon S3 compared to text formats. This is because of features such as column-wise compression, different encodings, or compression based on data type, as shown in the Top 10 Performance Tuning Tips for Amazon Athena blog post.
  • You can improve performance and reduce query costs of Amazon Athena by 30–90 percent by compressing, partitioning, and converting your data into columnar formats. Using columnar data formats and compressions reduces the amount of data scanned.

Reduce unused storage resources

Right size or delete unused storage volumes

As shown in the Cost Optimization on AWS video, right-sizing storage by data type and usage reduces your associated costs by up to 50 percent.

  • A straightforward way to reduce unused storage resources is to delete unattached EBS volumes. If the volume needs to be quickly restored later on, you can store an Amazon EBS snapshot before deletion.
  • You can also use Amazon Data Lifecycle Manager to retain and delete EBS snapshots and Amazon EBS-backed Amazon Machine Images (AMIs) automatically. This further reduces the storage footprint of stale resources.
  • To avoid over-provisioning volumes, see the Automating Amazon EBS Volume-resizing blog post. It demonstrates an automated workflow that can expand a volume every time it reaches a capacity threshold. These Amazon EBS elastic volumes extend a volume when needed, as shown in the Amazon EBS Update blog post.
  • Another way to optimize block storage is to identify volumes that are underutilized and downsize them. Or you can change the volume type, as shown in the AWS Storage Optimization whitepaper.

Modify the retention period of CloudWatch Logs

By default, CloudWatch Logs are kept indefinitely and never expire. You can adjust the retention policy for each log group to be between one day and 10 years. For compliance reasons, export log data to Amazon S3 and use archival storage such as Amazon S3 Glacier.

Deduplicate data

Large datasets often have redundant data, which increases your storage footprint.

Conclusion

In this blog post, we discussed data storing techniques to increase your storage efficiency. These include right-sizing storage volumes; choosing storage tiers depending on different data access patterns; and compressing and converting data.

These techniques allow you to optimize your AWS infrastructure for environmental sustainability.

This blog post is the second post in the series, you can find the first part of the series linked in the following section. In the next part of this blog post series, we will show you how you can optimize the networking part of your IT infrastructure for sustainability in the cloud!

Related information

Building a serverless GIF generator with AWS Lambda: Part 2

Post Syndicated from James Beswick original https://aws.amazon.com/blogs/compute/building-a-serverless-gif-generator-with-aws-lambda-part-2/

In part 1 of this blog post, I explain how a GIF generation service can support a front-end application for video streaming. I compare the performance of a server-based and serverless approach and show how parallelization can significantly improve processing time. I introduce an example application and I walk through the solution architecture.

In this post, I explain the scaling behavior of the example application and consider alternative approaches. I also look at how to manage memory, temporary space, and files in this type of workload. Finally, I discuss the cost of this approach and how to determine if a workload can use parallelization.

To set up the example, visit the GitHub repo and follow the instructions in the README.md file. The example application uses the AWS Serverless Application Model (AWS SAM), enabling you to deploy the application more easily in your own AWS account. This walkthrough creates some resources covered in the AWS Free Tier but others incur cost.

Scaling up the AWS Lambda workers with Amazon EventBridge

There are two AWS Lambda functions in the example application. The first detects the length of the source video and then generates batches of events containing start and end times. These events are put onto the Amazon EventBridge default event bus.

An EventBridge rule matches the events and invokes the second Lambda function. This second function receives the events, which have the following structure:

{
    "version": "0",
    "id": "06a1596a-1234-1234-1234-abc1234567",
    "detail-type": "newVideoCreated",
    "source": "custom.gifGenerator",
    "account": "123456789012",
    "time": "2021-0-17T11:36:38Z",
    "region": "us-east-1",
    "resources": [],
    "detail": {
        "key": "long.mp4",
        "start": 2250,
        "end": 2279,
        "length": 3294.024,
        "tsCreated": 1623929798333
    }
}

The detail attribute contains the unique start and end time for the slice of work. Each Lambda invocation receives a different start and end time and works on a 30-second snippet of the whole video. The function then uses FFMPEG to download the original video from the source Amazon S3 bucket and perform the processing for its allocated time slice.

The EventBridge rule matches events and invokes the target Lambda function asynchronously. The Lambda service scales up the number of execution environments in response to the number of events:

Solution architecture

The first function produces batches of events almost simultaneously but the worker function takes several seconds to process a single request. If there is no existing environment available to handle the request, the Lambda scales up to process the work. As a result, you often see a high level of concurrency when running this application, which is how parallelization is achieved:

CloudWatch metrics

Lambda continues to scale up until it reaches the initial burst concurrency quotas in the current AWS Region. These quotas are between 500 and 3000 execution environments per minute initially. After the initial burst, concurrency scales by an additional 500 instances per minute.

If the number of events is higher, Lambda responds to EventBridge with a throttling error. The EventBridge service retries the events with exponential backoff for 24 hours. Once Lambda is scaled sufficiently or existing execution environments become available, the events are then processed.

This means that under exceptional levels of heavy load, this retry pattern adds latency to the overall GIF generation task. To manage this, you can use Provisioned Concurrency to ensure that more execution environments are available during periods of very high load.

Alternative ways to scale the Lambda workers

The asynchronous invocation mode for Lambda allows you to scale up worker Lambda functions quickly. This is the mode used by EventBridge when Lambda functions are defined as targets in rules. The other benefit of using EventBridge to decouple the two functions in this example is extensibility. Currently, the events have only a single consumer. However, you can add new capabilities to this application by building new event consumers, without changing the producer logic. Note that using EventBridge in this architecture costs $1 per million events put onto the bus (this cost varies by Region). Delivery to targets in EventBridge is free.

This design could similarly use Amazon SNS, which also invokes consuming Lambda functions asynchronously. This costs $0.50 per million messages and delivery to Lambda functions is free (this cost varies by Region). Depending on if you use EventBridge capabilities, SNS may be a better choice for decoupling the two Lambda functions.

Alternatively, the first Lambda function could invoke the second function by using the invoke method of the Lambda API. By using the AWS SDK for JavaScript, one Lambda function can invoke another directly from the handler code. When the InvocationType is set to ‘Event’, this invocation occurs asynchronously. That means that the calling function does not wait for the target function to finish before continuing.

This direct integration between two Lambda services is the lowest latency alternative. However, this limits the extensibility of the solution in the future without modifying code.

Managing memory, temp space, and files

You can configure the memory for a Lambda function up to 10,240 MB. However, the temporary storage available in /tmp is always 512 MB, regardless of memory. Increasing the memory allocation proportionally increases the amount of virtual CPU and network bandwidth available to the function. To learn more about how this works in detail, watch Optimizing Lambda performance for your serverless applications.

The original video files used in this workload may be several gigabytes in size. Since these may be larger than the /tmp space available, the code is designed to keep the movie file in memory. As a result, this solution works for any length of movie that can fit into the 10 GB memory limit.

The FFMPEG application expects to work with local file systems and is not designed to work with object stores like Amazon S3. It can also read video files from HTTP endpoints, so the example application loads the S3 object over HTTPS instead of downloading the file and using the /tmp space. To achieve this, the code uses the getSignedUrl method of the S3 class in the SDK:

 	// Configure S3
 	const AWS = require('aws-sdk')
 	AWS.config.update({ region: process.env.AWS_REGION })
 	const s3 = new AWS.S3({ apiVersion: '2006-03-01' }) 

 	// Get signed URL for source object
	const params = {
		Bucket: record.s3.bucket.name, 
		Key: record.s3.object.key, 
		Expires: 300
	}
	const url = s3.getSignedUrl('getObject', params)

The resulting URL contains credentials to download the S3 object over HTTPs. The Expires attributes in the parameters determines how long the credentials are valid for. The Lambda function calling this method must have appropriate IAM permissions for the target S3 bucket.

The GIF generation Lambda function stores the output GIF and JPG in the /tmp storage space. Since the function can be reused by subsequent invocations, it’s important to delete these temporary files before each invocation ends. This prevents the function from using all of the /tmp space available. This is handled by the tmpCleanup function:

const fs = require('fs')
const path = require('path')
const directory = '/tmp/'

// Deletes all files in a directory
const tmpCleanup = async () => {
    console.log('Starting tmpCleanup')
    fs.readdir(directory, (err, files) => {
        return new Promise((resolve, reject) => {
            if (err) reject(err)

            console.log('Deleting: ', files)                
            for (const file of files) {
                const fullPath = path.join(directory, file)
                fs.unlink(fullPath, err => {
                    if (err) reject (err)
                })
            }
            resolve()
        })
    })
}

When the GenerateFrames parameter is set to true in the AWS SAM template, the worker function generates one frame per second of video. For longer videos, this results in a significant number of files. Since one of the dimensions of S3 pricing is the number of PUTs, this function increases the cost of the workload when using S3.

For applications that are handling large numbers of small files, it can be more cost effective to use Amazon EFS and mount the file system to the Lambda function. EFS charges based upon data storage and throughput, instead of number of files. To learn more about using EFS with Lambda, read this Compute Blog post.

Calculating the cost of the worker Lambda function

While parallelizing Lambda functions significantly reduces the overall processing time in this case, it’s also important to calculate the cost. To process the 3-hour video example in part 1, the function uses 345 invocations with 4096 MB of memory. Each invocation has an average duration of 4,311 ms.

Using the AWS Pricing Calculator, and ignoring the AWS Free Tier allowance, the costs to process this video is approximately $0.10.

AWS Pricing Calculator configuration

There are additional charges for other services used in the example application, such as EventBridge and S3. However, in terms of compute cost, this may compare favorably with server-based alternatives that you may have to scale manually depending on traffic. The exact cost depends upon your implementation and latency needs.

Deciding if a workload can be parallelized

The GIF generation workload is a good candidate for parallelization. This is because each 30-second block of work is independent and there is no strict ordering requirement. The end result is not impacted by the order that the GIFs are generated in. Each GIF also takes several seconds to generate, which is why the time saving comparison with the sequential, server-based approach is so significant.

Not all workloads can be parallelized and in many cases the work duration may be much shorter. This workload interacts with S3, which can scale to any level of read or write traffic created by the worker functions. You may use other downstream services that cannot scale this way, which may limit the amount of parallel processing you can use.

To learn more about designing and operating Lambda-based applications, read the Lambda Operator Guide.

Conclusion

Part 2 of this blog post expands on some of the advanced topics around scaling Lambda in parallelized workloads. It explains how the asynchronous invocation mode of Lambda scales and different ways to scale the worker Lambda function.

I cover how the example application manages memory, files, and temporary storage space. I also explain how to calculate the compute cost of using this approach, and considering if you can use parallelization in a workload.

For more serverless learning resources, visit Serverless Land.

Hybrid Cloud Architectures Using Self-hosted Apache Kafka and AWS Glue

Post Syndicated from Brandon Rubadou original https://aws.amazon.com/blogs/architecture/hybrid-cloud-architectures-using-self-hosted-apache-kafka-and-aws-glue/

Using analytics to gain insights from a variety of datasets is key to successful transformation. There are many options to consider to realize the full value and potential of our data in a hybrid cloud infrastructure. Common practice is to route data produced from on-premises to a central repository or data lake. Here it can be consumed by multiple applications.

You can use an Apache Kafka cluster for data movement from on-premises to the data lake, using Amazon Simple Storage Service (Amazon S3). But you must either replicate the topics onto a cloud cluster, or develop a custom connector to read and copy the topics to Amazon S3. This presents a challenge for many customers.

This blog presents another option; an architecture solution leveraging AWS Glue.

Kafka and ETL processing

Apache Kafka is an open-source distributed event streaming platform used by thousands of companies for high-performance data pipelines, streaming analytics, data integration, and mission-critical applications. You can use Kafka clusters as a system to move data between systems. Producers typically publish data (or push) to a Kafka topic, where an application can consume it. Consumers are usually custom applications that feed data into respective target applications. These targets can be a data warehouse, an Amazon OpenSearch Service cluster, or others.

AWS Glue offers the ability to create jobs that will extract, transform, and load (ETL) data. This allows you to consume from many sources, such as from Apache Kafka, Amazon Kinesis Data Streams, or Amazon Managed Streaming for Apache Kafka (Amazon MSK). The jobs cleanse and transform the data, and then load the results into Amazon S3 data lakes or JDBC data stores.

Hybrid solution and architecture design

In most cases, the first step in building a responsive and manageable architecture is to review the data itself. For example, if we are processing insurance policy data from a financial organization, our data may contain fields that identify customer data. These can be account ID, an insurance claim identifier, and the dollar amount of the specific claim. Glue provides the ability to change any of these field types into the expected data lake schema type for processing.

Figure 1. Data flow - Source to data lake target

Figure 1. Data flow – Source to data lake target

Next, AWS Glue must be configured to connect to the on-premises Kafka server (see Figure 1). Private and secure connectivity to the on-premises environment can be established via AWS Direct Connect or a VPN solution. Traffic from the Amazon Virtual Private Cloud (Amazon VPC) is allowed to access the cluster directly. You can do this by creating a three-step streaming ETL job:

  1. Create a Glue connection to the on-premises Kafka source
  2. Create a Data Catalog table
  3. Create an ETL job, which saves to an S3 data lake

Configuring AWS Glue

  1. Create a connection. Using AWS Glue, create a secure SSL connection in the Data Catalog using the predefined Kafka connection type. Enter the hostname of the on-premises cluster and use the custom-managed certificate option for additional security. If you are in a development environment, you are required to generate a self-signed SSL certificate. Use your Kafka SSL endpoint to connect to Glue. (AWS Glue also supports client authentication for Apache Kafka streams.)
  2. Specify a security group. To allow AWS Glue to communicate between its components, specify a security group with a self-referencing inbound rule for all TCP ports. By creating this rule, you can restrict the source to the same security group in the Amazon VPC. Ensure you check the default security group for your VPC, as it could have a preconfigured self-referencing inbound rule for ALL traffic.
  3. Create the Data Catalog. Glue can auto-create the data schema. Since it’s a simple flat file, use the schema detection function of Glue. Set up the Kafka topic and refer to the connection.
  4. Define the job properties. Create the AWS Identity and Access Management (IAM) role to allow Glue to connect to S3 data. Select an S3 bucket and format. In this case, we use CSV and enable schema detection.

The Glue job can be scheduled, initiated manually, or by using an event driven architecture. Note that Glue does not yet support the “test connection” option within the console. Make sure you set the “Job Timeout” and enter a duration in minutes because the default value is blank.

When the job runs, it pulls the latest topics from the source on-premises Kafka cluster. Glue supports checkpoints to ensure that all source data is processed. By default, AWS Glue processes and writes out data in 100-second windows. This allows data to be processed efficiently and permits aggregations to be performed on data arriving later. You can modify this window size to increase timeliness or aggregation accuracy. AWS Glue streaming jobs use checkpoints rather than job bookmarks to track the data that has been read. AWS Glue bills hourly for streaming ETL jobs only while they are running.

Now that the connection is complete and the job is created, we can format the source data needed for the data lake. AWS Glue offers a set of built-in transforms that you can use to process your data using your ETL script. The transformed data is then placed in S3, where it can be leveraged as part of a larger data lake environment.

Many additional steps can be taken to render even more value from the information. For example, one team may choose to use a business intelligence tool like Amazon QuickSight to visualize and embed the data into an internal dashboard. Another team may want to use event driven architectures to notify financial analysts and initiate downstream actions when specific types of data are discovered. There are endless opportunities that should be determined by the business needs.

Summary

In this blog post, we have given an overview of an architecture that provides hybrid cloud data integration and analytics capability. Once the data is transformed and hosted in the S3 data lake, we can provide secure, reliable access to gain valuable insights. This solution allows for a variety of different producers and consumers, with the ability to handle increasing volumes of data.

AWS Glue along with Apache Kafka will ensure that your on-premises workloads are tightly integrated with your larger data lake solution.

If you have questions, post your thoughts in the comments section.

For further reading:

Securely Ingest Industrial Data to AWS via Machine to Cloud Solution

Post Syndicated from Ajay Swamy original https://aws.amazon.com/blogs/architecture/securely-ingest-industrial-data-to-aws-via-machine-to-cloud-solution/

As a manufacturing enterprise, maximizing your operational efficiency and optimizing output are critical factors in this competitive global market. However, many manufacturers are unable to frequently collect data, link data together, and generate insights to help them optimize performance. Furthermore, decades of competing standards for connectivity have resulted in the lack of universal protocols to connect underlying equipment and assets.

Machine to Cloud Connectivity Framework (M2C2) is an Amazon Web Services (AWS) Solution that provides the secure ingestion of equipment telemetry data to the AWS Cloud. This allows you to use AWS services to conduct analysis on your equipment data, instead of managing underlying infrastructure operations. The solution allows for robust data ingestion from industrial equipment that use OPC Data Access (OPC DA) and OPC Unified Access (OPC UA) protocols.

Secure, automated configuration and ingestion of industrial data

M2C2 allows manufacturers to ingest their shop floor data into various data destinations in AWS. These include AWS IoT SiteWise, AWS IoT Core, Amazon Kinesis Data Streams, and Amazon Simple Storage Service (S3). The solution is integrated with AWS IoT SiteWise so you can store, organize, and monitor data from your factory equipment at scale. Additionally, the solution provides customers an intuitive user interface to create, configure, monitor, and manage connections.

Automated setup and configuration

Figure 1. Automatically create and configure connections

Figure 1. Automatically create and configure connections

With M2C2, you can connect to your operational technology assets (see Figure 1). The solution automatically creates AWS IoT certificates, keys, and configuration files for AWS IoT Greengrass. This allows you to set up Greengrass to run on your industrial gateway. It also automates the deployment of any Greengrass group configuration changes required by the solution. You can define a connection with the interface, and specify attributes about equipment, tags, protocols, and read frequency for equipment data.

Figure 2. Send data to different destinations in the AWS Cloud

Figure 2. Send data to different destinations in the AWS Cloud

Once the connection details have been specified, you can send data to different destinations in AWS Cloud (see Figure 2). M2C2 provides capability to ingest data from industrial equipment using OPC-DA and OPC-UA protocols. The solution collects the data, and then publishes the data to AWS IoT SiteWise, AWS IoT Core, or Kinesis Data Streams.

Publishing data to AWS IoT SiteWise allows for end-to-end modeling and monitoring of your factory floor assets. When using the default solution configuration, publishing data to Kinesis Data Streams allows for ingesting and storing data in an Amazon S3 bucket. This gives you the capability for custom advanced analytics use cases and reporting.

You can choose to create multiple connections, and specify sites, areas, processes, and machines, by using the setup UI.

Management of connections and messages

Figure 3. Manage your connections

Figure 3. Manage your connections

M2C2 provides a straightforward connections screen (see Figure 3), where production managers can monitor and review the current state of connections. You can start and stop connections, view messages and errors, and gain connectivity across different areas of your factory floor. The Manage connections UI allows you to holistically manage data connectivity from a centralized place. You can then make changes and corrections as needed.

Architecture and workflow

Figure 4. Machine to Cloud Connectivity (M2C2) Framework architecture

Figure 4. Machine to Cloud Connectivity (M2C2) Framework architecture

The AWS CloudFormation template deploys the following infrastructure, shown in Figure 4:

  1. An Amazon CloudFront user interface that deploys into an Amazon S3 bucket configured for web hosting.
  2. An Amazon API Gateway API provides the user interface for client requests.
  3. An Amazon Cognito user pool authenticates the API requests.
  4. AWS Lambda functions power the user interface, in addition to the configuration and deployment mechanism for AWS IoT Greengrass and AWS IoT SiteWise gateway resources. Amazon DynamoDB tables store the connection metadata.
  5. An AWS IoT SiteWise gateway configuration can be used for any OPC UA data sources.
  6. An Amazon Kinesis Data Streams data stream, Amazon Kinesis Data Firehose, and Amazon S3 bucket to store telemetry data.
  7. AWS IoT Greengrass is installed and used on an on-premises industrial gateway to run protocol connector Lambda functions. These connect and read telemetry data from your OPC UA and OPC DA servers.
  8. Lambda functions are deployed onto AWS IoT Greengrass Core software on the industrial gateway. They connect to the servers and send the data to one or more configured destinations.
  9. Lambda functions that collect the telemetry data write to AWS IoT Greengrass stream manager streams. The publisher Lambda functions read from the streams.
  10. Publisher Lambda functions forward the data to the appropriate endpoint.

Data collection

The Machine to Cloud Connectivity solution uses Lambda functions running on Greengrass to connect to your on-premises OPC-DA and OPC-UA industrial devices. When you deploy a connection for an OPC-DA device, the solution configures a connection-specific OPC-DA connector Lambda. When you deploy a connection for an OPC-UA device, the solution uses the AWS IoT SiteWise Greengrass connector to collect the data.

Regardless of protocol, the solution configures a publisher Lambda function, which takes care of sending your streaming data to one or more desired destinations. Stream Manager enables the reading and writing of stream data from multiple sources and to multiple destinations within the Greengrass core. This enables each configured collector to write data to a stream. The publisher reads from that stream and sends the data to your desired AWS resource.

Conclusion

Machine to Cloud Connectivity (M2C2) Framework is a self-deployable solution that provides secure connectivity between your technology (OT) assets and the AWS Cloud. With M2C2, you can send data to AWS IoT Core or AWS IoT SiteWise for analytics and monitoring. You can store your data in an industrial data lake using Kinesis Data Streams and Amazon S3. Get started with Machine to Cloud Connectivity (M2C2) Framework today.

Building well-architected serverless applications: Optimizing application costs

Post Syndicated from Julian Wood original https://aws.amazon.com/blogs/compute/building-well-architected-serverless-applications-optimizing-application-costs/

This series of blog posts uses the AWS Well-Architected Tool with the Serverless Lens to help customers build and operate applications using best practices. In each post, I address the serverless-specific questions identified by the Serverless Lens along with the recommended best practices. See the introduction post for a table of contents and explanation of the example application.

COST 1. How do you optimize your serverless application costs?

Design, implement, and optimize your application to maximize value. Asynchronous design patterns and performance practices ensure efficient resource use and directly impact the value per business transaction. By optimizing your serverless application performance and its code patterns, you can directly impact the value it provides, while making more efficient use of resources.

Serverless architectures are easier to manage in terms of correct resource allocation compared to traditional architectures. Due to its pay-per-value pricing model and scale based on demand, a serverless approach effectively reduces the capacity planning effort. As covered in the operational excellence and performance pillars, optimizing your serverless application has a direct impact on the value it produces and its cost. For general serverless optimization guidance, see the AWS re:Invent talks, “Optimizing your Serverless applications” Part 1 and Part 2, and “Serverless architectural patterns and best practices”.

Required practice: Minimize external calls and function code initialization

AWS Lambda functions may call other managed services and third-party APIs. Functions may also use application dependencies that may not be suitable for ephemeral environments. Understanding and controlling what your function accesses while it runs can have a direct impact on value provided per invocation.

Review code initialization

I explain the Lambda initialization process with cold and warm starts in “Optimizing application performance – part 1”. Lambda reports the time it takes to initialize application code in Amazon CloudWatch Logs. As Lambda functions are billed by request and duration, you can use this to track costs and performance. Consider reviewing your application code and its dependencies to improve the overall execution time to maximize value.

You can take advantage of Lambda execution environment reuse to make external calls to resources and use the results for subsequent invocations. Use TTL mechanisms inside your function handler code. This ensures that you can prevent additional external calls that incur additional execution time, while preemptively fetching data that isn’t stale.

Review third-party application deployments and permissions

When using Lambda layers or applications provisioned by AWS Serverless Application Repository, be sure to understand any associated charges that these may incur. When deploying functions packaged as container images, understand the charges for storing images in Amazon Elastic Container Registry (ECR).

Ensure that your Lambda function only has access to what its application code needs. Regularly review that your function has a predicted usage pattern so you can factor in the cost of other services, such as Amazon S3 and Amazon DynamoDB.

Required practice: Optimize logging output and its retention

Considering reviewing your application logging level. Ensure that logging output and log retention are appropriately set to your operational needs to prevent unnecessary logging and data retention. This helps you have the minimum of log retention to investigate operational and performance inquiries when necessary.

Emit and capture only what is necessary to understand and operate your component as intended.

With Lambda, any standard output statements are sent to CloudWatch Logs. Capture and emit business and operational events that are necessary to help you understand your function, its integration, and its interactions. Use a logging framework and environment variables to dynamically set a logging level. When applicable, sample debugging logs for a percentage of invocations.

In the serverless airline example used in this series, the booking service Lambda functions use Lambda Powertools as a logging framework with output structured as JSON.

Lambda Powertools is added to the Lambda functions as a shared Lambda layer in the AWS Serverless Application Model (AWS SAM) template. The layer ARN is stored in Systems Manager Parameter Store.

Parameters:
  SharedLibsLayer:
    Type: AWS::SSM::Parameter::Value<String>
    Description: Project shared libraries Lambda Layer ARN
Resources:
    ConfirmBooking:
        Type: AWS::Serverless::Function
        Properties:
            FunctionName: !Sub ServerlessAirline-ConfirmBooking-${Stage}
            Handler: confirm.lambda_handler
            CodeUri: src/confirm-booking
            Layers:
                - !Ref SharedLibsLayer
            Runtime: python3.7
…

The LOG_LEVEL and other Powertools settings are configured in the Globals section as Lambda environment variable for all functions.

Globals:
    Function:
        Environment:
            Variables:
                POWERTOOLS_SERVICE_NAME: booking
                POWERTOOLS_METRICS_NAMESPACE: ServerlessAirline
                LOG_LEVEL: INFO 

For Amazon API Gateway, there are two types of logging in CloudWatch: execution logging and access logging. Execution logs contain information that you can use to identify and troubleshoot API errors. API Gateway manages the CloudWatch Logs, creating the log groups and log streams. Access logs contain details about who accessed your API and how they accessed it. You can create your own log group or choose an existing log group that could be managed by API Gateway.

Enable access logs, and selectively review the output format and request fields that might be necessary. For more information, see “Setting up CloudWatch logging for a REST API in API Gateway”.

API Gateway logging

API Gateway logging

Enable AWS AppSync logging which uses CloudWatch to monitor and debug requests. You can configure two types of logging: request-level and field-level. For more information, see “Monitoring and Logging”.

AWS AppSync logging

AWS AppSync logging

Define and set a log retention strategy

Define a log retention strategy to satisfy your operational and business needs. Set log expiration for each CloudWatch log group as they are kept indefinitely by default.

For example, in the booking service AWS SAM template, log groups are explicitly created for each Lambda function with a parameter specifying the retention period.

Parameters:
    LogRetentionInDays:
        Type: Number
        Default: 14
        Description: CloudWatch Logs retention period
Resources:
    ConfirmBookingLogGroup:
        Type: AWS::Logs::LogGroup
        Properties:
            LogGroupName: !Sub "/aws/lambda/${ConfirmBooking}"
            RetentionInDays: !Ref LogRetentionInDays

The Serverless Application Repository application, auto-set-log-group-retention can update the retention policy for new and existing CloudWatch log groups to the specified number of days.

For log archival, you can export CloudWatch Logs to S3 and store them in Amazon S3 Glacier for more cost-effective retention. You can use CloudWatch Log subscriptions for custom processing, analysis, or loading to other systems. Lambda extensions allows you to process, filter, and route logs directly from Lambda to a destination of your choice.

Good practice: Optimize function configuration to reduce cost

Benchmark your function using a different set of memory size

For Lambda functions, memory is the capacity unit for controlling the performance and cost of a function. You can configure the amount of memory allocated to a Lambda function, between 128 MB and 10,240 MB. The amount of memory also determines the amount of virtual CPU available to a function. Benchmark your AWS Lambda functions with differing amounts of memory allocated. Adding more memory and proportional CPU may lower the duration and reduce the cost of each invocation.

In “Optimizing application performance – part 2”, I cover using AWS Lambda Power Tuning to automate the memory testing process to balances performance and cost.

Best practice: Use cost-aware usage patterns in code

Reduce the time your function runs by reducing job-polling or task coordination. This avoids overpaying for unnecessary compute time.

Decide whether your application can fit an asynchronous pattern

Avoid scenarios where your Lambda functions wait for external activities to complete. I explain the difference between synchronous and asynchronous processing in “Optimizing application performance – part 1”. You can use asynchronous processing to aggregate queues, streams, or events for more efficient processing time per invocation. This reduces wait times and latency from requesting apps and functions.

Long polling or waiting increases the costs of Lambda functions and also reduces overall account concurrency. This can impact the ability of other functions to run.

Consider using other services such as AWS Step Functions to help reduce code and coordinate asynchronous workloads. You can build workflows using state machines with long-polling, and failure handling. Step Functions also supports direct service integrations, such as DynamoDB, without having to use Lambda functions.

In the serverless airline example used in this series, Step Functions is used to orchestrate the Booking microservice. The ProcessBooking state machine handles all the necessary steps to create bookings, including payment.

Booking service state machine

Booking service state machine

To reduce costs and improves performance with CloudWatch, create custom metrics asynchronously. You can use the Embedded Metrics Format to write logs, rather than the PutMetricsData API call. I cover using the embedded metrics format in “Understanding application health” – part 1 and part 2.

For example, once a booking is made, the logs are visible in the CloudWatch console. You can select a log stream and find the custom metric as part of the structured log entry.

Custom metric structured log entry

Custom metric structured log entry

CloudWatch automatically creates metrics from these structured logs. You can create graphs and alarms based on them. For example, here is a graph based on a BookingSuccessful custom metric.

CloudWatch metrics custom graph

CloudWatch metrics custom graph

Consider asynchronous invocations and review run away functions where applicable

Take advantage of Lambda’s event-based model. Lambda functions can be triggered based on events ingested into Amazon Simple Queue Service (SQS) queues, S3 buckets, and Amazon Kinesis Data Streams. AWS manages the polling infrastructure on your behalf with no additional cost. Avoid code that polls for third-party software as a service (SaaS) providers. Rather use Amazon EventBridge to integrate with SaaS instead when possible.

Carefully consider and review recursion, and establish timeouts to prevent run away functions.

Conclusion

Design, implement, and optimize your application to maximize value. Asynchronous design patterns and performance practices ensure efficient resource use and directly impact the value per business transaction. By optimizing your serverless application performance and its code patterns, you can reduce costs while making more efficient use of resources.

In this post, I cover minimizing external calls and function code initialization. I show how to optimize logging output with the embedded metrics format, and log retention. I recap optimizing function configuration to reduce cost and highlight the benefits of asynchronous event-driven patterns.

This post wraps up the series, building well-architected serverless applications, where I cover the AWS Well-Architected Tool with the Serverless Lens . See the introduction post for links to all the blog posts.

For more serverless learning resources, visit Serverless Land.


Practical Entity Resolution on AWS to Reconcile Data in the Real World

Post Syndicated from David Amatulli original https://aws.amazon.com/blogs/architecture/practical-entity-resolution-on-aws-to-reconcile-data-in-the-real-world/

This post was co-written with Mamoon Chowdry, Solutions Architect, previously at AWS.

Businesses and organizations from many industries often struggle to ensure that their data is accurate. Data often has to match people or things exactly in the real world, such as a customer name, an address, or a company. Matching our data is important to validate it, de-duplicate it, or link records in different systems together. Know Your Customer (KYC) regulations also mean that we must be confident in who or what our data is referring to. We must match millions of records from different data sources. Some of that data may have been entered manually and contain inconsistencies.

It can often be hard to match data with the entity it is supposed to represent. For example, if a customer enters their details as, “Mr. John Doe, #1a 123 Main St.“ and you have a prior record in your customer database for ”J. Doe, Apt 1A, 123 Main Street“, are they referring to the same or a different person?

In cases like this, we often have to manually update our data to make sure it accurately and consistently matches a real-world entity. You may want to have consistent company names across a list of business contacts. When there isn’t an exact match, we have to reconcile our data with the available facts we know about that entity. This reconciliation is commonly referred to as entity resolution (ER). This process can be labor-intensive and error-prone.

This blog will explore some of the common types of ER. We will share a basic architectural pattern for near real-time ER processing. You will see how ER using fuzzy text matching can reconcile manually entered names with reference data.

Multiple ways to do entity resolution

Entity resolution is a broad and deep topic, and a complete discussion would be beyond the scope of this blog. However, at a high level there are four common approaches to matching ambiguous fields or records, to known entities.

    1. Fuzzy text matching. We might normally compare two strings to see if they are identical. If they don’t exactly match, it is often helpful to find the nearest match. We do this by calculating a similarity score. For example, “John Doe” and “J Doe” may have a similarity score of 80%. A common way to compare the similarity of two strings is to use the Levenshtein distance, which measures the distance between two sequences.

We may also examine more than one field. For example, we may compare a name and address. Is “Mr. J Doe, 123 Main St” likely to be the same person as “Mr John Doe, 123 Main Street”? If we compare multiple fields in a record and analyze all of their similarity scores, this is commonly called Pairwise comparison.

2. Clustering. We can plot records in an n-dimensional space based on values computed from their fields. Their similarity to other reference records is then measured by calculating how close they are to each other in that space. Those that are clustered together are likely to refer to the same entity. Clustering is an effective method for grouping or segmenting data for computer vision, astronomy, or market segmentation. An example of this method is K-means clustering.

3. Graph networks. Graph networks are commonly used to store relationships between entities, such as people who are friends with each other, or residents of a particular address. When we need to resolve an ambiguous record, we can use a graph database to identify potential relationships to other records. For example, “J Doe, 123 Main St,” may be the same as “John Doe, 123 Main St,” because they have the same address and similar names.

Graph networks are especially helpful when dealing with complex relationships over millions of entities. For example, you can build a customer profile using web server logs and other data.

4. Commercial off-the-shelf (COTS) software. Enterprises can also deploy ER software, such as these offerings from the AWS Marketplace and Senzing entity resolution. This is helpful when companies may not have the skill or experience to implement a solution themselves. It is important to mention the role of Master Data Management (MDM) with ER. MDM involves having a single trusted source for your data. Tools, such as Informatica, can help ER with their MDM features.

Our solution (shown in Figure 1) allows us to build a low-cost, streamlined solution using AWS serverless technology. The architecture uses AWS Lambda, which allows you to run code without having to provision or manage servers. This code will be invoked through an API, which is created with Amazon API Gateway. API Gateway is a fully managed service used by developers to create, publish, maintain, monitor, and secure API operations at any scale. Finally, we will store our reference data in Amazon Simple Storage Service (S3).

Entity resolution solution using AWS serverless services

We initially match manually entered strings to a list of reference strings. The strings we will try to match will be names of companies.

Figure 1. Example request dataflow through AWS

Figure 1. Example request dataflow through AWS

  1. Our API takes a string as input
  2. It then invokes the ER Lambda function
  3. This loads the index and data files of our reference dataset
  4. The ER finds the closest match in the list of real-world companies
  5. The closest match is returned

The reference data and index files were created from an export of the fuzzy match algorithm.

The fuzzy match algorithm in detail

The algorithm in the AWS Lambda function works by converting each string to a collection of n-grams. N-grams are smaller substrings that are commonly used for analyzing free-form text.

The n-grams are then converted to a simple vector. Each vector is a numerical statistic that represents the Term Frequency – Inverse Document Frequency (TF-IDF). Both TF-IDF and n-grams are used to prepare text for searching. N-grams of strings that are similar in nature, tend to have similar TF-IDF vectors. We can plot these vectors in a chart. This helps us find similar strings as they are grouped or clustered together.

Comparing vectors to find similar strings can be fairly straightforward. But if you have numerous records, it can be computationally expensive and slow. To solve this, we use the NMSLIB library. This library indexes the vectors for faster similarity searching. It also gives us the degree of similarity between two strings. This is important because we may want to know the accuracy of a match we have found. For example, it can be helpful to filter out weak matches.

The entity resolution Lambda

Using the NMSLIB library, which is loaded using Lambda layers, we initialize an index using Neighborhood APProximation (NAPP).

# initialize the index
newIndex = nmslib.init(method='napp', space='negdotprod_sparse_fast',
data_type=nmslib.DataType.SPARSE_VECTOR)

Next we imported the index and data files that were created from our reference data.

# load the index file
newIndex.loadIndex(DATA_DIR + 'index_company_names.bin',
load_data=True)

The input parameter companyName is then used to query the index to find the approximate nearest neighbor. By using the knnQueryBatch method, we distribute the work over a thread pool, which provides faster querying.

# set the input variable and empty output list
inputString = companyName
outputList = []
# Find the nearest neighbor for our company name
# (K is the number of matches, set to 1)
newQueryMatrix = vectorizer.transform(inputString)
newNbrs = index.knnQueryBatch(newQueryMatrix, k = K, num_threads = numThreads)

The best match is then returned as a JSON response.

# return the match
for i in range(K):
    outputList.append(orgNames[newNbrs[0][0][i]])
return {
      'statusCode': '200',
      'body': json.dumps(outputList),
       }

Cost estimate for solution

Our solution is a combination of Amazon API GatewayAWS Lambda, and Amazon S3 (hyperlinks are to pricing pages). As an example, let’s assume that the API will receive 10 million requests per month. We can estimate the costs of running the solution as:

Service Description Cost
AWS Lambda 10 million requests and associated compute costs $161.80
Amazon API Gateway HTTP API requests, avg size of request (34 KB), Avg message size (32 KB), requests (10 million/month) $10.00
Amazon S3 S3 Standard storage (including data transfer costs) $7.61
Total $179.41

Table 1. Example monthly cost estimate (USD)

Conclusion

Using AWS services to reconcile your data with real-world entities helps make your data more accurate and consistent. You can automate a manual task that could have been laborious, expensive, and error-prone.

Where can you use ER in your organization? Do you have manually entered or inaccurate data? Have you struggled to match it with real-world entities? You can experiment with this architecture to continue to improve the accuracy of your own data.

Further reading:

Welcome to AWS Storage Day 2021

Post Syndicated from Marcia Villalba original https://aws.amazon.com/blogs/aws/welcome-to-aws-storage-day-2021/

Welcome to the third annual AWS Storage Day 2021! During Storage Day 2020 and the first-ever Storage Day 2019 we made many impactful announcements for our customers and this year will be no different. The one-day, free AWS Storage Day 2021 virtual event will be hosted on the AWS channel on Twitch. You’ll hear from experts about announcements, leadership insights, and educational content related to AWS Storage services.

AWS Storage DayThe first part of the day is the leadership track. Wayne Duso, VP of Storage, Edge, and Data Governance, will be presenting a live keynote. He’ll share information about what’s new in AWS Cloud Storage and how these services can help businesses increase agility and accelerate innovation. The keynote will be followed by live interviews with the AWS Storage leadership team, including Mai-Lan Tomsen Bukovec, VP of AWS Block and Object Storage.

The second part of the day is a technical track in which you’ll learn more about Amazon Simple Storage Service (Amazon S3), Amazon Elastic Block Store (EBS), Amazon Elastic File System (Amazon EFS), AWS Backup, Cloud Data Migration, AWS Transfer Family and Amazon FSx.

To register for the event, visit the AWS Storage Day 2021 event page.

Now as Jeff Barr likes to say, let’s get into the announcements.

Amazon FSx for NetApp ONTAP
Today, we are pleased to announce Amazon FSx for NetApp ONTAP, a new storage service that allows you to launch and run fully managed NetApp ONTAP file systems in the cloud. Amazon FSx for NetApp ONTAP joins Amazon FSx for Lustre and Amazon FSx for Windows File Server as the newest file system offered by Amazon FSx.

Amazon FSx for NetApp ONTAP provides the full ONTAP experience with capabilities and APIs that make it easy to run applications that rely on NetApp or network-attached storage (NAS) appliances on AWS without changing your application code or how you manage your data. To learn more, read New – Amazon FSx for NetApp ONTAP.

Amazon S3
Amazon S3 Multi-Region Access Points is a new S3 feature that allows you to define global endpoints that span buckets in multiple AWS Regions. Using this feature, you can now build multi-region applications without adding complexity to your applications, with the same system architecture as if you were using a single AWS Region.

S3 Multi-Region Access Points is built on top of AWS Global Accelerator and routes S3 requests over the global AWS network. S3 Multi-Region Access Points dynamically routes your requests to the lowest latency copy of your data, so the upload and download performance can increase by 60 percent. It’s a great solution for applications that rely on reading files from S3 and also for applications like autonomous vehicles that need to write a lot of data to S3. To learn more about this new launch, read How to Accelerate Performance and Availability of Multi-Region Applications with Amazon S3 Multi-Region Access Points.

Creating a multi-region access point

There’s also great news about the Amazon S3 Intelligent-Tiering storage class! The conditions of usage have been updated. There is no longer a minimum storage duration for all objects stored in S3 Intelligent-Tiering, and monitoring and automation charges for objects smaller than 128 KB have been removed. Smaller objects (128 KB or less) are not eligible for auto-tiering when stored in S3 Intelligent-Tiering. Now that there is no monitoring and automation charge for small objects and no minimum storage duration, you can use the S3 Intelligent-Tiering storage class by default for all your workloads with unknown or changing access patterns. To learn more about this announcement, read Amazon S3 Intelligent-Tiering – Improved Cost Optimizations for Short-Lived and Small Objects.

Amazon EFS
Amazon EFS Intelligent Tiering is a new capability that makes it easier to optimize costs for shared file storage when access patterns change. When you enable Amazon EFS Intelligent-Tiering, it will store the files in the appropriate storage class at the right time. For example, if you have a file that is not used for a period of time, EFS Intelligent-Tiering will move the file to the Infrequent Access (IA) storage class. If the file is accessed again, Intelligent-Tiering will automatically move it back to the Standard storage class.

To get started with Intelligent-Tiering, enable lifecycle management in a new or existing file system and choose a lifecycle policy to automatically transition files between different storage classes. Amazon EFS Intelligent-Tiering is perfect for workloads with changing or unknown access patterns, such as machine learning inference and training, analytics, content management and media assets. To learn more about this launch, read Amazon EFS Intelligent-Tiering Optimizes Costs for Workloads with Changing Access Patterns.

AWS Backup
AWS Backup Audit Manager allows you to simplify data governance and compliance management of your backups across supported AWS services. It provides customizable controls and parameters, like backup frequency or retention period. You can also audit your backups to see if they satisfy your organizational and regulatory requirements. If one of your monitored backups drifts from your predefined parameters, AWS Backup Audit Manager will let you know so you can take corrective action. This new feature also enables you to generate reports to share with auditors and regulators. To learn more, read How to Monitor, Evaluate, and Demonstrate Backup Compliance with AWS Backup Audit Manager.

Amazon EBS
Amazon EBS direct APIs now support creating 64 TB EBS Snapshots directly from any block storage data, including on-premises. This was increased from 16 TB to 64 TB, allowing customers to create the largest snapshots and recover them to Amazon EBS io2 Block Express Volumes. To learn more, read Amazon EBS direct API documentation.

AWS Transfer Family
AWS Transfer Family Managed Workflows is a new feature that allows you to reduce the manual tasks of preprocessing your data. Managed Workflows does a lot of the heavy lifting for you, like setting up the infrastructure to run your code upon file arrival, continuously monitoring for errors, and verifying that all the changes to the data are logged. Managed Workflows helps you handle error scenarios so that failsafe modes trigger when needed.

AWS Transfer Family Managed Workflows allows you to configure all the necessary tasks at once so that tasks can automatically run in the background. Managed Workflows is available today in the AWS Transfer Family Management Console. To learn more, read Transfer Family FAQ.

Storage Day 2021 Join us online for more!
Don’t forget to register and join us for the AWS Storage Day 2021 virtual event. The event will be live at 8:30 AM Pacific Time (11:30 AM Eastern Time) on September 2. The event will immediately re-stream for the Asia-Pacific audience with live Q&A moderators on Friday, September 3, at 8:30 AM Singapore Time. All sessions will be available on demand next week.

We look forward to seeing you there!

Marcia

Top 10 security best practices for securing data in Amazon S3

Post Syndicated from Megan O'Neil original https://aws.amazon.com/blogs/security/top-10-security-best-practices-for-securing-data-in-amazon-s3/

With more than 100 trillion objects in Amazon Simple Storage Service (Amazon S3) and an almost unimaginably broad set of use cases, securing data stored in Amazon S3 is important for every organization. So, we’ve curated the top 10 controls for securing your data in S3. By default, all S3 buckets are private and can be accessed only by users who are explicitly granted access through ACLs, S3 bucket policies, and identity-based policies. In this post, we review the latest S3 features and Amazon Web Services (AWS) services that you can use to help secure your data in S3, including organization-wide preventative controls such as AWS Organizations service control policies (SCPs). We also provide recommendations for S3 detective controls, such as Amazon GuardDuty for S3, AWS CloudTrail object-level logging, AWS Security Hub S3 controls, and CloudTrail configuration specific to S3 data events. In addition, we provide data protection options and considerations for encrypting data in S3. Finally, we review backup and recovery recommendations for data stored in S3. Given the broad set of use cases that S3 supports, you should determine the priority of controls applied in accordance with your specific use case and associated details.

Block public S3 buckets at the organization level

Designate AWS accounts for public S3 use and prevent all other S3 buckets from inadvertently becoming public by enabling S3 Block Public Access. Use Organizations SCPs to confirm that the S3 Block Public Access setting cannot be changed. S3 Block Public Access provides a level of protection that works at the account level and also on individual buckets, including those that you create in the future. You have the ability to block existing public access—whether it was specified by an ACL or a policy—and to establish that public access isn’t granted to newly created items. This allows only designated AWS accounts to have public S3 buckets while blocking all other AWS accounts. To learn more about Organizations SCPs, see Service control policies.

Use bucket policies to verify all access granted is restricted and specific

Check that the access granted in the Amazon S3 bucket policy is restricted to specific AWS principals, federated users, service principals, IP addresses, or VPCs that you provide. A bucket policy that allows a wildcard identity such as Principal “*” can potentially be accessed by anyone. A bucket policy that allows a wildcard action “*” can potentially allow a user to perform any action in the bucket. For more information, see Using bucket policies.

Ensure that any identity-based policies don’t use wildcard actions

Identity policies are policies assigned to AWS Identity and Access Management (IAM) users and roles and should follow the principle of least privilege to help prevent inadvertent access or changes to resources. Establishing least privilege identity policies includes defining specific actions such as S3:GetObject or S3:PutObject instead of S3:*. In addition, you can use predefined AWS-wide condition keys and S3‐specific condition keys to specify additional controls on specific actions. An example of an AWS-wide condition key commonly used for S3 is IpAddress: { aws:SourceIP: “10.10.10.10”}, where you can specify your organization’s internal IP space for specific actions in S3. See IAM.1 in Monitor S3 using Security Hub and CloudWatch Logs for detecting policies with wildcard actions and wildcard resources are present in your accounts with Security Hub.

Consider splitting read, write, and delete access. Allow only write access to users or services that generate and write data to S3 but don’t need to read or delete objects. Define an S3 lifecycle policy to remove objects on a schedule instead of through manual intervention— see Managing your storage lifecycle. This allows you to remove delete actions from your identity-based policies. Verify your policies with the IAM policy simulator. Use IAM Access Analyzer to help you identify, review, and design S3 bucket policies or IAM policies that grant access to your S3 resources from outside of your AWS account.

Enable S3 protection in GuardDuty to detect suspicious activities

In 2020, GuardDuty announced coverage for S3. Turning this on enables GuardDuty to continuously monitor and profile S3 data access events (data plane operations) and S3 configuration (control plane APIs) to detect suspicious activities. Activities such as requests coming from unusual geolocations, disabling of preventative controls, and API call patterns consistent with an attempt to discover misconfigured bucket permissions. To achieve this, GuardDuty uses a combination of anomaly detection, machine learning, and continuously updated threat intelligence. To learn more, including how to enable GuardDuty for S3, see Amazon S3 protection in Amazon GuardDuty.

Use Macie to scan for sensitive data outside of designated areas

In May of 2020, AWS re-launched Amazon Macie. Macie is a fully managed service that helps you discover and protect your sensitive data by using machine learning to automatically review and classify your data in S3. Enabling Macie organization wide is a straightforward and cost-efficient method for you to get a central, continuously updated view of your entire organization’s S3 environment and monitor your adherence to security best practices through a central console. Macie continually evaluates all buckets for encryption and access control, alerting you of buckets that are public, unencrypted, or shared or replicated outside of your organization. Macie evaluates sensitive data using a fully-managed list of common sensitive data types and custom data types you create, and then issues findings for any object where sensitive data is found.

Encrypt your data in S3

There are four options for encrypting data in S3, including client-side and server-side options. With server-side encryption, S3 encrypts your data at the object level as it writes it to disks in AWS data centers and decrypts it when you access it. As long as you authenticate your request and you have access permissions, there is no difference in the way you access encrypted or unencrypted objects.

The first two options use AWS Key Management Service (AWS KMS). AWS KMS lets you create and manage cryptographic keys and control their use across a wide range of AWS services and their applications. There are options for managing which encryption key AWS uses to encrypt your S3 data.

  • Server-side encryption with Amazon S3-managed encryption keys (SSE-S3). When you use SSE-S3, each object is encrypted with a unique key that’s managed by AWS. This option enables you to encrypt your data by checking a box with no additional steps. The encryption and decryption are handled for you transparently. SSE-S3 is a convenient and cost-effective option.
  • Server-side encryption with customer master keys (CMKs) stored in AWS KMS (SSE-KMS), is similar to SSE-S3, but with some additional benefits and costs compared to SSE-S3. There are separate permissions for the use of a CMK that provide added protection against unauthorized access of your objects in S3. SSE-KMS also provides you with an audit trail that shows when your CMK was used and by whom. SSE-KMS gives you control of the key access policy, which might provide you with more granular control depending on your use case.
  • In server-side encryption with customer-provided keys (SSE-C), you manage the encryption keys and S3 manages the encryption as it writes to disks and decryption when you access your objects. This option is useful if you need to provide and manage your own encryption keys. Keep in mind that you are responsible for the creation, storage, and tracking of the keys used to encrypt each object and AWS has no ability to recover customer-provided keys if they’re lost. The major thing to account for with SSE-C is that you must provide the customer-managed key every-time you PUT or GET an object.
  • Client-side encryption is another option to encrypt your data in S3. You can use a CMK stored in AWS KMS or use a master key that you store within your application. Client-side encryption means that you encrypt the data before you send it to AWS and that you decrypt it after you retrieve it from AWS. AWS doesn’t manage your keys and isn’t responsible for encryption or decryption. Usually, client-side encryption needs to be deeply embedded into your application to work.

Protect data in S3 from accidental deletion using S3 Versioning and S3 Object Lock

Amazon S3 is designed for durability of 99.999999999 percent of objects across multiple Availability Zones, is resilient against events that impact an entire zone, and designed for 99.99 percent availability over a given year. In many cases, when it comes to strategies to back up your data in S3, it’s about protecting buckets and objects from accidental deletion, in which case S3 Versioning can be used to preserve, retrieve, and restore every version of every object stored in your buckets. S3 Versioning lets you keep multiple versions of an object in the same bucket and can help you recover objects from accidental deletion or overwrite. Keep in mind this feature has costs associated. You may consider S3 Versioning in selective scenarios such as S3 buckets that store critical backup data or sensitive data.

With S3 Versioning enabled on your S3 buckets, you can optionally add another layer of security by configuring a bucket to enable multi-factor authentication (MFA) delete. With this configuration, the bucket owner must include two forms of authentication in any request to delete a version or to change the versioning state of the bucket.

S3 Object Lock is a feature that helps you mitigate data loss by storing objects using a write-once-read-many (WORM) model. By using Object Lock, you can prevent an object from being overwritten or deleted for a fixed time or indefinitely. Keep in mind that there are specific use cases for Object Lock, including scenarios where it is imperative that data is not changed or deleted after it has been written.

Enable logging for S3 using CloudTrail and S3 server access logging

Amazon S3 is integrated with CloudTrail. CloudTrail captures a subset of API calls, including calls from the S3 console and code calls to the S3 APIs. In addition, you can enable CloudTrail data events for all your buckets or for a list of specific buckets. Keep in mind that a very active S3 bucket can generate a large amount of log data and increase CloudTrail costs. If this is concern around cost then consider enabling this additional logging only for S3 buckets with critical data.

Server access logging provides detailed records of the requests that are made to a bucket. Server access logs can assist you in security and access audits.

Backup your data in S3

Although S3 stores your data across multiple geographically diverse Availability Zones by default, your compliance requirements might dictate that you store data at even greater distances. Cross-region replication (CRR) allows you to replicate data between distant AWS Regions to help satisfy these requirements. CRR enables automatic, asynchronous copying of objects across buckets in different AWS Regions. For more information on object replication, see Replicating objects. Keep in mind that this feature has costs associated, you might consider CCR in selective scenarios such as S3 buckets that store critical backup data or sensitive data.

Monitor S3 using Security Hub and CloudWatch Logs

Security Hub provides you with a comprehensive view of your security state in AWS and helps you check your environment against security industry standards and best practices. Security Hub collects security data from across AWS accounts, services, and supported third-party partner products and helps you analyze your security trends and identify the highest priority security issues.

The AWS Foundational Security Best Practices standard is a set of controls that detect when your deployed accounts and resources deviate from security best practices, and provides clear remediation steps. The controls contain best practices from across multiple AWS services, including S3. We recommend you enable the AWS Foundational Security Best Practices as it includes the following detective controls for S3 and IAM:

IAM.1: IAM policies should not allow full “*” administrative privileges.
S3.1: Block Public Access setting should be enabled
S3.2: S3 buckets should prohibit public read access
S3.3: S3 buckets should prohibit public write access
S3.4: S3 buckets should have server-side encryption enabled
S3.5: S3 buckets should require requests to use Secure Socket layer
S3.6: Amazon S3 permissions granted to other AWS accounts in bucket policies should be restricted
S3.8: S3 Block Public Access setting should be enabled at the bucket level

For details of each control, including remediation steps, please review the AWS Foundational Security Best Practices controls.

If there is a specific S3 API activity not covered above that you’d like to be alerted on, you can use CloudTrail Logs together with Amazon CloudWatch for S3 to do so. CloudTrail integration with CloudWatch Logs delivers S3 bucket-level API activity captured by CloudTrail to a CloudWatch log stream in the CloudWatch log group that you specify. You create CloudWatch alarms for monitoring specific API activity and receive email notifications when the specific API activity occurs.

Conclusion

By using the ten practices described in this blog post, you can build strong protection mechanisms for your data in Amazon S3, including least privilege access, encryption of data at rest, blocking public access, logging, monitoring, and configuration checks.

Depending on your use case, you should consider additional protection mechanisms. For example, there are security-related controls available for large shared datasets in S3 such as Access Points, which you can use to decompose one large bucket policy into separate, discrete access point policies for each application that needs to access the shared data set. To learn more about S3 security, see Amazon S3 Security documentation.

Now that you’ve reviewed the top 10 security best practices to make your data in S3 more secure, make sure you have these controls set up in your AWS accounts—and go build securely!

If you have feedback about this post, submit comments in the Comments section below. If you have questions about this post, start a new thread on the Amazon S3 forum or contact AWS Support.

Want more AWS Security how-to content, news, and feature announcements? Follow us on Twitter.

Author

Megan O’Neil

Megan is a Senior Specialist Solutions Architect focused on threat detection and incident response. Megan and her team enable AWS customers to implement sophisticated, scalable, and secure solutions that solve their business challenges.

Author

Temi Adebambo

Temi is the Senior Manager for the America’s Security and Network Solutions Architect team. His team is focused on working with customers on cloud migration and modernization, cybersecurity strategy, architecture best practices, and innovation in the cloud. Before AWS, he spent over 14 years as a consultant, advising CISOs and security leaders at some of the largest global enterprises.

How to Accelerate Performance and Availability of Multi-region Applications with Amazon S3 Multi-Region Access Points

Post Syndicated from Alex Casalboni original https://aws.amazon.com/blogs/aws/s3-multi-region-access-points-accelerate-performance-availability/

Building multi-region applications allows you to improve latency for end users, achieve higher availability and resiliency in case of unexpected disasters, and adhere to business requirements related to data durability and data residency. For example, you might want to reduce the overall latency of dynamic API calls to your backend services . Or you might want to extend a single-region deployment to handle internet routing issues, failures of submarine cables, or regional connectivity issues – and therefore avoid costly downtime. Today, thanks to multi-region data replication functions such as Amazon DynamoDB global tables, Amazon Aurora global database, Amazon ElastiCache global datastore, and Amazon Simple Storage Service (Amazon S3) cross-region replication, you can build multi-region applications across 25 AWS Regions worldwide.

Yet, when it comes to implementing multi-region applications, you often have to make your code region-aware and take care of the heavy lifting of interacting with the correct regional resources, whether it’s the closest or the most available. For example, you might have three S3 buckets with object replication across three AWS Regions. Your application code needs to be aware of how many copies of the bucket exist and where they are located, which bucket is the closest to the caller, and how to fall back to other buckets in case of issues. The complexity grows when you add new regions to your multi-region architecture and redeploy your stack in each region whenever a global configuration changes.

Today, I’m happy to announce the general availability of Amazon S3 Multi-Region Access Points, a new S3 feature that allows you to define global endpoints that span buckets in multiple AWS Regions. With S3 Multi-Region Access Points, you can build multi-region applications with the same simple architecture used in a single region.

S3 Multi-Region Access Points deliver built-in network resilience, building on top AWS Global Accelerator to route S3 requests over the AWS global network. This is especially important to minimize network congestion and overall latency, while maintaining a simple application architecture. AWS Global Accelerator constantly monitors for regional availability and can shift requests to another region within seconds. By dynamically routing your requests to the lowest latency copy of your data, S3 Multi-Region Access Points increase upload and download performance by up to 60%. This is great not just for server-side applications that rely on S3 for reading configuration files or application data, but also for edge applications that need a performant and reliable write-only endpoint, such as IoT devices or autonomous vehicles.

S3 Multi-Region Access Points in Action
To get started, you create an S3 Multi-Region Access Point in the S3 console, via API, or with AWS CloudFormation.

Let me show you how to create one using the S3 console. Each access point needs a name, unique at the account level.

After it’s created, you can access it through its alias, which is generated automatically and globally unique. The alias will look like a random string ending with .mrap – for example, mmqdt41e4bf6x.mrap. It can also be accessed over the internet via https://mmqdt41e4bf6x.mrap.s3-global.amazonaws.com, via VPC, or on-premises using AWS PrivateLink.

Then, you associate multiple buckets (new or existing) to the access point, one per Region. If you need data replication, you’ll need to enable bucket versioning too.

Finally, you configure the Block Public Access settings for the access point. By default, all public access is blocked, which works fine for most cases.

The creation process is asynchronous, you can view the creation status in the Console or by listing the S3 Multi-Region Access Points from the CLI. When it becomes Ready, you can configure optional settings for the access point policy and object replication.

Similar to regular access points, you can customize the access control policy to limit the use of the access point with respect to the bucket’s permission. Keep in mind that both the access point and the underlying buckets must permit a request. S3 Multi-Region Access Points cannot extend the permissions, just limit (or equal) them. You can also use IAM Access Analyzer to verify public and cross-account access for buckets that use S3 Multi-Region Access Points and preview access to your buckets before deploying permissions changes.

Your S3 Multi-Region Access Point access policy might look like this:

{
  "Version": "2012-10-17",
  "Statement": [
    {
      "Sid": "Default",
      "Effect": "Allow",
      "Principal": {
        "AWS": "YOUR_ACCOUNT_ID" 
      },
      "Action": ["s3:GetObject", "s3:PutObject"],
      "Resource": "arn:aws:s3::YOUR_ACCOUNT_ID:accesspoint/YOUR_ALIAS/object/*"
    }
   ]
}

To replicate data between buckets used with your S3 Multi-Region Access Point, you configure S3 Replication. In some cases, you might want to store different content in each bucket, or have a portion of a regional bucket for use with a global endpoint and other portions that aren’t replicated and used only with a regional access point or direct bucket access. For example, an IoT device configuration might include references to other regional API endpoints or regional resources that will be different for each bucket.

The new S3 console provides two basic templates that you can use to easily and centrally create replication rules:

  • Replicate objects from one or more source bucket to one or more destination buckets: This is ideal for ready-only use cases where data is always generated in a specific AWS Region and you want it to be available in all other Regions, too.
  • Replicate objects among all specified buckets: This is ideal for the IoT scenario I mentioned, where you’d define a write-only access point that devices use to upload data to the closest region, and you need this data to be available in all regions.

Of course, thanks to filters and conditions, you can create more sophisticated replication setups. For example, you might want to replicate only certain objects based on a prefix or tags.

Keep in mind that bucket versioning must be enabled for cross-region replication.

The console will take care of creating and configuring the replication rules and IAM roles. Note that to add or remove buckets, you would create a new the S3 Multi-Region Access Point with the revised list.

In addition to the replication rules, here is where you configure replication options such as Replication Time Control (RTC), replication metrics and notifications, and bidirectional sync. RTC allows you to replicate most new objects in seconds, and 99.99% of those objects within 15 minutes, for use cases where replication speed is important; replications metrics allow you to monitor how synchronized are your buckets in terms of object and byte count; bidirectional sync allows you to achieve an active-active configuration for put-heavy use cases in which object metadata needs to be replicated across buckets too.

After replication is configured, you get a very useful visual and interactive summary that allows you to verify which AWS Regions are enabled. You’ll see where they are on the map, the name of the regional buckets, and which replication rules are being applied.

After the S3 Multi-Region Access Point is defined and correctly configured, you can start interacting with it through the S3 API, AWS CLI, or the AWS SDKs. For example, this is how you’d write and read a new object using the CLI (don’t forget to upgrade to the latest CLI version):

# create a new object
aws s3api put-object --bucket arn:aws:s3::YOUR_ACCOUNT_ID:accesspoint/YOUR_ALIAS --key test.png --body test.png
# retrieve the same object
aws s3api get-object --bucket arn:aws:s3::YOUR_ACCOUNT_ID:accesspoint/YOUR_ALIAS --key test.png test.png

Last but not least, you can use bucket metrics in Amazon CloudWatch to keep track of how user requests are distributed across buckets in multiple AWS Regions.

CloudFormation Support at Launch
Today, you can start using two new CloudFormation resources to easily define an S3 Multi-Region Access Point: AWS::S3::MultiRegionAccessPoint and AWS::S3::MultiRegionAccessPointPolicy.

Here is an example:

Resources:
  MyS3MultiRegionAccessPoint:
    Type: AWS::S3::MultiRegionAccessPoint
    Properties:
      Regions:
        - Bucket: regional-bucket-ireland
        - Bucket: regional-bucket-australia
        - Bucket: regional-bucket-us-east
      PublicAccessBlockConfiguration:
        BlockPublicAcls: true
        IgnorePublicAcls: true
        BlockPublicPolicy: true
        RestrictPublicBuckets: true
  MyMultiRegionAccessPointPolicy:
    Type: AWS::S3::MultiRegionAccessPointPolicy
    Properties:
      MrapName: !Ref MyS3MultiRegionAccessPoint
      Policy:
        Version: 2012-10-17
        Statement:
          - Action: '*'
            Effect: Allow
            Resource: !Sub
              - 'arn:aws:s3::${AWS::AccountId}:accesspoint/${mrapalias}/object/*'
              - mrapalias: !GetAtt
                  - MyS3MultiRegionAccessPoint
                  - Alias
            Principal: {"AWS": !Ref "AWS::AccountId"}

The AWS::S3::MultiRegionAccessPoint resource depends only on the S3 bucket names. You don’t need to reference other regional stacks and you can easily centralize the S3 Multi-Region Access Point definition into its own stack. On the other hand, cross-region replication needs to be configured on each S3 bucket.

Cost considerations
When you use an S3 Multi-Region Access Point to route requests within the AWS global network, you pay a data routing cost of $0.0033 per GB processed, in addition to the standard charges for S3 requests, storage, data transfer, and replication. If your applications access the S3 Multi-Region Access Point over the internet, you’re also charged an internet acceleration cost per GB. This cost depends on the transfer type (upload or download) and whether the client and the bucket are in the same or different locations. For details, visit the S3 pricing page and select the data transfer tab.

Let me share a few practical examples:

  • All traffic within an AWS Region: In this simple case, your application runs in US East (N. Virginia) and you configure two S3 buckets in US East (N. Virginia) and US West (Oregon). The application uploads 100GB of data and the lowest latency bucket is in US East(N. Virginia). All the data is routed by your S3 Multi-Region Access Point in the same region and the total cost is $0.33.
  • All traffic across two AWS Regions: In this case, your application runs in US East (N. Virginia) and you configure two S3 buckets in US East (Ohio) and US West (Oregon). The application uploads 100GB of data and the lowest latency bucket is in US East (Ohio). All the data is routed by your S3 Multi-Region Access Point across two AWS Regions. The data routing cost for 100GB is the same of the previous example ($0.33), plus the S3 data transfer cost of $0.01 per GB, resulting in a total cost of $1.33.
  • All traffic over the internet across North America, Europe, and Asia Pacific (download and upload): In this case, your application runs on customer devices in North America, Europe, and Asia, and you configure two S3 buckets in US East (N. Virginia) and Europe (Ireland). One customer in North America uploads 50GB of data, which is routed to the bucket in US East (N. Virginia); a second customer in Europe downloads 50GB of data from the bucket in Europe (Ireland); a third customer in Asia downloads 50GB of data from the bucket in Europe (Ireland). The data routing cost for 150GB is $0.495. Plus the data transfer out from S3 to Europe of $0.09 per GB ($9), the internet acceleration cost from North America to the S3 bucket in US East (N. Virginia) of $0.0025 per GB ($0.125), the internet acceleration cost from the S3 bucket in Europe (Ireland) to Europe of $0.005 per GB ($0.25), and the internet acceleration cost from the S3 bucket in Europe (Ireland) to Asia of $0.05 per GB ($2.5). The total cost is $12.37. Please note that this example is intended to demonstrate how the internet acceleration cost works across continents. Also note that the internet acceleration cost to Asia might be reduced by an order of magnitude with an additional S3 bucket in Asia (see next example).
  • All the traffic over the internet across North America, Europe, and Asia Pacific (only upload): In this case, we consider the same conditions of the previous example. The only difference is that all customers only upload data and that you configure an additional bucket in Asia Pacific (Singapore). The data routing cost is the same ($0.495). Plus the internet acceleration cost from North America to the S3 bucket in US East (N. Virginia) of $0.0025 per GB ($0.125), the internet acceleration cost from Europe to the S3 bucket in Europe (Ireland) of $0.0025 per GB ($0.125), and the internet acceleration cost from Asia to the S3 bucket in Asia Pacific (Singapore) of $0.01 per GB ($0.5). The total cost is $1.24.

In other words, the routing cost is easy to estimate and doesn’t depend on the application type or data access pattern. The internet acceleration cost depends on the access pattern (downloads are more expensive than uploads) and on the client location with respect to the closest AWS Region. For global applications that upload or download data over the internet, you can minimize the internet acceleration cost by configuring at least one S3 bucket in each continent.

Available Today
Amazon S3 Multi-Region Access Points allow you to increase resiliency and accelerate application performance up to 60% when accessing data across multiple AWS Regions. We look forward to feedback about your use cases so that we can iterate quickly and simplify how you design and implement multi-region applications.

You can get started using the S3 API, CLI, SDKs, AWS CloudFormation or the S3 Console. This new functionality is available in 17 AWS Regions worldwide (see the full list of supported AWS Regions).

Learn More

Watch this video to hear more about S3 Multi-Region Access Points and see a short demo.

Check out the technical documentation for S3 Multi-Region Access Points.

Alex

Amazon S3 Intelligent-Tiering – Improved Cost Optimizations for Short-Lived and Small Objects

Post Syndicated from Sean M. Tracey original https://aws.amazon.com/blogs/aws/amazon-s3-intelligent-tiering-further-automating-cost-savings-for-short-lived-and-small-objects/

In 2018, we first launched Amazon S3 Intelligent-Tiering (S3 Intelligent-Tiering). For customers managing data across business units, teams, and products, unpredictable access patterns are often the norm. With the S3 Intelligent-Tiering storage class, S3 automatically optimizes costs by moving data between access tiers as access patterns change.

Today, we’re pleased to announce two updates to further enhance savings.

  • S3 Intelligent-Tiering now has no minimum storage duration period for all objects.
  • Monitoring and automation charges are no longer collected for objects smaller than 128 KB.

How Does this Benefit Customers?
Amazon S3 Intelligent-Tiering can be used to store shared datasets, where data is aggregated and accessed by different applications, teams, and individuals, whether for analytics, machine learning, real-time monitoring, or other data lake use cases.

An image showing how S3 Intelligent-Tiering Optimises costs by moving objects between access tier

With these use cases, it’s common that many users within an organization will store data with a wide range of objects and delete subsets of data in less than 30 days.

To date, S3 Intelligent-Tiering was intended for objects larger than 128 KB stored for a minimum of 30 days. As of today, monitoring and automation charges will no longer be collected for objects smaller than 128 KB — this includes both new and already existing objects in the S3 Intelligent-Tiering storage class. Additionally, objects deleted, transitioned, or overwritten within 30 days will no longer accrue prorated charges.

With these changes, S3 Intelligent-Tiering is the ideal storage class for data with unknown, changing, or unpredictable access patterns, independent of object size or retention period.

How Can I Use This Now?
S3 Intelligent-Tiering can either be applied to objects individually, as they are written to S3 by adding the Intelligent-Tiering header to the PUT request for your object, or through the creation of a lifecycle rule.

One way you can explore the benefits of S3 Intelligent-Tiering is through the Amazon S3 Console.

Once there, select a bucket you wish to upload an object to and store with the S3 Intelligent-Tiering class, then select the Upload button on the object display view. This will take you to a page where you can upload files or folders to S3.

You can drag and drop or use either the Add Files or Add Folders button to upload objects to your bucket. Once selected, you will see a view like the following image.

A screenshot showing the upload of a file into an S3 bucket.

Next, scroll down the page and expand the Properties section. Here, we can select the storage class we wish for our object (or objects) to be stored in. Select Intelligent-Tiering from the storage class options list. Then select the Upload button at the bottom of the page.

Screenshot showing the properties section, choosing Intelligent-Tiering as the storage class

Your objects will now be stored in your S3 bucket utilizing the S3 Intelligent-Tiering storage class, further optimizing costs by moving data between access tiers as access patterns change.

S3 Intelligent-Tiering is available in all AWS Regions, including the AWS GovCloud (US) Regions, the AWS China (Beijing) Region, operated by Sinnet, and the AWS China (Ningxia) Region, operated by NWCD. To learn more, visit the S3 Intelligent-Tiering page.

Create a custom Amazon S3 Storage Lens metrics dashboard using Amazon QuickSight

Post Syndicated from Jignesh Gohel original https://aws.amazon.com/blogs/big-data/create-amazon-s3-storage-lens-metrics-dashboard-amazon-quicksight/

Companies use Amazon Simple Storage Service (Amazon S3) for its flexibility, durability, scalability, and ability to perform many things besides storing data. This has led to an exponential rise in the usage of S3 buckets across numerous AWS Regions, across tens or even hundreds of AWS accounts. To optimize costs and analyze security posture, Amazon S3 Storage Lens provides a single view of object storage usage and activity across your entire Amazon S3 storage. S3 Storage Lens includes an embedded dashboard to understand, analyze, and optimize storage with over 29 usage and activity metrics, aggregated for your entire organization, with drill-downs for specific accounts, Regions, buckets, or prefixes. In addition to being accessible in a dashboard on the Amazon S3 console, the raw data can also be scheduled for export to an S3 bucket.

For most customers, the S3 Storage Lens dashboard will cover all your needs. However, you may require specialized views of your S3 Storage Lens metrics, including combining data across multiple AWS accounts, or with external data sources. For such cases, you can use Amazon QuickSight, which is a scalable, serverless, embeddable, machine learning (ML)-powered business intelligence (BI) service built for the cloud. QuickSight lets you easily create and publish interactive BI dashboards that include ML-powered insights.

In this post, you learn how to use QuickSight to create simple customized dashboards to visualize S3 Storage Lens metrics. Specifically, this solution demonstrates two customization options:

  • Combining S3 Storage Lens metrics with external sources and being able to filter and visualize the metrics based on one or multiple accounts
  • Restricting users to view Amazon S3 metrics data only for specific accounts

You can further customize these dashboards based on your needs.

Solution architecture

The following diagram shows the high-level architecture of this solution. In addition to S3 Storage Lens and QuickSight, we use other AWS Serverless services like AWS Glue and Amazon Athena.

Solution Architecture for Amazon S3 Storage Lens custom metrics

The data flow includes the following steps:

  1. S3 Storage Lens collects the S3 metrics and exports them daily to a user-defined S3 bucket. Note that first we need to activate S3 Storage Lens from the Amazon S3 console and configure it to export the file either in CSV or Apache Parquet format.
  2. An AWS Glue crawler scans the data from the S3 bucket and populates the AWS Glue Data Catalog with tables. It automatically infers schema, format, and data types from the S3 bucket.
  3. You can schedule the crawler to run at regular intervals to keep metadata, table definitions, and schemas in sync with data in the S3 bucket. It automatically detects new partitions in Amazon S3 and adds the partition’s metadata to the AWS Glue table.
  4. Athena performs the following actions:
    • Uses the table populated by the crawler in Data Catalog to fetch the schema.
    • Queries and analyzes the data in Amazon S3 directly using standard SQL.
  5. QuickSight performs the following actions:
    • Uses the Athena connector to import the Amazon S3 metrics data.
    • Fetches the external data from a custom CSV file.

To demonstrate this, we have a sample CSV file that contains the mapping of AWS account numbers to team names owning these accounts. QuickSight combines these datasets using the data source join feature.

  1. When the combined data is available in QuickSight, users can create custom analysis and dashboards, apply appropriate QuickSight permissions, and share dashboards with other users.

At a high level, this solution requires you to complete the following steps:

  1. Enable S3 Storage Lens in your organization’s payer account or designate a member account. For instructions to have a member account as a delegated administrator, see Enabling a delegated administrator account for Amazon S3 Storage Lens.
  2. Set up an AWS Glue crawler, which populates the Data Catalog to query S3 Storage Lens data using Athena.
  3. Use QuickSight to import data (using the Athena connector) and create custom visualizations and dashboards that can be shared across multiple QuickSight users or groups.

Enable and configure the S3 Storage Lens dashboard

S3 Storage Lens includes an interactive dashboard available on the Amazon S3 console. It shows organization-wide visibility into object storage usage, activity trends, and makes actionable recommendations to improve cost-efficiency and apply data protection best practices. First you need to activate S3 Storage Lens via the Amazon S3 console. After it’s enabled, you can access an interactive dashboard containing preconfigured views to visualize storage usage and activity trends, with contextual recommendations. Most importantly, it also provides the ability to export metrics in CSV or Parquet format to an S3 bucket of your choice for further use. We use this export metrics feature in our solution. The following steps provide details on how you can enable this feature in your account.

  1. On the Amazon S3 console, under Storage Lens in the navigation pane, choose Dashboards.
  2. Choose Create dashboard.

Create S3 Storage Dashboard

  1. Provide the appropriate details in the Create dashboard
    • Make sure to select Include all accounts in your organization, Include Regions, and Include all Regions.

S3 Storage Lens Dashboard Configure

S3 Storage Lens has two tiers: Free metrics, which is free of charge, automatically available for all Amazon S3 customers, and contains 15 usage-related metrics; and Advanced metrics and recommendations, which has an additional charge, but includes all 29 usage and activity metrics with 15-month data retention, and contextual recommendations. For this solution, we select Free metrics. If you need additional metrics, you may select Advanced metrics.

  1. For Metrics export, select Enable.
  2. For Choose and output format, select Apache Parquet.
  3. For Destination bucket, select This account.
  4. For Destination, enter your S3 bucket path.

S3 Storage Lens Metrics Export Configuration

We highly recommend following security best practices for the S3 bucket you use, along with server-side encryption available with export. You can use an Amazon S3 key (SSE-S3) or AWS Key Management Service key (SSE-KMS) as encryption key types.

  1. Choose Create dashboard.

The data population process can take up to 48 hours. Proceed to the next steps only after the dashboard is available.

Set up the AWS Glue crawler

AWS Glue is serverless, fully managed extract, transform, and load (ETL) service that makes it simple and cost-effective to categorize your data, clean it, enrich it, and move it reliably between various data stores and data streams. AWS Glue consists of a central metadata repository known as the AWS Glue Data Catalog, an ETL engine, and a flexible scheduler that handles dependency resolution, job monitoring, and retries. We can use the AWS Glue to discover data, transform it, and make it available for search and querying. The AWS Glue Data Catalog is an index to the location, schema, and runtime metrics of your data. Athena uses this metadata definition to query data available in Amazon S3 using simple SQL statements.

The AWS Glue crawler populates the Data Catalog with tables from various sources, including Amazon S3. When the crawler runs, it classifies data to determine the format, schema, and associated properties of the raw data, performs grouping of data into tables or partitions, and writes metadata to the Data Catalog. You can configure the crawler to run at specific intervals to make sure the Data Catalog is in sync with the underlying source data.

For our solution, we use these services to catalog and query exported S3 Storage Lens metrics data. First, we create the crawler via the AWS Glue console. For the purpose of this example, we provide an AWS CloudFormation template that deploys the required AWS resources. This template creates the CloudFormation stack with three AWS resources in your AWS account:

When you create your stack with the CloudFormation template, provide the following information:

  • AWS Glue database name
  • AWS Glue crawler name
  • S3 URL path pointing to the reports folder where S3 Storage Lens has exported metrics data. For example, s3://[Name of the bucket]/StorageLens/o-lcpjprs6wq/s3-storage-lense-parquet-v1/V_1/reports/.

After the stack is complete, navigate to the AWS Glue console and confirm that a new crawler job is listed on the Crawlers page. When the crawler runs for the first time, it creates the table reports in the Data Catalog. The Data Catalog may need to be periodically refreshed, so this job is configured to run every day at midnight to sync the data. You can change this configuration to your desired schedule.

After the crawler job runs, we can confirm that the data is accessible using the following query in Athena (make sure to run this query in the database provided in the CloudFormation template):

select * from reports limit 10

Running this query should return results similar to the following screenshot.

Query Results

Create a QuickSight dashboard

When the data is available to access using Athena, we can use QuickSight to create customized analytics and publish dashboards across multiple users. This process involves creating a new QuickSight dataset, creating the analysis using this dataset, creating the dashboard, and configuring user permissions and security.

To get started, you must be signed in to QuickSight using the same payer account. If you’re signing into QuickSight for the first time, you’re prompted to complete the initial signup process (for example, choosing QuickSight Enterprise Edition). You’re also required to provide QuickSight access to your S3 bucket and Athena. For instructions on adding permissions, see Insufficient Permissions When Using Athena with Amazon QuickSight.

  1. In the QuickSight navigation pane, choose Datasets.
  2. Choose New dataset and select Athena.

QuickSight Create Dataset

  1. For Data source name, enter a name.
  2. Choose Create data source.

QuickSight create Athena Dataset

  1. For Catalog, choose AwsDataCatalog.
  2. For Database, choose the AWS Glue database that contains the table for S3 Storage Lens.
  3. For Tables, select your table (for this post, reports).

QuickSight table selection

  1. Choose Edit dataset and choose the query mode SPICE.
  2. Change the format of report_date and dt to Date.
  3. Choose Save.

We can use the cross data source join feature in QuickSight to connect external data sources to the S3 Storage Lens dataset. For this example, let’s say we want to visualize the number of S3 buckets mapped to the internal teams. This data is external to S3 Storage Lens and stored in a CSV file, which contains the mapping between the account numbers and internal team names.

Account to Team Mapping

  1. To import this data into our existing dataset, choose Add data.

QuickSight add external data

  1. Choose Upload a file to import the CSV file to the dataset.

QuickSight Upload External File

We’re redirected to the join configuration screen. From here, we can configure the join type and join clauses to connect these two data sources. For more information about the cross data source join functionality, see Joining across data sources on Amazon QuickSight.

  1. For this example, we need to perform the left join on columns aws_account_number (from the reports table) and Account (from the Account-to-Team-mapping table). This left join returns all records from the reports table and matching records from Account-to-Team-mapping.
  2. Choose Apply after selecting this configuration.

QuickSight DataSet Join

  1. Choose Save & visualize.

From here, you can create various analyses and visualizations on the imported datasets. For instructions on creating visualizations, see Creating an Amazon QuickSight Visual. We provide a sample template you can use to get the basic dashboard. This dashboard provides metrics for total Amazon S3 storage size, object count, S3 bucket by internal team, and more. It also allows authorized users to filter the metrics based on accounts and report dates. This is a simple report that can be further customized based on your needs.

Quicksight Final Dashboard

S3 Storage Lens’s IAM security policies don’t apply to imported data into QuickSight. So before you share this dashboard with anyone, one might want to restrict access according to the security requirement and business role of the user. For a comprehensive set of security features, see AWS Security in Amazon QuickSight. For implementation examples, see Applying row-level and column-level security on Amazon QuickSight dashboards. In our example, instead of all users having access to view S3 Storage Lens data for all accounts, you might want to restrict user access to only specific accounts.

QuickSight provides a feature called row-level security that can restrict user access to only a subset of table rows (or records). You can base the selection of these subsets of rows on filter conditions defined on specific columns.

For our current example, we want to allow user access to view the Amazon S3 metrics dashboard only for a few accounts. For this, we can use the column aws_account_number as filter criteria with account number values. We can implement this by creating a CSV file with columns named UserName and aws_account_number, and adding the rows for users and a list of account numbers (comma-separated). In the following example file, we have added a sample value for the user awslabs-qs-1 with a specific account. This means that user awslabs-qs-1 can only see the rows (or records) that match with the corresponding aws_account_number values specified in the permission CSV.

QuickSight Permissions file

For instructions on applying a permission rule file, see Using Row-Level Security (RLS) to Restrict Access to a Dataset.

You can further customize this QuickSight analysis to produce additional visualizations, apply additional permissions, and publish it to enterprise users and groups with various levels of security.

Conclusion

Harnessing the knowledge of S3 Storage Lens metrics with other custom data enables you to discover anomalies and identify cost-efficiencies across accounts. In this post, we used serverless components to build a workflow to use this data for real-time visualization. You can use this workflow to scale up and design an enterprise-level solution with a multi-account strategy and control fine-grained access to its data using the QuickSight row-level security feature.


About the Authors

Jignesh Gohel is a Technical Account Manager at AWS. In this role, he provides advocacy and strategic technical guidance to help plan and build solutions using best practices, and proactively keep customers’ AWS environments operationally healthy. He is passionate about building modular and scalable enterprise systems on AWS using serverless technologies. Besides work, Jignesh enjoys spending time with family and friends, traveling and exploring the latest technology trends.


Suman Koduri is a Global Category Lead for Data & Analytics category in AWS Marketplace. He is focused towards business development activities to further expand the presence and success of Data & Analytics ISVs in AWS Marketplace.  In this role, he leads the scaling, and evolution of new and existing ISVs, as well as field enablement and strategic customer advisement for the same. In his spare time, he loves running half marathon’s and riding his motorcycle.

How to securely create and store your CRL for ACM Private CA

Post Syndicated from Tracy Pierce original https://aws.amazon.com/blogs/security/how-to-securely-create-and-store-your-crl-for-acm-private-ca/

In this blog post, I show you how to protect your Amazon Simple Storage Service (Amazon S3) bucket while still allowing access to your AWS Certificate Manager (ACM) Private Certificate Authority (CA) certificate revocation list (CRL).

A CRL is a list of certificates that have been revoked by the CA. Certificates can be revoked because they might have inadvertently been shared, or to discontinue their use, such as when someone leaves the company or an IoT device is decommissioned. In this solution, you use a combination of separate AWS accounts, Amazon S3 Block Public Access (BPA) settings, and a new parameter created by ACM Private CA called S3ObjectAcl to mark the CRL as private. This new parameter allows you to set the privacy of your CRL as PUBLIC_READ or BUCKET_OWNER_FULL_CONTROL. If you choose PUBLIC_READ, the CRL will be accessible over the internet. If you choose BUCKET_OWNER_FULL_CONTROL, then only the CRL S3 bucket owner can access it, and you will need to use Amazon CloudFront to serve the CRL stored in Amazon S3 using origin access identity (OAI). This is because most TLS implementations expect a public endpoint for access.

A best practice for Amazon S3 is to apply the principle of least privilege. To support least privilege, you want to ensure you have the BPA settings for Amazon S3 enabled. These settings deny public access to your S3 objects by using ACLs, bucket policies, or access point policies. I’m going to walk you through setting up your CRL as a private object in an isolated secondary account with BPA settings for access, and a CloudFront distribution with OAI settings enabled. This will confirm that access can only be made through the CloudFront distribution and not directly to your S3 bucket. This enables you to maintain your private CA in your primary account, accessible only by your public key infrastructure (PKI) security team.

As part of the private infrastructure setup, you will create a CloudFront distribution to provide access to your CRL. While not required, it allows access to private CRLs, and is helpful in the event you want to move the CRL to a different location later. However, this does come with an extra cost, so that’s something to consider when choosing to make your CRL private instead of public.

Prerequisites

For this walkthrough, you should have the following resources ready to use:

CRL solution overview

The solution consists of creating an S3 bucket in an isolated secondary account, enabling all BPA settings, creating a CloudFront OAI, and a CloudFront distribution.
 

Figure 1: Solution flow diagram

Figure 1: Solution flow diagram

As shown in Figure 1, the steps in the solution are as follows:

  1. Set up the S3 bucket in the secondary account with BPA settings enabled.
  2. Create the CloudFront distribution and point it to the S3 bucket.
  3. Create your private CA in AWS Certificate Manager (ACM).

In this post, I walk you through each of these steps.

Deploying the CRL solution

In this section, you walk through each item in the solution overview above. This will allow access to your CRL stored in an isolated secondary account, away from your private CA.

To create your S3 bucket

  1. Sign in to the AWS Management Console of your secondary account. For Services, select S3.
  2. In the S3 console, choose Create bucket.
  3. Give the bucket a unique name. For this walkthrough, I named my bucket example-test-crl-bucket-us-east-1, as shown in Figure 2. Because S3 buckets are unique across all of AWS and not just within your account, you must create your own unique bucket name when completing this tutorial. Remember to follow the S3 naming conventions when choosing your bucket name.
     
    Figure 2: Creating an S3 bucket

    Figure 2: Creating an S3 bucket

  4. Choose Next, and then choose Next again.
  5. For Block Public Access settings for this bucket, make sure the Block all public access check box is selected, as shown in Figure 3.
     
    Figure 3: S3 block public access bucket settings

    Figure 3: S3 block public access bucket settings

  6. Choose Create bucket.
  7. Select the bucket you just created, and then choose the Permissions tab.
  8. For Bucket Policy, choose Edit, and in the text field, paste the following policy (remember to replace each <user input placeholder> with your own value).
    {
      "Version": "2012-10-17",
      "Statement": [
        {
          "Effect": "Allow",
          "Principal": {
            "Service": "acm-pca.amazonaws.com"
          },
          "Action": [
            "s3:PutObject",
            "s3:PutObjectAcl",
            "s3:GetBucketAcl",
            "s3:GetBucketLocation"
          ],
          "Resource": [
              "arn:aws:s3:::<your-bucket-name>/*",
              "arn:aws:s3:::<your-bucket-name>"
          ]
        }
      ]
    }
    

  9. Choose Save changes.
  10. Next to Object Ownership choose Edit.
  11. Select Bucket owner preferred, and then choose Save changes.

To create your CloudFront distribution

  1. Still in the console of your secondary account, from the Services menu, switch to the CloudFront console.
  2. Choose Create Distribution.
  3. For Select a delivery method for your content, under Web, choose Get Started.
  4. On the Origin Settings page, do the following, as shown in Figure 4:
    1. For Origin Domain Name, select the bucket you created earlier. In this example, my bucket name is example-test-crl-bucket-us-east-1.s3.amazonaws.com.
    2. For Restrict Bucket Access, select Yes.
    3. For Origin Access Identity, select Create a New Identity.
    4. For Comment enter a name. In this example, I entered access-identity-crl.
    5. For Grant Read Permissions on Bucket, select Yes, Update Bucket Policy.
    6. Leave all other defaults.
       
      Figure 4: CloudFront <strong>Origin Settings</strong> page

      Figure 4: CloudFront Origin Settings page

  5. Choose Create Distribution.

To create your private CA

  1. (Optional) If you have already created a private CA, you can update your CRL pointer by using the update-certificate-authority API. You must do this step from the CLI because you can’t select an S3 bucket in a secondary account for the CRL home when you create the CRL through the console. If you haven’t already created a private CA, follow the remaining steps in this procedure.
  2. Use a text editor to create a file named ca_config.txt that holds your CA configuration information. In the following example ca_config.txt file, replace each <user input placeholder> with your own value.
    {
        "KeyAlgorithm": "<RSA_2048>",
        "SigningAlgorithm": "<SHA256WITHRSA>",
        "Subject": {
            "Country": "<US>",
            "Organization": "<Example LLC>",
            "OrganizationalUnit": "<Security>",
            "DistinguishedNameQualifier": "<Example.com>",
            "State": "<Washington>",
            "CommonName": "<Example LLC>",
            "Locality": "<Seattle>"
        }
    }
    

  3. From the CLI configured with a credential profile for your primary account, use the create-certificate-authority command to create your CA. In the following example, replace each <user input placeholder> with your own value.
    aws acm-pca create-certificate-authority --certificate-authority-configuration file://ca_config.txt --certificate-authority-type “ROOT” --profile <primary_account_credentials>
    

  4. With the CA created, use the describe-certificate-authority command to verify success. In the following example, replace each <user input placeholder> with your own value.
    aws acm-pca describe-certificate-authority --certificate-authority-arn <arn:aws:acm-pca:us-east-1:111122223333:certificate-authority/12345678-1234-1234-1234-123456789012> --profile <primary_account_credentials>
    

  5. You should see the CA in the PENDING_CERTIFICATE state. Use the get-certificate-authority-csr command to retrieve the certificate signing request (CSR), and sign it with your ACM private CA. In the following example, replace each <user input placeholder> with your own value.
    aws acm-pca get-certificate-authority-csr --certificate-authority-arn <arn:aws:acm-pca:us-east-1:111122223333:certificate-authority/12345678-1234-1234-1234-123456789012> --output text > <cert_1.csr> --profile <primary_account_credentials>
    

  6. Now that you have your CSR, use it to issue a certificate. Because this example sets up a ROOT CA, you will issue a self-signed RootCACertificate. You do this by using the issue-certificate command. In the following example, replace each <user input placeholder> with your own value. You can find all allowable values in the ACM PCA documentation.
    aws acm-pca issue-certificate --certificate-authority-arn <arn:aws:acm-pca:us-east-1:111122223333:certificate-authority/12345678-1234-1234-1234-123456789012> --template-arn arn:aws:acm-pca:::template/RootCACertificate/V1 --csr fileb://<cert_1.csr> --signing-algorithm SHA256WITHRSA --validity Value=365,Type=DAYS --profile <primary_account_credentials>
    

  7. Now that the certificate is issued, you can retrieve it. You do this by using the get-certificate command. In the following example, replace each <user input placeholder> with your own value.
    aws acm-pca get-certificate --certificate-authority-arn <arn:aws:acm-pca:us-east-1:111122223333:certificate-authority/12345678-1234-1234-1234-123456789012> --certificate-arn <arn:aws:acm-pca:us-east-1:111122223333:certificate-authority/12345678-1234-1234-1234-123456789012/certificate/6707447683a9b7f4055627ffd55cebcc> --output text --profile <primary_account_credentials> > ca_cert.pem
    

  8. Import the certificate ca_cert.pem into your CA to move it into the ACTIVE state for further use. You do this by using the import-certificate-authority-certificate command. In the following example, replace each <user input placeholder> with your own value.
    aws acm-pca import-certificate-authority-certificate --certificate-authority-arn <arn:aws:acm-pca:us-east-1:111122223333:certificate-authority/12345678-1234-1234-1234-123456789012> --certificate fileb://ca_cert.pem --profile <primary_account_credentials>
    

  9. Use a text editor to create a file named revoke_config.txt that holds your CRL information pointing to your CloudFront distribution ID. In the following example revoke_config.txt, replace each <user input placeholder> with your own value.
    {
        "CrlConfiguration": {
            "Enabled": <true>,
            "ExpirationInDays": <365>,
            "CustomCname": "<example1234.cloudfront.net>",
            "S3BucketName": "<example-test-crl-bucket-us-east-1>",
            "S3ObjectAcl": "<BUCKET_OWNER_FULL_CONTROL>"
        }
    }
    

  10. Update your CA CRL CNAME to point to the CloudFront distribution you created. You do this by using the update-certificate-authority command. In the following example, replace each <user input placeholder> with your own value.
    aws acm-pca update-certificate-authority --certificate-authority-arn <arn:aws:acm-pca:us-east-1:111122223333:certificate-authority/12345678-1234-1234-1234-123456789012> --revocation-configuration file://revoke_config.txt --profile <primary_account_credentials>
    

You can use the describe-certificate-authority command to verify that your CA is in the ACTIVE state. After the CA is active, ACM generates your CRL periodically for you, and places it into your specified S3 bucket. It also generates a new CRL list shortly after you revoke any certificate, so you have the most updated copy.

Now that the PCA, CRL, and CloudFront distribution are all set up, you can test to verify the CRL is served appropriately.

To test that the CRL is served appropriately

  1. Create a CSR to issue a new certificate from your PCA. In the following example, replace each <user input placeholder> with your own value. Enter a secure PEM password when prompted and provide the appropriate field data.

    Note: Do not enter any values for the unused attributes, just press Enter with no value.

    openssl req -new -newkey rsa:2048 -days 365 -keyout <test_cert_private_key.pem> -out <test_csr.csr>
    

  2. Issue a new certificate using the issue-certificate command. In the following example, replace each <user input placeholder> with your own value. You can find all allowable values in the ACM PCA documentation.
    aws acm-pca issue-certificate --certificate-authority-arn <arn:aws:acm-pca:us-east-1:111122223333:certificate-authority/12345678-1234-1234-1234-123456789012> --csr file://<test_csr.csr> --signing-algorithm <SHA256WITHRSA> --validity Value=<31>,Type=<DAYS> --idempotency-token 1 --profile <primary_account_credentials>
    

  3. After issuing the certificate, you can use the get-certificate command retrieve it, parse it, then get the CRL URL from the certificate just like a PKI client would. In the following example, replace each <user input placeholder> with your own value. This command uses the JQ package.
    aws acm-pca get-certificate --certificate-authority-arn <arn:aws:acm-pca:us-east-1:111122223333:certificate-authority/12345678-1234-1234-1234-123456789012> --certificate-arn <arn:aws:acm-pca:us-east-1:111122223333:certificate-authority/12345678-1234-1234-1234-123456789012/certificate/6707447683a9b7f4055example1234> | jq -r '.Certificate' > cert.pem openssl x509 -in cert.pem -text -noout | grep crl 
    

    You should see an output similar to the following, but with the domain names of your CloudFront distribution and your CRL file:

    http://<example1234.cloudfront.net>/crl/<7215e983-3828-435c-a458-b9e4dd16bab1.crl>
    

  4. Run the curl command to download your CRL file. In the following example, replace each <user input placeholder> with your own value.
    curl http://<example1234.cloudfront.net>/crl/<7215e983-3828-435c-a458-b9e4dd16bab1.crl>
    

Security best practices

The following are some of the security best practices for setting up and maintaining your private CA in ACM Private CA.

  • Place your root CA in its own account. You want your root CA to be the ultimate authority for your private certificates, limiting access to it is key to keeping it secure.
  • Minimize access to the root CA. This is one of the best ways of reducing the risk of intentional or unintentional inappropriate access or configuration. If the root CA was to be inappropriately accessed, all subordinate CAs and certificates would need to be revoked and recreated.
  • Keep your CRL in a separate account from the root CA. The reason for placing the CRL in a separate account is because some external entities—such as customers or users who aren’t part of your AWS organization, or external applications—might need to access the CRL to check for revocation. To provide access to these external entities, the CRL object and the S3 bucket need to be accessible, so you don’t want to place your CRL in the same account as your private CA.

For more information, see ACM Private CA best practices in the AWS Private CA User Guide.

Conclusion

You’ve now successfully set up your private CA and have stored your CRL in an isolated secondary account. You configured your S3 bucket with Block Public Access settings, created a custom URL through CloudFront, enabled OAI settings, and pointed your DNS to it by using Route 53. This restricts access to your S3 bucket through CloudFront and your OAI only. You walked through the setup of each step, from bucket configurations, hosted zone setup, distribution setup, and finally, private CA configuration and setup. You can now store your private CA in an account with limited access, while your CRL is hosted in a separate account that allows external entity access.

If you have feedback about this post, submit comments in the Comments section below. If you have questions about this post, start a new thread on the AWS Certificate Manager forum or contact AWS Support.

Want more AWS Security how-to content, news, and feature announcements? Follow us on Twitter.

Author

Tracy Pierce

Tracy is a Senior Security Consultant for Engagement Security. She enjoys the peculiar culture of Amazon and uses that to ensure that every day is exciting for her fellow engineers and customers alike. Customer obsession is her highest priority both internally and externally. She has her AS in Computer Security and Forensics from Sullivan College of Technology and Design, Systems Security Certified Practitioner (SSCP) certification, AWS Developer Associate certification, AWS Solutions Architect Associates certificate, and AWS Security Specialist certification. Outside of work, she enjoys time with friends, her fiancé, her Great Dane, and three cats. She also reads (a lot), builds Legos, and loves glitter.

Use IAM Access Analyzer to generate IAM policies based on access activity found in your organization trail

Post Syndicated from Mathangi Ramesh original https://aws.amazon.com/blogs/security/use-iam-access-analyzer-to-generate-iam-policies-based-on-access-activity-found-in-your-organization-trail/

In April 2021, AWS Identity and Access Management (IAM) Access Analyzer added policy generation to help you create fine-grained policies based on AWS CloudTrail activity stored within your account. Now, we’re extending policy generation to enable you to generate policies based on access activity stored in a designated account. For example, you can use AWS Organizations to define a uniform event logging strategy for your organization and store all CloudTrail logs in your management account to streamline governance activities. You can use Access Analyzer to review access activity stored in your designated account and generate a fine-grained IAM policy in your member accounts. This helps you to create policies that provide only the required permissions for your workloads.

Customers that use a multi-account strategy consolidate all access activity information in a designated account to simplify monitoring activities. By using AWS Organizations, you can create a trail that will log events for all Amazon Web Services (AWS) accounts into a single management account to help streamline governance activities. This is sometimes referred to as an organization trail. You can learn more from Creating a trail for an organization. With this launch, you can use Access Analyzer to generate fine-grained policies in your member account and grant just the required permissions to your IAM roles and users based on access activity stored in your organization trail.

When you request a policy, Access Analyzer analyzes your activity in CloudTrail logs and generates a policy based on that activity. The generated policy grants only the required permissions for your workloads and makes it easier for you to implement least privilege permissions. In this blog post, I’ll explain how to set up the permissions for Access Analyzer to access your organization trail and analyze activity to generate a policy. To generate a policy in your member account, you need to grant Access Analyzer limited cross-account access to access the Amazon Simple Storage Service (Amazon S3) bucket where logs are stored and review access activity.

Generate a policy for a role based on its access activity in the organization trail

In this example, you will set fine-grained permissions for a role used in a development account. The example assumes that your company uses Organizations and maintains an organization trail that logs all events for all AWS accounts in the organization. The logs are stored in an S3 bucket in the management account. You can use Access Analyzer to generate a policy based on the actions required by the role. To use Access Analyzer, you must first update the permissions on the S3 bucket where the CloudTrail logs are stored, to grant access to Access Analyzer.

To grant permissions for Access Analyzer to access and review centrally stored logs and generate policies

  1. Sign in to the AWS Management Console using your management account and go to S3 settings.
  2. Select the bucket where the logs from the organization trail are stored.
  3. Change object ownership to bucket owner preferred. To generate a policy, all of the objects in the bucket must be owned by the bucket owner.
  4. Update the bucket policy to grant cross-account access to Access Analyzer by adding the following statement to the bucket policy. This grants Access Analyzer limited access to the CloudTrail data. Replace the <organization-bucket-name>, and <organization-id> with your values and then save the policy.
    {
        "Version": "2012-10-17",
        "Statement": 
        [
        {
            "Sid": "PolicyGenerationPermissions",
            "Effect": "Allow",
            "Principal": {
                "AWS": "*"
            },
            "Action": [
                "s3:GetObject",
                "s3:ListBucket"
            ],
            "Resource": [
                "arn:aws:s3:::<organization-bucket-name>",
                "arn:aws:s3:::my-organization-bucket/AWSLogs/o-exampleorgid/${aws:PrincipalAccount}/*
    "
            ],
            "Condition": {
    "StringEquals":{
    "aws:PrincipalOrgID":"<organization-id>"
    },
    
                "StringLike": {"aws:PrincipalArn":"arn:aws:iam::${aws:PrincipalAccount}:role/service-role/AccessAnalyzerMonitorServiceRole*"            }
            }
        }
        ]
    }
    

By using the preceding statement, you’re allowing listbucket and getobject for the bucket my-organization-bucket-name if the role accessing it belongs to an account in your Organizations and has a name that starts with AccessAnalyzerMonitorServiceRole. Using aws:PrincipalAccount in the resource section of the statement allows the role to retrieve only the CloudTrail logs belonging to its own account. If you are encrypting your logs, update your AWS Key Management Service (AWS KMS) key policy to grant Access Analyzer access to use your key.

Now that you’ve set the required permissions, you can use the development account and the following steps to generate a policy.

To generate a policy in the AWS Management Console

  1. Use your development account to open the IAM Console, and then in the navigation pane choose Roles.
  2. Select a role to analyze. This example uses AWS_Test_Role.
  3. Under Generate policy based on CloudTrail events, choose Generate policy, as shown in Figure 1.
     
    Figure 1: Generate policy from the role detail page

    Figure 1: Generate policy from the role detail page

  4. In the Generate policy page, select the time window for which IAM Access Analyzer will review the CloudTrail logs to create the policy. In this example, specific dates are chosen, as shown in Figure 2.
     
    Figure 2: Specify the time period

    Figure 2: Specify the time period

  5. Under CloudTrail access, select the organization trail you want to use as shown in Figure 3.

    Note: If you’re using this feature for the first time: select create a new service role, and then choose Generate policy.

    This example uses an existing service role “AccessAnalyzerMonitorServiceRole_MBYF6V8AIK.”
     

    Figure 3: CloudTrail access

    Figure 3: CloudTrail access

  6. After the policy is ready, you’ll see a notification on the role page. To review the permissions, choose View generated policy, as shown in Figure 4.
     
    Figure 4: Policy generation progress

    Figure 4: Policy generation progress

After the policy is generated, you can see a summary of the services and associated actions in the generated policy. You can customize it by reviewing the services used and selecting additional required actions from the drop down. To refine permissions further, you can replace the resource-level placeholders in the policies to restrict permissions to just the required access. You can learn more about granting fine-grained permissions and creating the policy as described in this blog post.

Conclusion

Access Analyzer makes it easier to grant fine-grained permissions to your IAM roles and users by generating IAM policies based on the CloudTrail activity centrally stored in a designated account such as your AWS Organizations management accounts. To learn more about how to generate a policy, see Generate policies based on access activity in the IAM User Guide.

If you have feedback about this blog post, submit comments in the Comments section below. If you have questions about this blog post, start a new thread on the IAM forum or contact AWS Support.

Want more AWS Security how-to content, news, and feature announcements? Follow us on Twitter.

Mathangi Ramesh

Mathangi Ramesh

Mathangi is the product manager for AWS Identity and Access Management. She enjoys talking to customers and working with data to solve problems. Outside of work, Mathangi is a fitness enthusiast and a Bharatanatyam dancer. She holds an MBA degree from Carnegie Mellon University.

Convert and Watermark Documents Automatically with Amazon S3 Object Lambda

Post Syndicated from Joseph Simon original https://aws.amazon.com/blogs/architecture/convert-and-watermark-documents-automatically-with-amazon-s3-object-lambda/

When you provide access to a sensitive document to someone outside of your organization, you likely need to ensure that the document is read-only. In this case, your document should be associated with a specific user in case it is shared.

For example, authors often embed user-specific watermarks into their ebooks. This way, if their ebook gets posted to a file-sharing site, they can prevent the purchaser from downloading copies of the ebook in the future.

In this blog post, we provide you a cost-efficient, scalable, and secure solution to efficiently generate user-specific versions of sensitive documents. This solution helps users track who their documents are shared with. This helps prevent fraud and ensure that private information isn’t leaked. Our solution uses a RESTful API, which uses Amazon S3 Object Lambda to convert documents to PDF and apply a watermark based on the requesting user. It also provides a method for authentication and tracks access to the original document.

Architectural overview

S3 Object Lambda processes and transforms data that is requested from Amazon Simple Storage Service (Amazon S3) before it’s sent back to a client. The AWS Lambda function is invoked inline via a standard S3 GET request. It can return different results from the same document based on parameters, such as who is requesting the document. Figure 1 provides a high-level view of the different components that make up the solution.

Document processing architectural diagram

Figure 1. Document processing architectural diagram

Authenticating users with Amazon Cognito

This architecture defines a RESTful API, but users will likely be using a mobile or web application that calls the API. Thus, the application will first need to authenticate users. We do this via Amazon Cognito, which functions as its own identity provider (IdP). You could also use an external IdP, including those that support OpenID Connect and SAML.

Validating the JSON Web Token with API Gateway

Once the user is successfully authenticated with Amazon Cognito, the application will be sent a JSON Web Token (JWT). This JWT contains information about the user and will be used in subsequent requests to the API.

Now that the application has a token, it will make a request to the API, which is provided by Amazon API Gateway. API Gateway provides a secure, scalable entryway into your application. The API Gateway validates the JWT sent from the client with Amazon Cognito to make sure it is valid. If it is validated, the request is accepted and sent on to the Lambda API Handler. If it’s not, the client gets rejected and sent an error code.

Storing user data with DynamoDB

When the Lambda API Handler receives the request, it parses the JWT to extract the user making the request. It then logs that user, file, and access time into Amazon DynamoDB. Optionally, you may use DynamoDB to store an encoded string that will be used as the watermark, rather than something in plaintext, like user name or email.

Generating the PDF and user-specific watermark

At this point, the Lambda API Handler sends an S3 GET request. However, instead of going to Amazon S3 directly, it goes to a different endpoint that invokes the S3 Object Lambda function. This endpoint is called an S3 Object Lambda Access Point. The S3 GET request contains the original file name and the string that will be used for the watermark.

The S3 Object Lambda function transforms the original file that it downloads from its source S3 bucket. It uses the open-source office suite LibreOffice (and specifically this Lambda layer) to convert the source document to PDF. Once it is converted, a JavaScript library (PDF-Lib) embeds the watermark into the PDF before it’s sent back to the Lambda API Handler function.

The Lambda API Handler stores the converted file in a temporary S3 bucket, generates a presigned URL, and sends that URL back to the client as a 302 redirect. Then the client sends a request to that presigned URL to get the converted file.

To keep the temporary S3 bucket tidy, we use an S3 lifecycle configuration with an expiration policy.

Figure 2. Process workflow for document transformation

Figure 2. Process workflow for document transformation

Alternate approach

Before S3 Object Lambda was available, Lambda@Edge was used. However, there are three main issues with using Lambda@Edge instead of S3 Object Lambda:

  1. It is designed to run code closer to the end user to decrease latency, but in this case, latency is not a major concern.
  2. It requires using an Amazon CloudFront distribution, and the single-download pattern described here will not take advantage of Lamda@Edge’s caching.
  3. It has quotas on memory that don’t lend themselves to complex libraries like OfficeLibre.

Extending this solution

This blog post describes the basic building blocks for the solution, but it can be extended relatively easily. For example, you could add another function to the API that would convert, resize, and watermark images. To do this, create an S3 Object Lambda function to perform those tasks. Then, add an S3 Object Lambda Access Point to invoke it based on a different API call.

API Gateway has many built-in security features, but you may want to enhance the security of your RESTful API. To do this, add enhanced security rules via AWS WAF. Integrating your IdP into Amazon Cognito can give you a single place to manage your users.

Monitoring any solution is critical, and understanding how an application is behaving end to end can greatly benefit optimization and troubleshooting. Adding AWS X-Ray and Amazon CloudWatch Lambda Insights will show you how functions and their interactions are performing.

Should you decide to extend this architecture, follow the architectural principles defined in AWS Well-Architected, and pay particular attention to the Serverless Application Lens.

Example expanded document processing architecture

Figure 3. Example expanded document processing architecture

Conclusion

You can implement this solution in a number of ways. However, by using S3 Object Lambda, you can transform documents without needing intermediary storage. S3 Object Lambda will also decouple your file logic from the rest of the application.

The Serverless on AWS components mentioned in this post allow you to reduce administrative overhead, saving you time and money.

Finally, the extensible nature of this architecture allows you to add functionality easily as your organization’s needs grow and change.

The following links provide more information on how to use S3 Object Lambda in your architectures:

Building well-architected serverless applications: Building in resiliency – part 2

Post Syndicated from Julian Wood original https://aws.amazon.com/blogs/compute/building-well-architected-serverless-applications-building-in-resiliency-part-2/

This series of blog posts uses the AWS Well-Architected Tool with the Serverless Lens to help customers build and operate applications using best practices. In each post, I address the serverless-specific questions identified by the Serverless Lens along with the recommended best practices. See the introduction post for a table of contents and explanation of the example application.

Reliability question REL2: How do you build resiliency into your serverless application?

This post continues part 1 of this reliability question. Previously, I cover managing failures using retries, exponential backoff, and jitter. I explain how DLQs can isolate failed messages. I show how to use state machines to orchestrate long running transactions rather than handling these in application code.

Required practice: Manage duplicate and unwanted events

Duplicate events can occur when a request is retried or multiple consumers process the same message from a queue or stream. A duplicate can also happen when a request is sent twice at different time intervals with the same parameters. Design your applications to process multiple identical requests to have the same effect as making a single request.

Idempotency refers to the capacity of an application or component to identify repeated events and prevent duplicated, inconsistent, or lost data. This means that receiving the same event multiple times does not change the result beyond the first time the event was received. An idempotent application can, for example, handle multiple identical refund operations. The first refund operation is processed. Any further refund requests to the same customer with the same payment reference should not be processes again.

When using AWS Lambda, you can make your function idempotent. The function’s code must properly validate input events and identify if the events were processed before. For more information, see “How do I make my Lambda function idempotent?

When processing streaming data, your application must anticipate and appropriately handle processing individual records multiple times. There are two primary reasons why records may be delivered more than once to your Amazon Kinesis Data Streams application: producer retries and consumer retries. For more information, see “Handling Duplicate Records”.

Generate unique attributes to manage duplicate events at the beginning of the transaction

Create, or use an existing unique identifier at the beginning of a transaction to ensure idempotency. These identifiers are also known as idempotency tokens. A number of Lambda triggers include a unique identifier as part of the event:

You can also create your own identifiers. These can be business-specific, such as transaction ID, payment ID, or booking ID. You can use an opaque random alphanumeric string, unique correlation identifiers, or the hash of the content.

A Lambda function, for example can use these identifiers to check whether the event has been previously processed.

Depending on the final destination, duplicate events might write to the same record with the same content instead of generating a duplicate entry. This may therefore not require additional safeguards.

Use an external system to store unique transaction attributes and verify for duplicates

Lambda functions can use Amazon DynamoDB to store and track transactions and idempotency tokens to determine if the transaction has been handled previously. DynamoDB Time to Live (TTL) allows you to define a per-item timestamp to determine when an item is no longer needed. This helps to limit the storage space used. Base the TTL on the event source. For example, the message retention period for SQS.

Using DynamoDB to store idempotent tokens

Using DynamoDB to store idempotent tokens

You can also use DynamoDB conditional writes to ensure a write operation only succeeds if an item attribute meets one of more expected conditions. For example, you can use this to fail a refund operation if a payment reference has already been refunded. This signals to the application that it is a duplicate transaction. The application can then catch this exception and return the same result to the customer as if the refund was processed successfully.

Third-party APIs can also support idempotency directly. For example, Stripe allows you to add an Idempotency-Key: <key> header to the request. Stripe saves the resulting status code and body of the first request made for any given idempotency key, regardless of whether it succeeded or failed. Subsequent requests with the same key return the same result.

Validate events using a pre-defined and agreed upon schema

Implicitly trusting data from clients, external sources, or machines could lead to malformed data being processed. Use a schema to validate your event conforms to what you are expecting. Process the event using the schema within your application code or at the event source when applicable. Events not adhering to your schema should be discarded.

For API Gateway, I cover validating incoming HTTP requests against a schema in “Implementing application workload security – part 1”.

Amazon EventBridge rules match event patterns. EventBridge provides schemas for all events that are generated by AWS services. You can create or upload custom schemas or infer schemas directly from events on an event bus. You can also generate code bindings for event schemas.

SNS supports message filtering. This allows a subscriber to receive a subset of the messages sent to the topic using a filter policy. For more information, see the documentation.

JSON Schema is a tool for validating the structure of JSON documents. There are a number of implementations available.

Best practice: Consider scaling patterns at burst rates

Load testing your serverless application allows you to monitor the performance of an application before it is deployed to production. Serverless applications can be simpler to load test, thanks to the automatic scaling built into many of the services. For more information, see “How to design Serverless Applications for massive scale”.

In addition to your baseline performance, consider evaluating how your workload handles initial burst rates. This ensures that your workload can sustain burst rates while scaling to meet possibly unexpected demand.

Perform load tests using a burst strategy with random intervals of idleness

Perform load tests using a burst of requests for a short period of time. Also introduce burst delays to allow your components to recover from unexpected load. This allows you to future-proof the workload for key events when you do not know peak traffic levels.

There are a number of AWS Marketplace and AWS Partner Network (APN) solutions available for performance testing, including Gatling FrontLine, BlazeMeter, and Apica.

In regulating inbound request rates – part 1, I cover running a performance test suite using Gatling, an open source tool.

Gatling performance results

Gatling performance results

Amazon does have a network stress testing policy that defines which high volume network tests are allowed. Tests that purposefully attempt to overwhelm the target and/or infrastructure are considered distributed denial of service (DDoS) tests and are prohibited. For more information, see “Amazon EC2 Testing Policy”.

Review service account limits with combined utilization across resources

AWS accounts have default quotas, also referred to as limits, for each AWS service. These are generally Region-specific. You can request increases for some limits while other limits cannot be increased. Service Quotas is an AWS service that helps you manage your limits for many AWS services. Along with looking up the values, you can also request a limit increase from the Service Quotas console.

Service Quotas dashboard

Service Quotas dashboard

As these limits are shared within an account, review the combined utilization across resources including the following:

  • Amazon API Gateway: number of requests per second across all APIs. (link)
  • AWS AppSync: throttle rate limits. (link)
  • AWS Lambda: function concurrency reservations and pool capacity to allow other functions to scale. (link)
  • Amazon CloudFront: requests per second per distribution. (link)
  • AWS IoT Core message broker: concurrent requests per second. (link)
  • Amazon EventBridge: API requests and target invocations limit. (link)
  • Amazon Cognito: API limits. (link)
  • Amazon DynamoDB: throughput, indexes, and request rates limits. (link)

Evaluate key metrics to understand how workloads recover from bursts

There are a number of key Amazon CloudWatch metrics to evaluate and alert on to understand whether your workload recovers from bursts.

  • AWS Lambda: Duration, Errors, Throttling, ConcurrentExecutions, UnreservedConcurrentExecutions. (link)
  • Amazon API Gateway: Latency, IntegrationLatency, 5xxError, 4xxError. (link)
  • Application Load Balancer: HTTPCode_ELB_5XX_Count, RejectedConnectionCount, HTTPCode_Target_5XX_Count, UnHealthyHostCount, LambdaInternalError, LambdaUserError. (link)
  • AWS AppSync: 5XX, Latency. (link)
  • Amazon SQS: ApproximateAgeOfOldestMessage. (link)
  • Amazon Kinesis Data Streams: ReadProvisionedThroughputExceeded, WriteProvisionedThroughputExceeded, GetRecords.IteratorAgeMilliseconds, PutRecord.Success, PutRecords.Success (if using Kinesis Producer Library), GetRecords.Success. (link)
  • Amazon SNS: NumberOfNotificationsFailed, NumberOfNotificationsFilteredOut-InvalidAttributes. (link)
  • Amazon Simple Email Service (SES): Rejects, Bounces, Complaints, Rendering Failures. (link)
  • AWS Step Functions: ExecutionThrottled, ExecutionsFailed, ExecutionsTimedOut. (link)
  • Amazon EventBridge: FailedInvocations, ThrottledRules. (link)
  • Amazon S3: 5xxErrors, TotalRequestLatency. (link)
  • Amazon DynamoDB: ReadThrottleEvents, WriteThrottleEvents, SystemErrors, ThrottledRequests, UserErrors. (link)

Conclusion

This post continues from part 1 and looks at managing duplicate and unwanted events with idempotency and an event schema. I cover how to consider scaling patterns at burst rates by managing account limits and show relevant metrics to evaluate

Build resiliency into your workloads. Ensure that applications can withstand partial and intermittent failures across components that may only surface in production. In the next post in the series, I cover the performance efficiency pillar from the Well-Architected Serverless Lens.

For more serverless learning resources, visit Serverless Land.

How Comcast uses AWS to rapidly store and analyze large-scale telemetry data

Post Syndicated from Asser Moustafa original https://aws.amazon.com/blogs/big-data/how-comcast-uses-aws-to-rapidly-store-and-analyze-large-scale-telemetry-data/

This blog post is co-written by Russell Harlin from Comcast Corporation.

Comcast Corporation creates incredible technology and entertainment that connects millions of people to the moments and experiences that matter most. At the core of this is Comcast’s high-speed data network, providing tens of millions of customers across the country with reliable internet connectivity. This mission has become more important now than ever.

This post walks through how Comcast used AWS to rapidly store and analyze large-scale telemetry data.

Background

At Comcast, we’re constantly looking for ways to gain new insights into our network and improve the overall quality of service. Doing this effectively can involve scaling solutions to support analytics across our entire network footprint. For this particular project, we wanted an extensible and scalable solution that could process, store, and analyze telemetry reports, one per network device every 5 minutes. This data would then be used to help measure quality of experience and determine where network improvements could be made.

Scaling big data solutions is always challenging, but perhaps the biggest challenge of this project was the accelerated timeline. With 2 weeks to deliver a prototype and an additional month to scale it, we knew we couldn’t go through the traditional bake-off of different technologies, so we had to either go with technologies we were comfortable with or proven managed solutions.

For the data streaming pipeline, we already had the telemetry data coming in on an Apache Kafka topic, and had significant prior experience using Kafka combined with Apache Flink to implement and scale streaming pipelines, so we decided to go with what we knew. For the data storage and analytics, we needed a suite of solutions that could scale quickly, had plenty of support, and had an ecosystem of well-integrated tools to solve any problem that might arise. This is where AWS was able to meet our needs with technologies like Amazon Simple Storage Service (Amazon S3), AWS Glue, Amazon Athena, and Amazon Redshift.

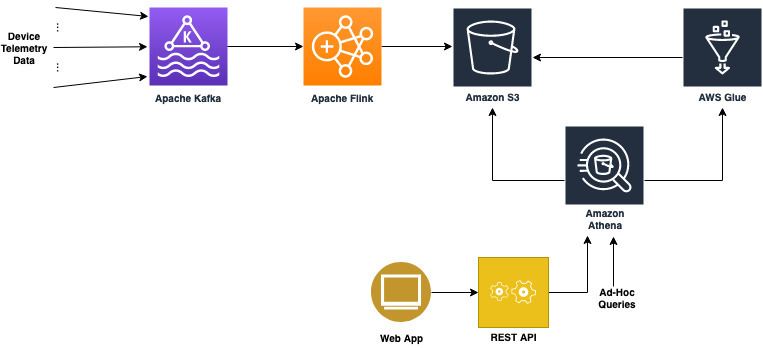
Initial architecture

Our initial prototype architecture for the data store needed to be fast and simple so that we could unblock the development of the other elements of the budding telemetry solution. We needed three key things out of it:

  • The ability to easily fetch raw telemetry records and run more complex analytical queries
  • The capacity to integrate seamlessly with the other pieces of the pipeline
  • The possibility that it could serve as a springboard to a more scalable long-term solution

The first instinct was to explore solutions we used in the past. We had positive experiences with using nosql databases, like Cassandra, to store and serve raw data records, but it was clear these wouldn’t meet our need for running ad hoc analytical queries. Likewise, we had experience with more flexible RDBMs, like Postgres, for handling more complicated queries, but we knew that those wouldn’t scale to meet our requirement to store tens to hundreds of billions of rows. Therefore, any prototyping with one of these approaches would be considered throwaway work.

After moving on from these solutions, we quickly settled on using Amazon S3 with Athena. Amazon S3 provides low-cost storage with near-limitless scaling, so we knew we could store as much historical data as required and Athena would provide serverless, on-demand querying of our data. Additionally, Amazon S3 is known to be a launching pad to many other data store solutions both inside and outside the AWS ecosystem. This was perfect for the exploratory prototyping phase.

Integrating it into the rest of our pipeline would also prove simple. Writing the data to Amazon S3 from our Flink job was straightforward and could be done using the readily available Flink streaming file sink with an Amazon S3 bucket as the destination. When the data was available in Amazon S3, we ran AWS Glue to index our Parquet-formatted data and generate schemas in the AWS Glue metastore for searching using Athena with standard SQL.

The following diagram illustrates this architecture.

Using Amazon S3 and Athena allowed us to quickly unblock development of our Flink pipeline and ensure that the data being passed through was correct. Additionally, we used the AWS SDK to connect to Athena from our northbound Golang microservice and provide REST API access to our data for our custom web application. This allowed us to prove out an end-to-end solution with almost no upfront cost and very minimal infrastructure.

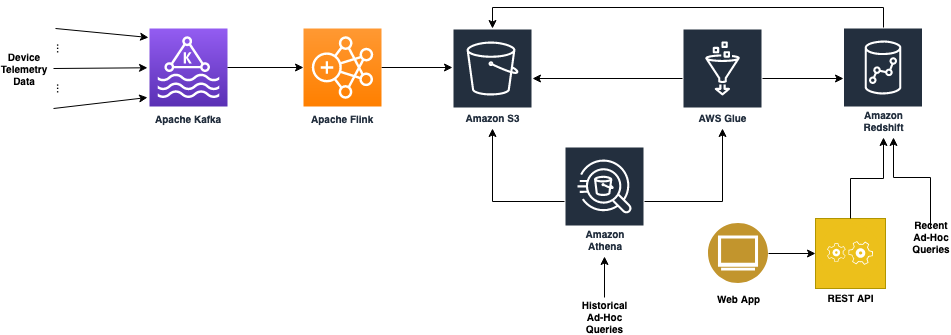
Updated architecture

As application and service development proceeded, it became apparent that Amazon Athena performed for developers running ad hoc queries, but wasn’t going to work as a long-term responsive backend for our microservices and user interface requirements.

One of the primary use cases of this solution was to look at device-level telemetry reports for a period of time and plot and track different aspects of their quality of experience. Because this most often involves solving problems happening in the now, we needed an improved data store for the most recent hot data.

This led us to Amazon Redshift. Amazon Redshift requires loading the data into a dedicated cluster and formulating a schema tuned for your use cases.

The following diagram illustrates this updated architecture.

Data loading and storage requirements

For loading and storing the data in Amazon Redshift, we had a few fundamental requirements:

  • Because our Amazon Redshift solution would be for querying data to troubleshoot problems happening as recent as the current hour, we needed to minimize the latency of the data load and keep up with our scale while doing it. We couldn’t live with nightly loads.
  • The pipeline had to be robust and recover from failures automatically.

There’s a lot of nuance that goes into making this happen, and we didn’t want to worry about handling these basic things ourselves, because this wasn’t where we were going to add value. Luckily, because we were already loading the data into Amazon S3, AWS Glue ETL satisfied these requirements and provided a fast, reliable, and scalable solution to do periodic loads from our Amazon S3 data store to our Amazon Redshift cluster.

A huge benefit of AWS Glue ETL is that it provides many opportunities to tune your ETL pipeline to meet your scaling needs. One of our biggest challenges was that we write multiple files to Amazon S3 from different regions every 5 minutes, which results in many small files. If you’re doing infrequent nightly loads, this may not pose a problem, but for our specific use case, we wanted to load data at least every hour and multiple times an hour if possible. This required some specific tuning of the default ETL job:

  • Amazon S3 list implementation – This allows the Spark job to handle files in batches and optimizes reads for a large number of files, preventing out of memory issues.
  • Pushdown predicates – This tells the load to skip listing any partitions in Amazon S3 that you know won’t be a part of the current run. For frequent loads, this can mean skipping a lot of unnecessary file listing during each job run.
  • File grouping – This allows the read from Amazon S3 to group files together in batches when reading from Amazon S3. This greatly improves performance when reading from a large number of small files.
  • AWS Glue 2.0 – When we were starting our development, only AWS Glue 1.0 was available, and we’d frequently see Spark cluster start times of over 10 minutes. This becomes problematic if you want to run the ETL job more frequently because you have to account for the cluster startup time in your trigger timings. When AWS Glue 2.0 came out, those start times consistently dropped to under 1 minute and they became a afterthought.

With these tunings, as well as increasing the parallelism of the job, we could meet our requirement of loading data multiple times an hour. This made relevant data available for analysis sooner.

Modeling, distributing, and sorting the data

Aside from getting the data into the Amazon Redshift cluster in a timely manner, the next consideration was how to model, distribute, and sort the data when it was in the cluster. For our data, we didn’t have a complex setup with tens of tables requiring extensive joins. We simply had two tables: one for the device-level telemetry records and one for records aggregated at a logical grouping.

The bulk of the initial query load would be centered around serving raw records from these tables to our web application. These types of raw record queries aren’t difficult to handle from a query standpoint, but do present challenges when dealing with tens of millions of unique devices and a report granularity of 5 minutes. So we knew we had to tune the database to handle these efficiently. Additionally, we also needed to be able to run more complex ad hoc queries, like getting daily summaries of each table so that higher-level problem areas could be more easily tracked and spotted in the network. These queries, however, were less time sensitive and could be run on an ad hoc, batch-like basis where responsiveness wasn’t as important.

The schema fields themselves were more or less one-to-one mappings from the respective Parquet schemas. The challenge came, however, in picking partition keys and sorting columns. For partition keys, we identified a logical device grouping column present in both our tables as the one column we were likely to join on. This seemed like a natural fit to partition on and had good enough cardinality that our distribution would be adequate.

For the sorting keys, we knew we’d be searching by the device identifier and the logical grouping; for the respective tables, and we knew we’d be searching temporally. So the primary identifier column of each table and the timestamp made sense to sort on. The documented sort key order suggestion was to use the timestamp column as the first value in the sort key, because it could provide dataset filtering on a specific time period. This initially worked well enough and we were able to get a performance improvement over Athena, but as we scaled and added more data, our raw record retrieval queries were rapidly slowing down. To help with this, we made two adjustments.

The first adjustment came with a change to the sort key. The first part of this involved swapping the order of the timestamp and the primary identifier column. This allowed us to filter down to the device and then search through the range of timestamps on just that device, skipping over all irrelevant devices. This provided significant performance gains and cut our raw record query times by several multiples. The second part of the sort key adjustment involved adding another column (a node-level identifier) to the beginning of the sort key. This allowed us to have one more level of data filtering, which further improved raw record query times.

One trade-off made while making these sort key adjustments was that our more complex aggregation queries had a noticeable decline in performance. This was because they were typically run across the entire footprint of devices and could no longer filter as easily based on time being the first column in the sort key. Fortunately, because these were less frequent and could be run offline if necessary, this performance trade-off was considered acceptable.

If the frequency of these workloads increases, we can use materialized views in Amazon Redshift, which can help avoid unnecessary reruns of the complex aggregations if minimal-to-no data changes in the underlying base tables have occurred since the last run.

The final adjustment was cluster scaling. We chose to use the Amazon Redshift next-generation RA3 nodes for a number of benefits, but three especially key benefits:

  • RA3 clusters allow for practically unlimited storage in our cluster.
  • The RA3 ability to scale storage and compute independently paired really well with our expectations and use cases. We fully expected our Amazon Redshift storage footprint to continue to grow, as well as the number, shape, and sizes of our use cases and users, but data and workloads wouldn’t necessarily grow in lockstep. Being able to scale the cluster’s compute power independent of storage (or vice versa) was a key technical requirement and cost-optimization for us.
  • RA3 clusters come with Amazon Redshift managed storage, which places the burden on Amazon Redshift to automatically situate data based on its temperature for consistently peak performance. With managed storage, hot data was cached on a large local SSD cache in each node, and cold data was kept in the Amazon Redshift persistent store on Amazon S3.

After conducting performance benchmarks, we determined that our cluster was under-powered for the amount of data and workloads it was serving, and we would benefit from greater distribution and parallelism (compute power). We easily resized our Amazon Redshift cluster to double the number of nodes within minutes, and immediately saw a significant performance boost. With this, we were able to recognize that as our data and workloads scaled, so too should our cluster.

Looking forward, we expect that there will be a relatively small population of ad hoc and experimental workloads that will require access to additional datasets sitting in our data lake, outside of Amazon Redshift in our data lake—workloads similar to the Athena workloads we previously observed. To serve that small customer base, we can leverage Amazon Redshift Spectrum, which empowers users to run SQL queries on external tables in our data lake, similar to SQL queries on any other table within Amazon Redshift, while allowing us to keep costs as lean as possible.

This final architecture provided us with the solid foundation of price, performance, and flexibility for our current set of analytical use cases—and, just as important, the future use cases that haven’t shown themselves yet.

Summary

This post details how Comcast leveraged AWS data store technologies to prototype and scale the serving and analysis of large-scale telemetry data. We hope to continue to scale the solution as our customer base grows. We’re currently working on identifying more telemetry-related metrics to give us increased insight into our network and deliver the best quality of experience possible to our customers.


About the Authors

Russell Harlin is a Senior Software Engineer at Comcast based out of the San Francisco Bay Area. He works in the Network and Communications Engineering group designing and implementing data streaming and analytics solutions.


Asser Moustafa is an Analytics Specialist Solutions Architect at AWS based out of Dallas, Texas. He advises customers in the Americas on their Amazon Redshift and data lake architectures and migrations, starting from the POC stage to actual production deployment and maintenance


Amit Kalawat is a Senior Solutions Architect at Amazon Web Services based out of New York. He works with enterprise customers as they transform their business and journey to the cloud.

Expiring Amazon S3 Objects Based on Last Accessed Date to Decrease Costs

Post Syndicated from Hareesh Singireddy original https://aws.amazon.com/blogs/architecture/expiring-amazon-s3-objects-based-on-last-accessed-date-to-decrease-costs/

Organizations are using Amazon Simple Storage Service (S3) for building their data lakes, websites, mobile applications, and enterprise applications. As the number of objects within your S3 bucket increases, you may want to move older objects into lower-cost tiers of Amazon S3. In some cases you may want to delete the objects altogether to further reduce S3 storage costs. A common practice is to use S3 Lifecycle rules to achieve this. These rules can be applied to objects based on their creation date. In certain situations, you may want to keep objects available that are still being accessed, but transition or delete objects that are no longer in use.

In this post, we will demonstrate how you can create custom object expiry rules for Amazon S3 based on the last accessed date of the object. We will first walk through the various features used within the workflow, followed by an architecture diagram outlining the process flow.

Amazon S3 server access logging

S3 Server access logging provides detailed records of the requests that are made to objects in Amazon S3 buckets. Amazon S3 periodically collects access log records, consolidates the records in log files, and then uploads log files to your target bucket as log objects. Each log record consists of information such as bucket name, the operation in the request, and the time at which the request was received. S3 Server Access Log Format provides more details about the format of the log file.

Amazon S3 inventory

Amazon S3 inventory provides a list of your objects and the corresponding metadata on a daily or weekly basis, for an S3 bucket or a shared prefix. The inventory lists are stored as a comma-separated value (CSV) file compressed with GZIP, as an Apache optimized row columnar (ORC) file compressed with ZLIB, or as an Apache Parquet file compressed with Snappy.

Amazon S3 Lifecycle

Amazon S3 Lifecycle policies help you manage your objects through two types of actions, Transition and Expiration. In the architecture shown following in Figure 1, we create an S3 Lifecycle configuration rule that expires objects after ‘x’ days. It has a filter for an object tag of “delete=True”. You can configure the value of ‘x’ based on your requirements.

If you are using an S3 bucket to store short lived objects with unknown access patterns, you might want to keep the objects that are still being accessed, but delete the rest. This will let you retain objects in your S3 bucket even after their expiry date as per the S3 lifecycle rules, while saving you costs by deleting objects that are not needed anymore. The following diagram shows an architecture that considers the last accessed date of the object before deleting S3 objects.

Figure 1. Object expiry architecture flow

Figure 1. Object expiry architecture flow

This architecture uses native S3 features mentioned earlier in combination with other AWS services to achieve the desired outcome.

Here is the architecture flow:

  1. The S3 server access logs capture S3 object requests. These are generated and stored in the target S3 bucket.
  2. An S3 inventory report is generated for the source bucket daily. It is written to the S3 inventory target bucket.
  3. An Amazon EventBridge rule is configured that will initiate an AWS Lambda function once a day, or as desired.
  4. The Lambda function initiates an S3 Batch Operation job to tag objects in the source bucket. These must be expired using the following logic:
    • Capture the number of days (x) configuration from the S3 Lifecycle configuration.
    • Run an Amazon Athena query that will get the list of objects from the S3 inventory report and server access logs. Create a delta list with objects that were created earlier than ‘x’ days, but not accessed during that time.
    • Write a manifest file with the list of these objects to an S3 bucket.
    • Create an S3 Batch operation job that will tag all objects in the manifest file with a tag of “delete=True”.
  5. The Lifecycle rule on the source S3 bucket will expire all objects that were created prior to ‘x’ days. They will have the tag given via the S3 batch operation of “delete=True”.

The preceding architecture is built for fault tolerance. If a particular run fails, all the objects that must be expired will be picked up during the next run. You can configure error handling and automatic retries in your Lambda function. An Amazon Simple Notification Service (SNS) topic will send out a notification in the event of a failure.

Cost considerations

S3 server access logs, S3 inventory lists, and manifest files can accumulate many objects over time. We recommend you configure an S3 Lifecycle policy on the target bucket to periodically delete older objects. Although following the guidelines in this post can decrease some of your costs, S3 requests, S3 inventory, S3 Object Tagging, and Lifecycle transitions also have costs associated with them. Additional details can be found on the S3 pricing page.

Amazon Athena charges you based on the amount of data scanned by each query. But Amazon S3 inventory can also output files in Apache ORC or Apache Parquet format, which can reduce the amount data scanned by Athena. The Athena pricing page would be helpful to review.

AWS Lambda has a free usage tier of 1M free requests per month and 400,000 GB-seconds of compute time per month. However, you are charged based on the number of requests, the amount of memory allocated, and the runtime duration of the function. See more at the Lambda pricing page.

Conclusion

In this blog post, we showed how you can create a custom process to delete objects from your S3 bucket based on the last time the object was accessed. You can use this architecture to customize your object transitions, clean up your S3 buckets for any unnecessary objects, and keep your S3 buckets cost-effective. This architecture can also be used on versioned S3 buckets with some minor modifications.

We hope you found this blog post useful and welcome your feedback!

Read more about queries, rules, and tags:

How GE Healthcare modernized their data platform using a Lake House Architecture

Post Syndicated from Krishna Prakash original https://aws.amazon.com/blogs/big-data/how-ge-healthcare-modernized-their-data-platform-using-a-lake-house-architecture/

GE Healthcare (GEHC) operates as a subsidiary of General Electric. The company is headquartered in the US and serves customers in over 160 countries. As a leading global medical technology, diagnostics, and digital solutions innovator, GE Healthcare enables clinicians to make faster, more informed decisions through intelligent devices, data analytics, applications, and services, supported by its Edison intelligence platform.

GE Healthcare’s legacy enterprise analytics platform used a traditional Postgres based on-premise data warehouse from a big data vendor to run a significant part of its analytics workloads. The data warehouse is key for GE Healthcare; it enables users across units to gather data and generate the daily reports and insights required to run key business functions. In the last few years, the number of teams accessing the cluster increased by almost three times, with twice the initial number of users running four times the number of daily queries for which the cluster had been designed. The legacy data warehouse wasn’t able to scale to support GE Healthcare’s business needs and would require significant investment to maintain, update, and secure.

Searching for a modern data platform

After working for several years in a database-focused approach, the rapid growth in the data made the GEHC’s on-prem system unviable from a cost and maintenance perspective. This presented GE Healthcare with an opportunity to take a holistic look at the emerging and strategic needs for data and analytics. With this in mind, GE Healthcare decided to adopt a Lake House Architecture using AWS services:

  • Use Amazon Simple Storage Service (Amazon S3) to store raw enterprise and event data
  • Use familiar SQL statements to combine and process data across all data stores in Amazon S3 and Amazon Redshift
  • Apply the “best fit” concept of using the appropriate AWS technology to meet specific business needs

Architecture

The following diagram illustrates GE Healthcare’s architecture.

Choosing Amazon Redshift for the enterprise cloud data warehouse

Choosing the right data store is just as important as how you collect the data for analytics. Amazon Redshift provided the best value because it was easy to launch, access, and store data, and could scale to meet our business needs on demand. The following are a few additional reasons for why GE Healthcare made Amazon Redshift our cloud data warehouse:

  • The ability to store petabyte-scale data in Amazon S3 and query the data in Amazon S3 and Amazon Redshift with little preprocessing was important because GE Healthcare’s data needs are expanding at a significant pace.
  • The AWS based strategy provides financial flexibility. GE Healthcare moved from a fixed cost/fixed asset on-premises model to a consumption-based model. In addition, the total cost of ownership (TCO) of the AWS based architecture was less than the solution it was replacing.
  • Native integration with the AWS Analytics ecosystem made it easier to handle end-to-end analytics workflows without friction. GE Healthcare took a hybrid approach to extract, transform, and load (ETL) jobs by using a combination of AWS Glue, Amazon Redshift SQL, and stored procedures based on complexity, scale, and cost.
  • The resilient platform makes recovery from failure easier, with errors further down the pipeline less likely to affect production environments because all historical data is on Amazon S3.
  • The idea of a Lake House Architecture is that taking a one-size-fits-all approach to analytics eventually leads to compromises. It’s not simply about integrating a data lake with a data warehouse, but rather about integrating a data lake, a data warehouse, and purpose-built data stores and enabling unified governance and easy data movement. (For more information about the Lake House Architecture, see Harness the power of your data with AWS Analytics.)
  • It’s easy to implement new capabilities to support emerging business needs such as artificial intelligence, machine learning, graph databases, and more because of the extensive product capabilities of AWS and the Amazon Redshift Lake House Architecture.

Implementation steps and best practices

As part of this journey, GE Healthcare partnered with AWS Professional Services to accelerate their momentum. AWS Professional Services was instrumental in following the Working Backwards (WB) process, which is Amazon’s customer-centric product development process.

Here’s how it worked:

  • AWS Professional Services guided GE Healthcare and partner teams through the Lake House Architecture, sharing AWS standards and best practices.
  • The teams accelerated Amazon Redshift stored procedure migration, including data structure selection and table design.
  • The teams delivered performant code at scale to enable a timely go live.
  • They implemented a framework for batch file extract to support downstream data consumption via a data as a service (DaaS) solution.

Conclusion

Modernizing to a Lake House Architecture with Amazon Redshift allowed GEHC to speed up, innovate faster, and better solve customers’ needs. At the time of writing, GE Healthcare workloads are running at full scale in production. We retired our on-premises infrastructure. Amazon Redshift RA3 instances with managed storage enabled us to scale compute and storage separately based on our customers’ needs. Furthermore, with the concurrency scaling feature of Amazon Redshift, we don’t have to worry about peak times affecting user performance any more. Amazon Redshift scales out and in automatically.

We also look forward to realizing the benefits of Amazon Redshift data sharing and AQUA (Advanced Query Accelerator) for Amazon Redshift as we continue to increase the performance and scale of our Amazon Redshift data warehouse. We appreciate AWS’s continual innovation on behalf of its customers.


About the Authors

Krishna Prakash (KP) Bhat is a Sr. Director in Data & Analytics at GE Healthcare. In this role, he’s responsible for architecture and data management of data and analytics solutions within GE Healthcare Digital Technologies Organization. In his spare time, KP enjoys spending time with family. Connect him on LinkedIn.


Suresh Patnam is a Solutions Architect at AWS, specialized in big data and AI/ML. He works with customers in their journey to the cloud with a focus on big data, data lakes, and AI/ML. In his spare time, Suresh enjoys playing tennis and spending time with his family. Connect him on LinkedIn.

Building a serverless multiplayer game that scales: Part 2

Post Syndicated from James Beswick original https://aws.amazon.com/blogs/compute/building-a-serverless-multiplayer-game-that-scales-part-2/

This post is written by Vito De Giosa, Sr. Solutions Architect and Tim Bruce, Sr. Solutions Architect, Developer Acceleration.

This series discusses solutions for scaling serverless games, using the Simple Trivia Service, a game that relies on user-generated content. Part 1 describes the overall architecture, how to deploy to your AWS account, and different communications methods.

This post discusses how to scale via automation and asynchronous processes. You can use automation to minimize the need to scale personnel to review player-generated content for acceptability. It also introduces asynchronous processing, which allows you to run non-critical processes in the background and batch data together. This helps to improve resource usage and game performance. Both scaling techniques can also reduce overall spend.

To set up the example, see the instructions in the GitHub repo and the README.md file. This example uses services beyond the AWS Free Tier and incurs charges. Instructions to remove the example application from your account are also in the README.md file.

Technical implementation

Games require a mechanism to support auto-moderated avatars. Specifically, this is an upload process to allow the player to send the content to the game. There is a content moderation process to remove unacceptable content and a messaging process to provide players with a status regarding their content.

Here is the architecture for this feature in Simple Trivia Service, which is combined within the avatar workflow:

Architecture diagram

This architecture processes images uploaded to Amazon S3 and notifies the user of the processing result via HTTP WebPush. This solution uses AWS Serverless services and the Amazon Rekognition moderation API.

Uploading avatars

Players start the process by uploading avatars via the game client. Using presigned URLs, the client allows players to upload images directly to S3 without sharing AWS credentials or exposing the bucket publicly.

The URL embeds all the parameters of the S3 request. It includes a SignatureV4 generated with AWS credentials from the backend allowing S3 to authorize the request.

S3 upload process

  1. The front end retrieves the presigned URL invoking an AWS Lambda function through an Amazon API Gateway HTTP API endpoint.
  2. The front end uses the URL to send a PUT request to S3 with the image.

Processing avatars

After the upload completes, the backend performs a set of activities. These include content moderation, generating the thumbnail variant, and saving the image URL to the player profile. AWS Step Functions orchestrates the workflow by coordinating tasks and integrating with AWS services, such as Lambda and Amazon DynamoDB. Step Functions enables creating workflows without writing code and handles errors, retries, and state management. This enables traffic control to avoid overloading single components when traffic surges.

The avatar processing workflow runs asynchronously. This allows players to play the game without being blocked and enables you to batch the requests. The Step Functions workflow is triggered from an Amazon EventBridge event. When the user uploads an image to S3, an event is published to EventBridge. The event is routed to the avatar processing Step Functions workflow.

The single avatar feature runs in seconds and uses Step Functions Express Workflows, which are ideal for high-volume event-processing use cases. Step Functions can also support longer running processes and manual steps, depending on your requirements.

To keep performance at scale, the solution adopts four strategies. First, it moderates content automatically, requiring no human intervention. This is done via Amazon Rekognition moderation API, which can discover inappropriate content in uploaded avatars. Developers do not need machine learning expertise to use this API. If it identifies unacceptable content, the Step Functions workflow deletes the uploaded picture.

Second, it uses avatar thumbnails on the top navigation bar and on leaderboards. This speeds up page loading and uses less network bandwidth. Image-editing software runs in a Lambda function to modify the uploaded file and store the result in S3 with the original.

Third, it uses Amazon CloudFront as a content delivery network (CDN) with the S3 bucket hosting images. This improves performance by implementing caching and serving static content from locations closer to the player. Additionally, using CloudFront allows you to keep the bucket private and provide greater security for the content stored within S3.

Finally, it stores profile picture URLs in DynamoDB and replicates the thumbnail URL in an Amazon Cognito user attribute named picture. This allows the game to retrieve the avatar URL as part of the login process, saving an HTTP GET request for the player profile.

The last step of the workflow publishes the result via an event to EventBridge for downstream systems to consume. The service routes the event to the notification component to inform the player about the moderation status.

Notifying users of the processing result

The result of the avatar workflow to the player is important but not urgent. Players want to know the result but not impact their gameplay experience. A solution for this challenge is to use HTTP web push. It uses the HTTP protocol and does not require a constant communication channel between backend and front end. This allows players to play games without being blocked or by introducing latency to the game communications channel.

Applications requiring low latency fully bidirectional communication, such as highly interactive multi-player games, typically use WebSockets. This creates a persistent two-way channel for front end and backend to exchange information. The web push mechanism can provide non-urgent data and messages to the player without interrupting the WebSockets channel.

The web push protocol describes how to use a consolidated push service as a broker between the web-client and the backend. It accepts subscriptions from the client and receives push message delivery requests from the backend. Each browser vendor provides a push service implementation that is compliant with the W3C Push API specification and is external to both client and backend.

The web client is typically a browser where a JavaScript application interacts with the push service to subscribe and listen for incoming notifications. The backend is the application that notifies the front end. Here is an overview of the protocol with all the parties involved.

Notification process

  1. A component on the client subscribes to the configured push service by sending an HTTP POST request. The client keeps a background connection waiting for messages.
  2. The push service returns a URL identifying a push resource that the client distributes to backend applications that are allowed to send notifications.
  3. Backend applications request a message delivery by sending an HTTP POST request to the previously distributed URL.
  4. The push service forwards the information to the client.

This approach has four advantages. First, it reduces the effort to manage the reliability of the delivery process by off-loading it to an external and standardized component. Second, it minimizes cost and resource consumption. This is because it doesn’t require the backend to keep a persistent communication channel or compute resources to be constantly available. Third, it keeps complexity to a minimum because it relies on HTTP only without requiring additional technologies. Finally, HTTP web push addresses concepts such as message urgency and time-to-live (TTL) by using a standard.

Serverless HTTP web push

The implementation of the web push protocol requires the following components, per the Push API specification. First, the front end is required to create a push subscription. This is implemented through a service worker, a script running in the origin of the application. The service worker exposes operations to access the push service either creating subscriptions or listening for push events.

Serverless HTTP web push

  1. The client uses the service worker to subscribe to the push service via the Push API.
  2. The push service responds with a payload including a URL, which is the client’s push endpoint. The URL is used to create notification delivery requests.
  3. The browser enriches the subscription with public cryptographic keys, which are used to encrypt messages ensuring confidentiality.
  4. The backend must receive and store the subscription for when a delivery request is made to the push service. This is provided by API Gateway, Lambda, and DynamoDB. API Gateway exposes an HTTP API endpoint that accepts POST requests with the push service subscription as payload. The payload is stored in DynamoDB alongside the player identifier.

This front end code implements the process:

//Once service worker is ready
navigator.serviceWorker.ready
  .then(function (registration) {
    //Retrieve existing subscription or subscribe
    return registration.pushManager.getSubscription()
      .then(async function (subscription) {
        if (subscription) {
          console.log('got subscription!', subscription)
          return subscription;
        }
        /*
         * Using Public key of our backend to make sure only our
         * application backend can send notifications to the returned
         * endpoint
         */
        const convertedVapidKey = self.vapidKey;
        return registration.pushManager.subscribe({
          userVisibleOnly: true,
          applicationServerKey: convertedVapidKey
        });
      });
  }).then(function (subscription) {
    //Distributing the subscription to the application backend
    console.log('register!', subscription);
    const body = JSON.stringify(subscription);
    const parms = {jwt: jwt, playerName: playerName, subscription: body};
    //Call to the API endpoint to save the subscription
    const res = DataService.postPlayerSubscription(parms);
    console.log(res);
  });


Next, the backend reacts to the avatar workflow completed custom event to create a delivery request. This is accomplished with EventBridge and Lambda.

Backend process after avater workflow completed

  1. EventBridge routes the event to a Lambda function.
  2. The function retrieves the player’s agent subscriptions, including push endpoint and encryption keys, from DynamoDB.
  3. The function sends an HTTP POST to the push endpoint with the encrypted message as payload.
  4. When the push service delivers the message, the browser activates the service worker updating local state and displaying the notification.

The push service allows creating delivery requests based on the knowledge of the endpoint and the front end allows the backend to deliver messages by distributing the endpoint. HTTPS provides encryption for data in transit while DynamoDB encrypts all your data at rest to provide confidentiality and security for the endpoint.

Security of WebPush can be further improved by using Voluntary Application Server Identification (VAPID). With WebPush, the clients authenticate messages at delivery time. VAPID allows the push service to perform message authentication on behalf of the web client avoiding denial-of-service risk. Without the additional security of VAPID, any application knowing the push service endpoint might successfully create delivery requests with an invalid payload. This can cause the player’s agent to accept messages from unauthorized services and, possibly, cause a denial-of-service to the client by overloading its capabilities.

VAPID requires backend applications to own a key pair. In Simple Trivia Service, a Lambda function, which is an AWS CloudFormation custom resource, generates the key pair when deploying the stack. It securely saves values in AWS System Manager (SSM) Parameter Store.

Here is a representation of VAPID in action:

VAPID process architecture

  1. The front end specifies which backend the push service can accept messages from. It does this by including the public key from VAPID in the subscription request.
  2. When requesting a message delivery, the backend self-identifies by including the public key and a token signed with the private key in the HTTP Authorization header. If the keys match and the client uses the public key at subscription, the message is sent. If not, the message is blocked by the push service.

The Lambda function that sends delivery requests to the push service reads the key values from SSM. It uses them to generate the Authorization header to include in the request, allowing for successful delivery to the client endpoint.

Conclusion

This post shows how you can add scaling support for a game via automation. The example uses Amazon Rekognition to check images for unacceptable content and uses asynchronous architecture patterns with Step Functions and HTTP WebPush. These scaling approaches can help you to maximize your technical and personnel investments.

For more serverless learning resources, visit Serverless Land.

Strengthen the security of sensitive data stored in Amazon S3 by using additional AWS services

Post Syndicated from Jerry Mullis original https://aws.amazon.com/blogs/security/strengthen-the-security-of-sensitive-data-stored-in-amazon-s3-by-using-additional-aws-services/

In this post, we describe the AWS services that you can use to both detect and protect your data stored in Amazon Simple Storage Service (Amazon S3). When you analyze security in depth for your Amazon S3 storage, consider doing the following:

Using these additional AWS services along with Amazon S3 can improve your security posture across your accounts.

Audit and restrict Amazon S3 access with IAM Access Analyzer

IAM Access Analyzer allows you to identify unintended access to your resources and data. Users and developers need access to Amazon S3, but it’s important for you to keep users and privileges accurate and up to date.

Amazon S3 can often house sensitive and confidential information. To help secure your data within Amazon S3, you should be using AWS Key Management Service (AWS KMS) with server-side encryption at rest for Amazon S3. It is also important that you secure the S3 buckets so that you only allow access to the developers and users who require that access. Bucket policies and access control lists (ACLs) are the foundation of Amazon S3 security. Your configuration of these policies and lists determines the accessibility of objects within Amazon S3, and it is important to audit them regularly to properly secure and maintain the security of your Amazon S3 bucket.

IAM Access Analyzer can scan all the supported resources within a zone of trust. Access Analyzer then provides you with insight when a bucket policy or ACL allows access to any external entities that are not within your organization or your AWS account’s zone of trust.

To setup and use IAM Access Analyzer, follow the instructions for Enabling Access Analyzer in the AWS IAM User Guide.

The example in Figure 1 shows creating an analyzer with the zone of trust as the current account, but you can also create an analyzer with the organization as the zone of trust.

Figure 1: Creating IAM Access Analyzer and zone of trust

Figure 1: Creating IAM Access Analyzer and zone of trust

After you create your analyzer, IAM Access Analyzer automatically scans the resources in your zone of trust and returns the findings from your Amazon S3 storage environment. The initial scan shown in Figure 2 shows the findings of an unsecured S3 bucket.

Figure 2: Example of unsecured S3 bucket findings

Figure 2: Example of unsecured S3 bucket findings

For each finding, you can decide which action you would like to take. As shown in figure 3, you are given the option to archive (if the finding indicates intended access) or take action to modify bucket permissions (if the finding indicates unintended access).

Figure 3: Displays choice of actions to take

Figure 3: Displays choice of actions to take

After you address the initial findings, Access Analyzer monitors your bucket policies for changes, and notifies you of access issues it finds. Access Analyzer is regional and must be enabled in each AWS Region independently.

Classify and secure sensitive data with Macie

Organizational compliance standards often require the identification and securing of sensitive data. Your organization’s sensitive data might contain personally identifiable information (PII), which includes things such as credit card numbers, birthdates, and addresses.

Macie is a data security and privacy service offered by AWS that uses machine learning and pattern matching to discover the sensitive data stored within Amazon S3. You can define your own custom type of sensitive data category that might be unique to your business or use case. Macie will automatically provide an inventory of S3 buckets and alert you of unprotected sensitive data.

Figure 4 shows a sample result from a Macie scan in which you can see important information regarding Amazon S3 public access, encryption settings, and sharing.

Figure 4: Sample results from a Macie scan

Figure 4: Sample results from a Macie scan

In addition to finding potential sensitive data, Macie also gives you a severity score based on the privacy risk, as shown in the example data in Figure 5.

Figure 5: Example Macie severity scores

Figure 5: Example Macie severity scores

When you use Macie in conjunction with AWS Step Functions, you can also automatically remediate any issues found. You can use this combination to help meet regulations such as General Data Protection Regulation (GDPR) and Health Insurance Portability and Accountability Act (HIPAA). Macie allows you to have constant visibility of sensitive data within your Amazon S3 storage environment.

When you deploy Macie in a multi-account configuration, your usage is rolled up to the master account to provide the total usage for all accounts and a breakdown across the entire organization.

Detect malicious access patterns with GuardDuty

Your customers and users can commit thousands of actions each day on S3 buckets. Discerning access patterns manually can be extremely time consuming as the volume of data increases. GuardDuty uses machine learning, anomaly detection, and integrated threat intelligence to analyze billions of events across multiple accounts and uses data collected in AWS CloudTrail logs for S3 data events as well as S3 access logs, VPC Flow Logs, and DNS logs. GuardDuty can be configured to analyze these logs and notify you of suspicious activity, such as unusual data access patterns, unusual discovery API calls, and more. After you receive a list of findings on these activities, you will be able to make informed decisions to secure your S3 buckets.

Figure 6 shows a sample list of findings returned by GuardDuty which shows the finding type, resource affected, and count of occurrences.

Figure 6: Example GuardDuty list of findings

Figure 6: Example GuardDuty list of findings

You can select one of the results in Figure 6 to see the IP address and details associated from this potential malicious IP caller, as shown in Figure 7.

Figure 7: GuardDuty Malicious IP Caller detailed findings

Figure 7: GuardDuty Malicious IP Caller detailed findings

Monitor and remediate configuration changes with AWS Config

Configuration management is important when securing Amazon S3, to prevent unauthorized users from gaining access. It is important that you monitor the configuration changes of your S3 buckets, whether the changes are intentional or unintentional. AWS Config can track all configuration changes that are made to an S3 bucket. For example, if an S3 bucket had its permissions and configurations unexpectedly changed, using AWS Config allows you to see the changes made, as well as who made them.

With AWS Config, you can set up AWS Config managed rules that serve as a baseline for your S3 bucket. When any bucket has configurations that deviate from this baseline, you can be alerted by Amazon Simple Notification Service (Amazon SNS) of the bucket being noncompliant.

AWS Config can be used in conjunction with a service called AWS Lambda. If an S3 bucket is noncompliant, AWS Config can trigger a preprogrammed Lambda function and then the Lambda function can resolve those issues. This combination can be used to reduce your operational overhead in maintaining compliance within your S3 buckets.

Figure 8 shows a sample of AWS Config managed rules selected for configuration monitoring and gives a brief description of what the rule does.

Figure 8: Sample selections of AWS Managed Rules

Figure 8: Sample selections of AWS Managed Rules

Figure 9 shows a sample result of a non-compliant configuration and resource inventory listing the type of resource affected and the number of occurrences.

Figure 9: Example of AWS Config non-compliant resources

Figure 9: Example of AWS Config non-compliant resources

Conclusion

AWS has many offerings to help you audit and secure your storage environment. In this post, we discussed the particular combination of AWS services that together will help reduce the amount of time and focus your business devotes to security practices. This combination of services will also enable you to automate your responses to any unwanted permission and configuration changes, saving you valuable time and resources to dedicate elsewhere in your organization.

For more information about pricing of the services mentioned in this post, see AWS Free Tier and AWS Pricing. For more information about Amazon S3 security, see Amazon S3 Preventative Security Best Practices in the Amazon S3 User Guide.

If you have feedback about this post, submit comments in the Comments section below.

Want more AWS Security how-to content, news, and feature announcements? Follow us on Twitter.

Author

Jerry Mullis

Jerry is an Associate Solutions Architect at AWS. His interests are in data migration, machine learning, and device automation. Jerry has previous experience in machine learning research and healthcare management. His certifications include AWS Solutions Architect Pro, AWS Developer Associate, AWS Sysops Admin Associate and AWS Certified Cloud Practitioner. In his free time, Jerry enjoys hiking, playing basketball, and spending time with his wife.

Author

Dave Geyer

Dave is an Associate Solutions Architect at AWS. He has a background in data management and organizational design, and is interested in data analytics and infrastructure security. Dave has advised and worked for customers in the commercial and public sectors, providing them with architectural best practices and recommendations. Dave is interested in the aerospace and financial services industries. Outside of work, he is an adrenaline junkie, and is passionate about mountaineering and high altitudes.

Author

Andrew Chen

Andrew is an Associate Solutions Architect with an interest in data analytics, machine learning, and virtualization of infrastructure. Andrew has previous experience in management consulting in which he worked as a technical lead for various cloud migration projects. In his free time, Andrew enjoys fishing, hiking, kayaking, and keeping up with financial markets.