Post Syndicated from Chris Morris original https://aws.amazon.com/blogs/security/how-to-configure-and-verify-acm-certificates-with-trust-stores/
In this post, we show how to configure customer trust stores to work with public certificates issued through AWS Certificate Manager (ACM). Organizations can encounter challenges when configuring trust stores for ACM certificates and incorrect trust store configuration can lead to SSL/TLS errors and application downtime. While most modern web browsers and operating systems trust ACM certificates by default, understanding how this trust is established and verifying proper configuration is important for IT professionals and developers. We also describe the relationship between public certificates issued through ACM and Amazon Trust Services. Whether you’re developing applications that connect to endpoints using ACM certificates or managing systems with customer trust stores that need to trust ACM certificates, this guide will provide you with insight regarding ACM certificate trust.
Background
ACM is a managed service that you can use to provision, manage, and deploy public and private SSL/TLS certificates. When you visit a website over HTTPS that has an ACM certificate, most modern web browsers will show a Connection is secure message in the address bar. This indicates that the web browser trusted the certificate. ACM certificates are trusted by popular browsers such as Chrome, Firefox, and Safari because they are issued by Amazon Trust Services, a public certificate authority (CA) managed by Amazon, whose root CA certificates are included by default in most web browsers’ and operating systems’ trust stores.
What is a trust store?
Web browsers, devices, and applications trust a collection of certificates known as CA certificates. These collections of CA certificates are called trust stores. Most often, the CA certificates in a trust store are root CA certificates. Root CA certificates are CA certificates that act as the foundation of trust. It’s best practice that root CAs issue intermediate CA certificates, which then issue end-entity certificates to minimize interaction with the root CA. When navigating to a website protected with HTTPS using a web browser, the website will present the end-entity certificate and the certificate chain. The certificate chain is a series of certificates, each issued by the next, leading back to a root CA certificate. The web browser will then check the end-entity certificate. It will make sure it’s derived from a root certificate that is in its trust store. It is important to note that trust store configurations can vary depending on the web browser, device or application.
Amazon Trust Services
Amazon Trust Services is a publicly trusted CA that is managed by Amazon. Amazon Trust Services root CA certificates are included in the trust stores of most web browsers and operating systems. As shown in Figure 1, when you request a public ACM certificate through DNS, Email, or HTTP validation, it will be issued by one of the multiple intermediate CAs that Amazon manages. These intermediate CAs are issued by one of the five Amazon Trust Services root CAs. Therefore, by trusting the Amazon Trust Services root CAs, you will be trusting ACM certificates. It’s important to note that ACM uses a dynamic intermediate CA model. This means you cannot predict which specific intermediate CA will issue an ACM certificate. The issuing intermediate CA is selected dynamically from a group of intermediate CAs at the time of certificate issuance. This means that the intermediate CA that issues ACM certificates is non-deterministic. In summary, we recommend customer trust stores include the five Amazon Trust Services root CA certificates. This includes Amazon Root CA 1, Amazon Root CA 2, Amazon Root CA 3, Amazon Root CA 4 and Starfield Services Root Certificate Authority – G2.
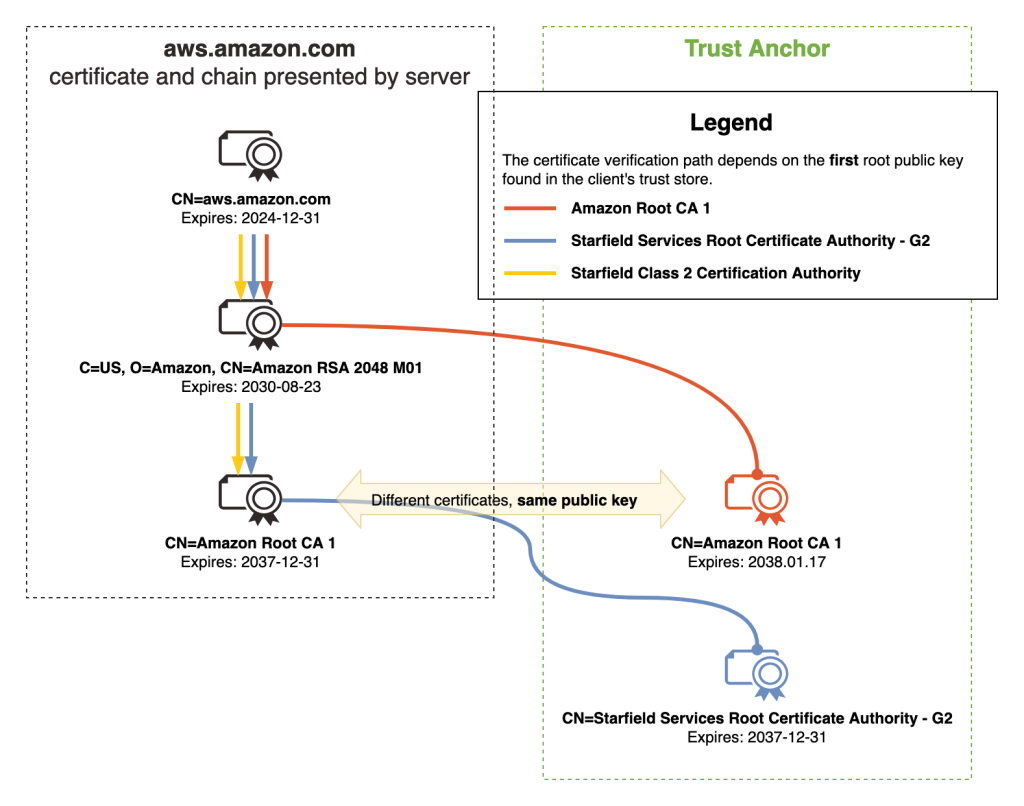
Figure 1 – ACM certificate chain
Best practices
To help establish reliable HTTPS connections to endpoints using ACM certificates, we recommend that your trust stores include the five Amazon root CAs.
| Distinguished name of Amazon root CA | SHA-256 hash of subject public key information | URL to root CA certificate in DER or PEM format |
| CN=Amazon Root CA 1,O=Amazon,C=US |
fbe3018031f9586bcbf41727e417b7d1c45c2f47f93be372a17b96b50757d5a2 | DER, PEM |
| CN=Amazon Root CA 2,O=Amazon,C=US |
7f4296fc5b6a4e3b35d3c369623e364ab1af381d8fa7121533c9d6c633ea2461 | DER, PEM |
| CN=Amazon Root CA 3,O=Amazon,C=US |
36abc32656acfc645c61b71613c4bf21c787f5cabbee48348d58597803d7abc9 | DER, PEM |
| CN=Amazon Root CA 4,O=Amazon,C=US |
f7ecded5c66047d28ed6466b543c40e0743abe81d109254dcf845d4c2c7853c5 | DER, PEM |
| CN=Starfield Services Root Certificate Authority – G2,O=Starfield Technologies\, Inc.,L=Scottsdale,ST=Arizona,C=US | 2b071c59a0a0ae76b0eadb2bad23bad4580b69c3601b630c2eaf0613afa83f92 | DER, PEM |
Adding the five Amazon root CAs provide maximum compatibility for trusting ACM certificates. If you must use certificate pinning in your application, we recommend that you pin to the public key of the mentioned root CAs.
While addressing the best practices, it is important to review how trust stores should not be configured.
Don’t limit your trust stores to only the intermediate CA certificates that issue ACM certificates. Examples of such intermediate CAs include Amazon RSA 2048 M01, Amazon RSA 2048 M02, Amazon RSA 2048 M03. Adding only these intermediate CA certificates to your trust store will introduce risk to your application. This is because of the dynamic intermediate CA (ICA) model. When an ACM certificate is issued or when it’s renewed, it will be from one of the many intermediate CAs. Furthermore, they are non-deterministic. If an ACM certificate was first issued by Amazon RSA 2048 M01, there is no guarantee that it will renew from that same intermediate CA.
In summary, here are the best practices for trusting ACM certificates.
- Add the five Amazon root CAs listed in Amazon Trust Services to your trust stores: Amazon Root CA 1 through 4 and Starfield Services Root Certificate Authority – G2.
- You should only add Amazon root CAs to your trust store, not their intermediate CAs or end-entity certificates. Because of the dynamic intermediate CA (ICA) model, installing only intermediate CAs or end-entity certificates will introduce risk to your trust store and application.
- Do not pin an ACM certificate (end-entity) or its intermediate CA certificate.
- If you require pinning, we recommend that you pin to the public key of the Amazon root CAs.
- For more information, see Trust Store and Pinning Recommendations and Certificate pinning problems.
- For OWASP guidance on certificate pinning, see Certificate and Public Key Pinning and Pinning Cheat Sheet.
- Do not modify Amazon root CA information in popular browsers and systems. By default, Amazon root CAs are already configured in most modern browsers, operating systems, and mobile devices.
- Additional best practices can be found in the ACM documentation.
How do I verify that the Amazon root CAs are in my trust store?
As mentioned in the previous section, most modern web browsers and operating systems already include the five Amazon root CAs in their respective trust stores by default. It’s still recommended to verify that the Amazon root CAs are installed correctly. It’s important to note that many applications have different trust store locations. For example, an application might use the Windows trust store location—Trusted Root Certification Authorities—as its trust store or it might use a PEM trust store in a custom directory. This is why we recommend that you review your application’s trust store documentation.
To verify, check your system’s trust store for existing Amazon root CA certificates. If they are not present, you can proceed with adding the five Amazon root CA certificates.
Windows: Check for the Amazon root CAs in Windows operating systems (GUI)
- Press Windows + R, enter certmgr.msc , then press Enter.
- Go to Trusted Root Certification Authorities and choose Certificates.
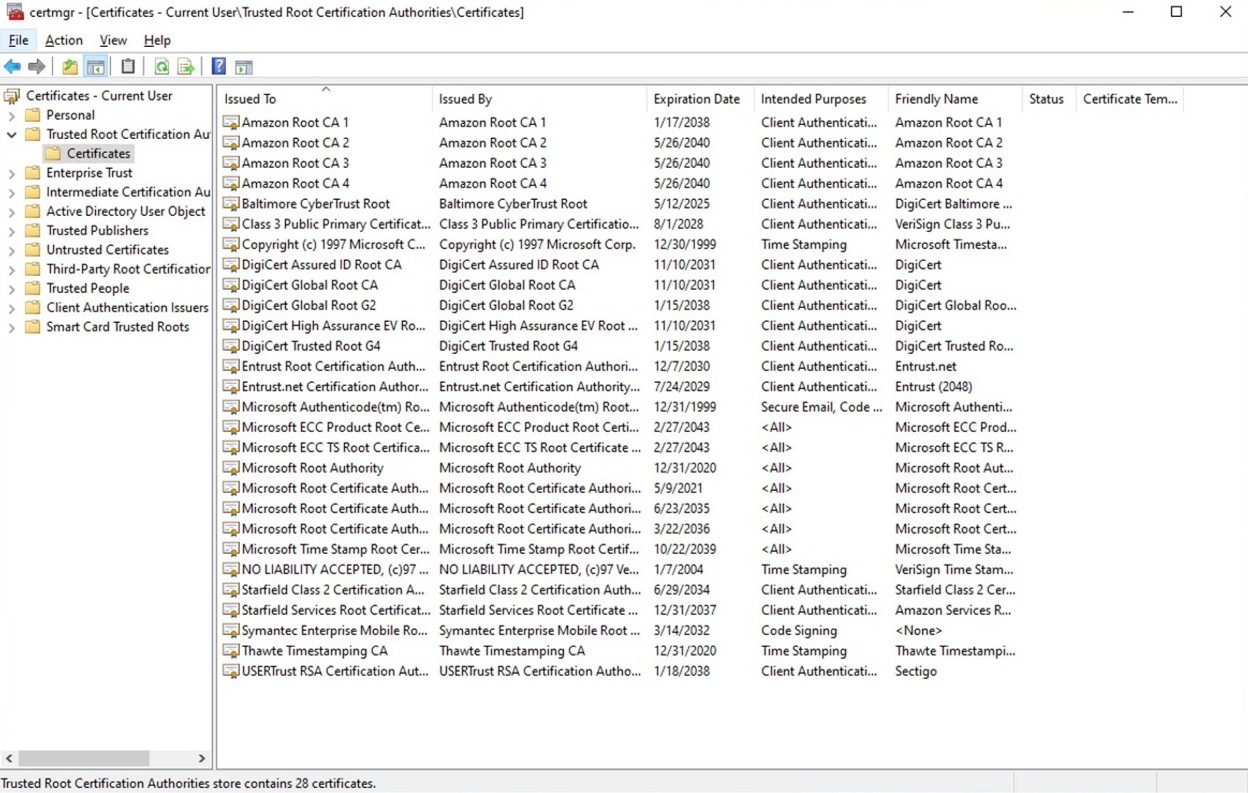
Figure 2: Windows certificate store: Trusted Root Certification Authorities
Check for the Amazon root CAs in Windows operating systems (CLI)
You can use Powershell to check for the Amazon root CAs. Use the certutil command.
- Open Windows Powershell and use the following
certutilcommands. These will search for the five Amazon root CAs.
Add Amazon root CAs to the default trust store using the UI
Download each Amazon Trust Services root CA. You can select the DER or PEM versions.
- Open Certmgr: Press Windows + R, enter certmgr.msc, and press Enter.
- Add to the trusted root:
- Choose Trusted Root Certification Authorities.
- Right-click Certificates.
- Select All Tasks and choose Import.
- Follow the Certificate Import Wizard:
- Choose Next.
- Browse to the root CA certificate file location. You might need to select All Files(*.*) to view the root CA certificate files.
- Select Place all certificates in the following store.
- Verify Trusted Root Certification Authorities is selected and choose Next.
- Choose Finish.
Add Amazon root CAs to the default trust store using the CLI
- Download each Amazon Trust Services root CA. You can select the DER or PEM versions.
- In Powershell, add a CA certificate to
AuthRootusingcertutil.
> certutil -addstore AuthRoot AmazonRootCA1.cer - In Powershell, verify that the certificate has been added.
> certutil -store AuthRoot | findstr /i "Amazon"
Amazon Linux 2023: Check for the Amazon root CAs in default trust store
The following is the default location for the system trust store in Amazon Linux 2023:
/etc/pki/tls/certs/ca-bundle.crt
1. Using OpenSSL, search for Amazon root CA certificates in the ca-bundle.crt bundle:
To add the Amazon root CAs to the default trust store
1. Navigate to the following directory for adding CA certificates
$ cd /etc/pki/ca-trust/source/anchors/
2. Using cURL, download each Amazon Trust Services root CA in the preceding folder. Do this for each of the Amazon root CAs replacing the name of the PEM file as needed.
$ sudo curl -O
 https://www.amazontrust.com/repository/AmazonRootCA1.pem
3. Add the root CAs by updating the system trust store.
$ sudo update-ca-trust extract
4. Verify that the bundle has been updated with OpenSSL.
$ openssl crl2pkcs7 -nocrl -certfile /etc/pki/tls/certs/ca-bundle.crt | openssl pkcs7 -print_certs -noout | grep -i "Amazon\|Starfield Services"
Java: Check for the Amazon root CAs in a Java trust store (Java Keystore)
Many custom Java applications use Java Keystore (JKS) as a trust store. You can use the keytool CLI tool to verify if the Amazon root CAs exist in your JKS trust store.
The output should show the Amazon root CAs listed as “trustedCertEntry” with those exact certificate fingerprints.
To add the Amazon root CAs to a Java trust store (Java Keytool)
1. Download each Amazon Trust Services root CA in PEM or DER format. Use the PowerShell command Invoke-WebRequest if you’re using Windows, or use cURL if you’re using a Linux-based operating system or MacOS.
> Invoke-WebRequest -Uri "https://www.amazontrust.com/repository/AmazonRootCA1.pem" -OutFile "AmazonRootCA1.pem"
$ curl -O https://www.amazontrust.com/repository/AmazonRootCA1.pem
2. Import the Amazon root CAs to the trust store—custom_truststore.jks. Replace changeit with your JKS password. Do this command for each of the Amazon root CAs, replacing the name of the root CA as needed.
$ keytool -importcert -alias "AmazonRootCA1" -file "AmazonRootCA1.pem" -keystore custom_truststore.jks -storepass changeit -trustcacerts -noprompt
Test your trust store configuration
After you have set up your trust store with the five Amazon root CA certificates, you can perform tests to confirm that the installed root CAs are correctly providing trust. Remember that your custom application might be sourcing its trust from a store other than the stores mentioned in this article. For custom applications, we recommend checking your testing documentation.
PEM
For operating systems or applications that use PEM certificate bundles, such as Amazon Linux 2023, you can use OpenSSL or cURL to test. For additional test URLs, see the Amazon Trust Services website. Replace CAbundle.pem with your certificate bundle.
$ openssl s_client -connect valid.rootca1.demo.amazontrust.com:443 -CAfile CAbundle.pem
$ curl -iv --cacert CAbundle.pem https://valid.rootca1.demo.amazontrust.com
Windows
Because Windows doesn’t use PEM certificate bundles, but a trust store in certmgr called Trusted Root Certification Authorities, you can use PowerShell to test.
1. Copy the following PowerShell script and save it in a file named ssl-connect.ps1.
2. Run the PowerShell script with the following command:
> .\ssl-connect.ps1
You can test with the other test URLs by passing them in -url:
> .\ssl-connect.ps1 -url https://s3.amazonaws.com
3. After running the command, you should see the subject and issuer of the end-entity certificate and the full trust chain, including the intermediate CA and root CA. If the command returns Certificate is valid and trusted, the certificate is trusted. If it returns an error with Certificate error, the error should tell you what went wrong.
Java
To test your Java applications that use JKS as a trust store, you can make HTTPS connections to endpoints that use Amazon Trust Services certificates.
1. Copy the Java code and name the file SSLTester.java.
- In the code, you can replace the
urlsvariable with additional URLs to test HTTPS. See the Amazon Trust Services website for additional test URLs. - Update
your_keystore.jksandyour passwordwith your JKS file path and password.
2. After you save the file, compile it and run.
javac SSLTester.java
java SSLTester.java
3. Check the output after it’s finished running.
- For Valid URLs, you should see
Connection successful: - For Revoked URLs, you should see
Certificate has been revoked: - For Expired URLs, you should see
Validity check failed:
Connection successful for https://valid.rootca1.demo.amazontrust.com/
failed: java.security.cert.CertPathValidatorException: Certificate has been revoked, reason: UNSPECIFIED
Failed for https://expired.rootca1.demo.amazontrust.com/: PKIX path validation failed: java.security.cert.CertPathValidatorException: validity check failed
Conclusion
When your web browser, device, or application performs HTTPS connections, it validates the certificate presented by the server using its trust store. A trust store is a collection of trusted CA certificates, primarily consisting of root CA certificates. When trusting endpoints using public certificates issued through ACM, best practice recommends installing the five Amazon Trust Services root CA certificates into your trust store. Be aware that trusting only the Amazon Trust Services intermediate CA certificates, such as Amazon RSA 2048 M01 and Amazon RSA 2048 M02, increases your application’s risk for outages. This is because of the non-deterministic nature of the dynamic intermediate CA (ICA) model. It’s worth noting that trust store configurations can vary across different applications. Furthermore, applications can also source their trust store from different locations. For example, you can have a Java application hosted on a Windows-based operating system that sources its trust store from a Java Keystore (JKS) file rather than the default Windows trust store location Trusted Root Certification Authorities. This means that you should thoroughly test your application after installing the Amazon Trust Services root CA certificates in your trust store. This will help to sustain reliable HTTPS connections to endpoints using ACM certificates.
If you have feedback about this post, submit comments in the Comments section below. If you have questions about this post, contact AWS Support.
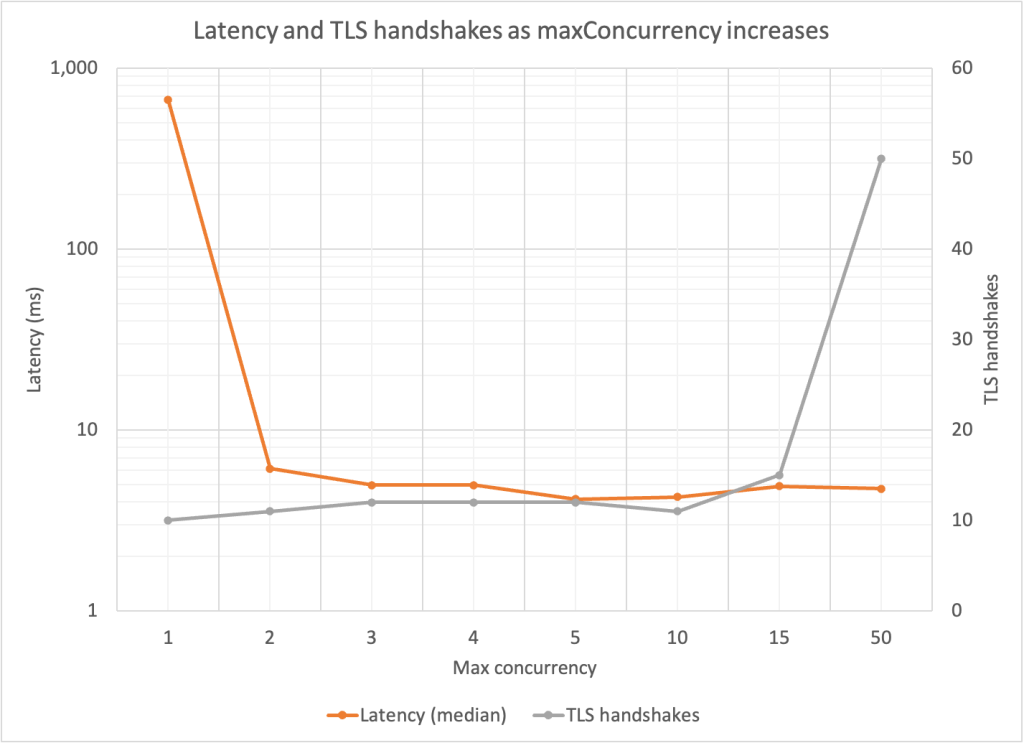
 Figure 1: AWS KMS GenerateDataKey requests per second without TLS connection reuse
 Figure 2: AWS KMS GenerateDataKey requests per second with TLS connection reuse