Now, you can add multiple MFA devices to AWS account root users and AWS Identity and Access Management (IAM) users in your AWS accounts. This helps you to raise the security bar in your accounts and limit access management to highly privileged principals, such as root users. Previously, you could only have one MFA device associated with root users or IAM users, but now you can associate up to eight MFA devices of the currently supported types with root users and IAM users.
In this blog post, we review the current MFA features for IAM, share use cases for multiple MFA devices, and show you how to manage and sign in with the additional MFA devices for better resiliency and flexibility.
Overview of MFA for IAM
First, let’s recap some of the benefits and available MFA configurations for IAM.
The use of MFA is an important security best practice on AWS. With MFA, you have an additional layer of protection to help prevent unauthorized individuals from gaining access to your systems and data. MFA can help protect your AWS environments if a password associated with your root user or IAM user became compromised.
To help meet different customer needs, AWS supports three types of MFA devices for IAM, including FIDO security keys, virtual authenticator applications, and time-based one-time password (TOTP) hardware tokens. You should select the device type that aligns with your security and operational requirements. You can associate different types of MFA devices with an IAM principal.
Use cases for multiple MFA devices
There are several use cases in which associating multiple MFA devices with an IAM principal is beneficial to the security and operational efficiency of your organization, such as the following:
In the event of a lost, stolen, or inaccessible MFA device, you can use one of the remaining MFA devices to access the account without performing the AWS account recovery procedure. If an MFA device is lost or stolen, it’s best practice to disassociate the lost or stolen device from the root users or IAM users that it’s associated with.
Geographically dispersed teams, or teams working remotely, can use hardware-based MFA to access AWS, without shipping a single hardware device or coordinating a physical exchange of a single hardware device between team members.
If the holder of an MFA device isn’t available, you can maintain access to your root users and IAM users by using a different MFA device associated with an IAM principal.
You can store additional MFA devices in a secure physical location, such as a vault or safe, while retaining physical access to another MFA device for redundancy.
How to manage multiple MFA devices in IAM
You can register up to eight MFA devices, in any combination of the currently supported MFA types, with your root users and IAM users.
For Multi-factor authentication (MFA), choose Assign MFA device.
Select the type of MFA device that you want to use and then choose Next.
With multiple MFA devices, you only need one MFA device to sign in to the console or to create a session through the AWS Command Line Interface (AWS CLI) as that principal.
You don’t need to make permissions changes in order for your organization to start taking advantage of multiple MFA devices. The root users and IAM users in your accounts that manage MFA devices today can use their existing IAM permissions to enable additional MFA devices.
Changes to Cloudtrail log entries
In support of this new feature, the identifier of the MFA device used will now be added to the console sign-in events of the root user and IAM user that use MFA. With these changes to AWS CloudTrail log entries, you can now view both the user and the MFA device used to authenticate to AWS. This provides better traceability and audibility for your accounts.
You can find this information in the MFAIdentifier field in CloudTrail, within additionalEventData. You don’t need to take action for this information to be logged. The following is a sample log from CloudTrail that includes the MFAIdentifier.
For Additional verification required, select the type of MFA device that you want to use to continue authenticating, and then choose Next:
Figure 1: MFA device selection when authenticating to the console as an IAM user or root user with different types of MFA devices available
You will then be prompted to authenticate with the type of device that you selected.
Figure 2: Prompt to authenticate with a FIDO security key
Conclusion
In this blog post, you learned about the new multiple MFA devices feature in IAM, and how to set up and manage multiple MFA devices in IAM. Associating multiple MFA devices with your root users and IAM users can make it simpler for you to manage access to them. This feature is available now for AWS customers, except for customers operating in AWS GovCloud (US) Regions or in the AWS China Regions. For more information about how to configure multiple MFA devices on your root users and IAM users, see the documentation on MFA in IAM. There is no extra charge to use MFA devices in IAM.
A few weeks ago we introduced Cryptographic Attestation of Personhood to replace CAPTCHAs with USB security keys, and today we announced additional support for on-device biometric hardware. While doing that work, it occurred to us that hardware attestation, proving identity or other properties of a user with a piece of hardware, could have many wider applications beyond just CAPTCHA alternatives and user authentication via WebAuthn. Really, why should someone have to have an account to prove they exist, when their own trusted device can do so?
Attestation in the WebAuthn standard lets websites know that your security key is authentic. It was designed to have good privacy properties baked into policies that must be followed by device manufacturers. The information your security key sends to websites is indistinguishable from that of myriad other keys. Even so, we wanted to do better. If we’re taking attestation out of authentication, then we need to learn only that your security key is authentic — and we’ve designed a new Zero-Knowledge Proof for the browser to do that.
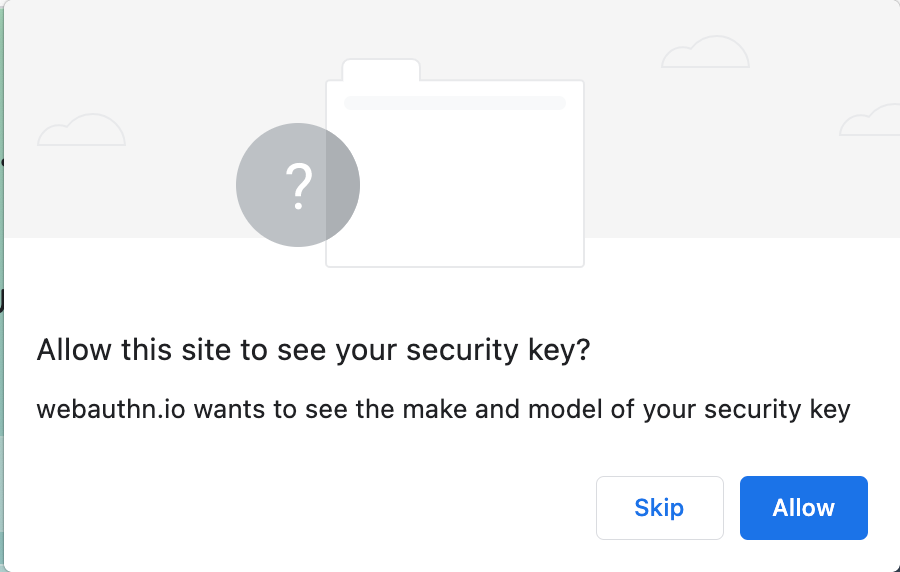
WebAuthn attestation identifies the manufacturer of your hardware security key to the website that wants the attestation. It was intended for deployment in closed settings like financial institutions and internal services where the website already has a preexisting relationship with you. Since logging in identifies you, the privacy impact was minimal. In contrast, any open website that uses attestation, like we do for proof of personhood, learns the make and model of the key you used.
Make and model information doesn’t seem that sensitive, just like the make and model of your car doesn’t seem that sensitive. There are a lot of 2015 Priuses out there, so knowing you drive one doesn’t help identify you. But when paired with information such as user agent, language preferences, time of day, etc., it can contribute to building up a picture of the user — just as demographic details, height, weight and clothing together with the make and model of a car combine to make it easier to pinpoint a particular car on the highway. Therefore, browsers have a dialogue when a website obtains this attestation, to make sure users understand that the website is learning information that may help identify them. We take privacy seriously at Cloudflare, and want to avoid learning any information that could identify you.
An example browser warning.
The information that we see from attestation is a proof that the manufacturer of your security key really did make that key. It’s a digital signature using a private key held on your security key in a secure enclave, together with a certificate chain that leads to the manufacturer. These chains enable any server to see that the hardware security key is authentic. All we want for the Cryptographic Attestation of Personhood is a single bit: that you own a hardware security key that is trustworthy, and none of the details about the manufacturer or model.
Historically, attestation has been used in environments where only a few manufacturers were considered acceptable. For example, large financial institutions are understandably conservative. In this environment, revealing the manufacturer is necessary. In an open vendor design, we don’t want to privilege any particular manufacturer, but instead just know that the keys are trustworthy.
Trustworthiness is determined by the FIDO MetaData Service. It is a service from the FIDO2 alliance who maintain root certificates for the manufacturers. When these keys are compromised, they are listed as such in the FIDO system. We have automated scripts to download these roots and insert them into releases of our software. This ensures that we are always up-to-date as new manufacturers emerge or older devices are compromised as attackers extract the keys or the keys get mishandled.
To their credit, the FIDO consortium requires that no fewer than 100,000 devices all share an attestation key, setting a lower bound on the device anonymity set size to minimize the impact of information collection. Alas, this hasn’t always happened. Some manufacturers might not have the volume necessary to ever get that batch size, and users shouldn’t have to flock to the biggest ones to have their privacy protected. At Cloudflare, we have a strong privacy policy that governs how we use this information, but we’d prefer not to know your key’s manufacturer at all. Just as we’ve removed cookies that we no longer needed, and log data customers need to debug their firewall rules without us being able to see it ourselves, we’re always looking for ways to reduce the information that we can see.
At the same time, we need to make sure that the device that’s responding to our request is a genuine security key and not some software emulation run by a bot. While we don’t care which key it is, we’d like to know that it actually is a key that meets our security requirements and hasn’t been compromised. In essence, we’d like to prove the legitimacy of the credential without learning anything else about it. This problem of anonymous credentials isn’t new, and lots of solutions have been proposed and some even deployed.
However, these schemes typically require that the hardware or software that implements the credential attestation was designed with the specific scheme in mind. We can’t go out and convince manufacturers to add features in a few months, let alone replace all the hardware authentication security keys in the world. We have to instead search for solutions that work with existing hardware.
A high-level introduction to Zero-Knowledge Proof
At first glance, it seems that we have an impossible task. How can I demonstrate that I know something without telling you what it is? But sometimes this is possible. If I claim to have the key to a mailbox, you can put a letter inside the mailbox, walk away, and ask me to read the letter. If I claim to know your telephone number, you can ask me to call you. Such a proof is known as a zero-knowledge proof, often abbreviated ZKP.
A classic example of a zero-knowledge proof is showing to someone that you know where Waldo is in Where’s Waldo. While you could point to Waldo on the page, this would tell the person exactly where Waldo is. If however you were to cover up the page with a big piece of paper that has a small hole that only shows Waldo, then the person could only see that Waldo was somewhere on the page, and would be unable to figure out where. They would know that you know where Waldo is, but not know where Waldo is themselves.
Cryptographers have designed numerous zero-knowledge proofs and ways to hook them together. The central piece in hooking them together is a commitment, a cryptographic envelope. A commitment prevents tampering with the value that was placed inside when it was made, and later can be opened to show what was placed in it. We use commitment schemes in real life. A magician might seal a piece of paper in an envelope to assure the audience that he cannot touch or tamper with it, and later have someone open the envelope to reveal his prediction. A silent auction involves people entering sealed envelopes containing bids that are then opened together, making sure that no one can adjust their bid after they see what others have bid.
One very simple cryptographic protocol that makes use of commitments is coin flipping. Suppose Alice and Bob want to flip a coin, but one of them has a few double-headed quarters and the other can flip a coin so it comes up on the side they want every time. The only way to get a fair flip is for both of them to be involved in a way that makes sure if either is honest, the result is a fair flip. But if they simply each flip a coin and trade the results, whoever goes last could pretend they had gotten the result that would make the desired outcome.
Using a commitment scheme solves this problem. Instead of Alice and Bob saying what their results are out loud, they trade commitments to the results. Then they open the commitments. Because they traded the commitments, neither of them can pretend to have gotten a different result based on what they learned, as then they will be detected when they open the commitments.
Commitments are like wires that tie zero-knowledge proofs together, making bigger and more complicated ones from simple ones. By proving that a value in a commitment has two different properties with different zero-knowledge proofs we can prove both properties hold for the value. This lets us link together proofs for statements like “the value in a commitment is a sum of values in two other commitments” and “the value in a commitment appears in a list” into much more complicated and useful statements. Since we know how to prove statements like “this commitment is one if and only if both of these other commitments are one” and “this commitment is one if either of these two commitments is one” we have the building blocks to prove any statement. These generic techniques can produce a zero-knowledge proof for any statement in NP, although it will be quite slow and complicated by default.
Our Zero-Knowledge Proof system for the browser
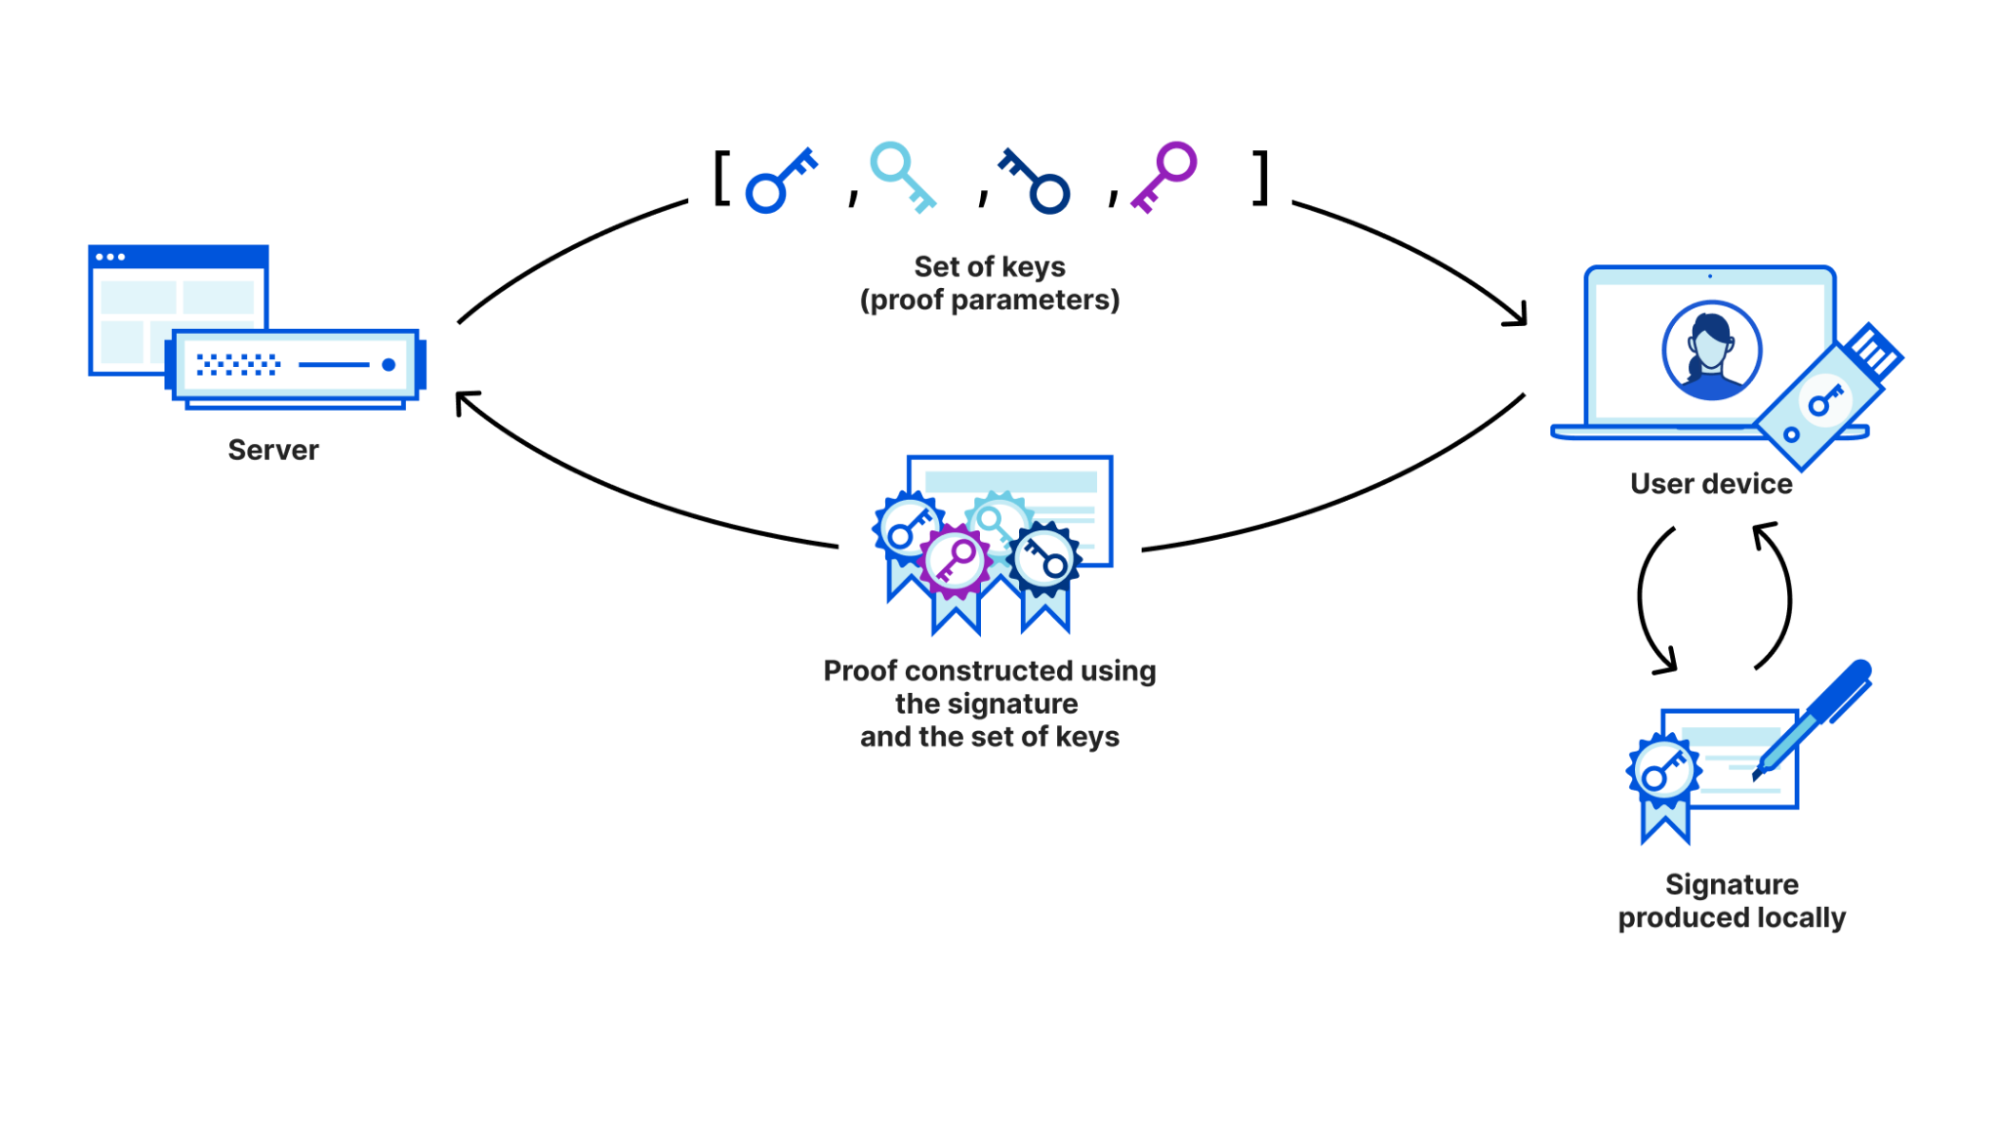
In Cryptographic Attestation of Personhood the server sends a message to the browser that the hardware security signs, demonstrating its authenticity. Just as a paper signature ensures that the person making it saw it and signed it, a digital signature ensures the identity of the signer. When we use our zero-knowledge proof, instead of sending the signature, the client sends a proof that the signature was generated by a key on a server provided list.
Because we only send the proof to the server, the server learns only that the attestation exists, and not which hardware security key generated it. This guarantees privacy as the identifying information about the security key never leaves the browser. But we need to make sure that proving and verification are efficient enough to carry out at scale, to have a deployable solution.
We investigated many potential schemes, including SNARKS. Unfortunately the code size, toolchain requirements, and proving complexity of a SNARK proved prohibitive. The security of SNARKS relies on more complicated assumptions than the scheme we ultimately went with. Obviously this is an area of active research and the best technology today is not necessarily the best technology of the future.
For the hardware security keys we support, the digital signature in the attestation was produced by the Elliptic Curve Digital Signature Algorithm (ECDSA). ECDSA is itself similar to many of the zero-knowledge proofs we use. It starts with the signer computing a point \(R=kG\) on an elliptic curve for a random value \(x\). Then the signer takes the \(x\) coordinate of the point, which is written as \(r\), and their private key, and the hash of the message, and computes a value \(s\). The pair \((r, s)\) is the signature. The verifier uses \(r\) and \(s\) and the public key to recompute \(R\), and then checks that the \(x\) coordinate matches \(r\).
Unfortunately, the verification equation as commonly presented involves some operations that would need to convert values from one form to another. In a zero knowledge proof these operations are complex and expensive, with many steps. We had to sidestep this limitation to make our system work. To transform ECDSA into a scheme we can work with, our prover sends \(R\) instead, and commits to a value \(z\) computed from \(r\) and \(s\) that simplifies the verification equation. Anyone can take an ECDSA signature and turn it into a signature for our tweaked scheme and vice versa without using any secret knowledge, so it is just as secure as ECDSA.
Since the statement we want to prove has two parts — “the message was signed by a key” and “the key is on the list” — it is natural to break up the problem of proving that statement into two pieces. First, the prover demonstrates that the key inside of a commitment signed the message, and then the prover demonstrates the committed key is on a list. The verifier likewise checks these two parts and if both parts work, indicates that the proof is valid.
To prove that the signature verifies under a key, we had to use a proof that one elliptic curve point is a known power of another. This proof is a fairly straightforward zero-knowledge proof, but some steps themselves require zero-knowledge protocols for proving that points were added correctly and arithmetic was done correctly. This proof consumes the bulk of the time in proof generation and verification. Once this proof is verified, the verifier knows that the message was signed by the committed public key.
The next step is for the prover to find where their key is on the list, and then prove that their key is in the list. To do this we use the zero-knowledge proof developed by Groth and Kohlweiss. Their proof first commits to the binary expansion of the place of the commitment in the list. The prover then proves that binary expansion is made out of bits, and supplies some extra information about how they proved it. With the extra info and the proofs, both sides can compute polynomials that evaluate to zero if the commitment is to a value on the list. This code is surprisingly short for such a complex task.
By evaluating a polynomial, we show our committed value is a zero.
The verifier then checks the Groth-Kohlweiss proof that the committed key is on the list, and then makes sure the message that was signed is what it should be. This is a very efficient proof, even as the list size grows: the work done per list element is a multiplication. If all matches, then we know that the signature was generated by a sufficiently secure security key, and nothing else. If it does not match we know that something is wrong.
Engineering a more efficient curve
We turned statements about ECDSA signatures into statements about points on the P-256 elliptic curve, and then into statements about arithmetic in the field that P-256 is defined over. These statements are easiest to prove if we have a group with a size matching the size of a field, and so we had to find one. This posed an interesting challenge as it’s the reverse of how we normally do things in cryptography. If you’d like to see how we solved it read on, otherwise skip ahead.
Most of the time in elliptic curve cryptography we start with a convenient base field, and search for elliptic curves of prime or nearly prime order with the right properties for our application. This way we can pick primes with properties convenient for computer hardware. When it comes to wanting pairing friendly curves, we typically do computer searches for curves whose parameters are given by polynomials that are known.
But here we wanted a curve with a given number of points, and so we would have to use some fairly advanced number theoretic machinery to determine this curve. Our doing so was a big part in getting our zero-knowledge attestation as efficient as it is.
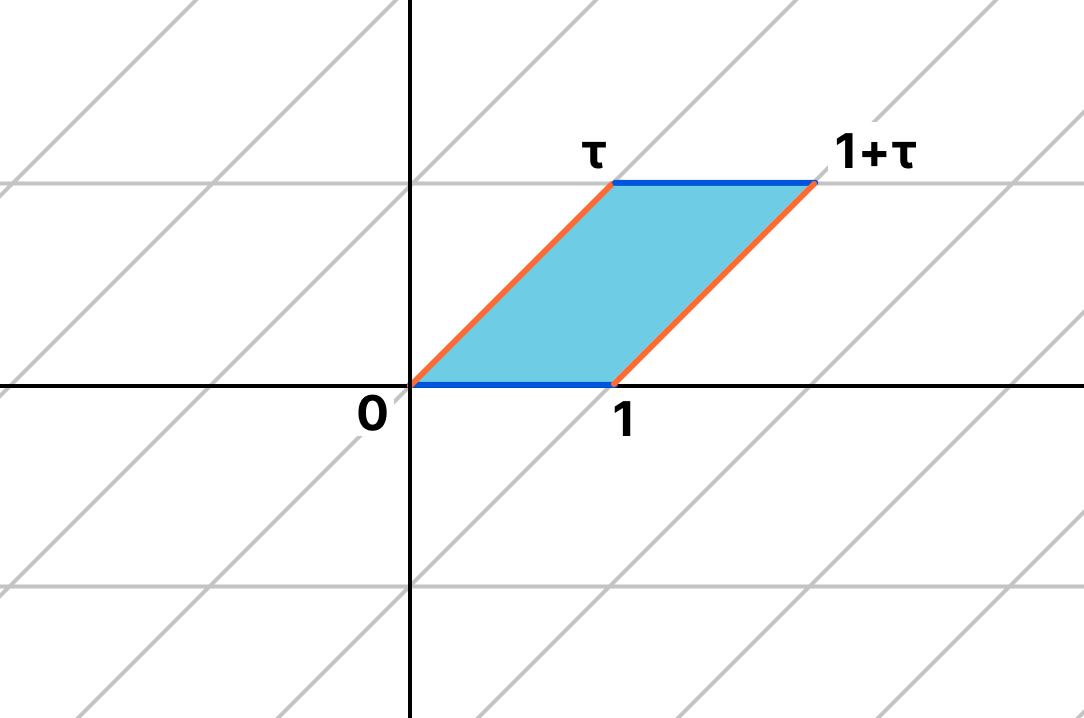
Elliptic Curves and the Complex Plane
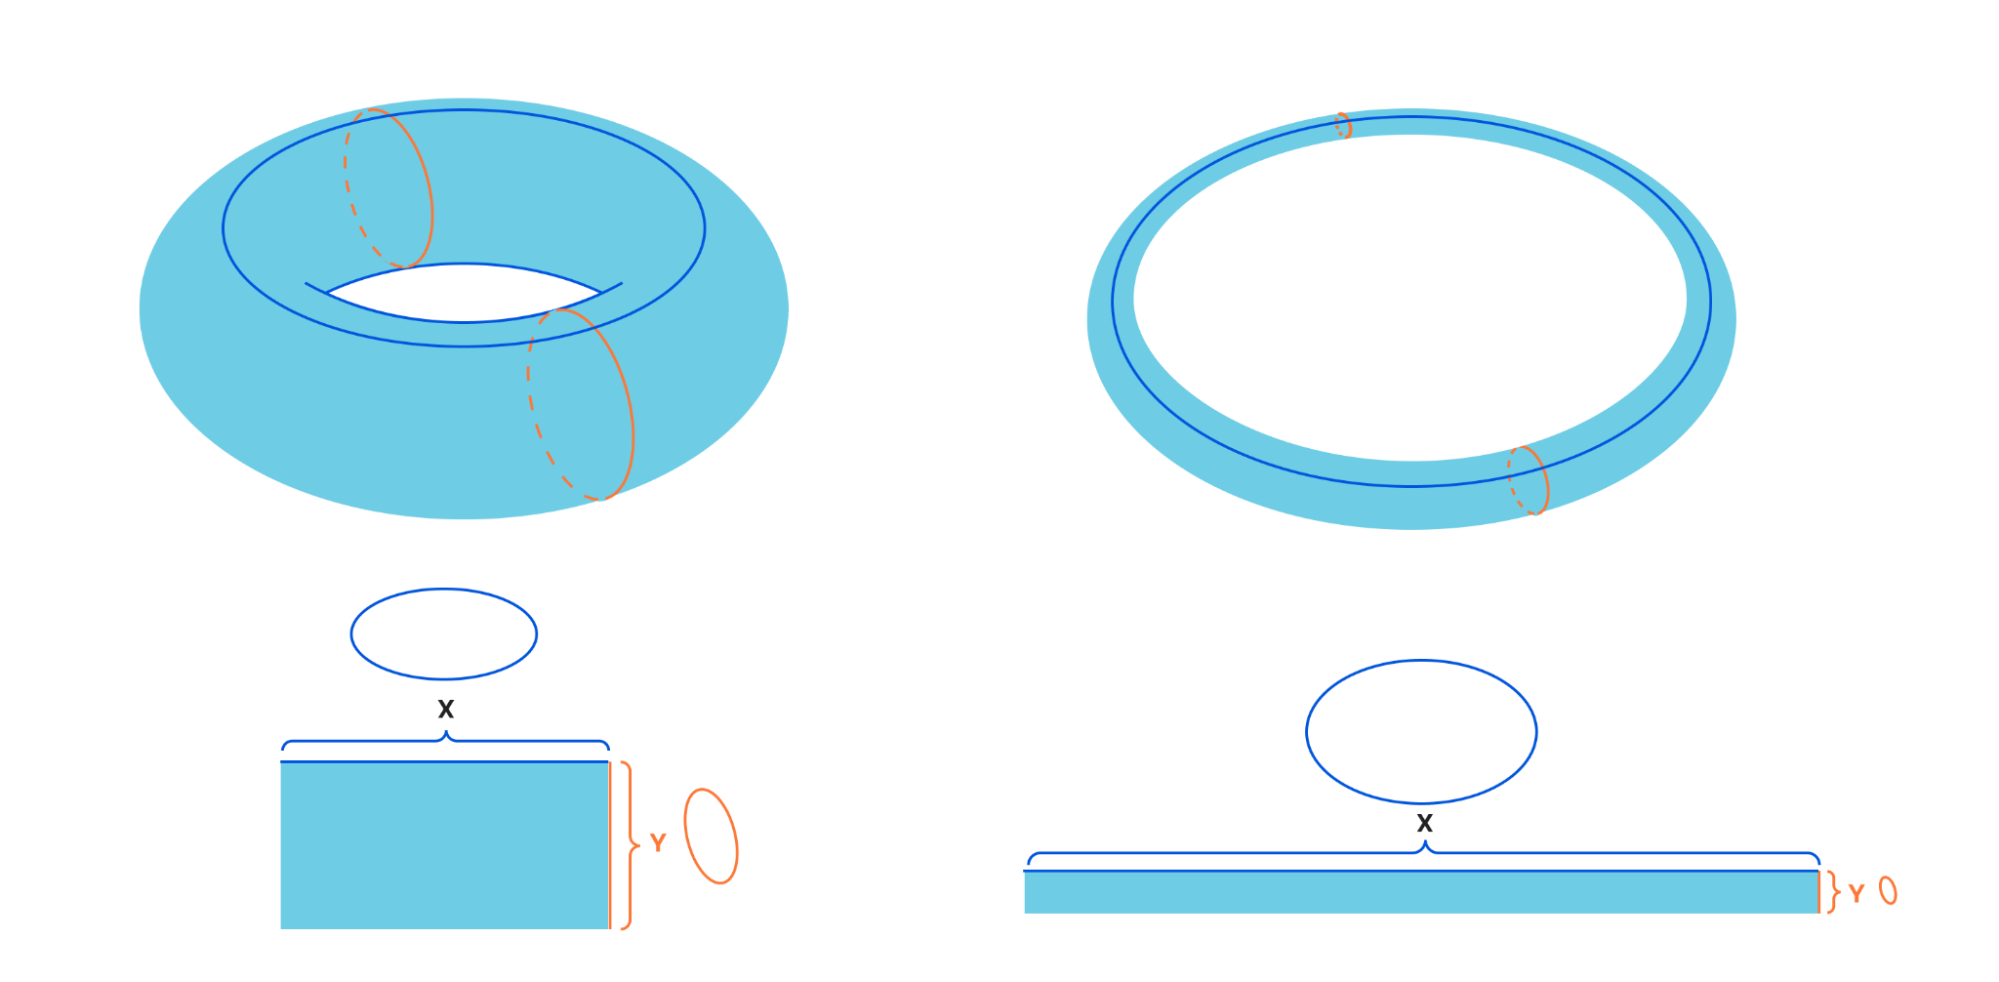
Elliptic curves are particularly nice over the complex numbers. An elliptic curve is isomorphic to a torus. All complex curves are isomorphic to tori over the complex numbers, but some have more than one hole.
Different elliptic curves are distinguished by how fat or thin the two directions around the torus are with respect to one another. If we imagine slicing around the holes in the torus, we see that we can get a torus from taking a rectangle and gluing up the sides. There is an illustrative video of what this looks like Gluing a torus.
Instead of taking one rectangle and gluing it up, we can imagine taking the entire plane, and then folding it up so that every rectangle lines up. In doing so the corners of these rectangles all line up over the origin. The corners form what we call a lattice, and we can always scale and rotate to have one of the generators of the lattice be 1.
Viewed this way, addition of complex numbers becomes addition on the torus, just as addition of the integers modulo 2 is addition of integers, then reduced mod 2. But with elliptic curves we’re used to having algebraic equations for addition and multiplication, and also for the curves themselves. How does this analytic picture interact with the algebraic one?
Via a great deal of classical complex geometry we find they are closely related. The ring of complex-valued functions on the lattice is generated by the Weierstrass \(\mathcal{P}\) function and its derivative. These satisfy an algebraic equation of the form \(y^2=x^3+ax+b\), and the parameters \(a\) and \(b\) are functions of the lattice parameter. The classical formulas for the algebraic addition of points on elliptic curves emerge from this.
One of the parameters is the \(j\) invariant, which is a more arithmetically meaningful invariant than \(\tau\). The \(j\) invariant is an invariant of the elliptic curve: values of \(\tau\) that give rise to the same lattice produce the same \(j\) invariant, while they may have different \(a\) and \(b\). There are many expressions for \(j\), with one being
Suppose we take the lattice \(\{1, i\}\). If we multiply this lattice by \(i\), we get back \(\{i, -1\}\), which generates the same set of points. This is exceptional, and can only happen when the number we multiply by satisfies a quadratic equation. The elements of the lattice are then closely related to the solutions of that quadratic equation.
Associated with such a lattice is a discriminant: the discriminant of the quadratic field associated with the example. For our example with i the discriminant is \(-4\), the discriminant of the quadratic equation \(x^2+1\). If, for instance, we were to take \(\sqrt{-5}\) instead and consider the lattice \( \{1, \sqrt{-5}\} \), the discriminant would be \(-20\), the discriminant of \(x^2-5\). Note that there are different definitions of the discriminant, which change the sign and add various powers of \(2\).
Maps from elliptic curves to themselves are called endomorphisms. Most elliptic curves just have multiplication by integers as endomorphisms. But some curves have additional endomorphisms. For instance, if we turn the lattice \(\{1, i\}\) into an elliptic curve, we obtain \(y^2=x^3+x\). Now this curve has an extra endomorphism: if I send \(y\) to \(iy\) and \(x\) to \(-x\), I get a point that satisfies the curve equation as \((-iy)^2=(-x)^3-x\). Doing this map twice produces the same effect as inverting a point, and it’s no coincidence that multiplying twice by \(i\) sends a complex number \(z\) to \(-z\). So this extra endomorphism and multiplying by \(i\) satisfy the same equation. Having an extra endomorphism is called complex multiplication as its multiplication by a complex number. When the lattice an elliptic curve comes from has complex multiplication, the elliptic curve also has complex multiplication and vice versa.
Any set of mathematical objects comes with questions, and elliptic curves with complex multiplication are no exception. We can ask how many elliptic curves with complex multiplication there are for a given discriminant. How does that number grow as the discriminant grows? Some of these questions are still open today, despite years of research and computer experimentation. Key to approaching them is a link between lattices and arithmetic.
Earlier in the 19th century Gauss studied binary quadratic forms, equations of the form \(ax^2+bxy+cy^2\). Such forms are said to be equivalent if there is a substitution with integer coefficients for \(x\) and \(y\) that takes one into the other. This is a core notion, and in addition to algorithms for reducing a binary quadratic form, Gauss demonstrated that there was a composition law that made binary quadratic forms of a given discriminant into a group.
Later number theorists would develop the concept of an ideal, tying quadratic forms to the failure of factorization to be unique. \(x^2+5y^2\)and \(2x^2+2xy+3y^2\) are both quadratic forms of discriminant -20, and this is connected to the failure of unique factorization in \(\mathbb{Z}[\sqrt{-5}]\).
When we consider binary quadratic forms as the lengths of vectors in a plane, each lattice gives a binary quadratic form up to equivalence. The elliptic curves with complex multiplication by a given discriminant thus correspond to the classes of binary quadratic forms with a given discriminant, which connects to the arithmetic in the quadratic field. Three very different looking questions thus all have the same answer.
Why complex multiplication matters for finding curves
When we take an elliptic curve with integral coefficients and consider it over a prime, it gets an extra endomorphism: the Frobenius endomorphism that sends \(x\rightarrow x^p\) and \(ny\rightarrow y^p\) . This endomorphism satisfies a quadratic equation, and the linear term of that quadratic equation is the number of points minus \(p+1\).
If the elliptic curve has complex multiplication, there is another endomorphism, namely the one we get from complex multiplication. But an elliptic curve can only have one extra endomorphism unless it is supersingular. Supersingular curves are very rare. So the Frobenius endomorphism and the endomorphism from complex multiplication must be the same. Because we started out with complex multiplication, we know the quadratic equation the Frobenius must satisfy, and hence the number of points.
This is the conclusion of our saga: to find an elliptic curve with a given order, find integer solutions to the equation \(t^2+Dy^2=4N\) for small \(D\) and let \(p=N-t+1\) and see if it is prime. Then factor the Hilbert class polynomial of \(D\) over \(p\), and take one of the roots modulo \(p\) as the \(j\) invariant of our elliptic curve. We may need to take a quadratic twist to get the right number of points, since t is only identified up to sign.
This gave us the curve we needed for efficient proving of relations over the base field of P-256. All of this mathematics produces a script that runs in a few minutes and produces the curve with the desired order that we needed.
The results of our labor
After all this work, and much additional engineering work needed to make the proof run faster through optimizing little bits of it, we can generate a proof in a few seconds, and verify it in a few hundred milliseconds. This is fast enough to be practical, and means that websites that want to verify the security of security keys can do so without negative privacy impacts.
All a website that uses our technique learns is whether or not the signature was generated by a token whose attestation key is on the list they provided. Unlike using WebAuthn directly they do not get any more detailed information, even if the manufacturer has accidentally made the batch too small. Instead of having a policy-based approach to guarding user privacy, we’ve removed the troublesome information.
Next steps — a community effort!
Our demonstration shows that we have a working privacy enhancement based on a zero-knowledge proof. We’re continuing to improve it, adding more performance and security features. But our task isn’t done until we have a privacy-preserving WebAuthn extension that works in every browser, giving users assurance that their data is not leaving the device.
What we have now is a demonstration of what is possible: using zero-knowledge proofs to turn WebAuthn attestation into a system that treats every manufacturer equally by design, protects user privacy, and can be used by every website. The challenges around user privacy that are created by using attestation on a wide scale are solvable.
There’s much more that goes into a high-quality, reliable system than the core cryptographic insights. In order to make the user experience not involve warnings about the information our zero-knowledge proof discards, we need more integration with the browser. We also need a safe way for users of devices not on our list to send their key to us and demonstrate that it should be trusted, and a way to make sure that the list isn’t being abused to try to pinpoint particular keys.
In addition, this verification is more heavyweight than the older verification methods, so servers that implement it need to incorporate rate limiting and other protections against abuse. SNARKS would be a big advantage here, but comes at a cost of code size for the demonstration. Ultimately bringing these improvements into a core part of the web ecosystem requires working with users, browsers, and other participants to find a solution that works for them. We would like to hear from you at [email protected] if you would like to contribute to the process.
Our Cryptographic Attestation of Personhood gives users an easier way to demonstrate their humanity, and one which is more privacy-preserving than many CAPTCHA alternatives or providers. But we weren’t satisfied with the state of the art and saw a way to apply advanced cryptography techniques to improve the privacy of our users. Our work shows zero-knowledge proofs can enhance the privacy offered by real world protocols.
In this blog post, I show you how to offer a password-less authentication experience to your customers. To do this, you’ll allow physical security keys or platform authenticators (like finger-print scanners) to be used as the authentication factor to your web or mobile applications that use Amazon Cognito user pools for authentication.
An Amazon Cognito user pool is a user directory that Amazon Web Services (AWS) customers use to manage their customer identities. Web Authentication (WebAuthn) is a W3C standard that lets users authenticate to web applications using public-key cryptography. Using public-key cryptography enables you to implement a stronger authentication mechanism that’s less dependent on passwords.
Mobile and web applications can use WebAuthn together with browser and device support for the Client-To-Authenticator-Protocol (CTAP) to implement Fast ID Online (FIDO) authentication. To learn more about the flow of WebAuthn and CTAP, visit the FIDO Alliance.
How it works
Amazon Cognito user pools allow you to build a custom authentication flow that uses AWS Lambda functions to authenticates users based on one or more challenge/response cycles. You can use this flow to implement password-less authentication that is based on custom challenges. To use this flow to implement FIDO authentication, you need to create credentials during the registration phase and reference these credentials in the user’s profile. You can then validate these credentials during the authentication phase in a custom challenge.
During registration, a new set of credentials that are bound to your application (relying party), are created through a FIDO authenticator. For example, a platform authenticator with a biometric sensor or a roaming authenticator like a physical security key. The private key of this credential set remains on the authenticator, the public key, together with a credential identifier are saved in a custom attribute that’s part of the user profile in Amazon Cognito.
During authentication, a Cognito custom authentication flow will be used to implement authentication through a custom challenge. The application prompts the user to sign in using the authenticator that they used during registration. Response from the authenticator is then passed as a challenge response to Amazon Cognito and verified using the stored public key.
In this password-less flow, the private key has never left the physical device, the authenticator also validates that relying party in authentication request matches the relying party that was used to create the credentials. This combination provides a more secured authentication flow that uses stronger credentials, protects user from phishing and provides better user experience.
About the demo project
This blog post and the diagrams below explain a scenario that uses FIDO as the only authentication factor, to implement password-less authentication. To help with implementation details, I created a project to demonstrate WebAuthn integration with Amazon Cognito that provides sample code for three scenarios:
A scenario that uses FIDO as the only factor (password-less)
A scenario that uses FIDO as a second factor (with password)
A scenario that lets users sign-in with only a password
This project is only a demonstration and shouldn’t be used as-is in production environments. When using FIDO as authentication factor, it is a best practice to allow users to register multiple authenticators and you need to implement an account recovery workflow in case of a lost authenticator.
Implementing FIDO Authentication
Let’s take a deeper dive into the design and components involved in implementing this solution. To deploy this project in your development environment, follow the instructions in the WebAuthn integration with Amazon Cognito project.
Creating and configuring user pool
The first step is to create a Cognito user pool and triggers that orchestrate a custom authentication flow. You do that by deploying the CloudFormation stack that will create all resources as explained in the demo project.
Few implementation details to note about the user pool:
The template creates a user pool, app client, triggers, and Lambda functions to use for custom authentication.
The template creates a custom attribute called publicKeyCred. This is the custom attribute that holds a base64 encoded representation of the credential identifier and public key for the user’s authenticator.
The app client defines what authentication flows are allowed. You can limit allowed flows according to your use-case. To support FIDO authentication, you must allow CUSTOM_AUTH flow.
The app client has “write” permissions to the custom attribute publicKeyCred but not “read” permissions. This allows your application to write the attribute during registration or profile updates but excludes this attribute from the user’s id_token. Since this attribute is considered back-end data that is only used during authentication, it doesn’t need to be part of user profile in the id_token.
User registration flow
The registration flow needs to create credentials using the authenticator and store the public-key in user’s profile. Let’s take a closer look at the sequence of calls and involved components to implement this flow.
Figure 1: WebAuthn user registration process
The user navigates to your application, www.example.com (relying party), and creates an account. A request is sent to the relying party to build a credentials options object and send it back to the browser. (in the demo project, this starts in the createCredentials function in webauthn-client.js and creates the credentials options object by making a call to createCredRequest in authn.js)
The browser uses built-in WebAuthn APIs to create the new credentials with an available authenticator using the credentials options object that was created in first step. This is done by making a call to navigator.credentials.create API (this API is available in browsers and platforms that support FIDO and WebAuthn).
The user experience in this step depends on the OS, browser, and the authenticator. For example, the browser could prompt the user to attach a security key or, on devices that support it, to use a biometric scanner.
Figure 2: User registration and browser alert to use an authenticator in Firefox
The user interacts with an authenticator (by touching a security key or scanning finger on a touch-id device), which generates new credentials bound to the relying party and returns a response object to the browser.
The browser sends a credential response object to the relying party to parse and validate the response on the server-side. The credential identifier and public key are extracted from the credential response. At this step, your application can also check additional authenticator data and use it to make authentication decisions. For example, your application can check if the authenticator was able to verify user identity through PIN or biometrics (UV flag) or only user presence (UP flag) was verified by authenticator. In the demo project, this is still part of createCredentials function and server-side parsing and validation is done in parseCredResponse that is implemented in authn.js
To complete the user registration, the browser passes the profile attributes that have been collected during registration through Amazon Cognito APIs as custom attributes. This step is performed in signUp function in webauthn-client.js
At the conclusion of this process, a new user will be created in Amazon Cognito and the custom attribute “publicKeyCred” will be populated with a base64 encoded string that includes a credential identifier and the public key generated by the authenticator. This attribute is not considered secret or sensitive data, it rather includes the public key that will be used to verify the authenticator response during subsequent authentications.
User authentication flow
The following diagram describes the custom authentication flow to implement password-less authentication.
Figure 3: WebAuthn user authentication process
The user provides their user name and selects the sign-in button, script (running in browser) starts the sign-in process using Amazon Cognito InitiateAuth API passing the user name and indicating that authentication flow is CUSTOM_AUTH. In the demo project, this part is performed in the signIn function in webauthn-client.js.
The Amazon Cognito service passes control to the Define Auth Challenge Lambda trigger. The trigger then determines that this is the first step in the authentication and returns CUSTOM_CHALLENGE as the next challenge to the user.
Control then moves to Create Auth Challenge Lambda trigger to create the custom challenge. This trigger creates a random challenge (a 64 bytes random string), extracts the credential identifier from the user profile (the value passed initially during the sign-up process) combines them and returns them as a custom challenge to the client. This is performed in CreateAuthChallenge Lambda function.
The browser then prompts the user to activate an authenticator. At this stage, the authenticator verifies that credentials exist for the identifier and that the relying party matches the one that is bound to the credentials. This is implemented by making a call to navigator.credentials.get API that is available in browsers and devices that support FIDO2 and WebAuthn.
Figure 4: Authentication and browser prompt to use a registered authenticator
If credentials exist and the relying party is verified, the authenticator requests a user attention or verification. Depending on the type of authenticator, user verification through biometrics or a PIN code is performed and the credentials response is passed back to the browser.
Figure 5: Authentication examples from different browsers and platforms
The signIn function continues the sign-in process by calling respondToAuthChallenge API and sending the credentials response to Amazon Cognito.
Amazon Cognito sends the response to the Verify Auth Challenge Lambda trigger. This trigger extracts the public key from the user profile, parses and validates the credentials response, and if the signature is valid, it responds with success. This is performed in VerifyAuthChallenge Lambda trigger.
Lastly, Amazon Cognito sends the control again to Define Auth Challenge to determine the next step. If the results from Verify Auth Challenge indicate a successful response, authentication succeeds and Amazon Cognito responds with ID, access, and refresh tokens.
Conclusion
When building customer facing applications, you as the application owner and developer need to balance security with usability. Reducing the risk of account take-over and phishing is based on using strong credentials, strong second-factors, and minimizing the role of passwords. The flexibility of Amazon Cognito custom authentication flow integrated with WebAuthn offer a technical path to make this possible in addition to offering better user experience to your customers.
Check out the WebAuthn with Amazon Cognito project for code samples and deployment steps, deploy this in your development environment to see this integration in action and go build an awesome password-less experience in your application.
If you have feedback about this post, submit comments in the Comments section below. If you have questions about this post, start a new thread on the Amazon Cognito forum or contact AWS Support.
Want more AWS Security how-to content, news, and feature announcements? Follow us on Twitter.
The collective thoughts of the interwebz
Manage Consent
To provide the best experiences, we use technologies like cookies to store and/or access device information. Consenting to these technologies will allow us to process data such as browsing behavior or unique IDs on this site. Not consenting or withdrawing consent, may adversely affect certain features and functions.
Functional
Always active
The technical storage or access is strictly necessary for the legitimate purpose of enabling the use of a specific service explicitly requested by the subscriber or user, or for the sole purpose of carrying out the transmission of a communication over an electronic communications network.
Preferences
The technical storage or access is necessary for the legitimate purpose of storing preferences that are not requested by the subscriber or user.
Statistics
The technical storage or access that is used exclusively for statistical purposes.The technical storage or access that is used exclusively for anonymous statistical purposes. Without a subpoena, voluntary compliance on the part of your Internet Service Provider, or additional records from a third party, information stored or retrieved for this purpose alone cannot usually be used to identify you.
Marketing
The technical storage or access is required to create user profiles to send advertising, or to track the user on a website or across several websites for similar marketing purposes.


.jpg)