Tag Archives: IAM

Best practices for managing Terraform State files in AWS CI/CD Pipeline

Post Syndicated from Arun Kumar Selvaraj original https://aws.amazon.com/blogs/devops/best-practices-for-managing-terraform-state-files-in-aws-ci-cd-pipeline/

Introduction

Today customers want to reduce manual operations for deploying and maintaining their infrastructure. The recommended method to deploy and manage infrastructure on AWS is to follow Infrastructure-As-Code (IaC) model using tools like AWS CloudFormation, AWS Cloud Development Kit (AWS CDK) or Terraform.

One of the critical components in terraform is managing the state file which keeps track of your configuration and resources. When you run terraform in an AWS CI/CD pipeline the state file has to be stored in a secured, common path to which the pipeline has access to. You need a mechanism to lock it when multiple developers in the team want to access it at the same time.

In this blog post, we will explain how to manage terraform state files in AWS, best practices on configuring them in AWS and an example of how you can manage it efficiently in your Continuous Integration pipeline in AWS when used with AWS Developer Tools such as AWS CodeCommit and AWS CodeBuild. This blog post assumes you have a basic knowledge of terraform, AWS Developer Tools and AWS CI/CD pipeline. Let’s dive in!

Challenges with handling state files

By default, the state file is stored locally where terraform runs, which is not a problem if you are a single developer working on the deployment. However if not, it is not ideal to store state files locally as you may run into following problems:

  • When working in teams or collaborative environments, multiple people need access to the state file
  • Data in the state file is stored in plain text which may contain secrets or sensitive information
  • Local files can get lost, corrupted, or deleted

Best practices for handling state files

The recommended practice for managing state files is to use terraform’s built-in support for remote backends. These are:

Remote backend on Amazon Simple Storage Service (Amazon S3): You can configure terraform to store state files in an Amazon S3 bucket which provides a durable and scalable storage solution. Storing on Amazon S3 also enables collaboration that allows you to share state file with others.

Remote backend on Amazon S3 with Amazon DynamoDB: In addition to using an Amazon S3 bucket for managing the files, you can use an Amazon DynamoDB table to lock the state file. This will allow only one person to modify a particular state file at any given time. It will help to avoid conflicts and enable safe concurrent access to the state file.

There are other options available as well such as remote backend on terraform cloud and third party backends. Ultimately, the best method for managing terraform state files on AWS will depend on your specific requirements.

When deploying terraform on AWS, the preferred choice of managing state is using Amazon S3 with Amazon DynamoDB.

AWS configurations for managing state files

  1. Create an Amazon S3 bucket using terraform. Implement security measures for Amazon S3 bucket by creating an AWS Identity and Access Management (AWS IAM) policy or Amazon S3 Bucket Policy. Thus you can restrict access, configure object versioning for data protection and recovery, and enable AES256 encryption with SSE-KMS for encryption control.
  1. Next create an Amazon DynamoDB table using terraform with Primary key set to LockID. You can also set any additional configuration options such as read/write capacity units. Once the table is created, you will configure the terraform backend to use it for state locking by specifying the table name in the terraform block of your configuration.
  1. For a single AWS account with multiple environments and projects, you can use a single Amazon S3 bucket. If you have multiple applications in multiple environments across multiple AWS accounts, you can create one Amazon S3 bucket for each account. In that Amazon S3 bucket, you can create appropriate folders for each environment, storing project state files with specific prefixes.

Now that you know how to handle terraform state files on AWS, let’s look at an example of how you can configure them in a Continuous Integration pipeline in AWS.

Architecture

Architecture on how to use terraform in an AWS CI pipeline

Figure 1: Example architecture on how to use terraform in an AWS CI pipeline

This diagram outlines the workflow implemented in this blog:

  1. The AWS CodeCommit repository contains the application code
  2. The AWS CodeBuild job contains the buildspec files and references the source code in AWS CodeCommit
  3. The AWS Lambda function contains the application code created after running terraform apply
  4. Amazon S3 contains the state file created after running terraform apply. Amazon DynamoDB locks the state file present in Amazon S3

Implementation

Pre-requisites

Before you begin, you must complete the following prerequisites:

Setting up the environment

  1. You need an AWS access key ID and secret access key to configure AWS CLI. To learn more about configuring the AWS CLI, follow these instructions.
  2. Clone the repo for complete example: git clone https://github.com/aws-samples/manage-terraform-statefiles-in-aws-pipeline
  3. After cloning, you could see the following folder structure:
AWS CodeCommit repository structure

Figure 2: AWS CodeCommit repository structure

Let’s break down the terraform code into 2 parts – one for preparing the infrastructure and another for preparing the application.

Preparing the Infrastructure

  1. The main.tf file is the core component that does below:
      • It creates an Amazon S3 bucket to store the state file. We configure bucket ACL, bucket versioning and encryption so that the state file is secure.
      • It creates an Amazon DynamoDB table which will be used to lock the state file.
      • It creates two AWS CodeBuild projects, one for ‘terraform plan’ and another for ‘terraform apply’.

    Note – It also has the code block (commented out by default) to create AWS Lambda which you will use at a later stage.

  1. AWS CodeBuild projects should be able to access Amazon S3, Amazon DynamoDB, AWS CodeCommit and AWS Lambda. So, the AWS IAM role with appropriate permissions required to access these resources are created via iam.tf file.
  1. Next you will find two buildspec files named buildspec-plan.yaml and buildspec-apply.yaml that will execute terraform commands – terraform plan and terraform apply respectively.
  1. Modify AWS region in the provider.tf file.
  1. Update Amazon S3 bucket name, Amazon DynamoDB table name, AWS CodeBuild compute types, AWS Lambda role and policy names to required values using variable.tf file. You can also use this file to easily customize parameters for different environments.

With this, the infrastructure setup is complete.

You can use your local terminal and execute below commands in the same order to deploy the above-mentioned resources in your AWS account.

terraform init
terraform validate
terraform plan
terraform apply

Once the apply is successful and all the above resources have been successfully deployed in your AWS account, proceed with deploying your application. 

Preparing the Application

  1. In the cloned repository, use the backend.tf file to create your own Amazon S3 backend to store the state file. By default, it will have below values. You can override them with your required values.
bucket = "tfbackend-bucket" 
key    = "terraform.tfstate" 
region = "eu-central-1"
  1. The repository has sample python code stored in main.py that returns a simple message when invoked.
  1. In the main.tf file, you can find the below block of code to create and deploy the Lambda function that uses the main.py code (uncomment these code blocks).
data "archive_file" "lambda_archive_file" {
    ……
}

resource "aws_lambda_function" "lambda" {
    ……
}
  1. Now you can deploy the application using AWS CodeBuild instead of running terraform commands locally which is the whole point and advantage of using AWS CodeBuild.
  1. Run the two AWS CodeBuild projects to execute terraform plan and terraform apply again.
  1. Once successful, you can verify your deployment by testing the code in AWS Lambda. To test a lambda function (console):
    • Open AWS Lambda console and select your function “tf-codebuild”
    • In the navigation pane, in Code section, click Test to create a test event
    • Provide your required name, for example “test-lambda”
    • Accept default values and click Save
    • Click Test again to trigger your test event “test-lambda”

It should return the sample message you provided in your main.py file. In the default case, it will display “Hello from AWS Lambda !” message as shown below.

Sample Amazon Lambda function response

Figure 3: Sample Amazon Lambda function response

  1. To verify your state file, go to Amazon S3 console and select the backend bucket created (tfbackend-bucket). It will contain your state file.
Amazon S3 bucket with terraform state file

Figure 4: Amazon S3 bucket with terraform state file

  1. Open Amazon DynamoDB console and check your table tfstate-lock and it will have an entry with LockID.
Amazon DynamoDB table with LockID

Figure 5: Amazon DynamoDB table with LockID

Thus, you have securely stored and locked your terraform state file using terraform backend in a Continuous Integration pipeline.

Cleanup

To delete all the resources created as part of the repository, run the below command from your terminal.

terraform destroy

Conclusion

In this blog post, we explored the fundamentals of terraform state files, discussed best practices for their secure storage within AWS environments and also mechanisms for locking these files to prevent unauthorized team access. And finally, we showed you an example of how efficiently you can manage them in a Continuous Integration pipeline in AWS.

You can apply the same methodology to manage state files in a Continuous Delivery pipeline in AWS. For more information, see CI/CD pipeline on AWS, Terraform backends types, Purpose of terraform state.

Arun Kumar Selvaraj

Arun Kumar Selvaraj is a Cloud Infrastructure Architect with AWS Professional Services. He loves building world class capability that provides thought leadership, operating standards and platform to deliver accelerated migration and development paths for his customers. His interests include Migration, CCoE, IaC, Python, DevOps, Containers and Networking.

Manasi Bhutada

Manasi Bhutada is an ISV Solutions Architect based in the Netherlands. She helps customers design and implement well architected solutions in AWS that address their business problems. She is passionate about data analytics and networking. Beyond work she enjoys experimenting with food, playing pickleball, and diving into fun board games.

IAM Access Analyzer simplifies inspection of unused access in your organization

Post Syndicated from Achraf Moussadek-Kabdani original https://aws.amazon.com/blogs/security/iam-access-analyzer-simplifies-inspection-of-unused-access-in-your-organization/

AWS Identity and Access Management (IAM) Access Analyzer offers tools that help you set, verify, and refine permissions. You can use IAM Access Analyzer external access findings to continuously monitor your AWS Organizations organization and Amazon Web Services (AWS) accounts for public and cross-account access to your resources, and verify that only intended external access is granted. Now, you can use IAM Access Analyzer unused access findings to identify unused access granted to IAM roles and users in your organization.

If you lead a security team, your goal is to manage security for your organization at scale and make sure that your team follows best practices, such as the principle of least privilege. When your developers build on AWS, they create IAM roles for applications and team members to interact with AWS services and resources. They might start with broad permissions while they explore AWS services for their use cases. To identify unused access, you can review the IAM last accessed information for a given IAM role or user and refine permissions gradually. If your company has a multi-account strategy, your roles and policies are created in multiple accounts. You then need visibility across your organization to make sure that teams are working with just the required access.

Now, IAM Access Analyzer simplifies inspection of unused access by reporting unused access findings across your IAM roles and users. IAM Access Analyzer continuously analyzes the accounts in your organization to identify unused access and creates a centralized dashboard with findings. From a delegated administrator account for IAM Access Analyzer, you can use the dashboard to review unused access findings across your organization and prioritize the accounts to inspect based on the volume and type of findings. The findings highlight unused roles, unused access keys for IAM users, and unused passwords for IAM users. For active IAM users and roles, the findings provide visibility into unused services and actions. With the IAM Access Analyzer integration with Amazon EventBridge and AWS Security Hub, you can automate and scale rightsizing of permissions by using event-driven workflows.

In this post, we’ll show you how to set up and use IAM Access Analyzer to identify and review unused access in your organization.

Generate unused access findings

To generate unused access findings, you need to create an analyzer. An analyzer is an IAM Access Analyzer resource that continuously monitors your accounts or organization for a given finding type. You can create an analyzer for the following findings:

An analyzer for unused access findings is a new analyzer that continuously monitors roles and users, looking for permissions that are granted but not actually used. This analyzer is different from an analyzer for external access findings; you need to create a new analyzer for unused access findings even if you already have an analyzer for external access findings.

You can centrally view unused access findings across your accounts by creating an analyzer at the organization level. If you operate a standalone account, you can get unused access findings by creating an analyzer at the account level. This post focuses on the organization-level analyzer setup and management by a central team.

Pricing

IAM Access Analyzer charges for unused access findings based on the number of IAM roles and users analyzed per analyzer per month. You can still use IAM Access Analyzer external access findings at no additional cost. For more details on pricing, see IAM Access Analyzer pricing.

Create an analyzer for unused access findings

To enable unused access findings for your organization, you need to create your analyzer by using the IAM Access Analyzer console or APIs in your management account or a delegated administrator account. A delegated administrator is a member account of the organization that you can delegate with administrator access for IAM Access Analyzer. A best practice is to use your management account only for tasks that require the management account and use a delegated administrator for other tasks. For steps on how to add a delegated administrator for IAM Access Analyzer, see Delegated administrator for IAM Access Analyzer.

To create an analyzer for unused access findings (console)

  1. From the delegated administrator account, open the IAM Access Analyzer console, and in the left navigation pane, select Analyzer settings.
  2. Choose Create analyzer.
  3. On the Create analyzer page, do the following, as shown in Figure 1:
    1. For Findings type, select Unused access analysis.
    2. Provide a Name for the analyzer.
    3. Select a Tracking period. The tracking period is the threshold beyond which IAM Access Analyzer considers access to be unused. For example, if you select a tracking period of 90 days, IAM Access Analyzer highlights the roles that haven’t been used in the last 90 days.
    4. Set your Selected accounts. For this example, we select Current organization to review unused access across the organization.
    5. Select Create.
       
    Figure 1: Create analyzer page

    Figure 1: Create analyzer page

Now that you’ve created the analyzer, IAM Access Analyzer starts reporting findings for unused access across the IAM users and roles in your organization. IAM Access Analyzer will periodically scan your IAM roles and users to update unused access findings. Additionally, if one of your roles, users or policies is updated or deleted, IAM Access Analyzer automatically updates existing findings or creates new ones. IAM Access Analyzer uses a service-linked role to review last accessed information for all roles, user access keys, and user passwords in your organization. For active IAM roles and users, IAM Access Analyzer uses IAM service and action last accessed information to identify unused permissions.

Note: Although IAM Access Analyzer is a regional service (that is, you enable it for a specific AWS Region), unused access findings are linked to IAM resources that are global (that is, not tied to a Region). To avoid duplicate findings and costs, enable your analyzer for unused access in the single Region where you want to review and operate findings.

IAM Access Analyzer findings dashboard

Your analyzer aggregates findings from across your organization and presents them on a dashboard. The dashboard aggregates, in the selected Region, findings for both external access and unused access—although this post focuses on unused access findings only. You can use the dashboard for unused access findings to centrally review the breakdown of findings by account or finding types to identify areas to prioritize for your inspection (for example, sensitive accounts, type of findings, type of environment, or confidence in refinement).

Unused access findings dashboard – Findings overview

Review the findings overview to identify the total findings for your organization and the breakdown by finding type. Figure 2 shows an example of an organization with 100 active findings. The finding type Unused access keys is present in each of the accounts, with the most findings for unused access. To move toward least privilege and to avoid long-term credentials, the security team should clean up the unused access keys.

Figure 2: Unused access finding dashboard

Figure 2: Unused access finding dashboard

Unused access findings dashboard – Accounts with most findings

Review the dashboard to identify the accounts with the highest number of findings and the distribution per finding type. In Figure 2, the Audit account has the highest number of findings and might need attention. The account has five unused access keys and six roles with unused permissions. The security team should prioritize this account based on volume of findings and review the findings associated with the account.

Review unused access findings

In this section, we’ll show you how to review findings. We’ll share two examples of unused access findings, including unused access key findings and unused permissions findings.

Finding example: unused access keys

As shown previously in Figure 2, the IAM Access Analyzer dashboard showed that accounts with the most findings were primarily associated with unused access keys. Let’s review a finding linked to unused access keys.

To review the finding for unused access keys

  1. Open the IAM Access Analyzer console, and in the left navigation pane, select Unused access.
  2. Select your analyzer to view the unused access findings.
  3. In the search dropdown list, select the property Findings type, the Equals operator, and the value Unused access key to get only Findings type = Unused access key, as shown in Figure 3.
     
    Figure 3: List of unused access findings

    Figure 3: List of unused access findings

  4. Select one of the findings to get a view of the available access keys for an IAM user, their status, creation date, and last used date. Figure 4 shows an example in which one of the access keys has never been used, and the other was used 137 days ago.
     
    Figure 4: Finding example - Unused IAM user access keys

    Figure 4: Finding example – Unused IAM user access keys

From here, you can investigate further with the development teams to identify whether the access keys are still needed. If they aren’t needed, you should delete the access keys.

Finding example: unused permissions

Another goal that your security team might have is to make sure that the IAM roles and users across your organization are following the principle of least privilege. Let’s walk through an example with findings associated with unused permissions.

To review findings for unused permissions

  1. On the list of unused access findings, apply the filter on Findings type = Unused permissions.
  2. Select a finding, as shown in Figure 5. In this example, the IAM role has 148 unused actions on Amazon Relational Database Service (Amazon RDS) and has not used a service action for 200 days. Similarly, the role has unused actions for other services, including Amazon Elastic Compute Cloud (Amazon EC2), Amazon Simple Storage Service (Amazon S3), and Amazon DynamoDB.
     
    Figure 5: Finding example - Unused permissions

    Figure 5: Finding example – Unused permissions

The security team now has a view of the unused actions for this role and can investigate with the development teams to check if those permissions are still required.

The development team can then refine the permissions granted to the role to remove the unused permissions.

Unused access findings notify you about unused permissions for all service-level permissions and for 200 services at the action-level. For the list of supported actions, see IAM action last accessed information services and actions.

Take actions on findings

IAM Access Analyzer categorizes findings as active, resolved, and archived. In this section, we’ll show you how you can act on your findings.

Resolve findings

You can resolve unused access findings by deleting unused IAM roles, IAM users, IAM user credentials, or permissions. After you’ve completed this, IAM Access Analyzer automatically resolves the findings on your behalf.

To speed up the process of removing unused permissions, you can use IAM Access Analyzer policy generation to generate a fine-grained IAM policy based on your access analysis. For more information, see the blog post Use IAM Access Analyzer to generate IAM policies based on access activity found in your organization trail.

Archive findings

You can suppress a finding by archiving it, which moves the finding from the Active tab to the Archived tab in the IAM Access Analyzer console. To archive a finding, open the IAM Access Analyzer console, select a Finding ID, and in the Next steps section, select Archive, as shown in Figure 6.

Figure 6: Archive finding in the AWS management console

Figure 6: Archive finding in the AWS management console

You can automate this process by creating archive rules that archive findings based on their attributes. An archive rule is linked to an analyzer, which means that you can have archive rules exclusively for unused access findings.

To illustrate this point, imagine that you have a subset of IAM roles that you don’t expect to use in your tracking period. For example, you might have an IAM role that is used exclusively for break glass access during your disaster recovery processes—you shouldn’t need to use this role frequently, so you can expect some unused access findings. For this example, let’s call the role DisasterRecoveryRole. You can create an archive rule to automatically archive unused access findings associated with roles named DisasterRecoveryRole, as shown in Figure 7.

Figure 7: Example of an archive rule

Figure 7: Example of an archive rule

Automation

IAM Access Analyzer exports findings to both Amazon EventBridge and AWS Security Hub. Security Hub also forwards events to EventBridge.

Using an EventBridge rule, you can match the incoming events associated with IAM Access Analyzer unused access findings and send them to targets for processing. For example, you can notify the account owners so that they can investigate and remediate unused IAM roles, user credentials, or permissions.

For more information, see Monitoring AWS Identity and Access Management Access Analyzer with Amazon EventBridge.

Conclusion

With IAM Access Analyzer, you can centrally identify, review, and refine unused access across your organization. As summarized in Figure 8, you can use the dashboard to review findings and prioritize which accounts to review based on the volume of findings. The findings highlight unused roles, unused access keys for IAM users, and unused passwords for IAM users. For active IAM roles and users, the findings provide visibility into unused services and actions. By reviewing and refining unused access, you can improve your security posture and get closer to the principle of least privilege at scale.

Figure 8: Process to address unused access findings

Figure 8: Process to address unused access findings

The new IAM Access Analyzer unused access findings and dashboard are available in AWS Regions, excluding the AWS GovCloud (US) Regions and AWS China Regions. To learn more about how to use IAM Access Analyzer to detect unused accesses, see the IAM Access Analyzer documentation.

If you have feedback about this post, submit comments in the Comments section below. If you have questions about this post, contact AWS Support.

Want more AWS Security news? Follow us on Twitter.

Achraf Moussadek-Kabdani

Achraf Moussadek-Kabdani

Achraf is a Senior Security Specialist at AWS. He works with global financial services customers to assess and improve their security posture. He is both a builder and advisor, supporting his customers to meet their security objectives while making security a business enabler.

Author

Yevgeniy Ilyin

Yevgeniy is a Solutions Architect at AWS. He has over 20 years of experience working at all levels of software development and solutions architecture and has used programming languages from COBOL and Assembler to .NET, Java, and Python. He develops and code clouds native solutions with a focus on big data, analytics, and data engineering.

Mathangi Ramesh

Mathangi Ramesh

Mathangi is the product manager for IAM. She enjoys talking to customers and working with data to solve problems. Outside of work, Mathangi is a fitness enthusiast and a Bharatanatyam dancer. She holds an MBA degree from Carnegie Mellon University.

Security at multiple layers for web-administered apps

Post Syndicated from Guy Morton original https://aws.amazon.com/blogs/security/security-at-multiple-layers-for-web-administered-apps/

In this post, I will show you how to apply security at multiple layers of a web application hosted on AWS.

Apply security at all layers is a design principle of the Security pillar of the AWS Well-Architected Framework. It encourages you to apply security at the network edge, virtual private cloud (VPC), load balancer, compute instance (or service), operating system, application, and code.

Many popular web apps are designed with a single layer of security: the login page. Behind that login page is an in-built administration interface that is directly exposed to the internet. Admin interfaces for these apps typically have simple login mechanisms and often lack multi-factor authentication (MFA) support, which can make them an attractive target for threat actors.

The in-built admin interface can also be problematic if you want to horizontally scale across multiple servers. The admin interface is available on every server that runs the app, so it creates a large attack surface. Because the admin interface updates the software on its own server, you must synchronize updates across a fleet of instances.

Multi-layered security is about identifying (or creating) isolation boundaries around the parts of your architecture and minimizing what is permitted to cross each boundary. Adding more layers to your architecture gives you the opportunity to introduce additional controls at each layer, creating more boundaries where security controls can be enforced.

In the example app scenario in this post, you have the opportunity to add many additional layers of security.

Example of multi-layered security

This post demonstrates how you can use the Run Web-Administered Apps on AWS sample project to help address these challenges, by implementing a horizontally-scalable architecture with multi-layered security. The project builds and configures many different AWS services, each designed to help provide security at different layers.

By running this solution, you can produce a segmented architecture that separates the two functions of these apps into an unprivileged public-facing view and an admin view. This design limits access to the web app’s admin functions while creating a fleet of unprivileged instances to serve the app at scale.

Figure 1 summarizes how the different services in this solution work to help provide security at the following layers:

  1. At the network edge
  2. Within the VPC
  3. At the load balancer
  4. On the compute instances
  5. Within the operating system
Figure 1: Logical flow diagram to apply security at multiple layers

Figure 1: Logical flow diagram to apply security at multiple layers

Deep dive on a multi-layered architecture

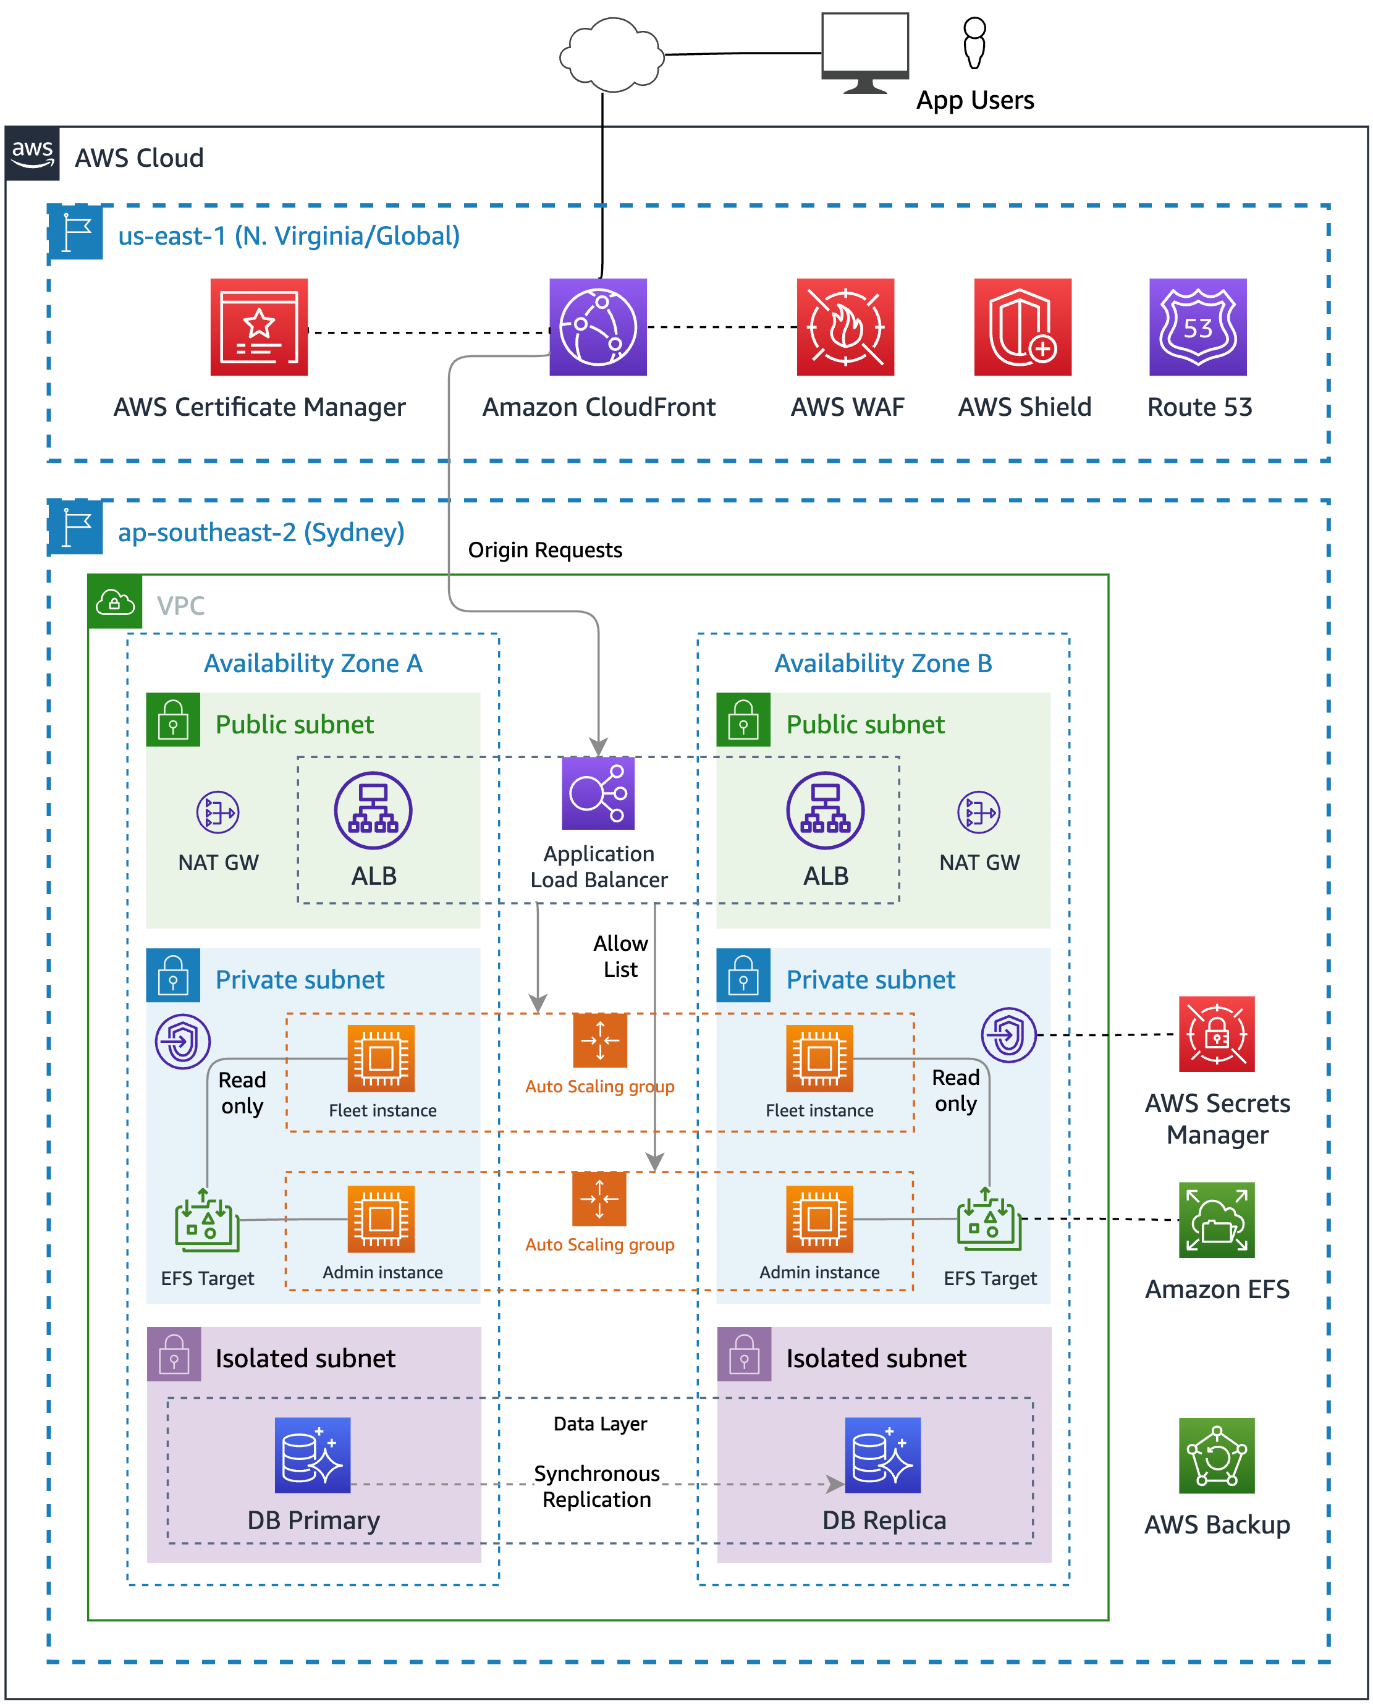
The following diagram shows the solution architecture deployed by Run Web-Administered Apps on AWS. The figure shows how the services deployed in this solution are deployed in different AWS Regions, and how requests flow from the application user through the different service layers.

Figure 2: Multi-layered architecture

Figure 2: Multi-layered architecture

This post will dive deeper into each of the architecture’s layers to see how security is added at each layer. But before we talk about the technology, let’s consider how infrastructure is built and managed — by people.

Perimeter 0 – Security at the people layer

Security starts with the people in your team and your organization’s operational practices. How your “people layer” builds and manages your infrastructure contributes significantly to your security posture.

A design principle of the Security pillar of the Well-Architected Framework is to automate security best practices. This helps in two ways: it reduces the effort required by people over time, and it helps prevent resources from being in inconsistent or misconfigured states. When people use manual processes to complete tasks, misconfigurations and missed steps are common.

The simplest way to automate security while reducing human effort is to adopt services that AWS manages for you, such as Amazon Relational Database Service (Amazon RDS). With Amazon RDS, AWS is responsible for the operating system and database software patching, and provides tools to make it simple for you to back up and restore your data.

You can automate and integrate key security functions by using managed AWS security services, such as Amazon GuardDuty, AWS Config, Amazon Inspector, and AWS Security Hub. These services provide network monitoring, configuration management, and detection of software vulnerabilities and unintended network exposure. As your cloud environments grow in scale and complexity, automated security monitoring is critical.

Infrastructure as code (IaC) is a best practice that you can follow to automate the creation of infrastructure. By using IaC to define, configure, and deploy the AWS resources that you use, you reduce the likelihood of human error when building AWS infrastructure.

Adopting IaC can help you improve your security posture because it applies the rigor of application code development to infrastructure provisioning. Storing your infrastructure definition in a source control system (such as AWS CodeCommit) creates an auditable artifact. With version control, you can track changes made to it over time as your architecture evolves.

You can add automated testing to your IaC project to help ensure that your infrastructure is aligned with your organization’s security policies. If you ever need to recover from a disaster, you can redeploy the entire architecture from your IaC project.

Another people-layer discipline is to apply the principle of least privilege. AWS Identity and Access Management (IAM) is a flexible and fine-grained permissions system that you can use to grant the smallest set of actions that your solution needs. You can use IAM to control access for both humans and machines, and we use it in this project to grant the compute instances the least privileges required.

You can also adopt other IAM best practices such as using temporary credentials instead of long-lived ones (such as access keys), and regularly reviewing and removing unused users, roles, permissions, policies, and credentials.

Perimeter 1 – network protections

The internet is public and therefore untrusted, so you must proactively address the risks from threat actors and network-level attacks.

To reduce the risk of distributed denial of service (DDoS) attacks, this solution uses AWS Shield for managed protection at the network edge. AWS Shield Standard is automatically enabled for all AWS customers at no additional cost and is designed to provide protection from common network and transport layer DDoS attacks. For higher levels of protection against attacks that target your applications, subscribe to AWS Shield Advanced.

Amazon Route 53 resolves the hostnames that the solution uses and maps the hostnames as aliases to an Amazon CloudFront distribution. Route 53 is a robust and highly available globally distributed DNS service that inspects requests to protect against DNS-specific attack types, such as DNS amplification attacks.

Perimeter 2 – request processing

CloudFront also operates at the AWS network edge and caches, transforms, and forwards inbound requests to the relevant origin services across the low-latency AWS global network. The risk of DDoS attempts overwhelming your application servers is further reduced by caching web requests in CloudFront.

The solution configures CloudFront to add a shared secret to the origin request within a custom header. A CloudFront function copies the originating user’s IP to another custom header. These headers get checked when the request arrives at the load balancer.

AWS WAF, a web application firewall, blocks known bad traffic, including cross-site scripting (XSS) and SQL injection events that come into CloudFront. This project uses AWS Managed Rules, but you can add your own rules, as well. To restrict frontend access to permitted IP CIDR blocks, this project configures an IP restriction rule on the web application firewall.

Perimeter 3 – the VPC

After CloudFront and AWS WAF check the request, CloudFront forwards it to the compute services inside an Amazon Virtual Private Cloud (Amazon VPC). VPCs are logically isolated networks within your AWS account that you can use to control the network traffic that is allowed in and out. This project configures its VPC to use a private IPv4 CIDR block that cannot be directly routed to or from the internet, creating a network perimeter around your resources on AWS.

The Amazon Elastic Compute Cloud (Amazon EC2) instances are hosted in private subnets within the VPC that have no inbound route from the internet. Using a NAT gateway, instances can make necessary outbound requests. This design hosts the database instances in isolated subnets that don’t have inbound or outbound internet access. Amazon RDS is a managed service, so AWS manages patching of the server and database software.

The solution accesses AWS Secrets Manager by using an interface VPC endpoint. VPC endpoints use AWS PrivateLink to connect your VPC to AWS services as if they were in your VPC. In this way, resources in the VPC can communicate with Secrets Manager without traversing the internet.

The project configures VPC Flow Logs as part of the VPC setup. VPC flow logs capture information about the IP traffic going to and from network interfaces in your VPC. GuardDuty analyzes these logs and uses threat intelligence data to identify unexpected, potentially unauthorized, and malicious activity within your AWS environment.

Although using VPCs and subnets to segment parts of your application is a common strategy, there are other ways that you can achieve partitioning for application components:

  • You can use separate VPCs to restrict access to a database, and use VPC peering to route traffic between them.
  • You can use a multi-account strategy so that different security and compliance controls are applied in different accounts to create strong logical boundaries between parts of a system. You can route network requests between accounts by using services such as AWS Transit Gateway, and control them using AWS Network Firewall.

There are always trade-offs between complexity, convenience, and security, so the right level of isolation between components depends on your requirements.

Perimeter 4 – the load balancer

After the request is sent to the VPC, an Application Load Balancer (ALB) processes it. The ALB distributes requests to the underlying EC2 instances. The ALB uses TLS version 1.2 to encrypt incoming connections with an AWS Certificate Manager (ACM) certificate.

Public access to the load balancer isn’t allowed. A security group applied to the ALB only allows inbound traffic on port 443 from the CloudFront IP range. This is achieved by specifying the Region-specific AWS-managed CloudFront prefix list as the source in the security group rule.

The ALB uses rules to decide whether to forward the request to the target instances or reject the traffic. As an additional layer of security, it uses the custom headers that the CloudFront distribution added to make sure that the request is from CloudFront. In another rule, the ALB uses the originating user’s IP to decide which target group of Amazon EC2 instances should handle the request. In this way, you can direct admin users to instances that are configured to allow admin tasks.

If a request doesn’t match a valid rule, the ALB returns a 404 response to the user.

Perimeter 5 – compute instance network security

A security group creates an isolation boundary around the EC2 instances. The only traffic that reaches the instance is the traffic that the security group rules allow. In this solution, only the ALB is allowed to make inbound connections to the EC2 instances.

A common practice is for customers to also open ports, or to set up and manage bastion hosts to provide remote access to their compute instances. The risk in this approach is that the ports could be left open to the whole internet, exposing the instances to vulnerabilities in the remote access protocol. With remote work on the rise, there is an increased risk for the creation of these overly permissive inbound rules.

Using AWS Systems Manager Session Manager, you can remove the need for bastion hosts or open ports by creating secure temporary connections to your EC2 instances using the installed SSM agent. As with every software package that you install, you should check that the SSM agent aligns with your security and compliance requirements. To review the source code to the SSM agent, see amazon-ssm-agent GitHub repo.

The compute layer of this solution consists of two separate Amazon EC2 Auto Scaling groups of EC2 instances. One group handles requests from administrators, while the other handles requests from unprivileged users. This creates another isolation boundary by keeping the functions separate while also helping to protect the system from a failure in one component causing the whole system to fail. Each Amazon EC2 Auto Scaling group spans multiple Availability Zones (AZs), providing resilience in the event of an outage in an AZ.

By using managed database services, you can reduce the risk that database server instances haven’t been proactively patched for security updates. Managed infrastructure helps reduce the risk of security issues that result from the underlying operating system not receiving security patches in a timely manner and the risk of downtime from hardware failures.

Perimeter 6 – compute instance operating system

When instances are first launched, the operating system must be secure, and the instances must be updated as required when new security patches are released. We recommend that you create immutable servers that you build and harden by using a tool such as EC2 Image Builder. Instead of patching running instances in place, replace them when an updated Amazon Machine Image (AMI) is created. This approach works in our example scenario because the application code (which changes over time) is stored on Amazon Elastic File System (Amazon EFS), so when you replace the instances with a new AMI, you don’t need to update them with data that has changed after the initial deployment.

Another way that the solution helps improve security on your instances at the operating system is to use EC2 instance profiles to allow them to assume IAM roles. IAM roles grant temporary credentials to applications running on EC2, instead of using hard-coded credentials stored on the instance. Access to other AWS resources is provided using these temporary credentials.

The IAM roles have least privilege policies attached that grant permission to mount the EFS file system and access AWS Systems Manager. If a database secret exists in Secrets Manager, the IAM role is granted permission to access it.

Perimeter 7 – at the file system

Both Amazon EC2 Auto Scaling groups of EC2 instances share access to Amazon EFS, which hosts the files that the application uses. IAM authorization applies IAM file system policies to control the instance’s access to the file system. This creates another isolation boundary that helps prevent the non-admin instances from modifying the application’s files.

The admin group’s instances have the file system mounted in read-write mode. This is necessary so that the application can update itself, install add-ons, upload content, or make configuration changes. On the unprivileged instances, the file system is mounted in read-only mode. This means that these instances can’t make changes to the application code or configuration files.

The unprivileged instances have local file caching enabled. This caches files from the EFS file system on the local Amazon Elastic Block Store (Amazon EBS) volume to help improve scalability and performance.

Perimeter 8 – web server configuration

This solution applies different web server configurations to the instances running in each Amazon EC2 Auto Scaling group. This creates a further isolation boundary at the web server layer.

The admin instances use the default configuration for the application that permits access to the admin interface. Non-admin, public-facing instances block admin routes, such as wp-login.php, and will return a 403 Forbidden response. This creates an additional layer of protection for those routes.

Perimeter 9 – database security

The database layer is within two additional isolation boundaries. The solution uses Amazon RDS, with database instances deployed in isolated subnets. Isolated subnets have no inbound or outbound internet access and can only be reached through other network interfaces within the VPC. The RDS security group further isolates the database instances by only allowing inbound traffic from the EC2 instances on the database server port.

By using IAM authentication for the database access, you can add an additional layer of security by configuring the non-admin instances with less privileged database user credentials.

Perimeter 10 – Security at the application code layer

To apply security at the application code level, you should establish good practices around installing updates as they become available. Most applications have email lists that you can subscribe to that will notify you when updates become available.

You should evaluate the quality of an application before you adopt it. The following are some metrics to consider:

  • Number of developers who are actively working on it
  • Frequency of updates to it
  • How quickly the developers respond with patches when bugs are reported

Other steps that you can take

Use AWS Verified Access to help secure application access for human users. With Verified Access, you can add another user authentication stage, to help ensure that only verified users can access an application’s administrative functions.

Amazon GuardDuty is a threat detection service that continuously monitors your AWS accounts and workloads for malicious activity and delivers detailed security findings for visibility and remediation. It can detect communication with known malicious domains and IP addresses and identify anomalous behavior. GuardDuty Malware Protection helps you detect the potential presence of malware by scanning the EBS volumes that are attached to your EC2 instances.

Amazon Inspector is an automated vulnerability management service that automatically discovers the Amazon EC2 instances that are running and scans them for software vulnerabilities and unintended network exposure. To help ensure that your web server instances are updated when security patches are available, use AWS Systems Manager Patch Manager.

Deploy the sample project

We wrote the Run Web-Administered Apps on AWS project by using the AWS Cloud Development Kit (AWS CDK). With the AWS CDK, you can use the expressive power of familiar programming languages to define your application resources and accelerate development. The AWS CDK has support for multiple languages, including TypeScript, Python, .NET, Java, and Go.

This project uses Python. To deploy it, you need to have a working version of Python 3 on your computer. For instructions on how to install the AWS CDK, see Get Started with AWS CDK.

Configure the project

To enable this project to deploy multiple different web projects, you must do the configuration in the parameters.properties file. Two variables identify the configuration blocks: app (which identifies the web application to deploy) and env (which identifies whether the deployment is to a dev or test environment, or to production).

When you deploy the stacks, you specify the app and env variables as CDK context variables so that you can select between different configurations at deploy time. If you don’t specify a context, a [default] stanza in the parameters.properties file specifies the default app name and environment that will be deployed.

To name other stanzas, combine valid app and env values by using the format <app>-<env>. For each stanza, you can specify its own Regions, accounts, instance types, instance counts, hostnames, and more. For example, if you want to support three different WordPress deployments, you might specify the app name as wp, and for env, you might want devtest, and prod, giving you three stanzas: wp-devwp-test, and wp-prod.

The project includes sample configuration items that are annotated with comments that explain their function.

Use CDK bootstrapping

Before you can use the AWS CDK to deploy stacks into your account, you need to use CDK bootstrapping to provision resources in each AWS environment (account and Region combination) that you plan to use. For this project, you need to bootstrap both the US East (N. Virginia) Region (us-east-1)  and the home Region in which you plan to host your application.

Create a hosted zone in the target account

You need to have a hosted zone in Route 53 to allow the creation of DNS records and certificates. You must manually create the hosted zone by using the AWS Management Console. You can delegate a domain that you control to Route 53 and use it with this project. You can also register a domain through Route 53 if you don’t currently have one.

Run the project

Clone the project to your local machine and navigate to the project root. To create the Python virtual environment (venv) and install the dependencies, follow the steps in the Generic CDK instructions.

To create and configure the parameters.properties file

Copy the parameters-template.properties file (in the root folder of the project) to a file called parameters.properties and save it in the root folder. Open it with a text editor and then do the following:

If you want to restrict public access to your site, change 192.0.2.0/24 to the IP range that you want to allow. By providing a comma-separated list of allowedIps, you can add multiple allowed CIDR blocks.

If you don’t want to restrict public access, set allowedIps=* instead.

If you have forked this project into your own private repository, you can commit the parameters.properties file to your repo. To do that, comment out the parameters.properties  line in the .gitignore file.

To install the custom resource helper

The solution uses an AWS CloudFormation custom resource for cross-Region configuration management. To install the needed Python package, run the following command in the custom_resource directory:

cd custom_resource
pip install crhelper -t .

To learn more about CloudFormation custom resource creation, see AWS CloudFormation custom resource creation with Python, AWS Lambda, and crhelper.

To configure the database layer

Before you deploy the stacks, decide whether you want to include a data layer as part of the deployment. The dbConfig parameter determines what will happen, as follows:

  • If dbConfig is left empty — no database will be created and no database credentials will be available in your compute stacks
  • If dbConfig is set to instance — you will get a new Amazon RDS instance
  • If dbConfig is set to cluster — you will get an Amazon Aurora cluster
  • If dbConfig is set to none — if you previously created a database in this stack, the database will be deleted

If you specify either instance or cluster, you should also configure the following database parameters to match your requirements:

  • dbEngine — set the database engine to either mysql or postgres
  • dbSnapshot — specify the named snapshot for your database
  • dbSecret — if you are using an existing database, specify the Amazon Resource Name (ARN) of the secret where the database credentials and DNS endpoint are located
  • dbMajorVersion — set the major version of the engine that you have chosen; leave blank to get the default version
  • dbFullVersion — set the minor version of the engine that you have chosen; leave blank to get the default version
  • dbInstanceType — set the instance type that you want (note that these vary by service); don’t prefix with db. because the CDK will automatically prepend it
  • dbClusterSize — if you request a cluster, set this parameter to determine how many Amazon Aurora replicas are created

You can choose between mysql or postgres for the database engine. Other settings that you can choose are determined by that choice.

You will need to use an Amazon Machine Image (AMI) that has the CLI preinstalled, such as Amazon Linux 2, or install the AWS Command Line Interface (AWS CLI) yourself with a user data command. If instead of creating a new, empty database, you want to create one from a snapshot, supply the snapshot name by using the dbSnapshot parameter.

To create the database secret

AWS automatically creates and stores the RDS instance or Aurora cluster credentials in a Secrets Manager secret when you create a new instance or cluster. You make these credentials available to the compute stack through the db_secret_command variable, which contains a single-line bash command that returns the JSON from the AWS CLI command aws secretsmanager get-secret-value. You can interpolate this variable into your user data commands as follows:

SECRET=$({db_secret_command})
USERNAME=`echo $SECRET | jq -r '.username'`
PASSWORD=`echo $SECRET | jq -r '.password'`
DBNAME=`echo $SECRET | jq -r '.dbname'`
HOST=`echo $SECRET | jq -r '.host'`

If you create a database from a snapshot, make sure that your Secrets Manager secret and Amazon RDS snapshot are in the target Region. If you supply the secret for an existing database, make sure that the secret contains at least the following four key-value pairs (replace the <placeholder values> with your values):

{
    "password":"<your-password>",
    "dbname":"<your-database-name>",
    "host":"<your-hostname>",
    "username":"<your-username>"
}

The name for the secret must match the app value followed by the env value (both in title case), followed by DatabaseSecret, so for app=wp and env=dev, your secret name should be WpDevDatabaseSecret.

To deploy the stacks

The following commands deploy the stacks defined in the CDK app. To deploy them individually, use the specific stack names (these will vary according to the info that you supplied previously), as shown in the following.

cdk deploy wp-dev-network-stack -c app=wp -c env=dev
cdk deploy wp-dev-database-stack -c app=wp -c env=dev
cdk deploy wp-dev-compute-stack -c app=wp -c env=dev
cdk deploy wp-dev-cdn-stack -c app=wp -c env=dev

To create a database stack, deploy the network and database stacks first.

cdk deploy wp-dev-network-stack -c app=wp -c env=dev
cdk deploy wp-dev-database-stack -c app=wp -c env=dev

You can then initiate the deployment of the compute stack.

cdk deploy wp-dev-compute-stack -c app=wp -c env=dev

After the compute stack deploys, you can deploy the stack that creates the CloudFront distribution.

cdk deploy wp-dev-cdn-stack -c env=dev

This deploys the CloudFront infrastructure to the US East (N. Virginia) Region (us-east-1). CloudFront is a global AWS service, which means that you must create it in this Region. The other stacks are deployed to the Region that you specified in your configuration stanza.

To test the results

If your stacks deploy successfully, your site appears at one of the following URLs:

  • subdomain.hostedZone (if you specified a value for the subdomain) — for example, www.example.com
  • appName-env.hostedZone (if you didn’t specify a value for the subdomain) — for example, wp-dev.example.com.

If you connect through the IP address that you configured in the adminIps configuration, you should be connected to the admin instance for your site. Because the admin instance can modify the file system, you should use it to do your administrative tasks.

Users who connect to your site from an IP that isn’t in your allowedIps list will be connected to your fleet instances and won’t be able to alter the file system (for example, they won’t be able to install plugins or upload media).

If you need to redeploy the same app-env combination, manually remove the parameter store items and the replicated secret that you created in us-east-1. You should also delete the cdk.context.json file because it caches values that you will be replacing.

One project, multiple configurations

You can modify the configuration file in this project to deploy different applications to different environments using the same project. Each app can have different configurations for dev, test, or production environments.

Using this mechanism, you can deploy sites for test and production into different accounts or even different Regions. The solution uses CDK context variables as command-line switches to select different configuration stanzas from the configuration file.

CDK projects allow for multiple deployments to coexist in one account by using unique names for the deployed stacks, based on their configuration.

Check the configuration file into your source control repo so that you track changes made to it over time.

Got a different web app that you want to deploy? Create a new configuration by copying and pasting one of the examples and then modify the build commands as needed for your use case.

Conclusion

In this post, you learned how to build an architecture on AWS that implements multi-layered security. You can use different AWS services to provide protections to your application at different stages of the request lifecycle.

You can learn more about the services used in this sample project by building it in your own account. It’s a great way to explore how the different services work and the full features that are available. By understanding how these AWS services work, you will be ready to use them to add security, at multiple layers, in your own architectures.

 
If you have feedback about this post, submit comments in the Comments section below. If you have questions about this post, contact AWS Support.

Want more AWS Security news? Follow us on Twitter.

Guy Morton

Guy Morton

Guy is a Senior Solutions Architect at AWS. He enjoys bringing his decades of experience as a full stack developer, architect, and people manager to helping customers build and scale their applications securely in the AWS Cloud. Guy has a passion for automation in all its forms, and is also an occasional songwriter and musician who performs under the pseudonym Whtsqr.

Introducing IAM Access Analyzer custom policy checks

Post Syndicated from Mitch Beaumont original https://aws.amazon.com/blogs/security/introducing-iam-access-analyzer-custom-policy-checks/

AWS Identity and Access Management (IAM) Access Analyzer was launched in late 2019. Access Analyzer guides customers toward least-privilege permissions across Amazon Web Services (AWS) by using analysis techniques, such as automated reasoning, to make it simpler for customers to set, verify, and refine IAM permissions. Today, we are excited to announce the general availability of IAM Access Analyzer custom policy checks, a new IAM Access Analyzer feature that helps customers accurately and proactively check IAM policies for critical permissions and increases in policy permissiveness.

In this post, we’ll show how you can integrate custom policy checks into builder workflows to automate the identification of overly permissive IAM policies and IAM policies that contain permissions that you decide are sensitive or critical.

What is the problem?

Although security teams are responsible for the overall security posture of the organization, developers are the ones creating the applications that require permissions. To enable developers to move fast while maintaining high levels of security, organizations look for ways to safely delegate the ability of developers to author IAM policies. Many AWS customers implement manual IAM policy reviews before deploying developer-authored policies to production environments. Customers follow this practice to try to prevent excessive or unwanted permissions finding their way into production. Depending on the volume and complexity of the policies that need to be reviewed; these reviews can be intensive and take time. The result is a slowdown in development and potential delay in deployment of applications and services. Some customers write custom tooling to remove the manual burden of policy reviews, but this can be costly to build and maintain.

How do custom policy checks solve that problem?

Custom policy checks are a new IAM Access Analyzer capability that helps security teams accurately and proactively identify critical permissions in their policies. Custom policy checks can also tell you if a new version of a policy is more permissive than the previous version. Custom policy checks use automated reasoning, a form of static analysis, to provide a higher level of security assurance in the cloud. For more information, see Formal Reasoning About the Security of Amazon Web Services.

Custom policy checks can be embedded in a continuous integration and continuous delivery (CI/CD) pipeline so that checks can be run against policies without having to deploy the policies. In addition, developers can run custom policy checks from their local development environments and get fast feedback about whether or not the policies they are authoring are in line with your organization’s security standards.

How to analyze IAM policies with custom policy checks

In this section, we provide step-by-step instructions for using custom policy checks to analyze IAM policies.

Prerequisites

To complete the examples in our walkthrough, you will need the following:

  1. An AWS account, and an identity that has permissions to use the AWS services, and create the resources, used in the following examples. For more information, see the full sample code used in this blog post on GitHub.
  2. An installed and configured AWS CLI. For more information, see Configure the AWS CLI.
  3. The AWS Cloud Development Kit (AWS CDK). For installation instructions, refer to Install the AWS CDK.

Example 1: Use custom policy checks to compare two IAM policies and check that one does not grant more access than the other

In this example, you will create two IAM identity policy documents, NewPolicyDocument and ExistingPolicyDocument. You will use the new CheckNoNewAccess API to compare these two policies and check that NewPolicyDocument does not grant more access than ExistingPolicyDocument.

Step 1: Create two IAM identity policy documents

  1. Use the following command to create ExistingPolicyDocument.
    cat << EOF > existing-policy-document.json
    {
        "Version": "2012-10-17",
        "Statement": [
            {
                "Effect": "Allow",
                "Action": [
                    "ec2:StartInstances",
                    "ec2:StopInstances"
                ],
                "Resource": "arn:aws:ec2:*:*:instance/*",
                "Condition": {
                    "StringEquals": {
                        "aws:ResourceTag/Owner": "\${aws:username}"
                    }
                }
            }
        ]
    }
    EOF

  2. Use the following command to create NewPolicyDocument.
    cat << EOF > new-policy-document.json
    {
        "Version": "2012-10-17",
        "Statement": [
            {
                "Effect": "Allow",
                "Action": [
                    "ec2:StartInstances",
                    "ec2:StopInstances"
                ],
                "Resource": "arn:aws:ec2:*:*:instance/*"
            }
        ]
    }
    EOF

Notice that ExistingPolicyDocument grants access to the ec2:StartInstances and ec2:StopInstances actions if the condition key aws:ResourceTag/Owner resolves to true. In other words, the value of the tag matches the policy variable aws:username. NewPolicyDocument grants access to the same actions, but does not include a condition key.

Step 2: Check the policies by using the AWS CLI

  1. Use the following command to call the CheckNoNewAccess API to check whether NewPolicyDocument grants more access than ExistingPolicyDocument.
    aws accessanalyzer check-no-new-access \
    --new-policy-document file://new-policy-document.json \
    --existing-policy-document file://existing-policy-document.json \
    --policy-type IDENTITY_POLICY

After a moment, you will see a response from Access Analyzer. The response will look similar to the following.

{
    "result": "FAIL",
    "message": "The modified permissions grant new access compared to your existing policy.",
    "reasons": [
        {
            "description": "New access in the statement with index: 1.",
            "statementIndex": 1
        }
    ]
}

In this example, the validation returned a result of FAIL. This is because NewPolicyDocument is missing the condition key, potentially granting any principal with this identity policy attached more access than intended or needed.

Example 2: Use custom policy checks to check that an IAM policy does not contain sensitive permissions

In this example, you will create an IAM identity-based policy that contains a set of permissions. You will use the CheckAccessNotGranted API to check that the new policy does not give permissions to disable AWS CloudTrail or delete any associated trails.

Step 1: Create a new IAM identity policy document

  • Use the following command to create IamPolicyDocument.
    cat << EOF > iam-policy-document.json
    {
        "Version": "2012-10-17",
        "Statement": [
            {
                "Effect": "Allow",
                "Action": [
                    "cloudtrail:StopLogging",
                    "cloudtrail:Delete*"
                ],
                "Resource": ["*"] 
            }
        ]
    }
    EOF

Step 2: Check the policy by using the AWS CLI

  • Use the following command to call the CheckAccessNotGranted API to check if the new policy grants permission to the set of sensitive actions. In this example, you are asking Access Analyzer to check that IamPolicyDocument does not contain the actions cloudtrail:StopLogging or cloudtrail:DeleteTrail (passed as a list to the access parameter).
    aws accessanalyzer check-access-not-granted \
    --policy-document file://iam-policy-document.json \
    --access actions=cloudtrail:StopLogging,cloudtrail:DeleteTrail \
    --policy-type IDENTITY_POLICY

Because the policy that you created contains both cloudtrail:StopLogging and cloudtrail:DeleteTrail actions, Access Analyzer returns a FAIL.

{
    "result": "FAIL",
    "message": "The policy document grants access to perform one or more of the listed actions.",
    "reasons": [
        {
            "description": "One or more of the listed actions in the statement with index: 0.",
            "statementIndex": 0
        }
    ]
}

Example 3: Integrate custom policy checks into the developer workflow

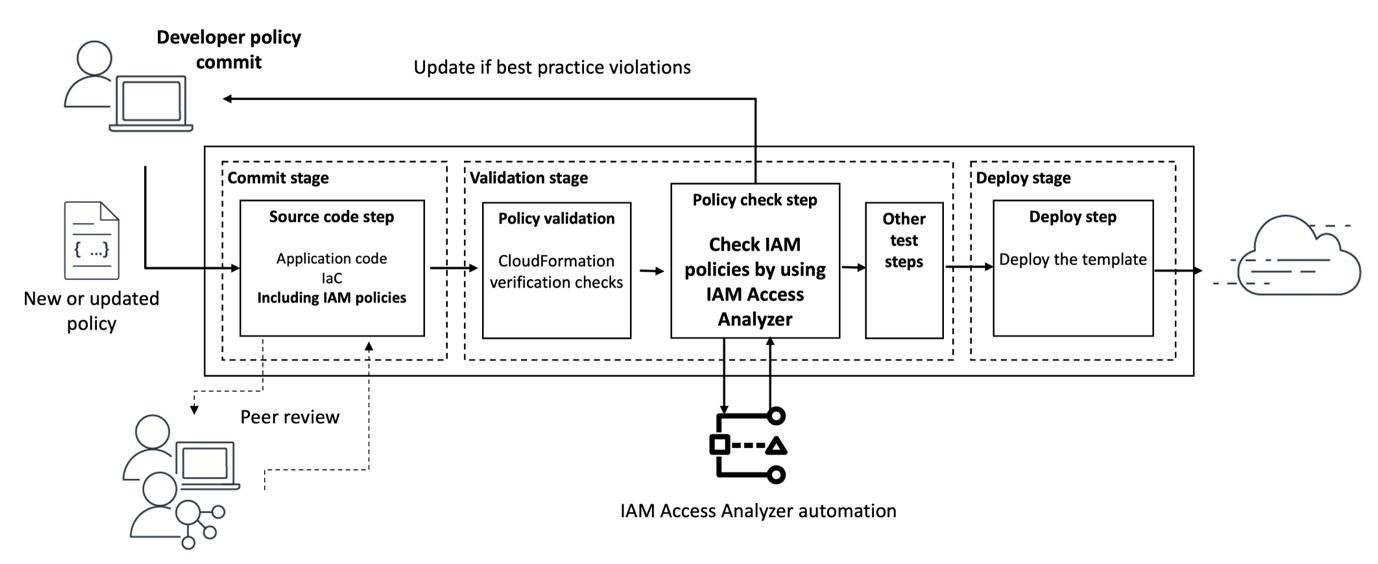
Building on the previous two examples, in this example, you will automate the analysis of the IAM policies defined in an AWS CloudFormation template. Figure 1 shows the workflow that will be used. The workflow will initiate each time a pull request is created against the main branch of an AWS CodeCommit repository called my-iam-policy (the commit stage in Figure 1). The first check uses the CheckNoNewAccess API to determine if the updated policy is more permissive than a reference IAM policy. The second check uses the CheckAccessNotGranted API to automatically check for critical permissions within the policy (the validation stage in Figure 1). In both cases, if the updated policy is more permissive, or contains critical permissions, a comment with the results of the validation is posted to the pull request. This information can then be used to decide whether the pull request is merged into the main branch for deployment (the deploy stage is shown in Figure 1).

Figure 1: Diagram of the pipeline that will check policies

Figure 1: Diagram of the pipeline that will check policies

Step 1: Deploy the infrastructure and set up the pipeline

  1. Use the following command to download and unzip the Cloud Development Kit (CDK) project associated with this blog post.
    git clone https://github.com/aws-samples/access-analyzer-automated-policy-analysis-blog.git
    cd ./access-analyzer-automated-policy-analysis-blog

  2. Create a virtual Python environment to contain the project dependencies by using the following command.
    python3 -m venv .venv

  3. Activate the virtual environment with the following command.
    source .venv/bin/activate

  4. Install the project requirements by using the following command.
    pip install -r requirements.txt

  5. Use the following command to update the CDK CLI to the latest major version.
    npm install -g aws-cdk@2 --force

  6. Before you can deploy the CDK project, use the following command to bootstrap your AWS environment. Bootstrapping is the process of creating resources needed for deploying CDK projects. These resources include an Amazon Simple Storage Service (Amazon S3) bucket for storing files and IAM roles that grant permissions needed to perform deployments.
    cdk bootstrap

  7. Finally, use the following command to deploy the pipeline infrastructure.
    cdk deploy --require-approval never

    The deployment will take a few minutes to complete. Feel free to grab a coffee and check back shortly.

    When the deployment completes, there will be two stack outputs listed: one with a name that contains CodeCommitRepo and another with a name that contains ConfigBucket. Make a note of the values of these outputs, because you will need them later.

    The deployed pipeline is displayed in the AWS CodePipeline console and should look similar to the pipeline shown in Figure 2.

    Figure 2: AWS CodePipeline and CodeBuild Management Console view

    Figure 2: AWS CodePipeline and CodeBuild Management Console view

    In addition to initiating when a pull request is created, the newly deployed pipeline can also be initiated when changes to the main branch of the AWS CodeCommit repository are detected. The pipeline has three stages, CheckoutSources, IAMPolicyAnalysis, and deploy. The CheckoutSource stage checks out the contents of the my-iam-policy repository when the pipeline is triggered due to a change in the main branch.

    The IAMPolicyAnalysis stage, which runs after the CheckoutSource stage or when a pull request has been created against the main branch, has two actions. The first action, Check no new access, verifies that changes to the IAM policies in the CloudFormation template do not grant more access than a pre-defined reference policy. The second action, Check access not granted, verifies that those same updates do not grant access to API actions that are deemed sensitive or critical. Finally, the Deploy stage will deploy the resources defined in the CloudFormation template, if the actions in the IAMPolicyAnalysis stage are successful.

    To analyze the IAM policies, the Check no new access and Check access not granted actions depend on a reference policy and a predefined list of API actions, respectively.

  8. Use the following command to create the reference policy.
    cd ../ 
    cat << EOF > cnna-reference-policy.json
    {
        "Version": "2012-10-17",
        "Statement": [
            {
                "Effect": "Allow",
                "Action": "*",
                "Resource": "*"
            },
            {
                "Effect": "Deny",
                "Action": "iam:PassRole",
                "Resource": "arn:aws:iam::*:role/my-sensitive-roles/*"
            }
        ]
    }	
    EOF

    This reference policy sets out the maximum permissions for policies that you plan to validate with custom policy checks. The iam:PassRole permission is a permission that allows an IAM principal to pass an IAM role to an AWS service, like Amazon Elastic Compute Cloud (Amazon EC2) or AWS Lambda. The reference policy says that the only way that a policy is more permissive is if it allows iam:PassRole on this group of sensitive resources: arn:aws:iam::*:role/my-sensitive-roles/*”.

    Why might a reference policy be useful? A reference policy helps ensure that a particular combination of actions, resources, and conditions is not allowed in your environment. Reference policies typically allow actions and resources in one statement, then deny the problematic permissions in a second statement. This means that a policy that is more permissive than the reference policy allows access to a permission that the reference policy has denied.

    In this example, a developer who is authorized to create IAM roles could, intentionally or unintentionally, create an IAM role for an AWS service (like EC2 for AWS Lambda) that has permission to pass a privileged role to another service or principal, leading to an escalation of privilege.

  9. Use the following command to create a list of sensitive actions. This list will be parsed during the build pipeline and passed to the CheckAccessNotGranted API. If the policy grants access to one or more of the sensitive actions in this list, a result of FAIL will be returned. To keep this example simple, add a single API action, as follows.
    cat << EOF > sensitive-actions.file
    dynamodb:DeleteTable
    EOF

  10. So that the CodeBuild projects can access the dependencies, use the following command to copy the cnna-reference-policy.file and sensitive-actions.file to an S3 bucket. Refer to the stack outputs you noted earlier and replace <ConfigBucket> with the name of the S3 bucket created in your environment.
    aws s3 cp ./cnna-reference-policy.json s3://<ConfgBucket>/cnna-reference-policy.json
    aws s3 cp ./sensitive-actions.file s3://<ConfigBucket>/sensitive-actions.file

Step 2: Create a new CloudFormation template that defines an IAM policy

With the pipeline deployed, the next step is to clone the repository that was created and populate it with a CloudFormation template that defines an IAM policy.

  1. Install git-remote-codecommit by using the following command.
    pip install git-remote-codecommit

    For more information on installing and configuring git-remote-codecommit, see the AWS CodeCommit User Guide.

  2. With git-remote-codecommit installed, use the following command to clone the my-iam-policy repository from AWS CodeCommit.
    git clone codecommit://my-iam-policy && cd ./my-iam-policy

    If you’ve configured a named profile for use with the AWS CLI, use the following command, replacing <profile> with the name of your named profile.

    git clone codecommit://<profile>@my-iam-policy && cd ./my-iam-policy

  3. Use the following command to create the CloudFormation template in the local clone of the repository.
    cat << EOF > ec2-instance-role.yaml
    ---
    AWSTemplateFormatVersion: 2010-09-09
    Description: CloudFormation Template to deploy base resources for access_analyzer_blog
    Resources:
      EC2Role:
        Type: AWS::IAM::Role
        Properties:
          AssumeRolePolicyDocument:
            Version: 2012-10-17
            Statement:
            - Effect: Allow
              Principal:
                Service: ec2.amazonaws.com
              Action: sts:AssumeRole
          Path: /
          Policies:
          - PolicyName: my-application-permissions
            PolicyDocument:
              Version: 2012-10-17
              Statement:
              - Effect: Allow
                Action:
                  - 'ec2:RunInstances'
                  - 'lambda:CreateFunction'
                  - 'lambda:InvokeFunction'
                  - 'dynamodb:Scan'
                  - 'dynamodb:Query'
                  - 'dynamodb:UpdateItem'
                  - 'dynamodb:GetItem'
                Resource: '*'
              - Effect: Allow
                Action:
                  - iam:PassRole 
                Resource: "arn:aws:iam::*:role/my-custom-role"
            
      EC2InstanceProfile:
        Type: AWS::IAM::InstanceProfile
        Properties:
          Path: /
          Roles:
            - !Ref EC2Role
    EOF

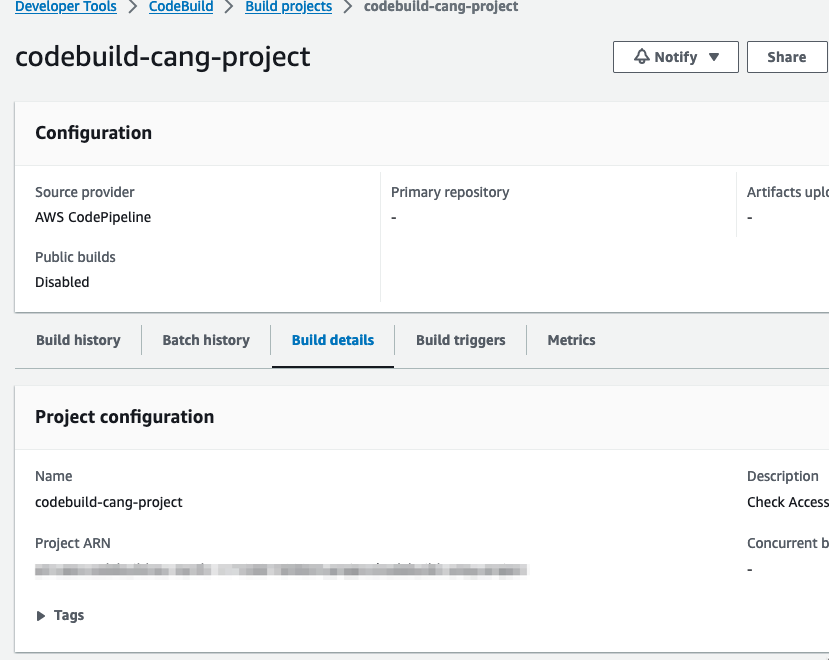
The actions in the IAMPolicyValidation stage are run by a CodeBuild project. CodeBuild environments run arbitrary commands that are passed to the project using a buildspec file. Each project has already been configured to use an inline buildspec file.

You can inspect the buildspec file for each project by opening the project’s Build details page as shown in Figure 3.

Figure 3: AWS CodeBuild console and build details

Figure 3: AWS CodeBuild console and build details

Step 3: Run analysis on the IAM policy

The next step involves checking in the first version of the CloudFormation template to the repository and checking two things. First, that the policy does not grant more access than the reference policy. Second, that the policy does not contain any of the sensitive actions defined in the sensitive-actions.file.

  1. To begin tracking the CloudFormation template created earlier, use the following command.
    git add ec2-instance-role.yaml 

  2. Commit the changes you have made to the repository.
    git commit -m 'committing a new CFN template with IAM policy'

  3. Finally, push these changes to the remote repository.
    git push

  4. Pushing these changes will initiate the pipeline. After a few minutes the pipeline should complete successfully. To view the status of the pipeline, do the following:
    1. Navigate to https://<region>.console.aws.amazon.com/codesuite/codepipeline/pipelines (replacing <region> with your AWS Region).
    2. Choose the pipeline called accessanalyzer-pipeline.
    3. Scroll down to the IAMPolicyValidation stage of the pipeline.
    4. For both the check no new access and check access not granted actions, choose View Logs to inspect the log output.
  5. If you inspect the build logs for both the check no new access and check access not granted actions within the pipeline, you should see that there were no blocking or non-blocking findings, similar to what is shown in Figure 4. This indicates that the policy was validated successfully. In other words, the policy was not more permissive than the reference policy, and it did not include any of the critical permissions.
    Figure 4: CodeBuild log entry confirming that the IAM policy was successfully validated

    Figure 4: CodeBuild log entry confirming that the IAM policy was successfully validated

Step 4: Create a pull request to merge a new update to the CloudFormation template

In this step, you will make a change to the IAM policy in the CloudFormation template. The change deliberately makes the policy grant more access than the reference policy. The change also includes a critical permission.

  1. Use the following command to create a new branch called add-new-permissions in the local clone of the repository.
    git checkout -b add-new-permissions

  2. Next, edit the IAM policy in ec2-instance-role.yaml to include an additional API action, dynamodb:Delete* and update the resource property of the inline policy to use an IAM role in the /my-sensitive-roles/*” path. You can copy the following example, if you’re unsure of how to do this.
    ---
    AWSTemplateFormatVersion: 2010-09-09
    Description: CloudFormation Template to deploy base resources for access_analyzer_blog
    Resources:
      EC2Role:
        Type: AWS::IAM::Role
        Properties:
          AssumeRolePolicyDocument:
            Version: 2012-10-17
            Statement:
            - Effect: Allow
              Principal:
                Service: ec2.amazonaws.com
              Action: sts:AssumeRole
          Path: /
          Policies:
          - PolicyName: my-application-permissions
            PolicyDocument:
              Version: 2012-10-17
              Statement:
              - Effect: Allow
                Action:
                  - 'ec2:RunInstances'
                  - 'lambda:CreateFunction'
                  - 'lambda:InvokeFunction'
                  - 'dynamodb:Scan'
                  - 'dynamodb:Query'
                  - 'dynamodb:UpdateItem'
                  - 'dynamodb:GetItem'
                  - 'dynamodb:Delete*'
                Resource: '*'
              - Effect: Allow
                Action:
                  - iam:PassRole 
                Resource: "arn:aws:iam::*:role/my-sensitive-roles/my-custom-admin-role"
            
      EC2InstanceProfile:
        Type: AWS::IAM::InstanceProfile
        Properties:
          Path: /
          Roles:
            - !Ref EC2Role

  3. Commit the policy change and push the updated policy document to the repo by using the following commands.
    git add ec2-instance-role.yaml 
    git commit -m "adding new permission and allowing my ec2 instance to assume a pass sensitive IAM role"

  4. The add-new-permissions branch is currently a local branch. Use the following command to push the branch to the remote repository. This action will not initiate the pipeline, because the pipeline only runs when changes are made to the repository’s main branch.
    git push -u origin add-new-permissions

  5. With the new branch and changes pushed to the repository, follow these steps to create a pull request:
    1. Navigate to https://console.aws.amazon.com/codesuite/codecommit/repositories (don’t forget to the switch to the correct Region).
    2. Choose the repository called my-iam-policy.
    3. Choose the branch add-new-permissions from the drop-down list at the top of the repository screen.
      Figure 5: my-iam-policy repository with new branch available

      Figure 5: my-iam-policy repository with new branch available

    4. Choose Create pull request.
    5. Enter a title and description for the pull request.
    6. (Optional) Scroll down to see the differences between the current version and new version of the CloudFormation template highlighted.
    7. Choose Create pull request.
  6. The creation of the pull request will Initiate the pipeline to fetch the CloudFormation template from the repository and run the check no new access and check access not granted analysis actions.
  7. After a few minutes, choose the Activity tab for the pull request. You should see a comment from the pipeline that contains the results of the failed validation.
    Figure 6: Results from the failed validation posted as a comment to the pull request

    Figure 6: Results from the failed validation posted as a comment to the pull request

Why did the validations fail?

The updated IAM role and inline policy failed validation for two reasons. First, the reference policy said that no one should have more permissions than the reference policy does. The reference policy in this example included a deny statement for the iam:PassRole permission with a resource of /my-sensitive-role/*. The new created inline policy included an allow statement for the iam:PassRole permission with a resource of arn:aws:iam::*:role/my-sensitive-roles/my-custom-admin-role. In other words, the new policy had more permissions than the reference policy.

Second, the list of critical permissions included the dynamodb:DeleteTable permission. The inline policy included a statement that would allow the EC2 instance to perform the dynamodb:DeleteTable action.

Cleanup

Use the following command to delete the infrastructure that was provisioned as part of the examples in this blog post.

cdk destroy 

Conclusion

In this post, I introduced you to two new IAM Access Analyzer APIs: CheckNoNewAccess and CheckAccessNotGranted. The main example in the post demonstrated one way in which you can use these APIs to automate security testing throughout the development lifecycle. The example did this by integrating both APIs into the developer workflow and validating the developer-authored IAM policy when the developer created a pull request to merge changes into the repository’s main branch. The automation helped the developer to get feedback about the problems with the IAM policy quickly, allowing the developer to take action in a timely way. This is often referred to as shifting security left — identifying misconfigurations early and automatically supporting an iterative, fail-fast model of continuous development and testing. Ultimately, this enables teams to make security an inherent part of a system’s design and architecture and can speed up product development workflow.

You can find the full sample code used in this blog post on GitHub.

To learn more about IAM Access Analyzer and the new custom policy checks feature, see the IAM Access Analyzer documentation.

If you have feedback about this post, submit comments in the Comments section below. If you have questions about this post, contact AWS Support.

Want more AWS Security news? Follow us on Twitter.
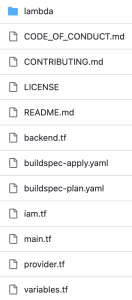
Mitch Beaumont

Mitch Beaumont

Mitch is a Principal Solutions Architect for AWS, based in Sydney, Australia. Mitch works with some of Australia’s largest financial services customers, helping them to continually raise the security bar for the products and features that they build and ship. Outside of work, Mitch enjoys spending time with his family, photography, and surfing.

Author

Matt Luttrell

Matt is a Principal Solutions Architect on the AWS Identity Solutions team. When he’s not spending time chasing his kids around, he enjoys skiing, cycling, and the occasional video game.

Writing IAM Policies: Grant Access to User-Specific Folders in an Amazon S3 Bucket

Post Syndicated from Dylan Souvage original https://aws.amazon.com/blogs/security/writing-iam-policies-grant-access-to-user-specific-folders-in-an-amazon-s3-bucket/

November 14, 2023: We’ve updated this post to use IAM Identity Center and follow updated IAM best practices.

In this post, we discuss the concept of folders in Amazon Simple Storage Service (Amazon S3) and how to use policies to restrict access to these folders. The idea is that by properly managing permissions, you can allow federated users to have full access to their respective folders and no access to the rest of the folders.

Overview

Imagine you have a team of developers named Adele, Bob, and David. Each of them has a dedicated folder in a shared S3 bucket, and they should only have access to their respective folders. These users are authenticated through AWS IAM Identity Center (successor to AWS Single Sign-On).

In this post, you’ll focus on David. You’ll walk through the process of setting up these permissions for David using IAM Identity Center and Amazon S3. Before you get started, let’s first discuss what is meant by folders in Amazon S3, because it’s not as straightforward as it might seem. To learn how to create a policy with folder-level permissions, you’ll walk through a scenario similar to what many people have done on existing files shares, where every IAM Identity Center user has access to only their own home folder. With folder-level permissions, you can granularly control who has access to which objects in a specific bucket.

You’ll be shown a policy that grants IAM Identity Center users access to the same Amazon S3 bucket so that they can use the AWS Management Console to store their information. The policy allows users in the company to upload or download files from their department’s folder, but not to access any other department’s folder in the bucket.

After the policy is explained, you’ll see how to create an individual policy for each IAM Identity Center user.

Throughout the rest of this post, you will use a policy, which will be associated with an IAM Identity Center user named David. Also, you must have already created an S3 bucket.

Note: S3 buckets have a global namespace and you must change the bucket name to a unique name.

For this blog post, you will need an S3 bucket with the following structure (the example bucket name for the rest of the blog is “my-new-company-123456789”):

/home/Adele/
/home/Bob/
/home/David/
/confidential/
/root-file.txt

Figure 1: Screenshot of the root of the my-new-company-123456789 bucket

Figure 1: Screenshot of the root of the my-new-company-123456789 bucket

Your S3 bucket structure should have two folders, home and confidential, with a file root-file.txt in the main bucket directory. Inside confidential you will have no items or folders. Inside home there should be three sub-folders: Adele, Bob, and David.

Figure 2: Screenshot of the home/ directory of the my-new-company-123456789 bucket

Figure 2: Screenshot of the home/ directory of the my-new-company-123456789 bucket

A brief lesson about Amazon S3 objects

Before explaining the policy, it’s important to review how Amazon S3 objects are named. This brief description isn’t comprehensive, but will help you understand how the policy works. If you already know about Amazon S3 objects and prefixes, skip ahead to Creating David in Identity Center.

Amazon S3 stores data in a flat structure; you create a bucket, and the bucket stores objects. S3 doesn’t have a hierarchy of sub-buckets or folders; however, tools like the console can emulate a folder hierarchy to present folders in a bucket by using the names of objects (also known as keys). When you create a folder in S3, S3 creates a 0-byte object with a key that references the folder name that you provided. For example, if you create a folder named photos in your bucket, the S3 console creates a 0-byte object with the key photos/. The console creates this object to support the idea of folders. The S3 console treats all objects that have a forward slash (/) character as the last (trailing) character in the key name as a folder (for example, examplekeyname/)

To give you an example, for an object that’s named home/common/shared.txt, the console will show the shared.txt file in the common folder in the home folder. The names of these folders (such as home/ or home/common/) are called prefixes, and prefixes like these are what you use to specify David’s department folder in his policy. By the way, the slash (/) in a prefix like home/ isn’t a reserved character — you could name an object (using the Amazon S3 API) with prefixes such as home:common:shared.txt or home-common-shared.txt. However, the convention is to use a slash as the delimiter, and the Amazon S3 console (but not S3 itself) treats the slash as a special character for showing objects in folders. For more information on organizing objects in the S3 console using folders, see Organizing objects in the Amazon S3 console by using folders.

Creating David in Identity Center

IAM Identity Center helps you securely create or connect your workforce identities and manage their access centrally across AWS accounts and applications. Identity Center is the recommended approach for workforce authentication and authorization on AWS for organizations of any size and type. Using Identity Center, you can create and manage user identities in AWS, or connect your existing identity source, including Microsoft Active Directory, Okta, Ping Identity, JumpCloud, Google Workspace, and Azure Active Directory (Azure AD). For further reading on IAM Identity Center, see the Identity Center getting started page.

Begin by setting up David as an IAM Identity Center user. To start, open the AWS Management Console and go to IAM Identity Center and create a user.

Note: The following steps are for Identity Center without System for Cross-domain Identity Management (SCIM) turned on, the add user option won’t be available if SCIM is turned on.

  1. From the left pane of the Identity Center console, select Users, and then choose Add user.
    Figure 3: Screenshot of IAM Identity Center Users page.

    Figure 3: Screenshot of IAM Identity Center Users page.

  2. Enter David as the Username, enter an email address that you have access to as you will need this later to confirm your user, and then enter a First name, Last name, and Display name.
  3. Leave the rest as default and choose Add user.
  4. Select Users from the left navigation pane and verify you’ve created the user David.
    Figure 4: Screenshot of adding users to group in Identity Center.

    Figure 4: Screenshot of adding users to group in Identity Center.

  5. Now that you’re verified the user David has been created, use the left pane to navigate to Permission sets, then choose Create permission set.
    Figure 5: Screenshot of permission sets in Identity Center.

    Figure 5: Screenshot of permission sets in Identity Center.

  6. Select Custom permission set as your Permission set type, then choose Next.
    Figure 6: Screenshot of permission set types in Identity Center.

    Figure 6: Screenshot of permission set types in Identity Center.

David’s policy

This is David’s complete policy, which will be associated with an IAM Identity Center federated user named David by using the console. This policy grants David full console access to only his folder (/home/David) and no one else’s. While you could grant each user access to their own bucket, keep in mind that an AWS account can have up to 100 buckets by default. By creating home folders and granting the appropriate permissions, you can instead allow thousands of users to share a single bucket.

{
 “Version”:”2012-10-17”,
 “Statement”: [
   {
     “Sid”: “AllowUserToSeeBucketListInTheConsole”,
     “Action”: [“s3:ListAllMyBuckets”, “s3:GetBucketLocation”],
     “Effect”: “Allow”,
     “Resource”: [“arn:aws:s3:::*”]
   },
  {
     “Sid”: “AllowRootAndHomeListingOfCompanyBucket”,
     “Action”: [“s3:ListBucket”],
     “Effect”: “Allow”,
     “Resource”: [“arn:aws:s3::: my-new-company-123456789”],
     “Condition”:{“StringEquals”:{“s3:prefix”:[“”,”home/”, “home/David”],”s3:delimiter”:[“/”]}}
    },
   {
     “Sid”: “AllowListingOfUserFolder”,
     “Action”: [“s3:ListBucket”],
     “Effect”: “Allow”,
     “Resource”: [“arn:aws:s3:::my-new-company-123456789”],
     “Condition”:{“StringLike”:{“s3:prefix”:[“home/David/*”]}}
   },
   {
     “Sid”: “AllowAllS3ActionsInUserFolder”,
     “Effect”: “Allow”,
     “Action”: [“s3:*”],
     “Resource”: [“arn:aws:s3:::my-new-company-123456789/home/David/*”]
   }
 ]
}
  1. Now, copy and paste the preceding IAM Policy into the inline policy editor. In this case, you use the JSON editor. For information on creating policies, see Creating IAM policies.
    Figure 7: Screenshot of the inline policy inside the permissions set in Identity Center.

    Figure 7: Screenshot of the inline policy inside the permissions set in Identity Center.

  2. Give your permission set a name and a description, then leave the rest at the default settings and choose Next.
  3. Verify that you modify the policies to have the bucket name you created earlier.
  4. After your permission set has been created, navigate to AWS accounts on the left navigation pane, then select Assign users or groups.
    Figure 8: Screenshot of the AWS accounts in Identity Center.

    Figure 8: Screenshot of the AWS accounts in Identity Center.

  5. Select the user David and choose Next.
    Figure 9: Screenshot of the AWS accounts in Identity Center.

    Figure 9: Screenshot of the AWS accounts in Identity Center.

  6. Select the permission set you created earlier, choose Next, leave the rest at the default settings and choose Submit.
    Figure 10: Screenshot of the permission sets in Identity Center.

    Figure 10: Screenshot of the permission sets in Identity Center.

    You’ve now created and attached the permissions required for David to view his S3 bucket folder, but not to view the objects in other users’ folders. You can verify this by signing in as David through the AWS access portal.

    Figure 11: Screenshot of the settings summary in Identity Center.

    Figure 11: Screenshot of the settings summary in Identity Center.

  7. Navigate to the dashboard in IAM Identity Center and go to the Settings summary, then choose the AWS access portal URL.
    Figure 12: Screenshot of David signing into the console via the Identity Center dashboard URL.

    Figure 12: Screenshot of David signing into the console via the Identity Center dashboard URL.

  8. Sign in as the user David with the one-time password you received earlier when creating David.
    Figure 13: Second screenshot of David signing into the console through the Identity Center dashboard URL.

    Figure 13: Second screenshot of David signing into the console through the Identity Center dashboard URL.

  9. Open the Amazon S3 console.
  10. Search for the bucket you created earlier.
    Figure 14: Screenshot of my-new-company-123456789 bucket in the AWS console.

    Figure 14: Screenshot of my-new-company-123456789 bucket in the AWS console.

  11. Navigate to David’s folder and verify that you have read and write access to the folder. If you navigate to other users’ folders, you’ll find that you don’t have access to the objects inside their folders.

David’s policy consists of four blocks; let’s look at each individually.

Block 1: Allow required Amazon S3 console permissions

Before you begin identifying the specific folders David can have access to, you must give him two permissions that are required for Amazon S3 console access: ListAllMyBuckets and GetBucketLocation.

   {
      "Sid": "AllowUserToSeeBucketListInTheConsole",
      "Action": ["s3:GetBucketLocation", "s3:ListAllMyBuckets"],
      "Effect": "Allow",
      "Resource": ["arn:aws:s3:::*"]
   }

The ListAllMyBuckets action grants David permission to list all the buckets in the AWS account, which is required for navigating to buckets in the Amazon S3 console (and as an aside, you currently can’t selectively filter out certain buckets, so users must have permission to list all buckets for console access). The console also does a GetBucketLocation call when users initially navigate to the Amazon S3 console, which is why David also requires permission for that action. Without these two actions, David will get an access denied error in the console.

Block 2: Allow listing objects in root and home folders

Although David should have access to only his home folder, he requires additional permissions so that he can navigate to his folder in the Amazon S3 console. David needs permission to list objects at the root level of the my-new-company-123456789 bucket and to the home/ folder. The following policy grants these permissions to David:

   {
      "Sid": "AllowRootAndHomeListingOfCompanyBucket",
      "Action": ["s3:ListBucket"],
      "Effect": "Allow",
      "Resource": ["arn:aws:s3:::my-new-company-123456789"],
      "Condition":{"StringEquals":{"s3:prefix":["","home/", "home/David"],"s3:delimiter":["/"]}}
   }

Without the ListBucket permission, David can’t navigate to his folder because he won’t have permissions to view the contents of the root and home folders. When David tries to use the console to view the contents of the my-new-company-123456789 bucket, the console will return an access denied error. Although this policy grants David permission to list all objects in the root and home folders, he won’t be able to view the contents of any files or folders except his own (you specify these permissions in the next block).

This block includes conditions, which let you limit under what conditions a request to AWS is valid. In this case, David can list objects in the my-new-company-123456789 bucket only when he requests objects without a prefix (objects at the root level) and objects with the home/ prefix (objects in the home folder). If David tries to navigate to other folders, such as confidential/, David is denied access. Additionally, David needs permissions to list prefix home/David to be able to use the search functionality of the console instead of scrolling down the list of users’ folders.

To set these root and home folder permissions, I used two conditions: s3:prefix and s3:delimiter. The s3:prefix condition specifies the folders that David has ListBucket permissions for. For example, David can list the following files and folders in the my-new-company-123456789 bucket:

/root-file.txt
/confidential/
/home/Adele/
/home/Bob/
/home/David/

But David cannot list files or subfolders in the confidential/home/Adele, or home/Bob folders.

Although the s3:delimiter condition isn’t required for console access, it’s still a good practice to include it in case David makes requests by using the API. As previously noted, the delimiter is a character—such as a slash (/)—that identifies the folder that an object is in. The delimiter is useful when you want to list objects as if they were in a file system. For example, let’s assume the my-new-company-123456789 bucket stored thousands of objects. If David includes the delimiter in his requests, he can limit the number of returned objects to just the names of files and subfolders in the folder he specified. Without the delimiter, in addition to every file in the folder he specified, David would get a list of all files in any subfolders.

Block 3: Allow listing objects in David’s folder

In addition to the root and home folders, David requires access to all objects in the home/David/ folder and any subfolders that he might create. Here’s a policy that allows this:

{
      “Sid”: “AllowListingOfUserFolder”,
      “Action”: [“s3:ListBucket”],
      “Effect”: “Allow”,
      “Resource”: [“arn:aws:s3:::my-new-company-123456789”],
      "Condition":{"StringLike":{"s3:prefix":["home/David/*"]}}
    }

In the condition above, you use a StringLike expression in combination with the asterisk (*) to represent an object in David’s folder, where the asterisk acts as a wildcard. That way, David can list files and folders in his folder (home/David/). You couldn’t include this condition in the previous block (AllowRootAndHomeListingOfCompanyBucket) because it used the StringEquals expression, which would interpret the asterisk (*) as an asterisk, not as a wildcard.

In the next section, the AllowAllS3ActionsInUserFolder block, you’ll see that the Resource element specifies my-new-company/home/David/*, which looks like the condition that I specified in this section. You might think that you can similarly use the Resource element to specify David’s folder in this block. However, the ListBucket action is a bucket-level operation, meaning the Resource element for the ListBucket action applies only to bucket names and doesn’t take folder names into account. So, to limit actions at the object level (files and folders), you must use conditions.

Block 4: Allow all Amazon S3 actions in David’s folder

Finally, you specify David’s actions (such as read, write, and delete permissions) and limit them to just his home folder, as shown in the following policy:

    {
      "Sid": "AllowAllS3ActionsInUserFolder",
      "Effect": "Allow",
      "Action": ["s3:*"],
      "Resource": ["arn:aws:s3:::my-new-company-123456789/home/David/*"]
    }

For the Action element, you specified s3:*, which means David has permission to do all Amazon S3 actions. In the Resource element, you specified David’s folder with an asterisk (*) (a wildcard) so that David can perform actions on the folder and inside the folder. For example, David has permission to change his folder’s storage class. David also has permission to upload files, delete files, and create subfolders in his folder (perform actions in the folder).

An easier way to manage policies with policy variables

In David’s folder-level policy you specified David’s home folder. If you wanted a similar policy for users like Bob and Adele, you’d have to create separate policies that specify their home folders. Instead of creating individual policies for each IAM Identity Center user, you can use policy variables and create a single policy that applies to multiple users (a group policy). Policy variables act as placeholders. When you make a request to a service in AWS, the placeholder is replaced by a value from the request when the policy is evaluated.

For example, you can use the previous policy and replace David’s user name with a variable that uses the requester’s user name through attributes and PrincipalTag as shown in the following policy (copy this policy to use in the procedure that follows):

{
	"Version": "2012-10-17",
	"Statement": [
		{
			"Sid": "AllowUserToSeeBucketListInTheConsole",
			"Action": [
				"s3:ListAllMyBuckets",
				"s3:GetBucketLocation"
			],
			"Effect": "Allow",
			"Resource": [
				"arn:aws:s3:::*"
			]
		},
		{
			"Sid": "AllowRootAndHomeListingOfCompanyBucket",
			"Action": [
				"s3:ListBucket"
			],
			"Effect": "Allow",
			"Resource": [
				"arn:aws:s3:::my-new-company-123456789"
			],
			"Condition": {
				"StringEquals": {
					"s3:prefix": [
						"",
						"home/",
						"home/${aws:PrincipalTag/userName}"
					],
					"s3:delimiter": [
						"/"
					]
				}
			}
		},
		{
			"Sid": "AllowListingOfUserFolder",
			"Action": [
				"s3:ListBucket"
			],
			"Effect": "Allow",
			"Resource": [
				"arn:aws:s3:::my-new-company-123456789"
			],
			"Condition": {
				"StringLike": {
					"s3:prefix": [
						"home/${aws:PrincipalTag/userName}/*"
					]
				}
			}
		},
		{
			"Sid": "AllowAllS3ActionsInUserFolder",
			"Effect": "Allow",
			"Action": [
				"s3:*"
			],
			"Resource": [
				"arn:aws:s3:::my-new-company-123456789/home/${aws:PrincipalTag/userName}/*"
			]
		}
	]
}
  1. To implement this policy with variables, begin by opening the IAM Identity Center console using the main AWS admin account (ensuring you’re not signed in as David).
  2. Select Settings on the left-hand side, then select the Attributes for access control tab.
    Figure 15: Screenshot of Settings inside Identity Center.

    Figure 15: Screenshot of Settings inside Identity Center.

  3. Create a new attribute for access control, entering userName as the Key and ${path:userName} as the Value, then choose Save changes. This will add a session tag to your Identity Center user and allow you to use that tag in an IAM policy.
    Figure 16: Screenshot of managing attributes inside Identity Center settings.

    Figure 16: Screenshot of managing attributes inside Identity Center settings.

  4. To edit David’s permissions, go back to the IAM Identity Center console and select Permission sets.
    Figure 17: Screenshot of permission sets inside Identity Center with Davids-Permissions selected.

    Figure 17: Screenshot of permission sets inside Identity Center with Davids-Permissions selected.

  5. Select David’s permission set that you created previously.
  6. Select Inline policy and then choose Edit to update David’s policy by replacing it with the modified policy that you copied at the beginning of this section, which will resolve to David’s username.
    Figure 18: Screenshot of David’s policy inside his permission set inside Identity Center.

    Figure 18: Screenshot of David’s policy inside his permission set inside Identity Center.

You can validate that this is set up correctly by signing in to David’s user through the Identity Center dashboard as you did before and verifying you have access to the David folder and not the Bob or Adele folder.

Figure 19: Screenshot of David’s S3 folder with access to a .jpg file inside.

Figure 19: Screenshot of David’s S3 folder with access to a .jpg file inside.

Whenever a user makes a request to AWS, the variable is replaced by the user name of whoever made the request. For example, when David makes a request, ${aws:PrincipalTag/userName} resolves to David; when Adele makes the request, ${aws:PrincipalTag/userName} resolves to Adele.

It’s important to note that, if this is the route you use to grant access, you must control and limit who can set this username tag on an IAM principal. Anyone who can set this tag can effectively read/write to any of these bucket prefixes. It’s important that you limit access and protect the bucket prefixes and who can set the tags. For more information, see What is ABAC for AWS, and the Attribute-based access control User Guide.

Conclusion

By using Amazon S3 folders, you can follow the principle of least privilege and verify that the right users have access to what they need, and only to what they need.

See the following example policy that only allows API access to the buckets, and only allows for adding, deleting, restoring, and listing objects inside the folders:

{
    "Version": "2012-10-17",
    "Statement": [
        {
            "Sid": "AllowAllS3ActionsInUserFolder",
            "Effect": "Allow",
            "Action": [
                "s3:DeleteObject",
                "s3:DeleteObjectTagging",
                "s3:DeleteObjectVersion",
                "s3:DeleteObjectVersionTagging",
                "s3:GetObject",
                "s3:GetObjectTagging",
                "s3:GetObjectVersion",
                "s3:GetObjectVersionTagging",
                "s3:ListBucket",
                "s3:PutObject",
                "s3:PutObjectTagging",
                "s3:PutObjectVersionTagging",
                "s3:RestoreObject"
            ],
            "Resource": [
		   "arn:aws:s3:::my-new-company-123456789",
                "arn:aws:s3:::my-new-company-123456789/home/${aws:PrincipalTag/userName}/*"
            ],
            "Condition": {
                "StringLike": {
                    "s3:prefix": [
                        "home/${aws:PrincipalTag/userName}/*"
                    ]
                }
            }
        }
    ]
}

We encourage you to think about what policies your users might need and restrict the access by only explicitly allowing what is needed.

Here are some additional resources for learning about Amazon S3 folders and about IAM policies, and be sure to get involved at the community forums:

 
If you have feedback about this post, submit comments in the Comments section below. If you have questions about this post, contact AWS Support.

Want more AWS Security news? Follow us on Twitter.
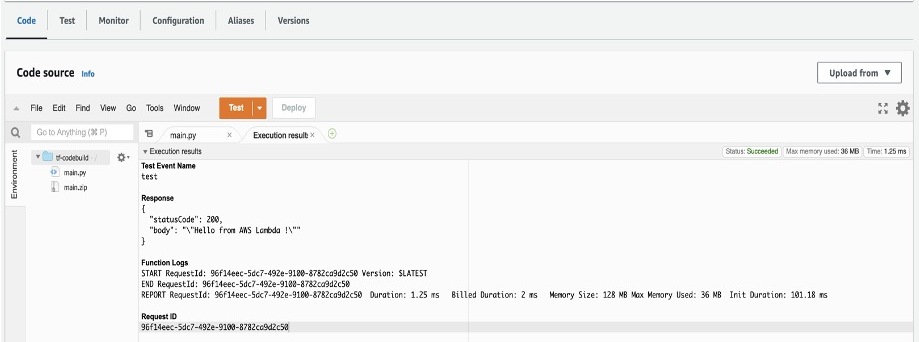
Dylan Souvage

Dylan Souvage

Dylan is a Solutions Architect based in Toronto, Canada. Dylan loves working with customers to understand their business needs and enable them in their cloud journey. In his spare time, he enjoys going out in nature, going on long road trips, and traveling to warm, sunny places.

Abhra Sinha

Abhra Sinha

Abhra is a Toronto-based Senior Solutions Architect at AWS. Abhra enjoys being a trusted advisor to customers, working closely with them to solve their technical challenges and help build a secure scalable architecture on AWS. In his spare time, he enjoys Photography and exploring new restaurants.

Divyajeet Singh

Divyajeet Singh

Divyajeet (DJ) is a Sr. Solutions Architect at AWS Canada. He loves working with customers to help them solve their unique business challenges using the cloud. In his free time, he enjoys spending time with family and friends, and exploring new places.

Get the full benefits of IMDSv2 and disable IMDSv1 across your AWS infrastructure

Post Syndicated from Saju Sivaji original https://aws.amazon.com/blogs/security/get-the-full-benefits-of-imdsv2-and-disable-imdsv1-across-your-aws-infrastructure/

The Amazon Elastic Compute Cloud (Amazon EC2) Instance Metadata Service (IMDS) helps customers build secure and scalable applications. IMDS solves a security challenge for cloud users by providing access to temporary and frequently-rotated credentials, and by removing the need to hardcode or distribute sensitive credentials to instances manually or programmatically. The Instance Metadata Service Version 2 (IMDSv2) adds protections; specifically, IMDSv2 uses session-oriented authentication with the following enhancements:

  • IMDSv2 requires the creation of a secret token in a simple HTTP PUT request to start the session, which must be used to retrieve information in IMDSv2 calls.
  • The IMDSv2 session token must be used as a header in subsequent IMDSv2 requests to retrieve information from IMDS. Unlike a static token or fixed header, a session and its token are destroyed when the process using the token terminates. IMDSv2 sessions can last up to six hours.
  • A session token can only be used directly from the EC2 instance where that session began.
  • You can reuse a token or create a new token with every request.
  • Session token PUT requests are blocked if they contain an X-forwarded-for header.

In a previous blog post, we explained how these new protections add defense-in-depth for third-party and external application vulnerabilities that could be used to try to access the IMDS.

You won’t be able to get the full benefits of IMDSv2 until you disable IMDSv1. While IMDS is provided by the instance itself, the calls to IMDS are from your software. This means your software must support IMDSv2 before you can disable IMDSv1. In addition to AWS SDKs, CLIs, and tools like the SSM agents supporting IMDSv2, you can also use the IMDS Packet Analyzer to pinpoint exactly what you need to update to get your instances ready to use only IMDSv2. These tools make it simpler to transition to IMDSv2 as well as launch new infrastructure with IMDSv1 disabled. All instances launched with AL2023 set the instance to provide only IMDSv2 (IMDSv1 is disabled) by default, with AL2023 also not making IMDSv1 calls.

AWS customers who want to get the benefits of IMDSv2 have told us they want to use IMDSv2 across both new and existing, long-running AWS infrastructure. This blog post shows you scalable solutions to identify existing infrastructure that is providing IMDSv1, how to transition to IMDSv2 on your infrastructure, and how to completely disable IMDSv1. After reviewing this blog, you will be able to set new Amazon EC2 launches to IMDSv2. You will also learn how to identify existing software making IMDSv1 calls, so you can take action to update your software and then require IMDSv2 on existing EC2 infrastructure.

Identifying IMDSv1-enabled EC2 instances

The first step in transitioning to IMDSv2 is to identify all existing IMDSv1-enabled EC2 instances. You can do this in various ways.

Using the console

You can identify IMDSv1-enabled instances using the IMDSv2 attribute column in the Amazon EC2 page in the AWS Management Console.

To view the IMDSv2 attribute column:

  1. Open the Amazon EC2 console and go to Instances.
  2. Choose the settings icon in the top right.
  3. Scroll down to IMDSv2, turn on the slider.
  4. Choose Confirm.

This gives you the IMDS status of your instances. A status of optional means that IMDSv1 is enabled on the instance and required means that IMDSv1 is disabled.

Figure 1: Example of IMDS versions for EC2 instances in the console

Figure 1: Example of IMDS versions for EC2 instances in the console

Using the AWS CLI

You can identify IMDSv1-enabled instances using the AWS Command Line Interface (AWS CLI) by running the aws ec2 describe-instances command and checking the value of HttpTokens. The HttpTokens value determines what version of IMDS is enabled, with optional enabling IMDSv1 and IMDSv2 and required means IMDSv2 is required. Similar to using the console, the optional status indicates that IMDSv1 is enabled on the instance and required indicates that IMDSv1 is disabled.

"MetadataOptions": {
                        "State": "applied", 
                        "HttpEndpoint": "enabled", 
                        "HttpTokens": "optional", 
                        "HttpPutResponseHopLimit": 1
                    },

[ec2-user@ip-172-31-24-101 ~]$ aws ec2 describe-instances | grep '"HttpTokens": "optional"' | wc -l
4

Using AWS Config

AWS Config continually assesses, audits, and evaluates the configurations and relationships of your resources on AWS, on premises, and on other clouds. The AWS Config rule ec2-imdsv2-check checks whether your Amazon EC2 instance metadata version is configured with IMDSv2. The rule is NON_COMPLIANT if the HttpTokens is set to optional, which means the EC2 instance has IMDSv1 enabled.

Figure 2: Example of noncompliant EC2 instances in the AWS Config console

Figure 2: Example of noncompliant EC2 instances in the AWS Config console

After this AWS Config rule is enabled, you can set up AWS Config notifications through Amazon Simple notification Service (Amazon SNS).

Using Security Hub

AWS Security Hub provides detection and alerting capability at the account and organization levels. You can configure cross-Region aggregation in Security Hub to gain insight on findings across Regions. If using AWS Organizations, you can configure a Security Hub designated account to aggregate findings across accounts in your organization.

Security Hub has an Amazon EC2 control ([EC2.8] Amazon EC2 instances should use Instance Metadata Service Version 2 (IMDSv2)) that uses the AWS Config rule ec2-imdsv2-check to check if the instance metadata version is configured with IMDSv2. The rule is NON_COMPLIANT if the HttpTokens is set to optional, which means EC2 instance has IMDSv1 enabled.

Figure 3: Example of AWS Security Hub showing noncompliant EC2 instances

Figure 3: Example of AWS Security Hub showing noncompliant EC2 instances

Using Amazon Event Bridge, you can also set up alerting for the Security Hub findings when the EC2 instances are noncompliant for IMDSv2.

{
  "source": ["aws.securityhub"],
  "detail-type": ["Security Hub Findings - Imported"],
  "detail": {
    "findings": {
      "ProductArn": ["arn:aws:securityhub:us-west-2::product/aws/config"],
      "Title": ["ec2-imdsv2-check"]
    }
  }
}

Identifying if EC2 instances are making IMDSv1 calls

Not all of your software will be making IMDSv1 calls; your dependent libraries and tools might already be compatible with IMDSv2. However, to mitigate against compatibility issues in requiring IMDSv2 and disabling IMDSv1 entirely, you must check for remaining IMDSv1 calls from your software. After you’ve identified that there are instances with IMDSv1 enabled, investigate if your software is making IMDSv1 calls. Most applications make IMDSv1 calls at instance launch and shutdown. For long running instances, we recommend monitoring IMDSv1 calls during a launch or a stop and restart cycle.

You can check whether your software is making IMDSv1 calls by checking the MetadataNoToken metric in Amazon CloudWatch. You can further identify the source of IMDSv1 calls by using the IMDS Packet Analyzer tool.

Steps to check IMDSv1 usage with CloudWatch

  1. Open the CloudWatch console.
  2. Go to Metrics and then All Metrics.
  3. Select EC2 and then choose Per-Instance Metrics.
  4. Search and add the Metric MetadataNoToken for the instances you’re interested in.
Figure 4: CloudWatch dashboard for MetadataNoToken per-instance metric

Figure 4: CloudWatch dashboard for MetadataNoToken per-instance metric

You can use expressions in CloudWatch to view account wide metrics.

SEARCH('{AWS/EC2,InstanceId} MetricName="MetadataNoToken"', 'Maximum')
Figure 5: Using CloudWatch expressions to view account wide metrics for MetadataNoToken

Figure 5: Using CloudWatch expressions to view account wide metrics for MetadataNoToken

You can combine SEARCH and SORT expressions in CloudWatch to help identify the instances using IMDSv1.

SORT(SEARCH('{AWS/EC2,InstanceId} MetricName="MetadataNoToken"', 'Sum', 300), SUM, DESC, 10)
Figure 6: Another example of using CloudWatch expressions to view account wide metrics

Figure 6: Another example of using CloudWatch expressions to view account wide metrics

If you have multiple AWS accounts or use AWS Organizations, you can set up a centralized monitoring account using CloudWatch cross account observability.

IMDS Packet Analyzer

The IMDS Packet Analyzer is an open source tool that identifies and logs IMDSv1 calls from your software, including software start-up on your instance. This tool can assist in identifying the software making IMDSv1 calls on EC2 instances, allowing you to pinpoint exactly what you need to update to get your software ready to use IMDSv2. You can run the IMDS Packet Analyzer from a command line or install it as a service. For more information, see IMDS Packet Analyzer on GitHub.

Disabling IMDSv1 and maintaining only IMDSv2 instances

After you’ve monitored and verified that the software on your EC2 instances isn’t making IMDSv1 calls, you can disable IMDSv1 on those instances. For all compatible workloads, we recommend using Amazon Linux 2023, which offers several improvements (see launch announcement), including requiring IMDSv2 (disabling IMDSv1) by default.

You can also create and modify AMIs and EC2 instances to disable IMDSv1. Configure the AMI provides guidance on how to register a new AMI or change an existing AMI by setting the imds-support parameter to v2.0. If you’re using container services (such as ECS or EKS), you might need a bigger hop limit to help avoid falling back to IMDSv1. You can use the modify-instance-metadata-options launch parameter to make the change. We recommend testing with a hop limit of three in container environments.

To create a new instance

For new instances, you can disable IMDSv1 and enable IMDSv2 by specifying the metadata-options parameter using the run-instance CLI command.

aws ec2 run-instances
    --image-id <ami-0123456789example>
    --instance-type c3.large
    --metadata-options “HttpEndpoint=enabled,HttpTokens=required”

To modify the running instance

aws ec2 modify-instance-metadata-options \
--instance-id <instance-0123456789example> \
--http-tokens required \
--http-endpoint enabled

To configure a new AMI

aws ec2 register-image \
    --name <my-image> \
    --root-device-name /dev/xvda \
    --block-device-mappings DeviceName=/dev/xvda,Ebs={SnapshotId=<snap-0123456789example>} \
    --imds-support v2.0

To modify an existing AMI

aws ec2 modify-image-attribute \
    --image-id <ami-0123456789example> \
    --imds-support v2.0

Using the console

If you’re using the console to launch instances, after selecting Launch Instance from AWS Console, choose the Advanced details tab, scroll down to Metadata version and select V2 only (token required).

Figure 7: Modifying IMDS version using the console

Figure 7: Modifying IMDS version using the console

Using EC2 launch templates

You can use an EC2 launch template as an instance configuration template that an Amazon Auto Scaling group can use to launch EC2 instances. When creating the launch template using the console, you can specify the Metadata version and select V2 only (token required).

Figure 8: Modifying the IMDS version in the EC2 launch templates

Figure 8: Modifying the IMDS version in the EC2 launch templates

Using CloudFormation with EC2 launch templates

When creating an EC2 launch template using AWS CloudFormation, you must specify the MetadataOptions property to use only IMDSv2 by setting HttpTokens as required.

In this state, retrieving the AWS Identity and Access Management (IAM) role credentials always returns IMDSv2 credentials; IMDSv1 credentials are not available.

{
"HttpEndpoint" : <String>,
"HttpProtocolIpv6" : <String>,
"HttpPutResponseHopLimit" : <Integer>,
"HttpTokens" : required,
"InstanceMetadataTags" : <String>
}

Using Systems Manager automation runbook

You can run the EnforceEC2InstanceIMDSv2 automation document available in AWS Systems Manager, which will enforce IMDSv2 on the EC2 instance using the ModifyInstanceMetadataOptions API.

  1. Open the Systems Manager console, and then select Automation from the navigation pane.
  2. Choose Execute automation.
  3. On the Owned by Amazon tab, for Automation document, enter EnforceEC2InstanceIMDSv2, and then press Enter.
  4. Choose EnforceEC2InstanceIMDSv2 document, and then choose Next.
  5. For Execute automation document, choose Simple execution.

    Note: If you need to run the automation on multiple targets, then choose Rate Control.

  6. For Input parameters, enter the ID of EC2 instance under InstanceId
  7. For AutomationAssumeRole, select a role.

    Note: To change the target EC2 instance, the AutomationAssumeRole must have ec2:ModifyInstanceMetadataOptions and ec2:DescribeInstances permissions. For more information about creating the assume role for Systems Manager Automation, see Create a service role for Automation.

  8. Choose Execute.

Using the AWS CDK

If you use the AWS Cloud Development Kit (AWS CDK) to launch instances, you can use it to set the requireImdsv2 property to disable IMDSv1 and enable IMDSv2.

new ec2.Instance(this, 'Instance', {
        // <... other parameters>
        requireImdsv2: true,
})

Using AWS SDK

The new clients for AWS SDK for Java 2.x use IMDSv2, and you can use the new clients to retrieve instance metadata for your EC2 instances. See Introducing a new client in the AWS SDK for Java 2.x for retrieving EC2 Instance Metadata for instructions.

Maintain only IMDSv2 EC2 instances

To maintain only IMDSv2 instances, you can implement service control policies and IAM policies that verify that users and software on your EC2 instances can only use instance metadata using IMDSv2. This policy specifies that RunInstance API calls require the EC2 instance use only IMDSv2. We recommend implementing this policy after all of the instances in associated accounts are free of IMDSv1 calls and you have migrated all of the instances to use only IMDSv2.

{
    "Version": "2012-10-17",
    "Statement": [
               {
            "Sid": "RequireImdsV2",
            "Effect": "Deny",
            "Action": "ec2:RunInstances",
            "Resource": "arn:aws:ec2:*:*:instance/*",
            "Condition": {
                "StringNotEquals": {
                    "ec2:MetadataHttpTokens": "required"
                }
            }
        }
    ]
} 

You can find more details on applicable service control policies (SCPs) and IAM policies in the EC2 User Guide.

Restricting credential usage using condition keys

As an additional layer of defence, you can restrict the use of your Amazon EC2 role credentials to work only when used in the EC2 instance to which they are issued. This control is complementary to IMDSv2 since both can work together. The AWS global condition context keys for EC2 credential control properties (aws:EC2InstanceSourceVPC and aws:EC2InstanceSourcePrivateIPv4) restrict the VPC endpoints and private IPs that can use your EC2 instance credentials, and you can use these keys in service control policies (SCPs) or IAM policies. Examples of these policies are in this blog post.

Conclusion

You won’t be able to get the full benefits of IMDSv2 until you disable IMDSv1. In this blog post, we showed you how to identify IMDSv1-enabled EC2 instances and how to determine if and when your software is making IMDSv1 calls. We also showed you how to disable IMDSv1 on new and existing EC2 infrastructure after your software is no longer making IMDSv1 calls. You can use these tools to transition your existing EC2 instances, and set your new EC2 launches, to use only IMDSv2.

If you have feedback about this post, submit comments in the Comments section below. If you have questions about this post, start a new thread on the AWS Compute re:Post or contact AWS Support.

Want more AWS Security news? Follow us on Twitter.

Saju Sivaji

Saju Sivaji

Saju is Senior Technical Program Manager with the AWS Security organization. When Saju isn’t managing security expectation programs to help raise the security bar for both internal and external customers, he enjoys travelling, racket sports, and bicycling.

Joshua Levinson

Joshua Levinson

Joshua is a Principal Product Manager at AWS on the Amazon EC2 team. He is passionate about helping customers with highly scalable features on EC2 and across AWS and enjoys the challenge of building simplified solutions to complex problems. Outside of work, he enjoys cooking, reading with his kids, and Olympic weightlifting.

Validate IAM policies by using IAM Policy Validator for AWS CloudFormation and GitHub Actions

Post Syndicated from Mitch Beaumont original https://aws.amazon.com/blogs/security/validate-iam-policies-by-using-iam-policy-validator-for-aws-cloudformation-and-github-actions/

In this blog post, I’ll show you how to automate the validation of AWS Identity and Access Management (IAM) policies by using a combination of the IAM Policy Validator for AWS CloudFormation (cfn-policy-validator) and GitHub Actions. Policy validation is an approach that is designed to minimize the deployment of unwanted IAM identity-based and resource-based policies to your Amazon Web Services (AWS) environments.

With GitHub Actions, you can automate, customize, and run software development workflows directly within a repository. Workflows are defined using YAML and are stored alongside your code. I’ll discuss the specifics of how you can set up and use GitHub actions within a repository in the sections that follow.

The cfn-policy-validator tool is a command-line tool that takes an AWS CloudFormation template, finds and parses the IAM policies that are attached to IAM roles, users, groups, and resources, and then runs the policies through IAM Access Analyzer policy checks. Implementing IAM policy validation checks at the time of code check-in helps shift security to the left (closer to the developer) and shortens the time between when developers commit code and when they get feedback on their work.

Let’s walk through an example that checks the policies that are attached to an IAM role in a CloudFormation template. In this example, the cfn-policy-validator tool will find that the trust policy attached to the IAM role allows the role to be assumed by external principals. This configuration could lead to unintended access to your resources and data, which is a security risk.

Prerequisites

To complete this example, you will need the following:

  1. A GitHub account
  2. An AWS account, and an identity within that account that has permissions to create the IAM roles and resources used in this example

Step 1: Create a repository that will host the CloudFormation template to be validated

To begin with, you need to create a GitHub repository to host the CloudFormation template that is going to be validated by the cfn-policy-validator tool.

To create a repository:

  1. Open a browser and go to https://github.com.
  2. In the upper-right corner of the page, in the drop-down menu, choose New repository. For Repository name, enter a short, memorable name for your repository.
  3. (Optional) Add a description of your repository.
  4. Choose either the option Public (the repository is accessible to everyone on the internet) or Private (the repository is accessible only to people access is explicitly shared with).
  5. Choose Initialize this repository with: Add a README file.
  6. Choose Create repository. Make a note of the repository’s name.

Step 2: Clone the repository locally

Now that the repository has been created, clone it locally and add a CloudFormation template.

To clone the repository locally and add a CloudFormation template:

  1. Open the command-line tool of your choice.
  2. Use the following command to clone the new repository locally. Make sure to replace <GitHubOrg> and <RepositoryName> with your own values.
    git clone [email protected]:<GitHubOrg>/<RepositoryName>.git

  3. Change in to the directory that contains the locally-cloned repository.
    cd <RepositoryName>

    Now that the repository is locally cloned, populate the locally-cloned repository with the following sample CloudFormation template. This template creates a single IAM role that allows a principal to assume the role to perform the S3:GetObject action.

  4. Use the following command to create the sample CloudFormation template file.

    WARNING: This sample role and policy should not be used in production. Using a wildcard in the principal element of a role’s trust policy would allow any IAM principal in any account to assume the role.

    cat << EOF > sample-role.yaml
    
    AWSTemplateFormatVersion: "2010-09-09"
    Description: Base stack to create a simple role
    Resources:
      SampleIamRole:
        Type: AWS::IAM::Role
        Properties:
          AssumeRolePolicyDocument:
            Statement:
              - Effect: Allow
                Principal:
                  AWS: "*"
                Action: ["sts:AssumeRole"]
          Path: /      
          Policies:
            - PolicyName: root
              PolicyDocument:
                Version: 2012-10-17
                Statement:
                  - Resource: "*"
                    Effect: Allow
                    Action:
                      - s3:GetObject
    EOF

Notice that AssumeRolePolicyDocument refers to a trust policy that includes a wildcard value in the principal element. This means that the role could potentially be assumed by an external identity, and that’s a risk you want to know about.

Step 3: Vend temporary AWS credentials for GitHub Actions workflows

In order for the cfn-policy-validator tool that’s running in the GitHub Actions workflow to use the IAM Access Analyzer API, the GitHub Actions workflow needs a set of temporary AWS credentials. The AWS Credentials for GitHub Actions action helps address this requirement. This action implements the AWS SDK credential resolution chain and exports environment variables for other actions to use in a workflow. Environment variable exports are detected by the cfn-policy-validator tool.

AWS Credentials for GitHub Actions supports four methods for fetching credentials from AWS, but the recommended approach is to use GitHub’s OpenID Connect (OIDC) provider in conjunction with a configured IAM identity provider endpoint.

To configure an IAM identity provider endpoint for use in conjunction with GitHub’s OIDC provider:

  1. Open the AWS Management Console and navigate to IAM.
  2. In the left-hand menu, choose Identity providers, and then choose Add provider.
  3. For Provider type, choose OpenID Connect.
  4. For Provider URL, enter
    https://token.actions.githubusercontent.com
  5. Choose Get thumbprint.
  6. For Audiences, enter sts.amazonaws.com
  7. Choose Add provider to complete the setup.

At this point, make a note of the OIDC provider name. You’ll need this information in the next step.

After it’s configured, the IAM identity provider endpoint should look similar to the following:

Figure 1: IAM Identity provider details

Figure 1: IAM Identity provider details

Step 4: Create an IAM role with permissions to call the IAM Access Analyzer API

In this step, you will create an IAM role that can be assumed by the GitHub Actions workflow and that provides the necessary permissions to run the cfn-policy-validator tool.

To create the IAM role:

  1. In the IAM console, in the left-hand menu, choose Roles, and then choose Create role.
  2. For Trust entity type, choose Web identity.
  3. In the Provider list, choose the new GitHub OIDC provider that you created in the earlier step. For Audience, select sts.amazonaws.com from the list.
  4. Choose Next.
  5. On the Add permission page, choose Create policy.
  6. Choose JSON, and enter the following policy:
    
        "Version": "2012-10-17",
        "Statement": [
            {
                "Effect": "Allow",
                "Action": [
                  "iam:GetPolicy",
                  "iam:GetPolicyVersion",
                  "access-analyzer:ListAnalyzers",
                  "access-analyzer:ValidatePolicy",
                  "access-analyzer:CreateAccessPreview",
                  "access-analyzer:GetAccessPreview",
                  "access-analyzer:ListAccessPreviewFindings",
                  "access-analyzer:CreateAnalyzer",
                  "s3:ListAllMyBuckets",
                  "cloudformation:ListExports",
                  "ssm:GetParameter"
                ],
                "Resource": "*"
            },
            {
              "Effect": "Allow",
              "Action": "iam:CreateServiceLinkedRole",
              "Resource": "*",
              "Condition": {
                "StringEquals": {
                  "iam:AWSServiceName": "access-analyzer.amazonaws.com"
                }
              }
            } 
        ]
    }

  7. After you’ve attached the new policy, choose Next.

    Note: For a full explanation of each of these actions and a CloudFormation template example that you can use to create this role, see the IAM Policy Validator for AWS CloudFormation GitHub project.

  8. Give the role a name, and scroll down to look at Step 1: Select trusted entities.

    The default policy you just created allows GitHub Actions from organizations or repositories outside of your control to assume the role. To align with the IAM best practice of granting least privilege, let’s scope it down further to only allow a specific GitHub organization and the repository that you created earlier to assume it.

  9. Replace the policy to look like the following, but don’t forget to replace {AWSAccountID}, {GitHubOrg} and {RepositoryName} with your own values.
    {
        "Version": "2012-10-17",
        "Statement": [
            {
                "Effect": "Allow",
                "Principal": {
                    "Federated": "arn:aws:iam::{AWSAccountID}:oidc-provider/token.actions.githubusercontent.com"
                },
                "Action": "sts:AssumeRoleWithWebIdentity",
                "Condition": {
                    "StringEquals": {
                        "token.actions.githubusercontent.com:aud": "sts.amazonaws.com"
                    },
                    "StringLike": {
                        "token.actions.githubusercontent.com:sub": "repo:${GitHubOrg}/${RepositoryName}:*"
                    }
                }
            }
        ]
    }

For information on best practices for configuring a role for the GitHub OIDC provider, see Creating a role for web identity or OpenID Connect Federation (console).

Checkpoint

At this point, you’ve created and configured the following resources:

  • A GitHub repository that has been locally cloned and filled with a sample CloudFormation template.
  • An IAM identity provider endpoint for use in conjunction with GitHub’s OIDC provider.
  • A role that can be assumed by GitHub actions, and a set of associated permissions that allow the role to make requests to IAM Access Analyzer to validate policies.

Step 5: Create a definition for the GitHub Actions workflow

The workflow runs steps on hosted runners. For this example, we are going to use Ubuntu as the operating system for the hosted runners. The workflow runs the following steps on the runner:

  1. The workflow checks out the CloudFormation template by using the community actions/checkout action.
  2. The workflow then uses the aws-actions/configure-aws-credentials GitHub action to request a set of credentials through the IAM identity provider endpoint and the IAM role that you created earlier.
  3. The workflow installs the cfn-policy-validator tool by using the python package manager, PIP.
  4. The workflow runs a validation against the CloudFormation template by using the cfn-policy-validator tool.

The workflow is defined in a YAML document. In order for GitHub Actions to pick up the workflow, you need to place the definition file in a specific location within the repository: .github/workflows/main.yml. Note the “.” prefix in the directory name, indicating that this is a hidden directory.

To create the workflow:

  1. Use the following command to create the folder structure within the locally cloned repository:
    mkdir -p .github/workflows

  2. Create the sample workflow definition file in the .github/workflows directory. Make sure to replace <AWSAccountID> and <AWSRegion> with your own information.
    cat << EOF > .github/workflows/main.yml
    name: cfn-policy-validator-workflow
    
    on: push
    
    permissions:
      id-token: write
      contents: read
    
    jobs: 
      cfn-iam-policy-validation: 
        name: iam-policy-validation
        runs-on: ubuntu-latest
        steps:
          - name: Checkout code
            uses: actions/checkout@v3
    
          - name: Configure AWS Credentials
            uses: aws-actions/configure-aws-credentials@v2
            with:
              role-to-assume: arn:aws:iam::<AWSAccountID>:role/github-actions-access-analyzer-role
              aws-region: <AWSRegion>
              role-session-name: GitHubSessionName
            
          - name: Install cfn-policy-validator
            run: pip install cfn-policy-validator
    
          - name: Validate templates
            run: cfn-policy-validator validate --template-path ./sample-role-test.yaml --region <AWSRegion>
    EOF
    

Step 6: Test the setup

Now that everything has been set up and configured, it’s time to test.

To test the workflow and validate the IAM policy:

  1. Add and commit the changes to the local repository.
    git add .
    git commit -m ‘added sample cloudformation template and workflow definition’

  2. Push the local changes to the remote GitHub repository.
    git push

    After the changes are pushed to the remote repository, go back to https://github.com and open the repository that you created earlier. In the top-right corner of the repository window, there is a small orange indicator, as shown in Figure 2. This shows that your GitHub Actions workflow is running.

    Figure 2: GitHub repository window with the orange workflow indicator

    Figure 2: GitHub repository window with the orange workflow indicator

    Because the sample CloudFormation template used a wildcard value “*” in the principal element of the policy as described in the section Step 2: Clone the repository locally, the orange indicator turns to a red x (shown in Figure 3), which signals that something failed in the workflow.

    Figure 3: GitHub repository window with the red cross workflow indicator

    Figure 3: GitHub repository window with the red cross workflow indicator

  3. Choose the red x to see more information about the workflow’s status, as shown in Figure 4.
    Figure 4: Pop-up displayed after choosing the workflow indicator

    Figure 4: Pop-up displayed after choosing the workflow indicator

  4. Choose Details to review the workflow logs.

    In this example, the Validate templates step in the workflow has failed. A closer inspection shows that there is a blocking finding with the CloudFormation template. As shown in Figure 5, the finding is labelled as EXTERNAL_PRINCIPAL and has a description of Trust policy allows access from external principals.

    Figure 5: Details logs from the workflow showing the blocking finding

    Figure 5: Details logs from the workflow showing the blocking finding

    To remediate this blocking finding, you need to update the principal element of the trust policy to include a principal from your AWS account (considered a zone of trust). The resources and principals within your account comprises of the zone of trust for the cfn-policy-validator tool. In the initial version of sample-role.yaml, the IAM roles trust policy used a wildcard in the Principal element. This allowed principals outside of your control to assume the associated role, which caused the cfn-policy-validator tool to generate a blocking finding.

    In this case, the intent is that principals within the current AWS account (zone of trust) should be able to assume this role. To achieve this result, replace the wildcard value with the account principal by following the remaining steps.

  5. Open sample-role.yaml by using your preferred text editor, such as nano.
    nano sample-role.yaml

    Replace the wildcard value in the principal element with the account principal arn:aws:iam::<AccountID>:root. Make sure to replace <AWSAccountID> with your own AWS account ID.

    AWSTemplateFormatVersion: "2010-09-09"
    Description: Base stack to create a simple role
    Resources:
      SampleIamRole:
        Type: AWS::IAM::Role
        Properties:
          AssumeRolePolicyDocument:
            Statement:
              - Effect: Allow
                Principal:
                  AWS: "arn:aws:iam::<AccountID>:root"
                Action: ["sts:AssumeRole"]
          Path: /      
          Policies:
            - PolicyName: root
              PolicyDocument:
                Version: 2012-10-17
                Statement:
                  - Resource: "*"
                    Effect: Allow
                    Action:
                      - s3:GetObject

  6. Add the updated file, commit the changes, and push the updates to the remote GitHub repository.
    git add sample-role.yaml
    git commit -m ‘replacing wildcard principal with account principal’
    git push

After the changes have been pushed to the remote repository, go back to https://github.com and open the repository. The orange indicator in the top right of the window should change to a green tick (check mark), as shown in Figure 6.

Figure 6: GitHub repository window with the green tick workflow indicator

Figure 6: GitHub repository window with the green tick workflow indicator

This indicates that no blocking findings were identified, as shown in Figure 7.

Figure 7: Detailed logs from the workflow showing no more blocking findings

Figure 7: Detailed logs from the workflow showing no more blocking findings

Conclusion

In this post, I showed you how to automate IAM policy validation by using GitHub Actions and the IAM Policy Validator for CloudFormation. Although the example was a simple one, it demonstrates the benefits of automating security testing at the start of the development lifecycle. This is often referred to as shifting security left. Identifying misconfigurations early and automatically supports an iterative, fail-fast model of continuous development and testing. Ultimately, this enables teams to make security an inherent part of a system’s design and architecture and can speed up product development workflows.

In addition to the example I covered today, IAM Policy Validator for CloudFormation can validate IAM policies by using a range of IAM Access Analyzer policy checks. For more information about these policy checks, see Access Analyzer reference policy checks.

 
If you have feedback about this post, submit comments in the Comments section below. If you have questions about this post, contact AWS Support.

Want more AWS Security news? Follow us on Twitter.

Mitch Beaumont

Mitch Beaumont

Mitch is a Principal Solutions Architect for Amazon Web Services, based in Sydney, Australia. Mitch works with some of Australia’s largest financial services customers, helping them to continually raise the security bar for the products and features that they build and ship. Outside of work, Mitch enjoys spending time with his family, photography, and surfing.

How to Receive Alerts When Your IAM Configuration Changes

Post Syndicated from Dylan Souvage original https://aws.amazon.com/blogs/security/how-to-receive-alerts-when-your-iam-configuration-changes/

July 27, 2023: This post was originally published February 5, 2015, and received a major update July 31, 2023.


As an Amazon Web Services (AWS) administrator, it’s crucial for you to implement robust protective controls to maintain your security configuration. Employing a detective control mechanism to monitor changes to the configuration serves as an additional safeguard in case the primary protective controls fail. Although some changes are expected, you might want to review unexpected changes or changes made by a privileged user. AWS Identity and Access Management (IAM) is a service that primarily helps manage access to AWS services and resources securely. It does provide detailed logs of its activity, but it doesn’t inherently provide real-time alerts or notifications. Fortunately, you can use a combination of AWS CloudTrail, Amazon EventBridge, and Amazon Simple Notification Service (Amazon SNS) to alert you when changes are made to your IAM configuration. In this blog post, we walk you through how to set up EventBridge to initiate SNS notifications for IAM configuration changes. You can also have SNS push messages directly to ticketing or tracking services, such as Jira, Service Now, or your preferred method of receiving notifications, but that is not discussed here.

In any AWS environment, many activities can take place at every moment. CloudTrail records IAM activities, EventBridge filters and routes event data, and Amazon SNS provides notification functionality. This post will guide you through identifying and setting alerts for IAM changes, modifications in authentication and authorization configurations, and more. The power is in your hands to make sure you’re notified of the events you deem most critical to your environment. Here’s a quick overview of how you can invoke a response, shown in Figure 1.

Figure 1: Simple architecture diagram of actors and resources in your account and the process for sending notifications through IAM, CloudTrail, EventBridge, and SNS.

Figure 1: Simple architecture diagram of actors and resources in your account and the process for sending notifications through IAM, CloudTrail, EventBridge, and SNS.

Log IAM changes with CloudTrail

Before we dive into implementation, let’s briefly understand the function of AWS CloudTrail. It records and logs activity within your AWS environment, tracking actions such as IAM role creation, deletion, or modification, thereby offering an audit trail of changes.

With this in mind, we’ll discuss the first step in tracking IAM changes: establishing a log for each modification. In this section, we’ll guide you through using CloudTrail to create these pivotal logs.

For an in-depth understanding of CloudTrail, refer to the AWS CloudTrail User Guide.

In this post, you’re going to start by creating a CloudTrail trail with the Management events type selected, and read and write API activity selected. If you already have a CloudTrail trail set up with those attributes, you can use that CloudTrail trail instead.

To create a CloudTrail log

  1. Open the AWS Management Console and select CloudTrail, and then choose Dashboard.
  2. In the CloudTrail dashboard, choose Create Trail.
    Figure 2: Use the CloudTrail dashboard to create a trail

    Figure 2: Use the CloudTrail dashboard to create a trail

  3. In the Trail name field, enter a display name for your trail and then select Create a new S3 bucket. Leave the default settings for the remaining trail attributes.
    Figure 3: Set the trail name and storage location

    Figure 3: Set the trail name and storage location

  4. Under Event type, select Management events. Under API activity, select Read and Write.
  5. Choose Next.
    Figure 4: Choose which events to log

    Figure 4: Choose which events to log

Set up notifications with Amazon SNS

Amazon SNS is a managed service that provides message delivery from publishers to subscribers. It works by allowing publishers to communicate asynchronously with subscribers by sending messages to a topic, a logical access point, and a communication channel. Subscribers can receive these messages using supported endpoint types, including email, which you will use in the blog example today.

For further reading on Amazon SNS, refer to the Amazon SNS Developer Guide.

Now that you’ve set up CloudTrail to log IAM changes, the next step is to establish a mechanism to notify you about these changes in real time.

To set up notifications

  1. Open the Amazon SNS console and choose Topics.
  2. Create a new topic. Under Type, select Standard and enter a name for your topic. Keep the defaults for the rest of the options, and then choose Create topic.
    Figure 5: Select Standard as the topic type

    Figure 5: Select Standard as the topic type

  3. Navigate to your topic in the topic dashboard, choose the Subscriptions tab, and then choose Create subscription.
    Figure 6: Choose Create subscription

    Figure 6: Choose Create subscription

  4. For Topic ARN, select the topic you created previously, then under Protocol, select Email and enter the email address you want the alerts to be sent to.
    Figure 7: Select the topic ARN and add an endpoint to send notifications to

    Figure 7: Select the topic ARN and add an endpoint to send notifications to

  5. After your subscription is created, go to the mailbox you designated to receive notifications and check for a verification email from the service. Open the email and select Confirm subscription to verify the email address and complete setup.

Initiate events with EventBridge

Amazon EventBridge is a serverless service that uses events to connect application components. EventBridge receives an event (an indicator of a change in environment) and applies a rule to route the event to a target. Rules match events to targets based on either the structure of the event, called an event pattern, or on a schedule.

Events that come to EventBridge are associated with an event bus. Rules are tied to a single event bus, so they can only be applied to events on that event bus. Your account has a default event bus that receives events from AWS services, and you can create custom event buses to send or receive events from a different account or AWS Region.

For a more comprehensive understanding of EventBridge, refer to the Amazon EventBridge User Guide.

In this part of our post, you’ll use EventBridge to devise a rule for initiating SNS notifications based on IAM configuration changes.

To create an EventBridge rule

  1. Go to the EventBridge console and select EventBridge Rule, and then choose Create rule.
    Figure 8: Use the EventBridge console to create a rule

    Figure 8: Use the EventBridge console to create a rule

  2. Enter a name for your rule, keep the defaults for the rest of rule details, and then choose Next.
    Figure 9: Rule detail screen

    Figure 9: Rule detail screen

  3. Under Target 1, select AWS service.
  4. In the dropdown list for Select a target, select SNS topic, select the topic you created previously, and then choose Next.
    Figure 10: Target with target type of AWS service and target topic of SNS topic selected

    Figure 10: Target with target type of AWS service and target topic of SNS topic selected

  5. Under Event source, select AWS events or EventBridge partner events.
    Figure 11: Event pattern with AWS events or EventBridge partner events selected

    Figure 11: Event pattern with AWS events or EventBridge partner events selected

  6. Under Event pattern, verify that you have the following selected.
    1. For Event source, select AWS services.
    2. For AWS service, select IAM.
    3. For Event type, select AWS API Call via CloudTrail.
    4. Select the radio button for Any operation.
    Figure 12: Event pattern details selected

    Figure 12: Event pattern details selected

Now that you’ve set up EventBridge to monitor IAM changes, test it by creating a new user or adding a new policy to an IAM role and see if you receive an email notification.

Centralize EventBridge alerts by using cross-account alerts

If you have multiple accounts, you should be evaluating using AWS Organizations. (For a deep dive into best practices for using AWS Organizations, we recommend reading this AWS blog post.)

By standardizing the implementation to channel alerts from across accounts to a primary AWS notification account, you can use a multi-account EventBridge architecture. This allows aggregation of notifications across your accounts through sender and receiver accounts. Figure 13 shows how this works. Separate member accounts within an AWS organizational unit (OU) have the same mechanism for monitoring changes and sending notifications as discussed earlier, but send notifications through an EventBridge instance in another account.

Figure 13: Multi-account EventBridge architecture aggregating notifications between two AWS member accounts to a primary management account

Figure 13: Multi-account EventBridge architecture aggregating notifications between two AWS member accounts to a primary management account

You can read more and see the implementation and deep dive of the multi-account EventBridge solution on the AWS samples GitHub, and you can also read more about sending and receiving Amazon EventBridge notifications between accounts.

Monitor calls to IAM

In this blog post example, you monitor calls to IAM.

The filter pattern you selected while setting up EventBridge matches CloudTrail events for calls to the IAM service. Calls to IAM have a CloudTrail eventSource of iam.amazonaws.com, so IAM API calls will match this pattern. You will find this simple default filter pattern useful if you have minimal IAM activity in your account or to test this example. However, as your account activity grows, you’ll likely receive more notifications than you need. This is when filtering only the relevant events becomes essential to prioritize your responses. Effectively managing your filter preferences allows you to focus on events of significance and maintain control as your AWS environment grows.

Monitor changes to IAM

If you’re interested only in changes to your IAM account, you can modify the event pattern inside EventBridge, the one you used to set up IAM notifications, with an eventName filter pattern, shown following.

"eventName": [
      "Add*",
      "Attach*",
      "Change*",
      "Create*",
      "Deactivate*",
      "Delete*",
      "Detach*",
      "Enable*",
      "Put*",
      "Remove*",
      "Set*",
      "Update*",
      "Upload*"
    ]

This filter pattern will only match events from the IAM service that begin with Add, Change, Create, Deactivate, Delete, Enable, Put, Remove, Update, or Upload. For more information about APIs matching these patterns, see the IAM API Reference.

To edit the filter pattern to monitor only changes to IAM

  1. Open the EventBridge console, navigate to the Event pattern, and choose Edit pattern.
    Figure 14: Modifying the event pattern

    Figure 14: Modifying the event pattern

  2. Add the eventName filter pattern from above to your event pattern.
    Figure 15: Use the JSON editor to add the eventName filter pattern

    Figure 15: Use the JSON editor to add the eventName filter pattern

Monitor changes to authentication and authorization configuration

Monitoring changes to authentication (security credentials) and authorization (policy) configurations is critical, because it can alert you to potential security vulnerabilities or breaches. For instance, unauthorized changes to security credentials or policies could indicate malicious activity, such as an attempt to gain unauthorized access to your AWS resources. If you’re only interested in these types of changes, use the preceding steps to implement the following filter pattern.

    "eventName": [
      "Put*Policy",
      "Attach*",
      "Detach*",
      "Create*",
      "Update*",
      "Upload*",
      "Delete*",
      "Remove*",
      "Set*"
    ]

This filter pattern matches calls to IAM that modify policy or create, update, upload, and delete IAM elements.

Conclusion

Monitoring IAM security configuration changes allows you another layer of defense against the unexpected. Balancing productivity and security, you might grant a user broad permissions in order to facilitate their work, such as exploring new AWS services. Although preventive measures are crucial, they can potentially restrict necessary actions. For example, a developer may need to modify an IAM role for their task, an alteration that could pose a security risk. This change, while essential for their work, may be undesirable from a security standpoint. Thus, it’s critical to have monitoring systems alongside preventive measures, allowing necessary actions while maintaining security.

Create an event rule for IAM events that are important to you and have a response plan ready. You can refer to Security best practices in IAM for further reading on this topic.

If you have questions or feedback about this or any other IAM topic, please visit the IAM re:Post forum. You can also read about the multi-account EventBridge solution on the AWS samples GitHub and learn more about sending and receiving Amazon EventBridge notifications between accounts.

If you have feedback about this post, submit comments in the Comments section below. If you have questions about this post, contact AWS Support.

Want more AWS Security news? Follow us on Twitter.

Dylan Souvage

Dylan Souvage

Dylan is a Solutions Architect based in Toronto, Canada. Dylan loves working with customers to understand their business and enable them in their cloud journey. In his spare time, he enjoys martial arts, sports, anime, and traveling to warm, sunny places to spend time with his friends and family.

Abhra Sinha

Abhra Sinha

Abhra is a Toronto-based Enterprise Solutions Architect at AWS. Abhra enjoys being a trusted advisor to customers, working closely with them to solve their technical challenges and help build a secure, scalable architecture on AWS. In his spare time, he enjoys Photography and exploring new restaurants.

IAM Policies and Bucket Policies and ACLs! Oh, My! (Controlling Access to S3 Resources)

Post Syndicated from Kai Zhao original https://aws.amazon.com/blogs/security/iam-policies-and-bucket-policies-and-acls-oh-my-controlling-access-to-s3-resources/

Updated on July 6, 2023: This post has been updated to reflect the current guidance around the usage of S3 ACL and to include S3 Access Points and the Block Public Access for accounts and S3 buckets.

Updated on April 27, 2023: Amazon S3 now automatically enables S3 Block Public Access and disables S3 access control lists (ACLs) for all new S3 buckets in all AWS Regions.

Updated on January 8, 2019: Based on customer feedback, we updated the third paragraph in the “What about S3 ACLs?” section to clarify permission management.


In this post, we will discuss Amazon S3 Bucket Policies and IAM Policies and its different use cases. This post will assist you in distinguishing between the usage of IAM policies and S3 bucket policies. We will also discuss how these policies integrate with some default S3 bucket security settings like automatically enabling S3 Block Public Access and disabling S3 access control lists (ACLs).

IAM policies vs. S3 bucket policies

AWS access is managed by setting IAM policies and linking them to IAM identities (users, groups of users, or roles) or AWS resources. A policy is an object in AWS that when associated with an identity or resource, defines their permissions. IAM policies specify what actions are allowed or denied on what AWS resources (e.g. user Alice can read objects from the “Production” bucket but can’t write objects in the “Dev” bucket whereas user Bob can have full access to S3).

S3 bucket policies, on the other hand, are resource-based policies that you can use to grant access permissions to your Amazon S3 buckets and the objects in it. S3 bucket policies can allow or deny requests based on the elements in the policy.(e.g. allow user Alice to PUT but not DELETE objects in the bucket).

Note: You attach S3 bucket policies at the bucket level (i.e. you can’t attach a bucket policy to an S3 object), but the permissions specified in the bucket policy apply to all the objects in the bucket. You can also specify permissions at the object level by putting an object as the resource in the Bucket policy.

IAM policies and S3 bucket policies are both used for access control and they’re both written in JSON using the AWS access policy language. Let’s look at an example policy of each type:

Sample S3 Bucket Policy

This S3 bucket policy enables any IAM principal (user or role) in account 111122223333 to use the Amazon S3 GET Bucket (List Objects) operation.

{
  "Version": "2012-10-17",
  "Statement": [
    {
      "Effect": "Allow",
      "Principal": {
        "AWS": ["arn:aws:iam::111122223333:root"]
      },
      "Action": "s3:ListBucket",
      "Resource": ["arn:aws:s3:::my_bucket"]
    }
  ]
}

This S3 bucket policy enables the IAM role ‘Role-name’ under the account 111122223333 to use the Amazon S3 GET Bucket (List Objects) operation.

{
  "Version": "2012-10-17",
  "Statement": [
    {
      "Effect": "Allow",
      "Principal": {
        "AWS": "arn:aws:iam::111122223333:role/Role-name"
      },
      "Action": "s3:ListBucket",
      "Resource": "arn:aws:s3:::my_bucket"
    }
  ]
}

Sample IAM Policy

This IAM policy grants the IAM principal it is attached to permission to perform any S3 operation on the contents of the bucket named “my_bucket”.

{
  "Version": "2012-10-17",
  "Statement":[{
    "Effect": "Allow",
    "Action": "s3:*",
    "Resource": ["arn:aws:s3:::my_bucket/*"]
    }
  ]
}

Note that the S3 bucket policy includes a “Principal” element, which lists the principals that bucket policy controls access for. The “Principal” element is unnecessary in an IAM policy, because the principal is by default the entity that the IAM policy is attached to.

S3 bucket policies (as the name would imply) only control access to S3 resources for the bucket they’re attached to, whereas IAM policies can specify nearly any AWS action. One of the neat things about AWS is that you can actually apply both IAM policies and S3 bucket policies simultaneously, with the ultimate authorization being the least-privilege union of all the permissions (more on this in the section below titled “How does authorization work with multiple access control mechanisms?”).

When to use IAM policies vs. S3 policies

Use IAM policies if:

  • You need to control access to AWS services other than S3. IAM policies will be easier to manage since you can centrally manage all of your permissions in IAM, instead of spreading them between IAM and S3.
  • You have numerous S3 buckets each with different permissions requirements. IAM policies will be easier to manage since you don’t have to define a large number of S3 bucket policies and can instead rely on fewer, more detailed IAM policies.
  • You prefer to keep access control policies in the IAM environment.

Use S3 bucket policies if:

  • You want a simple way to grant cross-account access to your S3 environment, without using IAM roles.
  • Your IAM policies bump up against the size limit (up to 2 kb for users, 5 kb for groups, and 10 kb for roles). S3 supports bucket policies of up 20 kb.
  • You prefer to keep access control policies in the S3 environment.
  • You want to apply common security controls to all principals who interact with S3 buckets, such as restricting the IP addresses or VPC a bucket can be accessed from.

If you’re still unsure of which to use, consider which audit question is most important to you:

  • If you’re more interested in “What can this user do in AWS?” then IAM policies are probably the way to go. You can easily answer this by looking up an IAM user and then examining their IAM policies to see what rights they have.
  • If you’re more interested in “Who can access this S3 bucket?” then S3 bucket policies will likely suit you better. You can easily answer this by looking up a bucket and examining the bucket policy.

Whichever method you choose, we recommend staying as consistent as possible. Auditing permissions becomes more challenging as the number of IAM policies and S3 bucket policies grows.

What about S3 ACLs?

An S3 ACL is a sub-resource that’s attached to every S3 bucket and object. It defines which AWS accounts or groups are granted access and the type of access. You can attach S3 ACLs to both buckets and individual objects within a bucket to manage permissions for those objects. As a general rule, AWS recommends using S3 bucket policies or IAM policies for access control. S3 ACLs is a legacy access control mechanism that predates IAM. By default, Object Ownership is set to the Bucket owner enforced setting and all ACLs are disabled, as can be seen below.

A majority of modern use cases in Amazon S3 no longer require the use of ACLs, and we recommend that you keep ACLs disabled by applying the Bucket owner enforced setting. This approach simplifies permissions management: you can use policies to more easily control access to every object in your bucket, regardless of who uploaded the objects in your bucket. When ACLs are disabled, the bucket owner owns all the objects in the bucket and manages access to data exclusively using access management policies.

S3 bucket policies and IAM policies define object-level permissions by providing those objects in the Resource element in your policy statements. The statement will apply to those objects in the bucket. Consolidating object-specific permissions into one policy (as opposed to multiple S3 ACLs) makes it simpler for you to determine effective permissions for your users and roles.

You can disable ACLs on both newly created and already existing buckets. For newly created buckets, ACLs are disabled by default. In the case of an existing bucket that already has objects in it, after you disable ACLs, the object and bucket ACLs are no longer part of an access evaluation, and access is granted or denied on the basis of policies.

S3 Access Points and S3 Access

In some cases customers have use cases with complex entitlement: Amazon s3 is used to store shared datasets where data is aggregated and accessed by different applications, individuals or teams for different use cases. Managing access to this shared bucket requires a single bucket policy that controls access for dozens to hundreds of applications with different permission levels. As an application set grows, the bucket policy becomes more complex, time consuming to manage, and needs to be audited to make sure that changes don’t have an unexpected impact on another application.

These customers need additional policy space for access to their data, and that buckets. To support these use cases, Amazon S3 provides a feature called Amazon S3 Access Points. Amazon S3 access points simplify data access for any AWS service or customer application that stores data in S3.

Access points are named network endpoints that are attached to buckets that you can use to perform S3 object operations, such as GetObject and PutObject. Each access point has distinct permissions and network controls that S3 applies for any request that is made through that access point. Each access point enforces a customized access point policy that works in conjunction with the bucket policy that is attached to the underlying bucket.

Amazon S3 access points support AWS Identity and Access Management (IAM) resource policies that allow you to control the use of the access point by resource, user, or other conditions. For an application or user to be able to access objects through an access point, both the access point and the underlying bucket must permit the request.

Note that Adding an S3 access point to a bucket doesn’t change the bucket’s ehaviour when the bucket is accessed directly through the bucket’s name or Amazon Resource Name (ARN). All existing operations against the bucket will continue to work as before. Restrictions that you include in an access point policy apply only to requests made through that access point.

Sample Access point policy

This access point policy grants the IAM user Alice permissions to GET and PUT objects through the access point ‘my-access-point’ in account 111122223333.

{
  “Version”: “2012-10-17”,
  “Statement”:[{
    “Effect”: “Allow”,
    “Principal”: { “AWS”: “arn:aws:iam::111122223333:user/Alice” },
    “Action”: [“s3:GetObject”, “s3:PutObject”],
    “Resource”: “arn:aws:s3:us-west-2:111122223333:accesspoint/my-access-point/object/*”
    }
  ]
}

Blocking Public Access for accounts and buckets

Public access is granted to buckets and objects through access control lists (ACLs), bucket policies, access point policies, or all. In order to ensure that public access to this bucket and its objects is blocked, you can turn on Block all public on both the bucket level or the account level.

The Amazon S3 Block Public Access feature provides settings for access points, buckets, and accounts to help you manage public access to Amazon S3 resources. By default, new buckets, access points, and objects don’t allow public access. However, users can modify bucket policies, access point policies, or object permissions to allow public access. S3 Block Public Access settings override these policies and permissions so that you can limit public access to these resources.

With S3 Block Public Access, account administrators and bucket owners can easily set up centralized controls to limit public access to their Amazon S3 resources that are enforced regardless of how the resources are created.

If you apply a setting to an account, it applies to all buckets and access points that are owned by that account. Similarly, if you apply a setting to a bucket, it applies to all access points associated with that bucket.

Block Public Access for buckets

These settings apply only to this bucket and its access points. AWS recommends that you turn on Block all public access, but before applying any of these settings, ensure that your applications will work correctly without public access. If you require some level of public access to this bucket or objects within, you can customize the individual settings below to suit your specific storage use cases.

You can use the S3 console, AWS CLI, AWS SDKs, and REST API to grant public access to one or more buckets. This setting is on by default at the account creation, as can be seen below (using the S3 console).

Turning off this session will create a warning in the account, as AWS recommends this setting to be turned un unless public access is required for specific and verified use cases such as static website hosting.

This setting can also be turned on for existing buckets. In the AWS Management Console this is done by opening the Amazon S3 console at https://console.aws.amazon.com/s3/, choosing the name of the bucket you want, choosing the Permissions tab. And Choosing Edit to change the public access settings for the bucket.

Block Public Access for accounts

In order to ensure that public access to all your S3 buckets and objects is blocked, turn on Block all public access. These settings apply account-wide for all current and future buckets and access points. AWS recommends that you turn on Block all public access, but before applying any of these settings, ensure that your applications will work correctly without public access. If you require some level of public access to your buckets or objects, you can customize the individual settings below to suit your specific storage use cases.

You can use the S3 console, AWS CLI, AWS SDKs, and REST API to configure block public access settings for all the buckets in your account. This setting can be turned on in the AWS Management Console by opening the Amazon S3 console at https://console.aws.amazon.com/s3/, and clicking Block Public Access setting for this account on the left panel. And Choosing Edit to change the public access settings for the bucket.

When working with AWS organizations, you can prevent people from modifying the Block Public Access on the account level by adding a Service control policy (SCP) that denies editing this. An example of such a SCP can be seen below:

{
  “Version”: “2012-10-17”,
  “Statement”:[{
    “Sid”: “DenyTurningOffBlockPublicAccessForThisAccount”,
    “Effect”: “Deny”,
    “Action”: “s3:PutAccountPublicAccessBlock”,
    “Resource”: “arn:aws:s3:::*”
    }
  ]
}

How does authorization work with multiple access control mechanisms?

Whenever an AWS principal issues a request to S3, the authorization decision depends on the union of all the IAM policies, S3 bucket policies, and S3 ACLs that apply as well as if Block Public Access is enabled on either the account, bucket or access point.

In accordance with the principle of least-privilege, decisions default to DENY and an explicit DENY always trumps an ALLOW. For example, if an IAM policy grants access to an object, the S3 bucket policies denies access to that object, and there is no S3 ACL, then access will be denied. Similarly, if no method specifies an ALLOW, then the request will be denied by default. Only if no method specifies a DENY and one or more methods specify an ALLOW will the request be allowed.

When Amazon S3 receives a request to access a bucket or an object, it determines whether the bucket or the bucket owner’s account has a block public access setting applied. If the request was made through an access point, Amazon S3 also checks for block public access settings for the access point. If there is an existing block public access setting that prohibits the requested access, Amazon S3 rejects the request.

This diagram illustrates the authorization process.

We hope that this post clarifies some of the confusion around the various ways you can control access to your S3 environment.

Using IAM Access Analyzer for S3 to review bucket access

Another interesting feature that can be used is IAM Access Analyzer for S3 to review bucket access. You can use IAM Access Analyzer for S3 to review buckets with bucket ACLs, bucket policies, or access point policies that grant public access. IAM Access Analyzer for S3 alerts you to buckets that are configured to allow access to anyone on the internet or other AWS accounts, including AWS accounts outside of your organization. For each public or shared bucket, you receive findings that report the source and level of public or shared access.

In IAM Access Analyzer for S3, you can block all public access to a bucket with a single click. You can also drill down into bucket-level permission settings to configure granular levels of access. For specific and verified use cases that require public or shared access, you can acknowledge and record your intent for the bucket to remain public or shared by archiving the findings for the bucket.

Additional Resources

If you have feedback about this post, submit comments in the Comments section below. If you have questions about this post, contact AWS Support.

Want more AWS Security news? Follow us on Twitter.

Laura Verghote

Laura Verghote

Laura is a Territory Solutions Architect for Public Sector customers in the Benelux. She works together with customers to design and build solutions in the AWS cloud. She joined AWS as a technical trainer through a graduate program and has wide experience delivering training content to developers, administrators, architects, and partners in EMEA.

Gautam Kumar

Gautam Kumar

Gautam is a Solution Architect at AWS. Gautam helps various Enterprise customers to design and architect innovative solutions on AWS and specifically passionate about building secure workloads on AWS. Outside work, he enjoys traveling and spending time with family.

Use IAM roles to connect GitHub Actions to actions in AWS

Post Syndicated from David Rowe original https://aws.amazon.com/blogs/security/use-iam-roles-to-connect-github-actions-to-actions-in-aws/

Have you ever wanted to initiate change in an Amazon Web Services (AWS) account after you update a GitHub repository, or deploy updates in an AWS application after you merge a commit, without the use of AWS Identity and Access Management (IAM) user access keys? If you configure an OpenID Connect (OIDC) identity provider (IdP) inside an AWS account, you can use IAM roles and short-term credentials, which removes the need for IAM user access keys.

In this blog post, we will walk you through the steps needed to configure a specific GitHub repo to assume an individual role in an AWS account to preform changes. You will learn how to create an OIDC-trusted connection that is scoped to an individual GitHub repository, and how to map the repository to an IAM role in your account. You will create the OIDC connection, IAM role, and trust relationship two ways: with the AWS Management Console and with the AWS Command Line Interface (AWS CLI).

This post focuses on creating an IAM OIDC identity provider for GitHub and demonstrates how to authorize access into an AWS account from a specific branch and repository. You can use OIDC IdPs for workflows that support the OpenID Connect standard, such as Google or Salesforce.

Prerequisites

To follow along with this blog post, you should have the following prerequisites in place:

Solution overview

GitHub is an external provider that is independent from AWS. To use GitHub as an OIDC IdP, you will need to complete four steps to access AWS resources from your GitHub repository. Then, for the fifth and final step, you will use AWS CloudTrail to audit the role that you created and used in steps 1–4.

  1. Create an OIDC provider in your AWS account. This is a trust relationship that allows GitHub to authenticate and be authorized to perform actions in your account.
  2. Create an IAM role in your account. You will then scope the IAM role’s trust relationship to the intended parts of your GitHub organization, repository, and branch for GitHub to assume and perform specific actions.
  3. Assign a minimum level of permissions to the role.
  4. Create a GitHub Actions workflow file in your repository that can invoke actions in your account.
  5. Audit the role’s use with Amazon CloudTrail logs.

Step 1: Create an OIDC provider in your account

The first step in this process is to create an OIDC provider which you will use in the trust policy for the IAM role used in this action.

To create an OIDC provider for GitHub (console):

  1. Open the IAM console.
  2. In the left navigation menu, choose Identity providers.
  3. In the Identity providers pane, choose Add provider.
  4. For Provider type, choose OpenID Connect.
  5. For Provider URL, enter the URL of the GitHub OIDC IdP for this solution: https://token.actions.GitHubusercontent.com.
  6. Choose Get thumbprint to verify the server certificate of your IdP. To learn more about OIDC thumbprints, see Obtaining the thumbprint for an OpenID Connect Identity Provider.
  7. For Audience, enter sts.amazonaws.com. This will allow the AWS Security Token Service (AWS STS) API to be called by this IdP.
  8. (Optional) For Add tags, you can add key–value pairs to help you identify and organize your IdPs. To learn more about tagging IAM OIDC IdPs, see Tagging OpenID Connect (OIDC) IdPs.
  9. Verify the information that you entered. Your console should match the screenshot in Figure 1. After verification, choose Add provider.

    Note: Each provider is a one-to-one relationship to an external IdP. If you want to add more IdPs to your account, you can repeat this process.

    Figure 1: Steps to configure the identity provider

    Figure 1: Steps to configure the identity provider

  10. Once you are taken back to the Identity providers page, you will see your new IdP as shown in Figure 2. Select your provider to view its properties, and make note of the Amazon Resource Name (ARN). You will use the ARN later in this post. The ARN will look similar to the following:

    arn:aws:iam::111122223333:oidc-provider/token.actions.GitHubusercontent.com

    Figure 2: View your identity provider

    Figure 2: View your identity provider

To create an OIDC provider for GitHub (AWS CLI):

You can add GitHub as an IdP in your account with a single AWS CLI command. The following code will perform the previous steps outlined for the console, with the same results. For the value —thumbprint-list, you will use the GitHub OIDC thumbprint 938fd4d98bab03faadb97b34396831e3780aea1.

aws iam create-open-id-connect-provider --url 
"https://token.actions.GitHubusercontent.com" --thumbprint-list 
"6938fd4d98bab03faadb97b34396831e3780aea1" --client-id-list 
'sts.amazonaws.com'

To learn more about the GitHub thumbprint, see GitHub Actions – Update on OIDC based deployments to AWS. At the time of publication, this thumbprint is correct.

Both of the preceding methods will add an IdP in your account. You can view the provider on the Identity providers page in the IAM console.

Step 2: Create an IAM role and scope the trust policy

You can create an IAM role with either the IAM console or the AWS CLI. If you choose to create the IAM role with the AWS CLI, you will scope the Trust Relationship Policy before you create the role.

The procedure to create the IAM role and to scope the trust policy come from the AWS Identity and Access Management User Guide. For detailed instructions on how to configure a role, see How to Configure a Role for GitHub OIDC Identity Provider.

To create the IAM role (IAM console):

  1. In the IAM console, on the Identity providers screen, choose the Assign role button for the newly created IdP.
    Figure 3: Assign a role to the identity provider

    Figure 3: Assign a role to the identity provider

  2. In the Assign role for box, choose Create a new role, and then choose Next, as shown in the following figure.
    Figure 4: Create a role from the Identity provider page

    Figure 4: Create a role from the Identity provider page

  3. The Create role page presents you with a few options. Web identity is already selected as the trusted entity, and the Identity provider field is populated with your IdP. In the Audience list, select sts.amazonaws.com, and then choose Next.
  4. On the Permissions page, choose Next. For this demo, you won’t add permissions to the role.

    If you’d like to test other actions, like AWS CodeBuild operations, you can add permissions as outlined by these blog posts: Complete CI/CD with AWS CodeCommit, AWS CodeBuild, AWS CodeDeploy, and AWS CodePipeline or Techniques for writing least privilege IAM policies.

  5. (Optional) On the Tags page, add tags to this new role, and then choose Next: Review.
  6. On the Create role page, add a role name. For this demo, enter GitHubAction-AssumeRoleWithAction. Optionally add a description.
  7. To create the role, choose Create role.

Next, you’ll scope the IAM role’s trust policy to a single GitHub organization, repository, and branch.

To scope the trust policy (IAM console)

  1. In the IAM console, open the newly created role and choose Edit trust relationship.
  2. On the Edit trust policy page, modify the trust policy to allow your unique GitHub organization, repository, and branch to assume the role. This example trusts the GitHub organization <aws-samples>, the repository named <EXAMPLEREPO>, and the branch named <ExampleBranch>. Update the Federated ARN with the GitHub IdP ARN that you copied previously.
    {
        "Version": "2012-10-17",
        "Statement": [
            {
                "Effect": "Allow",
                "Principal": {
                    "Federated": "<arn:aws:iam::111122223333:oidc-provider/token.actions.githubusercontent.com>"
                },
                "Action": "sts:AssumeRoleWithWebIdentity",
                "Condition": {
                    "StringEquals": {
                        "token.actions.githubusercontent.com:sub": "repo: <aws-samples/EXAMPLEREPO>:ref:refs/heads/<ExampleBranch>",
                        "token.actions.githubusercontent.com:aud": "sts.amazonaws.com"
                    }
                }
            }
        ]
    }

To create a role (AWS CLI)

In the AWS CLI, use the example trust policy shown above for the console. This policy is designed to limit access to a defined GitHub organization, repository, and branch.

  1. Create and save a JSON file with the example policy to your local computer with the file name trustpolicyforGitHubOIDC.json.
  2. Run the following command to create the role.
    aws iam create-role --role-name GitHubAction-AssumeRoleWithAction --assume-role-policy-document file://C:\policies\trustpolicyforGitHubOIDC.json

For more details on how to create an OIDC role with the AWS CLI, see Creating a role for federated access (AWS CLI).

Step 3: Assign a minimum level of permissions to the role

For this example, you won’t add permissions to the IAM role, but will assume the role and call STS GetCallerIdentity to demonstrate a GitHub action that assumes the AWS role.

If you’re interested in performing additional actions in your account, you can add permissions to the role you created, GitHubAction-AssumeRoleWithAction. Common actions for workflows include calling AWS Lambda functions or pushing files to an Amazon Simple Storage Service (Amazon S3) bucket. For more information about using IAM to apply permissions, see Policies and permissions in IAM.

If you’d like to do a test, you can add permissions as outlined by these blog posts: Complete CI/CD with AWS CodeCommit, AWS CodeBuild, AWS CodeDeploy, and AWS CodePipeline or Techniques for writing least privilege IAM policies.

Step 4: Create a GitHub action to invoke the AWS CLI

GitHub actions are defined as methods that you can use to automate, customize, and run your software development workflows in GitHub. The GitHub action that you create will authenticate into your account as the role that was created in Step 2: Create the IAM role and scope the trust policy.

To create a GitHub action to invoke the AWS CLI:

  1. Create a basic workflow file, such as main.yml, in the .github/workflows directory of your repository. This sample workflow will assume the GitHubAction-AssumeRoleWithAction role, to perform the action aws sts get-caller-identity. Your repository can have multiple workflows, each performing different sets of tasks. After GitHub is authenticated to the role with the workflow, you can use AWS CLI commands in your account.
  2. Paste the following example workflow into the file.
    # This is a basic workflow to help you get started with Actions
    name:Connect to an AWS role from a GitHub repository
    
    # Controls when the action will run. Invokes the workflow on push events but only for the main branch
    on:
      push:
        branches: [ main ]
      pull_request:
        branches: [ main ]
    
    env:
      
      AWS_REGION : <"us-east-1"> #Change to reflect your Region
    
    # Permission can be added at job level or workflow level    
    permissions:
          id-token: write   # This is required for requesting the JWT
          contents: read    # This is required for actions/checkout
    jobs:
      AssumeRoleAndCallIdentity:
        runs-on: ubuntu-latest
        steps:
          - name: Git clone the repository
            uses: actions/checkout@v3
          - name: configure aws credentials
            uses: aws-actions/[email protected]
            with:
              role-to-assume: <arn:aws:iam::111122223333:role/GitHubAction-AssumeRoleWithAction> #change to reflect your IAM role’s ARN
              role-session-name: GitHub_to_AWS_via_FederatedOIDC
              aws-region: ${{ env.AWS_REGION }}
          # Hello from AWS: WhoAmI
          - name: Sts GetCallerIdentity
            run: |
              aws sts get-caller-identity

  3. Modify the workflow to reflect your AWS account information:
    • AWS_REGION: Enter the AWS Region for your AWS resources.
    • role-to-assume: Replace the ARN with the ARN of the AWS GitHubAction role that you created previously.

In the example workflow, if there is a push or pull on the repository’s “main” branch, the action that you just created will be invoked.

Figure 5 shows the workflow steps in which GitHub does the following:

  • Authenticates to the IAM role with the OIDC IdP in the Region that was defined in the workflow file in the step configure aws credentials.
  • Calls aws sts get-caller-identity in the step Hello from AWS. WhoAmI… Run AWS CLI sts GetCallerIdentity.
    Figure 5: Results of GitHub action

    Figure 5: Results of GitHub action

Step 5: Audit the role usage: Query CloudTrail logs

The final step is to view the AWS CloudTrail logs in your account to audit the use of this role.

To view the event logs for the GitHub action:

  1. In the AWS Management Console, open CloudTrail and choose Event History.
  2. In the Lookup attributes list, choose Event source.
  3. In the search bar, enter sts.amazonaws.com.
    Figure 6: Find event history in CloudTrail

    Figure 6: Find event history in CloudTrail

  4. You should see the GetCallerIdentity and AssumeRoleWithWebIdentity events, as shown in Figure 6. The GetCallerIdentity event is the Hello from AWS. step in the GitHub workflow file. This event shows the workflow as it calls aws sts get-caller-identity. The AssumeRoleWithWebIdentity event shows GitHub authenticating and assuming your IAM role GitHubAction-AssumeRoleWithAction.

You can also view one event at a time.

To view the AWS CLI GetCallerIdentity event:

  1. In the Lookup attributes list, choose User name.
  2. In the search bar, enter the role-session-name, defined in the workflow file in your repository. This is not the IAM role name, because this role-session-name is defined in line 30 of the workflow example. In the workflow example for this blog post, the role-session-name is GitHub_to_AWS_via_FederatedOIDC.
  3. You can now see the first event in the CloudTrail history.
    Figure 7: View the get caller identity in CloudTrail

    Figure 7: View the get caller identity in CloudTrail

To view the AssumeRoleWithWebIdentity event

  1. In the Lookup attributes list, choose User name.
  2. In the search bar, enter the GitHub organization, repository, and branch that is defined in the IAM role’s trust policy. In the example outlined earlier, the user name is repo:aws-samples/EXAMPLE:ref:refs/heads/main.
  3. You can now see the individual event in the CloudTrail history.
    Figure 8: View the assume role call in CloudTrail

    Figure 8: View the assume role call in CloudTrail

Conclusion

When you use IAM roles with OIDC identity providers, you have a trusted way to provide access to your AWS resources. GitHub and other OIDC providers can generate temporary security credentials to update resources and infrastructure inside your accounts.

In this post, you learned how to use the federated access to assume a role inside AWS directly from a workflow action file in a GitHub repository. With this new IdP in place, you can begin to delete AWS access keys from your IAM users and use short-term credentials.

After you read this post, we recommend that you follow the AWS Well Architected Security Pillar IAM directive to use programmatic access to AWS services using temporary and limited-privilege credentials. If you deploy IAM federated roles instead of AWS user access keys, you follow this guideline and issue tokens by the AWS Security Token Service. If you have feedback on this post, leave a comment below and let us know how you would like to see OIDC workflows expanded to help your IAM needs.

 
If you have feedback about this post, submit comments in the Comments section below. If you have questions about this post, contact AWS Support.

Want more AWS Security news? Follow us on Twitter.

David Rowe

David Rowe

David is a Senior Solutions Architect at AWS. He has a background in focusing on identity solutions for all sizes of businesses. He has a history of working with Healthcare and Life Science customers as well as working in Finance and Education.

How to use policies to restrict where EC2 instance credentials can be used from

Post Syndicated from Liam Wadman original https://aws.amazon.com/blogs/security/how-to-use-policies-to-restrict-where-ec2-instance-credentials-can-be-used-from/

Today AWS launched two new global condition context keys that make it simpler for you to write policies in which Amazon Elastic Compute Cloud (Amazon EC2) instance credentials work only when used on the instance to which they are issued. These new condition keys are available today in all AWS Regions, as well as AWS GovCloud and China partitions.

Using these new condition keys, you can write service control policies (SCPs) or AWS Identity and Access Management (IAM) policies that restrict the virtual private clouds (VPCs) and private IP addresses from which your EC2 instance credentials can be used, without hard-coding VPC IDs or IP addresses in the policy. Previously, you had to list specific VPC IDs and IP addresses in the policy if you wanted to use it to restrict where EC2 credentials were used. With this new approach, you can use less policy space and reduce the time spent on updates when your list of VPCs and network ranges changes.

In this blog post, we will show you how to use these new condition keys in an SCP and a resource policy to help ensure that the IAM role credentials assigned to your EC2 instances can only be used from the instances to which they were issued.

New global condition keys

The two new condition keys are as follows:

  • aws:EC2InstanceSourceVPC — This single-valued condition key contains the VPC ID to which an EC2 instance is deployed.
  • aws:EC2InstanceSourcePrivateIPv4 — This single-valued condition key contains the primary IPv4 address of an EC2 instance.

These new conditions are available only for use with credentials issued to an EC2 instance. You don’t have to make configuration changes to activate the new condition keys.

Let’s start by reviewing some existing IAM conditions and how to combine them with the new conditions. When requests are made to an AWS service over a VPC endpoint, the value of the aws:SourceVpc condition key is the ID of the VPC into which the endpoint is deployed. The value of the aws:VpcSourceIP condition key is the IP address from which the endpoint receives the request. The aws:SourceVpc and aws:VpcSourceIP keys are null when requests are made through AWS public service endpoints. These condition keys relate to dynamic properties of the network path by which your AWS Signature Version 4-signed request reached the API endpoint. For a list of AWS services that support VPC endpoints, see AWS services that integrate with AWS PrivateLink.

The two new condition keys relate to dynamic properties of the EC2 role credential itself. By using the two new credential-relative condition keys with the existing network path-relative aws:SourceVPC and aws:VpcSourceIP condition keys, you can create SCPs to help ensure that credentials for EC2 instances are only used from the EC2 instances to which they were issued. By writing policies that compare the two sets of dynamic values, you can configure your environment such that requests signed with an EC2 instance credential are denied if they are used anywhere other than the EC2 instance to which they were issued.

Policy examples

In the following SCP example, access is denied if the value of aws:SourceVpc is not equal to the value of aws:ec2InstanceSourceVPC, or if the value of aws:VpcSourceIp is not equal to the value of aws:ec2InstanceSourcePrivateIPv4. The policy uses aws:ViaAWSService to allow certain AWS services to take action on your behalf when they use your role’s identity to call services, such as when Amazon Athena queries Amazon Simple Storage Service (Amazon S3).

{
  "Version": "2012-10-17",
  "Statement": [
    {
      "Effect": "Deny",
      "Action": "*",
      "Resource": "*",
      "Condition": {
        "StringNotEquals": {
          "aws:ec2InstanceSourceVPC": "${aws:SourceVpc}"
        },
        "Null": {
          "ec2:SourceInstanceARN": "false"
        },
        "BoolIfExists": {
          "aws:ViaAWSService": "false"
        }
      }
    },
    {
      "Effect": "Deny",
      "Action": "*",
      "Resource": "*",
      "Condition": {
        "StringNotEquals": {
          "aws:ec2InstanceSourcePrivateIPv4": "${aws:VpcSourceIp}"
        },
        "Null": {
          "ec2:SourceInstanceARN": "false"
        },
        "BoolIfExists": {
          "aws:ViaAWSService": "false"
        }
      }
    }
  ]
}

Because we encase aws:SourceVpc and aws:VpcSourceIp in “${}” in these policies, they are treated as a variable using the value in the request being made. However, in the IAM policy language, the operator on the left side of a comparison is implicitly treated as a variable, while the operator on the right side must be explicitly declared as a variable. The “Null” operator on the ec2:SourceInstanceARN condition key is designed to ensure that this policy only applies to EC2 instance roles, and not roles used for other purposes, such as those used in AWS Lambda functions.

The two deny statements in this example form a logical “or” statement, such that either a request from a different VPC or a different IP address evaluates in a deny. But functionally, they act in an “and” fashion. To be allowed, a request must satisfy both the VPC-based and the IP-based conditions because failure of either denies the call. Because VPC IDs are globally unique values, it’s reasonable to use the VPC-based condition without the private IP condition. However, you should avoid evaluating only the private IP condition without also evaluating the VPC condition. Private IPs can be the same across different environments, so aws:ec2InstanceSourcePrivateIPv4 is safe to use only in conjunction with the VPC-based condition.

Note: SCPs do not grant IAM permissions; they only remove them. Thus, you must permit your EC2 instances to use AWS services by using IAM policies associated with their roles. For more information, see Determining whether a request is allowed or denied within an account.

If you have specific EC2 instance roles that you want to exclude from the statement, you can apply exception logic through tags or role names.

The following example applies to roles used as EC2 instance roles, except those with a tag of exception-to-vpc-ip where the value is equal to true by using the aws:PrincipalTag condition key. The three condition operators (StringNotEquals, Null, and BoolIfExists) in the same condition block are evaluated with a logical AND operation, and if either of the tests doesn’t evaluate, then the deny statement doesn’t apply. Hence, EC2 instance roles with a principal tag of exception-to-vpc-ip equal to true are not subject to this SCP.

{
  "Version": "2012-10-17",
  "Statement": [
    {
      "Effect": "Deny",
      "Action": "*",
      "Resource": "*",
      "Condition": {
        "StringNotEquals": {
          "aws:ec2InstanceSourceVPC": "${aws:SourceVpc}",
          "aws:PrincipalTag/exception-to-vpc-ip": "true"
        },
        "Null": {
          "ec2:SourceInstanceARN": "false"
        },
        "BoolIfExists": {
          "aws:ViaAWSService": "false"
        }
      }
    },
    {
      "Effect": "Deny",
      "Action": "*",
      "Resource": "*",
      "Condition": {
        "StringNotEquals": {
          "aws:ec2InstanceSourcePrivateIPv4": "${aws:VpcSourceIp}",
           "aws:principaltag/exception-to-vpc-ip": "true"
        },
        "Null": {
          "ec2:SourceInstanceARN": "false"
        },
        "BoolIfExists": {
          "aws:ViaAWSService": "false"
        }
      }
    }
  ]
}

You can apply exception logic to other attributes of your IAM roles. For example, you can use the aws:PrincipalArn condition key to exempt certain roles based on their AWS account. You can also specify where you want this SCP to be applied in your AWS Organizations organization. You can apply SCPs directly to accounts, organizational units, or organizational roots. For more information about inheritance when applying SCPs in Organizations, see Understanding policy inheritance.

You can also apply exception logic to your SCP statements at the IAM Action. The following example statement restricts an EC2 instance’s credential usage to only the instance from which it was issued, except for calls to IAM by using a NotAction element. You should use this exception logic if an AWS service doesn’t have a VPC endpoint, or if you don’t want to use VPC endpoints to access a particular service.

{
  "Version": "2012-10-17",
  "Statement": [
    {
      "Effect": "Deny",
      "NotAction": "iam:*",
      "Resource": "*",
      "Condition": {
        "StringNotEquals": {
          "aws:ec2InstanceSourceVPC": "${aws:SourceVpc}"
        },
        "Null": {
          "ec2:SourceInstanceARN": "false"
        },
        "BoolIfExists": {
          "aws:ViaAWSService": "false"
        }
      }
    },
    {
      "Effect": "Deny",
      "NotAction": "iam:*",
      "Resource": "*",
      "Condition": {
        "StringNotEquals": {
          "aws:ec2InstanceSourcePrivateIPv4": "${aws:VpcSourceIp}"
        },
        "Null": {
          "ec2:SourceInstanceARN": "false"
        },
        "BoolIfExists": {
          "aws:ViaAWSService": "false"
        }
      }
    }
  ]
}

Because these new condition keys are global condition keys, you can use the keys in all relevant AWS policy types, such as the following policy for an S3 bucket. When using this as a bucket policy, make sure to replace <DOC-EXAMPLE-BUCKET> with the ARN of your S3 bucket.

{
  "Version": "2012-10-17",
  "Statement": [
    {
      "Effect": "Deny",
      "Action": "s3:*",
      "Principal": {
        "AWS": "*"
      },
      "Resource": [
        "arn:aws:s3:::<DOC-EXAMPLE-BUCKET>/*",
        "arn:aws:s3::: <DOC-EXAMPLE-BUCKET>"
      ],
      "Condition": {
        "StringNotEquals": {
          "aws:ec2InstanceSourceVPC": "${aws:SourceVpc}"
        },
        "Null": {
          "ec2:SourceInstanceARN": "false"
        },
        "BoolIfExists": {
          "aws:ViaAWSService": "false"
        }
      }
    },
    {
      "Effect": "Deny",
      "Action": "*",
      "Principal": {
        "AWS": "*"
      },
      "Resource": [
        "arn:aws:s3::: <DOC-EXAMPLE-BUCKET> /*",
        "arn:aws:s3::: <DOC-EXAMPLE-BUCKET>"
      ],
      "Condition": {
        "StringNotEquals": {
          "aws:ec2InstanceSourcePrivateIPv4": "${aws:VpcSourceIp}"
        },
        "Null": {
          "ec2:SourceInstanceARN": "false"
        },
        "BoolIfExists": {
          "aws:ViaAWSService": "false"
        }
      }
    }
  ]
}

This policy restricts access to your S3 bucket to EC2 instance roles that are used only from the instance to which they were vended. Like the previous policy examples, there are two deny statements in this example to form a logical “or” statement but a functional “and” statement, because a request must come from the same VPC and same IP address of the instance that it was issued to, or else it evaluates to a deny.

Conclusion

In this blog post, you learned about the newly launched aws:ec2InstanceSourceVPC and aws:ec2InstanceSourcePrivateIPv4 condition keys. You also learned how to use them with SCPs and resource policies to limit the usage of your EC2 instance roles to the instances from which they originated when requests are made over VPC endpoints. Because these new condition keys are global condition keys, you can use them in all relevant AWS policy types. These new condition keys are available today in all Regions, as well as AWS GovCloud and China partitions.

If you have questions, comments, or concerns, contact AWS Support or start a new thread at AWS Identity and Access Management or Compute re:Post.

If you have feedback about this post, submit comments in the Comments section below.

Liam Wadman

Liam Wadman

Liam is a Solutions Architect with the Identity Solutions team. When he’s not building exciting solutions on AWS or helping customers, he’s often found in the hills of British Columbia on his Mountain Bike. Liam points out that you cannot spell LIAM without IAM.

Joshua Levinson

Joshua Levinson

Joshua is a Senior Product Manager at AWS on the EC2 team. He is passionate about helping customers with highly scalable features on EC2 and across AWS, and enjoys the challenge of building simplified solutions to complex problems. Outside of work, he enjoys cooking, reading with his kids, and Olympic weightlifting.

How to monitor and query IAM resources at scale – Part 2

Post Syndicated from Michael Chan original https://aws.amazon.com/blogs/security/how-to-monitor-and-query-iam-resources-at-scale-part-2/

In this post, we continue with our recommendations for using AWS Identity and Access Management (IAM) APIs. In part 1 of this two-part series, we described how you could create IAM resources and use them soon after for authorization decisions. We also described options for monitoring and responding to IAM resource changes for entire accounts. Now, in part 2 of this post, we’ll cover the API throttling behavior of IAM and AWS Security Token Service (AWS STS) and how you can effectively plan your usage of these APIs. We’ll also cover the features of IAM that enable you to right-size the permissions granted to principals in your organization and assess external access to your resources.

Increase your usage of IAM APIs

If you’re a developer or a security engineer, you might find yourself writing more and more automation that interacts with IAM APIs. Other engineers, teams, or applications might also call the IAM APIs within the same account or cross-account. Over time, anyone calling the APIs in your account incrementally increases the number of requests per second. If so, IAM might send a “Rate exceeded” error that indicates you have exceeded a certain threshold of API calls per second. This is called API throttling.

Understand IAM API throttling

API throttling occurs when you exceed the call rate limits for an API. AWS uses API throttling to limit requests to a service. Like many AWS services, IAM limits API requests to maintain the performance of the service, and to ensure fair usage across customers. IAM and AWS STS independently implement a token bucket algorithm for throttling, in which a bucket of virtual tokens is refilled every second. Each token represents a non-throttled API call that you can make. The number of tokens that a bucket holds and the refill rate depends on the API. For each IAM API, a number of token buckets might apply.

We refer to this simply as rate-limiting criteria. Essentially, there are several rate-limiting criteria that are considered when evaluating whether a customer is generating more traffic than the service allows. The following are some examples of these criteria:

  • The account where the API is called
  • The account for read or write APIs (depending on whether the API is a read or write operation)
  • The account from which AssumeRole was called prior to the API call (for example, third-party cross-account calls)
  • The account from which AssumeRole was called prior to the API call for read APIs
  • The API and organization where the API is called

Understand STS API throttling

Although IAM has criteria pertaining to the account from which AssumeRole was called, IAM has its own API rate limits that are distinct from AWS STS. Therefore, the preceding criteria are IAM-specific and are separate from the throttling that can occur if you call STS APIs. IAM is also a global service, and the limits are not Region-aware. In contrast, while STS has a single global endpoint, every Region has its own STS endpoint with its own limits.

The STS rate-limiting criteria pertain to each account and endpoint for API calls. For example, if you call the AssumeRole API against the sts.ap-northeast-1.amazonaws.com endpoint, STS will evaluate the rate-limiting criteria associated with that account and the ap-northeast-1 endpoint. Other STS API requests that you perform under the same account and endpoint will also count towards these criteria. However, if you make a request from the same account to a different regional endpoint or the global endpoint, that request will count against different criteria.

Note: AWS recommends that you use the STS regional endpoints instead of the STS global endpoint. Regional endpoints have several benefits, including redundancy and reduced latency. To learn more about other benefits, see Managing AWS STS in an AWS Region.

How multiple criteria affect throttling

The preceding examples show the different ways that IAM and STS can independently limit requests. Limits might be applied at the account level and across read or write APIs. More than one rate-limiting criterion is typically associated with an API call, with each request counted against each rate-limiting criterion independently. This means that if the requests-per-second exceeds the applicable criteria, then API throttling occurs and returns a rate-limiting error.

How to address IAM and STS API throttling

In this section, we’ll walk you through some strategies to reduce IAM and STS API throttling.

Query for top callers

With AWS CloudTrail Lake, your organization can aggregate, store, and query events recorded by CloudTrail for auditing, security investigation, and operational troubleshooting. To monitor API throttling, you can run a simple query that identifies the top callers of IAM and STS.

For example, you can make a SQL-based query in the CloudTrail console to identify the top callers of IAM, as shown in Figure 1. This query includes the API count, API event name, and more that are made to IAM (shown under eventSource). In this example, the top result is a call to GetServiceLastAccessedDetails, which occurred 163 times. The result includes the account ID and principal ID that made those requests.

Figure 1: Example AWS CloudTrail Lake query

Figure 1: Example AWS CloudTrail Lake query

You can enable AWS CloudTrail Lake for all accounts in your organization. For more information, see Announcing AWS CloudTrail Lake – a managed audit and security Lake. For sample queries, including top IAM actions by principal, see cloud-trail-lake-query-samples in our aws-samples GitHub repository.

Know when you exceed API call rate limits

To reduce call throttling, you need to know when you exceed a rate limit. You can identify when you are being throttled by catching the RateLimitExceeded exception in your API calls. Or, you can send your application logs to Amazon CloudWatch Logs and then configure a metric filter to record each time that throttling occurs, for later analysis or notification. Ideally, you should do this across your applications, and log this information centrally so that you can investigate whether calls from a specific account (such as your central monitoring account) are affecting API availability across your other accounts by exceeding a rate-limiting criterion in those accounts.

Call your APIs with a less aggressive retry strategy

In the AWS SDKs, you can use the existing retry library and provide a custom base for the initial sleep done between API calls. For example, you can set a custom configuration for the backoff or edit the defaults directly. The default SDK_DEFAULT_THROTTLED_BASE_DELAY is 500 milliseconds (ms) in the relevant Java SDK file, but if you’re experiencing throttling consistently, we recommend a minimum 1000 ms for the throttled base delay. You can change this value or implement a custom configuration through the PredefinedBackoffStrategies.SDKDefaultBackoffStrategy() class, which is referenced in the same file. As another example, in the Javascript SDK, you can edit the base retry of the retryDelayOptions configuration in the AWS.Config class, as described in the documentation.

The difference between making these changes and using the SDK defaults is that the custom base provides a less aggressive retry. You shouldn’t retry multiple requests that are throttled during the same one-second window. If the API has other applicable rate-limiting criteria, you can potentially exceed those limits as well, preventing other calls in your account from performing requests. Lastly, be careful that you don’t implement your own retry or backoff logic on top of the SDK retry or backoff logic because this could make throttling worse — instead, you should override the SDK defaults.

Reduce the number of requests by using max items

For some APIs, you can increase the number of items returned by a single API call. Consider the example of the GetServiceLastAccessedDetails API. This API returns a lot of data, but the results are truncated by default to 100 items, ordered alphabetically by the service namespace. If the number of items returned is greater than 100, then the results are paginated, and you need to make multiple requests to retrieve the paginated results individually. But if you increase the value of the MaxItems parameter, you can decrease the number of requests that you need to make to obtain paginated results.

AWS has hundreds of services, so you should set the value of the MaxItems parameter no higher than your application can handle (the response size could be large). At the time of our testing, the results were no longer truncated when this value was 300. For this particular API, IAM might return fewer results, even when more results are available. This means that your code still needs to check whether the results are paginated and make an additional request if paginated results are available.

Consistent use of the MaxItems parameter across AWS APIs can help reduce your total number of API requests. The MaxItems parameter is also available through the GetOrganizationsAccessReport operation, which defaults to 100 items but offers a maximum of 1000 items, with the same caveat that fewer results might be returned, so check for paginated results.

Smooth your high burst traffic

In the table from part 1 of this post, we stated that you should evaluate IAM resources every 24 hours. However, if you use a simple script to perform this check, you could initiate a throttling event. Consider the following fictional example:

As a member of ExampleCorp’s Security team, you are working on a task to evaluate the company’s IAM resources through some custom evaluation scripts. The scripts run in a central security account. ExampleCorp has 1000 accounts. You write automation that assumes a role in every account to run the GetAccountAuthorizationDetails API call. Everything works fine during development on a few accounts, but you later build a dashboard to graph the data. To get the results faster for the dashboard, you update your code to run concurrently every hour. But after this change, you notice that many requests result in the throttling error “Rate exceeded.” Other security teams see “Rate exceeded” errors in their application logs, too.

Can you guess what happened? When you tried to make the requests faster, you used concurrency to make the requests run in parallel. By initiating this large number of requests simultaneously, you exceeded the rate-limiting criteria for the security account from which the sts:AssumeRole action was called prior to the GetAccountAuthorizationDetails API call.

To address scenarios like this, we recommend that you set your own client-side limitations when you need to make a large number of API requests. You can spread these calls out so that they happen sequentially and avoid large spikes. For example, if you run checks every 24 hours, make sure that the calls don’t happen at exactly midnight. Figure 2 shows two different ways to distribute API volume over time:

Figure 2: Call volume that periodically spikes compared to evenly-distributed call volume

Figure 2: Call volume that periodically spikes compared to evenly-distributed call volume

The graph on the left represents a large, recurring API call volume, with calls occurring at roughly the same time each day—such as 1000 requests at midnight every 24 hours. However, if you intend to make these 1000 requests consistently every 24 hours, you can spread them out over the 24-hour period. This means that you could make about 41 requests every hour, so that 41 accounts are queried at 00:00 UTC, another 41 the next hour, and so on. By using this strategy, you can make these requests blend into your other traffic, as shown in the graph on the right, rather than create large spikes. In summary, your automation scheduler should avoid large spikes and distribute API requests evenly over the 24-hour period. Using queues such as those provided by Amazon Simple Queue Service (Amazon SQS) can also help, and when errors are identified, you can put them in a dead letter queue to try again later.

Some IAM APIs have rate-limiting criteria for API requests made from the account from which the AssumeRole was called prior to the call. We recommend that you serially iterate over the accounts in your organization to avoid throttling. To continue with our example, you should iterate the 41 accounts one-by-one each hour, rather than running 41 calls at once, to reduce spikes in your request rates.

Recommendations specific to STS

You can adjust how you use AWS STS to reduce your number of API calls. When you write code that calls the AssumeRole API, you can reuse the returned credentials for future requests because the credentials might still be valid. Imagine that you have an event-driven application running in a central account that assumes a role in a target account and does an API call for each event that occurs in that account. You should consider reusing the credentials returned by the AssumeRole call for each subsequent call in the target account, especially if calls in the central accounts are being throttled. You can do this for AssumeRole calls because there is no service-side limit to the number of credentials that you can create and use. Whether it’s one credential or many, you need to use and store these carefully. You can also adjust the role session duration, which determines how long the role’s credentials are valid. This value can be up to 12 hours, depending on the maximum session duration configured on the role. If you reuse short-term credentials or adjust the session duration, make sure that you evaluate these changes from a security perspective as you optimize your use of STS to reduce API call volume.

Use case #3: Pare down permissions for least-privileged access

Let’s assume that you want to evaluate your organization’s IAM resources with some custom evaluation scripts. AWS has native functionality that can reduce your need for a custom solution. Let’s take a look at some of these that can help you accomplish these goals.

Identify unintended external sharing

To identify whether resources in your accounts, such as IAM roles and S3 buckets, have been shared with external entities, you can use IAM Access Analyzer instead of writing your own checks. With IAM Access Analyzer, you can identify whether resources are accessible outside your account or even your entire organization. Not only can you identify these resources on-demand, but IAM Access Analyzer proactively re-analyzes resources when their policies change, and reports new findings. This can help you feel confident that you will be notified of new external sharing of supported resources, so that you can act quickly to investigate. For more details, see the IAM Access Analyzer user guide.

Right-size permissions

You can also use IAM Access Analyzer to help right-size the permissions policies for key roles in your accounts. IAM Access Analyzer has a policy generation feature that allows you to generate a policy by analyzing your CloudTrail logs to identify actions used from over 140 services. You can compare this generated policy with the existing policy to see if permissions are unused, and if so, remove them.

You can perform policy generation through the API or the IAM console. For example, you can use the console to navigate to the role that you want to analyze, and then choose Generate policy to start analyzing the actions used over a specified period. Actions that are missing from the generated policy are permissions that can be potentially removed from the existing policy, after you confirm your changes with those who administer the IAM role. To learn more about generating policies based on CloudTrail activity, see IAM Access Analyzer makes it easier to implement least privilege permissions by generating IAM policies based on access activity.

Conclusion

In this two-part series, you learned more about how to use IAM so that you can test and query IAM more efficiently. In this post, you learned about the rate-limiting criteria for IAM and STS, to help you address API throttling when increasing your usage of these services. You also learned how IAM Access Analyzer helps you identify unintended resource sharing while also generating policies that serve as a baseline for principals in your account. In part 1, you learned how to quickly create IAM resources and use them when refining permissions. You also learned how to get information about IAM resources and respond to IAM changes through the various services integrated with IAM. Lastly, when calling IAM directly, you learned about bulk APIs, which help you efficiently retrieve the state of your principals and policies. We hope these posts give you valuable insights about IAM to help you better monitor, review, and secure access to your AWS cloud environment!

If you have feedback about this post, submit comments in the Comments section below. If you have questions about this post, start a new thread on the Security, Identity, & Compliance re:Post or contact AWS Support.

Want more AWS Security news? Follow us on Twitter.

Michael Chan

Michael Chan

Michael is a Senior Solutions Architect for AWS Identity who has advised financial services and global customers of AWS. He enjoys understanding customer problems with identity and access management and helping them solve their security issues at scale.

Author photo

Joshua Du Lac

Josh is a Senior Manager of Security Solutions Architects at AWS. Based out of Texas, he has advised dozens of enterprise, global, and financial services customers to accelerate their journey to the cloud while improving their security along the way. Outside of work, Josh enjoys searching for the best tacos in Texas and practicing his handstands.

How to monitor and query IAM resources at scale – Part 1

Post Syndicated from Michael Chan original https://aws.amazon.com/blogs/security/how-to-monitor-and-query-iam-resources-at-scale-part-1/

In this two-part blog post, we’ll provide recommendations for using AWS Identity and Access Management (IAM) APIs, and we’ll share useful details on how IAM works so that you can use it more effectively. For example, you might be creating new IAM resources such as roles and policies through automation and notice a delay for resource propagations. Or you might be building a custom cloud security monitoring solution that uses IAM APIs to evaluate the security and compliance of your AWS accounts, and you want to know how to do that without exceeding limits. Although these are just a few example use cases, the insights described in this post are intended to help you avoid anti-patterns when building scalable cloud services that use IAM APIs.

In this post, we describe how to create IAM resources and use them soon after for authorization decisions. We also describe options for monitoring and responding to IAM resource changes for entire accounts. In part 2, we’ll cover the API throttling behavior of IAM and AWS Security Token Service (AWS STS) and how you can effectively plan your usage of these APIs. Let’s dive in!

Use case 1: Create IAM resources and attempt to use them immediately

If you’re a cloud developer, you create and use IAM resources when you develop applications on AWS. For your application to interact with AWS services, you need to grant IAM permissions to your application. Your application—whether it runs on AWS Lambda, Amazon Elastic Compute Cloud (Amazon EC2), or another service—will need an associated IAM role and policy that provide the necessary permissions.

Imagine that you want to create least privilege policies for your application. You begin by deploying new or updated IAM resources, such as roles and policies, along with your application updates, and you automate this process to speed up testing and development.

During development, you begin removing unnecessary policy permissions, with your automation testing the updated permissions. However, you notice that some of your updates do not immediately take effect. The following sections address why this occurs and provide insights to help you architect for other scenarios.

Understand the IAM control plane and data plane

Let’s first learn more about the control plane and data plane in IAM. The control plane involves operations to create, read, update, and delete IAM resources, and it’s how you get the current state of IAM. When you invoke IAM APIs, you interact with the control plane. This includes any API that falls under the iam:* namespace. The data plane, in contrast, consists of the authorization system that is used at scale to grant access to the broader set of AWS services and resources. This includes the AWS STS APIs, which have their own sts:* namespace.

When you call the IAM control plane APIs to create, update, or delete resources, you can expect a read-after-write consistent response. This means that you can retrieve (read) the resource and its latest updates immediately after it’s written. In contrast, the IAM data plane, where authorizations occur, is eventually consistent. This means that there will be a delay for IAM resource changes, such as updates to roles and policies, to propagate and reflect in the authorizations that follow. The delay can be several seconds or longer. Because of this, you need to allow for propagation time when you test changes to IAM resources. To learn more about the control plane and data plane of IAM, see Resilience in AWS Identity and Access Management.

Note: Because calls to AWS APIs rely on IAM to check permissions, the availability and scalability of the data plane are paramount. In 2011, the “can the caller do this?” function handled a couple of thousand requests per second. Today, as new services continue to launch and the number of AWS customers increases, AWS Identity handles over half a billion API calls per second worldwide, and the number is growing. Eventually consistent design enables the IAM data plane to maintain the high availability and low latency needed to evaluate permissions on AWS.

This is why when architecting your application, we recommend that you don’t depend on control plane actions such as resource updates for critical parts of your application’s workflow. Instead, you should architect to take advantage of the data plane, which includes STS and the authorization system of IAM. In the next section, we describe how you can do this.

Test permissions with STS scope-down policies

IAM role sessions have a feature called a session policy, which takes effect immediately when a role is assumed. This is an optional policy that you can provide to scope down the role’s existing identity policies, with the permissions being the intersection of the role’s identity-based policies and the session policy. By using session policies, you get specific, scoped-down credentials from a single pre-existing role without having to create new roles or identity policies for each particular session’s use case. You can use session policies for your application or when you test which least privilege policies are best for your application.

Let’s walk through an example of when to use session policies for permissions testing. Imagine that you need permissions that require very specific, fine-grained conditions to attain your ideal least privilege policy. You might iterate on the policy several times, making updates and testing the changes over and over again. If you update a policy attached to a role, you need to wait for these changes to propagate to the IAM data plane. But if you instead specify a scope-down policy when assuming the pre-existing role prior to testing, you can immediately test and observe the effects of your permissions changes. Immediate testing is possible because your role and its original policy have already propagated to the data plane, enabling you to iterate over various scoped-down session policies that operate against the IAM data plane.

Use STS session policies to assume a role with the AWS CLI

There are two ways to provide a session policy during the AssumeRole process: you can provide an inline policy document or the Amazon Resource Names (ARNs) of managed session policies. The following example shows how to do this through the AWS Command Line Interface (AWS CLI), by passing in a policy document along with the AssumeRole call. If you use this example policy, make sure to replace <123456789012> and <DOC-EXAMPLE-BUCKET> with your own information.

$ aws sts assume-role \
 --role-arn arn:aws:iam::<123456789012>:role/s3-full-access
 --role-session-name getobject-only-exco
 --policy '{ "Version": "2012-10-17", "Statement": [ { "Action": [ "s3:GetObject" ], "Effect": "Allow", "Resource": "arn:aws:s3::: <DOC-EXAMPLE-BUCKET>/*" } ] }'

In this example, we provide a previously created role ARN named s3-full-access, which provides full access to Amazon Simple Storage Service (Amazon S3). We can further restrict the role’s permissions by supplying a policy with the optional --policy option. The inline policy document only allows the GetObject request against the S3 bucket named <DOC-EXAMPLE-BUCKET>. The effective permissions for the returned session are the intersection of the role’s identity-based policies and our provided session policy. Therefore, the role session’s permissions are limited to only performing the GetObject request against the <DOC-EXAMPLE-BUCKET>.

Note: The combined size of the passed inline policy document and all passed managed policy ARN characters cannot exceed 2,048 characters. You can reduce the size of the JSON policy document by removing unnecessary whitespace and shortening or removing tags associated with your session.

To learn more about session permissions, see Create fine-grained session permissions using IAM managed policies. In part two of this post, we will describe how you can use role sessions when you need to provide credentials at a high rate.

Use case 2: Monitor and respond to IAM resources for entire accounts

You might need to periodically audit the state of your IAM resources, such as roles and policies, including whether these IAM resources have changed, in a single account or across your entire organization. For example, you might want to check whether roles have overly broad access to actions and resources. Or you might want to monitor IAM resource creation and updates to respond to security-relevant permission changes. In this section, you will learn how to choose the right tool for auditing and monitoring IAM resources across accounts. You will learn about the AWS services that support this use case, the benefits of polling compared to event-based architectures, and powerful APIs that aggregate common information.

Respond to configuration changes with an event-driven approach

Sometimes you might need to perform actions relatively quickly based on IAM changes. For example, you might need to check if a trust policy for a newly created or updated role allows cross-account access. In cases like this, you can use AWS Config rules, AWS CloudTrail, or Amazon EventBridge to detect state changes and perform actions based on these state changes. You can use AWS Config rules to evaluate whether a resource complies with the conditions that you specify. If it doesn’t comply, you can provide a workflow to remediate the non-compliance. With CloudTrail, you can monitor your account’s API calls, and log API calls for your accounts with AWS Organizations integration. EventBridge works closely with CloudTrail and helps you create rules that match incoming events and send them to targets, such as Lambda, where your code can perform analysis or automated remediation. You can even filter out events from your accounts and send them to a central account’s event bus for processing. For an example of how to use EventBridge with IAM Access Analyzer to remediate cross-account access in a role’s trust policy, see Automate resolution for IAM Access Analyzer cross-account access findings on IAM roles. Which feature you choose depends on whether you need to monitor one account or all accounts in your organization, as well as which solution you are more comfortable building with.

One caveat to an event-driven approach is that if many events occur over a short period and your application responds to each event with an IAM API call of its own, you could eventually be throttled by IAM. To address this, you can queue up your responding API calls, distribute them over a longer period, or aggregate them to reduce API call volume. For example, if some of your calls are write APIs (such as UpdateAssumeRolePolicy or CreatePolicyVersion) or read APIs (such as GetRole or GetRolePolicy), you can call them serially with a delay between calls. If you need the latest status on a large number of principals and policies, you can call IAM bulk APIs such as GetAccountAuthorizationDetails, which will return data to you for principals and policies and their relationships in your organization. This approach helps you avoid throttling and querying the IAM control plane with unnecessary and redundant API calls. You will learn more about throttling and how to address it in part two of this post.

Retrieve point-in-time resource information with AWS Config

AWS Config helps you assess, audit, and evaluate the configuration of your AWS resources. It also offers multi-account, multi-Region data aggregation and is integrated with AWS Organizations. With AWS Config, you can create rules that detect and respond to changes. AWS Config also keeps an inventory of AWS resource configurations that you can query through its API, so that you don’t need to make direct API calls to each resource’s service. AWS Config also offers the ability to return the status of resources from multiple accounts and AWS Regions. As shown in Figure 1, you can use the AWS Config console to run a simple SQL-like statement for details on the IAM roles in your entire organization.

Figure 1: Run a query on IAM roles in AWS Config

Figure 1: Run a query on IAM roles in AWS Config

The preceding results also show associated resources, such as the inline and attached policies for the IAM roles. Alternatively, you can obtain these results from the SDK or CLI. The following query that uses the CLI is equivalent to the preceding query that uses the console. If you use this query, make sure to replace DOC-EXAMPLE-CONFIG-AGGREGATOR> with your AWS Config aggregator.

aws configservice select-aggregate-resource-config
--configuration-aggregator-name <DOC-EXAMPLE-CONFIG-AGGREGATOR>
--expression "SELECT accountId, resourceId, resourceName, resourceType, tags, configuration.attachedManagedPolicies, configuration.rolePolicyList WHERE resourceType = 'AWS::IAM::Role'"

Here is the response (note that we’ve adjusted the formatting to make it more readable):

{
  "accountId": "123456789012",
  "resourceId": "AROAI3X5HCEQIIEXAMPLE",
  "configuration": { 
    "attachedManagedPolicies": [
      {     
        "policyArn": "arn:aws:iam::aws:policy/service-role/AWSLambdaBasicExecutionRole",
        "policyName": "AWSLambdaBasicExecutionRole"
      },    
      {     
        "policyArn": "arn:aws:iam::123456789012:policy/mchan-test-cloudtrail-post-to-SNS",
        "policyName": "mchan-test-cloudtrail-post-to-SNS"
      }     
      ],    
    "rolePolicyList": []
  },
  "resourceName": "lambda-cloudtrail-notifications",
  "tags": [],
  "resourceType": "AWS::IAM::Role"
}

The preceding command returns the details of roles in your organization’s accounts, including the full policy document for the associated inline policy. It also returns the customer-managed policy names and their ARNs, for which you can view the policy documents and versions by using the BatchGetResourceConfig API. Note that AWS Config doesn’t provide the AWS-managed policy documents. However, these are common across accounts, and we will show you how to query that data later in this section.

To query the status of roles in your organization, you need to have AWS Config enabled in each account. You also need an aggregator to monitor your accounts with your organization’s management account or a delegated administrator account. For more details on how to set up AWS Config, see the AWS Config developer guide. After you set up AWS Config, you can periodically call the AWS Config APIs to get a snapshot of the current or prior state of your resources. Furthermore, you can periodically pull the snapshot records and evaluate this information in other tools outside of AWS Config. So before you directly use the IAM APIs to get IAM information, consider using AWS Config—this is what it’s for!

Retrieve IAM resource information directly from IAM

As previously noted, AWS Config can give you a bulk view of your AWS and IAM resources. Additionally, CloudTrail and EventBridge can detect AWS and IAM resource changes and help you act on them. If you need data from IAM beyond what these services offer, you can query the IAM APIs directly to get the latest information on your resources.

A few key APIs can help you audit IAM resources more efficiently, especially in bulk. The first is GetAccountAuthorizationDetails, which enables you to retrieve the principals in your account, their associated inline policy documents (if any), attached managed policies, and their relationships to each other. This API reduces the need to individually call ListRolePolicies and ListAttachedRolePolicies for each role in an account. GetAccountAuthorizationDetails also returns the role trust policy document for roles in the results. Finally, GetAccountAuthorizationDetails allows you to filter the result set. For example, if you don’t need information relating to groups or AWS managed policies, you can exclude these from the API response. You can do this by using the filter parameter to only include the details that you need at the time.

Another useful API is GenerateServiceLastAccessedDetails. This API gives you details about when an IAM resource (user, group, role, or policy) was last used in an attempt to access AWS services. You can use this API to identify roles that are unused and remove them if you don’t need them. IAM Access Analyzer, which you will learn about later in this post, also uses the same information.

The following table summarizes the key APIs that you can use, rather than building your own code that loops for this information individually.

Type of information API How to use the API Frequency of use
User list and user detail GetAccountAuthorizationDetails Pass User to the filter parameter When needed, per account
User’s inline policy User’s inline policy GetAccountAuthorizationDetails Pass User to the filter parameter When needed, per account
User’s attached managed policies GetAccountAuthorizationDetails Pass User to the filter parameter When needed, per account
Role list and role detail GetAccountAuthorizationDetails Pass Role to the filter parameter When needed, per account
Role trust policy GetAccountAuthorizationDetails Pass Role to the filter parameter When needed, per account
Role’s inline policy GetAccountAuthorizationDetails Pass Role to the filter parameter When needed, per account
Role’s attached managed policies GetAccountAuthorizationDetails Pass Role to the filter parameter When needed, per account
Role last used GetAccountAuthorizationDetails Pass Role to the filter parameter When needed, per account
Group list and group detail GetAccountAuthorizationDetails Pass Group to the filter parameter When needed, per account
Group’s inline policy GetAccountAuthorizationDetails Pass Group to the filter parameter When needed, per account
Group’s attached managed policies GetAccountAuthorizationDetails Pass Group to the filter parameter When needed, per account
AWS customer managed policies GetAccountAuthorizationDetails Pass LocalManagedPolicy to the filter parameter When needed, per account
AWS managed policies GetAccountAuthorizationDetails Pass LocalManagedPolicy to the filter parameter 24 hours recommended, globally (once for all accounts within an AWS partition)
Policy versions GetAccountAuthorizationDetails Pass either LocalManagedPolicy or WSManagedPolicy to the filter parameter 24 hours recommended, per account
Services access attempts by an IAM resource GetServiceLastAccessedDetails Submit a job through the GenerateServiceLastAccessedDetails API, which returns a JobId; then retrieve the results after the job completes. Spread total number of requests evenly across 24 hours
Actions access attempts by an IAM resource GetServiceLastAccessedDetails Submit a job through the GenerateServiceLastAccessedDetails API which returns a JobId; then retrieve the results after the job completes. Pass ACTION_LEVEL as the required Granularity parameter. Spread total number of requests evenly across 24 hours

Note: In the table, we suggest that you perform some of these API requests once every 24 hours as a starting point. You might prefer to perform your own analysis at a longer time interval, such as every 48 hours, but we don’t recommend requesting it more often than every 24 hours because these resources (and therefore the details in the responses) don’t change often. These APIs are suitable for periodic, point-in-time collection of information. If you need faster detection of information from GetAccountAuthorizationDetails, consider whether AWS Config rules or EventBridge will fit your needs. For GetServiceLastAccessedDetails, recent activity usually appears within four hours, so more frequent requests are unlikely to provide much value.

Use of these APIs can help you avoid writing code that loops through results to make individual read API calls for each principal, policy, and policy version in an account, which could result in tens of thousands of API requests and call throttling. Instead of iterating over each resource, you should use solutions that return bulk data, such as GetAccountAuthorizationDetails, AWS Config, or an AWS Partner Network solution. However, if you’re experiencing throttling, you will learn some practical considerations on how to handle that later in this post.

Inspect IAM resources across multiple accounts and organizations

Your use case might require that you inspect IAM resources across multiple accounts in your organization. Or perhaps you are an independent software vendor and need to build a software-as-a-service tool to evaluate IAM resources across many organizations. The following considerations can help you address use cases like these.

AWS Organizations integration

Previously, you learned of the benefits of the “service last accessed data” that the GenerateServiceLastAccessedDetails and GetServiceLastAccessedDetails APIs provide. But what if you want to pull this data for multiple accounts in your organization? IAM has bulk APIs that support querying this data across your entire organization, so you don’t need to assume a role in each account to generate the request. To generate a report for entities (organization root, organizational unit, or account) or policies in your organization, use the GenerateOrganizationsAccessReport operation, which returns a JobId that is passed as a parameter to the GetOrganizationsAccessReport operation to check if the report has been generated. When the job status is marked complete, you can retrieve the report.

AWS managed policies

Many customers use AWS managed policies because they align to common job functions. AWS creates and administers these policies, which have their own ARNs, such as arn:aws:iam::aws:policy/AWSCodeCommitPowerUser. AWS managed policies are available for every account, and they are the same for every account. AWS updates them when new services and API operations are introduced. Updated policies are recorded and visible as a new version, so you only need to query for the current AWS managed policies once per evaluation cycle, rather than once per account. Therefore, if you’re evaluating hundreds or thousands of accounts, you shouldn’t include the AWS managed policies and their policy versions in your query. Doing so would result in thousands of redundant API requests and could cause throttling. Instead, you can query the AWS managed policies once and then reuse the results across your analysis and evaluation by caching the results for a period of time (for example, every 24 hours) in your application before requesting them again to check for updates. Because AWS managed policies are available through the GetAccountAuthorizationDetails API, you don’t need to query for the AWS managed policies or their versions as a separate action.

Multi-account limits

The preceding table lists the frequency of API requests as “per account” in many places. If you’re calling IAM APIs by assuming a role in other accounts from a central account, some IAM APIs have rate-limiting criteria that apply to API requests performed from the assuming account (the central account). To query data from multiple accounts, we recommend that you serially iterate over the accounts one-by-one to avoid throttling. You’ll learn more about this strategy, as well as throttling, in part 2 of this blog post.

Conclusion

In this post, you learned about different aspects of IAM and best practices to test and query IAM efficiently. With STS session policies, you can test different policies to help achieve least privilege access. With AWS Config, EventBridge, CloudTrail, and CloudTrail Lake, you can audit your IAM resources and respond to changes while reducing the number of IAM API calls that you make. If you need to call IAM directly, you can use IAM bulk APIs for more efficient retrieval of your resource state. You can learn more about IAM and best practices in part 2 of blog post: How to monitor and query IAM resources at scale – Part 2.

If you have feedback about this post, submit comments in the Comments section below. If you have questions about this post, start a new thread on the Security, Identity, & Compliance re:Post or contact AWS Support.

Want more AWS Security news? Follow us on Twitter.

Michael Chan

Michael Chan

Michael is a Senior Solutions Architect for AWS Identity who has advised financial services and global customers of AWS. He enjoys understanding customer problems with identity and access management and helping them solve their security issues at scale.

Author photo

Joshua Du Lac

Josh is a Senior Manager of Security Solutions Architects at AWS. Based out of Texas, he has advised dozens of enterprise, global, and financial services customers to accelerate their journey to the cloud while improving their security along the way. Outside of work, Josh enjoys searching for the best tacos in Texas and practicing his handstands.

The anatomy of ransomware event targeting data residing in Amazon S3

Post Syndicated from Megan O'Neil original https://aws.amazon.com/blogs/security/anatomy-of-a-ransomware-event-targeting-data-in-amazon-s3/

Ransomware events have significantly increased over the past several years and captured worldwide attention. Traditional ransomware events affect mostly infrastructure resources like servers, databases, and connected file systems. However, there are also non-traditional events that you may not be as familiar with, such as ransomware events that target data stored in Amazon Simple Storage Service (Amazon S3). There are important steps you can take to help prevent these events, and to identify possible ransomware events early so that you can take action to recover. The goal of this post is to help you learn about the AWS services and features that you can use to protect against ransomware events in your environment, and to investigate possible ransomware events if they occur.

Ransomware is a type of malware that bad actors can use to extort money from entities. The actors can use a range of tactics to gain unauthorized access to their target’s data and systems, including but not limited to taking advantage of unpatched software flaws, misuse of weak credentials or previous unintended disclosure of credentials, and using social engineering. In a ransomware event, a legitimate entity’s access to their data and systems is restricted by the bad actors, and a ransom demand is made for the safe return of these digital assets. There are several methods actors use to restrict or disable authorized access to resources including a) encryption or deletion, b) modified access controls, and c) network-based Denial of Service (DoS) attacks. In some cases, after the target’s data access is restored by providing the encryption key or transferring the data back, bad actors who have a copy of the data demand a second ransom—promising not to retain the data in order to sell or publicly release it.

In the next sections, we’ll describe several important stages of your response to a ransomware event in Amazon S3, including detection, response, recovery, and protection.

Observable activity

The most common event that leads to a ransomware event that targets data in Amazon S3, as observed by the AWS Customer Incident Response Team (CIRT), is unintended disclosure of Identity and Access Management (IAM) access keys. Another likely cause is if there is an application with a software flaw that is hosted on an Amazon Elastic Compute Cloud (Amazon EC2) instance with an attached IAM instance profile and associated permissions, and the instance is using Instance Metadata Service Version 1 (IMDSv1). In this case, an unauthorized user might be able to use AWS Security Token Service (AWS STS) session keys from the IAM instance profile for your EC2 instance to ransom objects in S3 buckets. In this post, we will focus on the most common scenario, which is unintended disclosure of static IAM access keys.

Detection

After a bad actor has obtained credentials, they use AWS API actions that they iterate through to discover the type of access that the exposed IAM principal has been granted. Bad actors can do this in multiple ways, which can generate different levels of activity. This activity might alert your security teams because of an increase in API calls that result in errors. Other times, if a bad actor’s goal is to ransom S3 objects, then the API calls will be specific to Amazon S3. If access to Amazon S3 is permitted through the exposed IAM principal, then you might see an increase in API actions such as s3:ListBuckets, s3:GetBucketLocation, s3:GetBucketPolicy, and s3:GetBucketAcl.

Analysis

In this section, we’ll describe where to find the log and metric data to help you analyze this type of ransomware event in more detail.

When a ransomware event targets data stored in Amazon S3, often the objects stored in S3 buckets are deleted, without the bad actor making copies. This is more like a data destruction event than a ransomware event where objects are encrypted.

There are several logs that will capture this activity. You can enable AWS CloudTrail event logging for Amazon S3 data, which allows you to review the activity logs to understand read and delete actions that were taken on specific objects.

In addition, if you have enabled Amazon CloudWatch metrics for Amazon S3 prior to the ransomware event, you can use the sum of the BytesDownloaded metric to gain insight into abnormal transfer spikes.

Another way to gain information is to use the region-DataTransfer-Out-Bytes metric, which shows the amount of data transferred from Amazon S3 to the internet. This metric is enabled by default and is associated with your AWS billing and usage reports for Amazon S3.

For more information, see the AWS CIRT team’s Incident Response Playbook: Ransom Response for S3, as well as the other publicly available response frameworks available at the AWS customer playbooks GitHub repository.

Response

Next, we’ll walk through how to respond to the unintended disclosure of IAM access keys. Based on the business impact, you may decide to create a second set of access keys to replace all legitimate use of those credentials so that legitimate systems are not interrupted when you deactivate the compromised access keys. You can deactivate the access keys by using the IAM console or through automation, as defined in your incident response plan. However, you also need to document specific details for the event within your secure and private incident response documentation so that you can reference them in the future. If the activity was related to the use of an IAM role or temporary credentials, you need to take an additional step and revoke any active sessions. To do this, in the IAM console, you choose the Revoke active session button, which will attach a policy that denies access to users who assumed the role before that moment. Then you can delete the exposed access keys.

In addition, you can use the AWS CloudTrail dashboard and event history (which includes 90 days of logs) to review the IAM related activities by that compromised IAM user or role. Your analysis can show potential persistent access that might have been created by the bad actor. In addition, you can use the IAM console to look at the IAM credential report (this report is updated every 4 hours) to review activity such as access key last used, user creation time, and password last used. Alternatively, you can use Amazon Athena to query the CloudTrail logs for the same information. See the following example of an Athena query that will take an IAM user Amazon Resource Number (ARN) to show activity for a particular time frame.

SELECT eventtime, eventname, awsregion, sourceipaddress, useragent
FROM cloudtrail
WHERE useridentity.arn = 'arn:aws:iam::1234567890:user/Name' AND
-- Enter timeframe
(event_date >= '2022/08/04' AND event_date <= '2022/11/04')
ORDER BY eventtime ASC

Recovery

After you’ve removed access from the bad actor, you have multiple options to recover data, which we discuss in the following sections. Keep in mind that there is currently no undelete capability for Amazon S3, and AWS does not have the ability to recover data after a delete operation. In addition, many of the recovery options require configuration upon bucket creation.

S3 Versioning

Using versioning in S3 buckets is a way to keep multiple versions of an object in the same bucket, which gives you the ability to restore a particular version during the recovery process. You can use the S3 Versioning feature to preserve, retrieve, and restore every version of every object stored in your buckets. With versioning, you can recover more easily from both unintended user actions and application failures. Versioning-enabled buckets can help you recover objects from accidental deletion or overwrite. For example, if you delete an object, Amazon S3 inserts a delete marker instead of removing the object permanently. The previous version remains in the bucket and becomes a noncurrent version. You can restore the previous version. Versioning is not enabled by default and incurs additional costs, because you are maintaining multiple copies of the same object. For more information about cost, see the Amazon S3 pricing page.

AWS Backup

Using AWS Backup gives you the ability to create and maintain separate copies of your S3 data under separate access credentials that can be used to restore data during a recovery process. AWS Backup provides centralized backup for several AWS services, so you can manage your backups in one location. AWS Backup for Amazon S3 provides you with two options: continuous backups, which allow you to restore to any point in time within the last 35 days; and periodic backups, which allow you to retain data for a specified duration, including indefinitely. For more information, see Using AWS Backup for Amazon S3.

Protection

In this section, we’ll describe some of the preventative security controls available in AWS.

S3 Object Lock

You can add another layer of protection against object changes and deletion by enabling S3 Object Lock for your S3 buckets. With S3 Object Lock, you can store objects using a write-once-read-many (WORM) model and can help prevent objects from being deleted or overwritten for a fixed amount of time or indefinitely.

AWS Backup Vault Lock

Similar to S3 Object lock, which adds additional protection to S3 objects, if you use AWS Backup you can consider enabling AWS Backup Vault Lock, which enforces the same WORM setting for all the backups you store and create in a backup vault. AWS Backup Vault Lock helps you to prevent inadvertent or malicious delete operations by the AWS account root user.

Amazon S3 Inventory

To make sure that your organization understands the sensitivity of the objects you store in Amazon S3, you should inventory your most critical and sensitive data across Amazon S3 and make sure that the appropriate bucket configuration is in place to protect and enable recovery of your data. You can use Amazon S3 Inventory to understand what objects are in your S3 buckets, and the existing configurations, including encryption status, replication status, and object lock information. You can use resource tags to label the classification and owner of the objects in Amazon S3, and take automated action and apply controls that match the sensitivity of the objects stored in a particular S3 bucket.

MFA delete

Another preventative control you can use is to enforce multi-factor authentication (MFA) delete in S3 Versioning. MFA delete provides added security and can help prevent accidental bucket deletions, by requiring the user who initiates the delete action to prove physical or virtual possession of an MFA device with an MFA code. This adds an extra layer of friction and security to the delete action.

Use IAM roles for short-term credentials

Because many ransomware events arise from unintended disclosure of static IAM access keys, AWS recommends that you use IAM roles that provide short-term credentials, rather than using long-term IAM access keys. This includes using identity federation for your developers who are accessing AWS, using IAM roles for system-to-system access, and using IAM Roles Anywhere for hybrid access. For most use cases, you shouldn’t need to use static keys or long-term access keys. Now is a good time to audit and work toward eliminating the use of these types of keys in your environment. Consider taking the following steps:

  1. Create an inventory across all of your AWS accounts and identify the IAM user, when the credentials were last rotated and last used, and the attached policy.
  2. Disable and delete all AWS account root access keys.
  3. Rotate the credentials and apply MFA to the user.
  4. Re-architect to take advantage of temporary role-based access, such as IAM roles or IAM Roles Anywhere.
  5. Review attached policies to make sure that you’re enforcing least privilege access, including removing wild cards from the policy.

Server-side encryption with customer managed KMS keys

Another protection you can use is to implement server-side encryption with AWS Key Management Service (SSE-KMS) and use customer managed keys to encrypt your S3 objects. Using a customer managed key requires you to apply a specific key policy around who can encrypt and decrypt the data within your bucket, which provides an additional access control mechanism to protect your data. You can also centrally manage AWS KMS keys and audit their usage with an audit trail of when the key was used and by whom.

GuardDuty protections for Amazon S3

You can enable Amazon S3 protection in Amazon GuardDuty. With S3 protection, GuardDuty monitors object-level API operations to identify potential security risks for data in your S3 buckets. This includes findings related to anomalous API activity and unusual behavior related to your data in Amazon S3, and can help you identify a security event early on.

Conclusion

In this post, you learned about ransomware events that target data stored in Amazon S3. By taking proactive steps, you can identify potential ransomware events quickly, and you can put in place additional protections to help you reduce the risk of this type of security event in the future.

 
If you have feedback about this post, submit comments in the Comments section below. If you have questions about this post, start a new thread on the Security, Identity and Compliance re:Post or contact AWS Support.

Want more AWS Security news? Follow us on Twitter.

Author

Megan O’Neil

Megan is a Principal Specialist Solutions Architect focused on threat detection and incident response. Megan and her team enable AWS customers to implement sophisticated, scalable, and secure solutions that solve their business challenges.

Karthik Ram

Karthik Ram

Karthik is a Senior Solutions Architect with Amazon Web Services based in Columbus, Ohio. He has a background in IT networking, infrastructure architecture and Security. At AWS, Karthik helps customers build secure and innovative cloud solutions, solving their business problems using data driven approaches. Karthik’s Area of Depth is Cloud Security with a focus on Threat Detection and Incident Response (TDIR).

Kyle Dickinson

Kyle Dickinson

Kyle is a Sr. Security Solution Architect, specializing in threat detection, incident response. He focuses on working with customers to respond to security events with confidence. He also hosts AWS on Air: Lockdown, a livestream security show. When he’s not – he enjoys hockey, BBQ, and trying to convince his Shitzu that he’s in-fact, not a large dog.

How to revoke federated users’ active AWS sessions

Post Syndicated from Matt Howard original https://aws.amazon.com/blogs/security/how-to-revoke-federated-users-active-aws-sessions/

When you use a centralized identity provider (IdP) for human user access, changes that an identity administrator makes to a user within the IdP won’t invalidate the user’s existing active Amazon Web Services (AWS) sessions. This is due to the nature of session durations that are configured on assumed roles. This situation presents a challenge for identity administrators.

In this post, you’ll learn how to revoke access to specific users’ sessions on AWS assumed roles through the use of AWS Identity and Access Management (IAM) policies and service control policies (SCPs) via AWS Organizations.

Session duration overview

When you configure IAM roles, you have the option of configuring a maximum session duration that specifies how long a session is valid. By default, the temporary credentials provided to the user will last for one hour, but you can change this to a value of up to 12 hours.

When a user assumes a role in AWS by using their IdP credentials, that role’s credentials will remain valid for the length of their session duration. It’s convenient for end users to have a maximum session duration set to 12 hours, because this prevents their sessions from frequently timing out and then requiring re-login. However, a longer session duration also poses a challenge if you, as an identity administrator, attempt to revoke or modify a user’s access to AWS from your IdP.

For example, user John Doe is leaving the company and you want to verify that John has his privileges within AWS revoked. If John has access to IAM roles with long-session durations, then he might have residual access to AWS despite having his session revoked or his user identity deleted within the IdP. Perhaps John assumed a role for his daily work at 8 AM and then you revoked his credentials within the IdP at 9 AM. Because John had already assumed an AWS role, he would still have access to AWS through that role for the duration of the configured session, 8 PM if the session was configured for 12 hours. Therefore, as a security best practice, AWS recommends that you do not set the session duration length longer than is needed. This example is displayed in Figure 1.

Figure 1: Session duration overview

Figure 1: Session duration overview

In order to restrict access despite the session duration being active, you could update the roles that are assumable from an IdP with a deny-all policy or delete the role entirely. However, this is a disruptive action for the users that have access to this role. If the role was deleted or the policy was updated to deny all, then users would no longer be able to assume the role or access their AWS environment. Instead, the recommended approach is to revoke access based on the specific user’s principalId or sourceIdentity values.

The principalId is the unique identifier for the entity that made the API call. When requests are made with temporary credentials, such as assumed roles through IdPs, this value also includes the session name, such as [email protected]. The sourceIdentity identifies the original user identity that is making the request, such as a user who is authenticated through SAML federation from an IdP. As a best practice, AWS recommends that you configure this value within the IdP, because this improves traceability for user sessions within AWS. You can find more information on this functionality in the blog post, How to integrate AWS STS SourceIdentity with your identity provider.

Identify the principalId and sourceIdentity by using CloudTrail

You can use AWS CloudTrail to review the actions taken by a user, role, or AWS service that are recorded as events. In the following procedure, you will use CloudTrail to identify the principalId and sourceIdentity contained in the CloudTrail record contents for your IdP assumed role.

To identify the principalId and sourceIdentity by using CloudTrail

  1. Assume a role in AWS by signing in through your IdP.
  2. Perform an action such as a creating an S3 bucket.
  3. Navigate to the CloudTrail service.
  4. In the navigation pane, choose Event History.
  5. For Lookup attributes, choose Event name. For Event name, enter CreateBucket.
  6. Figure 2: Looking up the CreateBucket event in the CloudTrail event history

    Figure 2: Looking up the CreateBucket event in the CloudTrail event history

  7. Select the corresponding event record and review the event details. An example showing the userIdentity element is as follows.

"userIdentity": {
	"type": "AssumedRole",
	"principalId": 
"AROATVGBKRLCHXEXAMPLE:[email protected]",
	"arn": "arn:aws:sts::111122223333:assumed-
role/roleexample/[email protected]",
	"accountId": "111122223333",
	"accessKeyId": "ASIATVGBKRLCJEXAMPLE",
	"sessionContext": {
		"sessionIssuer": {
			"type": "Role",
			"principalId": "AROATVGBKRLCHXEXAMPLE",
			"arn": 
"arn:aws:iam::111122223333:role/roleexample",
			"accountId": "111122223333",
			"userName": "roleexample"
		},
		"webIdFederationData": {},
		"attributes": {
			"creationDate": "2022-07-05T15:48:28Z",
			"mfaAuthenticated": "false"
		},
		"sourceIdentity": "[email protected]"
	}
}

In this event record, you can see that principalId is “AROATVGBKRLCHXEXAMPLE:[email protected] and sourceIdentity was specified as [email protected]. Now that you have these values, let’s explore how you can revoke access by using SCP and IAM policies.

Use an SCP to deny users based on IdP user name or revoke session token

First, you will create an SCP, a policy that can be applied to an organization to offer central control of the maximum available permissions across the accounts in the organization. More information on SCPs, including steps to create and apply them, can be found in the AWS Organizations User Guide.

The SCP will have a deny-all statement with a condition for aws:userid, which will evaluate the principalId field; and a condition for aws:SourceIdentity, which will evaluate the sourceIdentity field. In the following example SCP, the users John Doe and Mary Major are prevented from accessing AWS, in member accounts, regardless of their session duration, because each action will check against their aws:userid and aws:SourceIdentity values and be denied accordingly.

SCP to deny access based on IdP user name


{
	"Version": "2012-10-17",
	"Statement": [
		{
			"Effect": "Deny",
			"Action": "*",
			"Resource": "*",
			"Condition": {
				"StringLike": {
					"aws:userid": [
						"*:[email protected]",
						"*:[email protected]"
				]
			}
		}
	},
	{
			"Effect": "Deny",
			"Action": "*",
			"Resource": "*",
			"Condition": {
				"StringEquals": {
					"aws:SourceIdentity": [
						"[email protected]",
						"[email protected]"
					]
				}
			}
		}
	]
}

Use an IAM policy to revoke access in the AWS Organizations management account

SCPs do not affect users or roles in the AWS Organizations management account and instead only affect the member accounts in the organization. Therefore, using an SCP alone to deny access may not be sufficient. However, identity administrators can revoke access in a similar way within their management account by using the following procedure.

To create an IAM policy in the management account

  1. Sign in to the AWS Management Console by using your AWS Organizations management account credentials.
  2. Follow these steps to use the JSON policy editor to create an IAM policy. Use the JSON of the SCP shown in the preceding section, SCP to deny access based on IdP user name, in the IAM JSON editor.
  3. Follow these steps to add the IAM policy to roles that IdP users may assume within the account.

Revoke active sessions when role chaining

At this point, the user actions on the IdP assumable roles within the AWS organization have been blocked. However, there is still an edge case if the target users use role chaining (use an IdP assumedRole credential to assume a second role) that uses a different RoleSessionName than the one assigned by the IdP. In a role chaining situation, the users will still have access by using the cached credentials for the second role.

This is where the sourceIdentity field is valuable. After a source identity is set, it is present in requests for AWS actions that are taken during the role session. The value that is set persists when a role is used to assume another role (role chaining). The value that is set cannot be changed during the role session. Therefore, it’s recommended that you configure the sourceIdentity field within the IdP as explained previously. This concept is shown in Figure 3.

Figure 3: Role chaining with sourceIdentity configured

Figure 3: Role chaining with sourceIdentity configured

A user assumes an IAM role via their IdP (#1), and the CloudTrail record displays sourceIdentity: [email protected] (#2). When the user assumes a new role within AWS (#3), that CloudTrail record continues to display sourceIdentity: [email protected] despite the principalId changing (#4).

However, if a second role is assumed in the account through role chaining and the sourceIdentity is not set, then it’s recommended that you revoke the issued session tokens for the second role. In order to do this, you can use the SCP policy at the end of this section, SCP to revoke active sessions for assumed roles. When you use this policy, the issued credentials related to the roles specified will be revoked for the users currently using them, and only users who were not denied through the previous SCP or IAM policies restricting their aws:userid will be able to reassume the target roles to obtain a new temporary credential.

If you take this approach, you will need to use an SCP to apply across the organization’s member accounts. The SCP must have the human-assumable roles for role chaining listed and a token issue time set to a specific time when you want users’ access revoked. (Normally, this time window would be set to the present time to immediately revoke access, but there might be circumstances in which you wish to revoke the access at a future date, such as when a user moves to a new project or team and therefore requires different access levels.) In addition, you will need to follow the same procedures in your management account by creating a customer-managed policy by using the same JSON with the condition statement for aws:PrincipalArn removed. Then attach the customer managed policy to the individual roles that are human-assumable through role chaining.

SCP to revoke active sessions for assumed roles


{
	"Version": "2012-10-17",
	"Statement": [
		{
			"Sid": "RevokeActiveSessions",
			"Effect": "Deny",
			"Action": [
				"*"
			],
			"Resource": [
				"*"
			],
			"Condition": {
				"StringEquals": {
					"aws:PrincipalArn": [
						"arn:aws:iam::<account-id>:role/<role-name>",
						"arn:aws:iam::<account-id>:role/<role-name>"
					]
				},
				"DateLessThan": {
					"aws:TokenIssueTime": "2022-06-01T00:00:00Z"
				}
			}
		}
	]
}

Conclusion and final recommendations

In this blog post, I demonstrated how you can revoke a federated user’s active AWS sessions by using SCPs and IAM policies that restrict the use of the aws:userid and aws:SourceIdentity condition keys. I also shared how you can handle a role chaining situation with the aws:TokenIssueTime condition key.

This exercise demonstrates the importance of configuring the session duration parameter on IdP assumed roles. As a security best practice, you should set the session duration to no longer than what is needed to perform the role. In some situations, that could mean an hour or less in a production environment and a longer session in a development environment. Regardless, it’s important to understand the impact of configuring the maximum session duration in the user’s environment and also to have proper procedures in place for revoking a federated user’s access.

This post also covered the recommendation to set the sourceIdentity for assumed roles through the IdP. This value cannot be changed during role sessions and therefore persists when a user conducts role chaining. Following this recommendation minimizes the risk that a user might have assumed another role with a different session name than the one assigned by the IdP and helps prevent the edge case scenario of revoking active sessions based on TokenIssueTime.

You should also consider other security best practices, described in the Security Pillar of the AWS Well-Architected Framework, when you revoke users’ AWS access. For example, rotating credentials such as IAM access keys in situations in which IAM access keys are regularly used and shared among users. The example solutions in this post would not have prevented a user from performing AWS actions if that user had IAM access keys configured for a separate IAM user in the environment. Organizations should limit long-lived security credentials such as IAM keys and instead rotate them regularly or avoid their use altogether. Also, the concept of least privilege is highly important to limit the access that users have and scope it solely to the requirements that are needed to perform their job functions. Lastly, you should adopt a centralized identity provider coupled with the AWS IAM Identity Center (successor to AWS Single Sign-On) service in order to centralize identity management and avoid the need for multiple credentials for users.

If you have feedback about this post, submit comments in the Comments section below. If you have questions about this post, start a new thread on the AWS Identity and Access Management re:Post or contact AWS Support.

Want more AWS Security news? Follow us on Twitter.

Author

Matt Howard

Matt is a Principal Technical Account Manager (TAM) for AWS Enterprise Support. As a TAM, Matt provides advocacy and technical guidance to help customers plan and build solutions using AWS best practices. Outside of AWS, Matt enjoys spending time with family, sports, and video games.

How to secure your SaaS tenant data in DynamoDB with ABAC and client-side encryption

Post Syndicated from Jani Muuriaisniemi original https://aws.amazon.com/blogs/security/how-to-secure-your-saas-tenant-data-in-dynamodb-with-abac-and-client-side-encryption/

If you’re a SaaS vendor, you may need to store and process personal and sensitive data for large numbers of customers across different geographies. When processing sensitive data at scale, you have an increased responsibility to secure this data end-to-end. Client-side encryption of data, such as your customers’ contact information, provides an additional mechanism that can help you protect your customers and earn their trust.

In this blog post, we show how to implement client-side encryption of your SaaS application’s tenant data in Amazon DynamoDB with the Amazon DynamoDB Encryption Client. This is accomplished by leveraging AWS Identity and Access Management (IAM) together with AWS Key Management Service (AWS KMS) for a more secure and cost-effective isolation of the client-side encrypted data in DynamoDB, both at run-time and at rest.

Encrypting data in Amazon DynamoDB

Amazon DynamoDB supports data encryption at rest using encryption keys stored in AWS KMS. This functionality helps reduce operational burden and complexity involved in protecting sensitive data. In this post, you’ll learn about the benefits of adding client-side encryption to achieve end-to-end encryption in transit and at rest for your data, from its source to storage in DynamoDB. Client-side encryption helps ensure that your plaintext data isn’t available to any third party, including AWS.

You can use the Amazon DynamoDB Encryption Client to implement client-side encryption with DynamoDB. In the solution in this post, client-side encryption refers to the cryptographic operations that are performed on the application-side in the application’s Lambda function, before the data is sent to or retrieved from DynamoDB. The solution in this post uses the DynamoDB Encryption Client with the Direct KMS Materials Provider so that your data is encrypted by using AWS KMS. However, the underlying concept of the solution is not limited to the use of the DynamoDB Encryption Client, you can apply it to any client-side use of AWS KMS, for example using the AWS Encryption SDK.

For detailed information about using the DynamoDB Encryption Client, see the blog post How to encrypt and sign DynamoDB data in your application. This is a great place to start if you are not yet familiar with DynamoDB Encryption Client. If you are unsure about whether you should use client-side encryption, see Client-side and server-side encryption in the Amazon DynamoDB Encryption Client Developer Guide to help you with the decision.

AWS KMS encryption context

AWS KMS gives you the ability to add an additional layer of authentication for your AWS KMS API decrypt operations by using encryption context. The encryption context is one or more key-value pairs of additional data that you want associated with AWS KMS protected information.

Encryption context helps you defend against the risks of ciphertexts being tampered with, modified, or replaced — whether intentionally or unintentionally. Encryption context helps defend against both an unauthorized user replacing one ciphertext with another, as well as problems like operational events. To use encryption context, you specify associated key-value pairs on encrypt. You must provide the exact same key-value pairs in the encryption context on decrypt, or the operation will fail. Encryption context is not secret, and is not an access-control mechanism. The encryption context is a means of authenticating the data, not the caller.

The Direct KMS Materials Provider used in this blog post transparently generates a unique data key by using AWS KMS for each item stored in the DynamoDB table. It automatically sets the item’s partition key and sort key (if any) as AWS KMS encryption context key-value pairs.

The solution in this blog post relies on the partition key of each table item being defined in the encryption context. If you encrypt data with your own implementation, make sure to add your tenant ID to the encryption context in all your AWS KMS API calls.

For more information about the concept of AWS KMS encryption context, see the blog post How to Protect the Integrity of Your Encrypted Data by Using AWS Key Management Service and EncryptionContext. You can also see another example in Exercise 3 of the Busy Engineer’s Document Bucket Workshop.

Attribute-based access control for AWS

Attribute-based access control (ABAC) is an authorization strategy that defines permissions based on attributes. In AWS, these attributes are called tags. In the solution in this post, ABAC helps you create tenant-isolated access policies for your application, without the need to provision tenant specific AWS IAM roles.

If you are new to ABAC, or need a refresher on the concepts and the different isolation methods, see the blog post How to implement SaaS tenant isolation with ABAC and AWS IAM.

Solution overview

If you are a SaaS vendor expecting large numbers of tenants, it is important that your underlying architecture can cost effectively scale with minimal complexity to support the required number of tenants, without compromising on security. One way to meet these criteria is to store your tenant data in a single pooled DynamoDB table, and to encrypt the data using a single AWS KMS key.

Using a single shared KMS key to read and write encrypted data in DynamoDB for multiple tenants reduces your per-tenant costs. This may be especially relevant to manage your costs if you have users on your organization’s free tier, with no direct revenue to offset your costs.

When you use shared resources such as a single pooled DynamoDB table encrypted by using a single KMS key, you need a mechanism to help prevent cross-tenant access to the sensitive data. This is where you can use ABAC for AWS. By using ABAC, you can build an application with strong tenant isolation capabilities, while still using shared and pooled underlying resources for storing your sensitive tenant data.

You can find the solution described in this blog post in the aws-dynamodb-encrypt-with-abac GitHub repository. This solution uses ABAC combined with KMS encryption context to provide isolation of tenant data, both at rest and at run time. By using a single KMS key, the application encrypts tenant data on the client-side, and stores it in a pooled DynamoDB table, which is partitioned by a tenant ID.

Solution Architecture

Figure 1: Components of solution architecture

Figure 1: Components of solution architecture

The presented solution implements an API with a single AWS Lambda function behind an Amazon API Gateway, and implements processing for two types of requests:

  1. GET request: fetch any key-value pairs stored in the tenant data store for the given tenant ID.
  2. POST request: store the provided key-value pairs in the tenant data store for the given tenant ID, overwriting any existing data for the same tenant ID.

The application is written in Python, it uses AWS Lambda Powertools for Python, and you deploy it by using the AWS CDK.

It also uses the DynamoDB Encryption Client for Python, which includes several helper classes that mirror the AWS SDK for Python (Boto3) classes for DynamoDB. This solution uses the EncryptedResource helper class which provides Boto3 compatible get_item and put_item methods. The helper class is used together with the KMS Materials Provider to handle encryption and decryption with AWS KMS transparently for the application.

Note: This example solution provides no authentication of the caller identity. See chapter “Considerations for authentication and authorization” for further guidance.

How it works

Figure 2: Detailed architecture for storing new or updated tenant data

Figure 2: Detailed architecture for storing new or updated tenant data

As requests are made into the application’s API, they are routed by API Gateway to the application’s Lambda function (1). The Lambda function begins to run with the IAM permissions that its IAM execution role (DefaultExecutionRole) has been granted. These permissions do not grant any access to the DynamoDB table or the KMS key. In order to access these resources, the Lambda function first needs to assume the ResourceAccessRole, which does have the necessary permissions. To implement ABAC more securely in this use case, it is important that the application maintains clear separation of IAM permissions between the assumed ResourceAccessRole and the DefaultExecutionRole.

As the application assumes the ResourceAccessRole using the AssumeRole API call (2), it also sets a TenantID session tag. Session tags are key-value pairs that can be passed when you assume an IAM role in AWS Simple Token Service (AWS STS), and are a fundamental core building block of ABAC on AWS. When the session credentials (3) are used to make a subsequent request, the request context includes the aws:PrincipalTag context key, which can be used to access the session’s tags. The chapter “The ResourceAccessRole policy” describes how the aws:PrincipalTag context key is used in IAM policy condition statements to implement ABAC for this solution. Note that for demonstration purposes, this solution receives the value for the TenantID tag directly from the request URL, and it is not authenticated.

The trust policy of the ResourceAccessRole defines the principals that are allowed to assume the role, and to tag the assumed role session. Make sure to limit the principals to the least needed for your application to function. In this solution, the application Lambda function is the only trusted principal defined in the trust policy.

Next, the Lambda function prepares to encrypt or decrypt the data (4). To do so, it uses the DynamoDB Encryption Client. The KMS Materials Provider and the EncryptedResource helper class are both initialized with sessions by using the temporary credentials from the AssumeRole API call. This allows the Lambda function to access the KMS key and DynamoDB table resources, with access restricted to operations on data belonging only to the specific tenant ID.

Finally, using the EncryptedResource helper class provided by the DynamoDB Encryption Library, the data is written to and read from the DynamoDB table (5).

Considerations for authentication and authorization

The solution in this blog post intentionally does not implement authentication or authorization of the client requests. Instead, the requested tenant ID from the request URL is passed as the tenant identity. Your own applications should always authenticate and authorize tenant requests. There are multiple ways you can achieve this.

Modern web applications commonly use OpenID Connect (OIDC) for authentication, and OAuth for authorization. JSON Web Tokens (JWTs) can be used to pass the resulting authorization data from client to the application. You can validate a JWT when using AWS API Gateway with one of the following methods:

  1. When using a REST or a HTTP API, you can use a Lambda authorizer
  2. When using a HTTP API, you can use a JWT authorizer
  3. You can validate the token directly in your application code

If you write your own authorizer code, you can pick a popular open source library or you can choose the AWS provided open source library. To learn more about using a JWT authorizer, see the blog post How to secure API Gateway HTTP endpoints with JWT authorizer.

Regardless of the chosen method, you must be able to map a suitable claim from the user’s JWT, such as the subject, to the tenant ID, so that it can be used as the session tag in this solution.

The ResourceAccessRole policy

A critical part of the correct operation of ABAC in this solution is with the definition of the IAM access policy for the ResourceAccessRole. In the following policy, be sure to replace <region>, <account-id>, <table-name>, and <key-id> with your own values.

{
    "Version": "2012-10-17",
    "Statement": [
        {
            "Effect": "Allow",
            "Action": [
                "dynamodb:DescribeTable",
                "dynamodb:GetItem",
                "dynamodb:PutItem"
            ],
            "Resource": [
                "arn:aws:dynamodb:<region>:<account-id>:table/<table-name>",
           ],
            "Condition": {
                "ForAllValues:StringEquals": {
                    "dynamodb:LeadingKeys": [
                        "${aws:PrincipalTag/TenantID}"
                    ]
                }
            }
        },
        {
            "Effect": "Allow",
            "Action": [
                "kms:Decrypt",
                "kms:GenerateDataKey",
            ],
            "Resource": "arn:aws:kms:<region>:<account-id>:key/<key-id>",
            "Condition": {
                "StringEquals": {
                    "kms:EncryptionContext:tenant_id": "${aws:PrincipalTag/TenantID}"
                }
            }
        }
    ]
}

The policy defines two access statements, both of which apply separate ABAC conditions:

  1. The first statement grants access to the DynamoDB table with the condition that the partition key of the item matches the TenantID session tag in the caller’s session.
  2. The second statement grants access to the KMS key with the condition that one of the key-value pairs in the encryption context of the API call has a key called tenant_id with a value that matches the TenantID session tag in the caller’s session.

Warning: Do not use a ForAnyValue or ForAllValues set operator with the kms:EncryptionContext single-valued condition key. These set operators can create a policy condition that does not require values you intend to require, and allows values you intend to forbid.

Deploying and testing the solution

Prerequisites

To deploy and test the solution, you need the following:

Deploying the solution

After you have the prerequisites installed, run the following steps in a command line environment to deploy the solution. Make sure that your AWS CLI is configured with your AWS account credentials. Note that standard AWS service charges apply to this solution. For more information about pricing, see the AWS Pricing page.

To deploy the solution into your AWS account

  1. Use the following command to download the source code:
    git clone https://github.com/aws-samples/aws-dynamodb-encrypt-with-abac
    cd aws-dynamodb-encrypt-with-abac

  2. (Optional) You will need an AWS CDK version compatible with the application (2.37.0) to deploy. The simplest way is to install a local copy with npm, but you can also use a globally installed version if you already have one. To install locally, use the following command to use npm to install the AWS CDK:
    npm install [email protected]

  3. Use the following commands to initialize a Python virtual environment:
    python3 -m venv demoenv
    source demoenv/bin/activate
    python3 -m pip install -r requirements.txt

  4. (Optional) If you have not used AWS CDK with this account and Region before, you first need to bootstrap the environment:
    npx cdk bootstrap

  5. Use the following command to deploy the application with the AWS CDK:
    npx cdk deploy

  6. Make note of the API endpoint URL https://<api url>/prod/ in the Outputs section of the CDK command. You will need this URL for the next steps.
    Outputs:
    DemoappStack.ApiEndpoint4F160690 = https://<api url>/prod/

Testing the solution with example API calls

With the application deployed, you can test the solution by making API calls against the API URL that you captured from the deployment output. You can start with a simple HTTP POST request to insert data for a tenant. The API expects a JSON string as the data to store, so make sure to post properly formatted JSON in the body of the request.

An example request using curl -command looks like:

curl https://<api url>/prod/tenant/<tenant-name> -X POST --data '{"email":"<[email protected]>"}'

You can then read the same data back with an HTTP GET request:

curl https://<api url>/prod/tenant/<tenant-name>

You can store and retrieve data for any number of tenants, and can store as many attributes as you like. Each time you store data for a tenant, any previously stored data is overwritten.

Additional considerations

A tenant ID is used as the DynamoDB table’s partition key in the example application in this solution. You can replace the tenant ID with another unique partition key, such as a product ID, as long as the ID is consistently used in the IAM access policy, the IAM session tag, and the KMS encryption context. In addition, while this solution does not use a sort key in the table, you can modify the application to support a sort key with only a few changes. For more information, see Working with tables and data in DynamoDB.

Clean up

To clean up the application resources that you deployed while testing the solution, in the solution’s home directory, run the command cdk destroy.

Then, if you no longer plan to deploy to this account and Region using AWS CDK, you can also use the AWS CloudFormation console to delete the bootstrap stack (CDKToolKit).

Conclusion

In this post, you learned a method for simple and cost-efficient client-side encryption for your tenant data. By using the DynamoDB Encryption Client, you were able to implement the encryption with less effort, all while using a standard Boto3 DynamoDB Table resource compatible interface.

Adding to the client-side encryption, you also learned how to apply attribute-based access control (ABAC) to your IAM access policies. You used ABAC for tenant isolation by applying conditions for both the DynamoDB table access, as well as access to the KMS key that is used for encryption of the tenant data in the DynamoDB table. By combining client-side encryption with ABAC, you have increased your data protection with multiple layers of security.

You can start experimenting today on your own by using the provided solution. If you have feedback about this post, submit comments in the Comments section below. If you have questions on the content, consider submitting them to AWS re:Post

Want more AWS Security news? Follow us on Twitter.

Jani Muuriaisniemi

Jani is a Principal Solutions Architect at Amazon Web Services based out of Helsinki, Finland. With more than 20 years of industry experience, he works as a trusted advisor with a broad range of customers across different industries and segments, helping the customers on their cloud journey.

You can now assign multiple MFA devices in IAM

Post Syndicated from Liam Wadman original https://aws.amazon.com/blogs/security/you-can-now-assign-multiple-mfa-devices-in-iam/

At Amazon Web Services (AWS), security is our top priority, and configuring multi-factor authentication (MFA) on accounts is an important step in securing your organization.

Now, you can add multiple MFA devices to AWS account root users and AWS Identity and Access Management (IAM) users in your AWS accounts. This helps you to raise the security bar in your accounts and limit access management to highly privileged principals, such as root users. Previously, you could only have one MFA device associated with root users or IAM users, but now you can associate up to eight MFA devices of the currently supported types with root users and IAM users.

In this blog post, we review the current MFA features for IAM, share use cases for multiple MFA devices, and show you how to manage and sign in with the additional MFA devices for better resiliency and flexibility.

Overview of MFA for IAM

First, let’s recap some of the benefits and available MFA configurations for IAM.

The use of MFA is an important security best practice on AWS. With MFA, you have an additional layer of protection to help prevent unauthorized individuals from gaining access to your systems and data. MFA can help protect your AWS environments if a password associated with your root user or IAM user became compromised.

As a security best practice, AWS recommends that you avoid using root users or IAM users to manage access to your accounts. Instead, you should use AWS IAM Identity Center (successor to AWS Single Sign-On) to manage access to your accounts. You should only use root users for tasks that they are required for.

To help meet different customer needs, AWS supports three types of MFA devices for IAM, including FIDO security keys, virtual authenticator applications, and time-based one-time password (TOTP) hardware tokens. You should select the device type that aligns with your security and operational requirements. You can associate different types of MFA devices with an IAM principal.

Use cases for multiple MFA devices

There are several use cases in which associating multiple MFA devices with an IAM principal is beneficial to the security and operational efficiency of your organization, such as the following:

  • In the event of a lost, stolen, or inaccessible MFA device, you can use one of the remaining MFA devices to access the account without performing the AWS account recovery procedure. If an MFA device is lost or stolen, it’s best practice to disassociate the lost or stolen device from the root users or IAM users that it’s associated with.
  • Geographically dispersed teams, or teams working remotely, can use hardware-based MFA to access AWS, without shipping a single hardware device or coordinating a physical exchange of a single hardware device between team members.
  • If the holder of an MFA device isn’t available, you can maintain access to your root users and IAM users by using a different MFA device associated with an IAM principal.
  • You can store additional MFA devices in a secure physical location, such as a vault or safe, while retaining physical access to another MFA device for redundancy.

How to manage multiple MFA devices in IAM

You can register up to eight MFA devices, in any combination of the currently supported MFA types, with your root users and IAM users.

To register an MFA device

  1. Sign in to the AWS Management Console and do the following:
    • For a root user, choose My Security Credentials.
    • For an IAM user, choose Security credentials.
  2. For Multi-factor authentication (MFA), choose Assign MFA device.
  3. Select the type of MFA device that you want to use and then choose Next.

With multiple MFA devices, you only need one MFA device to sign in to the console or to create a session through the AWS Command Line Interface (AWS CLI) as that principal.

You don’t need to make permissions changes in order for your organization to start taking advantage of multiple MFA devices. The root users and IAM users in your accounts that manage MFA devices today can use their existing IAM permissions to enable additional MFA devices.

Changes to Cloudtrail log entries

In support of this new feature, the identifier of the MFA device used will now be added to the console sign-in events of the root user and IAM user that use MFA. With these changes to AWS CloudTrail log entries, you can now view both the user and the MFA device used to authenticate to AWS. This provides better traceability and audibility for your accounts.

You can find this information in the MFAIdentifier field in CloudTrail, within additionalEventData. You don’t need to take action for this information to be logged. The following is a sample log from CloudTrail that includes the MFAIdentifier.

"additionalEventData": {
"LoginTo": "https://console.aws.amazon.com/console/home?state=hashArgs%23&isauthcode=true",
"MobileVersion": "No",
"MFAIdentifier": "arn:aws:iam::111122223333:mfa/root-account-mfa-device",
"MFAUsed": "YES"
}

The identifier of the MFA devices used for AWS CLI sessions with the sts:GetSessionToken action are logged in the requestParameters field.

    "requestParameters": {
"serialNumber": "arn:aws:iam::111122223333:mfa/root-account-mfa-device"
    }

Sign-in experience with multiple MFA devices

In this section, we’ll show you how to sign in to the console as an IAM principal with multiple MFA devices associated with it.

To authenticate as an IAM principal with multiple MFA devices

  1. Sign in to the IAM console as an IAM principal.
  2. Authenticate with the principal’s password.
  3. For Additional verification required, select the type of MFA device that you want to use to continue authenticating, and then choose Next:
    Figure 1: MFA device selection when authenticating to the console as an IAM user or root user with different types of MFA devices available

    Figure 1: MFA device selection when authenticating to the console as an IAM user or root user with different types of MFA devices available

  4. You will then be prompted to authenticate with the type of device that you selected.
    Figure 2: Prompt to authenticate with a FIDO security key

    Figure 2: Prompt to authenticate with a FIDO security key

Conclusion

In this blog post, you learned about the new multiple MFA devices feature in IAM, and how to set up and manage multiple MFA devices in IAM. Associating multiple MFA devices with your root users and IAM users can make it simpler for you to manage access to them. This feature is available now for AWS customers, except for customers operating in AWS GovCloud (US) Regions or in the AWS China Regions. For more information about how to configure multiple MFA devices on your root users and IAM users, see the documentation on MFA in IAM. There is no extra charge to use MFA devices in IAM.

AWS offers a free MFA security key to eligible AWS account owners in the United States. To determine eligibility and order a key, see the ordering portal.

If you have questions, post them in the AWS Identity and Access Management re:Post topic or reach out to AWS Support.

 
If you have feedback about this post, submit comments in the Comments section below. If you have questions about this post, contact AWS Support.

Want more AWS Security news? Follow us on Twitter.

Liam Wadman

Liam Wadman

Liam is a Solutions Architect with the Identity Solutions team. When he’s not building exciting solutions on AWS or helping customers, he’s often found in the hills of British Columbia on his Mountain Bike. Liam points out that you cannot spell LIAM without IAM.

Khaled Zaky

Khaled Zaky

Khaled is a Sr. Product Manager – Technical at Amazon Web Services. He is responsible for AWS Identity products related to user authentication such as sign-in security and multi-factor authentication products. Khaled has deep industry experience in cloud computing and product management. He is passionate about building customer-centric products that make it easier and more secure for customers to use the cloud. Outside of work interests include teaching product management, road cycling, Taekwondo (Martial Arts) and DIY home renovations.

Announcing an update to IAM role trust policy behavior

Post Syndicated from Mark Ryland original https://aws.amazon.com/blogs/security/announcing-an-update-to-iam-role-trust-policy-behavior/

AWS Identity and Access Management (IAM) is changing an aspect of how role trust policy evaluation behaves when a role assumes itself. Previously, roles implicitly trusted themselves from a role trust policy perspective if they had identity-based permissions to assume themselves. After receiving and considering feedback from customers on this topic, AWS is changing role assumption behavior to always require self-referential role trust policy grants. This change improves consistency and visibility with regard to role behavior and privileges. This change allows customers to create and understand role assumption permissions in a single place (the role trust policy) rather than two places (the role trust policy and the role identity policy). It increases the simplicity of role trust permission management: “What you see [in the trust policy] is what you get.”

Therefore, beginning today, for any role that has not used the identity-based behavior since June 30, 2022, a role trust policy must explicitly grant permission to all principals, including the role itself, that need to assume it under the specified conditions. Removal of the role’s implicit self-trust improves consistency and increases visibility into role assumption behavior.

Most AWS customers will not be impacted by the change at all. Only a tiny percentage (approximately 0.0001%) of all roles are involved. Customers whose roles have recently used the previous implicit trust behavior are being notified, beginning today, about those roles, and may continue to use this behavior with those roles until February 15, 2023, to allow time for making the necessary updates to code or configuration. Or, if these customers are confident that the change will not impact them, they can opt out immediately by substituting in new roles, as discussed later in this post.

The first part of this post briefly explains the change in behavior. The middle sections answer practical questions like: “why is this happening?,” “how might this change impact me?,” “which usage scenarios are likely to be impacted?,” and “what should I do next?” The usage scenario section is important because it shows that, based on our analysis, the self-assuming role behavior exhibited by code or human users is very likely to be unnecessary and counterproductive. Finally, for security professionals interested in better understanding the reasons for the old behavior, the rationale for the change, as well as its possible implications, the last section reviews a number of core IAM concepts and digs in to additional details.

What is changing?

Until today, an IAM role implicitly trusted itself. Consider the following role trust policy attached to the role named RoleA in AWS account 123456789012.

{
    "Version": "2012-10-17",
    "Statement": [
        {
            "Effect": "Allow",
            "Principal": {
                "AWS": "arn:aws:iam::123456789012:role/RoleB"
            },
            "Action": "sts:AssumeRole"
        }
    ]
}

This role trust policy grants role assumption access to the role named RoleB in the same account. However, if the corresponding identity-based policy for RoleA grants the sts:AssumeRole action with respect to itself, then RoleA could also assume itself. Therefore, there were actually two roles that could assume RoleA: the explicitly permissioned RoleB, and RoleA, which implicitly trusted itself as a byproduct of the IAM ownership model (explained in detail in the final section). Note that the identity-based permission that RoleA must have to assume itself is not required in the case of RoleB, and indeed an identity-based policy associated with RoleB that references other roles is not sufficient to allow RoleB to assume them. The resource-based permission granted by RoleA’s trust policy is both necessary and sufficient to allow RoleB to assume RoleA.

Although earlier we summarized this behavior as “implicit self-trust,” the key point here is that the ability of Role A to assume itself is not actually implicit behavior. The role’s self-referential permission had to be explicit in one place or the other (or both): either in the role’s identity-based policy (perhaps based on broad wildcard permissions), or its trust policy. But unlike the case with other principals and role trust, an IAM administrator would have to look in two different policies to determine whether a role could assume itself.

As of today, for any new role, or any role that has not recently assumed itself while relying on the old behavior, IAM administrators must modify the previously shown role trust policy as follows to allow RoleA to assume itself, regardless of the privileges granted by its identity-based policy:

{
    "Version": "2012-10-17",
    "Statement": [
        {
            "Effect": "Allow",
            "Principal": {
                "AWS": [
                    "arn:aws:iam::123456789012:role/RoleB",
                    "arn:aws:iam::123456789012:role/RoleA"
                ]
            },
            "Action": "sts:AssumeRole"
        }
    ]
}

This change makes role trust behavior clearer and more consistent to understand and manage, whether directly by humans or as embodied in code.

How might this change impact me?

As previously noted, most customers will not be impacted by the change at all. For those customers who do use the prior implicit trust grant behavior, AWS will work with you to eliminate your usage prior to February 15, 2023. Here are more details for the two cases of customers who have not used the behavior, and those who have.

If you haven’t used the implicit trust behavior since June 30, 2022

Beginning today, if you have not used the old behavior for a given role at any time since June 30, 2022, you will now experience the new behavior. Those existing roles, as well as any new roles, will need an explicit reference in their own trust policy in order to assume themselves. If you have roles that are used only very occasionally, such as once per quarter for a seldom-run batch process, you should identify those roles and if necessary either remove the dependency on the old behavior or update their role trust policies to include the role itself prior to their next usage (see the second sample policy above for an example).

If you have used the implicit trust behavior since June 30, 2022

If you have a role that has used the implicit trust behavior since June 30, 2022, then you will continue to be able to do so with that role until February 15, 2023. AWS will provide you with notice referencing those roles beginning today through your AWS Health Dashboard and will also send an email with the relevant information to the account owner and security contact. We are allowing time for you to make any necessary changes to your existing processes, code, or configurations to prepare for removal of the implicit trust behavior. If you can’t change your processes or code, you can continue to use the behavior by making a configuration change—namely, by updating the relevant role trust policies to reference the role itself. On the other hand, you can opt out of the old behavior at any time by creating a new role with a different Amazon Resource Name (ARN) with the desired identity-based and trust-policy-based permissions and substituting it for any older role that was identified as using the implicit trust behavior. (The new role will not be allow-listed, because the allow list is based on role ARNs.) You can also modify an existing allow-listed role’s trust policy to explicitly deny access to itself. See the “What should I do next?” section for more information.

Notifications and retirement

As we previously noted, starting today, accounts with existing roles that use the implicit self-assume role assumption behavior will be notified of this change by email and through their AWS Health Dashboard. Those roles have been allow-listed, and so for now their behavior will continue as before. After February 15, 2023, the old behavior will be retired for all roles and all accounts. IAM Documentation has been updated to make clear the new behavior.

After the old behavior is retired from the allow-listed roles and accounts, role sessions that make self-referential role assumption calls will fail with an Access Denied error unless the role’s trust policy explicitly grants the permission directly through a role ARN. Another option is to grant permission indirectly through an ARN to the root principal in the trust policy that acts as a delegation of privilege management, after which permission grants in identity-based policies determine access, similar to the typical cross-account case.

Which usage scenarios are likely to be impacted?

Users often attach an IAM role to an Amazon Elastic Compute Cloud (Amazon EC2) instance, an Amazon Elastic Container Service (Amazon ECS) task, or AWS Lambda function. Attaching a role to one of these runtime environments enables workloads to use short-term session credentials based on that role. For example, when an EC2 instance is launched, AWS automatically creates a role session and assigns it to the instance. An AWS best practice is for the workload to use these credentials to issue AWS API calls without explicitly requesting short-term credentials through sts:AssumeRole calls.

However, examples and code snippets commonly available on internet forums and community knowledge sharing sites might incorrectly suggest that workloads need to call sts:AssumeRole to establish short-term sessions credentials for operation within those environments.

We analyzed AWS Security Token Service (AWS STS) service metadata about role self-assumption in order to understand the use cases and possible impact of the change. What the data shows is that in almost all cases this behavior is occurring due to unnecessarily reassuming the role in an Amazon EC2, Amazon ECS, Amazon Elastic Kubernetes Services (EKS), or Lambda runtime environment already provided by the environment. There are two exceptions, discussed at the end of this section under the headings, “self-assumption with a scoped-down policy” and “assuming a target compute role during development.”

There are many variations on this theme, but overall, most role self-assumption occurs in scenarios where the person or code is unnecessarily reassuming the role that the code was already running as. Although this practice and code style can still work with a configuration change (by adding an explicit self-reference to the role trust policy), the better practice will almost always be to remove this unnecessary behavior or code from your AWS environment going forward. By removing this unnecessary behavior, you save CPU, memory, and network resources.

Common mistakes when using Amazon EKS

Some users of the Amazon EKS service (or possibly their shell scripts) use the command line interface (CLI) command aws eks get-token to obtain an authentication token for use in managing a Kubernetes cluster. The command takes as an optional parameter a role ARN. That parameter allows a user to assume another role other than the one they are currently using before they call get-token. However, the CLI cannot call that API without already having an IAM identity. Some users might believe that they need to specify the role ARN of the role they are already using. We have updated the Amazon EKS documentation to make clear that this is not necessary.

Common mistakes when using AWS Lambda

Another example is the use of an sts:AssumeRole API call from a Lambda function. The function is already running in a preassigned role provided by user configuration within the Lambda service, or else it couldn’t successfully call any authenticated API action, including sts:AssumeRole. However, some Lambda functions call sts:AssumeRole with the target role being the very same role that the Lambda function has already been provided as part of its configuration. This call is unnecessary.

AWS Software Development Kits (SDKs) all have support for running in AWS Lambda environments and automatically using the credentials provided in that environment. We have updated the Lambda documentation to make clear that such STS calls are unnecessary.

Common mistakes when using Amazon ECS

Customers can associate an IAM role with an Amazon ECS task to give the task AWS credentials to interact with other AWS resources.

We detected ECS tasks that call sts:AssumeRole on the same role that was provided to the ECS task. Amazon ECS makes the role’s credentials available inside the compute resources of the ECS task, whether on Amazon EC2 or AWS Fargate, and these credentials can be used to access AWS services or resources as the IAM role associated with the ECS talk, without being called through sts:AssumeRole. AWS handles renewing the credentials available on ECS tasks before the credentials expire. AWS STS role assumption calls are unnecessary, because they simply create a new set of the same temporary role session credentials.

AWS SDKs all have support for running in Amazon ECS environments and automatically using the credentials provided in that ECS environment. We have updated the Amazon ECS documentation to make clear that calling sts:AssumeRole for an ECS task is unnecessary.

Common mistakes when using Amazon EC2

Users can configure an Amazon EC2 instance to contain an instance profile. This instance profile defines the IAM role that Amazon EC2 assigns the compute instance when it is launched and begins to run. The role attached to the EC2 instance enables your code to send signed requests to AWS services. Without this attached role, your code would not be able to access your AWS resources (nor would it be able to call sts:AssumeRole). The Amazon EC2 service handles renewing these temporary role session credentials that are assigned to the instance before they expire.

We have observed that workloads running on EC2 instances call sts:AssumeRole to assume the same role that is already associated with the EC2 instance and use the resulting role-session for communication with AWS services. These role assumption calls are unnecessary, because they simply create a new set of the same temporary role session credentials.

AWS SDKs all have support for running in Amazon EC2 environments and automatically using the credentials provided in that EC2 environment. We have updated the Amazon EC2 documentation to make clear that calling sts:AssumeRole for an EC2 instance with a role assigned is unnecessary.

For information on creating an IAM role, attaching that role to an EC2 instance, and launching an instance with an attached role, see “IAM roles for Amazon EC2” in the Amazon EC2 User Guide.

Other common mistakes

If your use case does not use any of these AWS execution environments, you might still experience an impact from this change. We recommend that you examine the roles in your account and identify scenarios where your code (or human use through the AWS CLI) results in a role assuming itself. We provide Amazon Athena and AWS CloudTrail Lake queries later in this post to help you locate instances where a role assumed itself. For each instance, you can evaluate whether a role assuming itself is the right operation for your needs.

Self-assumption with a scoped-down policy

The first pattern we have observed that is not a mistake is the use of self-assumption combined with a scoped-down policy. Some systems use this approach to provide different privileges for different use cases, all using the same underlying role. Customers who choose to continue with this approach can do so by adding the role to its own trust policy. While the use of scoped-down policies and the associated least-privilege approach to permissions is a good idea, we recommend that customers switch to using a second generic role and assume that role along with the scoped-down policy rather than using role self-assumption. This approach provides more clarity in CloudTrail about what is happening, and limits the possible iterations of role assumption to one round, since the second role should not be able to assume the first. Another possible approach in some cases is to limit subsequent assumptions is by using an IAM condition in the role trust policy that is no longer satisfied after the first role assumption. For example, for Lambda functions, this would be done by a condition checking for the presence of the “lambda:SourceFunctionArn” property; for EC2, by checking for presence of “ec2:SourceInstanceARN.”

Assuming an expected target compute role during development

Another possible reason for role self-assumption may result from a development practice in which developers attempt to normalize the roles that their code is running in between scenarios in which role credentials are not automatically provided by the environment, and scenarios where they are. For example, imagine a developer is working on code that she expects to run as a Lambda function, but during development is using her laptop to do some initial testing of the code. In order to provide the same execution role as is expected later in product, the developer might configure the role trust policy to allow assumption by a principal readily available on the laptop (an IAM Identity Center role, for example), and then assume the expected Lambda function execution role when the code is initializing. The same approach could be used on a build and test server. Later, when the code is deployed to Lambda, the actual role is already available and in use, but the code need not be modified in order to provide the same post-role-assumption behavior that existing outside of Lambda: the unmodified code can automatically assume what is in this case the same role, and proceed. While this approach is not illogical, as with the scope-down policy case we recommend that customers configure distinct roles for assumption both in development and test environments as well as later production environments. Again, this approach provides more clarity in CloudTrail about what is happening, and limits the possible iterations of role assumption to one round, since the second role should not be able to assume the first.

What should I do next?

If you receive an email or AWS Health Dashboard notification for an account, we recommend that you review your existing role trust policies and corresponding code. For those roles, you should remove the dependency on the old behavior, or if you can’t, update those role trust policies with an explicit self-referential permission grant. After the grace period expires on February 15, 2023, you will no longer be able to use the implicit self-referential permission grant behavior.

If you currently use the old behavior and need to continue to do so for a short period of time in the context of existing infrastructure as code or other automated processes that create new roles, you can do so by adding the role’s ARN to its own trust policy. We strongly encourage you to treat this as a temporary stop-gap measure, because in almost all cases it should not be necessary for a role to be able to assume itself, and the correct solution is to change the code that results in the unnecessary self-assumption. If for some reason that self-service solution is not sufficient, you can reach out to AWS Support to seek an accommodation of your use case for new roles or accounts.

If you make any necessary code or configuration changes and want to remove roles that are currently allow-listed, you can also ask AWS Support to remove those roles from the allow list so that their behavior follows the new model. Or, as previously noted, you can opt out of the old behavior at any time by creating a new role with a different ARN that has the desired identity-based and trust-policy–based permissions and substituting it for the allow-listed role. Another stop-gap type of option is to add an explicit deny that references the role to its own trust policy.

If you would like to understand better the history of your usage of role self-assumption in a given account or organization, you can follow these instructions on querying CloudTrail data with Athena and then use the following Athena query against your account or organization CloudTrail data, as stored in Amazon Simple Storage Services (Amazon S3). The results of the query can help you understand the scenarios and conditions and code involved. Depending on the size of your CloudTrail logs, you may need to follow the partitioning instructions to query subsets of your CloudTrail logs sequentially. If this query yields no results, the role self-assumption scenario described in this blog post has never occurred within the analyzed CloudTrail dataset.

SELECT eventid, eventtime, userIdentity.sessioncontext.sessionissuer.arn as RoleARN, split_part(userIdentity.principalId, ':', 2) as RoleSessionName from cloudtrail_logs t CROSS JOIN UNNEST(t.resources) unnested (resources_entry) where eventSource = 'sts.amazonaws.com' and eventName = 'AssumeRole' and userIdentity.type = 'AssumedRole' and errorcode IS NULL and substr(userIdentity.sessioncontext.sessionissuer.arn,12) = substr(unnested.resources_entry.ARN,12)

As another option, you can follow these instructions to set up CloudTrail Lake to perform a similar analysis. CloudTrail Lake allows richer, faster queries without the need to partition the data. As of September 20, 2022, CloudTrail Lake now supports import of CloudTrail logs from Amazon S3. This allows you to perform a historical analysis even if you haven’t previously enabled CloudTrail Lake. If this query yields no results, the scenario described in this blog post has never occurred within the analyzed CloudTrail dataset.

SELECT eventid, eventtime, userIdentity.sessioncontext.sessionissuer.arn as RoleARN, userIdentity.principalId as RoleIdColonRoleSessionName from $EDS_ID where eventSource = 'sts.amazonaws.com' and eventName = 'AssumeRole' and userIdentity.type = 'AssumedRole' and errorcode IS NULL and userIdentity.sessioncontext.sessionissuer.arn = element_at(resources,1).arn

Understanding the change: more details

To better understand the background of this change, we need to review the IAM basics of identity-based policies and resource-based policies, and then explain some subtleties and exceptions. You can find additional overview material in the IAM documentation.

The structure of each IAM policy follows the same basic model: one or more statements with an effect (allow or deny), along with principals, actions, resources, and conditions. Although the identity-based and resource-based policies share the same basic syntax and semantics, the former is associated with a principal, the latter with a resource. The main difference between the two is that identity-based policies do not specify the principal, because that information is supplied implicitly by associating the policy with a given principal. On the other hand, resource policies do not specify an arbitrary resource, because at least the primary identifier of the resource (for example, the bucket identifier of an S3 bucket) is supplied implicitly by associating the policy with that resource. Note that an IAM role is the only kind of AWS object that is both a principal and a resource.

In most cases, access to a resource within the same AWS account can be granted by either an identity-based policy or a resource-based policy. Consider an Amazon S3 example. An identity-based policy attached to an IAM principal that allows the s3:GetObject action does not require an equivalent grant in the S3 bucket resource policy. Conversely, an s3:GetObject permission grant in a bucket’s resource policy is all that is needed to allow a principal in the same account to call the API with respect to that bucket; an equivalent identity-based permission is not required. Either the identity-based policy or the resource-based policy can grant the necessary permission. For more information, see IAM policy types: How and when to use them.

However, in order to more tightly govern access to certain security-sensitive resources, such as AWS Key Management Service (AWS KMS) keys and IAM roles, those resource policies need to grant access to the IAM principal explicitly, even within the same AWS account. A role trust policy is the resource policy associated with a role that specifies which IAM principals can assume the role by using one of the sts:AssumeRole* API calls. For example, in order for RoleB to assume RoleA in the same account, whether or not RoleB’s identity-based policy explicitly allows it to assume RoleA, RoleA’s role trust policy must grant access to RoleB. Within the same account, an identity-based permission by itself is not sufficient to allow assumption of a role. On the other hand, a resource-based permission—a grant of access in the role trust policy—is sufficient. (Note that it’s possible to construct a kind of hybrid permission to a role by using both its resource policy and other identity-based policies. In that case, the role trust policy grants permission to the root principal ARN; after that, the identity-based policy of a principal in that account would need to explicitly grant permission to assume that role. This is analogous to the typical cross-account role trust scenario.)

Until now, there has been a nonintuitive exception to these rules for situations where a role assumes itself. Since a role is both a principal (potentially with an identity-based policy) and a resource (with a resource-based policy), it is in the unique position of being both a subject and an object within the IAM system, as well as being an object owned by itself rather than its containing account. Due to this ownership model, roles with identity-based permission to assume themselves implicitly trusted themselves as resources, and vice versa. That is to say, roles that had the privilege as principals to assume themselves implicitly trusted themselves as resources, without an explicit self-referential Allow in the role trust policy. Conversely, a grant of permission in the role trust policy was sufficient regardless of whether there was a grant in the same role’s identity-based policy. Thus, in the self-assumption case, roles behaved like most other resources in the same account: only a single permission was required to allow role self-assumption, either on the identity side or the resource side of their dual-sided nature. Because of a role’s implicit trust of itself as a resource, the role’s trust policy—which might otherwise limit assumption of the role with properties such as actions and conditions—was not applied, unless it contained an explicit deny of itself.

The following example is a role trust policy attached to the role named RoleA in account 123456789012. It grants explicit access only to the role named RoleB.

{
    "Version": "2012-10-17",
    "Statement": [
        {
            "Effect": "Allow",
            "Principal": {
                "AWS": "arn:aws:iam::123456789012:role/RoleB"
            },
            "Action": ["sts:AssumeRole", "sts:TagSession"],
            "Condition": {
                "StringEquals": {
                    "aws:PrincipalTag/project": "BlueSkyProject"
                }
            }
        }
    ]
}

Assuming that the corresponding identity-based policy for RoleA granted the sts:AssumeRole action with regard to RoleA, this role trust policy provided that there were two roles that could assume RoleA: RoleB (explicitly referenced in the trust policy) and RoleA (assuming it was explicitly referenced in its identity policy). RoleB could assume RoleA only if it had the principal tag project:BlueSkyProject because of the trust policy condition. (The sts:TagSession permission is needed here in case tags need to be added by the caller as parted of the RoleAssumption call.) RoleA, on the other hand, did not need to meet that condition because it relied on a different explicit permission—the one granted in the identity-based policy. RoleA would have needed the principal tag project:BlueSkyProject to meet the trust policy condition if and only if it was relying on the trust policy to gain access through the sts:AssumeRole action; that is, in the case where its identity-based policy did not provide the needed privilege.

As we previously noted, after considering feedback from customers on this topic, AWS has decided that requiring self-referential role trust policy grants even in the case where the identity-based policy also grants access is the better approach to delivering consistency and visibility with regard to role behavior and privileges. Therefore, as of today, r­ole assumption behavior requires an explicit self-referential permission in the role trust policy, and the actions and conditions within that policy must also be satisfied, regardless of the permissions expressed in the role’s identity-based policy. (If permissions in the identity-based policy are present, they must also be satisfied.)

Requiring self-reference in the trust policy makes role trust policy evaluation consistent regardless of which role is seeking to assume the role. Improved consistency makes role permissions easier to understand and manage, whether through human inspection or security tooling. This change also eliminates the possibility of continuing the lifetime of an otherwise temporary credential without explicit, trackable grants of permission in trust policies. It also means that trust policy constraints and conditions are enforced consistently, regardless of which principal is assuming the role. Finally, as previously noted, this change allows customers to create and understand role assumption permissions in a single place (the role trust policy) rather than two places (the role trust policy and the role identity policy). It increases the simplicity of role trust permission management: “what you see [in the trust policy] is what you get.”

Continuing with the preceding example, if you need to allow a role to assume itself, you now must update the role trust policy to explicitly allow both RoleB and RoleA. The RoleA trust policy now looks like the following:

{
    "Version": "2012-10-17",
    "Statement": [
        {
            "Effect": "Allow",
            "Principal": {
                "AWS": [
                    "arn:aws:iam::123456789012:role/RoleB",
                    "arn:aws:iam::123456789012:role/RoleA"
                ]
            },
            "Action": ["sts:AssumeRole", "sts:TagSession"],
            "Condition": {
                "StringEquals": {
					"aws:PrincipalTag/project": "BlueSkyProject"
				}
            }
        }
    ]
}

Without this new principal grant, the role can no longer assume itself. The trust policy conditions are also applied, even if the role still has unconditioned access to itself in its identity-based policy.

Conclusion

In this blog post we’ve reviewed the old and new behavior of role assumption in the case where a role seeks to assume itself. We’ve seen that, according to our analysis of service metadata, the vast majority of role self-assumption behavior that relies solely on identity-based privileges is totally unnecessary, because the code (or human) who calls sts:AssumeRole is already, without realizing it, using the role’s credentials to call the AWS STS API. Eliminating that mistake will improve performance and decrease resource consumption. We’ve also explained in more depth the reasons for the old behavior and the reasons for making the change, and provided Athena and CloudTrail Lake queries that you can use to examine past or (in the case of allow-listed roles) current self-assumption behavior in your own environments. You can reach out to AWS Support or your customer account team if you need help in this effort.

If you currently use the old behavior and need to continue to do so, your primary option is to create an explicit allow for the role in its own trust policy. If that option doesn’t work due to operational constraints, you can reach out to AWS Support to seek an accommodation of your use case for new roles or new accounts. You can also ask AWS Support to remove roles from the allow-list if you want their behavior to follow the new model.

If you have feedback about this post, submit comments in the Comments section below. If you have questions about this post, start a new IAM-tagged discussion on AWS re:Post or contact AWS Support.

AWS would like to thank several customers and partners who highlighted this behavior as something they found surprising and unhelpful, and asked us to consider making this change. We would also like to thank independent security researcher Ryan Gerstenkorn who engaged with AWS on this topic and worked with us prior to this update.

Want more AWS Security news? Follow us on Twitter.

Mark Ryland

Mark Ryland

Mark is the director of the Office of the CISO for AWS. He has over 30 years of experience in the technology industry and has served in leadership roles in cybersecurity, software engineering, distributed systems, technology standardization and public policy. Previously, he served as the Director of Solution Architecture and Professional Services for the AWS World Public Sector team.

Stephen Whinston

Stephen Whinston

Stephen is a Senior Product Manager with the AWS Identity and Access Management organization. Prior to Amazon, Stephen worked in product management for cloud service and identity management providers. Stephen holds degrees in computer science and an MBA from the University of Colorado Leeds School of Business. Outside of work, Stephen enjoys his family time and the Pacific Northwest.

How to centralize findings and automate deletion for unused IAM roles

Post Syndicated from Hong Pham original https://aws.amazon.com/blogs/security/how-to-centralize-findings-and-automate-deletion-for-unused-iam-roles/

Maintaining AWS Identity and Access Management (IAM) resources is similar to keeping your garden healthy over time. Having visibility into your IAM resources, especially the resources that are no longer used, is important to keep your AWS environment secure. Proactively detecting and responding to unused IAM roles helps you prevent unauthorized entities from gaining access to your AWS resources. In this post, I will show you how to apply resource tags on IAM roles and deploy serverless technologies on AWS to detect unused IAM roles and to require the owner of the IAM role (identified through tags) to take action.

You can use this solution to check for unused IAM roles in a standalone AWS account. As you grow your workloads in the cloud, you can run this solution for multiple AWS accounts by using AWS Organizations. In this solution, you use AWS Control Tower to create an AWS Organizations organization with a Security organizational unit (OU), and a Security account in this OU. In this blog post, you deploy the solution in the Security account belonging to a Security OU of an organization.

For more information and recommended best practices, see the blog post Managing the multi-account environment using AWS Organizations and AWS Control Tower. Following this best practice, you can create a Security OU, in which you provision one or more Security and Audit accounts that are dedicated for security automation and audit activities on behalf of the entire organization.

Solution architecture

The architecture diagram in Figure 1 demonstrates the solution workflow.

Figure 1: Solution workflow for standalone account or member account of an AWS Organization.

Figure 1: Solution workflow for standalone account or member account of an AWS Organization.

The solution is triggered periodically by an Amazon EventBridge scheduled rule and invokes a series of actions. You specify the frequency (in number of days) when you create the EventBridge rule. There are two options to run this solution, based on the needs of your organization.

Option 1: For a standalone account

Choose this option if you would like to check for unused IAM roles in a single AWS account. This AWS account might or might not belong to an organization or OU. In this blog post, I refer to this account as the standalone account.

Prerequisites

  1. You need an AWS account specifically for security automation. For this blog post, I refer to this account as the standalone Security account.
  2. You should deploy the solution to the standalone Security account, which has appropriate admin permission to audit other accounts and manage security automation.
  3. Because this solution uses AWS CloudFormation StackSets, you need to grant self-managed permissions to create stack sets in standalone accounts. Specifically, you need to establish a trust relationship between the standalone Security account and the standalone account by creating the AWSCloudFormationStackSetAdministrationRole IAM role in the standalone Security account, and the AWSCloudFormationStackSetExecutionRole IAM role in the standalone account.
  4. You need to have AWS Security Hub enabled in your standalone Security account, and you need to deploy the solution in the same AWS Region as your Security Hub dashboard.
  5. You need a tagging enforcement in place for IAM roles. This solution uses an IAM tag key Owner to identify the email address of the owner. The value of this tag key should be the email address associated with the owner of the IAM role. If the Owner tag isn’t available, the notification email is sent to the email address that you provided in the parameter ITSecurityEmail when you provisioned the CloudFormation stack.
  6. This solution uses Amazon Simple Email Service (Amazon SES) to send emails to the owner of the IAM roles. The destination address needs to be verified with Amazon SES. With Amazon SES, you can verify identity at the individual email address or at the domain level.

An EventBridge rule triggers the AWS Lambda function LambdaCheckIAMRole in the standalone Security account. The LambdaCheckIAMRolefunction assumes a role in the standalone account. This role is named after the Cloudformation stack name that you specify when you provision the solution. Then LambdaCheckIAMRole calls the IAM API action GetAccountAuthorizationDetails to get the list of IAM roles in the standalone account, and parses the data type RoleLastUsed to retrieve the date, time, and the Region in which the roles were last used. If the last time value is not available, the IAM role is skipped. Based on the CloudFormation parameter MaxDaysForLastUsed that you provide, LambdaCheckIAMRole determines if the last time used is greater than the MaxDaysForLastUsed value. LambdaCheckIAMRole also extracts tags associated with the IAM roles, and retrieves the email address of the IAM role owner from the value of the tag key Owner. If there is no Owner tag, then LambdaCheckIAMRole sends an email to a default email address provided by you from the CloudFormation parameter ITSecurityEmail.

Option 2: For all member accounts that belong to an organization or an OU

Choose this option if you want to check for unused IAM roles in every member account that belongs to an AWS Organizations organization or OU.

Prerequisites

  1. You need to have an AWS Organizations organization with a dedicated Security account that belongs to a Security OU. For this blog post, I refer to this account as the Security account.
  2. You should deploy the solution to the Security account that has appropriate admin permission to audit other accounts and to manage security automation.
  3. Because this solution uses CloudFormation StackSets to create stack sets in member accounts of the organization or OU that you specify, the Security account in the Security OU needs to be granted CloudFormation delegated admin permission to create AWS resources in this solution.
  4. You need Security Hub enabled in your Security account, and you need to deploy the solution in the same Region as your Security Hub dashboard.
  5. You need tagging enforcement in place for IAM roles. This solution uses the IAM tag key Owner to identify the owner email address. The value of this tag key should be the email address associated with the owner of the IAM role. If the Owner tag isn’t available, the notification email will be sent to the email address that you provided in the parameter ITSecurityEmail when you provisioned the CloudFormation stack.
  6. This solution uses Amazon SES to send emails to the owner of the IAM roles. The destination address needs to be verified with Amazon SES. With Amazon SES, you can verify identity at the individual email address or at the domain level.

An EventBridge rule triggers the Lambda function LambdaGetAccounts in the Security account to collect the account IDs of member accounts that belong to the organization or OU. LambdaGetAccounts sends those account IDs to an SNS topic. Each account ID invokes the Lambda function LambdaCheckIAMRole once.

Similar to the process for Option 1, LambdaCheckIAMRole in the Security account assumes a role in the member account(s) of the organization or OU, and checks the last time that IAM roles in the account were used.

In both options, if an IAM role is not currently used, the function LambdaCheckIAMRole generates a Security Hub finding, and performs BatchImportFindings for all findings to Security Hub in the Security account. At the same time, the Lambda function starts an AWS Step Functions state machine execution. Each execution is for an unused IAM role following this naming convention:
[target-account-id]-[unused IAM role name]-[time the execution created in Unix format]

You should avoid running this solution against special IAM roles, such as a break-glass role or a disaster recovery role. In the CloudFormation parameter RolePatternAllowedlist, you can provide a list of role name patterns to skip the check.

Use a Step Functions state machine to process approval

Figure 2 shows the state machine workflow for owner approval.

Figure 2: Owner approval state machine workflow

Figure 2: Owner approval state machine workflow

After the solution identifies an unused IAM role, it creates a Step Functions state machine execution. Figure 2 demonstrates the workflow of the execution. After the execution starts, the first Lambda task NotifyOwner (powered by the Lambda function NotifyOwnerFunction) sends an email to notify the IAM role owner. This is a callback task that pauses the execution until a taskToken is returned. The maximum pause for a callback task is 1 year. The execution waits until the owner responds with a decision to delete or keep the role, which is captured by a private API endpoint in Amazon API Gateway. You can configure a timeout to avoid waiting for callback task execution.

With a private API endpoint, you can build a REST API that is only accessible within your Amazon Virtual Private Cloud (Amazon VPC), or within your internal network connected to your VPC. Using a private API endpoint will prevent anyone from outside of your internal network from selecting this link and deleting the role. You can implement authentication and authorization with API Gateway to make sure that only the appropriate owner can delete a role.

If the owner denies role deletion, then the role remains intact until the next automation cycle runs, and the state machine execution stops immediately with a Fail status. If the owner approves role deletion, the next Lambda task Approve (powered by the function ApproveFunction) checks again if the role is not currently used. If the role isn’t in use, the Lambda task Approve attaches an IAM policy DenyAllCheckUnusedIAMRoleSolution to deny the role to perform any actions, and waits for 30 days. During this wait time, you can restore the IAM role by removing the IAM policy DenyAllCheckUnusedIAMRoleSolution from the role. The Step Functions state machine execution for this role is still in progress until the wait time expires.

After the wait time expires, the state machine execution invokes the Validate task. The Lambda function ValidateFunction checks again if the role is not in use after the amount of time calculated by adding MaxDaysForLastUsed and the preceding wait time. It also checks if the IAM policy DenyAllCheckUnusedIAMRoleSolution is attached to the role. If both of these conditions are true, the Lambda function follows a process to detach the IAM policies and delete the role permanently. The role can’t be recovered after deletion.

Note: To restore a role that has been marked for deletion, detach the DenyAll IAM policy from the role.

To deploy the solution using the AWS CLI

  1. Clone git repo from AWS Samples to get source code and CloudFormation templates.
    git clone https://github.com/aws-samples/aws-blog-automate-iam-role-deletion 
    cd /aws-blog-automate-iam-role-deletion

  2. Run the AWS CLI command below to upload CloudFormation templates and Lambda code to a S3 bucket in the Security Account. The S3 bucket needs to be in the same Region where you will deploy the solution.
    • To deploy the solution for a single account, use the following commands. Be sure to replace <YOUR_BUCKET_NAME> and <PATH_TO_UPLOAD_CODE> with your own values.
      #Deploy solution for a single target AWS Account
      aws cloudformation package \
      --template-file solution_scope_account.yml \
      --s3-bucket <YOUR_BUCKET_NAME> \
      --s3-prefix <PATH_TO_UPLOAD_CODE> \
      --output-template-file solution_scope_account.template

    • To deploy the solution for an organization or OU, use the following commands. Be sure to replace <YOUR_BUCKET_NAME> and <PATH_TO_UPLOAD_CODE> with your own values.
      #Deploy solution for an Organization/OU
      aws cloudformation package \
      --template-file solution_scope_organization.yml \
      --s3-bucket <YOUR_BUCKET_NAME> \
      --s3-prefix <PATH_TO_UPLOAD_CODE> \
      --output-template-file solution_scope_organization.template

  3. Validate the template generated by the CloudFormation package.
    • To validate the solution for a single account, use the following commands.
      #Deploy solution for a single target AWS Account
      aws cloudformation validate-template —template-body file://solution_scope_account.template

    • To validate the solution for an organization or OU, use the following commands.
      #Deploy solution for an Organization/OU
      aws cloudformation validate-template —template-body file://solution_scope_organization.template

  4. Deploy the solution in the same Region that you use for Security Hub. The stack takes 30 minutes to complete deployment.
    • To deploy the solution for a single account, use the following commands. Be sure to replace all of the placeholders with your own values.
      #Deploy solution for a single target AWS Account
      aws cloudformation deploy \
      --template-file solution_scope_account.template \
      --stack-name <UNIQUE_STACK_NAME> \
      --region <REGION> \
      --capabilities CAPABILITY_NAMED_IAM CAPABILITY_AUTO_EXPAND \
      --parameter-overrides AccountId='<STANDALONE ACCOUNT ID>' \
      Frequency=<DAYS> MaxDaysForLastUsed=<DAYS> \
      ITSecurityEmail='<YOUR IT TEAM EMAIL>' \
      RolePatternAllowedlist='<ALLOWED PATTERN>'

    • To deploy the solution for an organization, run the following commands to create CloudFormation stack in the Security Account of the organization.
      #Deploy solution for an Organization
      aws cloudformation deploy \
      --template-file solution_scope_organization.template \
      --stack-name <UNIQUE_STACK_NAME> \
      --region <REGION> \
      --capabilities CAPABILITY_NAMED_IAM CAPABILITY_AUTO_EXPAND \
      --parameter-overrides Scope=Organization \
      OrganizationId='<o-12345abcde>' \
      OrgRootId='<r-1234>'  \
      Frequency=<DAYS> MaxDaysForLastUsed=<DAYS> \
      ITSecurityEmail='<[email protected]>' \
      RolePatternAllowedlist='<ALLOWED PATTERN>'

    • To deploy the solution for an OU, run the following commands to create CloudFormation stack in the Security Account of the organization.
      #Deploy solution for an OU
      aws cloudformation deploy \
      --template-file solution_scope_organization.template \
      --stack-name <UNIQUE_STACK_NAME> \
      --region <REGION> \
      --capabilities CAPABILITY_NAMED_IAM CAPABILITY_AUTO_EXPAND \
      --parameter-overrides Scope=OrganizationalUnit \
      OrganizationId='<o-12345abcde>' \
      OrganizationalUnitId='<ou-1234-1234abcd>'  \
      Frequency=<DAYS> MaxDaysForLastUsed=<DAYS> \
      ITSecurityEmail=’<[email protected]>’ \
      RolePatternAllowedlist=’<ALLOWED PATTERN>

Test the solution

The solution is triggered by an EventBridge scheduled rule, so it doesn’t perform the checks immediately. To test the solution right away after the CloudFormation stacks are successfully created, follow these steps.

To manually trigger the automation for a single account

  1. Navigate to the AWS Lambda console and choose the function
    <CloudFormation stackname>-LambdaCheckIAMRole.
  2. Choose Test.
  3. Choose New event.
  4. For Name, enter a name for the event, and provide the current time in UTC Date Time format YYYY-MM-DDTHH:MM:SSZ. For example {“time”: “2022-01-22T04:36:52Z”}. The Lambda function uses this value to calculate how much time has passed since the last time that a role was used. Figure 5 shows an example of configuring a test event.
    Figure 5: Configure test event for standalone account

    Figure 5: Configure test event for standalone account

  5. Choose Test.

To manually trigger the automation for an organization or OU

  1. Choose the function
    [CloudFormation stackname]-LambdaGetAccounts.
  2. Choose Test.
  3. Choose New event.
  4. For Name, enter a name for the event. Leave the default values for the remaining fields.
  5. Choose Test.

Respond to unused IAM roles

After you’ve triggered the Lambda function, the automation runs the necessary checks. For each unused IAM role, it creates a Step Functions state machine execution.

To see the list of Step Functions state machine executions

  1. Navigate to the AWS Step Functions console.
  2. Choose state machine [CloudFormation stackname]OnwerApprovalStateMachine.
  3. Under the Executions tab, you will see the list of executions in running state following this naming convention: [target-account-id]-[unused IAM role name]-[time the execution created in Unix format]. Figure 6 shows an example list of executions.
    Figure 6: Each unused IAM role generates an execution in the Step Functions state machine

    Figure 6: Each unused IAM role generates an execution in the Step Functions state machine

Each execution sends out an email notification to the IAM role owner (if available through the Owner tag) or to the IT security email address that you provided in the CloudFormation stack parameter ITSecurityEmail. The email content is:

Subject: Please take action on this unused IAM Role
 
Hello!
 
This IAM Role arn:aws:iam::<AWS account>:role/<role name> is not in use for
more than 60 days.
 
Can you please delete the role by following this link: Approve link
 
Or keep this role by following this link: Deny Link

In the email, the Approve link and Deny link is the hyperlink to a private API endpoint with a parameter taskToken. If you try to access these links publicly, they won’t work. When you access the link, the taskToken is provided to the private API endpoint, which updates the Step Functions state machine.

To test the approval action using an API Gateway test

  1. Navigate to the AWS Step Functions console. Under State machines, choose the state machine that has the name [CloudFormation stackname]OwnerApprovalStateMachine
  2. On the Executions tab, there is a list of executions. Each execution represents a workflow for one IAM role, as shown in Figure 6. Choose the execution name that includes the IAM role name in the email that you received earlier.
  3. Scroll down to Execution event history.
  4. Expand the Step Notify Owner, enter TaskScheduled, find the item taskToken, and copy its value to a notepad, as shown in Figure 7.
    Figure 7: Retrieve taskToken from execution

    Figure 7: Retrieve taskToken from execution

  5. Navigate to the API Gateway console.
  6. Choose the API that has a name similar to [CloudFormation stackname]-PrivateAPIGW-[unique string]-ApprovalEndpoint.
  7. Choose which action to test: Deny or Approve.
    • To test the Deny action, under /deny resource, choose the GET method.
    • To test the Approve action, under /approve resource, choose the GET method.
  8. Choose Test.
  9. Under Query Strings, enter taskToken= and paste the taskToken you copied earlier from the state machine execution. Figure 8 shows how to pass the taskToken to API Gateway.
    Figure 8: Provide taskToken to API Gateway Method

    Figure 8: Provide taskToken to API Gateway Method

  10. Choose Test. After you test, the state machine resumes the workflow and finishes the automation. You won’t be able to change the action.
  11. Navigate to the AWS Step Functions console. Choose the state machine and go to the state machine execution.
    1. If you choose to deny the role deletion, the execution immediately stops as Fail.
    2. If you choose to approve the role deletion, the execution moves to the Wait task. This task removes IAM policies associated to the role and waits for a period of time before moving to the next task. By default, the wait time is 30 days. To change this number, go to the Lambda function [CloudFormation stackname]ApproveFunction, and update the variable wait_time_stamp.
    3. After the waiting period expires, the state machine triggers the Validate task to do a final validation on the role before deleting it. If the Validate task decides that the role is being used, it leaves the role intact. Otherwise, it deletes the role permanently.

Conclusion

In this blog post, you learned how serverless services such as Lambda, Step Functions, and API Gateway can work together to build security automation. We recommend testing this solution as a starting point. Then, you can build more features on top of the sample code and templates to customize it to perform checks, following guidance from your IT security team.

Here are a few suggestions that you can take to extend this solution.

  • This solution uses a private API Gateway to handle the approval response from the IAM role owner. You need to establish private connectivity between your internal network and AWS to invoke a private API Gateway. For instructions, see How to invoke a private API.
  • Add a mechanism to control access to API Gateway by using endpoint policies for interface VPC endpoints.
  • Archive the Security Hub finding after the IAM role is deleted using the AWS CLI or AWS Console.
  • Use a Step Functions state machine for other automation that needs human approval.
  • Add the capability to report on IAM roles that were skipped due to the absence of RoleLastUsed information.

 
If you have feedback about this post, submit comments in the Comments section below. If you have questions about this post, contact AWS Support.

Want more AWS Security news? Follow us on Twitter.

Hong Pham

Hong Pham

Hong is a Senior Solutions Architect at AWS. For more than five years, she has helped many customers from start-ups to enterprises in different industries to adopt Cloud Computing. She was born in Vietnam and currently lives in Seattle, Washington.

Scale your workforce access management with AWS IAM Identity Center (previously known as AWS SSO)

Post Syndicated from Ron Cully original https://aws.amazon.com/blogs/security/scale-your-workforce-access-management-with-aws-iam-identity-center-previously-known-as-aws-sso/

AWS Single Sign-On (AWS SSO) is now AWS IAM Identity Center. Amazon Web Services (AWS) is changing the name to highlight the service’s foundation in AWS Identity and Access Management (IAM), to better reflect its full set of capabilities, and to reinforce its recommended role as the central place to manage access across AWS accounts and applications. Although the technical capabilities of the service haven’t changed with this announcement, we want to take the opportunity to walk through some of the important features that drive our recommendation to consider IAM Identity Center your front door into AWS.

If you’ve worked with AWS accounts, chances are that you’ve worked with IAM. This is the service that handles authentication and authorization requests for anyone who wants to do anything in AWS. It’s a powerful engine, processing half a billion API calls per second globally, and it has underpinned and secured the growth of AWS customers since 2011. IAM provides authentication on a granular basis—by resource, within each AWS account. Although this gives you unsurpassed ability to tailor permissions, it also requires that you establish permissions on an account-by-account basis for credentials (IAM users) that are also defined on an account-by-account basis.

As AWS customers increasingly adopted a multi-account strategy for their environments, in December 2017 we launched AWS Single Sign-On (AWS SSO)—a service built on top of IAM to simplify access management across AWS accounts. In the years since, customer adoption of multi-account AWS environments continued to increase the need for centralized access control and distributed access management. AWS SSO evolved accordingly, adding integrations with new identity providers, AWS services, and applications; features for the consistent management of permissions at scale; multiple compliance certifications; and availability in most AWS Regions. The variety of use cases supported by AWS SSO, now known as AWS IAM Identity Center, makes it our recommended way to manage AWS access for workforce users.

IAM Identity Center, just like AWS SSO before it, is offered at no extra charge. You can follow along with our walkthrough in your own console by choosing Getting started on the console main page. If you don’t have the service enabled, you will be prompted to choose Enable IAM Identity Center, as shown in Figure 1.

Figure 1: IAM Identity Center Getting Started page

Figure 1: IAM Identity Center Getting Started page

Freedom to choose your identity source

Once you’re in the IAM Identity Center console, you can choose your preferred identity source for use across AWS, as shown in Figure 2. If you already have a workforce directory, you can continue to use it by connecting, or federating, it. You can connect to the major cloud identity providers, including Okta, Ping Identity, Azure AD, JumpCloud, CyberArk, and OneLogin, as well as Microsoft Active Directory Domain Services. If you don’t have or don’t want to use a workforce directory, you have the option to create users in Identity Center. Whichever source you decide to use, you connect or create it in one place for use in multiple accounts and AWS or SAML 2.0 applications.

Figure 2 Choosing and connecting your identity source

Figure 2 Choosing and connecting your identity source

Management of fine-grained permissions at scale

As noted before, IAM Identity Center builds on the per-account capabilities of IAM. The difference is that in IAM Identity Center, you can define and assign access across multiple AWS accounts. For example, permission sets create IAM roles and apply IAM policies in multiple AWS accounts, helping to scale the access of your users securely and consistently.

You can use predefined permission sets based on AWS managed policies, or custom permission sets, where you can still start with AWS managed policies but then tailor them to your needs.

Recently, we added the ability to use IAM customer managed policies (CMPs) and permissions boundary policies as part of Identity Center permission sets, as shown in Figure 3. This helps you improve your security posture by creating larger and finer-grained policies for least privilege access and by tailoring them to reference the resources of the account to which they are applied. By using CMPs, you can maintain the consistency of your policies, because CMP changes apply automatically to the permission sets and roles that use the CMP. You can govern your CMPs and permissions boundaries centrally, and auditors can find, monitor, and review them in one place. If you already have existing CMPs for roles you manage in IAM, you can reuse them without the need to create, review, and approve new inline policies.

Figure 3: Specify permission sets in IAM Identity Center

Figure 3: Specify permission sets in IAM Identity Center

By default, users and permission sets in IAM Identity Center are administered by the management account in an organization in AWS Organizations. This management account has the power and authority to manage member accounts in the organization as well. Because of the power of this account, it is important to exercise least privilege and tightly control access to it. If you are managing a complex organization supporting multiple operations or business units, IAM Identity Center allows you to delegate a member account that can administer user permissions, reducing the need to access the AWS Organizations management account for daily administrative work.

One place for application assignments

If your workforce uses Identity Center enabled applications, such as Amazon Managed Grafana, Amazon SageMaker Studio, or AWS Systems Manager Change Manager, you can assign access to them centrally, through IAM Identity Center, and your users can have a single sign-on experience.

If you do not have a separate cloud identity provider, you have the option to use IAM Identity Center as a single place to manage user assignments to SAML 2.0-based cloud applications, such as top-tier customer relationship management (CRM) applications, document collaboration tools, and productivity suites. Figure 4 shows this option.

Figure 4: Assign users to applications in IAM Identity Center

Figure 4: Assign users to applications in IAM Identity Center

Conclusion

IAM Identity Center (the successor to AWS Single Sign-On) is where you centrally create or connect your workforce users once, and manage their access to multiple AWS accounts and applications. It’s our recommended front door into AWS, because it gives you the freedom to choose your preferred identity source for use across AWS, helps you strengthen your security posture with consistent permissions across AWS accounts and applications, and provides a convenient experience for your users. Its new name highlights the service’s foundation in IAM, while also reflecting its expanded capabilities and recommended role.

Learn more about IAM Identity Center. If you have questions about this post, start a new thread on the IAM Identity Center forum page.

Want more AWS Security news? Follow us on Twitter.

Ron Cully

Ron is a Principal Product Manager at AWS where he leads feature and roadmap planning for workforce identity products at AWS. Ron has over 20 years of industry experience in product and program management of networking and directory related products. He is passionate about delivering secure, reliable solutions that help make it easier for customers to migrate directory aware applications and workloads to the cloud.