All posts by Ashcon Partovi

Cloudflare Queues: globally distributed queues without the egress fees

Post Syndicated from Ashcon Partovi original https://blog.cloudflare.com/introducing-cloudflare-queues/

Cloudflare Queues: globally distributed queues without the egress fees

Cloudflare Queues: globally distributed queues without the egress fees

Developers continue to build more complex applications on Cloudflare’s Developer Platform. We started with Workers, which brought compute, then introduced KV, Durable Objects, R2, and soon D1, which enabled persistence. Now, as we enable developers to build larger, more sophisticated, and more reliable applications, it’s time to unlock another foundational building block: messaging.

Thus, we’re excited to announce the private beta of Cloudflare Queues, a global message queuing service that allows applications to reliably send and receive messages using Cloudflare Workers. It offers at-least once message delivery, supports batching of messages, and charges no bandwidth egress fees. Let’s queue up the details.

What is a Queue?

Queues enable developers to send and receive messages with a guarantee of delivery. Think of it like the postal service for the Internet. You give it a message, then it handles all the hard work to ensure the message gets delivered in a timely manner. Unlike the real postal service, where it’s possible for a message to get lost, Queues provide a guarantee that each message is delivered at-least once; no matter what. This lets you focus on your application, rather than worry about the chaos of transactions, retries, and backoffs to prevent data loss.

Queues also allow you to scale your application to process large volumes of data. Imagine a million people send you a package in the mail, at the same time. Instead of a million postal workers suddenly showing up at your front door, you would want them to aggregate your mail into batches, then ask you when you’re ready to receive each batch. This lets you decouple and spread load among services that have different throughput characteristics.

How does it work?

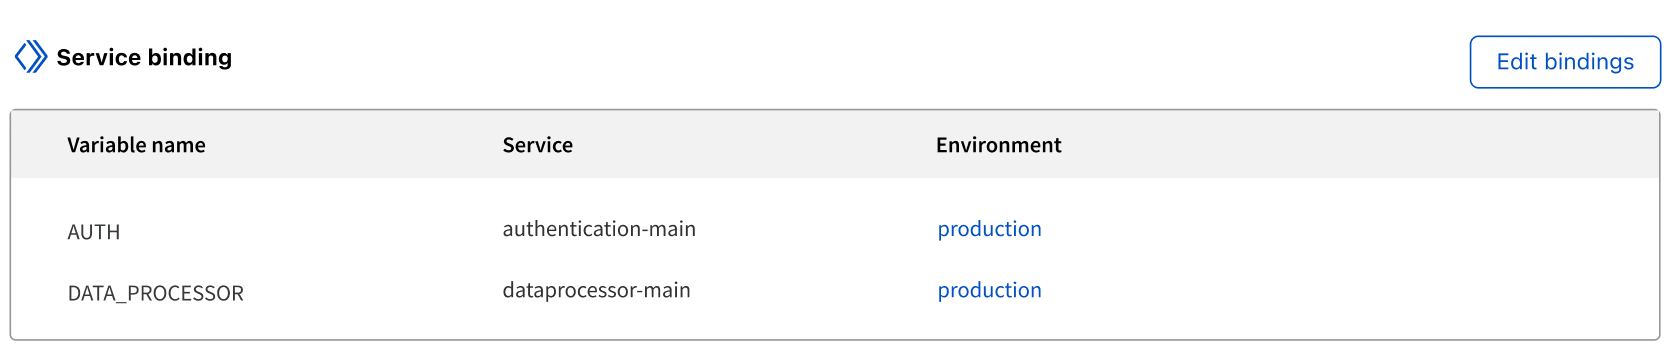
Queues are integrated into the fabric of the Cloudflare Workers runtime, with simple APIs that make it easy to send and receive messages. First, you’ll want to send messages to the Queue. You can do this by defining a Worker, referred to as a “producer,” which has a binding to the Queue.

In the example below, a Worker catches JavaScript exceptions and sends them to a Queue. You might notice that any object can be sent to the Queue, including an error. That’s because messages are encoded using the standard structuredClone() algorithm.

export default {
  async fetch(request: Request, env: Environment) {
     try {
       return await doRequest(request);
     } catch (error) {
       await env.ERROR_QUEUE.send(error);
       return new Response(error.stack, { status: 500 });
     }
  }
}

Second, you’ll want to process messages in the Queue. You can do this by defining a Worker, referred to as the “consumer,” which will receive messages from the Queue. To facilitate this, there is a new type of event handler, named “queue,” which receives the messages sent to the consumer.

This Worker is configured to receive messages from the previous example. It appends the stack trace of each Error to a log file, then saves it to an R2 bucket.

export default {
  async queue(batch: MessageBatch<Error>, env: Environment) {
     let logs = "";
     for (const message of batch.messages) {
        logs += message.body.stack;
     }
     await env.ERROR_BUCKET.put(`errors/${Date.now()}.log`, logs);
  }
}

Configuration is also easy. You can change the message batch size, message retries, delivery wait time, and dead-letter queue. Here’s a snippet of the wrangler.toml configuration when deploying with wrangler, our command-line interface

name = "my-producer"
[queues]
producers = [{ queue = "errors", binding = "ERROR_QUEUE" }]
# ---
name = "my-consumer"
[queues]
consumers = [{ queue = "errors", max_batch_size = 100, max_retries = 3 }]

Above are two different wrangler.tomls, one for a producer and another for a consumer. It is also possible for a producer and consumer to be implemented by the same Worker. To see the full list of options and examples, see the documentation.

What can you build with it?

You can use Cloudflare Queues to defer tasks and guarantee they get processed, decouple load among different services, batch events and process them together, and send messages from Worker to Worker.

To demonstrate, we’ve put together a demo application that you can run on your local machine using wrangler. It shows how Queues can batch messages and handle failures in your code, here’s a preview of it in action:

In addition to batching, here are other examples of what you can build with Queues:

  • Off-load tasks from the critical path of a Workers request.
  • Guarantee messages get delivered to a service that talks HTTP.
  • Transform, filter, and fan-out messages to multiple Queues.

Cloudflare Queues gives you the flexibility to decide where to route messages. Instead of static configuration files that define routing keys and patterns, you can use JavaScript to define custom logic for how you filter and fan-out to multiple Queues. In the next example, you can distribute work to different Queues based on the attributes of a user.

export default {
  async queue(batch: MessageBatch, env: Environment) {
    for (const message of batch.messages) {
      const user = message.body;
      if (isEUResident(user)) {
        await env.EU_QUEUE.send(user);
      }
      if (isForgotten(user)) {
        await env.DELETION_QUEUE.send(user);
      }
    }
  }
}

We will also support integrations with Cloudflare products, like R2. For example, you might configure an R2 bucket to send lifecycle events to a Queue or archive messages to a R2 bucket for long-term storage.

How much does it cost?

Cloudflare Queues has a simple, transparent pricing model that’s easy to predict. It costs $0.40 per million operations, which is defined for every 64 KB chunk of data that is written, read, or deleted. There are also no egregious bandwidth fees for data in or out — unlike Amazon’s SQS or Google’s Pub/Sub.

To effectively deliver a message, it usually takes three operations: one write, one read, and one acknowledgement. You can estimate your usage by considering the cost of messages delivered, which is $1.20 per million. (calculated as 3 x \$0.40)

When can I try it?

You can register to join the waitlist as we work towards a beta launch. You’ll have an opportunity to try it out, for free. Once it’s ready, we’ll launch an open beta for everyone to try.

In the meantime, you can read the documentation to view our code samples, see which features will be supported, and learn what you can build. If you’re in our developer Discord, you stay up-to-date by joining the #queues-beta channel. If you’re an Enterprise customer, reach out to your account team to schedule a session with our Product team.

We’re excited to see what you build with Cloudflare Queues. Let the queuing begin!

wrangler 2.0 — a new developer experience for Cloudflare Workers

Post Syndicated from Ashcon Partovi original https://blog.cloudflare.com/wrangler-v2-beta/

wrangler 2.0 — a new developer experience for Cloudflare Workers

wrangler 2.0 — a new developer experience for Cloudflare Workers

Much of a developer’s work is about making trade-offs: consistency versus availability, speed over correctness, you name it. While there will always be different technical trade-offs to consider, we believe there are some that you, as a developer, should never need to make.

One of those decisions is an easy-to-use development environment. Whether you’re onboarding a new developer to your team or you simply want to develop faster, it’s important that even the smallest of things are optimized for speed and simplicity.

That’s why we’re excited to announce the second-generation of our developer tooling for Cloudflare Workers. It’s a new developer experience that’s out-of-the-box, lightning fast, and can even run Workers on a local machine. (Yes!)

If you’re already familiar with our existing tools, we’re not just talking about the wrangler CLI, we’re talking about its next major release: wrangler 2.0. Stick around to get a sneak-peak at the new experience.

No config? No problem

We’ve made it much easier to get started with Cloudflare Workers. All you need is a single JavaScript file to run a Worker — no configuration needed. You don’t even need to decide on a name!

When you run wrangler dev <filename>, your code is automatically bundled and deployed to a development environment. Then, you can send HTTP requests to that environment using a localhost proxy. Here’s what that looks like in-action:

Live debugging, just like that

Now there’s a completely redesigned experience for debugging a Worker. With a simple command you get access to a remote debugger, the same used by Chrome when you click “Inspect,” which provides an interactive view of logs, exceptions, and requests. It feels like your Worker is running locally, yet it’s actually running on the Cloudflare network.

A debugger that “just works” and auto-detects your changes makes all the difference when you’re just trying to code. We’ve also made a number of improvements to make the debugging experience even easier:

  • Keybind shortcuts, to quickly toggle features or open a window.
  • Support for “–public <path>”, to automatically serve your static assets.
  • Faster and more reliable file-watching.

To start a debugging session, just run: wrangler dev <filename>, then hit the “D” keybind.

Local mode? Flip a switch

Another aspect of the new debugging experience is the ability to switch to “local mode,” which runs your Worker on your local machine. In fact, you can easily switch between “network” and “local” mode with just a keybind shortcut.

How does this work? Recently, we announced that Miniflare (created by Brendan Coll), a project to locally emulate Workers in Node.js, has joined the Cloudflare organization. Miniflare is great for unit testing and situations where you’d like to debug Workers without an Internet connection. Now we’ve integrated it directly into the local development experience, so you can enjoy the benefits of both the network and your localhost!

Let us know what you think!

Serverless should be simple. We’re really excited about these improvements to the developer experience for Workers, and we have a lot more planned.

While we’re still working on wrangler 2.0, you can try the beta release by running: npm install wrangler@beta or by visiting the repository to see what we’re working on. If you’re already using wrangler to deploy existing applications, we recommend continuing to use wrangler 1.0 until the 2.0 release is officially out. We will continue to develop and maintain wrangler 1.0 until we’re finished with backwards-compatibility for 2.0.

If you’re starting a project or want to try out the new experience, we’d love to hear your feedback! Let us know what we’re missing or what you’d like to see in wrangler 2.0. You can create a feature request or start a discussion in the repository. (we’ll merge them into the existing wrangler repository when 2.0 is out of beta).

Thank you to all of our developers out there, and we look forward to seeing what you build!

JavaScript modules are now supported on Cloudflare Workers

Post Syndicated from Ashcon Partovi original https://blog.cloudflare.com/workers-javascript-modules/

JavaScript modules are now supported on Cloudflare Workers

JavaScript modules are now supported on Cloudflare Workers

We’re excited to announce that JavaScript modules are now supported on Cloudflare Workers. If you’ve ever taken look at an example Worker written in JavaScript, you might recognize the following code snippet that has been floating around the Internet the past few years:

addEventListener("fetch", (event) => {
  event.respondWith(new Response("Hello Worker!"));
}

The above syntax is known as the “Service Worker” API, and it was proposed to be standardized for use in web browsers. The idea is that you can attach a JavaScript file to a web page to modify its HTTP requests and responses, acting like a virtual endpoint. It was exactly what we needed for Workers, and it even integrated well with standard Web APIs like fetch() and caches.

Before introducing modules, we want to make it clear that we will continue to support the Service Worker API. No developer wants to get an email saying that you need to rewrite your code because an API or feature is being deprecated; and you won’t be getting one from us. If you’re interested in learning why we made this decision, you can read about our commitment to backwards-compatibility for Workers.

What are JavaScript modules?

JavaScript modules, also known as ECMAScript (abbreviated. “ES”) modules, is the standard API for importing and exporting code in JavaScript. It was introduced by the “ES6” language specification for JavaScript, and has been implemented by most Web browsers, Node.js, Deno, and now Cloudflare Workers. Here’s an example to demonstrate how it works:

// filename: ./src/util.js
export function getDate(time) {
  return new Date(time).toISOString().split("T")[0]; // "YYYY-MM-DD"
}

The “export” keyword indicates that the “getDate” function should be exported from the current module. Then, you can use “import” from another module to use that function.

// filename: ./src/index.js
import { getDate } from "./util.js"

console.log("Today’s date:", getDate());

Those are the basics, but there’s a lot more you can do with modules. It allows you to organize, maintain, and re-use your code in an elegant way that just works. While we can’t go over every aspect of modules here, if you’d like to learn more we’d encourage you to read the MDN guide on modules, or a more technical deep-dive by Lin Clark.

How can I use modules in Workers?

You can export a default module, which will represent your Worker. Instead of using “addEventListener,” each event handler is defined as a function on that module. Today, we support “fetch” for HTTP and WebSocket requests and “scheduled” for cron triggers.

export default {
  async fetch(request, environment, context) {
    return new Response("I’m a module!");
  },
  async scheduled(controller, environment, context) {
    // await doATask();
  }
}

You may also notice some other differences, such as the parameters on each event handler. Instead of a single “Event” object, the parameters that you need the most are spread out on their own. The first parameter is specific to the event type: for “fetch” it’s the Request object, and for “scheduled” it’s a controller that contains the cron schedule.

The second parameter is an object that contains your environment variables (also known as “bindings“). Previously, each variable was inserted into the global scope of the Worker. While a simple solution, it was confusing to have variables magically appear in your code. Now, with an environment object, you can control which modules and libraries get access to your environment variables. This mechanism is more secure, as it can prevent a compromised or nosy third-party library from enumerating all your variables or secrets.

The third parameter is a context object, which allows you to register background tasks using waitUntil(). This is useful for tasks like logging or error reporting that should not block the execution of the event.

When you put that all together, you can import and export multiple modules, as well as use the new event handler syntax.

// filename: ./src/error.js
export async function logError(url, error) {
  await fetch(url, {
     method: "POST",
     body: error.stack
  })
}

// filename: ./src/worker.js
import { logError } from "./error.js"

export default {
  async fetch(request, environment, context) {
    try {
       return await fetch(request);
    } catch (error) {
       context.waitUntil(logError(environment.ERROR_URL, error));
       return new Response("Oops!", { status: 500 });
    }
  }
}

Let’s not forget about Durable Objects, which became generally available earlier this week! You can also export classes, which is how you define a Durable Object class. Here’s another example with a “Counter” Durable Object, that responds with an incrementing value.

// filename: ./src/counter.js
export class Counter {
  value = 0;
  fetch() {
    this.value++;
    return new Response(this.value.toString());
  }
}

// filename: ./src/worker.js
// We need to re-export the Durable Object class in the Worker module.
export { Counter } from "./counter.js"

export default {
  async fetch(request, environment) {
    const clientId = request.headers.get("cf-connecting-ip");
    const counterId = environment.Counter.idFromName(clientId);
    // Each IP address gets its own Counter.
    const counter = environment.Counter.get(counterId);
    return counter.fetch("https://counter.object/increment");
  }
}

Are there non-JavaScript modules?

Yes! While modules are primarily for JavaScript, we also support other modules types, some of which are not yet standardized.

For instance, you can import WebAssembly as a module. Previously, with the Service Worker API, WebAssembly was included as a binding. We think that was a mistake, since WebAssembly should be represented as code and not an external resource. With modules, here’s the new way to import WebAssembly:

import module from "./lib/hello.wasm"

export default {
  async fetch(request) {
    const instance = await WebAssembly.instantiate(module);
    const result = instance.exports.hello();
    return new Response(result);
  }
}

While not supported today, we look forward to a future where WebAssembly and JavaScript modules can be more tightly integrated, as outlined in this proposal. The ergonomics improvement, demonstrated below, can go a long way to make WebAssembly more included in the JavaScript ecosystem.

import { hello } from "./lib/hello.wasm"

export default {
  async fetch(request) {
    return new Response(hello());
  }
}

We’ve also added support for text and binary modules, which allow you to import a String and ArrayBuffer, respectively. While not standardized, it allows you to easily import resources like an HTML file or an image.

<!-- filename: ./public/index.html -->
<!DOCTYPE html>
<html><body>
<p>Hello!</p>
</body></html>

import html from "../public/index.html"

export default {
  fetch(request) {
    if (request.url.endsWith("/index.html") {
       return new Response(html, {
          headers: { "Content-Type": "text/html" }
       });
    }
    return fetch(request);
  }
}

How can I get started?

There are many ways to get started with modules.

First, you can try out modules in your browser using our playground (which doesn’t require an account) or by using the dashboard quick editor. Your browser will automatically detect when you’re using modules to allow you to seamlessly switch from the Service Worker API. For now, you’ll only be able to create one JavaScript module in the browser, though supporting multiple modules is something we’ll be improving soon.

If you’re feeling adventurous and want to start a new project using modules, you can try out the beta release of wrangler 2.0, the next-generation of the command-line interface (CLI) for Workers.

For existing projects, we still recommend using wrangler 1.0 (release 1.17 or later). To enable modules, you can adapt your “wrangler.toml” configuration to the following example:

name = "my-worker"
type = "javascript"
workers_dev = true

[build.upload]
format = "modules"
dir = "./src"
main = "./worker.js" # becomes "./src/worker.js"

[[build.upload.rules]]
type = "ESModule"
globs = "**/*.js"

# Uncomment if you have a build script.
# [build]
# command = "npm run build"

We’ve updated our documentation to provide more details about modules, though some examples will still be using the Service Worker API as we transition to showing both formats. (and TypeScript as a bonus!)

If you experience an issue or notice something strange with modules, please let us know, and we’ll take a look. Happy coding, and we’re excited to see what you build with modules!

JavaScript modules are now supported on Cloudflare Workers

Introducing Services: Build Composable, Distributed Applications on Cloudflare Workers

Post Syndicated from Ashcon Partovi original https://blog.cloudflare.com/introducing-worker-services/

Introducing Services: Build Composable, Distributed Applications on Cloudflare Workers

Introducing Services: Build Composable, Distributed Applications on Cloudflare Workers

First, there was the Worker script. It was simple, yet elegant. With just a few lines of code, you could rewrite an HTTP request, append a header, or make a quick fix to your website.

Though, what if you wanted to build an entire application on Workers? You’d need a lot more tools in your developer toolbox. That’s why we’ve introduced extensions to Workers platform like KV, our distributed key-value store; Durable Objects, — a strongly consistent, object-oriented database; and soon R2, the no-egress object storage. While these tools allow you to build a more robust application, there’s still a gap when it comes to building a system architecture, composed of many applications or services.

Imagine you’ve built an authentication service that authorizes requests to your API. You’d want to re-use that logic among all your other services. Moreover, when you make changes to that authentication service, you’d want to test it in a controlled environment that doesn’t affect those other services in production. Well, you don’t need to imagine anymore.

Introducing Services

Services are the new building block for deploying applications on Cloudflare Workers. Unlike the script, a service is composable, which allows services to talk to each other. Services also support multiple environments, which allow you to test changes in a preview environment, then promote to production when you’re confident it worked.

To enable a seamless transition to services, we’ve automatically migrated every script to become a service with one “production” environment — no action needed.

Services have environments

Each service comes with a production environment and the ability to create or clone dozens of preview environments. Every aspect of an environment is overridable: the code, environment variables, and even resources like a KV namespace. You can create and switch between environments with just a few clicks in the dashboard.

Each environment is resolvable at a unique hostname, which is automatically generated when you create or rename the environment. There’s no waiting around after you deploy. Everything you need, like DNS records, SSL certificates, and more, is ready-to-go seconds later. If you’d like a more advanced setup, you can also add custom routes from your domain to an environment.

Once you’ve tested your changes in a preview environment, you’re ready to promote to production. We’ve made it really easy to promote code from one environment to another, without the need to rebuild or upload your code again. Environments also manage code separately from settings, so you don’t need to manually edit environment variables when you promote from staging to production.

Services are versioned

Every change to a service is versioned and audited. Mistakes do happen, but when they do, it’s important to be able to quickly roll back, then have the tools to answer the age-old question: “who changed what, when?”

Introducing Services: Build Composable, Distributed Applications on Cloudflare Workers

Each environment in a service has its own version history. Every time there is a code change or an environment variable is updated, the version number of that environment is incremented. You can also append additional metadata to each version, like a git commit or a deployment tag.

Services can talk to each other

Services are composable, allowing one service to talk to another service. To support this, we’re introducing a new API to facilitate service-to-service communication: service bindings.

Introducing Services: Build Composable, Distributed Applications on Cloudflare Workers

A service binding allows you to send HTTP requests to another service, without those requests going over the Internet. That means you can invoke other Workers directly from your code! Service bindings open up a new world of composability. In the example below, requests are validated by an authentication service.

export default {
  async fetch(request, environment) {
    const response = await environment.AUTH.fetch(request);
    if (response.status !== 200) {
      return response;
    }
    return new Response("Authenticated!");
  }
}

Introducing Services: Build Composable, Distributed Applications on Cloudflare Workers

Service bindings use the standard fetch API, so you can continue to use your existing utilities and libraries. You can also change the environment of a service binding, so you can test a new version of a service. In the next example, 1% of requests are routed to a “canary” deployment of a service. If a request to the canary fails, it’s sent to the production deployment for another chance.

export default {
  canRetry(request) {
    return request.method === "GET" || request.method === "HEAD";
  },
  async fetch(request, environment) {
    if (Math.random() < 0.01) {
      const response = await environment.CANARY.fetch(request.clone());
      if (response.status < 500 || !canRetry(request)) {
        return response;
      }
    }
    return environment.PRODUCTION.fetch(request);
  }
}

While the interface among services is HTTP, the networking is not. In fact, there is no networking! Unlike the typical “microservice architecture,” where services communicate over a network and can suffer from latency or interruption, service bindings are a zero-cost abstraction. When you deploy a service, we build a dependency graph of its service bindings, then package all of those services into a single deployment. When one service invokes another, there is no network delay; the request is executed immediately.

Introducing Services: Build Composable, Distributed Applications on Cloudflare Workers

This zero-cost model enables teams to share and reuse code within their organizations, without sacrificing latency or performance. Forget the days of convoluted YAML templates or exponential back off to orchestrate services — just write code, and we’ll stitch it all together.

Try out the future, today!

We’re excited to announce that you can start using Services today! If you’ve already used Workers, you’ll notice that each of your scripts have been upgraded to a service with one “production” environment. The dashboard and all the existing Cloudflare APIs will continue to “just work” with services.

You can also create and deploy code to multiple “preview” environments, as part of the open-beta launch. We’re still working on service bindings and versioning, and we’ll provide an update as soon as you can start using them.

For more information about Services, check out any of the resources below:

Introducing Services: Build Composable, Distributed Applications on Cloudflare Workers

Introducing logs from the dashboard for Cloudflare Workers

Post Syndicated from Ashcon Partovi original https://blog.cloudflare.com/workers-dashboard-logs/

Introducing logs from the dashboard for Cloudflare Workers

Introducing logs from the dashboard for Cloudflare Workers

If you’re writing code: what can go wrong, will go wrong.

Many developers know the feeling: “It worked in the local testing suite, it worked in our staging environment, but… it’s broken in production?” Testing can reduce mistakes and debugging can help find them, but logs give us the tools to understand and improve what we are creating.

if (this === undefined) {
  console.log("there’s no way… right?") // Narrator: there was.
}

While logging can help you understand when the seemingly impossible is actually possible, it’s something that no developer really wants to set up or maintain on their own. That’s why we’re excited to launch a new addition to the Cloudflare Workers platform: logs and exceptions from the dashboard.

Starting today, you can view and filter the console.log output and exceptions from a Worker… at no additional cost with no configuration needed!

View logs, just a click away

When you view a Worker in the dashboard, you’ll now see a “Logs” tab which you can click on to view a detailed stream of logs and exceptions. Here’s what it looks like in action:

Each log entry contains an event with a list of logs, exceptions, and request headers if it was triggered by an HTTP request. We also automatically redact sensitive URLs and headers such as Authorization, Cookie, or anything else that appears to have a sensitive name.

If you are in the Durable Objects open beta, you will also be able to view the logs and requests sent to each Durable Object. This is a great tool to help you understand and debug the interactions between your Worker and a Durable Object.

For now, we support filtering by event status and type. Though, you can expect more filters to be added to the dashboard very soon! Today, we support advanced filtering with the wrangler CLI, which will be discussed later in this blog.

console.log(), and you’re all set

It’s really simple to get started with logging for Workers. Simply invoke one of the standard console APIs, such as console.log(), and we handle the rest. That’s it! There’s no extra setup, no configuration needed, and no hidden logging fees.

function logRequest (request) {
  const { cf, headers } = request
  const { city, region, country, colo, clientTcpRtt  } = cf
  
  console.log("Detected location:", [city, region, country].filter(Boolean).join(", "))
  if (clientTcpRtt) {
     console.debug("Round-trip time from client to", colo, "is", clientTcpRtt, "ms")
  }

  // You can also pass an object, which will be interpreted as JSON.
  // This is great if you want to define your own structured log schema.
  console.log({ headers })
}

In fact, you don’t even need to use console.log to view an event from the dashboard. If your Worker doesn’t generate any logs or exceptions, you will still be able to see the request headers from the event.

Advanced filters, from your terminal

If you need more advanced filters you can use wrangler, our command-line tool for deploying Workers. We’ve updated the wrangler tail command to support sampling and a new set of advanced filters. You also no longer need to install or configure cloudflared to use the command. Not to mention it’s much faster, no more waiting around for logs to appear. Here are a few examples:

# Filter by your own IP address, and if there was an uncaught exception.
wrangler tail --format=pretty --ip-address=self --status=error

# Filter by HTTP method, then apply a 10% sampling rate.
wrangler tail --format=pretty --method=GET --sampling-rate=0.1

# Filter using a generic search query.
wrangler tail --format=pretty --search="TypeError"

We recommend using the “pretty” format, since wrangler will output your logs in a colored, human-readable format. (We’re also working on a similar display for the dashboard.)

However, if you want to access structured logs, you can use the “json” format. This is great if you want to pipe your logs to another tool, such as jq, or save them to a file. Here are a few more examples:

# Parses each log event, but only outputs the url.
wrangler tail --format=json | jq .event.request?.url

# You can also specify --once to disconnect the tail after receiving the first log.
# This is useful if you want to run tests in a CI/CD environment.
wrangler tail --format=json --once > event.json

Try it out!

Both logs from the dashboard and wrangler tail are available and free for existing Workers customers. If you would like more information or a step-by-step guide, check out any of the resources below.

Asynchronous HTMLRewriter for Cloudflare Workers

Post Syndicated from Ashcon Partovi original https://blog.cloudflare.com/asynchronous-htmlrewriter-for-cloudflare-workers/

Asynchronous HTMLRewriter for Cloudflare Workers

Asynchronous HTMLRewriter for Cloudflare Workers

Last year, we launched HTMLRewriter for Cloudflare Workers, which enables developers to make streaming changes to HTML on the edge. Unlike a traditional DOM parser that loads the entire HTML document into memory, we developed a streaming parser written in Rust. Today, we’re announcing support for asynchronous handlers in HTMLRewriter. Now you can perform asynchronous tasks based on the content of the HTML document: from prefetching fonts and image assets to fetching user-specific content from a CMS.

How can I use HTMLRewriter?

We designed HTMLRewriter to have a jQuery-like experience. First, you define a handler, then you assign it to a CSS selector; Workers does the rest for you. You can look at our new and improved documentation to see our supported list of selectors, which now include nth-child selectors. The example below changes the alternative text for every second image in a document.

async function editHtml(request) {
  return new HTMLRewriter()
     .on("img:nth-child(2)", new ElementHandler())
     .transform(await fetch(request))
}

class ElementHandler {
   element(e) {
      e.setAttribute("alt", "A very interesting image")
   }
}

Since these changes are applied using streams, we maintain a low TTFB (time to first byte) and users never know the HTML was transformed. If you’re interested in how we’re able to accomplish this technically, you can read our blog post about HTML parsing.

What’s new with HTMLRewriter?

Now you can define an async handler which allows any code that uses await. This means you can make dynamic HTML injection, based on the contents of the document, without having prior knowledge of what it contains. This allows you to customize HTML based on a particular user, feature flag, or even an integration with a CMS.

class UserCustomizer {
   // Remember to add the `async` keyword to the handler method
   async element(e) {
      const user = await fetch(`https://my.api.com/user/${e.getAttribute("user-id")}/online`)
      if (user.ok) {
         // Add the user’s name to the element
         e.setAttribute("user-name", await user.text())
      } else {
         // Remove the element, since this user not online
         e.remove()
      }
   }
}

What can I build with HTMLRewriter?

To illustrate the flexibility of HTMLRewriter, I wrote an example that you can deploy on your own website. If you manage a website, you know that old links and images can expire with time. Here’s an excerpt from a years’ old post I wrote on the Cloudflare Blog:

Asynchronous HTMLRewriter for Cloudflare Workers

As you might see, that missing image is not the prettiest sight. However, we can easily fix this using async handlers in HTMLRewriter. Using a service like the Internet Archive API, we can check if an image no longer exists and rewrite the URL to use the latest archive. That means users don’t see an ugly placeholder and won’t even know the image was replaced.

async function fetchAndFixImages(request) {
   return new HTMLRewriter()
      .on("img", new ImageFixer())
      .transform(await fetch(request))
}

class ImageFixer {
   async element(e) {
    var url = e.getAttribute("src")
    var response = await fetch(url)
    if (!response.ok) {
       var archive = await fetch(`https://archive.org/wayback/available?url=${url}`)
       if (archive.ok) {
          var snapshot = await archive.json()
          e.setAttribute("src", snapshot.archived_snapshots.closest.url)
       } else {
          e.remove()
       }
    }
  }
}

Using the Workers Playground, you can view a working sample of the above code. A more complex example could even alert a service like Sentry when a missing image is detected. Using the previous missing image, now you can see the image is restored and users are none of the wiser.

Asynchronous HTMLRewriter for Cloudflare Workers

If you’re interested in deploying this to your own website, click on the button below:

Asynchronous HTMLRewriter for Cloudflare Workers

What else can I build with HTMLRewriter?

We’ve been blown away by developer projects using HTMLRewriter. Here are a few projects that caught our eye and are great examples of the power of Cloudflare Workers and HTMLRewriter:

If you’re interested in using HTMLRewriter, check out our documentation. Also be sure to share any creations you’ve made with @CloudflareDev, we love looking at the awesome projects you build.