Post Syndicated from Inanna Malick original https://blog.cloudflare.com/serverless-atproto/
Social media users are tired of losing their identity and data every time a platform shuts down or pivots. In the ATProto ecosystem — short for Authenticated Transfer Protocol — users own their data and identities. Everything they publish becomes part of a global, cryptographically signed shared social web. Bluesky is the first big example, but a new wave of decentralized social networks is just beginning. In this post I’ll show you how to get started, by building and deploying a fully serverless ATProto application on Cloudflare’s Developer Platform.
Why serverless? The overhead of managing VMs, scaling databases, maintaining CI pipelines, distributing data across availability zones, and securing APIs against DDoS attacks pulls focus away from actually building.
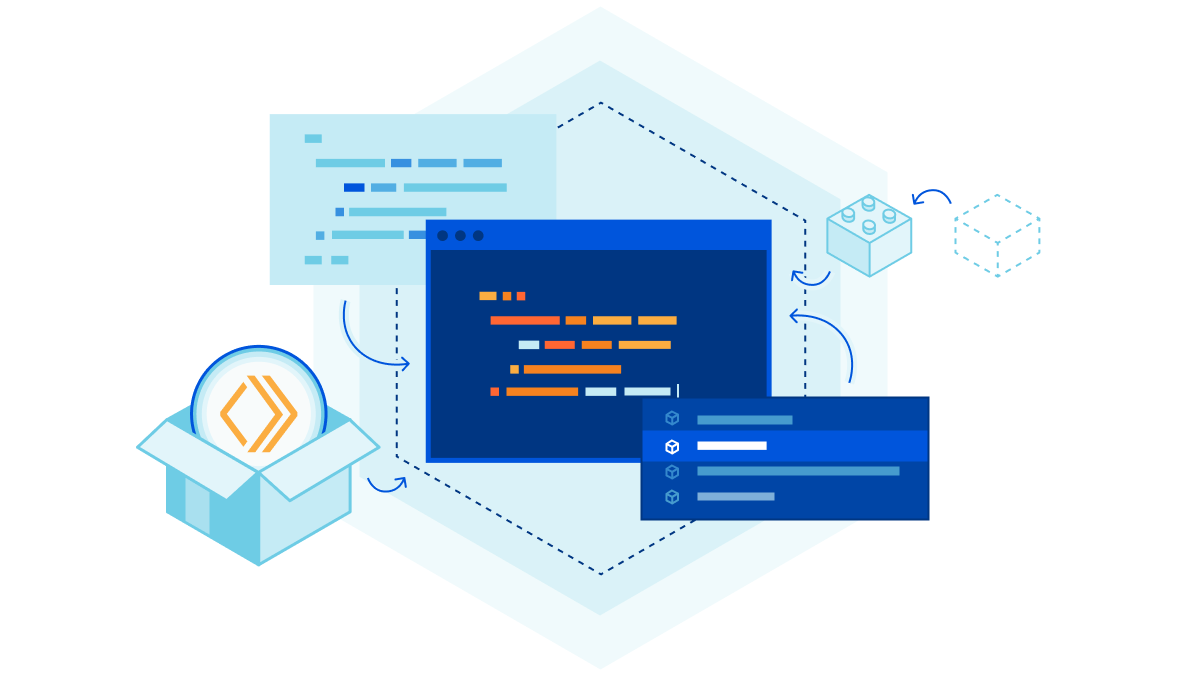
That’s where Cloudflare comes in. You can take advantage of our Developer Platform to build applications that run on our global network: Workers deploy code globally in milliseconds, KV provides fast, globally distributed caching, D1 offers a distributed relational database, and Durable Objects manage WebSockets and handle real-time coordination. Best of all, everything you need to build your serverless ATProto application is available on our free tier, so you can get started without spending a cent.
Let’s start with a conceptual overview of how data flows in the ATProto ecosystem:
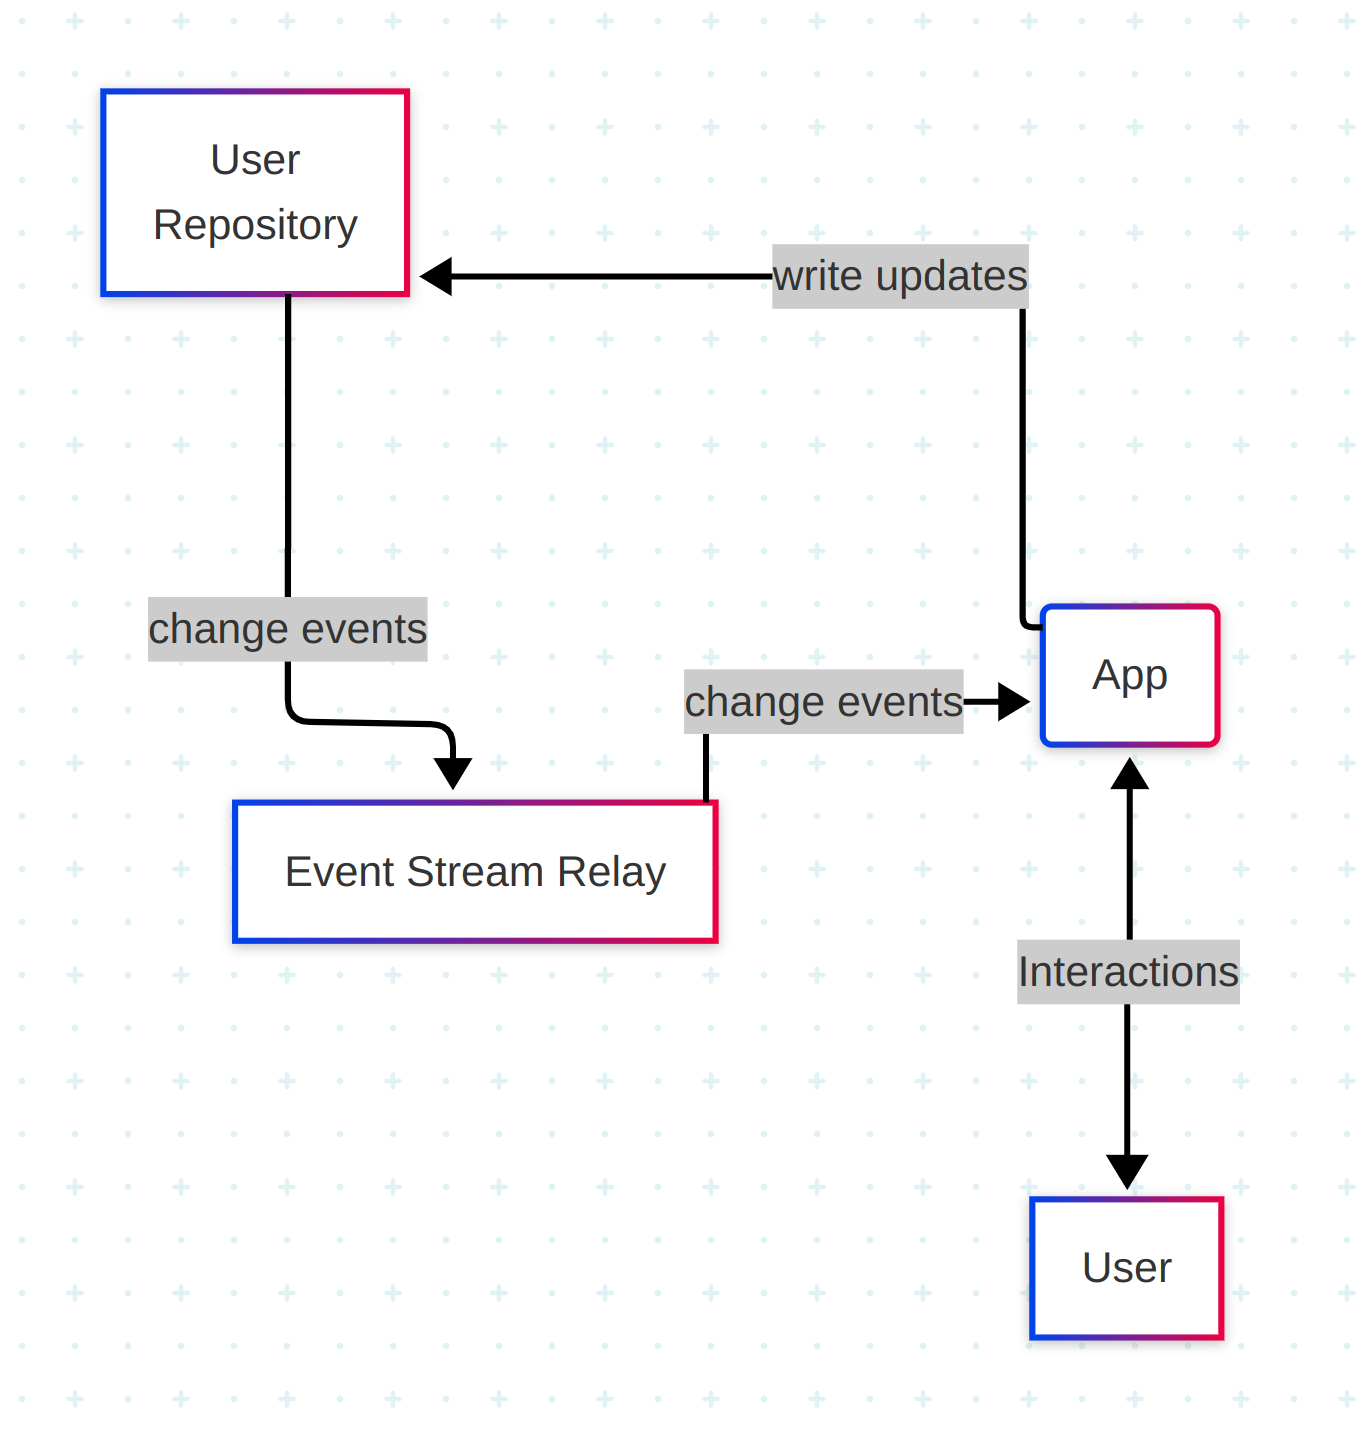
Users interact with apps, which write updates to their personal repositories. Those updates trigger change events, which are published to a relay and broadcast through the global event stream. Any app can subscribe to these events — even if it didn’t publish the original update — because in ATProto, repos, relays, and apps are all independent components, which can be (and are) run by different operators.
User identity starts with handles — human-readable names like alice.example.com. Each handle must be a valid domain name, allowing the protocol to leverage DNS to provide a global view of who owns what account. Handles map to a user’s Decentralized Identifier (DID), which contains the location of the user’s Personal Data Server (PDS).
A user’s PDS manages their keys and repos. It handles authentication and provides an authoritative view of their data via their repo.

If you’d like to learn more, there’s a great article here: ATProto for distributed systems engineers.
What’s different here — and easy to miss — is how little any part of this stack relies on trust in a single service. DID resolution is verifiable. The PDS is user-selected. The client app is just an interface.
When we publish or fetch data, it’s signed and self-validating. That means any other app can consume or build on top of it without asking permission, and without trusting our backend.
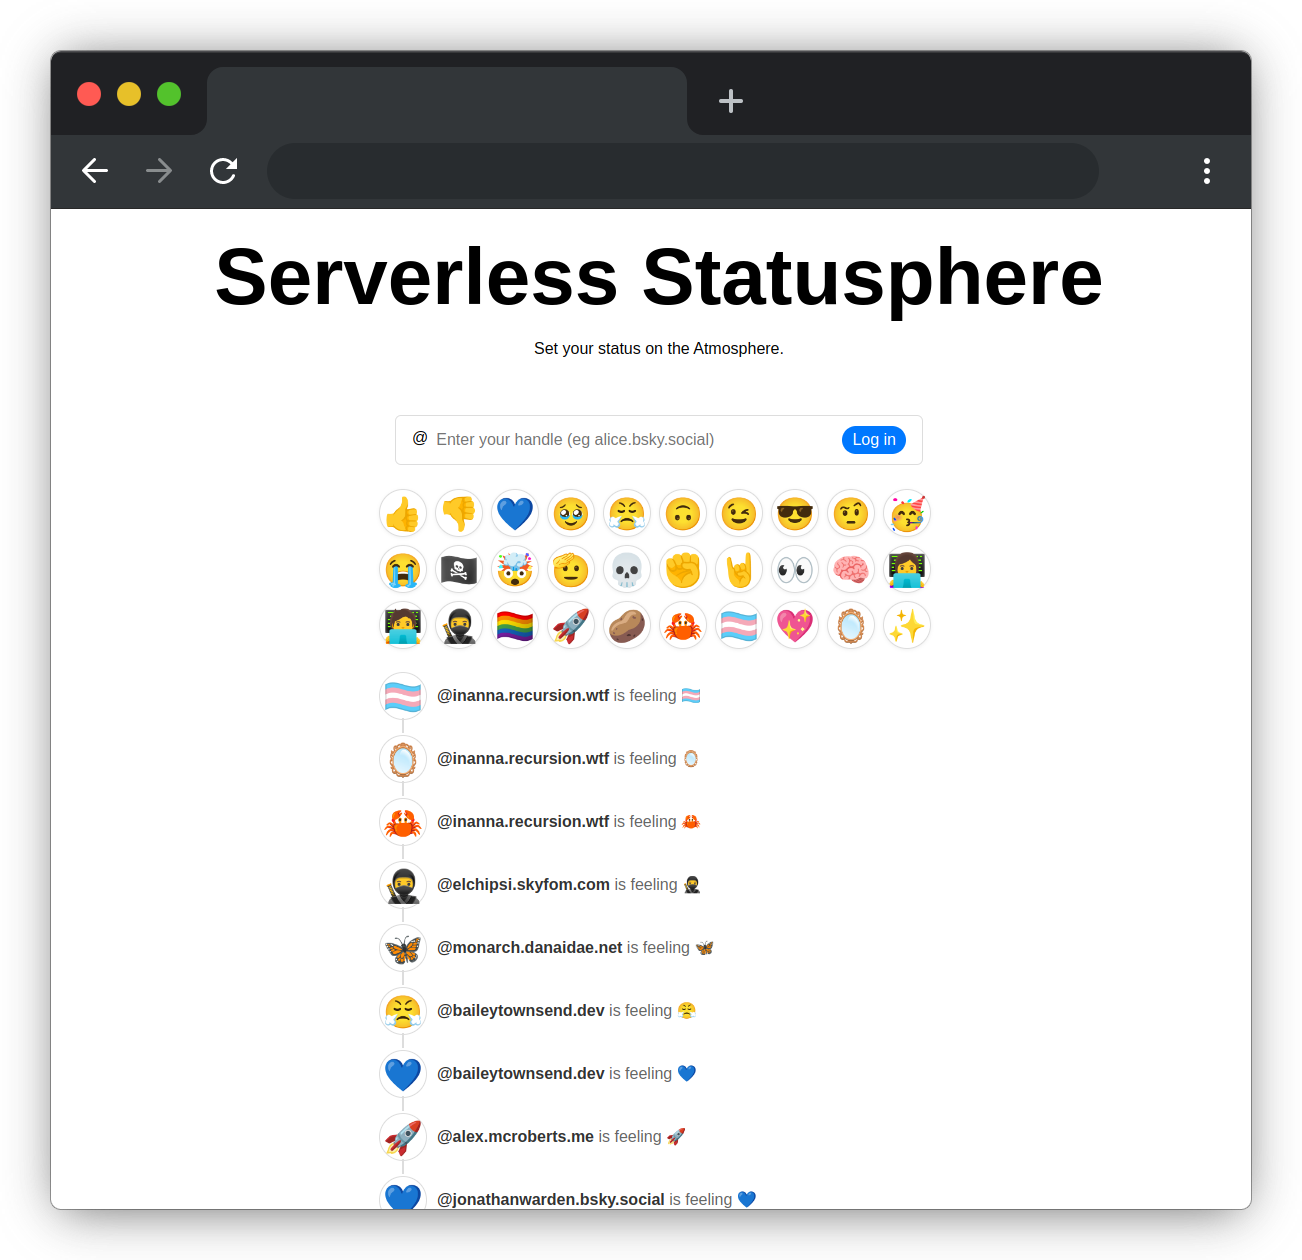
We’ll be working with Statusphere, a tiny but complete demo app built by the ATProto team. It’s the simplest possible social media app: users post single-emoji status updates. Because it’s so minimal, Statusphere is a perfect starting point for learning how decentralized ATProto apps work, and how to adapt them to run on Cloudflare’s serverless stack.
In ATProto, all repository data is typed using Lexicons — a shared schema language similar to JSON-Schema. For Statusphere, we use the xyz.statusphere.status record, originally defined by the ATProto team:
{
  "type": "record",
  "key": "tid", # timestamp-based id
  "record": {
    "type": "object",
    "required": ["status", "createdAt"],
    "properties": {
      "status": { "type": "string", "maxGraphemes": 1 },
      "createdAt": { "type": "string", "format": "datetime" }
    }
  }
}
Lexicons are strongly typed, which allows for easy interoperability between apps.
In this section, we’ll follow the flow of data inside Statusphere: from authentication, to repo reads and writes, to real-time updates, and look at how we handle live event streams on serverless infrastructure.
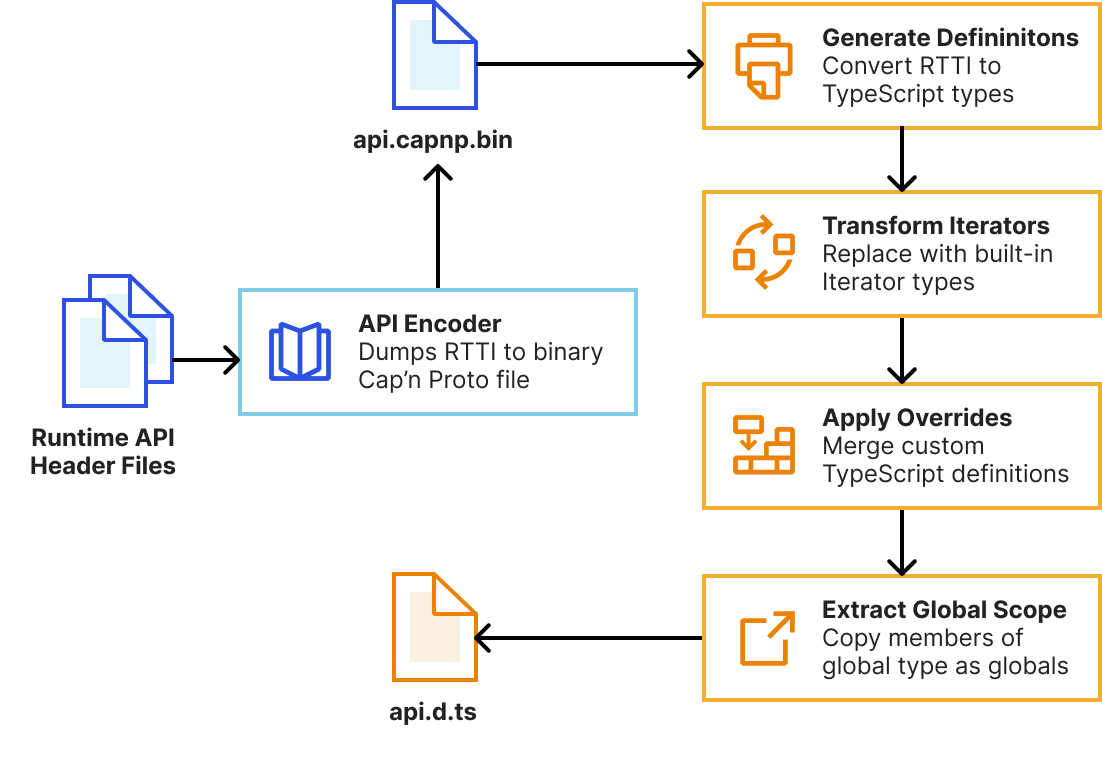
ATProto’s core libraries are written in TypeScript, and Cloudflare Workers provide first-class TypeScript support. It’s the natural starting point for building ATProto services on Cloudflare Workers.
However, the ATProto TypeScript libraries assume a backend or browser context. Cloudflare Workers support using Node.js APIs in a serverless context, but the ATProto library’s use of the ‘error’ redirect handling mode isn’t compatible with the edge runtime.
Cloudflare also supports Rust in Workers via WASM cross-compilation, so I tried that next. The ATProto Rust crates and codegen tooling make strong use of Rust’s type system and build tooling, but they’re still in active development. Rust’s WASM ecosystem is solid, though, so I was able to get a working prototype running quickly by adapting an existing Rust implementation of Statusphere — originally written by Bailey Townsend. You can find the code in this GitHub repo.
If you’re building ATProto apps on Cloudflare Workers, I’d suggest contributing to the TypeScript libraries to better support serverless runtimes. A TypeScript version of this app would be a great next step — if you’re interested in building it, please get in touch via the Cloudflare Developer Discord server.
Use this Deploy to Cloudflare button to clone the repo and set up your own KV and D1 instances and a CI pipeline.

Follow the steps at this link, use the default values or choose custom names, and it’ll build and deploy your own Statusphere Worker.
Note: this project includes a scheduled component that reads from the public event stream. You may wish to delete it when you finish experimenting to save resources.
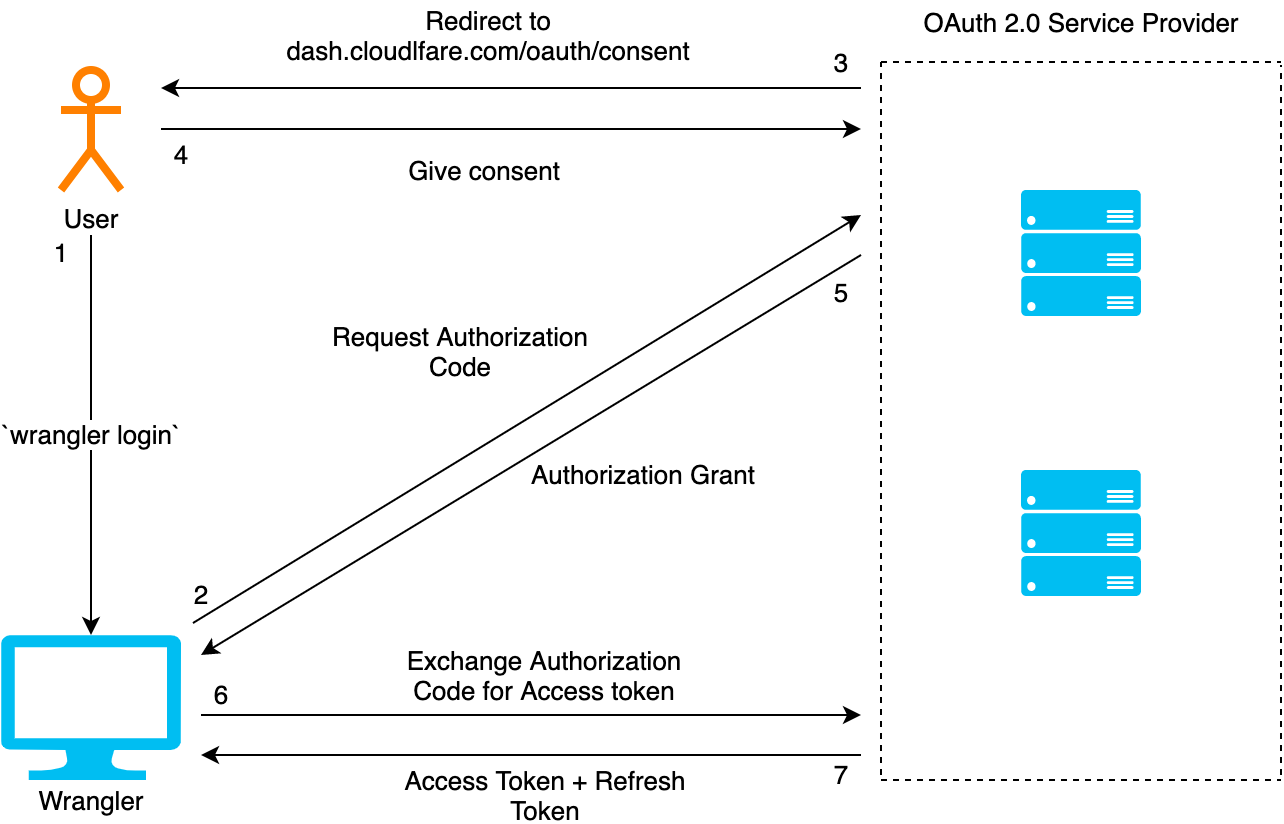
To interact with a user’s data, we start by resolving their handle to a DID using the record registered at the _atproto subdomain. For example, my handle is inanna.recursion.wtf, so my DID record is stored at _atproto.inanna.recursion.wtf. The value of that record is did:plc:p2sm7vlwgcbbdjpfy6qajd4g.
We then resolve the DID to its corresponding DID Document, which contains identity metadata including the location of the user’s Personal Data Server. Depending on the DID method, this resolution is handled directly via DNS (for did:web identifiers) or, more frequently, via the Public Ledger of Credentials for did:plc identifiers.
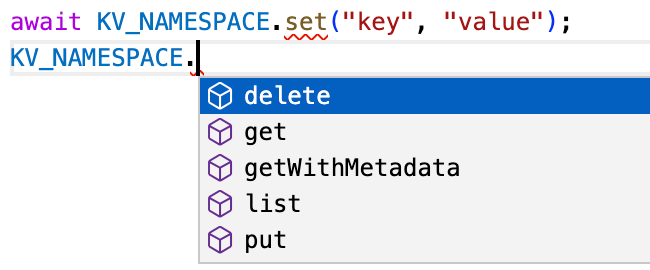
Since these values don’t change frequently, we cache them using Cloudflare KV — it’s perfect for cases like this, where we have some infrequently updated but frequently read key-value mapping that needs to be globally available with low latency.
From the DID document, we extract the location of the user’s Personal Data Server. In my case, it’s bsky.social, but other users may self-host their own PDS or use an alternative provider.
The details of the OAuth flow aren’t important here — you can read the code I used to implement it or dig into the OAuth spec if you’re curious — but the short version is: the user signs in via their PDS, and it grants our app permission to act on their behalf, using the signing keys it manages.
We persist session data in a secure session cookie using tower-sessions. This means that only an opaque session ID is stored client-side, and all session/oauth state data is stored in Cloudflare KV. Again, it’s a natural fit for this use case.
Using the DID stored in the session cookie, we restore the user’s OAuth session and spin up an authenticated agent:
let agent = state.oauth.restore_session(&did).await?;With the agent ready, we fetch the user’s latest Statusphere post and their Bluesky profile.
let current_status = agent.current_status().await?;
let profile = agent.bsky_profile().await?;
With their status and profile info in hand, we can render the homepage:
Ok(HomeTemplate {
    status_options: &STATUS_OPTIONS,
    profile: Some(Profile {
        did: did.to_string(),
        display_name: Some(username),
    }),
    my_status: current_status,
})When a user posts a new emoji status, we create a new record in their personal repo — using the same authenticated agent we used to fetch their data. This time, instead of reading, we perform a create record operation:
let uri = agent.create_status(form.status.clone()).await?.uri;The operation returns a URI — the canonical identifier for the new record.
We then write the status update into D1, so it can immediately be reflected in the UI.
Every active homepage maintains a WebSocket connection to a Durable Object, which acts as a lightweight real-time message broker. When idle, the Durable Object hibernates, saving resources while keeping the WebSocket connections alive. We send a message to the Durable Object to wake it up and broadcast the new update:
state.durable_object.broadcast(status).await?;The Durable Object then broadcasts the new update to every connected homepage:
for ws in self.state.get_websockets() {
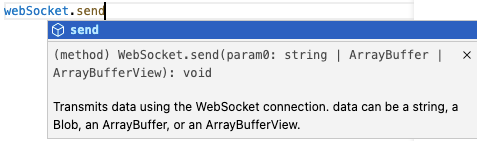
ws.send(&status);
}It then iterates over every live WebSocket and sends the update.
One practical note: Durable Objects perform better when sharded across instances. For simplicity, I’ve described the case where everything runs everything through one single Durable Object.
To scale beyond that, the next step would be using multiple Durable Object instances per supported location using location hints, to minimize latency for users around the globe and avoid bottlenecks if we encounter high numbers of concurrent users in a single location. I initially considered implementing this pattern, but it conflicted with my goal of creating a concise ‘hello world’ style example that ATProto devs could clone and use as a template for their app.
Publishing updates inside our own app is easy, but in the ATProto ecosystem, other applications can publish status updates for users. If we want Statusphere to be fully integrated, we need to pick up those events too.
Listening for live event updates requires a persistent WebSocket connection to the ATProto Jetstream service. Traditional server-based apps can keep WebSocket client sockets open indefinitely, but serverless platforms can’t — workers aren’t allowed to run forever.
We need a way to “listen” without running a live server.
To solve this, we moved the listening logic into a Cron Trigger — instead of keeping a live socket open, we used this feature to read updates in small batches using a recurring scheduled job.
When the scheduled worker invocation fires, it loads the last seen cursor from its persistent storage. Then it connects to Jetstream — a streaming service for ATProto repo events — filtered by the xyz.statusphere.status collection and starting at the last seen cursor.
let ws = WebSocket::connect("wss://jetstream1.us-east.bsky.network/subscribe?wantedCollections=xyz.statusphere.status&cursor={cursor}").await?;We store a cursor — a microsecond timestamp marking the last message we received — in the Durable Object’s persistent storage, so even if the object restarts, it knows exactly where to resume. As soon as we process an event newer than our start time, we close the WebSocket connection and let the Durable Object go back to sleep.
The tradeoff: updates can lag by up to a minute, but the system stays fully serverless. This is a great fit for early-stage apps and prototypes, where minimizing infrastructure complexity matters more than achieving perfect real-time delivery.
If you want real time updates, and you’re willing to bend the serverless model slightly, you can deploy a lightweight listener process that maintains a live WebSocket connection to Jetstream.
Instead of polling once a minute, this process listens for new events for the xyz.statusphere.status collection and pushes updates to our Cloudflare Worker as soon as they arrive. When this mode is active, we disable the Cron Trigger step with an environment variable. You can find a sketch of this listener process here and the endpoint that handles updates from it here.
The result still isn’t a traditional server:
-
No public exposure to the web
-
No open HTTP ports
-
No persistent database
It’s just a single-purpose, stateless listener — something simple enough to run on a home server until your app grows large enough to need more serious infrastructure.
Later on, you could swap this design for something more scalable using tools like Cloudflare Queues to provide batching and retries — but for small-to-medium apps, this lightweight listener is an easy and effective upgrade.
Today, Durable Objects can hibernate while holding long-lived WebSocket server connections but don’t support hibernation when holding long-lived WebSocket client connections (like a Jetstream listener). That’s why Statusphere uses workarounds — scheduled Worker invocations via Cron Trigger and lightweight external listeners — to stay synced with the network.
Future improvements to Durable Objects — like adding support for hibernating active WebSocket clients — could remove the need for these workarounds entirely.
This is a full-featured atproto app running entirely on Cloudflare with zero servers and minimal ops overhead. Workers run your code within 50 ms of most users, KV and D1 keep your data available, and Durable Objects handle WebSocket fan-out and live coordination.
Use the Deploy to Cloudflare Button to clone the repo and set up your serverless environment. Then show us what you build. Drop a link in our Discord, or tag @cloudflare.social on Bluesky or @CloudflareDev on X — we’d love to see it.