Post Syndicated from Connor Maddox original https://blog.cloudflare.com/making-super-slurper-five-times-faster/
Super Slurper is Cloudflare’s data migration tool that is designed to make large-scale data transfers between cloud object storage providers and Cloudflare R2 easy. Since its launch, thousands of developers have used Super Slurper to move petabytes of data from AWS S3, Google Cloud Storage, and other S3-compatible services to R2.
But we saw an opportunity to make it even faster. We rearchitected Super Slurper from the ground up using our Developer Platform — building on Cloudflare Workers, Durable Objects, and Queues — and improved transfer speeds by up to 5x. In this post, we’ll dive into the original architecture, the performance bottlenecks we identified, how we solved them, and the real-world impact of these improvements.
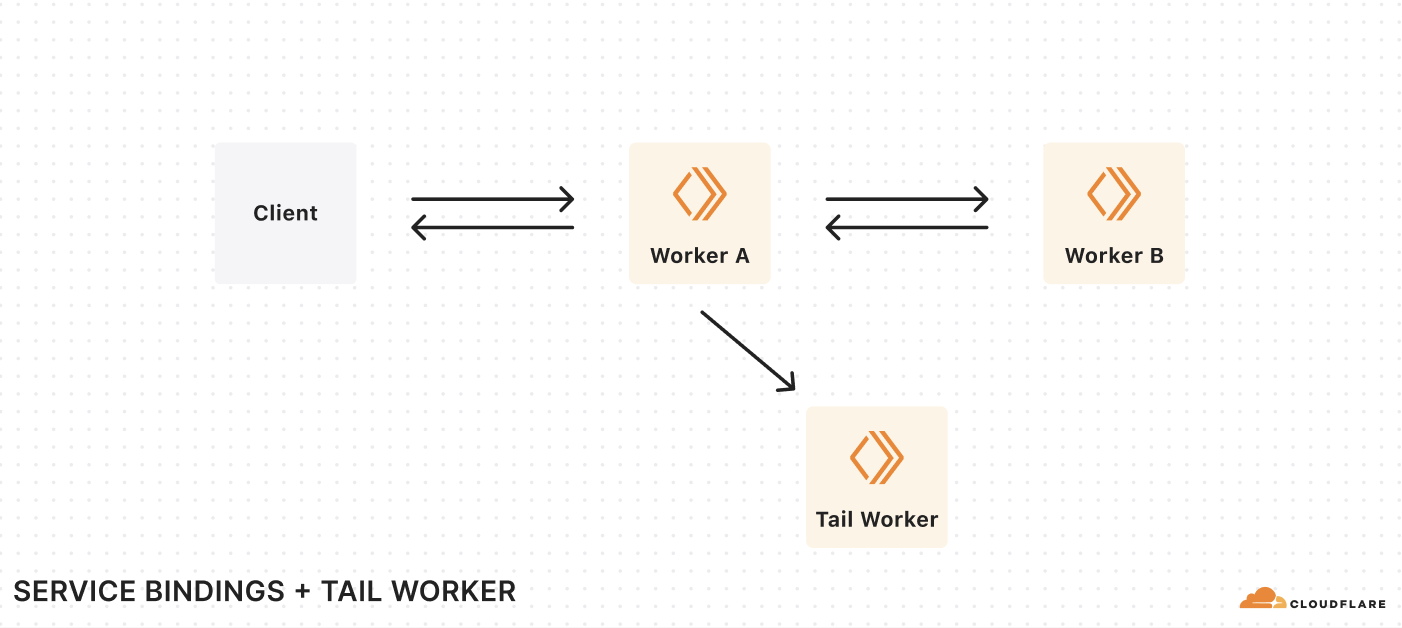
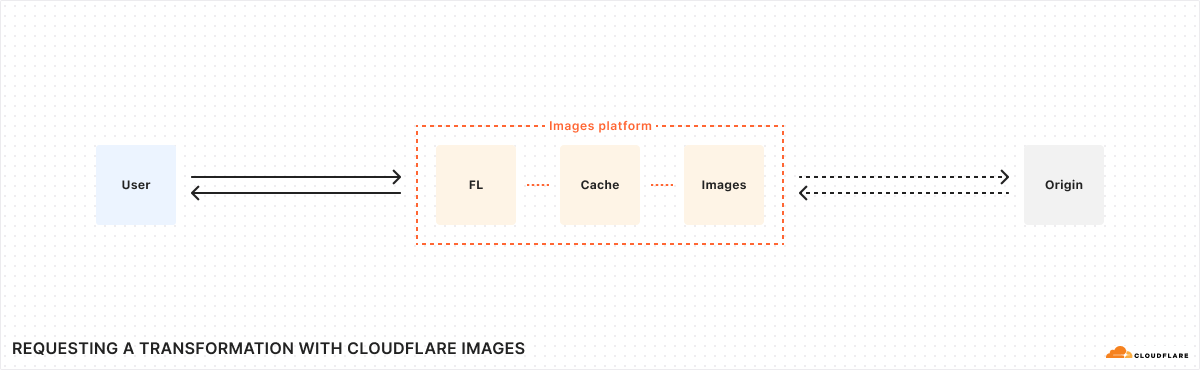
Super Slurper originally shared its architecture with SourcingKit, a tool built to bulk import images from AWS S3 into Cloudflare Images. SourcingKit was deployed on Kubernetes and ran alongside the Images service. When we started building Super Slurper, we split it into its own Kubernetes namespace and introduced a few new APIs to make it easier to use for the object storage use case. This setup worked well and helped thousands of developers move data to R2.
However, it wasn’t without its challenges. SourcingKit wasn’t designed to handle the scale required for large, petabytes-scale transfers. SourcingKit, and by extension Super Slurper, operated on Kubernetes clusters located in one of our core data centers, meaning it had to share compute resources and bandwidth with Cloudflare’s control plane, analytics, and other services. As the number of migrations grew, these resource constraints became a clear bottleneck.
For a service transferring data between object storage providers, the job is simple: list objects from the source, copy them to the destination, and repeat. This is exactly how the original Super Slurper worked. We listed objects from the source bucket, pushed that list to a Postgres-based queue (pg_queue), and then pulled from this queue at a steady pace to copy objects over. Given the scale of object storage migrations, bandwidth usage was inevitably going to be high. This made it challenging to scale.
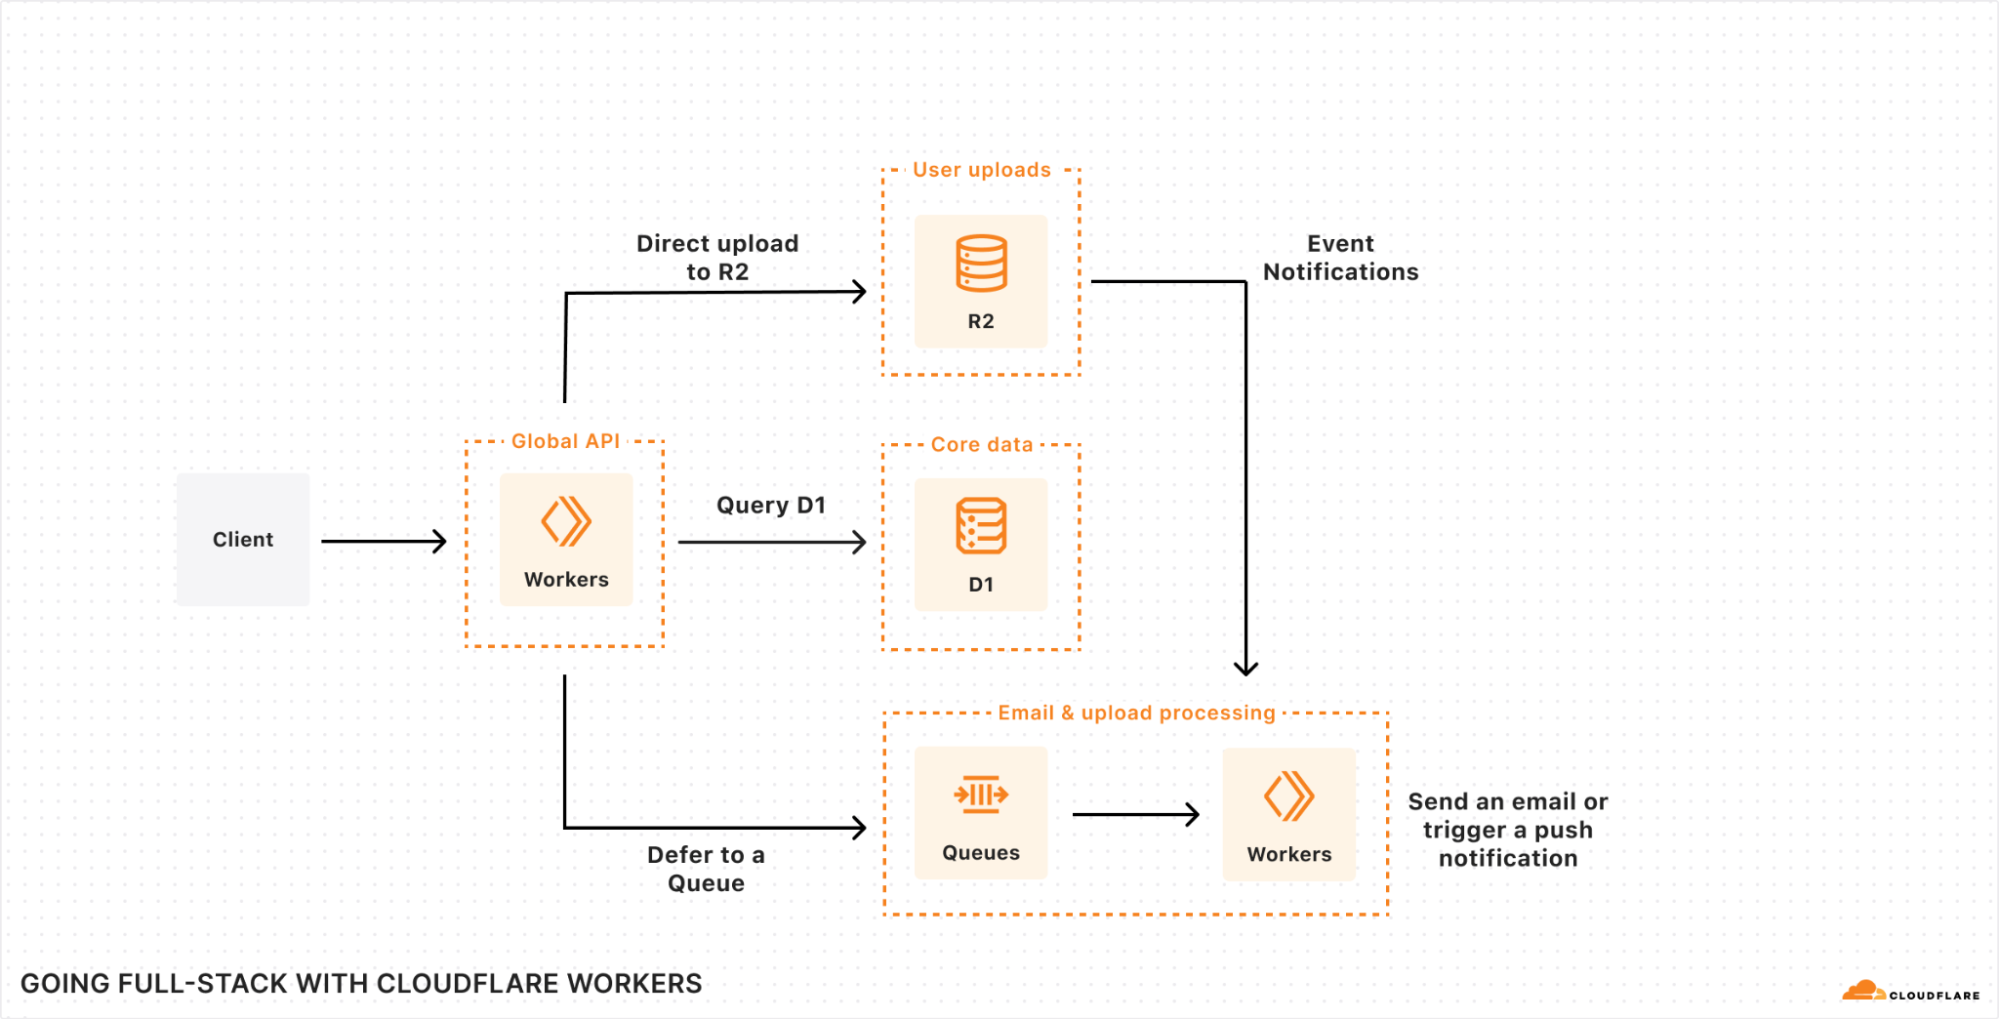
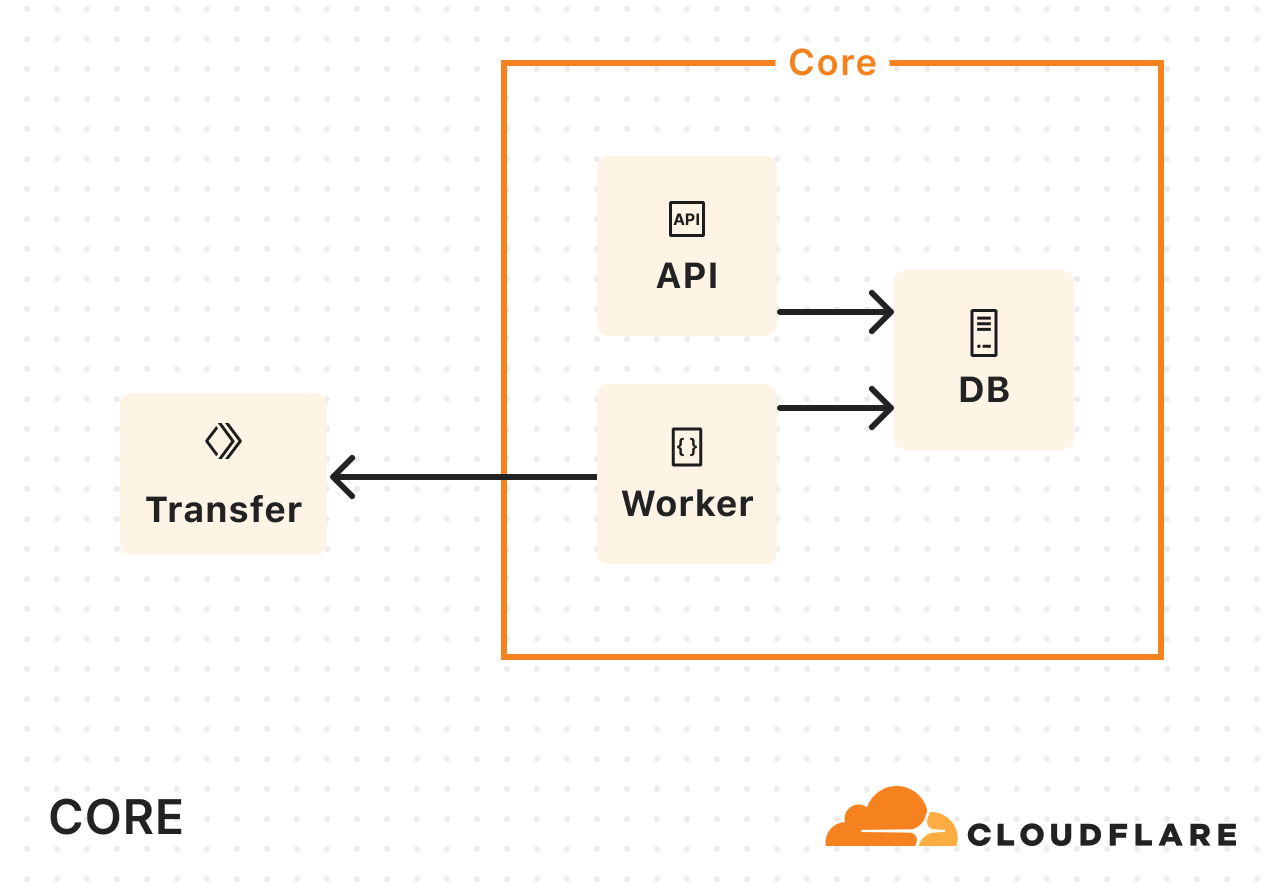
To address the bandwidth constraints operating solely in our core data center, we introduced Cloudflare Workers into the mix. Instead of handling the copying of data in our core data center, we started calling out to a Worker to do the actual copying:
As Super Slurper’s usage grew, so did our Kubernetes resource consumption. A significant amount of time during data transfers was spent waiting on network I/O or storage, and not actually doing compute-intensive tasks. So we didn’t need more memory or more CPU, we needed more concurrency.
To keep up with demand, we kept increasing the replica count. But eventually, we hit a wall. We were dealing with scalability challenges when running on the order of tens of pods when we wanted multiple orders of magnitude more.
We decided to rethink the entire approach from first principles, instead of leaning on the architecture we had inherited. In about a week, we built a rough proof of concept using Cloudflare Workers, Durable Objects, and Queues. We listed objects from the source bucket, pushed them into a queue, and then consumed messages from the queue to initiate transfers. Although this sounds very similar to what we did in the original implementation, building on our Developer Platform allowed us to automatically scale an order of magnitude higher than before.
-
Cloudflare Queues: Enables asynchronous object transfers and auto-scales to meet the number of objects being migrated.
-
Cloudflare Workers: Runs lightweight compute tasks without the overhead of Kubernetes and optimizes where in the world each part of the process runs for lower latency and better performance.
-
SQLite-backed Durable Objects (DOs): Acts as a fully distributed database, eliminating the limitations of a single PostgreSQL instance.
-
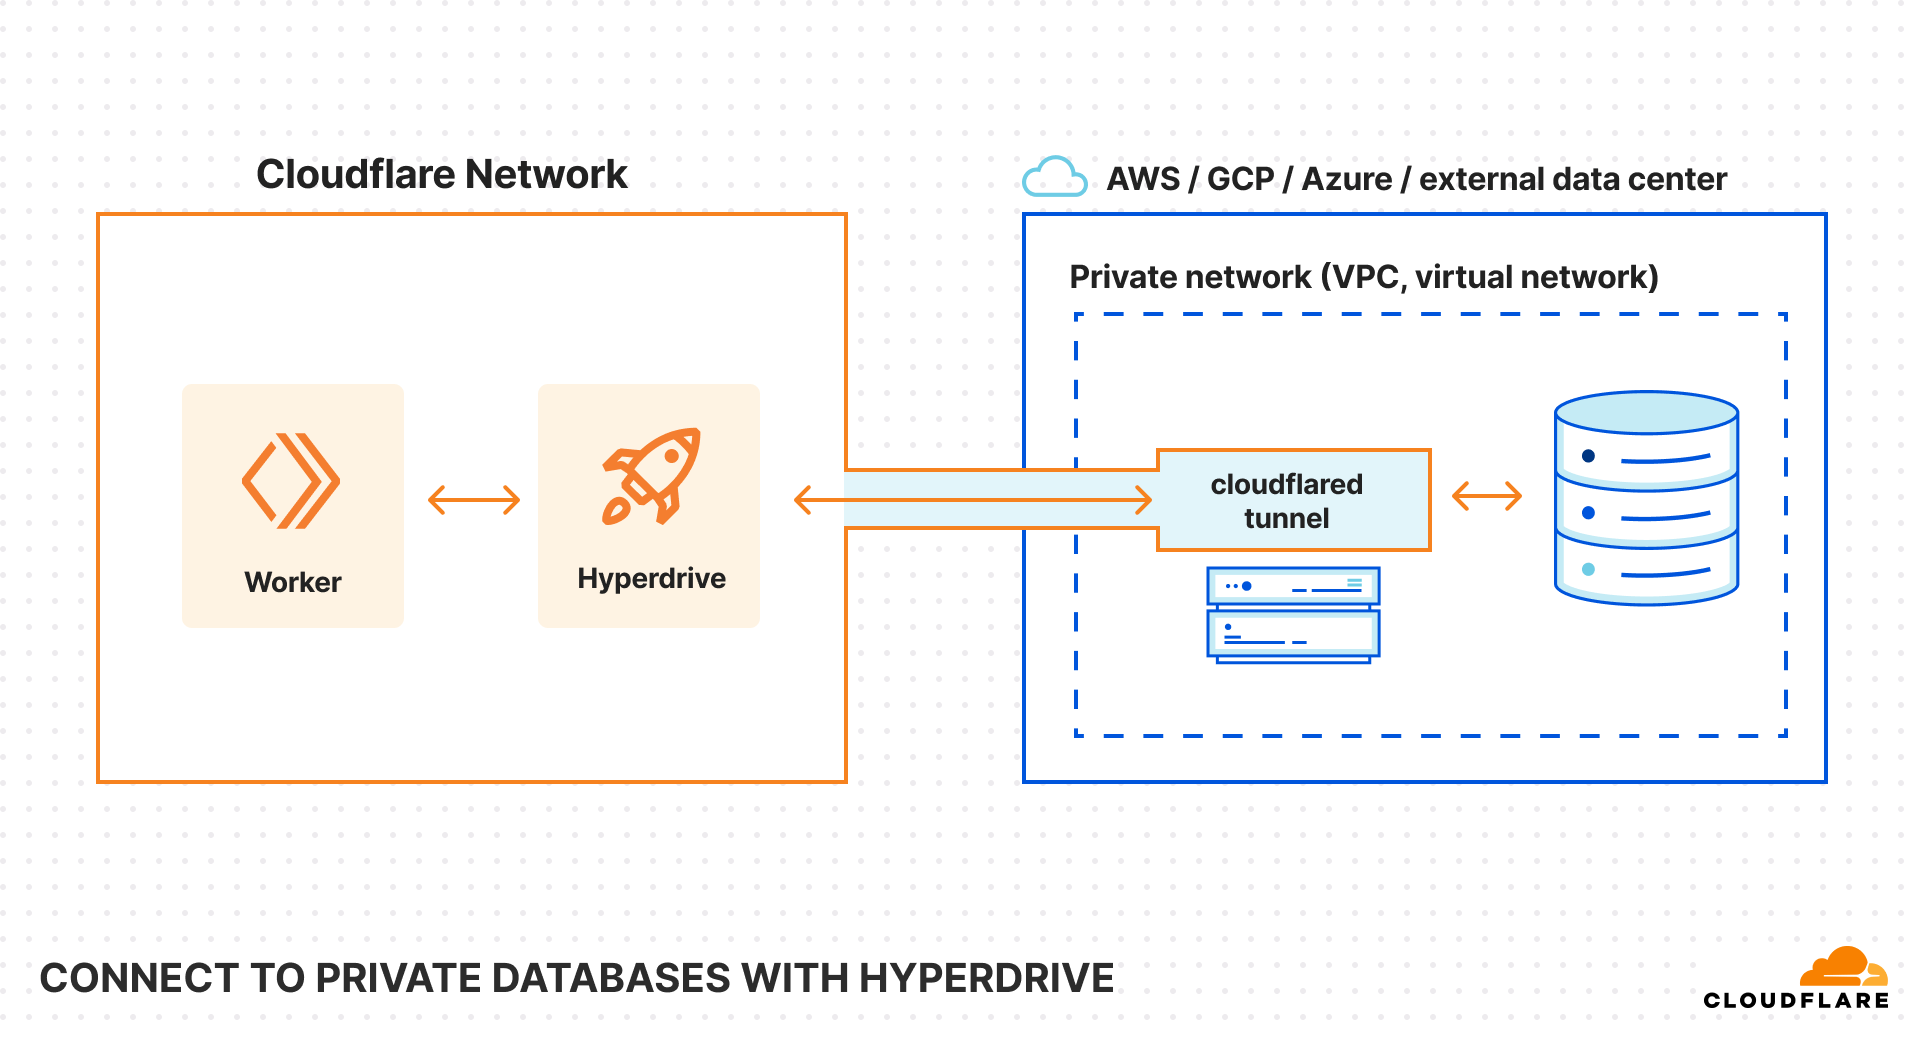
Hyperdrive: Provides fast access to historical job data from the original PostgreSQL database, keeping it as an archive store.
We ran a few tests and found that our proof of concept was slower than the original implementation for small transfers (a few hundred objects), but it matched and eventually exceeded the performance of the original as transfers scaled into the millions of objects. That was the signal we needed to invest the time to take our proof of concept to production.
We removed our proof of concept hacks, worked on stability, and found new ways to make transfers scale to even higher concurrency. After a few iterations, we landed on something we were happy with.
Processing layer: managing the flow of migration
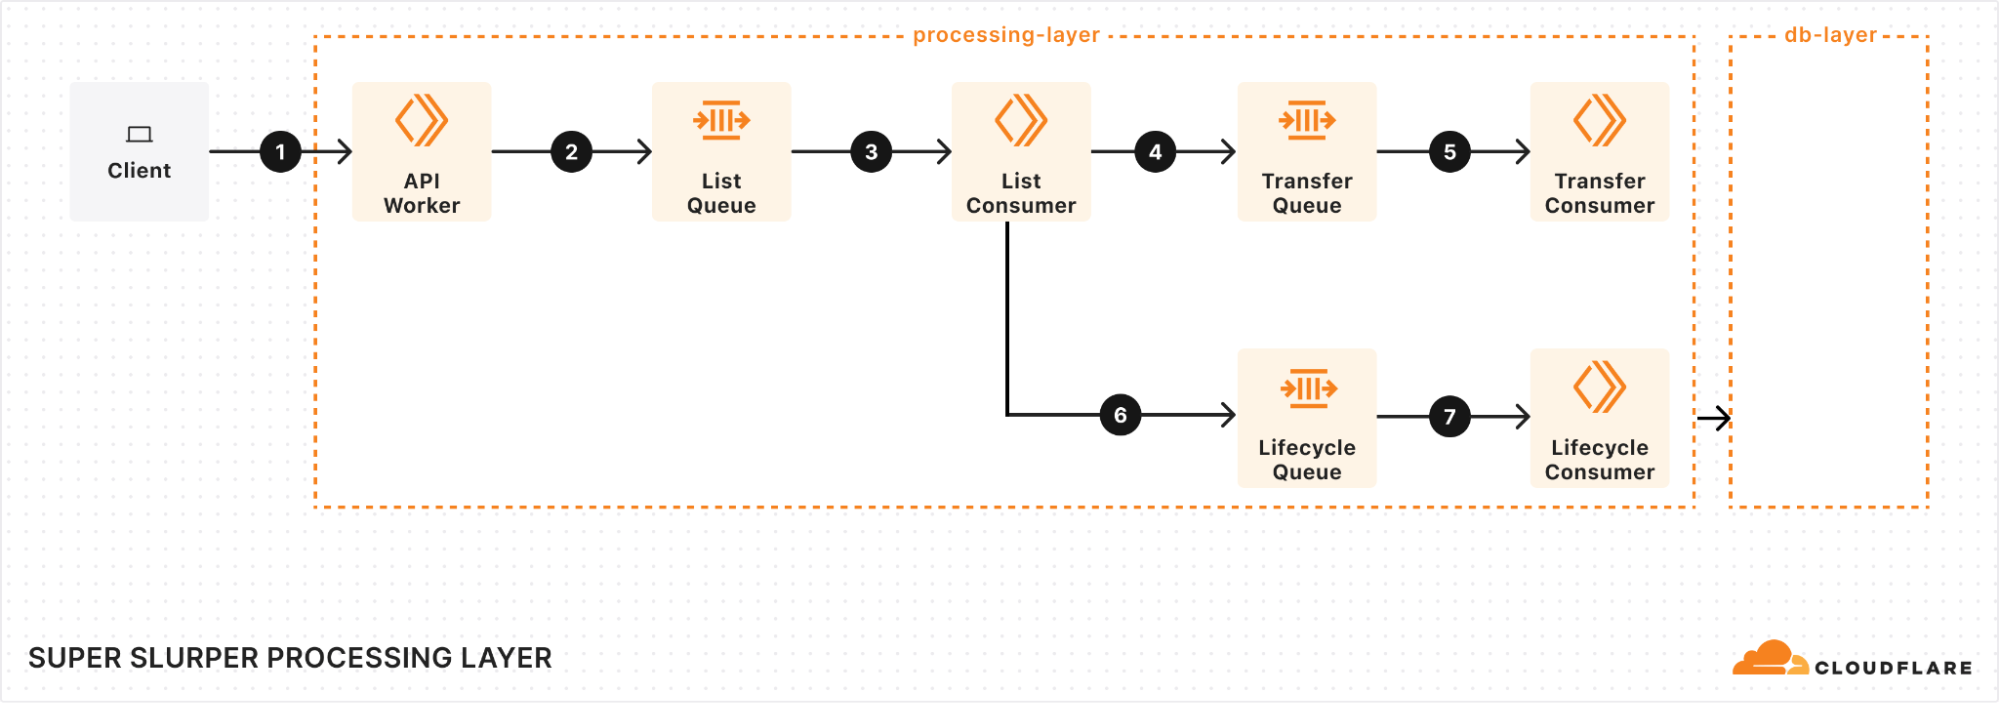
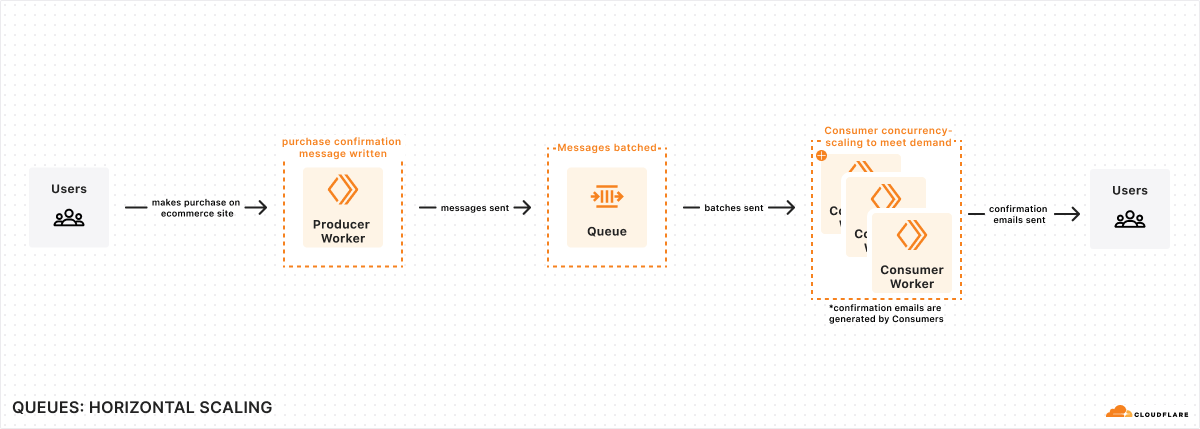
At the heart of our processing layer are queues, consumers, and workers. Here’s what the process looks like:
Kicking off a migration
When a client triggers a migration, it starts with a request sent to our API Worker. This worker takes the details of the migration, stores them in the database, and adds a message to the List Queue to start the process.
Listing source bucket objects
The List Queue Consumer is where things start to pick up. It pulls messages from the queue, retrieves object listings from the source bucket, applies any necessary filters, and stores important metadata in the database. Then, it creates new tasks by enqueuing object transfer messages into the Transfer Queue.
We immediately queue new batches of work, maximizing concurrency. A built-in throttling mechanism prevents us from adding more messages to our queues when unexpected failures occur, such as dependent systems going down. This helps maintain stability and prevents overload during disruptions.
Efficient object transfers
The Transfer Queue Consumer Workers pull object transfer messages from the queue, ensuring that each object is processed only once by locking the object key in the database. When the transfer finishes, the object is unlocked. For larger objects, we break them into manageable chunks and transfer them as multipart uploads.
Handling failures gracefully
Failures are inevitable in any distributed system, and we had to make sure we accounted for that. We implemented automatic retries for transient failures, so issues don’t interrupt the flow of the migration. But if something can’t be resolved with retries, the message goes into the Dead Letter Queue (DLQ), where it is logged for later review and resolution.
Job completion & lifecycle management
Once all the objects are listed and the transfers are in progress, the Lifecycle Queue Consumer keeps an eye on everything. It monitors the ongoing transfers, ensuring that no object is left behind. When all the transfers are complete, the job is marked as finished and the migration process wraps up.
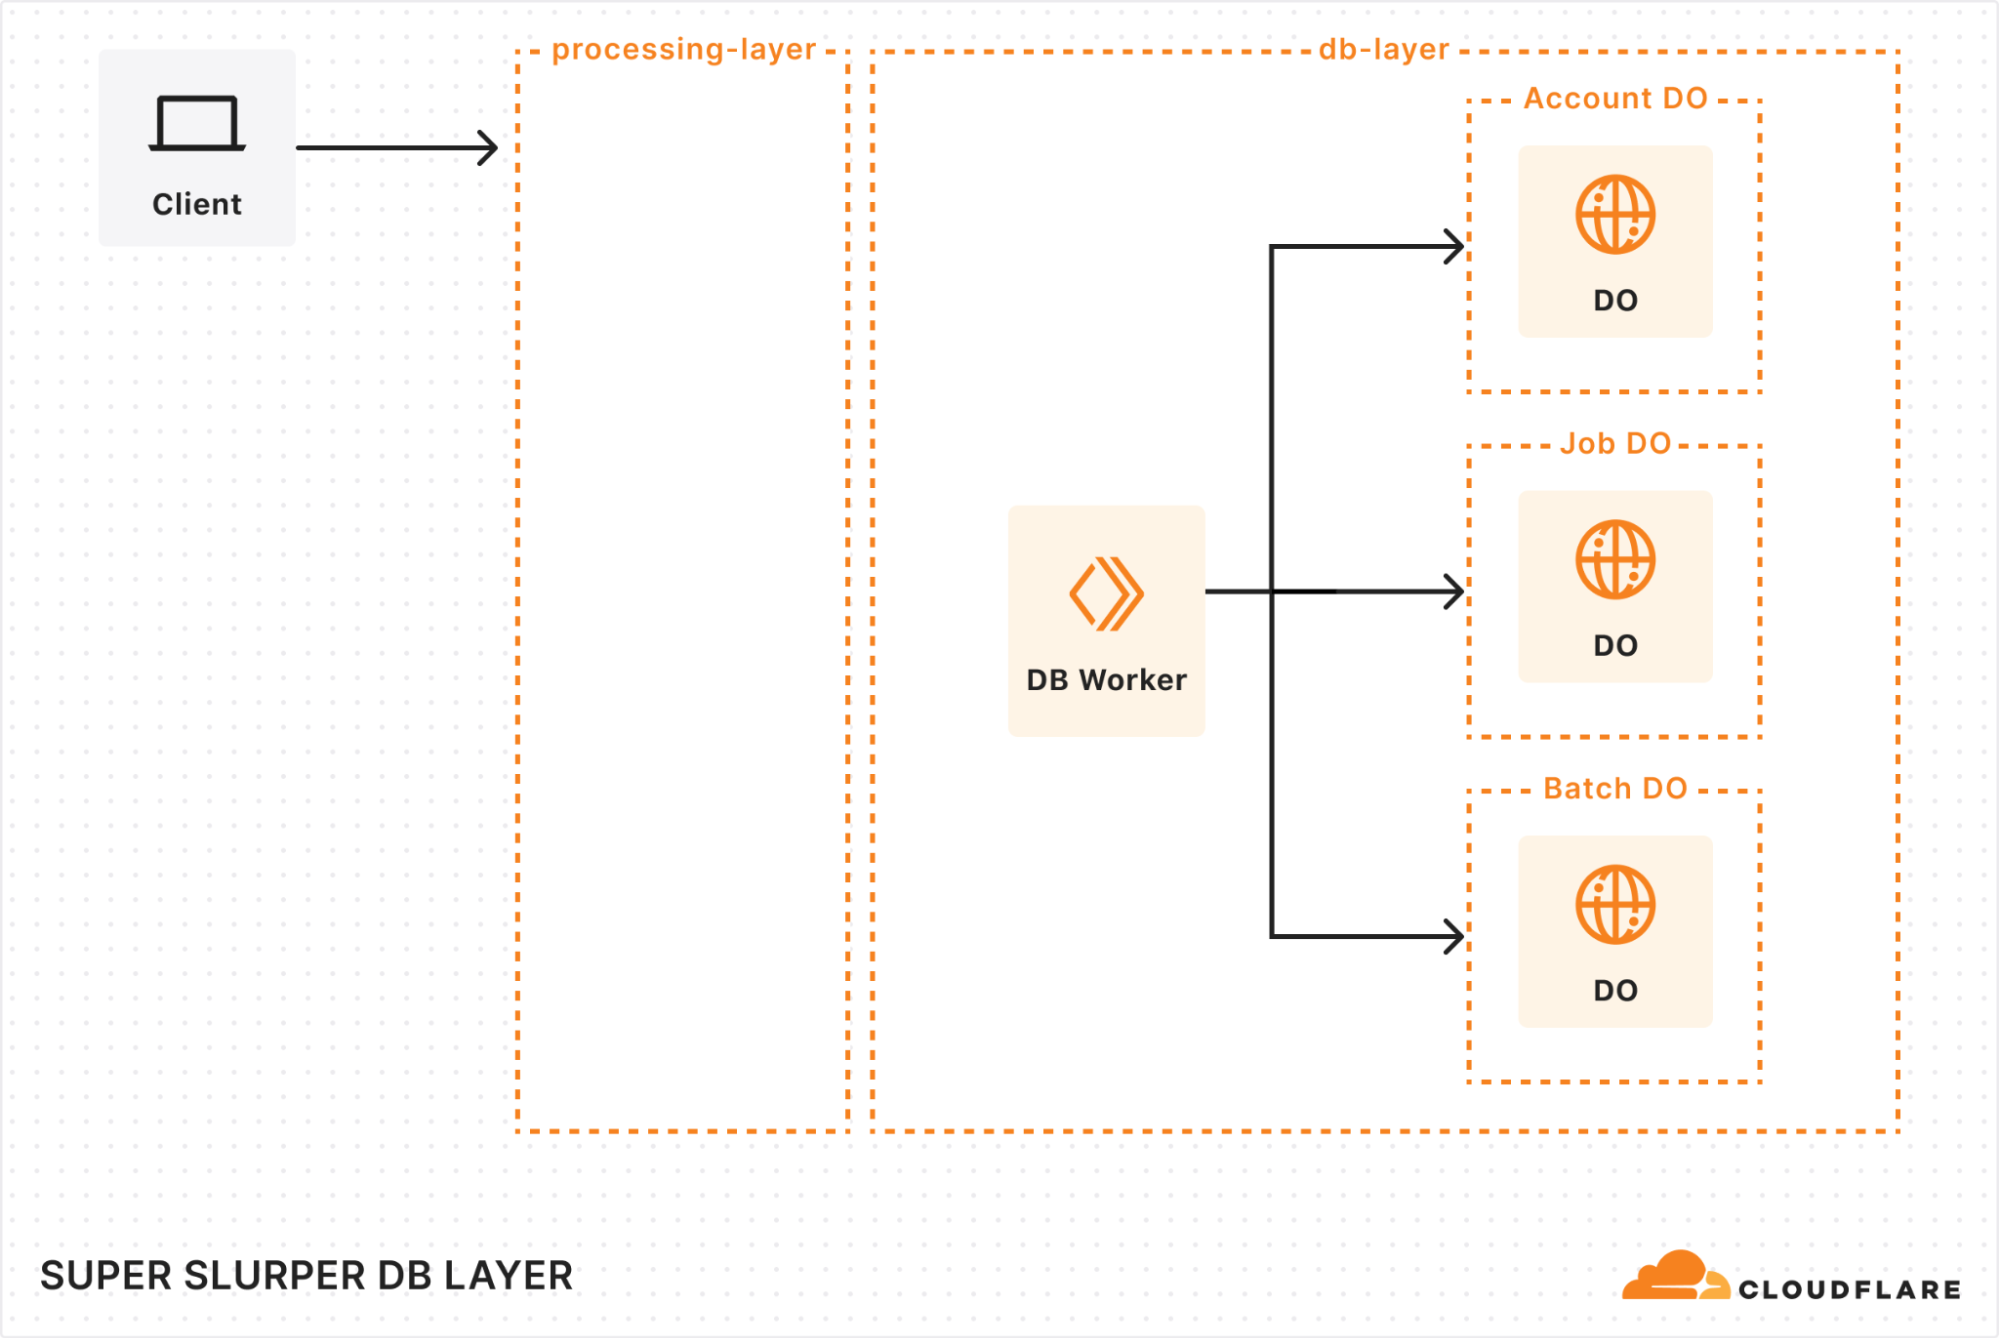
When building our new architecture, we knew we needed a robust solution to handle massive datasets while ensuring retrieval of historical job data. That’s where our combination of Durable Objects (DOs) and Hyperdrive came in.
Durable Objects
We gave each account a dedicated Durable Object to track migration jobs. Each job’s DO stores vital details, such as bucket names, user options, and job state. This ensured everything stayed organized and easy to manage. To support large migrations, we also added a Batch DO that manages all the objects queued for transfer, storing their transfer state, object keys, and any extra metadata.
As migrations scaled up to billions of objects, we had to get creative with storage. We implemented a sharding strategy to distribute request loads, preventing bottlenecks and working around SQLite DO’s 10 GB storage limit. As objects are transferred, we clean up their details, optimizing storage space along the way. It’s surprising how much storage a billion object keys can require!
Hyperdrive
Since we were rebuilding a system with years of migration history, we needed a way to preserve and access every past migration detail. Hyperdrive serves as a bridge to our legacy systems, enabling seamless retrieval of historical job data from our core PostgreSQL database. It’s not just a data retrieval mechanism, but an archive for complex migration scenarios.
So, after all of that, did we actually achieve our goal of making transfers faster?
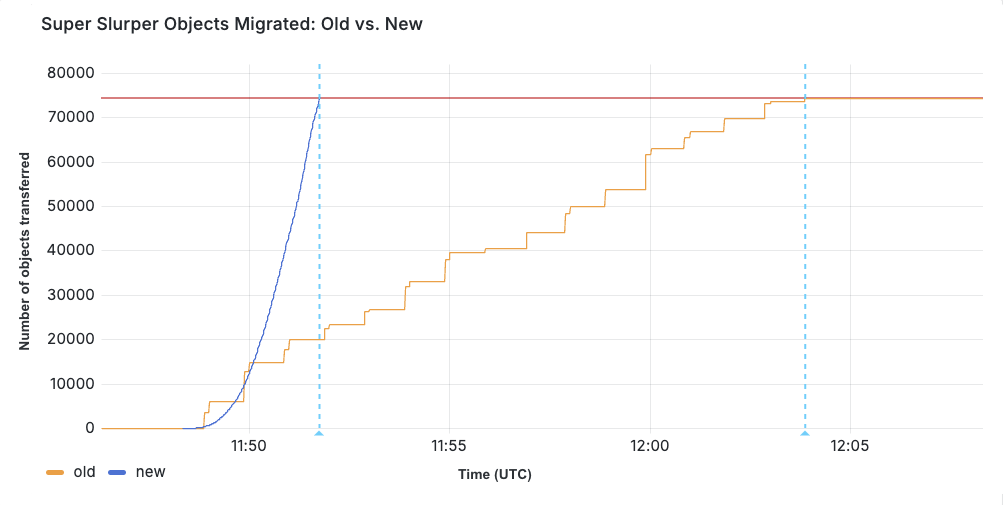
We ran a test migration of 75,000 objects from AWS S3 to R2. With the original implementation, the transfer took 15 minutes and 30 seconds. After our performance improvements, the same migration completed in just 3 minutes and 25 seconds.
When production migrations started using the new service in February, we saw even greater improvements in some cases, especially depending on the distribution of object sizes. Super Slurper has been around for about two years. But the improved performance has led to it being able to move much more data — 35% of all objects copied by Super Slurper happened just in the last two months.
One of the biggest challenges we faced with the new architecture was handling duplicate messages. There were a couple of ways duplicates could occur:
-
Queues provides at-least-once delivery, which means consumers may receive the same message more than once to guarantee delivery.
-
Failures and retries could also create apparent duplicates. For example, if a request to a Durable Object fails after the object has already been transferred, the retry could reprocess the same object.
If not handled correctly, this could result in the same object being transferred multiple times. To solve this, we implemented several strategies to ensure each object was accurately accounted for and only transferred once:
-
Since listing is sequential (e.g., to get object 2, you need the continuation token from listing object 1), we assign a sequence ID to each listing operation. This allows us to detect duplicate listings and prevent multiple processes from starting simultaneously. This is particularly useful because we don’t wait for database and queue operations to complete before listing the next batch. If listing 2 fails, we can retry it, and if listing 3 has already started, we can short-circuit unnecessary retries.
-
Each object is locked when its transfer begins, preventing parallel transfers of the same object. Once successfully transferred, the object is unlocked by deleting its key from the database. If a message for that object reappears later, we can safely assume it has already been transferred if the key no longer exists.
-
We rely on database transactions to keep our counts accurate. If an object fails to unlock, its count remains unchanged. Similarly, if an object key fails to be added to the database, the count isn’t updated, and the operation will be retried later.
-
As a last failsafe, we check whether the object already exists in the target bucket and was published after the start of our migration. If so, we assume it was transferred by our process (or another) and safely skip it.

We’re always exploring ways to make Super Slurper faster, more scalable, and even easier to use — this is just the beginning.
-
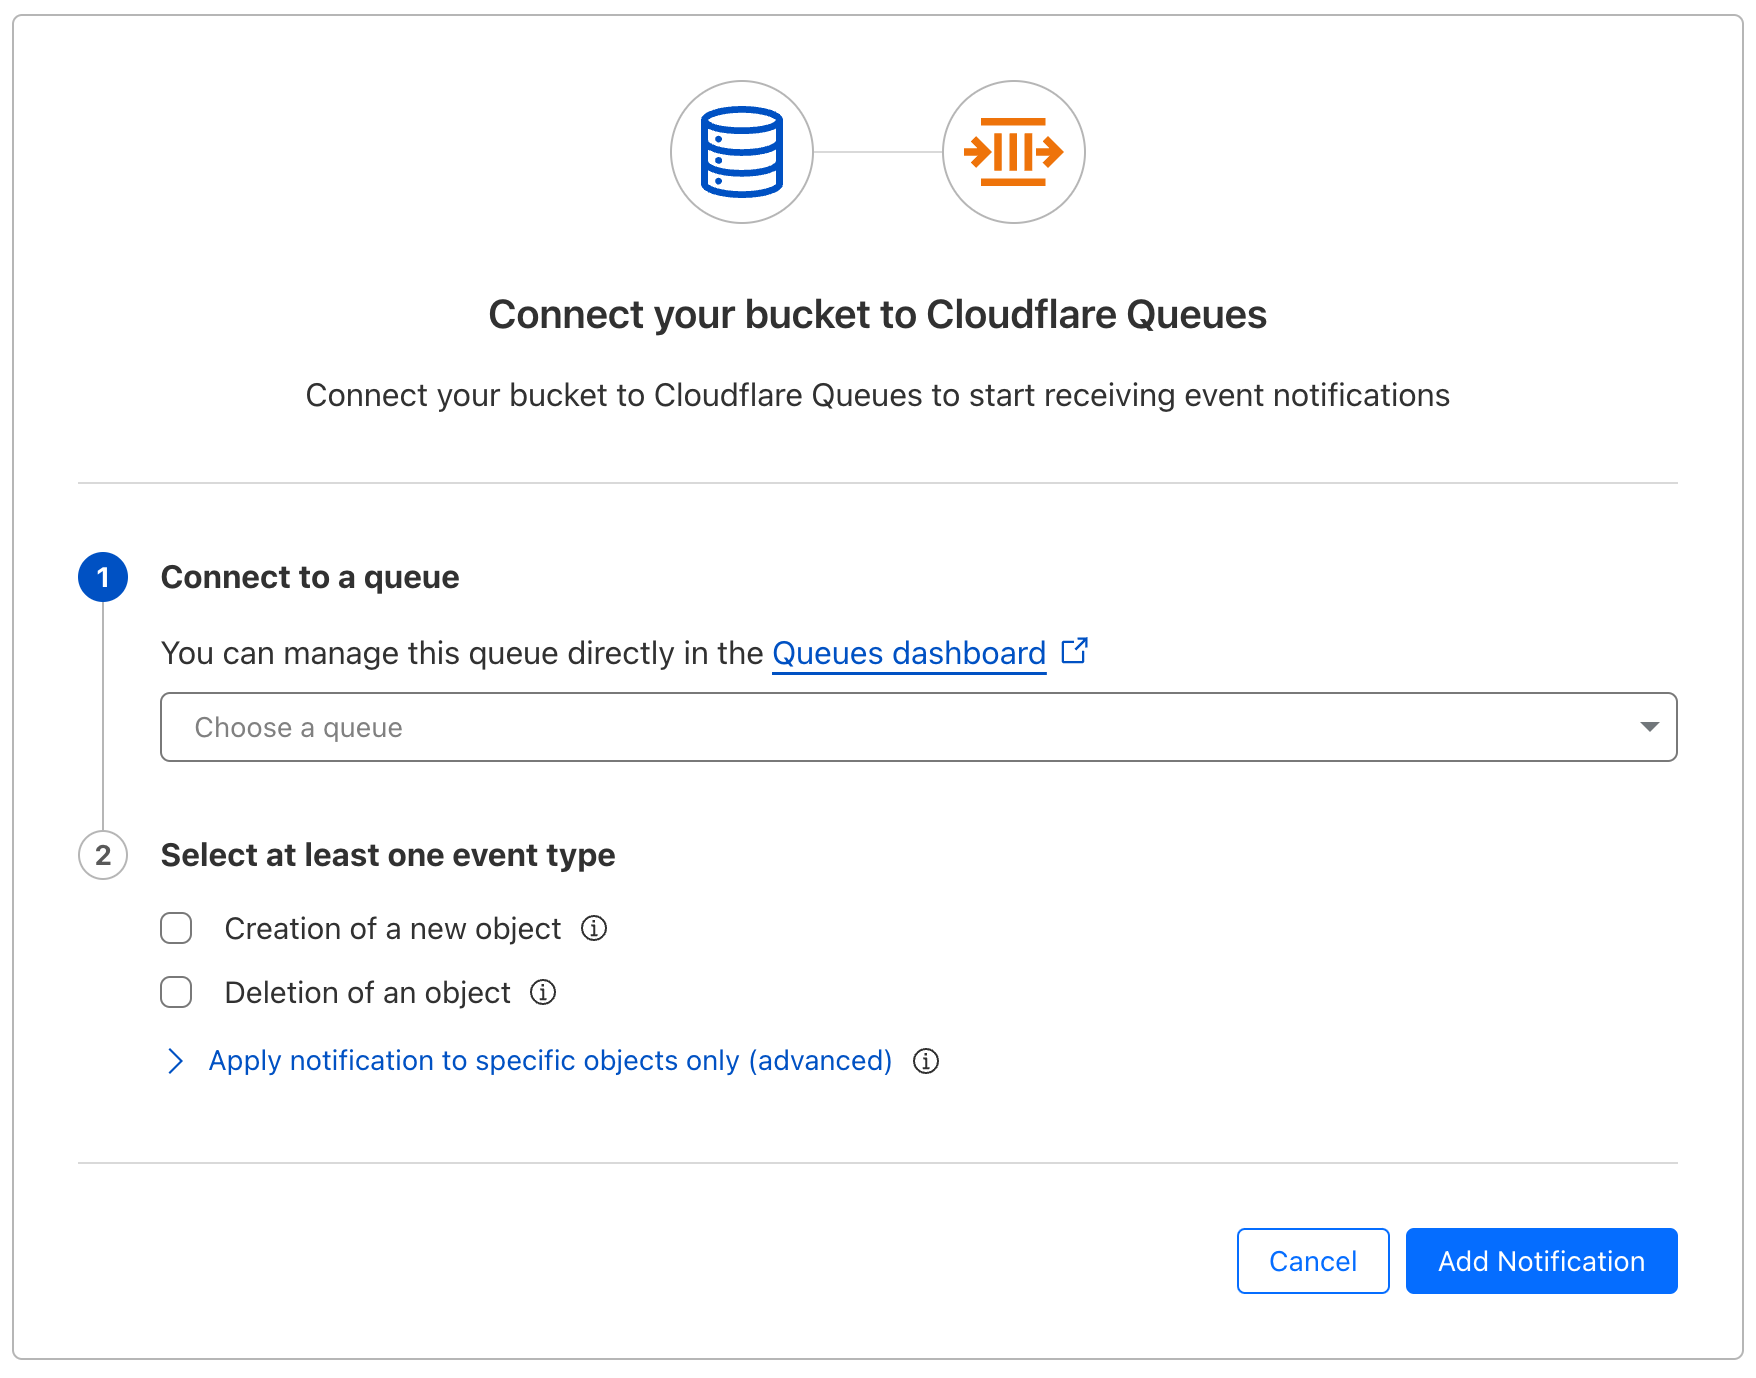
We recently launched the ability to migrate from any S3 compatible storage provider!
-
Data migrations are still currently limited to 3 concurrent migrations per account, but we want to increase that limit. This will allow object prefixes to be split up into separate migrations and run in parallel, drastically increasing the speed at which a bucket can be migrated. For more information on Super Slurper and how to migrate data from existing object storage to R2, refer to our documentation.
P.S. As part of this update, we made the API much simpler to interact with, so migrations can now be managed programmatically!