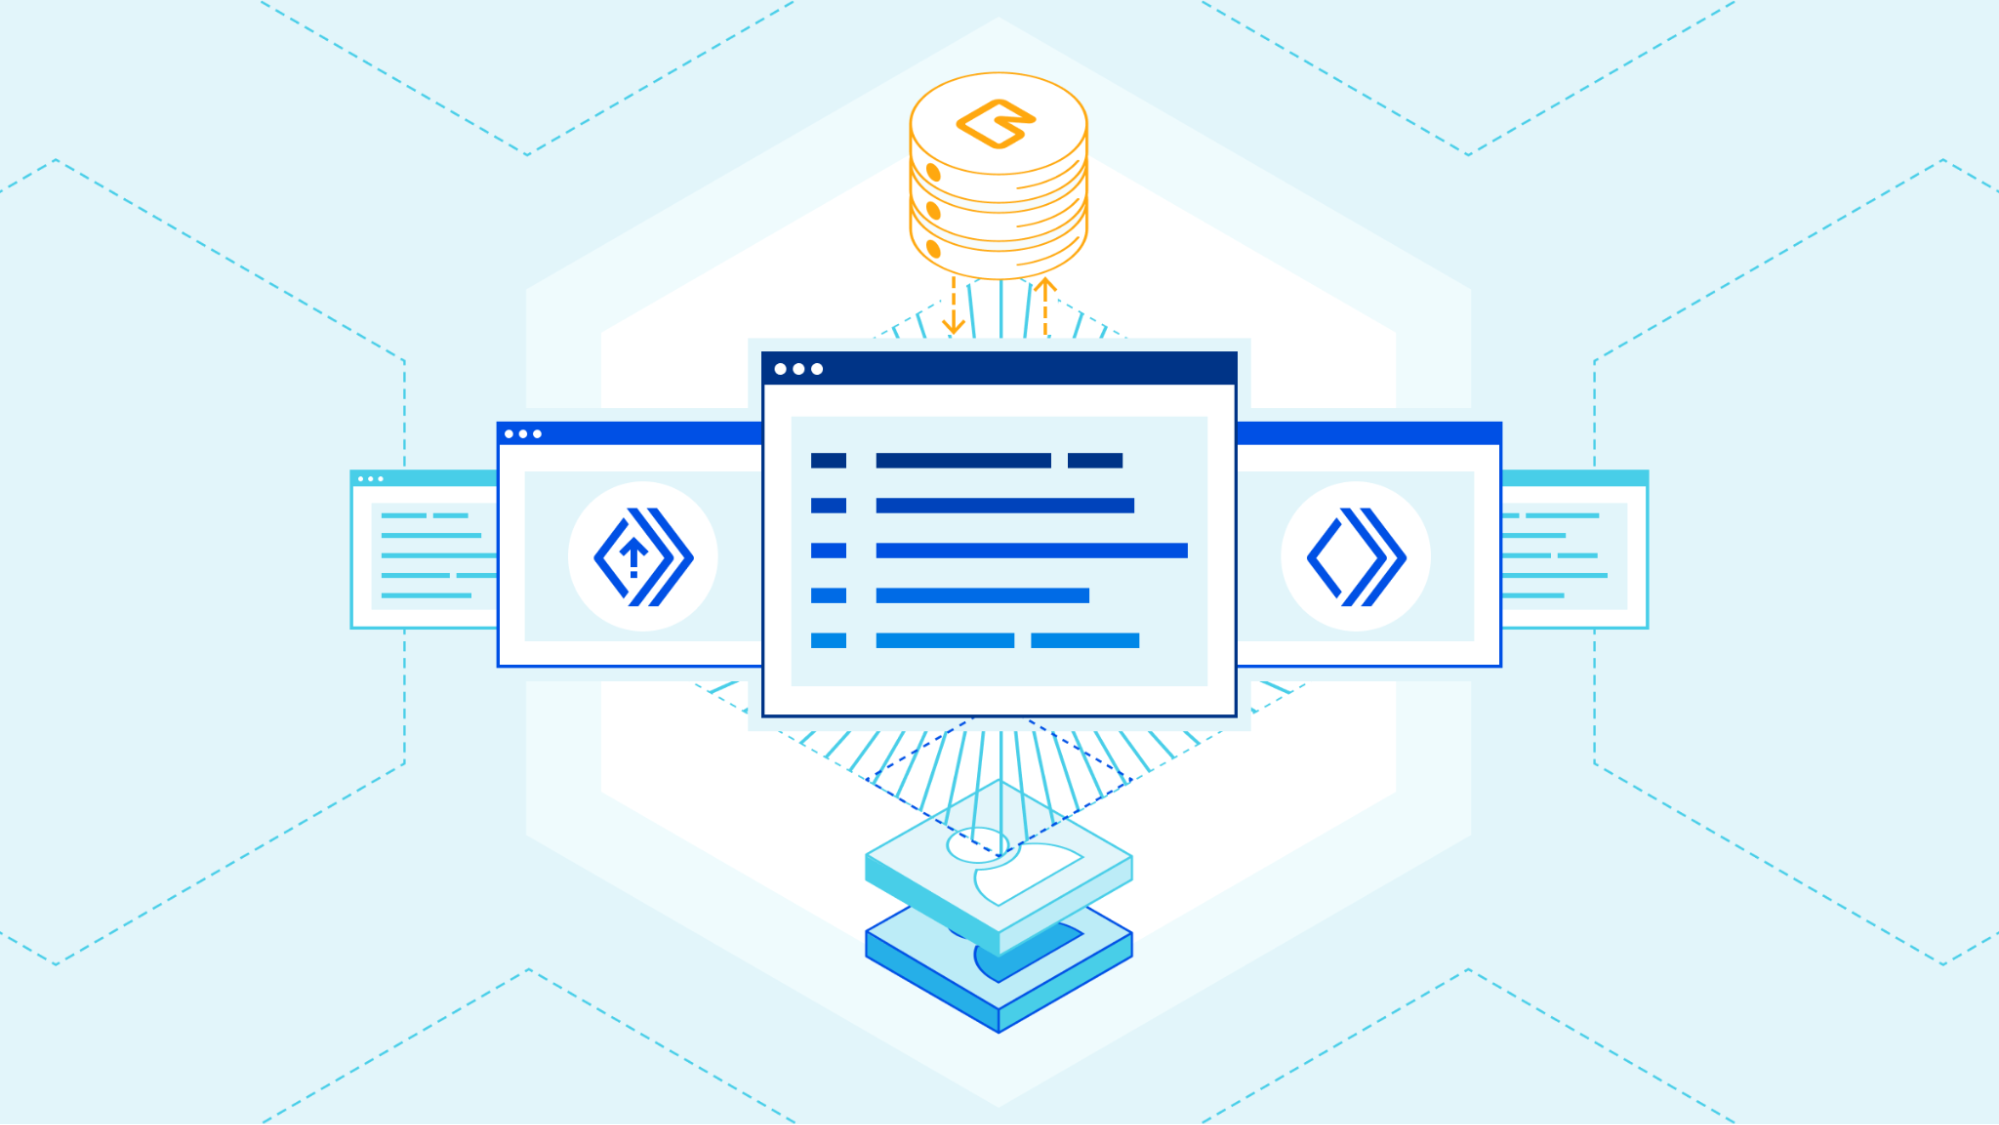
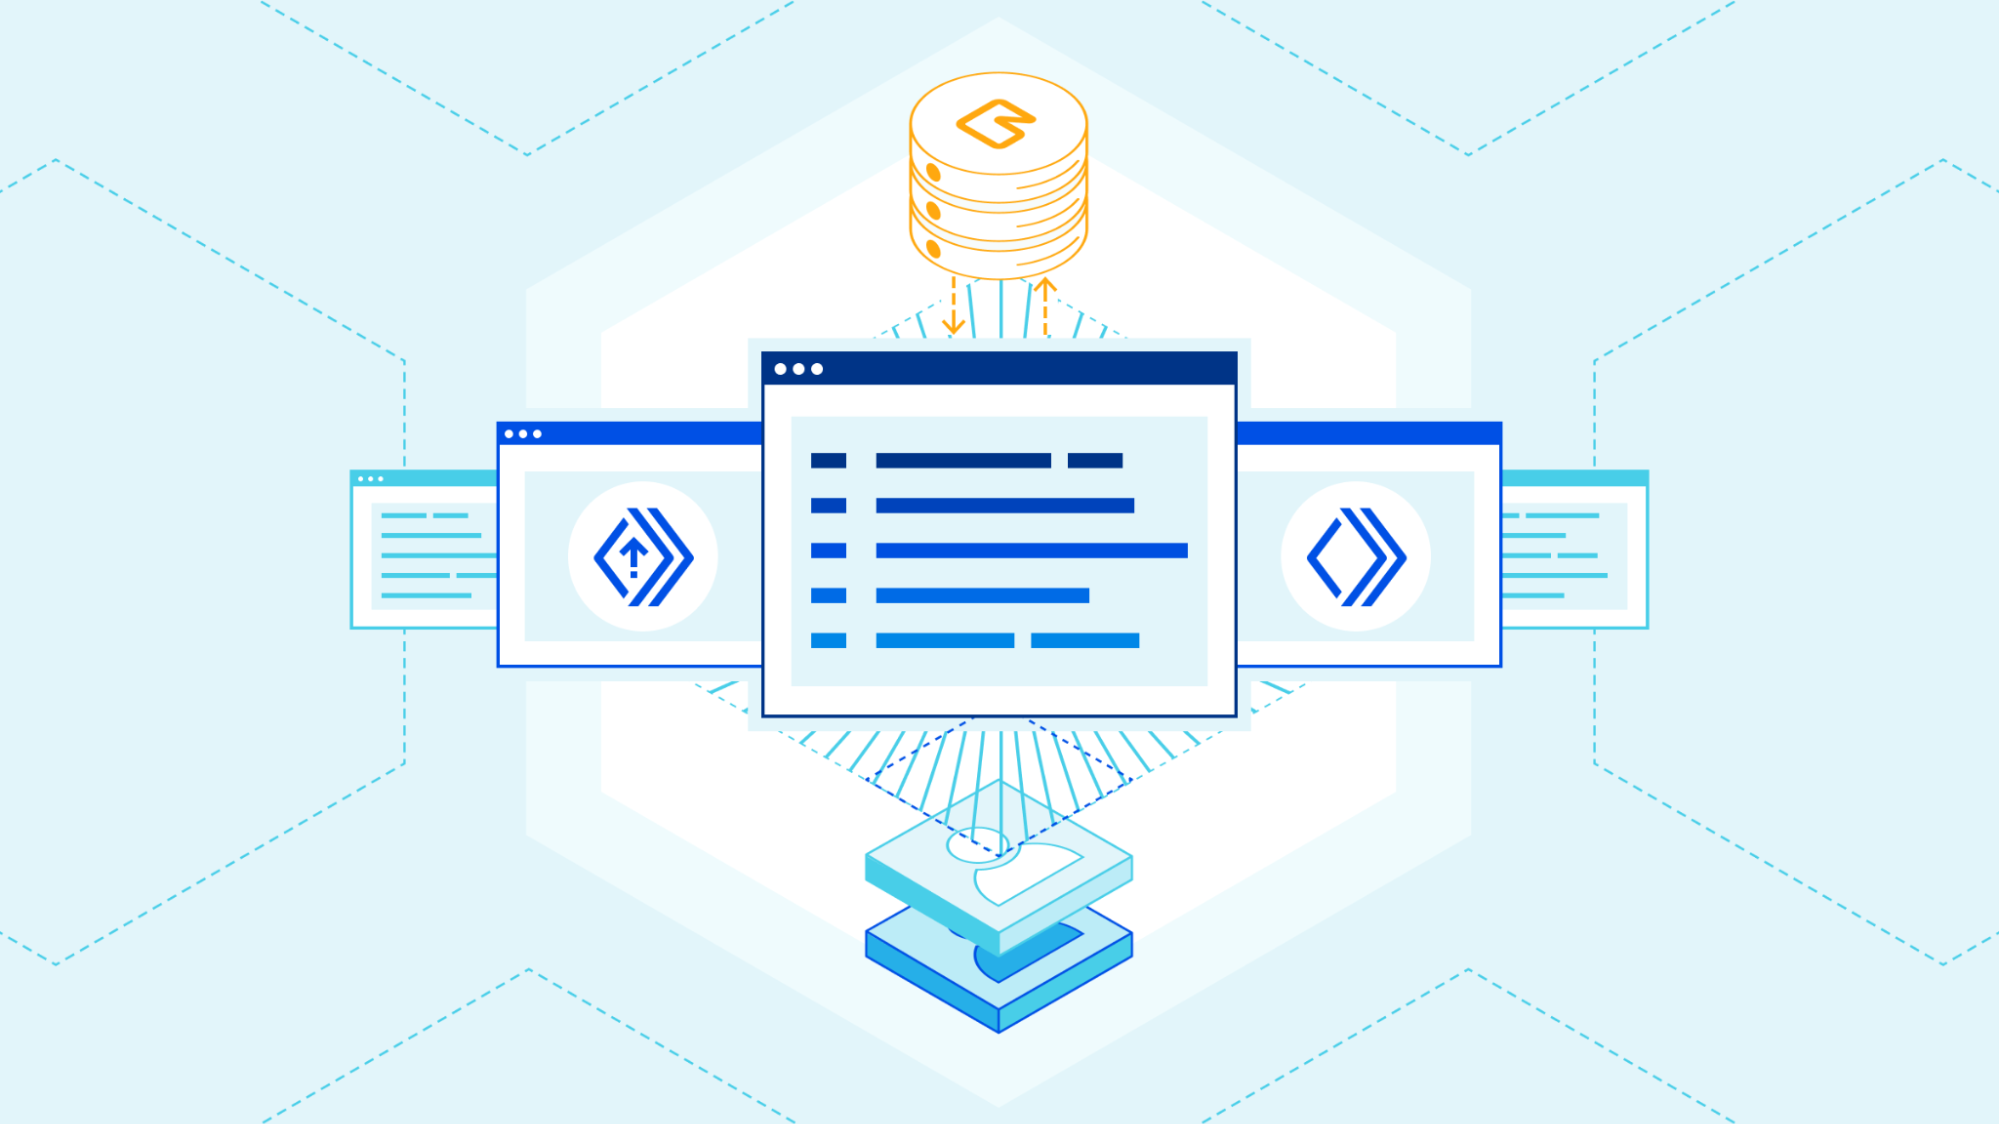
It’s no wonder that Postgres is one of the world’s favorite databases. It’s easy to learn, a pleasure to use, and can scale all the way up from your first database in an early-stage startup to the system of record for giant organizations. Postgres has been an integral part of Cloudflare’s journey, so we know this fact well. But when it comes to connecting to Postgres from environments like Cloudflare Workers, there are unfortunately a bunch of challenges, as we mentioned in our Relational Database Connector post.
Neon.tech not only solves these problems; it also has other cool features such as branching databases — being able to branch your database in exactly the same way you branch your code: instant, cheap and completely isolated.
How to use it
It’s easy to get started. Neon’s client library @neondatabase/serverless is a drop-in replacement for node-postgres, the npm pg package with which you may already be familiar. After going through the getting started process to set up your Neon database, you can easily create a Worker to ask Postgres for the current time like so:
Create a new Worker — Run npx wrangler init neon-cf-demo and accept all the defaults. Enter the new folder with cd neon-cf-demo.
Install the Neon package — Run npm install @neondatabase/serverless.
Provide connection details — For deployment, run npx wrangler secret put DATABASE_URL and paste in your connection string when prompted (you’ll find this in your Neon dashboard: something like postgres://user:[email protected]/main). For development, create a new file .dev.vars with the contents DATABASE_URL= plus the same connection string.
Write the code — Lastly, replace src/index.ts with the following code:
import { Client } from '@neondatabase/serverless';
interface Env { DATABASE_URL: string; }

export default {
  async fetch(request: Request, env: Env, ctx: ExecutionContext) {
    const client = new Client(env.DATABASE_URL);
    await client.connect();
    const { rows: [{ now }] } = await client.query('select now();');
    ctx.waitUntil(client.end());  // this doesn’t hold up the response
    return new Response(now);
  }
}
To try this locally, type npm start. To deploy it around the globe, type npx wrangler publish.
How does this work? In this case, we take the coordinates supplied to our Worker in request.cf.longitude and request.cf.latitude. We then feed these coordinates to a SQL query that uses the PostGIS distance operator <-> to order our results:
const { longitude, latitude } = request.cf
const { rows } = await client.query(`
  select
    id_no, name_en, category,
    st_makepoint($1, $2) <-> location as distance
  from whc_sites_2021
  order by distance limit 10`,
  [longitude, latitude]
);
Since we created a spatial index on the location column, the query is blazing fast. The result (rows) looks like this:
[{
  "id_no": 308,
  "name_en": "Yosemite National Park",
  "category": "Natural",
  "distance": 252970.14782223428
},
{
  "id_no": 134,
  "name_en": "Redwood National and State Parks",
  "category": "Natural",
  "distance": 416334.3926827573
},
/* … */
]
For even lower latencies, we could cache these results at a slightly coarser geographical resolution — rounding, say, to one sixtieth of a degree (one arc minute) of longitude and latitude, which is a little under a mile.
Sign up to Neon using the invite code serverless and try the @neondatabase/serverless driver with Cloudflare Workers.
Why we did it
Cloudflare Workers has enormous potential to improve back-end development and deployment. It’s cost-effective, admin-free, and radically scalable.
The use of V8 isolates means Workers are now fast and lightweight enough for nearly any use case. But it has a key drawback: Cloudflare Workers don’t yet support raw TCP communication, which has made database connections a challenge.
Even when Workers eventually support raw TCP communication, we will not have fully solved our problem, because database connections are expensive to set up and also have quite a bit of memory overhead.
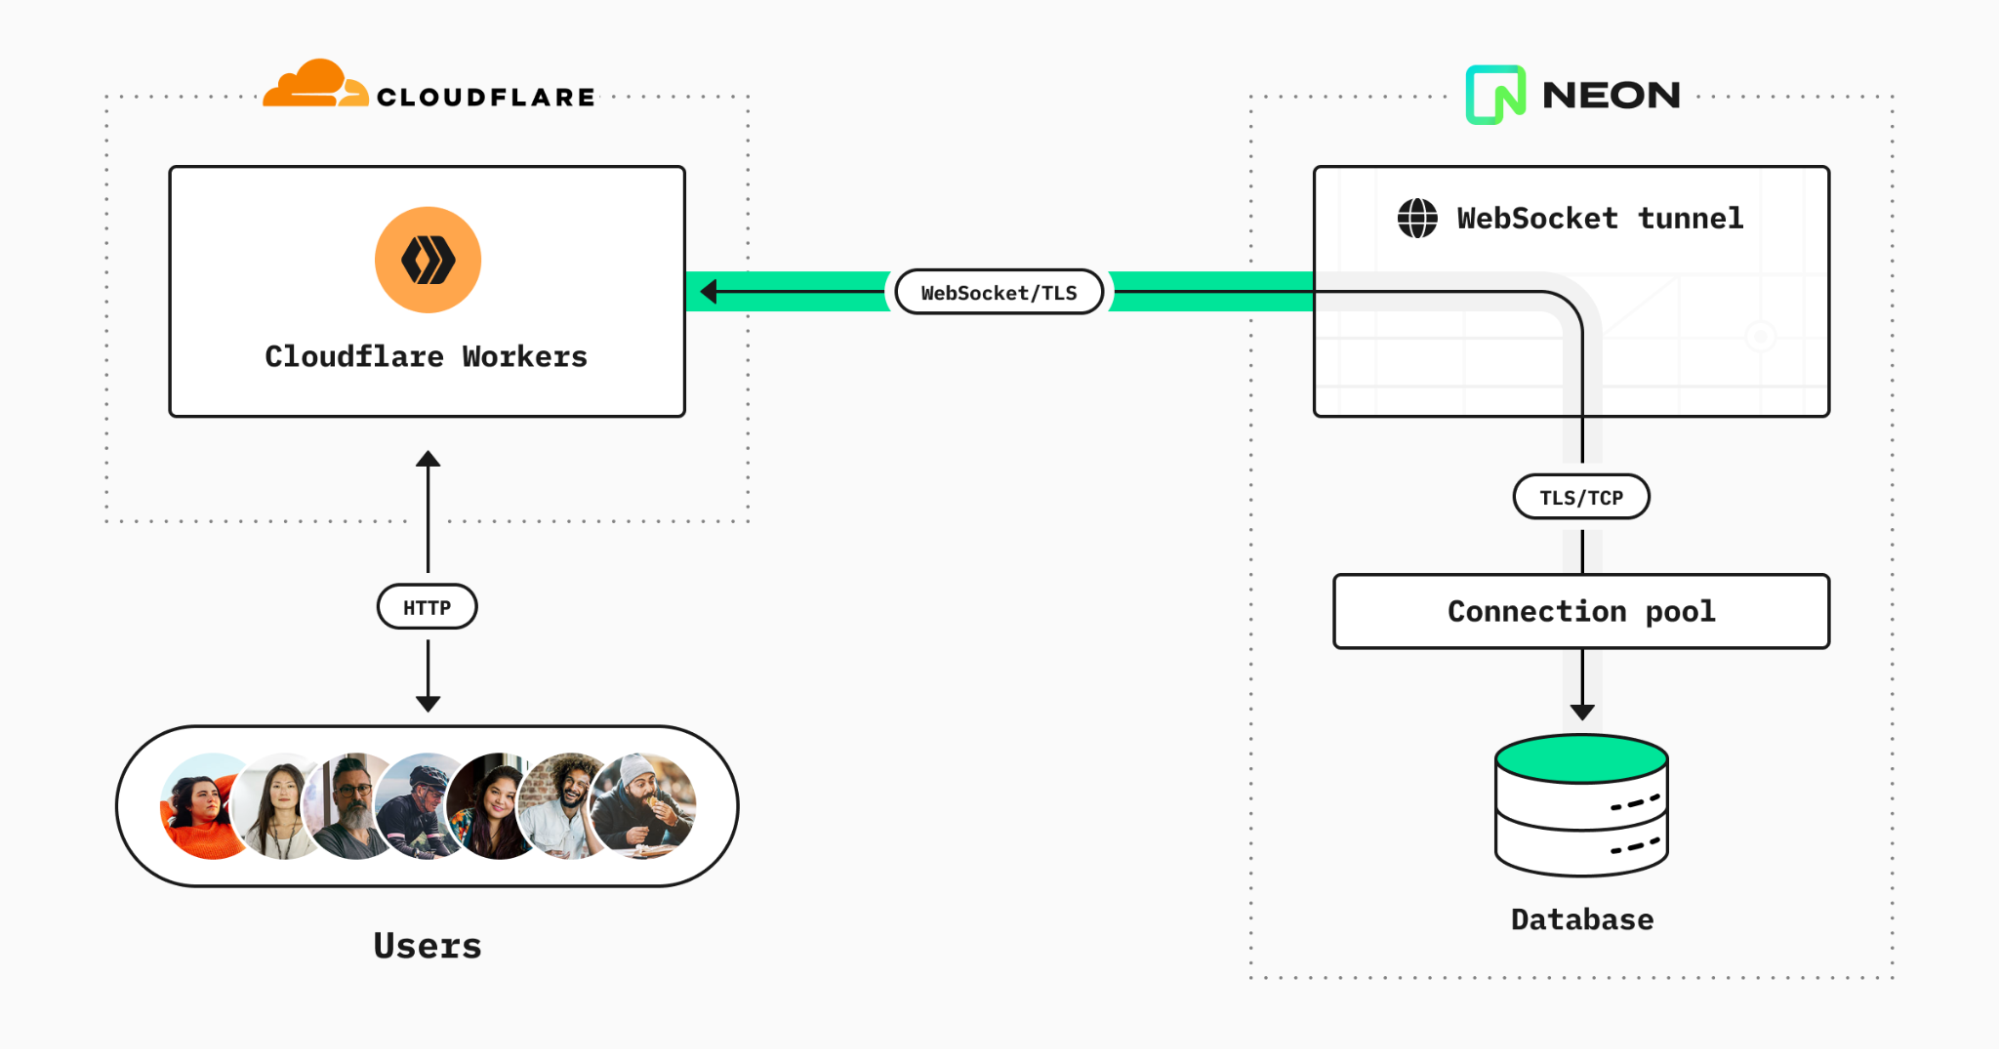
This is what the solution looks like:
It consists of three parts:
Connection pooling built into the platform — Given Neon’s serverless compute model, splitting storage and compute operations, it is not recommended to rely on a one-to-one mapping between external clients and Postgres connections. Instead, you can turn on connection pooling simply by flicking a switch (it’s in the Settings area of your Neon dashboard).
WebSocket proxy — We deploy our own WebSocket-to-TCP proxy, written in Go. The proxy simply accepts WebSocket connections from Cloudflare Worker clients, relays message payloads to a requested (Neon-only) host over plain TCP, and relays back the responses.
Client library — Our driver library is based on node-postgres but provides the necessary shims for Node.js features that aren’t present in Cloudflare Workers. Crucially, we replace Node’s net.Socket and tls.connect with code that redirects network reads and writes via the WebSocket connection. To support end-to-end TLS encryption between Workers and the database, we compile WolfSSL to WebAssembly with emscripten. Then we use esbuild to bundle it all together into an easy-to-use npm package.
The @neondatabase/serverless package is currently in public beta. We have plans to improve, extend, and explain it further in the near future on the Neon blog. In line with our commitment to open source, you can configure our serverless driver and/or run our WebSocket proxy to provide access to Postgres databases hosted anywhere — just see the respective repos for details.
Here at Cloudflare we often talk about HTTP and related protocols as we work to help build a better Internet. However, the Simple Mail Transfer Protocol (SMTP) — used to send emails — is still a massive part of the Internet too.
Even though SMTP is turning 40 years old this year, most businesses still rely on email to validate user accounts, send notifications, announce new features, and more.
Sending an email is simple from a technical standpoint, but getting an email actually delivered to an inbox can be extremely tricky. Because of the enormous amount of spam that is sent every single day, all major email providers are very wary of things like new domains and IP addresses that start sending emails.
That is why we are delighted to announce a partnership with MailChannels. MailChannels has created an email sending service specifically for Cloudflare Workers that removes all the friction associated with sending emails. To use their service, you do not need to validate a domain or create a separate account. MailChannels filters spam before sending out an email, so you can feel safe putting user-submitted content in an email and be confident that it won’t ruin your domain reputation with email providers. But the absolute best part? Thanks to our friends at MailChannels, it is completely free to send email.
In the words of their CEO Ken Simpson: “Cloudflare Workers and Pages are changing the game when it comes to ease of use and removing friction to get started. So when we sat down to see what friction we could remove from sending out emails, it turns out that with our incredible anti-spam and anti-phishing, the answer is “everything”. We can’t wait to see what applications the community is going to build on top of this.”
The only constraint currently is that the integration only works when the request comes from a Cloudflare IP address. So it won’t work yet when you are developing on your local machine or running a test on your build server.
First let’s walk you through how to send out your first email using a Worker.
export default {
  async fetch(request) {
    send_request = new Request('https://api.mailchannels.net/tx/v1/send', {
      method: 'POST',
      headers: {
        'content-type': 'application/json',
      },
      body: JSON.stringify({
        personalizations: [
          {
            to: [{ email: '[email protected]', name: 'Test Recipient' }],
          },
        ],
        from: {
          email: '[email protected]',
          name: 'Workers - MailChannels integration',
        },
        subject: 'Look! No servers',
        content: [
          {
            type: 'text/plain',
            value: 'And no email service accounts and all for free too!',
          },
        ],
      }),
    })
  },
}
That is all there is to it. You can modify the example to make it send whatever email you want.
The MailChannels integration makes it easy to send emails to and from anywhere with Workers. However, we also wanted to make it easier to send emails to yourself from a form on your website. This is perfect for quickly and painlessly setting up pages such as “Contact Us” forms, landing pages, and sales inquiries.
The Pages Plugin Framework that we announced earlier this week allows other people to email you without exposing your email address.
The only thing you need to do is copy and paste the following code snippet in your /functions/_middleware.ts file. Now, every form that has the data-static-form-name attribute will automatically be emailed to you.
Here is an example of what such a form would look like. You can make the form as complex as you like, the only thing it needs is the data-static-form-name attribute. You can give it any name you like to be able to distinguish between different forms.
So as you can see there is no barrier left when it comes to sending out emails. You can copy and paste the above Worker or Pages code into your projects and immediately start to send email for free.
If you have any questions about using MailChannels in your Workers, or want to learn more about Workers in general, please join our Cloudflare Developer Discord server.
Closing out the Developer Spotlight series for this week is Tejas Mehta who shares how he built his startup, cClip.
cClip is a great tool that allows you to “copy/paste” and transfer files between any of your devices, regardless of what OS they run.
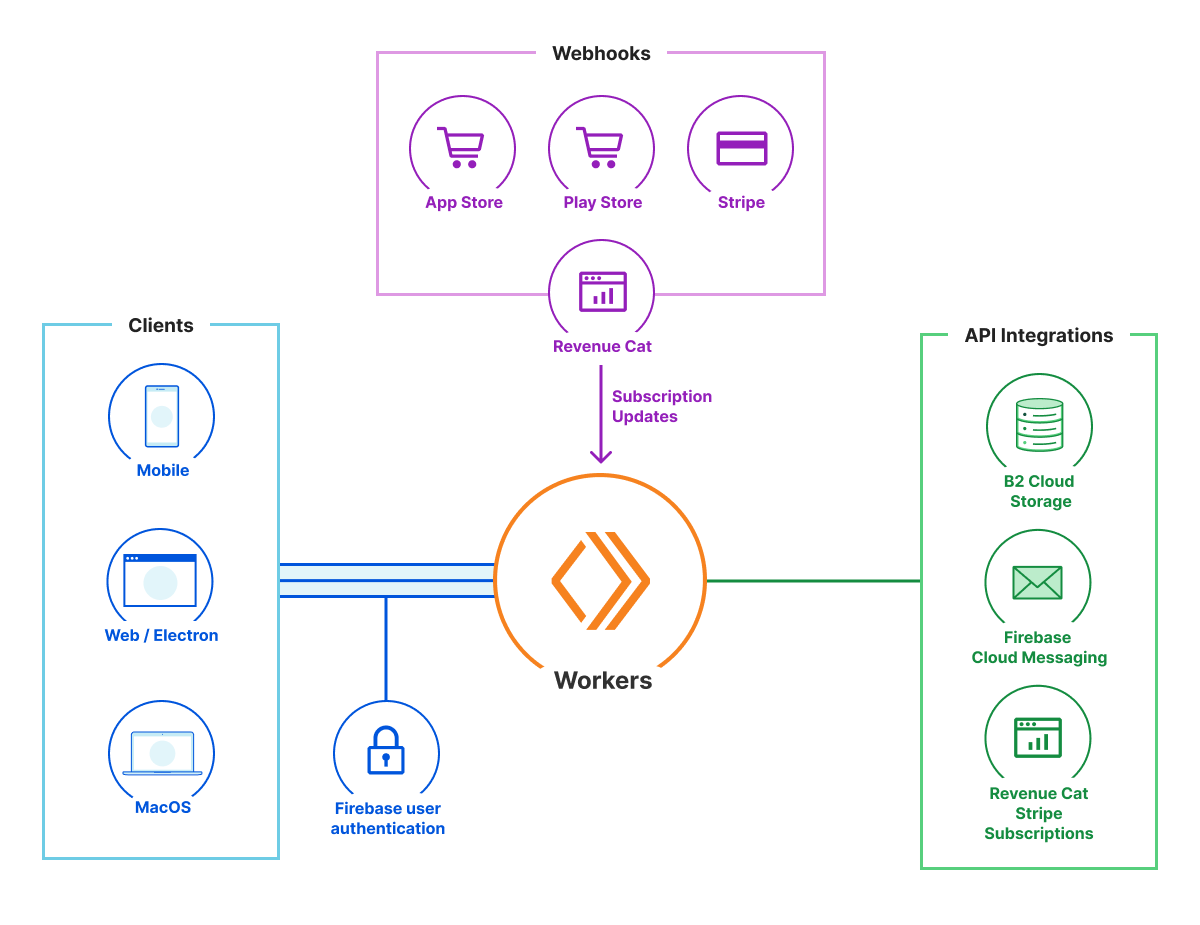
What is so interesting about cClip though is that it is a fully serverless application built on top of Workers and KV, but not exclusively. It uses Firebase for authentication, RevenueCat for a consolidated view over the Apple and Google Play store, and Stripe for all other billing related work.
This is a peek into the future of application development. This is a future where we will be “importing” other SaaS applications as easily as we currently import a package from a package manager. And not only unidirectional by calling APIs on that external application, but bi-directional communication through events with Webhooks.
Here is Tejas telling his story.
The origins of cClip
The abrupt transition to virtual schooling last year led to all my school communications and assignments transitioning online. With a MacBook laptop and an Android phone, submitting my precalculus homework meant I had to take a picture of each page, email each picture to myself, access the email on my computer, and finally upload each file to the submission portal. Doing this once or twice? It was no issue. Doing this every day for the rest of my sophomore and junior years? Just the thought of that got on my nerves.
This led me to make cClip, a simple transfer tool that sends images and links from my phone to my laptop. After a few friends saw it, they wanted it too, and that was when I realized it could bring enhanced productivity and platform-agnostic fluidity to a multitude of virtual workspaces.
After adding in end-to-end encryption, live-time updates, and a subscription model, I debuted cClip to the public.
Architecture
As Erwin mentioned, the architecture for cClip isn’t just Workers, but it integrates with a few other SaaS products as well. I use RevenueCat to easily integrate with the mobile app stores and Stripe via Webhooks. Firebase is used for both authentication and messaging, and, lastly, B2 for cloud storage. (At least until R2 is available!)
And of course we need clients for every single platform.
In a diagram it looks something like this:
The Clients
One of the major challenges was to create clients for every single OS and platform out there. At a minimum, we would need both an iOS and Android app, a Windows, Mac, and a web application.
Flutter to the rescue
Flutter is a cross-platform application development framework. It allowed me to have a single codebase for the UI and a majority of the logic, while allowing some specific portions, like encryption, to be able to interface with the platform-specific libraries.
Both iOS and Android are well-supported by Flutter, but Flutter Web was still relatively new. I had to use a bunch of JavaScript for tasks such as encryption, because Flutter Web doesn’t have WebWorker support yet, and file uploads and downloads. I wanted to use StreamSaver.js for streamed decryption to download to save on memory consumption for larger files.
Additionally, using Flutter Web allowed me to create an Electron app for Windows or Linux Users if they desired a native app for cClip instead of accessing the website.
macOS
macOS has its own application, written in Swift, which was built before the web one and further maintained for its performance benefits. The macOS and iOS applications share code for password hashing, file uploads and downloads, and encryption.
Backend
cClip uses five main backend technologies: Backblaze B2, Firebase Auth, Firebase Database, RevenueCat, and Cloudflare Workers. Workers acts as the main bridge between all backend services, whether in the contexts of access control or subscription management.
Authentication and Authorization
The authentication flow starts by using Firebase Authentication to validate a user’s identity through a sign in with Google, Apple, or Email/Password and uses Workers for all sensitive API calls. Workers validates the identity of the caller using the ‘idToken’ provided by Firebase, which is a JWT that contains the user’s UID when decoded successfully. Each sensitive operation, such as upload/download file, subscribe/unsubscribe, etc., is put behind Workers, which validates the JWT provided as a ‘Token’ header in the correlating API call before performing the operation itself.
Workers handles all access control after a user has been authenticated, such as ensuring the user can access a file at a given location or updating a user’s subscription status when notified by RevenueCat.
Workers acts as a gatekeeper for a user’s upload or download authorizations. When the request is sent, Workers verifies the user’s identity, checks the requested location, and the user’s subscription status. If all three check out, Workers authorize the requested action with B2 and return the corresponding information.
Storage and Messaging
Because files could be larger than 25MB, it wasn’t practical to store them in Workers KV, so I chose B2 Cloud Storage. B2 Cloud Storage is part of the Bandwidth Alliance with Cloudflare, which meant I wouldn’t be paying any egress fees for those files, which is a nice bonus.
As mentioned above, the Worker in front of B2 does all the authentication and authorization for both uploads, downloads, and any other B2 operation.
Firebase is used for real-time communication with all clients. Subscription information is stored there, for example, and we use the Cloud Messaging APIs to send notifications to different clients when necessary.
Subscription Management
Of course a large part of any SaaS application is spent dealing with billing and subscriptions. Luckily, RevenueCat simplifies that a lot and gives you one place for all information related to the mobile app stores and Stripe.
That meant I only had to implement one set of Webhooks to receive events from all three providers, and all received events followed the same format.
Most of the outgoing subscription API calls also go through RevenueCat, but there are a few edge-cases where we need a direct connection to Stripe and the Google Play Store.
Biggest Challenges
Cross-platform subscriptions
Cross-platform subscriptions, or the synchronization of a user’s subscription across every platform, were a HUGE challenge. Everything had to be integrated perfectly, from ensuring double subscriptions don’t occur to live-time changes for status. RevenueCat simplified the process substantially, but I still had to manage cross-platform cancellations and updates. I managed this by storing the status in Firebase Database and having the user listen for updates on their end. The information was write-locked to allow only the verified Worker update to modify statuses to prevent any status spoofs.
File Quotas
Another tough challenge was file storage tracking. In my initial planning, I learned B2’s API doesn’t support any getters for a directory’s storage total and needs to sum up all file values returned with the ‘b2_list_file_names’ API. This was costly, in terms of time and money, as the API is classed as one of the more expensive operations. On top of that, the API would’ve been called each time a user uploads or deletes a file. As a result I created a counter that synchronizes with B2 on different file modifications (uploads or deletion), which is stored in Firebase’s Database by the Worker to allow for real-time updates on a user’s device through Firebase’s SDK change listeners.
However, I wanted to ensure users couldn’t modify their used storage count and that every upload operation was valid to verify users had enough storage available for the file. The app interacts with Workers first, and upon determining that the user has enough storage, returns an authorization for upload.
Overall experience
Workers & KV acted as a core solution to save on costly API calls and provide a completely serverless backend for cClip. On top of the quick nature of the platform, testing changes was extremely easy and needed just a quick preview or staging environment to test the newest changes to my API.
My biggest challenge with Workers was the lack of a Stripe library, as the node.js Stripe isn’t Workers compatible yet, but I used the Stripe API endpoints directly with fetch which worked without any issues. It is great, however, to see that Stripe launched their Workers-compatible SDK earlier today!
I am currently working on a revamped implementation of cClip Direct, the peer-to-peer transfer protocol that allows you to share any file across devices. Using Workers to manage notifications and signaling, the initial handshake process has been reworked, and I am looking to move the real-time communication from Firebase to Durable Objects and WebSockets. And of course, I can’t wait to try out R2 when that becomes available.
It has been so great to see an application that I made to scratch my own itch was able to scale into a fully fledged product without any problems whatsoever.
Thank you for following along with our Developer Spotlight series this week. We hope you enjoyed reading about how our customers are using the Cloudflare ecosystem to solve interesting problems. We are looking to do more spotlights in the future, so if you want to read more of these, or have a use-case you want us to write about, feel free to let me know on Twitter or any of the discussions linked below.
Next up on the Developer Spotlight is another favourite of mine. Today’s post is by Jacob Hands. Jacob operates TriTails Premium Beef, which is an online store for meat, a very perishable good. So he has a lot of unique challenges when it comes to shipping. To deal with their growth, Jacob, a developer by trade, turned to Airtable and Cloudflare Workers to automate a lot of their workflow.
One of Jacob’s quotes is one of my favourites:
“Sure, Cloudflare Workers allows you to scale to billions of requests per day, but it is also awesome for a few hundred requests a day.”
Here is Jacob talking about how it only took him a few days to put together a fully customised workflow tool by integrating Airtable and Workers. And how it saves them multiple hours every single day.
Shipping Requirements
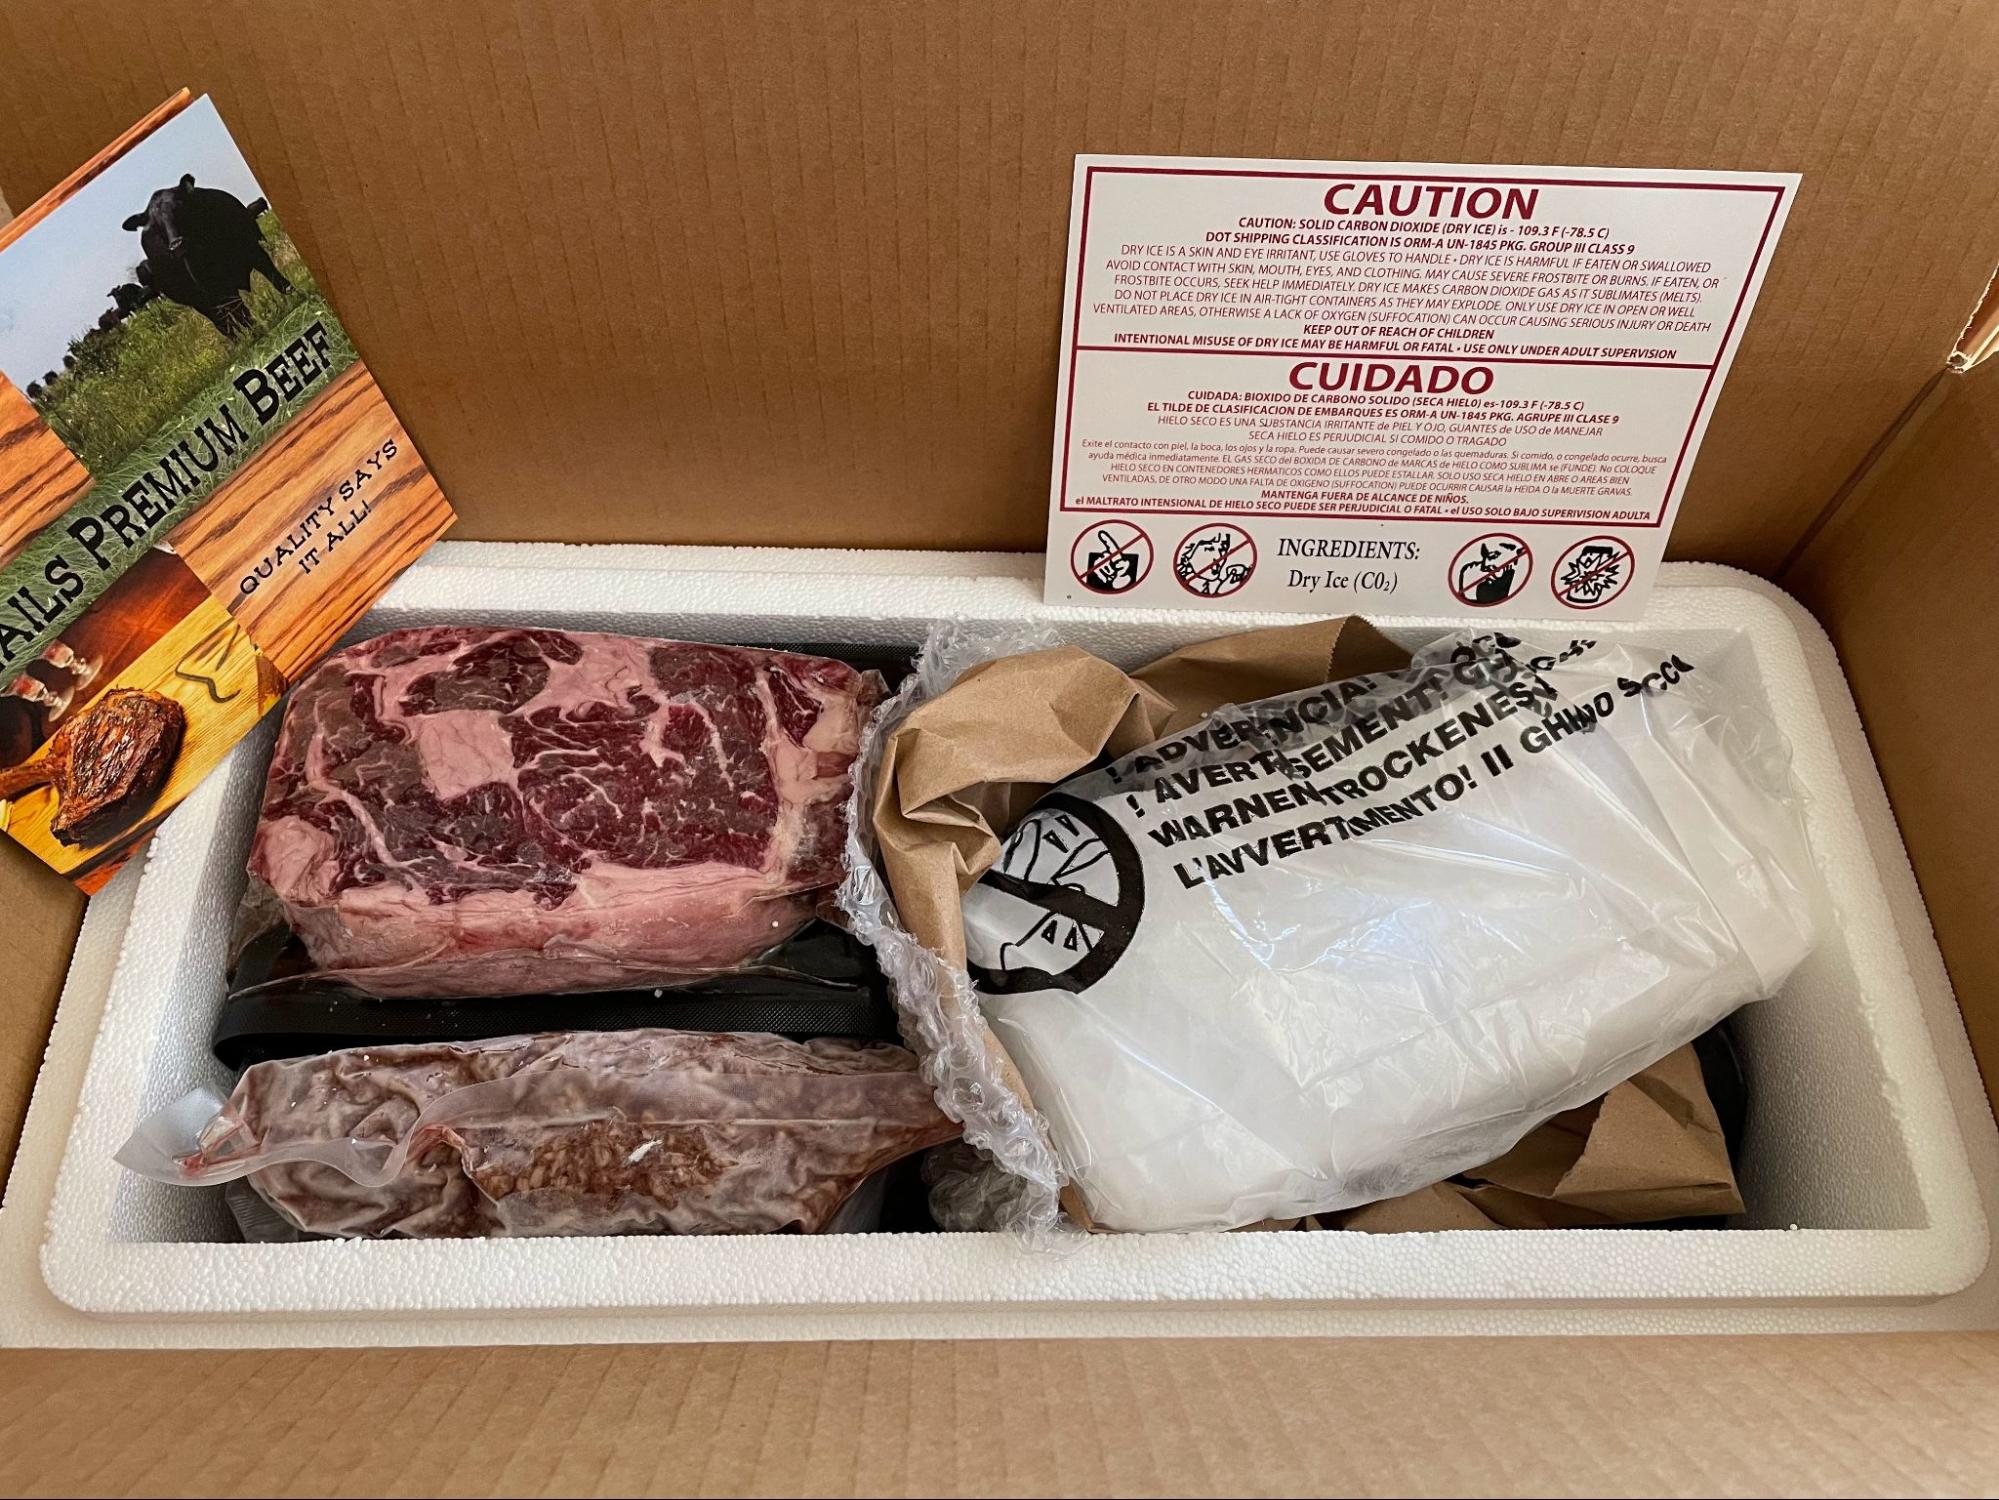
Working at a new e-commerce business shipping perishable goods has several challenges as operations scale up. One of our biggest challenges is that daily shipping throughput is limited. Partly because of a small workspace, limiting how many employees can simultaneously pack orders, and also because despite having a requested pickup time with UPS, they often show up hours early, requiring packers to stop and scramble to meet them before they leave. Packing is also time-consuming because it’s a game of Tetris getting all products to fit with enough dry ice to keep it frozen.
This is what a regular box looks like:
Ensuring time-in-transit stays as low as possible is critical for ensuring that products stay frozen when arriving at the customer’s doorstep. Because of this requirement, avoiding packages staying in transit during the weekend is a must. We learned that the hard way after a package got delayed by a day, which wouldn’t have been too bad, but that meant it stayed in a sorting centre over the weekend, which wasn’t as pleasant.
Luckily, we caught it on time, and we were able to send a replacement set of steaks overnight and save a dinner party. But after that, we started triaging our orders to make sure that the correct packages were shipped at the right time.
Order Triage, The Hard Way
In the early days, we could pack orders after lunch and be done in an hour, but as we grew we needed to be careful about what, when, and how we ship. First, all open orders were copied to a Google Sheet. Next, the time-in-transit was manually checked for each order and added to the sheet. The sheet was then sorted by transit time (with paid priority air at the top), and each set of orders was separated into groups. Finally, the Google Sheet was printed for the packing team to work through.
Transit times are so crucial to the shipment process that they need to be on each packing slip so that the packing team knows how much dry ice and packaging each order needs. So the transit times were typed into each packing slip in Adobe Acrobat before printing. While this is a very tedious process, it is vital to ensure that each package is packed according to what they need to arrive in good condition.
Once the packing team would finish packing orders, the box weights and sizes were added to the Google Sheet based on the worksheet filled out by the packers. Next, each order label was created, individually copying weights and sizes from the Google Sheet to ShipStation, the application we use to manage logistics with our providers. Finally, the packages would be picked up and started their journey to the customer’s doorstep.
This process worked fine for ten orders, but as operations scaled up, triaging and organizing the orders became a full-time job, checking and double-checking that everything was entered correctly and that no human mistakes occurred (spoiler, they still happened!)
Automation
At first, I just wanted to automate the most tedious step: calculating transit times. This process took so long that it hindered how early the packing team could start packing orders, further limiting our throughput. Cloudflare Workers are so easy to use and get running quickly, so they seemed like a great place to start. The plan was to use =IMPORTDATA(order) in Google Sheets and eliminate that step in the process.
Automating just one thing is powerful, and it opened a flood of ideas about how our workflow could further be improved. With the first 30 minutes of daily work automated, what else could be done? That’s when I set out to automate as much of the workflow as possible, excited about the possibilities.
Triaging the Triaging
Problem-solving is often about figuring out what to prioritize, and automating this workflow is no different. Our order triaging process has many steps, and setting out to automate the entire thing at once wasn’t possible because of the limited blocks of time to work on it. Instead, I decided to only solve the highest priority problems, one step at a time. Triaging the triaging process helped me build everything needed to automate an entire workflow without it ever feeling overwhelming, and gaining efficiency each step along the way.
With the time-in-transit calculation API working, the next part I automated was getting the orders that need shipping from Shopify via the API instead of copy-pasting every time. This is where the limits of Google Sheets started to become apparent. While automation can be done in Sheets, it can quickly become a black box full of hacks. So it was time to move to a better platform, but which one?
While I had often heard of Airtable and played with it a few times since it launched in 2012, the pricing and limitations never seemed to fit any of my use cases. But with the little amount of data we needed to store at any one time, it seemed worth trying since it has an easy-to-use API and supports strict cell formats, which is much harder to do in Sheets. Airtable has an intuitive UI, and it is easy to create custom fields for each type of data needed.
Once I found out Airtable had a built-in Scripting app, it was obvious this was the right tool for the job.
Building Airtable Scripting Apps
Airtable Scripting is a powerful tool for building functionality directly within Airtable using JavaScript. Unfortunately, there are some limitations. For example, it isn’t possible to share code between different instances of the Scripting App without copying and pasting. There’s also no source control so reverting changes relies on the Undo button.
Cloudflare Workers, on the other hand, is a full developer platform. You can easily use source control, and it has a great developer experience with Wrangler and Miniflare, so testing and deploying is fast and seamless.
Airtable Scripting and Cloudflare Workers work together beautifully. Building APIs on Workers allows more complex tasks to run on the Cloudflare network. These APIs are then fetched by Airtable scripts, solving the code-sharing issue and speeding up development.
Shopify Order Importing
First, we needed to import orders from Shopify into Airtable. The API endpoint I created in Workers goes through all open orders and figures out which ones should be shipped this week. The orders are then cached in the Workers Cache API, so we can request this endpoint as much as needed without hitting Shopify API’s limits.
From there, the Airtable Scripting app checks the transit time for each order using our Workers API that makes calls to Shippo (a multi-carrier shipping API) to get time-in-transit estimates for the carrier. Finally, each row in Airtable is updated with the respective transit times, automatically sorted with priority paid air at the top, followed by the longest to the shortest transit times.
Going from an entirely manual process of getting a list of triaged orders in 45 minutes to clicking a button and having Airtable and Workers do it all for me in seconds was one of the most significant “lightbulb” moments I’ve ever had programming.
Printing Packing Slips in Order
The next big thing to tackle was the printing of packing slips. They need to be printed in the triaged order rather than in chronological order. To do so, this manually required searching for each order, but now a button in Airtable generates links to Shopify search with each batch of orders prefilled.
Printing the Order Worksheet
Of course, we just couldn’t stop there.
To keep track of orders as they are packed, we use a printed worksheet with all orders listed and columns for each order’s box size and weight. Unfortunately, Airtable does not have a good way to customize the printout of a table.
Ironically, this brought us back to Google Sheets! Since Sheets is the easiest way to format a table, it seemed like the best choice. But copying data from Airtable to Sheets is tedious. Instead, I created an API endpoint in Workers to get the data from Airtable and format it as a CSV the way we need it to look when printing. From Sheets, the IMPORTDATA function imports the day’s orders automatically when opened, ready for printing.
Sending Package Details to ShipStation
Once the packing team has finished packing and filling out the shipment worksheet, box size and weights are entered into Airtable for each order. Rather than typing these details also into ShipStation, I built an endpoint in our Workers API to set the weight and size using the ShipStation API. ShipStation order updates are done based on the ID of the order. The script first lists all open orders and then writes the order name and ID mapping for all open orders to Workers KV so that future requests to this API can avoid the ShipStation list API, which is slow and has strict limits.
Next, I built another Airtable script to send the details of each box to this API. In addition to setting the weight and size, the order is also tagged with today’s date, making it easy to identify what orders in ShipStation are ready to be labeled. Finally, the labels are created and printed in ShipStation in bulk and applied to their respective packages.
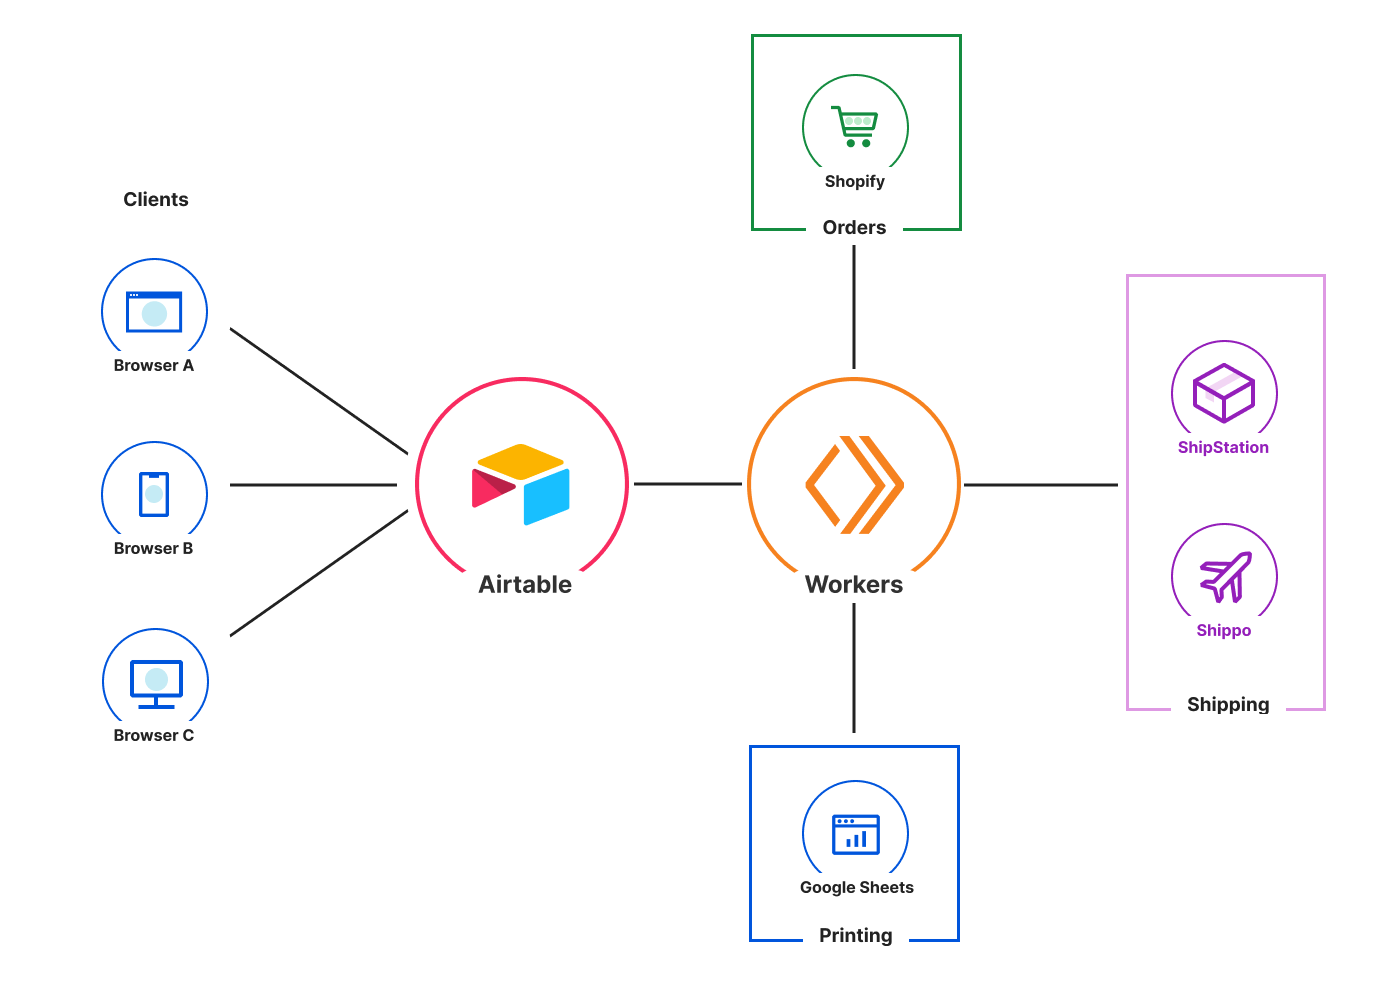
Putting it all together
So an overview of the entire system looks like this. All clients connect to Airtable and Airtable makes calls out to the Worker APIs which connect and coordinates between all third party APIs.
Why Workers and Airtable Work Well Together
While it might have been possible to build this entire workflow in Airtable, integrating Workers has made the process much easier to build, test, and reuse code both between Airtable scripts and other platforms.
Development Experience
The Airtable Scripting app makes it quick and easy to build scripts that work with the data stored in Airtable, with a decent editor and autocomplete, but it is hard to build more complex scripts in it.
Funnily enough for this project, latency and scaling weren’t all that important. But Cloudflare Workers makes development and testing incredibly easy: no excessive configuration or deployment pipelines.
Reliability and Security
We are running a business and having to babysit servers is a massive distraction that we certainly don’t need. With Workers being fully serverless I never have to worry about anything breaking because a server is down.
And we can safely store all our secrets needed to access all third-party systems with Cloudflare, with the secret environments variables. Making sure those tokens and keys are all fully encrypted and secure.
Airtable is a great database and UI in one
Building UI’s around data entry and visualisation takes a lot of time and resources. By utilizing Airtable, I built out an entire workflow without ever touching HTML, let alone front-end frameworks. Instead, I could focus solely on core business logic. Airtable’s dashboard feature also allows building reports with high-level overviews of the types of packages being sent, helping us forecast future packing supplies needed.
While building workflows in spreadsheets can feel like a hack when custom scripting gets involved, Airtable is the opposite. The extensibility and good UX have made Airtable a great tool to use going forward.
Improvements Going Forward
Now that we had the basics covered, I noticed one of the most powerful things about this setup: how easy it was to add features. I started noticing minor issues with the workflow that could be improved. For example, when an order has to be split into multiple packages, the row in Airtable has to be duplicated and have a suffix added to the order number for each order. Automating order splitting was not a priority previously, but it quickly became one of the most time-consuming parts of the process. Thirty minutes later, every row had a “Split order” button, built with another Airtable script.
Another issue was when a customer was not going to be home on a Wednesday, which meant that if the order got shipped on Monday, it would go bad sitting on their doorstep. Thankfully, adding an optional minimum ship date tag to the Workers API that gets shippable orders was quick and easy. Now, our sales team can add tags for minimum ship dates when customers are not home, and the rest of the workflow will automatically take it into account when deciding what to ship.
Conclusion
Many businesses are turning to Workers for their incredible performance and scaling to millions or billions of requests, but we couldn’t be happier with how much value we get with the few hundred Workers requests we do every day.
Cloudflare Workers, especially in combination with tools like Airtable, make it really easy to create your own internal tool, built to your exact specifications. Which will bring this capability to so many more businesses.
Cloudflare is not affiliated with Formagrid, Inc., dba Airtable. The views and opinions expressed in this blog post are solely those of the guest author and do not necessarily represent those of Cloudflare, Inc.
Welcome to a new blog post series called Developer Spotlight. In this series we will be showcasing interesting applications built on top of the Cloudflare Workers Ecosystem.
And to celebrate Durable Objects going GA, what better to kick off the series than with a really cool tech demo of Durable Objects called Full Tilt?
Full Tilt by Guido Zuidhof is a game jam entry for Ludum Dare, one of the biggest and oldest game jams around, where he won first place in the innovation category. A game jam is like a hackathon for games, where you have a very short amount of time (usually 48-72 hours) to create a game from scratch.
We love Full Tilt, not just because Guido used Workers and Durable Objects to build a cool game where you control a game on your computer via your phone, but especially because it shows how powerful Durable Objects are. In less than 48 hours Guido was able to write all the logic to instantly spin up a personal gaming server anywhere in the world, as close to that player as possible. And it is so fast that you feel like you are controlling the computer directly.
But here is Guido, to tell you about his experience developing Full Tilt.
Last October I participated in the Ludum Dare 49 game jam. The thing I love about game jams is that the time constraint forces you to work quickly, iterate often, and most importantly cut scope.
In this game jam I created Full Tilt, a game in which you seamlessly use your phone as a Wiimote-like motion controller for a game that is run on your laptop in a web browser. The secret sauce to making it so smooth was in combining a game jam with Jamstack and mixing in some Durable Objects.
Full Tilt is a browser game in which you move the player character by moving your hand around. There are a few different ways we can do that. One idea would be to use your computer’s webcam to track a marker object through 3D space. While that is possible, it is tricky to get it working in any situation (a dark room can be problematic!) and also some players may feel uncomfortable turning on their webcam for a simple web game.
A smartphone has a bunch of sensors built in, including a magnetometer and gyroscope — those sensors are exactly what we need, and we can assume that the majority of our potential players have a smartphone within arm’s reach. When a native mobile application uses these sensors, it adds a lot of friction (users now have to install an app), as well as a bunch of implementation work. Fortunately modern web browsers allow you to read from these sensors through the DeviceMotion API: a small web app will do the job perfectly!
The next challenge is communicating the sensor readings from the phone to the game running on the main computer. For that we will use a combination of Cloudflare Workers and Durable Objects. There needs to be some shared contact (i.e., a game server) that both the main computer and the smartphone talk to. Using a serverless solution makes a lot of sense for a web game. And as we only have 48 hours here, less stuff to worry about is a big selling point too. Workers and Durable Objects also make it easy to keep the game running after the game jam, without having to pay for — and more importantly worry about — keeping servers running.
Setting up a line of communication
There are roughly two ways for browsers to communicate: through a shared connection (a game server somewhere) or a peer to peer connection, so browsers can talk directly to each other without a middleman by leveraging WebRTC DataChannels.
WebRTC can be very challenging to make reliable and may still need a proxy server for some especially problematic network setups behind multiple NATs. Setting up a WebRTC connection may have been the perfect solution for the lowest possible latency, but it was out of scope for such a short game jam.
The game we are creating has low latency requirements, when I tilt my phone the game should respond quickly. We can probably get away with anything under 100ms, although low double digits or less is definitely preferred! If I’m geographically located in one place and the game server is geographically close enough, then this game server will be able to pass messages from my smartphone to my laptop without too much delay. Edge computing is hot nowadays, and for this gaming use case it is not just a nice-to-have but also a necessity.
Enough background, let’s architect the system.
On-demand game rooms
The first thing I needed to set up was game rooms. Something that both the phone and the computer browsers could connect to, so they can pass messages between them.
Durable Objects allow us to create a large amount of small stateful “mini servers” or “rooms” that multiple clients can connect to simultaneously over WebSockets, providing perfect small on-demand game servers. Think of Durable Objects as a single thread of Javascript that runs in a data center close to where the user first asked for it to be created.
After the browser on the computer starts the game, it asks our Cloudflare Worker API to create a room for the current game session. This API request is a simple POST request, the server responds with a four character room code that uniquely identifies the room that was created. The reason we want the room code to be short is because the user may need to copy this code and type it into their smartphone if they are unable to scan a QR code.
Humans are notoriously bad at copying random character strings as different characters look alike, so we use a limited character set that excludes the most commonly confused characters:
const DICTIONARY = "2345679ADEFGHJKLMNPQRSTUVWXYZ"; // 29 chars (no 0, O, I, 1, B, 8)
A four character code will allow us to uniquely point to ~700,000 different rooms, that seems like it would be enough even if our game got quite popular! What’s more: these game sessions don’t last forever. After some period of time (say 24 hours) we can be certain enough that the game session has ended, and we can re-use that room code.
Room code coordination
In your Cloudflare Worker script, there are two ways to create a Durable Object: either we ask for one to be created with an ID generated from a name, or we ask for one to be created with a random unique ID. The naive solution would be to create a Durable Object with an ID generated from the room code. However, that is not a good idea here because a Durable Object gets created in a data center that is geographically close to the end user.
A problematic situation would be if a user in Mumbai requests a room and gets room code ABCD. Initially, they play the game for a bit, and it works great.
The issue comes a week later when that room code is reused for another player based in Los Angeles, The game room Durable Object will be revived in Mumbai and latency will be awful for our Los Angeles player. In the future, Durable Objects may get migrated between data centers, but that’s not yet guaranteed.
Instead, what we can do is create a new Durable Object with a random ID for every new game session and keep a mapping from the four character room code to this random ID. We are introducing some state in our system: we will need a central source of truth which is where Durable Objects can come to the rescue again.
We will solve this by creating a single “Room Hub” Durable Object that keeps track of this mapping from room code to Durable Object ID. This Durable Object will have two endpoints, one to request a new room and another to look up a room’s information.
Here’s our request handler for the Room Request endpoint (the argument is a Sunder Context, Sunder is the web framework I used for this project):
export async function handleRoomRequest(ctx: Context<Env>) {
    const now = Date.now();
    const reqBody = await ctx.request.json();

    // We make some attempts to find a room that is available..
    const attempts = 5

    let roomCode: string;
    let roomStorageKey: string;

    for (let i = 0; i < attempts; i++) {
        roomCode = generateRoomCode();
        roomStorageKey = ROOM_STATE_PREFIX + roomCode;
        const room = await ctx.state.storage.get<RoomData>(roomStorageKey);
        if (room === undefined) {
            break;
        } else if (now - room.createdAt > MAX_ROOM_AGE) {
            await ctx.state.storage.delete(roomStorageKey);
            break;
        }
        if (i === attempts-1) {
            return ctx.throw("Couldn't find available room code :(");
        }
    }

    const roomData: RoomData = {
        roomCode: roomCode,
        durableObjectId: reqBody.durableObjectId,
        createdAt: now,
    }

    await ctx.state.storage.put<RoomData>(roomStorageKey, roomData);

    ctx.response.body = {
        room: roomData
    };
    ctx.response.status = HttpStatus.Created;
}
In a nutshell, we generate a few room codes until we find one that has never been used or hasn’t been used in a long enough time.
There is a subtle but important nuance in this code: the Durable Object gets created in the Cloudflare Worker that talks to our Room Hub, not in the Room Hub itself. Our Room Hub will run in a single data center somewhere on Cloudflare’s network. If we create the game room from there it may still be far away from our end user!
Looking up a room’s information is simpler, we return either the room data or status 404.
export async function handleRoomLookup(ctx: Context<Env, {roomCode: string}>) {
    const now = Date.now();

    let roomStorageKey = ROOM_STATE_PREFIX + ctx.params.roomCode;
    const roomData = await ctx.state.storage.get<RoomData>(roomStorageKey);

    if (roomData === undefined) {
        ctx.throw(404, "Room not found");
        return;
    }

    if (now - roomData.createdAt > MAX_ROOM_AGE) {
        // About time we cleaned it up.
        await ctx.state.storage.delete(roomStorageKey);
        ctx.response.status = HttpStatus.NotFound;
        return;
    }

    ctx.response.body = {
        room: roomData
    };
}
The smartphone browser needs to connect to that same room. To make things easy for the user we generate a four character room code which points at that specific “Game Room” Durable Object. This way the user can take their smartphone, navigate to the website address https://ld49.pages.dev, and enter the code “ABCD” (or more commonly, they scan a QR code with the link https://ld49.pages.dev?room=ABCD).
Game Room Durable Object
Our game room Durable Object can be pretty simple since it is only responsible for passing along messages from the smartphone to the laptop with the latest sensor readings. I was able to modify the Durable Objects chat room example to do exactly this — a good time saver for a game jam!
When a browser connects, they either connect as a “peer” or as a “host” role. Any messages sent by peers are forwarded to the host, and all messages from the host get forwarded to all peers. In this case, our host is the laptop browser running the game and the peer is the smartphone controller. Implementation-wise this means that we keep two lists of users: the peers and the hosts. Whenever a message comes in, we loop over the list to broadcast it to all connections of the other role. In practice, the code is a bit more involved to deal with users disconnecting.
Full Tilt is a singleplayer game, but adapting it to be a multiplayer game would be easy with this setup. Imagine a Mario Kart-like game that runs in your browser in which multiple friends can join using their smartphones as their steering wheel controller! Unfortunately there was not enough time in this game jam to make a polished game.
Front end
With the backend ready, we still need to create the actual game and the controller web app.
My initial plan was to create a game in which you fly a 3D plane by tilting your phone, collecting stars and completing aerobatic tricks. It would fit the theme “Unstable” as I expected this control method to be pretty flimsy! Since there was no time left to create anything close to that, it was time to cut scope.
I ended up using the Phaser game engine and put the entire system together in a Svelte app. This was certainly a challenge, as I had only used Phaser once before many years ago and had never used Svelte. Luckily, I was able to put together something simple quickly enough: a snake-like game in which you move a thingy to collect blips that appear randomly on the screen.
In order for a game to be a game there needs to be some goal for the user, usually some game over condition. I changed the game to go faster and faster over time, added a score counter, and added a game over condition where you lose the game if you touch the edge of the screen. I made my “art” in MS Paint, generated some sound effects using the online tool sfxr, and “composed” the music soundtrack in Chrome’s Music Lab Song Maker.
Simultaneously I wrote a small client for my game server and duct-taped together the smartphone controller app which is powered by the browser’s DeviceMotion APIs. To distribute my game I used Cloudflare Pages, which worked like a charm the first time.
All done
And then the deadline was there — I barely made it, but I submitted something I was proud of. A not-so-great game, but with an interesting backend system and a novel input method. Do try the game yourself here, and the source code is available here (warning: it’s pretty hacky code of course!).
The reception of my co-jammers was great. While everybody agreed the game itself and its graphics were awful, it was novel. The game ended up rated first in the *Innovation* category for this game jam, out of hundreds of other games!
Finally, is this the future of game servers? For indie developers and smaller studios, setting up and maintaining a globally distributed fleet of game servers is both a huge distraction and cost. Serverless and in particular Durable Objects can provide an amazing solution.
But not every game is well-suited for a WebSocket-based backend. In some real-time games you are not interested in what happened a second ago and only the latest information matters. This is where the reliable and ordered nature of WebSockets can get in the way.
All in all my first impressions of Durable Objects are very positive, it is a great tool to have in your toolbelt for all kinds of web projects. You can now tackle problems that would otherwise take days in mere minutes. I am very excited to see what other problems will be made easy by Durable Objects, even those I haven’t even thought of yet.
The collective thoughts of the interwebz
Manage Consent
To provide the best experiences, we use technologies like cookies to store and/or access device information. Consenting to these technologies will allow us to process data such as browsing behavior or unique IDs on this site. Not consenting or withdrawing consent, may adversely affect certain features and functions.
Functional
Always active
The technical storage or access is strictly necessary for the legitimate purpose of enabling the use of a specific service explicitly requested by the subscriber or user, or for the sole purpose of carrying out the transmission of a communication over an electronic communications network.
Preferences
The technical storage or access is necessary for the legitimate purpose of storing preferences that are not requested by the subscriber or user.
Statistics
The technical storage or access that is used exclusively for statistical purposes.The technical storage or access that is used exclusively for anonymous statistical purposes. Without a subpoena, voluntary compliance on the part of your Internet Service Provider, or additional records from a third party, information stored or retrieved for this purpose alone cannot usually be used to identify you.
Marketing
The technical storage or access is required to create user profiles to send advertising, or to track the user on a website or across several websites for similar marketing purposes.