Post Syndicated from Guillaume Neau original https://aws.amazon.com/blogs/security/scaling-national-identity-schemes-with-itsme-and-amazon-cognito/
In this post, we demonstrate how you can use identity federation and integration between the identity provider itsme® and Amazon Cognito to quickly consume and build digital services for citizens on Amazon Web Services (AWS) using available national digital identities. We also provide code examples and integration proofs of concept to get you started quickly.
National digital identities refer to a system or framework that a government establishes to uniquely and securely identify its citizens or residents in the digital realm.
These national digital identities are built on a rigorous process of identity verification and enforce the use of high security standards when it comes to authentication mechanisms. Their adoption by both citizens and businesses helps to fight identity theft, most notably by removing the need to send printed copies of identity documents.
National certified secure digital identities are suitable for both businesses and public services and can improve the onboarding experience by reducing the need to create new credentials.
About itsme
itsme is a trusted identity provider (certified and notified for all 27 member states of EU at Level of Assurance HIGH of the eiDAS regulation) that can be used on over 800 government and company platforms to identify yourself online, log in, confirm transactions, or sign documents. It allows partners to use its verified identities for authentication and authorization on web, desktop, mobile web, and mobile applications.
As of this writing, itsme is accessible for all residents in Belgium, The Netherlands, and Luxembourg. However, since there are no limitations on the geographic usage of the identity and electronic signature APIs, itsme has the potential to expand to additional countries in the future. (Source: itsme, 2023)
Architecture overview
To demonstrate the integration, you’re going to build a minimalistic application made of the following components as shown in Figure 1 that follows:
- An Amazon Cognito user pool that supports OIDC federation with itsme for Belgium.
- A basic, frontend application that offers an authentication portal that will be served from a local development environment.
- An API built on top of Amazon API Gateway from which data are consumed.
- An API Gateway Amazon Cognito user pools authorizer that consumes tokens vended by Amazon Cognito to authorize API calls.
- An AWS Lambda function that reads and writes from an Amazon DynamoDB database.
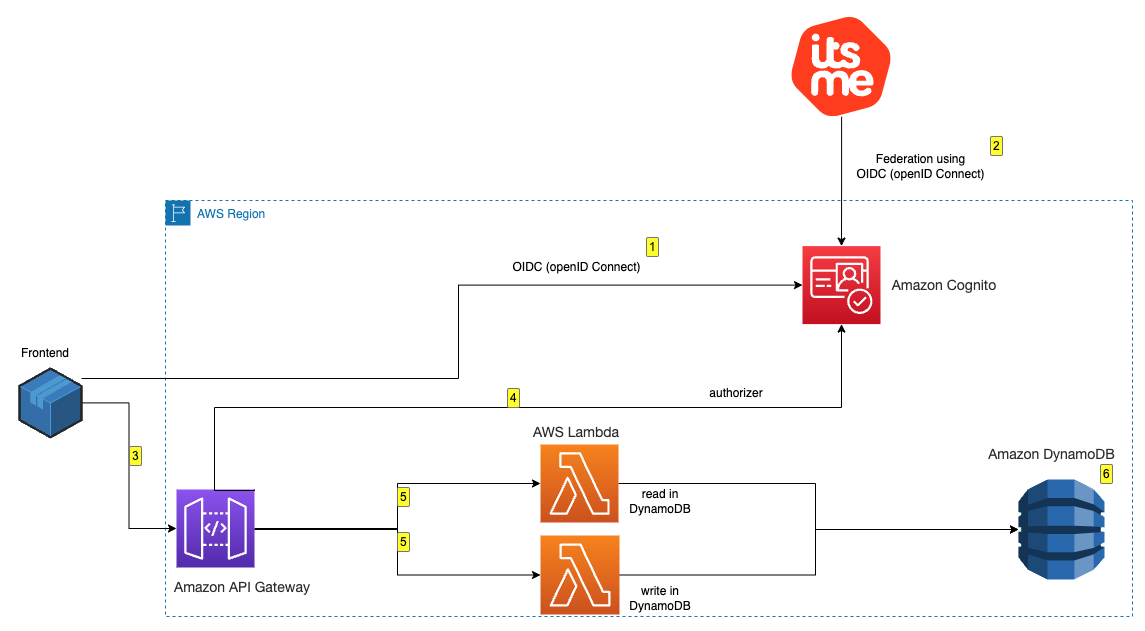
Figure 1: Architectural diagram
After deployment, you can log in and interact with the application:
- Visit the frontend deployed locally, and you’re presented the option to authenticate with itsme by using a blue colored button. Choose the button to proceed.
- After being redirected to itsme, you’re asked to either create a new account or to use an existing one for authentication. After you’re successfully authenticated with itsme, the associated Amazon Cognito user pool is populated with the requested data in the scope of the federation. Specifically in this example, the national registration number is made available.
- When authenticated, you’re redirected to the frontend, and you can read and write messages to and from the database behind an Amazon API Gateway.
- The Amazon API Gateway uses Amazon Cognito to check the validity of your authentication token.
- The Lambda function reads and writes messages to and from DynamoDB.
Prerequisites to deploy the identity federation with itsme
While setting up the Amazon Cognito user pool, you’re asked for the following information:
- An itsme client ID – itsmeClientId
- An itsme client secret – itsmeClientSecret
- An itsme service code – itsmeServiceCode
- An itsme issuer URL – itsmeIssuerUrl
To retrieve this information, you must be an itsme partner and to have your sandbox requested and available. The sandbox should be made available three business days after you submit the dedicated request form to itsme.
After the sandbox is provisioned, you must contact the itsme support desk and ask to switch the sandbox authentication to the client secret – itsmeClientSecret flow. Include the link to this post and specify that it’s for establishing a federation with Amazon Cognito.
Implement the proof of concept
To implement this proof of concept, you need to follow these steps:
- Create an Amazon Cognito user pool.
- Configure the Amazon Cognito user pool.
- Deploy a sample API.
- Configure your application.
To create and configure an Amazon Cognito user pool
- Sign in to the AWS Management Console and enter cognito in the search bar at the top. Select Cognito from the Services results.

Figure 2: Select Cognito service
- In the Amazon Cognito console, select User pools, and then choose Create user pool.

Figure 3: Cognito user pool creation
- To configure the sign-in experience section, select Federated identity providers as the authentication providers.
- In the Cognito user pool sign-in options area, select User name, Email, and Phone number.
- In the Federated sign-in options area, select OpenID Connect (OIDC).

Figure 4: Sign-in configuration
- Choose Next to continue to security requirements.


Note: In this post, account management and authentication are restricted to itsme. Because of this, the password length, multi-factor authentication, and recovery procedures are delegated to itsme. If you don’t restrict your Cognito user pool to itsme only, configure it according to your security requirements.
To configure the security requirements
- For Password policy, select Cognito defaults.
- Select Require MFA – Recommended in the Multi-factor authentication area, and select Authenticator apps
Note: Although the activation of multi-factor authentication is recommended, it’s important to understand that users of this pool will be created and authenticated through the federation with itsme. In the next procedure, you disable the Self service sign-up feature to prevent users from creating accounts. As itsme is compliant with the level of assurance substantial of the eIDAS regulation, itsme users must log in using a second factor of authentication.
- Clear Enable self-service account recovery in the User account recovery area.
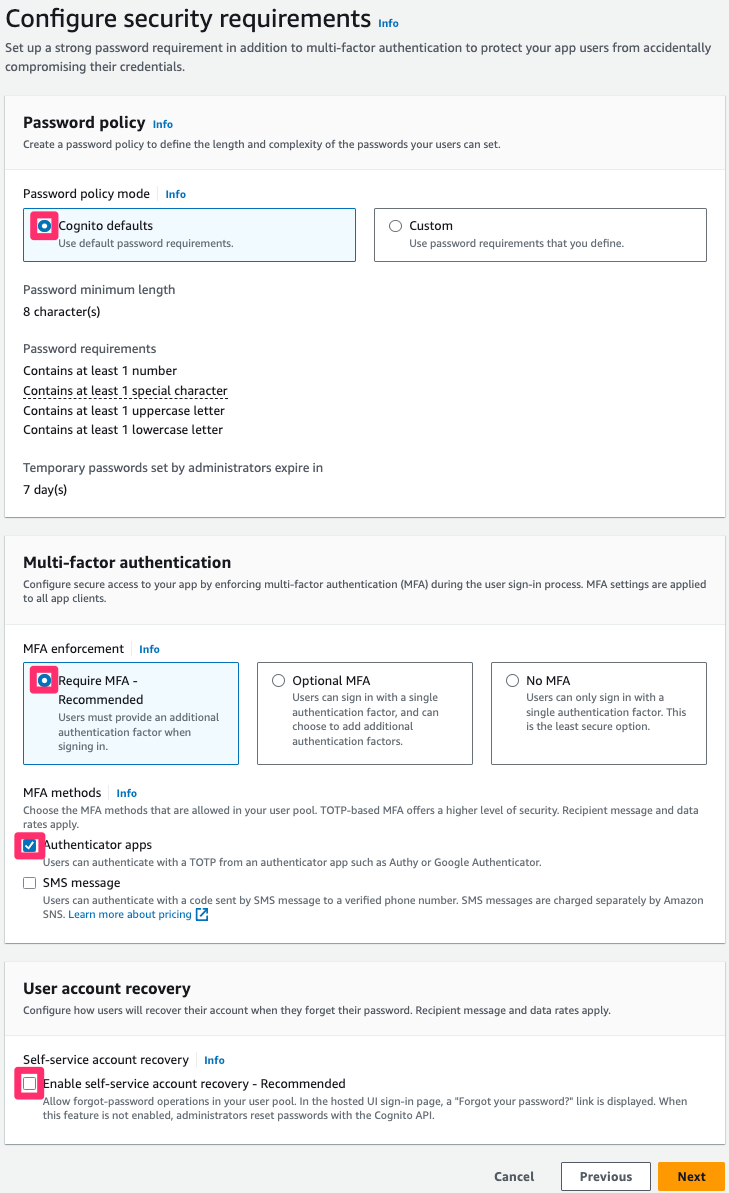
Figure 5: Security requirements configuration
To configure the sign-up experience
- Clear Enable self-registration.
- Clear Allow Cognito to automatically send messages to verify and confirm.

Figure 6: Sign-up configuration
- Skip the configuration of required attributes and configure custom attributes. Expand the drop-down menu and add the following custom attributes:
- Name: eid.
- Type: String.
- Leave Min and Max length blank.
- Mutable: Select.
This custom attribute is used to map and store the national registration number.
- Choose Next to configure message delivery.

Note: In this post, account management and authentication are going to be restricted to itsme. As a result, Amazon Cognito doesn’t send email or SMS, and the prescribed configuration is minimal. If you don’t limit your user pool to itsme, configure message delivery parameters according to your corporate policy.
To configure message delivery
- For Email, select Send email with Cognito and leave the other fields with their default configuration.
- To configure the SMS, select Create a new IAM Role if you don’t already have one provisioned.
- Choose Next to configure the federated identity provider.

Figure 7: Message delivery configuration
- Choose Next to configure identity provider.

To configure the federated identity provider
- For Provider name, enter itsme.
- For Client ID, enter the client ID provided by itsme.
- For Client secret, enter the client secret provided by itsme.
- For Authorized scopes, start with the mandatory service:itsmeServiceCode.
- With a space between each scope, enter openid profile eid email address.
- For Retrieve OIDC endpoints, enter the issuer URL provided by itsme.

Figure 8: OIDC federation configuration
The configuration of the mapping of the attributes can be done according to the documentation provided by itsme.
An example of mapping is provided in Figure 9 that follows. Some differences exist to be able to retrieve and map the eID and the unique username of itsme (sub).
More specifically, to retrieve the National Registration Number, the eid field needs to be set to http://itsme.services/v2/claim/BENationalNumber.

Figure 9: Attributes mapping
- Choose Next to configure an app client.


To configure an app client
- Configure both your user pool name and domain by opening the Amazon Cognito console.

Figure 10: User pool and domain name
- In the Initial app client area, select Public client.
- Enter your application client name.
- Select Don’t generate a client secret.
- Enter the application callback URL that’s used by itsme at the end of the authenticating flow. This URL is the one your end user is going to land on after authenticating.

Figure 11: Configuring app client


To finish the creation by reviewing and creating the user pool
When the user pool is created, send your Amazon Cognito domain name to itsme support for them to activate your authentication endpoints. That URL has the following composition:
https://<Your user pool domain>.auth.<your region>.amazoncognito.com/oauth2/idpresponse
When the user pool is created, you can retrieve your userPoolWebClientId, which is required to create a consuming application.
To retrieve your userPoolWebClientId
- From the Amazon Cognito Console, select User pools on the left menu.
- Select the user pool that you created.

Figure 12: User pool app integration

In the App integration area, your userPoolWebClientId is displayed at the bottom of the window.
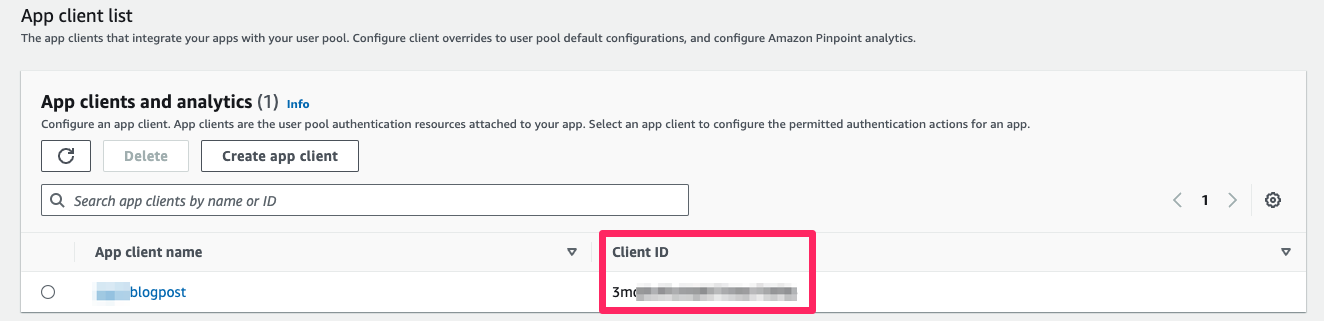
Figure 13: Client ID
To create a consuming application
When the setup of the user pool is done, you can integrate the authenticating flow in your application. The integration can be done using the AWS Amplify SDK and by calling the relevant API directly. Depending of the framework you used when building the application, you can find documentation about doing so in AWS Prescriptive Guidance Patterns.
You can use Amazon API Gateway to quickly build a secure API that uses the authentication made through Amazon Cognito and the federation to build services. We encourage you to review the Amazon API Gateway documentation to learn more. The next section provides you with examples that you can deploy to get an idea of the integration steps.
Additionally, you can use an Amazon Cognito identity pool to exchange Amazon Cognito issued tokens for AWS credentials (in other words, assuming AWS Identity and Access Management (IAM) roles) to access other AWS services. As an example, this could allow users to upload files to an Amazon Simple Storage Service (Amazon S3) bucket.
About the examples provided
The public GitHub repository that is provided contains code examples and associated documentation to help you automatically go through the setup steps detailed in this post. Specifically, the following are available:
- An AWS Cloudformation template that can help you provision a properly set-up user pool after you have the required information from itsme.
- An AWS Cloudformation template that deploys the backend for the test application.
- A React frontend that you can run locally to interact with the backend and to consume identities from itsme.
To deploy the provided examples
- Clone the repository on your local machine.
- Install the dependencies.
- If you haven’t created your user pool following the instructions in this post, you can use the CognitoItsmeStack provided as an example.
- Deploy the associated backend stack BackendItsmeStack.cfn.yaml.
- Rename the frontend/src/config.json.template file to frontend/src/config.json and replace the following:
- region with the AWS Region associated with your Amazon Cognito user pool.
- userPoolId with the assigned ID of the user pool that you created.
- userPoolWebClientId with the client ID that you retrieved.
- domain with your Amazon Cognito domain in the form of
<your user pool name>.auth.<your region>.amazoncognito.com

Figure 14: Frontend configuration file
- After modifications are done, start the application on your local machine with the provided command.

Following authentication, the results in the associated collected data are displayed, as shown in Figure 15 that follows.
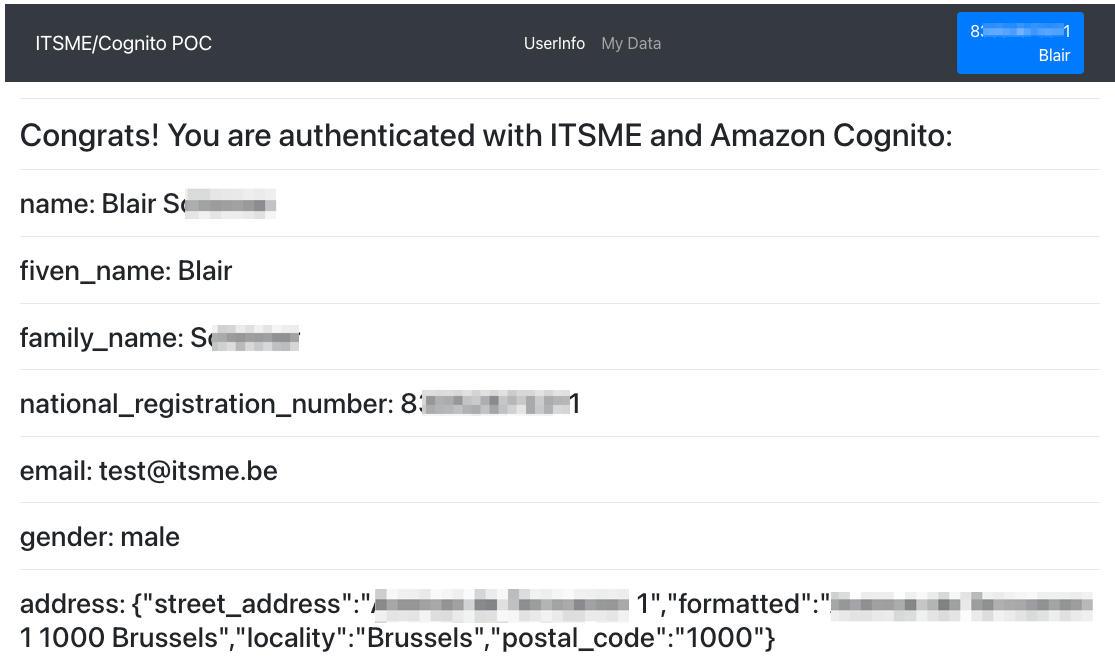
Figure 15: User information
In the My Data section, you can access a form to input a value (shown in Figure 16). Each time you go back to this page, the previous value entered is shown in the input box. This input is associated with your NRN (custom:eid), and only you can access it.
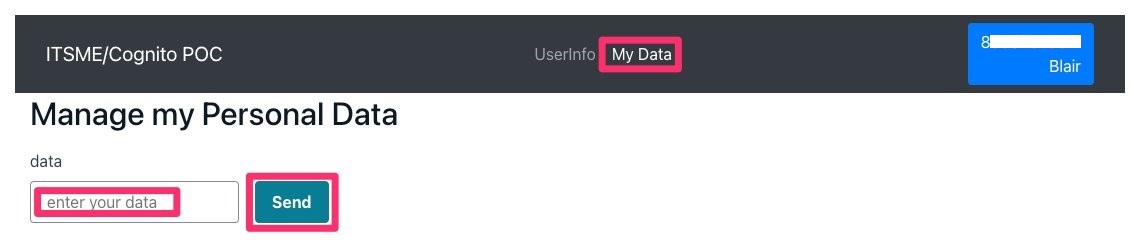
Figure 16: Database interaction
Conclusion
You can now consume digital identities through identity federation between Amazon Cognito and itsme. We hope that it helps you build secure digital services to improve the life of Benelux users.
If you have feedback about this post, submit comments in the Comments section below. If you have questions about this post, contact AWS Support.
Want more AWS Security how-to content, news, and feature announcements? Follow us on Twitter.


