Tag Archives: network protection

Reaffirming our commitment to free

Post Syndicated from Nitin Rao original https://blog.cloudflare.com/cloudflares-commitment-to-free

Cloudflare launched our free tier at the same time our company launched — fourteen years ago, on September 27, 2010. Of course, a bit has changed since then — there are now millions of Internet properties behind Cloudflare. As we’ve grown in size and amassed millions of free customers, one of the questions we often get asked is: how can Cloudflare afford to do this at such scale?

Cloudflare always has, and always will, offer a generous free version for public-facing applications (Application Services), internal private networks and people (Cloudflare One), and developer tools (Developer Platform). Counterintuitively: our free service actually helps us keep our costs lower. Not only is it mission-aligned, our free tier is business-aligned. We want to make abundantly clear: our free plan is here to stay, and we reaffirmed that commitment this week with 15 releases across our product portfolio that make the Free plan even better.

Understanding our Cost of Goods Sold

To understand the economics of Free, you need to understand our Cost of Goods Sold (COGS). Cloudflare hasn’t outsourced its network — we built it ourselves, and it spans more than 330 cities. We design and ship our own hardware across the world, we interconnect with more than 12,500 networks, and we manage over 300 Tbps of network capacity. We even have a dedicated backbone that spans the globe.

There are three major costs of running our network, which together comprise about 80% of our COGS. First and largest is bandwidth: the traffic that traverses our network. Then there is hardware: the servers that process traffic. And third are colocation costs: the power and space at the data centers where we house our servers. There are other parts of COGS, too, like our SRE team that keeps the network running, and our payment processor fees, without which we couldn’t collect revenue.

To get traffic across the Internet for a network of our scale, we need a lot of bandwidth. Typically, a network like ours would pay third-party transit networks and Internet Service Providers (ISPs) to transmit data anywhere on the Internet. But there are thousands of ISPs that we don’t have to pay at all, and hundreds that also offer us space in their data center at no cost. How did we manage that? The surprising answer: Free.

How our Free services keep costs low

Imagine you run an ISP serving your local community. Your job is to connect your customers to the Internet. You notice that your customers are often visiting sites behind Cloudflare, which sits in front of roughly 20% of the web. You need to deliver those webpages and facilitate connections to the applications behind Cloudflare, but right now you have to pay a transit provider to reach them. Instead, you could choose to peer directly with Cloudflare and exchange traffic at no cost.

Cloudflare is one of the most peered networks in the world. We freely exchange traffic with thousands of ISPs, who in turn benefit because they can cut out a third-party transit provider to reach the millions of sites and applications behind Cloudflare.

Continuing with this hypothetical, if as an ISP, your customers pay for Internet connectivity based on data usage (a common model outside of Western Europe and the US), your revenue scales with data consumption. One simple way to increase data consumption? Make the Internet faster! Hosting Cloudflare’s servers in your facility, as close to your users as possible, reduces latency for millions of websites and apps. So it’s in your best interest to host Cloudflare’s servers in your data centers, too.

We have hundreds of ISP partnerships that look just like that. The value ISPs get from Cloudflare stems from the breadth of the web that sits behind Cloudflare, a number driven by our Free customers. This arrangement is a big part of why we have a free service, and is part of what enables us to continue to offer one. PS: If you really are an operator for a local ISP and don’t partner with us yet, please connect with us through our peering portal!

These days, we are at such a scale that the traffic our customers generate requires much more capacity than can fit within our ISP partners. To reliably serve our enterprise customers, we operate in multiple facilities in every major Internet hub city. And yet, the traffic patterns of our enterprise customers are typically very predictable. They usually follow a diurnal cycle, with peaks and troughs throughout a day. Enterprise customer traffic is prioritized and served as close to end users as possible, regardless of the time of day. But our Free customers use off-cycle headroom. That’s why we’re able to continue to offer unmetered bandwidth on the Free plan: we serve the traffic from across our network, wherever there is spare room. It might not have quite the same performance as our enterprise traffic, but it’s still reliable and fast.

There do have to be some rules for this to continue to work, however. Free traffic needs to remain a manageable proportion of our total traffic. To ensure that remains true, and that we can continue to offer unmetered traffic to Free customers at no cost, we have to be opinionated about what kind of traffic we serve for free. Our terms of service specify that large assets (like videos) are not supported on our Free plan. So we require that customers pushing large files and videos move onto one of our paid services, like Images and Stream.

Free customers help us build better products and grow our business

The benefits of our Free plan extend well beyond direct economics.

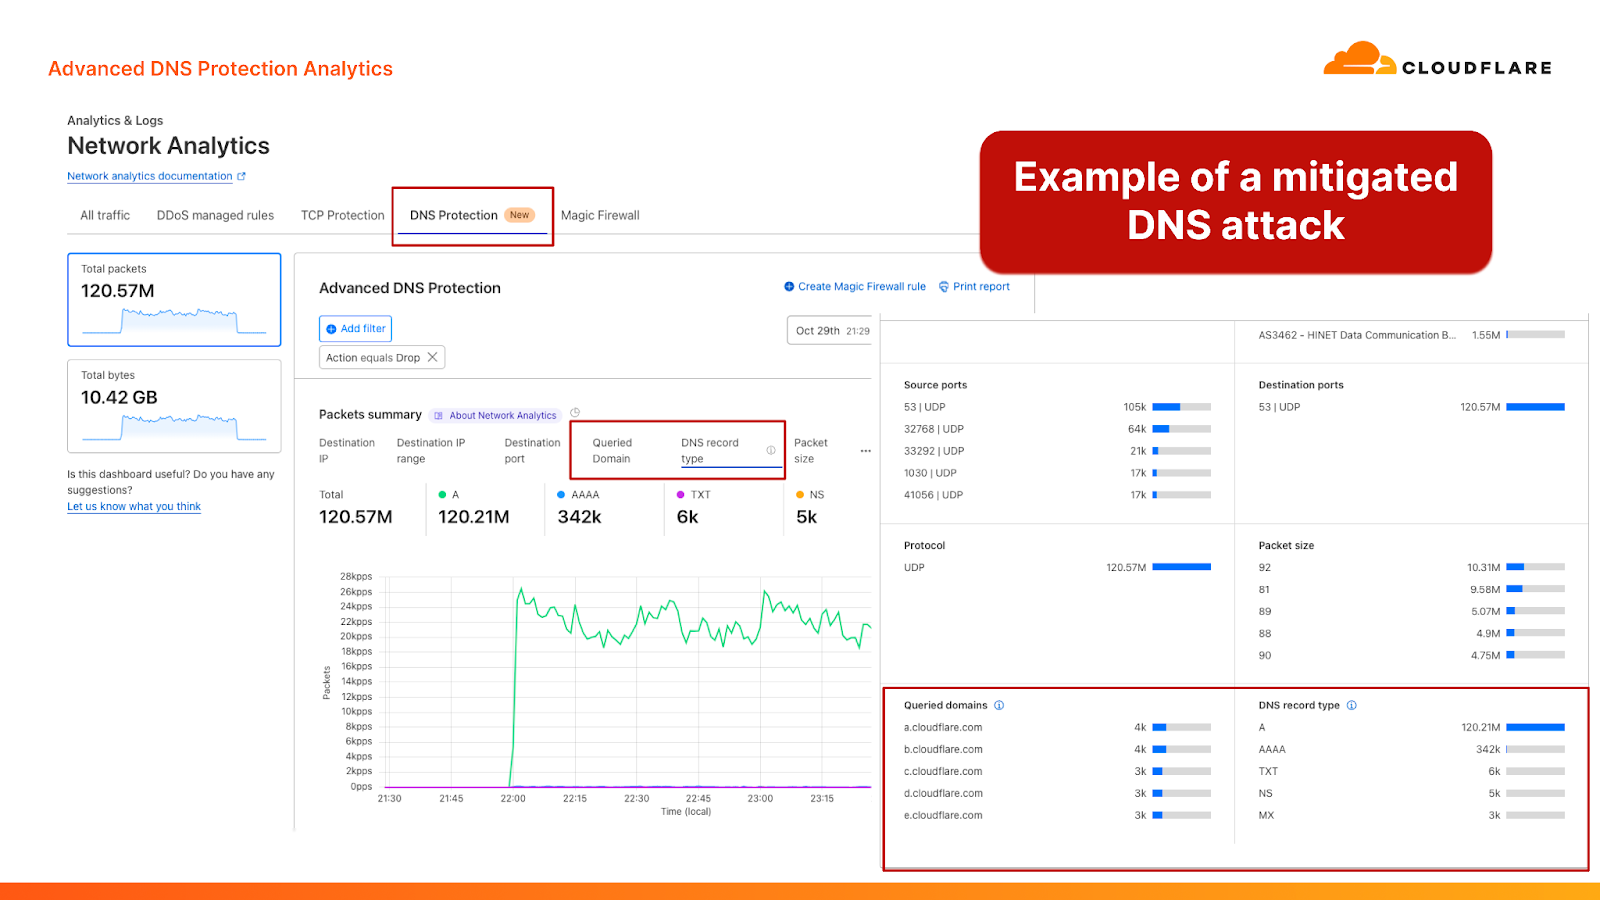
Our Free plan gives Cloudflare access to unique threat intelligence. A wide surface area exposes our network to diverse traffic and attacks that we wouldn’t otherwise see, often allowing us to identify potential security and reliability issues at the earliest stage. Like an immune system, we learn from these attacks and adapt to improve our products for all customers. This is a special competitive advantage. Visibility into attacks allows us to build products that no one else could.

Our Free customers help us do quality assurance (QA) quickly. Free customers are often the first to try new products and features. When we launch something new, we get signal immediately and at an incredible scale. We use that signal to swiftly address bugs and iterate on our products. 

Offering a Free plan challenges us to build more intuitive products. Free customers represent a broad audience, from tech enthusiasts to those simply looking to secure their website or build an application. Building for a broad spectrum of users forces us to create more user-friendly tools for everyone.

Offering a Free service has other benefits, too. Some of our strongest customer advocates are folks that used our Free plan on their hobby projects before bringing Cloudflare with them to work. Some of them even end up working at Cloudflare!

Our free plan will keep getting better

Our Free offering is a flywheel that helps make Cloudflare’s products, team, and cost structure more efficient. We pay back these efficiencies by continuing to improve our free offerings. Just this week, we’ve announced 15 updates that make our Free plans even better:

We offer a Free plan out of more than goodwill — it is a core business differentiator that helps us build better products, drive growth, and keep costs low. And it helps us advance our mission. Building a better Internet is a collective effort. Today, more than 30 million domains, comprising some 20% of the web, sit behind Cloudflare. Our Free plan makes that portion of the web faster, more secure, and more efficient. Free is not just a commitment — it’s a cornerstone of our strategy.

Become part of a better Internet and sign up for Cloudflare’s Free plan.


Advanced DNS Protection: mitigating sophisticated DNS DDoS attacks

Post Syndicated from Omer Yoachimik original https://blog.cloudflare.com/advanced-dns-protection


We’re proud to introduce the Advanced DNS Protection system, a robust defense mechanism designed to protect against the most sophisticated DNS-based DDoS attacks. This system is engineered to provide top-tier security, ensuring your digital infrastructure remains resilient in the face of evolving threats.

Our existing systems have been successfully detecting and mitigating ‘simpler’ DDoS attacks against DNS, but they’ve struggled with the more complex ones. The Advanced DNS Protection system is able to bridge that gap by leveraging new techniques that we will showcase in this blog post.

Advanced DNS Protection is currently in beta and available for all Magic Transit customers at no additional cost. Read on to learn more about DNS DDoS attacks, how the new system works, and what new functionality is expected down the road.

Register your interest to learn more about how we can help keep your DNS servers protected, available, and performant.

A third of all DDoS attacks target DNS servers

Distributed Denial of Service (DDoS) attacks are a type of cyber attack that aim to disrupt and take down websites and other online services. When DDoS attacks succeed and websites are taken offline, it can lead to significant revenue loss and damage to reputation.

Distribution of DDoS attack types for 2023

One common way to disrupt and take down a website is to flood its servers with more traffic than it can handle. This is known as an HTTP flood attack. It is a type of DDoS attack that targets the website directly with a lot of HTTP requests. According to our last DDoS trends report, in 2023 our systems automatically mitigated 5.2 million HTTP DDoS attacks — accounting for 37% of all DDoS attacks.

Diagram of an HTTP flood attack

However, there is another way to take down websites: by targeting them indirectly. Instead of flooding the website servers, the threat actor floods the DNS servers. If the DNS servers are overwhelmed with more queries than their capacity, hostname to IP address translation fails and the website experiences an indirectly inflicted outage because the DNS server cannot respond to legitimate queries.

One notable example is the attack that targeted Dyn, a DNS provider, in October 2016. It was a devastating DDoS attack launched by the infamous Mirai botnet. It caused disruptions for major sites like Airbnb, Netflix, and Amazon, and it took Dyn an entire day to restore services. That’s a long time for service disruptions that can lead to significant reputation and revenue impact.

Over seven years later, Mirai attacks and DNS attacks are still incredibly common. In 2023, DNS attacks were the second most common attack type — with a 33% share of all DDoS attacks (4.6 million attacks). Attacks launched by Mirai-variant botnets were the fifth most common type of network-layer DDoS attack, accounting for 3% of all network-layer DDoS attacks.

Diagram of a DNS query flood attack

What are sophisticated DNS-based DDoS attacks?

DNS-based DDoS attacks can be easier to mitigate when there is a recurring pattern in each query. This is what’s called the “attack fingerprint”. Fingerprint-based mitigation systems can identify those patterns and then deploy a mitigation rule that surgically filters the attack traffic without impacting legitimate traffic.

For example, let’s take a scenario where an attacker sends a flood of DNS queries to their target. In this example, the attacker only randomized the source IP address. All other query fields remained consistent. The mitigation system detected the pattern (source port is 1024 and the queried domain is example.com) and will generate an ephemeral mitigation rule to filter those queries.

A simplified diagram of the attack fingerprinting concept

However, there are DNS-based DDoS attacks that are much more sophisticated and randomized, lacking an apparent attack pattern. Without a consistent pattern to lock on to, it becomes virtually impossible to mitigate the attack using a fingerprint-based mitigation system. Moreover, even if an attack pattern is detected in a highly randomized attack, the pattern would probably be so generic that it would mistakenly mitigate legitimate user traffic and/or not catch the entire attack.

In this example, the attacker also randomized the queried domain in their DNS query flood attack. Simultaneously, a legitimate client (or server) is also querying example.com. They were assigned a random port number which happened to be 1024. The mitigation system detected a pattern (source port is 1024 and the queried domain is example.com) that caught only the part of the attack that matched the fingerprint. The mitigation system missed the part of the attack that queried other hostnames. Lastly, the mitigation system mistakenly caught legitimate traffic that happened to appear similar to the attack traffic.

A simplified diagram of a randomized DNS flood attack

This is just one very simple example of how fingerprinting can fail in stopping randomized DDoS attacks. This challenge is amplified when attackers “launder” their attack traffic through reputable public DNS resolvers (a DNS resolver, also known as a recursive DNS server, is a type of DNS server that is responsible for tracking down the IP address of a website from various other DNS servers). This is known as a DNS laundering attack.

Diagram of the DNS resolution process

During a DNS laundering attack, the attacker queries subdomains of a real domain that is managed by the victim’s authoritative DNS server. The prefix that defines the subdomain is randomized and is never used more than once. Due to the randomization element, recursive DNS servers will never have a cached response and will need to forward the query to the victim’s authoritative DNS server. The authoritative DNS server is then bombarded by so many queries until it cannot serve legitimate queries or even crashes altogether.

Diagram of a DNS Laundering attack

The complexity of sophisticated DNS DDoS attacks lies in their paradoxical nature: while they are relatively easy to detect, effectively mitigating them is significantly more difficult. This difficulty stems from the fact that authoritative DNS servers cannot simply block queries from recursive DNS servers, as these servers also make legitimate requests. Moreover, the authoritative DNS server is unable to filter queries aimed at the targeted domain because it is a genuine domain that needs to remain accessible.

Mitigating sophisticated DNS-based DDoS attacks with the Advanced DNS Protection system

The rise in these types of sophisticated DNS-based DDoS attacks motivated us to develop a new solution — a solution that would better protect our customers and bridge the gap of more traditional fingerprinting approaches. This solution came to be the Advanced DNS Protection system. Similar to the Advanced TCP Protection system, it is a software-defined system that we built, and it is powered by our stateful mitigation platform, flowtrackd (flow tracking daemon).

The Advanced DNS Protection system complements our existing suite of DDoS defense systems. Following the same approach as our other DDoS defense systems, the Advanced DNS Protection system is also a distributed system, and an instance of it runs on every Cloudflare server around the world. Once the system has been initiated, each instance can detect and mitigate attacks autonomously without requiring any centralized regulation. Detection and mitigation is instantaneous (zero seconds). Each instance also communicates with other instances on other servers in a data center. They gossip and share threat intelligence to deliver a comprehensive mitigation within each data center.

Screenshots from the Cloudflare dashboard showcasing a DNS-based DDoS attack that was mitigated by the Advanced DNS Protection system 

Together, our fingerprinting-based systems (the DDoS protection managed rulesets) and our stateful mitigation systems provide a robust multi-layered defense strategy to defend against the most sophisticated and randomized DNS-based DDoS attacks. The system is also customizable, allowing Cloudflare customers to tailor it for their needs. Review our documentation for more information on configuration options.

Diagram of Cloudflare’s DDoS protection systems

We’ve also added new DNS-centric data points to help customers better understand their DNS traffic patterns and attacks. These new data points are available in a new “DNS Protection” tab within the Cloudflare Network Analytics dashboard. The new tab provides insights about which DNS queries are passed and dropped, as well as the characteristics of those queries, including the queried domain name and the record type. The analytics can also be fetched by using the Cloudflare GraphQL API and by exporting logs into your own monitoring dashboards via Logpush.

DNS queries: discerning good from bad

To protect against sophisticated and highly randomized DNS-based DDoS attacks, we needed to get better at deciding which DNS queries are likely to be legitimate for our customers. However, it’s not easy to infer what’s legitimate and what’s likely to be a part of an attack just based on the query name. We can’t rely solely on fingerprint-based detection mechanisms, since sometimes seemingly random queries, like abc123.example.com, can be legitimate. The opposite is true as well: a query for mailserver.example.com might look legitimate, but can end up not being a real subdomain for a customer.

To make matters worse, our Layer 3 packet routing-based mitigation service, Magic Transit, uses direct server return (DSR), meaning we can not see the DNS origin server’s responses to give us feedback about which queries are ultimately legitimate.

Diagram of Magic Transit with Direct Server Return (DSR)

We decided that the best way to combat these attacks is to build a data model of each customer’s expected DNS queries, based on a historical record that we build. With this model in hand, we can decide with higher confidence which queries are likely to be legitimate, and drop the ones that we think are not, shielding our customer’s DNS servers.

This is the basis of Advanced DNS Protection. It inspects every DNS query sent to our Magic Transit customers, and passes or drops them based on the data model and each customer’s individual settings.

To do so, each server at our global network continually sends certain DNS-related data such as query type (for example, A record) and the queried domains (but not the source of the query) to our core data centers, where we periodically compute DNS query traffic profiles for each customer. Those profiles are distributed across our global network, where they are consulted to help us more confidently and accurately decide which queries are good and which are bad. We drop the bad queries and pass on the good ones, taking into account a customer’s tolerance for unexpected DNS queries based on their configurations.

Solving the technical challenges that emerged when designing the Advanced DNS Protection system

In building this system, we faced several specific technical challenges:

Data processing

We process tens of millions of DNS queries per day across our global network for our Magic Transit customers, not counting Cloudflare’s suite of other DNS products, and use the DNS-related data mentioned above to build custom query traffic profiles. Analyzing this type of data requires careful treatment of our data pipelines. When building these traffic profiles, we use sample-on-write and adaptive bitrate technologies when writing and reading the necessary data, respectively, to ensure that we capture the data with a fine granularity while protecting our data infrastructure, and we drop information that might impact the privacy of end users.

Compact representation of query data

Some of our customers see tens of millions of DNS queries per day alone. This amount of data would be prohibitively expensive to store and distribute in an uncompressed format. To solve this challenge, we decided to use a counting Bloom filter for each customer’s traffic profile. This is a probabilistic data structure that allows us to succinctly store and distribute each customer’s DNS profile, and then efficiently query it at packet processing time.

Data distribution

We periodically need to recompute and redistribute every customer’s DNS traffic profile between our data centers to each server in our fleet. We used our very own R2 storage service to greatly simplify this task. With regional hints and custom domains enabled, we enabled caching and used only a handful of R2 buckets. Each time we need to update the global view of the customer data models across our edge fleet, 98% of the bits transferred are served from cache.

Built-in tolerance

When new domain names are put into service, our data models will not immediately be aware of them because queries with these names have never been seen before. This and other reasons for potential false positives mandate that we need to build a certain amount of tolerance into the system to allow through potentially legitimate queries. We do so by leveraging token bucket algorithms. Customers can configure the size of the token buckets by changing the sensitivity levels of the Advanced DNS Protection system. The lower the sensitivity, the larger the token bucket — and vice versa. A larger token bucket provides more tolerance for unexpected DNS queries and expected DNS queries that deviate from the profile. A high sensitivity level translates to a smaller token bucket and a stricter approach.

Leveraging Cloudflare’s global software-defined network

At the end of the day, these are the types of challenges that Cloudflare is excellent at solving. Our customers trust us with handling their traffic, and ensuring their Internet properties are protected, available and performant. We take that trust extremely seriously.

The Advanced DNS Protection system leverages our global infrastructure and data processing capabilities alongside intelligent algorithms and data structures to protect our customers.

If you are not yet a Cloudflare customer, let us know if you’d like to protect your DNS servers. Existing Cloudflare customers can enable the new systems by contacting their account team or Cloudflare Support.

How to automate updates for your domain list in Route 53 Resolver DNS Firewall

Post Syndicated from Guillaume Neau original https://aws.amazon.com/blogs/security/how-to-automate-updates-for-your-domain-list-in-route-53-resolver-dns-firewall/

Note: This post includes links to third-party websites. AWS is not responsible for the content on those websites.


Following the release of Amazon Route 53 Resolver DNS Firewall, Amazon Web Services (AWS) published several blog posts to help you protect your Amazon Virtual Private Cloud (Amazon VPC) DNS resolution, including How to Get Started with Amazon Route 53 Resolver DNS Firewall for Amazon VPC and Secure your Amazon VPC DNS resolution with Amazon Route 53 Resolver DNS Firewall. Route 53 Resolver DNS Firewall provides managed domain lists that are fully maintained and kept up-to-date by AWS and that directly benefit from the threat intelligence that we gather, but you might want to create or import your own list to have full control over the DNS filtering.

In this blog post, you will find a solution to automate the management of your domain list by using AWS Lambda, Amazon EventBridge, and Amazon Simple Storage Service (Amazon S3). The solution in this post uses, as an example, the URLhaus open Response Policy Zone (RPZ) list, which generates a new file every five minutes.

Architecture overview

The solution is made of the following four components, as shown in Figure 1.

  1. An EventBridge scheduled rule to invoke the Lambda function on a schedule.
  2. A Lambda function that uses the AWS SDK to perform the automation logic.
  3. An S3 bucket to temporarily store the list of domains retrieved.
  4. Amazon Route 53 Resolver DNS Firewall.
    Figure 1: Architecture overview

    Figure 1: Architecture overview

After the solution is deployed, it works as follows:

  1. The scheduled rule invokes the Lambda function every 5 minutes to fetch the latest domain list available.
  2. The Lambda function fetches the list from URLhaus, parses the data retrieved, formats the data, uploads the list of domains into the S3 bucket, and invokes the Route 53 Resolver DNS Firewall importFirewallDomains API action.
  3. The domain list is then updated.

Implementation steps

As a first step, create your own domain list on the Route 53 Resolver DNS Firewall. Having your own domain list allows you to have full control of the list of domains to which you want to apply actions, as defined within rule groups.

To create your own domain list

  1. In the Route 53 console, in the left menu, choose Domain lists in the DNS firewall section.
  2. Choose the Add domain list button, enter a name for your owned domain list, and then enter a placeholder domain to initialize the domain list.
  3. Choose Add domain list to finalize the creation of the domain list.
    Figure 2: Expected view of the console

    Figure 2: Expected view of the console

The list from URLhaus contains more than a thousand records. You will use the ImportFirewallDomains endpoint to upload this list to DNS Firewall. The use of the ImportFirewallDomains endpoint requires that you first upload the list of domains and make the list available in an S3 bucket that is located in the same AWS Region as the owned domain list that you just created.

To create the S3 bucket

  1. In the S3 console, choose Create bucket.
  2. Under General configuration, configure the AWS Region option to be the same as the Region in which you created your domain list.
  3. Finalize the configuration of your S3 bucket, and then choose Create bucket.

Because a new file is created every five minutes, we recommend setting a lifecycle rule to automatically expire and delete files after 24 hours to optimize for cost and only save the most recent lists.

To create the Lambda function

  1. Follow the steps in the topic Creating an execution role in the IAM console to create an execution role. After step 4, when you configure permissions, choose Create Policy, and then create and add an IAM policy similar to the following example. This policy needs to:
    • Allow the Lambda function to put logs in Amazon CloudWatch.
    • Allow the Lambda function to have read and write access to objects placed in the created S3 bucket.
    • Allow the Lambda function to update the firewall domain list.
    • {
          "Version": "2012-10-17",
          "Statement": [
              {
                  "Action": [
                      "logs:CreateLogGroup",
                      "logs:CreateLogStream",
                      "logs:PutLogEvents"
                  ],
                  "Resource": "arn:aws:logs:<region>:<accountId>:*",
                  "Effect": "Allow"
              },
              {
                  "Action": [
                      "s3:PutObject",
                      "s3:GetObject"
                  ],
                  "Resource": "arn:aws:s3:::<DNSFW-BUCKET-NAME>/*",
                  "Effect": "Allow"
              },
              {
                  "Action": [
                      "route53resolver:ImportFirewallDomains"
                  ],
                  "Resource": "arn:aws:route53resolver:<region>:<accountId>:firewall-domain-list/<domain-list-id>",
                  "Effect": "Allow"
              }
          ]
      }

  2. (Optional) If you decide to use the example provided by AWS:
    • After cloning the repository: Build the layer following the instruction included in the readme.md and the provided script.
    • Zip the lambda.
    • In the left menu, select Layers then Create Layer. Enter a name for the layer, then select Upload a .zip file. Choose to upload the layer (node-axios-layer.zip).
    • As a compatible runtime, select: Node.js 16.x.
    • Select Create
  3. In the Lambda console, in the same Region as your domain list, choose Create function, and then do the following:
    • Choose your desired runtime and architecture.
    • (Optional) To use the code provided by AWS: Select Node.js 16.x as the runtime.
    • Choose Change the default execution role.
    • Choose Use an existing role, and then pick the role that you just created.
  4. After the Lambda function is created, in the left menu of the Lambda console, choose Functions, and then select the function you created.
    • For Code source, you can either enter the code of the Lambda function or choose the Upload from button and then choose the source for the code. AWS provides an example of functioning code on GitHub under a MIT-0 license.

    (optional) To use the code provided by AWS:

    • Choose the Upload from button and upload the zipped code example.
    • After the code is uploaded, edit the default Runtime settings: Choose the Edit button and set the handler to be equal to: LambdaRpz.handler
    • Edit the default Layers configuration, choose the Add a layer button, select Specify an ARN and enter the ARN of the layer created during the optional step 2.
    • Edit the environment variables of the function: Select the Edit button and define the three following variables:
      1. Key : FirewallDomainListId | Value : <domain-list-id>
      2. Key : region | Value : <region>
      3. Key : s3Prefix | Value : <DNSFW-BUCKET-NAME>

The code that you place in the function will be able to fetch the list from URLhaus, upload the list as a file to S3, and start the import of domains.

For the Lambda function to be invoked every 5 minutes, next you will create a scheduled rule with Amazon EventBridge.

To automate the invoking of the Lambda function

  1. In the EventBridge console, in the same AWS Region as your domain list, choose Create rule.
  2. For Rule type, choose Schedule.
  3. For Schedule pattern, select the option A schedule that runs at a regular rate, such as every 10 minutes, and under Rate expression set a rate of 5 minutes.
    Figure 3: Console view when configuring a schedule

    Figure 3: Console view when configuring a schedule

  4. To select the target, choose AWS service, choose Lambda function, and then select the function that you previously created.

After the solution is deployed, your domain list will be updated every 5 minutes and look like the view in Figure 4.

Figure 4: Console view of the created domain list after it has been updated by the Lambda function

Figure 4: Console view of the created domain list after it has been updated by the Lambda function

Code samples

You can use the samples in the amazon-route-53-resolver-firewall-automation-examples-2 GitHub repository to ease the automation of your domain list, and the associated updates. The repository contains script files to help you with the deployment process of the AWS CloudFormation template. Note that you need to have the AWS Command Line Interface (AWS CLI) installed and properly configured in order to use the files.

To deploy the CloudFormation stack

  1. If you haven’t done so already, create an S3 bucket to store the artifacts in the Region where you wish to deploy. This name of this bucket will then be referenced as ParamS3ArtifactBucket with a value of <DOC-EXAMPLE-BUCKET-ARTIFACT>
  2. Clone the repository locally.
    git clone https://github.com/aws-samples/amazon-route-53-resolver-firewall-automation-examples-2
  3. Build the Lambda function layer. From the /layer folder, use the provided script.
    . ./build-layer.sh
  4. Zip and upload the artifact to the bucket created in step 1. From the root folder, use the provided script.
    . ./zipupload.sh <ParamS3ArtifactBucket>
  5. Deploy the AWS CloudFormation stack by using either the AWS CLI or the CloudFormation console.
    • To deploy by using the AWS CLI, from the root folder, type the following command, making sure to replace <region>, <DOC-EXAMPLE-BUCKET-ARTIFACT>, <DNSFW-BUCKET-NAME>, and <DomainListName>with your own values.
      aws --region <region> cloudformation create-stack --stack-name DNSFWStack --capabilities CAPABILITY_NAMED_IAM --template-body file://./DNSFWStack.cfn.yaml --parameters ParameterKey=ParamS3ArtifactBucket,ParameterValue=<DOC-EXAMPLE-BUCKET-ARTIFACT> ParameterKey=ParamS3RpzBucket,ParameterValue=<DNSFW-BUCKET-NAME> ParameterKey=ParamFirewallDomainListName,ParameterValue=<DomainListName>

    • To deploy by using the console, do the following:
      1. In the CloudFormation console, choose Create stack, and then choose With new resources (standard).
      2. On the creation screen, choose Template is ready, and upload the provided DNSFWStack.cfn.yaml file.
      3. Enter a stack name and configure the requested parameters with your desired configuration and outcomes. These parameters include the following:
        • The name of your firewall domain list.
        • The name of the S3 bucket that contains Lambda artifacts.
        • The name of the S3 bucket that will be created to contain the files with the domain information from URLhaus.
      4. Acknowledge that the template requires IAM permission because it will create the role for the Lambda function and manage its IAM policy, and then choose Create stack.

After a few minutes, all the resources should be created and the CloudFormation stack is now deployed. After 5 minutes, your domain list should be updated, as shown in Figure 5.

Figure 5: Console view of CloudFormation after the stack has been deployed

Figure 5: Console view of CloudFormation after the stack has been deployed

Conclusions and cost

In this blog post, you learned about creating and automating the update of a domain list that you fully control. To go further, you can extend and replicate the architecture pattern to fetch domain names from other sources by editing the source code of the Lambda function.

After the solution is in place, in order for the filtering to be effective, you need to create a rule group referencing the domain list and associate the rule group with some of your VPCs.

For cost information, see the AWS Pricing Calculator. This solution will be invoked 60 (minutes) * 24 (hours) * 30 (days) / 5 (minutes) = 8,640 times per month, invoking the Lambda function that will run for an average of 400 minutes, storing an average of 0.5 GB in Amazon S3, and creating a domain list that averages 1,500 domains. According to our public pricing, and without factoring in the AWS Free Tier, this will incur the estimated total cost of $1.43 per month for the filtering of 1 million DNS requests.

 
If you have feedback about this post, submit comments in the Comments section below. If you have questions about this post, contact AWS Support.

Want more AWS Security news? Follow us on Twitter.

Guillaume Neau

Guillaume Neau

Guillaume is a solutions architect of France with an expertise in information security that focus on building solutions that improve the life of citizens.