All posts by Joerg Woehrle

Improve collaboration between teams by using AWS CDK constructs

Post Syndicated from Joerg Woehrle original https://aws.amazon.com/blogs/devops/improve-collaboration-between-teams-by-using-aws-cdk-constructs/

There are different ways to organize teams to deliver great software products. There are companies that give the end-to-end responsibility for a product to a single team, like Amazon’s Two-Pizza teams, and there are companies where multiple teams split the responsibility between infrastructure (or platform) teams and application development teams. This post provides guidance on how collaboration efficiency can be improved in the case of a split-team approach with the help of the AWS Cloud Development Kit (CDK).

The AWS CDK is an open-source software development framework to define your cloud application resources. You do this by using familiar programming languages like TypeScript, Python, Java, C# or Go. It allows you to mix code to define your application’s infrastructure, traditionally expressed through infrastructure as code tools like AWS CloudFormation or HashiCorp Terraform, with code to bundle, compile, and package your application.

This is great for autonomous teams with end-to-end responsibility, as it helps them to keep all code related to that product in a single place and single programming language. There is no need to separate application code into a different repository than infrastructure code with a single team, but what about the split-team model?

Larger enterprises commonly split the responsibility between infrastructure (or platform) teams and application development teams. We’ll see how to use the AWS CDK to ensure team independence and agility even with multiple teams involved. We’ll have a look at the different responsibilities of the participating teams and their produced artifacts, and we’ll also discuss how to make the teams work together in a frictionless way.

This blog post assumes a basic level of knowledge on the AWS CDK and its concepts. Additionally, a very high level understanding of event driven architectures is required.

Team Topologies

Let’s first have a quick look at the different team topologies and each team’s responsibilities.

One-Team Approach

In this blog post we will focus on the split-team approach described below. However, it’s still helpful to understand what we mean by “One-Team” Approach: A single team owns an application from end-to-end. This cross-functional team decides on its own on the features to implement next, which technologies to use and how to build and deploy the resulting infrastructure and application code. The team’s responsibility is infrastructure, application code, its deployment and operations of the developed service.

If you’re interested in how to structure your AWS CDK application in a such an environment have a look at our colleague Alex Pulver’s blog post Recommended AWS CDK project structure for Python applications.

Split-Team Approach

In reality we see many customers who have separate teams for application development and infrastructure development and deployment.

Infrastructure Team

What I call the infrastructure team is also known as the platform or operations team. It configures, deploys, and operates the shared infrastructure which other teams consume to run their applications on. This can be things like an Amazon SQS queue, an Amazon Elastic Container Service (Amazon ECS) cluster as well as the CI/CD pipelines used to bring new versions of the applications into production.
It is the infrastructure team’s responsibility to get the application package developed by the Application Team deployed and running on AWS, as well as provide operational support for the application.

Application Team

Traditionally the application team just provides the application’s package (for example, a JAR file or an npm package) and it’s the infrastructure team’s responsibility to figure out how to deploy, configure, and run it on AWS. However, this traditional setup often leads to bottlenecks, as the infrastructure team will have to support many different applications developed by multiple teams. Additionally, the infrastructure team often has little knowledge of the internals of those applications. This often leads to solutions which are not optimized for the problem at hand: If the infrastructure team only offers a handful of options to run services on, the application team can’t use options optimized for their workload.

This is why we extend the traditional responsibilities of the application team in this blog post. The team provides the application and additionally the description of the infrastructure required to run the application. With “infrastructure required” we mean the AWS services used to run the application. This infrastructure description needs to be written in a format which can be consumed by the infrastructure team.

While we understand that this shift of responsibility adds additional tasks to the application team, we think that in the long term it is worth the effort. This can be the starting point to introduce DevOps concepts into the organization. However, the concepts described in this blog post are still valid even if you decide that you don’t want to add this responsibility to your application teams. The boundary of who is delivering what would then just move more into the direction of the infrastructure team.

To be successful with the given approach, the two teams need to agree on a common format on how to hand over the application, its infrastructure definition, and how to bring it to production. The AWS CDK with its concept of Constructs provides a perfect means for that.

Primer: AWS CDK Constructs

In this section we take a look at the concepts the AWS CDK provides for structuring our code base and how these concepts can be used to fit a CDK project into your team topology.

Constructs

Constructs are the basic building block of an AWS CDK application. An AWS CDK application is composed of multiple constructs which in the end define how and what is deployed by AWS CloudFormation.

The AWS CDK ships with constructs created to deploy AWS services. However, it is important to understand that you are not limited to the out-of-the-box constructs provided by the AWS CDK. The true power of AWS CDK is the possibility to create your own abstractions on top of the default constructs to create solutions for your specific requirement. To achieve this you write, publish, and consume your own, custom constructs. They codify your specific requirements, create an additional level of abstraction and allow other teams to consume and use your construct.

We will use a custom construct to separate the responsibilities between the the application and the infrastructure team. The application team will release a construct which describes the infrastructure along with its configuration required to run the application code. The infrastructure team will consume this construct to deploy and operate the workload on AWS.

How to use the AWS CDK in a Split-Team Setup

Let’s now have a look at how we can use the AWS CDK to split the responsibilities between the application and infrastructure team. I’ll introduce a sample scenario and then illustrate what each team’s responsibility is within this scenario.

Scenario

Our fictitious application development team writes an AWS Lambda function which gets deployed to AWS. Messages in an Amazon SQS queue will invoke the function. Let’s say the function will process orders (whatever this means in detail is irrelevant for the example) and each order is represented by a message in the queue.

The application development team has full flexibility when it comes to creating the AWS Lambda function. They can decide which runtime to use or how much memory to configure. The SQS queue which the function will act upon is created by the infrastructure team. The application team does not have to know how the messages end up in the queue.

With that we can have a look at a sample implementation split between the teams.

Application Team

The application team is responsible for two distinct artifacts: the application code (for example, a Java jar file or an npm module) and the AWS CDK construct used to deploy the required infrastructure on AWS to run the application (an AWS Lambda Function along with its configuration).

The lifecycles of these artifacts differ: the application code changes more frequently than the infrastructure it runs in. That’s why we want to keep the artifacts separate. With that each of the artifacts can be released at its own pace and only if it was changed.

In order to achieve these separate lifecycles, it is important to notice that a release of the application artifact needs to be completely independent from the release of the CDK construct. This fits our approach of separate teams compared to the standard CDK way of building and packaging application code within the CDK construct.

But how will this be done in our example solution? The team will build and publish an application artifact which does not contain anything related to CDK.
When a CDK Stack with this construct is synthesized it will download the pre-built artifact with a given version number from AWS CodeArtifact and use it to create the input zip file for a Lambda function. There is no build of the application package happening during the CDK synth.

With the separation of construct and application code, we need to find a way to tell the CDK construct which specific version of the application code it should fetch from CodeArtifact. We will pass this information to the construct via a property of its constructor.

For dependencies on infrastructure outside of the responsibility of the application team, I follow the pattern of dependency injection. Those dependencies, for example a shared VPC or an Amazon SQS queue, are passed into the construct from the infrastructure team.

Let’s have a look at an example. We pass in the external dependency on an SQS Queue, along with details on the desired appPackageVersion and its CodeArtifact details:

export interface OrderProcessingAppConstructProps {
    queue: aws_sqs.Queue,
    appPackageVersion: string,
    codeArtifactDetails: {
        account: string,
        repository: string,
        domain: string
    }
}

export class OrderProcessingAppConstruct extends Construct {

    constructor(scope: Construct, id: string, props: OrderProcessingAppConstructProps) {
        super(scope, id);

        const lambdaFunction = new lambda.Function(this, 'OrderProcessingLambda', {
            code: lambda.Code.fromDockerBuild(path.join(__dirname, '..', 'bundling'), {
                buildArgs: {
                    'PACKAGE_VERSION' : props.appPackageVersion,
                    'CODE_ARTIFACT_ACCOUNT' : props.codeArtifactDetails.account,
                    'CODE_ARTIFACT_REPOSITORY' : props.codeArtifactDetails.repository,
                    'CODE_ARTIFACT_DOMAIN' : props.codeArtifactDetails.domain
                }
            }),
            runtime: lambda.Runtime.NODEJS_16_X,
            handler: 'node_modules/order-processing-app/dist/index.lambdaHandler'
        });
        const eventSource = new SqsEventSource(props.queue);
        lambdaFunction.addEventSource(eventSource);
    }
}

Note the code lambda.Code.fromDockerBuild(...): We use AWS CDK’s functionality to bundle the code of our Lambda function via a Docker build. The only things which happen inside of the provided Dockerfile are:

  • the login into the AWS CodeArtifact repository which holds the pre-built application code’s package
  • the download and installation of the application code’s artifact from AWS CodeArtifact (in this case via npm)

If you are interested in more details on how you can build, bundle and deploy your AWS CDK assets I highly recommend a blog post by my colleague Cory Hall: Building, bundling, and deploying applications with the AWS CDK. It goes into much more detail than what we are covering here.

Looking at the example Dockerfile we can see the two steps described above:

FROM public.ecr.aws/sam/build-nodejs16.x:latest

ARG PACKAGE_VERSION
ARG CODE_ARTIFACT_AWS_REGION
ARG CODE_ARTIFACT_ACCOUNT
ARG CODE_ARTIFACT_REPOSITORY

RUN aws codeartifact login --tool npm --repository $CODE_ARTIFACT_REPOSITORY --domain $CODE_ARTIFACT_DOMAIN --domain-owner $CODE_ARTIFACT_ACCOUNT --region $CODE_ARTIFACT_AWS_REGION
RUN npm install order-processing-app@$PACKAGE_VERSION --prefix /asset

Please note the following:

  • we use --prefix /asset with our npm install command. This tells npm to install the dependencies into the folder which CDK will mount into the container. All files which should go into the output of the docker build need to be placed here.
  • the aws codeartifact login command requires credentials with the appropriate permissions to proceed. In case you run this on for example AWS CodeBuild or inside of a CDK Pipeline you need to make sure that the used role has the appropriate policies attached.

Infrastructure Team

The infrastructure team consumes the AWS CDK construct published by the application team. They own the AWS CDK Stack which composes the whole application. Possibly this will only be one of several Stacks owned by the Infrastructure team. Other Stacks might create shared infrastructure (like VPCs, networking) and other applications.

Within the stack for our application the infrastructure team consumes and instantiates the application team’s construct, passes any dependencies into it and then deploys the stack by whatever means they see fit (e.g. through AWS CodePipeline, GitHub Actions or any other form of continuous delivery/deployment).

The dependency on the application team’s construct is manifested in the package.json of the infrastructure team’s CDK app:

{
  "name": "order-processing-infra-app",
  ...
  "dependencies": {
    ...
    "order-app-construct" : "1.1.0",
    ...
  }
  ...
}

Within the created CDK Stack we see the dependency version for the application package as well as how the infrastructure team passes in additional information (like e.g. the queue to use):

export class OrderProcessingInfraStack extends cdk.Stack {
  constructor(scope: Construct, id: string, props?: cdk.StackProps) {
    super(scope, id, props);   

    const orderProcessingQueue = new Queue(this, 'order-processing-queue');

    new OrderProcessingAppConstruct(this, 'order-processing-app', {
       appPackageVersion: "2.0.36",
       queue: orderProcessingQueue,
       codeArtifactDetails: { ... }
     });
  }
}

Propagating New Releases

We now have the responsibilities of each team sorted out along with the artifacts owned by each team. But how do we propagate a change done by the application team all the way to production? Or asked differently: how can we invoke the infrastructure team’s CI/CD pipeline with the updated artifact versions of the application team?

We will need to update the infrastructure team’s dependencies on the application teams artifacts whenever a new version of either the application package or the AWS CDK construct is published. With the dependencies updated we can then start the release pipeline.

One approach is to listen and react to events published by AWS CodeArtifact via Amazon EventBridge. On each release AWS CodeArtifact will publish an event to Amazon EventBridge. We can listen to that event, extract the version number of the new release from its payload and start a workflow to update either our dependency on the CDK construct (e.g. in the package.json of our CDK application) or a update the appPackageVersion which the infrastructure team passes into the consumed construct.

Here’s how a release of a new app version flows through the system:

A release of the application package triggers a change and deployment of the infrastructure team's CDK Stack

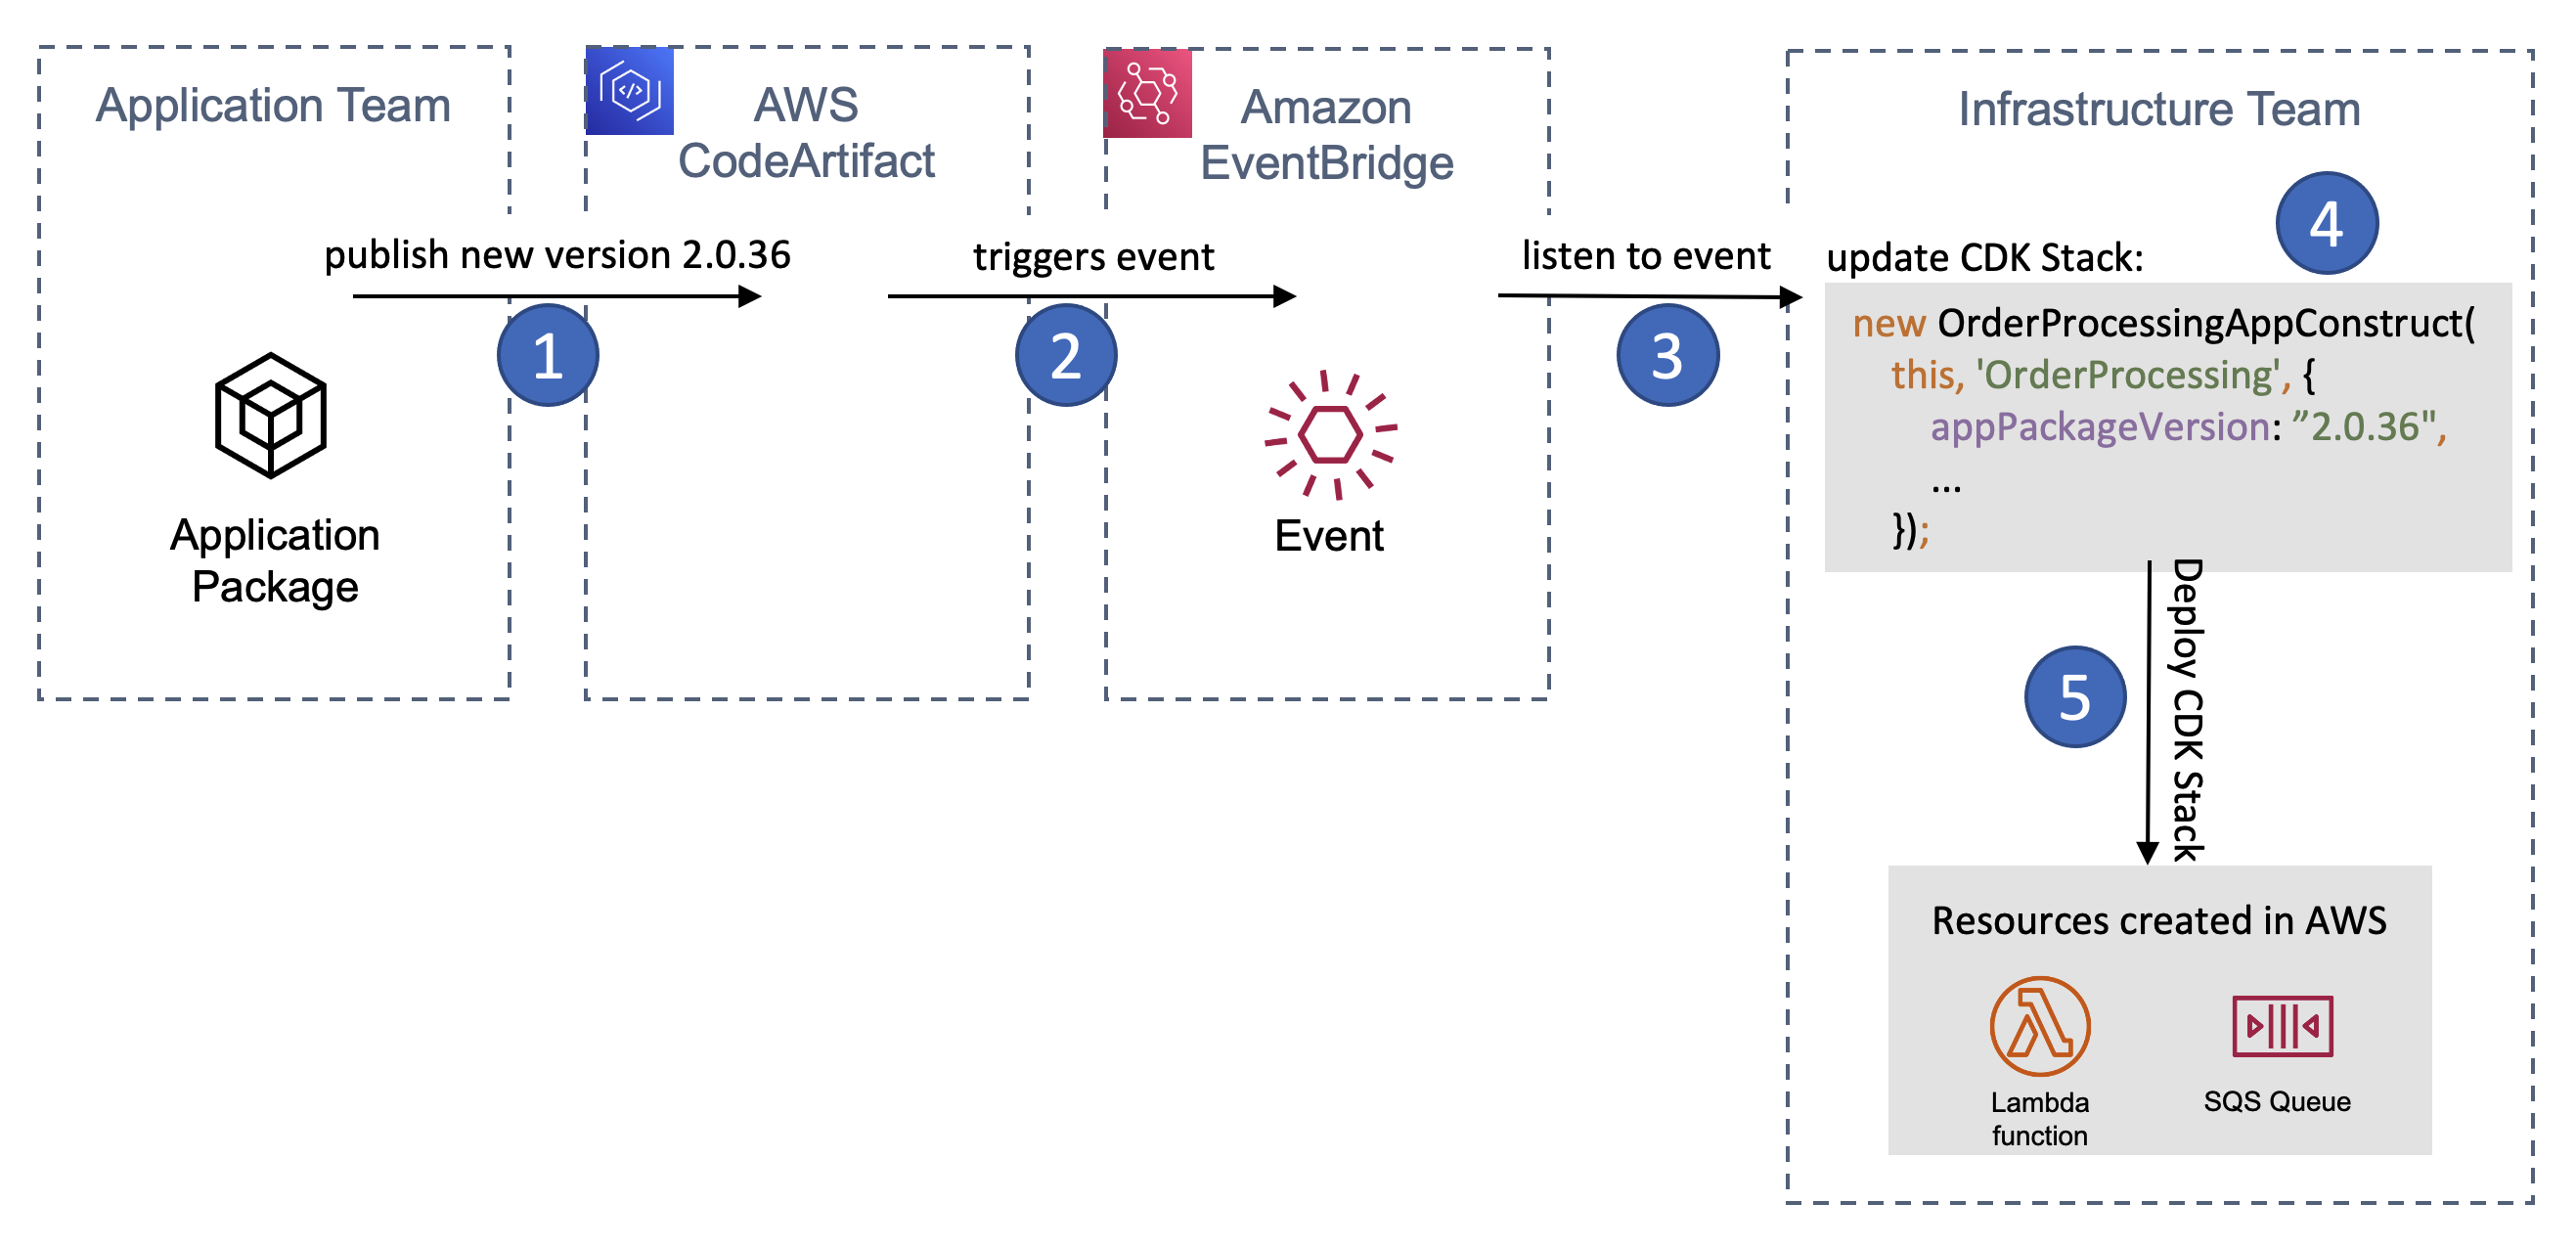
Figure 1 – A release of the application package triggers a change and deployment of the infrastructure team’s CDK Stack

  1. The application team publishes a new app version into AWS CodeArtifact
  2. CodeArtifact triggers an event on Amazon EventBridge
  3. The infrastructure team listens to this event
  4. The infrastructure team updates its CDK stack to include the latest appPackageVersion
  5. The infrastructure team’s CDK Stack gets deployed

And very similar the release of a new version of the CDK Construct:

A release of the application team's CDK construct triggers a change and deployment of the infrastructure team's CDK Stack

Figure 2 – A release of the application team’s CDK construct triggers a change and deployment of the infrastructure team’s CDK Stack

  1. The application team publishes a new CDK construct version into AWS CodeArtifact
  2. CodeArtifact triggers an event on Amazon EventBridge
  3. The infrastructure team listens to this event
  4. The infrastructure team updates its dependency to the latest CDK construct
  5. The infrastructure team’s CDK Stack gets deployed

We will not go into the details on how such a workflow could look like, because it’s most likely highly custom for each team (think of different tools used for code repositories, CI/CD). However, here are some ideas on how it can be accomplished:

Updating the CDK Construct dependency

To update the dependency version of the CDK construct the infrastructure team’s package.json (or other files used for dependency tracking like pom.xml) needs to be updated. You can build automation to checkout the source code and issue a command like npm install sample-app-construct@NEW_VERSION (where NEW_VERSION is the value read from the EventBridge event payload). You then automatically create a pull request to incorporate this change into your main branch. For a sample on what this looks like see the blog post Keeping up with your dependencies: building a feedback loop for shared librares.

Updating the appPackageVersion

To update the appPackageVersion used inside of the infrastructure team’s CDK Stack you can either follow the same approach outlined above, or you can use CDK’s capability to read from an AWS Systems Manager (SSM) Parameter Store parameter. With that you wouldn’t put the value for appPackageVersion into source control, but rather read it from SSM Parameter Store. There is a how-to for this in the AWS CDK documentation: Get a value from the Systems Manager Parameter Store. You then start the infrastructure team’s pipeline based on the event of a change in the parameter.

To have a clear understanding of what is deployed at any given time and in order to see the used parameter value in CloudFormation I’d recommend using the option described at Reading Systems Manager values at synthesis time.

Conclusion

You’ve seen how the AWS Cloud Development Kit and its Construct concept can help to ensure team independence and agility even though multiple teams (in our case an application development team and an infrastructure team) work together to bring a new version of an application into production. To do so you have put the application team in charge of not only their application code, but also of the parts of the infrastructure they use to run their application on. This is still in line with the discussed split-team approach as all shared infrastructure as well as the final deployment is in control of the infrastructure team and is only consumed by the application team’s construct.

About the Authors

Picture of the author Joerg Woehrle As a Solutions Architect Jörg works with manufacturing customers in Germany. Before he joined AWS in 2019 he held various roles like Developer, DevOps Engineer and SRE. With that Jörg enjoys building and automating things and fell in love with the AWS Cloud Development Kit.
Picture of the author Mohamed Othman Mo joined AWS in 2020 as a Technical Account Manager, bringing with him 7 years of hands-on AWS DevOps experience and 6 year as System operation admin. He is a member of two Technical Field Communities in AWS (Cloud Operation and Builder Experience), focusing on supporting customers with CI/CD pipelines and AI for DevOps to ensure they have the right solutions that fit their business needs.

Keeping up with your dependencies: building a feedback loop for shared libraries

Post Syndicated from Joerg Woehrle original https://aws.amazon.com/blogs/devops/keeping-up-with-your-dependencies-building-a-feedback-loop-for-shared-libraries/

In a microservices world, it’s common to share as little as possible between services. This enables teams to work independently of each other, helps to reduce wait times and decreases coupling between services.

However, it’s also a common scenario that libraries for cross-cutting-concerns (such as security or logging) are developed one time and offered to other teams for consumption. Although it’s vital to offer an opt-out of those libraries (namely, use your own code to address the cross-cutting-concern, such as when there is no version for a given language), shared libraries also provide the benefit of better governance and time savings.

To avoid these pitfalls when sharing artifacts, two points are important:

  • For consumers of shared libraries, it’s important to stay up to date with new releases in order to benefit from security, performance, and feature improvements.
  • For producers of shared libraries, it’s important to get quick feedback in case of an involuntarily added breaking change.

Based on those two factors, we’re looking for the following solution:

  • A frictionless and automated way to update consumer’s code to the latest release version of a given library
  • Immediate feedback to the library producer in case of a breaking change (the new version of the library breaks the build of a downstream system)

In this blog post I develop a solution that takes care of both those problems. I use Amazon EventBridge to be notified on new releases of a library in AWS CodeArtifact. I use an AWS Lambda function along with an AWS Fargate task to automatically create a pull request (PR) with the new release version on AWS CodeCommit. Finally, I use AWS CodeBuild to kick off a build of the PR and notify the library producer via EventBridge and Amazon Simple Notification Service (Amazon SNS) in case of a failure.

Overview of solution

Let’s start with a short introduction on the services I use for this solution:

  1. CodeArtifact – A fully managed artifact repository service that makes it easy for organizations of any size to securely store, publish, and share software packages used in their software development process. CodeArtifact works with commonly used package managers and build tools like Maven, Gradle, npm, yarn, twine, and pip.
  2. CodeBuild – A fully managed continuous integration service that compiles source code, runs tests, and produces software packages that are ready to deploy.
  3. CodeCommit – A fully-managed source control service that hosts secure Git-based repositories.
  4. EventBridge – A serverless event bus that makes it easy to connect applications together using data from your own applications, integrated software as a service (SaaS) applications, and AWS services. EventBridge makes it easy to build event-driven applications because it takes care of event ingestion and delivery, security, authorization, and error handling.
  5. Fargate – A serverless compute engine for containers that works with both Amazon Elastic Container Service (ECS) and Amazon Elastic Kubernetes Service (EKS). Fargate removes the need to provision and manage servers, lets you specify and pay for resources per application, and improves security through application isolation by design.
  6. Lambda – Lets you run code without provisioning or managing servers. You pay only for the compute time you consume.
  7. Amazon SNS – A fully managed messaging service for both application-to-application (A2A) and application-to-person (A2P) communication.

The resulting flow through the system looks like the following diagram.

Architecture Diagram


In my example, I look at two independent teams working in two different AWS accounts. Team A is the provider of the shared library, and Team B is the consumer.

Let’s do a high-level walkthrough of the involved steps and components:

  1. A new library version is released by Team A and pushed to CodeArtifact.
  2. CodeArtifact creates an event when the new version is published.
  3. I send this event to the default event bus in Team B’s AWS account.
  4. An EventBridge rule in Team B’s account triggers a Lambda function for further processing.
  5. The function filters SNAPSHOT releases (in Maven a SNAPSHOT represents an artifact still under development that doesn’t have a final release yet) and runs an Amazon ECS Fargate task for non-SNAPSHOT versions.
  6. The Fargate task checks out the source that uses the shared library, updates the library’s version in the pom.xml, and creates a pull request to integrate the change into the mainline of the code repository.
  7. The pull request creation results in an event being published.
  8. An EventBridge rule triggers the CodeBuild project of the downstream artifact.
  9. The result of the build is published as an event.
  10. If the build fails, this failure is propagated back to the event bus of Team A.
  11. The failure is forwarded to an SNS topic that notifies the subscribers of the failure.

Amazon EventBridge

A central component of the solution is Amazon EventBridge. I use EventBridge to receive and react on events emitted by the various AWS services in the solution (e.g., whenever a new version of an artifact gets uploaded to CodeArtifact, when a PR is created within CodeCommit or when a build fails in CodeBuild). Let’s have a high-level look on some of the central concepts of EventBridge:

  • Event Bus – An event bus is a pipeline that receives events. There is a default event bus in each account which receives events from AWS services. One can send events to an event bus via the PutEvents API.
  • Event – An event indicates a change in e.g., an AWS environment, a SaaS partner service or application or one of your applications.
  • Rule – A rule matches incoming events on an event bus and sends them to targets for processing. To react on a particular event, one creates a rule which matches this event. To learn more about the rule concept check out Rules on the EventBridge documentation.
  • Target – When an event matches the event pattern defined in a rule it is send to a target. There are currently more than 20 target types available in EventBridge. In this blog post I use the targets provided for: an event bus in a different account, a Lambda function, a CodeBuild project and an SNS topic. For a detailed list on available targets see Amazon EventBridge targets.

Solution Details:

In this section I walk through the most important parts of the solution. The complete code can be found on GitHub. For a detailed view on the resources created in each account please refer to the GitHub repository.

I use the AWS Cloud Development Kit (CDK) to create my infrastructure. For some of the resource types I create, no higher-level constructs are available yet (at the time of writing, I used AWS CDK version 1.108.1). This is why I sometimes use low-level AWS CloudFormation constructs or even use the provided escape hatches to use AWS CloudFormation constructs directly.

The code for the shared library producer and consumer is written in Java and uses Apache Maven for dependency management. However, the same concepts apply to e.g., Node.js and npm.

Notify another account of new releases

To send events from EventBridge to another account, the receiving account needs to specify an EventBusPolicy. The AWS CDK code on the consumer account looks like the following code:

new events.CfnEventBusPolicy(this, 'EventBusPolicy', {
    statementId: 'AllowCrossAccount',
    action: 'events:PutEvents',
    principal: consumerAccount
});

With that the producer account has the permission to publish events into the event bus of the consumer account.

I’m interested in CodeArtifact events that are published on the release of a new artifact. I first create a Rule which matches those events. Next, I add a target to the rule which targets the event bus of account B. As of this writing there is no CDK construct available to directly add another account as a target. That is why I use the underlying CloudFormation CfnRule to do that. This is called an escape hatch in CDK. For more information about escape hatches, see Escape hatches.

const onLibraryReleaseRule = new events.Rule(this, 'LibraryReleaseRule', {
  eventPattern: {
    source: [ 'aws.codeartifact' ],
    detailType: [ 'CodeArtifact Package Version State Change' ],
    detail: {
      domainOwner: [ this.account ],
      domainName: [ codeArtifactDomain.domainName ],
      repositoryName: [ codeArtifactRepo.repositoryName ],
      packageVersionState: [ 'Published' ],
      packageFormat: [ 'maven' ]
    }
  }
});
/* there is currently no CDK construct provided to add an event bus in another account as a target. 
That's why we use the underlying CfnRule directly */
const cfnRule = onLibraryReleaseRule.node.defaultChild as events.CfnRule;
cfnRule.targets = [ {arn: `arn:aws:events:${this.region}:${consumerAccount}:event-bus/default`, id: 'ConsumerAccount'} ];

For more information about event formats, see CodeArtifact event format and example.

Act on new releases in the consumer account

I established the connection between the events produced by Account A and Account B: The events now are available in Account B’s event bus. To use them, I add a rule which matches this event in Account B:

const onLibraryReleaseRule = new events.Rule(this, 'LibraryReleaseRule', {
  eventPattern: {
    source: [ 'aws.codeartifact' ],
    detailType: [ 'CodeArtifact Package Version State Change' ],
    detail: {
      domainOwner: [ producerAccount ],
      packageVersionState: [ 'Published' ],
      packageFormat: [ 'maven' ]
    }
  }
});

Add a Lambda function target

Now that I created a rule to trigger anytime a new package version is published, I will now add an EventBridge target which  triggers my runTaskLambda Lambda Function. The below CDK code shows how I add our Lambda function as a target to the onLibraryRelease rule. Notice how I extract information from the event’s payload and pass it into the Lambda function’s invocation event.

onLibraryReleaseRule.addTarget(
    new targets.LambdaFunction( runTaskLambda,{
      event: events.RuleTargetInput.fromObject({
        groupId: events.EventField.fromPath('$.detail.packageNamespace'),
        artifactId: events.EventField.fromPath('$.detail.packageName'),
        version: events.EventField.fromPath('$.detail.packageVersion'),
        repoUrl: codeCommitRepo.repositoryCloneUrlHttp,
        region: this.region
      })
    }));

Filter SNAPSHOT versions

Because I’m not interested in Maven SNAPSHOT versions (such as 1.0.1-SNAPSHOT), I have to find a way to filter those and only act upon non-SNAPSHOT versions. Even though content-based filtering on event patterns is supported by Amazon EventBridge, filtering on suffixes is not supported as of this writing. This is why the Lambda function filters SNAPSHOT versions and only acts upon real, non-SNAPSHOT, releases. For those, I start a custom Amazon ECS Fargate task by using the AWS JavaScript SDK. My function passes some environment overrides to the Fargate task in order to have the required information about the artifact available at runtime.

In the following function code, I pass all required information to create a pull request into the environment of the Fargate task:

const AWS = require('aws-sdk');

const ECS = new AWS.ECS();
exports.handler = async (event) => {
    console.log(`Received event: ${JSON.stringify(event)}`)
    const artifactVersion = event.version;
    const artifactId = event.artifactId;
    if ( artifactVersion.indexOf('SNAPSHOT') > -1 ) {
        console.log(`Skipping SNAPSHOT version ${artifactVersion}`)
    } else {
        console.log(`Triggering task to create pull request for version ${artifactVersion} of artifact ${artifactId}`);
        const params = {
            launchType: 'FARGATE',
            taskDefinition: process.env.TASK_DEFINITION_ARN,
            cluster: process.env.CLUSTER_ARN,
            networkConfiguration: {
                awsvpcConfiguration: {
                    subnets: process.env.TASK_SUBNETS.split(',')
                }
            },
            overrides: {
                containerOverrides: [ {
                    name: process.env.CONTAINER_NAME,
                    environment: [
                        {name: 'REPO_URL', value: process.env.REPO_URL},
                        {name: 'REPO_NAME', value: process.env.REPO_NAME},
                        {name: 'REPO_REGION', value: process.env.REPO_REGION},
                        {name: 'ARTIFACT_VERSION', value: artifactVersion},
                        {name: 'ARTIFACT_ID', value: artifactId}
                    ]
                } ]
            }
        };
        await ECS.runTask(params).promise();
    }
};

Create the pull request

With the environment set, I can use a simple bash script inside the container to create a new Git branch, update the pom.xml with the new dependency version, push the branch to CodeCommit, and use the AWS Command Line Interface (AWS CLI) to create the pull request. The Docker entrypoint looks like the following code:

#!/usr/bin/env bash
set -e

# clone the repository and create a new branch for the change
git clone --depth 1 $REPO_URL repo && cd repo
branch="library_update_$(date +"%Y-%m-%d_%H-%M-%S")"
git checkout -b "$branch"

# replace whatever version is currently used by the new version of the library
sed -i "s/<shared\.library\.version>.*<\/shared\.library\.version>/<shared\.library\.version>${ARTIFACT_VERSION}<\/shared\.library\.version>/g" pom.xml

# stage, commit and push the change
git add pom.xml
git -c "user.name=ECS Pull Request Creator" -c "[email protected]" commit -m "Update version of ${ARTIFACT_ID} to ${ARTIFACT_VERSION}"
git push --set-upstream origin "$branch"

# create pull request
aws codecommit create-pull-request --title "Update version of ${ARTIFACT_ID} to ${ARTIFACT_VERSION}" --targets repositoryName="$REPO_NAME",sourceReference="$branch",destinationReference=main --region "$REPO_REGION"

After a successful run, I can check the CodeCommit UI for the created pull request. The following screenshot shows the changes introduced by one of my pull requests during testing:

Screenshot of the Pull Request in AWS CodeCommit

Now that I have the pull request in place, I want to verify that the dependency update does not break my consumer code. I do this by triggering a CodeBuild project with the help of EventBridge.

Build the pull request

The ingredients I use are the same as with the CodeArtifact event. I create a rule that matches the event emitted by CodeCommit (limiting it to branches that match the prefix used by our Fargate task). Afterwards I add a target to the rule to start the CodeBuild project:

const onPullRequestCreatedRule = new events.Rule(this, 'PullRequestCreatedRule', {
  eventPattern: {
    source: [ 'aws.codecommit' ],
    detailType: [ 'CodeCommit Pull Request State Change' ],
    resources: [ codeCommitRepo.repositoryArn ],
    detail: {
      event: [ 'pullRequestCreated' ],
      sourceReference: [ {
        prefix: 'refs/heads/library_update_'
      } ],
      destinationReference: [ 'refs/heads/main' ]
    }
  }
});
onPullRequestCreatedRule.addTarget( new targets.CodeBuildProject(codeBuild, {
  event: events.RuleTargetInput.fromObject( {
    projectName: codeBuild.projectName,
    sourceVersion: events.EventField.fromPath('$.detail.sourceReference')
  })
}));

This triggers the build whenever a new pull request is created with a branch prefix of refs/head/library_update_.
You can easily add the build results as a comment back to CodeCommit. For more information, see Validating AWS CodeCommit Pull Requests with AWS CodeBuild and AWS Lambda.

My last step is to notify an SNS topic in in case of a failing build. The SNS topic is a resource in Account A. To target a resource in a different account I need to forward the event to this account’s event bus. From there I then target the SNS topic.

First, I forward the failed build event from Account B into the default event bus of Account A:

const onFailedBuildRule = new events.Rule(this, 'BrokenBuildRule', {
  eventPattern: {
    detailType: [ 'CodeBuild Build State Change' ],
    source: [ 'aws.codebuild' ],
    detail: {
      'build-status': [ 'FAILED' ]
    }
  }
});
const producerAccountTarget = new targets.EventBus(events.EventBus.fromEventBusArn(this, 'cross-account-event-bus', `arn:aws:events:${this.region}:${producerAccount}:event-bus/default`))
onFailedBuildRule.addTarget(producerAccountTarget);

Then I target the SNS topic in Account A to be notified of failures:

const onFailedBuildRule = new events.Rule(this, 'BrokenBuildRule', {
  eventPattern: {
    detailType: [ 'CodeBuild Build State Change' ],
    source: [ 'aws.codebuild' ],
    account: [ consumerAccount ],
    detail: {
      'build-status': [ 'FAILED' ]
    }
  }
});
onFailedBuildRule.addTarget(new targets.SnsTopic(notificationTopic));

See it in action

I use the cdk-assume-role-credential-plugin to deploy to both accounts, producer and consumer, with a single CDK command issued to the producer account. To do this I create roles for cross account access from the producer account in the consumer account as described here. I also make sure that the accounts are bootstrapped for CDK as described here. After that I run the following steps:

  1. Deploy the Stacks:
    cd cdk && cdk deploy --context region=<YOUR_REGION> --context producerAccount=<PRODUCER_ACCOUNT_NO> --context consumerAccount==<CONSUMER_ACCOUNT_NO>  --all && cd -
  2. After a successful deployment CDK prints a set of export commands. I set my environment from those Outputs:
    ❯ export CODEARTIFACT_ACCOUNT=<MY_PRODUCER_ACCOUNT>
    ❯ export CODEARTIFACT_DOMAIN=<MY_CODEARTIFACT_DOMAIN>
    ❯ export CODEARTIFACT_REGION=<MY_REGION>
    ❯ export CODECOMMIT_URL=<MY_CODECOMMIT_URL>
  3. Setup Maven to authenticate to CodeArtifact
    export CODEARTIFACT_TOKEN=$(aws codeartifact get-authorization-token --domain $CODEARTIFACT_DOMAIN --domain-owner $CODEARTIFACT_ACCOUNT --query authorizationToken --output text)
  4. Release the first version of the shared library to CodeArtifact:
    cd library_producer/library && mvn --settings ./settings.xml deploy && cd -
  5. From a console which is authenticated/authorized for CodeCommit in the Consumer Account
    1. Setup git to work with CodeCommit
    2. Push the code of the library consumer to CodeCommit:
      cd library_consumer/library && git init && git add . && git commit -m "Add consumer to codecommit" && git remote add codecommit $CODECOMMIT_URL && git push --set-upstream codecommit main && cd -
  6. Release a new version of the shared library:
    cd library_producer/library && sed -i '' 's/<version>1.0.0/<version>1.0.1/' pom.xml && mvn --settings settings.xml deploy && cd -
  7. After 1-3 minutes a Pull Request is created in the CodeCommit repo in the Consumer Account and a build is run to verify this PR:
    Screenshot of AWS CodeBuild running the build
  8. In case of a build failure, you can create a subscription to the SNS topic in Account A to act upon the broken build.

Clean up

In case you followed along with this blog post and want to prevent incurring costs you have to delete the created resources. Run cdk destroy --context region=<YOUR_REGION> --context producerAccount=<PRODUCER_ACCOUNT_NO> --context consumerAccount==<CONSUMER_ACCOUNT_NO> --all to delete the CloudFormation stacks.

Conclusion

In this post, I automated the manual task of updating a shared library dependency version. I used a workflow that not only updates the dependency version, but also notifies the library producer in case the new artifact introduces a regression (for example, an API incompatibility with an older version). By using Amazon EventBridge I’ve created a loosely coupled solution which can be used as a basis for a feedback loop between library creators and consumers.

What next?

To improve the solution, I suggest to look into possibilities of error handling for the Fargate task. What happens if the git operation fails? How do we signal such a failure? You might want to replace the AWS Fargate portion with a Lambda-only solution and use AWS Step Functions for better error handling.

As a next step, I could think of a solution that automates updates for libraries stored in Maven Central. Wouldn’t it be nice to never miss the release of a new Spring Boot version? A Fargate task run on a schedule and the following code should get you going:

curl -sS 'https://search.maven.org/solrsearch/select?q=g:org.springframework.boot%20a:spring-boot-starter&start=0&rows=1&wt=json' | jq -r '.response.docs[ 0 ].latestVersion'

Happy Building!

Author bio

Picture of the author: Joerg Woehrle Joerg is a Solutions Architect at AWS and works with manufacturing customers in Germany. As a former Developer, DevOps Engineer and SRE he enjoys building and automating things.