All posts by Kenton Varda

Unpacking Cloudflare Workers CPU Performance Benchmarks

Post Syndicated from Kenton Varda original https://blog.cloudflare.com/unpacking-cloudflare-workers-cpu-performance-benchmarks/

On October 4, independent developer Theo Browne published a series of benchmarks designed to compare server-side JavaScript execution speed between Cloudflare Workers and Vercel, a competing compute platform built on AWS Lambda. The initial results showed Cloudflare Workers performing worse than Node.js on Vercel at a variety of CPU-intensive tasks, by a factor of as much as 3.5x.

We were surprised by the results. The benchmarks were designed to compare JavaScript execution speed in a CPU-intensive workload that never waits on external services. But, Cloudflare Workers and Node.js both use the same underlying JavaScript engine: V8, the open source engine from Google Chrome. Hence, one would expect the benchmarks to be executing essentially identical code in each environment. Physical CPUs can vary in performance, but modern server CPUs do not vary by anywhere near 3.5x.

On investigation, we discovered a wide range of small problems that contributed to the disparity, ranging from some bad tuning in our infrastructure, to differences between the JavaScript libraries used on each platform, to some issues with the test itself. We spent the week working on many of these problems, which means over the past week Workers got better and faster for all of our customers. We even fixed some problems that affect other compute providers but not us, such as an issue that made trigonometry functions much slower on Vercel. This post will dig into all the gory details.

It’s important to note that the original benchmark was not representative of billable CPU usage on Cloudflare, nor did the issues involved impact most typical workloads. Most of the disparity was an artifact of the specific benchmark methodology. Read on to understand why.

With our fixes, the results now look much more like we’d expect:


There is still work to do, but we’re happy to say that after these changes, Cloudflare now performs on par with Vercel in every benchmark case except the one based on Next.js. On that benchmark, the gap has closed considerably, and we expect to be able to eliminate it with further improvements detailed later in this post.

We are grateful to Theo for highlighting areas where we could make improvements, which will now benefit all our customers, and even many who aren’t our customers.

Our benchmark methodology

We wanted to run Theo’s test with no major design changes, in order to keep numbers comparable. Benchmark cases are nearly identical to Theo’s original test but we made a couple changes in how we ran the test, in the hopes of making the results more accurate:

  • Theo ran the test client on a laptop connected by a Webpass internet connection in San Francisco, against Vercel instances running in its sfo1 region. In order to make our results easier to reproduce, we chose instead to run our test client directly in AWS’s us-east-1 datacenter, invoking Vercel instances running in its iad1 region (which we understand to be in the same building). We felt this would minimize any impact from network latency. Because of this, Vercel’s numbers are slightly better in our results than they were in Theo’s.

  • We chose to use Vercel instances with 1 vCPU instead of 2. All of the benchmarks are single-threaded workloads, meaning they cannot take advantage of a second CPU anyway. Vercel’s CTO, Malte Ubl, had stated publicly on X that using single-CPU instances would make no difference in this test, and indeed, we found this to be correct. Using 1 vCPU makes it easier to reason about pricing, since both Vercel and Cloudflare charge for CPU time ($0.128/hr for Vercel in iad1, and $0.072/hr for Cloudflare globally).

  • We made some changes to fix bugs in the test, for which we submitted a pull request. More on this below.

Cloudflare platform improvements

Theo’s benchmarks covered a variety of frameworks, making it clear that no single JavaScript library could be at fault for the general problem. Clearly, we needed to look first at the Workers Runtime itself. And so we did, and we found two problems – not bugs, but tuning and heuristic choices which interacted poorly with the benchmarks as written.

Sharding and warm isolate routing: A problem of scheduling, not CPU speed

Over the last year we shipped smarter routing that sends traffic to warm isolates more often. That cuts cold starts for large apps, which matters for frameworks with heavy initialization requirements like Next.js. The original policy optimized for latency and throughput across billions of requests, but was less optimal for heavily CPU-bound workloads for the same reason that such workloads cause performance issues in other platforms like Node.js: When the CPU is busy computing an expensive operation for one request, other requests sent to the same isolate must wait for it to finish before they can proceed.

The system uses heuristics to detect when requests are getting blocked behind each other, and automatically spin up more isolates to compensate. However, these heuristics are not precise, and the particular workload generated by Theo’s tests – in which a burst of expensive traffic would come from a single client – played poorly with our existing algorithm. As a result, the benchmarks showed much higher latency (and variability in latency) than would normally be expected.

It’s important to understand that, as a result of this problem, the benchmark was not really measuring CPU time. Pricing on the Workers platform is based on CPU time – that is, time spent actually executing JavaScript code, as opposed to time waiting for things. Time spent waiting for the isolate to become available makes the request take longer, but is not billed as CPU time against the waiting request. So, this problem would not have affected your bill.

After analyzing the benchmarks, we updated the algorithm to detect sustained CPU-heavy work earlier, then bias traffic so that new isolates spin up faster. The result is that Workers can more effectively and efficiently autoscale when different workloads are applied. I/O-bound workloads coalesce into individual already warm isolates while CPU-bound are directed so that they do not block each other. This change has already been rolled out globally and is enabled automatically for everyone. It should be pretty clear from the graph when the change was rolled out:


V8 garbage collector tuning

While this scheduling issue accounted for the majority of the disparity in the benchmark, we did find a minor issue affecting code execution performance during our testing.

The range of issues that we uncovered in the framework code in these benchmarks repeatedly pointed at garbage collection and memory management issues as being key contributors to the results. But, we would expect these to be an issue with the same frameworks running in Node.js as well. To see exactly what was going on differently with Workers and why it was causing such a significant degradation in performance, we had to look inwards at our own memory management configuration.

The V8 garbage collector has a huge number of knobs that can be tuned that directly impact performance. One of these is the size of the “young generation”. This is where newly created objects go initially. It’s a memory area that’s less compact, but optimized for short-lived objects. When objects have bounced around the “young space” for a few generations they get moved to the old space, which is more compact, but requires more CPU to reclaim.

V8 allows the embedding runtime to tune the size of the young generation. And it turns out, we had done so. Way back in June of 2017, just two months after the Workers project kicked off, we – or specifically, I, Kenton, as I was the only engineer on the project at the time – had configured this value according to V8’s recommendations at the time for environments with 512MB of memory or less. Since Workers defaults to a limit of 128MB per isolate, this seemed appropriate.

V8’s entire garbage collector has changed dramatically since 2017. When analyzing the benchmarks, it became apparent that the setting which made sense in 2017 no longer made sense in 2025, and we were now limiting V8’s young space too rigidly. Our configuration was causing V8’s garbage collection to work harder and more frequently than it otherwise needed to. As a result, we have backed off on the manual tuning and now allow V8 to pick its young space size more freely, based on its internal heuristics. This is already live on Cloudflare Workers, and it has given an approximately 25% boost to the benchmarks with only a small increase in memory usage. Of course, the benchmarks are not the only Workers that benefit: all Workers should now be faster. That said, for most Workers the difference has been much smaller.

Tuning OpenNext for performance

The platform changes solved most of the problem. Following the changes, our testing showed we were now even on all of the benchmarks save one: Next.js.

Next.js is a popular web application framework which, historically, has not had built-in support for hosting on a wide range of platforms. Recently, a project called OpenNext has arisen to fill the gap, making Next.js work well on many platforms, including Cloudflare. On investigation, we found several missing optimizations and other opportunities to improve performance, explaining much of why the benchmark performed poorly on Workers.

Unnecessary allocations and copies

When profiling the benchmark code, we noticed that garbage collection was dominating the timeline. From 10-25% of the request processing time was being spent reclaiming memory.


So we dug in and discovered that OpenNext, and in some cases Next.js and React itself, will often create unnecessary copies of internal data buffers at some of the worst times during the handling of the process. For instance, there’s one pipeThrough() operation in the rendering pipeline that we saw creating no less than 50 2048-byte Buffer instances, whether they are actually used or not.

We further discovered that on every request, the Cloudflare OpenNext adapter has been needlessly copying every chunk of streamed output data as it’s passed out of the renderer and into the Workers runtime to return to users. Given this benchmark returns a 5 MB result on every request, that’s a lot of data being copied!

In other places, we found that arrays of internal Buffer instances were being copied and concatenated using Buffer.concat for no other reason than to get the total number of bytes in the collection. That is, we spotted code of the form getBody().length. The function getBody() would concatenate a large number of buffers into a single buffer and return it, without storing the buffer anywhere. So, all that work was being done just to read the overall length. Obviously this was not intended, and fixing it was an easy win.

We’ve started opening a series of pull requests in OpenNext to fix these issues, and others in hot paths, removing some unnecessary allocations and copies:

We’re not done. We intend to keep iterating through OpenNext code, making improvements wherever they’re needed – not only in the parts that run on Workers. Many of these improvements apply to other OpenNext platforms. The shared goal of OpenNext is to make NextJS as fast as possible regardless of where you choose to run your code.

Inefficient Streams Adapters

Much of the Next.js code was written to use Node.js’s APIs for byte streams. Workers, however, prefers the web-standard Streams API, and uses it to represent HTTP request and response bodies. This necessitates using adapters to convert between the two APIs. When investigating the performance bottlenecks, we found a number of examples where inefficient streams adapters are being needlessly applied. For example:

const stream = Readable.toWeb(Readable.from(res.getBody()))

res.getBody() was performing a Buffer.concat(chunks) to copy accumulated chunks of data into a new Buffer, which was then passed as an iterable into a Node.js stream.Readable that was then wrapped by an adapter that returns a ReadableStream. While these utilities do serve a useful purpose, this becomes a data buffering nightmare since both Node.js streams and Web streams each apply their own internal buffers! Instead we can simply do:

const stream = ReadableStream.from(chunks);

This returns a ReadableStream directly from the accumulated chunks without additional copies, extraneous buffering, or passing everything through inefficient adaptation layers.

In other places we see that Next.js and React make extensive use of ReadableStream to pass bytes through, but the streams being created are value-oriented rather than byte-oriented! For example,

const readable = new ReadableStream({
  pull(controller) {
    controller.enqueue(chunks.shift());
    if (chunks.length === 0) {
      controller.close();
    }
});  // Default highWaterMark is 1!

Seems perfectly reasonable. However, there’s an issue here. If the chunks are Buffer or Uint8Array instances, every instance ends up being a separate read by default. So if the chunk is only a single byte, or 1000 bytes, that’s still always two reads. By converting this to a byte stream with a reasonable high water mark, we can make it possible to read this stream much more efficiently:

const readable = new ReadableStream({
  type: 'bytes',
  pull(controller) {
    controller.enqueue(chunks.shift());
    if (chunks.length === 0) {
      controller.close();
    }
}, { highWaterMark: 4096 });

Now, the stream can be read as a stream of bytes rather than a stream of distinct JavaScript values, and the individual chunks can be coalesced internally into 4096 byte chunks, making it possible to optimize the reads much more efficiently. Rather than reading each individual enqueued chunk one at a time, the ReadableStream will proactively call pull() repeatedly until the highWaterMark is reached. Reads then do not have to ask the stream for one chunk of data at a time.

While it would be best for the rendering pipeline to be using byte streams and paying attention to back pressure signals more, our implementation can still be tuned to better handle cases like this.

The bottom line? We’ve got some work to do! There are a number of improvements to make in the implementation of OpenNext and the adapters that allow it to work on Cloudflare that we will continue to investigate and iterate on. We’ve made a handful of these fixes already and we’re already seeing improvements. Soon we also plan to start submitting patches to Next.js and React to make further improvements upstream that will ideally benefit the entire ecosystem.

JSON parsing

Aside from buffer allocations and streams, one additional item stood out like a sore thumb in the profiles: JSON.parse() with a reviver function. This is used in both React and Next.js and in our profiling this was significantly slower than it should be. We built a microbenchmark and found that JSON.parse with a reviver argument recently got even slower when the standard added a third argument to the reviver callback to provide access to the JSON source context.

For those unfamiliar with the reviver function, it allows an application to effectively customize how JSON is parsed. But it has drawbacks. The function gets called on every key-value pair included in the JSON structure, including every individual element of an Array that gets serialized. In Theo’s NextJS benchmark, in any single request, it ends up being called well over 100,000 times!

Even though this problem affects all platforms, not just ours, we decided that we weren’t just going to accept it. After all, we have contributors to V8 on the Workers runtime team! We’ve upstreamed a V8 patch that can speed up JSON.parse() with revivers by roughly 33 percent. That should be in V8 starting with version 14.3 (Chrome 143) and can help everyone using V8, not just Cloudflare: Node.js, Chrome, Deno, the entire ecosystem.  If you are not using Cloudflare Workers or didn’t change the syntax of your reviver you are currently suffering under the red performance bar.

We will continue to work with framework authors to reduce overhead in hot paths. Some changes belong in the frameworks, some belong in the engine, some in our platform.

Node.js’s trigonometry problem

We are engineers, and we like to solve engineering problems — whether our own, or for the broader community.

Theo’s benchmarks were actually posted in response to a different benchmark by another author which compared Cloudflare Workers against Vercel. The original benchmark focused on calling trigonometry functions (e.g. sine and cosine) in a tight loop. In this benchmark, Cloudflare Workers performed 3x faster than Node.js running on Vercel.

The author of the original benchmark offered this as evidence that Cloudflare Workers are just faster. Theo disagreed, and so did we. We expect to be faster, but not by 3x! We don’t implement math functions ourselves; these come with V8. We weren’t happy to just accept the win, so we dug in.

It turns out that Node.js is not using the latest, fastest path for these functions. Node.js can be built with either the clang or gcc compilers, and is written to support a broader range of operating systems and architectures than Workers. This means that Node.js’ compilation often ends up using a lowest-common denominator for some things in order to provide support for the broadest range of platforms. V8 includes a compile-time flag that, in some configurations, allows it to use a faster implementation of the trig functions. In Workers, mostly by coincidence, that flag is enabled by default. In Node.js, it is not. We’ve opened a pull request to enable the flag in Node.js so that everyone benefits, at least on platforms where it can be supported.

Assuming that lands, and once AWS Lambda and Vercel are able to pick it up, we expect this specific gap to go away, making these operations faster for everyone. This change won’t benefit our customers, since Cloudflare Workers already uses the faster trig functions, but a bug is a bug and we like making everything faster.

Benchmarks are hard

Even the best benchmarks have bias and tradeoffs. It’s difficult to create a benchmark that is truly representative of real-world performance, and all too easy to misinterpret the results of benchmarks that are not. We particularly liked Planetscale’s take on this subject.

These specific CPU-bound tests are not an ideal choice to represent web applications. Theo even notes this in his video. Most real-world applications on Workers and Vercel are bound by databases, downstream services, network, and page size. End user experience is what matters. CPU is one piece of that picture. That said, if a benchmark shows us slower, we take it seriously.

While the benchmarks helped us find and fix many real problems, we also found a few problems with the benchmarks themselves, which contributed to the apparent disparity in speed:

Running locally

The benchmark is designed to be run on your laptop, from which it hits Cloudflare’s and Vercel’s servers over the Internet. It makes the assumption that latency observed from the client is a close enough approximation of server-side CPU time. The reasons are fair: As Theo notes, Cloudflare does not permit an application to measure its own CPU time, in order to prevent timing side channel attacks. Actual CPU time can be seen in logs after the fact, but gathering those may be a lot of work. It’s just easier to measure time from the client.

However, as Cloudflare and Vercel are hosted from different data centers, the network latency to each can be a factor in the benchmark, and this can skew the results. Typically, this effect will favor Cloudflare, because Cloudflare can run your Worker in locations spread across 330+ cities worldwide, and will tend to choose the closest one to you. Vercel, on the other hand, usually places compute in a central location, so latency will vary depending on your distance from that location.

For our own testing, to minimize this effect, we ran the benchmark client from a VM on AWS located in the same data center as our Vercel instances. Since Cloudflare is well-connected to every AWS location, we think this should have eliminated network latency from the picture. We chose AWS’s us-east-1 / Vercel’s iad1 for our test as it is widely seen as the default choice; any other choice could draw questions about cherry-picking.

Not all CPUs are equal

Cloudflare’s servers aren’t all identical. Although we refresh them aggressively, there will always be multiple generations of hardware in production at any particular time. Currently, this includes generations 10, 11, and 12 of our server hardware.

Other cloud providers are no different. No cloud provider simply throws away all their old servers every time a new version becomes available.

Of course, newer CPUs run faster, even for single-threaded workloads. The differences are not as large as they used to be 20-30 years ago, but they are not nothing. As such, an application may get (a little bit) lucky or unlucky depending on what machine it is assigned to.

In cloud environments, even identical CPUs can yield different performance depending on circumstances, due to multitenancy. The server your application is assigned to is running many others as well. In AWS Lambda, a server may be running hundreds of applications; in Cloudflare, with our ultra-efficient runtime, a server may be running thousands. These “noisy neighbors” won’t share the same CPU core as your app, but they may share other resources, such as memory bandwidth. As a result, performance can vary.

It’s important to note that these problems create correlated noise. That is, if you run the test again, the application is likely to remain assigned to the same machines as before – this is true of both Cloudflare and Vercel. So, this noise cannot be corrected by simply running more iterations. To correct for this type of noise on Cloudflare, one would need to initiate requests from a variety of geographic locations, in order to hit different Cloudflare data centers and therefore different machines. But, that is admittedly a lot of work. (We are not familiar with how best to get an application to switch machines on Vercel.)

A Next.js config bug

The Cloudflare version of the NextJS benchmark was not configured to use force-dynamic while the Vercel version was. This triggered curious behavior. Our understanding is that pages which are not “dynamic” should normally be rendered statically at build time. With OpenNext, however, it appears the pages are still rendered dynamically, but if multiple requests for the same page are received at the same time, OpenNext will only invoke the rendering once. Before we made the changes to fix our scheduling algorithm to avoid sending too many requests to the same isolate, this behavior may have somewhat counteracted that problem. Theo reports that he had disabled force-dynamic in the Cloudflare version specifically for this reason: with it on, our results were so bad as to appear outright broken, so he intentionally turned it off.

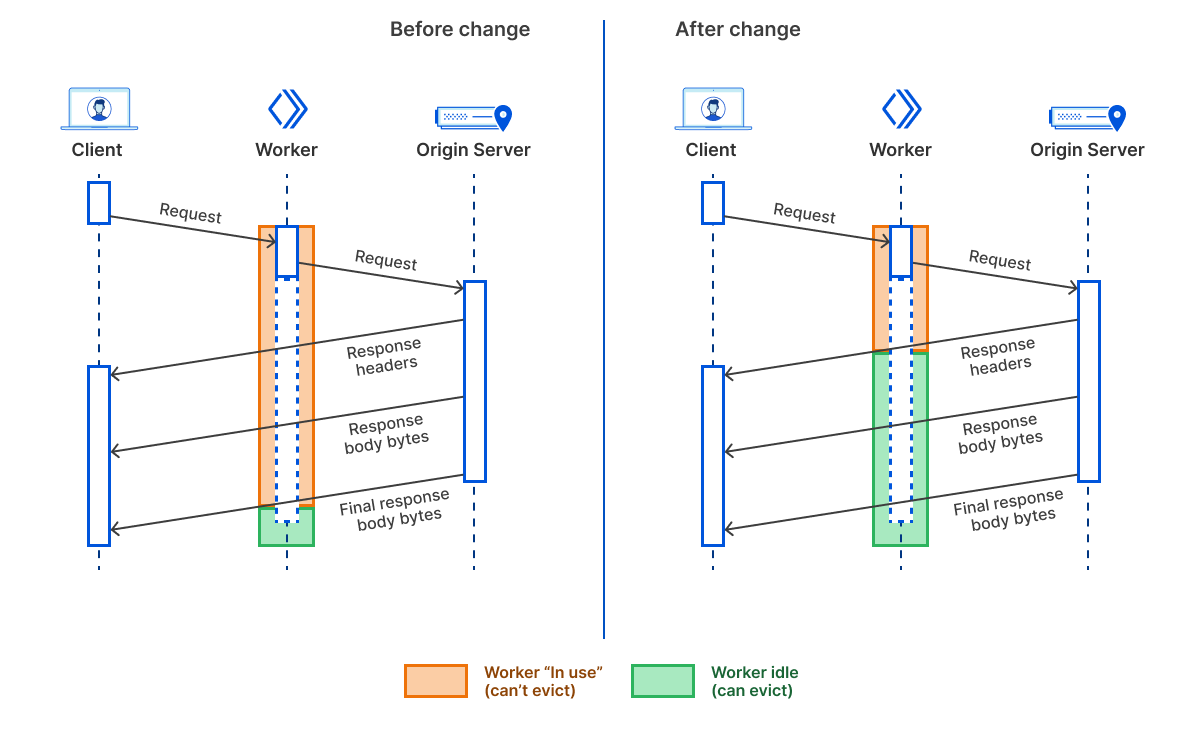
Ironically, though, once we fixed the scheduling issue, using “static” rendering (i.e. not enabling force-dynamic) hurt Cloudflare’s performance for other reasons. It seems that when OpenNext renders a “cacheable” page, streaming of the response body is inhibited. This interacted poorly with a property of the benchmark client: it measured time-to-first-byte (TTFB), rather than total request/response time. When running in dynamic mode – as the test did on Vercel – the first byte would be returned to the client before the full page had been rendered. The rest of the rendering would happen as bytes streamed out. But with OpenNext in non-dynamic mode, the entire payload was rendered into a giant buffer upfront, before any bytes were returned to the client.

Due to the TTFB behavior of the benchmark client, in dynamic mode, the benchmark actually does not measure the time needed to fully render the page. We became suspicious when we noticed that Vercel’s observability tools indicated more CPU time had been spent than the benchmark itself had reported.

One option would have been to change the benchmarks to use TTLB instead – that is, wait until the last byte is received before stopping the timer. However, this would make the benchmark even more affected by network differences: The responses are quite large, ranging from 2MB to 15MB, and so the results could vary depending on the bandwidth to the provider. Indeed, this would tend to favor Cloudflare, but as the point of the test is to measure CPU speed, not bandwidth, it would be an unfair advantage.

Once we changed the Cloudflare version of the test to use force-dynamic as well, matching the Vercel version, the streaming behavior then matched, making the request fair. This means that neither version is actually measuring the cost of rendering the full page to HTML, but at least they are now measuring the same thing.

As a side note, the original behavior allowed us to spot that OpenNext has a couple of performance bottlenecks in its implementation of the composable cache it uses to deduplicate rendering requests. While fixes to these aren’t going to impact the numbers for this particular set of benchmarks, we’re working on improving those pieces also.

A React SSR config bug

The React SSR benchmark contained a more basic configuration error. React inspects the environment variable NODE_ENV to decide whether the environment is “production” or a development environment. Many Node.js-based environments, including Vercel, set this variable automatically in production. Many frameworks, such as OpenNext, automatically set this variable for Workers in production as well. However, the React SSR benchmark was written against lower-level React APIs, not using any framework. In this case, the NODE_ENV variable wasn’t being set at all.

And, unfortunately, when NODE_ENV is not set, React defaults to “dev mode”, a mode that contains extra debugging checks and is therefore much slower than production mode. As a result, the numbers for Workers were much worse than they should have been.

Arguably, it may make sense for Workers to set this variable automatically for all deployed workers, particularly when Node.js compatibility is enabled. We are looking into doing this in the future, but for now we’ve updated the test to set it directly.

What we’re going to do next

Our improvements to the Workers Runtime are already live for all workers, so you do not need to change anything. Many apps will already see faster, steadier tail latency on compute heavy routes with less jitter during bursts. In places where garbage collection improved, some workloads will also use fewer billed CPU seconds.

We also sent Theo a pull request to update OpenNext with our improvements there, and with other test fixes.

But we’re far from done. We still have work to do to close the gap between OpenNext and Next.js on Vercel – but given the other benchmark results, it’s clear we can get there. We also have plans for further improvements to our scheduling algorithm, so that requests almost never block each other. We will continue to improve V8, and even Node.js – the Workers team employs multiple core contributors to each project. Our approach is simple: improve open source infrastructure so that everyone gets faster, then make sure our platform makes the most of those improvements.

And, obviously, we’ll be writing more benchmarks, to make sure we’re catching these kinds of issues ourselves in the future. If you have a benchmark that shows Workers being slower, send it to us with a repro. We will profile it, fix what we can upstream, and share back what we learn!

Code Mode: the better way to use MCP

Post Syndicated from Kenton Varda original https://blog.cloudflare.com/code-mode/

It turns out we’ve all been using MCP wrong.

Most agents today use MCP by directly exposing the “tools” to the LLM.

We tried something different: Convert the MCP tools into a TypeScript API, and then ask an LLM to write code that calls that API.

The results are striking:

  1. We found agents are able to handle many more tools, and more complex tools, when those tools are presented as a TypeScript API rather than directly. Perhaps this is because LLMs have an enormous amount of real-world TypeScript in their training set, but only a small set of contrived examples of tool calls.

  2. The approach really shines when an agent needs to string together multiple calls. With the traditional approach, the output of each tool call must feed into the LLM’s neural network, just to be copied over to the inputs of the next call, wasting time, energy, and tokens. When the LLM can write code, it can skip all that, and only read back the final results it needs.

In short, LLMs are better at writing code to call MCP, than at calling MCP directly.

What’s MCP?

For those that aren’t familiar: Model Context Protocol is a standard protocol for giving AI agents access to external tools, so that they can directly perform work, rather than just chat with you.

Seen another way, MCP is a uniform way to:

  • expose an API for doing something,

  • along with documentation needed for an LLM to understand it,

  • with authorization handled out-of-band.

MCP has been making waves throughout 2025 as it has suddenly greatly expanded the capabilities of AI agents.

The “API” exposed by an MCP server is expressed as a set of “tools”. Each tool is essentially a remote procedure call (RPC) function – it is called with some parameters and returns a response. Most modern LLMs have the capability to use “tools” (sometimes called “function calling”), meaning they are trained to output text in a certain format when they want to invoke a tool. The program invoking the LLM sees this format and invokes the tool as specified, then feeds the results back into the LLM as input.

Anatomy of a tool call

Under the hood, an LLM generates a stream of “tokens” representing its output. A token might represent a word, a syllable, some sort of punctuation, or some other component of text.

A tool call, though, involves a token that does not have any textual equivalent. The LLM is trained (or, more often, fine-tuned) to understand a special token that it can output that means “the following should be interpreted as a tool call,” and another special token that means “this is the end of the tool call.” Between these two tokens, the LLM will typically write tokens corresponding to some sort of JSON message that describes the call.

For instance, imagine you have connected an agent to an MCP server that provides weather info, and you then ask the agent what the weather is like in Austin, TX. Under the hood, the LLM might generate output like the following. Note that here we’ve used words in <| and |> to represent our special tokens, but in fact, these tokens do not represent text at all; this is just for illustration.

I will use the Weather MCP server to find out the weather in Austin, TX.

I will use the Weather MCP server to find out the weather in Austin, TX.

<|tool_call|>
{
  "name": "get_current_weather",
  "arguments": {
    "location": "Austin, TX, USA"
  }
}
<|end_tool_call|>

Upon seeing these special tokens in the output, the LLM’s harness will interpret the sequence as a tool call. After seeing the end token, the harness pauses execution of the LLM. It parses the JSON message and returns it as a separate component of the structured API result. The agent calling the LLM API sees the tool call, invokes the relevant MCP server, and then sends the results back to the LLM API. The LLM’s harness will then use another set of special tokens to feed the result back into the LLM:

<|tool_result|>
{
  "location": "Austin, TX, USA",
  "temperature": 93,
  "unit": "fahrenheit",
  "conditions": "sunny"
}
<|end_tool_result|>

The LLM reads these tokens in exactly the same way it would read input from the user – except that the user cannot produce these special tokens, so the LLM knows it is the result of the tool call. The LLM then continues generating output like normal.

Different LLMs may use different formats for tool calling, but this is the basic idea.

What’s wrong with this?

The special tokens used in tool calls are things LLMs have never seen in the wild. They must be specially trained to use tools, based on synthetic training data. They aren’t always that good at it. If you present an LLM with too many tools, or overly complex tools, it may struggle to choose the right one or to use it correctly. As a result, MCP server designers are encouraged to present greatly simplified APIs as compared to the more traditional API they might expose to developers.

Meanwhile, LLMs are getting really good at writing code. In fact, LLMs asked to write code against the full, complex APIs normally exposed to developers don’t seem to have too much trouble with it. Why, then, do MCP interfaces have to “dumb it down”? Writing code and calling tools are almost the same thing, but it seems like LLMs can do one much better than the other?

The answer is simple: LLMs have seen a lot of code. They have not seen a lot of “tool calls”. In fact, the tool calls they have seen are probably limited to a contrived training set constructed by the LLM’s own developers, in order to try to train it. Whereas they have seen real-world code from millions of open source projects.

Making an LLM perform tasks with tool calling is like putting Shakespeare through a month-long class in Mandarin and then asking him to write a play in it. It’s just not going to be his best work.

But MCP is still useful, because it is uniform

MCP is designed for tool-calling, but it doesn’t actually have to be used that way.

The “tools” that an MCP server exposes are really just an RPC interface with attached documentation. We don’t really have to present them as tools. We can take the tools, and turn them into a programming language API instead.

But why would we do that, when the programming language APIs already exist independently? Almost every MCP server is just a wrapper around an existing traditional API – why not expose those APIs?

Well, it turns out MCP does something else that’s really useful: It provides a uniform way to connect to and learn about an API.

An AI agent can use an MCP server even if the agent’s developers never heard of the particular MCP server, and the MCP server’s developers never heard of the particular agent. This has rarely been true of traditional APIs in the past. Usually, the client developer always knows exactly what API they are coding for. As a result, every API is able to do things like basic connectivity, authorization, and documentation a little bit differently.

This uniformity is useful even when the AI agent is writing code. We’d like the AI agent to run in a sandbox such that it can only access the tools we give it. MCP makes it possible for the agentic framework to implement this, by handling connectivity and authorization in a standard way, independent of the AI code. We also don’t want the AI to have to search the Internet for documentation; MCP provides it directly in the protocol.

OK, how does it work?

We have already extended the Cloudflare Agents SDK to support this new model!

For example, say you have an app built with ai-sdk that looks like this:

const stream = streamText({
  model: openai("gpt-5"),
  system: "You are a helpful assistant",
  messages: [
    { role: "user", content: "Write a function that adds two numbers" }
  ],
  tools: {
    // tool definitions 
  }
})

You can wrap the tools and prompt with the codemode helper, and use them in your app: 

import { codemode } from "agents/codemode/ai";

const {system, tools} = codemode({
  system: "You are a helpful assistant",
  tools: {
    // tool definitions 
  },
  // ...config
})

const stream = streamText({
  model: openai("gpt-5"),
  system,
  tools,
  messages: [
    { role: "user", content: "Write a function that adds two numbers" }
  ]
})

With this change, your app will now start generating and running code that itself will make calls to the tools you defined, MCP servers included. We will introduce variants for other libraries in the very near future. Read the docs for more details and examples. 

Converting MCP to TypeScript

When you connect to an MCP server in “code mode”, the Agents SDK will fetch the MCP server’s schema, and then convert it into a TypeScript API, complete with doc comments based on the schema.

For example, connecting to the MCP server at https://gitmcp.io/cloudflare/agents, will generate a TypeScript definition like this:

interface FetchAgentsDocumentationInput {
  [k: string]: unknown;
}
interface FetchAgentsDocumentationOutput {
  [key: string]: any;
}

interface SearchAgentsDocumentationInput {
  /**
   * The search query to find relevant documentation
   */
  query: string;
}
interface SearchAgentsDocumentationOutput {
  [key: string]: any;
}

interface SearchAgentsCodeInput {
  /**
   * The search query to find relevant code files
   */
  query: string;
  /**
   * Page number to retrieve (starting from 1). Each page contains 30
   * results.
   */
  page?: number;
}
interface SearchAgentsCodeOutput {
  [key: string]: any;
}

interface FetchGenericUrlContentInput {
  /**
   * The URL of the document or page to fetch
   */
  url: string;
}
interface FetchGenericUrlContentOutput {
  [key: string]: any;
}

declare const codemode: {
  /**
   * Fetch entire documentation file from GitHub repository:
   * cloudflare/agents. Useful for general questions. Always call
   * this tool first if asked about cloudflare/agents.
   */
  fetch_agents_documentation: (
    input: FetchAgentsDocumentationInput
  ) => Promise<FetchAgentsDocumentationOutput>;

  /**
   * Semantically search within the fetched documentation from
   * GitHub repository: cloudflare/agents. Useful for specific queries.
   */
  search_agents_documentation: (
    input: SearchAgentsDocumentationInput
  ) => Promise<SearchAgentsDocumentationOutput>;

  /**
   * Search for code within the GitHub repository: "cloudflare/agents"
   * using the GitHub Search API (exact match). Returns matching files
   * for you to query further if relevant.
   */
  search_agents_code: (
    input: SearchAgentsCodeInput
  ) => Promise<SearchAgentsCodeOutput>;

  /**
   * Generic tool to fetch content from any absolute URL, respecting
   * robots.txt rules. Use this to retrieve referenced urls (absolute
   * urls) that were mentioned in previously fetched documentation.
   */
  fetch_generic_url_content: (
    input: FetchGenericUrlContentInput
  ) => Promise<FetchGenericUrlContentOutput>;
};

This TypeScript is then loaded into the agent’s context. Currently, the entire API is loaded, but future improvements could allow an agent to search and browse the API more dynamically – much like an agentic coding assistant would.

Running code in a sandbox

Instead of being presented with all the tools of all the connected MCP servers, our agent is presented with just one tool, which simply executes some TypeScript code.

The code is then executed in a secure sandbox. The sandbox is totally isolated from the Internet. Its only access to the outside world is through the TypeScript APIs representing its connected MCP servers.

These APIs are backed by RPC invocation which calls back to the agent loop. There, the Agents SDK dispatches the call to the appropriate MCP server.

The sandboxed code returns results to the agent in the obvious way: by invoking console.log(). When the script finishes, all the output logs are passed back to the agent.


Dynamic Worker loading: no containers here

This new approach requires access to a secure sandbox where arbitrary code can run. So where do we find one? Do we have to run containers? Is that expensive?

No. There are no containers. We have something much better: isolates.

The Cloudflare Workers platform has always been based on V8 isolates, that is, isolated JavaScript runtimes powered by the V8 JavaScript engine.

Isolates are far more lightweight than containers. An isolate can start in a handful of milliseconds using only a few megabytes of memory.

Isolates are so fast that we can just create a new one for every piece of code the agent runs. There’s no need to reuse them. There’s no need to prewarm them. Just create it, on demand, run the code, and throw it away. It all happens so fast that the overhead is negligible; it’s almost as if you were just eval()ing the code directly. But with security.

The Worker Loader API

Until now, though, there was no way for a Worker to directly load an isolate containing arbitrary code. All Worker code instead had to be uploaded via the Cloudflare API, which would then deploy it globally, so that it could run anywhere. That’s not what we want for Agents! We want the code to just run right where the agent is.

To that end, we’ve added a new API to the Workers platform: the Worker Loader API. With it, you can load Worker code on-demand. Here’s what it looks like:

// Gets the Worker with the given ID, creating it if no such Worker exists yet.
let worker = env.LOADER.get(id, async () => {
  // If the Worker does not already exist, this callback is invoked to fetch
  // its code.

  return {
    compatibilityDate: "2025-06-01",

    // Specify the worker's code (module files).
    mainModule: "foo.js",
    modules: {
      "foo.js":
        "export default {\n" +
        "  fetch(req, env, ctx) { return new Response('Hello'); }\n" +
        "}\n",
    },

    // Specify the dynamic Worker's environment (`env`).
    env: {
      // It can contain basic serializable data types...
      SOME_NUMBER: 123,

      // ... and bindings back to the parent worker's exported RPC
      // interfaces, using the new `ctx.exports` loopback bindings API.
      SOME_RPC_BINDING: ctx.exports.MyBindingImpl({props})
    },

    // Redirect the Worker's `fetch()` and `connect()` to proxy through
    // the parent worker, to monitor or filter all Internet access. You
    // can also block Internet access completely by passing `null`.
    globalOutbound: ctx.exports.OutboundProxy({props}),
  };
});

// Now you can get the Worker's entrypoint and send requests to it.
let defaultEntrypoint = worker.getEntrypoint();
await defaultEntrypoint.fetch("http://example.com");

// You can get non-default entrypoints as well, and specify the
// `ctx.props` value to be delivered to the entrypoint.
let someEntrypoint = worker.getEntrypoint("SomeEntrypointClass", {
  props: {someProp: 123}
});

You can start playing with this API right now when running workerd locally with Wrangler (check out the docs), and you can sign up for beta access to use it in production.

Workers are better sandboxes

The design of Workers makes it unusually good at sandboxing, especially for this use case, for a few reasons:

Faster, cheaper, disposable sandboxes

The Workers platform uses isolates instead of containers. Isolates are much lighter-weight and faster to start up. It takes mere milliseconds to start a fresh isolate, and it’s so cheap we can just create a new one for every single code snippet the agent generates. There’s no need to worry about pooling isolates for reuse, prewarming, etc.

We have not yet finalized pricing for the Worker Loader API, but because it is based on isolates, we will be able to offer it at a significantly lower cost than container-based solutions.

Isolated by default, but connected with bindings

Workers are just better at handling isolation.

In Code Mode, we prohibit the sandboxed worker from talking to the Internet. The global fetch() and connect() functions throw errors.

But on most platforms, this would be a problem. On most platforms, the way you get access to private resources is, you start with general network access. Then, using that network access, you send requests to specific services, passing them some sort of API key to authorize private access.

But Workers has always had a better answer. In Workers, the “environment” (env object) doesn’t just contain strings, it contains live objects, also known as “bindings”. These objects can provide direct access to private resources without involving generic network requests.

In Code Mode, we give the sandbox access to bindings representing the MCP servers it is connected to. Thus, the agent can specifically access those MCP servers without having network access in general.

Limiting access via bindings is much cleaner than doing it via, say, network-level filtering or HTTP proxies. Filtering is hard on both the LLM and the supervisor, because the boundaries are often unclear: the supervisor may have a hard time identifying exactly what traffic is legitimately necessary to talk to an API. Meanwhile, the LLM may have difficulty guessing what kinds of requests will be blocked. With the bindings approach, it’s well-defined: the binding provides a JavaScript interface, and that interface is allowed to be used. It’s just better this way.

No API keys to leak

An additional benefit of bindings is that they hide API keys. The binding itself provides an already-authorized client interface to the MCP server. All calls made on it go to the agent supervisor first, which holds the access tokens and adds them into requests sent on to MCP.

This means that the AI cannot possibly write code that leaks any keys, solving a common security problem seen in AI-authored code today.

Try it now!

Sign up for the production beta

The Dynamic Worker Loader API is in closed beta. To use it in production, sign up today.

Or try it locally

If you just want to play around, though, Dynamic Worker Loading is fully available today when developing locally with Wrangler and workerd – check out the docs for Dynamic Worker Loading and code mode in the Agents SDK to get started.

Cap’n Web: a new RPC system for browsers and web servers

Post Syndicated from Kenton Varda original https://blog.cloudflare.com/capnweb-javascript-rpc-library/

Allow us to introduce Cap’n Web, an RPC protocol and implementation in pure TypeScript.

Cap’n Web is a spiritual sibling to Cap’n Proto, an RPC protocol I (Kenton) created a decade ago, but designed to play nice in the web stack. That means:

  • Like Cap’n Proto, it is an object-capability protocol. (“Cap’n” is short for “capabilities and”.) We’ll get into this more below, but it’s incredibly powerful.

  • Unlike Cap’n Proto, Cap’n Web has no schemas. In fact, it has almost no boilerplate whatsoever. This means it works more like the JavaScript-native RPC system in Cloudflare Workers.

  • That said, it integrates nicely with TypeScript.

  • Also unlike Cap’n Proto, Cap’n Web’s underlying serialization is human-readable. In fact, it’s just JSON, with a little pre-/post-processing.

  • It works over HTTP, WebSocket, and postMessage() out-of-the-box, with the ability to extend it to other transports easily.

  • It works in all major browsers, Cloudflare Workers, Node.js, and other modern JavaScript runtimes.

  • The whole thing compresses (minify+gzip) to under 10 kB with no dependencies.

  • It’s open source under the MIT license.

Cap’n Web is more expressive than almost every other RPC system, because it implements an object-capability RPC model. That means it:

  • Supports bidirectional calling. The client can call the server, and the server can also call the client.

  • Supports passing functions by reference: If you pass a function over RPC, the recipient receives a “stub”. When they call the stub, they actually make an RPC back to you, invoking the function where it was created. This is how bidirectional calling happens: the client passes a callback to the server, and then the server can call it later.

  • Similarly, supports passing objects by reference: If a class extends the special marker type RpcTarget, then instances of that class are passed by reference, with method calls calling back to the location where the object was created.

  • Supports promise pipelining. When you start an RPC, you get back a promise. Instead of awaiting it, you can immediately use the promise in dependent RPCs, thus performing a chain of calls in a single network round trip.

  • Supports capability-based security patterns.

In short, Cap’n Web lets you design RPC interfaces the way you’d design regular JavaScript APIs – while still acknowledging and compensating for network latency.

The best part is, Cap’n Web is absolutely trivial to set up.

A client looks like this:

import { newWebSocketRpcSession } from "capnweb";

// One-line setup.
let api = newWebSocketRpcSession("wss://example.com/api");

// Call a method on the server!
let result = await api.hello("World");

console.log(result);

And here’s a complete Cloudflare Worker implementing an RPC server:

import { RpcTarget, newWorkersRpcResponse } from "capnweb";

// This is the server implementation.
class MyApiServer extends RpcTarget {
  hello(name) {
    return `Hello, ${name}!`
  }
}

// Standard Workers HTTP handler.
export default {
  fetch(request, env, ctx) {
    // Parse URL for routing.
    let url = new URL(request.url);

    // Serve API at `/api`.
    if (url.pathname === "/api") {
      return newWorkersRpcResponse(request, new MyApiServer());
    }

    // You could serve other endpoints here...
    return new Response("Not found", {status: 404});
  }
}

That’s it. That’s the app.

  • You can add more methods to MyApiServer, and call them from the client.

  • You can have the client pass a callback function to the server, and then the server can just call it.

  • You can define a TypeScript interface for your API, and easily apply it to the client and server.

It just works.

Why RPC? (And what is RPC anyway?)

Remote Procedure Calls (RPC) are a way of expressing communications between two programs over a network. Without RPC, you might communicate using a protocol like HTTP. With HTTP, though, you must format and parse your communications as an HTTP request and response, perhaps designed in REST style. RPC systems try to make communications look like a regular function call instead, as if you were calling a library rather than a remote service. The RPC system provides a “stub” object on the client side which stands in for the real server-side object. When a method is called on the stub, the RPC system figures out how to serialize and transmit the parameters to the server, invoke the method on the server, and then transmit the return value back.

The merits of RPC have been subject to a great deal of debate. RPC is often accused of committing many of the fallacies of distributed computing.

But this reputation is outdated. When RPC was first invented some 40 years ago, async programming barely existed. We did not have Promises, much less async and await. Early RPC was synchronous: calls would block the calling thread waiting for a reply. At best, latency made the program slow. At worst, network failures would hang or crash the program. No wonder it was deemed “broken”.

Things are different today. We have Promise and async and await, and we can throw exceptions on network failures. We even understand how RPCs can be pipelined so that a chain of calls takes only one network round trip. Many large distributed systems you likely use every day are built on RPC. It works.

The fact is, RPC fits the programming model we’re used to. Every programmer is trained to think in terms of APIs composed of function calls, not in terms of byte stream protocols nor even REST. Using RPC frees you from the need to constantly translate between mental models, allowing you to move faster.

When should you use Cap’n Web?

Cap’n Web is useful anywhere where you have two JavaScript applications speaking to each other over a network, including client-to-server and microservice-to-microservice scenarios. However, it is particularly well-suited to interactive web applications with real-time collaborative features, as well as modeling interactions over complex security boundaries.

Cap’n Web is still new and experimental, so for now, a willingness to live on the cutting edge may also be required!

Features, features, features…

Here’s some more things you can do with Cap’n Web.

HTTP batch mode

Sometimes a WebSocket connection is a bit too heavyweight. What if you just want to make a quick one-time batch of calls, but don’t need an ongoing connection?

For that, Cap’n Web supports HTTP batch mode:

import { newHttpBatchRpcSession } from "capnweb";

let batch = newHttpBatchRpcSession("https://example.com/api");

let result = await batch.hello("World");

console.log(result);

(The server is exactly the same as before.)

Note that once you’ve awaited an RPC in the batch, the batch is done, and all the remote references received through it become broken. To make more calls, you need to start over with a new batch. However, you can make multiple calls in a single batch:

let batch = newHttpBatchRpcSession("https://example.com/api");

// We can call make multiple calls, as long as we await them all at once.
let promise1 = batch.hello("Alice");
let promise2 = batch.hello("Bob");

let [result1, result2] = await Promise.all([promise1, promise2]);

console.log(result1);
console.log(result2);

And that brings us to another feature…

Chained calls (Promise Pipelining)

Here’s where things get magical.

In both batch mode and WebSocket mode, you can make a call that depends on the result of another call, without waiting for the first call to finish. In batch mode, that means you can, in a single batch, call a method, then use its result in another call. The entire batch still requires only one network round trip.

For example, say your API is:

class MyApiServer extends RpcTarget {
  getMyName() {
    return "Alice";
  }

  hello(name) {
    return `Hello, ${name}!`
  }
}

You can do:

let namePromise = batch.getMyName();
let result = await batch.hello(namePromise);

console.log(result);

Notice the initial call to getMyName() returned a promise, but we used the promise itself as the input to hello(), without awaiting it first. With Cap’n Web, this just works: The client sends a message to the server saying: “Please insert the result of the first call into the parameters of the second.”

Or perhaps the first call returns an object with methods. You can call the methods immediately, without awaiting the first promise, like:

let batch = newHttpBatchRpcSession("https://example.com/api");

// Authencitate the API key, returning a Session object.
let sessionPromise = batch.authenticate(apiKey);

// Get the user's name.
let name = await sessionPromise.whoami();

console.log(name);

This works because the promise returned by a Cap’n Web call is not a regular promise. Instead, it’s a JavaScript Proxy object. Any methods you call on it are interpreted as speculative method calls on the eventual result. These calls are sent to the server immediately, telling the server: “When you finish the call I sent earlier, call this method on what it returns.”

Did you spot the security?

This last example shows an important security pattern enabled by Cap’n Web’s object-capability model.

When we call the authenticate() method, after it has verified the provided API key, it returns an authenticated session object. The client can then make further RPCs on the session object to perform operations that require authorization as that user. The server code might look like this:

class MyApiServer extends RpcTarget {
  authenticate(apiKey) {
    let username = await checkApiKey(apiKey);
    return new AuthenticatedSession(username);
  }
}

class AuthenticatedSession extends RpcTarget {
  constructor(username) {
    super();
    this.username = username;
  }

  whoami() {
    return this.username;
  }

  // ...other methods requiring auth...
}

Here’s what makes this work: It is impossible for the client to “forge” a session object. The only way to get one is to call authenticate(), and have it return successfully.

In most RPC systems, it is not possible for one RPC to return a stub pointing at a new RPC object in this way. Instead, all functions are top-level, and can be called by anyone. In such a traditional RPC system, it would be necessary to pass the API key again to every function call, and check it again on the server each time. Or, you’d need to do authorization outside of the RPC system entirely.

This is a common pain point for WebSockets in particular. Due to the design of the web APIs for WebSocket, you generally cannot use headers nor cookies to authorize them. Instead, authorization must happen in-band, by sending a message over the WebSocket itself. But this can be annoying for RPC protocols, as it means the authentication message is “special” and changes the state of the connection itself, affecting later calls. This breaks the abstraction.

The authenticate() pattern shown above neatly makes authentication fit naturally into the RPC abstraction. It’s even type-safe: you can’t possibly forget to authenticate before calling a method requiring auth, because you wouldn’t have an object on which to make the call. Speaking of type-safety…

TypeScript

If you use TypeScript, Cap’n Web plays nicely with it. You can declare your RPC API once as a TypeScript interface, implement in on the server, and call it on the client:

// Shared interface declaration:
interface MyApi {
  hello(name: string): Promise<string>;
}

// On the client:
let api: RpcStub<MyApi> = newWebSocketRpcSession("wss://example.com/api");

// On the server:
class MyApiServer extends RpcTarget implements MyApi {
  hello(name) {
    return `Hello, ${name}!`
  }
}

Now you get end-to-end type checking, auto-completed method names, and so on.

Note that, as always with TypeScript, no type checks occur at runtime. The RPC system itself does not prevent a malicious client from calling an RPC with parameters of the wrong type. This is, of course, not a problem unique to Cap’n Web – JSON-based APIs have always had this problem. You may wish to use a runtime type-checking system like Zod to solve this. (Meanwhile, we hope to add type checking based directly on TypeScript types in the future.)

An alternative to GraphQL?

If you’ve used GraphQL before, you might notice some similarities. One benefit of GraphQL was to solve the “waterfall” problem of traditional REST APIs by allowing clients to ask for multiple pieces of data in one query. For example, instead of making three sequential HTTP calls:

GET /user
GET /user/friends
GET /user/friends/photos

…you can write one GraphQL query to fetch it all at once.

That’s a big improvement over REST, but GraphQL comes with its own tradeoffs:

  • New language and tooling. You have to adopt GraphQL’s schema language, servers, and client libraries. If your team is all-in on JavaScript, that’s a lot of extra machinery.

  • Limited composability. GraphQL queries are declarative, which makes them great for fetching data, but awkward for chaining operations or mutations. For example, you can’t easily say: “create a user, then immediately use that new user object to make a friend request, all-in-one round trip.”

  • Different abstraction model. GraphQL doesn’t look or feel like the JavaScript APIs you already know. You’re learning a new mental model rather than extending the one you use every day.

How Cap’n Web goes further

Cap’n Web solves the waterfall problem without introducing a new language or ecosystem. It’s just JavaScript. Because Cap’n Web supports promise pipelining and object references, you can write code that looks like this:

let user = api.createUser({ name: "Alice" });
let friendRequest = await user.sendFriendRequest("Bob");

What happens under the hood? Both calls are pipelined into a single network round trip:

  1. Create the user.

  2. Take the result of that call (a new User object).

  3. Immediately invoke sendFriendRequest() on that object.

All of this is expressed naturally in JavaScript, with no schemas, query languages, or special tooling required. You just call methods and pass objects around, like you would in any other JavaScript code.

In other words, GraphQL gave us a way to flatten REST’s waterfalls. Cap’n Web lets us go even further: it gives you the power to model complex interactions exactly the way you would in a normal program, with no impedance mismatch.

But how do we solve arrays?

With everything we’ve presented so far, there’s a critical missing piece to seriously consider Cap’n Web as an alternative to GraphQL: handling lists. Often, GraphQL is used to say: “Perform this query, and then, for every result, perform this other query.” For example: “List the user’s friends, and then for each one, fetch their profile photo.”

In short, we need an array.map() operation that can be performed without adding a round trip.

Cap’n Proto, historically, has never supported such a thing.

But with Cap’n Web, we’ve solved it. You can do:

let user = api.authenticate(token);

// Get the user's list of friends (an array).
let friendsPromise = user.listFriends();

// Do a .map() to annotate each friend record with their photo.
// This operates on the *promise* for the friends list, so does not
// add a round trip.
// (wait WHAT!?!?)
let friendsWithPhotos = friendsPromise.map(friend => {
  return {friend, photo: api.getUserPhoto(friend.id))};
}

// Await the friends list with attached photos -- one round trip!
let results = await friendsWithPhotos;

Wait… How!?

.map() takes a callback function, which needs to be applied to each element in the array. As we described earlier, normally when you pass a function to an RPC, the function is passed “by reference”, meaning that the remote side receives a stub, where calling that stub makes an RPC back to the client where the function was created.

But that is NOT what is happening here. That would defeat the purpose: we don’t want the server to have to round-trip to the client to process every member of the array. We want the server to just apply the transformation server-side.

To that end, .map() is special. It does not send JavaScript code to the server, but it does send something like “code”, restricted to a domain-specific, non-Turing-complete language. The “code” is a list of instructions that the server should carry out for each member of the array. In this case, the instructions are:

  1. Invoke api.getUserPhoto(friend.id).

  2. Return an object {friend, photo}, where friend is the original array element and photo is the result of step 1.

But the application code just specified a JavaScript method. How on Earth could we convert this into the narrow DSL?

The answer is record-replay: On the client side, we execute the callback once, passing in a special placeholder value. The parameter behaves like an RPC promise. However, the callback is required to be synchronous, so it cannot actually await this promise. The only thing it can do is use promise pipelining to make pipelined calls. These calls are intercepted by the implementation and recorded as instructions, which can then be sent to the server, where they can be replayed as needed.

And because the recording is based on promise pipelining, which is what the RPC protocol itself is designed to represent, it turns out that the “DSL” used to represent “instructions” for the map function is just the RPC protocol itself. 🤯

Implementation details

JSON-based serialization

Cap’n Web’s underlying protocol is based on JSON – but with a preprocessing step to handle special types. Arrays are treated as “escape sequences” that let us encode other values. For example, JSON does not have an encoding for Date objects, but Cap’n Web does. You might see a message that looks like this:

{
  event: "Birthday Week",
  timestamp: ["date", 1758499200000]
}

To encode a literal array, we simply double-wrap it in []:

{
  names: [["Alice", "Bob", "Carol"]]
}

In other words, an array with just one element which is itself an array, evaluates to the inner array literally. An array whose first element is a type name, evaluates to an instance of that type, where the remaining elements are parameters to the type.

Note that only a fixed set of types are supported: essentially, “structured clonable” types, and RPC stub types.

On top of this basic encoding, we define an RPC protocol inspired by Cap’n Proto – but greatly simplified.

RPC protocol

Since Cap’n Web is a symmetric protocol, there is no well-defined “client” or “server” at the protocol level. There are just two parties exchanging messages across a connection. Every kind of interaction can happen in either direction.

In order to make it easier to describe these interactions, I will refer to the two parties as “Alice” and “Bob”.

Alice and Bob start the connection by establishing some sort of bidirectional message stream. This may be a WebSocket, but Cap’n Web also allows applications to define their own transports. Each message in the stream is JSON-encoded, as described earlier.

Alice and Bob each maintain some state about the connection. In particular, each maintains an “export table”, describing all the pass-by-reference objects they have exposed to the other side, and an “import table”, describing the references they have received. Alice’s exports correspond to Bob’s imports, and vice versa. Each entry in the export table has a signed integer ID, which is used to reference it. You can think of these IDs like file descriptors in a POSIX system. Unlike file descriptors, though, IDs can be negative, and an ID is never reused over the lifetime of a connection.

At the start of the connection, Alice and Bob each populate their export tables with a single entry, numbered zero, representing their “main” interfaces. Typically, when one side is acting as the “server”, they will export their main public RPC interface as ID zero, whereas the “client” will export an empty interface. However, this is up to the application: either side can export whatever they want.

From there, new exports are added in two ways:

  • When Alice sends a message to Bob that contains within it an object or function reference, Alice adds the target object to her export table. IDs assigned in this case are always negative, starting from -1 and counting downwards.

  • Alice can send a “push” message to Bob to request that Bob add a value to his export table. The “push” message contains an expression which Bob evaluates, exporting the result. Usually, the expression describes a method call on one of Bob’s existing exports – this is how an RPC is made. Each “push” is assigned a positive ID on the export table, starting from 1 and counting upwards. Since positive IDs are only assigned as a result of pushes, Alice can predict the ID of each push she makes, and can immediately use that ID in subsequent messages. This is how promise pipelining is achieved.

After sending a push message, Alice can subsequently send a “pull” message, which tells Bob that once he is done evaluating the “push”, he should proactively serialize the result and send it back to Alice, as a “resolve” (or “reject”) message. However, this is optional: Alice may not actually care to receive the return value of an RPC, if Alice only wants to use it in promise pipelining. In fact, the Cap’n Web implementation will only send a “pull” message if the application has actually awaited the returned promise.

Putting it together, a code sequence like this:

{
  names: [["Alice", "Bob", "Carol"]]
}

Might produce a message exchange like this:

// Call api.getByName(). `api` is the server's main export, so has export ID 0.
-> ["push", ["pipeline", 0, "getMyName", []]
// Call api.hello(namePromise). `namePromise` refers to the result of the first push,
// so has ID 1.
-> ["push", ["pipeline", 0, "hello", [["pipeline", 1]]]]
// Ask that the result of the second push be proactively serialized and returned.
-> ["pull", 2]
// Server responds.
<- ["resolve", 2, "Hello, Alice!"]

For more details about the protocol, check out the docs.

Try it out!

Cap’n Web is new and still highly experimental. There may be bugs to shake out. But, we’re already using it today. Cap’n Web is the basis of the recently-launched “remote bindings” feature in Wrangler, allowing a local test instance of workerd to speak RPC to services in production. We’ve also begun to experiment with it in various frontend applications – expect more blog posts on this in the future.

In any case, Cap’n Web is open source, and you can start using it in your own projects now.

Check it out on GitHub.


Zero-latency SQLite storage in every Durable Object

Post Syndicated from Kenton Varda original https://blog.cloudflare.com/sqlite-in-durable-objects

Traditional cloud storage is inherently slow, because it is normally accessed over a network and must carefully synchronize across many clients that could be accessing the same data. But what if we could instead put your application code deep into the storage layer, such that your code runs directly on the machine where the data is stored, and the database itself executes as a local library embedded inside your application?

Durable Objects (DO) are a novel approach to cloud computing which accomplishes just that: Your application code runs exactly where the data is stored. Not just on the same machine: your storage lives in the same thread as the application, requiring not even a context switch to access. With proper use of caching, storage latency is essentially zero, while nevertheless being durable and consistent.

Until today, DOs only offered key/value oriented storage. But now, they support a full SQL query interface with tables and indexes, through the power of SQLite.

SQLite is the most-used SQL database implementation in the world, with billions of installations. It’s on practically every phone and desktop computer, and many embedded devices use it as well. It’s known to be blazingly fast and rock solid. But it’s been less common on the server. This is because traditional cloud architecture favors large distributed databases that live separately from application servers, while SQLite is designed to run as an embedded library. In this post, we’ll show you how Durable Objects turn this architecture on its head and unlock the full power of SQLite in the cloud.


Refresher: what are Durable Objects?

Durable Objects (DOs) are a part of the Cloudflare Workers serverless platform. A DO is essentially a small server that can be addressed by a unique name and can keep state both in-memory and on-disk. Workers running anywhere on Cloudflare’s network can send messages to a DO by its name, and all messages addressed to the same name — from anywhere in the world — will find their way to the same DO instance.

DOs are intended to be small and numerous. A single application can create billions of DOs distributed across our global network. Cloudflare automatically decides where a DO should live based on where it is accessed, automatically starts it up as needed when requests arrive, and shuts it down when idle. A DO has in-memory state while running and can also optionally store long-lived durable state. Since there is exactly one DO for each name, a DO can be used to coordinate between operations on the same logical object.

For example, imagine a real-time collaborative document editor application. Many users may be editing the same document at the same time. Each user’s changes must be broadcast to other users in real time, and conflicts must be resolved. An application built on DOs would typically create one DO for each document. The DO would receive edits from users, resolve conflicts, broadcast the changes back out to other users, and keep the document content updated in its local storage.

DOs are especially good at real-time collaboration, but are by no means limited to this use case. They are general-purpose servers that can implement any logic you desire to serve requests. Even more generally, DOs are a basic building block for distributed systems.

When using Durable Objects, it’s important to remember that they are intended to scale out, not up. A single object is inherently limited in throughput since it runs on a single thread of a single machine. To handle more traffic, you create more objects. This is easiest when different objects can handle different logical units of state (like different documents, different users, or different “shards” of a database), where each unit of state has low enough traffic to be handled by a single object. But sometimes, a lot of traffic needs to modify the same state: consider a vote counter with a million users all trying to cast votes at once. To handle such cases with Durable Objects, you would need to create a set of objects that each handle a subset of traffic and then replicate state to each other. Perhaps they use CRDTs in a gossip network, or perhaps they implement a fan-in/fan-out approach to a single primary object. Whatever approach you take, Durable Objects make it fast and easy to create more stateful nodes as needed.

Why is SQLite-in-DO so fast?

In traditional cloud architecture, stateless application servers run business logic and communicate over the network to a database. Even if the network is local, database requests still incur latency, typically measured in milliseconds.

When a Durable Object uses SQLite, SQLite is invoked as a library. This means the database code runs not just on the same machine as the DO, not just in the same process, but in the very same thread. Latency is effectively zero, because there is no communication barrier between the application and SQLite. A query can complete in microseconds.

Reads and writes are synchronous

The SQL query API in DOs does not require you to await results — they are returned synchronously:

// No awaits!
let cursor = sql.exec("SELECT name, email FROM users");
for (let user of cursor) {
  console.log(user.name, user.email);
}

This may come as a surprise to some. Querying a database is I/O, right? I/O should always be asynchronous, right? Isn’t this a violation of the natural order of JavaScript?

It’s OK! The database content is probably cached in memory already, and SQLite is being called as a library in the same thread as the application, so the query often actually won’t spend any time at all waiting for I/O. Even if it does have to go to disk, it’s a local SSD. You might as well consider the local disk as just another layer in the memory cache hierarchy: L5 cache, if you will. In any case, it will respond quickly.

Meanwhile, synchronous queries provide some big benefits. First, the logistics of asynchronous event loops have a cost, so in the common case where the data is already in memory, a synchronous query will actually complete faster than an async one.

More importantly, though, synchronous queries help you avoid subtle bugs. Any time your application awaits a promise, it’s possible that some other code executes while you wait. The state of the world may have changed by the time your await completes. Maybe even other SQL queries were executed. This can lead to subtle bugs that are hard to reproduce because they require events to happen at just the wrong time. With a synchronous API, though, none of that can happen. Your code always executes in the order you wrote it, uninterrupted.

Fast writes with Output Gates

Database experts might have a deeper objection to synchronous queries: Yes, caching may mean we can perform reads and writes very fast. However, in the case of a write, just writing to cache isn’t good enough. Before we return success to our client, we must confirm that the write is actually durable, that is, it has actually made it onto disk or network storage such that it cannot be lost if the power suddenly goes out.

Normally, a database would confirm all writes before returning to the application. So if the query is successful, it is confirmed. But confirming writes can be slow, because it requires waiting for the underlying storage medium to respond. Normally, this is OK because the write is performed asynchronously, so the program can go on and work on other things while it waits for the write to finish. It looks kind of like this:


But I just told you that in Durable Objects, writes are synchronous. While a synchronous call is running, no other code in the program can run (because JavaScript does not have threads). This is convenient, as mentioned above, because it means you don’t need to worry that the state of the world may have changed while you were waiting. However, if write queries have to wait a while, and the whole program must pause and wait for them, then throughput will suffer.


Luckily, in Durable Objects, writes do not have to wait, due to a little trick we call “Output Gates”.


In DOs, when the application issues a write, it continues executing without waiting for confirmation. However, when the DO then responds to the client, the response is blocked by the “Output Gate”. This system holds the response until all storage writes relevant to the response have been confirmed, then sends the response on its way. In the rare case that the write fails, the response will be replaced with an error and the Durable Object itself will restart. So, even though the application constructed a “success” response, nobody can ever see that this happened, and thus nobody can be misled into believing that the data was stored.

Let’s see what this looks like with multiple requests:


If you compare this against the first diagram above, you should notice a few things:

  • The timing of requests and confirmations are the same.

  • But, all responses were sent to the client sooner than in the first diagram. Latency was reduced! This is because the application is able to work on constructing the response in parallel with the storage layer confirming the write.

  • Request handling is no longer interleaved between the three requests. Instead, each request runs to completion before the next begins. The application does not need to worry, during the handling of one request, that its state might change unexpectedly due to a concurrent request.

With Output Gates, we get the ease-of-use of synchronous writes, while also getting lower latency and no loss of throughput.

N+1 selects? No problem.

Zero-latency queries aren’t just faster, they allow you to structure your code differently, often making it simpler. A classic example is the “N+1 selects” or “N+1 queries” problem. Let’s illustrate this problem with an example:

// N+1 SELECTs example

// Get the 100 most-recently-modified docs.
let docs = sql.exec(`
  SELECT title, authorId FROM documents
  ORDER BY lastModified DESC
  LIMIT 100
`).toArray();

// For each returned document, get the author name from the users table.
for (let doc of docs) {
  doc.authorName = sql.exec(
      "SELECT name FROM users WHERE id = ?", doc.authorId).one().name;
}

If you are an experienced SQL user, you are probably cringing at this code, and for good reason: this code does 101 queries! If the application is talking to the database across a network with 5ms latency, this will take 505ms to run, which is slow enough for humans to notice.

// Do it all in one query with a join?
let docs = sql.exec(`
  SELECT documents.title, users.name
  FROM documents JOIN users ON documents.authorId = users.id
  ORDER BY documents.lastModified DESC
  LIMIT 100
`).toArray();

Here we’ve used SQL features to turn our 101 queries into one query. Great! Except, what does it mean? We used an inner join, which is not to be confused with a left, right, or cross join. What’s the difference? Honestly, I have no idea! I had to look up joins just to write this example and I’m already confused.

Well, good news: You don’t need to figure it out. Because when using SQLite as a library, the first example above works just fine. It’ll perform about the same as the second fancy version.

More generally, when using SQLite as a library, you don’t have to learn how to do fancy things in SQL syntax. Your logic can be in regular old application code in your programming language of choice, orchestrating the most basic SQL queries that are easy to learn. It’s fine. The creators of SQLite have made this point themselves.

Point-in-Time Recovery

While not necessarily related to speed, SQLite-backed Durable Objects offer another feature: any object can be reverted to the state it had at any point in time in the last 30 days. So if you accidentally execute a buggy query that corrupts all your data, don’t worry: you can recover. There’s no need to opt into this feature in advance; it’s on by default for all SQLite-backed DOs. See the docs for details.

How do I use it?

Let’s say we’re an airline, and we are implementing a way for users to choose their seats on a flight. We will create a new Durable Object for each flight. Within that DO, we will use a SQL table to track the assignments of seats to passengers. The code might look something like this:

import {DurableObject} from "cloudflare:workers";

// Manages seat assignment for a flight.
//
// This is an RPC interface. The methods can be called remotely by other Workers
// running anywhere in the world. All Workers that specify same object ID
// (probably based on the flight number and date) will reach the same instance of
// FlightSeating.
export class FlightSeating extends DurableObject {
  sql = this.ctx.storage.sql;

  // Application calls this when the flight is first created to set up the seat map.
  initializeFlight(seatList) {
    this.sql.exec(`
      CREATE TABLE seats (
        seatId TEXT PRIMARY KEY,  -- e.g. "3B"
        occupant TEXT             -- null if available
      )
    `);

    for (let seat of seatList) {
      this.sql.exec(`INSERT INTO seats VALUES (?, null)`, seat);
    }
  }

  // Get a list of available seats.
  getAvailable() {
    let results = [];

    // Query returns a cursor.
    let cursor = this.sql.exec(`SELECT seatId FROM seats WHERE occupant IS NULL`);

    // Cursors are iterable.
    for (let row of cursor) {
      // Each row is an object with a property for each column.
      results.push(row.seatId);
    }

    return results;
  }

  // Assign passenger to a seat.
  assignSeat(seatId, occupant) {
    // Check that seat isn't occupied.
    let cursor = this.sql.exec(`SELECT occupant FROM seats WHERE seatId = ?`, seatId);
    let result = [...cursor][0];  // Get the first result from the cursor.
    if (!result) {
      throw new Error("No such seat: " + seatId);
    }
    if (result.occupant !== null) {
      throw new Error("Seat is occupied: " + seatId);
    }

    // If the occupant is already in a different seat, remove them.
    this.sql.exec(`UPDATE seats SET occupant = null WHERE occupant = ?`, occupant);

    // Assign the seat. Note: We don't have to worry that a concurrent request may
    // have grabbed the seat between the two queries, because the code is synchronous
    // (no `await`s) and the database is private to this Durable Object. Nothing else
    // could have changed since we checked that the seat was available earlier!
    this.sql.exec(`UPDATE seats SET occupant = ? WHERE seatId = ?`, occupant, seatId);
  }
}

(With just a little more code, we could extend this example to allow clients to subscribe to seat changes with WebSockets, so that if multiple people are choosing their seats at the same time, they can see in real time as seats become unavailable. But, that’s outside the scope of this blog post, which is just about SQL storage.)

Then in wrangler.toml, define a migration setting up your DO class like usual, but instead of using new_classes, use new_sqlite_classes:

[[migrations]]
tag = "v1"
new_sqlite_classes = ["FlightSeating"]

SQLite-backed objects also support the existing key/value-based storage API: KV data is stored into a hidden table in the SQLite database. So, existing applications built on DOs will work when deployed using SQLite-backed objects.

However, because SQLite-backed objects are based on an all-new storage backend, it is currently not possible to switch an existing deployed DO class to use SQLite. You must ask for SQLite when initially deploying the new DO class; you cannot change it later. We plan to begin migrating existing DOs to the new storage backend in 2025.

Pricing

We’ve kept pricing for SQLite-in-DO similar to D1, Cloudflare’s serverless SQL database, by billing for SQL queries (based on rows) and SQL storage. SQL storage per object is limited to 1 GB during the beta period, and will be increased to 10 GB on general availability. DO requests and duration billing are unchanged and apply to all DOs regardless of storage backend. 

During the initial beta, billing is not enabled for SQL queries (rows read and rows written) and SQL storage. SQLite-backed objects will incur charges for requests and duration. We plan to enable SQL billing in the first half of 2025 with advance notice.

Workers Paid
Rows read First 25 billion / month included + $0.001 / million rows
Rows written First 50 million / month included + $1.00 / million rows
SQL storage 5 GB-month + $0.20/ GB-month

For more on how to use SQLite-in-Durable Objects, check out the documentation

What about D1?

Cloudflare Workers already offers another SQLite-backed database product: D1. In fact, D1 is itself built on SQLite-in-DO. So, what’s the difference? Why use one or the other?

In short, you should think of D1 as a more “managed” database product, while SQLite-in-DO is more of a lower-level “compute with storage” building block.

D1 fits into a more traditional cloud architecture, where stateless application servers talk to a separate database over the network. Those application servers are typically Workers, but could also be clients running outside of Cloudflare. D1 also comes with a pre-built HTTP API and managed observability features like query insights. With D1, where your application code and SQL database queries are not colocated like in SQLite-in-DO, Workers has Smart Placement to dynamically run your Worker in the best location to reduce total request latency, considering everything your Worker talks to, including D1. By the end of 2024, D1 will support automatic read replication for scalability and low-latency access around the world. If this managed model appeals to you, use D1.

Durable Objects require a bit more effort, but in return, give you more power. With DO, you have two pieces of code that run in different places: a front-end Worker which routes incoming requests from the Internet to the correct DO, and the DO itself, which runs on the same machine as the SQLite database. You may need to think carefully about which code to run where, and you may need to build some of your own tooling that exists out-of-the-box with D1. But because you are in full control, you can tailor the solution to your application’s needs and potentially achieve more.

Under the hood: Storage Relay Service

When Durable Objects first launched in 2020, it offered only a simple key/value-based interface for durable storage. Under the hood, these keys and values were stored in a well-known off-the-shelf database, with regional instances of this database deployed to locations in our data centers around the world. Durable Objects in each region would store their data to the regional database.

For SQLite-backed Durable Objects, we have completely replaced the persistence layer with a new system built from scratch, called Storage Relay Service, or SRS. SRS has already been powering D1 for over a year, and can now be used more directly by applications through Durable Objects.

SRS is based on a simple idea:

Local disk is fast and randomly-accessible, but expensive and prone to disk failures. Object storage (like R2) is cheap and durable, but much slower than local disk and not designed for database-like access patterns. Can we get the best of both worlds by using a local disk as a cache on top of object storage?

So, how does it work?

The mismatch in functionality between local disk and object storage

A SQLite database on disk tends to undergo many small changes in rapid succession. Any row of the database might be updated by any particular query, but the database is designed to avoid rewriting parts that didn’t change. Read queries may randomly access any part of the database. Assuming the right indexes exist to support the query, they should not require reading parts of the database that aren’t relevant to the results, and should complete in microseconds.

Object storage, on the other hand, is designed for an entirely different usage model: you upload an entire “object” (blob of bytes) at a time, and download an entire blob at a time. Each blob has a different name. For maximum efficiency, blobs should be fairly large, from hundreds of kilobytes to gigabytes in size. Latency is relatively high, measured in tens or hundreds of milliseconds.

So how do we back up our SQLite database to object storage? An obviously naive strategy would be to simply make a copy of the database files from time to time and upload it as a new “object”. But, uploading the database on every change — and making the application wait for the upload to complete — would obviously be way too slow. We could choose to upload the database only occasionally — say, every 10 minutes — but this means in the case of a disk failure, we could lose up to 10 minutes of changes. Data loss is, uh, bad! And even then, for most databases, it’s likely that most of the data doesn’t change every 10 minutes, so we’d be uploading the same data over and over again.

Trick one: Upload a log of changes

Instead of uploading the entire database, SRS records a log of changes, and uploads those.

Conveniently, SQLite itself already has a concept of a change log: the Write-Ahead Log, or WAL. SRS always configures SQLite to use WAL mode. In this mode, any changes made to the database are first written to a separate log file. From time to time, the database is “checkpointed”, merging the changes back into the main database file. The WAL format is well-documented and easy to understand: it’s just a sequence of “frames”, where each frame is an instruction to write some bytes to a particular offset in the database file.

SRS monitors changes to the WAL file (by hooking SQLite’s VFS to intercept file writes) to discover the changes being made to the database, and uploads those to object storage.

Unfortunately, SRS cannot simply upload every single change as a separate “object”, as this would result in too many objects, each of which would be inefficiently small. Instead, SRS batches changes over a period of up to 10 seconds, or up to 16 MB worth, whichever happens first, then uploads the whole batch as a single object.

When reconstructing a database from object storage, we must download the series of change batches and replay them in order. Of course, if the database has undergone many changes over a long period of time, this can get expensive. In order to limit how far back it needs to look, SRS also occasionally uploads a snapshot of the entire content of the database. SRS will decide to upload a snapshot any time that the total size of logs since the last snapshot exceeds the size of the database itself. This heuristic implies that the total amount of data that SRS must download to reconstruct a database is limited to no more than twice the size of the database. Since we can delete data from object storage that is older than the latest snapshot, this also means that our total stored data is capped to 2x the database size.

Credit where credit is due: This idea — uploading WAL batches and snapshots to object storage — was inspired by Litestream, although our implementation is different.

Trick two: Relay through other servers in our global network


Batches are only uploaded to object storage every 10 seconds. But obviously, we cannot make the application wait for 10 whole seconds just to confirm a write. So what happens if the application writes some data, returns a success message to the user, and then the machine fails 9 seconds later, losing the data?

To solve this problem, we take advantage of our global network. Every time SQLite commits a transaction, SRS will immediately forward the change log to five “follower” machines across our network. Once at least three of these followers respond that they have received the change, SRS informs the application that the write is confirmed. (As discussed earlier, the write confirmation opens the Durable Object’s “output gate”, unblocking network communications to the rest of the world.)

When a follower receives a change, it temporarily stores it in a buffer on local disk, and then awaits further instructions. Later on, once SRS has successfully uploaded the change to object storage as part of a batch, it informs each follower that the change has been persisted. At that point, the follower can simply delete the change from its buffer.

However, if the follower never receives the persisted notification, then, after some timeout, the follower itself will upload the change to object storage. Thus, if the machine running the database suddenly fails, as long as at least one follower is still running, it will ensure that all confirmed writes are safely persisted.

Each of a database’s five followers is located in a different physical data center. Cloudflare’s network consists of hundreds of data centers around the world, which means it is always easy for us to find four other data centers nearby any Durable Object (in addition to the one it is running in). In order for a confirmed write to be lost, then, at least four different machines in at least three different physical buildings would have to fail simultaneously (three of the five followers, plus the Durable Object’s host machine). Of course, anything can happen, but this is exceedingly unlikely.

Followers also come in handy when a Durable Object’s host machine is unresponsive. We may not know for sure if the machine has died completely, or if it is still running and responding to some clients but not others. We cannot start up a new instance of the DO until we know for sure that the previous instance is dead – or, at least, that it can no longer confirm writes, since the old and new instances could then confirm contradictory writes. To deal with this situation, if we can’t reach the DO’s host, we can instead try to contact its followers. If we can contact at least three of the five followers, and tell them to stop confirming writes for the unreachable DO instance, then we know that instance is unable to confirm any more writes going forward. We can then safely start up a new instance to replace the unreachable one.

Bonus feature: Point-in-Time Recovery

I mentioned earlier that SQLite-backed Durable Objects can be asked to revert their state to any time in the last 30 days. How does this work?

This was actually an accidental feature that fell out of SRS’s design. Since SRS stores a complete log of changes made to the database, we can restore to any point in time by replaying the change log from the last snapshot. The only thing we have to do is make sure we don’t delete those logs too soon.

Normally, whenever a snapshot is uploaded, all previous logs and snapshots can then be deleted. But instead of deleting them immediately, SRS merely marks them for deletion 30 days later. In the meantime, if a point-in-time recovery is requested, the data is still there to work from.

For a database with a high volume of writes, this may mean we store a lot of data for a lot longer than needed. As it turns out, though, once data has been written at all, keeping it around for an extra month is pretty cheap — typically cheaper, even, than writing it in the first place. It’s a small price to pay for always-on disaster recovery.

Get started with SQLite-in-DO

SQLite-backed DOs are available in beta starting today. You can start building with SQLite-in-DO by visiting developer documentation and provide beta feedback via the #durable-objects channel on our Developer Discord.

Do distributed systems like SRS excite you? Would you like to be part of building them at Cloudflare? We’re hiring!

We’ve added JavaScript-native RPC to Cloudflare Workers

Post Syndicated from Kenton Varda original https://blog.cloudflare.com/javascript-native-rpc


Cloudflare Workers now features a built-in RPC (Remote Procedure Call) system enabling seamless Worker-to-Worker and Worker-to-Durable Object communication, with almost no boilerplate. You just define a class:

export class MyService extends WorkerEntrypoint {
  sum(a, b) {
    return a + b;
  }
}

And then you call it:

let three = await env.MY_SERVICE.sum(1, 2);

No schemas. No routers. Just define methods of a class. Then call them. That’s it.

But that’s not it

This isn’t just any old RPC. We’ve designed an RPC system so expressive that calling a remote service can feel like using a library – without any need to actually import a library! This is important not just for ease of use, but also security: fewer dependencies means fewer critical security updates and less exposure to supply-chain attacks.

To this end, here are some of the features of Workers RPC:

  • For starters, you can pass Structured Clonable types as the params or return value of an RPC. (That means that, unlike JSON, Dates just work, and you can even have cycles.)
  • You can additionally pass functions in the params or return value of other functions. When the other side calls the function you passed to it, they make a new RPC back to you.
  • Similarly, you can pass objects with methods. Method calls become further RPCs.
  • RPC to another Worker (over a Service Binding) usually does not even cross a network. In fact, the other Worker usually runs in the very same thread as the caller, reducing latency to zero. Performance-wise, it’s almost as fast as an actual function call.
  • When RPC does cross a network (e.g. to a Durable Object), you can invoke a method and then speculatively invoke further methods on the result in a single network round trip.
  • You can send a byte stream over RPC, and the system will automatically stream the bytes with proper flow control.
  • All of this is secure, based on the object-capability model.
  • The protocol and implementation are fully open source as part of workerd.

Workers RPC is a JavaScript-native RPC system. Under the hood, it is built on Cap’n Proto. However, unlike Cap’n Proto, Workers RPC does not require you to write a schema. (Of course, you can use TypeScript if you like, and we provide tools to help with this.)

In general, Workers RPC is designed to “just work” using idiomatic JavaScript code, so you shouldn’t have to spend too much time looking at docs. We’ll give you an overview in this blog post. But if you want to understand the full feature set, check out the documentation.

Why RPC? (And what is RPC anyway?)

Remote Procedure Calls (RPC) are a way of expressing communications between two programs over a network. Without RPC, you might communicate using a protocol like HTTP. With HTTP, though, you must format and parse your communications as an HTTP request and response, perhaps designed in REST style. RPC systems try to make communications look like a regular function call instead, as if you were calling a library rather than a remote service. The RPC system provides a “stub” object on the client side which stands in for the real server-side object. When a method is called on the stub, the RPC system figures out how to serialize and transmit the parameters to the server, invoke the method on the server, and then transmit the return value back.

The merits of RPC have been subject to a great deal of debate. RPC is often accused of committing many of the fallacies of distributed computing.

But this reputation is outdated. When RPC was first invented some 40 years ago, async programming barely existed. We did not have Promises, much less async and await. Early RPC was synchronous: calls would block the calling thread waiting for a reply. At best, latency made the program slow. At worst, network failures would hang or crash the program. No wonder it was deemed “broken”.

Things are different today. We have Promise and async and await, and we can throw exceptions on network failures. We even understand how RPCs can be pipelined so that a chain of calls takes only one network round trip. Many large distributed systems you likely use every day are built on RPC. It works.

The fact is, RPC fits the programming model we’re used to. Every programmer is trained to think in terms of APIs composed of function calls, not in terms of byte stream protocols nor even REST. Using RPC frees you from the need to constantly translate between mental models, allowing you to move faster.

Example: Authentication Service

Here’s a common scenario: You have one Worker that implements an application, and another Worker that is responsible for authenticating user credentials. The app Worker needs to call the auth Worker on each request to check the user’s cookie.

This example uses a Service Binding, which is a way of configuring one Worker with a private channel to talk to another, without going through a public URL. Here, we have an application Worker that has been configured with a service binding to the Auth worker.

Before RPC, all communications between Workers needed to use HTTP. So, you might write code like this:

// OLD STYLE: HTTP-based service bindings.
export default {
  async fetch(req, env, ctx) {
    // Call the auth service to authenticate the user's cookie.
    // We send it an HTTP request using a service binding.

    // Construct a JSON request to the auth service.
    let authRequest = {
      cookie: req.headers.get("Cookie")
    };

    // Send it to env.AUTH_SERVICE, which is our service binding
    // to the auth worker.
    let resp = await env.AUTH_SERVICE.fetch(
        "https://auth/check-cookie", {
      method: "POST",
      headers: {
        "Content-Type": "application/json; charset=utf-8",
      },
      body: JSON.stringify(authRequest)
    });

    if (!resp.ok) {
      return new Response("Internal Server Error", {status: 500});
    }

    // Parse the JSON result.
    let authResult = await resp.json();

    // Use the result.
    if (!authResult.authorized) {
      return new Response("Not authorized", {status: 403});
    }
    let username = authResult.username;

    return new Response(`Hello, ${username}!`);
  }
}

Meanwhile, your auth server might look like:

// OLD STYLE: HTTP-based auth server.
export default {
  async fetch(req, env, ctx) {
    // Parse URL to decide what endpoint is being called.
    let url = new URL(req.url);
    if (url.pathname == "/check-cookie") {
      // Parse the request.
      let authRequest = await req.json();

      // Look up cookie in Workers KV.
      let cookieInfo = await env.COOKIE_MAP.get(
          hash(authRequest.cookie), "json");

      // Construct the response.
      let result;
      if (cookieInfo) {
        result = {
          authorized: true,
          username: cookieInfo.username
        };
      } else {
        result = { authorized: false };
      }

      return Response.json(result);
    } else {
      return new Response("Not found", {status: 404});
    }
  }
}

This code has a lot of boilerplate involved in setting up an HTTP request to the auth service. With RPC, we can instead express this as a function call:

// NEW STYLE: RPC-based service bindings
export default {
  async fetch(req, env, ctx) {
    // Call the auth service to authenticate the user's cookie.
    // We invoke it using a service binding.
    let authResult = await env.AUTH_SERVICE.checkCookie(
        req.headers.get("Cookie"));

    // Use the result.
    if (!authResult.authorized) {
      return new Response("Not authorized", {status: 403});
    }
    let username = authResult.username;

    return new Response(`Hello, ${username}!`);
  }
}

And the server side becomes:

// NEW STYLE: RPC-based auth server.
import { WorkerEntrypoint } from "cloudflare:workers";

export class AuthService extends WorkerEntrypoint {
  async checkCookie(cookie) {
    // Look up cookie in Workers KV.
    let cookieInfo = await this.env.COOKIE_MAP.get(
        hash(cookie), "json");

    // Return result.
    if (cookieInfo) {
      return {
        authorized: true,
        username: cookieInfo.username
      };
    } else {
      return { authorized: false };
    }
  }
}

This is a pretty nice simplification… but we can do much more!

Let’s get fancy! Or should I say… classy?

Let’s say we want our auth service to do a little more. Instead of just checking cookies, it provides a whole API around user accounts. In particular, it should let you:

  • Get or update the user’s profile info.
  • Send the user an email notification.
  • Append to the user’s activity log.

But, these operations should only be allowed after presenting the user’s credentials.

Here’s what the server might look like:

import { WorkerEntrypoint, RpcTarget } from "cloudflare:workers";

// `User` is an RPC interface to perform operations on a particular
// user. This class is NOT exported as an entrypoint; it must be
// received as the result of the checkCookie() RPC.
class User extends RpcTarget {
  constructor(uid, env) {
    super();

    // Note: Instance members like these are NOT exposed over RPC.
    // Only class (prototype) methods and properties are exposed.
    this.uid = uid;
    this.env = env;
  }

  // Get/set user profile, backed by Worker KV.
  async getProfile() {
    return await this.env.PROFILES.get(this.uid, "json");
  }
  async setProfile(profile) {
    await this.env.PROFILES.put(this.uid, JSON.stringify(profile));
  }

  // Send the user a notification email.
  async sendNotification(message) {
    let addr = await this.env.EMAILS.get(this.uid);
    await this.env.EMAIL_SERVICE.send(addr, message);
  }

  // Append to the user's activity log.
  async logActivity(description) {
    // (Please excuse this somewhat problematic implementation,
    // this is just a dumb example.)
    let timestamp = new Date().toISOString();
    await this.env.ACTIVITY.put(
        `${this.uid}/${timestamp}`, description);
  }
}

// Now we define the entrypoint service, which can be used to
// get User instances -- but only by presenting the cookie.
export class AuthService extends WorkerEntrypoint {
  async checkCookie(cookie) {
    // Look up cookie in Workers KV.
    let cookieInfo = await this.env.COOKIE_MAP.get(
        hash(cookie), "json");

    if (cookieInfo) {
      return {
        authorized: true,
        user: new User(cookieInfo.uid, this.env),
      };
    } else {
      return { authorized: false };
    }
  }
}

Now we can write a Worker that uses this API while displaying a web page:

export default {
  async fetch(req, env, ctx) {
    // `using` is a new JavaScript feature. Check out the
    // docs for more on this:
    // https://developers.cloudflare.com/workers/runtime-apis/rpc/lifecycle/
    using authResult = await env.AUTH_SERVICE.checkCookie(
        req.headers.get("Cookie"));
    if (!authResult.authorized) {
      return new Response("Not authorized", {status: 403});
    }

    let user = authResult.user;
    let profile = await user.getProfile();

    await user.logActivity("You visited the site!");
    await user.sendNotification(
        `Thanks for visiting, ${profile.name}!`);

    return new Response(`Hello, ${profile.name}!`);
  }
}

Finally, this worker needs to be configured with a service binding pointing at the AuthService class. Its wrangler.toml may look like:

name = "app-worker"
main = "./src/app.js"

# Declare a service binding to the auth service.
[[services]]
binding = "AUTH_SERVICE"    # name of the binding in `env`
service = "auth-service"    # name of the worker in the dashboard
entrypoint = "AuthService"  # name of the exported RPC class

Wait, how?

What exactly happened here? The Server created an instance of the class User and returned it to the client. It has methods that the client can then just call? Are we somehow transferring code over the wire?

No, absolutely not! All code runs strictly in the isolate where it was originally loaded. What actually happens is, when the return value is passed over RPC, all class instances are replaced with RPC stubs. The stub, when called, makes a new RPC back to the server, where it calls the method on the original User object that was created there:

But then you might ask: how does the RPC stub know what methods are available? Is a list of methods passed over the wire?

In fact, no. The RPC stub is a special object called a “Proxy“. It implements a “wildcard method”, that is, it appears to have an infinite number of methods of every possible name. When you try to call a method, the name you called is sent to the server. If the original object has no such method, an exception is thrown.

Did you spot the security?

In the above example, we see that RPC is easy to use. We made an object! We called it! It all just felt natural, like calling a local API! Hooray!

But there’s another extremely important property that the AuthService API has which you may have missed: As designed, you cannot perform any operation on a user without first checking the cookie. This is true despite the fact that the individual method calls do not require sending the cookie again, and the User object itself doesn’t store the cookie.

The trick is, the initial checkCookie() RPC is what returns a User object in the first place. The AuthService API does not provide any other way to obtain a User instance. The RPC client cannot create a User object out of thin air, and cannot call methods of an object without first explicitly receiving a reference to it.

This is called capability-based security: we say that the User reference received by the client is a “capability”, because receiving it grants the client the ability to perform operations on the user. The getProfile() method grants this capability only when the client has presented the correct cookie.

Capability-based security is often like this: security can be woven naturally into your APIs, rather than feel like an additional concern bolted on top.

More security: Named entrypoints

Another subtle but important detail to call out: in the above example, the auth service’s RPC API is exported as a named class:

export class AuthService extends WorkerEntrypoint {

And in our wrangler.toml for the calling worker, we had to specify an “entrypoint”, matching the class name:

entrypoint = "AuthService"  # name of the exported RPC class

In the past, service bindings would bind to the “default” entrypoint, declared with export default {. But, the default entrypoint is also typically exposed to the Internet, e.g. automatically mapped to a hostname under workers.dev (unless you explicitly turn that off). It can be tricky to safely assume that requests arriving at this entrypoint are in any way trusted.

With named entrypoints, this all changes. A named entrypoint is only accessible to Workers which have explicitly declared a binding to it. By default, only Workers on your own account can declare such bindings. Moreover, the binding must be declared at deploy time; a Worker cannot create new service bindings at runtime.

Thus, you can trust that requests arriving at a named entrypoint can only have come from Workers on your account and for which you explicitly created a service binding. In the future, we plan to extend this pattern further with the ability to lock down entrypoints, audit which Workers have bindings to them, tell the callee information about who is calling at runtime, and so on. With these tools, there is no need to write code in your app itself to authenticate access to internal APIs; the system does it for you.

What about type safety?

Workers RPC works in an entirely dynamically-typed way, just as JavaScript itself does. But just as you can apply TypeScript on top of JavaScript in general, you can apply it to Workers RPC.

The @cloudflare/workers-types package defines the type Service<MyEntrypointType>, which describes the type of a service binding. MyEntrypointType is the type of your server-side interface. Service<MyEntrypointType> applies all the necessary transformations to turn this into a client-side type, such as converting all methods to async, replacing functions and RpcTargets with (properly-typed) stubs, and so on.

It is up to you to share the definition of MyEntrypointType between your server app and its clients. You might do this by defining the interface in a separate shared TypeScript file, or by extracting a .d.ts type declaration file from your server code using tsc --declaration.

With that done, you can apply types to your client:

import { WorkerEntrypoint } from "cloudflare:workers";

// The interface that your server-side entrypoint implements.
// (This would probably be imported from a .d.ts file generated
// from your server code.)
declare class MyEntrypointType extends WorkerEntrypoint {
  sum(a: number, b: number): number;
}

// Define an interface Env specifying the bindings your client-side
// worker expects.
interface Env {
  MY_SERVICE: Service<MyEntrypointType>;
}

// Define the client worker's fetch handler with typed Env.
export default <ExportedHandler<Env>> {
  async fetch(req, env, ctx) {
    // Now env.MY_SERVICE is properly typed!
    const result = await env.MY_SERVICE.sum(1, 2);
    return new Response(result.toString());
  }
}

RPC to Durable Objects

Durable Objects allow you to create a “named” worker instance somewhere on the network that multiple other workers can then talk to, in order to coordinate between them. Each Durable Object also has its own private on-disk storage where it can store state long-term.

Previously, communications with a Durable Object had to take the form of HTTP requests and responses. With RPC, you can now just declare methods on your Durable Object class, and call them on the stub. One catch: to opt into RPC, you must declare your Durable Object class with extends DurableObject, like so:

import { DurableObject } from "cloudflare:workers";

export class Counter extends DurableObject {
  async increment() {
    // Increment our stored value and return it.
    let value = await this.ctx.storage.get("value");
    value = (value || 0) + 1;
    this.ctx.storage.put("value", value);
    return value;
  }
}

Now we can call it like:

let stub = env.COUNTER_NAMEPSACE.get(id);
let value = await stub.increment();

TypeScript is supported here too, by defining your binding with type DurableObjectNamespace<ServerType>:

interface Env {
  COUNTER_NAMESPACE: DurableObjectNamespace<Counter>;
}

Eliding awaits with speculative calls

When talking to a Durable Object, the object may be somewhere else in the world from the caller. RPCs must cross the network. This takes time: despite our best efforts, we still haven’t figured out how to make information travel faster than the speed of light.

When you have a complex RPC interface where one call returns an object on which you wish to make further method calls, it’s easy to end up with slow code that makes too many round trips over the network.

// Makes three round trips.
let foo = await stub.foo();
let baz = await foo.bar.baz();
let corge = await baz.qux[3].corge();

Workers RPC features a way to avoid this: If you know that a call will return a value containing a stub, and all you want to do with it is invoke a method on that stub, you can skip awaiting it:

// Same thing, only one round trip.
let foo = stub.foo();
let baz = foo.bar.baz();
let corge = await baz.qux[3].corge();

Whoa! How does this work?

RPC methods do not return normal promises. Instead, they return special RPC promises. These objects are “custom thenables“, which means you can use them in all the ways you’d use a regular Promise, like awaiting it or calling .then() on it.

But an RPC promise is more than just a thenable. It is also a proxy. Like an RPC stub, it has a wildcard property. You can use this to express speculative RPC calls on the eventual result, before it has actually resolved. These speculative calls will be sent to the server immediately, so that they can begin executing as soon as the first RPC has finished there, before the result has actually made its way back over the network to the client.

This feature is also known as “Promise Pipelining”. Although it isn’t explicitly a security feature, it is commonly provided by object-capability RPC systems like Cap’n Proto.

The future: Custom Bindings Marketplace?

For now, Service Bindings and Durable Objects only allow communication between Workers running on the same account. So, RPC can only be used to talk between your own Workers.

But we’d like to take it further.

We have previously explained why Workers environments contain live objects, also known as “bindings”. But today, only Cloudflare can add new binding types to the Workers platform – like Queues, KV, or D1. But what if anyone could invent their own binding type, and give it to other people?

Previously, we thought this would require creating a way to automatically load client libraries into the calling Workers. That seemed scary: it meant using someone’s binding would require trusting their code to run inside your isolate. With RPC, there’s no such trust. The binding only sees exactly what you explicitly pass to it. It cannot compromise the rest of your Worker.

Could Workers RPC provide the basis for a “bindings marketplace”, where people can offer rich JavaScript APIs to each other in an easy and secure way? We’re excited to explore and find out.

Try it now

Workers RPC is available today for all Workers users. To get started, check out the docs.

Why Workers environment variables contain live objects

Post Syndicated from Kenton Varda original https://blog.cloudflare.com/workers-environment-live-object-bindings


If you’ve ever written a Cloudflare Worker using Workers KV for storage, you may have noticed something unsettling.

// A simple Worker that always returns the value named "content",
// read from Workers KV storage.
export default {
  async fetch(request, env, ctx) {
    return new Response(await env.MY_KV.get("content"));
  }
}

Do you feel something is… missing? Like… Where is the setup? The authorization keys? The client library instantiation? Aren’t environment variables normally strings? How is it that env.MY_KV seems to be an object with a get() method that is already hooked up?

Coming from any other platform, you might expect to see something like this instead:

// How would a "typical cloud platform" do it?

// Import KV client library?
import { KV } from "cloudflare:kv";

export default {
  async fetch(request, env, ctx) {
    // Connect to the database?? Using my secret auth key???
    // Which comes from an environment variable????
    let myKv = KV.connect("my-kv-namespace", env.MY_KV_AUTHKEY);

    return new Response(await myKv.get("content"));
  }
}

As another example, consider service bindings, which allow a Worker to send requests to another Worker.

// A simple Worker that greets an authenticated user, delegating to a
// separate service to perform authentication.
export default {
  async fetch(request, env, ctx) {
    // Forward headers to auth service to get user info.
    let authResponse = await env.AUTH_SERVICE.fetch(
        "https://auth/getUser",
        {headers: request.headers});
    let userInfo = await authResponse.json();
    return new Response("Hello, " + userInfo.name);
  }
}

Notice in particular the use of env.AUTH_SERVICE.fetch() to send the request. This sends the request directly to the auth service, regardless of the hostname we give in the URL.

On “typical” platforms, you’d expect to use a real (perhaps internal) hostname to route the request instead, and also include some credentials proving that you’re allowed to use the auth service API:

// How would a "typical cloud platform" do it?
export default {
  async fetch(request, env, ctx) {
    // Forward headers to auth service, via some internal hostname?
    // Hostname needs to be configurable, so get it from an env var.
    let authRequest = new Request(
        "https://" + env.AUTH_SERVICE_HOST + "/getUser",
        {headers: request.headers});

    // We also need to prove that our service is allowed to talk to
    // the auth service API. Add a header for that, containing a
    // secret token from our environment.
    authRequest.headers.set("X-Auth-Service-Api-Key",
        env.AUTH_SERVICE_API_KEY);

    // Now we can make the request.
    let authResponse = await fetch(authRequest);
    let userInfo = await authResponse.json();
    return new Response("Hello, " + userInfo.name);
  }
}

As you can see, in Workers, the “environment” is not just a bunch of strings. It contains full-fledged objects. We call each of these objects a “binding“, because it binds the environment variable name to a resource. You configure exactly what resource a name is bound to when you deploy your Worker – again, just like a traditional environment variable, but not limited to strings.

We can clearly see above that bindings eliminate a little bit of boilerplate, which is nice. But, there’s so much more.

Bindings don’t just reduce boilerplate. They are a core design feature of the Workers platform which simultaneously improve developer experience and application security in several ways. Usually these two goals are in opposition to each other, but bindings elegantly solve for both at the same time.

Security

It may not be obvious at first glance, but bindings neatly solve a number of common security problems in distributed systems.

SSRF is Not A Thing

Bindings, when used properly, make Workers immune to Server-Side Request Forgery (SSRF) attacks, one of the most common yet deadly security vulnerabilities in application servers today. In an SSRF attack, an attacker tricks a server into making requests to other internal services that only it can see, thus giving the attacker access to those internal services.

As an example, imagine we have built a social media application where users are able to set their avatar image. Imagine that, as a convenience, instead of uploading an image from their local disk, a user can instead specify the URL of an image on a third-party server, and the application server will fetch that image to use as the avatar. Sounds reasonable, right? We can imagine the app contains some code like:

let resp = await fetch(userAvatarUrl);
let data = await resp.arrayBuffer();
await setUserAvatar(data);

One problem: What if the user claims their avatar URL is something like “https://auth-service.internal/status”? Whoops, now the above code will actually fetch a status page from the internal auth service, and set it as the user’s avatar. Presumably, the user can then download their own avatar, and it’ll contain the content of this status page, which they were not supposed to be able to access!

But using bindings, this is impossible: There is no URL that the attacker can specify to reach the auth service. The application must explicitly use the binding env.AUTH_SERVICE to reach it. The global fetch() function cannot reach the auth service no matter what URL it is given; it can only make requests to the public Internet.

A legacy caveat: When we originally designed Workers in 2017, the primary use case was implementing a middleware layer in front of an origin server, integrated with Cloudflare’s CDN. At the time, bindings weren’t a thing yet, and we were primarily trying to implement the Service Workers interface. To that end, we made a design decision: when a Worker runs on Cloudflare in front of some origin server, if you invoke the global fetch() function with a URL that is within your zone’s domain, the request will be sent directly to the origin server, bypassing most logic Cloudflare would normally apply to a request received from the Internet. Sadly, this means that Workers which run in front of an origin server are not immune to SSRF – they must worry about it just like traditional servers on private networks must. Although this puts Workers in the same place as most servers, we now see a path to make SSRF a thing you never have to worry about when writing Workers. We will be introducing “origin bindings”,  where the origin server is represented by an explicit binding. That is, to send a request to your origin, you’d need to do env.ORIGIN.fetch(). Then, the global fetch() function can be restricted to only talk to the public Internet, fully avoiding SSRF. This is a big change and we need to handle backwards-compatibility carefully – expect to see more in the coming months. Meanwhile, for Workers that do not have an origin server behind them, or where the origin server does not rely on Cloudflare for security, global fetch() is SSRF-safe today.

And a reminder: Requests originating from Workers have a header, CF-Worker, identifying the domain name that owns the Worker. This header is intended for abuse mitigation: if your server is receiving abusive requests from a Worker, it tells you who to blame and gives you a way to filter those requests. This header is not intended for authorization. You should not implement a private API that grants access to your Workers based solely on the CF-Worker header matching your domain. If you do, you may re-open the opportunity for SSRF vulnerabilities within any Worker running on that domain.

You can’t leak your API key if there is no API key

Usually, if your web app needs access to a protected resource, you will have to obtain some sort of an API key that grants access to the resource. But typically anyone who has this key can access the resource as if they were the Worker. This makes handling auth keys tricky. You can’t put it directly in a config file, unless the entire config file is considered a secret. You can’t check it into source control – you don’t want to publish your keys to GitHub! You probably shouldn’t even store the key on your hard drive – what if your laptop is compromised? And so on.

Even if you have systems in place to deliver auth keys to services securely (like Workers Secrets), if the key is just a string, the service itself can easily leak it. For instance, a developer might carelessly insert a log statement for debugging which logs the service’s configuration – including keys. Now anyone who can access your logs can discover the secret, and there’s probably no practical way to tell if such a leak has occurred.

With Workers bindings, we endeavor for bindings to be live objects, not secret keys. For instance, as seen in the first example in this post, when using a Workers KV binding, you never see a key at all. It’s therefore impossible for a Worker to accidentally leak access to a KV namespace.

No certificate management

This is similar to the API key problem, but arguably worse. When internal services talk to each other over a network, you presumably want them to use secure transports, but typically that requires that every service have a certificate and a private key signed by some CA, and clients must be configured to trust that CA. This is all a big pain to manage, and often the result is that developers don’t bother; they set up a VPC and assume the network is trusted.

In Workers, since all intra-service communications happen over a binding, the system itself can take on all the work of ensuring the transport is secure and goes to the right place.

No frustrating ACL management – but also no lazy “allow all”

At this point you might be thinking: Why are we talking about API keys at all? Cloudflare knows which Worker is sending any request. Can’t it handle the authentication that way?

Consider the earlier example where we imagined that KV namespaces could be opened by name:

// Imagine KV namespaces could be open by name?
let myKv = KV.connect("my-kv-namespace", env.MY_KV_AUTHKEY);

What if we made it simply:

// No authkey, because the system knows whether the Worker has
// permission?
let myKv = KV.connect("my-kv-namespace");

We could then imagine that we could separately configure each KV namespace with an Access Control List (ACL) that specifies which Workers can access it.

Of course, the first problem with this is that it’s vulnerable to SSRF. But, we discussed that already, so let’s discuss another problem.

Many platforms use ACLs for security, but have you ever noticed how everyone hates them? You end up with two choices:

  • Tediously maintain ACLs on every resource. Inevitably, this is always a huge pain. First you deploy your code, which you think is properly configured. Then you discover that it’s failing with permissions errors causing a production outage! So you go fiddle with the IAM system. There are 533,291 roles to choose from and none of them are actually what you want. It turns out you’re supposed to create a custom role, but that’s not obvious, and once you get there, the UI is confusing. Also it’s easy to confuse your team’s service account with your team’s email group, so you give the permissions to the wrong principal, but it takes you an hour of staring at it to realize what you did wrong. Then somehow you manage to remove your own access to the resource and you can’t add it back even though you’re a project admin? (Why yes, all this did in fact happen to me, while using a cloud provider that shall remain nameless.)
  • Give up and grant everything access to everything. Just put all your services in a single VPC where they can all freely talk to each other. This is what most developers are inclined to do, if their security team doesn’t step in to stop them.

Much of this pain comes about because connecting a server to a resource today involves two steps that should really be one step:

  1. Configure the server to point at the resource.
  2. Configure the resource to accept requests from the server.

Developers are primarily concerned with step 1, and forget that step 2 exists until it blows up in their faces. Then it’s a mad scramble to learn how step 2 even works.

What if step 1 just implied step 2? Obviously, if you’re trying to configure a service to access a resource, then you also want the resource to allow access to the service. As long as the person trying to set this up has permissions to both, then there is no reason for this to be a two-step process.

But in typical platforms, the platform itself has no way of knowing that a service has been configured to talk to a resource, because the configuration is just a string.

Bindings fix that. When you define a binding from a Worker to a particular KV namespace, the platform inherently understands that you are telling the Worker to use the KV namespace. Therefore, it can implicitly ensure that the correct permissions are granted. There is no step 2.

And conversely, if no binding is configured, then the Worker does not have access. That means that every Worker starts out with no access by default, and only receives access to exactly the things it needs. Secure by default.

As a related benefit, you can always accurately answer the question “What services are using this resource?” based on bindings. Since the system itself understands bindings and what they point to, the system can answer the query without knowing anything about the service’s internals.

Developer Experience

We’ve seen that bindings improve security in a number of ways. Usually, people expect security and developer friendliness to be a trade-off, with each security measure making life harder for developers. Bindings, however, are entirely the opposite! They actually make life easier!

Easier setup

As we saw in the intro, using a binding reduces setup boilerplate. Instead of receiving an environment variable containing an API key which must be passed into some sort of library, the environment variable itself is an already-initialized client library.

Observability

Because the system understands what bindings a Worker has, and even exactly when those bindings are exercised, the system can answer a lot of questions that would normally require more manual instrumentation or analysis to answer, such as:

  • For a given Worker, what resources does it use? Since the system understands the types of all bindings and what they point to (it doesn’t just see them as opaque strings), it can answer this question.
  • For a given resource, which Workers use it? This is the reverse query. The system can maintain an index of bindings in order to find ones pointing at a given resource.
  • How often does a particular Worker use a particular resource? Since bindings are invoked by calling methods on the binding itself, the system can observe these calls, log them, collect metrics, etc.

Testability via dependency injection

When you deploy a test version of your service, you probably want it to operate on test resources rather than real production resources. For instance, you might have a separate testing KV namespace for storage. But, you probably want to deploy exactly the same code to test that you will eventually deploy to production. That means the names of these resources cannot be hard-coded.

On traditional platforms, the obvious way to avoid hard-coding resource names is to put the name in an environment variable. Going back to our example from the intro, if KV worked in a traditional way not using bindings, you might end up with code like this:

// Hypothetical non-binding-based KV.
let myKv = KV.connect(env.MY_KV_NAMESPACE, env.MY_KV_AUTHKEY);

At best, you now have two environment variables (which had better stay in sync) just to specify what namespace to use.

But at worst, developers might forget to parameterize their resources this way.

  • A developer may write new code that is hard-coded to use a test database, and then forget to update it before pushing it to production, accidentally using the test database in prod.
  • A developer might prototype a new service using production resources from the start (or using new resources which become production resources), only later on deciding that they need to create a new deployment for testing. But by then, it may be a pain to find and parameterize all the different resources used.

With bindings, it’s impossible to have this problem. Since you can only connect to a KV namespace through a binding, it’s always possible to make a separate deployment of the same code which talks to a test namespace instead of production, e.g. using Wrangler Environments.

In the testing world, this is sometimes called “dependency injection”. With bindings, dependencies are always injectable.

Adaptability

Dependency injection isn’t just for tests. A service whose dependencies can be changed out easily will be easier to deploy into new environments, including new production environments.

Say, for instance, you have a service that authenticates users. Now you are launching a new product, which, for whatever reason, has a separate userbase from the original product. You need to deploy a new version of the auth service that uses a different database to implement a separate user set. As long as all dependencies are injectable, this should be easy.

Again, bindings are not the only way to achieve dependency injection, but a bindings-based system will tend to lead developers to write dependency-injectable code by default.

Q&A

Has anyone done this before?

You have. Every time you write code.

As it turns out, this approach is used all the time at the programming language level. Bindings are analogous to parameters of a function, or especially parameters to a class constructor. In a memory-safe programming language, you can’t access an object unless someone has passed you a pointer or reference to that object. Objects in memory don’t have URLs that you use to access them.

Programming languages work this way because they are designed to manage complexity, and this proves to be an elegant way to do so. Yet, this style which we’re used to using at the programming language level is much less common at the distributed system level. The Cloudflare Workers platform aims to treat the network as one big computer, and so it makes sense to extend programming language concepts across the network.

Of course, we’re not the first to apply this to distributed systems, either. The paradigm is commonly called “capability-based security”, which brings us to the next question…

Is this capability-based security?

Bindings are very much inspired by capability-based security.

At present, bindings are not a complete capability system. In particular, there is currently no particular mechanism for a Worker to pass a binding to another Worker. However, this is something we can definitely imagine adding in the future.

Imagine, for instance, you want to call another Worker through a service binding, and as you do, you want to give that other Worker temporary access to a KV namespace for it to operate on. Wouldn’t it be nice if you could just pass the object, and have it auto-revoked at the end of the request? In the future, we might introduce a notion of dynamic bindings which can bind to different resources on a per-request basis, where a calling Worker can pass in a particular value to use for a given request.

For the time being, bindings cannot really be called object capabilities. However, many of the benefits of bindings are the same benefits commonly attributed to capability systems. This is because of some basic similarities:

  • Like a capability, a binding simultaneously designates a resource and also confers permission to access that resource, without referencing any separate ACL.
  • Like capabilities, bindings do not exist in any global namespace: they are scoped to the env object passed to a specific Worker.
  • Like a capability, to use a binding, the application must explicitly specify which binding it is trying to use, and only specifies the binding. In particular, the application does not separately specify the name of the resource in any other namespace (no URL, no global ID, etc.). The existence of the binding only affects the application’s behavior when the application explicitly invokes that binding.

Why is env a parameter to fetch(), not global?

This is a bit wonky, but the goal is to enable composition of Workers.

Imagine you have two Workers, one which implements your API, mapped to api.example.com, and one which serves static assets, mapped to assets.example.com. One day, for whatever reason, you decide you want to combine these two Workers into a single Worker. So you write this code:

import apiWorker from "api-worker.js";
import assetWorker from "asset-worker.js";

export default {
  async fetch(req, env, ctx) {
    let url = new URL(req.url);
    if (url.hostname == "api.example.com") {
      return apiWorker.fetch(req, env, ctx);
    } else if (url.hostname == "assets.example.com") {
      return assetWorker.fetch(req, env, ctx);
    } else {
      return new Response("Not found", {status: 404});
    }
  }
}

This is great! No code from either Worker needed to be modified at all. We just create a new file containing a router Worker that delegates to one or the other.

But, you discover a problem: both the API Worker and the assets Worker use a KV namespace binding, and it turns out that they both decided to name the binding env.KV, but these bindings are meant to point to different namespaces used for different purposes. Does this mean I have to go edit the Workers to change the name of the binding before I can merge them?

No, it doesn’t, because I can just remap the environments before delegating:

import apiWorker from "api-worker.js";
import assetWorker from "asset-worker.js";

export default {
  async fetch(req, env, ctx) {
    let url = new URL(req.url);
    if (url.hostname == "api.example.com") {
      let subenv = {KV: env.API_KV};
      return apiWorker.fetch(req, subenv, ctx);
    } else if (url.hostname == "assets.example.com") {
      let subenv = {KV: env.ASSETS_KV};
      return assetWorker.fetch(req, subenv, ctx);
    } else {
      return new Response("Not found", {status: 404});
    }
  }
}

If environments were globals, this remapping would not be possible.

In fact, this benefit goes much deeper than this somewhat-contrived example. The fact that the environment is not a global essentially forces code to be internally designed for dependency injection (DI). Designing code to be DI-friendly sometimes seems tedious, but every time I’ve done it, I’ve been incredibly happy that I did. Such code tends to be much easier to test and to adapt to new circumstances, for the same reasons mentioned when we discussed dependency injection earlier, but applying at the level of individual modules rather than whole Workers.

With that said, if you really insist that you don’t care about making your code explicitly DI-friendly, there is an alternative: Put your env into AsyncLocalStorage. That way it is “ambiently” available anywhere in your code, but you can still get some composability.

import { AsyncLocalStorage } from 'node:async_hooks';

// Allocate a new AsyncLocalStorage to store the value of `env`.
const ambientEnv = new AsyncLocalStorage();

// We can now define a global function that reads a key from env.MY_KV,
// without having to pass `env` down to it.
function getFromKv(key) {
  // Get the env from AsyncLocalStorage.
  return ambientEnv.getStore().MY_KV.get(key);
}

export default {
  async fetch(req, env, ctx) {
    // Put the env into AsyncLocalStorage while we handle the request,
    // so that calls to getFromKv() work.
    return ambientEnv.run(env, async () => {
      // Handle request, including calling functions that may call
      // getFromKv().

      // ... (code) ...
    });
  }
};

How does a KV binding actually work?

Under the hood, a Workers KV binding encapsulates a secret key used to access the corresponding KV namespace. This key is actually the encryption key for the namespace. The key is distributed to the edge along with the Worker’s code and configuration, using encrypted storage to keep it safe.

Although the key is distributed with the Worker, the Worker itself has no way to access the key. In fact, even the owner of the Cloudflare account cannot see the key – it is simply never revealed outside of Cloudflare’s systems. (Cloudflare employees are also prevented from viewing these keys.)

Even if an attacker somehow got ahold of the key, it would not be useful to them as-is. Cloudflare’s API does not provide any way for a user to upload a raw key to use in a KV binding. The API instead has the client specify the public ID of the namespace they want to use. The deployment system verifies that the KV namespace in question is on the same account as the Worker being uploaded (and that the client is authorized to deploy Workers on said account).

Get Started

To learn about all the types of bindings offered by Workers and how to use them, check out the documentation.

Introducing workerd: the Open Source Workers runtime

Post Syndicated from Kenton Varda original https://blog.cloudflare.com/workerd-open-source-workers-runtime/

Introducing workerd: the Open Source Workers runtime

Introducing workerd: the Open Source Workers runtime

Today I’m proud to introduce the first beta release of workerd, the JavaScript/Wasm runtime based on the same code that powers Cloudflare Workers. workerd is Open Source under the Apache License version 2.0.

workerd shares most of its code with the runtime that powers Cloudflare Workers, but with some changes designed to make it more portable to other environments. The name “workerd” (pronounced “worker dee”) comes from the Unix tradition of naming servers with a “-d” suffix standing for “daemon”. The name is not capitalized because it is a program name, which are traditionally lower-case in Unix-like environments.

What it’s for

Self-hosting Workers

workerd can be used to self-host applications that you’d otherwise run on Cloudflare Workers. It is intended to be a production-ready web server for this purpose. workerd has been designed to be unopinionated about hosting environments, so that it should fit nicely into whatever server/VM/container hosting and orchestration system you prefer. It’s just a web server.

Workers has always been based on standardized APIs, so that code is not locked into Cloudflare, and we work closely with other runtimes to promote compatibility. workerd provides another option to ensure that applications built on Workers can run anywhere, by leveraging the same underlying code to get exact, “bug-for-bug” compatibility.

Local development and testing

workerd is also designed to facilitate realistic local testing of Workers. Up until now, this has been achieved using Miniflare, which simulated the Workers API within a Node.js environment. Miniflare has worked well, but in a number of cases its behavior did not exactly match Workers running on Cloudflare. With the release of workerd, Miniflare and the Wrangler CLI tool will now be able to provide a more accurate simulation by leveraging the same runtime code we use in production.

Programmable proxies

workerd can act as an application host, a proxy, or both. It supports both forward and reverse proxy modes. In all cases, JavaScript code can be used to intercept and process requests and responses before forwarding them on. Traditional web servers and proxies have used bespoke configuration languages with quirks that are hard to master. Programming proxies in JavaScript instead provides more power while making the configuration easier to write and understand.

What it is

workerd is not just another way to run JavaScript and Wasm. Our runtime is uniquely designed in a number of ways.

Server-first

Many non-browser JavaScript and Wasm runtimes are designed to be general-purpose: you can use them to build command-line apps, local GUI apps, servers, or anything in between. workerd is not. It specifically focuses on servers, in particular (for now, at least) HTTP servers.

This means in particular that workerd-based applications are event-driven at the top level. Applications do not open listen sockets and accept connections from them; instead, the runtime pushes events to the application. It may seem like a minor difference, but this basic change in perspective directly enables many of the features below.

Web standard APIs

Wherever possible, Workers (and workerd in particular) offers the same standard APIs found in web browsers, such as Fetch, URL, WebCrypto, and others. This means that code built on workerd is more likely to be portable to browsers as well as to other standards-based runtimes. When Workers launched five years ago, it was unusual for a non-browser to offer web APIs, but we are pleased to see that the broader JavaScript ecosystem is now converging on them.

Nanoservices

workerd is a nanoservice runtime. What does that mean?

Microservices have become popular over the last decade as a way to split monolithic servers into smaller components that could be maintained and deployed independently. For example, a company that offers several web applications with a common user authentication flow might have a separate team that maintains the authentication logic. In a monolithic model, the authentication logic might have been offered to the application teams as a library. However, this could be frustrating for the maintainers of that logic, as making any change might require waiting for every application team to deploy an update to their respective server. By splitting the authentication logic into a separate server that all the others talk to, the authentication team is able to deploy changes on their own schedule.

However, microservices have a cost. What was previously a fast library call instead now requires communicating over a network. In addition to added overhead, this communication requires configuration and administration to ensure security and reliability. These costs become greater as the codebase is split into more and more services. Eventually, the costs outweigh the benefits.

Nanoservices are a new model that achieve the benefits of independent deployment with overhead closer to that of library calls. With workerd, many Workers can be configured to run in the same process. Each Worker runs in a separate “isolate”, which gives the appearance of running independently of the others: each isolate loads separate code and has its own global scope. However, when one Worker explicitly sends a request to another Worker, the destination Worker actually runs in the same thread with zero latency. So, it performs more like a function call.

With nanoservices, teams can now break their code into many more independently-deployed pieces without worrying about the overhead.

(Some in the industry prefer to call nanoservices “functions”, implying that each individual function making up an application could be its own service. I feel, however, that this puts too much emphasis on syntax rather than logical functionality. That said, it is the same concept.)

To really make nanoservices work well, we had to minimize the baseline overhead of each service. This required designing workerd very differently from most other runtimes, so that common resources could be shared between services as much as possible. First, as mentioned, we run many nanoservices within a single process, to share basic process overhead and minimize context switching costs. A second big architectural difference between workerd and other runtimes is how it handles built-in APIs. Many runtimes implement significant portions of their built-in APIs in JavaScript, which must then be loaded separately into each isolate. workerd does not; all the APIs are implemented in native code, so that all isolates may share the same copy of that code. These design choices would be difficult to retrofit into another runtime, and indeed these needs are exactly why we chose to build a custom runtime for Workers from the start.

Homogeneous deployment

In a typical microservices model, you might deploy different microservices to containers running across a cluster of machines, connected over a local network. You might manually choose how many containers to dedicate to each service, or you might configure some form of auto-scaling based on resource usage.

workerd offers an alternative model: Every machine runs every service.

workerd’s nanoservices are much lighter-weight than typical containers. As a result, it’s entirely reasonable to run a very large number of them – hundreds, maybe thousands – on a single server. This in turn means that you can simply deploy every service to every machine in your fleet.

Homogeneous deployment means that you don’t have to worry about scaling individual services. Instead, you can simply load balance requests across the entire cluster, and scale the cluster as needed. Overall, this can greatly reduce the amount of administration work needed.

Cloudflare itself has used the homogeneous model on our network since the beginning. Every one of Cloudflare’s edge servers runs our entire software stack, so any server can answer any kind of request on its own. We’ve found it works incredibly well. This is why services on Cloudflare – including ones that use Workers – are able to go from no traffic at all to millions of requests per second instantly without trouble.

Capability bindings: cleaner configuration and SSRF safety

workerd takes a different approach to most runtimes – indeed, to most software development platforms – in how an application accesses external resources.

Most development platforms start from assuming that the application can talk to the whole world. It is up to the application to figure out exactly what it wants to talk to, and name it in some global namespace, such as using a URL. So, an application server that wants to talk to the authentication microservice might use code like this:

// Traditional approach without capability bindings.
fetch("https://auth-service.internal-network.example.com/api", {
  method: "POST",
  body: JSON.stringify(authRequest),
  headers: { "Authorization": env.AUTH_SERVICE_TOKEN }
});

In workerd, we do things differently. An application starts out with no ability to talk to the rest of the world, and must be configured with specific capability bindings that provide it access to specific external resources. So, an application which needs to be able to talk to the authentication service would be configured with a binding called authService, and the code would look something like this:

// Capability-based approach. Hostname doesn't matter; all
// requests to AUTH_SERVICE.fetch() go to the auth service.
env.AUTH_SERVICE.fetch("https://auth/api", {
 method: "POST",
 body: JSON.stringify(authRequest),
});

This may at first appear to be a trivial difference. In both cases, we have to use configuration to control access to external services. In the traditional approach, we’d provide access tokens (and probably the service’s hostname) as environment variables. In the new approach, the environment goes a bit further to provide a full-fledged object. Is this just syntax sugar?

It turns out, this slight change has huge advantages:

First, we can now restrict the global fetch() function to accept only publicly-routable URLs. This makes applications totally immune to SSRF attacks! You cannot trick an application into accessing an internal service unintentionally if the code to access internal services is explicitly different. (In fact, the global fetch() is itself backed by a binding, which can be configured. workerd defaults to connecting it to the public internet, but you can also override it to permit private addresses if you want, or to route to a specific proxy service, or to be blocked entirely.)

With that done, we now have an interesting property: All internal services which an application uses must be configurable. This means:

  • You can easily see a complete list of the internal services an application talks to, without reading all the code.
  • You can always replace these services with mocks for testing purposes.
  • You can always configure an application to authenticate itself differently (e.g. client certificates) or use a different back end, without changing code.

The receiving end of a binding benefits, too. Take the authentication service example, above. The auth service may be another Worker running in workerd as a nanoservice. In this case, the auth service does not need to be bound to any actual network address. Instead, it may be made available strictly to other Workers through their bindings. In this case, the authentication service doesn’t necessarily need to verify that a request received came from an allowed client – because only allowed clients are able to send requests to it in the first place.

Overall, capability bindings allow simpler code that is secure by default, more composable, easier to test, and easier to understand and maintain.

Always backwards compatible

Cloudflare Workers has a hard rule against ever breaking a live Worker running in production. This same dedication to backwards compatibility extends to workerd.

workerd shares Workers’ compatibility date system to manage breaking changes. Every Worker must be configured with a “compatibility date”. The runtime then ensures that the API behaves exactly as it did on that date. At your leisure, you may check the documentation to see if new breaking changes are introduced at a future date, and update your code for them. Most such changes are minor and most code won’t require any changes. However, you are never obliged to update. Old dates will continue to be supported by newer versions of workerd. It is always safe to update workerd itself without updating your code.

What it’s not

To avoid misleading or disappointing anyone, I need to take a moment to call out what workerd is not.

workerd is not a Secure Sandbox

It’s important to note that workerd is not, on its own, a secure way to run possibly-malicious code. If you wish to run code you don’t trust using workerd, you must enclose it in an additional sandboxing layer, such as a virtual machine configured for sandboxing.

workerd itself is designed such that a Worker should not be able to access any external resources to which it hasn’t been granted a capability. However, a complete sandbox solution not only must be designed to restrict access, but also must account for the possibility of bugs – both in software and in hardware. workerd on its own is not sufficient to protect against hardware bugs like Spectre, nor can it adequately defend against the possibility of vulnerabilities in V8 or in workerd’s own code.

The Cloudflare Workers service uses the same code found in workerd, but adds many additional layers of security on top to harden against such bugs. I described some of these in a past blog post. However, these measures are closely tied to our particular environment. For example, we rely on build automation to push V8 patches to production immediately upon becoming available; we separate customers according to risk profile; we rely on non-portable kernel features and assumptions about the host system to enforce security and resource limits. All of this is very specific to our environment, and cannot be packaged up in a reusable way.

workerd is not an independent project

workerd is the core of Cloudflare Workers, a fast-moving project developed by a dedicated team at Cloudflare. We are not throwing code over the wall to forget about, nor are we expecting volunteers to do our jobs for us. workerd’s GitHub repository will be the canonical source used by Cloudflare Workers and our team will be doing much of their work directly in this repository. Just like V8 is developed primarily by the Chrome team for use in Chrome, workerd will be developed primarily by the Cloudflare Workers team for use in Cloudflare Workers.

This means we cannot promise that external contributions will sit on a level playing field with internal ones. Code reviews take time, and work that is needed for Cloudflare Workers will take priority. We also cannot promise we will accept every feature contribution. Even if the code is already written, reviews and maintenance have a cost. Within Cloudflare, we have a product management team who carefully evaluates what features we should and shouldn’t offer, and plenty of ideas generated internally ultimately don’t make the cut.

If you want to contribute a big new feature to workerd, your best bet is to talk to us before you write code, by raising an issue on GitHub early to get input. That way, you can find out if we’re likely to accept a PR before you write it. We also might be able to give hints on how best to implement.

It’s also important to note that while workerd’s internal interfaces may sometimes appear clean and reusable, we cannot make any guarantee that those interfaces won’t completely change on a whim. If you are trying to build on top of workerd internals, you will need to be prepared either to accept a fair amount of churn, or pin to a specific version.

workerd is not an off-the-shelf edge compute platform

As hinted above, the full Cloudflare Workers service involves a lot of technology beyond workerd itself, including additional security, deployment mechanisms, orchestration, and so much more. workerd itself is a portion of our runtime codebase, which is itself a small (albeit critical) piece of the overall Cloudflare Workers service.

We are pleased, though, that this means it is possible for us to release this code under a permissive Open Source license.

Try the Beta

As of this blog post, workerd is in beta. If you want to try it out,

A Workers optimization that reduces your bill

Post Syndicated from Kenton Varda original https://blog.cloudflare.com/workers-optimization-reduces-your-bill/

A Workers optimization
that reduces your bill

A Workers optimization
that reduces your bill

Recently, we made an optimization to the Cloudflare Workers runtime which reduces the amount of time Workers need to spend in memory. We’re passing the savings on to you for all your Unbound Workers.

Background

Workers are often used to implement HTTP proxies, where JavaScript is used to rewrite an HTTP request before sending it on to an origin server, and then to rewrite the response before sending it back to the client. You can implement any kind of rewrite in a Worker, including both rewriting headers and bodies.

Many Workers, though, do not actually modify the response body, but instead simply allow the bytes to pass through from the origin to the client. In this case, the Worker’s application code has finished executing as soon as the response headers are sent, before the body bytes have passed through. Historically, the Worker was nevertheless considered to be “in use” until the response body had fully finished streaming.

For billing purposes, under the Workers Unbound pricing model, we charge duration-memory (gigabyte-seconds) for the time in which the Worker is in use.

The change

On December 15-16, we made a change to the way we handle requests that are streaming through the response without modifying the content. This change means that we can mark application code as “idle” as soon as the response headers are returned.

Since no further application code will execute on behalf of the request, the system does not need to keep the request state in memory – it only needs to track the low-level native sockets and pump the bytes through. So now, during this time, the Worker will be considered idle, and could even be evicted before the stream completes (though this would be unlikely unless the stream lasts for a very long time).

Visualized it looks something like this:

A Workers optimization
that reduces your bill

As a result of this change, we’ve seen that the time a Worker is considered “in use” by any particular request has dropped by an average of 70%. Of course, this number varies a lot depending on the details of each Worker. Some may see no benefit, others may see an even larger benefit.

This change is totally invisible to the application. To any external observer, everything behaves as it did before. But, since the system now considers a Worker to be idle during response streaming, the response streaming time will no longer be billed. So, if you saw a drop in your bill, this is why!

But it doesn’t stop there!

The change also applies to a few other frequently used scenarios, namely Websocket proxying, reading from the cache and streaming from KV.

WebSockets: once a Worker has arranged to proxy through a WebSocket, as long as it isn’t handling individual messages in your Worker code, the Worker does not remain in use during the proxying. The change applies to regular stateless Workers, but not to Durable Objects, which are not usually used for proxying.

export default {
  async fetch(request: Request) {
    //Do anything before
    const upgradeHeader = request.headers.get('Upgrade')
    if (upgradeHeader || upgradeHeader === 'websocket') {
      return await fetch(request)
    }
    //Or with other requests
  }
}

Reading from Cache: If you return the response from a cache.match call, the Worker is considered idle as soon as the response headers are returned.

export default {
  async fetch(request: Request) {
    let response = await caches.default.match('https://example.com')
    if (response) {
      return response
    }
    // get/create response and put into cache
  }
}

Streaming from KV: And lastly, when you stream from KV. This one is a bit trickier to get right, because often people retrieve the value from KV as a string, or JSON object and then create a response with that value. But if you fetch the value as a stream, as done in the example below, you can create a Response with the ReadableStream.

interface Env {
  MY_KV_NAME: KVNamespace
}

export default {
  async fetch(request: Request, env: Env) {
    const readableStream = await env.MY_KV_NAME.get('hello_world.pdf', { type: 'stream' })
    if (readableStream) {
      return new Response(readableStream, { headers: { 'content-type': 'application/pdf' } })
    }
  },
}

Interested in Workers Unbound?

If you are already using Unbound, your bill will have automatically dropped already.

Now is a great time to check out Unbound if you haven’t already, especially since recently, we’ve also removed the egress fees. Unbound allows you to build more complex workloads on our platform and only pay for what you use.

We are always looking for opportunities to make Workers better. Often that improvement takes the form of powerful new features such as the soon-to-be released Service Bindings and, of course, performance enhancements. This time, we are delighted to make Cloudflare Workers even cheaper than they already were.

Backwards-compatibility in Cloudflare Workers

Post Syndicated from Kenton Varda original https://blog.cloudflare.com/backwards-compatibility-in-cloudflare-workers/

Backwards-compatibility in
Cloudflare Workers

Backwards-compatibility in
Cloudflare Workers

Cloudflare Workers is our serverless platform that runs your code in 250+ cities worldwide.

On the Workers team, we have a policy:

A change to the Workers Runtime must never break an application that is live in production.

It seems obvious enough, but this policy has deep consequences. What if our API has a bug, and some deployed Workers accidentally depend on that bug? Then, seemingly, we can’t fix the bug! That sounds… bad?

This post will dig deeper into our policy, explaining why Workers is different from traditional server stacks in this respect, and how we’re now making backwards-incompatible changes possible by introducing “compatibility dates”.

TL;DR: Developers may now opt into backwards-incompatible fixes by setting a compatibility date.

Serverless demands strict compatibility

Workers is a serverless platform, which means we maintain the server stack for you. You do not have to manage the runtime version, you only manage your own code. This means that when we update the Workers Runtime, we update it for everyone. We do this at least once a week, sometimes more.

This means that if a runtime upgrade breaks someone’s application, it’s really bad. The developer didn’t make any change, so won’t be watching for problems. They may be asleep, or on vacation. If we want people to trust serverless, we can’t let this happen.

This is very different from traditional server platforms, where the developer maintains their own stack. For example, when a developer maintains a traditional VM-based server running Node.js applications, then the developer must decide exactly when to upgrade to a new version of Node.js. Careful developers do not upgrade Node.js 14 to Node.js 16 in production without testing first. They typically verify that their application works in a staging environment before going to production. A developer who doesn’t have time to spend testing each new version may instead choose to rely on a long-term support release, applying only low-risk security patches.

In the old world, if the Node.js maintainers decide to make a breaking change to an obscure API between releases, it’s OK. Downstream developers are expected to test their code before upgrading, and address any breakages. But in the serverless world, it’s not OK: developers have no control over when upgrades happen, therefore upgrades must never break anything.

But sometimes we need to fix things

Sometimes, we get things wrong, and we need to fix them. But sometimes, the fix would break people.

For example, in Workers, the fetch() function is used to make outgoing HTTP requests. Unfortunately, due to an oversight, our original implementation of fetch(), when given a non-HTTP URL, would silently interpret it as HTTP instead. For example, if you did fetch(“ftp://example.com”), you’d get the same result as fetch(“http://example.com”).

This is obviously not what we want and could lead to confusion or deeper bugs. Instead, fetch() should throw an exception in these cases. However, we couldn’t simply fix the problem, because a surprising number of live Workers depended on the behavior. For whatever reason, some Workers fetch FTP URLs and expect to get a result back. Perhaps they are fetching from sites that support both FTP and HTTP, and they arbitrarily chose FTP and it worked. Perhaps the fetches aren’t actually working, but changing a 404 error result into an exception would break things worse. When you have tens of thousands of new developers deploying applications every month, inevitably there’s always someone relying on any bug. We can’t “fix” the bug because it would break these applications.

The obvious solutions don’t work

Could we contact developers and ask them to fix their code?

No, because the problem is our fault, not the application developer’s, and the developer may not have time to help us fix our problems.

The fact that a Worker is doing something “wrong” — like using an FTP URL when they should be using HTTP — doesn’t necessarily mean the developer did anything wrong. Everyone writes code with bugs. Good developers rely on careful testing to make sure their code does what it is supposed to.

But what if the test only worked because of a bug in the underlying platform that caused it to do the right thing by accident? Well, that’s the platform’s fault. The developer did everything they could: they tested their code thoroughly, and it worked.

Developers are busy people. Nobody likes hearing that they need to drop whatever they are doing to fix a problem in code that they thought worked — especially code that has been working fine for years without anyone touching it. We think developers have enough on their plates already, we shouldn’t be adding more work.

Could we run multiple versions of the Workers Runtime?

No, for three reasons.

First, in order for edge computing to be effective, we need to be able to host a very large number of applications in each instance of the Workers Runtime. This is what allows us to run your code in hundreds of locations around the world at minimal cost. If we ran a separate copy of the runtime for each application, we’d need to charge a lot more, or deploy your code to far fewer locations. So, realistically it is infeasible for us to have different Workers asking for different versions of the runtime.

Second, part of the promise of serverless is that developers shouldn’t have to worry about updating their stack. If we start letting people pin old versions, then we have to start telling people how long they are allowed to do so, alerting people about security updates, giving people documentation that differentiates versions, and so on. We don’t want developers to have to think about any of that.

Third, this doesn’t actually solve the real problem anyway. We can easily implement multiple behaviors within the same runtime binary. But how do we know which behavior to use for any particular Worker?

Introducing Compatibility Dates

Going forward, every Worker is assigned a “compatibility date”, which must be a date in the past. The date is specified inside the project’s metadata (for Wrangler projects, in wrangler.toml). This metadata is passed to the Cloudflare API along with the application code whenever it is updated and deployed. A compatibility date typically starts out as the date when the Worker was first created, but can be updated from time to time.

# wrangler.toml
compatibility_date = "2021-09-20"

We can now introduce breaking changes. When we do, the Workers Runtime must implement both the old and the new behavior, and chooses behavior based on the compatibility date. Each time we introduce a new change, we choose a date in the future when that change will become the default. Workers with a later compatibility date will see the change; Workers with an older compatibility date will retain the old behavior.

A page in our documentation lists the history of breaking changes — and only breaking changes. When you wish to update your Worker’s compatibility date, you can refer to this page to quickly determine what might be affected, so that you can test for problems.

We will reserve the compatibility system strictly for changes which cannot be made without causing a breakage. We don’t want to force people to update their compatibility date to get regular updates, including new features, non-breaking bug fixes, and so on.

If you’d prefer never to update your compatibility date, that’s OK! Old compatibility dates are intended to be supported forever. However, if you are frequently updating your code, you should update your compatibility date along with it.

Acknowledgement

While the details are a bit different, we were inspired by Stripe’s API versioning, as well as the absolute promise of backwards compatibility maintained by both the Linux kernel system call API and the Web Platform implemented by browsers.

Dynamic Process Isolation: Research by Cloudflare and TU Graz

Post Syndicated from Kenton Varda original https://blog.cloudflare.com/spectre-research-with-tu-graz/

Dynamic Process Isolation: Research by Cloudflare and TU Graz

Dynamic Process Isolation: Research by Cloudflare and TU Graz

Last year, I wrote about the Cloudflare Workers security model, including how we fight Spectre attacks. In that post, I explained that there is no known complete defense against Spectre — regardless of whether you’re using isolates, processes, containers, or virtual machines to isolate tenants. What we do have, though, is a huge number of tools to increase the cost of a Spectre attack, to the point where it becomes infeasible. Cloudflare Workers has been designed from the very beginning with protection against side channel attacks in mind, and because of this we have been able to incorporate many defenses that other platforms — such as virtual machines and web browsers — cannot. However, the performance and scalability requirements of edge compute make it infeasible to run every Worker in its own private process, so we cannot rely on the usual defenses provided by the operating system kernel and address space separation.

Given our different approach, we cannot simply rely on others to tell us if we are safe. We had to do our own research. To do this we partnered with researchers at Graz Technical University (TU Graz) to study the impact of Spectre on our environment. The team at TU Graz are some of the foremost experts on the topic, having co-discovered Spectre initially as well as discovered several follow-on bugs like NetSpectre, ZombieLoad, Fallout, and others.

Today we are publishing a paper describing our findings, authored by Martin Schwarzl, Pietro Borrello, Andreas Kogler, Thomas Schuster, Daniel Gruss, Michael Schwarz, and myself. This paper covers research done in 2019 and early 2020. The research both tests the possibility of attacking Workers using Spectre, and proposes a new defense mechanism, which we now employ in production.

For this research, the team at TU Graz had full access to the Workers Runtime source code and were able to compile and run it locally for testing.

The research has two basic components.

Part 1: Develop an attack

A side channel attack (of which Spectre is one variety) is kind of like playing poker with a CPU. In poker, players try to understand what their opponents are thinking by looking for subtle unconscious behaviors, such as a nervous look or a hand motion. These behaviors are called “tells”. In a side channel attack, the attacker wants to find out secrets that the CPU knows. The CPU won’t reveal these secrets directly, but they can sometimes subtly affect how long the CPU spends to perform certain operations, kind of like a poker tell. If an attacker can carefully time the CPU’s actions, they can potentially discover the underlying secrets. Spectre attacks in particular focus on side channels that result from the CPU’s use of speculative execution, in which the CPU executes code that it is not yet sure should be executed, and then attempts to roll it back if not. Speculative execution is a particularly potent tool in side channel attacks because it essentially allows the attacker to program custom side channels in speculatively-executed code.

Many Spectre defenses focus on eliminating the “tells” by trying to prevent the variability in the CPU’s timing. This is hard, because CPUs are extremely complex and there are many ways that their timing can be affected. While many specific “tells” have been found and mitigated, there are undoubtedly many more that haven’t been disclosed. This has led to a game of whack-a-mole, where researchers continuously find new “tells” while CPU vendors rush out kernel and microcode patches to solve them — often with large performance losses as a side effect.

In Workers, we have focused on a different approach: preventing the attacker from seeing the “tells”. The Workers Runtime is designed to prevent a Worker from measuring its own execution time, as well as to prevent other forms of non-deterministic behavior like multithreading that could be used in place of a timer. I described these techniques in detail in last year’s post.

However, this approach can’t be perfect as long as Workers are allowed to talk to the rest of the world. A Worker could always communicate with a remote time server to measure time. Such communications will be far less accurate than a local timer, and since the timing differences are extremely small, they will be hard to measure this way. But, by using amplification techniques to improve the strength of the signal, repeating the attack many times and applying statistics, it could still be possible to derive secrets.

We therefore set out to develop an attack based on this approach. Upon applying the best techniques available to us, we were indeed able to produce a working Spectre variant 1 attack that could leak memory at a rate of 120 bits per hour. Compared to attacks demonstrated on many other platforms, 120 bits per hour is pretty slow. However, it’s obviously still fast enough to be a problem.

It’s important to note, though, that this speed was achieved in an ideal scenario:

  • Since the Workers Runtime prevents Workers from measuring their own execution time, any attack would need to rely on a remote time server. But for the purpose of our test, the “remote” server was in fact located on the same machine. In a real-world scenario, such a server would need to be accessed over the Internet, making the timing less accurate.
  • The machine running the test had no other load. A real-world machine would be processing hundreds or thousands of requests concurrently, creating noise.
  • The attack only demonstrated that it could read some bits that it shouldn’t. In order to read interesting bits, an attacker would first need to locate those bits, which likely would require reading hundreds or thousands of other bits first.

In the real world, these factors appear to make an attack too slow to be interesting. If an attack takes days or weeks to carry out, the contents of memory are highly likely to change before it can read them. For example, we update the Workers Runtime code at least once a week, which causes a restart of all processes.

That said, we did not feel comfortable relying on this argument as our defense. Instead, we set out to do better.

Part 2: Enhance our defenses

In the second part of the research, we designed and implemented a novel Spectre defense which we call Dynamic Process Isolation.

Dynamic Process Isolation was described in my blog post last year. At the time, this system was still in testing, but it has since been fully deployed in production.

In short, our defense uses hardware performance counters to detect Workers whose performance characteristics could be indicative of an attack. Before the attack has had enough time to leak any bits, we move the Worker into a separate operating system process, thus taking advantage of the additional defenses implemented by the OS kernel. Crucially, since a benign Worker can still operate normally while in an isolated process, we are able to use a detector that produces false positives, as long as the rate is relatively low. This affordance made it possible for us to develop a working classifier where previous work in the area had struggled.

Specifically, we developed a detector based on measuring branch mispredictions. Spectre variant 1 attacks — the fastest and easiest kind of Spectre attack — work by fooling the CPU’s branch predictor to trigger speculative code execution. Such an attack, when running in our environment, must trigger repeated mispredictions in a loop, in order to get enough data to apply statistics to overcome the noise floor. We can see these mispredictions in the hardware performance counters. While an attack could try to evade the detector by spreading out its trials over a longer time period, doing so would slow down the attack by orders of magnitude, which is exactly our goal. Classifiers for other Spectre variants might be straightforward to build as well, however, we find other variants already produce much lower bandwidth or are otherwise effectively mitigated by our existing defenses.

This defense successfully detects and mitigates the attack we developed. We also tested it against a number of Spectre proofs of concept and found it caught all of them. Meanwhile, the rate of false positives is well within the range we can tolerate: Out of many thousands of Workers running on our platform, we see only about 20 being falsely detected as attacks.

For more details, check out the paper and my blog post from last year.

Read the Paper

Collaborating with TU Graz was a great experience. We are very happy to work with some of the world’s foremost experts on this problem, and to have produced not just an attack but also a constructive defense.

For more details, download the full paper on arXiv.

Durable Objects: Easy, Fast, Correct — Choose three.

Post Syndicated from Kenton Varda original https://blog.cloudflare.com/durable-objects-easy-fast-correct-choose-three/

Durable Objects: Easy, Fast, Correct — Choose three.

Durable Objects: Easy, Fast, Correct — Choose three.

Storage in distributed systems is surprisingly hard to get right. Distributed databases and consensus are well-known to be extremely hard to build. But, application code isn’t necessarily easy either. There are many ways in which apps that use databases can have subtle timing bugs that could result in inconsistent results, or even data loss. Worse, these problems can be very hard to test for, as they’ll often manifest only under heavy load, or only after a sudden machine failure.

Up until recently, Durable Objects were no exception. A Durable Object is a special kind of Cloudflare Worker that has access to persistent storage and processes requests in one of Cloudflare’s points of presence. Each Object has its own private storage, accessible through a classical key/value storage API. Like any classical database API, this storage API had to be used carefully to avoid possible race conditions and data loss, especially when performance mattered. And like any classical database API, many apps got it wrong.

However, rather than fix the apps, we decided to fix the model. Last month, we rolled out deep changes to the Durable Objects runtime such that many applications which previously contained subtle race conditions are now correct by default, and many that were previously slow are now fast. Developers can now write their code in an intuitive way, and have it work. No changes at all are needed to your code in order to take advantage of these new features.

So, let me tell you about what changed…

Background: Durable Objects are Single-Threaded

To understand what changed, it’s necessary to first understand Durable Objects. For a full introduction, see the Durable Objects announcement blog post.

The most important point is: Each Durable Object runs in exactly one location, in one single thread, at a time. Each object has its own private on-disk storage. This is a very different situation from a typical database, where many clients may be accessing the same data. In Durable Objects, any particular piece of data belongs to exactly one thread at a time.

Because a single Durable Object is single-threaded, it’s possible, and even encouraged, to keep state and perform synchronization in memory. This is, indeed, the killer feature of Durable Objects. With classical databases, in-memory state is extremely difficult to keep synchronized between all database clients. But with Durable Objects, since each piece of data belongs to a specific thread, this synchronization is easy.

However, interacting with the disk is still an I/O (input/output) operation, which means that each operation returns a Promise which you must await. As we’ll see, this re-introduces some of the synchronization difficulties that we were trying to avoid. However, it turns out, we can solve these difficulties within the system itself, without bothering application developers.

An Example

Consider this code:

// Used to be slow and racy -- but not anymore!
async function getUniqueNumber() {
  let val = await this.storage.get("counter");
  await this.storage.put("counter", val + 1);
  return val;
}

At first glance, this seems like reasonable code that returns a unique number each time it is called (incrementing each time).

Unfortunately, before now, this code had two problems:

  1. It had a subtle race condition (even though Durable Objects are single-threaded!).
  2. It was kind of slow.

The Race Condition

A race condition occurs when two operations running concurrently might interfere with each other in a way that makes them behave incorrectly. Race conditions are commonly associated with code that uses multiple threads.

JavaScript, however, famously does not use threads. Instead, it uses event-driven programming, with callbacks. It’s not possible for two pieces of JavaScript code to be running "at the same time" in the same isolate (and Durable Objects promises that no other isolate could possibly be accessing the same storage). Does that mean that race conditions aren’t a problem in JavaScript, the way they are in multi-threaded apps?

Unfortunately, it does not. The problem is, the code above is an async function, containing two await statements. Each time await is used, execution pauses, waiting for the specified Promise to complete.

In the meantime, though, other code can run! For example, the Durable Object might receive two requests at the same time. If each of them calls getUniqueNumber(), then the two calls might be interleaved. Each time one call performs an await, execution may switch to the other call. So, the two calls might end up looking like this:

Request 1 timeline Request 2 timeline
async function getUniqueNumber() {
  let val = await this.storage.get("counter");


async function getUniqueNumber() {
  let val = await this.storage.get("counter");
  await this.storage.put("counter", val + 1);
 
 
  await this.storage.put("counter", val + 1);
  return val;
}


  return val;
}

There’s a big problem here: Both of these two calls will call get("counter") before either of them calls put("counter", val + 1). That means, both of them will return the same value!

This problem is especially bad because it only happens when multiple requests are being handled at the same time — and even then, only sometimes. It is very hard to test for this kind of problem, and everything might seem just fine when the application is deployed, as long as it isn’t getting too much traffic. But one day, when a lot of visitors try to use the same object at the same time, all of a sudden getUniqueNumber() starts returning duplicates!

The Slowness

To add insult to injury, getUniqueNumber() was (until recently) pretty slow. The problem is, it has to do two round trips to storage — a get() and a put(). The get() might typically take a couple milliseconds. The put(), however, will take much longer, probably tens of milliseconds.

Why is put() so slow? Because we don’t want to lose data. The worst thing an application can do is tell the user that their action was successful when it wasn’t. If, for some reason, a write cannot be completed, then it’s imperative that the application presents an error to the user, so that the user knows that something is wrong and they’ll have to try again or look for a fix.

In order to make sure an application does not prematurely report success to the user, await put() has to make sure it doesn’t return until the data is actually safe on disk. Disks are slow, so this might take a while.

But that’s not all. Disks can fail. In order for the data to be really safe, we have to write the same data on multiple disks, in multiple machines. That means we have to wait for some network traffic.

But that’s still not all. What if a meteor were to come out of the sky and land on a Cloudflare data center, completely destroying it? Or, more likely, what if the power or network connection failed? We don’t want a user’s data to be lost in this case, or even temporarily become unavailable. Therefore, Durable Object data is replicated to multiple Cloudflare locations. This requires communicating across long distances before any write can be confirmed. There is little we can do to make this faster, the speed of light being what it is.

A call to getUniqueNumber() will therefore always take tens of milliseconds. If an application calls it multiple times, awaiting each call before beginning the next, it can easily become very slow very quickly. Or, at least, that was the case before our recent changes.

The Wrong Fixes

There are several ways that an application could fix these problems, but all of them have their own issues.

Transactions?

Many databases offer "transactions". A transaction allows an application to make sure some operation completes "atomically", with no interference from concurrent operations.

The Durable Objects storage API has always supported transactions. We could use them to fix our getUniqueNumber() implementation like so:

// No more race condition... but slow and complicated.
async function getUniqueNumber() {
  let val;
  await this.storage.transaction(async (txn) => {
    val = await txn.get("counter");
    await txn.put("counter", val + 1);
  });
  return val;
}

This fixes our race condition. Now, if getUniqueNumber() is called multiple times concurrently such that the storage operations interleave, the system will detect the problem. One of the concurrent calls will be chosen to be the "winner", and will complete normally. The other calls will be canceled and retried, so that they can see the value written by the first call.

This fixes our problems! But, at some cost:

  • getUniqueNumber() is now even slower than it was before. The difference typically won’t be huge, but setting up a transaction does require some additional coordination in the database. Of course, if the transaction needs to be retried, then it may end up being much slower. And retries will tend to happen more when load gets high… the worst possible time.
  • Speaking of retries, many developers might not realize that the transaction callback can be called multiple times. It’s difficult to test for this, since retries will only happen when concurrent operations cause conflicts. The problem is especially acute when the application is trying to synchronize not just on-disk state, but also in-memory state — if the transaction callback modifies in-memory state, it must be careful to ensure that its changes are idempotent. The need for idempotency may not be top of mind for most developers, and tests won’t catch the problem, making it very easy to end up deploying buggy code.

So we solved our problem, but we did it with a foot-gun. If we keep using the foot-gun, we’re probably going to shoot our own feet eventually.

Is there another way?

In-memory caching?

Durable Objects’ superpower is their in-memory state. Each object has only one active instance at any particular time. All requests sent to that object are handled by that same instance. That means, you can store some state in memory.

// Much faster! But (used to be) wrong.
async function getUniqueNumber() {
  if (this.val === undefined) {
    this.val = await this.storage.get("counter");
  }

  let result = this.val;
  ++this.val;
  this.storage.put("counter", this.val);
  return result;
}

This code is MUCH faster than the previous implementation, because it stores the value in memory. In fact, after the function runs once, further calls won’t wait for any I/O at all — they will return immediately. This is because by caching the value in memory, we avoid waiting for a get() (except for the first time), and we don’t wait for the put() either, trusting that it will complete asynchronously later on.

Returning immediately also means that there’s no opportunity for concurrency, so the calls that return immediately will always return unique numbers! This means that not only is this implementation faster than our original implementation, it is also more correct. This is only possible because the Durable Objects platform guarantees that there will only be one instance, and therefore only one copy of this.val.

Unfortunately, there are two problems with this code:

  • We still have a race condition on initialization. If the first two calls to getUniqueNumber() happen to occur at about the same time, then initialization will be performed multiple times. The second call will likely clobber what the first call did, and the two calls will end up returning the same number. We could solve this problem by making initialization more complicated — the first call could create an initialization promise, and other concurrent calls could wait on it, so that initialization really only happens once. But this creates even deeper complexity: What if initialization fails for some reason? The object could be placed in a permanently broken state. It’s possible to get this right, but it’s surprisingly tricky.
  • Because we don’t wait for the put() to report success, it’s possible that it could be silently lost. For example, if the machine hosting the Durable Object suffered a sudden power failure, then the Durable Object would be transferred to some other machine. When it starts up there, calls to getUniqueNumber() might return numbers that had already been returned under the old instance before it failed, because the put()s hadn’t actually completed before the failure occurred. But if we await the put(), then our function becomes slow again, and creates more opportunities for race conditions (e.g. in the calling code).

Our answer: Make it automatic

When looking at this, we had two options:

  1. Try to carefully document these problems and educate developers about them, so that they could write code that does the right thing.
  2. Change the system so that naturally-written code just does the right thing by default — and runs quickly.

We chose option 2. We accomplished this in three parts.

Part 1: Input Gates

Let’s go back to our original example. Can we make this example "just work", even in the face of concurrent requests?

// Can this "just work" please?
async function getUniqueNumber() {
  let val = await this.storage.get("counter");
  await this.storage.put("counter", val + 1);
  return val;
}

It turns out we can! We create a new rule:

Input gates: While a storage operation is executing, no events shall be delivered to the object except for storage completion events. Any other events will be deferred until such a time as the object is no longer executing JavaScript code and is no longer waiting for any storage operations. We say that these events are waiting for the "input gate" to open.

If we do this, then our storage operations above are no longer an opportunity for concurrency. Our concurrent requests now look like this:

Request 1 timeline Request 2 timeline
async function getUniqueNumber() {
  let val = await this.storage.get("counter");


// Request 2 delivery is blocked because
// request 1 is waiting for storage.
  await this.storage.put("counter", val + 1);


// Request 2 delivery is blocked because
// request 1 is waiting for storage.
  return val;
}


async function getUniqueNumber() {
  let val = await this.storage.get("counter");
  await this.storage.put("counter", val + 1);
  return val;
}

The two calls return unique numbers, as expected. Hooray! (Unfortunately, we did it by delaying the second request, creating latency and reducing throughput — but we’ll address that in part 3, below.)

Note that our rule does not preclude making multiple concurrent requests to storage at the same time. You can still say:

let promise1 = this.storage.get("foo");
let promise2 = this.storage.put("bar", 123);
await promise1;
frob();
await promise2;

Here, the get() and put() execute concurrently. Moreover, the call to frob() may execute before the put() has completed (but strictly after the get() completes, since we awaited that promise). However, no other event — such as receiving a new request — can unexpectedly happen in the meantime.

On the other hand, the rule protects you not just against concurrent incoming requests, but also concurrent responses to outgoing requests. For example, say you have:

async function task1() {
  await fetch("https://example.com/api1");
  return await this.getUniqueNumber();
}
async function task2() {
  await fetch("https://example.com/api2");
  return await this.getUniqueNumber();
}
let promise1 = task1();
let promise2 = task2();
let val1 = await promise1;
let val2 = await promise2;

This code launches two fetch() calls concurrently. After each fetch completes, getUniqueNumber() is invoked. Could the two calls interfere with each other?

No, they will not. The completion of a fetch() is itself a kind of event. Our rule states that such events cannot be delivered while storage events are in progress. When the first of the two fetches returns, the app calls getUniqueNumber(), which starts performing some storage operations. If the second fetch() also returns while these storage operations are still outstanding, that return will be deferred until after the storage operations are done. Once again, our code ends up correct!

At this point, the async programming experts in the audience are probably starting to feel like something is fishy here. Indeed, there is a catch. What if we do:

// Still a problem even with input gates.
let promise1 = getUniqueNumber();
let promise2 = getUniqueNumber();
let val1 = await promise1;
let val2 = await promise2;

In this case, there is, in fact, a problem. Two calls to getUniqueNumber() are initiated by the same event. The application does not await the first call before starting the second, so the two calls end up running concurrently. Our special rule doesn’t protect us here, because there is no incoming event that can be deferred between when the two calls are made. From the system’s point of view, there’s no way to distinguish this code from code which legitimately decided to perform two storage operations in parallel.

As such, in this case, the two calls to getUniqueNumber() will interfere with each other. However, this problem is far less likely to come about by accident, and is far easier to catch in testing. This bug is deterministic, not caused by the unpredictable timing of network events. We consider this an acceptable caveat in order to solve the larger problem posed by concurrent requests.

Part 2: Output Gates

Let’s go back to our in-memory caching example. Can we make it work?

// Can we make this "just work"?
async function getUniqueNumber() {
  if (this.val === undefined) {
    this.val = await this.storage.get("counter");
  }

  let result = this.val;
  ++this.val;
  this.storage.put("counter", this.val);
  return result;
}

With input gates (part 1), we’ve solved one of the two problems this code had: the race condition of initialization. We no longer need to worry that two requests will call this at the same time, leading this.val to be initialized twice.

However, the problem with not awaiting the put() is still there. If we don’t await it, then we could lose data. If we do await it, then the call is slow.

We make another new rule:

Output gates: When a storage write operation is in progress, any new outgoing network messages will be held back until the write has completed. We say that these messages are waiting for the "output gate" to open. If the write ultimately fails, the outgoing network messages will be discarded and replaced with errors, while the Durable Object will be shut down and restarted from scratch.

With this rule, we no longer have to await the result of put(). Our code can happily continue executing and just assume the put() will succeed. If the put() doesn’t succeed, then anything the application does here will never be observable to the rest of the world anyway. For example, if the app prematurely sends a response to the user saying that the operation succeeded, this response will not actually be delivered until after the put() completes successfully. So, by the time the user receives the message, it is no longer "premature"! In the very rare event that the write operation fails, the user will not receive the premature confirmation at all.

Note that output gates apply not only to responses sent back to a client, but also to new outgoing requests made with fetch() — those requests will be delayed from being sent until all prior writes are confirmed. So, once again, it is impossible for anything else in the world to observe a premature confirmation.

With this change, our getUniqueNumber() implementation with in-memory caching is now fully correct, while retaining most of its speed advantage over the non-caching implementation. Except for the very first call, the application will never be blocked waiting for getUniqueNumber() to finish. The final response from the app to the client will be delayed pending write confirmation, but that write can be performed in parallel with any writes the application performs after getUniqueNumber() completes.

Part 3: Automatic in-memory caching

Our in-memory caching example now works great. But, it’s still a little bit complicated and unnatural to write. Let’s go back to our original, simple code one more time… can we make it fast by default?

// Can we make this not just work, but just work FAST?
async function getUniqueNumber() {
  let val = await this.storage.get("counter");
  await this.storage.put("counter", val + 1);
  return val;
}

The answer to this part is a classic one: we can add automatic caching to the storage layer, just like most operating systems do for disk storage.

We have rolled out an in-memory caching layer for Durable Objects. This layer keeps up to several megabytes worth of data directly in memory in the process where the object runs.

When a get() requests a key that is in cache, the operation returns immediately, without even context-switching out of the thread and isolate where the object is hosted. If the key is not in cache, then a storage request will still be needed, but reads complete relatively quickly.

Better yet, put() requests now always complete "instantaneously". A put() simply writes to cache. We rely on output gates ("part 2", above) to prevent the premature confirmation of writes to any external party. Writes will be coalesced (even if you await them), so that the output gate waits only for O(1) network round trips of latency, not O(n).

Moreover, because get() and put() now complete instantly in most or all cases, the negative impact of input gates on throughput is largely mitigated, because the gate now spends relatively little time blocked.

With Durable Objects built-in caching, our simple code is now just as fast as our code that manually implemented in-memory caching. Combined with input and output gates, our code is now simple, fast, and correct, all at the same time.

Bonus Correctness

Our caching layer provides some bonus consistency guarantees, in addition to performance.

First, writes are automatically coalesced. That is, if you perform multiple put() or delete() operations without awaiting them or anything else in between, then the operations are automatically grouped together and stored atomically. In the case of a sudden power failure, after coming back up, either all of the writes will have been stored, or none of them will. For example:

// Move a value from "foo" to "bar".
let val = await this.storage.get("foo");

this.storage.delete("foo");
this.storage.put("bar", val);
// There's no possibility of data loss, because the delete() and the
// following put() are automatically coalesced into one atomic
// operation. This is true as long as you do not `await` anything
// in between.

Second, the API is also able to provide stronger ordering guarantees for reads. Previously, overlapping storage operations did not have guaranteed ordering. For example, if you issued a get() and a put() on the same key at the same time (without awaiting one before starting the other), then it was not deterministic whether the get() might return the value written by the put() — regardless of the ordering of the statements in your code. The caching layer fixes this. Now, operations are performed in exactly the order in which they were initiated, regardless of when they complete.

These two features eliminate more subtle bugs that might otherwise be hard to catch in testing, so that you don’t have to be a database expert to write code that works.

Optional Bypass

We expect gates and caching will be a win in the vast majority of use cases, but not always. In some use cases, concurrency won’t lead to any problems, and so blocking it may be a loss. Sometimes, the application is OK with prematurely confirming writes in order to minimize latency. And sometimes, caching may just waste memory because the same keys are not frequently accessed.

For those cases, we offer explicit bypasses:

this.storage.get("foo", {allowConcurrency: true, noCache: true});
this.storage.put("foo", "bar", {allowUnconfirmed: true, noCache: true});

Developers who have taken the time to think carefully about these issues can use these flags to tune performance to their specific needs. For those who don’t want to think about it, the defaults should work well.

Conclusion

Concurrency is hard. It doesn’t matter if you’re a novice or an expert: even experts regularly get it wrong. It’s difficult to think about all the ways that concurrent operations might overlap to corrupt your application state.

The traditional answer has been to make applications stateless, and defer all concurrency control to the database layer using transactions. However, transactions are slow, which is a big reason why so many web applications today take hundreds of milliseconds or more to respond to basic actions.

Durable Objects are all about state. By keeping state in memory in addition to on disk, and directing requests for the same data to be coordinated through the same instance, we can make applications much faster. But until recently, this was extremely tricky to get right.

With input gates, output gates, and caching, code written in the most intuitive way now "just works", and runs fast. This means you can focus on building your application, without wasting time optimizing I/O performance and debugging obscure race conditions.

Workers Durable Objects Beta: A New Approach to Stateful Serverless

Post Syndicated from Kenton Varda original https://blog.cloudflare.com/introducing-workers-durable-objects/

Workers Durable Objects Beta:
A New Approach to Stateful Serverless

Workers Durable Objects Beta:
A New Approach to Stateful Serverless

We launched Cloudflare Workers® in 2017 with a radical vision: code running at the network edge could not only improve performance, but also be easier to deploy and cheaper to run than code running in a single datacenter. That vision means Workers is about more than just edge compute — we’re rethinking how applications are built.

Using a “serverless” approach has allowed us to make deploys dead simple, and using isolate technology has allowed us to deliver serverless more cheaply and without the lengthy cold starts that hold back other providers. We added easy-to-use eventually-consistent edge storage to the platform with Workers KV.

But up until today, it hasn’t been possible to manage state with strong consistency, or to coordinate in real time between multiple clients, entirely on the edge. Thus, these parts of your application still had to be hosted elsewhere.

Durable Objects provide a truly serverless approach to storage and state: consistent, low-latency, distributed, yet effortless to maintain and scale. They also provide an easy way to coordinate between clients, whether it be users in a particular chat room, editors of a particular document, or IoT devices in a particular smart home. Durable Objects are the missing piece in the Workers stack that makes it possible for whole applications to run entirely on the edge, with no centralized “origin” server at all.

Today we are beginning a closed beta of Durable Objects.

Request a beta invite »

What is a “Durable Object”?

I’m going to be honest: naming this product was hard, because it’s not quite like any other cloud technology that is widely-used today. This proverbial bike shed has many layers of paint, but ultimately we settled on “Unique Durable Objects”, or “Durable Objects” for short. Let me explain what they are by breaking that down:

  • Objects: Durable Objects are objects in the sense of Object-Oriented Programming. A Durable Object is an instance of a class — literally, a class definition written in JavaScript (or your language of choice). The class has methods which define its public interface. An object is an instance of this class, combining the code with some private state.
  • Unique: Each object has a globally-unique identifier. That object exists in only one location in the whole world at a time. Any Worker running anywhere in the world that knows the object’s ID can send messages to it. All those messages end up delivered to the same place.
  • Durable: Unlike a normal object in JavaScript, Durable Objects can have persistent state stored on disk. Each object’s durable state is private to it, which means not only that access to storage is fast, but the object can even safely maintain a consistent copy of the state in memory and operate on it with zero latency. The in-memory object will be shut down when idle and recreated later on-demand.

What can they do?

Durable Objects have two primary abilities:

  • Storage: Each object has attached durable storage. Because this storage is private to a specific object, the storage is always co-located with the object. This means the storage can be very fast while providing strong, transactional consistency. Durable Objects apply the serverless philosophy to storage, splitting the traditional large monolithic databases up into many small, logical units. In doing so, we get the advantages you’ve come to expect from serverless: effortless scaling with zero maintenance burden.
  • Coordination: Historically, with Workers, each request would be randomly load-balanced to a Worker instance. Since there was no way to control which instance received a request, there was no way to force two clients to talk to the same Worker, and therefore no way for clients to coordinate through Workers. Durable Objects change that: requests related to the same topic can be forwarded to the same object, which can then coordinate between them, without any need to touch storage. For example, this can be used to facilitate real-time chat, collaborative editing, video conferencing, pub/sub message queues, game sessions, and much more.

The astute reader may notice that many coordination use cases call for WebSockets — and indeed, conversely, most WebSocket use cases require coordination. Because of this complementary relationship, along with the Durable Objects beta, we’ve also added WebSocket support to Workers. For more on this, see the Q&A below.

Region: Earth

Workers Durable Objects Beta:
A New Approach to Stateful Serverless

When using Durable Objects, Cloudflare automatically determines the Cloudflare datacenter that each object will live in, and can transparently migrate objects between locations as needed.

Traditional databases and stateful infrastructure usually require you to think about geographical “regions”, so that you can be sure to store data close to where it is used. Thinking about regions can often be an unnatural burden, especially for applications that are not inherently geographical.

With Durable Objects, you instead design your storage model to match your application’s logical data model. For example, a document editor would have an object for each document, while a chat app would have an object for each chat. There is no problem creating millions or billions of objects, as each object has minimal overhead.

Killer app: Real-time collaborative document editing

Let’s say you have a spreadsheet editor application — or, really, any kind of app where users edit a complex document. It works great for one user, but now you want multiple users to be able to edit it at the same time. How do you accomplish this?

For the standard web application stack, this is a hard problem. Traditional databases simply aren’t designed to be real-time. When Alice and Bob are editing the same spreadsheet, you want every one of Alice’s keystrokes to appear immediately on Bob’s screen, and vice versa. But if you merely store the keystrokes to a database, and have the users repeatedly poll the database for new updates, at best your application will have poor latency, and at worst you may find database transactions repeatedly fail as users on opposite sides of the world fight over editing the same content.

The secret to solving this problem is to have a live coordination point. Alice and Bob connect to the same coordinator, typically using WebSockets. The coordinator then forwards Alice’s keystrokes to Bob and Bob’s keystrokes to Alice, without having to go through a storage layer. When Alice and Bob edit the same content at the same time, the coordinator resolves conflicts instantly. The coordinator can then take responsibility for updating the document in storage — but because the coordinator keeps a live copy of the document in-memory, writing back to storage can happen asynchronously.

Every big-name real-time collaborative document editor works this way. But for many web developers, especially those building on serverless infrastructure, this kind of solution has long been out-of-reach. Standard serverless infrastructure — and even cloud infrastructure more generally — just does not make it easy to assign these coordination points and direct users to talk to the same instance of your server.

Durable Objects make this easy. Not only do they make it easy to assign a coordination point, but Cloudflare will automatically create the coordinator close to the users using it and migrate it as needed, minimizing latency. The availability of local, durable storage means that changes to the document can be saved reliably in an instant, even if the eventual long-term storage is slower. Or, you can even store the entire document on the edge and abandon your database altogether.

With Durable Objects lowering the barrier, we hope to see real-time collaboration become the norm across the web. There’s no longer any reason to make users refresh for updates.

Example: An atomic counter

Here’s a very simple example of a Durable Object which can be incremented, decremented, and read over HTTP. This counter is consistent even when receiving simultaneous requests from multiple clients — none of the increments or decrements will be lost. At the same time, reads are served entirely from memory, no disk access needed.

export class Counter {
  // Constructor called by the system when the object is needed to
  // handle requests.
  constructor(controller, env) {
    // `controller.storage` is an interface to access the object's
    // on-disk durable storage.
    this.storage = controller.storage
  }

  // Private helper method called from fetch(), below.
  async initialize() {
    let stored = await this.storage.get("value");
    this.value = stored || 0;
  }

  // Handle HTTP requests from clients.
  //
  // The system calls this method when an HTTP request is sent to
  // the object. Note that these requests strictly come from other
  // parts of your Worker, not from the public internet.
  async fetch(request) {
    // Make sure we're fully initialized from storage.
    if (!this.initializePromise) {
      this.initializePromise = this.initialize();
    }
    await this.initializePromise;

    // Apply requested action.
    let url = new URL(request.url);
    switch (url.pathname) {
      case "/increment":
        ++this.value;
        await this.storage.put("value", this.value);
        break;
      case "/decrement":
        --this.value;
        await this.storage.put("value", this.value);
        break;
      case "/":
        // Just serve the current value. No storage calls needed!
        break;
      default:
        return new Response("Not found", {status: 404});
    }

    // Return current value.
    return new Response(this.value);
  }
}

Once the class has been bound to a Durable Object namespace, a particular instance of Counter can be accessed from anywhere in the world using code like:

// Derive the ID for the counter object named "my-counter".
// This name is associated with exactly one instance in the
// whole world.
let id = COUNTER_NAMESPACE.idFromName("my-counter");

// Send a request to it.
let response = await COUNTER_NAMESPACE.get(id).fetch(request);

Demo: Chat

Chat is arguably real-time collaboration in its purest form. And to that end, we have built a demo open source chat app that runs entirely at the edge using Durable Objects.

Try the live demo »See the source code on GitHub »

This chat app uses a Durable Object to control each chat room. Users connect to the object using WebSockets. Messages from one user are broadcast to all the other users. The chat history is also stored in durable storage, but this is only for history. Real-time messages are relayed directly from one user to others without going through the storage layer.

Additionally, this demo uses Durable Objects for a second purpose: Applying a rate limit to messages from any particular IP. Each IP is assigned a Durable Object that tracks recent request frequency, so that users who send too many messages can be temporarily blocked — even across multiple chat rooms. Interestingly, these objects don’t actually store any durable state at all, because they only care about very recent history, and it’s not a big deal if a rate limiter randomly resets on occasion. So, these rate limiter objects are an example of a pure coordination object with no storage.

This chat app is only a few hundred lines of code. The deployment configuration is only a few lines. Yet, it will scale seamlessly to any number of chat rooms, limited only by Cloudflare’s available resources. Of course, any individual chat room’s scalability has a limit, since each object is single-threaded. But, that limit is far beyond what a human participant could keep up with anyway.

Other use cases

Durable Objects have infinite uses. Here are just a few ideas, beyond the ones described above:

  • Shopping cart: An online storefront could track a user’s shopping cart in an object. The rest of the storefront could be served as a fully static web site. Cloudflare will automatically host the cart object close to the end user, minimizing latency.
  • Game server: A multiplayer game could track the state of a match in an object, hosted on the edge close to the players.
  • IoT coordination: Devices within a family’s house could coordinate through an object, avoiding the need to talk to distant servers.
  • Social feeds: Each user could have a Durable Object that aggregates their subscriptions.
  • Comment/chat widgets: A web site that is otherwise static content can add a comment widget or even a live chat widget on individual articles. Each article would use a separate Durable Object to coordinate. This way the origin server can focus on static content only.

The Future: True Edge Databases

We see Durable Objects as a low-level primitive for building distributed systems. Some applications, like those mentioned above, can use objects directly to implement a coordination layer, or maybe even as their sole storage layer.

However, Durable Objects today are not a complete database solution. Each object can see only its own data. To perform a query or transaction across multiple objects, the application needs to do some extra work.

That said, every big distributed database – whether it be relational, document, graph, etc. – is, at some low level, composed of “chunks” or “shards” that store one piece of the overall data. The job of a distributed database is to coordinate between chunks.

We see a future of edge databases that store each “chunk” as a Durable Object. By doing so, it will be possible to build databases that operate entirely at the edge, fully distributed with no regions or home location. These databases need not be built by us; anyone can potentially build them on top of Durable Objects. Durable Objects are only the first step in the edge storage journey.

Join the Beta

Storing data is a big responsibility which we do not take lightly. Because of the critical importance of getting it right, we are being careful. We will be making Durable Objects available gradually over the next several months.

As with any beta, this product is a work in progress, and some of what is described in this post is not fully enabled yet. Full details of beta limitations can be found in the documentation.

If you’d like to try out Durable Objects now, tell us about your use case. We’ll be selecting the most interesting use cases for early access.

Request a beta invite »

Q&A

Can Durable Objects serve WebSockets?

Yes.

As part of the Durable Objects beta, we’ve made it possible for Workers to act as WebSocket endpoints — including as a client or as a server. Before now, Workers could proxy WebSocket connections on to a back-end server, but could not speak the protocol directly.

While technically any Worker can speak WebSocket in this way, WebSockets are most useful when combined with Durable Objects. When a client connects to your application using a WebSocket, you need a way for server-generated events to be sent back to the existing socket connection. Without Durable Objects, there’s no way to send an event to the specific Worker holding a WebSocket. With Durable Objects, you can now forward the WebSocket to an Object. Messages can then be addressed to that Object by its unique ID, and the Object can then forward those messages down the WebSocket to the client.

The chat app demo presented above uses WebSockets. Check out the source code to see how it works.

How does this compare to Workers KV?

Two years ago, we introduced Workers KV, a global key-value data store. KV is a fairly minimalist global data store that serves certain purposes well, but is not for everyone. KV is eventually consistent, which means that writes made in one location may not be visible in other locations immediately. Moreover, it implements “last write wins” semantics, which means that if a single key is being modified from multiple locations in the world at once, it’s easy for those writes to overwrite each other. KV is designed this way to support low-latency reads for data that doesn’t frequently change. However, these design decisions make KV inappropriate for state that changes frequently, or when changes need to be immediately visible worldwide.

Durable Objects, in contrast, are not primarily a storage product at all — many use cases for them do not actually utilize durable storage. To the extent that they do provide storage, Durable Objects sit at the opposite end of the storage spectrum from KV. They are extremely well-suited to workloads requiring transactional guarantees and immediate consistency. However, since transactions inherently must be coordinated in a single location, and clients on the opposite side of the world from that location will experience moderate latency due to the inherent limitations of the speed of light. Durable Objects will combat this problem by auto-migrating to live close to where they are used.

In short, Workers KV remains the best way to serve static content, configuration, and other rarely-changing data around the world, while Durable Objects are better for managing dynamic state and coordination.

Going forward, we plan to utilize Durable Objects in the implementation of Workers KV itself, in order to deliver even better performance.

Why not use CRDTs?

You can build CRDT-based storage on top of Durable Objects, but Durable Objects do not require you to use CRDTs.

Conflict-free Replicated Data Types (CRDTs), or their cousins, Operational Transforms (OTs), are a technology that allows data to be edited from multiple places in the world simultaneously without synchronization, and without data loss. For example, these technologies are commonly used in the implementation of real-time collaborative document editors, so that a user’s keypresses can show up in their local copy of the document in real time, without waiting to see if anyone else edited another part of the document first. Without getting into details, you can think of these techniques like a real time version of “git fork” and “git merge”, where all merge conflicts are resolved automatically in a deterministic way, so that everyone ends up with the same state in the end.

CRDTs are a powerful technology, but applying them correctly can be challenging. Only certain kinds of data structures lend themselves to automatic conflict resolution in a way that doesn’t lead to easy data loss. Any developer familiar with git can see the problem: arbitrary conflict resolution is hard, and any automated algorithm for it will likely get things wrong sometimes. It’s all the more difficult if the algorithm has to handle merges in arbitrary order and still get the same answer.

We feel that, for most applications, CRDTs are overly complex and not worth the effort. Worse, the set of data structures that can be represented as a CRDT is too limited for many applications. It’s usually much easier to assign a single authoritative coordination point for each document, which is exactly what Durable Objects accomplish.

With that said, CRDTs can be used on top of Durable Objects. If an object’s state lends itself to CRDT treatment, then an application could replicate that object into several objects serving different regions, which then synchronize their states via CRDT. This would make sense for applications to implement as an optimization if and when they find it is worth the effort.

Last thoughts: What does it mean for state to be “serverless”?

Traditionally, serverless has focused on stateless compute. In serverless architectures, the logical unit of compute is reduced to something fine-grained: a single event, such as an HTTP request. This works especially well because events just happened to be the logical unit of work that we think about when designing server applications. No one thinks about their business logic in units of “servers” or “containers” or “processes” — we think about events. It is exactly because of this semantic alignment that serverless succeeds in shifting so much of the logistical burden of maintaining servers away from the developer and towards the cloud provider.

However, serverless architecture has traditionally been stateless. Each event executes in isolation. If you wanted to store data, you had to connect to a traditional database. If you wanted to coordinate between requests, you had to connect to some other service that provides that ability. These external services have tended to re-introduce the operational concerns that serverless was intended to avoid. Developers and service operators have to worry not just about scaling their databases to handle increasing load, but also about how to split their database into “regions” to effectively handle global traffic. The latter concern can be especially cumbersome.

So how can we apply the serverless philosophy to state? Just like serverless compute is about splitting compute into fine-grained pieces, serverless state is about splitting state into fine-grained pieces. Again, we seek to find a unit of state that corresponds to logical units in our application. The logical unit of state in an application is not a “table” or a “collection” or a “graph”. Instead, it depends on the application. The logical unit of state in a chat app is a chat room. The logical unit of state in an online spreadsheet editor is a spreadsheet. The logical unit of state in an online storefront is a shopping cart. By making the physical unit of storage provided by the storage layer match the logical unit of state inherent in the application, we can allow the underlying storage provider (Cloudflare) to take responsibility for a wide array of logistical concerns that previously fell on the developer, including scalability and regionality.

This is what Durable Objects do.