All posts by Mangesh Budkule

Accessing Amazon Q Developer using Microsoft Entra ID and VS Code to accelerate development

Post Syndicated from Mangesh Budkule original https://aws.amazon.com/blogs/devops/accessing-amazon-q-developer-using-microsoft-entra-id-and-vs-code-to-accelerate-development/

Overview

In this blog post, I’ll explain how to use a Microsoft Entra ID and Visual Studio Code editor to access Amazon Q developer service and speed up your development. Additionally, I’ll explain how to minimize the time spent on repetitive tasks and quickly integrate users from external identity sources so they can immediately use and explore Amazon Web Services (AWS).Generative AI on AWS holds great ability for businesses seeking to unlock new opportunities and drive innovation. AWS offers a robust suite of tools and capabilities that can revolutionize software development, generate valuable insights, and deliver enhanced customer value. AWS is committed to simplifying generative AI for businesses through services like Amazon Q, Amazon Bedrock, Amazon SageMaker, Data foundation & AI infrastructure.

Amazon Q Developer is a generative AI-powered assistant that helps developers and IT professionals with all of their tasks across the software development lifecycle. Amazon Q Developer assists with coding, testing, and upgrading to troubleshooting, performing security scanning and fixes, optimizing AWS resources, and creating data engineering pipelines.

A common request from Amazon Q Developer customers is to allow developer sign-ins using established identity providers (IdP) such as Entra ID. Amazon Q Developer offers authentication support through AWS Builder ID or AWS IAM Identity Center. AWS Builder ID is a personal profile for builders. IAM Identity Center is ideal for an enterprise developer working with Amazon Q and employed by organizations with an AWS account. When using the Amazon Q Developer Pro tier, the developer should authenticate with the IAM Identity Center. See the documentation, Understanding tiers of service for Amazon Q Developer for more information.

How it works

The flow for accessing Amazon Q Developer through the IAM Identity Center involves the authentication of Entra ID users using Security Assertion Markup Language (SAML) 2.0 authentication (Figure 1).

The diagram explains you the flow for accessing Amazon Q Developer through the IAM Identity Center involves the authentication of Entra ID users using SAML 2.0 authentication.

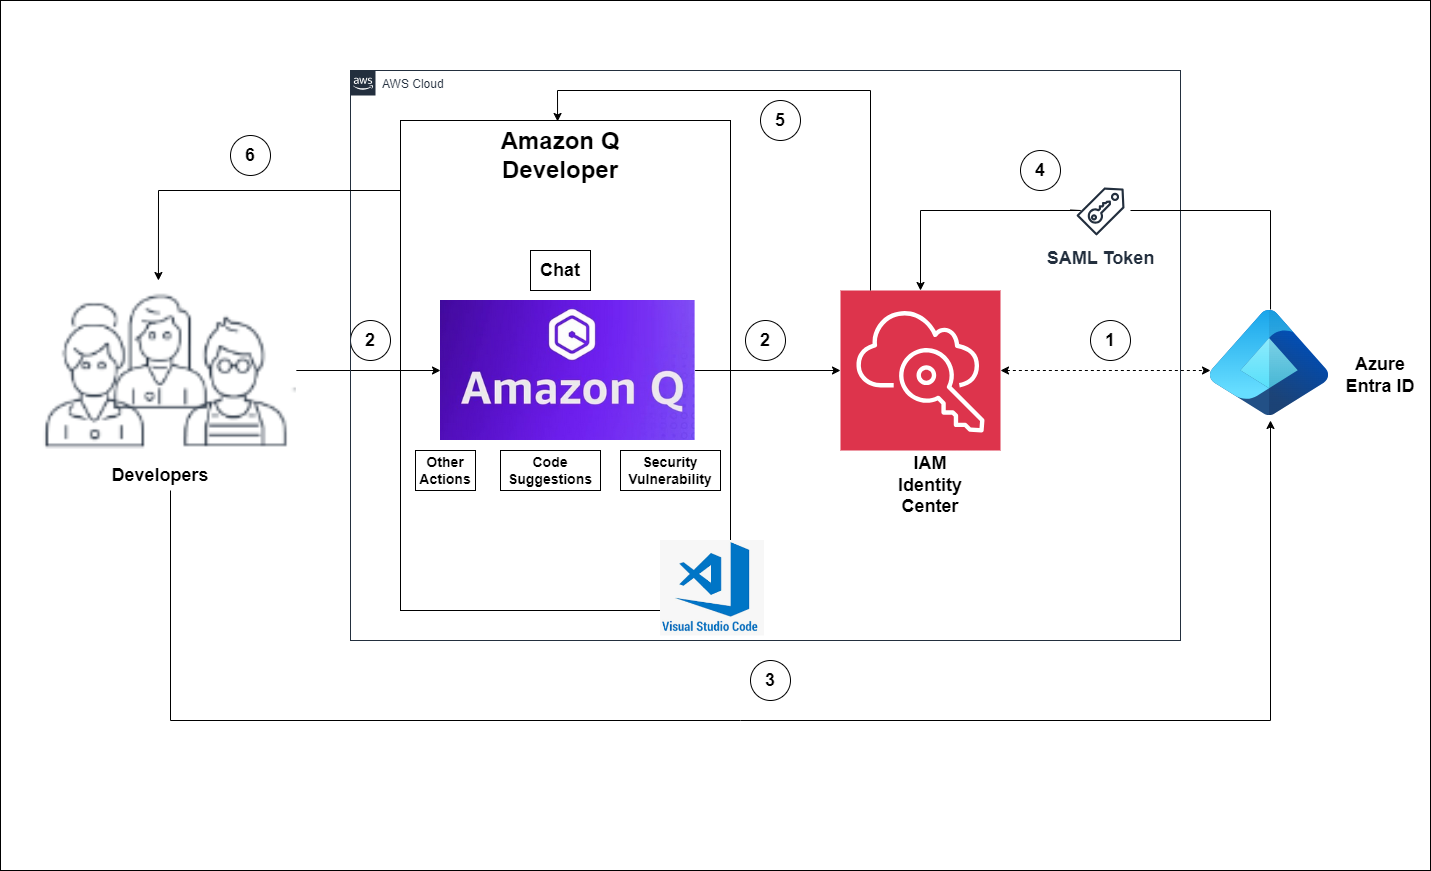
Figure 1 – Solution Overview

The flow for accessing Amazon Q Developer through the IAM Identity Center involves the authentication of Entra ID users using SAML 2.0 authentication. (Figure 1).

  1. IAM Identity Center synchronizes users and groups information from Entra ID into IAM Identity Center using the System for Cross-domain Identity Management (SCIM) v2.0 protocol.
  2. Developers with an Entra ID account connect to Amazon Q Developer through IAM Identity Center using the VS Code IDE.
  3. If a developer isn’t already authenticated, they will be redirected to the Entra ID account login. The developer will sign in using their Entra ID credentials.
  4. If the sign-in is successful, Entra ID processes the request and sends a SAML response containing the developer identity and authentication status to IAM Identity Center.
  5. If the SAML response is valid and the developer is authenticated, IAM Identity Center grants access to Amazon Q Developer.
  6. The developer can now securely access and use Amazon Q Developer.

Prerequisites

In order to perform the following procedure, make sure the following are in place.

Walkthrough

Configure Entra ID and AWS IAM Identity Center integration

In this section, I will show how you can create a SAML base connection between Entra ID and AWS Identity Center so you can access AWS generative AI services using your Entra ID.

Note: You need to switch the console between Entra ID portal and AWS IAM Identity center. I recommend to open new browser tabs for each console.

Step 1 – Prepare your Microsoft tenant

Perform the below steps in the Entra identity provider section.

Entra ID configuration.

  1. Sign in to the Microsoft Entra admin center with a minimum permission set of a Cloud Application Administrator.
  2. Navigate to Identity > Applications > Enterprise applications, and then choose New application.
  3. On the Browse Microsoft Entra Gallery page, enter AWS IAM Identity Center in the search box.
  4. Select AWS IAM Identity Center from the results area.
  5. Choose Create.

Now you have created AWS IAM Identity Center application, set up single sign-on to enable users to sign into their applications using their Entra ID credentials. Select the Single sign-on tab from the left navigation plane and select Setup single sign on.

Step 2 – Collect required service provider metadata from IAM Identity Center

In this step, you will launch the Change identity source wizard from within the IAM Identity Center console and retrieve the metadata file and the AWS specific sign-in URL. You will need this to enter when configuring the connection with Entra ID in the next step.

IAM Identity Center.

You need to enable this in order to configure SSO.

  1. Navigate to Services –> Security, Identity, & Compliance –> AWS IAM Identity Center.
  2. Choose Enable (Figure 2).

    This diagram illustrates , how you can enable AWS IAM Identity Center

    Figure 2 – Get started with AWS IAM Identity Center

  3. In the left navigation pane, choose Settings.
  4. On the Settings page, find Identity source, select Actions pull-down menu, and select Change identity source.
  5. On the Change identity source page, choose External identity provider (Figure 3).
    This diagram illustrates how to choose an External identity provider in the Source account when using AWS Identity Center.

    Figure 3 – Select External identity provider

  6. On the Configure external identity provider page, under Service provider metadata, select Download metadata file (XML file).
  7. In the same section, locate the AWS access portal sign-in URL value and copy it. You will need to enter this value when prompted in the next step (Figure 4).

    The diagram illustrates the sources for downloading and copying the metadata URLs of service providers.

    Figure 4 – Copy provider metadata URLs

Leave this page open, and move to the next step to configure the AWS IAM Identity Center enterprise application in Entra ID. Later, you will return to this page to complete the process.

Step 3 – Configure the AWS IAM Identity Center enterprise application in Entra ID

This procedure establishes one-half of the SAML connection on the Microsoft side using the values from the metadata file and Sign-On URL you obtained in the previous step.

  1. In the Microsoft Entra admin center console, navigate to Identity > Applications > Enterprise applications and then choose AWS IAM Identity Center.
  2. On the left, choose Single sign-on.
  3. On the Set up Single sign on with SAML page, choose Upload metadata file, choose the folder icon, select the service provider metadata file that you downloaded in the previous step 2.6, and then choose Add.
  4. On the Basic SAML Configuration page, verify that both the Identifier and Reply URL values now point to endpoints in AWS that start with https://<REGION>.signin.aws.amazon.com/platform/saml/.
  5. Under Sign on URL (Optional), paste in the AWS access portal sign-in URL value you copied in the previous step (Step 2.7), choose Save, and then choose X to close the window.
  6. If prompted to test single sign-on with AWS IAM Identity Center, choose No I’ll test later. You will do this verification in a later step.
  7. On the Set up Single Sign-On with SAML page, in the SAML Certificates section, next to Federation Metadata XML, choose Download to save the metadata file to your system. You will need to upload this file when prompted in the next step.

Step 4 – Configure the Entra ID external IdP in AWS IAM Identity Center

Next you will return to the Change identity source wizard in the IAM Identity Center console to complete the second-half of the SAML connection in AWS.

  1. Return to the browser session you left open in the IAM Identity Center console.
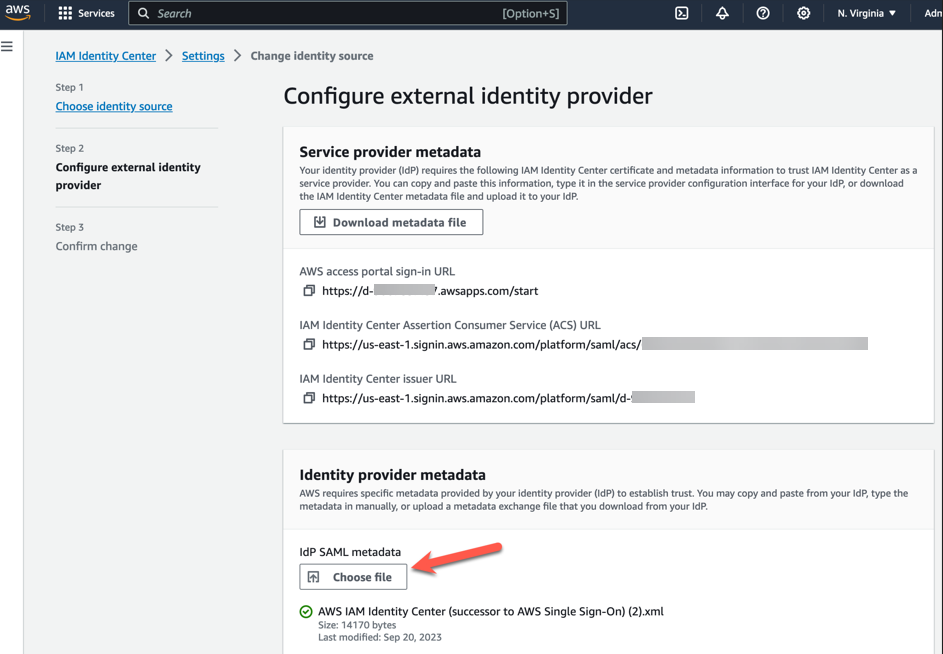
  2. On the Configure external identity provider page, in the Identity provider metadata section, under IdP SAML metadata, choose the Choose file button, and select the identity provider metadata file that you downloaded from Microsoft Entra ID in the previous step, and then choose Open (Figure 5).

    This diagram illustrate AWS IAM Identity center metadata

    Figure 5 – AWS IAM Identity center metadata

  3. Choose Next
  4. After you read the disclaimer and are ready to proceed, enter ACCEPT
  5. Choose Change identity source to apply your changes (Figure 6).

    The diagram illustrates AWS IAM Identity center metadata change request acceptance.

    Figure 6 – AWS IAM Identity center metadata

  6. Confirm the changes (Figure 7).

    The diagram illustrates AWS IAM Identity center metadata configuration changes progress information.

    Figure 7 – AWS IAM Identity center metadata configuration changes progress console.

Step 5 – Configure and test your SCIM synchronization

In this step, you will set up automatic provisioning (synchronization) of user and group information from Microsoft Entra ID into IAM Identity Center using the SCIM v2.0 protocol. You configure this connection in Microsoft Entra ID using your SCIM endpoint for AWS IAM Identity Center and a bearer token that is created automatically by AWS IAM Identity Center.

To enable automatic provisioning of Entra ID users to IAM Identity Center, follow these steps using the IAM Identity Center application in Entra ID. For testing purposes, you can create a new user (TestUser) in Entra ID with details like First Name, Last Name, Email ID, Department, and more. Once you’ve configured SCIM synchronization, you can verify that this user and their relevant attributes were successfully synced to AWS IAM Identity Center.

In this procedure, you will use the IAM Identity Center console to enable automatic provisioning of users and groups coming from Entra ID into IAM Identity Center.

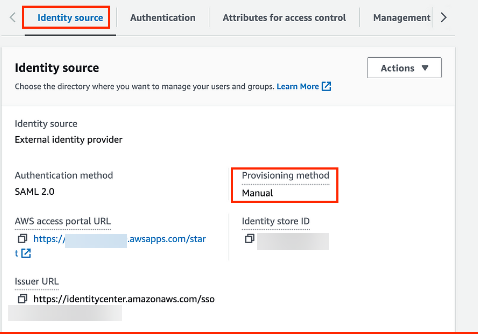
  1. Open the IAM Identity Center console and Choose Setting in the left navigation pane.
  2. On the Settings page, under the Identity source tab, notice that Provisioning method is set to Manual (Figure 8).

    This diagram illustrates provisioning method configuration details

    Figure 8 – AWS IAM Identity center console with provisioning method configuration details

  3. Locate the Automatic provisioning information box, and then choose Enable. This immediately enables automatic provisioning in IAM Identity Center and displays the necessary SCIM endpoint and access token information.
  4. In the Inbound automatic provisioning dialog box, copy each of the values for the following options. You will need to paste these in the next step when you configure provisioning in Entra ID.
  5. SCIM endpoint – For example, https://scim.us-east-2.amazonaws.com/11111111111-2222-3333-4444-555555555555/scim/v2/
  6. Access token – Choose Show token to copy the value (Figure 9).
    The diagram illustrates SCIM endpoint URL and Access token information.

    Figure 9 – AWS IAM Identity center automatic provisioning info

  7. Choose Close.
  8. Under the Identity source tab, notice that Provisioning method is now set to SCIM.

Step 6 – Configure automatic provisioning in Entra ID

Now that you have your test user in place and have enabled SCIM in IAM Identity Center, you can proceed with configuring the SCIM synchronization settings in Entra ID.

  1. In the Microsoft Entra admin center console, navigate to Identity > Applications > Enterprise applications and then choose AWS IAM Identity Center.
  2. Choose Provisioning, under Manage, choose Provisioning
  3. In Provisioning Mode select
  4. For Admin Credentials, in Tenant URL paste in the SCIM endpoint URL value you copied earlier. In Secret Token, paste in the Access token value (Figure 10).

    The diagram illustrates Azure Enterprise AWS IAM Identity center application provisioning configuration tab

    Figure 10 – Azure Enterprise AWS IAM Identity center application provisioning configuration tab

  5. Choose Test Connection. You should see a message indicating that the tested credentials were successfully authorized to enable provisioning (Figure 11).

    This diagram illustrates AWS IAM Identity center application provisioning testing status

    Figure 11 – Azure Enterprise AWS IAM Identity center application provisioning testing status

  6. Choose Save.
  7. Under Manage, choose Users and groups, and then choose Add user/group.
  8. On the Add Assignment page, under Users, choose None Selected.
  9. Select TestUser, and then choose Select.
  10. On the Add Assignment page, choose
  11. Choose Overview, and then choose Start provisioning (Figure 12).
    The diagram shows the process of manually initiating provisioning through the Azure AWS IAM Identity center application.

    Figure 12 – AWS IAM Identity center application Start provisioning tab

    Note : The default provisioning interval is set to 40 minutes. Our users (Figure 13) are successfully provisioned and are now available in the AWS IAM Identity Center console.

In this section, you will verify that TestUser user was successfully provisioned and that all attributes are displayed in IAM Identity Center (Figure 13).

This diagram shows the user console of AWS IAM Identity center application.

Figure 13 – AWS IAM Identity center application user console example

Preview (opens in a new tab)

In the Identity source in IDC section, enable Identity-aware console sessions (Figure 14). This enables AWS IAM Identity Center user and session IDs to be included in users’ AWS console sessions when they sign in. For example, Amazon Q Developer Pro uses identity-aware console sessions to personalize the service experience.

The diagram illustrates how you can enable Identity aware console sessions

Figure 14 – Enable Identity aware console sessions

I have completed Entra ID and AWS Identity Center configuration. You can see Entra ID identity synced successfully with AWS IAM identity center.

Step 7 – Set up AWS Toolkit with IAM Identity Center

To use Amazon Q Developer, you will now set up the AWS Toolkit within integrated development environments (IDE) to establish authentication with the IAM Identity Center.

AWS Toolkit for Visual Studio Code is an open-source plug-in for VS Code that makes it easier for developers by providing an integrated experience to create, debug, and deploy applications on AWS. Getting started with Amazon Q Developer in VS Code is simple.

  1. Open the AWS Toolkit for Visual Studio Code extension in your VS Code IDE. Install AWS Toolkit for VS Code, which is available as a download from the VS Code Marketplace.
  2. From the AWS Toolkit for Visual Studio Code extension in the VS Code Marketplace, choose Install to begin the installation process.
  3. When prompted, choose to restart VS Code to complete the installation process.

Step 8 – Setup Amazon Q Developer service with VS Code using AWS IAM identity center.

After installing the Amazon Q extension or plugin, authenticate through IAM Identity Center or AWS Builder ID.

After your identity has been subscribed to Amazon Q Developer Pro, complete the following steps to authenticate.

  1. Install the Amazon Q IDE extension or plugin in your Visual Studio Code.
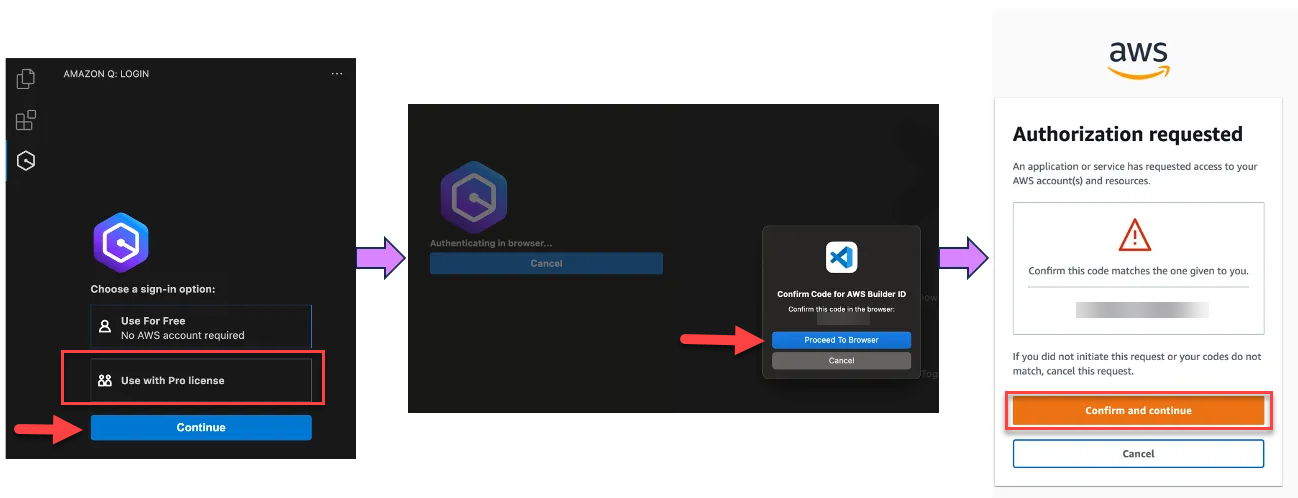
  2. Choose the Amazon Q icon from the sidebar in your IDE
  3. Choose Use with Pro license and select Continue (Figure 15).

    The diagram illustrates how you can use Visual Studio code IDE with Amazon Q Developer extension.

    Figure 15 – Visual Studio code Amazon Q Developer extension

  4. Enter the IAM Identity Center URL you previously copied into the Start URL
  5. Set the appropriate region, example us-east-1, and select Continue
  6. Click Copy Code and Proceed to copy the code from the resulting pop-up.
  7. When prompted by the Do you want Code to open the external website? pop-up, select Open
  8. Paste the code copied in Step 6 and select Next
  9. Enter your Entra ID credentials and select Sign in
  10. Select Allow Access to AWS IDE Extensions for VSCode to access Amazon Q Developer (Figure 16).

    The diagram illustrates how can you provide VS code IDE permission to access Amazon Q service.

    Figure 16 – Allow VS Code to access Amazon Q Developer

  11. When the connection is complete, a notification indicates that it is safe to close your browser. Close the browser tab and return to your IDE.
  12. You are now all set to use Amazon Q Developer from within IDE, authenticated with your Entra ID credentials.

Step 9 – Test configuration examples

Now you have configured IAM identity Center access with VS code now you can chat, get inline code suggestions, check for security vulnerabilities with Amazon Q Developer to learn about, build, and operate AWS applications. I have mentioned a few examples of Amazon Q Suggestions, Code suggestions, Security Vulnerabilities during development for your reference (Figures 17 ,18 ,19 ,20).

The diagram illustrates how to seek assistance from Amazon Q.

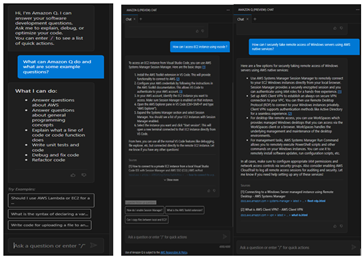
Figure 17 – Amazon Q suggestion examples

Example of developers get the recommendations using Amazon Q developer.

This diagram shows an example of Amazon Q Developer.

Figure 18 – Amazon Q Developer example

This diagram show the example of software development using AWS Amazon Q

Figure 19 – Generate code, explain code, and get answers to questions about software development.

Example of integrating secure coding practices early in the software development lifecycle using Amazon Q developer.

This diagram shows the example of how to Analyze and fix security vulnerabilities in your project example using Amazon Q

Figure 20 – Analyze and fix security vulnerabilities in your project example

Cleanup

Configuring AWS and Azure services from this blog will provision resources which incur cost. It is a best practice to delete configurations and resources that you are no longer using so that you do not incur unintended charges.

 Conclusion

In this blog post, you learned how to integrate AWS IAM Identity Center and Entra ID IdP for accessing Amazon Q Developer service using VS Code IDE, which speeds up development. Next, you set up the AWS Toolkit to establish a secure connection to AWS using Entra ID credentials, granting you access to the Amazon Q Developer Professional Tier. Using SCIM automatic provisioning for user provisioning and access assignment saves time and speeds up onboarding, allowing for immediate use of AWS services using you own identity. Using Amazon Q, developers get the recommendations and information within their working environment in the IDE, enabling them to integrate secure coding practices early in the software development lifecycle. Developers can proactively scan their existing code using Amazon Q and remediate the security vulnerabilities found in the code.

To learn more about the AWS services

AWS Toolkit for Visual Studio Code

What is IAM Identity Center?

Configure SAML and SCIM with Microsoft Entra ID and IAM Identity Center

How to use Amazon CodeWhisperer using Okta as an external IdP

Mangesh Budkule

Mangesh Budkule is a Sr. Microsoft Specialist Solution architect at AWS with 20 years of experience in the technology industry. Using his passion to bridge the gap between technology and business, he works with our customers to provide architectural guidance and technical assistance on AWS Services, improving the value of their solutions to achieve their business outcomes.

Securely extend and access on-premises Active Directory domain controllers in AWS

Post Syndicated from Mangesh Budkule original https://aws.amazon.com/blogs/security/securely-extend-and-access-on-premises-active-directory-domain-controllers-in-aws/

If you have an on-premises Windows Server Active Directory infrastructure, it’s important to plan carefully how to extend it into Amazon Web Services (AWS) when you’re migrating or implementing cloud-based applications. In this scenario, existing applications require Active Directory for authentication and identity management. When you migrate these applications to the cloud, having a locally accessible Active Directory domain controller is an important factor in achieving fast, reliable, and secure Active Directory authentication.

In this blog post, I’ll provide guidance on how to securely extend your existing Active Directory domain to AWS and optimize your infrastructure for maximum performance. I’ll also show you a best practice that implements a remote desktop gateway solution to access your domain controllers securely while using the minimum required ports. Additionally, you will learn about how AWS Systems Manager Session Manager port forwarding helps provide a secure and simple way to manage your domain resources remotely, without the need to open inbound ports and maintain RDGW hosts.

Administrators can use this blog post as guidance to design Active Directory on Amazon Elastic Compute Cloud (Amazon EC2) domain controllers. This post can also be used to determine which ports and protocols are required for domain controller infrastructure communication in a segmented network.

Design and guidelines for EC2-hosted domain controllers

This section provides a set of best practices for designing and deploying EC2-hosted domain controllers in AWS.

AWS has multiple options for hosting Active Directory on AWS, which are discussed in detail in the Active Directory Domain Services on AWS Design and Planning Guide. One option is to use AWS Directory Service for Microsoft Active Directory (AWS Managed Microsoft AD). AWS Managed Microsoft AD provides you with a complete new forest and domain to start your Active Directory deployment on AWS. However, if you prefer to extend your existing Active Directory domain infrastructure to AWS and manage it yourself, you have the option of running Active Directory on EC2-hosted domain controllers. See our Quick Start guide for instructions on how to deploy both of these options (AWS Managed Microsoft AD or EC2-hosted domain controllers on AWS).

If you’re operating in more than one AWS Region and require Active Directory to be available in all these Regions, use the best practices in the Design and Planning Guide for a multi-Region deployment strategy. Within each of the Regions, follow the guidelines and best practices described in this blog post.

Figure 1 shows an example of how to deploy Active Directory on EC2 instances in multiple Regions with multiple virtual private clouds (VPCs). In this example, I’m showing the Active Directory design in multiple Regions that interconnect to each other by using AWS Transit Gateway.
 

Figure 1: Extended EC2 domain controllers architecture

Figure 1: Extended EC2 domain controllers architecture

In order to extend your existing Active Directory deployment from on-premises to AWS as shown in the example, you do two things. First, you add additional domain controllers (running on Amazon EC2) to your existing domain. Second, you place the domain controllers in multiple Availability Zones (AZs) within your VPC, in multiple Regions, by keeping the same forest (Example.com) and domain structure.

Consider these best practices when you deploy or extend Active Directory on EC2 instances:

  1. We recommend deploying at least two domain controllers (DCs) in each Region and configuring a minimum of two AZs, to provide high availability.
  2. If you require additional domain controllers to achieve your performance goals, add more domain controllers to existing AZs or deploy to another available AZ.
  3. It’s important to define Active Directory sites and subnets correctly to prevent clients from using domain controllers that are located in different Regions, which causes increased latency.
  4. Configure the VPC in a Region as a single Active Directory site and configure Active Directory subnets accordingly in the AD Sites and Services console. This configuration confirms that your clients correctly select the closest available domain controller.
  5. If you have multiple VPCs, centralize the Active Directory services in one of your existing VPCs or create a shared services VPC to centralize the domain controllers.
  6. Make sure that robust inter-Region connectivity exists between all of the Regions. Within AWS, you can leverage cross-Region VPC peering to achieve highly available private connectivity between Regions. You can also use the Transit Gateway VPC solution, as shown in Figure 1, to interconnect multiple Regions.
  7. Make sure that you’re deploying your domain controllers in a private subnet without internet access.
  8. Keep your security patches up to date on EC2 domain controllers. You can use AWS Systems Manager to patch your domain controllers in a controlled manner.
  9. Have a dedicated AWS account for directory services and don’t share the account with other general services and applications. This helps you to control access to the AWS account and add domain controller–specific automation.
  10. If your users need to manage AWS services and access AWS applications with their Active Directory credentials, we recommend integrating your identity service with the management account in AWS Organizations. You can configure the AWS Single Sign-On (AWS SSO) service to use AD Connector in a primary account VPC to connect to self-managed Active Directory domain controllers that are hosted in a Shared Services account.

    Alternatively, you can deploy AWS Managed Microsoft AD in the management account, with trust to your EC2 Active Directory domain, to allow users from any trusted domain to access AWS applications. However, you could host these EC2 domain controllers in the primary account, similar to the AWS Managed AD option.

  11. Build domain controllers with end-to-end automation using version control (for example, GIT and AWS CodeCommit) and Desired State Configuration (DSC)/PowerShell.

Security considerations for EC2-hosted domains

This section explains how you can maximize the security of your extended EC2-hosted domain controller infrastructure, and use AWS services to help achieve security compliance. You should also refer to your organization’s IT system security policies to determine the most relevant recommendations to implement.

AWS operates under a shared security responsibility model, where AWS is responsible for the security of the underlying cloud infrastructure and you are responsible for securing workloads you deploy in AWS.

Our recommendations for security for EC2-hosted domains are as follows:

  1. We recommend that you place EC2-hosted domain controllers in a single dedicated AWS account or deploy them in your AWS Organizations management account. This makes it possible for you to use your Active Directory credentials for authentication to access the AWS Management Console and other AWS applications.
  2. Use tag-based policies to restrict access to domain controllers if you’re using the Shared Services account for hosting domain controllers.
  3. Take advantage of the EC2 Image Builder service to deploy a domain controller that uses a CIS standard base image. By doing this, you can avoid manual deployment by setting up an image pipeline.
  4. Secure the AWS account where the domain controllers are running by following the principle of least privilege and by using role-based access control.
  5. Take advantage of these AWS services to help secure your workloads and application:
    • AWS Landing Zone–A solution that helps you more quickly set up a secure, multi-account AWS environment, based on AWS best practices.
    • AWS Organizations–A service that helps you centrally manage and govern your environment as you grow and scale your AWS resources.
    • Amazon Guard Duty–An automated threat detection service that continuously monitors for suspicious activity and unauthorized behavior to protect your AWS accounts, workloads, and data that are stored in Amazon Simple Storage Service (Amazon S3).
    • Amazon Detective–A service that can analyze, investigate, and quickly identify the root cause of potential security issues or suspicious activities.
    • Amazon Inspector–An automated security assessment service that helps improve the security and compliance of applications that are deployed on AWS.
    • AWS Security Hub–A service that provides customers with a comprehensive view of their security and compliance status across their AWS accounts. You can import critical patch compliance findings into Security Hub for easy reference.

Use data encryption

AWS offers you the ability to add a layer of security to your data at rest in the cloud, providing scalable and efficient encryption features. These are some best practices for data encryption:

  1. Encrypt the Amazon Elastic Block Store (Amazon EBS) volumes that are attached to the domain controllers, and keep the customer master key (CMK) safe with AWS Key Management Service (AWS KMS) or AWS CloudHSM, according to your security team’s guidance and policies.
  2. Consider using a separate CMK for the Active Directory and restrict access to the CMK to a specific team.
  3. Enable LDAP over SSL (LDAPS) on all domain controllers, for secure authentication, if your application supports LDAPS authentication.
  4. Deploy and manage a public key infrastructure (PKI) on AWS. For more information, see the Microsoft PKI Quick Start guide.

Restrict account and instance access

Provide management access for directory service accounts and domain controller instances only to the specific team that manages the Active Directory. To do this, follow these guidelines:

  1. Restrict access to an EC2 domain controller’s start, stop, and terminate behavior by using AWS Identity and Access Management (IAM) policy and resources tags. Example: Restrict-ec2-iam
  2. Restrict access to Amazon EBS volumes and snapshots.
  3. Restrict account root access and implement multi-factor authentication (MFA) for this access.

Network access control for domain controllers

Whenever possible, block all unnecessary traffic to and from your domain controllers to limit the communication so that only the necessary ports are opened between a domain controller and another computer. Use these best practices:

  1. Allow only the required network ports between the client and domain controllers, and between domain controllers.
  2. Use a security group to narrow down the access to domain controllers.
  3. Use network access control lists (network ACLs) to filter Active Directory ports as this gives you better control than using ephemeral ports.
  4. Deploy domain controllers in private subnets.
  5. Route only the required subnets into the VPC that contains the domain controllers.

Secure administration

AWS provides services that continuously monitor your data, accounts, and workloads to help protect them from unauthorized access. We recommend that you take advantage of the following services to securely administer your domain controller’s deployment:

  1. Use AWS Systems Manager Session Manager or Run Command to manage your instances remotely. The command actions are sent to Amazon CloudWatch Logs or Amazon S3 for auditing purposes. Leaving inbound Remote Desktop Protocol (RDP), WinRM ports, and remote PowerShell ports open on your instances greatly increases the risk of entities running unauthorized or malicious commands on the instances. Session Manager helps you improve your security posture by letting you close these inbound ports, which frees you from managing SSH keys and certificates, bastion hosts, and jump boxes.
  2. Use Amazon EventBridge to set up rules to detect when changes happen to your domain controller EC2 instances and to send notifications by using Amazon Simple Notification Service (Amazon SNS) when a command is run.
  3. Manage configuration drift on EC2 instances. Systems Manager State Manager helps you automate the process of keeping your domain controller EC2 instances in the desired state and integrates with Systems Manager Compliance.
  4. Avoid any manual interventions while you build and manage domain controllers. Automate the domain join process for Amazon EC2 instances from multiple AWS accounts and Regions.
  5. For developing your applications with domain controllers, use the Windows DC locator service or use the Dynamic DNS (DDNS) service of your AWS Managed Microsoft AD to locate domain controllers. Do not hard-code applications with the address of a domain controller.
  6. Use AWS Config to manage your domain controller configuration.
  7. Use Systems Manager Parameter Store or Secrets Manager to store all secrets, as well as configurations for your domain controller automation.
  8. Use version control to update the domain controller source code with pipeline approvals to avoid any misconfigurations and faulty deployments.

Logging and monitoring

AWS provides tools and features that you can use to see what’s happening in your AWS environment. We recommend that you use these logging and monitoring practices for your EC2-hosted domain controllers:

  1. Enable VPC Flow Logs data for each domain controller’s accounts to monitor the traffic that’s reaching your domain controller instance.
  2. Log Windows and Active Directory events in Amazon CloudWatch Logs for increased visibility.
  3. Consider setting up alerts and notifications for key security events for EC2 domain controllers, in real time. These alerts can be sent to your Red and Blue security response teams for further analysis.
  4. Deploy the CloudWatch agent or the Amazon Kinesis Agent for Windows on EC2 for detail monitoring and alerting at the domain controller operating system level.
  5. Log Systems Manager API calls with AWS CloudTrail.

Other security considerations

As a best practice, implement domain controller security at the operating system level, according to your security team’s recommendations. We recommend these options:

  1. Block executables from running on domain controllers.
  2. Prevent web browsing from domain controllers.
  3. Configure a Windows Server Core base image for domain controllers.
  4. Integrate bastion hosts with Systems Manager Session Manager and use MFA to manage domain controllers remotely.
  5. Perform regular system state backups of your Active Directory environments. Encrypt these backups.
  6. Perform Active Directory administrative management from a remote server, and avoid logging in to domain controllers interactively unless needed.
  7. For FSMO roles, you can follow the same recommendations you would follow for your on-premises deployment to determine FSMO roles on domain controllers. For more information, see these best practices from Microsoft. In the case of AWS Managed Microsoft AD, all domain controllers and FSMO role assignments are managed by AWS and don’t require you to manage or change them.

Domain controller ports

In this section, I’m going to cover the network ports and protocols that are needed to deploy domain services securely. Understanding how traffic flows and is processed by a network firewall is essential when someone requests or implements firewall rules, to avoid any connectivity issues.

Here are some common problems that you might observe because of network port blockage:

  • The RPC server is unavailable
  • Name resolution issues
  • A connectivity issue is detected with LDAP, LDAPS, and Kerberos
  • Domain replication issues
  • Domain authentication issues
  • Domain trust issues between on-premises Active Directory and AWS Managed Microsoft AD
  • AD Connector connectivity issues
  • Issues with domain join, password reset, and more

Understand Active Directory firewall ports

You must allow traffic from your on-premises network to the VPC that contains your extended domain controllers. To do this, make sure that the firewall ports that opened with the VPC subnets that were used to deploy your EC2-hosted domain controllers and the security group rules that are configured on your domain controllers both allow the network traffic to support domain trusts.

Domain controller to domain controller core ports requirements

The following table lists the port requirements for establishing DC-to-DC communication in all versions of Windows Server.

Source Destination Protocol Port Type Active Directory usage Type of traffic
Any domain controller Any domain controller TCP and UDP 53 Bi-directional User and computer authentication, name resolution, trusts DNS
TCP and UDP 88 Bi-directional User and computer authentication, forest level trusts Kerberos
UDP 123 Bi-directional Windows Time, trusts Windows Time
TCP 135 Bi-directional Replication RPC, Endpoint Mapper (EPM)
UDP 137 Bi-directional User and computer authentication NetLogon, NetBIOS name resolution
UDP 138 Bi-directional Distributed File System (DFS), Group Policy DFSN, NetLogon, NetBIOS Datagram Service
TCP 139 Bi-directional User and computer authentication, replication DFSN, NetBIOS Session Service, NetLogon
TCP and UDP 389 Bi-directional Directory, replication, user, and computer authentication, Group Policy, trustss LDAP
TCP and UDP 445 Bi-directional Replication, user, and computer authentication, Group Policy, trusts SMB, CIFS, SMB2, DFSN, LSARPC, NetLogonR, SamR, SrvSvc
TCP and UDP 464 Bi-directional Replication, user, and computer authentication, trusts Kerberos change/set password
TCP 636 Bi-directional Directory, replication, user, and computer authentication, Group Policy, trusts LDAP SSL (required only if LDAP over SSL is configured)
TCP 3268 Bi-directional Directory, replication, user, and computer authentication, Group Policy, trusts LDAP Global Catalog (GC)
TCP 3269 Bi-directional Directory, replication, user, and computer authentication, Group Policy, trusts LDAP GC SSL (required only if LDAP over SSL is configured)
TCP 5722 Bi-directional File replication RPC, DFSR (SYSVOL)
TCP 9389 Bi-directional AD DS web services SOAP
TCP Dynamic 49152–65535 Bi-directional Replication, user, and computer authentication, Group Policy, trusts RPC, DCOM, EPM, DRSUAPI, NetLogonR, SamR, File Replication Service (FRS)
UDP Dynamic 49152–65535 Bi-directional Group Policy DCOM, RPC, EPM

Note: There is no need to open a DNS port on domain controllers if you are not using a domain controller as a DNS server, or if you’re using any third-party DNS solutions.

Client to domain controller core ports requirements

The following table lists the port requirements for establishing client to domain controller communication for Active Directory.

Source Destination Protocol Port Type Usage Type of traffic
All internal company client network IP subnets Any domain controller TCP 53 Uni-directional DNS DNS
UDP 53 Uni-directional DNS Kerberos
TCP 88 Uni-directional Kerberos Auth Kerberos
UDP 88 Uni-directional Kerberos Auth Kerberos
UDP 123 Uni-directional Windows Time Windows Time
TCP 135 Uni-directional RPC, EPM RPC, EPM
UDP 137 Uni-directional NetLogon, NetBIOS name User and computer authentication
UDP 138 Uni-directional DFSN, NetLogon, NetBIOS datagram service DFS, Group Policy, NetBIOS, NetLogon, browsing
TCP 389 Uni-directional LDAP Directory, replication, user, and computer authentication, Group Policy, trust
UDP 389 Uni-directional LDAP Directory, replication, user, and computer authentication, Group Policy, trust
TCP 445 Uni-directional SMB, CIFS, SMB3, DFSN, LSARPC, NetLogonR, SamR, SrvSvc Replication, user, and computer authentication, Group Policy, trust
TCP 464 Uni-directional Kerberos change/set password Replication, user, and computer authentication, trust
UDP 464 Uni-directional Kerberos change/set password Replication, user, and computer authentication, trust
TCP 636 Uni-directional LDAP SSL Directory, replication, user, and computer authentication, Group Policy, trust
TCP 3268 Uni-directional LDAP GC Directory, replication, user, and computer authentication, Group Policy, trust
TCP 3269 Uni-directional LDAP GC SSL Directory, replication, user, and computer authentication, Group Policy, trust
TCP 9389 Uni-directional SOAP AD DS web service
TCP 49152–65535 Uni-directional DCOM, RPC, EPM Group Policy

Note:

  • You must allow network traffic communication from your on-premises network to the VPC that contains your AWS-hosted EC2 domain controllers.
  • You also can restrict DC-to-DC replication traffic and DC-to-client communications to specific ports.
  • Packet fragmentation can cause issues with services such as Kerberos. You should make sure that maximum transmission unit (MTU) sizes match your network devices.
  • Additionally, unless a tunneling protocol is used to encapsulate traffic to Active Directory, ranges of ephemeral TCP ports between 49152 to 65535 are required. Ephemeral ports are also known as service response ports. These ports are created dynamically for session responses for each client that establishes a session. These ports are required not only for Windows but for Linux and UNIX.

Manage domain controllers securely using a bastion host and RDGW

We recommend that you restrict the domain controller’s management by using a secure, highly available, and scalable Microsoft Remote Desktop Gateway (RDGW) solution in conjunction with bastion hosts. A bastion host that is designed to work with a specific part of the infrastructure should work with that unit only, and nothing else. Limiting the use of bastion hosts to a specific instance example domain controller can help improve your security posture.

The reference architecture shown in Figure 2 restricts management access to your domain controllers and access via port 443. The bastion hosts in the diagram are configured to only allow RDP from the RDGW.
 

For additional security, follow these best practices:

  • Configure RDGW and bastions hosts to use MFA for logins.
  • Implement login restrictions by using a Group Policy Object (GPO), so that only required administrators log in to RDGW and the bastion host, based on their group membership.

Bastion host to domain controllers ports requirements

The following table lists the port requirements for establishing bastion host-to-DC communication in all versions of Windows Server.

Source Destination Protocol Ports Type Usage Type of traffic
Bastion host to domain controller Any domain controller subset TCP 443 Uni-directional TPKT Remote Protocol Gateway access
UDP 3389 Uni-directional TPKT Remote Desktop Protocol
TCP 3389 Uni-directional WS-Man Remote Desktop Protocol
TCP 5985 Bi-directional HTTPS Windows Remote Management (WinRM)
TCP 5985 Bi-directional WS-Man Windows Remote Management (WinRM)

You can also take advantage of Systems Manager Session Manager to manage domain joined resources instead of using bastion hosts for management. This option eliminates the need to manage bastion infrastructure and open any inbound rules. It also integrates natively with IAM and AWS CloudTrail, two services that enhance your security and audit posture. In the next section, I’ll discuss Session Manager and how it is useful in this context.

Session Manager port forwarding

Active Directory administrators are accustomed to managing domain resources by using Remote Server Administrators Tools (RSAT) that are installed on either their workstations or a member server in the domain (for example, RDP to a bastion host). Although RDP is effective, using RDP requires more management, such as managing inbound rules for port 3389. In some cases, having this port exposed to the internet might put your systems at risk. For example, systems can be susceptible to brute force or unauthorized dictionary activity. Instead of using a RDGW host and opening RDP inbound RDP ports, we recommend using the Session Manager Service, which provides port-forwarding ability without opening inbound ports.

Port forwarding provides the ability to forward traffic between your clients to open ports on your EC2 instance. After you configure port forwarding, you can connect to the local port and access the server application that is running inside the instance, as shown in Figure 3. To configure the port-forwarding feature in Session Manager, you can use IAM policies and the AWS-StartPortForwardingSession document.
 

Figure 3: Session Manager tunnel

Figure 3: Session Manager tunnel

To start a session using the AWS Command Line Interface (AWS CLI), run the following command.

aws ssm start-session --target "instance-id" --document-name AWS StartPortForwardingSession -parameters portNumber="3389",localPortNumber="9999"

Note: You can use any available ephemeral port. 9999 is just an example. Install and configure the AWS CLI, if you haven’t already.

You can also start a session by using an IAM policy like the one shown in the following example. To learn more about creating IAM policies for Session Manager, see the topic Quickstart default IAM policies for Session Manager.

In this policy example, I created the policy for Systems Manager for both AWS-StartPortForwadingSession and AWS-StartSSHSession for Linux (SSH) environments, for your reference and guidance.

{
    "Version": "2012-10-17",
    "Statement": [
        {
            "Effect": "Allow",
            "Action": [
                "ssm:StartSession",
                "ssm:SendCommand"
            ],
            "Resource": [
                "arn:aws:ec2:*: <AccountID>:instance/*",
                "arn:aws:ssm:*: <AccountID>:document/SSM-SessionManagerRunShell"
            ],
            "Condition": {
                "StringLike": {
                    "ssm:resourceTag/TAGKEY": [
                        "TAGVALUE"
                    ]
                }
            }
        },
        {

            "Effect": "Allow",
            "Action": [
                "ssm:StartSession"
            ],
            "Resource": [
                "arn:aws:ssm:*:*:document/AWS-StartSSHSession",
                "arn:aws:ssm:*:*:document/AWS-StartPortForwardingSession"
            ]
        },
        {

            "Effect": "Allow",

            "Action": [

                "ssm:DescribeSessions",

                "ssm:GetConnectionStatus",

                "ssm:DescribeInstanceInformation",
                "ssm:DescribeInstanceProperties",
                "ec2:DescribeInstances"
            ],
            "Resource": "*"
        },
        {
            "Effect": "Allow",
            "Action": [
                "ssm:TerminateSession"
            ],
            "Resource": [
                "arn:aws:ssm:*:*:session/${aws:username}-*"
            ]
        }
    ]
}

When you use the port-forwarding feature in Session Manager, you have the option to use an auditing service like AWS CloudTrail to provide a record of the connections made to your instances. You can also monitor the session by using Amazon CloudWatch Events with Amazon SNS to receive notifications when a user starts or ends session activity.

There is no additional charge for accessing EC2 instances by using Session Manager port forwarding. Port forwarding is available today in all AWS Regions where Systems Manager is available. You will be charged for the outgoing bandwidth from the NAT Gateway or your VPC Private Link.

Bastion host architecture using Session Manager

In this section, I discuss how to use a bastion host with Session Manager. Session Manager uses the Systems Manager infrastructure to create an SSH-like session with an instance. Session Manager tunnels real SSH connections, which allows you to tunnel to another resource within your VPC directly from your local machine. A managed instance that you create, acts as a bastion host, or gateway, to your AWS resources. The benefits of this configuration are:

  • Increased security: This configuration uses only one EC2 instance (the bastion host), and connects outbound port 443 to Systems Manager infrastructure. This allows you to use Session Manager without any inbound connections. The local resource must allow inbound traffic only from the instance that is acting as bastion host. Therefore, there is no need to open any inbound rule publicly.
  • Ease of use: You can access resources in your private VPC directly from your local machine.

In the example shown in Figure 4, the EC2 instance is acting as a domain controller that must be accessed securely by an Active Directory administrator who is working remotely via bastion host. To support this use case, I’ve chosen to use an interface VPC endpoint for Systems Manager, in order to facilitate private connectivity between Systems Manager Agent (SSM Agent) on the EC2 instance that is acting as a bastion host, and the Systems Manager service endpoints. You can configure Session Manager to enable port forwarding between the administrator’s local workstation and the private EC2 bastion instances, so that they can securely access the bastion host from the internet. This architecture helps you to eliminate RDGW infrastructure setup and reduce management efforts. You can add MFA at the bastion host level to enhance security.
 

Note:

  • If you want to use the AWS CLI to start and end sessions that connect you to your managed instances, you must first install the Session Manager plugin on your local machine.
  • Make sure that the bastion host has SSM Agent installed, because Session Manager only works with Systems Manager managed instances.
  • Follow the steps in Creating an interface endpoint to create the following interface endpoints:
    • com.amazonaws.<region>.ssm – The endpoint for the Systems Manager service.
    • com.amazonaws.><region>.ec2messages – Systems Manager uses this endpoint to make calls from the SSM Agent to the Systems Manager service.
    • com.amazonaws.<region>.ec2 – The endpoint to the EC2 service. If you’re using Systems Manager to create VSS-enabled snapshots, you must ensure that you have this endpoint. Without the EC2 endpoint defined, a call to enumerate attached EBS volumes fails. This causes the Systems Manager command to fail.
    • com.amazonaws.<region>.ssmmessages – This endpoint is required for connecting to your instances through a secure data channel by using Session Manager, in this case the port-forwarding requirement.

Support for domain controllers in Session Manager

You can use Session Manager to connect EC2 domain controllers directly, as well. To initiate a connection with either the default Session Manager connection or the port-forwarding feature discussed in this post, complete these steps.

To initiation a connection

  1. Create the ssm-user in your domain.
  2. Add the ssm-user to the domain groups that grant the user local access to the domain controller. One example is to add the user to the Domain Admins group.

IMPORTANT: Follow your organization’s security best practices when you grant the ssm-user access to the domain.

Conclusion

In this blog post, I described best practices for deploying domain controllers on EC2 instances and extending on-premises Active Directory to AWS for your guidance and quick reference. I also covered how you can maximize security for your extended EC2-hosted domain controller infrastructure by using AWS services. In addition, you learned about how AWS Systems Manager Session Manager port forwarding to RDP provides a simple and secure way to manage your domain resources remotely, without the need to open inbound ports and maintain RDGW hosts. Port forwarding works for Windows and Linux instances. It’s available today in all AWS Regions where Systems Manager is available. Depending on your use case, you should consider additional protection mechanisms per your organization’s security best practices.

To learn more about migrating Windows Server or SQL Server, visit Windows on AWS. For more information about how AWS can help you modernize your legacy Windows applications, see Modernize Windows Workloads with AWSContact us to start your modernization journey today.

If you have feedback about this post, submit comments in the Comments section below.

Want more AWS Security how-to content, news, and feature announcements? Follow us on Twitter.

Author

Mangesh Budkule

Mangesh is a Microsoft Specialist Solutions Architect at AWS. He works with customers to provide architectural guidance and technical assistance on AWS services, improving the value of their solutions when using AWS.