All posts by Moumita Saha

Introducing AWS account access manager: IAM role flexibility with centralized workforce access

Post Syndicated from Moumita Saha original https://aws.amazon.com/blogs/security/introducing-aws-account-access-manager-iam-role-flexibility-with-centralized-workforce-access/

AWS Identity and Access Management (IAM) is introducing account access manager, a flexible new way to manage workforce access to your Amazon Web Services (AWS) accounts. This combines the IAM role flexibility your teams already rely on, delivered through the centralized federation of AWS IAM Identity Center, with user-level visibility built-in.

Account access manager streamlines the assignment of your existing IAM roles from individual AWS accounts to your workforce users and groups in an organization instance of IAM Identity Center, giving you a clear path to centralized access management at scale. You can adopt account access manager on its own or alongside IAM Identity Center permission sets; both draw on the same users and groups you already synchronize from your corporate identity provider. That means you assign your existing IAM roles to those users and groups directly, without duplicating identities or managing per-account federation points.

Why use account access manager?

Enterprises scaling on AWS have long faced a difficult choice in workforce access: the flexibility of IAM roles or the central control of IAM Identity Center. Until now, granting workforce access to AWS accounts generally meant choosing one of two approaches, each with trade-offs to consider. Federating into each account separately with IAM roles gives you the full flexibility of IAM roles—custom trust policies, tags, and paths—but requires you to configure an identity provider and manage role assignments independently in each account, making it harder to assign a group across multiple accounts or maintain a unified view of who has access where. Federating once through IAM Identity Center with permission sets gives you a single federation point with centrally provisioned, uniform access, but permission sets can feel restrictive for teams whose roles vary from account to account, or that have difficulty generalizing their existing roles into uniform sets.

Account access manager removes the trade-offs. It’s built for customers who want the single federation point and identity-propagation benefits of IAM Identity Center together with the flexibility of IAM roles. Because it uses the IAM roles you already own, you keep the tailoring capabilities you rely on today:

  • Attribute-based access control (ABAC) – Use IAM role tags, or session tags populated from your identity provider as SAML claims, for fine-grained, attribute-driven authorization.
  • Precise trust policies – Restrict role assumption with network conditions or identity provider (IdP)-asserted claims; such as group membership, department, or cost center, as trust-policy conditions.
  • Role paths for organization at scale – Use IAM role paths to group roles and simplify administration as your environment grows.

Because roles are managed in the account you provision access to, account access manager scales with your account usage rather than relying on Identity Center specific quotas. Assignments are made to users and groups, reducing administrative overhead, and providing accountability and auditability to the specific user and role being used.

How it works

Access flows through IAM Identity Center and carries the user’s identity through trusted identity propagation. Even when multiple users assume a shared IAM role, each role session contains user context that attributes every action to the individual user. Access is granted and audited against the actual user, so you can see who assumed which role in which account. The result is user-level visibility across your organization, not just at the point of sign-in. You also maintain access to the full set of IAM role capabilities, such as role paths, tagging, naming conventions, and other IAM primitives.
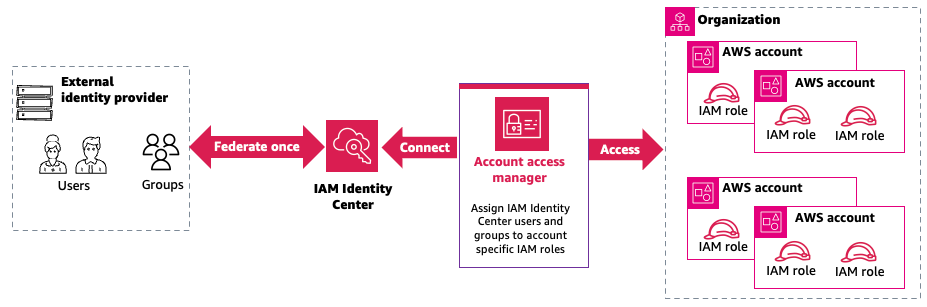
Figure 1: Account access manager connects IAM Identity Center federated workforce users and groups to AWS accounts specific IAM roles

Figure 1: Account access manager connects IAM Identity Center federated workforce users and groups to AWS accounts specific IAM roles

To grant a user access to a specific role in an account using account access manager, an administrator creates an entitlement. The user can then access that account from the new account access manager application portal or from their IAM Identity Center access portal, or retrieve credentials from the command line with aws login.

You can manage account access manager through the AWS Management Console for IAM and programmatically through the AWS Command Line Interface (AWS CLI) (aws login and the account-access API namespace), AWS SDKs, AWS CloudFormation, and HashiCorp Terraform and Pulumi, so you can enable it and manage role assignments the same way you manage the rest of your AWS infrastructure. It exposes its own API namespace, account-access, separate from the IAM API, with its own permissions and AWS CloudTrail events.

How to enable account access manager

Here’s how to enable account access manager in your own environment, from prerequisites through your first role assignment.

Prerequisites

  1. An organization instance of IAM Identity Center enabled.
  2. Users or groups in IAM Identity Center that you want to entitle with IAM roles from individual AWS accounts. If users or groups don’t exist already then either:
  3. IAM roles in the individual AWS accounts that you want to assign to users and groups of IAM Identity Center. If the role you need doesn’t exist, create a role using custom trust policies first.
  4. Appropriate permissions to enable account access manager and manage assignments (see the IAM policy examples later in this post).
  5. Both the organization instance of IAM Identity Center and account access manager must be enabled in your organization’s management account.
  6. For CLI access: Install or update to the latest version of the AWS command Line Interface (AWS CLI) v2.36.0 or newer.

Step 1: Enable account access manager

Before enabling account access manager, run the following command from the AWS organization management account to grant account access manager access to your organization:

aws organizations enable-aws-service-access --service-principal account-access.amazonaws.com

Next, use one of the following methods to enable account access manager:

Console:

  1. Sign in to your organization’s management account.
  2. In the AWS Management Console for IAM navigation pane, under Multi-account access, choose account access manager.
  3. The console Region should be set to the primary Region of your IAM Identity Center instance.
  4. If there is no organization instance of IAM Identity Center, you’ll be prompted to enable one before continuing. Otherwise, choose Enable account access manager.
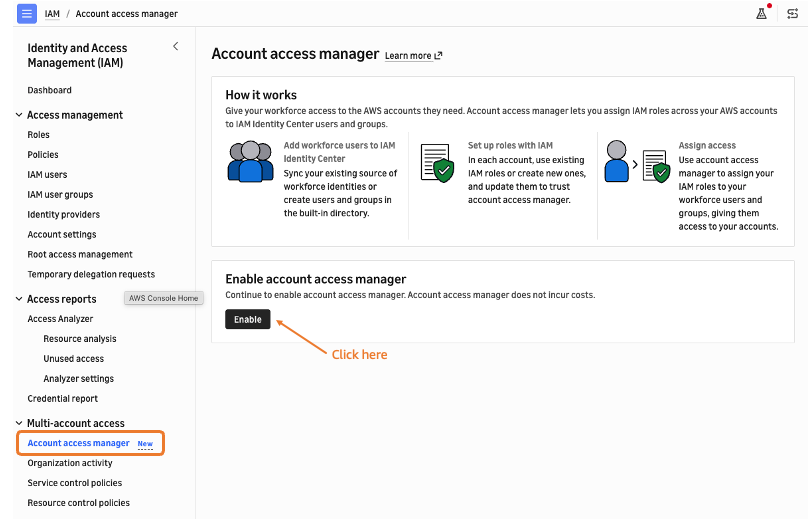
Figure 2: Account access manager enablement from the IAM console

Figure 2: Account access manager enablement from the IAM console

AWS CLI:

Fetch the Amazon Resource Name (ARN) of your IAM Identity Center organization instance, confirm the Region code matches its primary Region, and run:

aws account-access create-application \
 	--region <Region> \
  	--identity-source '{
    		"identityCenter": {
      			"instanceArn": "<IAM Identity Center Instance ARN>"
    		}
 	}'

As an output, the account access manager application ARN will be generated.

After you enable account access manager (through the console or AWS CLI), you will get the account access URL and the account access manager ARN along with other details on the capability.

  • Account access portal URL is the single sign-on entry point for your workforce. This is where your users will go to access AWS accounts. Its format is - https://[Tenant-ID].account-access.[Region].app.aws , found on the Settings tab of the account access manager console).
  • Account access manager ARN: the identifier for the application instance created when you enable account access manager. Note this ARN to use in your IAM role’s trust policies so that only your specific account access manager application can assume those roles, providing confused-deputy protection (see Step 3 for details) and pass it as --application-arn when creating entitlements using the AWS CLI so each assignment is tied to the correct application instance.
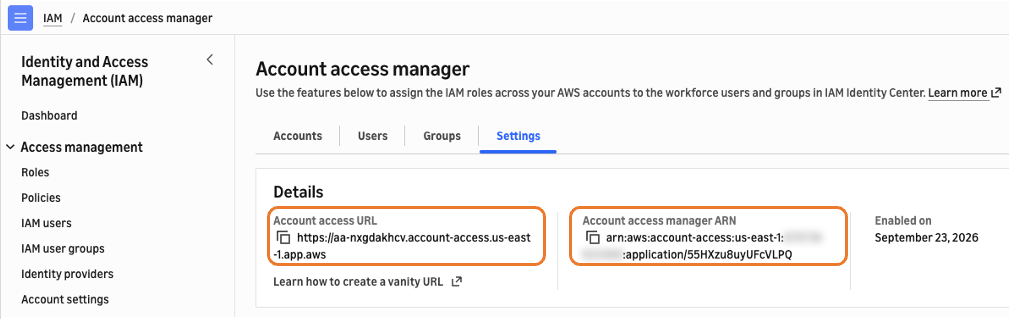
Figure 3: Account access manager settings after enablement

Figure 3: Account access manager settings after enablement

In the AWS CLI, run the command aws account-access list-applications to get the application ARN and tenant-ID of the enabled account access manager instance ARN.

Step 2: Update firewalls and gateways

If you filter access to specific AWS domains or URL endpoints with a next-generation firewall (NGFW) or Secure Web Gateway (SWG), allowlist the account access portal domains and endpoints in the following list. Account access manager has no IPv4-only endpoints; endpoints are dual-stack.

  • Account access portal URL – https://[Tenant-ID].account-access.[Region].app.aws
  • Portal APIs – [Tenant-ID].account-access.[Region].app.aws/api/* and /auth/*
  • Control plane – account-access.[Region].api.aws
  • Runtime – account-access-runtime.[Region].api.aws
  • Console – console.aws.amazon.com/account-access

Step 3: Prepare your IAM roles

Before assigning IAM roles to users and groups, update the role’s trust policy to allow account access manager service to assume it.

Add the following statement to the role’s trust policy (or paste the entire policy that follows if you’re creating a new role). Replace <your-account-id>, <region> (your IAM Identity Center primary Region), and <application-id> (from the Settings page of the console).
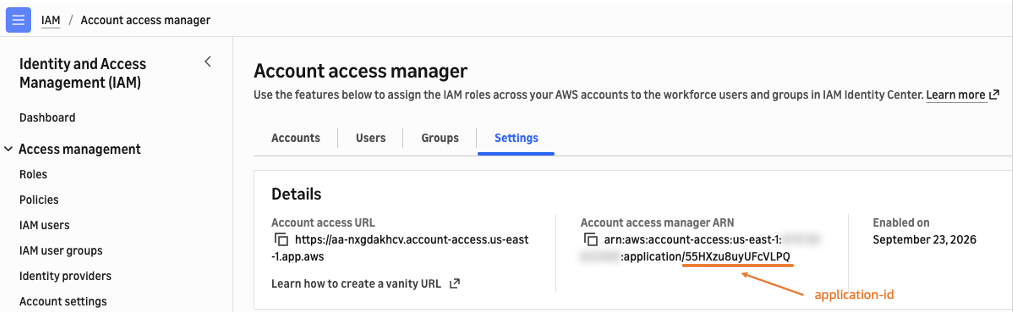
Figure 4: Account access manager ARN details

Figure 4: Account access manager ARN details

IAM role trust policy:

{
  "Version": "2012-10-17",
  "Statement": [
    {
      "Sid": "AccountAccessManagerIAMRoleTrustPolicyStatement",
      "Effect": "Allow",
      "Principal": {
        "Service": "account-access.amazonaws.com"
      },
      "Action": [
        "sts:AssumeRole",
        "sts:SetContext",
        "sts:TagSession"
      ],
      "Condition": {
        "StringEquals": {
          "aws:SourceAccount": "<your-account-id>",
          "aws:SourceArn": "arn:aws:account-access:<region>:<your-account-id>:application/<application-id>"
        }
      }
    }
  ]
}

Define the Condition block to enforce confused-deputy protection. It helps ensure that the role can be assumed only by the specific account access manager application instance (defined using the application ARN) created when you enabled the service, and only when the request originates from your AWS account where that instance resides.

Best practice:

  • Propagate identity attributes with ABAC – The sts:TagSession action listed in the preceding IAM role trust policy allows upstream attributes from your identity provider (group memberships, department, cost center) to flow through as principal tags on the session. Without it, role assumption still succeeds; only session-tag propagation is suppressed. Add it when downstream IAM policies use aws:PrincipalTag/<key> and the tag is populated from your IdP SAML claims; leave it out otherwise.
  • Automate the trust-policy update – We recommend updating your IAM role-creation workflows to add this trust-policy statement automatically wherever it’s needed, so new roles are assignable from day one. You can use this sample-aam-migration tool as a reference.

Step 4: Assign access to users and groups

Like IAM Identity Center role entitlements, an entitlement in account access manager requires three components: a user or group ID, an account ID, and an IAM role ARN (instead of a permission set ARN). You can create assignments from the Accounts, Users, or Groups tabs in the console, or using the API or AWS CLI. For assignments where the same role needs to be assigned to multiple users, you must create each assignment individually. You can automate it using the account access API, the AWS SDK, or AWS CLI

Assign from the console:

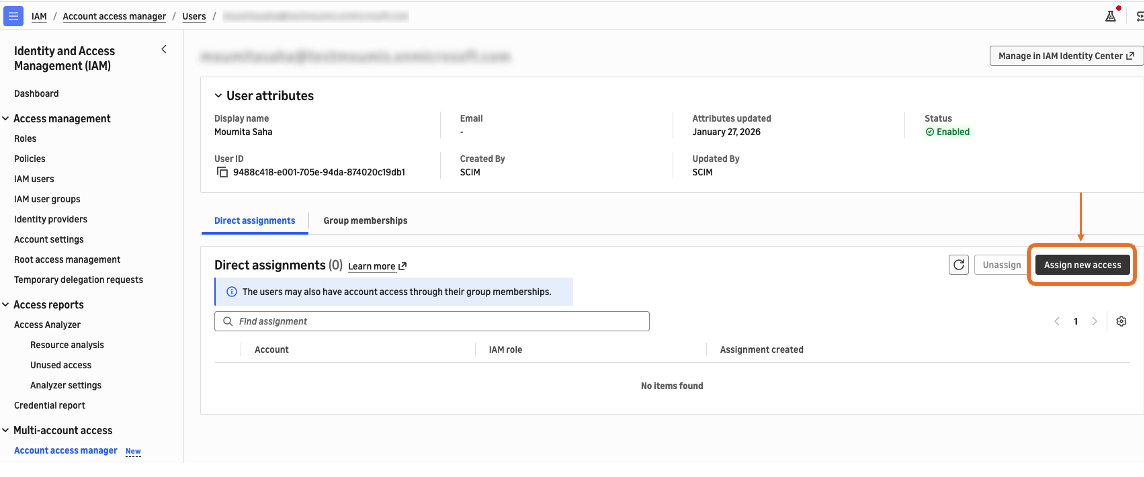
  1. Choose the Users tab and search by username or display name.
  2. Select the user, then choose Assign new access.
    Figure 5: Assign new access in account access manager

    Figure 5: Assign new access in account access manager

  3. On the Assign account access page, enter the workforce user or group, account ID, and IAM role name, then choose Assign access.
Assign a user using AWS CLI:

aws account-access create-entitlement \
  --region <Region> \
  --application-arn "<Account_access_manager_ARN>" \
  --entitlement '{
    "principalRole": {
      "principal": {
        "identityCenter": {
          "userId": "<Identity_Center_User_ID>"
        }
      },
      "roleArn": "arn:aws:iam::<ACCOUNT_ID>:role/<ROLE_NAME>"
    }
  }'

To assign a group, replace the userId block with "groupId": "<IDC_GROUP_ID>". To remove access, use aws account-access delete-entitlement with the entitlement ID.

Note:

  • The console can search users, groups, and accounts, but it can’t detect IAM roles because they can come from different AWS accounts in your organization; you must know the role name beforehand.
  • Only IAM roles whose trust policy grants account access manager as an allowed service principal are eligible for assignment.
  • IAM role sessions assigned by account access manager use the maximum session duration configured on the underlying IAM role in each AWS account, up to 12 hours.

Step 5: How workforce users can sign in

Workforce users can federate to AWS accounts using IAM roles assigned through account access manager in any of the following ways:

  1. Directly through the account access portal URL – Navigate to the portal URL (for example, https://aa-xxxxxxxxx.account-access.us-east-2.app.aws, or a vanity URL) and sign in.
  2. Through the AWS access portal – Go to the Applications tab, select the Account Access application, and you’ll be redirected to the account access portal, where your assigned accounts and their respective roles are listed.

Tip: We recommend that users bookmark both the account access portal and the AWS access portal for faster navigation. In addition, if you use a supported IdP, such as Okta, Microsoft Entra ID, or Ping Identity, you can add the account access portal as a bookmark app in the IdP’s dashboard; giving users authenticated, single-click access to the portal directly from the tools they already sign in to each day.

Access through a web browser

Use the following steps to use account access manager through a web browser.

  1. Navigate to the account access portal URL and sign in with your credentials.
  2. On the portal, find the AWS account you need. Search by account name or ID to filter the list of accounts you’re assigned to.
  3. Expand the account to see the roles you can assume.
  4. Select a role (for example, Developer). A new tab opens, signed into that account with the selected role.

Access through the AWS CLI

Account access manager works with the aws login command. To get started:

  1. Install the latest AWS CLI (v2.36.0 or newer).
  2. Sign in through your default browser – Sign in to your account access portal and into the target AWS account using one of your assigned roles.
  3. On the command line, run:
    aws login

  4. Set a default Region if prompted – If you haven’t set one, the AWS CLI will prompt you for a Region (for example, us-east-2).
  5. Select your session – The AWS CLI opens a browser page; select the tile for the session you initiated.
  6. Confirm and return to the CLI – The page confirms that your credentials were shared successfully. Close the tab and keep working in the AWS CLI for the duration of your session.

The temporary credentials are automatically rotated by the AWS CLI, AWS Tools for PowerShell, and AWS SDKs, and remain valid for the default session duration of an IAM role. After the session expires, you’re prompted to sign in again on the browser.

Note: IAM Identity Center–specific commands, such as aws sso configure don’t work with account access manager assignments; use aws login instead. If you want to continue to use aws sso login, refer to AWS CLI Integration for IAM Account access manager.

Create shortcut links to specific console destinations

The portal also lets you create a shortcut link that opens a specific console destination for a given account and role. Shortcut links work only with accounts and roles already assigned to the user—they can’t grant new access—and URL parameters must be URL-encoded. Because shortcut links are Regional and expose the account ID and role name in plain text, review your organization’s sharing policies before experimenting with them.

Customer managed key considerations

If your IAM Identity Center instance is encrypted with an AWS KMS customer managed key, which is required when you replicate IAM Identity Center to additional Regions, check the key policy before you enable account access manager. We recommend implementing the current baseline KMS key policy to ensure account access manager can read user, group, and instance data from IAM Identity Center.

Best practices summary

  • Enable in the right place – Enable account access manager in your organization’s management account and in the same Region as your IAM Identity Center instance and confirm your organization instance is in place before you begin.
  • Automate trust-policy updates – Build the account access manager trust-policy statement into your role-creation pipelines so every new role is assignable from day one, with no manual intervention.
  • Add sts:TagSession only when you need it – Include it only where downstream policies consume principal tags; otherwise leave it off to keep sessions lean and least-privilege.
  • Assign roles to groups, not individual users – Granting access at the group level reduces administrative overhead and strengthens the auditability of user-level access.
  • Scope administrator permissions tightly – Separate managing the feature from managing assignments, and enable delegating administration to keep day-to-day operations out of the management account.
  • Allowlist the portal domains before rollout – Add the account access portal domains and endpoints to your next-generation firewall or Secure Web Gateway ahead of launch to avoid access disruptions.
  • Prepare your workforce users – Have users bookmark both the account access portal and the AWS access portal and communicate the aws login flow clearly to your developers.

Account access manager launch partners

Account access manager launches with a broad ecosystem of AWS identity and access-governance partners who have integrated the service into their existing solutions, making it available to our joint customers from day one. Leading identity providers Okta, PingIdentity and Cisco Duo extend account access manager so customers can manage human workforce access to AWS accounts directly from the identity platforms they already use. Alongside them, access-governance and privileged-access partners Apono, BeyondTrust, Britive, Sonrai Security, C1.ai and Lumos added capabilities to govern, provision, and audit that access through the tooling our customers already rely on.

Account access manager also integrates with leading infrastructure-as-code (IaC) partners, so teams can define and manage access assignments declaratively alongside the rest of their AWS infrastructure. Pulumi enables customers to codify account access manager role assignments as part of their existing provisioning workflows, bringing repeatable, version-controlled automation to workforce access at scale.

Conclusion

Account access manager combines the flexibility of the IAM roles your teams already own with the single, centralized federation point of IAM Identity Center, adding user-level visibility into what users or roles have done across your organization. You assign existing IAM roles to users and groups centrally, scale with your account usage rather than a fixed quota, and give developers a fast, secure command-line experience with aws login. It’s available at no additional cost, enabled by default in Commercial Regions (excluding opt-in Commercial Regions, GovCloud (US), China, and other non-commercial Regions).

To see account access manager in action, watch the enablement video, which walks through enabling the service, preparing your IAM roles, and assigning access to your workforce end to end. You can also extend account access manager through our launch partners; leading identity, access-governance, and IaC providers who have integrated the service into their platforms, so you can govern, provision, and automate workforce access to AWS using the tooling you already rely on. Review the preceding partner integrations to find the ones that fit your environment.

To learn more and get started, visit the AWS Identity and Access Management User Guide. We encourage you to enable account access manager in a test organization, assign your first entitlement, and explore how centralized, user-attributed access can simplify your AWS environment.
Moumita Saha

Moumita Saha

Moumita is a Sr. Identity Specialist Solutions Architect, currently driving identity innovation, she builds customer solutions, shapes product direction, and advances access management practices across industries. With over 14 years of security expertise, she has delivered high-impact security innovations for Fortune 500 enterprises and Global Systems Integrator partners.

Omar Zoma

Omar Zoma

Omar is a Principal Security Solutions Architect with AWS Industries. With 15 years of security experience spanning multiple industries, his goal is to help customers understand and improve their security and compliance posture in a scalable way. He tackles global security challenges through content creation, teaching, knowledge sharing, and contributing to global standards and organizational bodies.

How to visualize multi-account Amazon Inspector findings with Amazon Elasticsearch Service

Post Syndicated from Moumita Saha original https://aws.amazon.com/blogs/security/how-to-visualize-multi-account-amazon-inspector-findings-with-amazon-elasticsearch-service/

Amazon Inspector helps to improve the security and compliance of your applications that are deployed on Amazon Web Services (AWS). It automatically assesses Amazon Elastic Compute Cloud (Amazon EC2) instances and applications on those instances. From that assessment, it generates findings related to exposure, potential vulnerabilities, and deviations from best practices.

You can use the findings from Amazon Inspector as part of a vulnerability management program for your Amazon EC2 fleet across multiple AWS Regions in multiple accounts. The ability to rank and efficiently respond to potential security issues reduces the time that potential vulnerabilities remain unresolved. This can be accelerated within a single pane of glass for all the accounts in your AWS environment.

Following AWS best practices, in a secure multi-account AWS environment, you can provision (using AWS Control Tower) a group of accounts—known as core accounts, for governing other accounts within the environment. One of the core accounts may be used as a central security account, which you can designate for governing the security and compliance posture across all accounts in your environment. Another core account is a centralized logging account, which you can provision and designate for central storage of log data.

In this blog post, I show you how to:

  1. Use Amazon Inspector, a fully managed security assessment service, to generate security findings.
  2. Gather findings from multiple Regions across multiple accounts using Amazon Simple Notification Service (Amazon SNS) and Amazon Simple Queue Service (Amazon SQS).
  3. Use AWS Lambda to send the findings to a central security account for deeper analysis and reporting.

In this solution, we send the findings to two services inside the central security account:

Solution overview

Overall architecture

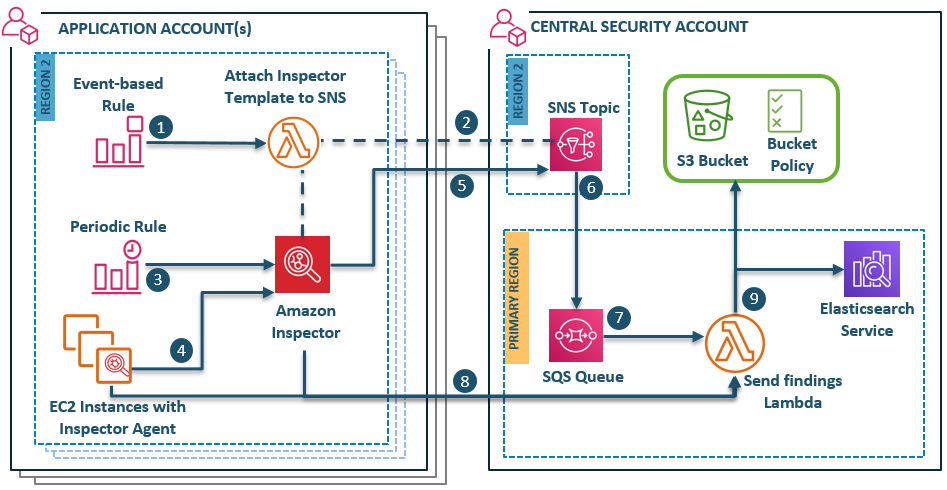
The flow of events to implement the solution is shown in Figure 1 and described in the following process flow.

Figure 1: Solution overview architecture

Figure 1: Solution overview architecture

Process flow

The flow of this architecture is divided into two types of processes—a one-time process and a scheduled process. The AWS resources that are part of the one-time process are triggered the first time an Amazon Inspector assessment template is created in each Region of each application account. The AWS resources of the scheduled process are triggered at a designated interval of Amazon Inspector scan in each Region of each application account.

One-time process

  1. An event-based Amazon CloudWatch rule in each Region of every application account triggers a regional AWS Lambda function when an Amazon Inspector assessment template is created for the first time in that Region.

    Note: In order to restrict this event to trigger the Lambda function only the first time an assessment template is created, you must use a specific user-defined tag to trigger the Attach Inspector template to SNS Lambda function for only one Amazon Inspector template per Region. For more information on tags, see the Tagging AWS resources documentation.

  2. The Lambda function attaches the Amazon Inspector assessment template (created in application accounts) to the cross-account Amazon SNS topic (created in the security account). The function, the template, and the topic are all in the same AWS Region.

    Note: This step is needed because Amazon Inspector templates can only be attached to SNS topics in the same account via the AWS Management Console or AWS Command Line Interface (AWS CLI).

Scheduled process

  1. A scheduled Amazon CloudWatch Event in every Region of the application accounts starts the Amazon Inspector scan at a scheduled time interval, which you can configure.
  2. An Amazon Inspector agent conducts the scan on the EC2 instances of the Region where the assessment template is created and sends any findings to Amazon Inspector.
  3. Once the findings are generated, Amazon Inspector notifies the Amazon SNS topic of the security account in the same Region.
  4. The Amazon SNS topics from each Region of the central security account receive notifications of Amazon Inspector findings from all application accounts. The SNS topics then send the notifications to a central Amazon SQS queue in the primary Region of the security account.
  5. The Amazon SQS queue triggers the Send findings Lambda function (as shown in Figure 1) of the security account.

    Note: Each Amazon SQS message represents one Amazon Inspector finding.

  6. The Send findings Lambda function assumes a cross-account role to fetch the following information from all application accounts:
    1. Finding details from the Amazon Inspector API.
    2. Additional Amazon EC2 attributes—VPC, subnet, security group, and IP address—from EC2 instances with potential vulnerabilities.
  7. The Lambda function then sends all the gathered data to a central S3 bucket and a domain in Amazon ES—both in the central security account.

These Amazon Inspector findings, along with additional attributes on the scanned instances, can be used for further analysis and visualization via Kibana—a data visualization dashboard for Amazon ES. Storing a copy of these findings in an S3 bucket gives you the opportunity to forward the findings data to outside monitoring tools that don’t support direct data ingestion from AWS Lambda.

Prerequisites

The following resources must be set up before you can implement this solution:

  1. A multi-account structure. To learn how to set up a multi-account structure, see Setting up AWS Control Tower and AWS Landing zone.
  2. Amazon Inspector agents must be installed on all EC2 instances. See Installing Amazon Inspector agents to learn how to set up Amazon Inspector agents on EC2 instances. Additionally, keep note of all the Regions where you install the Amazon Inspector agent.
  3. An Amazon ES domain with Kibana authentication. See Getting started with Amazon Elasticsearch Service and Use Amazon Cognito for Kibana access control.
  4. An S3 bucket for centralized storage of Amazon Inspector findings.
  5. An S3 bucket for storage of the Lambda source code for the solution.

Set up Amazon Inspector with Amazon ES and S3

Follow these steps to set up centralized Amazon Inspector findings with Amazon ES and Amazon S3:

  1. Upload the solution ZIP file to the S3 bucket used for Lambda code storage.
  2. Collect the input parameters for AWS CloudFormation deployment.
  3. Deploy the base template into the central security account.
  4. Deploy the second template in the primary Region of all application accounts to create global resources.
  5. Deploy the third template in all Regions of all application accounts.

Step 1: Upload the solution ZIP file to the S3 bucket used for Lambda code storage

  1. From GitHub, download the file Inspector-to-S3ES-crossAcnt.zip.
  2. Upload the ZIP file to the S3 bucket you created in the central security account for Lambda code storage. This code is used to create the Lambda function in the first CloudFormation stack set of the solution.

Step 2: Collect input parameters for AWS CloudFormation deployment

In this solution, you deploy three AWS CloudFormation stack sets in succession. Each stack set should be created in the primary Region of the central security account. Underlying stacks are deployed across the central security account and in all the application accounts where the Amazon Inspector scan is performed. You can learn more in Working with AWS CloudFormation StackSets.

Before you proceed to the stack set deployment, you must collect the input parameters for the first stack set: Central-SecurityAcnt-BaseTemplate.yaml.

To collect input parameters for AWS CloudFormation deployment

  1. Fetch the account ID (CentralSecurityAccountID) of the AWS account where the stack set will be created and deployed. You can use the steps in Finding your AWS account ID to help you find the account ID.
  2. Values for the ES domain parameters can be fetched from the Amazon ES console.
    1. Open the Amazon ES Management Console and select the Region where the Amazon ES domain exists.
    2. Select the domain name to view the domain details.
    3. The value for ElasticsearchDomainName is displayed on the top left corner of the domain details.
    4. On the Overview tab in the domain details window, select and copy the URL value of the Endpoint to use as the ElasticsearchEndpoint parameter of the template. Make sure to exclude the https:// at the beginning of the URL.

      Figure 2: Details of the Amazon ES domain for fetching parameter values

      Figure 2: Details of the Amazon ES domain for fetching parameter values

  3. Get the values for the S3 bucket parameters from the Amazon S3 console.
    1. Open the Amazon S3 Management Console.
    2. Copy the name of the S3 bucket that you created for centralized storage of Amazon Inspector findings. Save this bucket name for the LoggingS3Bucket parameter value of the Central-SecurityAcnt-BaseTemplate.yaml template.
    3. Select the S3 bucket used for source code storage. Select the bucket name and copy the name of this bucket for the LambdaSourceCodeS3Bucket parameter of the template.

      Figure 3: The S3 bucket where Lambda code is uploaded

      Figure 3: The S3 bucket where Lambda code is uploaded

  4. On the bucket details page, select the source code ZIP file name that you previously uploaded to the bucket. In the detail page of the ZIP file, choose the Overview tab, and then copy the value in the Key field to use as the value for the LambdaCodeS3Key parameter of the template.

    Figure 4: Details of the Lambda code ZIP file uploaded in Amazon S3 showing the key prefix value

    Figure 4: Details of the Lambda code ZIP file uploaded in Amazon S3 showing the key prefix value

Note: All of the other input parameter values of the template are entered automatically, but you can change them during stack set creation if necessary.

Step 3: Deploy the base template into the central security account

Now that you’ve collected the input parameters, you’re ready to deploy the base template that will create the necessary resources for this solution implementation in the central security account.

Prerequisites for CloudFormation stack set deployment

There are two permission modes that you can choose from for deploying a stack set in AWS CloudFormation. If you’re using AWS Organizations and have all features enabled, you can use the service-managed permissions; otherwise, self-managed permissions mode is recommended. To deploy this solution, you’ll use self-managed permissions mode. To run stack sets in self-managed permissions mode, your administrator account and the target accounts must have two IAM roles—AWSCloudFormationStackSetAdministrationRole and AWSCloudFormationStackSetExecutionRole—as prerequisites. In this solution, the administrator account is the central security account and the target accounts are application accounts. You can use the following CloudFormation templates to create the necessary IAM roles:

To deploy the base template

  1. Download the base template (Central-SecurityAcnt-BaseTemplate.yaml) from GitHub.
  2. Open the AWS CloudFormation Management Console and select the Region where all the stack sets will be created for deployment. This should be the primary Region of your environment.
  3. Select Create StackSet.
    1. In the Create StackSet window, select Template is ready and then select Upload a template file.
    2. Under Upload a template file, select Choose file and select the Central-SecurityAcnt-BaseTemplate.yaml template that you downloaded earlier.
    3. Choose Next.
  4. Add stack set details.
    1. Enter a name for the stack set in StackSet name.
    2. Under Parameters, most of the values are pre-populated except the values you collected in the previous procedure for CentralSecurityAccountID, ElasticsearchDomainName, ElasticsearchEndpoint, LoggingS3Bucket, LambdaSourceCodeS3Bucket, and LambdaCodeS3Key.
    3. After all the values are populated, choose Next.
  5. Configure StackSet options.
    1. (Optional) Add tags as described in the prerequisites to apply to the resources in the stack set that these rules will be deployed to. Tagging is a recommended best practice, because it enables you to add metadata information to resources during their creation.
    2. Under Permissions, choose the Self service permissions mode to be used for deploying the stack set, and then select the AWSCloudFormationStackSetAdministrationRole from the dropdown list.

      Figure 5: Permission mode to be selected for stack set deployment

      Figure 5: Permission mode to be selected for stack set deployment

    3. Choose Next.
  6. Add the account and Region details where the template will be deployed.
    1. Under Deployment locations, select Deploy stacks in accounts. Under Account numbers, enter the account ID of the security account that you collected earlier.

      Figure 6: Values to be provided during the deployment of the first stack set

      Figure 6: Values to be provided during the deployment of the first stack set

    2. Under Specify regions, select all the Regions where the stacks will be created. This should be the list of Regions where you installed the Amazon Inspector agent. Keep note of this list of Regions to use in the deployment of the third template in an upcoming step.
      • Though an Amazon Inspector scan is performed in all the application accounts, the regional Amazon SNS topics that send scan finding notifications are created in the central security account. Therefore, this template is created in all the Regions where Amazon Inspector will notify SNS. The template has the logic needed to handle the creation of specific AWS resources only in the primary Region, even though the template executes in many Regions.
      • The order in which Regions are selected under Specify regions defines the order in which the stack is deployed in the Regions. So you must make sure that the primary Region of your deployment is the first one specified under Specify regions, followed by the other Regions of stack set deployment. This is required because global resources are created using one Region—ideally the primary Region—and so stack deployment in that Region should be done before deployment to other Regions in order to avoid any build dependencies.

        Figure 7: Showing the order of specifying the Regions of stack set deployment

        Figure 7: Showing the order of specifying the Regions of stack set deployment

  7. Review the template settings and select the check box to acknowledge the Capabilities section. This is required if your deployment template creates IAM resources. You can learn more at Controlling access with AWS Identity and Access Management.

    Figure 8: Acknowledge IAM resources creation by AWS CloudFormation

    Figure 8: Acknowledge IAM resources creation by AWS CloudFormation

  8. Choose Submit to deploy the stack set.

Step 4: Deploy the second template in the primary Region of all application accounts to create global resources

This template creates the global resources required for sending Amazon Inspector findings to Amazon ES and Amazon S3.

To deploy the second template

  1. Download the template (ApplicationAcnts-RolesTemplate.yaml) from GitHub and use it to create the second CloudFormation stack set in the primary Region of the central security account.
  2. To deploy the template, follow the steps used to deploy the base template (described in the previous section) through Configure StackSet options.
  3. In Set deployment options, do the following:
    1. Under Account numbers, enter the account IDs of your application accounts as comma-separated values. You can use the steps in Finding your AWS account ID to help you gather the account IDs.
    2. Under Specify regions, select only your primary Region.

      Figure 9: Select account numbers and specify Regions

      Figure 9: Select account numbers and specify Regions

  4. The remaining steps are the same as for the base template deployment.

Step 5: Deploy the third template in all Regions of all application accounts

This template creates the resources in each Region of all application accounts needed for scheduled scanning of EC2 instances using Amazon Inspector. Notifications are sent to the SNS topics of each Region of the central security account.

To deploy the third template

  1. Download the template InspectorRun-SetupTemplate.yaml from GitHub and create the final AWS CloudFormation stack set. Similar to the previous stack sets, this one should also be created in the central security account.
  2. For deployment, follow the same steps you used to deploy the base template through Configure StackSet options.
  3. In Set deployment options:
    1. Under Account numbers, enter the same account IDs of your application accounts (comma-separated values) as you did for the second template deployment.
    2. Under Specify regions, select all the Regions where you installed the Amazon Inspector agent.

      Note: This list of Regions should be the same as the Regions where you deployed the base template.

  4. The remaining steps are the same as for the second template deployment.

Test the solution and delivery of the findings

After successful deployment of the architecture, to test the solution you can wait until the next scheduled Amazon Inspector scan or you can use the following steps to run the Amazon Inspector scan manually.

To run the Amazon Inspector scan manually for testing the solution

  1. In any one of the application accounts, go to any Region where the Amazon Inspector scan was performed.
  2. Open the Amazon Inspector console.
  3. In the left navigation menu, select Assessment templates to see the available assessments.
  4. Choose the assessment template that was created by the third template.
  5. Choose Run to start the assessment immediately.
  6. When the run is complete, Last run status changes from Collecting data to Analysis Complete.

    Figure 10: Amazon Inspector assessment run

    Figure 10: Amazon Inspector assessment run

  7. You can see the recent scan findings in the Amazon Inspector console by selecting Assessment runs from the left navigation menu.

    Figure 11: The assessment run indicates total findings from the last Amazon Inspector run in this Region

    Figure 11: The assessment run indicates total findings from the last Amazon Inspector run in this Region

  8. In the left navigation menu, select Findings to see details of each finding, or use the steps in the following section to verify the delivery of findings to the central security account.

Test the delivery of the Amazon Inspector findings

This solution delivers the Amazon Inspector findings to two AWS services—Amazon ES and Amazon S3—in the primary Region of the central security account. You can either use Kibana to view the findings sent to Amazon ES or you can use the findings sent to Amazon S3 and forward them to the security monitoring software of your preference for further analysis.

To check whether the findings are delivered to Amazon ES

  1. Open the Amazon ES Management Console and select the Region where the Amazon ES domain is located.
  2. Select the domain name to view the domain details.
  3. On the domain details page, select the Kibana URL.

    Figure 12: Amazon ES domain details page

    Figure 12: Amazon ES domain details page

  4. Log in to Kibana using your preferred authentication method as set up in the prerequisites.
    1. In the left panel, select Discover.
    2. In the Discover window, select a Region to view the total number of findings in that Region.

      Figure 13: The total findings in Kibana for the chosen Region of an application account

      Figure 13: The total findings in Kibana for the chosen Region of an application account

To check whether the findings are delivered to Amazon S3

  1. Open the Amazon S3 Management Console.
  2. Select the S3 bucket that you created for storing Amazon Inspector findings.
  3. Select the bucket name to view the bucket details. The total number of findings for the chosen Region is at the top right corner of the Overview tab.

    Figure 14: The total security findings as stored in an S3 bucket for us-east-1 Region

    Figure 14: The total security findings as stored in an S3 bucket for us-east-1 Region

Visualization in Kibana

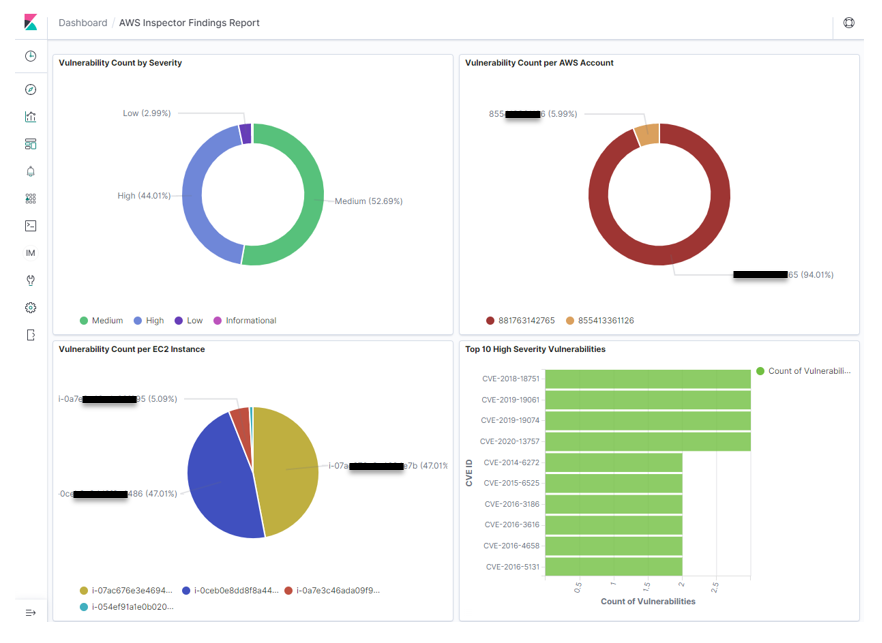
The data sent to the Amazon ES index can be used to create visualizations in Kibana that make it easier to identify potential security gaps and plan the remediation accordingly.

You can use Kibana to create a dashboard that gives an overview of the potential vulnerabilities identified in different instances of different AWS accounts. Figure 15 shows an example of such a dashboard. The dashboard can help you rank the need for remediation based on criteria such as:

  • The category of vulnerability
  • The most impacted AWS accounts
  • EC2 instances that need immediate attention
Figure 15: A sample Kibana dashboard showing findings from Amazon Inspector

Figure 15: A sample Kibana dashboard showing findings from Amazon Inspector

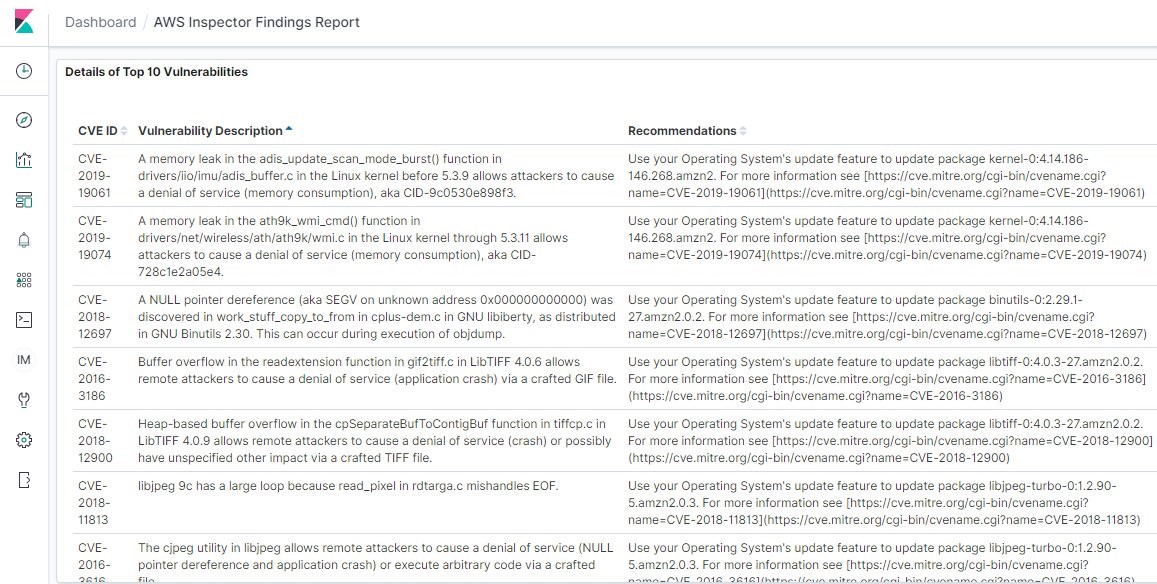
You can build additional panels to visualize details of the vulnerability findings identified by Amazon Inspector, such as the CVE ID of the security vulnerability, its description, and recommendations on how to remove the vulnerabilities.

Figure 16: A sample Kibana dashboard panel listing the top identified vulnerabilities and their details

Figure 16: A sample Kibana dashboard panel listing the top identified vulnerabilities and their details

Conclusion

By using this solution to combine Amazon Inspector, Amazon SNS topics, Amazon SQS queues, Lambda functions, an Amazon ES domain, and S3 buckets, you can centrally analyze and monitor the vulnerability posture of EC2 instances across your AWS environment, including multiple Regions across multiple AWS accounts. This solution is built following least privilege access through AWS IAM roles and policies to help secure the cross-account architecture.

In this blog post, you learned how to send the findings directly to Amazon ES for visualization in Kibana. These visualizations can be used to build dashboards that security analysts can use for centralized monitoring. Better monitoring capability helps analysts to identify potentially vulnerable assets and perform remediation activities to improve security of your applications in AWS and their underlying assets. This solution also demonstrates how to store the findings from Amazon Inspector in an S3 bucket, which makes it easier for you to use those findings to create visualizations in your preferred security monitoring software.

If you have feedback about this post, submit comments in the Comments section below. If you have questions about this post, contact AWS Support.

Want more AWS Security how-to content, news, and feature announcements? Follow us on Twitter.

Author

Moumita Saha

Moumita is a Security Consultant with AWS Professional Services working to help enterprise customers secure their workloads in the cloud. She assists customers in secure cloud migration, designing automated solutions to protect against cyber threats in the cloud. She is passionate about cyber security, data privacy, and new, emerging cloud-security technologies.