Post Syndicated from Nima Fotouhi original https://aws.amazon.com/blogs/security/how-to-automate-session-manager-preferences-across-your-organization/
AWS Systems Manager Session Manager is a fully managed service that provides secure, interactive, one-click access to your Amazon Elastic Compute Cloud (Amazon EC2) instances, edge devices, and virtual machines (VMs) through a browser-based shell or AWS Command Line Interface (AWS CLI), without requiring open inbound ports, bastion hosts, or SSH keys. Session Manager helps you maintain security compliance and controlled access while providing users with access to managed nodes. When starting a session, you must specify a preferences document (known as the Session Manager preferences document) to set the session parameters.
While providing users with access to managed nodes, managing these preferences consistently across multiple AWS Regions and accounts in a large organization can be challenging. Organizations often need to maintain standardized security settings, logging configurations, and session controls across their entire AWS footprint. Manual configuration of these preferences in each Region and account is not only time-consuming but also prone to human error and can lead to security gaps or compliance violations. Additionally, tracking and maintaining these configurations becomes increasingly complex as the organization scales.
You can use Session Manager to control various session options including data encryption for session data in transit and session logs at rest, session duration, and logging. For example, you can specify whether to store session log data in an Amazon Simple Storage Service (Amazon S3) bucket or Amazon CloudWatch Logs log group. In this post, I demonstrate how to manage Session Manager preferences across your organization using AWS CloudFormation StackSets. You can use CloudFormation StackSets to manage resources and configurations, such as Session Manager preferences, across different AWS accounts and Regions using standardized templates to maintain consistent security and compliance standards across your entire AWS infrastructure.
Prerequisites
You need to meet the following prerequisites to deploy the solution in this post:
- Basic understanding of CloudFormation
- Trusted access enabled between CloudFormation StackSets and AWS Organizations
- Access to an AWS management account or StackSet delegated admin account
- Appropriate AWS Identity and Access Management (IAM) permissions to create and manage StackSets
The Session Manager environment has some additional prerequisites:
- For EC2 instances with internet access, allow HTTPS (port 443) outbound traffic to:
ec2messages.<region>.amazonaws.comssm.<region>.amazonaws.comssmmessages.<region>.amazonaws.com
Note:
<region>represents the actual Region where you are deploying your instances. - Additional endpoints required for specific features:
- For CloudWatch Logs integration:
logs.<region>.amazonaws.com - For Amazon S3 log storage:
s3.<region>.amazonaws.com - For session data encryption:
kms.<region>.amazonaws.com
Note: For EC2 instances without internet access, you must configure virtual private cloud (VPC) endpoints to maintain connectivity with Systems Manager and related services.
- For CloudWatch Logs integration:
- SSM Agent requirements:
- Minimum version 2.3.68.0 for basic session connectivity
- Version 3.0.222.0 or later for port forwarding and SSH sessions
Note: Many AWS-provided and trusted third-party Amazon Machine Images (AMIs) come with the SSM Agent pre-installed. For more information, see Find AMIs with the SSM Agent preinstalled.
For a complete list of requirements, see Setting up Session Manager.
Solution overview
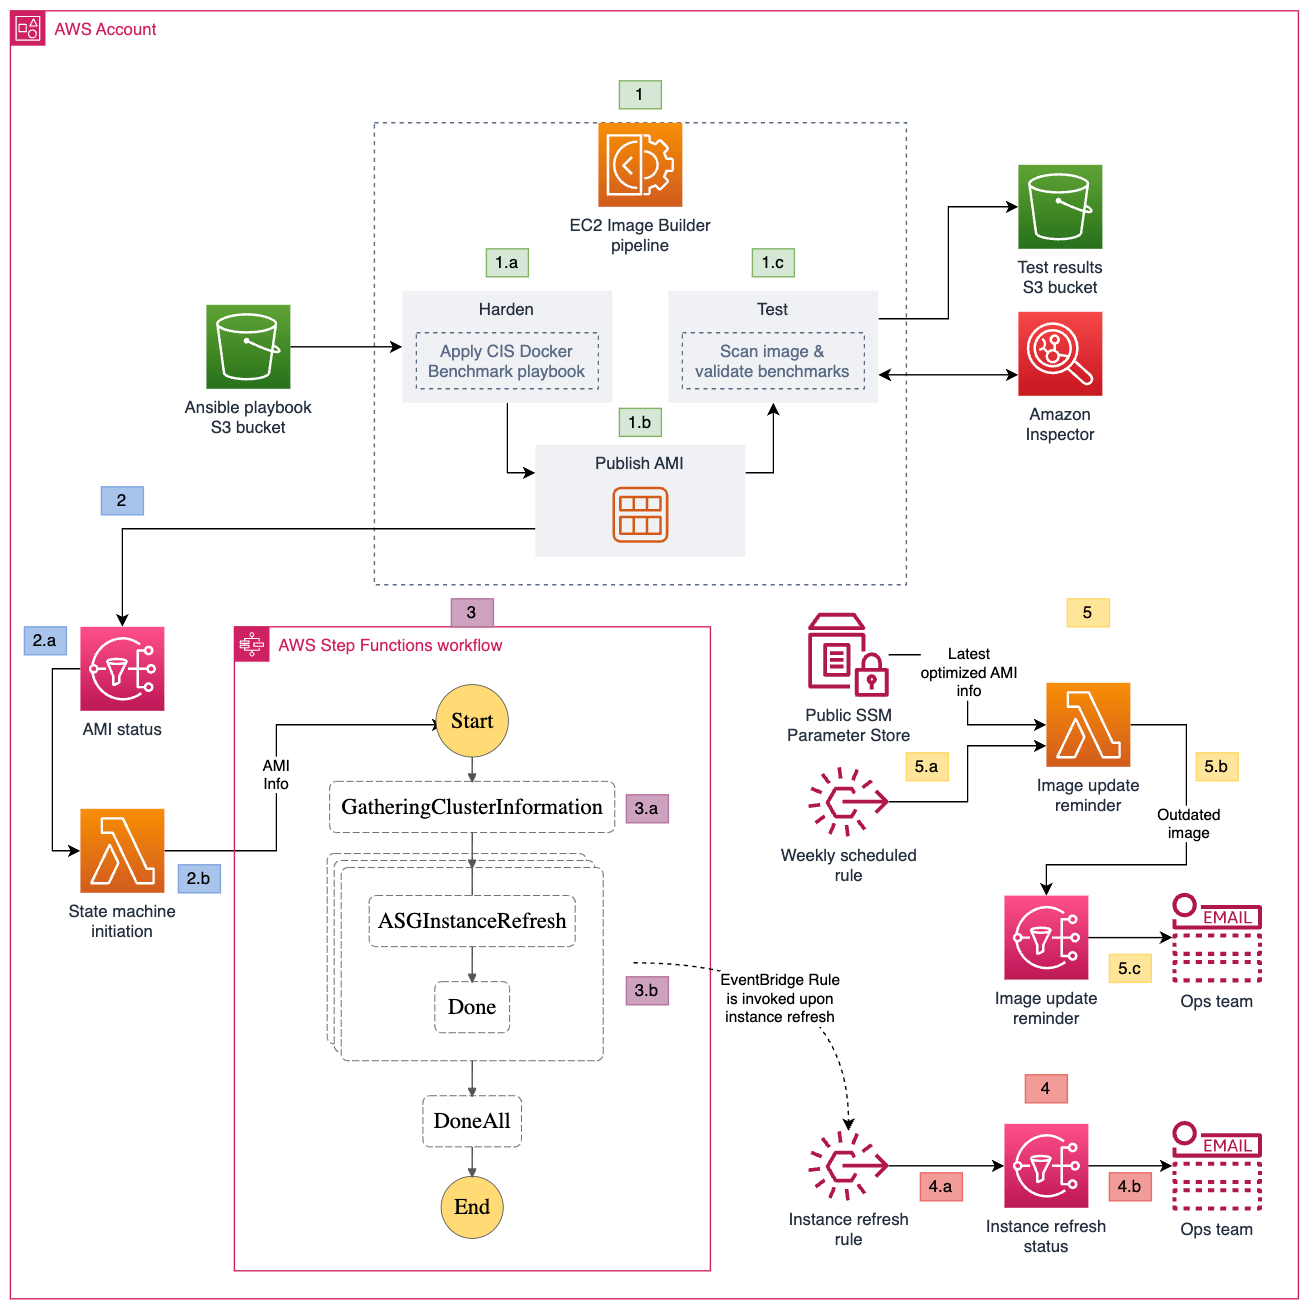
This solution, shown in Figure 1, automatically configures the SSM-SessionManagerRunShell document with customizable preferences that govern how Session Manager behaves across your AWS accounts. It creates resources for logging, encryption, and session controls, and updates the SSM-SessionManagerRunShell document with these preferences. The document is updated by an AWS Lambda function that helps make sure that the preferences are correctly applied. It transforms the default Session Manager preferences document to meet your enterprise compliance requirements. Changes are deployed using CloudFormation template provided in the GitHub repository. The solution supports multiple logging destinations, encryption options, and session controls to meet various security and compliance requirements.
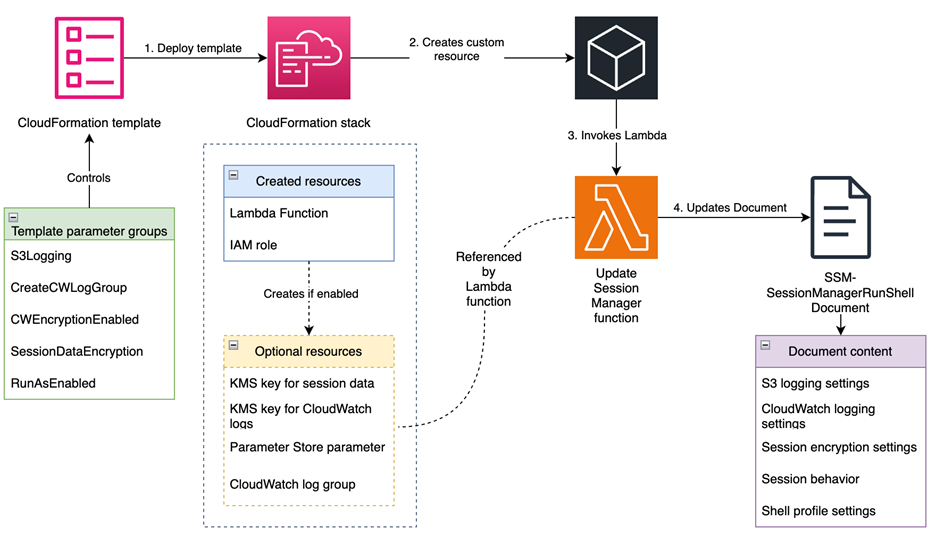
Figure 1: Solution overview
Walkthrough
To deploy the solution, complete the following steps.
Step 1: Download or clone the repository
The first step is to download or clone the GitHub repository.
To download the repository:
- Go to the main page of the repository on GitHub.
- Choose Code and then choose Download ZIP.
To clone the repository:
- Make sure that you have Git installed.
- Run the following command in your terminal:
git clone https://github.com/aws-samples/<repo-link>
Step 2: Create the CloudFormation StackSet
In this step, you deploy the solution’s resources by creating a CloudFormation StackSet using the provided CloudFormation template. Sign in to your management account or StackSet delegated admin account. To create the stack, follow the steps in Get started with StackSets using a sample template. Create the StackSet in each of the accounts and Regions where you plan to implement the solution. Note that you need to provide values for the parameters defined in the template to deploy the stack. The following table lists the parameters that you need to provide.
|
Parameter |
Description |
|
|
Enables storing session logs to an S3 bucket. |
|
|
Name of the S3 bucket for session logs. The bucket must exist or the deployment will fail. |
|
|
Key prefix for session logs, will be appended by account ID and Region |
|
|
If set to |
|
|
Creates the CloudWatch log group. If set to |
|
|
The name of the CloudWatch log group you want to send session logs to. |
|
|
If set to |
|
|
If set to |
|
|
If set to |
|
|
If set to |
|
|
The name of the user account to start sessions with on Linux and macOS managed nodes when the |
|
|
The amount of time of inactivity you want to allow before a session ends. This input is measured in minutes. |
|
|
The maximum amount of time you want to allow before a session ends. This input is measured in minutes. |
|
|
The shell preferences, environment variables, working directories, and commands you specify for sessions on Windows Server managed nodes. |
|
|
The shell preferences, environment variables, working directories, and commands you specify for sessions on Linux and macOS managed nodes. |
Step 3: Update your EC2 instance profiles with proper permissions
Depending on the parameter values you pass when deploying the template, you need to update your EC2 instance profiles with proper permissions. For example, if you have enabled session data and session log encryption, you need to add the following policy to your instance profiles.
Note: If you enable S3 logging, you need to add the required permissions for that as well. See Configure a central S3 bucket for Session Manager logging article on AWS re:Post for more information about how to properly configure your S3 bucket and EC2 instance profile for centralized logging. Same-account logging follows a similar pattern.
Step 4: Verify the solution implementation
You can verify that the Session Manager preferences are correctly configured across your environment. Here’s a systematic approach to validation:
Verify preference configuration
Through the AWS Management Console, navigate to AWS Systems Manager Session Manager, choose Preferences and review the configured Session Manager preferences. Alternatively, verify the configuration through AWS CLI using:
aws ssm get-document --name "SSM-SessionManagerRunShell" --document-version \$LATEST
Validate session functionality
Start a new session following the AWS Systems Manager User Guide and perform the following validations:
- Verify the encryption configuration by starting a new session. If session data encryption is enabled, you should see the message This session is encrypted using AWS KMS when the session begins.
- For CloudWatch logging verification, navigate to the CloudWatch console and access the Log groups section. Confirm that your specified log group exists and KMS encryption is enabled if you configured it during deployment. Execute some commands in your session and observe the real-time log streaming to your configured log group.
- To verify S3 logging, establish a session and execute several commands. Terminate the session and check your configured S3 bucket for the session logs. Remember that S3 logs are only generated after the session is terminated.
- If you enabled the
RunAsEnabledoption, verify the configuration by executing thewhoamicommand in your session. The output should match your configuredRunAsuser.
Resources
The following is a list of resources created by this solution:
AWS::Lambda::Function (UpdateSessionManagerFunction)
This resource creates a Lambda function that:
- Updates the
SSM-SessionManagerRunShelldocument with the specified preferences - Handles CloudFormation create, update, and delete events
- Performs deep comparison of document contents to avoid unnecessary updates
- Includes error handling and retry logic
AWS::IAM::Role (LambdaExecutionRole)
This resource creates an IAM role that allows the Lambda function to:
- Execute with basic Lambda permissions
- Access and modify the
SSM-SessionManagerRunShelldocument - Access SSM parameters storing session data encryption key ID
AWS::KMS::Key (SessionDataKMSKey)
This conditional resource creates a KMS key for encrypting session data when SessionDataEncryption parameter is set to enabled. The key has a policy allowing key management with IAM.
AWS::KMS::Alias (SessionDataKeyAlias)
This conditional resource creates a friendly alias (alias/session-manager/data) for the session data encryption key. This value cannot be changed.
AWS::SSM::Parameter (SessionKeyID)
This conditional resource creates an Systems Manager parameter to store the KMS key ID for session data encryption, making it accessible to other components.
Note: The session data KMS key ID is stored in a Systems Manager parameter to decouple components and help prevent circular dependency and failures to due race conditions.
AWS::KMS::Key (SessionLogsKMSKey)
This conditional resource creates a KMS key for encrypting CloudWatch logs when CWEncryptionEnabled parameter is set to enabled. The key has a policy allowing CloudWatch Logs service to use it
Note:
SessionLogsKMSKeyis used to encrypt logs at-rest and is not used by the SSM Agent, so your instance profile does not need to have permission to this key. Logs are encrypted in-transit and will be encrypted by CloudWatch service after they are received.
AWS::KMS::Alias (SessionLogsKeyAlias)
This conditional resource creates a friendly alias (alias/session-manager/logs) for the CloudWatch Logs encryption key.
AWS::Logs::LogGroup (SessionManagerLogGroup)
This conditional resource creates a CloudWatch Logs group for session logs when the CreateCWLogGroup paremeter is set to enabled. The log group:
- Uses the specified name (controlled by the
CWLogGroupNameparameter, and defaults tossm-sessionmanager-logs) - Sets a 90-day retention period
- Uses KMS encryption if enabled
Custom::UpdateSessionManager (UpdateSessionManagerCustomResource)
This custom resource invokes the Lambda function to update the SSM-SessionManagerRunShell document with the specified preferences.
Parameter groups
The following template parameters are available for customizing Session Manager behavior:
|
Parameter group |
Parameters |
Description |
|
S3 logging |
|
Controls logging to Amazon S3 |
|
CloudWatch logging |
|
Controls logging to CloudWatch Logs |
|
Encryption |
|
Controls encryption of session data |
|
Session controls |
|
Controls session behavior |
|
Shell profiles |
|
Controls shell environment |
Conclusion
In this post, we explored how to implement and manage Session Manager preferences across your organization using CloudFormation StackSets. This solution enables centralized management of Session Manager configurations across multiple accounts and Regions from a single account, significantly simplifying the administration of remote access to your compute resources. Through automated deployment of security controls including session encryption, logging, and access restrictions, the solution helps facilitate consistent compliance with organizational security requirements while reducing manual configuration efforts and the risk of human error. As your organization grows, this solution scales seamlessly to accommodate new accounts and Regions while maintaining uniform security standards across your infrastructure.
Remember to regularly review and update your Session Manager preferences to align with evolving security requirements and organizational needs. For more information about AWS Systems Manager Session Manager, visit the official AWS documentation.
If you have feedback about this post, submit comments in the Comments section below.