All posts by Sai Parthasaradhi

Disaster recovery approaches for Db2 databases on AWS

Post Syndicated from Sai Parthasaradhi original https://aws.amazon.com/blogs/architecture/disaster-recovery-approaches-for-db2-databases-on-aws/

As you migrate your critical enterprise workloads from an IBM Db2 on-premises database to the AWS Cloud, it’s critical to have a reliable and effective disaster recovery (DR) strategy. This helps the database applications operate with little or no disruption from unexpected events like a natural disaster.

Recovery point objective (RPO), recovery time objective (RTO), and cost, are three key metrics to consider when developing your DR strategy, (see Figure 1.) Based on these metrics, you can define your DR strategy for Db2 databases on AWS. It can be either an on-demand backup restore approach or nearly continuous replication method.

Figure 1. Disaster recovery strategies

Figure 1. Disaster recovery strategies

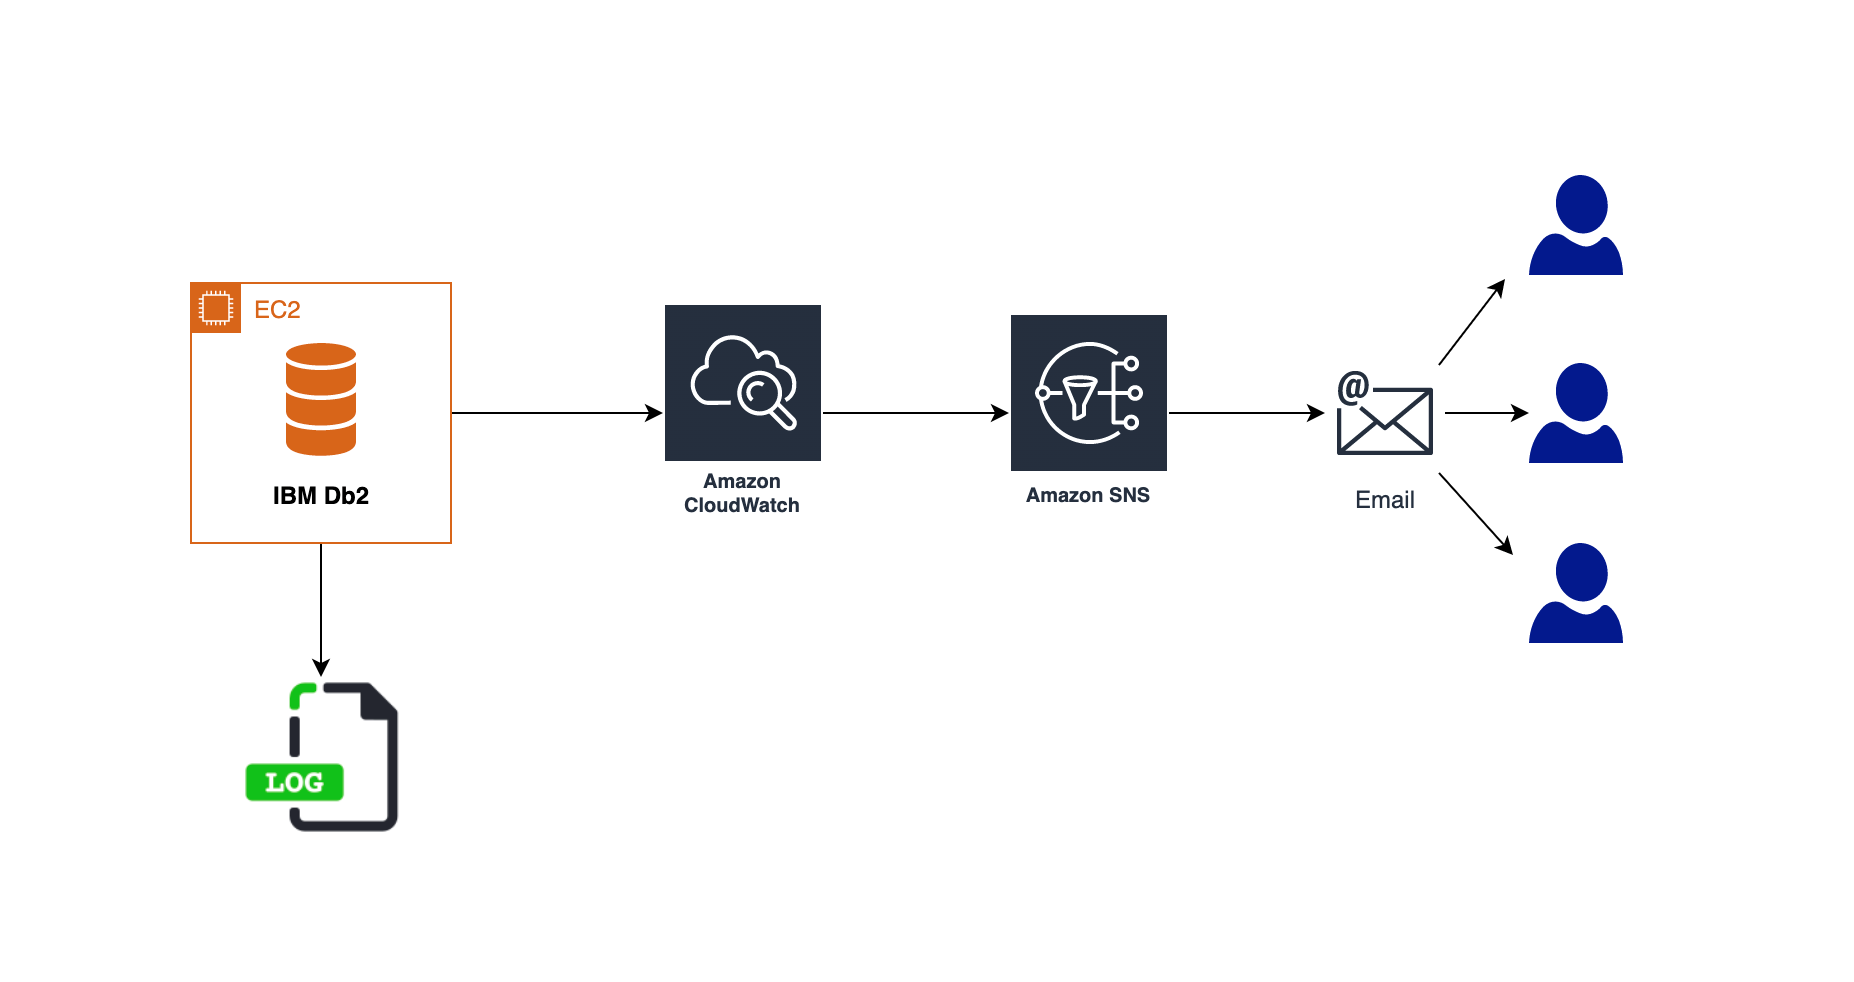
In this post, we show an overview of active/passive cross-Region disaster recovery options for the Db2 database on Amazon Elastic Compute Cloud (Amazon EC2). This solution uses native Db2 features and AWS services such as Amazon Simple Storage Service (Amazon S3), Amazon Elastic File System (Amazon EFS), and Amazon VPC Peering connection.

Approach 1: Db2 log shipping

In this approach, the transactional log files produced by the primary database are made available to the standby database via a log archive location. The transaction logs from the archive location can be replayed on the standby database by manually applying the Rollforward command, or by setting up user exit programs.

We can use Amazon S3 or Amazon EFS as the log archive location to share the logs with the standby database hosted in a secondary AWS Region.

Using Amazon S3:

Starting Db2 11.5.7, we can specify DB2REMOTE Amazon S3 storage for LOGARCHMETH1 and LOGARCHMETH2 database log archive method configuration parameters. This enables us to archive/retrieve transaction logs to/from Amazon S3.

In Figure 2, we enable Amazon S3 Cross-Region Replication (CRR) between the S3 buckets in the primary and the DR AWS Regions. This permits the transaction logs to be replicated into the S3 bucket in the DR Region.

We set up an AWS Lambda function to tell AWS Systems Manager (SSM) to run a command document. This document runs a bash script containing Rollforward command on the standby database instance. The Lambda function can be invoked based on the S3 bucket events in the DR Region.

Figure 2. Db2 log shipping using S3 Cross-Region Replication

Figure 2. Db2 log shipping using S3 Cross-Region Replication

This approach works as follows:

  • The transactions are committed and the active transaction log files gets closed on the primary database. It then marks the log file as ready for archive into the destination (the S3 bucket.)
  • The database asynchronously archives the log files into the S3 bucket archive location in the primary Region. This gets replicated to the S3 bucket in the DR Region.
  • This S3 event in the DR Region will initiate an AWS Lambda function to apply the Rollforward database operation on the standby database.
  • Db2 pulls the logs from the S3 bucket in the DR Region and applies them to the standby database.
  • When the primary Region is unavailable, initiate failover manually or by using scripts on the standby database. Use the Rollforward command so that the database can replay up to the end of logs and stop and be ready to accept client connections.

Using Amazon EFS:

In this approach, we configure the database parameter LOGARCHMETH1 with Amazon EFS as an archive location for transaction logs using the DISK option. It will push the transaction logs to a directory on Amazon EFS.

As shown in Figure 3, we configure a Replication for Amazon EFS to automatically replicate the database archive logs to the EFS in the DR Region. This can be mounted on the standby database.

Figure 3. Db2 log shipping using Amazon EFS replication

Figure 3. Db2 log shipping using Amazon EFS replication

This approach replicates transaction logs to EFS. We can schedule a script for every few minutes that runs the Rollforward command to replay the logs on the standby database.

Alternatively, we can use the user exit programs provided along with the Db2 installation. This automatically applies the logs with the log archive method LOGARCHMETH1 with the parameter value set to USEREXIT.

This approach has the following advantages:

  1. Straightforward setup, with minimal database configurations.
  2. This can be a DR option for multi-partitioned database environments or environments where federation is set up with two-phase commit for federated transactions.
  3. Bulk load operations on the primary database can be replayed on standby by sharing the load image using EFS.
  4. Rollforward operation progress can be checked on standby using monitoring commands.

Limitations of this approach are as follows:

  1. We cannot connect to the standby database to offload read-only workloads as the database will be in Rollforward recovery mode.
  2. We must write custom scripts like Lambda, user exit programs, or bash scripts to replay the logs on the standby database.
  3. Non-logged operations, such as database configuration parameters or nonrecoverable bulk data loads, are not replayed on standby database.
  4. Automated failover to standby is not possible.

Approach 2: Db2 highly available and disaster recovery (HADR) auxiliary standby

In this approach, we set up Db2 Highly Available and Disaster Recovery (HADR) to deploy an auxiliary Db2 standby database in a secondary or DR AWS Region.

The architecture for this approach is shown in Figure 4, and works as follows:

  • We establish TCP/IP connectivity between the primary and auxiliary Db2 standby database using Amazon VPC Peering connection.
  • Any transaction written on the primary Db2 database is committed without waiting for replication onto the auxiliary standby database.
  • Replicated transactions are replayed on the auxiliary standby database, which connects with the primary database in a remote catchup state.
  • When the primary AWS Region is unavailable, promote standby database to primary using the takeover commands manually.
Figure 4. Db2 HADR with auxiliary standby database

Figure 4. Db2 HADR with auxiliary standby database

This approach has the following advantages:

  1. The replication is handled by the database automatically without the need for custom scripts.
  2. We can enable reads on standby to offload read-only workload, such as reporting from the primary database to stand by. This will reduce the load on the primary database.
  3. Key metrics such as replication lag, connection status, and errors can be monitored from the primary database.

Limitations of this approach are as follows:

  1. Non-logged operations, such as database configuration parameters or nonrecoverable bulk data loads are not replayed on the standby database.
  2. This approach is not supported in a multi-partitioned database environment or two phase commit federated transactions.
  3. Automated failover to standby is not possible.
  4. There are various other restrictions, which must be evaluated.

Conclusion

In this post, we discussed how to set up a disaster recovery Db2 database using database native features and AWS services. We discussed the advantages and restrictions for each. You can use this post as a reference for setting up the right disaster recovery approach for your database to minimize data loss and maintain business continuity. Let us know your comments, we always love your feedback!

For further reading:

Field Notes: Monitor IBM Db2 for Errors Using Amazon CloudWatch and Send Notifications Using Amazon SNS

Post Syndicated from Sai Parthasaradhi original https://aws.amazon.com/blogs/architecture/field-notes-monitor-ibm-db2-for-errors-using-amazon-cloudwatch-and-send-notifications-using-amazon-sns/

Monitoring a is crucial function to be able to detect any unanticipated or unknown access to your data in an IBM Db2 database running on AWS.  You also need to monitor any specific errors which might have an impact on the system stability and get notified immediately in case such an event occurs. Depending on the severity of the events, either manual or automatic intervention is needed to avoid issues.

While it is possible to access the database logs directly from the Amazon EC2 instances on which the database is running, you may need additional privilege to access the instance, in a production environment. Also, you need to write custom scripts to extract the required information from the logs and share with the relevant team members.

In this post, we use Amazon CloudWatch log Agent to export the logs to Amazon CloudWatch Logs and monitor the errors and activities in the Db2 database. We provide email notifications for the configured metric alerts which may need attention using Amazon Simple Notification Service (Amazon SNS).

Overview of solution

This solution covers the steps to configure a Db2 Audit policy on the database to capture the SQL statements which are being run on a particular table. This is followed by installing and configuring Amazon CloudWatch log Agent to export the logs to Amazon CloudWatch Logs. We set up metric filters to identify any suspicious activity on the table like unauthorized access from a user or permissions being granted on the table to any unauthorized user. We then use Amazon Simple Notification Service (Amazon SNS) to notify of events needing attention.

Similarly, we set up the notifications in case of any critical errors in the Db2 database by exporting the Db2 Diagnostics Logs to Amazon CloudWatch Logs.

Solution Architecture diagram

Figure 1 – Solution Architecture

Prerequisites

You should have the following prerequisites:

  • Ensure you have access to the AWS console and CloudWatch
  • Db2 database running on Amazon EC2 Linux instance. Refer to the Db2 Installation methods from the IBM documentation for more details.
  • A valid email address for notifications
  • A SQL client or Db2 Command Line Processor (CLP) to access the database
  • Amazon CloudWatch Logs agent installed on the EC2 instances

Refer to the Installing CloudWatch Agent documentation and install the agent. The setup shown in this post is based on a RedHat Linux operating system.  You can run the following commands as a root user to install the agent on the EC2 instance, if your OS is also based on the RedHat Linux operating system.

cd /tmp
wget https://s3.amazonaws.com/amazoncloudwatch-agent/redhat/amd64/latest/amazon-cloudwatch-agent.rpm
sudo rpm -U ./amazon-cloudwatch-agent.rpm
  • Create an IAM role with policy CloudWatchAgentServerPolicy.

This IAM role/policy is required to run CloudWatch agent on EC2 instance. Refer to the documentation CloudWatch Agent IAM Role for more details. Once the role is created, attach it to the EC2 instance profile.

Setting up a Database audit

In this section, we set up and activate the db2 audit at the database level. In order to run the db2audit command, the user running it needs SYSADM authority on the database.

First, let’s configure the path to store an active audit log where the main audit file will be created, and archive path where it will be archived using the following commands.

db2audit configure datapath /home/db2inst1/dbaudit/active/
db2audit configure archivepath /home/db2inst1/dbaudit/archive/

Now, let’s set up the static configuration audit_buf_sz size to write the audit records asynchronously in 64 4K pages. This will ensure that the statement generating the corresponding audit record does not wait until the record is written to disk.

db2 update dbm cfg using audit_buf_sz 64

Now, create an audit policy on the WORKER table, which contains sensitive employee data to log all the SQL statements being executed against the table and attach the policy to the table as follows.

db2 connect to testdb
db2 "create audit policy worktabpol categories execute status both error type audit"
db2 "audit table sample.worker using policy worktabpol"

Finally, create an audit policy to audit and log the SQL queries run by the admin user authorities. Attach this policy to dbadm, sysadm and secadm authorities as follows.

db2 "create audit policy adminpol categories execute status both,sysadmin status both error type audit"
db2 "audit dbadm,sysadm,secadm using policy adminpol"
db2 terminate

The following SQL statement can be issued to verify if the policies are created and attached to the WORKER table and the admin authorities properly.

db2 "select trim(substr(p.AUDITPOLICYNAME,1,10)) AUDITPOLICYNAME, EXECUTESTATUS, ERRORTYPE,substr(OBJECTSCHEMA,1,10) as OBJECTSCHEMA, substr(OBJECTNAME,1,10) as OBJECTNAME from SYSCAT.AUDITPOLICIES p,SYSCAT.AUDITUSE u where p.AUDITPOLICYNAME=u.AUDITPOLICYNAME and p.AUDITPOLICYNAME in ('WORKTABPOL','ADMINPOL')"
Figure 2. Audit policy setup in the database

Figure 2. Audit policy setup in the database

Once the audit setup is complete, you need to extract the details into a readable file. This contains all the execution logs whenever the WORKER table is accessed by any user from any SQL statement. You can run the following bash script periodically using CRON scheduler. This identifies events where the WORKER table is being accessed as part of any SQL statement by any user to populate worker_audit.log file which will be in a readable format.

#!/bin/bash
. /home/db2inst1/sqllib/db2profile
cd /home/db2inst1/dbaudit/archive
db2audit flush
db2audit archive database testdb
if ls db2audit.db.TESTDB.log* 1> /dev/null 2>&1; then
latest_audit=`ls db2audit.db.TESTDB.log* | tail -1`
db2audit extract file worker_audit.log from files $latest_audit
rm -f db2audit.db.TESTDB.log*
fi

Publish database audit and diagnostics Logs to CloudWatch Logs

The CloudWatch Log agent uses a JSON configuration file located at /opt/aws/amazon-cloudwatch-agent/bin/config.json. You can edit the JSON configuration as a root user and provide the following configuration details manually.  For more information, refer to the CloudWatch Agent configuration file documentation. Based on the setup in your environment, modify the file_path location in the following configuration along with any custom values for the log group and log stream names which you specify.

{
     "agent": {
         "run_as_user": "root"
     },
     "logs": {
         "logs_collected": {
             "files": {
                 "collect_list": [
                     {
                         "file_path": "/home/db2inst1/dbaudit/archive/worker_audit.log",
                         "log_group_name": "db2-db-worker-audit-log",
                         "log_stream_name": "Db2 - {instance_id}"
                     },
                   {
                       "file_path": "/home/db2inst1/sqllib/db2dump/DIAG0000/db2diag.log",
                       "log_group_name": "db2-diagnostics-logs",
                       "log_stream_name": "Db2 - {instance_id}"
                   }
                 ]
             }
         }
     }
 }

This configuration specifies the file path which needs to be published to CloudWatch Logs along with the CloudWatch Logs group and stream name details as provided in the file. We publish the audit log which was created earlier as well as the Db2 Diagnostics log which gets generated on the Db2 server, generally used to troubleshoot database issues. Based on the config file setup, we publish the worker audit log file with log group name db2-db-worker-audit-log and the Db2 diagnostics log with db2-diagnostics-logs log group name respectively.

You can now run the following command to start the CloudWatch Log agent which was installed on the EC2 instance as part of the Prerequisites.

sudo /opt/aws/amazon-cloudwatch-agent/bin/amazon-cloudwatch-agent-ctl -a fetch-config -m ec2 -c file:/opt/aws/amazon-cloudwatch-agent/bin/config.json -s

Create SNS Topic and subscription

To create an SNS topic, complete the following steps:

  • On the Amazon SNS console, choose Topics in the navigation pane.
  • Choose Create topic.
  • For Type, select Standard.
  • Provide the Topic name and other necessary details as per your requirements.
  • Choose Create topic.

After you create your SNS topic, you can create a subscription. Following are the steps to create the subscription.

  • On the Amazon SNS console, choose Subscriptions in the navigation pane.
  • Choose Create subscription.
  • For Topic ARN, choose the SNS topic you created earlier.
  • For Protocol, choose Email. Other options are available, but for this post we create an email notification.
  • For Endpoint, enter the email address to receive event notifications.
  • Choose Create subscription. Refer to the following screenshot for an example:
Figure 3. Create SNS subscription

Figure 3. Create SNS subscription

Create metric filters and CloudWatch alarm

You can use a metric filter in CloudWatch to create a new metric in a custom namespace based on a filter pattern.  Create a metric filter for db2-db-worker-audit-log log using the following steps.

To create a metric filter for the db2-db-worker-audit-log log stream:

  • On the CloudWatch console, under CloudWatch Logs, choose Log groups.
  • Select the Log group db2-db-worker-audit-log.
  • Choose Create metric filter from the Actions drop down as shown in the following screenshot.
Figure 4. Create Metric filter

Figure 4. Create Metric filter

  • For Filter pattern, enter “worker – appusr” to filter any user access on the WORKER table in the database except the authorized user appusr.

This means that only appusr user is allowed to query WORKER table to access the data. If there is an attempt to grant permissions on the table to any other user or access is being attempted by any other user, these actions are monitored. Choose Next to navigate to Assign metric step as shown in the following screenshot.

Figure 5. Define Metric filter

Figure 5. Define Metric filter

  • Enter Filter name, Metric namespace, Metric name and Metric value as provided and choose Next as shown in the following screenshot.
Figure 6. Assign Metric

Figure 6. Assign Metric

  • Choose Create Metric Filter from the next page.
  • Now, select the new Metric filter you just created from the Metric filters tab and choose Create alarm as shown in the following screenshot.
Figure 7. Create alarm

Figure 7. Create alarm

  • Choose Minimum under Statistic, Period as per your choice, say 10 seconds and Threshold value as 0 as shown in the following screenshot.
Figure 8. Configure actions

Figure 8. Configure actions

  • Choose Next and under Notification screen. select In Alarm under Alarm state trigger option.
  • Under Send a notification to search box, select the SNS Topic you have created earlier to send notifications and choose Next.
  • Enter the Filter name and choose Next and then finally choose Create alarm.

To create metric filter for db2-diagnostics-logs log stream:

Follow the same steps as earlier to create the Metric filter and alarm for the CloudWatch Log group db2-diagnostics-logs. While creating the Metric filter, enter the Filter pattern “?Error?Severe” to monitor Log level that are ‘Error’ or ‘Severe’ in nature from the diagnostics file and get notified during such events.

Testing the solution

Let’s test the solution by running a few commands and validate if notifications are being sent appropriately.

To test audit notifications, run the following grant statement against the WORKER table as system admin user or database admin user or the security admin user, depending on the user authorization setup in your environment. For this post, we use db2inst1 (system admin) to run the commands. Since the WORKER table has sensitive data, the DBA does not issue grants against the table to any other user apart from the authorized appusr user.

Alternatively, you can also issue a SELECT SQL statement against the WORKER table from any user other than appusr for testing.

db2 "grant select on table sample.worker to user abcuser, role trole"
Figure 9. Email notification for audit monitoring

Figure 9. Email notification for audit monitoring

To test error notifications, we can simulate db2 database manager failure by issuing db2_kill from the instance owner login.

Figure 10. Issue db2_kill on the database server

Figure 10. Issue db2_kill on the database server

Figure 11. Email notification for error monitoring

Figure 11. Email notification for error monitoring

Clean up

Shut down the Amazon EC2 instance which was created as part of the setup outlined in this blog post to avoid any incurring future charges.

Conclusion

In this post, we showed you how to set up Db2 database auditing on AWS and set up metric alerts and alarms to get notified in case of any unknown access or unauthorized actions. We used the audit logs and monitor errors from Db2 diagnostics logs by publishing to CloudWatch Logs.

If you have a good understanding on specific error patterns in your system, you can use the solution to filter out specific errors and get notified to take the necessary action. Let us know if you have any comments or questions. We value your feedback!

Field Notes provides hands-on technical guidance from AWS Solutions Architects, consultants, and technical account managers, based on their experiences in the field solving real-world business problems for customers.

Field Notes: Set Up a Highly Available Database on AWS with IBM Db2 Pacemaker

Post Syndicated from Sai Parthasaradhi original https://aws.amazon.com/blogs/architecture/field-notes-set-up-a-highly-available-database-on-aws-with-ibm-db2-pacemaker/

Many AWS customers need to run mission-critical workloads—like traffic control system, online booking system, and so forth—using the IBM Db2 LUW database server. Typically, these workloads require the right high availability (HA) solution to make sure that the database is available in the event of a host or Availability Zone failure.

This HA solution for the Db2 LUW database with automatic failover is managed using IBM Tivoli System Automation for Multiplatforms (Tivoli SA MP) technology with IBM Db2 high availability instance configuration utility (db2haicu). However, this solution is not supported on AWS Cloud deployment because the automatic failover may not work as expected.

In this blog post, we will go through the steps to set up an HA two-host Db2 cluster with automatic failover managed by IBM Db2 Pacemaker with quorum device setup on a third EC2 instance. We will also set up an overlay IP as a virtual IP pointing to a primary instance initially. This instance is used for client connections and in case of failover, the overlay IP will automatically point to a new primary instance.

IBM Db2 Pacemaker is an HA cluster manager software integrated with Db2 Advanced Edition and Standard Edition on Linux (RHEL 8.1 and SLES 15). Pacemaker can provide HA and disaster recovery capabilities on AWS, and an alternative to Tivoli SA MP technology.

Note: The IBM Db2 v11.5.5 database server implemented in this blog post is a fully featured 90-day trial version. After the trial period ends, you can select the required Db2 edition when purchasing and installing the associated license files. Advanced Edition and Standard Edition are supported by this implementation.

Overview of solution

For this solution, we will go through the steps to install and configure IBM Db2 Pacemaker along with overlay IP as virtual IP for the clients to connect to the database. This blog post also includes prerequisites, and installation and configuration instructions to achieve an HA Db2 database on Amazon Elastic Compute Cloud (Amazon EC2).

Figure 1. Cluster management using IBM Db2 Pacemaker

Prerequisites for installing Db2 Pacemaker

To set up IBM Db2 Pacemaker on a two-node HADR (high availability disaster recovery) cluster, the following prerequisites must be met.

  • Set up instance user ID and group ID.

Instance user id and group id’s must be set up as part of Db2 Server installation which can be verified as follows:

grep db2iadm1 /etc/group
grep db2inst1 /etc/group

  • Set up host names for all the hosts in /etc/hosts file on all the hosts in the cluster.

For both of the hosts in the HADR cluster, ensure that the host names are set up as follows.

Format: ipaddress fully_qualified_domain_name alias

  • Install kornshell (ksh) on both of the hosts.

sudo yum install ksh -y

  • Ensure that all instances have TCP/IP connectivity between their ethernet network interfaces.
  • Enable password less secure shell (ssh) for the root and instance user IDs across both instances.After the password less root ssh is enabled, verify it using the “ssh <host name> -l root ls” command (hostname is either an alias or fully-qualified domain name).

ssh <host name> -l root ls

  • Activate HADR for the Db2 database cluster.
  • Make available the IBM Db2 Pacemaker binaries in the /tmp folder on both hosts for installation. The binaries can be downloaded from IBM download location (login required).

Installation steps

After completing all prerequisites, run the following command to install IBM Db2 Pacemaker on both primary and standby hosts as root user.

cd /tmp
tar -zxf Db2_v11.5.5.0_Pacemaker_20201118_RHEL8.1_x86_64.tar.gz
cd Db2_v11.5.5.0_Pacemaker_20201118_RHEL8.1_x86_64/RPMS/

dnf install https://dl.fedoraproject.org/pub/epel/epel-release-latest-8.noarch.rpm -y
dnf install */*.rpm -y

cp /tmp/Db2_v11.5.5.0_Pacemaker_20201118_RHEL8.1_x86_64/Db2/db2cm /home/db2inst1/sqllib/adm

chmod 755 /home/db2inst1/sqllib/adm/db2cm

Run the following command by replacing the -host parameter value with the alias name you set up in prerequisites.

/home/db2inst1/sqllib/adm/db2cm -copy_resources
/tmp/Db2_v11.5.5.0_Pacemaker_20201118_RHEL8.1_x86_64/Db2agents -host <host>

After the installation is complete, verify that all required resources are created as shown in Figure 2.

ls -alL /usr/lib/ocf/resource.d/heartbeat/db2*

Figure 2. List of heartbeat resources

Configuring Pacemaker

After the IBM Db2 Pacemaker is installed on both primary and standby hosts, initiate the following configuration commands from only one of the hosts (either primary or standby hosts) as root user.

  1. Create the cluster using db2cm utility.Create the Pacemaker cluster using db2cm utility using the following command. Before running the command, replace the -domain and -host values appropriately.

/home/db2inst1/sqllib/adm/db2cm -create -cluster -domain <anydomainname> -publicEthernet eth0 -host <primary host alias> -publicEthernet eth0 -host <standby host alias>

Note: Run ifconfig to get the –publicEthernet value and replace in the former command.

  1. Create instance resource model using the following commands.Modify -instance and -host parameter values in the following command before running.

/home/db2inst1/sqllib/adm/db2cm -create -instance db2inst1 -host <primary host alias>
/home/db2inst1/sqllib/adm/db2cm -create -instance db2inst1 -host <standby host alias>

  1. Create the database instance using db2cm utility. Modify -db parameter value accordingly.

/home/db2inst1/sqllib/adm/db2cm -create -db TESTDB -instance db2inst1

After configuring Pacemaker, run crm status command from both the primary and standby hosts to check if the Pacemaker is running with automatic failover activated.

Figure 3. Pacemaker cluster status

Quorum device setup

Next, we shall set up a third lightweight EC2 instance that will act as a quorum device (QDevice) which will act as a tie breaker avoiding a potential split-brain scenario. We need to install only corsync-qnetd* package from the Db2 Pacemaker cluster software.

Prerequisites (quorum device setup)

  1. Update /etc/hosts file on Db2 primary and standby instances to include the host details of QDevice EC2 instance.
  2. Set up password less root ssh access between Db2 instances and the QDevice instance.
  3. Ensure TCP/IP connectivity between the Db2 instances and the QDevice instance on port 5403.

Steps to set up quorum device

Run the following commands on the quorum device EC2 instance.

cd /tmp
tar -zxf Db2_v11.5.5.0_Pacemaker_20201118_RHEL8.1_x86_64.tar.gz
cd Db2_v11.5.5.0_Pacemaker_20201118_RHEL8.1_x86_64/RPMS/
dnf install */corosync-qnetd* -y

  1. Run the following command from one of the Db2 instances to join the quorum device to the cluster by replacing the QDevice value appropriately.

/home/db2inst1/sqllib/adm/db2cm -create -qdevice <hostnameofqdevice>

  1. Verify the setup using the following commands.

From any Db2 servers:

/home/db2inst1/sqllib/adm/db2cm -list

From QDevice instance:

corosync-qnetd-tool -l

Figure 4. Quorum device status

Setting up overlay IP as virtual IP

For HADR activated databases, virtual IP provides a common connection point for the clients so that in case of failovers there is no need to update the connection strings with the actual IP address of the hosts. Furtermore, the clients can continue to establish the connection to the new primary instance.

We can use the overlay IP address routing on AWS to send the network traffic to HADR database servers within Amazon Virtual Private Cloud (Amazon VPC) using a route table so that the clients can connect to the database using the overlay IP from the same VPC (any Availability Zone) where the database exists. aws-vpc-move-ip is a resource agent from AWS which is available along with the Pacemaker software that helps to update the route table of the VPC.

If you need to connect to the database using overlay IP from on-premises or outside of the VPC (different VPC than database servers), then additional setup is needed using either AWS Transit Gateway or Network Load Balancer.

Prerequisites (setting up overlay IP as virtual IP)

  • Choose the overlay IP address range which needs to be configured. This IP should not be used anywhere in the VPC or on-premises, and should be a part of the private IP address range as defined in RFC 1918. If the VPC is configured in the range of 0.0.0.0/8 or 172.16.0.0/12, we can use the overlay IP from the range of 192.168.0.0/16.We will use the following IP and ethernet settings.

192.168.1.81/32
eth0

  • To route traffic through overlay IP, we need to disable source and target destination checks on the primary and standby EC2 instances.

aws ec2 modify-instance-attribute –profile <AWS CLI profile> –instance-id EC2-instance-id –no-source-dest-check

Steps to configure overlay IP

The following commands can be run as root user on the primary instance.

  1. Create the following AWS Identity and Access Management (IAM) policy and attach it to the instance profile. Update region, account_id, and routetableid values.
{
  "Version": "2012-10-17",
  "Statement": [
    {
      "Sid": "Stmt0",
      "Effect": "Allow",
      "Action": "ec2:ReplaceRoute",
      "Resource": "arn:aws:ec2:<region>:<account_id>:route-table/<routetableid>"
    },
    {
      "Sid": "Stmt1",
      "Effect": "Allow",
      "Action": "ec2:DescribeRouteTables",
      "Resource": "*"
    }
  ]
}
  1. Add the overlay IP on the primary instance.

ip address add 192.168.1.81/32 dev eth0

  1. Update the route table (used in Step 1) with the overlay IP specifying the node with the Db2 primary instance. The following command returns True.

aws ec2 create-route –route-table-id <routetableid> –destination-cidr-block 192.168.1.81/32 –instance-id <primrydb2instanceid>

  1. Create a file overlayip.txt with the following command to create the resource manager for overlay ip.

overlayip.txt

primitive db2_db2inst1_db2inst1_TESTDB_AWS_primary-OIP ocf:heartbeat:aws-vpc-move-ip \
  params ip=192.168.1.81 routing_table=<routetableid> interface=<ethernet> profile=<AWS CLI profile name> \
  op start interval=0 timeout=180s \
  op stop interval=0 timeout=180s \
  op monitor interval=30s timeout=60s

eifcolocation db2_db2inst1_db2inst1_TESTDB_AWS_primary-colocation inf:

db2_db2inst1_db2inst1_TESTDB_AWS_primary-OIP:Started
db2_db2inst1_db2inst1_TESTDB-clone:Master

order order-rule-db2_db2inst1_db2inst1_TESTDB-then-primary-oip Mandatory:

db2_db2inst1_db2inst1_TESTDB-clone db2_db2inst1_db2inst1_TESTDB_AWS_primary-OIP
location prefer-node1_db2_db2inst1_db2inst1_TESTDB_AWS_primary-OIP

db2_db2inst1_db2inst1_TESTDB_AWS_primary-OIP 100: <primaryhostname>
location prefer-node2_db2_db2inst1_db2inst1_TESTDB_AWS_primary-OIP

db2_db2inst1_db2inst1_TESTDB_AWS_primary-OIP 100: <standbyhostname>

The following parameters must be replaced in the resource manager create command in the file.

    • Name of the database resource agent (This can be found through crm config show | grep primitive | grep DBNAME command. For this example, we will use: db2_db2inst1_db2inst1_TESTDB)
    • Overlay IP address (created earlier)
    • Routing table ID (used earlier)
    • AWS command-line interface (CLI) profile name
    • Primary and standby host names
  1. After the file with commands is ready, run the following command to create the overlay IP resource manager.

crm configure load update overlayip.txt

  1. Next, create the VIP resource manager—not in managed state. Run the following command to manage and start the resource.

crm resource manage db2_db2inst1_db2inst1_TESTDB_AWS_primary-OIP

  1. Validate the setup with crm status command.

Figure 5. Pacemaker cluster status along with overlay IP resource

Test failover with client connectivity

For the purpose of this testing, launch another EC2 instance with Db2 client installed, and catalog the Db2 database server using overlay IP.

Figure 6. Database directory list

Establish a connection with the Db2 primary instance using the cataloged alias (created earlier) using overlay IP address.

Figure 7. Connect to database

If we connect to the primary instance and check the applications connected, we can see the active connection from the client’s IP as shown in Figure 8.

Check client connections before failover

Figure 8. Check client connections before failover

Next, let’s stop the primary Db2 instance and check if the Pacemaker cluster promoted the standby to primary and we can still connect to the database using the overlay IP, which now points to the new primary instance.

If we check the CRM status from the new primary instance, we can see that the Pacemaker cluster has promoted the standby database to new primary database as shown in Figure 9.

Figure 9. Automatic failover to standby

Let’s go back to our client and reestablish the connection using the cataloged DB alias created using overlay IP.

Figure 10. Database reconnection after failover

If we connect to the new promoted primary instance and check the applications connected, we can see the active connection from the client’s IP as shown in Figure 11.

Check client connections after failover

Figure 11. Check client connections after failover

Cleaning up

To avoid incurring future charges, terminate all EC2 instances which were created as part of the setup referencing this blog post.

Conclusion

In this blog post, we have set up automatic failover using IBM Db2 Pacemaker with overlay (virtual) IP to route traffic to secondary database instance during failover, which helps to reconnect to the database without any manual intervention. In addition, we can also enable automatic client reroute using the overlay IP address to achieve a seamless failover connectivity to the database for mission-critical workloads.

Field Notes provides hands-on technical guidance from AWS Solutions Architects, consultants, and technical account managers, based on their experiences in the field solving real-world business problems for customers.