All posts by Sébastien Stormacq

Amazon Connect – Now Smarter and More Integrated With Third-Party Tools

Post Syndicated from Sébastien Stormacq original https://aws.amazon.com/blogs/aws/amazon-connect-smarter-and-more-integrated/

We launched Amazon Connect in 2017 and, since then, thousands of customers have created their own contact centers in the cloud. Amazon Connect makes it easy for non-technical customers to design interaction flows, manage agents, and track performance metrics.

For example, when I book a Best Western hotel room in Europe by phone, the call is managed by Amazon Connect. In the UK, the Post Office went from ideation to production rollout in just three weeks. In France, WebHelp, a global leader in Business Process Outsourcing, activated thousands of workstations and remote agents in just 72 hours.

Since I last blogged about Amazon Connect, the team has been continuously listening for your feedback and, today, I am happy to announce a new set of capabilities to make Amazon Connect smarter and more integrated with third-party tools.

We are using Machine Learning (ML) to make Amazon Connect smarter at analyzing conversations in real time, finding relevant information needed by contact center agents, and authenticating customers by the sound of their voice. The second set of capabilities makes Amazon Connect easier to integrate with third party tools or services to present unified customer profile information to contact center agents, and to make it easier to manage their tasks.

Let’s go into the details, one by one.

Contact Lens Real Time
Contact Lens for Amazon Connect is a set of machine learning (ML) capabilities allowing contact center supervisors to better understand the sentiment, trends, and compliance of customer conversations. It was first announced during re:Invent 2019 and available since July 2020. It allows to effectively train agents, replicate successful interactions, and to identify crucial company and product feedback.

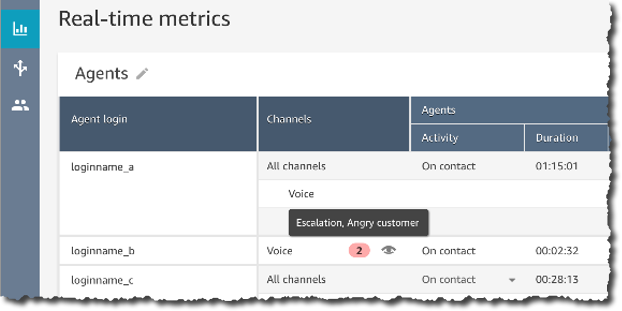
Starting today, you can get real-time insights into customer experience during the live calls, such as a customer expressing dissatisfaction. Customer experience analytics and alerts for live calls are delivered in Amazon Connect’s real-time metrics dashboard. It makes it easy for supervisors to identify when to listen-in on a critical call, and to provide guidance to the agent via chat, or have the agent transfer the call to them for assistance.

You, as the contact center manager, can define rules using specific terms such as “not happy,” “poor quality product,” and “cancel my subscription.” Contact Lens uses natural language processing (NLP) to perform intelligent matching to automatically detect variations of the spoken words even when the example phrases are limited.

Create Rules for real time analytics

Contact Lens analyzes in-progress calls in real time to detect when the rule criteria for a customer experience issue is met, and immediately creates an alert next to the live call in the Amazon Connect dashboard to notify supervisors of the situation.

Real Time alert based on rules

With this launch, we are adding 13 language variants to post-call analytics, in addition to the 5 already supported :English (United States), English (Great Britain), English (Australia), English (India), and Spanish (United States).

The new language variants for post-call analytics are: English (Ireland), English (Scotland), English (Wales), Spanish (Spain), French (Canada), French (France), Portuguese (Portugal), Portuguese (Brazil), German (Germany), German (Switzerland), Italian (Italy), Arabic (Gulf), and Hindi (India).

Contact Lens for Amazon Connect real-time is available in 4 language variants: English (United States), English (Great Britain), English (Australia), and Spanish (United States). More language variants will be added at later stage.

For more details visit this launch page.

Amazon Connect Wisdom (Preview)
Wisdom provides built-in agent assistance capabilities in Amazon Connect, including machine learning (ML) powered search and real-time recommendations, to quickly enable agents with relevant information for resolving customer issues.

As an agent, I can type questions or phrases in the Wisdom search box, without guessing what keyword I should use. Wisdom understands what information I am searching for. It surfaces results in the agent’s preferred Amazon Connect application, the web-based one we do provide, or the ones you built.

Amazon Connect Wisdom search results

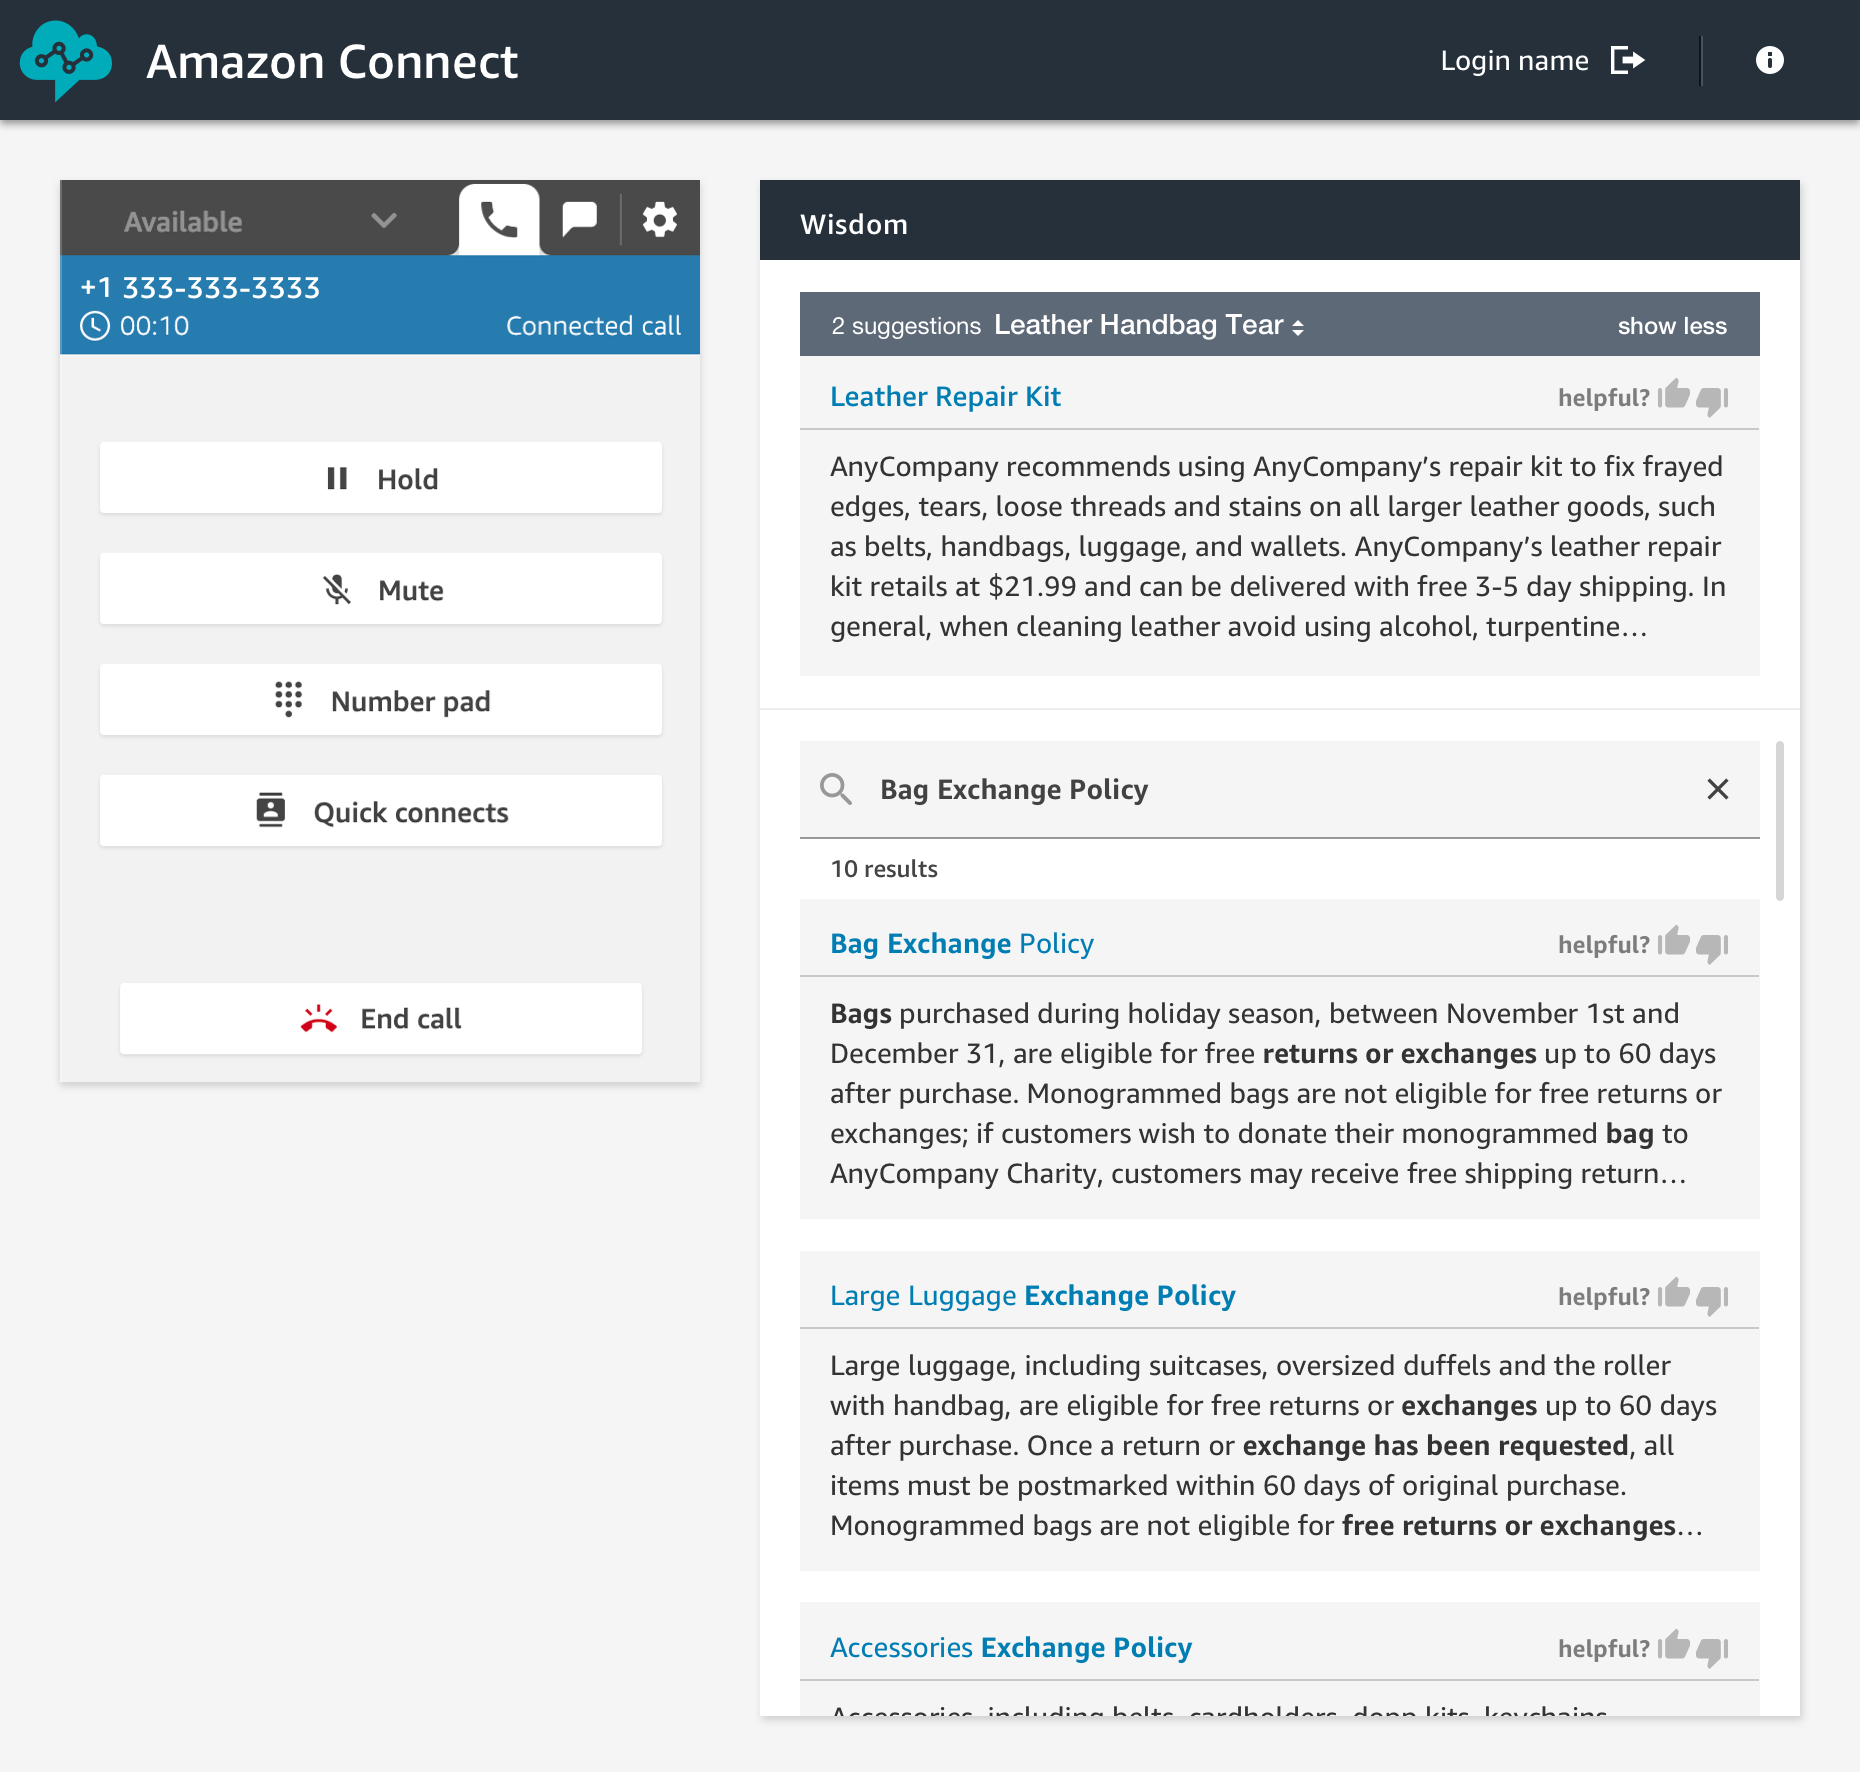
Wisdom comes with pre-built connectors to third-party knowledge repositories to provide most relevant results to agents. Wisdom includes connectors for Salesforce and ServiceNow during the preview, with more to come at launch.

Wisdom may use Contact Lens Real Time analytics to analyse the conversation in real-time. It detects the customer issue, finds related content in the connected repositories, and provides proactive recommendations to help the agent resolve it. For example, Wisdom can detect that a customer is talking about a problem with the handbag they bought last week, recommend an article that describes similar products defect, and provide instructions with a link to the order management application needed to initiate an exchange.

Wisdom is available in preview, you can signup today or visit the launch page.

Amazon Connect Voice ID (Preview)
Amazon Connect Voice ID provides real-time caller authentication which makes voice interactions in contact centers more secure and efficient.

To effectively recognise me as “Sébastien”, Voice ID must learn how I am talking. This is the enrolment phase. Then it compares the sound of my voice with the one enrolled earlier. This is the verification phase.

To meet with personal data protection laws, contact center agents capture my consent to use Voice ID.

During the enrolment phase, Voice ID listens to the call until it has captured 30 seconds of my voice. Then it creates my voiceprint, which uniquely authenticates me. A voiceprint is a mathematical representation that captures unique aspects of an individual’s voice such as speech rhythm, pitch, intonation, and loudness. I do not need to say or repeat any specific phrases to let Voice ID create my voiceprint. Voice ID provides an API that can be used to opt-out a customer.

When I call back in, Voice ID just needs 10 seconds of my voice to authenticate me. My voice can be captured as part of a typical interaction with the Interactive Voice Response (IVR) happening at the start of the call, or when I first start to talk with the agent. For example when I am answering questions, such as “what’s your first and last name?” and “what are you calling about?”, Voice ID uses this audio to generate my voiceprint again. It compares it with the one enrolled earlier. Voice ID then generates an authentication score depending on the confidence of the match. Contact center managers can use this score to create policies in Amazon Connect to let agents see a real-time result (“authenticated” or “not authenticated”) in their web-based application. Agents can then decide to proceed with the call or ask for additional authentication credentials.

Amazon Connect Voice ID is available in preview. You can signup today or visit this launch page.

Amazon Connect Customer Profiles
Customer Profiles is a unified profile for Amazon Connect that brings together customer information from disparate sources without having to build integrations or wrangle data.

Providing agents (or automatic IVR systems) with accurate and unified customer profile information at the right moment helps them to deliver better service to customers, and to resolve calls faster. Using Customer Profiles, agents must not navigate out of Amazon Connect, or switch between different applications to get the customer insights they need.

With just a few clicks, System Administrators can integrate customer profile data from applications like Salesforce, ServiceNow, Zendesk, and Marketo to build your own homegrown integration. Setting up connectors for Customer Profiles requires no programming or data integration expertise.

Once enabled, Customer Profiles automatically detects customer records from the applications. It matches and deduplicates them. This results in accurate and up-to-date profiles displayed to agents within their Connect web-based experience.

Amazon Connect Customer Profile

Learn more about Amazon Connect Customer Profile by visiting the launch page.

Amazon Connect Tasks
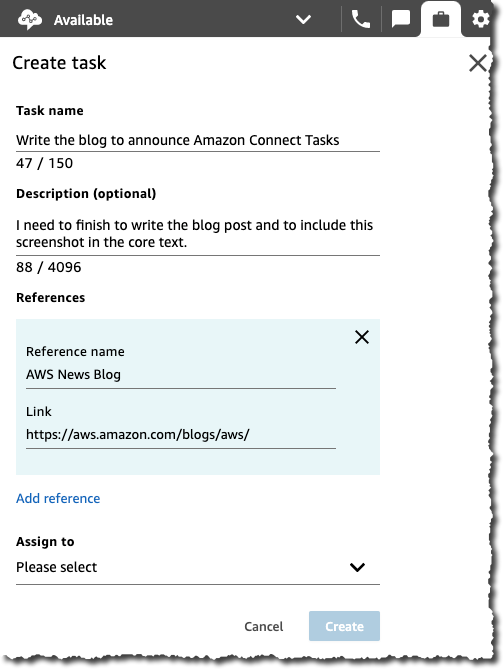
Amazon Connect Tasks makes it easy to automate, track, and manage contact center agent tasks. It provides a single place for contact center managers to prioritize, assign, and track customer service tasks across the disparate applications used by agents, so that they are focused on the highest priority work of any type.

Tasks can be sourced from third-party applications, such as a CRM solution, or to update a business-specific system. For example, you can programmatically create tasks for agents to follow-up on a customer case in a third party application like Salesforce, or complete an action item in a business-specific application, such as processing a claim in an insurance system. You can also automate tasks that dont require agent interaction, to ensure your agents spend more time focused on customers.

Using Amazon Connect tasks, agents no longer need to switch between applications to know what work should be completed, and with what priority. Agents can see all their assigned tasks right from the Amazon Connect contact control panel, the same web-based application they use to interact with customers over calls and chat. When a task is assigned, the agent receives a notification with the description of the task, and when required, links to any external applications needed to complete the action. Agents can also create tasks so that follow-up work is not forgotten, for example calling a customer back to provide a status update.

Amazon Connect Accept Tasks Amazon Connect View Task Create a task uisng Amazon Connect Tasks
Incoming Tasks Task Details Create a new Task

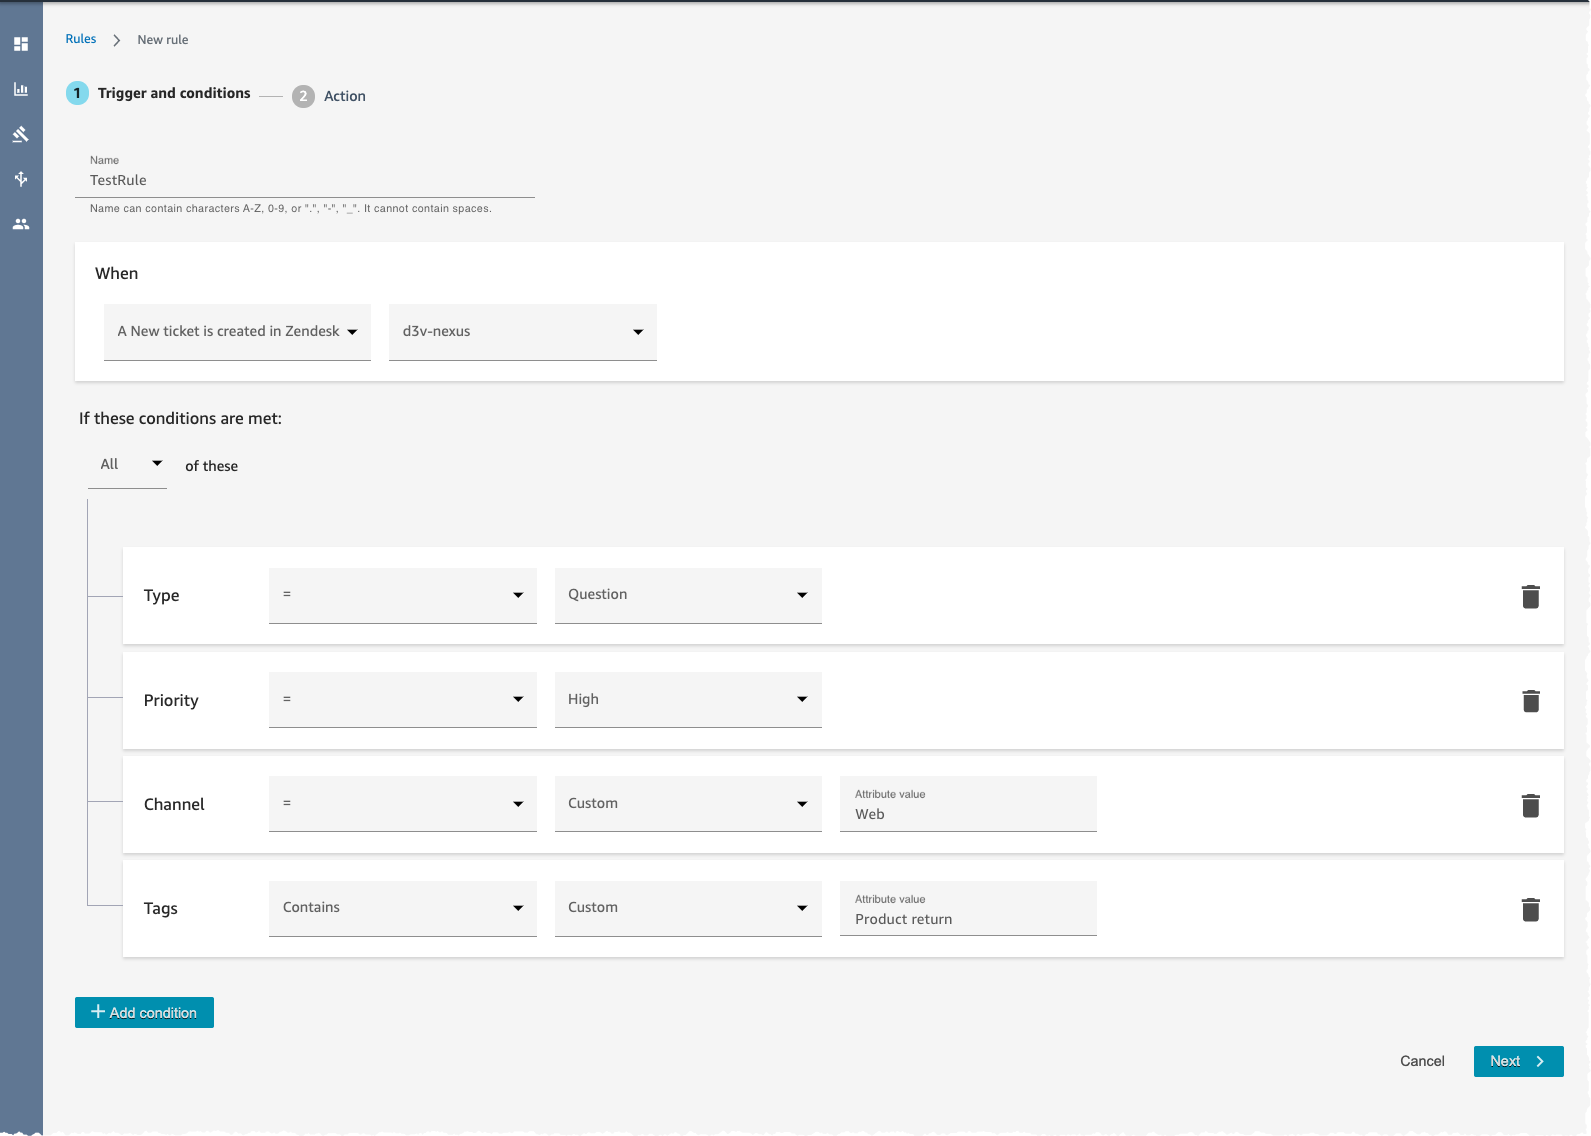
Amazon Connect Tasks provides pre-built connectors fo Salesforce and Zendesk. With just a few clicks, you can easily set up rules to automatically create tasks based on pre-defined conditions, as sown on the screenshot hereunder. It also provides an API to create tasks from any other application.

Amazon Connect Task Rules

Learn more about how to configure and to get started with Tasks by visiting the launch page.

Available Today
Three of these new capabilities are available today: Contact Lens Real Time, Customer Profiles, and Tasks. You must register to the preview program to test Wisdom and Voice ID.

Customer Profile and Tasks are available in all AWS Regions where Amazon Connect is available : US East (N. Virginia), US East (Ohio), US West (N. California), US West (Oregon), Asia Pacific (Sydney), Asia Pacific (Singapore), Asia Pacific (Tokyo), Europe (Frankfurt), and Europe (London). Contact Lens Real Time is available in US West (Oregon), US East (N. Virginia), and Asia Pacific (Sydney) at the moment. Wisdom is available in US East (N. Virginia) and US West (Oregon) during the preview, while Voice ID is available only in US West (Oregon) during the preview.

With Amazon Connect, you only pay for what you use. There are no required up-front payments, long-term commitments, or minimum monthly fees. The price metrics for these new capabilities are detailed on the Amazon Connect pricing page.

Should you need help adding Amazon Connect any of these capabilities to contact flows, please reach out to one of the dozens of Amazon Connect partners available worldwide.

— seb

New – Attributes Based Access Control with AWS Single Sign On

Post Syndicated from Sébastien Stormacq original https://aws.amazon.com/blogs/aws/new-attributes-based-access-control-with-aws-single-sign-on/

Starting today, you can pass user attributes in the AWS session when your workforce sign-in into the cloud using AWS Single Sign-On. This gives you the centralized account access management of AWS Single Sign-On and ABAC, with the flexibility to use AWS SSO, Active Directory, or an external identity provider as your identity source. To learn more about the advantages of ABAC policies on AWS, you may read my previous blog post on the subject.

Overview
On one side, system administrators configure user attributes on the AWS Single Sign-On identity repository, or the managed Active Directory. System administrators may also configure an external identity provider, such as Okta, OneLogin or PingFederate to pass existing user attributes in the AWS sessions when their workforce federates into AWS. These attributes are known as session tags in AWS. On the other side, cloud administrators create fine-grained permissions policies such that your workforce get only access to cloud resources with matching resource tags.

Creating policies based on matching attributes instead of functional roles helps to reduce the number of distinct permissions and roles you must create and manage in your AWS environment. For example, when developers Bob from team red and Alice from team blue sign-in into AWS and assume the same AWS Identity and Access Management (IAM) role, they get distinct permissions to project resources tagged for their team. The identity system sends the team name attribute in the AWS session when Bob and Alice sign-in into AWS. The role’s permissions grant access to project resources with matching team name tags. Now, if Bob moves to team blue and system administrators update his team name in their identity provider directory, Bob automatically gets access to team blue’s project resources without requiring permissions updates in IAM.

How to Configure AWS SSO to Map User Attributes
Before to configure AWS SSO, there are two important points to highlight. First, ABAC will work with attributes from any identity source configured in AWS SSO : AWS SSO itself, a managed Active Directory, or an external identity provider. Second, there are two ways to pass attributes for access control to AWS SSO. Either you can pass attributes directly in the SAML assertion using the prefix https://aws.amazon.com/SAML/Attributes/AccessControl, or you can use attributes that are in the AWS SSO identity store. Those attributes are configured by your AWS SSO administrator for users created in AWS SSO, synchronized in from an Active Directory, or synchronized in from an external identity provider using automatic provisioning (SCIM).

For this demo, I choose to use an external identity provider and SCIM.

I can enable ABAC in AWS using AWS SSO with three steps:

Step 1: I configure my identity source with the associated user identities and attributes in the external identity provider. As of today, AWS SSO supports identity synchronization via SCIM with Azure AD, Okta, OneLogin, and PingFederate. Check this page to get an up-to-date list. The specifics depend on each identity provider.

Step 2: I configure the SCIM attributes I want to use for access control using the new Access Control Attributes global setting in the AWS SSO console or API. This screen allows me to select attributes for access control from the identity source I configured in step 1.

Attributes for Access Control

Step 3: I author ABAC rules through permission sets and resource-based policies using the attributes I configured in Step 2. More about this in a minute.

Now, when my workforce federates into an AWS account using SSO, they get access to their AWS resources based on matching attributes.

Attributes are passed as session tags. They are passed as comma-separated key:value pairs. The total character length of all the attributes together must be less than or equal to 460 characters.

What Does a Policy Look Like?
I now can use user attributes in my permission sets using the aws:PrincipalTag condition key when creating access control rules. For example, I can tag all the resources in my organization with their respective department name, and use a single permission set that grants developers access only to their department resources. Now, whenever developers federate into the AWS account, AWS SSO creates a department session tag with the value received from the identity provider. The security policies allow them to only get access to the resources in their respective department. As the team adds more developers and resources to their project, I only have to tag resources with the correct department name. As a result, as the organization adds new resources and developers to departments, developers can only manage resources aligned to their department without needing any permission updates.

An ABAC SSO permission set policy might look like this:

{
    "Version": "2012-10-17",
    "Statement": [
        {
            "Effect": "Allow",
            "Action": [ "ec2:DescribeInstances"],
            "Resource": "*"
        },
        {
            "Effect": "Allow",
            "Action": ["ec2:StartInstances","ec2:StopInstances"],
            "Resource": "*",
            "Condition": {
                "StringEquals": {
                    "ec2:ResourceTag/Department": "${aws:PrincipalTag/Department}"
                }
            }
        }
    ]
}

This policy allows anybody to DescribeInstances, but only users with a aws:PrincipalTag/Department tag’s value matching the EC2 instance ec2:ResourceTag/Department tag’s value are authorized to stop or to start instances.

I attach this policy to an AWS Account’s Permission Set. On the left part of the AWS Single Sign-On console, I click AWS Accounts and select the Permission sets tab. Then I click Create permission set. On the next screen, I select Create a customer permission set.

Create a custom permission set

I enter a name and description, I make sure Create a custom permissions policy is selected. Then I can copy/paste the previous policy allowing to start and stop EC2 instances when the department name tag value is equal to the person’s department name tag value.

Create Custom Policy for Permission Set

On the next screen, I enter some tags, then I review my configuration before clicking Create. Et voila, I am ready to go.

If you have existing federation configured with AWS Security Token Service, remember that external identity providers consider AWS SSO as a new application configuration. This means when you move from direct IAM federation to AWS SSO, you have to update your external identity provider configuration to connect with AWS SSO and to introduce attributes as session tags for this configuration.

Available Today
There is no additional charge to configure user attributes with AWS Single Sign-On. You can start to use it today in all AWS Regions where AWS SSO is available.

— seb

New – Multi-Factor Authentication with WebAuthn for AWS SSO

Post Syndicated from Sébastien Stormacq original https://aws.amazon.com/blogs/aws/multi-factor-authentication-with-webauthn-for-aws-sso/

Starting today, you can add WebAuthn as a new multi-factor authentication (MFA) to AWS Single Sign-On, in addition to currently supported one-time password (OTP) and Radius authenticators. By adding support for WebAuthn, a W3C specification developed in coordination with FIDO Alliance, you can now authenticate with a wide variety of interoperable authenticators provisioned by your system administrator or built into your laptops or smartphones. For example, you can now tap a hardware security key, touch a fingerprint sensor on your Mac, or use facial recognition on your mobile device or PC to authenticate into the AWS Management Console or AWS Command Line Interface (CLI).

With this addition, you can now self-register multiple MFA authenticators. Doing so allows you to authenticate on AWS with another device in case you lose or misplace your primary authenticator device. We make it easy for you to name your devices for long-term manageability.

WebAuthn two-factor authentication is available for identities stored in the AWS Single Sign-On internal identity store and those stored in Microsoft Active Directory, whether it is managed by AWS or not.

What are WebAuthn and FIDO2?

Before exploring how to configure two-factor authentication using your FIDO2-enabled devices, and to discover the user experience for web-based and CLI authentications, let’s recap how FIDO2, WebAuthn and other specifications fit together.

FIDO2 is made of two core specifications: Web Authentication (WebAuthn) and Client To Authenticator Protocol (CTAP).

Web Authentication (WebAuthn) is a W3C standard that provides strong authentication based upon public key cryptography. Unlike traditional code generator tokens or apps using TOTP protocol, it does not require sharing a secret between the server and the client. Instead, it relies on a public key pair and digital signature of unique challenges. The private key never leaves a secured device, the FIDO-enabled authenticator. When you try to authenticate to a website, this secured device interacts with your browser using the CTAP protocol.

WebAuthn is strong: Authentication is ideally backed by a secure element, which can safely store private keys and perform the cryptographic operations. It is scoped: A key pair is only useful for a specific origin, like browser cookies. A key pair registered at console.amazonaws.com cannot be used at console.not-the-real-amazon.com, mitigating the threat of phishing. Finally, it is attested: Authenticators can provide a certificate that helps servers verify that the public key did in fact come from an authenticator they trust, and not a fraudulent source.

To start to use FIDO2 authentication, you therefore need three elements: a website that supports WebAuthn, a browser that supports WebAuthn and CTAP protocols, and a FIDO authenticator. Starting today, the SSO Management Console and CLI now support WebAuthn. All modern web browsers are compatible (Chrome, Edge, Firefox, and Safari). FIDO authenticators are either devices you can use from one device or another (roaming authenticators), such as a YubiKey, or built-in hardware supported by Android, iOS, iPadOS, Windows, Chrome OS, and macOS (platform authenticators).

How Does FIDO2 Work?
When I first register my FIDO-enabled authenticator on AWS SSO, the authenticator creates a new set of public key credentials that can be used to sign a challenge generated by AWS SSO Console (the relaying party). The public part of these new credentials, along with the signed challenge, are stored by AWS SSO.

When I want to use WebAuthn as second factor authentication, the AWS SSO console sends a challenge to my authenticator. This challenge can then be signed with the previously generated public key credentials and sent back to the console. This way, AWS SSO console can verify that I have the required credentials.

How Do I Enable MFA With a Secure Device in the AWS SSO Console?
You, the system administrator, can enable MFA for your AWS SSO workforce when the user profiles are stored in AWS SSO itself, or stored in your Active Directory, either self-managed or a AWS Directory Service for Microsoft Active Directory.

To let my workforce register their FIDO or U2F authenticator in self-service mode, I first navigate to Settings, click Configure under Multi-Factor Authentication. On the following screen, I make four changes. First, under Users should be prompted for MFA, I select Every time they sign in. Second, under Users can authenticate with these MFA types, I check Security Keys and built-in authenticators. Third, under If a user does not yet have a registered MFA device, I check Require them to register an MFA device at sign in. Finally, under Who can manage MFA devices, I check Users can add and manage their own MFA devices. I click on Save Changes to save and return.

Configure SSO 2

That’s it. Now your workforce is prompted to register their MFA device the next time they authenticate.

What Is the User Experience?
As an AWS console user, I authenticate on the AWS SSO portal page URL that I received from my System Administrator. I sign in using my user name and password, as usual. On the next screen, I am prompted to register my authenticator. I check Security Key as device type. To use a biometric factor such as fingerprints or face recognition, I would click Built-in authenticator.

Register MFA Device

The browser asks me to generate a key pair and to send my public key. I can do that just by touching a button on my device, or providing the registered biometric, e.g. TouchID or FaceID.Register a security keyThe browser does confirm and shows me a last screen where I have the possibility to give a friendly name to my device, so I can remember which one is which. Then I click Save and Done.Confirm device registrationFrom now on, every time I sign in, I am prompted to touch my security device or use biometric authentication on my smartphone or laptop. What happens behind the scene is the server sending a challenge to my browser. The browser sends the challenge to the security device. The security device uses my private key to sign the challenge and to return it to the server for verification. When the server validates the signature with my public key, I am granted access to the AWS Management Console.

Additional verification required

At any time, I can register additional devices and manage my registered devices. On the AWS SSO portal page, I click MFA devices on the top-right part of the screen.

MFA device management

I can see and manage the devices registered for my account, if any. I click Register device to register a new device.

How to Configure SSO for the AWS CLI?
Once my devices are configured, I can configure SSO on the AWS Command Line Interface (CLI).

I first configure CLI SSO with aws configure sso and I enter the SSO domain URL that I received from my system administrator. The CLI opens a browser where I can authenticate with my user name, password, and my second-factor authentication configured previously. The web console gives me a code that I enter back into the CLI prompt.aws configure sso

When I have access to multiple AWS Accounts, the CLI lists them and I choose the one I want to use. This is a one-time configuration.

Once this is done, I can use the aws CLI as usual, the SSO authentication happens automatically behind the scene. You are asked to re-authenticate from time to time, depending on the configuration set by your system administrator.

Available today
Just like AWS Single Sign-On, FIDO2 second-factor authentication is provided to you at no additional cost, and is available in all AWS Regions where AWS SSO is available.

As usual, we welcome your feedback. The team told me they are working on other features to offer you additional authentication options in the near future.

You can start to use FIDO2 as second factor authentication for AWS Single Sign-On today. Configure it now.

— seb

Lightsail Containers: An Easy Way to Run your Containers in the Cloud

Post Syndicated from Sébastien Stormacq original https://aws.amazon.com/blogs/aws/lightsail-containers-an-easy-way-to-run-your-containers-in-the-cloud/

When I am delivering an introduction to the AWS Cloud for developers, I usually spend a bit of time to mention and to demonstrate Amazon Lightsail. It is by far the easiest way to get started on AWS. It allows you to get your application running on your own virtual server in a matter of minutes. Today, we are adding the possibility to deploy your container-based workloads on Amazon Lightsail. You can now deploy your container images to the cloud with the same simplicity and the same bundled pricing Amazon Lightsail provides for your virtual servers.

Amazon Lightsail is an easy-to-use cloud service that offers you everything needed to deploy an application or website, for a cost effective and easy to understand monthly plan. It is ideal to deploy simple workloads, websites, or to get started with AWS. The typical Lightsail customers range from developers to small businesses or startups who are looking to get quickly started in the cloud and AWS. At any time, you can later adopt the broad AWS Services when you are getting more familiar with the AWS cloud.

Under the hood, Lightsail is powered by Amazon Elastic Compute Cloud (EC2), Amazon Relational Database Service (RDS), Application Load Balancer, and other AWS services. It offers the level of security, reliability, and scalability you are expecting from AWS.

When deploying to Lightsail, you can choose between six operating systems (4 Linux distributions, FreeBSD, or Windows), seven applications (such as WordPress, Drupal, Joomla, Plesk…), and seven stacks (such as Node.js, Lamp, GitLab, Django…). But what about Docker containers?

Starting today, Amazon Lightsail offers an simple way for developers to deploy their containers to the cloud. All you need to provide is a Docker image for your containers and we automatically containerize it for you. Amazon Lightsail gives you an HTTPS endpoint that is ready to serve your application running in the cloud container. It automatically sets up a load balanced TLS endpoint, and take care of the TLS certificate. It replaces unresponsive containers for you automatically, it assigns a DNS name to your endpoint, it maintains the old version till the new version is healthy and ready to go live, and more.

Let’s see how it works by deploying a simple Python web app as a container. I assume you have the AWS Command Line Interface (CLI) and Docker installed on your laptop. Python is not required, it will be installed in the container only.

I first create a Python REST API, using the Flask simple application framework. Any programming language and any framework that can run inside a container works too. I just choose Python and Flask because they are simple and elegant.

You can safely copy /paste the following commands:

mkdir helloworld-python
cd helloworld-python
# create a simple Flask application in helloworld.py
echo "

from flask import Flask, request
from flask_restful import Resource, Api

app = Flask(__name__)
api = Api(app)

class Greeting (Resource):
   def get(self):
      return { "message" : "Hello Flask API World!" }
api.add_resource(Greeting, '/') # Route_1

if __name__ == '__main__':
   app.run('0.0.0.0','8080')

"  > helloworld.py

Then I create a Dockerfile that contains the steps and information required to build the container image:

# create a Dockerfile
echo '
FROM python:3
ADD helloworld.py /
RUN pip install flask
RUN pip install flask_restful
EXPOSE 8080
CMD [ "python", "./helloworld.py"]
 '  > Dockerfile

Now I can build my container:

docker build -t lightsail-hello-world .

The build command outputs many lines while it builds the container, it eventually terminates with the following message (actual ID differs):

Successfully built 7848e055edff
Successfully tagged lightsail-hello-world:latest

I test the container by launching it on my laptop:

docker run -it --rm -p 8080:8080 lightsail-hello-world

and connect a browser to localhost:8080

Testing Flask API in the container

When I am satisfied with my app, I push the container to Docker Hub.

docker tag lightsail-hello-world sebsto/lightsail-hello-world
docker login
docker push sebsto/lightsail-hello-world

Now that I have a container ready on Docker Hub, let’s create a Lightsail Container Service.

I point my browser to the Amazon Lightsail console. I can see container services already deployed and I can manage them. To create a new service, I click Create container service:Lighsail Container Console

On the next screen, I select the size of the container I want to use, in terms of vCPU and memory available to my application. I also select the number of container instances I want to run in parallel for high availability or scalability reasons. I can change the number of container instances or their power (vCPU and RAM) at any time, without interrupting the service. Both these parameters impact the price AWS charges you per month. The price is indicated and dynamically adjusted on the screen, as shown on the following video.

Lightsail choose capacity

Slightly lower on the screen, I choose to skip the deployment for now. I give a name for the service (“hello-world“). I click Create container service.

Lightsail container name

Once the service is created, I click Create your first deployment to create a deployment. A deployment is a combination of a specific container image and version to be deployed on the service I just created.

I chose a name for my image and give the address of the image on Docker Hub, using the format user/<my container name>:tag. This is also where I have the possibility to enter environment variables, port mapping, or a launch command.

My container is offering a network service on port TCP 8080, so I add that port to the deployment configuration. The Open Ports configuration specifies which ports and protocols are open to other systems in my container’s network. Other containers or virtual machines can only connect to my container when the port is explicitly configured in the console or EXPOSE‘d in my Dockerfile. None of these ports are exposed to the public internet.

But in this example, I also want Lightsail to route the traffic from the public internet to this container. So, I add this container as an endpoint of the hello-world service I just created. The endpoint is automatically configured for TLS, there is no certificate to install or manage.

I can add up to 10 containers for one single deployment. When ready, I click Save and deploy.

Lightsail Deployment

After a while, my deployment is active and I can test the endpoint.

Lightsail Deployment Active

The endpoint DNS address is available on the top-right side of the console. If I must, I can configure my own DNS domain name.

Lightsail endpoint DNSI open another tab in my browser and point it at the https endpoint URL:

Testing Container DeploymentWhen I must deploy a new version, I use the console again to modify the deployment. I spare you the details of modifying the application code, build, and push a new version of the container. Let’s say I have my second container image version available under the name sebsto/lightsail-hello-world:v2. Back to Amazon Lightsail console, I click Deployments, then Modify your Deployments. I enter the full name, including the tag, of the new version of the container image and click Save and Deploy.

Lightsail Deploy updated VersionAfter a while, the new version is deployed and automatically activated.

Lightsail deployment sucesful

I open a new tab in my browser and I point it to the endpoint URI available on the top-right corner of Amazon Lightsail console. I observe the JSON version is different. It now has a version attribute with a value of 2.

lightsail v2 is deployed

When something goes wrong during my deployment, Amazon Lightsail automatically keeps the last deployment active, to avoid any service interruption. I can also manually activate a previous deployment version to reverse any undesired changes.

I just deployed my first container image from Docker Hub. I can also manage my services and deploy local container images from my laptop using the AWS Command Line Interface (CLI). To push container images to my Amazon Lightsail container service directly from my laptop, I must install the LightSail Controler Plugin. (TL;DR curl, cp and chmod are your friends here, I also maintain a DockerFile to use the CLI inside a container.)

To create, list, or delete a container service, I type:

aws lightsail create-container-service --service-name myservice --power nano --scale 1

aws lightsail get-container-services
{
   "containerServices": [{
      "containerServiceName": "myservice",
      "arn": "arn:aws:lightsail:us-west-2:012345678901:ContainerService/1b50c121-eac7-4ee2-9078-425b0665b3d7",
      "createdAt": "2020-07-31T09:36:48.226999998Z",
      "location": {
         "availabilityZone": "all",
         "regionName": "us-west-2"
      },
      "resourceType": "ContainerService",
      "power": "nano",
      "powerId": "",
      "state": "READY",
      "scale": 1,
      "privateDomainName": "",
      "isDisabled": false,
      "roleArn": ""
   }]
}

aws lightsail delete-container-service --service myservice

I can also use the CLI to deploy container images directly from my laptop. Be sure lightsailctl is installed.

# Build the new version of my image (v3)
docker build -t sebsto/lightsail-hello-world:v3 .

# Push the new image.
aws lightsail push-container-image --service-name hello-world --label hello-world --image sebsto/lightsail-hello-world:v3

After a while, I see the output:

Image "sebsto/lightsail-hello-world:v3" registered.
Refer to this image as ":hello-world.hello-world.1" in deployments.

I create a lc.json file to hold the details of the deployment configuration. it is aligned to the options I see on the console. I report the name given by the previous command on the image property:

{
  "serviceName": "hello-world",
  "containers": {
     "hello-world": {
        "image": ":hello-world.hello-world.1",
        "ports": {
           "8080": "HTTP"
        }
     }
  },
  "publicEndpoint": {
     "containerName": "hello-world",
     "containerPort": 8080
  }
}

Finally, I create a new service version with:
aws lightsail create-container-service-deployment --cli-input-json file://lc.json

I can query the deployment status with
aws lightsail get-container-services

...
"nextDeployment": {
   "version": 4,
   "state": "ACTIVATING",
   "containers": {
      "hello-world": {
      "image": ":hello-world.hello-world.1",
      "command": [],
      "environment": {},
      "ports": {
         "8080": "HTTP"
      }
     }
},
...

After a while, the status  becomes  ACTIVE, and I can test my endpoint.

curl https://hello-world.nxxxxxxxxxxx.lightsail.ec2.aws.dev/
{"message": "Hello Flask API World!", "version": 3}

If you plan to later deploy your container to Amazon ECS or Amazon Elastic Kubernetes Service, no changes are required. You can pull the container image from your repository, just like you do with Amazon Lightsail.

You can deploy your containers on Lightsail in all AWS Regions where Amazon Lightsail is available. As of today, this is US East (Ohio), US East (N. Virginia), US West (Oregon), Asia Pacific (Mumbai), Asia Pacific (Seoul), Asia Pacific (Singapore), Asia Pacific (Sydney), Asia Pacific (Tokyo), Canada (Central), Europe (Frankfurt), Europe (Ireland), Europe (London), and Europe (Paris).

As usual when using Amazon Lightsail, pricing is easy to understand and predictable. Amazon Lightsail Containers have a fixed price per month per container, depending on the size of the container (the vCPU/memory combination you use). You are charged on the prorated hours you keep the service running. The price per month is the maximum price you will be charged for running your service 24h/7. The prices are identical in all AWS Regions. They are ranging from $7 / month for a Nano container (512MB memory and 0.25 vCPU) to $160 / month for a X-Large container (8GB memory and 4 vCPU cores). This price not only includes the container itself, but also the load balancer, the DNS, and a generous data transfer tier. The details and prices for other AWS Regions are on the Lightsail pricing page.

I can’t wait to discover what solutions you will build and deploy on Amazon Lightsail Containers!

— seb

Majority of Alexa Now Running on Faster, More Cost-Effective Amazon EC2 Inf1 Instances

Post Syndicated from Sébastien Stormacq original https://aws.amazon.com/blogs/aws/majority-of-alexa-now-running-on-faster-more-cost-effective-amazon-ec2-inf1-instances/

Today, we are announcing that the Amazon Alexa team has migrated the vast majority of their GPU-based machine learning inference workloads to Amazon Elastic Compute Cloud (EC2) Inf1 instances, powered by AWS Inferentia. This resulted in 25% lower end-to-end latency, and 30% lower cost compared to GPU-based instances for Alexa’s text-to-speech workloads. The lower latency allows Alexa engineers to innovate with more complex algorithms and to improve the overall Alexa experience for our customers.

AWS built AWS Inferentia chips from the ground up to provide the lowest-cost machine learning (ML) inference in the cloud. They power the Inf1 instances that we launched at AWS re:Invent 2019. Inf1 instances provide up to 30% higher throughput and up to 45% lower cost per inference compared to GPU-based G4 instances, which were, before Inf1, the lowest-cost instances in the cloud for ML inference.

Alexa is Amazon’s cloud-based voice service that powers Amazon Echo devices and more than 140,000 models of smart speakers, lights, plugs, smart TVs, and cameras. Today customers have connected more than 100 million devices to Alexa. And every month, tens of millions of customers interact with Alexa to control their home devices (“Alexa, increase temperature in living room,” “Alexa, turn off bedroom’“), to listen to radios and music (“Alexa, start Maxi 80 on bathroom,” “Alexa, play Van Halen from Spotify“), to be informed (“Alexa, what is the news?” “Alexa, is it going to rain today?“), or to be educated, or entertained with 100,000+ Alexa Skills.

If you ask Alexa where she lives, she’ll tell you she is right here, but her head is in the cloud. Indeed, Alexa’s brain is deployed on AWS, where she benefits from the same agility, large-scale infrastructure, and global network we built for our customers.

How Alexa Works
When I’m in my living room and ask Alexa about the weather, I trigger a complex system. First, the on-device chip detects the wake word (Alexa). Once detected, the microphones record what I’m saying and stream the sound for analysis in the cloud. At a high level, there are two phases to analyze the sound of my voice. First, Alexa converts the sound to text. This is known as Automatic Speech Recognition (ASR). Once the text is known, the second phase is to understand what I mean. This is Natural Language Understanding (NLU). The output of NLU is an Intent (what does the customer want) and associated parameters. In this example (“Alexa, what’s the weather today ?”), the intent might be “GetWeatherForecast” and the parameter can be my postcode, inferred from my profile.

This whole process uses Artificial Intelligence heavily to transform the sound of my voice to phonemes, phonemes to words, words to phrases, phrases to intents. Based on the NLU output, Alexa routes the intent to a service to fulfill it. The service might be internal to Alexa or external, like one of the skills activated on my Alexa account. The fulfillment service processes the intent and returns a response as a JSON document. The document contains the text of the response Alexa must say.

The last step of the process is to generate the voice of Alexa from the text. This is known as Text-To-Speech (TTS). As soon as the TTS starts to produce sound data, it is streamed back to my Amazon Echo device: “The weather today will be partly cloudy with highs of 16 degrees and lows of 8 degrees.” (I live in Europe, these are Celsius degrees 🙂 ). This Text-To-Speech process also heavily involves machine learning models to build a phrase that sounds natural in terms of pronunciations, rhythm, connection between words, intonation etc.

Alexa is one of the most popular hyperscale machine learning services in the world, with billions of inference requests every week. Of Alexa’s three main inference workloads (ASR, NLU, and TTS), TTS workloads initially ran on GPU-based instances. But the Alexa team decided to move to the Inf1 instances as fast as possible to improve the customer experience and reduce the service compute cost.

What is AWS Inferentia?
AWS Inferentia is a custom chip, built by AWS, to accelerate machine learning inference workloads and optimize their cost. Each AWS Inferentia chip contains four NeuronCores. Each NeuronCore implements a high-performance systolic array matrix multiply engine, which massively speeds up typical deep learning operations such as convolution and transformers. NeuronCores are also equipped with a large on-chip cache, which helps cut down on external memory accesses, dramatically reducing latency and increasing throughput.

AWS Inferentia can be used natively from popular machine-learning frameworks like TensorFlow, PyTorch, and MXNet, with AWS Neuron. AWS Neuron is a software development kit (SDK) for running machine learning inference using AWS Inferentia chips. It consists of a compiler, run-time, and profiling tools that enable you to run high-performance and low latency inference.

Who Else is Using Amazon EC2 Inf1?
In addition to Alexa, Amazon Rekognition is also adopting AWS Inferentia. Running models such as object classification on Inf1 instances resulted in 8x lower latency and doubled throughput compared to running these models on GPU instances.

Customers, from Fortune 500 companies to startups, are using Inf1 instances for machine learning inference. For example, Snap Inc.​ incorporates machine learning (ML) into many aspects of Snapchat, and exploring innovation in this field is a key priority for them. Once they heard about AWS Inferentia, they collaborated with AWS to adopt Inf1 instances to help with ML deployment, including around performance and cost. They started with their recommendation models inference, and are now looking forward to deploying more models on Inf1 instances in the future.

Conde Nast, one of the world’s leading media companies, saw a 72% reduction in cost of inference compared to GPU-based instances for its recommendation engine. And Anthem, one of the leading healthcare companies in the US, observed 2x higher throughput compared to GPU-based instances for its customer sentiment machine learning workload.

How to Get Started with Amazon EC2 Inf1
You can start using Inf1 instances today.

If you prefer to manage your own machine learning application development platforms, you can get started by either launching Inf1 instances with AWS Deep Learning AMIs, which include the Neuron SDK, or you can use Inf1 instances via Amazon Elastic Kubernetes Service or Amazon ECS for containerized machine learning applications. To learn more about running containers on Inf1 instances, read this blog to get started on ECS and this blog to get started on EKS.

The easiest and quickest way to get started with Inf1 instances is via Amazon SageMaker, a fully managed service that enables developers to build, train, and deploy machine learning models quickly.

Get started with Inf1 on Amazon SageMaker today.

— seb

PS: The team just released this video, check it out!

New – Amazon RDS on Graviton2 Processors

Post Syndicated from Sébastien Stormacq original https://aws.amazon.com/blogs/aws/new-amazon-rds-on-graviton2-processors/

I recently wrote a post to announce the availability of M6g, R6g and C6g families of instances on Amazon Elastic Compute Cloud (EC2). These instances offer better cost-performance ratio than their x86 counterparts. They are based on AWS-designed AWS Graviton2 processors, utilizing 64-bit Arm Neoverse N1 cores.

Starting today, you can also benefit from better cost-performance for your Amazon Relational Database Service (RDS) databases, compared to the previous M5 and R5 generation of database instance types, with the availability of AWS Graviton2 processors for RDS. You can choose between M6g and R6g instance families and three database engines (MySQL 8.0.17 and higher, MariaDB 10.4.13 and higher, and PostgreSQL 12.3 and higher).

M6g instances are ideal for general purpose workloads. R6g instances offer 50% more memory than their M6g counterparts and are ideal for memory intensive workloads, such as Big Data analytics.

Graviton2 instances provide up to 35% performance improvement and up to 52% price-performance improvement for RDS open source databases, based on internal testing of workloads with varying characteristics of compute and memory requirements.

Graviton2 instances family includes several new performance optimizations such as larger L1 and L2 caches per core, higher Amazon Elastic Block Store (EBS) throughput than comparable x86 instances, fully encrypted RAM, and many others as detailed on this page. You can benefit from these optimizations with minimal effort, by provisioning or migrating your RDS instances today.

RDS instances are available in multiple configurations, starting with 2 vCPUs, with 8 GiB memory for M6g, and 16 GiB memory for R6g with up to 10 Gbps of network bandwidth, giving you new entry-level general purpose and memory optimized instances. The table below shows the list of instance sizes available for you:

Instance Size vCPU Memory (GiB) Dedicated EBS Bandwidth (Mbps) Network Bandwidth
(Gbps)
M6g R6g
large 2 8 16 Up to 4750 Up to 10
xlarge 4 16 32 Up to 4750 Up to 10
2xlarge 8 32 64 Up to 4750 Up to 10
4xlarge 16 64 128 4750 Up to 10
8xlarge 32 128 256 9000 12
12xlarge 48 192 384 13500 20
16xlarge 64 256 512 19000 25

Let’s Start Your First Graviton2 Based Instance
To start a new RDS instance, I use the AWS Management Console or the AWS Command Line Interface (CLI), just like usual, and select one of the db.m6g or db.r6ginstance types (this page in the documentation has all the details).

RDS Launch Graviton2 instance

Using the CLI, it would be:

aws rds create-db-instance
 --region us-west-2 \
 --db-instance-identifier $DB_INSTANCE_NAME \
 --db-instance-class db.m6g.large \
 --engine postgres \
 --engine-version 12.3 \
 --allocated-storage 20 \
 --master-username $MASTER_USER \
 --master-user-password $MASTER_PASSWORD

The CLI confirms with:

{
    "DBInstance": {
        "DBInstanceIdentifier": "newsblog",
        "DBInstanceClass": "db.m6g.large",
        "Engine": "postgres",
        "DBInstanceStatus": "creating",
...
}

Migrating to Graviton2 instances is easy, in the AWS Management Console, I select my database and I click Modify.

Modify RDS database

The I select the new DB instance class:

modify db instance

Or, using the CLI, I can use the modify-db-instance API call.

There is a short service interruption happening when you switch instance type. By default, the modification will happen during your next maintenance window, unless you enable the ApplyImmediately option.

You can provision new or migrate to Graviton2 Amazon Relational Database Service (RDS) instances in all regions where EC2 M6g and R6g are available : US East (N. Virginia), US East (Ohio), US West (Oregon), Asia Pacific (Mumbai), Asia Pacific (Singapore), Asia Pacific (Sydney), Asia Pacific (Tokyo), Europe (Ireland), and Europe (Frankfurt) AWS Regions.

As usual, let us know your feedback on the AWS Forum or through your usual AWS contact.

— seb