Post Syndicated from Terin Stock original http://blog.cloudflare.com/lost-in-transit-debugging-dropped-packets-from-negative-header-lengths/


Previously, I wrote about building network load balancers with the maglev scheduler, which we use for ingress into our Kubernetes clusters. At the time of that post we were using Foo-over-UDP encapsulation with virtual interfaces, one for each Internet Protocol version for each worker node.
To reduce operational toil managing the traffic director nodes, we've recently switched to using IP Virtual Server's (IPVS) native support for encapsulation. Much to our surprise, instead of a smooth change, we instead observed significant drops in bandwidth and failing API requests. In this post I'll discuss the impact observed, the multi-week search for the root cause, and the ultimate fix.
Recap and the change
To support our requirements we've been creating virtual interfaces on our traffic directors configured to encapsulate traffic with Foo-Over-UDP (FOU). In this encapsulation new UDP and IP headers are added to the original packet. When the worker node receives this packet, the kernel removes the outer headers and injects the inner packet back into the network stack. Each virtual interface would be assigned a private IP, which would be configured to send traffic to these private IPs in "direct" mode.
This configuration presents several problems for our operations teams.
For example, each Kubernetes worker node needs a separate virtual interface on the traffic director, and each of the interfaces requires their own private IP. The pairs of virtual interfaces and private IPs were only used by this system, but still needed to be tracked in our configuration management system. To ensure the interfaces were created and configured properly on each director we had to run complex health checks, which added to the lag between provisioning a new worker node and the director being ready to send it traffic. Finally, the header for FOU also lacks a way to signal the "next protocol" of the inner packet, requiring a separate virtual interface for IPv4 and IPv6. Each of these problems individually contributed a small amount of toil, but taken together, gave us impetus to find a better alternative.
In the time since we had originally implemented this system, IPVS has added native support for encapsulation. This would allow us to eliminate provisioning virtual interfaces (and their corresponding private IPs), and be able to use newly provisioned workers without delay.
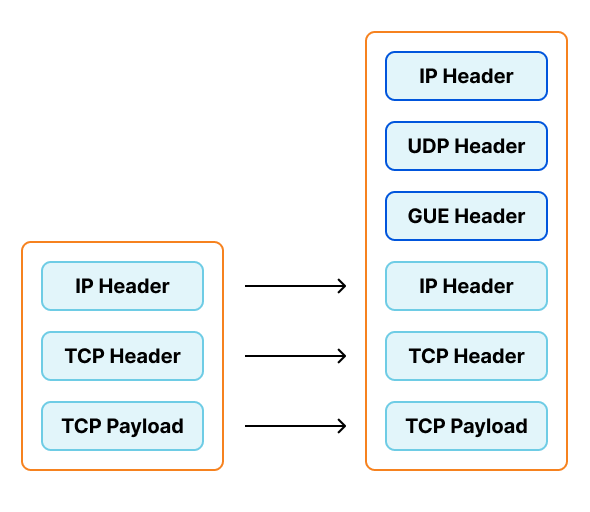
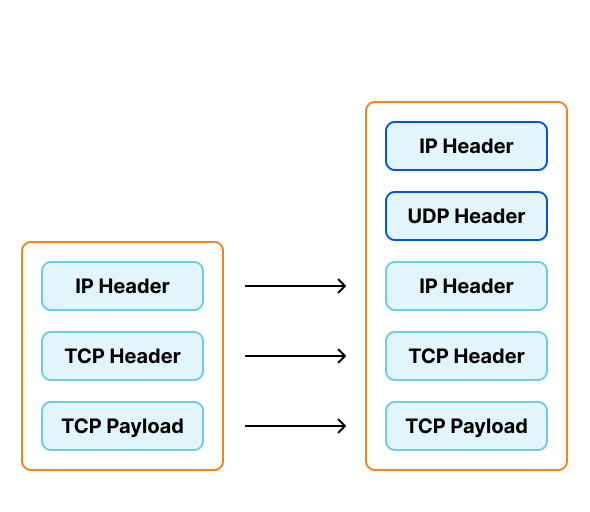
IPVS doesn't support Foo-over-UDP as an encapsulation type. As part of this project we switched to a similar option, Generic UDP Encapsulation (GUE). This encapsulation option does include the "next protocol", allowing one listener on the worker nodes to support both IPv4 and IPv6.
What went wrong?
When we make changes to our Kubernetes clusters, we go through several layers of testing. This change had been deployed to the traffic directors in front of our staging environments, where it had been running for several weeks. However, due to the nature of this bug, the type of traffic to our staging environment did not trigger the underlying bug.
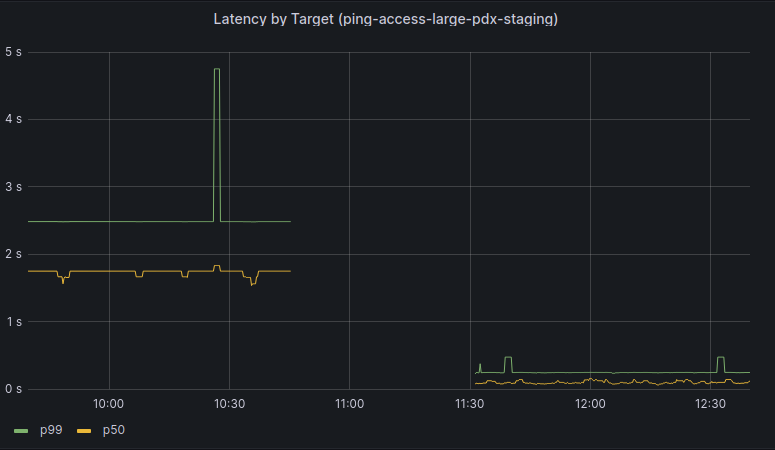
We began a slow rollout of this change to one production cluster, and after a few hours we began observing issues reaching services behind Kubernetes Load Balancers. The behavior observed was very interesting: the vast majority of requests had no issues, but a small percentage of requests corresponding to large HTTP request payloads or gRPC had significant latency. However, large responses had no corresponding latency increase. There was no corresponding increase in latency seen to any requests to our ingress controllers, though we could observe a small drop in overall requests per second.

Through debugging after the incident, we discovered that the traffic directors were dropping packets that exceeded the Internet maximum transmission unit (MTU) of 1500 bytes, despite the packets being smaller than the actual MTU configured in our internal networks. Once dropped, the original host would fragment and resend packets until they were small enough to pass through the traffic directors. Dropping one packet is inconvenient, but unlikely to be noticed. However, when making a request with large payloads it is very likely that all packets would be dropped and need to be individually fragmented and resent.
When every packet is dropped and has to be resent, the network latency can add up to several seconds, exceeding the request timeouts configured by applications. This would cause the request to fail. necessitating retries by applications. As more traffic directors were reconfigured, these retries were less likely to succeed, leading to slower processing and causing the backlog of queued work to increase.
As you can see this small, but consistent, number of dropped packets could cause a domino effect into much larger problems. Once it became clear there was a problem, we reverted traffic directors to their previous configuration, and this quickly restored traffic to previous levels. From this we knew something about the change caused this problem.
Finding the culprit
With the symptoms of the issues identified, we started to try to understand the root cause. Once the root cause was understood, we could come up with a satisfactory solution.
Knowing the packets were larger than the Internet MTU, our first thought was that this was a misconfiguration of the machine in our configuration management tool. However, we found the interface MTUs were all set as expected, and there were no overriding MTUs in the routing table. We also found that sending packets from the director that exceeded the Internet MTU worked fine with no drops.
Cilium has developed a debugging tool pwru, short for "packet, where are you?", that uses eBPF to aid in debugging the kernel networking state. We used pwru in our staging environment and found the location where the packet had been dropped.
sudo pwru --output-skb --output-tuple --per-cpu-buffer 2097152 --output-file pwru.log
This captures tracing data for all packets that reach the traffic director, and saves the trace data to "pwru.log". There are filters built into pwru to select matching packets, but unfortunately they could not be used as the packet was being modified by the encapsulation. Instead, we used grep afterwards to find a matching packet, and then filtered farther based on the pointer in the first column.
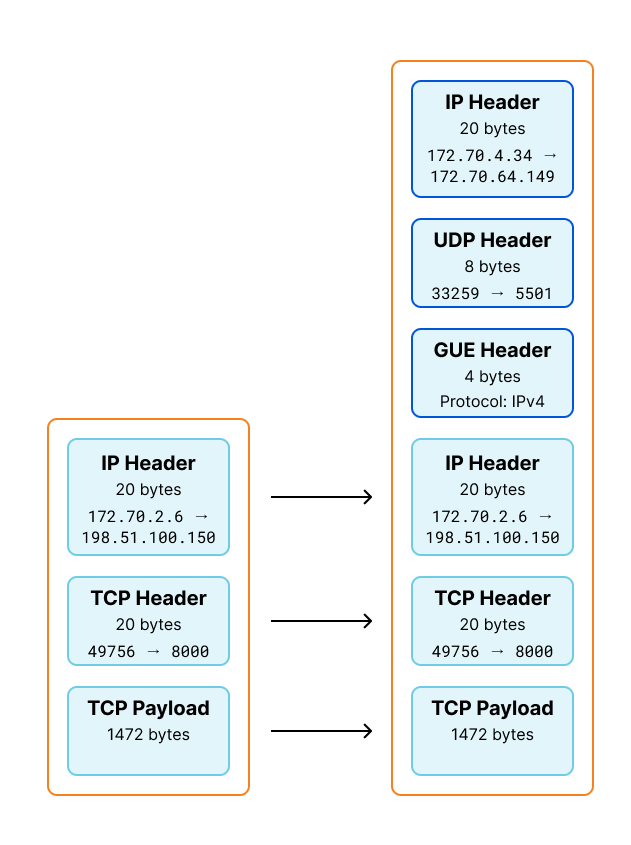
0xffff947712f34400      9        [<empty>]               packet_rcv netns=4026531840 mark=0x0 ifindex=4 proto=8 mtu=1600 len=1512 172.70.2.6:49756->198.51.100.150:8000(tcp)
0xffff947712f34400      9        [<empty>]                 skb_push netns=4026531840 mark=0x0 ifindex=4 proto=8 mtu=1600 len=1512 172.70.2.6:49756->198.51.100.150:8000(tcp)
0xffff947712f34400      9        [<empty>]              consume_skb netns=4026531840 mark=0x0 ifindex=4 proto=8 mtu=1600 len=1512 172.70.2.6:49756->198.51.100.150:8000(tcp)
[ ... snip ... ]
0xffff947712f34400      9        [<empty>]         inet_gso_segment netns=4026531840 mark=0x0 ifindex=7 proto=8 mtu=1600 len=1544 172.70.4.34:33259->172.70.64.149:5501(udp)
0xffff947712f34400      9        [<empty>]        udp4_ufo_fragment netns=4026531840 mark=0x0 ifindex=7 proto=8 mtu=1600 len=1524 172.70.4.34:33259->172.70.64.149:5501(udp)
0xffff947712f34400      9        [<empty>]   skb_udp_tunnel_segment netns=4026531840 mark=0x0 ifindex=7 proto=8 mtu=1600 len=1524 172.70.4.34:33259->172.70.64.149:5501(udp)
0xffff947712f34400      9        [<empty>] kfree_skb_reason(SKB_DROP_REASON_NOT_SPECIFIED) netns=4026531840 mark=0x0 ifindex=7 proto=8 mtu=1600 len=1558 172.70.4.34:33259->172.70.64.149:5501(udp)
Looking at the lines logged for this packet, we can observe some behavior. We originally received a TCP packet for the load balancer IP. However, when the packet is dropped, it is a UDP packet destined for the worker's IP on the port we use for GUE. We can surmise that the packet was being processed and encapsulated by IPVS, and form a theory it was being dropped on the egress path from the director node. We could also see that when the packet was dropped, the packet was still smaller than the calculated MTU.
We can visualize this change by applying this information to our GUE encapsulation diagram shown earlier. The byte totals of the encapsulated packet is 1544, matching the length pwru logged entering inet_gso_segment above.
The trace above tells us what kernel functions are entered, but does not tell us if or how the program flow left. This means we don't know in which function kfree_skb_reason was called. Fortunately pwru can print a stacktrace when functions are entered.
0xffff9868b7232e00 	19       	[pwru] kfree_skb_reason(SKB_DROP_REASON_NOT_SPECIFIED) netns=4026531840 mark=0x0 ifindex=7 proto=8 mtu=1600 len=1558 172.70.4.34:63336->172.70.72.206:5501(udp)
kfree_skb_reason
validate_xmit_skb
__dev_queue_xmit
ip_finish_output2
ip_vs_tunnel_xmit   	[ip_vs]
ip_vs_in_hook   [ip_vs]
nf_hook_slow
ip_local_deliver
ip_sublist_rcv_finish
ip_sublist_rcv
ip_list_rcv
__netif_receive_skb_list_core
netif_receive_skb_list_internal
napi_complete_done
mlx5e_napi_poll [mlx5_core]
__napi_poll
net_rx_action
__softirqentry_text_start
__irq_exit_rcu
common_interrupt
asm_common_interrupt
audit_filter_syscall
__audit_syscall_exit
syscall_exit_work
syscall_exit_to_user_mode
do_syscall_64
entry_SYSCALL_64_after_hwframe
This stacktrace shows that kfree_skb_reason was called from within the validate_xmit_skb function and this is called from ip_vs_tunnel_xmit. However, when looking at the implementation of validate_xmit_skb, we find there are three paths to kfree_skb. How can we determine which path is taken?
In addition to the eBPF support used by pwru, Linux has support for attaching dynamic tracepoints using perf-probe. After installing the kernel source code and debugging symbols, we can ask the kprobe mechanism what lines of validate_xmit_skb we can create a dynamic tracepoint. It prints the line numbers for the line we can attach a tracepoint onto.
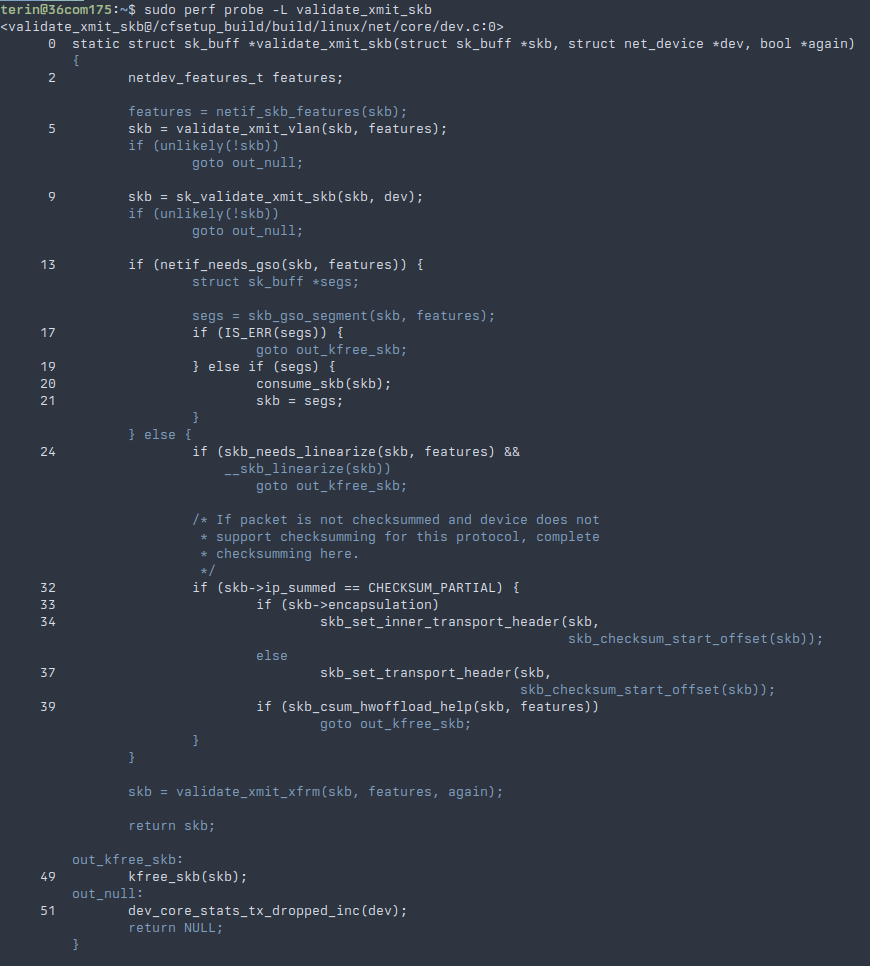
Unfortunately, we can't create a tracepoint on the goto lines, but we can attach tracepoints around them, using the context to determine how control flowed through this function. In addition to specifying a line number, additional arguments can be specified to include local variables. The skb variable is a pointer to a structure that represents this packet, which can be logged to separate packets in case more than one is being processed at a time.
sudo perf probe --add 'validate_xmit_skb:17 skb'
sudo perf probe --add 'validate_xmit_skb:20 skb'
sudo perf probe --add 'validate_xmit_skb:24 skb'
sudo perf probe --add 'validate_xmit_skb:32 skb'
Access to these tracepoints could be recorded by using perf-record and providing the tracepoint names given when they were added.
sudo perf record -a -e 'probe:validate_xmit_skb_L17,probe:validate_xmit_skb_L20,probe:validate_xmit_skb_L24,probe:validate_xmit_skb_L32'
The tests can be rerun so some packets are logged, before using perf-script to read the generated "perf.data" file. When inspecting the output file, we found that all the packets that were dropped were coming from the control flow of netif_needs_gso succeeding (that is, from the goto on line 18). We continued to create and record tracepoints, following the failing control flow, until execution reached __skb_udp_tunnel_segment.
When netif_needs_gso returns false, we do not see packet drops and no problems are reported. It returns true when the packet is larger than the maximum segment size (MSS) advertised by our peer in the connection handshake. For IPv4, the MSS is usually 40 bytes smaller than the MTU (though this can be adjusted by the application or system configuration). For most packets the traffic directors see, the MSS is 40 bytes less than the Internet MTU of 1500, or in this case 1460.
The tracepoints in this function showed that control flow was leaving through the error case on line 33: that kernel was unable to allocate memory for the tunnel header. GUE was designed to have a minimal tunnel header, so this seemed suspicious. We updated the probe to also record the calculated tnl_hlen, and reran the tests. To our surprise the value recorded by the probes was "-2". Huh, somehow the encapsulated packet got smaller?
static struct sk_buff *__skb_udp_tunnel_segment(struct sk_buff *skb,
    netdev_features_t features,
    struct sk_buff *(*gso_inner_segment)(struct sk_buff *skb,
   				  	netdev_features_t features),
    __be16 new_protocol, bool is_ipv6)
{
    int tnl_hlen = skb_inner_mac_header(skb) - skb_transport_header(skb); // tunnel header length computed here
    bool remcsum, need_csum, offload_csum, gso_partial;
    struct sk_buff *segs = ERR_PTR(-EINVAL);
    struct udphdr *uh = udp_hdr(skb);
    u16 mac_offset = skb->mac_header;
    __be16 protocol = skb->protocol;
    u16 mac_len = skb->mac_len;
    int udp_offset, outer_hlen;
    __wsum partial;
    bool need_ipsec;

    if (unlikely(!pskb_may_pull(skb, tnl_hlen))) // allocation failed due to negative number.
   	 goto out;
Ultimate fix
At this point the kernel's behavior was a bit baffling: why would the tunnel header be computed to be a negative number? To answer this question, we added two more probes. The first was added to ip_vs_in_hook, a hook function that is called as packets enter and leave IPVS code. The second probe was added to __dev_queue_xmit, which is called when preparing to ask the hardware device to transmit the packet. To both of these probes we also logged some of the fields of the sk_buff struct by using the "pointer->field" syntax. These fields are offsets into the packet's data for the packet's headers, as well as corresponding offsets for the encapsulated headers.
- The
mac_headerandinner_mac_headerare offsets to the packet's layer two header. For Ethernet this includes the MAC addresses for the frame, but also other metadata such as the EtherType field giving the type the next protocol. - The
network_headerandinner_network_headerfields are offsets to the packet's layer three header. For our purposes, this would be the header for IPv4 or IPv6. - The
transport_headerandinner_transport_headerfields are offset to the packet's layer four header, such as TCP, UDP, or ICMP.
sudo perf probe -m ip_vs --add 'ip_vs_in_hook dev=skb->dev->name:string skb skb->inner_mac_header skb->inner_network_header skb->inner_transport_header skb->mac_header skb->network_header skb->transport_header skb->ipvs_property skb->len:u skb->data_len:u'
sudo perf probe --add '__dev_queue_xmit dev=skb->dev->name:string skb skb->inner_mac_header skb->inner_network_header skb->inner_transport_header skb->mac_header skb->network_header skb->transport_header skb->len:u skb->data_len:u'
When we review the tracepoints using perf-script, we can notice something interesting with these values.
swapper     0 [030] 79090.376151:    probe:ip_vs_in_hook: (ffffffffc0feebe0) dev="vlan100" skb=0xffff9ca661e90200 inner_mac_header=0x0 inner_network_header=0x0 inner_transport_header=0x0 mac_header=0x44 network_header=0x52 transport_header=0x66 len=1512 data_len=12
swapper     0 [030] 79090.376153:    probe:ip_vs_in_hook: (ffffffffc0feebe0) dev="vlan100" skb=0xffff9ca661e90200 inner_mac_header=0x44 inner_network_header=0x52 inner_transport_header=0x66 mac_header=0x44 network_header=0x32 transport_header=0x46 len=1544 data_len=12
swapper     0 [030] 79090.376155: probe:__dev_queue_xmit: (ffffffff85070e60) dev="vlan100" skb=0xffff9ca661e90200 inner_mac_header=0x44 inner_network_header=0x52 inner_transport_header=0x66 mac_header=0x44 network_header=0x32 transport_header=0x46 len=1558 data_len=12
When the packet reaches ip_vs_in_hook on the way into IPVS, it only has outer packet headers. This makes sense, as the packet hasn't been encapsulated by IPVS yet. When the same hook is called again as the packet leaves IPVS, we see the encapsulation is already completed. We also find that the outer MAC header and the inner MAC header are at the same offset. Knowing how the tunnel header length is calculated in __skb_udp_tunnel_segment, we can also see where "-2" comes from. The inner_mac_header is at offset 0x44, while the transport_header is at offset 0x46.
When packets pass through network interfaces, the code for the interface reserves some space for the MAC header. For example, on an Ethernet interface some space is reserved for the Ethernet headers. FOU and GUE do not use link-layer addressing like Ethernet so no space is needed to be reserved. When we were using the virtual interfaces with FOU before it was correctly handling this case by setting the inner MAC header offset to the same as the inner network offset, effectively making it zero bytes long.
When using the encapsulation inside IPVS, this was not being accounted for, resulting in the inner MAC header offset being invalid. When packets did not need to be segmented this was a harmless bug. When segmenting, however, the tunnel header size needed to be known to duplicate it to all segmented packets.
I created a patch to correct the MAC header offset in IPVS's encapsulation code. The correction to the inner header offsets needed to be duplicated for IPv4 and IPv6.
diff --git a/net/netfilter/ipvs/ip_vs_xmit.c b/net/netfilter/ipvs/ip_vs_xmit.c
index c7652da78c88..9193e109e6b3 100644
--- a/net/netfilter/ipvs/ip_vs_xmit.c
+++ b/net/netfilter/ipvs/ip_vs_xmit.c
@@ -1207,6 +1207,7 @@ ip_vs_tunnel_xmit(struct sk_buff *skb, struct ip_vs_conn *cp,
 	skb->transport_header = skb->network_header;

 	skb_set_inner_ipproto(skb, next_protocol);
+	skb_set_inner_mac_header(skb, skb_inner_network_offset(skb));

 	if (tun_type == IP_VS_CONN_F_TUNNEL_TYPE_GUE) {
 		bool check = false;
@@ -1349,6 +1350,7 @@ ip_vs_tunnel_xmit_v6(struct sk_buff *skb, struct ip_vs_conn *cp,
 	skb->transport_header = skb->network_header;

 	skb_set_inner_ipproto(skb, next_protocol);
+	skb_set_inner_mac_header(skb, skb_inner_network_offset(skb));

 	if (tun_type == IP_VS_CONN_F_TUNNEL_TYPE_GUE) {
 		bool check = false;
When the patch was included in our kernel and deployed the difference in end-to-end request latency was immediately noticeable. We also no longer observed packet drops for requests with large payloads.
I've submitted the Linux kernel patch upstream, which is currently queued for inclusion in future releases of the kernel.
Conclusion
Through this post, we hoped to have provided some insight into the process of investigating networking issues and how to begin debugging issues in the kernel using pwru and kprobe tracepoints. This investigation also led to a Linux kernel patch upstream. It also allowed us to safely roll out IPVS's native encapsulation.