Tag Archives: udp

Lost in transit: debugging dropped packets from negative header lengths

Post Syndicated from Terin Stock original http://blog.cloudflare.com/lost-in-transit-debugging-dropped-packets-from-negative-header-lengths/

Lost in transit: debugging dropped packets from negative header lengths

Lost in transit: debugging dropped packets from negative header lengths

Previously, I wrote about building network load balancers with the maglev scheduler, which we use for ingress into our Kubernetes clusters. At the time of that post we were using Foo-over-UDP encapsulation with virtual interfaces, one for each Internet Protocol version for each worker node.

To reduce operational toil managing the traffic director nodes, we've recently switched to using IP Virtual Server's (IPVS) native support for encapsulation. Much to our surprise, instead of a smooth change, we instead observed significant drops in bandwidth and failing API requests. In this post I'll discuss the impact observed, the multi-week search for the root cause, and the ultimate fix.

Recap and the change

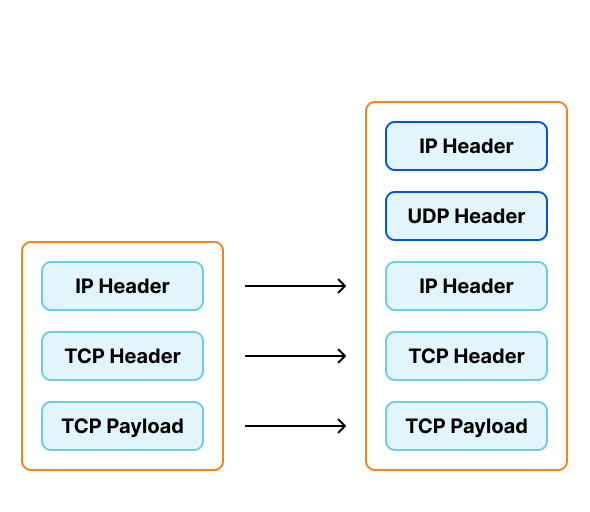
To support our requirements we've been creating virtual interfaces on our traffic directors configured to encapsulate traffic with Foo-Over-UDP (FOU). In this encapsulation new UDP and IP headers are added to the original packet. When the worker node receives this packet, the kernel removes the outer headers and injects the inner packet back into the network stack. Each virtual interface would be assigned a private IP, which would be configured to send traffic to these private IPs in "direct" mode.
Lost in transit: debugging dropped packets from negative header lengths

This configuration presents several problems for our operations teams.

For example, each Kubernetes worker node needs a separate virtual interface on the traffic director, and each of the interfaces requires their own private IP. The pairs of virtual interfaces and private IPs were only used by this system, but still needed to be tracked in our configuration management system. To ensure the interfaces were created and configured properly on each director we had to run complex health checks, which added to the lag between provisioning a new worker node and the director being ready to send it traffic. Finally, the header for FOU also lacks a way to signal the "next protocol" of the inner packet, requiring a separate virtual interface for IPv4 and IPv6. Each of these problems individually contributed a small amount of toil, but taken together, gave us impetus to find a better alternative.

In the time since we had originally implemented this system, IPVS has added native support for encapsulation. This would allow us to eliminate provisioning virtual interfaces (and their corresponding private IPs), and be able to use newly provisioned workers without delay.
Lost in transit: debugging dropped packets from negative header lengths

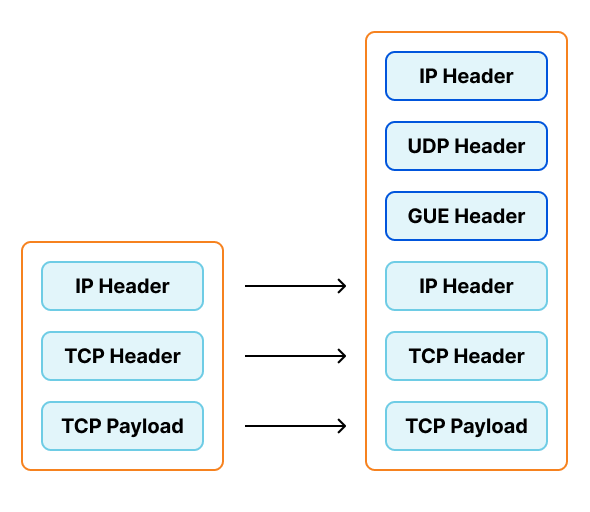
IPVS doesn't support Foo-over-UDP as an encapsulation type. As part of this project we switched to a similar option, Generic UDP Encapsulation (GUE). This encapsulation option does include the "next protocol", allowing one listener on the worker nodes to support both IPv4 and IPv6.

What went wrong?

When we make changes to our Kubernetes clusters, we go through several layers of testing. This change had been deployed to the traffic directors in front of our staging environments, where it had been running for several weeks. However, due to the nature of this bug, the type of traffic to our staging environment did not trigger the underlying bug.

We began a slow rollout of this change to one production cluster, and after a few hours we began observing issues reaching services behind Kubernetes Load Balancers. The behavior observed was very interesting: the vast majority of requests had no issues, but a small percentage of requests corresponding to large HTTP request payloads or gRPC had significant latency. However, large responses had no corresponding latency increase. There was no corresponding increase in latency seen to any requests to our ingress controllers, though we could observe a small drop in overall requests per second.

Lost in transit: debugging dropped packets from negative header lengths

Through debugging after the incident, we discovered that the traffic directors were dropping packets that exceeded the Internet maximum transmission unit (MTU) of 1500 bytes, despite the packets being smaller than the actual MTU configured in our internal networks. Once dropped, the original host would fragment and resend packets until they were small enough to pass through the traffic directors. Dropping one packet is inconvenient, but unlikely to be noticed. However, when making a request with large payloads it is very likely that all packets would be dropped and need to be individually fragmented and resent.

When every packet is dropped and has to be  resent, the network latency can add up to several seconds, exceeding the request timeouts configured by applications. This would cause the request to fail. necessitating retries by applications. As more traffic directors were reconfigured, these retries were less likely to succeed, leading to slower processing and causing the backlog of queued work to increase.

As you can see this small, but consistent, number of dropped packets could cause a domino effect into much larger problems. Once it became clear there was a problem, we reverted traffic directors to their previous configuration, and this quickly restored traffic to previous levels. From this we knew something about the change caused this problem.

Finding the culprit

With the symptoms of the issues identified, we started to try to understand the root cause. Once the root cause was understood, we could come up with a satisfactory solution.

Knowing the packets were larger than the Internet MTU, our first thought was that this was a misconfiguration of the machine in our configuration management tool. However, we found the interface MTUs were all set as expected, and there were no overriding MTUs in the routing table. We also found that sending packets from the director that exceeded the Internet MTU worked fine with no drops.

Cilium has developed a debugging tool pwru, short for "packet, where are you?", that uses eBPF to aid in debugging the kernel networking state. We used pwru in our staging environment and found the location where the packet had been dropped.

sudo pwru --output-skb --output-tuple --per-cpu-buffer 2097152 --output-file pwru.log

This captures tracing data for all packets that reach the traffic director, and saves the trace data to "pwru.log". There are filters built into pwru to select matching packets, but unfortunately they could not be used as the packet was being modified by the encapsulation. Instead, we used grep afterwards to find a matching packet, and then filtered farther based on the pointer in the first column.

0xffff947712f34400      9        [<empty>]               packet_rcv netns=4026531840 mark=0x0 ifindex=4 proto=8 mtu=1600 len=1512 172.70.2.6:49756->198.51.100.150:8000(tcp)
0xffff947712f34400      9        [<empty>]                 skb_push netns=4026531840 mark=0x0 ifindex=4 proto=8 mtu=1600 len=1512 172.70.2.6:49756->198.51.100.150:8000(tcp)
0xffff947712f34400      9        [<empty>]              consume_skb netns=4026531840 mark=0x0 ifindex=4 proto=8 mtu=1600 len=1512 172.70.2.6:49756->198.51.100.150:8000(tcp)
[ ... snip ... ]
0xffff947712f34400      9        [<empty>]         inet_gso_segment netns=4026531840 mark=0x0 ifindex=7 proto=8 mtu=1600 len=1544 172.70.4.34:33259->172.70.64.149:5501(udp)
0xffff947712f34400      9        [<empty>]        udp4_ufo_fragment netns=4026531840 mark=0x0 ifindex=7 proto=8 mtu=1600 len=1524 172.70.4.34:33259->172.70.64.149:5501(udp)
0xffff947712f34400      9        [<empty>]   skb_udp_tunnel_segment netns=4026531840 mark=0x0 ifindex=7 proto=8 mtu=1600 len=1524 172.70.4.34:33259->172.70.64.149:5501(udp)
0xffff947712f34400      9        [<empty>] kfree_skb_reason(SKB_DROP_REASON_NOT_SPECIFIED) netns=4026531840 mark=0x0 ifindex=7 proto=8 mtu=1600 len=1558 172.70.4.34:33259->172.70.64.149:5501(udp)

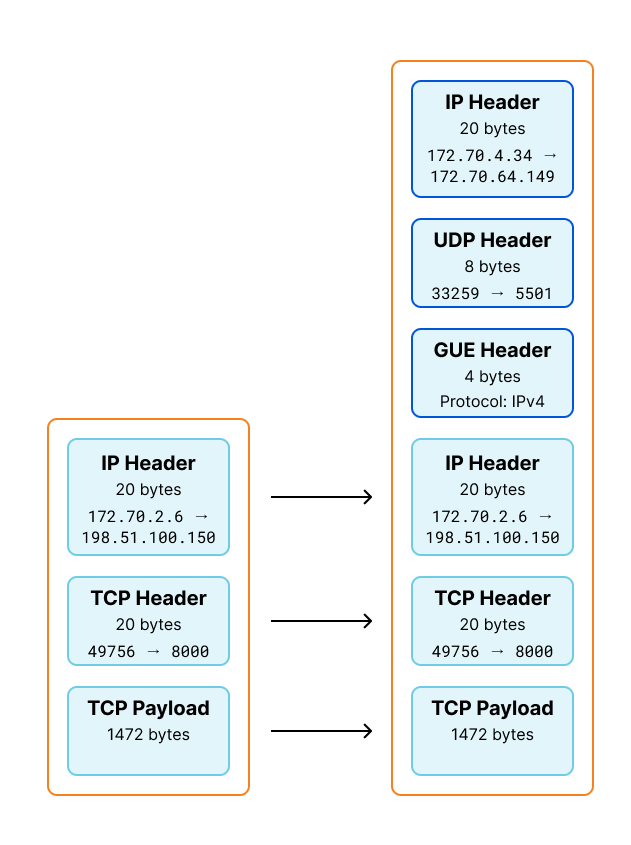
Looking at the lines logged for this packet, we can observe some behavior. We originally received a TCP packet for the load balancer IP. However, when the packet is dropped, it is a UDP packet destined for the worker's IP on the port we use for GUE. We can surmise that the packet was being processed and encapsulated by IPVS, and form a theory it was being dropped on the egress path from the director node. We could also see that when the packet was dropped, the packet was still smaller than the calculated MTU.

We can visualize this change by applying this information to our GUE encapsulation diagram shown earlier. The byte totals of the encapsulated packet is 1544, matching the length pwru logged entering inet_gso_segment above.
Lost in transit: debugging dropped packets from negative header lengths

The trace above tells us what kernel functions are entered, but does not tell us if or how the program flow left. This means we don't know in which function kfree_skb_reason was called. Fortunately pwru can print a stacktrace when functions are entered.

0xffff9868b7232e00 	19       	[pwru] kfree_skb_reason(SKB_DROP_REASON_NOT_SPECIFIED) netns=4026531840 mark=0x0 ifindex=7 proto=8 mtu=1600 len=1558 172.70.4.34:63336->172.70.72.206:5501(udp)
kfree_skb_reason
validate_xmit_skb
__dev_queue_xmit
ip_finish_output2
ip_vs_tunnel_xmit   	[ip_vs]
ip_vs_in_hook   [ip_vs]
nf_hook_slow
ip_local_deliver
ip_sublist_rcv_finish
ip_sublist_rcv
ip_list_rcv
__netif_receive_skb_list_core
netif_receive_skb_list_internal
napi_complete_done
mlx5e_napi_poll [mlx5_core]
__napi_poll
net_rx_action
__softirqentry_text_start
__irq_exit_rcu
common_interrupt
asm_common_interrupt
audit_filter_syscall
__audit_syscall_exit
syscall_exit_work
syscall_exit_to_user_mode
do_syscall_64
entry_SYSCALL_64_after_hwframe

This stacktrace shows that kfree_skb_reason was called from within the validate_xmit_skb function and this is called from ip_vs_tunnel_xmit. However, when looking at the implementation of validate_xmit_skb, we find there are three paths to kfree_skb. How can we determine which path is taken?

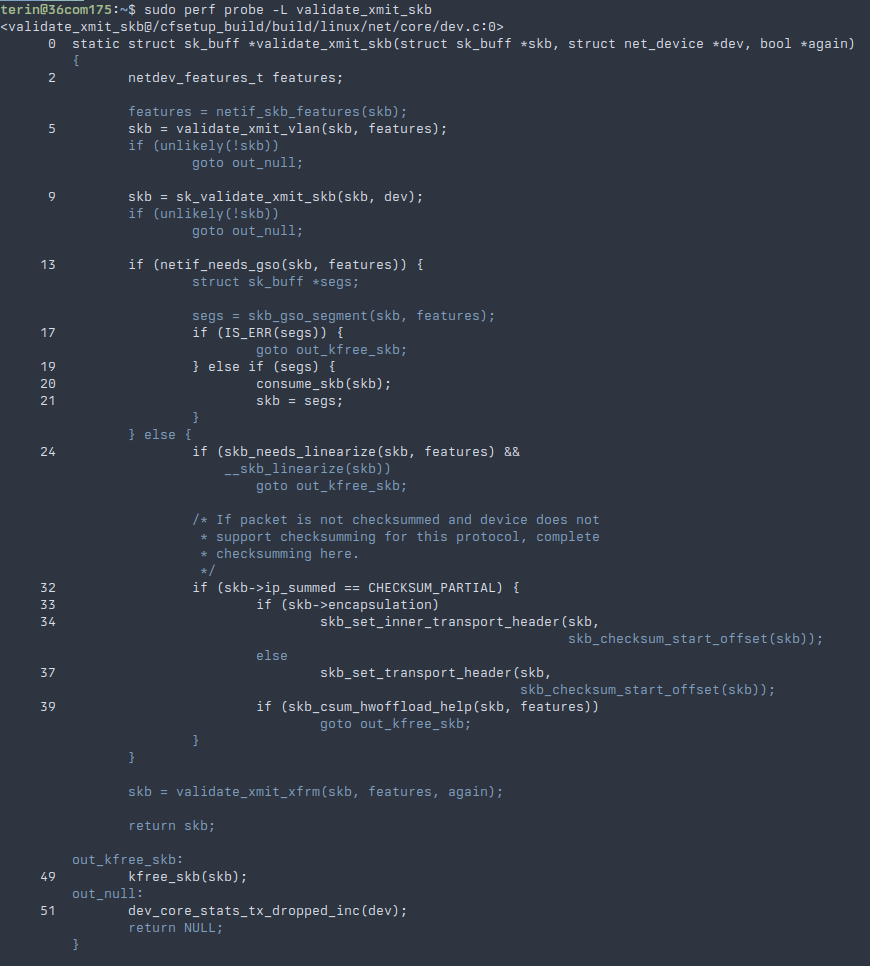
In addition to the eBPF support used by pwru, Linux has support for attaching dynamic tracepoints using perf-probe. After installing the kernel source code and debugging symbols, we can ask the kprobe mechanism what lines of validate_xmit_skb we can create a dynamic tracepoint. It prints the line numbers for the line we can attach a tracepoint onto.
Lost in transit: debugging dropped packets from negative header lengths

Unfortunately, we can't create a tracepoint on the goto lines, but we can attach tracepoints around them, using the context to determine how control flowed through this function. In addition to specifying a line number, additional arguments can be specified to include local variables. The skb variable is a pointer to a structure that represents this packet, which can be logged to separate packets in case more than one is being processed at a time.

sudo perf probe --add 'validate_xmit_skb:17 skb'
sudo perf probe --add 'validate_xmit_skb:20 skb'
sudo perf probe --add 'validate_xmit_skb:24 skb'
sudo perf probe --add 'validate_xmit_skb:32 skb'

Access to these tracepoints could be recorded by using perf-record and providing the tracepoint names given when they were added.

sudo perf record -a -e 'probe:validate_xmit_skb_L17,probe:validate_xmit_skb_L20,probe:validate_xmit_skb_L24,probe:validate_xmit_skb_L32'

The tests can be rerun so some packets are logged, before using perf-script to read the generated "perf.data" file. When inspecting the output file, we found that all the packets that were dropped were coming from the control flow of netif_needs_gso succeeding (that is, from the goto on line 18). We continued to create and record tracepoints, following the failing control flow, until execution reached __skb_udp_tunnel_segment.

When netif_needs_gso returns false, we do not see packet drops and no problems are reported. It returns true when the packet is larger than the maximum segment size (MSS) advertised by our peer in the connection handshake. For IPv4, the MSS is usually 40 bytes smaller than the MTU (though this can be adjusted by the application or system configuration). For most packets the traffic directors see, the MSS is 40 bytes less than the Internet MTU of 1500, or in this case 1460.

The tracepoints in this function showed that control flow was leaving through the error case on line 33: that kernel was unable to allocate memory for the tunnel header. GUE was designed to have a minimal tunnel header, so this seemed suspicious. We updated the probe to also record the calculated tnl_hlen, and reran the tests. To our surprise the value recorded by the probes was "-2". Huh, somehow the encapsulated packet got smaller?

static struct sk_buff *__skb_udp_tunnel_segment(struct sk_buff *skb,
    netdev_features_t features,
    struct sk_buff *(*gso_inner_segment)(struct sk_buff *skb,
   				  	netdev_features_t features),
    __be16 new_protocol, bool is_ipv6)
{
    int tnl_hlen = skb_inner_mac_header(skb) - skb_transport_header(skb); // tunnel header length computed here
    bool remcsum, need_csum, offload_csum, gso_partial;
    struct sk_buff *segs = ERR_PTR(-EINVAL);
    struct udphdr *uh = udp_hdr(skb);
    u16 mac_offset = skb->mac_header;
    __be16 protocol = skb->protocol;
    u16 mac_len = skb->mac_len;
    int udp_offset, outer_hlen;
    __wsum partial;
    bool need_ipsec;

    if (unlikely(!pskb_may_pull(skb, tnl_hlen))) // allocation failed due to negative number.
   	 goto out;

Ultimate fix

At this point the kernel's behavior was a bit baffling: why would the tunnel header be computed to be a negative number? To answer this question, we added two more probes. The first was added to ip_vs_in_hook, a hook function that is called as packets enter and leave IPVS code. The second probe was added to __dev_queue_xmit, which is called when preparing to ask the hardware device to transmit the packet. To both of these probes we also logged some of the fields of the sk_buff struct by using the "pointer->field" syntax. These fields are offsets into the packet's data for the packet's headers, as well as corresponding offsets for the encapsulated headers.

  • The mac_header and inner_mac_header are offsets to the packet's layer two header. For Ethernet this includes the MAC addresses for the frame, but also other metadata such as the EtherType field giving the type the next protocol.
  • The network_header and inner_network_header fields are offsets to the packet's layer three header. For our purposes, this would be the header for IPv4 or IPv6.
  • The transport_header and inner_transport_header fields are offset to the packet's layer four header, such as TCP, UDP, or ICMP.

sudo perf probe -m ip_vs --add 'ip_vs_in_hook dev=skb->dev->name:string skb skb->inner_mac_header skb->inner_network_header skb->inner_transport_header skb->mac_header skb->network_header skb->transport_header skb->ipvs_property skb->len:u skb->data_len:u'
sudo perf probe --add '__dev_queue_xmit dev=skb->dev->name:string skb skb->inner_mac_header skb->inner_network_header skb->inner_transport_header skb->mac_header skb->network_header skb->transport_header skb->len:u skb->data_len:u'

When we review the tracepoints using perf-script, we can notice something interesting with these values.

swapper     0 [030] 79090.376151:    probe:ip_vs_in_hook: (ffffffffc0feebe0) dev="vlan100" skb=0xffff9ca661e90200 inner_mac_header=0x0 inner_network_header=0x0 inner_transport_header=0x0 mac_header=0x44 network_header=0x52 transport_header=0x66 len=1512 data_len=12
swapper     0 [030] 79090.376153:    probe:ip_vs_in_hook: (ffffffffc0feebe0) dev="vlan100" skb=0xffff9ca661e90200 inner_mac_header=0x44 inner_network_header=0x52 inner_transport_header=0x66 mac_header=0x44 network_header=0x32 transport_header=0x46 len=1544 data_len=12
swapper     0 [030] 79090.376155: probe:__dev_queue_xmit: (ffffffff85070e60) dev="vlan100" skb=0xffff9ca661e90200 inner_mac_header=0x44 inner_network_header=0x52 inner_transport_header=0x66 mac_header=0x44 network_header=0x32 transport_header=0x46 len=1558 data_len=12

When the packet reaches ip_vs_in_hook on the way into IPVS, it only has outer packet headers. This makes sense, as the packet hasn't been encapsulated by IPVS yet. When the same hook is called again as the packet leaves IPVS, we see the encapsulation is already completed. We also find that the outer MAC header and the inner MAC header are at the same offset. Knowing how the tunnel header length is calculated in __skb_udp_tunnel_segment, we can also see where "-2" comes from. The inner_mac_header is at offset 0x44, while the transport_header is at offset 0x46.

When packets pass through network interfaces, the code for the interface reserves some space for the MAC header. For example, on an Ethernet interface some space is reserved for the Ethernet headers. FOU and GUE do not use link-layer addressing like Ethernet so no space is needed to be reserved. When we were using the virtual interfaces with FOU before it was correctly handling this case by setting the inner MAC header offset to the same as the inner network offset, effectively making it zero bytes long.

When using the encapsulation inside IPVS, this was not being accounted for, resulting in the inner MAC header offset being invalid. When packets did not need to be segmented this was a harmless bug. When segmenting, however, the tunnel header size needed to be known to duplicate it to all segmented packets.

I created a patch to correct the MAC header offset in IPVS's encapsulation code. The correction to the inner header offsets needed to be duplicated for IPv4 and IPv6.

diff --git a/net/netfilter/ipvs/ip_vs_xmit.c b/net/netfilter/ipvs/ip_vs_xmit.c
index c7652da78c88..9193e109e6b3 100644
--- a/net/netfilter/ipvs/ip_vs_xmit.c
+++ b/net/netfilter/ipvs/ip_vs_xmit.c
@@ -1207,6 +1207,7 @@ ip_vs_tunnel_xmit(struct sk_buff *skb, struct ip_vs_conn *cp,
 	skb->transport_header = skb->network_header;
 
 	skb_set_inner_ipproto(skb, next_protocol);
+	skb_set_inner_mac_header(skb, skb_inner_network_offset(skb));
 
 	if (tun_type == IP_VS_CONN_F_TUNNEL_TYPE_GUE) {
 		bool check = false;
@@ -1349,6 +1350,7 @@ ip_vs_tunnel_xmit_v6(struct sk_buff *skb, struct ip_vs_conn *cp,
 	skb->transport_header = skb->network_header;
 
 	skb_set_inner_ipproto(skb, next_protocol);
+	skb_set_inner_mac_header(skb, skb_inner_network_offset(skb));
 
 	if (tun_type == IP_VS_CONN_F_TUNNEL_TYPE_GUE) {
 		bool check = false;

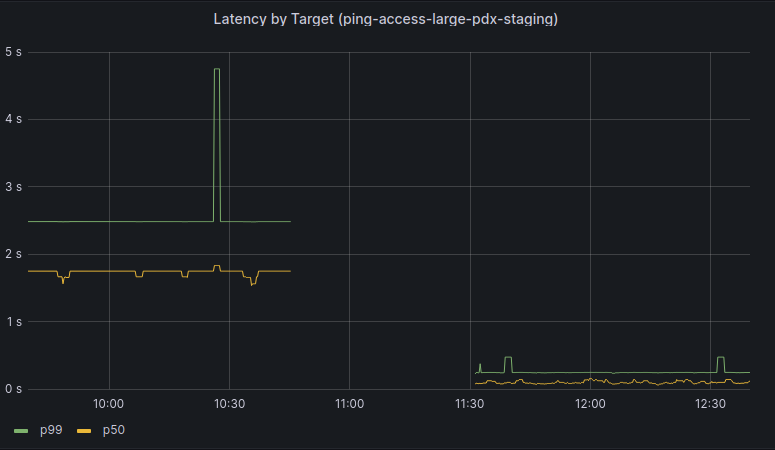
When the patch was included in our kernel and deployed the difference in end-to-end request latency was immediately noticeable. We also no longer observed packet drops for requests with large payloads.
Lost in transit: debugging dropped packets from negative header lengths

I've submitted the Linux kernel patch upstream, which is currently queued for inclusion in future releases of the kernel.

Conclusion

Through this post, we hoped to have provided some insight into the process of investigating networking issues and how to begin debugging issues in the kernel using pwru and kprobe tracepoints. This investigation also led to a Linux kernel patch upstream. It also allowed us to safely roll out IPVS's native encapsulation.

Argo Smart Routing for UDP: speeding up gaming, real-time communications and more

Post Syndicated from Achiel van der Mandele original http://blog.cloudflare.com/turbo-charge-gaming-and-streaming-with-argo-for-udp/

Argo Smart Routing for UDP: speeding up gaming, real-time communications and more

Argo Smart Routing for UDP: speeding up gaming, real-time communications and more

Today, Cloudflare is super excited to announce that we’re bringing traffic acceleration to customer’s UDP traffic. Now, you can improve the latency of UDP-based applications like video games, voice calls, and video meetings by up to 17%. Combining the power of Argo Smart Routing (our traffic acceleration product) with UDP gives you the ability to supercharge your UDP-based traffic.

When applications use TCP vs. UDP

Typically when people talk about the Internet, they think of websites they visit in their browsers, or apps that allow them to order food. This type of traffic is sent across the Internet via HTTP which is built on top of the Transmission Control Protocol (TCP). However, there’s a lot more to the Internet than just browsing websites and using apps. Gaming, live video, or tunneling traffic to different networks via a VPN are all common applications that don’t use HTTP or TCP. These popular applications leverage the User Datagram Protocol (or UDP for short). To understand why these applications use UDP instead of TCP, we’ll need to dig into how these different applications work.

When you load a web page, you generally want to see the entire web page; the website would be confusing if parts of it are missing. For this reason, HTTP uses TCP as a method of transferring website data. TCP ensures that if a packet ever gets lost as it crosses the Internet, that packet will be resent. Having a reliable protocol like TCP is generally a good idea when 100% of the information sent needs to be loaded. It’s worth noting that later HTTP versions like HTTP/3 actually deviated from TCP as a transmission protocol, but they still ensure packet delivery by handling packet retransmission using the QUIC protocol.

There are other applications that prioritize quickly sending real time data and are less concerned about perfectly delivering 100% of the data. Let’s explore Real-Time Communications (RTC) like video meetings as an example. If two people are streaming video live, all they care about is what is happening now. If a few packets are lost during the initial transmission, retransmission is usually too slow to render the lost packet data in the current video frame. TCP doesn’t really make sense in this scenario.

Instead, RTC protocols are built on top of UDP. TCP is like a formal back and forth conversation where every sentence matters. UDP is more like listening to your friend's stream of consciousness: you don’t care about every single bit as long as you get the gist of it. UDP transfers packet data with speed and efficiency without guaranteeing the delivery of those packets. This is perfect for applications like RTC where reducing latency is more important than occasionally losing a packet here or there. The same applies to gaming traffic; you generally want the most up-to-date information, and you don’t really care about retransmitting lost packets.

Gaming and RTC applications really care about latency. Latency is the length of time it takes a packet to be sent to a server plus the length of time to receive a response from the server (called round-trip time or RTT). In the case of video games, the higher the latency, the longer it will take for you to see other players move and the less time you’ll have to react to the game. With enough latency, games become unplayable: if the players on your screen are constantly blipping around it’s near impossible to interact with them. In RTC applications like video meetings, you’ll experience a delay between yourself and your counterpart. You may find yourselves accidentally talking over each other which isn’t a great experience.

Companies that host gaming or RTC infrastructure often try to reduce latency by spinning up servers that are geographically closer to their users. However, it’s common to have two users that are trying to have a video call between distant locations like Amsterdam and Los Angeles. No matter where you install your servers, that's still a long distance for that traffic to travel. The longer the path, the higher the chances are that you're going to run into congestion along the way. Congestion is just like a traffic jam on a highway, but for networks. Sometimes certain paths get overloaded with traffic. This causes delays and packets to get dropped. This is where Argo Smart Routing comes in.

Argo Smart Routing

Cloudflare customers that want the best cross-Internet application performance rely on Argo Smart Routing’s traffic acceleration to reduce latency. Argo Smart Routing is like the GPS of the Internet. It uses real time global network performance measurements to accelerate traffic, actively route around Internet congestion, and increase your traffic’s stability by reducing packet loss and jitter.

Argo Smart Routing was launched in May 2017, and its first iteration focused on reducing website traffic latency. Since then, we’ve improved Argo Smart Routing and also launched Argo Smart Routing for Spectrum TCP traffic which reduces latency in any TCP-based protocols. Today, we’re excited to bring the same Argo Smart Routing technology to customer’s UDP traffic which will reduce latency, packet loss, and jitter in gaming, and live audio/video applications.

Argo Smart Routing accelerates Internet traffic by sending millions of synthetic probes from every Cloudflare data center to the origin of every Cloudflare customer. These probes measure the latency of all possible routes between Cloudflare’s data centers and a customer’s origin. We then combine that with probes running between Cloudflare’s data centers to calculate possible routes. When an Internet user makes a request to an origin, Cloudflare calculates the results of our real time global latency measurements, examines Internet congestion data, and calculates the optimal route for customer’s traffic. To enable Argo Smart Routing for UDP traffic, Cloudflare extended the route computations typically used for HTTP and TCP traffic and applied them to UDP traffic.

We knew that Argo Smart Routing offered impressive benefits for HTTP traffic, reducing time to first byte by up to 30% on average for customers. But UDP can be treated differently by networks, so we were curious to see if we would see a similar reduction in round-trip-time for UDP. To validate, we ran a set of tests. We set up an origin in Iowa, USA and had a client connect to it from Tokyo, Japan. Compared to a regular Spectrum setup, we saw a decrease in round-trip-time of up to 17.3% on average. For the standard setup, Spectrum was able to proxy packets to Iowa in 173.3 milliseconds on average. Comparatively, turning on Argo Smart Routing reduced the average round-trip-time down to 143.3 milliseconds. The distance between those two cities is 6,074 miles (9,776 kilometers), meaning we've effectively moved the two closer to each other by over a thousand miles (or 1,609 km) just by turning on this feature.

We're incredibly excited about Argo Smart Routing for UDP and what our customers will use it for. If you're in gaming or real-time-communications, or even have a different use-case that you think would benefit from speeding up UDP traffic, please contact your account team today. We are currently in closed beta but are excited about accepting applications.

How to stop running out of ephemeral ports and start to love long-lived connections

Post Syndicated from Marek Majkowski original https://blog.cloudflare.com/how-to-stop-running-out-of-ephemeral-ports-and-start-to-love-long-lived-connections/

How to stop running out of ephemeral ports and start to love long-lived connections

Often programmers have assumptions that turn out, to their surprise, to be invalid. From my experience this happens a lot. Every API, technology or system can be abused beyond its limits and break in a miserable way.

It’s particularly interesting when basic things used everywhere fail. Recently we’ve reached such a breaking point in a ubiquitous part of Linux networking: establishing a network connection using the connect() system call.

Since we are not doing anything special, just establishing TCP and UDP connections, how could anything go wrong? Here’s one example: we noticed alerts from a misbehaving server, logged in to check it out and saw:

marek@:~# ssh 127.0.0.1
ssh: connect to host 127.0.0.1 port 22: Cannot assign requested address

You can imagine the face of my colleague who saw that. SSH to localhost refuses to work, while she was already using SSH to connect to that server! On another occasion:

marek@:~# dig cloudflare.com @1.1.1.1
dig: isc_socket_bind: address in use

This time a basic DNS query failed with a weird networking error. Failing DNS is a bad sign!

In both cases the problem was Linux running out of ephemeral ports. When this happens it’s unable to establish any outgoing connections. This is a pretty serious failure. It’s usually transient and if you don’t know what to look for it might be hard to debug.

The root cause lies deeper though. We can often ignore limits on the number of outgoing connections. But we encountered cases where we hit limits on the number of concurrent outgoing connections during normal operation.

In this blog post I’ll explain why we had these issues, how we worked around them, and present an userspace code implementing an improved variant of connect() syscall.

Outgoing connections on Linux part 1 – TCP

Let’s start with a bit of historical background.

Long-lived connections

Back in 2014 Cloudflare announced support for WebSockets. We wrote two articles about it:

If you skim these blogs, you’ll notice we were totally fine with the WebSocket protocol, framing and operation. What worried us was our capacity to handle large numbers of concurrent outgoing connections towards the origin servers. Since WebSockets are long-lived, allowing them through our servers might greatly increase the concurrent connection count. And this did turn out to be a problem. It was possible to hit a ceiling for a total number of outgoing connections imposed by the Linux networking stack.

In a pessimistic case, each Linux connection consumes a local port (ephemeral port), and therefore the total connection count is limited by the size of the ephemeral port range.

Basics – how port allocation works

When establishing an outbound connection a typical user needs the destination address and port. For example, DNS might resolve cloudflare.com to the ‘104.1.1.229’ IPv4 address. A simple Python program can establish a connection to it with the following code:

cd = socket.socket(AF_INET, SOCK_STREAM)
cd.connect(('104.1.1.229', 80))

The operating system’s job is to figure out how to reach that destination, selecting an appropriate source address and source port to form the full 4-tuple for the connection:

How to stop running out of ephemeral ports and start to love long-lived connections

The operating system chooses the source IP based on the routing configuration. On Linux we can see which source IP will be chosen with ip route get:

$ ip route get 104.1.1.229
104.1.1.229 via 192.168.1.1 dev eth0 src 192.168.1.8 uid 1000
	cache

The src parameter in the result shows the discovered source IP address that should be used when going towards that specific target.

The source port, on the other hand, is chosen from the local port range configured for outgoing connections, also known as the ephemeral port range. On Linux this is controlled by the following sysctls:

$ sysctl net.ipv4.ip_local_port_range net.ipv4.ip_local_reserved_ports
net.ipv4.ip_local_port_range = 32768    60999
net.ipv4.ip_local_reserved_ports =

The ip_local_port_range sets the low and high (inclusive) port range to be used for outgoing connections. The ip_local_reserved_ports is used to skip specific ports if the operator needs to reserve them for services.

Vanilla TCP is a happy case

The default ephemeral port range contains more than 28,000 ports (60999+1-32768=28232). Does that mean we can have at most 28,000 outgoing connections? That’s the core question of this blog post!

In TCP the connection is identified by a full 4-tuple, for example:

full 4-tuple 192.168.1.8 32768 104.1.1.229 80

In principle, it is possible to reuse the source IP and port, and share them against another destination. For example, there could be two simultaneous outgoing connections with these 4-tuples:

full 4-tuple #A 192.168.1.8 32768 104.1.1.229 80
full 4-tuple #B 192.168.1.8 32768 151.101.1.57 80

This “source two-tuple” sharing can happen in practice when establishing connections using the vanilla TCP code:

sd = socket.socket(SOCK_STREAM)
sd.connect( (remote_ip, remote_port) )

But slightly different code can prevent this sharing, as we’ll discuss.

In the rest of this blog post, we’ll summarise the behaviour of code fragments that make outgoing connections showing:

  • The technique’s description
  • The typical `errno` value in the case of port exhaustion
  • And whether the kernel is able to reuse the {source IP, source port}-tuple against another destination

The last column is the most important since it shows if there is a low limit of total concurrent connections. As we’re going to see later, the limit is present more often than we’d expect.

technique description errno on port exhaustion possible src 2-tuple reuse
connect(dst_IP, dst_port) EADDRNOTAVAIL yes (good!)

In the case of generic TCP, things work as intended. Towards a single destination it’s possible to have as many connections as an ephemeral range allows. When the range is exhausted (against a single destination), we’ll see EADDRNOTAVAIL error. The system also is able to correctly reuse local two-tuple {source IP, source port} for ESTABLISHED sockets against other destinations. This is expected and desired.

Manually selecting source IP address

Let’s go back to the Cloudflare server setup. Cloudflare operates many services, to name just two: CDN (caching HTTP reverse proxy) and WARP.

For Cloudflare, it’s important that we don’t mix traffic types among our outgoing IPs. Origin servers on the Internet might want to differentiate traffic based on our product. The simplest example is CDN: it’s appropriate for an origin server to firewall off non-CDN inbound connections. Allowing Cloudflare cache pulls is totally fine, but allowing WARP connections which contain untrusted user traffic might lead to problems.

To achieve such outgoing IP separation, each of our applications must be explicit about which source IPs to use. They can’t leave it up to the operating system; the automatically-chosen source could be wrong. While it’s technically possible to configure routing policy rules in Linux to express such requirements, we decided not to do that and keep Linux routing configuration as simple as possible.

Instead, before calling connect(), our applications select the source IP with the bind() syscall. A trick we call “bind-before-connect”:

sd = socket.socket(SOCK_STREAM)
sd.bind( (src_IP, 0) )
sd.connect( (dst_IP, dst_port) )

technique description errno on port exhaustion possible src 2-tuple reuse
bind(src_IP, 0)
connect(dst_IP, dst_port)
EADDRINUSE no (bad!)

This code looks rather innocent, but it hides a considerable drawback. When calling bind(), the kernel attempts to find an unused local two-tuple. Due to BSD API shortcomings, the operating system can’t know what we plan to do with the socket. It’s totally possible we want to listen() on it, in which case sharing the source IP/port with a connected socket will be a disaster! That’s why the source two-tuple selected when calling bind() must be unique.

Due to this API limitation, in this technique the source two-tuple can’t be reused. Each connection effectively “locks” a source port, so the number of connections is constrained by the size of the ephemeral port range. Notice: one source port is used up for each connection, no matter how many destinations we have. This is bad, and is exactly the problem we were dealing with back in 2014 in the WebSockets articles mentioned above.

Fortunately, it’s fixable.

IP_BIND_ADDRESS_NO_PORT

Back in 2014 we fixed the problem by setting the SO_REUSEADDR socket option and manually retrying bind()+ connect() a couple of times on error. This worked ok, but later in 2015 Linux introduced a proper fix: the IP_BIND_ADDRESS_NO_PORT socket option. This option tells the kernel to delay reserving the source port:

sd = socket.socket(SOCK_STREAM)
sd.setsockopt(IPPROTO_IP, IP_BIND_ADDRESS_NO_PORT, 1)
sd.bind( (src_IP, 0) )
sd.connect( (dst_IP, dst_port) )

technique description errno on port exhaustion possible src 2-tuple reuse
IP_BIND_ADDRESS_NO_PORT
bind(src_IP, 0)

connect(dst_IP, dst_port)
EADDRNOTAVAIL yes (good!)

This gets us back to the desired behavior. On modern Linux, when doing bind-before-connect for TCP, you should set IP_BIND_ADDRESS_NO_PORT.

Explicitly selecting a source port

Sometimes an application needs to select a specific source port. For example: the operator wants to control full 4-tuple in order to debug ECMP routing issues.

Recently a colleague wanted to run a cURL command for debugging, and he needed the source port to be fixed. cURL provides the --local-port option to do this¹ :

$ curl --local-port 9999 -4svo /dev/null https://cloudflare.com/cdn-cgi/trace
*   Trying 104.1.1.229:443...

In other situations source port numbers should be controlled, as they can be used as an input to a routing mechanism.

But setting the source port manually is not easy. We’re back to square one in our hackery since IP_BIND_ADDRESS_NO_PORT is not an appropriate tool when calling bind() with a specific source port value. To get the scheme working again and be able to share source 2-tuple, we need to turn to SO_REUSEADDR:

sd = socket.socket(SOCK_STREAM)
sd.setsockopt(socket.SOL_SOCKET, socket.SO_REUSEADDR, 1)
sd.bind( (src_IP, src_port) )
sd.connect( (dst_IP, dst_port) )

Our summary table:

technique description errno on port exhaustion possible src 2-tuple reuse
SO_REUSEADDR
bind(src_IP, src_port)

connect(dst_IP, dst_port)
EADDRNOTAVAIL yes (good!)

Here, the user takes responsibility for handling conflicts, when an ESTABLISHED socket sharing the 4-tuple already exists. In such a case connect will fail with EADDRNOTAVAIL and the application should retry with another acceptable source port number.

Userspace connectx implementation

With these tricks, we can implement a common function and call it connectx. It will do what bind()+connect() should, but won’t have the unfortunate ephemeral port range limitation. In other words, created sockets are able to share local two-tuples as long as they are going to distinct destinations:

def connectx((source_IP, source_port), (destination_IP, destination_port)):

We have three use cases this API should support:

user specified technique
{_, _, dst_IP, dst_port} vanilla connect()
{src_IP, _, dst_IP, dst_port} IP_BIND_ADDRESS_NO_PORT
{src_IP, src_port, dst_IP, dst_port} SO_REUSEADDR

The name we chose isn’t an accident. MacOS (specifically the underlying Darwin OS) has exactly that function implemented as a connectx() system call (implementation):

How to stop running out of ephemeral ports and start to love long-lived connections

It’s more powerful than our connectx code, since it supports TCP Fast Open.

Should we, Linux users, be envious? For TCP, it’s possible to get the right kernel behaviour with the appropriate setsockopt/bind/connect dance, so a kernel syscall is not quite needed.

But for UDP things turn out to be much more complicated and a dedicated syscall might be a good idea.

Outgoing connections on Linux – part 2 – UDP

In the previous section we listed three use cases for outgoing connections that should be supported by the operating system:

  • Vanilla egress: operating system chooses the outgoing IP and port
  • Source IP selection: user selects outgoing IP but the OS chooses port
  • Full 4-tuple: user selects full 4-tuple for the connection

We demonstrated how to implement all three cases on Linux for TCP, without hitting connection count limits due to source port exhaustion.

It’s time to extend our implementation to UDP. This is going to be harder.

For UDP, Linux maintains one hash table that is keyed on local IP and port, which can hold duplicate entries. Multiple UDP connected sockets can not only share a 2-tuple but also a 4-tuple! It’s totally possible to have two distinct, connected sockets having exactly the same 4-tuple. This feature was created for multicast sockets. The implementation was then carried over to unicast connections, but it is confusing. With conflicting sockets on unicast addresses, only one of them will receive any traffic. A newer connected socket will “overshadow” the older one. It’s surprisingly hard to detect such a situation. To get UDP connectx() right, we will need to work around this “overshadowing” problem.

Vanilla UDP is limited

It might come as a surprise to many, but by default, the total count for outbound UDP connections is limited by the ephemeral port range size. Usually, with Linux you can’t have more than ~28,000 connected UDP sockets, even if they point to multiple destinations.

Ok, let’s start with the simplest and most common way of establishing outgoing UDP connections:

sd = socket.socket(SOCK_DGRAM)
sd.connect( (dst_IP, dst_port) )

technique description errno on port exhaustion possible src 2-tuple reuse risk of overshadowing
connect(dst_IP, dst_port) EAGAIN no (bad!) no

The simplest case is not a happy one. The total number of concurrent outgoing UDP connections on Linux is limited by the ephemeral port range size. On our multi-tenant servers, with potentially long-lived gaming and H3/QUIC flows containing WebSockets, this is too limiting.

On TCP we were able to slap on a setsockopt and move on. No such easy workaround is available for UDP.

For UDP, without REUSEADDR, Linux avoids sharing local 2-tuples among UDP sockets. During connect() it tries to find a 2-tuple that is not used yet. As a side note: there is no fundamental reason that it looks for a unique 2-tuple as opposed to a unique 4-tuple during ‘connect()’. This suboptimal behavior might be fixable.

SO_REUSEADDR is hard

To allow local two-tuple reuse we need the SO_REUSEADDR socket option. Sadly, this would also allow established sockets to share a 4-tuple, with the newer socket overshadowing the older one.

sd = socket.socket(SOCK_DGRAM)
sd.setsockopt(socket.SOL_SOCKET, socket.SO_REUSEADDR, 1)
sd.connect( (dst_IP, dst_port) )

technique description errno on port exhaustion possible src 2-tuple reuse risk of overshadowing
SO_REUSEADDR
connect(dst_IP, dst_port)
EAGAIN yes yes (bad!)

In other words, we can’t just set SO_REUSEADDR and move on, since we might hit a local 2-tuple that is already used in a connection against the same destination. We might already have an identical 4-tuple connected socket underneath. Most importantly, during such a conflict we won’t be notified by any error. This is unacceptably bad.

Detecting socket conflicts with eBPF

We thought a good solution might be to write an eBPF program to detect such conflicts. The idea was to put a code on the connect() syscall. Linux cgroups allow the BPF_CGROUP_INET4_CONNECT hook. The eBPF is called every time a process under a given cgroup runs the connect() syscall. This is pretty cool, and we thought it would allow us to verify if there is a 4-tuple conflict before moving the socket from UNCONNECTED to CONNECTED states.

Here is how to load and attach our eBPF

bpftool prog load ebpf.o /sys/fs/bpf/prog_connect4  type cgroup/connect4
bpftool cgroup attach /sys/fs/cgroup/unified/user.slice connect4 pinned /sys/fs/bpf/prog_connect4

With such a code, we’ll greatly reduce the probability of overshadowing:

technique description errno on port exhaustion possible src 2-tuple reuse risk of overshadowing
INET4_CONNECT hook
SO_REUSEADDR
connect(dst_IP, dst_port)
manual port discovery, EPERM on conflict yes yes, but small

However, this solution is limited. First, it doesn’t work for sockets with an automatically assigned source IP or source port, it only works when a user manually creates a 4-tuple connection from userspace. Then there is a second issue: a typical race condition. We don’t grab any lock, so it’s technically possible a conflicting socket will be created on another CPU in the time between our eBPF conflict check and the finish of the real connect() syscall machinery. In short, this lockless eBPF approach is better than nothing, but fundamentally racy.

Socket traversal – SOCK_DIAG ss way

There is another way to verify if a conflicting socket already exists: we can check for connected sockets in userspace. It’s possible to do it without any privileges quite effectively with the SOCK_DIAG_BY_FAMILY feature of netlink interface. This is the same technique the ss tool uses to print out sockets available on the system.

The netlink code is not even all that complicated. Take a look at the code. Inside the kernel, it goes quickly into a fast __udp_lookup() routine. This is great – we can avoid iterating over all sockets on the system.

With that function handy, we can draft our UDP code:

sd = socket.socket(SOCK_DGRAM)
sd.setsockopt(socket.SOL_SOCKET, socket.SO_REUSEADDR, 1)
cookie = sd.getsockopt(socket.SOL_SOCKET, SO_COOKIE, 8)
sd.bind( src_addr )
c, _ = _netlink_udp_lookup(family, src_addr, dst_addr)
if c != cookie:
    raise OSError(...)
sd.connect( dst_addr )

This code has the same race condition issue as the connect inet eBPF hook before. But it’s a good starting point. We need some locking to avoid the race condition. Perhaps it’s possible to do it in the userspace.

SO_REUSEADDR as a lock

Here comes a breakthrough: we can use SO_REUSEADDR as a locking mechanism. Consider this:

sd = socket.socket(SOCK_DGRAM)
cookie = sd.getsockopt(socket.SOL_SOCKET, SO_COOKIE, 8)
sd.setsockopt(socket.SOL_SOCKET, socket.SO_REUSEADDR, 1)
sd.bind( src_addr )
sd.setsockopt(socket.SOL_SOCKET, socket.SO_REUSEADDR, 0)
c, _ = _netlink_udp_lookup(family, src_addr, dst_addr)
if c != cookie:
    raise OSError()
sd.connect( dst_addr )
sd.setsockopt(socket.SOL_SOCKET, socket.SO_REUSEADDR, 1)

The idea here is:

  • We need REUSEADDR around bind, otherwise it wouldn’t be possible to reuse a local port. It’s technically possible to clear REUSEADDR after bind. Doing this technically makes the kernel socket state inconsistent, but it doesn’t hurt anything in practice.
  • By clearing REUSEADDR, we’re locking new sockets from using that source port. At this stage we can check if we have ownership of the 4-tuple we want. Even if multiple sockets enter this critical section, only one, the newest, can win this verification. This is a cooperative algorithm, so we assume all tenants try to behave.
  • At this point, if the verification succeeds, we can perform connect() and have a guarantee that the 4-tuple won’t be reused by another socket at any point in the process.

This is rather convoluted and hacky, but it satisfies our requirements:

technique description errno on port exhaustion possible src 2-tuple reuse risk of overshadowing
REUSEADDR as a lock EAGAIN yes no

Sadly, this schema only works when we know the full 4-tuple, so we can’t rely on kernel automatic source IP or port assignments.

Faking source IP and port discovery

In the case when the user calls ‘connect’ and specifies only target 2-tuple – destination IP and port, the kernel needs to fill in the missing bits – the source IP and source port. Unfortunately the described algorithm expects the full 4-tuple to be known in advance.

One solution is to implement source IP and port discovery in userspace. This turns out to be not that hard. For example, here’s a snippet of our code:

def _get_udp_port(family, src_addr, dst_addr):
    if ephemeral_lo == None:
        _read_ephemeral()
    lo, hi = ephemeral_lo, ephemeral_hi
    start = random.randint(lo, hi)
    ...

Putting it all together

Combining the manual source IP, port discovery and the REUSEADDR locking dance, we get a decent userspace implementation of connectx() for UDP.

We have covered all three use cases this API should support:

user specified comments
{_, _, dst_IP, dst_port} manual source IP and source port discovery
{src_IP, _, dst_IP, dst_port} manual source port discovery
{src_IP, src_port, dst_IP, dst_port} just our “REUSEADDR as lock” technique

Take a look at the full code.

Summary

This post described a problem we hit in production: running out of ephemeral ports. This was partially caused by our servers running numerous concurrent connections, but also because we used the Linux sockets API in a way that prevented source port reuse. It meant that we were limited to ~28,000 concurrent connections per protocol, which is not enough for us.

We explained how to allow source port reuse and prevent having this ephemeral-port-range limit imposed. We showed an userspace connectx() function, which is a better way of creating outgoing TCP and UDP connections on Linux.

Our UDP code is more complex, based on little known low-level features, assumes cooperation between tenants and undocumented behaviour of the Linux operating system. Using REUSEADDR as a locking mechanism is rather unheard of.

The connectx() functionality is valuable, and should be added to Linux one way or another. It’s not trivial to get all its use cases right. Hopefully, this blog post shows how to achieve this in the best way given the operating system API constraints.

___

¹ On a side note, on the second cURL run it fails due to TIME-WAIT sockets: “bind failed with errno 98: Address already in use”.

One option is to wait for the TIME_WAIT socket to die, or work around this with the time-wait sockets kill script. Killing time-wait sockets is generally a bad idea, violating protocol, unneeded and sometimes doesn’t work. But hey, in some extreme cases it’s good to know what’s possible. Just saying.

Extending Cloudflare’s Zero Trust platform to support UDP and Internal DNS

Post Syndicated from Abe Carryl original https://blog.cloudflare.com/extending-cloudflares-zero-trust-platform-to-support-udp-and-internal-dns/

Extending Cloudflare’s Zero Trust platform to support UDP and Internal DNS

Extending Cloudflare’s Zero Trust platform to support UDP and Internal DNS

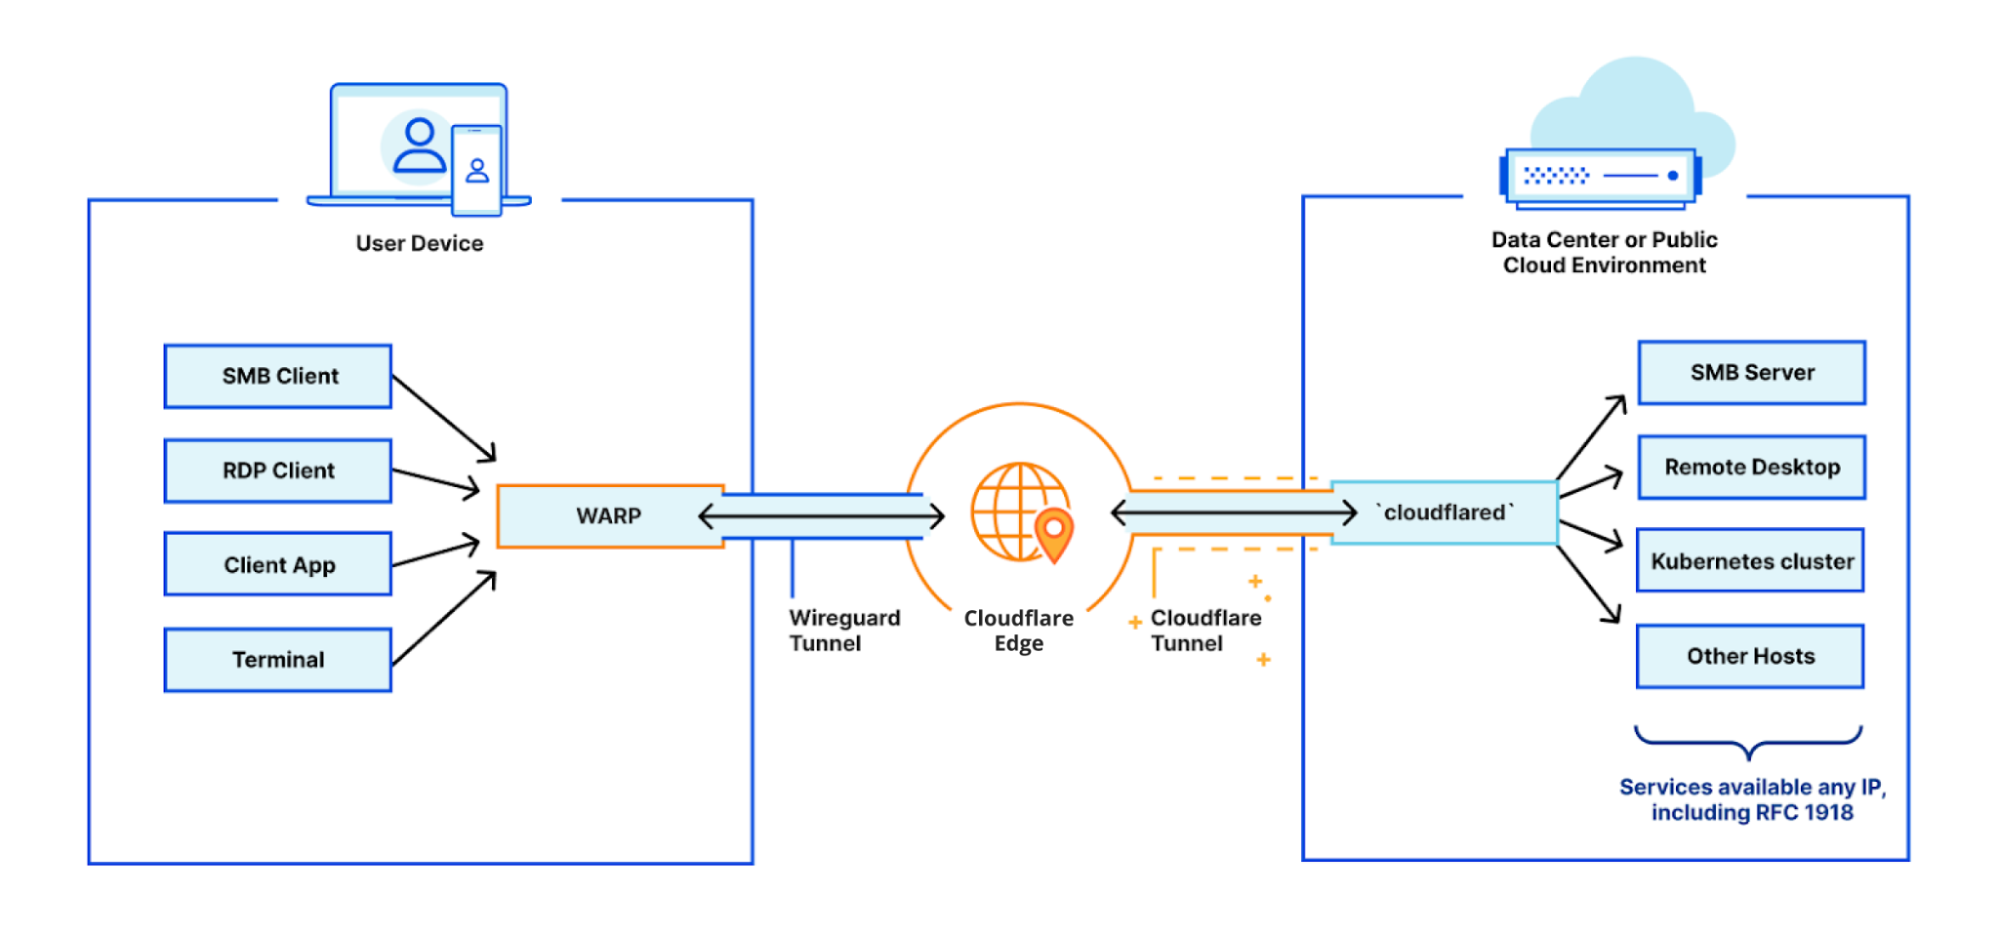
At the end of 2020, Cloudflare empowered organizations to start building a private network on top of our network. Using Cloudflare Tunnel on the server side, and Cloudflare WARP on the client side, the need for a legacy VPN was eliminated. Fast-forward to today, and thousands of organizations have gone on this journey with us — unplugging their legacy VPN concentrators, internal firewalls, and load balancers. They’ve eliminated the need to maintain all this legacy hardware; they’ve dramatically improved speeds for end users; and they’re able to maintain Zero Trust rules organization-wide.

We started with TCP, which is powerful because it enables an important range of use cases. However, to truly replace a VPN, you need to be able to cover UDP, too. Starting today, we’re excited to provide early access to UDP on Cloudflare’s Zero Trust platform. And even better: as a result of supporting UDP, we can offer Internal DNS — so there’s no need to migrate thousands of private hostnames by hand to override DNS rules. You can get started with Cloudflare for Teams for free today by signing up here; and if you’d like to join the waitlist to gain early access to UDP and Internal DNS, please visit here.

The topology of a private network on Cloudflare

Building out a private network has two primary components: the infrastructure side, and the client side.

The infrastructure side of the equation is powered by Cloudflare Tunnel, which simply connects your infrastructure (whether that be a singular application, many applications, or an entire network segment) to Cloudflare. This is made possible by running a simple command-line daemon in your environment to establish multiple secure, outbound-only, load-balanced links to Cloudflare. Simply put, Tunnel is what connects your network to Cloudflare.

On the other side of this equation, we need your end users to be able to easily connect to Cloudflare and, more importantly, your network. This connection is handled by our robust device client, Cloudflare WARP. This client can be rolled out to your entire organization in just a few minutes using your in-house MDM tooling, and it establishes a secure, WireGuard-based connection from your users’ devices to the Cloudflare network.

Extending Cloudflare’s Zero Trust platform to support UDP and Internal DNS

Now that we have your infrastructure and your users connected to Cloudflare, it becomes easy to tag your applications and layer on Zero Trust security controls to verify both identity and device-centric rules for each and every request on your network.

Up until now though, only TCP was supported.

Extending Cloudflare Zero Trust to support UDP

Over the past year, with more and more users adopting Cloudflare’s Zero Trust platform, we have gathered data surrounding all the use cases that are keeping VPNs plugged in. Of those, the most common need has been blanket support for UDP-based traffic. Modern protocols like QUIC take advantage of UDP’s lightweight architecture — and at Cloudflare, we believe it is part of our mission to advance these new standards to help build a better Internet.

Today, we’re excited to open an official waitlist for those who would like early access to Cloudflare for Teams with UDP support.

What is UDP and why does it matter?

UDP is a vital component of the Internet. Without it, many applications would be rendered woefully inadequate for modern use. Applications which depend on near real time communication such as video streaming or VoIP services are prime examples of why we need UDP and the role it fills for the Internet. At their core, however, TCP and UDP achieve the same results — just through vastly different means. Each has their own unique benefits and drawbacks, which are always felt downstream by the applications that utilize them.

Here’s a quick example of how they both work, if you were to ask a question to somebody as a metaphor. TCP should look pretty familiar: you would typically say hi, wait for them to say hi back, ask how they are, wait for their response, and then ask them what you want.

UDP, on the other hand, is the equivalent of just walking up to someone and asking what you want without checking to make sure that they’re listening. With this approach, some of your question may be missed, but that’s fine as long as you get an answer.

Like the conversation above, with UDP many applications actually don’t care if some data gets lost; video streaming or game servers are good examples here. If you were to lose a packet in transit while streaming, you wouldn’t want the entire stream to be interrupted until this packet is received — you’d rather just drop the packet and move on. Another reason application developers may utilize UDP is because they’d prefer to develop their own controls around connection, transmission, and quality control rather than use TCP’s standardized ones.

For Cloudflare, end-to-end support for UDP-based traffic will unlock a number of new use cases. Here are a few we think you’ll agree are pretty exciting.

Internal DNS Resolvers

Most corporate networks require an internal DNS resolver to disseminate access to resources made available over their Intranet. Your Intranet needs an internal DNS resolver for many of the same reasons the Internet needs public DNS resolvers. In short, humans are good at many things, but remembering long strings of numbers (in this case IP addresses) is not one of them. Both public and internal DNS resolvers were designed to solve this problem (and much more) for us.

In the corporate world, it would be needlessly painful to ask internal users to navigate to, say, 192.168.0.1 to simply reach Sharepoint or OneDrive. Instead, it’s much easier to create DNS entries for each resource and let your internal resolver handle all the mapping for your users as this is something humans are actually quite good at.

Under the hood, DNS queries generally consist of a single UDP request from the client. The server can then return a single reply to the client. Since DNS requests are not very large, they can often be sent and received in a single packet. This makes support for UDP across our Zero Trust platform a key enabler to pulling the plug on your VPN.

Thick Client Applications

Another common use case for UDP is thick client applications. One benefit of UDP we have discussed so far is that it is a lean protocol. It’s lean because the three-way handshake of TCP and other measures for reliability have been stripped out by design. In many cases, application developers still want these reliability controls, but are intimately familiar with their applications and know these controls could be better handled by tailoring them to their application. These thick client applications often perform critical business functions and must be supported end-to-end to migrate. As an example, legacy versions of Outlook may be implemented through thick clients where most of the operations are performed by the local machine, and only the sync interactions with Exchange servers occur over UDP.

Again, UDP support on our Zero Trust platform now means these types of applications are no reason to remain on your legacy VPN.

And more…

A huge portion of the world’s Internet traffic is transported over UDP. Often, people equate time-sensitive applications with UDP, where occasionally dropping packets would be better than waiting — but there are a number of other use cases, and we’re excited to be able to provide sweeping support.

How can I get started today?

You can already get started building your private network on Cloudflare with our tutorials and guides in our developer documentation. Below is the critical path. And if you’re already a customer, and you’re interested in joining the waitlist for UDP and Internal DNS access, please skip ahead to the end of this post!

Connecting your network to Cloudflare

First, you need to install cloudflared on your network and authenticate it with the command below:

cloudflared tunnel login

Next, you’ll create a tunnel with a user-friendly name to identify your network or environment.

cloudflared tunnel create acme-network

Finally, you’ll want to configure your tunnel with the IP/CIDR range of your private network. By doing this, you’re making the Cloudflare WARP agent aware that any requests to this IP range need to be routed to our new tunnel.

cloudflared tunnel route ip add 192.168.0.1/32

Then, all you need to do is run your tunnel!

Connecting your users to your network

To connect your first user, start by downloading the Cloudflare WARP agent on the device they’ll be connecting from, then follow the steps in our installer.

Next, you’ll visit the Teams Dashboard and define who is allowed to access our network by creating an enrollment policy. This policy can be created under Settings > Devices > Device Enrollment. In the example below, you can see that we’re requiring users to be located in Canada and have an email address ending @cloudflare.com.

Once you’ve created this policy, you can enroll your first device by clicking the WARP desktop icon on your machine and navigating to preferences > Account > Login with Teams.

Last, we’ll remove the IP range we added to our Tunnel from the Exclude list in Settings > Network > Split Tunnels. This will ensure this traffic is, in fact, routed to Cloudflare and then sent to our private network Tunnel as intended.

In addition to the tutorial above, we also have in-product guides in the Teams Dashboard which go into more detail about each step and provide validation along the way.

To create your first Tunnel, navigate to the Access > Tunnels.

To enroll your first device into WARP, navigate to My Team > Devices.

What’s Next

We’re incredibly excited to release our waitlist today and even more excited to launch this feature in the coming weeks. We’re just getting started with private network Tunnels and plan to continue adding more support for Zero Trust access rules for each request to each internal DNS hostname after launch. We’re also working on a number of efforts to measure performance and to ensure we remain the fastest Zero Trust platform — making using us a delight for your users, compared to the pain of using a legacy VPN.

Everything you ever wanted to know about UDP sockets but were afraid to ask, part 1

Post Syndicated from Marek Majkowski original https://blog.cloudflare.com/everything-you-ever-wanted-to-know-about-udp-sockets-but-were-afraid-to-ask-part-1/

Everything you ever wanted to know about UDP sockets but were afraid to ask, part 1
Snippet from internal presentation about UDP inner workings in Spectrum. Who said UDP is simple!

Everything you ever wanted to know about UDP sockets but were afraid to ask, part 1

Historically Cloudflare’s core competency was operating an HTTP reverse proxy. We’ve spent significant effort optimizing traditional HTTP/1.1 and HTTP/2 servers running on top of TCP. Recently though, we started operating big scale stateful UDP services.

Stateful UDP gains popularity for a number of reasons:

QUIC is a new transport protocol based on UDP, it powers HTTP/3. We see the adoption accelerating.

We operate WARP — our Wireguard protocol based tunneling service — which uses UDP under the hood.

— We have a lot of generic UDP traffic going through our Spectrum service.

Although UDP is simple in principle, there is a lot of domain knowledge needed to run things at scale. In this blog post we’ll cover the basics: all you need to know about UDP servers to get started.

Connected vs unconnected

How do you “accept” connections on a UDP server? If you are using unconnected sockets, you generally don’t.

But let’s start with the basics. UDP sockets can be “connected” (or “established”) or “unconnected”. Connected sockets have a full 4-tuple associated {source ip, source port, destination ip, destination port}, unconnected sockets have 2-tuple {bind ip, bind port}.

Traditionally the connected sockets were mostly used for outgoing flows, while unconnected for inbound “server” side connections.

UDP client

As we’ll learn today, these can be mixed. It is possible to use connected sockets for ingress handling, and unconnected for egress. To illustrate the latter, consider these two snippets. They do the same thing — send a packet to the DNS resolver. First snippet is using a connected socket:

Everything you ever wanted to know about UDP sockets but were afraid to ask, part 1

Second, using unconnected one:

Everything you ever wanted to know about UDP sockets but were afraid to ask, part 1

Which one is better? In the second case, when receiving, the programmer should verify the source IP of the packet. Otherwise, the program can get confused by some random inbound internet junk — like port scanning. It is tempting to reuse the socket descriptor and query another DNS server afterwards, but this would be a bad idea, particularly when dealing with DNS. For security, DNS assumes the client source port is unpredictable and short-lived.

Generally speaking for outbound traffic it’s preferable to use connected UDP sockets.

Connected sockets can save route lookup on each packet by employing a clever optimization — Linux can save a route lookup result on a connection struct. Depending on the specifics of the setup this might save some CPU cycles.

For completeness, it is possible to roll a new source port and reuse a socket descriptor with an obscure trick called “dissolving of the socket association”. It can be done with connect(AF_UNSPEC), but this is rather advanced Linux magic.

UDP server

Traditionally on the server side UDP requires unconnected sockets. Using them requires a bit of finesse. To illustrate this, let’s write an UDP echo server. In practice, you probably shouldn’t write such a server, due to a risk of becoming a DoS reflection vector. Among other protections, like rate limiting, UDP services should always respond with a strictly smaller amount of data than was sent in the initial packet. But let’s not digress, the naive UDP echo server might look like:

Everything you ever wanted to know about UDP sockets but were afraid to ask, part 1

This code begs questions:

— Received packets can be longer than 2048 bytes. This can happen over loop back, when using jumbo frames or with help of IP fragmentation.

— It’s totally possible for the received packet to have an empty payload.

— What about inbound ICMP errors?

These problems are specific to UDP, they don’t happen in the TCP world. TCP can transparently deal with MTU / fragmentation and ICMP errors. Depending on the specific protocol, a UDP service might need to be more complex and pay extra care to such corner cases.

Sourcing packets from a wildcard socket

There is a bigger problem with this code. It only works correctly when binding to a specific IP address, like ::1 or 127.0.0.1. It won’t always work when we bind to a wildcard. The issue lies in the sendto() line — we didn’t explicitly set the outbound IP address! Linux doesn’t know where we’d like to source the packet from, and it will choose a default egress IP address. It might not be the IP the client communicated to. For example, let’s say we added ::2 address to loop back interface and sent a packet to it, with src IP set to a valid ::1:

marek@mrprec:~$ sudo tcpdump -ni lo port 1234 -t
tcpdump: verbose output suppressed, use -v or -vv for full protocol decode
listening on lo, link-type EN10MB (Ethernet), capture size 262144 bytes
IP6 ::1.41879 > ::2.1234: UDP, length 2
IP6 ::1.1234 > ::1.41879: UDP, length 2

Here we can see the packet correctly flying from ::1 to ::2, to our server. But then when the server responds, it sources the response from ::1 IP which in this case is wrong.

On the server side, when binding to a wildcard:

— we might receive packets destined to a number of IP addresses

— we must be very careful when responding and use appropriate source IP address

BSD Sockets API doesn’t make it easy to understand where the received packet was destined to. On Linux and BSD it is possible to request useful CMSG metadata with IP_RECVPKTINO and IPV6_RECVPKTINFO.

An improved server loop might look like:

Everything you ever wanted to know about UDP sockets but were afraid to ask, part 1

The recvmsg and sendmsg syscalls, as opposed to recvfrom / sendto allow the programmer to request and set extra CMSG metadata, which is very handy when dealing with UDP.

The IPV6_PKTINFO CMSG contains this data structure:

Everything you ever wanted to know about UDP sockets but were afraid to ask, part 1

We can find here the IP address and interface number of the packet target. Notice, there’s no place for a port number.

Graceful server restart

Many traditional UDP protocols, like DNS, are request-response based. Since there is no state associated with a higher level “connection”, the server can restart, to upgrade or change configuration, without any problems. Ideally, sockets should be managed with the usual systemd socket activation to avoid the short time window where the socket is down.

Modern protocols are often connection-based. For such servers, on restart, it’s beneficial to keep the old connections directed to the old server process, while the new server instance is available for handling the new connections. The old connections will eventually die off, and the old server process will be able to terminate. This is a common and easy practice in the TCP world where each connection has its own file descriptor. The old server process stops accept()-ing new connections and just waits for the old connections to gradually go away. NGINX has a good documentation on the subject.

Sadly, in UDP you can’t accept() new connections. Doing graceful server restarts for UDP is surprisingly hard.

Established-over-unconnected technique

For some services we are using a technique which we call “established-over-unconnected”. This comes from a realization that on Linux it’s possible to create a connected socket *over* an unconnected one. Consider this code:

Everything you ever wanted to know about UDP sockets but were afraid to ask, part 1

Does this look hacky? Well, it should. What we do here is:

— We start a UDP unconnected socket.

— We wait for a client to come in.

— As soon as we receive the first packet from the client, we immediately create a new fully connected socket, *over* the unconnected socket! It shares the same local port and local IP.

This is how it might look in ss:

marek@mrprec:~$ ss -panu sport = :1234 or dport = :1234 | cat
State     Recv-Q    Send-Q       Local Address:Port        Peer Address:Port    Process                                                                         
ESTAB     0         0                    [::1]:1234               [::1]:44592    python3
UNCONN    0         0                        *:1234                   *:*        python3
ESTAB     0         0                    [::1]:44592              [::1]:1234     nc

Here you can see the two sockets managed in our python test server. Notice the established socket is sharing the unconnected socket port.

This trick is basically reproducing the ‘accept()` behaviour in UDP, where each ingress connection gets its own dedicated socket descriptor.

While this trick is nice, it’s not without drawbacks — it’s racy in two places. First, it’s possible that the client will send more than one packet to the unconnected socket before the connected socket is created. The application code should work around it — if a packet received from the server socket belongs to an already existing connected flow, it shall be handed over to the right place. Then, during the creation of the connected socket, in the short window after bind() before connect() we might receive unexpected packets belonging to the unconnected socket! We don’t want these packets here. It is necessary to filter the source IP/port when receiving early packets on the connected socket.

Is this approach worth the extra complexity? It depends on the use case. For a relatively small number of long-lived flows, it might be ok. For a high number of short-lived flows (especially DNS or NTP) it’s an overkill.

Keeping old flows stable during service restarts is particularly hard in UDP. The established-over-unconnected technique is just one of the simpler ways of handling it. We’ll leave another technique, based on SO_REUSEPORT ebpf, for a future blog post.

Summary

In this blog post we started by highlighting connected and unconnected UDP sockets. Then we discussed why binding UDP servers to a wildcard is hard, and how IP_PKTINFO CMSG can help to solve it. We discussed the UDP graceful restart problem, and hinted on an established-over-unconnected technique.

Socket type Created with Appropriate syscalls
established connect() recv()/send()
established bind() + connect() recvfrom()/send(), watch out for the race after bind(), verify source of the packet
unconnected bind(specific IP) recvfrom()/sendto()
unconnected bind(wildcard) recvmsg()/sendmsg() with IP_PKTINFO CMSG

Stay tuned, in future blog posts we might go even deeper into the curious world of production UDP servers.

Cloudflare blocks an almost 2 Tbps multi-vector DDoS attack

Post Syndicated from Omer Yoachimik original https://blog.cloudflare.com/cloudflare-blocks-an-almost-2-tbps-multi-vector-ddos-attack/

Cloudflare blocks an almost 2 Tbps multi-vector DDoS attack

Cloudflare blocks an almost 2 Tbps multi-vector DDoS attack

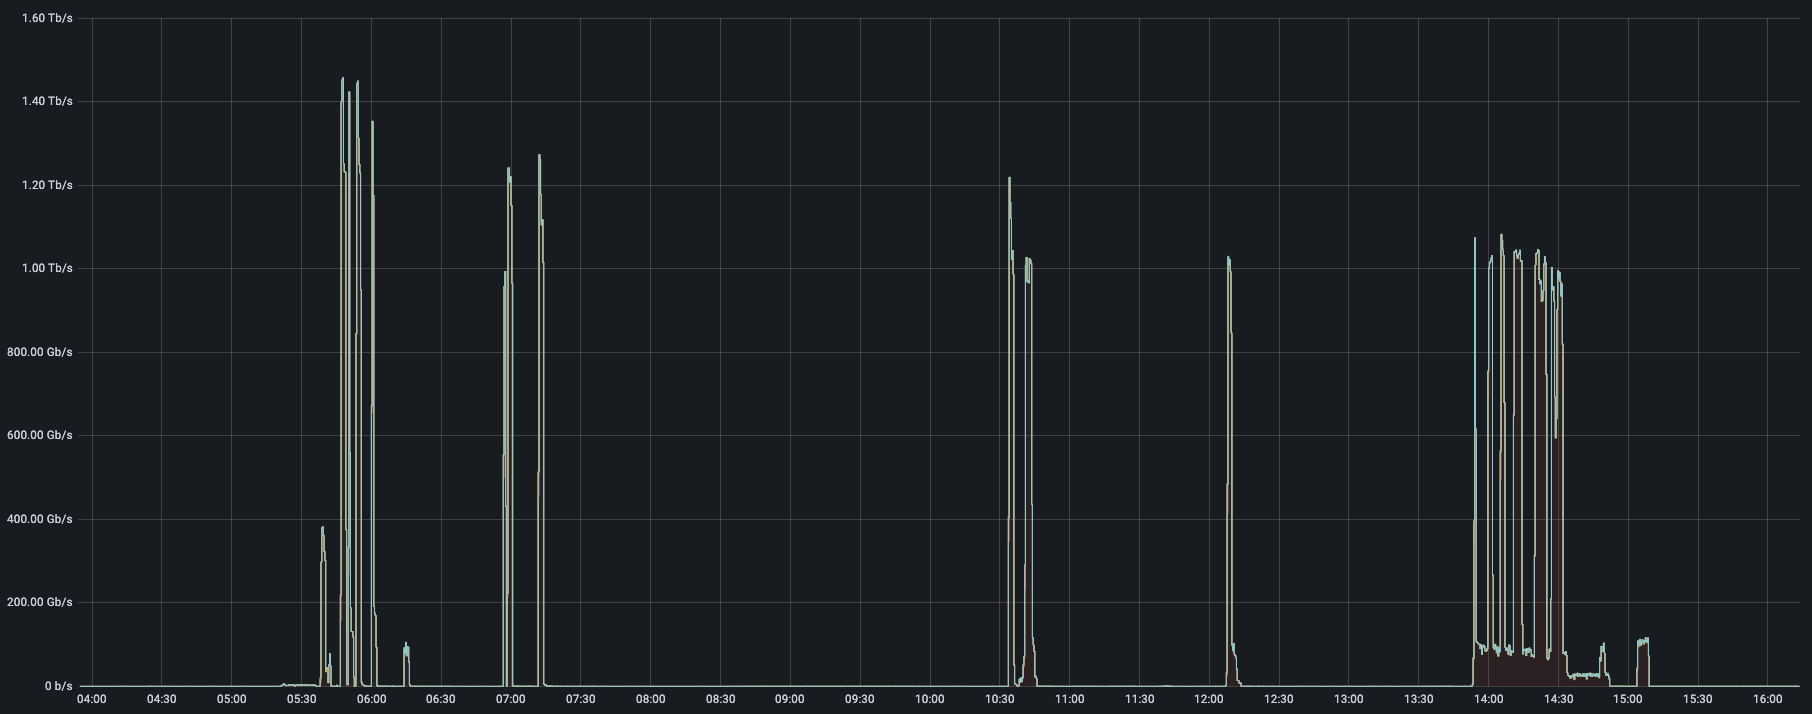
Earlier this week, Cloudflare automatically detected and mitigated a DDoS attack that peaked just below 2 Tbps — the largest we’ve seen to date. This was a multi-vector attack combining DNS amplification attacks and UDP floods. The entire attack lasted just one minute. The attack was launched from approximately 15,000 bots running a variant of the original Mirai code on IoT devices and unpatched GitLab instances.

Cloudflare blocks an almost 2 Tbps multi-vector DDoS attack
DDoS attack peaking just below 2 Tbps‌‌

Network-layer DDoS attacks increased by 44%

Last quarter, we saw multiple terabit-strong DDoS attacks and this attack continues this trend of increased attack intensity. Another key finding from our Q3 DDoS Trends report was that network-layer DDoS attacks actually increased by 44% quarter-over-quarter. While the fourth quarter is not over yet, we have, again, seen multiple terabit-strong attacks that targeted Cloudflare customers.

Cloudflare blocks an almost 2 Tbps multi-vector DDoS attack
DDoS attacks peaking at 1-1.4 Tbps

How did Cloudflare mitigate this attack?

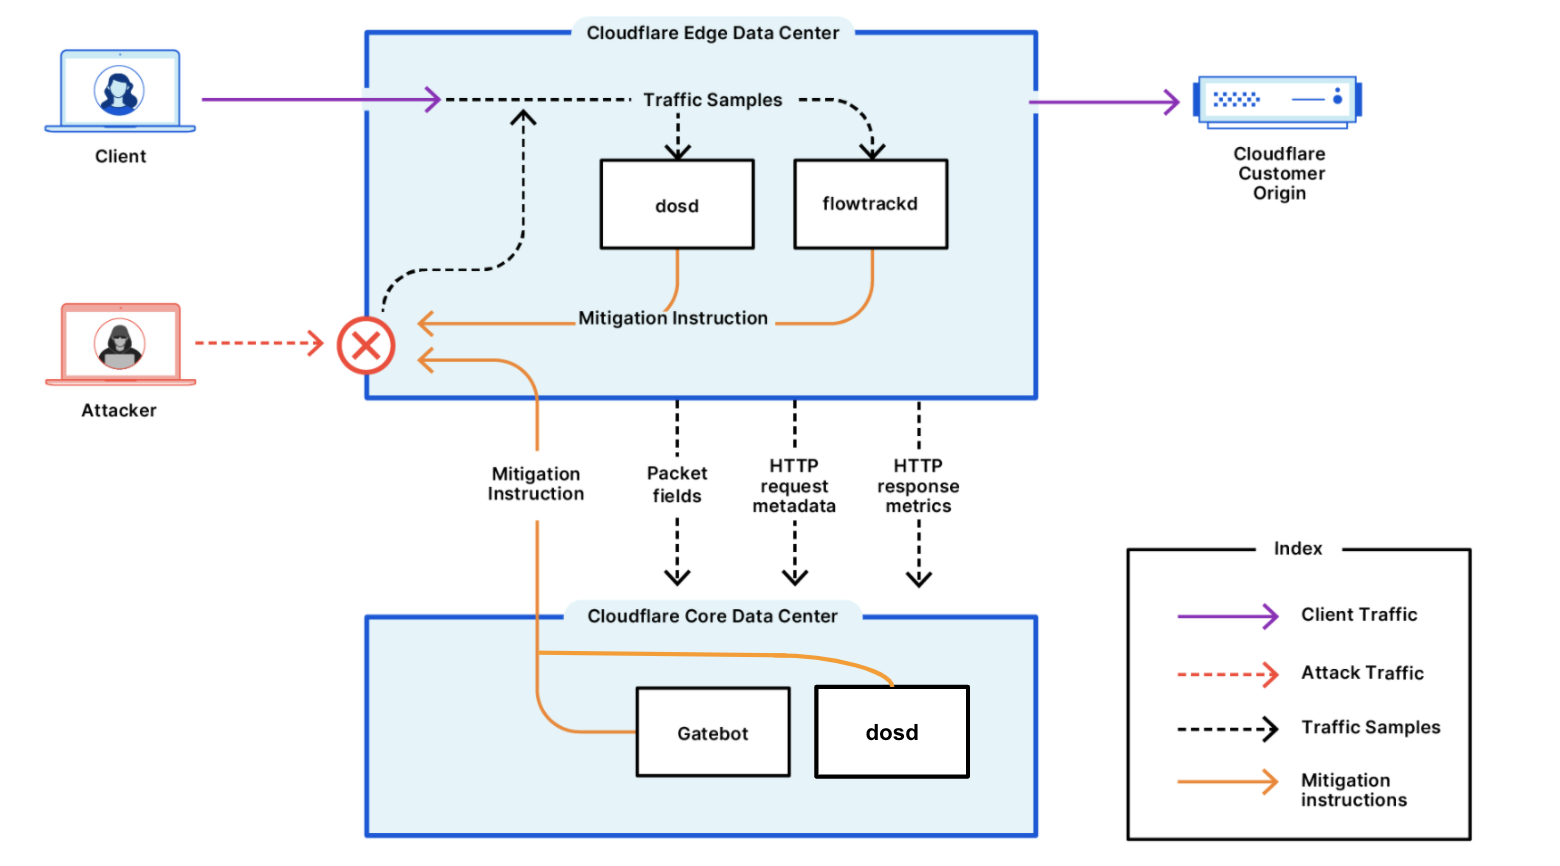
To begin with, our systems constantly analyze traffic samples “out-of-path” which allows us to asynchronously detect DDoS attacks without causing latency or impacting performance. Once the attack traffic was detected (within sub-seconds), our systems generated a real-time signature that surgically matched against the attack patterns to mitigate the attack without impacting legitimate traffic.

Once generated, the fingerprint is propagated as an ephemeral mitigation rule to the most optimal location in the Cloudflare edge for cost-efficient mitigation. In this specific case, as with most L3/4 DDoS attacks, the rule was pushed in-line into the Linux kernel eXpress Data Path (XDP) to drop the attack packet at wirespeed.

Cloudflare blocks an almost 2 Tbps multi-vector DDoS attack
A conceptual diagram of Cloudflare’s DDoS protection systems

Read more about Cloudflare’s DDoS Protection systems.

Helping build a better Internet

Cloudflare’s mission is to help build a better Internet — one that is secure, faster, and more reliable for everyone. The DDoS team’s vision is derived from this mission: our goal is to make the impact of DDoS attacks a thing of the past. Whether it’s the Meris botnet that launched some of the largest HTTP DDoS attacks on record, the recent attacks on VoIP providers or this Mirai-variant that’s DDoSing Internet properties, Cloudflare’s network automatically detects and mitigates DDoS attacks. Cloudflare provides a secure, reliable, performant, and customizable platform for Internet properties of all types.

For more information about Cloudflare’s DDoS protection, reach out to us or have a go with a hands-on evaluation of Cloudflare’s Free plan here.

Update on recent VoIP attacks: What should I do if I’m attacked?

Post Syndicated from Omer Yoachimik original https://blog.cloudflare.com/update-on-voip-attacks/

Update on recent VoIP attacks: What should I do if I’m attacked?

Update on recent VoIP attacks: What should I do if I’m attacked?

Attackers continue targeting VoIP infrastructure around the world. In our blog from last week, May I ask who’s calling, please? A recent rise in VoIP DDoS attacks, we reviewed how the SIP protocol works, ways it can be abused, and how Cloudflare can help protect against attacks on VoIP infrastructure without impacting performance.

Cloudflare’s network stands in front of some of the largest, most performance-sensitive voice and video providers in the world, and is uniquely well suited to mitigating attacks on VoIP providers.

Because of the sustained attacks we are observing, we are sharing details on recent attack patterns, what steps they should take before an attack, and what to do after an attack has taken place.

Below are three of the most common questions we’ve received from companies concerned about attacks on their VoIP systems, and Cloudflare’s answers.

Question #1: How is VoIP infrastructure being attacked?

The attackers primarily use off-the-shelf booter services to launch attacks against VoIP infrastructure. The attack methods being used are not novel, but the persistence of the attacker and their attempts to understand the target’s infrastructure are.

Attackers have used various attack vectors to probe the existing defenses of targets and try to infiltrate any existing defenses to disrupt VoIP services offered by certain providers. In some cases, they have been successful. HTTP attacks against API gateways and the corporate websites of the providers have been combined with network-layer and transport-layer attack against VoIP infrastructures. Examples:

  1. TCP floods targeting stateful firewalls
    These are being used in “trial-and-error” type attacks. They are not very effective against telephony infrastructure specifically (because it’s mostly UDP) but very effective at overwhelming stateful firewalls.
  2. UDP floods targeting SIP infrastructure
    Floods of UDP traffic that have no well-known fingerprint, aimed at critical VoIP services. Generic floods like this may look like legitimate traffic to unsophisticated filtering systems.
  3. UDP reflection targeting SIP infrastructure
    These methods, when targeted at SIP or RTP services, can easily overwhelm Session Border Controllers (SBCs) and other telephony infrastructure. The attacker seems to learn enough about the target’s infrastructure to target such services with high precision.
  4. SIP protocol-specific attacks
    Attacks at the application layer are of particular concern because of the higher resource cost of generating application errors vs filtering on network devices.

Question #2: How should I prepare my organization in case our VoIP infrastructure is targeted?

  1. Deploy an always-on DDoS mitigation service
    Cloudflare recommends the deployment of always-on network level protection, like Cloudflare Magic Transit, prior to your organization being attacked.

    Do not rely on reactive on-demand SOC-based DDoS Protection services that require humans to analyze attack traffic — they take too long to respond. Instead, onboard to a cloud service that has sufficient network capacity and automated DDoS mitigation systems.

    Cloudflare has effective mitigations in place for the attacks seen against VoIP infrastructure, including for sophisticated TCP floods and SIP specific attacks.

  2. Enforce a positive security model
    Block TCP on IP/port ranges that are not expected to receive TCP, instead of relying on on-premise firewalls that can be overwhelmed. Block network probing attempts (e.g. ICMP) and other packets that you don’t normally expect to see.
  3. Build custom mitigation strategies
    Work together with your DDoS protection vendor to tailor mitigation strategies to your workload. Every network is different, and each poses unique challenges when integrating with DDoS mitigation systems.
  4. Educate your employees
    Train all of your employees to be on the lookout for ransom demands. Check email, support tickets, form submissions, and even server access logs. Ensure employees know to immediately report ransom demands to your Security Incident Response team.

Question #3: What should I do if I receive a ransom/threat?

  1. Do not to pay the ransom
    Paying the ransom only encourages bad actors—and there’s no guarantee that they won’t attack your network now or later.
  2. Notify Cloudflare
    We can help ensure your website and network infrastructure are safeguarded against these attacks.
  3. Notify local law enforcement
    They will also likely request a copy of the ransom letter that you received.

Cloudflare is here to help

With over 100 Tbps of network capacity, a network architecture that efficiently filters traffic close to the source, and a physical presence in over 250 cities, Cloudflare can help protect critical VoIP infrastructure without impacting latency, jitter, and call quality. Test results demonstrate a performance improvement of 36% on average across the globe for a real customer network using Cloudflare Magic Transit.

Some of the largest voice and video providers in the world rely on Cloudflare to protect their networks and ensure their services remain online and fast. We stand ready to help.

Talk to a Cloudflare specialist to learn more.
Under attack? Contact our hotline to speak with someone immediately.

Raking the floods: How to protect UDP services from DoS attacks with eBPF

Post Syndicated from Jonas Otten original https://blog.cloudflare.com/building-rakelimit/

Raking the floods: How to protect UDP services from DoS attacks with eBPF

Raking the floods: How to protect UDP services from DoS attacks with eBPF

Cloudflare’s globally distributed network is not just designed to protect HTTP services but any kind of TCP or UDP traffic that passes through our edge. To this end, we’ve built a number of sophisticated DDoS mitigation systems, such as Gatebot, which analyze world-wide traffic patterns. However, we’ve always employed defense-in-depth: in addition to global protection systems we also use off-the shelf mechanisms such as TCP SYN-cookies, which protect individual servers locally from the very common SYN-flood. But there’s a catch: such a mechanism does not exist for UDP. UDP is a connectionless protocol and does not have similar context around packets, especially considering that Cloudflare powers services such as Spectrum which are agnostic to the upper layer protocol (DNS, NTP, …), so my 2020 intern class project was to come up with a different approach.

Protecting UDP services

First of all, let’s discuss what it actually means to provide protection to UDP services. We want to ensure that an attacker cannot drown out legitimate traffic. To achieve this we want to identify floods and limit them while leaving legitimate traffic untouched.

The idea to mitigate such attacks is straight forward: first identify a group of packets that is related to an attack, and then apply a rate limit on this group. Such groups are determined based on the attributes available to us in the packet, such as addresses and ports.

We do not want to completely drop the flood of traffic, as legitimate traffic may still be part of it. We only want to drop as much traffic as necessary to comply with our set rate limit. Completely ignoring a set of packets just because it is slightly above the rate limit is not an option, as it may contain legitimate traffic.

This ensures both that our service stays responsive but also that legitimate packets experience as little impact as possible.

While rate limiting is a somewhat straightforward procedure, determining groups is a bit harder, for a number of reasons.

Finding needles in the haystack

The problem in determining groups in packets is that we have barely any context. We consider four things as useful attributes as attack signatures: the source address and port as well as the destination address and port. While that already is not a lot, it gets worse: the source address and port may not even be accurate. Packets can be spoofed, in which case an attacker hides their own address. That means only keeping a rate per source address may not provide much value, as it could simply be spoofed.

But there is another problem: keeping one rate per address does not scale. When bringing IPv6 into the equation and its whopping address space it becomes clear it’s not going to work.

To solve these issues we turned to the academic world and found what we were looking for, the problem of Heavy Hitters. Heavy Hitters are elements of a datastream that appear frequently, and can be expressed relative to the overall elements of the stream. We can define for example that an element is considered to be a Heavy Hitter if its frequency exceeds, say, 10% of the overall count. To do so we naively could suggest to simply maintain a counter per element, but due to the space limitations this will not scale. Instead probabilistic algorithms such as a CountMin sketch or the SpaceSaving algorithm can be used. These provide an estimated count instead of a precise one, but are capable of doing this with constant memory requirements, and in our case we will just save rates into the CountMin sketch instead of counts. So no matter how many unique elements we have to track, the memory consumption is the same.

We now have a way of finding the needle in the haystack, and it does have constant memory requirements, solving our problem. However, reality isn’t that simple. What if an attack is not just originating from a single port but many? Or what if a reflection attack is hitting our service, resulting in random source addresses but a single source port? Maybe a full /24 subnet is sending us a flood? We can not just keep a rate per combination we see, as it would ignore all these patterns.

Grouping the groups: How to organize packets

Luckily the academic world has us covered again, with the concept of Hierarchical Heavy Hitters. It extends the Heavy Hitter concept by using the underlying hierarchy in the elements of the stream. For example, an IP address can be naturally grouped into several subnets:

Raking the floods: How to protect UDP services from DoS attacks with eBPF

In this case we defined that we consider the fully-specified address, the /24 subnet and the /0 wildcard. We start at the left with the fully specified address, and each step walking towards the top we consider less information from it. We call these less-specific addresses generalisations, and measure how specific a generalisation is by assigning a level. In our example, the address 192.0.2.123 is at level 0, while 192.0.2.0/24 is at level 1, etc.

If we want to create a structure which can hold this information for every packet, it could look like this:

Raking the floods: How to protect UDP services from DoS attacks with eBPF

We maintain a CountMin-sketch per subnet and then apply Heavy Hitters. When a new packet arrives and we need to determine if it is allowed to pass we simply check the rates of the corresponding elements in every node. If no rate exceeds the rate limit that we set, e.g. 25 packets per second (pps), it is allowed to pass.

The structure could now keep track of a single attribute, but we would waste a lot of context around packets! So instead of letting it go to waste, we use the two-dimensional approach for addresses proposed in the paper Hierarchical Heavy Hitters with SpaceSaving algorithm, and extend it further to also incorporate ports into our structure. Ports do not have a natural hierarchy such as addresses, so they can only be in two states: either specified (e.g. 8080) or wildcard.

Now our structure looks like this:

Raking the floods: How to protect UDP services from DoS attacks with eBPF

Now let’s talk about the algorithm we use to traverse the structure and determine if a packet should be allowed to pass. The paper Hierarchical Heavy Hitters with SpaceSaving algorithm provides two methods that can be used on the data structure: one that updates elements and increases their counters, and one that provides all elements that currently are Heavy Hitters. This is actually not necessary for our use-case, as we are only interested if the element, or packet, we are looking at right now would be a Heavy Hitter to decide if it can pass or not.

Secondly, our goal is to prevent any Heavy Hitters from passing, thus leaving the structure with no Heavy Hitters whatsoever. This is a great property, as it allows us to simplify the algorithm substantially, and it looks like this:

Raking the floods: How to protect UDP services from DoS attacks with eBPF

As you may notice, we update every node of a level and maintain the maximum rate we see. After each level we calculate a probability that determines if a packet should be passed to the next level, based on the maximum rate we saw on that level and a set rate limit. Each node essentially filters the traffic for the following, less specific level.

I actually left out a small detail: a packet is not dropped if any rate exceeds the limit, but instead is kept with the probability rate limit/maximum rate seen. The reason is that if we just drop all packets if the rates exceed the limit, we would drop the whole traffic, not just a subset to make it comply with our set rate limit.

Since we now still update more specific nodes even if a node reaches a rate limit, the rate limit will converge towards the underlying pattern of the attack as much as possible. That means other traffic will be impacted as minimally as possible, and that with no manual intervention whatsoever!

BPF to the rescue: building a Go library

As we want to use this algorithm to mitigate floods, we need to spend as little computation and overhead as possible before we decide if a packet should be dropped or not. As so often, we looked into the BPF toolbox and found what we need: Socketfilters. As our colleague Marek put it: “It seems, no matter the question – BPF is the answer.”.

Socketfilters are pieces of code that can be attached to a single socket and get executed before a packet will be passed from kernel to userspace. This is ideal for a number of reasons. First, when the kernel runs the socket filter code, it gives it all the information from the packet we need, and other mitigations such as firewalls have been executed. Second the code is executed per socket, so every application can activate it as needed, and also set appropriate rate limits. It may even use different rate limits for different sockets. The third reason is privileges: we do not need to be root to attach the code to a socket. We can execute code in the kernel as a normal user!

BPF also has a number of limitations which have been already covered on this blog in the past, so we will focus on one that’s specific to our project: floating-point numbers.

To calculate rates we need floating-point numbers to provide an accurate estimate. BPF, and the whole kernel for that matter, does not support these. Instead we implemented a fixed-point representation, which uses a part of the available bits for the fractional part of a rational number and the remaining bits for the integer part. This allows us to represent floats within a certain range, but there is a catch when doing arithmetic: while subtraction and addition of two fixed-points work well, multiplication and division requires double the number of bits to ensure there will not be any loss in precision. As we use 64 bits for our fixed-point values, there is no larger data type available to ensure this does not happen. Instead of calculating the result with exact precision, we convert one of the arguments into an integer. That results in the loss of the fractional part, but as we deal with large rates that does not pose any issue, and helps us to work around the bit limitation as intermediate results fit into the available 64 bits. Whenever fixed-point arithmetic is necessary the precision of intermediate results has to be carefully considered.

There are many more details to the implementation, but instead of covering every single detail in this blog post lets just look at the code.

We open sourced rakelimit over on Github at cloudflare/rakelimit! It is a full-blown Go library that can be enabled on any UDP socket, and is easy to configure.

The development is still in early stages and this is a first prototype, but we are excited to continue and push the development with the community! And if you still can’t get enough, look at our talk from this year’s Linux Plumbers Conference.