Post Syndicated from Timothy James Power original https://aws.amazon.com/blogs/security/access-token-security-for-microservice-apis-on-amazon-eks/
In this blog post, I demonstrate how to implement service-to-service authorization using OAuth 2.0 access tokens for microservice APIs hosted on Amazon Elastic Kubernetes Service (Amazon EKS). A common use case for OAuth 2.0 access tokens is to facilitate user authorization to a public facing application. Access tokens can also be used to identify and authorize programmatic access to services with a system identity instead of a user identity. In service-to-service authorization, OAuth 2.0 access tokens can be used to help protect your microservice API for the entire development lifecycle and for every application layer. AWS Well Architected recommends that you validate security at all layers, and by incorporating access tokens validated by the microservice, you can minimize the potential impact if your application gateway allows unintended access. The solution sample application in this post includes access token security at the outset. Access tokens are validated in unit tests, local deployment, and remote cluster deployment on Amazon EKS. Amazon Cognito is used as the OAuth 2.0 token issuer.
Benefits of using access token security with microservice APIs
Some of the reasons you should consider using access token security with microservices include the following:
- Access tokens provide production grade security for microservices in non-production environments, and are designed to ensure consistent authentication and authorization and protect the application developer from changes to security controls at a cluster level.
- They enable service-to-service applications to identify the caller and their permissions.
- Access tokens are short-lived credentials that expire, which makes them preferable to traditional API gateway long-lived API keys.
- You get better system integration with a web or mobile interface, or application gateway, when you include token validation in the microservice at the outset.
Overview of solution
In the solution described in this post, the sample microservice API is deployed to Amazon EKS, with an Application Load Balancer (ALB) for incoming traffic. Figure 1 shows the application architecture on Amazon Web Services (AWS).
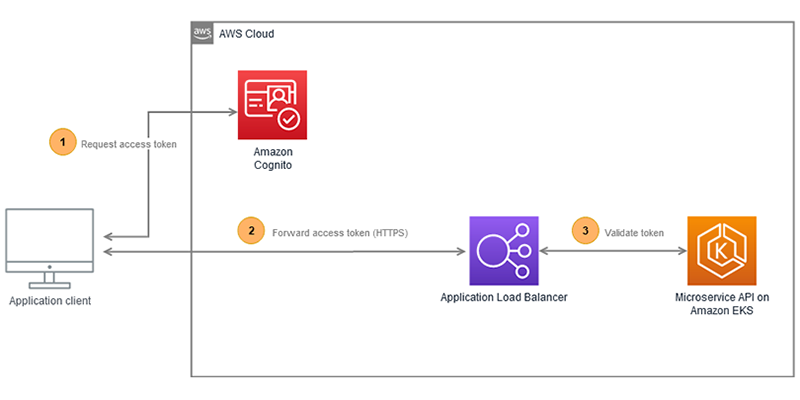
Figure 1: Application architecture
The application client shown in Figure 1 represents a service-to-service workflow on Amazon EKS, and shows the following three steps:
- The application client requests an access token from the Amazon Cognito user pool token endpoint.
- The access token is forwarded to the ALB endpoint over HTTPS when requesting the microservice API, in the bearer token authorization header. The ALB is configured to use IP Classless Inter-Domain Routing (CIDR) range filtering.
- The microservice deployed to Amazon EKS validates the access token using JSON Web Key Sets (JWKS), and enforces the authorization claims.
Walkthrough
The walkthrough in this post has the following steps:
- Amazon EKS cluster setup
- Amazon Cognito configuration
- Microservice OAuth 2.0 integration
- Unit test the access token claims
- Deployment of microservice on Amazon EKS
- Integration tests for local and remote deployments
Prerequisites
For this walkthrough, you should have the following prerequisites in place:
- An AWS account
- The AWS Command Line Interface (AWS CLI) installed and configured
- The Amazon EKS command-line tool (eksctl) installed
- The Kubernetes command-line tool (kubectl) installed
- Docker installed
- A basic familiarity with Kotlin or Java, and frameworks such as Quarkus or Spring
- A Unix terminal
Set up
Amazon EKS is the target for your microservices deployment in the sample application. Use the following steps to create an EKS cluster. If you already have an EKS cluster, you can skip to the next section: To set up the AWS Load Balancer Controller. The following example creates an EKS cluster in the Asia Pacific (Singapore) ap-southeast-1 AWS Region. Be sure to update the Region to use your value.
To create an EKS cluster with eksctl
- In your Unix editor, create a file named eks-cluster-config.yaml, with the following cluster configuration:
- Create the cluster by using the following eksctl command:
Allow 10–15 minutes for the EKS control plane and managed nodes creation. eksctl will automatically add the cluster details in your kubeconfig for use with kubectl.
Validate your cluster node status as “ready” with the following command
- Create the demo namespace to host the sample application by using the following command:
With the EKS cluster now up and running, there is one final setup step. The ALB for inbound HTTPS traffic is created by the AWS Load Balancer Controller directly from the EKS cluster using a Kubernetes Ingress resource.
To set up the AWS Load Balancer Controller
- Follow the installation steps to deploy the AWS Load Balancer Controller to Amazon EKS.
- For your domain host (in this case, gateway.example.com) create a public certificate using Amazon Certificate Manager (ACM) that will be used for HTTPS.
- An Ingress resource defines the ALB configuration. You customize the ALB by using annotations. Create a file named alb.yml, and add resource definition as follows, replacing the inbound IP CIDR with your values:
- Deploy the Ingress resource with kubectl to create the ALB by using the following command:
After a few moments, you should see the ALB move from status provisioning to active, with an auto-generated public DNS name.
- Validate the ALB DNS name and the ALB is in active status by using the following command:
- To alias your host, in this case gateway.example.com with the ALB, create a Route 53 alias record. The remote API is now accessible using your Route 53 alias, for example: https://gateway.example.com/api/demo/*
The ALB that you created will only allow incoming HTTPS traffic on port 443, and restricts incoming traffic to known source IP addresses. If you want to share the ALB across multiple microservices, you can add the alb.ingress.kubernetes.io/group.name annotation. To help protect the application from common exploits, you should add an annotation to bind AWS Web Application Firewall (WAFv2) ACLs, including rate-limiting options for the microservice.
Configure the Amazon Cognito user pool
To manage the OAuth 2.0 client credential flow, you create an Amazon Cognito user pool. Use the following procedure to create the Amazon Cognito user pool in the console.
To create an Amazon Cognito user pool
- Log in to the Amazon Cognito console.
- Choose Manage User Pools.
- In the top-right corner of the page, choose Create a user pool.
- Provide a name for your user pool, and choose Review defaults to save the name.
- Review the user pool information and make any necessary changes. Scroll down and choose Create pool.
- Note down your created Pool Id, because you will need this for the microservice configuration.
Next, to simulate the client in subsequent tests, you will create three app clients: one for read permission, one for write permission, and one for the microservice.
To create Amazon Cognito app clients
- In the left navigation pane, under General settings, choose App clients.
- On the right pane, choose Add an app client.
- Enter the App client name as readClient.
- Leave all other options unchanged.
- Choose Create app client to save.
- Choose Add another app client, and add an app client with the name writeClient, then repeat step 5 to save.
- Choose Add another app client, and add an app client with the name microService. Clear Generate Client Secret, as this isn’t required for the microservice. Leave all other options unchanged. Repeat step 5 to save.
- Note down the App client id created for the microService app client, because you will need it to configure the microservice.
You now have three app clients: readClient, writeClient, and microService.
With the read and write clients created, the next step is to create the permission scope (role), which will be subsequently assigned.
To create read and write permission scopes (roles) for use with the app clients
- In the left navigation pane, under App integration, choose Resource servers.
- On the right pane, choose Add a resource server.
- Enter the name Gateway for the resource server.
- For the Identifier enter your host name, in this case https://gateway.example.com.Figure 2 shows the resource identifier and custom scopes for read and write role permission.

Figure 2: Resource identifier and custom scopes
- In the first row under Scopes, for Name enter demo.read, and for Description enter Demo Read role.
- In the second row under Scopes, for Name enter demo.write, and for Description enter Demo Write role.
- Choose Save changes.

You have now completed configuring the custom role scopes that will be bound to the app clients. To complete the app client configuration, you will now bind the role scopes and configure the OAuth2.0 flow.
To configure app clients for client credential flow
- In the left navigation pane, under App Integration, select App client settings.
- On the right pane, the first of three app clients will be visible.
- Scroll to the readClient app client and make the following selections:
- For Enabled Identity Providers, select Cognito User Pool.
- Under OAuth 2.0, for Allowed OAuth Flows, select Client credentials.
- Under OAuth 2.0, under Allowed Custom Scopes, select the demo.read scope.
- Leave all other options blank.
- Scroll to the writeClient app client and make the following selections:
- For Enabled Identity Providers, select Cognito User Pool.
- Under OAuth 2.0, for Allowed OAuth Flows, select Client credentials.
- Under OAuth 2.0, under Allowed Custom Scopes, select the demo.write scope.
- Leave all other options blank.
- Scroll to the microService app client and make the following selections:
- For Enabled Identity Providers, select Cognito User Pool.
- Under OAuth 2.0, for Allowed OAuth Flows, select Client credentials.
- Under OAuth 2.0, under Allowed Custom Scopes, select the demo.read scope.
- Leave all other options blank.
Figure 3 shows the app client configured with the client credentials flow and custom scope—all other options remain blank

Figure 3: App client configuration
Your Amazon Cognito configuration is now complete. Next you will integrate the microservice with OAuth 2.0.
Microservice OAuth 2.0 integration
For the server-side microservice, you will use Quarkus with Kotlin. Quarkus is a cloud-native microservice framework with strong Kubernetes and AWS integration, for the Java Virtual Machine (JVM) and GraalVM. GraalVM native-image can be used to create native executables, for fast startup and low memory usage, which is important for microservice applications.
To create the microservice quick start project
- Open the Quarkus quick-start website code.quarkus.io.
- On the top left, you can modify the Group, Artifact and Build Tool to your preference, or accept the defaults.
- In the Pick your extensions search box, select each of the following extensions:
- RESTEasy JAX-RS
- RESTEasy Jackson
- Kubernetes
- Container Image Jib
- OpenID Connect
- Choose Generate your application to download your application as a .zip file.
Quarkus permits low-code integration with an identity provider such as Amazon Cognito, and is configured by the project application.properties file.
To configure application properties to use the Amazon Cognito IDP
- Edit the application.properties file in your quick start project:
- Add the following properties, replacing the variables with your values. Use the cognito-pool-id and microservice App client id that you noted down when creating these Amazon Cognito resources in the previous sections, along with your Region.
- Save and close your application.properties file.
The Kotlin code sample that follows verifies the authenticated principle by using the @Authenticated annotation filter, which performs JSON Web Key Set (JWKS) token validation. The JWKS details are cached, adding nominal latency to the application performance.
The access token claims are auto-filtered by the @RolesAllowed annotation for the custom scopes, read and write. The protected methods are illustrations of a microservice API and how to integrate this with one to two lines of code.
Unit test the access token claims
For the unit tests you will test three scenarios: unauthorized, forbidden, and ok. The @TestSecurity annotation injects an access token with the specified role claim using the Quarkus test security library. To include access token security in your unit test only requires one line of code, the @TestSecurity annotation, which is a strong reason to include access token security validation upfront in your development. The unit test code in the following example maps to the protectedRole method for the microservice via the uri /api/demo/protectedRole, with an additional path parameter sample-username to be returned by the method for confirmation.
Deploy the microservice on Amazon EKS
Deploying the microservice to Amazon EKS is the same as deploying to any upstream Kubernetes-compliant installation. You declare your application resources in a manifest file, and you deploy a container image of your application to your container registry. You can do this in a similar low-code manner with the Quarkus Kubernetes extension, which automatically generates the Kubernetes deployment and service resources at build time. The Quarkus Container Image Jib extension to automatically build the container image and deploys the container image to Amazon Elastic Container Registry (ECR), without the need for a Dockerfile.
Amazon ECR setup
Your microservice container image created during the build process will be published to Amazon Elastic Container Registry (Amazon ECR) in the same Region as the target Amazon EKS cluster deployment. Container images are stored in a repository in Amazon ECR, and in the following example uses a convention for the repository name of project name and microservice name. The first command that follows creates the Amazon ECR repository to host the microservice container image, and the second command obtains login credentials to publish the container image to Amazon ECR.
To set up the application for Amazon ECR integration
- In the AWS CLI, create an Amazon ECR repository by using the following command. Replace the project name variable with your parent project name, and replace the microservice name with the microservice name.
- Obtain an ECR authorization token, by using your IAM principal with the following command. Replace the variables with your values for the AWS account ID and Region.
Configure the application properties to use Amazon ECR
To update the application properties with the ECR repository details
- Edit the application.properties file in your Quarkus project:
- Add the following properties, replacing the variables with your values, for the AWS account ID and Region.
- Save and close your application.properties.
- Re-build your application
After the application re-build, you should now have a container image deployed to Amazon ECR in your region with the following name [project-group]/[project-name]. The Quarkus build will give an error if the push to Amazon ECR failed.
Now, you can deploy your application to Amazon EKS, with kubectl from the following build path:
Integration tests for local and remote deployments
The following environment assumes a Unix shell: either MacOS, Linux, or Windows Subsystem for Linux (WSL 2).
How to obtain the access token from the token endpoint
Obtain the access token for the application client by using the Amazon Cognito OAuth 2.0 token endpoint, and export an environment variable for re-use. Replace the variables with your Amazon Cognito pool name, and AWS Region respectively.
To generate the client credentials in the required format, you need the Base64 representation of the app client client-id:client-secret. There are many tools online to help you generate a Base64 encoded string. Export the following environment variables, to avoid hard-coding in configuration or scripts.
You can use curl to post to the token endpoint, and obtain an access token for the read and write app client respectively. You can pass grant_type=client_credentials and the custom scopes as appropriate. If you pass an incorrect scope, you will receive an invalid_grant error. The Unix jq tool extracts the access token from the JSON string. If you do not have the jq tool installed, you can use your relevant package manager (such as apt-get, yum, or brew), to install using sudo [package manager] install jq.
The following shell commands obtain the access token associated with the read or write scope. The client credentials are used to authorize the generation of the access token. An environment variable stores the read or write access token for future use. Update the scope URL to your host, in this case gateway.example.com.
If the curl commands are successful, you should see the access tokens in the environment variables by using the following echo commands:
For more information or troubleshooting, see TOKEN Endpoint in the Amazon Cognito Developer Guide.
Test scope with automation script
Now that you have saved the read and write access tokens, you can test the API. The endpoint can be local or on a remote cluster. The process is the same, all that changes is the target URL. The simplicity of toggling the target URL between local and remote is one of the reasons why access token security can be integrated into the full development lifecycle.
To perform integration tests in bulk, use a shell script that validates the response code. The example script that follows validates the API call under three test scenarios, the same as the unit tests:
- If no valid access token is passed: 401 (unauthorized) response is expected.
- A valid access token is passed, but with an incorrect role claim: 403 (forbidden) response is expected.
- A valid access token and valid role-claim is passed: 200 (ok) response with content-type of application/json expected.
Name the following script, demo-api.sh. For each API method in the microservice, you duplicate these three tests, but for the sake of brevity in this post, I’m only showing you one API method here, protectedRole.
Test the microservice API against the access token claims
Run the script for a local host deployment on http://localhost:8080, and on the remote EKS cluster, in this case https://gateway.example.com.
If everything works as expected, you will have demonstrated the same test process for local and remote deployments of your microservice. Another advantage of creating a security test automation process like the one demonstrated, is that you can also include it as part of your continuous integration/continuous delivery (CI/CD) test automation.
The test automation script accepts the microservice host URL as a parameter (the default is local), referencing the stored access tokens from the environment variables. Upon error, the script will exit with the error code. To test the remote EKS cluster, use the following command, with your host URL, in this case gateway.example.com.
Expected output:
Best practices for a well architected production service-to-service client
For elevated security in alignment with AWS Well Architected, it is recommend to use AWS Secrets Manager to hold the client credentials. Separating your credentials from the application permits credential rotation without the requirement to release a new version of the application or modify environment variables used by the service. Access to secrets must be tightly controlled because the secrets contain extremely sensitive information. Secrets Manager uses AWS Identity and Access Management (IAM) to secure access to the secrets. By using the permissions capabilities of IAM permissions policies, you can control which users or services have access to your secrets. Secrets Manager uses envelope encryption with AWS KMS customer master keys (CMKs) and data key to protect each secret value. When you create a secret, you can choose any symmetric customer managed CMK in the AWS account and Region, or you can use the AWS managed CMK for Secrets Manager aws/secretsmanager.
Access tokens can be configured on Amazon Cognito to expire in as little as 5 minutes or as long as 24 hours. To avoid unnecessary calls to the token endpoint, the application client should cache the access token and refresh close to expiry. In the Quarkus framework used for the microservice, this can be automatically performed for a client service by adding the quarkus-oidc-client extension to the application.
Cleaning up
To avoid incurring future charges, delete all the resources created.
- To delete the EKS cluster, and the associated Application Load Balancer, follow the steps described in Deleting a cluster in the Amazon EKS User Guide.
- Delete the Amazon Cognito user pool.
- Delete any AWS Certificate Manager public certificate or AWS Route 53 DSN alias that was created.
Conclusion
This post has focused on the last line of defense, the microservice, and the importance of a layered security approach throughout the development lifecycle. Access token security should be validated both at the application gateway and microservice for end-to-end API protection.
As an additional layer of security at the application gateway, you should consider using Amazon API Gateway, and the inbuilt JWT authorizer to perform the same API access token validation for public facing APIs. For more advanced business-to-business solutions, Amazon API Gateway provides integrated mutual TLS authentication.
To learn more about protecting information, systems, and assets that use Amazon EKS, see the Amazon EKS Best Practices Guide for Security.
If you have feedback about this post, submit comments in the Comments section below. If you have questions about this post, start a new thread on the Amazon Cognito forum or contact AWS Support.
Want more AWS Security how-to content, news, and feature announcements? Follow us on Twitter.